

Westinghouse PSP632 Installation Manual
USER MANUAL
PSP632, DSP635, GSP625, GSP627
600mm SLOT-IN UPRIGHT RANGE COOKER

CONTENTSCONGRATULATIONS
IMPORTANT SAFETY INSTRUCTIONS
Congratulations and thank you for choosing our Product.
We are sure you will nd your new appliance a pleasure to
use and a great asset to your cooking. Before you use the
appliance, we recommend that you read through the whole
user manual which provides a description of the product and
its functions.
To avoid the risks that are always present when you use a
gas appliance, it is important that the appliance is installed
correctly and that you read the safety instructions carefully to
avoid misuse and hazards. For future reference, please store
this booklet in a safe place.
This appliance complies with the requirements of Australian
Standard AS/NZ 60335.2.6. Gas appliances also comply
with the requirements of AS4551.
CONDITIONS OF USE
This appliance is intended to be used in household
and similar applications such as:
• Staff kitchen areas in shops, ofces and other
working environments
• Farm houses
• By clients in hotels, motels and other residential
type environments
• Bed and breakfast type environments.
RECORD MODEL AND SERIAL NUMBER HERE:
Model: ....................................................................
Serial number: ..........................................................
Please read the user manual carefully and store in a handy
place for later reference. The symbols you will see in this
booklet have these meanings:
WARNING
THIS SYMBOL INDICATES INFORMATION CONCERNING YOUR PERSONAL
SAFETY
CAUTION
THIS SYMBOL INDICATES INFORMATION ON HOW TO AVOID DAMAGING
THE APPLIANCE
TIPS & INFORMATION
THIS SYMBOL INDICATES TIPS AND INFORMATION ABOUT USE OF THE
APPLIANCE
Important safety instructions � � � � � � � � � � � � � � � � � � � � � � � � 3
Description of your appliance � � � � � � � � � � � � � � � � � � � � � � � � 4
Before operating your appliance for the first time� � � � � � � � � � � � � � 5
Installing your oven accessories � � � � � � � � � � � � � � � � � � � � � � 5
Using the hotplate� � � � � � � � � � � � � � � � � � � � � � � � � � � � � � 7
Using the grill � � � � � � � � � � � � � � � � � � � � � � � � � � � � � � � � 8
Guide to better grilling � � � � � � � � � � � � � � � � � � � � � � � � � � � 9
Using the timer � � � � � � � � � � � � � � � � � � � � � � � � � � � � � � �10
Using the oven � � � � � � � � � � � � � � � � � � � � � � � � � � � � � � �12
Dealing with cooking problems � � � � � � � � � � � � � � � � � � � � � � �15
Electronic burner control(models 625 and 627 only) � � � � � � � � � � � �16
Cleaning your appliance� � � � � � � � � � � � � � � � � � � � � � � � � � �17
Cleaning your oven accessories� � � � � � � � � � � � � � � � � � � � � � �18
Solving problems � � � � � � � � � � � � � � � � � � � � � � � � � � � � � �19
Installing the appliance � � � � � � � � � � � � � � � � � � � � � � � � � � �20
Wiring requirements� � � � � � � � � � � � � � � � � � � � � � � � � � � � �22
Connecting to services and commissioning� � � � � � � � � � � � � � � � �22
Testing the operation of the gas cooker� � � � � � � � � � � � � � � � � � �25
Warranty� � � � � � � � � � � � � � � � � � � � � � � � � � � � � � � � � � �27
TIPS & INFORMATION
IMPORTANT – CHECK FOR ANY DAMAGE OR MARKS.
If you find the appliance is damaged or marked, you must
report it within 7 days if you wish to claim for damage/
marks under the manufacturer’s warranty. This does not affect
your statutory rights.
ENVIRONMENTAL TIPS
INFORMATION ON DISPOSAL FOR USERS
• Most of the packing materials are recyclable.
Please dispose of those materials through your local
recycling depot or by placing them in appropriate
collection containers.
• If you wish to discard this product, please contact your
local authorities and ask for the correct method of disposal.
GENERAL WARNINGS
• This appliance is not intended for use by persons
(including children) with reduced physical, sensory
or mental capabilities, or lack of experience and
knowledge, unless they have been given supervision or
instruction concerning use of the appliance by a person
responsible for their safety.
• Children should be supervised to ensure that they do not
play with the appliance.
• During use, this appliance becomes hot. Care should
be taken to avoid touching hot surfaces, e.g. oven door,
heating elements or internal surfaces of the oven.
• This appliance must not be used as a space heater.
• Do Not install gas models in marine craft, caravans or
mobile homes because these products are not tted
with a ame safeguard on each burner.
• In order to avoid a re, the appliance must be kept clean
and vents kept unobstructed.
• Do not spray aerosols in the vicinity of the appliance
during operation.
• Do not store ammable materials in or under the
appliance, e.g. Aerosols.
• Accessible parts will become hot when in use. To avoid
burns and scalds children should be kept away.
• Do not line the bottom of the oven or grill with foil
or cookware.
• Always use gloves when handling hot items inside
grill or oven.
• Do not use harsh abrasive cleaners or sharp metal
scrapers to clean the oven door glass since they can
scratch the surface, which may result in shattering
of the glass.
GRILL
• Always turn the grill off immediately after use as fat
left there may catch fire.
• Always keep the grill dish clean as any fat left
may catch fire.
• Do not leave the grill on unattended.
• To avoid a re, ensure that grill trays and ttings are
always inserted into the appliance in accordance
with the instructions.
• Do not place thick portions of food under the grill.
Foods may curl, catch and ignite.
• Accessible parts may become hot when grill is in use.
Children should be kept away.
OVEN
• During use the appliance becomes hot. Care should be
taken to avoid touching the hot surfaces inside the oven.
• Switch the appliance off before removing the oven light
glass for globe replacement.
• To avoid an accident, ensure that oven shelves and ttings
are always inserted into the appliance in accordance with
the instructions.
• Do not use the door as a shelf.
• Do not push down on the open oven door.
INSTALLATION, CLEANING AND SERVICING
• An authorised person must install this appliance.
(Certicate of Compliance to be retained)
• Before using the appliance, ensure that all packing
materials are removed from the appliance.
• In order to avoid any potential hazard, the enclosed
installation instructions must be followed.
• Ensure that all specied appliance vents, openings and
airspaces are not blocked.
• Where the appliance is built into a cabinet, the cabinet
material must be capable of withstanding 85°C
• Only authorised personnel should carry out servicing.
(Certicate of Compliance to be retained)
• Always ensure the appliance is switched off before
cleaning or replacing parts.
• Do not use steam cleaners, as this may cause
moisture build up.
• Always clean the appliance immediately after any
food spillage.
• To maintain safe operation, it is recommended that the
product be inspected every ve years by an authorised
serviceperson.
• If rigid gas pipe is used for installation it should include
sufcient loops to allow the appliance to be removed
from installed position without the need to disconnect
the piping.
THIS APPLIANCE MUST BE EARTHED
• For appliances supplied with a supply cord, if the
supply cord is damaged, it must be replaced by the
Manufacturer or its service agent or similarly qualied
person in order to avoid a hazard.
ENVIRONMENTAL TIPS
THIS SYMBOL INDICATES TIPS AND INFORMATION ABOUT ECONOMICAL
AND ECOLOGICAL USE OF THE APPLIANCE
2 3
SAFETYCONTENTS
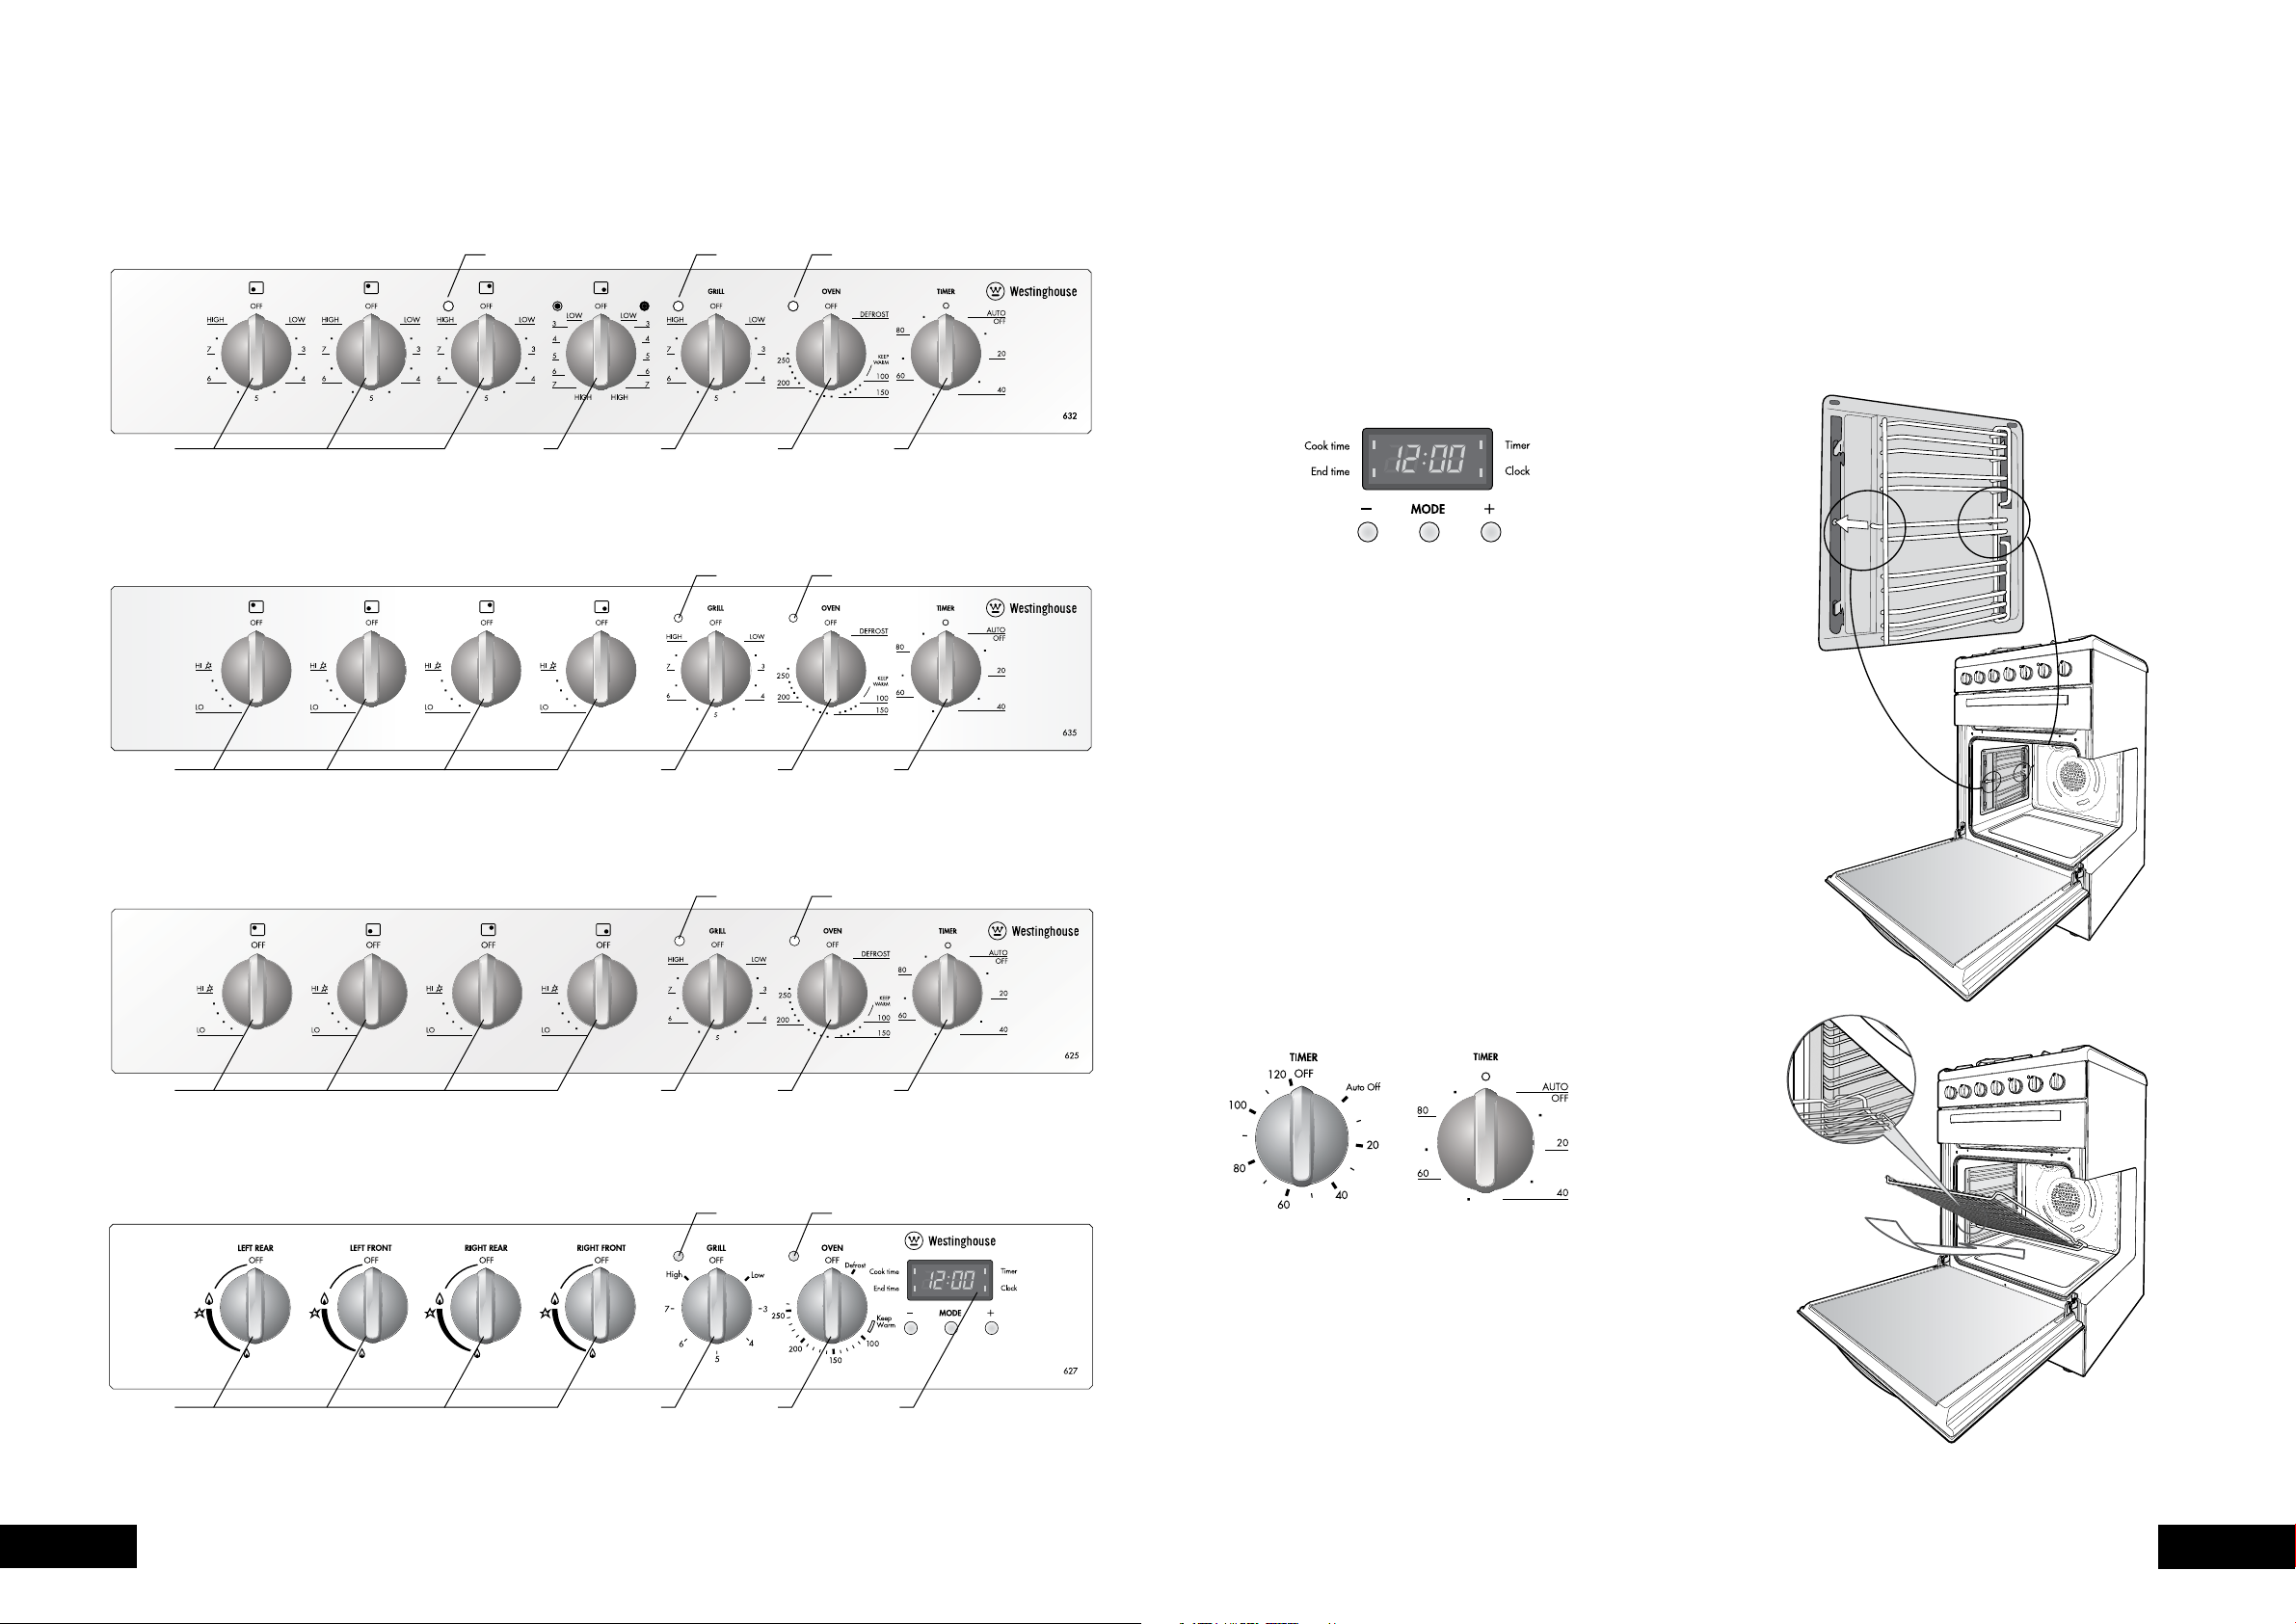
DESCRIPTION OF YOUR APPLIANCE
MODEL PSP632
Hotplate power on
indicator lamp
Grill indicator
lamp
Oven indicator
lamp
BEFORE OPERATING YOUR APPLIANCE
FOR THE FIRST TIME
SETTING THE TIME
If you have purchased a model tted with an electronic
timer, you must set the time of day before you can operate
your appliance.
3 BUTTON ELECTRONIC CLOCK
• After the appliance has been electrically connected “12.00”
will be displayed and the “clock” indicator will ash.
INSTALLING YOUR OVEN ACCESSORIES
SIDE RACKS (SHELF SUPPORT)
• Insert the twin pegged side into the rear access holes
provided, ensuring the pegs are fully inserted.
• Then locate the front peg into the front access hole
and push firmly.
Hotplate
controls
MODEL DSP635
Hotplate
controls
MODEL GSP625
Dual ring
hotplate
control
Grill
temperature
selector
Grill
temperature
selector
Oven
temperature
selector
Grill indicator
lamp
Oven
temperature
selector
Grill indicator
lamp
‘Auto Off’
timer
Oven indicator
lamp
‘Auto Off’
timer
Oven indicator
lamp
• To set the time of day, press the – or + buttons. 5 seconds
after the last change, the “clock” indicator will disappear,
conrming the time has been set.
NOTE: The clock has a 24-hour display.
PREPARING YOUR APPLIANCE FOR THE FIRST TIME
• Please remove all internal boxes and bags from the oven
before operation.
• Please wipe out the oven interior prior to operation with
warm soapy water and polish dry with a soft clean cloth.
Do no close the oven door until the oven is completely dry.
• New appliances can have an odour during rst operation.
It is recommended to ‘run in’ your oven before you cook
for the rst time. Run the oven at 180°C for 2–4 hours
and ensure the room is well ventilated.
• DO NOT line the oven with foil. It will damage the enamel.
• If your appliance is fitted with a “Auto Off” timer, make
sure it is set to the “Off” marker for manual operation.
See image.
Hotplate
controls
MODEL GSP627
Hotplate
controls
4 5
Grill
temperature
selector
Grill
temperature
selector
Oven
temperature
selector
Grill indicator
lamp
Oven
temperature
selector
‘Auto Off’
timer
Oven indicator
lamp
Electronic
clock and
timer
COOLING/VENTING FAN
Your appliance is tted with a cooling fan. This prevents
your kitchen cabinet from overheating and reduces the
condensation inside the oven. It will operate whenever you
are using your oven or grill and will blow warm air across the
top of the grill door. The cooling fan may continue to operate
after the appliance is turned off. It will switch off by itself
once the oven is cool.
INSTALLATIONDESCRIPTION
USING THE HOTPLATE
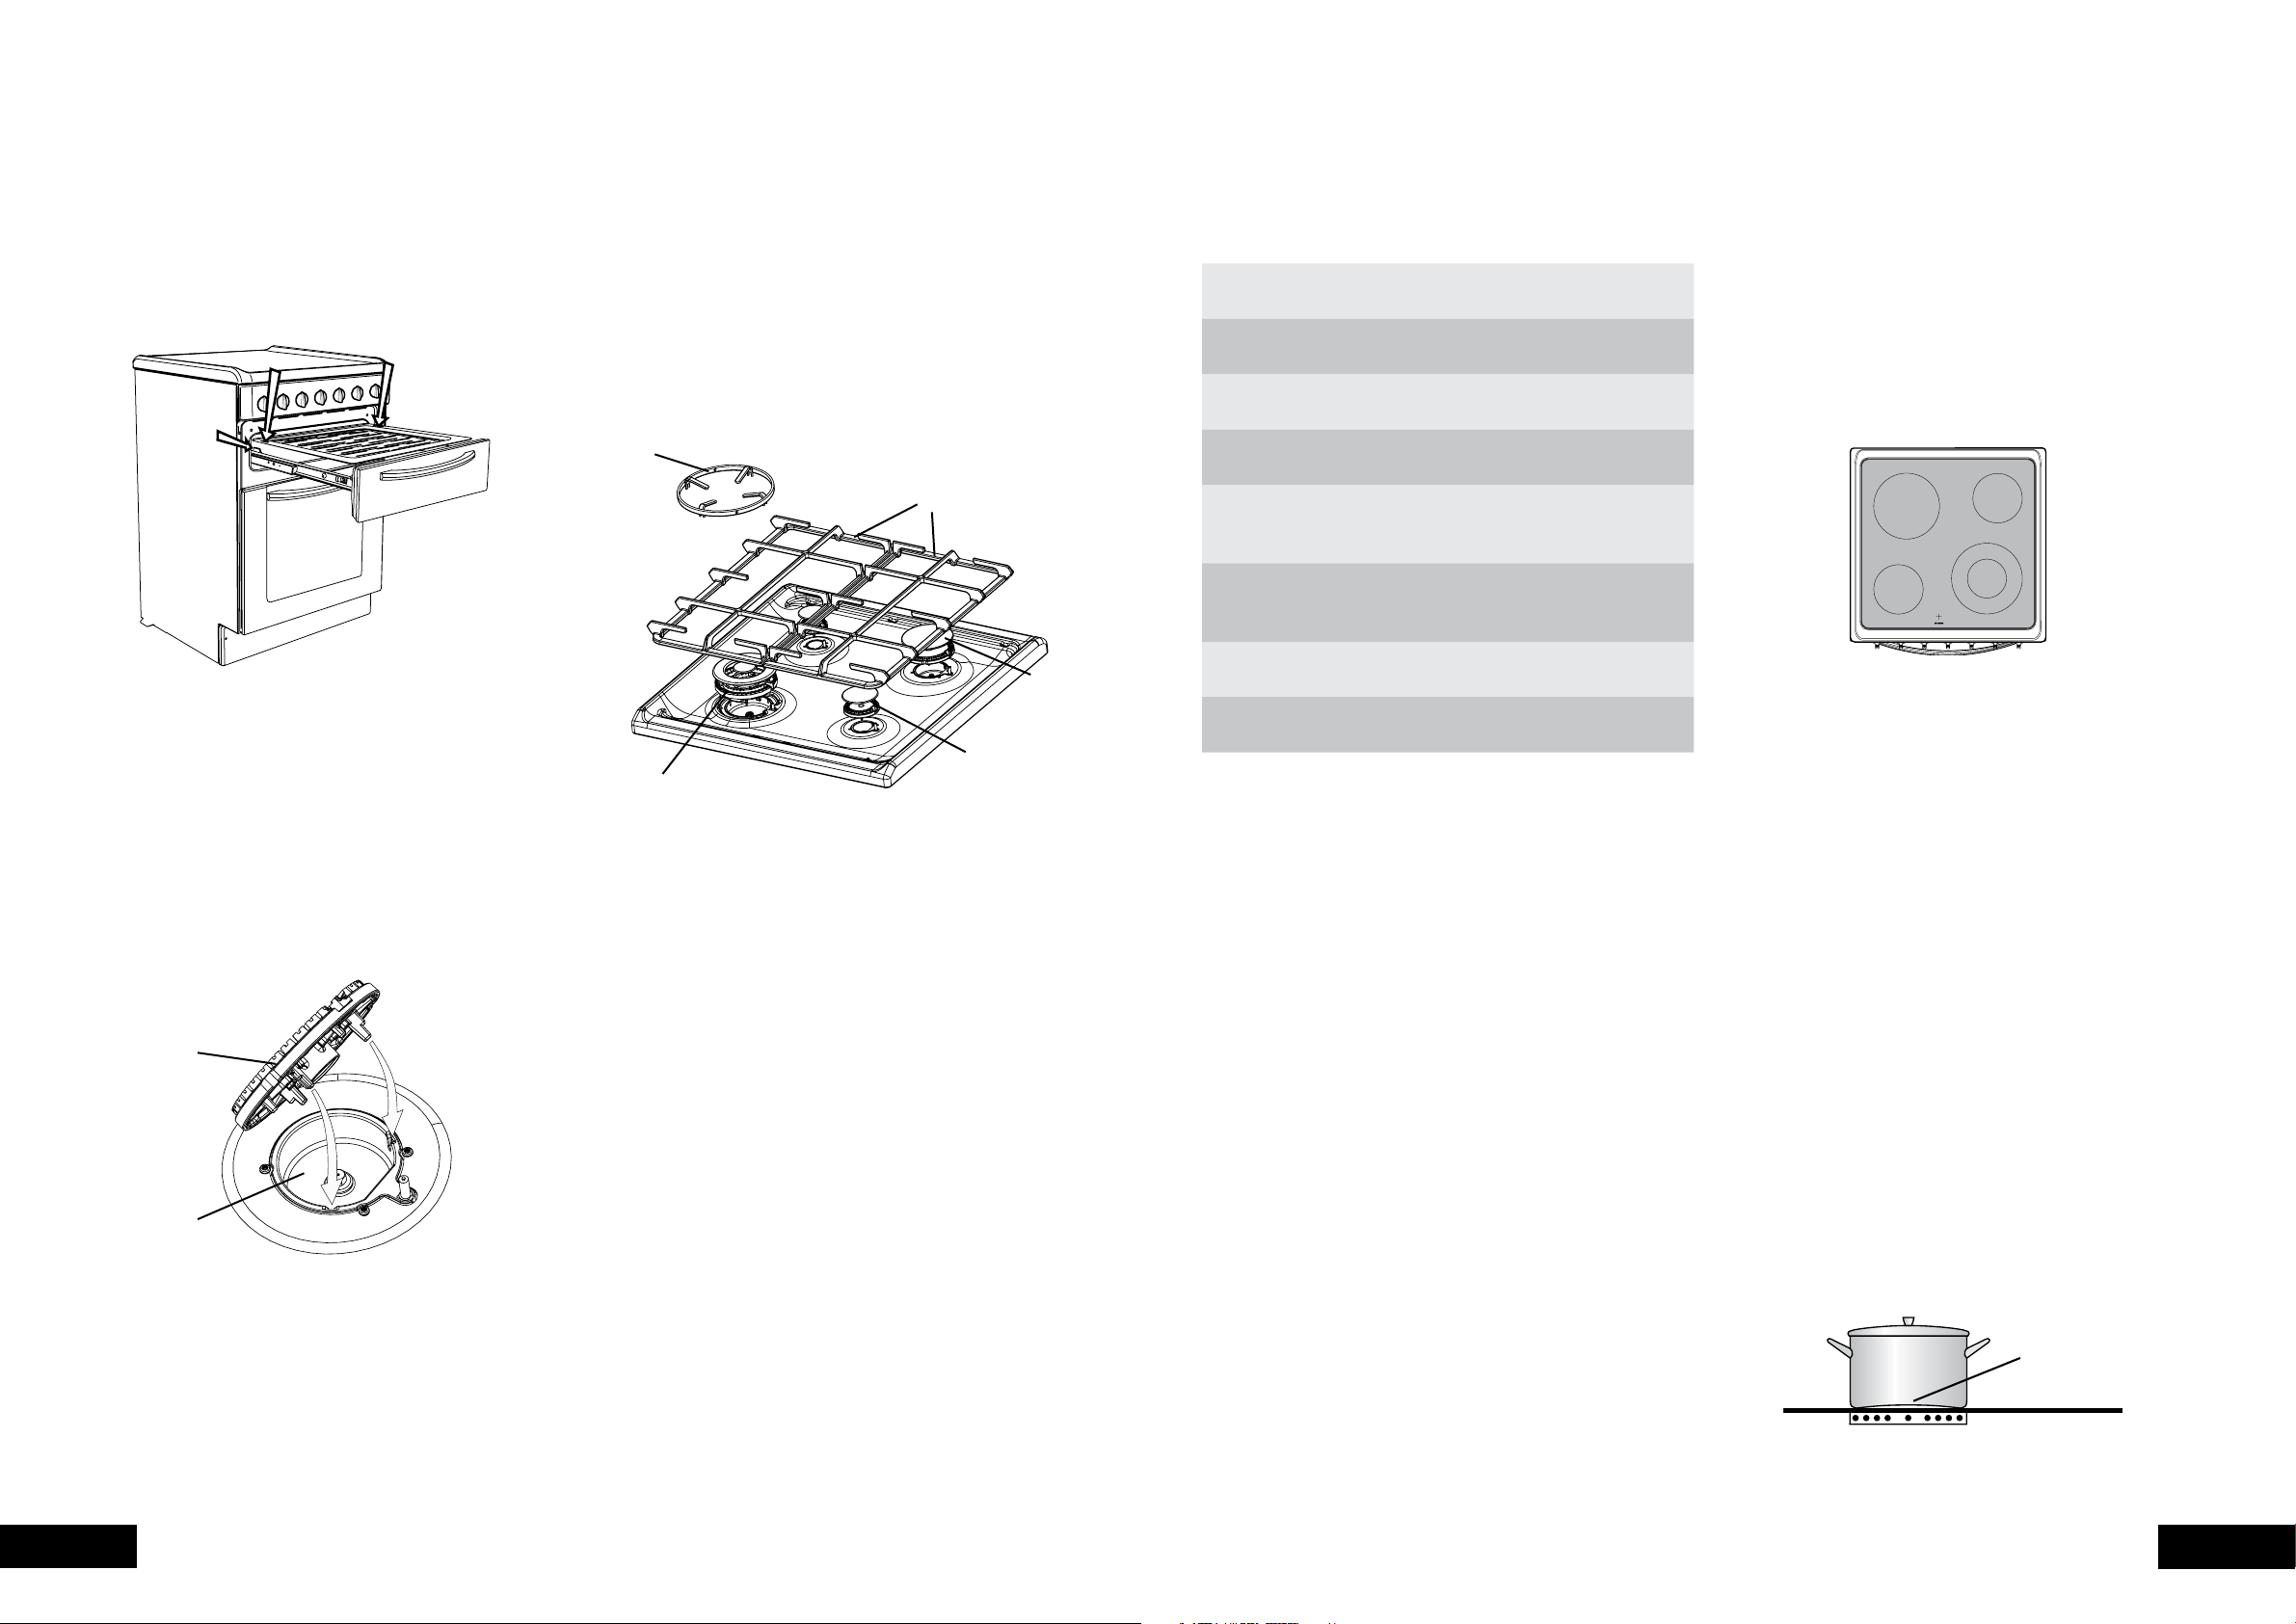
GRILL TRAY
To insert the grill tray, fully open the drawer and position
the tray so that the slots on the outer edges t over the tabs
on the slides.
Place the grill tray insert into the grill tray.
BURNER CROWNS AND CAPS
• The burner crown must be tted correctly into the burner
cup or damage will occur during operation.
• To do this, ensure that the 2 ribs on either side of the
spark plug hole are positioned into the 2 slots on the
burner cup (see diagram).
• The burner cap is simply positioned over the top of the
burner crown.
NOTE: When the burner is correctly fitted it will sit level
on the hob.
burner crown
burner cup
TRIVETS
• The rubber feet on the trivets locate into the recesses
on the hob.
• Take care when placing the trivets as dropping them
may damage the hob or trivet.
• The wok trivet sits on top of the base trivet above the
wok burner.
wok trivet
trivets
burner cap
burner crown
wok burner
HOTPLATE DOS AND DON’TS
Do not place heat resistant mats, wire mats or
•
aluminium foil under pots and pans.
Do not allow pots and pans to boil dry, as damage
•
to both pan and hotplate may result.
Do not use the hotplate as extra bench space or as a
•
cutting board.
Do not allow children on or near the cooktop at
•
any time.
Do not allow large cookware to overhang the hotplate
•
onto the adjacent benchtop. This will cause scorching
to the benchtop surface.
Do not use round bottom woks or similar utensils which
•
could lead to overheating of the hotplates and possible
damage to the cooking surface.
Use the stored heat in the hotplate by turning the control
•
to off before the nal few minutes of cooking.
Do not slide pans across the surface of the ceramic glass
•
as it could result in scratching of the surface.
CERAMIC HOTPLATES
The cooktop is made from ceramic glass, a tough, durable
material that withstands heating and cooling without
breaking. It is strong enough to hold the heaviest utensils.
However, it must be remembered that as it is GLASS, it may
break. Treat it accordingly!
Should you have any questions about the glass in your new
appliance, please contact the service centre by dialling 13 13 49.
The heating elements are concealed under the smooth glass
surface which has a pattern to show the location of the elements.
When cooking, turn the control to the required setting.
The ceramic cooktop glass will retain heat for a period of
time after the control is turned off. This will be indicated by
the hot surface warning light which will continue to glow until
the temperature drops below 60°C.
NOTE: If the ceramic glass is cracked switch off the
appliance to avoid the possibility of electric shock.
• Use pans with smooth, clean and dry bottoms to avoid
scratching or burning residue into the glass.
• Ensure the pan bottom is the same size as the
working element.
• We do not recommend ceramic glass pans because they
do not conduct heat well.
• Stainless steel or enamelled saucepans are best.
• Do not use pans with copper or aluminium bottoms
because they can leave traces which are difcult to
remove from the glass.
• If buying new utensils select enamelled steel pans with
2-3mm thick bottoms or stainless steel pans with sandwich
bottoms 4-6mm thick. The pan bottom should be at, or
preferably, slightly concave at room temperature so that it
lies flat on the glass surface when hot.
INSTALLATION
a flat or slightly
concave pan is
preferable for
ceramic hotplates
6 7
USING THE
HOTPLATE
USING THE GRILL
GUIDE TO BETTER GRILLING
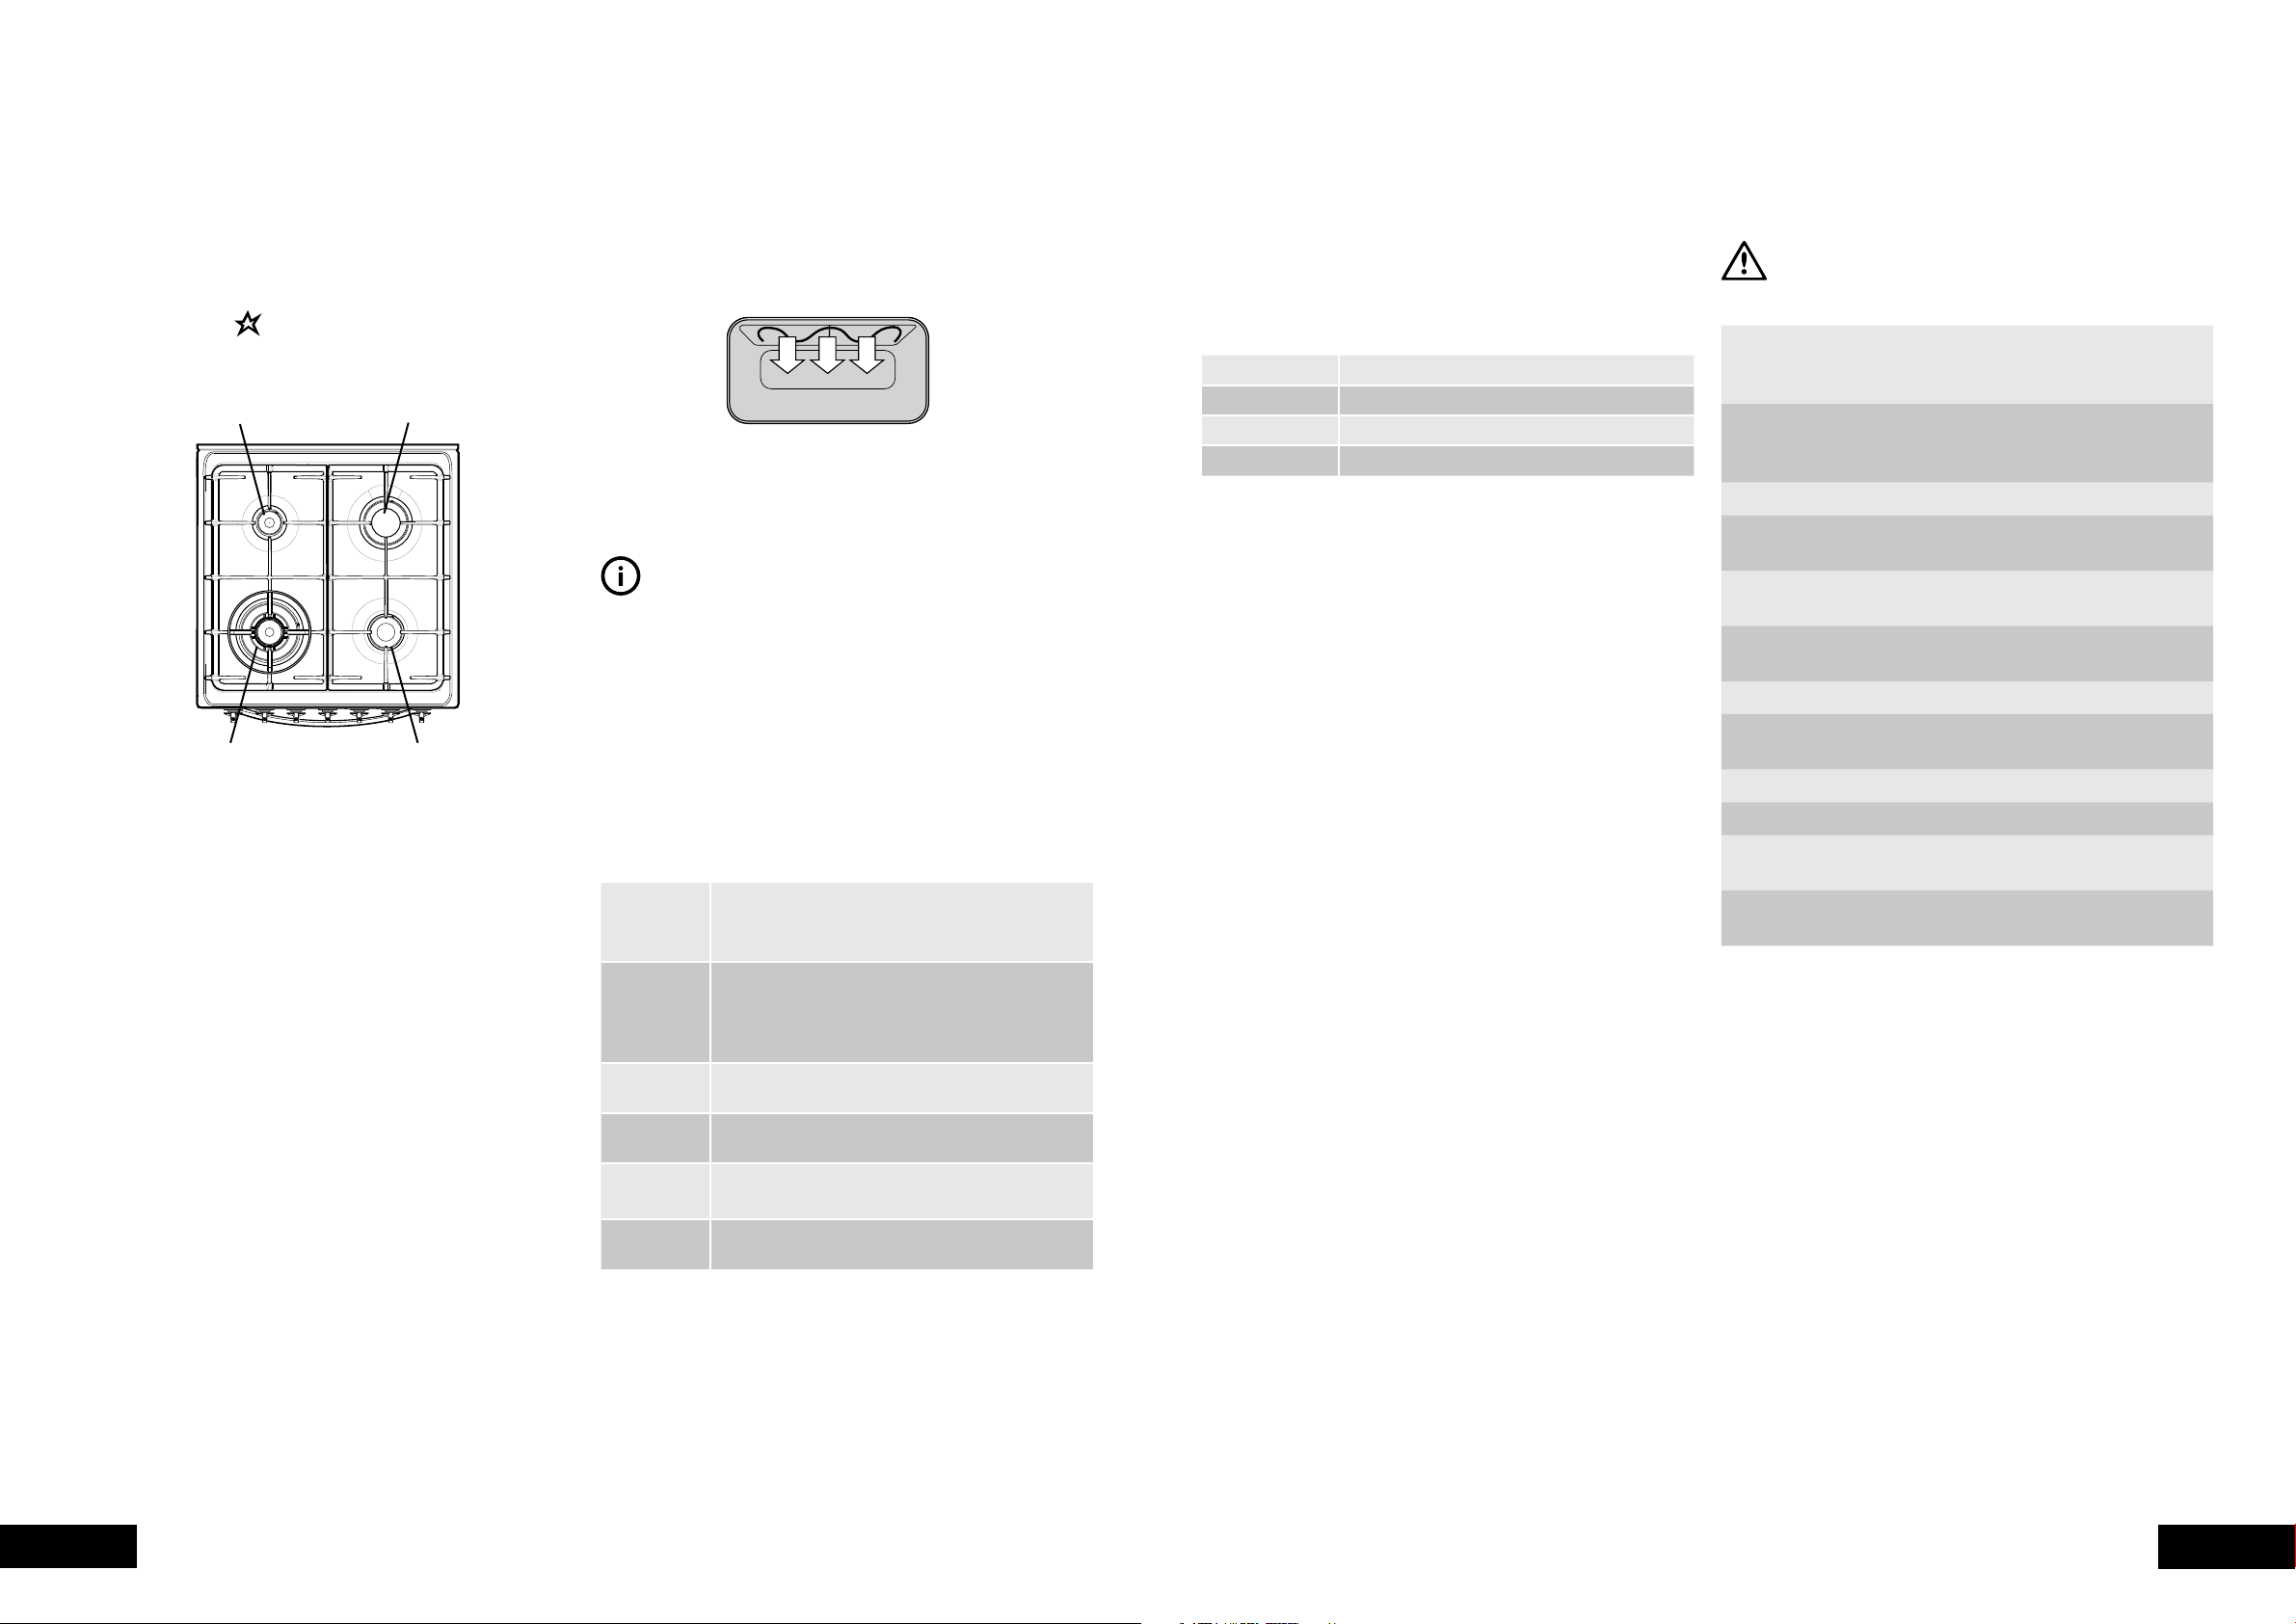
GAS HOTPLATES
OPERATION
• To ignite, push knob in and turn anti-clockwise to the
ignition symbol
• Sparks are sent to all burners.
• Release knob once burner has ignited and adjust the ame.
1 Low heat burner (5.1 MJ/h)
Used for simmering and for use with small cookware items.
2 High heat burner (12.7 MJ/h)
Used for fast heating with large size cookware items.
3 Intense heat wok burner (14.4 MJ/h)
Used for very fast heating with woks and other large size
cook ware items. Use wok support provided when cooking
with a wok.
4 Medium heat burner (9.0 MJ/h)
Used for normal cooking and simmering with mid size
cookware items.
To conserve gas, place the pan centrally over the burner
and adjust the flame so that it does not go past the edge
of the cookware.
.
1
3
2
4
WHAT IS GRILLING?
• The grill directs heat from the electric element in the grill
compartment onto the food.
• This way of cooking traps the juices inside the food and
increases the avour.
• Grilling is suitable for tender cuts of meat, steak, chops,
sausages, sh and other foods which cook quickly.
TIPS & INFORMATION
ALWAYS CLEAN THE GRILL TRAY AND GRILL TRAY INSERT AFTER EVERY
USE. EXCESSIVE FAT BUILD UP MAY CAUSE A FIRE.
IT IS BEST FOR YOUR APPLIANCE WHEN GRILLING IF THE GRILL DRAWER IS
APPROXIMATELY TWO FINGER WIDTHS AJAR.
As a method of cooking, grilling can be used to:
• Enhance the avours of vegetables, sh, poultry
and meat.
• Seal the surface of the food and retain the natural juices.
This table shows how to grill different types of meat:
Beef You can use tenderloin, rump, sirloin. Brush
with oil or melted butter, especially if the meat
is very lean.
Lamb You can use loin chops, shortloin chops,
chump chops, and forequarter chops.
Remove skin or cut at intervals to stop curling.
Brush with oil or melted butter.
Sausages Prick sausages to stop skin from bursting.
Poultry Divide into serving pieces. Brush with oil.
No denite times can be given for grilling because this
depends on your own taste and the size of the food. These
times should only be used as a guide and remember to turn
the food over half way through the cooking process.
Steak 15 - 20 minutes
Chops 20 - 30 minutes
Fish 8 -10 minutes
Bacon 4 - 5 minutes
For better grilling results, follow these easy instructions:
1. Preheat the grill for at least 3 minutes to obtain best
results. This will help to seal the natural juices.
2. Choose only prime cuts of meat or sh. If the cut is less
than 5mm thick it will dry out. If the cut is more than
40mm thick, the outside may burn whilst the inside
remains raw.
3. Do not place aluminium foil under the food as this
prevents fats and oils from draining away, which could
result in a fire.
4. Baste the food during cooking with butter, olive oil
or marinade. Grilled food is better if marinated
before cooking.
5. Use tongs to turn food as a fork pierces the surface
and will let juices escape.
6. Set the height of the grill tray insert to the most
suitable height.
• The grill insert can be used on both sides to provide
two different grill heights
• Thinner pieces of food should be nearer the element
and thicker pieces should be 10mm away.
WARNING
SAFETY WARNINGS ABOUT THE GRILL
Do not cook food on the bottom of the grill
•
compartment. Always use the grill dish and grill
dish insert.
Do not place foil under the food on the grill dish insert,
•
as this prevents fats and oils running away and may
cause a fire.
Always use the grill parts according to instructions.
•
Do not put thick pieces of food too near the element.
•
They may curl and catch fire.
Always turn the grill off immediately after cooking.
•
Left-over fat may cause a re.
Always clean the grill dish and insert after use. Fat
•
build up may cause a re.
Do not let children play with the grill.
•
Do not let children use the grill without adult
•
supervision.
Do not leave the grill unattended when on.
•
Be careful not to touch hot surfaces.
•
Do not spray aerosols near the grill, when it is
•
turned on.
Do not keep ammable materials in or near the grill,
•
eg chemicals, aerosols, etc.
NOTE: In the absence of electrical power, carry out the
ignition directly to the burner with a hand held ignition source.
8 9
Fish Brush with oil or melted butter and
lemon juice.
Bacon Remove rind. Grill at.
USING THE GRILLUSING THE GRILL
 Loading...