

Page 1

USER’S MANUAL
MANUEL DE L’UTILISATEUR
MANUAL DEL USUARIO
LVM-42w2 / LVM-47w1
1080p Monitor
Moniteur 1080p
Monitor de 1080p
Page 2

Contents
Important Product Safety Instructions………………………………….2
Safety Guidelines….………….………………………………………….4
Cleaning the HD Video Monitor………………..……………….…….... 5
INSTALLATION
Package Contents……………………………….………………………. 6
Front View of the HD Video Monitor……………..……………………. 7
Rear View of the HD Video Monitor……………….………..…………. 7
Side View of the HD Video Monitor…..……………………...………… 8
Remote Control…………………..…………………………..………… 10
Installation………….…………………………………………………….11
English
OSD Functions
PICTURE PARAMETERS: Brightness / Contrast / Saturation / Hue /
PC PARAMETERS:
AUDIO SETTINGS:
PICTURE-IN-PICTURE:
GENERAL SETTINGS: Menu Position / Menu Timeout / Language /
Specifications
Specifications
………………………………………………………… 20
Troubleshooting
Troubleshooting
Color Temp / Sharpness / Aspect Ratio /
Backlight / Reset……………………..…... .15
Auto Adjust / Clock / Phase / Position………..……. 16
Volume / Bass / Treble / Balance / Mute / Speaker /
Reset…………………...……………....….….….. 17
Display Mode / Main Source / PIP Source /
Swap / PIP Position / PIP Size / Audio From….. 18
Sleep Timer / Transparency / DPMS / LED /
System Info / Factory Reset………...….….…... 19
……………....………………………………..…….21
Page 3
English
1
Page 4

Important Product Safety Instructions
Follow and obey all warnings and instructions marked on the HD Video Monitor. For your
safety, please read all the safety and operating instructions before you operate the HD
Monitor Keep this user’s manual for future reference.
Overloading
Do not overload wall outlets, extension cords, or power strips. This can result in fire or
electronic shock.
Power Cord Protection
Power supply cords should be routed so that they are not likely to be walked on or pinched
by items placed upon or against them. Periodically inspect the cords and each end of the
cords for damage. The HD Monitor shall be installed near a wall socket outlet and the plug
on power cord shall be readily accessible.
Ventilation
Slots and openings on the cabinet are provided for ventilation purposes. To ensure reliable
operation of the HD Monitor and to protect it from overheating, these openings must not be
blocked or covered.
• Do not block the openings by placing the HD Monitor on a bed, sofa, rug or other
similar surface.
• Do not place the HD Monitor in a built-in installation such as a bookcase or rack
unless proper ventilation is provided and the manufacturer’s instruction have been
adhered to.
Other Notices
• Avoid exposing the HD Monitor to direct sunlight or high temperatures.
• Avoid exposing the HD Monitor to moisture or high humidity.
• Do not attempt repairs yourself. Your warranty does not cover repairs or attempted
repairs by anyone not authorized by Westinghouse Digital.
• If the HD Monitor will not be used for a long period of time, unplug the HD Monitor and
remove the batteries from the remote control.
Precautions
• Avoid touching the screen. Skin oils are difficult to remove.
• Never remove the rear cover. The HD Monitor contains high-voltage parts. You may
be seriously injured if you touch them.
• Avoid exposing the HD Monitor to direct sunlight or another heat source. Orient the
HD Monitor away from direct sunlight to reduce glare.
• Always handle the HD display with care when moving it.
• Place the HD Monitor in a well-ventilated area; don’t place the HD Monitor in airtight
compartments. Do not place anything on the HD Monitor that prevents heat
dissipation.
• Ensure that the area around the HD Monitor is clean and free of moisture.
• Do not place heavy objects on the HD Monitor, audio/video cables, or power cord.
• If the HD Monitor emits smoke, abnormal noise, or a strange odor, immediately turn it
off and contact the Westinghouse Service Center.
• WARNING – To Reduce The Risk Of Fire Or Electric Shock, Do Not Expose The
HD Monitor To Rain Or Moisture! The HD Monitor shall not be exposed to dripping
or splashing and objects filled with liquids, such as vases, shall not be placed on the
Monitor.
English
2
Page 5

1) Read these instructions.
2) Keep these instructions.
3) Heed all warnings.
4) Follow all instructions.
5) Do not use the HD Monitor near water.
6) Clean only with a dry cloth.
7) Do not block any ventilation openings. Install in accordance with the manufacturer’s
instructions.
8) Do not install near any heat sources such as radiators, heat registers, stoves, or
other apparatus (including amplifiers) that produce heat.
9) Do not attempt to bypass the safety purpose of the polarized or grounding- type plug.
A polarized plug has two blades with one wider than the other. A grounding-type plug
has two blades and a third grounding prong. If the provided plug does not fit into
your wall outlet, consult an electrician for replacement of the obsolete outlet.
10) Protect the power cord from being walked on or pinched particularly at the ends of
the cord.
11) Only use attachments/accessories specified by the manufacturer.
12) Use only with the cart, stand, tripod, bracket, or table specified by the manufacturer,
or sold with the HD Monitor. When a cart is used, use caution when moving the cart
to avoid injury or damage.
13) Unplug the HD Monitor during lightning storms or when it is not being used for a long
period of time.
14) Refer all servicing to qualified service personnel. Servicing is required when the HD
Monitor has been damaged in any way, such as the power-supply cord or plug is
damaged, liquid has been spilled or objects have fallen into the HD Monitor, it has
been exposed to rain or moisture, it does not operate normally, or the TV has been
dropped.
English
Antenna Installation Safety
Outdoor Antenna Grounding
If an outside antenna or cable system is connected to the HD Monitor, be sure the antenna or cable
system is grounded to prevent voltage surges and built-up static charges. Article 810 of the National
Electrical Code, ANS/NFPA 70, provides information on proper grounding of the mast and
supporting structure, grounding of the lead-in wire to an antenna discharge unit, connection to
grounding electrodes, and requirements for the grounding electrode.
Lightning
For added protection for the HD Monitor during a lightning storm, or when it is left unattended and
unused for long periods of time, unplug it from the wall outlet and disconnect the antenna or cable
system. This will prevent damage to the HD Monitor due to lightning and power-line surges. Do not
disconnect the antenna or the power cord during a heavy storm – lightning may strike while you are
holding the cable cord, causing serious injury. Turn off your HD MONITOR and wait for the weather
to improve.
Power Lines
An outside antenna system should not be located in the vicinity of overhead power lines or other
electric light or power circuits. When installing an outside antenna system, extreme care should be
taken to keep from touching such power lines or circuits.
3
Page 6
Safety Guidelines
CAUTION: The power supply outlet should be located near the HD Monitor and should be easily accessible.
Always use the appropriate AC cord that is certified for your specific country. Some examples are listed below:
USA..................UL Switzerland ..... SEV
Canada.............CSA Britain............. . BASE/BS
Germany..........VDE Japan ............... Electric Appliance Control Act
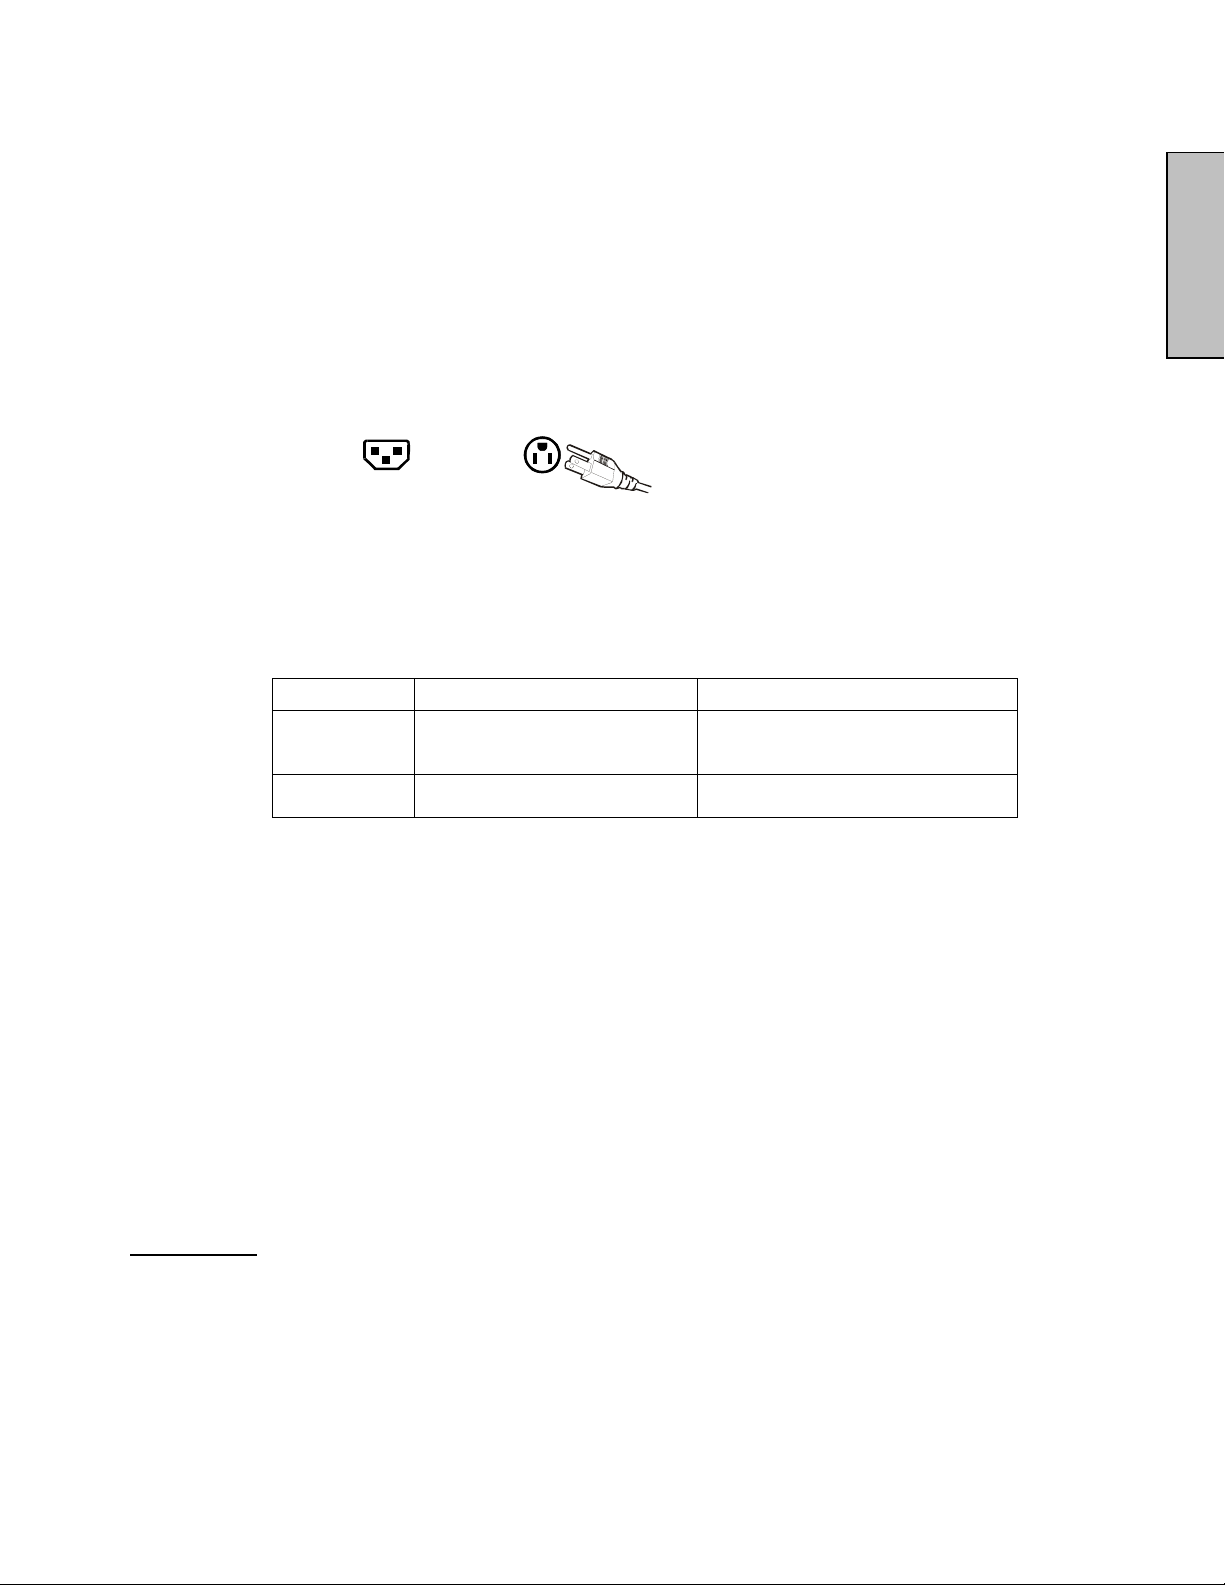
IMPORTANT NOTICE CONCERNING POWER CORD SELECTION
The specific power cord for this HD Monitor is enclosed and has been selected according to the country of
destination and must be used to prevent electric shock. Use the following guidelines if it is necessary to replace
the original cord set, or if the cord set is not enclosed. The female receptacle of the cord set must meet
IEC-60320 requirements and should look like Figure A1 below:
Figure A1 Figure A2
English
For the United States and Canada
In the United States and Canada the male plug is a NEMA5-15 style (Figure A2), UL Listed, and CSA Labeled.
For LCD Monitors that are placed on a desk or table, type SVT or SJT cord sets may be used. For LCD
Monitors placed directly on the floor, only SJT type cord sets may be used. The cord set must be selected
according to the current rating for the LCD Monitor. Please consult the table below for the selection criteria for
power cords used in the United States and Canada.
Cord Type Size of Conductors in Cord Maximum Current Rating of Unit
SJT
SVT
18 AWG
16 AWG
14 AWG
18 AWG
17 AWG
10 Amps
12 Amps
12 Amps
10 Amps
12 Amps
FCC Compliance Statement
This equipment has been tested and complies with the limits for a Class B digital device, pursuant to part 15 of
the FCC Rules. These limits are designed to provide reasonable protection against harmful interference in a
residential installation. This equipment generates, uses, and can radiate radio frequency energy, and may
cause harmful interference to radio communications if not installed and used in accordance with the
instructions. However, there is no guarantee that interference will not occur in a particular installation. If this
equipment does cause harmful interference to radio or television reception, which can be determined by
turning the equipment off and on, the user is encouraged to try to correct the interference by one or more of the
following measures:
• Reorient or relocate the receiving antenna.
• Increase the separation between the LCD Monitor and receiver.
• Connect the equipment into an outlet on a circuit different from that to which the receiver is connected.
• Consult the Westinghouse Service Center or an experienced radio/Monitor technician for assistance.
FCC Warning
To assure continued FCC compliance, the user must use a grounded power supply cord and the
provided shielded video interface cable with bonded ferrite cores. If a BNC cable is used, use only a
shielded BNC (5) cable. Also, any unauthorized changes or modifications not expressly approved by
Westinghouse Digital will void the user's authority to operate this device.
4
Page 7

Cleaning the HD Video Monitor
• MAKE SURE THE HD Monitor IS TURNED OFF
• NEVER SPRAY OR POUR ANY LIQUID DIRECTLY ONTO THE SCREEN OR CASE
To clean the screen:
1. Wipe the screen with a clean, soft, lint-free cloth. This removes dust and other particles.
2. If it still is not clean, apply a small amount of non-ammonia, non-alcohol based glass cleaner
onto a clean, soft, lint-free cloth, and wipe the screen.
To clean the case:
1. Use a soft, dry cloth.
2. If it still is not clean, apply a small amount of non-ammonia, non-alcohol based, mild non-
abrasive detergent onto a clean, soft, lint-free cloth, then wipe the surface.
Disclaimer
Westinghouse Digital does not recommend the use of any ammonia or alcohol-based cleaners on
the HD Monitor screen or case. Some chemical cleaners have been reported to damage the screen
and/or HD Monitor case. Westinghouse Digital will not be liable for damage resulting from the use of
any ammonia or alcohol-based cleaners.
English
5
Page 8
INSTALLATION
Package Contents
Your product package includes:
• LVM-42w2 (42”) / LVM47-w1 (47”) Westinghouse HD Video Monitor
• Remote Control (with batteries)
• Power Cord
• Quick Connect Guide
• User’s Manual
• Warranty Card
English
6
Page 9

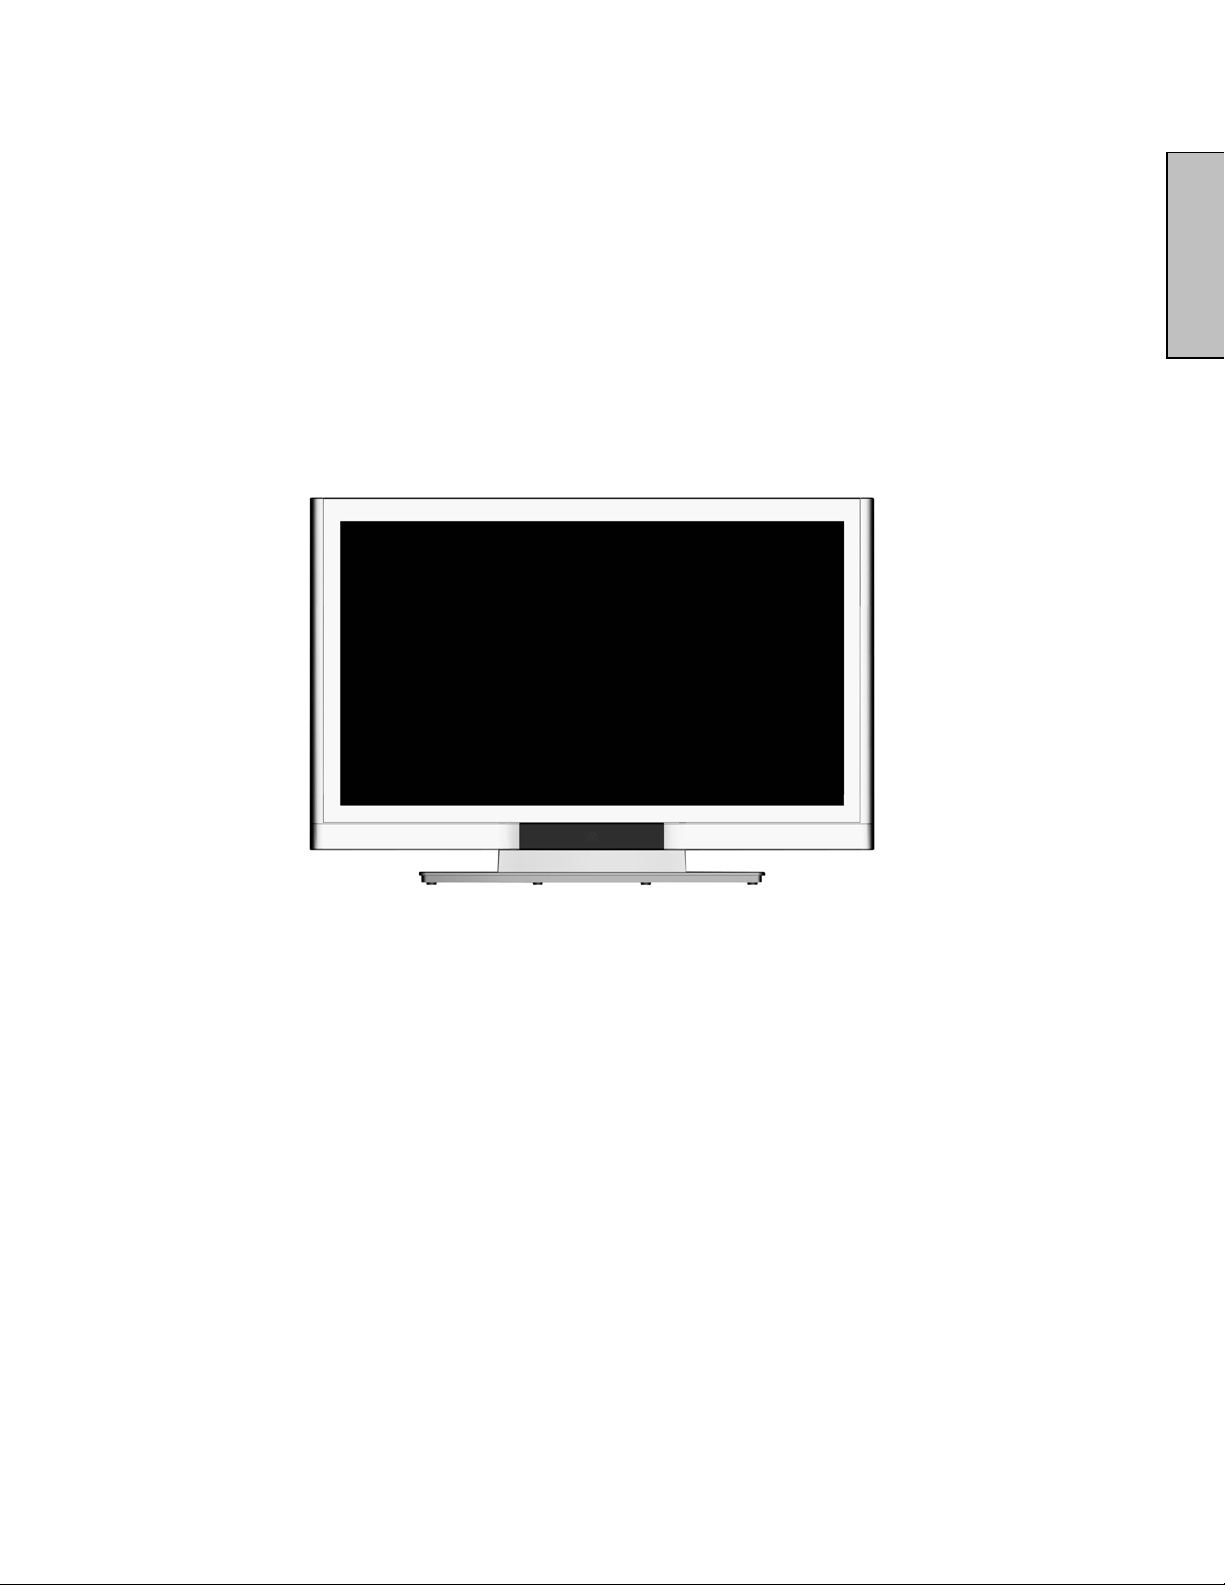
Front View of the HD Video Monitor
Use the buttons on the right side of the HD Monitor or on the remote control to display the On
Screen Display (OSD). The OSD controls are defined in “OSD Functions” on page 12.
English
Speakers
Rear View of the HD Video Monitor
“IR” receiver and
LED indicator
7
Page 10
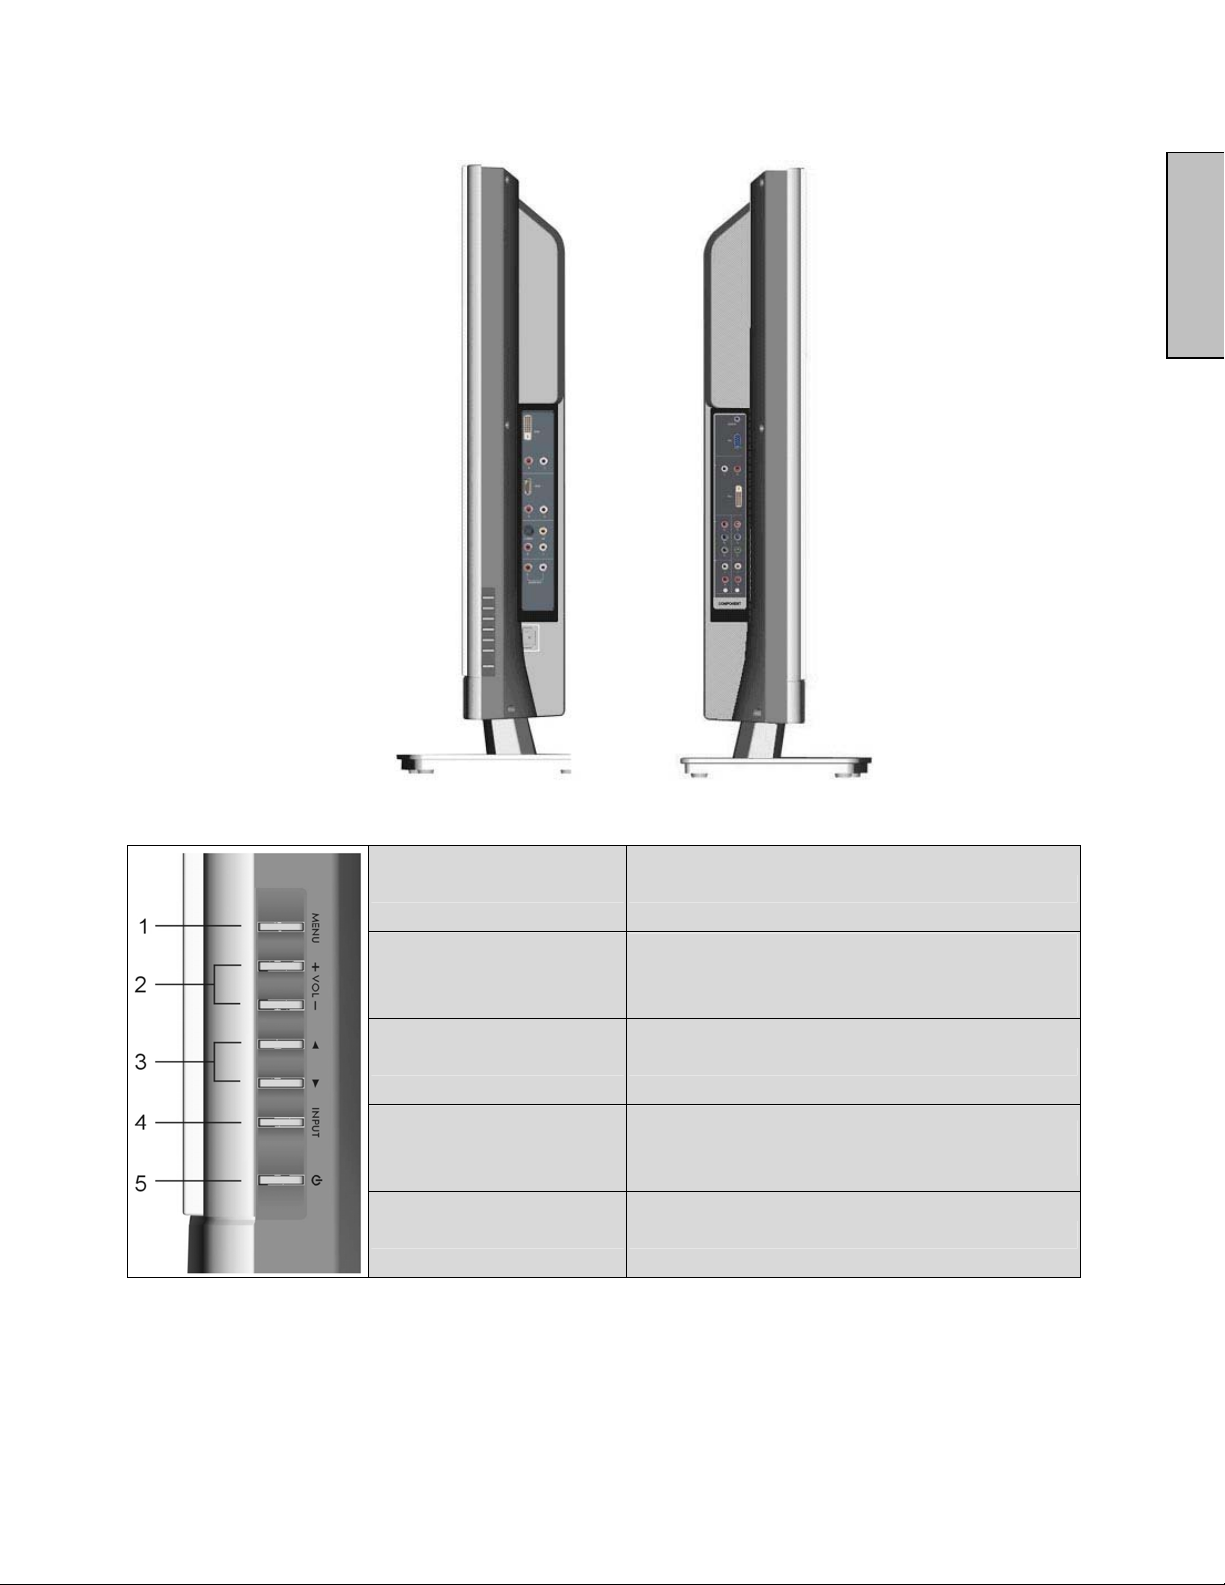
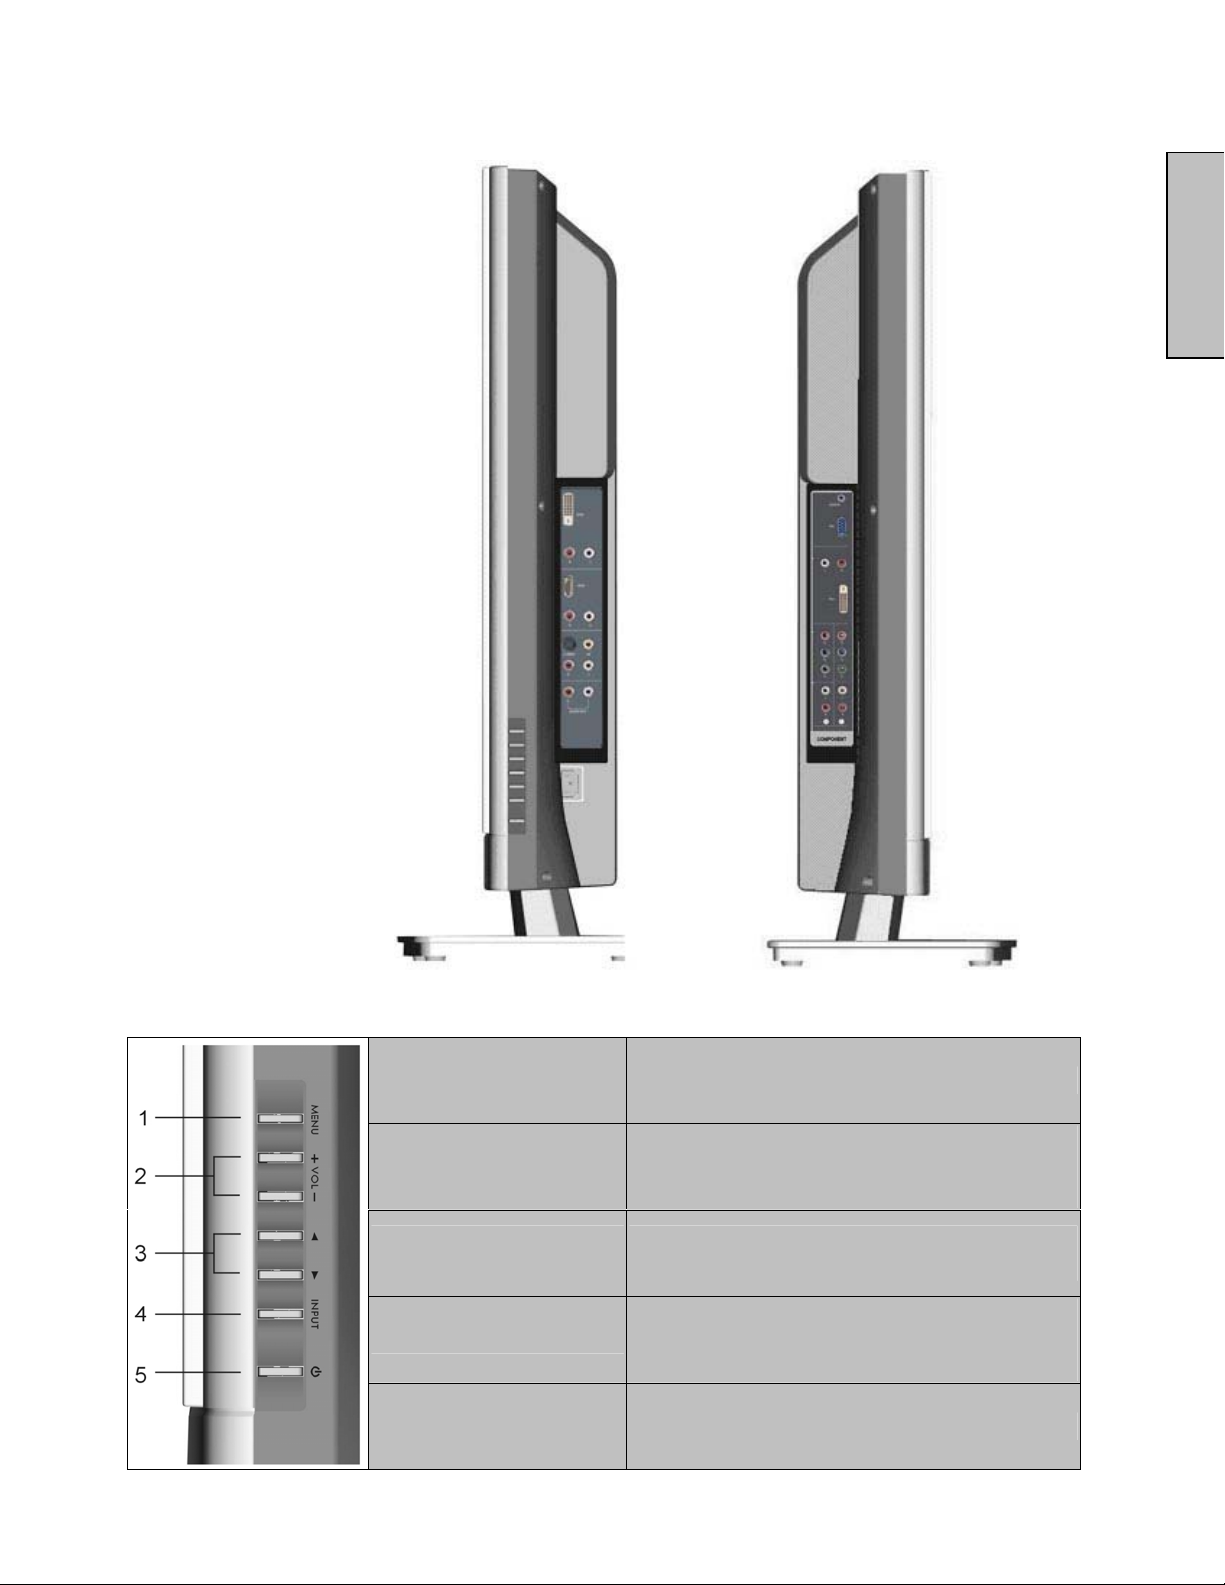
Side View of the HD Video Monitor
English
1. Menu Turn OSD Menu ON/OFF
Increase/Decrease sound volume or
2. Volume + / -
3. OSD Selection T/S Highlight a control while in the OSD Menu.
4. Input
5. Power Button Turn Power ON/OFF
adjust a highlighted control while in the
OSD Menu.
Select Active Video Input or choose a
selection while in the OSD MENU.
8
Page 11
5
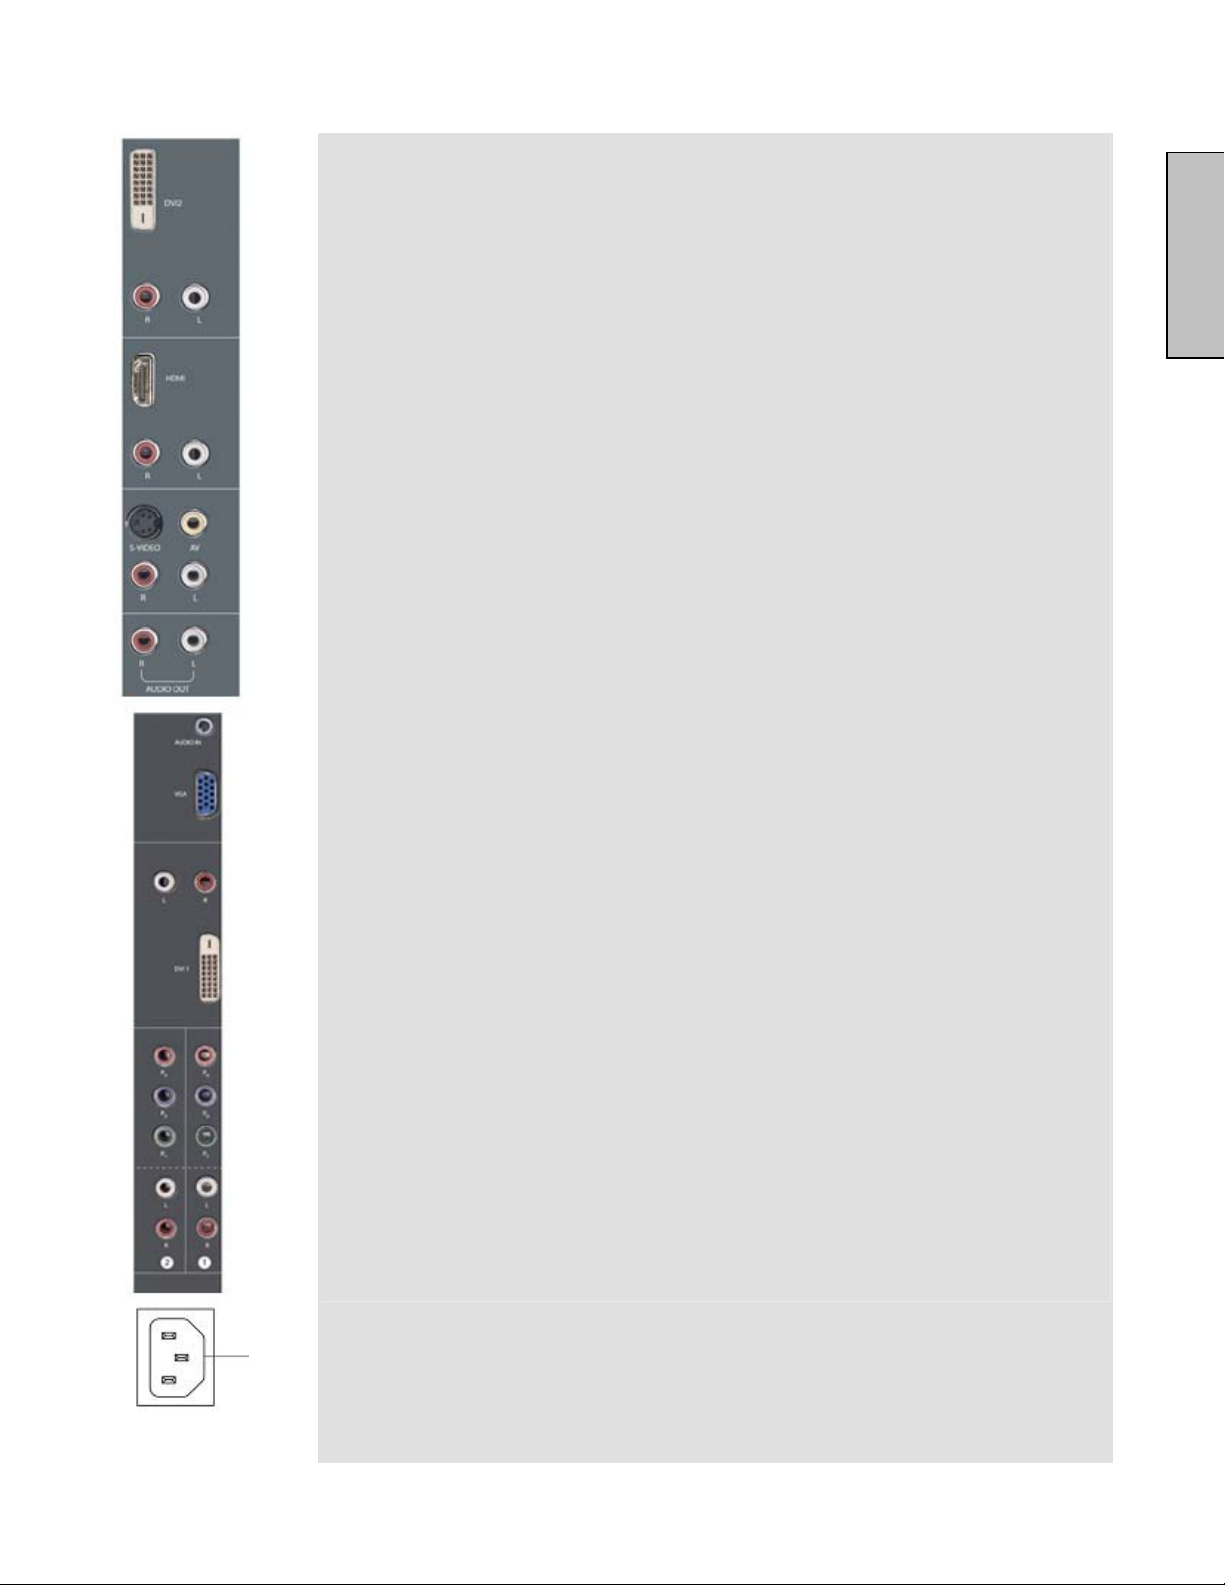
Side View of the HD Video Monitor
1. DVI2 (Supports up to 1080p Full HD)
Using a 20-pin DVI cable, connect to a computer, HD Digital cable/satellite
1
2
3
6
8
9
10
11
12
13
14
15
16
receiver, HD Set-Top-Box, DVD or other device with a DVI output.
2. DVI2 Audio Input (Right / Left)
Connect an external DVI audio source to this jack.
3. HDMI Input
Connect to an external video device such as HD Digital cable/satellite
receiver, HD Set-Top-Box, Media Center PC, or DVD player.
4. HDMI Audio Input (Right / Left)
Connect the audio input if you using a DVI-to-HDMI converter.
5. S-Video Input
Connect to an external video device such as a VHS player.
6. AV Video Input
Connect to an external video device such as a VHS player or video game
system.
7. AV & S-Video Audio Input (Right / Left)
Connect an external audio source to this jack; (Audio (R/L). This connection
supports either S-Video or AV input.
8. Audio Output (Right / Left)
Connect this output to an external stereo audio amplifier, receiver or
surround sound processor.
9. VGA Audio IN
Using the cable provided, connect to the Audio out (Green) from a computer.
10. VGA
Using a 15-pin VGA cable, connect to a computer or other device with a
VGA output.
11. DVI1 Audio Input (Right / Left)
Connect an external DVI audio source to this jack.
12. DVI1 (Supports up to 1080p Full HD)
Using a 20-pin DVI cable, connect to a computer, HD Digital cable/satellite
receiver, HD Set-Top-Box, DVD or other device with a DVI output.
13. YPbPr1 (HD) Input
Connect an external video device such as DVD or video game system with
component output to these jacks.
14. YPbPr2 (HD) Input
Connect an external video device such as DVD or video game system with
component output to these jacks.
15. YPbPr1 Audio 1 Input (Left / Right)
Connect an external audio source to this jack.
16. YPbPr2 Audio 2 Input (Left / Right)
Connect an external audio source to this jack.
17. AC IN (Power)
Connect the power cord from AC IN to a power source.
English
17
9
Page 12
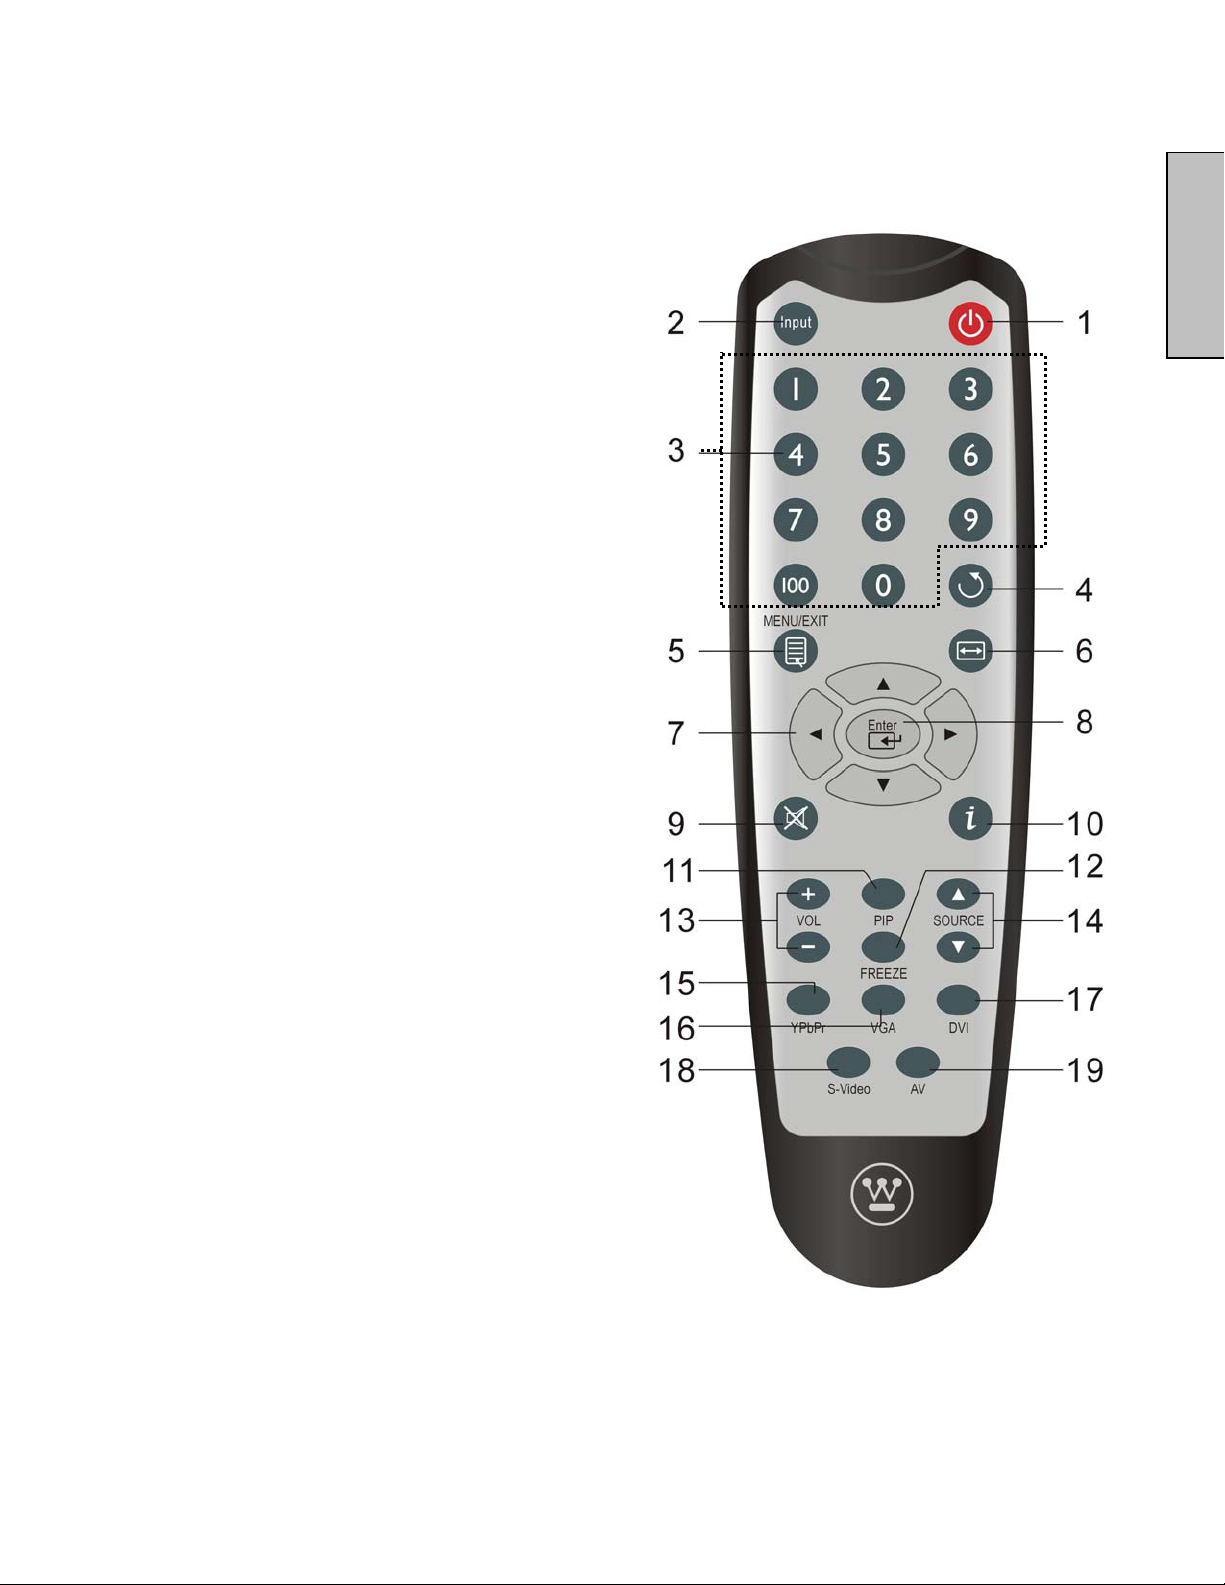
Remote Control
The Remote Control will transmit to the HD Monitor up to 10 feet away.
1. POWER:
Switch the power On/Off
2. INPUT
Select input source
3. OSD SUB-MENU SELECTION
Select OSD sub-menu option directly
4. PREVIOUS OSD MENU
Select previous OSD menu
5. MENU/EXIT
Turn OSD Menu On/Off.
6. SCALING
Select Video Display format “STANDARD” or
“FILL”
7. T / S / W / X
OSD MENU control
8. Enter
Execute a command
9. MUTE
Turn the Sound On/Off
10. INFO
Display the source and channel information
11. PIP
Display sub-picture On/Off
12. FREEZE
Freeze main screen
13. VOL - / +
Volume Up/Down adjustment
14. SOURCE T / S
Source selection Up/Down
15. YPbPr
Select YPbPr1 / YPbPr2 source input
16. VGA
Select VGA source input
17. DVI
Select DVI1 / DVI2 / HDMI source input
18. S-Video
Select S-Video source input
19. AV
Select AV source input
English
10
Page 13
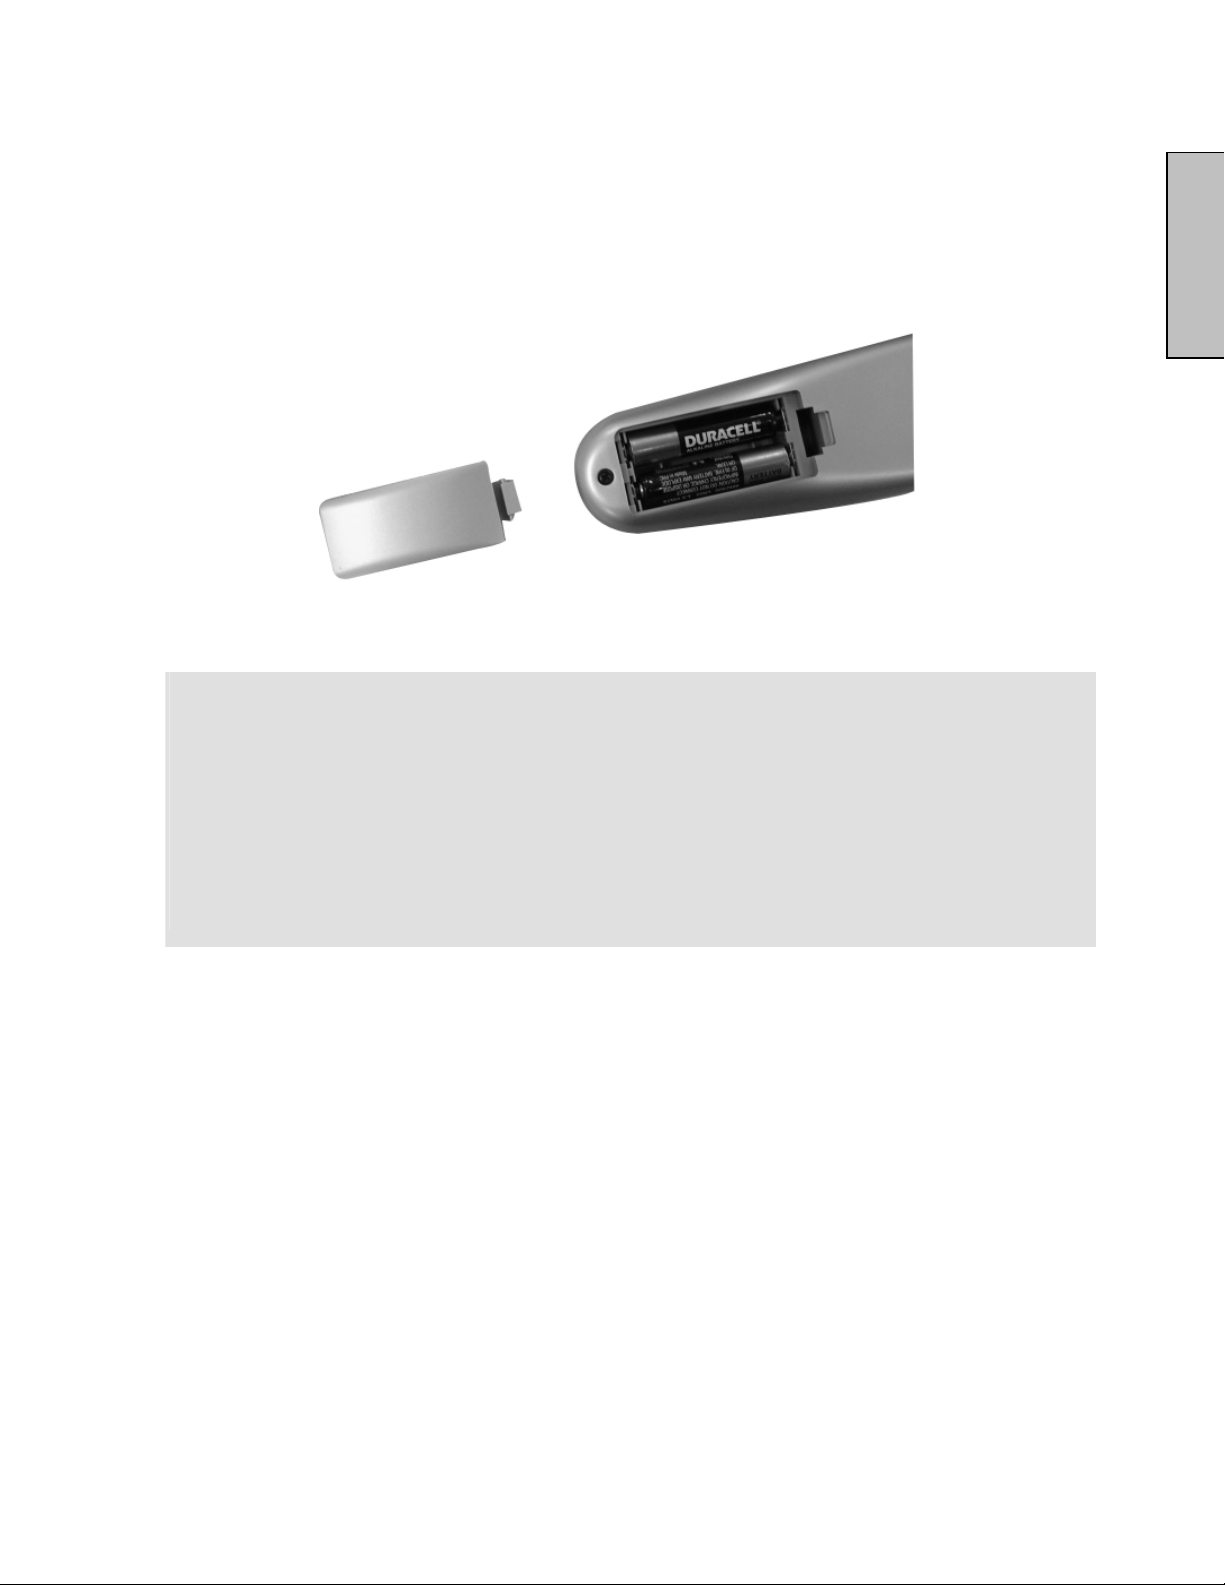
Installation
1. Insert Remote Control Batteries
1) Remove the battery cover.
2) Insert the batteries corresponding to the (+) and (−) marks on the battery
compartment.
English
3) Re-attach the battery cover.
CAUTION:
z Only use AAA batteries.
z Do not mix new and old batteries. This may result in cracking or leakage, which
may pose a fire risk or lead to personal injury.
z Insert batteries according to (+) and (−) markings. Inserting the batteries incorrectly
may result in cracking or leakage, which may pose a fire risk or lead to personal injury.
z Dispose of used batteries in accordance with local laws and regulations.
z Keep batteries away from children and pets.
z When the remote control will not to be used for an extended period, remove the batteries.
11
Page 14
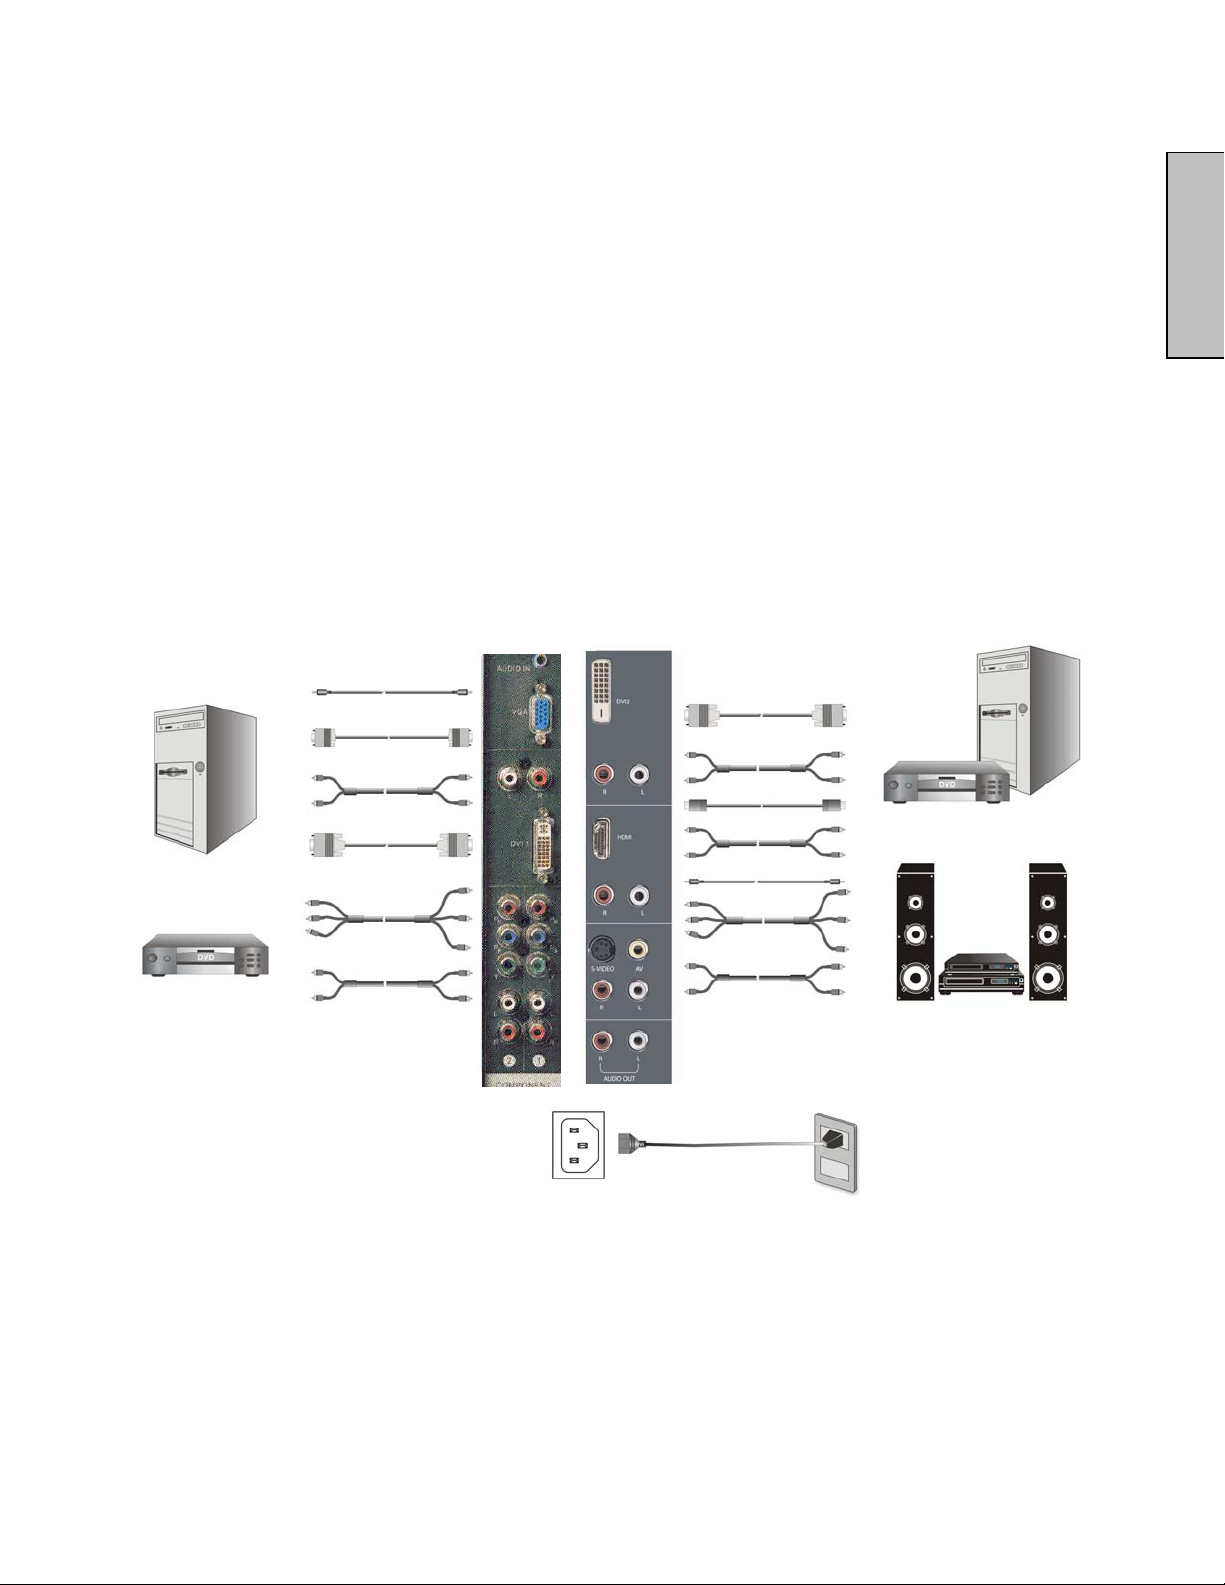
2. Connect audio and video cables from a PC
Connect one or all of the following into the back of the HD Monitor
IMPORTANT: Before beginning, make sure all devices are turned off.
VGA CONNECTION: Connect an analog VGA cable from your PC VGA OUT port to
the HD Monitor VGA IN port.
DVI1/DVI2 CONNECTION: Connect a Digital DVI cable from your PC DVI OUT port to
one of the HD Monitor DVI-HDCP port.
AUDIO CONNECTION: Connect a stereo mini cable from the PC’s AUDIO OUT port
to the AUDIO IN port on the HD Monitor.
3. Connect AV, Component, S-Video to Video Devices
Connect Audio/Video cables from compatible devices to the back panel of the HD
Monitor.
English
12
Page 15
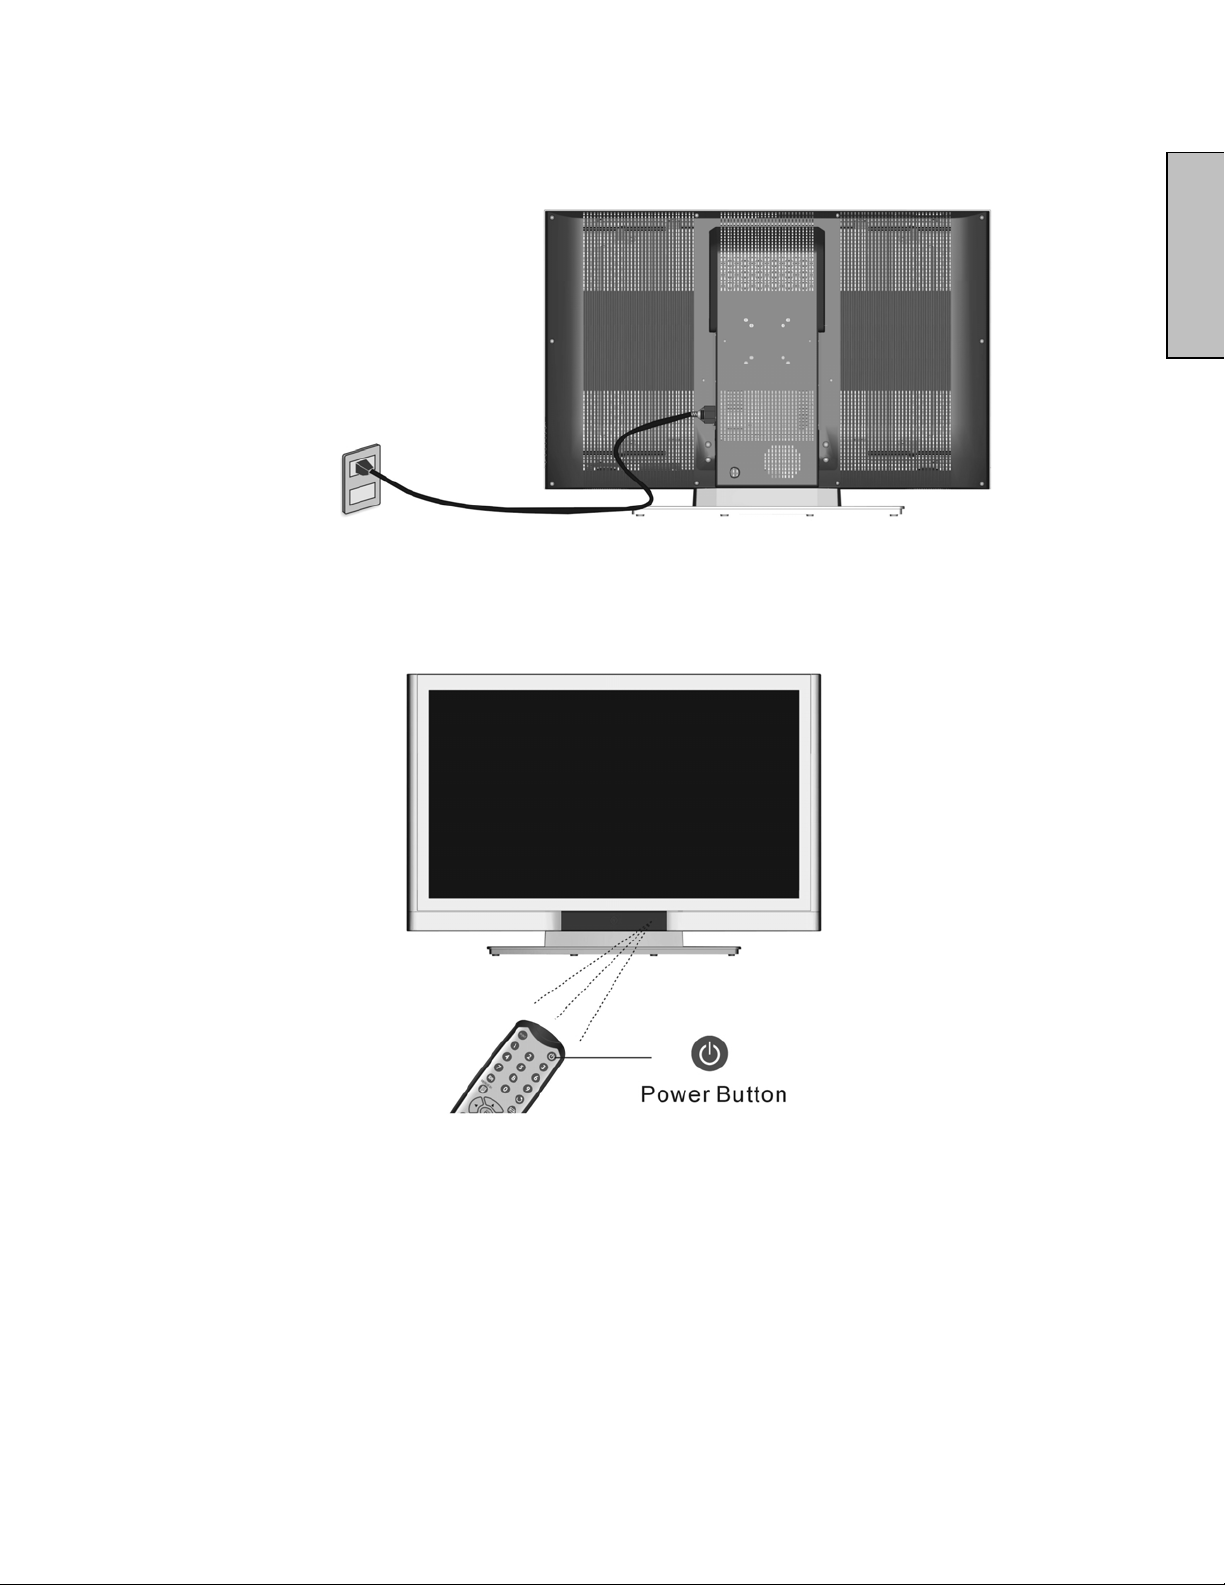
4. Connect power cables
Connect the power cord to the HD Monitor then to a properly grounded AC outlet.
5. Turn Power On
Press the Power ON button on the right side of the HD Monitor, or press the Power ON
(Red) button on the remote control.
English
6. Select input source for the HD Monitor using the OSD menu or remote
control
7. If connecting to a PC (VGA/DVI1/DVI2):
For the best picture quality, set the HD Monitor resolution to 1920 x 1080 at 60Hz (refer
to the graphic card’s user guide to set this resolution).
13
Page 16
OSD Function
All the OSD function settings are controlled either by the remote control or using the control
keys on the right side of HD Monitor.
To display the OSD main menu, press the Menu button on the right side of front control keys
of the HD Monitor or the MENU key on the remote control. Use 3/4 arrow keys to highlight
the desired OSD sub-menu.
Main Menu
To select a sub-menu, press ▲/▼ on the right side of the HD Monitor or the ▲/▼ key on the
remote control. Also, by using the number keys on the remote control, you can select a OSD
sub-menu directly.
English
14
Page 17
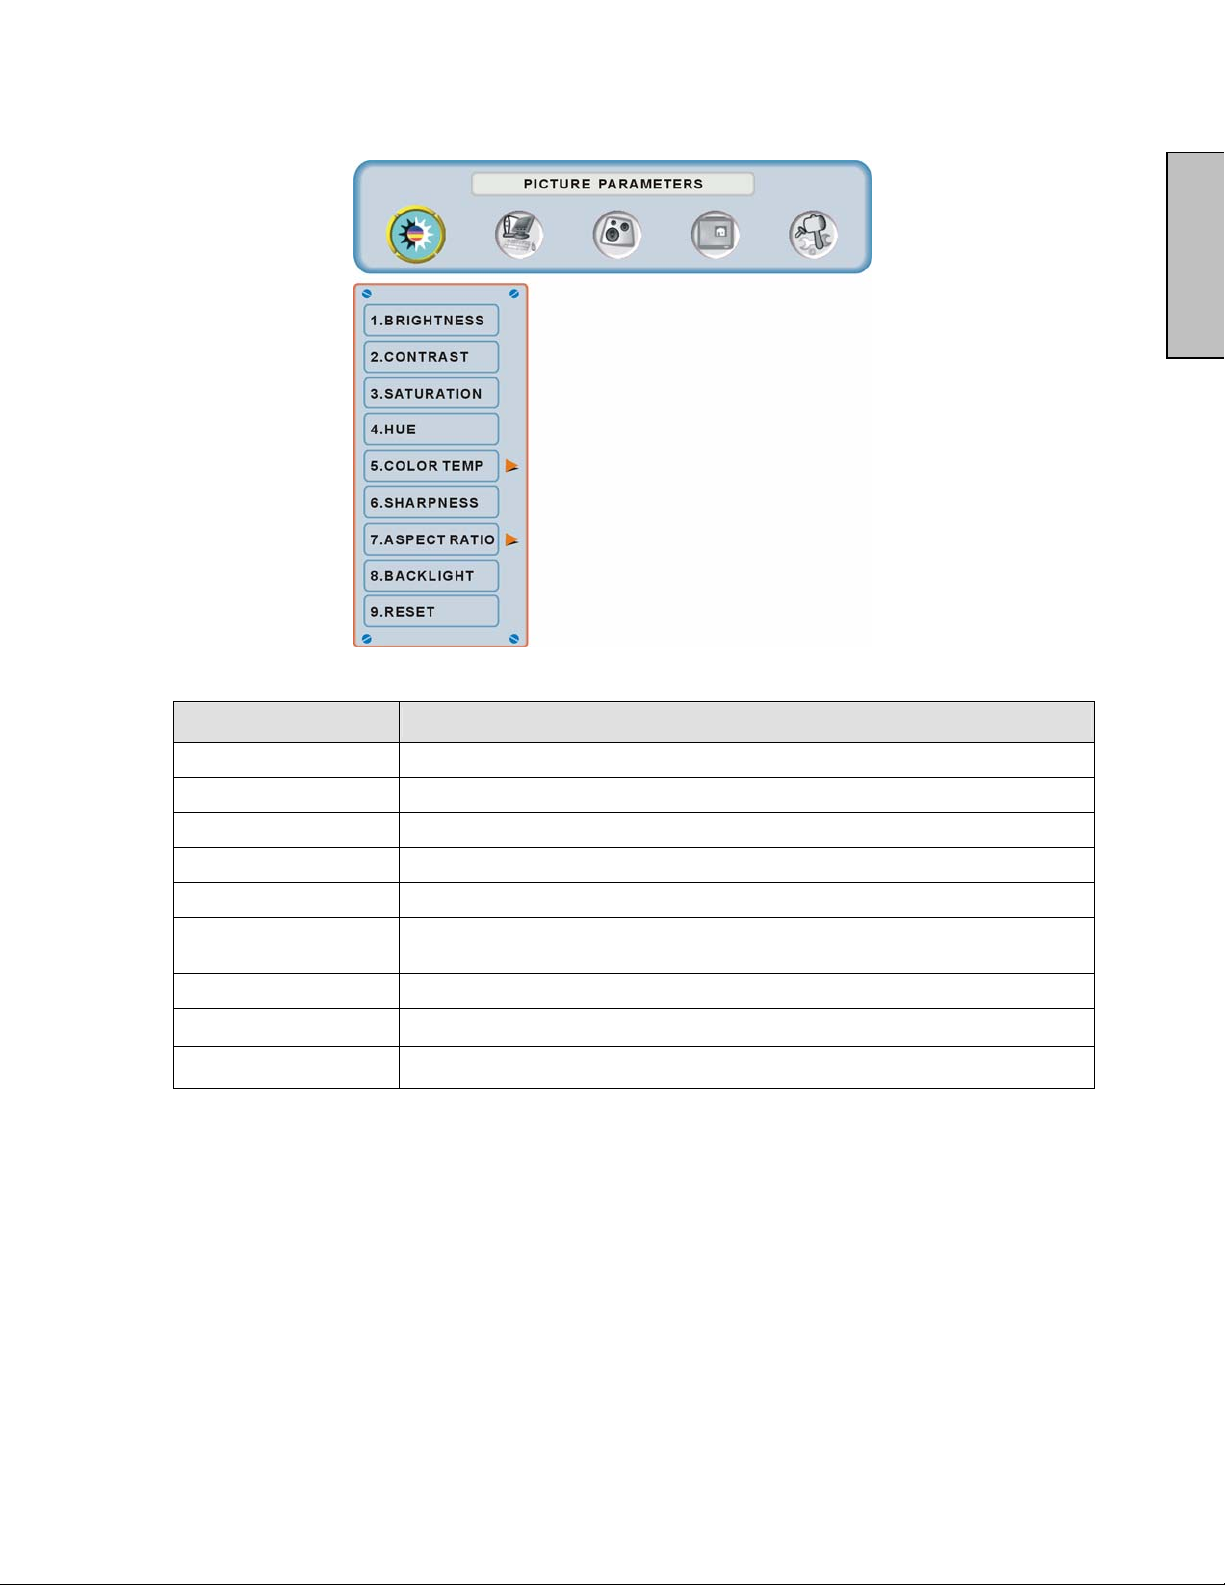
PICTURE PARAMETERS:
English
Function Name Function
Brightness Brightness adjustment
Contrast Contrast adjustment
Saturation Saturation adjustment
Hue Hue adjustment
Color Temp Color temperature adjustment (Warm, Neutral, Cool)
Sharpness
Aspect Ratio Set display to “STANDARD” / “FILL”
Backlight Backlight adjustment
Reset Reset video settings
Sharpness adjustment
(Sharpness cannot be adjusted in PC mode)
15
Page 18
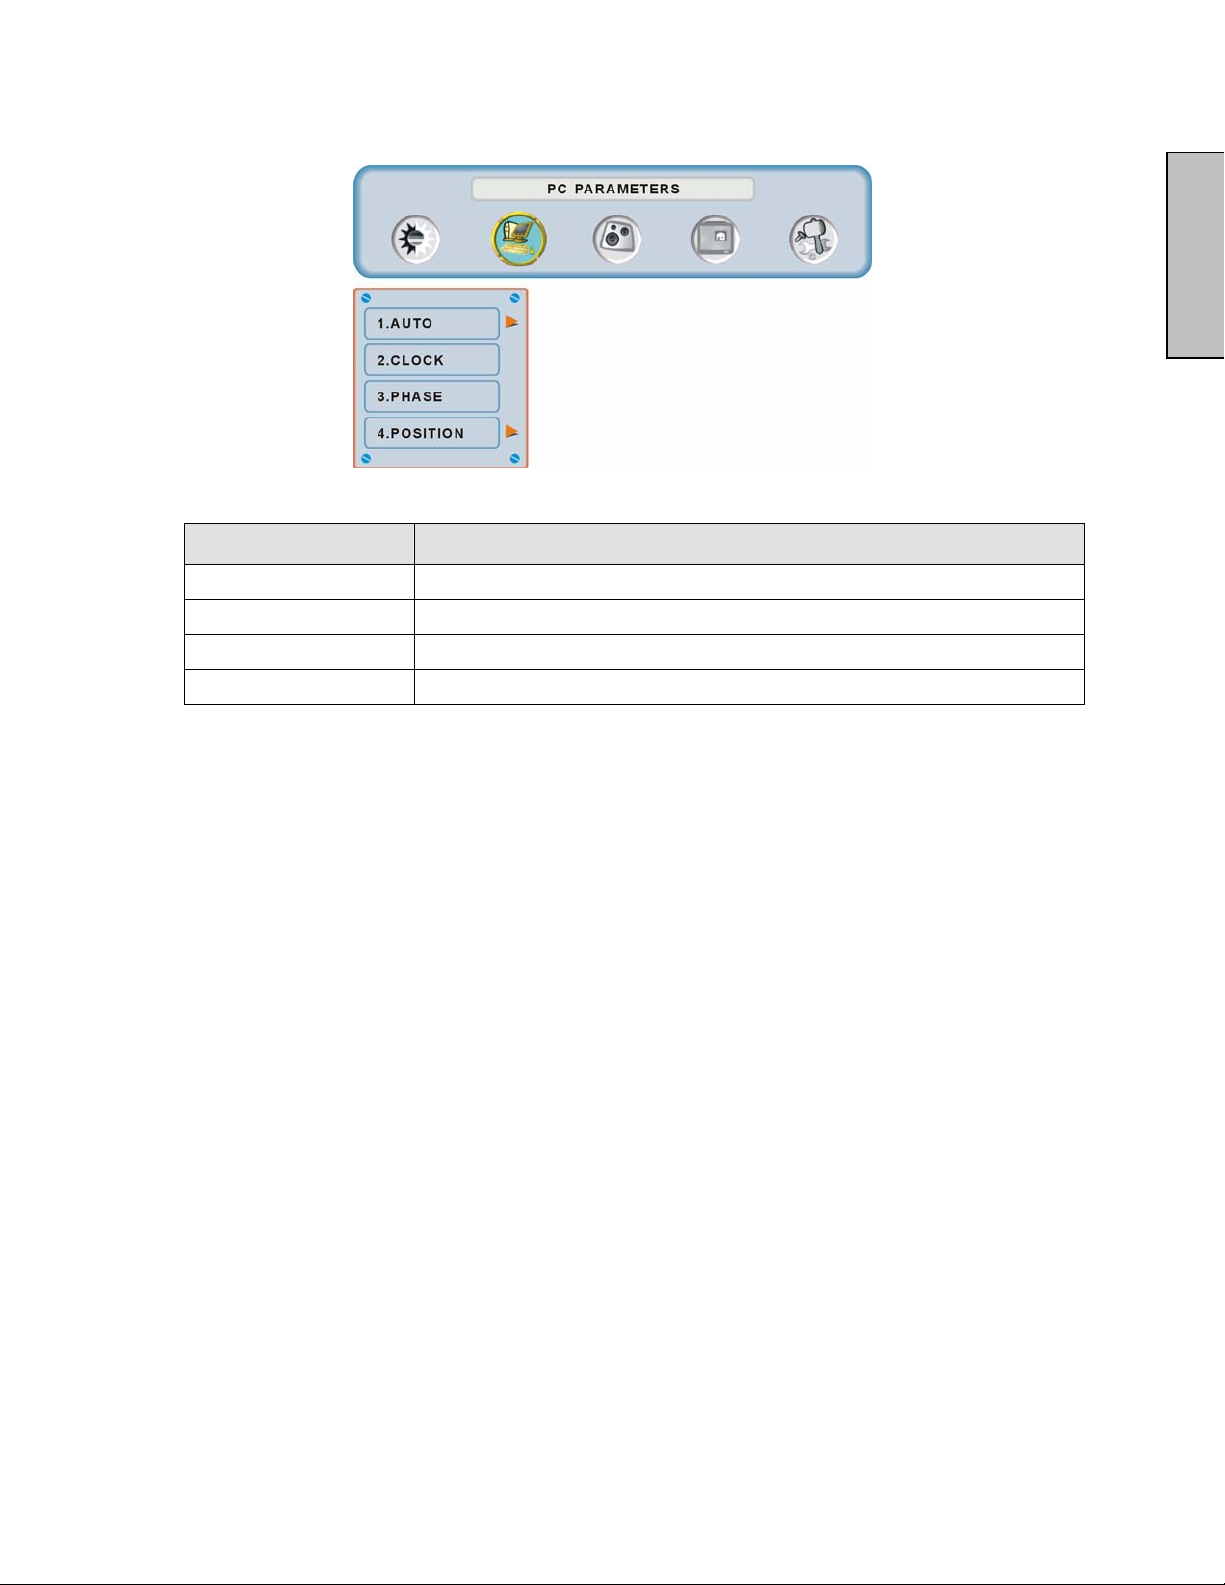
PC PARAMETERS:
Function Name Function
Auto Adjust Automatically adjust the horizontal phase of the image
English
Clock Clock adjustment
Phase Phase adjustment
Position Adjust the horizontal and vertical position of the image
NOTE: The GRAPHIC menu is only available when VGA source is selected.
16
Page 19

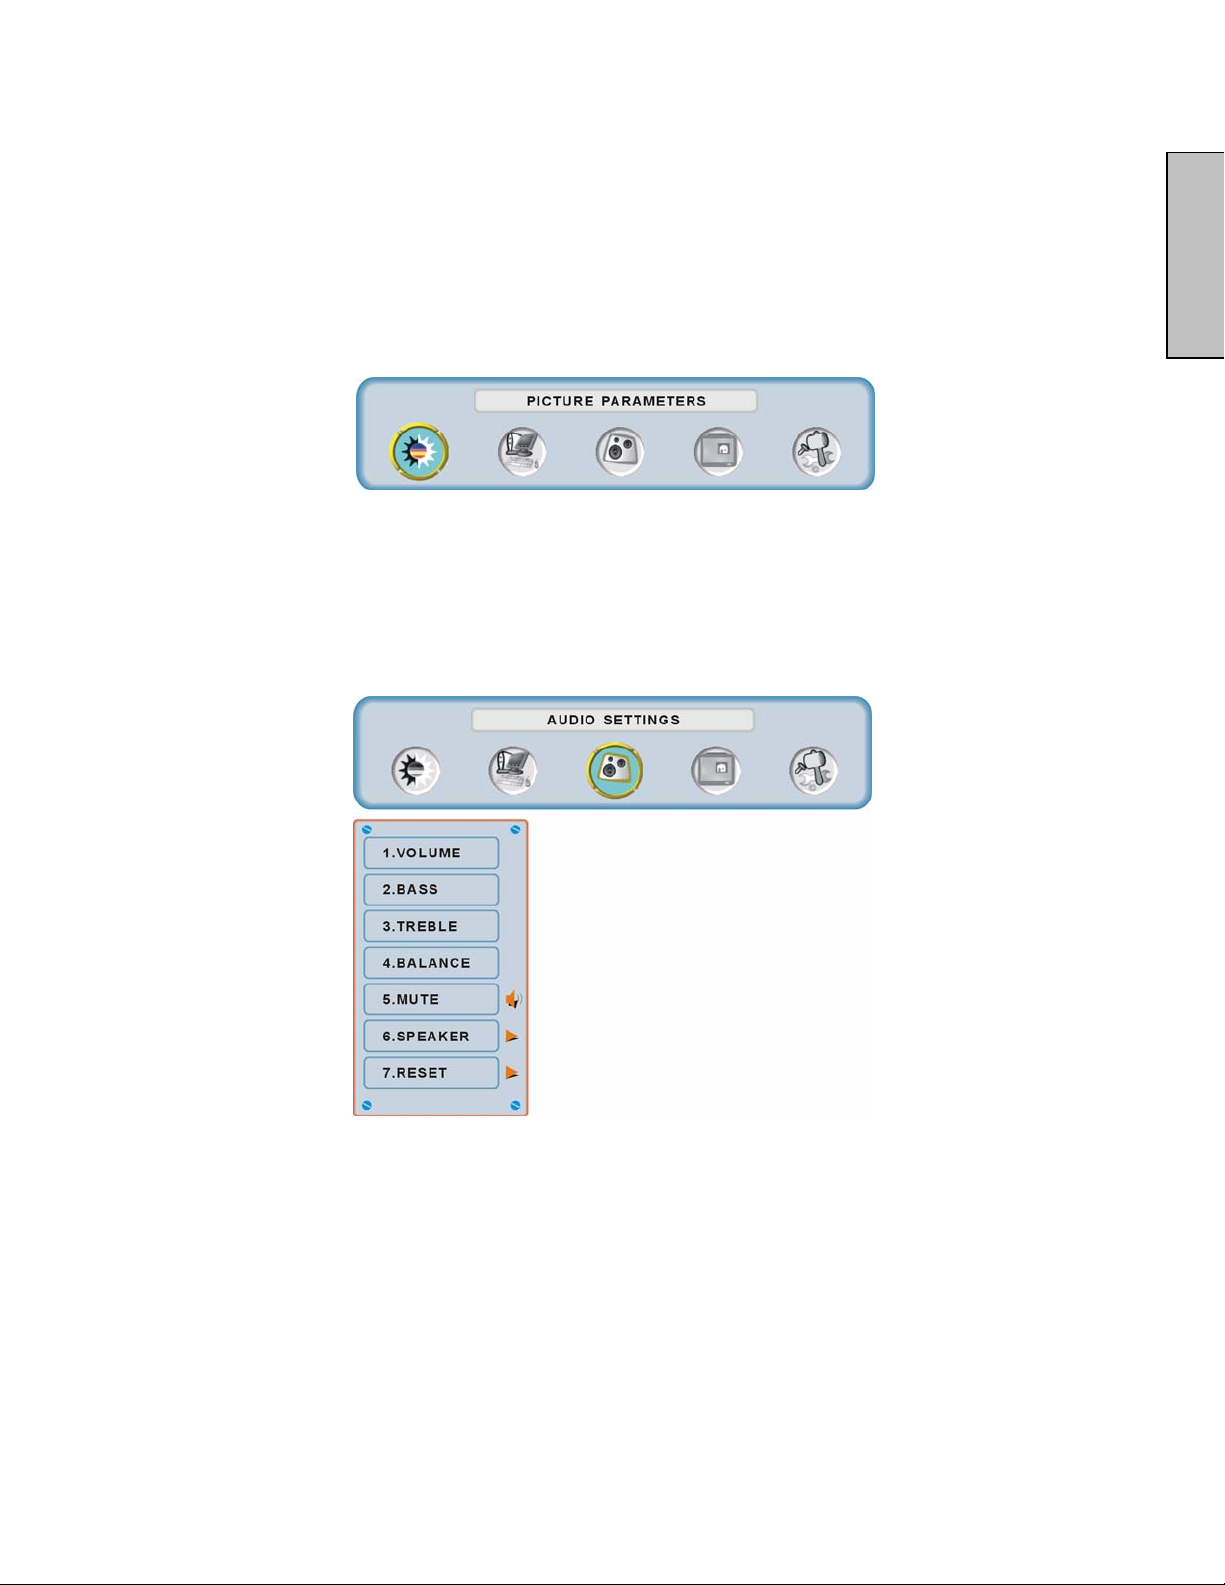
AUDIO SETTINGS:
English
Function Name Function
Volume Volume adjustment
Bass Bass adjustment
Treble Treble adjustment
Balance Balance adjustment
Mute Select Audio OFF or ON
Speaker Select internal or external speaker
Reset Reset audio settings
17
Page 20
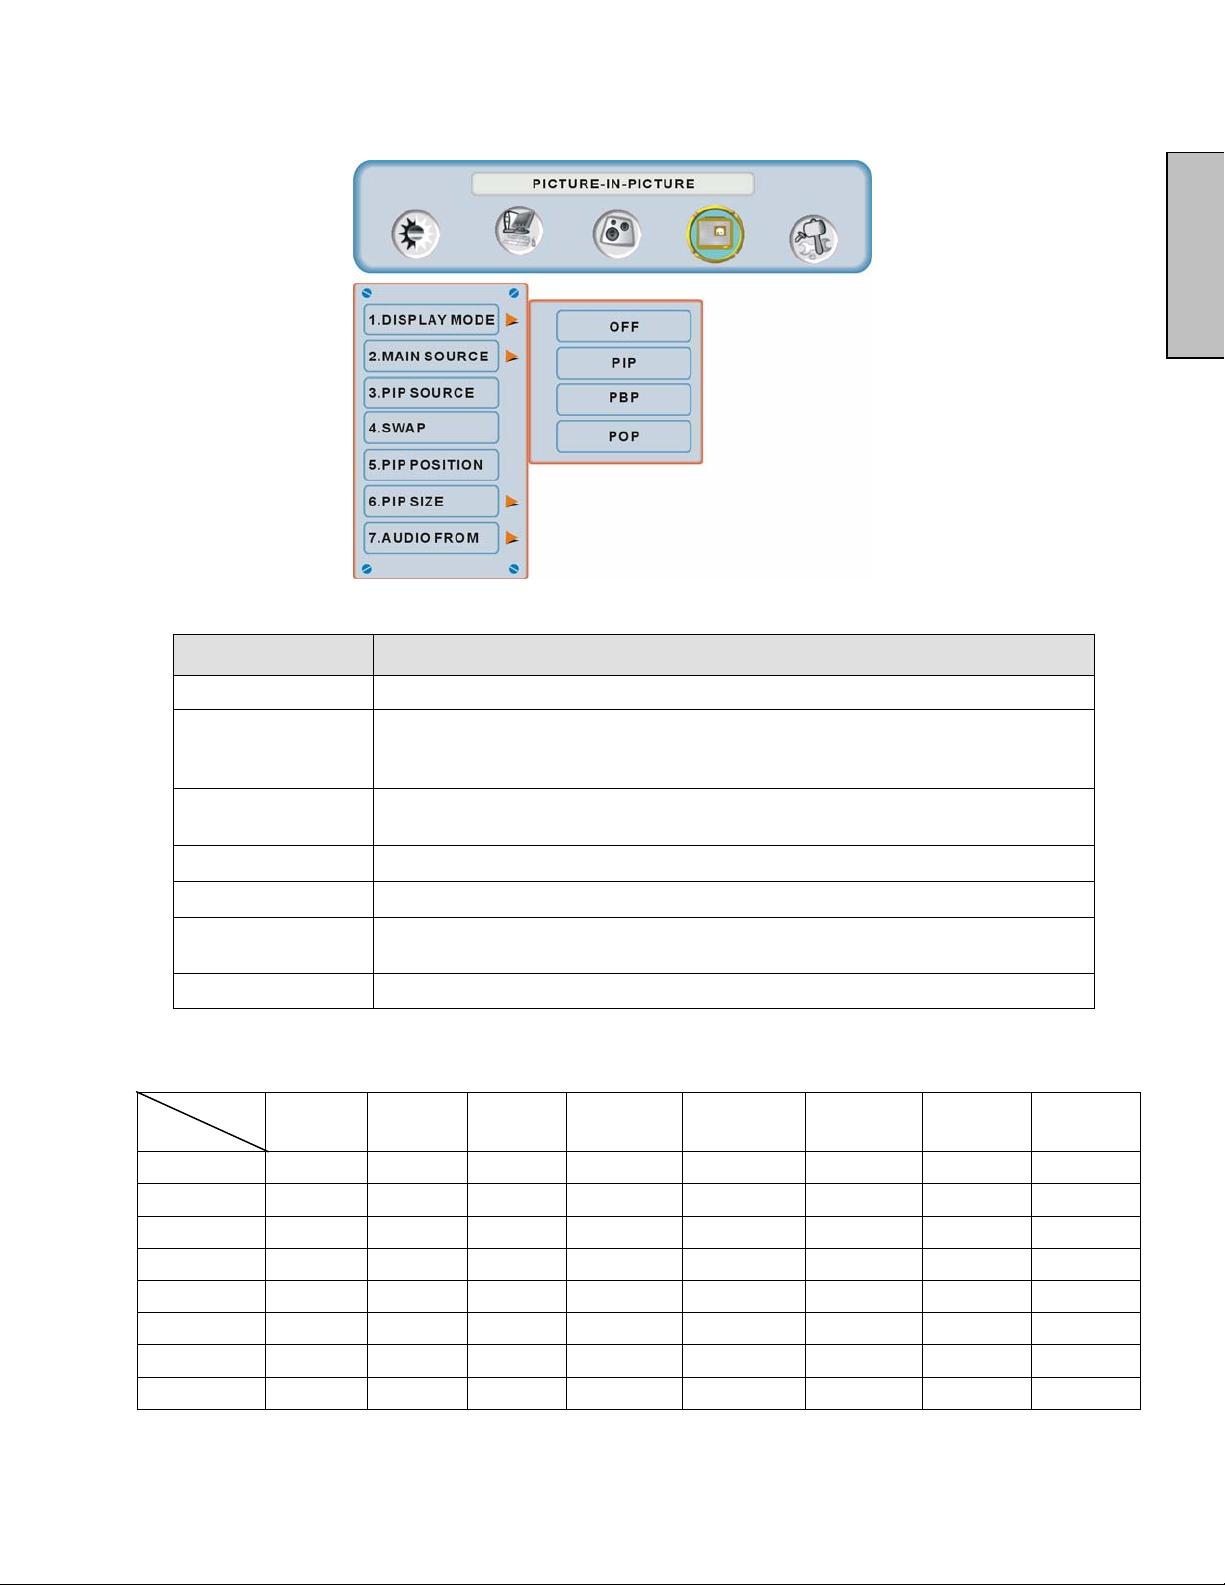
PICTURE-IN-PICTURE:
English
Function Name Function
Display Mode OFF --> PIP --> PBP --> POP
Main Source Select main screen sources
VGA --> DVI1--> DVI2 --> AV --> S-Video--> YPbPr1 -->
YPbPr2 --> HDMI
PIP Source Select sub screen sources
Please see PIP/PBP/POP specification in Table 1
Swap Swap main screen and sub-screen source
PIP Position Sub-screen display horizontal/vertical position adjustment
PIP Size
Audio From Select main screen or sub-screen audio sources
Table 1:
SUB
Main
VGA
DVI1
AV
S-Video
YPbPr1
YPbPr2
DVI2
HDMI
VGA DVI1 AV S-Video YPbPr1 YPbPr2 DVI2 HDMI
X O O O X X O O
O X O O O O O O
O O X X O O O O
O O X X O O O O
X O O O X X O O
X O O O X X O O
O O O O O O X X
O O O O O O X X
Sub-screen display size adjustment
(Small -->Medium --> Large)
18
Page 21
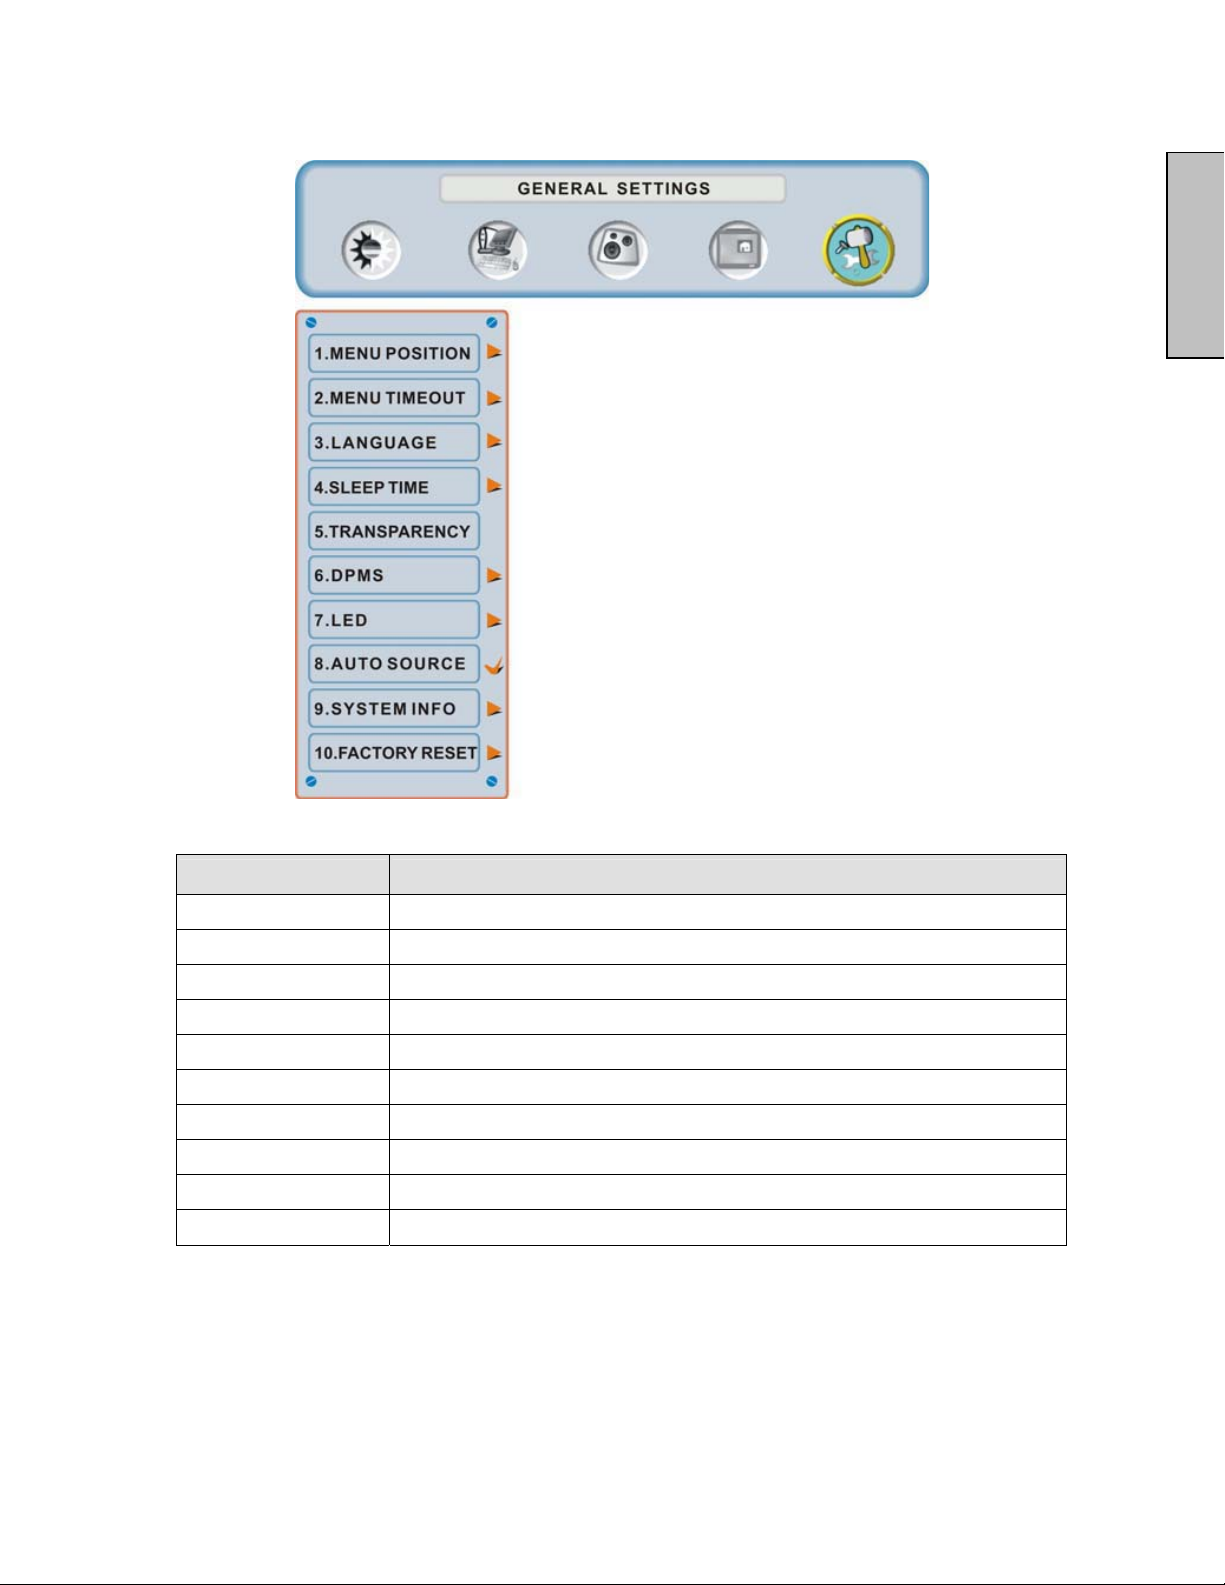
GENERAL SETTINGS:
English
Function Name Function
Menu Position OSD horizontal/vertical position adjustment
Menu Timeout Set the time to turn off the OSD automatically
Language OSD language selection
Sleep Timer Set sleep timer to turn off the power automatically
Transparency Set OSD transparency level
DPMS Select DPMS On/Off
LED Turn the LED ON or OFF
Auto Source Select auto source function on/off
System Info Display Input source, type and signal
Factory Reset Restore factory default settings
19
Page 22

Specifications
Panel
Viewing Angles
Input Signal
Output Signal
HDTV Compatibility
PC Compatible
(VGA, DVI1, & DVI2)
Speaker Output
Power
Operating Conditions
Storage Conditions
Dimensions
Weight
Regulations
Power
Power
Power
Type
Color Anti-reflective coating + Anti-glare coating
176° (H) / 176° (V)
Video/Audio RGB Analog x 1 (75 ohms, 0.7 Vp-p)/Mini-Stereo x1
H/V separated (TTL) for PC
fh: 30-80 kHz, fv: 50-75 Hz
RCA (L/R) Stereo x 1
480i, 480P, 720P, 1080i, 1080p
Supported 1920 x 1080 @ 60 Hz
1280 x 1024 @ 60, 75 Hz
1280 x 768 @ 60, 75Hz
1024 x 768 @ 60, 75 Hz
800 x 600 @ 60, 75 Hz
640 x 480 @ 60, 75 Hz
720 x 400 @ 70 Hz
10W (x2 Channels) / Subwoofer x 1 (10W)
Voltage 100-240 VAC, 50/60 Hz (auto switch), 3.5A (MAX)
Temperature 0° C to + 35° C (32° F to + 95° F)
Humidity 10% to 90% (no condensation)
Altitude To 3,000 m, (9,842.520 feet)
Temperature -20° C to + 60° C (-4° F to + 140° F)
Humidity 10% to 90% (no condensation)
Altitude To 12,000 m, ( 39,370.079 feet)
Physical
Net / Gross
FCC-B, UL/c-UL
On (Normal)
Off <1W
Saving <3W (White LED)
LVM-42w2 (42”) (42.02” viewable diagonal area)
LVM-47w1 (47”) (47.00” viewable diagonal area)
TFT (Thin Film Transistor), Active Matrix WXGA LCD, 1920x1080 vertical stripe
DVI-D x 2 (HDCP support) / RCA (L/R) x 2
DVI1 & DVI2 supports up to 1080P
Component Video (YPbPr) x 2 / RCA (L/R) Stereo x 2
YPbPr 1 & 2 supports up to 720p/1080i /1080p
Composite Video x 1 / S–Video x 1 / RCA (L/R) stereo x 1
Supports up to 480i
HDMI x 1 / RCA (L/R) stereo x 1
Supports up to 720p/1080i/1080p
LVM-42w2 (42”) 1050 mm (W) x 719 mm (H) x 226 mm (D)
41.3” (W) x 28.3” (H) x 8.9” (D)
LVM-47w1 (47”) 1170 mm (W) x 805 mm (H) x 226 mm (D)
46.1” (W) x 31.7” (H) x 8.9” (D)
LVM-42w2 (42”) 57.3 lb (26.0kgs) / 73.8 lb (33.5kgs)
LVM-47w1 (47”) 78.9 lb (35.8kgs) / 94.4 lb (42.8kgs)
LVM-42w2 (42”) 240W (White LED)
LVM-47w1 (47”) 290W (White LED)
English
Preset Timing Mode (Pre-adjusted to reduce blanking: 1920x1080 at 60Hz)
Warning: Do not set the graphics card in your computer to exceed these refresh rates; if refresh rates over spec, OSD will show
the "Out of range" message and LCD will be going to power saving mode.
Note: Product Specifications are subject to change without notice.
20
Page 23

Troubleshooting
No Power
• Make sure power button is ON (White LED).
• Make sure AC power cord is securely connected to the AC socket.
• Plug another electrical device (such as a radio) to the power outlet to verify that the
AUDIO Interconnection Issues
Power is ON but No Screen Image
Wrong or Abnormal Colors
Remote Control Buttons Do Not Work
No Sound
Remote Control Does Not Work
Remote Control Code Not Found in a “Universal” Remote
How Can I Find More Help?
outlet is supplying the proper voltage.
• Remember that S-Video and Composite (AV) share the same audio source.
• Make sure the video cable connected to the HD Monitor is tightly secured to the video
output port on the back of the computer. If the other end of the video cable is not
attached properly to the HD Monitor, secure it tightly.
• Adjust brightness and contrast.
• If you are using a Macintosh computer older than G3, you need a Macintosh adapter.
• Check Source settings.
• If any colors (red, green, or blue) are missing, check the video cable to make sure it is
connected securely. Loose or broken pins in the cable connector could cause an
improper connection.
• Connect the HD Monitor to another computer.
• Press only one button at a time.
• Check the audio connection.
• Press MUTE on the remote control, so that MUTE disappears from the screen.
• Check the audio settings. The HD Monitor audio may be set to minimum.
• Press the Volume + (Up) key on the remote control.
• Make sure the speaker setting is set to “internal”.
• Make sure batteries are inserted correctly.
• Replace batteries with new ones if necessary.
• Purchase a separate “learning” remote control or log on to:
www.westinghousedigital.com for updated remote code info.
• Log on to: www.westinghousedigital.com
• Contact Westinghouse Customer Service at (866) 287-5555 or write us at
service@westinghousedigital.com
• service@westinghousedigital.com
English
21
Page 24

Table des matières
Consignes de sécurité importantes………………………………….….2
Consignes de sécurité……………………………………………………4
Nettoyage du Moniteur Vidéo HD……………………………………….5
INSTALLATION
Contenu de l’emballage……………………………….…………………6
Façade du Moniteur Vidéo HD……………………………….…………7
Vue arrière du Moniteur Vidéo HD…………………………………….. 7
Vue latérale du Moniteur Vidéo HD…………………………………….8
Télécommande……………………………….………………………… 10
Installation……………………………….……………………………….11
Français
Fonctions OSD
PARAMETRES DE LA QUALITE D’IMAGE : Luminosité / Contraste /
Netteté / Format de l’image /Rétro-éclairage /
Réinitialisation………………………………....15
PARAMETRES DU PC : Réglage automatique / Horloge / Phase /
Position….……………………………............16
CONFIGURATION AUDIO : Volume / Grave / Aigu / Balance / Silence /
Haut-parleur / Réinitialisation….………..……...17
INCRUSTATION D’IMAGE : Affichage des Modes / Source principale /
CONFIGURATION GENERALE : Position du menu / Délai d’attente du
menu / Langues /Minuteur de mise en sommeil /
système / Restauration aux paramètres
Caractéristiques
Caractéristiques ….………..……......................................................20
Saturation / Teinte /Température de couleur /
Source d’incrustation d’image / Swap / Position de
l’image incrustée / Taille de l’image incrustée /
Audio à partir de…
Transparence / DPMS / DEL / Info relative au
d’usine….………………………………….....19
….………..………………..18
Dépannage
Dépannage ….……..…..…………....................................................21
Page 25

Français
1
Page 26

Consignes de sécurité importantes
Suivez toutes les consignes et obéissez à tous les avertissements qui apparaissent sur le Moniteur
Vidéo HD. Pour votre sécurité, veuillez lire toutes les consignes de sécurité et d’utilisation avant
d’utiliser le Moniteur HD. Gardez le manuel d’utilisation pour de futures consultations.
Surcharge
Ne pas surcharger les prises murales, les rallonges électriques ou les blocs multiprises. Cela peut
provoquer des incendies ou des chocs électroniques.
Protection du cordon secteur
Les cordons secteurs doivent être positionnés de façon à ce qu’ils ne soient pas piétinés ou
percés par des objets placés sur ou contre ceux-ci. Inspectez régulièrement les câbles ainsi que
chacune ses extrémités pour déceler les détériorations. Le moniteur HD doit être installé près
d’une prise murale et le câble d’alimentation doit être accessible.
Ventilation
Les logements et les orifices contenus dans le coffret ont pour but de permettre la ventilation. Pour
un fonctionnent fiable du moniteur HD et pour le protéger des surchauffes, ses orifices ne doivent
être ni obstrués ni couverts.
• Ne pas obstruer les orifices en installant le moniteur LCD sur un lit, un canapé, une
couverture ou autres surfaces similaires.
• Ne pas installer le moniteur LCD dans un meuble fermé tel qu’une bibliothèque ou une
étagère à moins qu’il ait sa propre ventilation et que les consignes du fabricant aient été
respectées.
Autres avertissements
• Evitez l’exposition directe du moniteur HD aux rayons du soleil ou à des températures
élevées.
• Evitez l’exposition directe du moniteur HD à l’humidité excessive.
• Ne pas tenter de réparer vous-même. Votre garantie ne couvre pas les réparations ou
tentatives de réparation réalisées par des personnes non autorisées par Westinghouse
Digital.
• Si vous n’envisagez pas d’utiliser votre moniteur HD pendant un certain temps, débranchez
le moniteur HD et retirer les piles de la télécommande.
Précautions
• Eviter de toucher l’écran. Les huiles corporelles sont difficiles à retirer.
• Ne jamais retirer le panneau arrière. Le moniteur HD contient des composants à haute
tension. Vous pouvez vous blesser sérieusement si vous les touchez.
• Evitez l’exposition directe du moniteur HD aux rayons du soleil ou à une autre source de
chaleur. Diriger votre moniteur HD de façon à éviter les rayons du soleil afin de réduire les
reflets.
• Manipuler toujours votre moniteur HD avec précaution lorsque vous le déplacez.
• Installer votre moniteur HD dans un endroit bien aéré ; n’installez pas le moniteur HD dans
un compartiment hermétique. Ne rien placer sur votre moniteur HD qui empêche la
dissipation thermique.
• Assurez-vous que le moniteur HD est installé dans un endroit propre et sans humidité.
• Ne pas placer d’objets lourds sur le moniteur LCD, les câbles audio / vidéo ou sur le cordon
d’alimentation.
• Si le moniteur LCD dégage de la fumée, une odeur étrange ou s’il émet un bruit anormal,
éteignez-le immédiatement et contactez le Centre de Services de Westinghouse.
• AVERTISSEMENT – Afin de réduire les risques d’incendies ou de chocs électriques,
ne pas exposer le moniteur HD à la pluie ou à l’humidité ! Evitez que le moniteur HD
soit sujet à des égouttures ou des éclaboussures et que des récipients contenant des
liquides, tels que des vases soit placés près de celui-ci
2
Français
Page 27

1) Lisez ces consignes.
2) Gardez ces consignes.
3) Prenez en compte tous les avertissements.
4) Suivez toutes les consignes.
5) Ne pas utiliser le moniteur HD près de l’eau.
6) Nettoyer uniquement avec un chiffon sec.
7) Ne pas obstruer les orifices de ventilation. Procéder à l’installation en respectant les
consignes du fabricant.
8) Ne pas installer près de sources de chaleur telles que radiateurs, registres d’alimentation en
air chaud, poêles ou autres appareils (y compris les amplificateurs) produisant de la chaleur.
9) Ne pas tenter de contourner les mesures de sécurité de la fiche polarisée ou de mise à la
terre. Une fiche polarisée possède deux broches dont l’une est plus large que l’autre. Une
fiche de mise à la terre possède deux broches et une troisième pour la mise à la terre. Si la
fiche fournie ne peut être branchée dans la prise murale, consultez un électricien qui
remplacera la prise désuète
10) Protéger le cordon d’alimentation de sorte que celui-ci ne puisse être ni piétiné ni percé
surtout au niveau des extrémités.
11) Utiliser uniquement les accessoires recommandés par le fabricant.
12) Utiliser le moniteur HD uniquement le chariot, le meuble, le trépied, le support ou la table
recommandés par le fabricant ou vendus avec celui-ci. Dans le cas où un chariot est utilisé,
faire bien attention en déplaçant le chariot afin d’éviter toute blessure ou tout dommage.
13) Débrancher le moniteur HD pendant les orages électriques ou lorsque celui-ci n’est pas
utilisé pendant une période prolongée.
14) Pour tout service après-vente, consulter un technicien de service agrée. Le service après-
vente est nécessaire lorsque le moniteur HD a été endommagé et cela qu’il s’agisse de
l’endommagement du cordon ou de la prise d’alimentation, que l’appareil ait été éclaboussé
d’eau ou que des objets soient tombés sur le moniteur HD, qu’il ait été exposé à la pluie ou
l’humidité, qu’il ne fonctionne pas normalement ou que la TV soit tombée par terre.
Mesures de sécurité relatives à l’installation de l’antenne
Mise à la terre de l’antenne extérieure
Si une antenne extérieure ou un système de câblage est connecté au moniteur HD de manière à offrir une
protection contre les surtensions et les charges électrostatiques. Vous trouverez à la section 810 du Code
National de l’électricité, ANSI/NFPA nº 70, des informations concernant la mise à la terre appropriée du fil
d’entrée d’un dispositif de décharge pour antenne, la taille des conducteurs de mise la terre, l’emplacement
du dispositif de décharge pour antenne, la connexion des électrodes de mise à la terre et les besoins pour
les électrodes de mise à la terre.
Foudre
Pour bien protéger le moniteur HD au cours d’un orage ou lorsque celui-ci n’est pas utilisé pendant des
périodes prolongées, débranchez-le de la prise murale et déconnectez l’antenne ou le système de câblage.
Vous protégerez ainsi le moniteur HD contre les dommages causés par la foudre ou les sur tensions
temporaires. Ne pas déconnecter l’antenne ou le cordon d’alimentation au cours d’un orage – vous pouvez
être atteint par la foudre alors que vous tenez le cordon et donc être sérieusement blessé. Mettez votre
MONITEUR HD hors tension et attendez que le temps s’améliore.
Lignes électriques
Une antenne extérieure ne devrait pas être située à proximité de lignes électriques aériennes ou autres
circuits électriques. Lorsque vous installez une antenne extérieure, prenez grand soin de ne pas toucher les
lignes ou les circuits électriques.
Français
3
Page 28

Consignes de sécurité
ATTENTION : La prise de courant devrait être située près du moniteur LCD et devrait être facile d’accès.
Utiliser toujours le cordon d’alimentation CA approprié, c’est-à-dire celui conforme à votre pays. Quelques
exemples sont énumérés ci-dessous :
USA..................UL Suisse SEV
Canada.............CSA Grande Bretagne BASE/BS
Allemagne…….VDE Japon Loi concernant le contrôle de l’application électrique
REMARQUE IMPORTANTE CONCERNANT LA SELECTION DU CORDON D’ALIMENTATION
Le cordon d’alimentation spécifique à ce moniteur LCD est joint ; il a été sélectionné en fonction du pays de
destination et il doit être utilisé afin d’éviter des chocs électriques. Suivez les directives suivantes dans le cas
où le cordon d’origine doit être remplacé ou si celui-ci n’est pas joint. La prise femelle du cordon doit
répondre aux exigences IEC-60320 et devrait ressembler à la figure A1 ci-dessous :
Figure A1 Figure A2
Français
Pour les Etats-Unis et le Canada
Aux Etats-Unis et au Canada, la prise male est de style NEMA-15 (Figure A2), elle est homologuée UL et est
étiqueté CSA. Pour les moniteurs LCD installés sur un bureau ou une table, les cordons de type SVT ou SJT
peuvent être utilisés. Pour les moniteurs LCD installés sur le sol, seuls les cordons de type SJT peuvent être
utilisés. Le cordon doit être sélectionné en fonction du courant électrique pour le moniteur LCD. Veuillez
consulter le tableau ci-dessous pour le critère de sélection concernant les cordons utilisés aux Etats-Unis et
au Canada.
Type de
cordon
SJT
SVT
Rapport de conformité FCC
Cet appareil a été testé et est conforme aux limites relatives à un équipement numérique de Classe B, selon
les caractéristiques énoncées dans la partie 15 des Règlements de la FCC. Ces limites ont été conçues afin
d’assurer la protection raisonnable contre les interférences dans une installation résidentielle. Cet appareil
produit, utilise et peut émettre de l’énergie de fréquence par radio ; il peut provoquer des interférences
néfastes aux communications radio s’il n’est pas installé et utilisé selon les consignes. Cependant, il n’y a
pas de garantie que l’interférence ne se produira pas dans une installation particulière. Si cet appareil
provoque des interférences néfastes à la réception de la radio ou de la télévision, ce qui peut être déterminé
en allumant et éteignant l’appareil, l’utilisateur est encouragé à essayer de corriger les interférences par une
ou plusieurs mesures suivantes :
• Réorientez ou déplacez l’antenne de réception.
• Augmenter la distance entre le moniteur LCD et l’antenne.
• Branchez l’appareil à une prise appartenant à un circuit différent de celui où l’antenne est branchée.
• Consulter le Centre de services de Westinghouse ou un technicien spécialisé en radio/moniteur pour
de l’aide.
Avertissement FFC
Pour s’assurer de la conformité FFC continue, l’utilisateur doit utiliser un cordon d’alimentation avec
mise à la terre et le câble d’interface vidéo blindé avec des noyaux de ferrite qui est fourni. Si un
câble BNC est à utiliser, utilisez uniquement le câble (5) BNC blindé. De plus, tout changement ou
modification non expressément approuvé par Westinghouse Digital annulera le droit de l’utilisateur à
l’emploi de l’équipement en question.
Taille des conducteurs dans
le cordon
18 AWG
16 AWG
14 AWG
18 AWG
17 AWG
Intensité maximum de l’unité
10 Ampères
12 Ampères
12 Ampères
10 Ampères
12 Ampères
4
Page 29

Nettoyage du Moniteur Vidéo HD
• ASSUREZ-VOUS QUE LE MONITEUR HD EST ETEINT
• NE PAS VAPORISER OU VERSER DE LIQUIDE DIRECTEMENT SUR L’ECRAN OU LE
COFFRET
Pour nettoyer l’écran :
1. Essuyer l’écran avec un chiffon propre, doux et non pelucheux. Celui-ci retire la poussière
et autres particules.
2. S’il n’est toujours pas propre, appliquez une petite quantité de nettoyant pour vitre sans
ammoniaque et sans alcool sur un chiffon propre, doux et non pelucheux et essuyer
l’écran.
Pour nettoyer le coffret :
1. Utiliser un chiffon propre et doux.
2. S’il n’est toujours pas propre, appliquez une petite quantité de nettoyant détergent non
abrasif, sans alcool et sans ammoniaque sur un chiffon propre, doux et non pelucheux et
essuyer l’écran.
Avis de dégagement de responsabilité
Westinghouse Digital ne recommande l’utilisation d’aucun nettoyant à base d’ammoniaque ou
d’alcool sur l’écran ou le coffret du moniteur HD. Certains nettoyants chimiques sont reconnus
pour endommager l’écran et/ou le coffret du moniteur HD. Westinghouse Digital n’est pas
responsable des dommages dus à l’utilisation de ces nettoyants.
Français
5
Page 30

INSTALLATION
Contenu de l’emballage
L’emballage de votre produit contient :
• Moniteur Vidéo HD Westinghouse LVM-42w2 (42 pouces) / LVM-47w1 (47 pouces)
• Télécommande (piles inclues)
• Cordon d’alimentation
• Guide de connexion rapide
• Manuel d’utilisateur
• Carte de Garantie
Français
6
Page 31

Façade du Moniteur Vidéo HD
Utilisez les boutons situés sur le côté droit du moniteur LCD ou dans la télécommande
pour afficher l’OSD (On Screen Display). Les commandes OSD sont définies dans
« Fonctions OSD » page 12.
Français
Haut-parleurs
Vue arrière du Moniteur Vidéo HD
Récepteur “IR” et
indicateur LED
7
Page 32

Vue latérale du Moniteur Vidéo HD
Français
1. Menu Met le Menu OSD sous / hors tension.
Augmente / Diminue le volume ou sert à
2. Volume + / -
3. Sélection OSD q/p
4. Input
5. Touche
d’alimentation
régler une commande déterminée du
menu OSD
Sert à sélectionner une commande du
Menu OSD
Sélectionner Entrée Vidéo Active ou
choisir une option dans le MENU OSD
Mise sous / hors tension
8
Page 33

5
Vue latérale du Moniteur Vidéo HD
1. DVI2 (Supporte jusqu’à 1080p Full HD)
Grâce à un câble DVI 15 broches, connectez à un ordinateur, un récepteur
1
2
3
6
8
9
10
11
12
13
14
15
16
17
numérique HD pour câble / satellite, un boîtier « Set-Top-Box » HD, un
lecteur DVD ou autre appareil possédant une sortie DVI.
2. Entrée Audio DVI2 (Droite / Gauche)
Connectez à une source audio externe DVI à ce jack
3. Entrée HDMI
Connectez à un appareil vidéo externe tel qu’un récepteur numérique HD
pour câble / satellite, un boitier « Set-Top-Box » HD ou un lecteur DVD.
4. Entrée Audio HDMI (Droite / Gauche)
Connectez à l’entrée audio si vous utilisez un adaptateur DVI – HDMI.
5. Entrée S-Vidéo
Connectez à un appareil vidéo externe tel qu’un lecteur VHS
6. Entrée AV Vidéo
Connectez à un appareil vidéo externe tel qu’un lecteur VHS ou une console
de jeux vidéo.
7. Entrée Audio AV & S-Vidéo (Droite / Gauche)
Connectez à une source audio externe au jack; (Audio (D/G)). Cette
connexion accepte les entrées S-Vidéo ou AV.
8. Sortie Audio (Droite / Gauche)
Connectez cette sortie à un amplificateur audio stéréo externe, récepteur ou
un système d’ambiophonie.
9. VGA Audio IN
En utilisant le câble fourni, connectez à la sortie Audio (Vert) depuis un
ordinateur.
10. VGA
En utilisant un câble VGA 15 broches, connectez à un ordinateur ou autre
appareil possédant une sortie VGA.
11. Entrée Audio DVI1 (Droite / Gauche)
Connectez à une source audio externe DVI à ce jack
12. DVI1 (Supporte jusqu’à 1080p Full HD)
Grâce à un câble DVI 20 broches, connectez à un ordinateur, un récepteur
numérique HD pour câble / satellite, un boîtier « Set-Top-Box » HD, un
lecteur DVD ou autre appareil possédant une sortie DVI.
13. Entrée YPbPr1 (HD)
Connectez à un appareil vidéo externe tel qu’un lecteur DVD ou une console
de jeux vidéo possédant une sortie en composantes à ces connecteurs
jacks.
14. Entrée YPbPr2 (HD)
Connectez à un appareil vidéo externe tel qu’un lecteur DVD ou une console
de jeux vidéo possédant une sortie en composantes à ces connecteurs
jacks.
15. Entrée Audio 1 YPbPr1 (Gauche / Droite)
Connectez une source audio externe à ce connecteur jack
16. Entrée Audio 2 YPbPr2 (Gauche / Droite)
Connectez une source audio externe à ce connecteur jack.
17. Entrée en c.a. (Alimentation)
Reliez à l’aide du cordon d’alimentation l’entrée en c.a. et la source
d’alimentation.
Français
9
Page 34

Télécommande
Le signal de la télécommande a une portée effective de plus de 10 pieds (3 mètres).
1. ALIMENTATION :
Marche / Arrêt
2. INPUT
Sélectionne la source d’entrée
3. SELECTION DU SOUS-MENU OSD
Sélectionne directement l’option du sous-
menu OSD
4. MENU OSD PRECEDENT
Sélectionne le menu OSD précédent
5. MENU / EXIT
Affiche / efface le Menu OSD.
6. CADRAGE
Sélectionne le format d’Affichage Vidéo en
mode « STANDARD » ou
« REMPLISSAGE »
7. T / S / W / X
Touches du MENU OSD
8. Enter
Exécute une commande
9. SOURDINE
Coupe / remet le son
10. INFO
Affiche l’information relative à la chaine.
11. PIP
Incrustation / désincrustation d’image.
12. FREEZE
Fige l’écran principal
13. VOL - / +
Réglage du volume
14. SOURCE T / S
Sélection vers le Haut / Bas
15. YPbPr
Sélectionnez YPbPr1 / YPbPr2.
16. VGA
Sélectionnez l’entrée VGA
17. DVI
Sélectionnez l’entrée DVI1 / DVI2 / HDMI
18. S-Vidéo
Sélectionnez l’entrée S-Vidéo
19. AV
Sélectionner l’entrée AV
Français
10
Page 35

Installation
1. Installation des piles de la télécommande
1) Retirez le couvercle du compartiment à piles
2) Insérez les piles en respectant les signes (+) et (-) qui se trouvent dans le
compartiment à piles.
Français
3) Remettre le couvercle du compartiment piles
ATTENTION :
z Utilisez uniquement des piles AAA.
z Ne pas mélanger des piles neuves avec des piles usagées. Cela pourrait provoquer une
oxydation ou une fuite, ce qui pourrait présenter un risque d’incendie ou de blessures.
z Insérer les piles en respectant les signes (+) et (-). Insertion incorrecte des piles
peut provoquer une oxydation ou une fuite, ce qui pourrait présenter un risque d'incendie
ou de blessures.
z Débarrassez-vous des piles usagées selon la législation locale en vigueur.
z Gardez les piles hors de la portée des enfants et des animaux domestiques.
z Si la télécommande ne sera pas utilisée pendant une période prolongée, retirez les piles
de celle-ci.
11
Page 36

2. Connexion des câbles audio et vidéo à partir d’un PC
Connectez un ou tous les câbles suivants au panneau arrière du moniteur HD
IMPORTANT : Avant de commencer, assurez-vous que tous les appareils sont
hors tension.
CONNEXION VGA : Reliez un câble analogue VGA du port de sortie VGA de votre
PC au port d’entrée VGA du moniteur HD.
CONNEXION DVI1 / DVI2 : Reliez un câble numérique DVI au port de sortie DVI de
votre PC à l’un des ports DVI – HDCP de votre moniteur HD.
CONNEXION AUDIO : Reliez un mini câble stéréo du port AUDIO-OUT de votre PC
au port AUDIO-IN sur le moniteur HD.
3. Connexion des câbles AV, Composants, S-Vidéo aux appareils vidéo
Connectez les câbles Audio / Vidéo des appareils compatibles au panneau arrière du
moniteur HD.
Français
12
Page 37

4. Connexion des câbles d’alimentation
Branchez le cordon d’alimentation au moniteur HD et ensuite à une prise CA avec mise
à la terre.
5. Mise sous tension
Appuyez sur la touche de mise sous tension sur le côté droit du moniteur HD ou
appuyez sur la touche (rouge) de mise sous tension de la télécommande.
Français
6. Sélectionnez la source d'entrée pour le moniteur HD en utilisant le
menu OSD ou la télécommande
7. Si un PC est connecté (VGA / DVI1 / DVI2) :
Pour une meilleure qualité de l’image, la résolution du moniteur HD doit être configurée
sur 1920 x 1080 à 60 Hz (consultez la guide d’utilisateur de la carte graphique pour
régler la résolution).
13
Page 38

Fonctions OSD
La configuration des fonctions OSD du moniteur HD est possible soit grâce à la
télécommande soit en utilisant les touches de contrôle situées sur le côté droit du moniteur
HD.
Pour afficher le menu principal OSD, appuyez sur la touche « Menu » se trouvant dans le
bloc de touches avant sur le côté droit du moniteur HD ou sur la touche « Menu » de la
télécommande. Utilisez les touches 3/4 pour sélectionner le sous-menu souhaité.
Menu Principal
Pour sélectionner un sous-menu, appuyer sur ▲/▼ sur le côté droit du moniteur HD ou
sur les touches ▲/▼ de la télécommande. Vous pouvez également sélectionner
directement un sous-menu en utilisant les touches numériques de la télécommande.
Français
14
Page 39

PARAMETRES DE LA QUALITE D’IMAGE :
Français
Nom de la
fonction
Luminosité Réglage de la luminosité
Contraste Réglage du contraste
Saturation Réglage de la saturation
Teinte Réglage de la teinte
Température de la
couleur
Netteté
Format Affichage en mode "STANDARD" / "REMPLISSAGE"
Rétro-éclairage Réglage du rétro-éclairage
Réinitialisation Réinitialisation des paramètres vidéo
Réglage de la température de la couleur (Chaude, Neutre,
Froide)
Réglage de la netteté
(La netteté ne peut être réglée en mode PC)
Fonction
15
Page 40

PARAMETRES DU PC :
Français
Nom de la
fonction
Réglage
automatique
Horloge Réglage de l’horloge
Phase Réglage de la phase
Position Ajuste la position horizontale et verticale de l’image
NOTE : Le menu GRAPHIQUE est uniquement disponible lorsque la source VGA est
sélectionnée.
Ajuste automatiquement la phase horizontale de l’image.
Fonction
16
Page 41

CONFIGURATION AUDIO :
Français
Nom de la
fonction
Volume Réglage du volume
Grave Réglage des graves
Aigu Réglage des aigus
Balance Réglage de la balance
Sourdine Coupe ou remet le son
Haut-parleur Sélection de haut-parleurs internes ou externes
Réinitialisation Réinitialise les paramètres audio
Fonction
17
Page 42

A
INCRUSTATION D’IMAGE :
Nom de la
fonction
ffichage du
mode
Source principale Sélection des sources de l’écran principal
Source
d’incrustation
d’image
Swap Permutation de la source de l’écran principal et l'écran secondaire
Position de
l’image incrustée
Taille de l’image
incrustée
Audio depuis
Tableau 1 :
SUB
Principal
VGA
DVI1
AV
S-Vidéo
YPbPr1
YPbPr2
DVI2
HDMI
VGA DVI1 AV S-Vidéo YPbPr1 YPbPr2 DVI2 HDMI
X O O O X X O O
O X O O O O O O
O O X X O O O O
O O X X O O O O
X O O O X X O O
X O O O X X O O
O O O O O O X X
O O O O O O X X
OFF --> PIP --> PBP --> POP
VGA --> DVI1--> DVI2 --> AV --> S-Vidéo--> YPbPr1 -->
YPbPr2 --> HDMI
Sélection des sources de l’écran secondaire
Veuillez consulter les caractéristiques PIP / PBP / POP dans le
tableau 1
Réglage de la position d’affiche horizontal / vertical de l’écran
secondaire
Réglage de la taille d’affichage de l’écran secondaire
(Petit Æ Moyen Æ Grand)
Sélection des sources audio de l’écran principal ou de l’écran
secondaire
Fonction
Français
18
Page 43

CONFIGURATION GENERALE :
Français
Nom de la
fonction
Position du menu Ajustement de la position horizontale / verticale de l’OSD
Délai d’attente du
menu
Langues Sélection de la langue de l’OSD
Temporisateur de
veille
Transparence Configuration du niveau de transparence de l’OSD
DPMS Marche / Arrêt du DPMS
DEL Marche ou Arrêt du DEL
Source
automatique
Info relative au
système
Restauration des
paramètres d’usine
Configuration du temps où l’OSD disparaît automatiquement
Configuration du temporisateur de veille afin que le moniteur
se mette automatiquement hors tension
Sélection marche / arrêt de la fonction source automatique
Affichage de la source, du type et du signal d’entrée
Restauration des paramètres par défaut
Fonction
19
Page 44

Caractéristiques
Panneau Type
Couleur Revêtement anti-reflets + anti-éblouissement
Angles de vue 176° (H) / 176° (V)
Signal d’entrée Vidéo / Audio Analogue RGB x 1 (75 ohms, 0,7 Vp-p) / Mini-Stéréo x 1
H / V séparé (TTL) pour PC
FH : 30-80 KHz, FV : 50-75 Hz
Signal de sortie RCA (G / D) Stéréo x 1
Compatibilité HDTV 480i, 480P, 720P, 1080i, 1080p
Compatible PC Supporte 1920 x 1080 @ 60 Hz
(VGA, DVI1, & DVI2) 1280 x 1024 @ 60, 75 Hz
1280 x 768 @ 60, 75 Hz
1280 x 768 @ 60, 75 Hz
800 x 600 @ 60, 75 Hz
640 x 480 @ 60, 75 Hz
720 x 400 @ 70 Hz
Sortie Haut-parleurs 10 W (x 2 Voies) / Caisson de basse x 1 (10 W)
Alimentation Voltage 100-240 V c.a., 50/60 Hz (commutateur automatique), 3.5 A (MAX)
Conditions de fonctionnement Température 0° C à +35° C (32° F à + +95° F)
Humidité 10% à 90% (pas de condensation)
Altitude
Conditions de stockage Température -20° C à +60° C (-4° F à + 140° F)
Humidité 10% à 90% (pas de condensation)
Altitude
Dimensions Physique
Poids Net / Brut
LVM-42w2 (42 pouces) (écran de 42” (106 cm) de diagonale)
LVM-47w1 (47 pouces) (écran de 47.0” (119 cm) de diagonale)
Ecran TFT (Thin Film Transistor), LCD à Matrice Active WXGA, résolution:
1920 x 1080 pixels
DVI-D x 2 (support HDCP) / RCA (G / D) x 2
DVI1 & DVI2 jusqu’à 1080 p
Vidéo en composantes (YPbPR) x 2 / RCA (G / D) Stéréo x 2
YPbPR 1 & 2 jusqu’à 720p / 1080i / 1080p
Vidéo composite x 1 / S-Vidéo x 1 / RCA (G / D) stéréo x 1
Jusqu’à 480i
HDMI x 1 / RCA (G / D) stéréo x 1
Jusqu’à 720p / 1080i / 1080p
Jusqu’à 3 000 m
Jusqu’à 12 000 m
LVM-42w2 (42 pouces) 1 050 mm (L) x 719 mm (H) x 226 mm (P)
41.4” (L) x 28.3” (H) x 8.9” (P)
LVM-47w1 (47 pouces) 1 173.5 mm (L) x 793 mm (H) x 248 mm (P)
46.2” (L) x 31.2” (H) x 9.8” (P)
LVM-42w2 (42 pouces) 57.3 lb (26 kg) / 73.8 lb (33.5 kg)
LVM-47w1 (47 pouces) 78.9 lb (35.8 kg) / 94.4 lb (42.8 kg)
, (9,842.520 feet)
, ( 39,370.079 feet)
Français
Homologué FCC-B, UL / c-UL
Alimentation
Alimentation Hors tension < 1 W
Alimentation
Préréglage du mode synchronisation (Préréglé afin de réduire les espaces vides : 1920 x 1080 à 60 Hz)
Avertissement : Le réglage de la carte graphique de votre ordinateur ne doit pas dépasser les fréquences de rafraîchissement ; si les fréquences
de rafraîchissement dépassent les spécifications, OSD fera apparaître le message « En dehors de la plage » et le LCD se mettra sur le mode
économie d’énergie.
Note : Les caractéristiques du produit sont sujettes à des changements sans avis préalable.
Sous tension
(Normal)
Mode économie
d’énergie
LVM-42w2 (42 pouces) 240 W (DEL blanc)
LVM-47w1 (47 pouces) 290 W (DEL blanc)
< 3 W (DEL blanc)
20
Page 45

Dépannage
Pas d’alimentation
• Assurez-vous que l’appareil est sous tension (Voyant LED blanc)
• Assurez-vous que le cordon d’alimentation CA est branché correctement à la
prise de courant.
• Branchez un autre appareil électrique (une radio par exemple) à la prise de
courant afin de vérifier que la prise fournit le voltage approprié.
Problèmes d’interconnexion AUDIO
• Souvenez-vous que S-Vidéo et Composite (AV) partagent la même source
audio.
Appareil sous tension mais pas d’image
• Assurez-vous que le câble vidéo connecté au moniteur HD est fermement
branché au port de sortie vidéo à l’arrière de votre ordinateur. Si l’autre
extrémité du câble vidéo n’est pas branchée correctement au moniteur HD, fixezla fermement à celui-ci.
• Réglez la luminosité et le contraste.
• Si vous utilisez un ordinateur Macintosh antérieur au G3, vous avez besoin d’un
adaptateur Macintosh.
• Vérifiez la configuration.
Couleurs erronées ou anormales
• Si des couleurs (rouge, vert ou bleu) manquent, vérifiez que le câble vidéo est
correctement branché. Si le raccord de câble possède des broches desserrées
ou cassées, cela peut provoquer une mauvaise connexion.
• Connectez le moniteur HD à un autre ordinateur.
Les touches de la télécommande ne fonctionnent pas
• Appuyer sur une seule touche à la fois.
Pas de son
• Vérifiez la connexion audio.
• Appuyez sur la touche MUTE (sourdine) de la télécommande de sorte que
MUTE disparaisse de l’écran.
• Vérifiez la configuration audio. Le moniteur HD est peut-être réglé sur le
minimum.
• Appuyez sur la touche Volume + de la télécommande.
• Assurez-vous que les haut-parleurs sont configurés sur « internes »
La télécommande ne fonctionne pas
• Assurez-vous que les piles sont correctement installées.
• Remplacez les piles par des nouvelles si cela est nécessaire.
Le code de télécommande ne figure pas dans le guide des télécommandes
« universelles »
• Achetez un « guide » des télécommandes ou visitez notre site web :
Français
21
Page 46

www.westinghousedigital.com pour consulter l’information mise à jour concernant
les télécommandes
Où puis-je trouver une aide supplémentaire ?
• Visiter notre site web : www.westinghousedigital.com
• Contactez le Service clientèle de Westinghouse Digital au (866) 287-5555 ou
écrivez nous à service@westinghousedigital.com
Français
22
Page 47

Contenido
Importantes Instrucciones de Seguridad del Producto .............…….2
Reglas de Seguridad ………….……………………………………….4
Limpieza del Monitor de Video de Alta Definición (HD)…….…….... 5
INSTALACIÓN
Contenido del Paquete………………………….………………………. 6
Aspecto Delantero del Monitor de Video de Alta Definición (HD)…. 7
Aspecto Posterior del Monitor de Video de Alta Definición (HD……. 7
Aspecto lateral del Monitor de Video de Alta Definición (HD)…………
8
Control Remoto…………………..…………………………..………… 10
Instalación………….…………………………………………………….11
Español
Funciones del Menú OSD (Menú de Pantalla)
PARÁMETROS DE IMAGEN: Brillo / Contraste / Saturación / Matiz /
Temperatura de Color / Nitidez / Relación de
aspecto / Iluminación Posterior /
Reestablecer.. .15
PARÁMETROS DEL PC:
AJUSTE DE AUDIO:
Parlantes / Reestablecer…...................................................….….…..17
Volumen / Bajos / Agudos / Balance / Silencio /
IMAGEN-SOBRE-IMAGEN:
Fuente de Imagen-Sobre-Imagen (PIP) / Cambio / Posición Imagen-Sobre-Imagen
(PIP) / Tamaño Imagen-Sobre-Imagen (PIP) / Audio
Desde
…........................................................................................ 18
Ajuste Automático / Reloj / Fase / Posición…16
Modo de Visualización / Fuente Principal /
AJUSTES GENERALES: Posición del Menú / Temporizador de Menú / Idioma
/ Desconexión Temporizada / Transparencia / Sistema de Control de Energía del
Monitor (DPMS) / Diodo Emisor de Luz (LED) / Información del Sistema /
Reestablecer Configuración de Fábrica………...….….…...................... 19
Especificaciones
Especificaciones ……………………………………………………….. 20
Solución de Problemas
Solución de Problemas ………..………………………………………..21
Page 48

Español
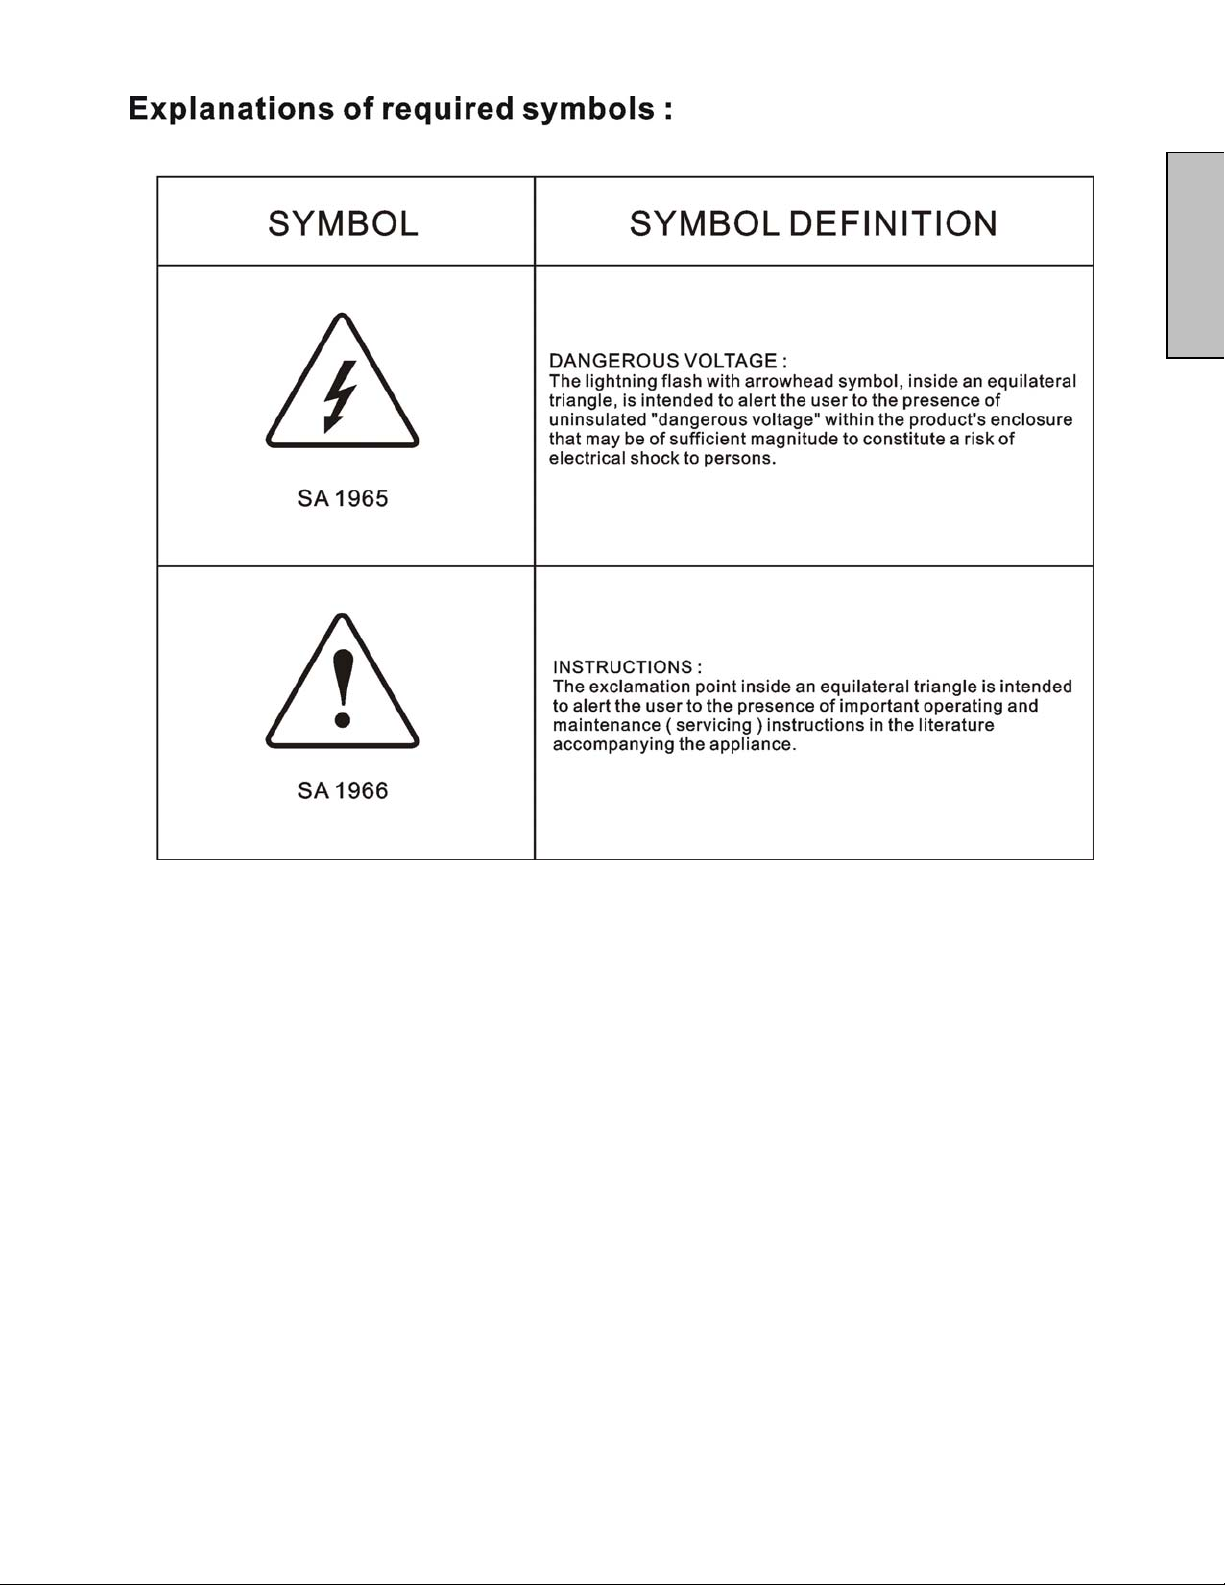
Explicaciones de símbolos requeridos:
SÍMBOLO DEFINICIÓN DEL SÍMBOLO
SA 1965 VOLTAJE PELIGROSO:
El símbolo de un rayo con una punta de flecha dentro
de un triángulo equilátero, tiene como propósito alertar
al usuario de la presencia de “voltaje peligroso” no
aislado dentro del gabinete del producto que puede ser
de magnitud suficiente para transformarse en un riesgo
de shock eléctrico para las personas
SA 1966 INSTRUCCIONES:
El signo de exclamación dentro de un triángulo
equilátero tiene como propósito alertar al usuario de la
presencia de instrucciones importantes de operación y
mantención (de servicio) en la información escrita que
acompaña a éste artefacto
1
Page 49

Importantes Instrucciones de Seguridad del Producto
Siga y obedezca todos los avisos e instruc ciones marcados en el Monitor de Video de Alta Definición (HD). Para su
seguridad, por favor lea todas las instrucciones de seguridad y operaci ón antes de operar el Monitor de Alta Definición
(HD). Guarde este manual de usuario para poder referirse a él en el futuro.
Sobrecargas de electricidad
No sobrecargue los enchufes de pared, los cables de extensión, o los enchufes múltiples. Esto puede producir un
incendio o un shock electrónico.
Protección de Cables de Alimentación Eléctrica
Los cables de suministro de electricidad deben disponerse de manera que no sea probable que se les pise o que
objetos que se coloquen sobre ellos o cerca de ellos los pellizquen. Inspeccione periódicamente los cables y los
extremos de los cables para asegurarse de que no están dañados. El Monitor de Alta Definició n debe instalarse cerca
de un enchufe de pared y el enchufe del cable de alimentación de be estar fácilmente accesible.
Ventilación
Las ranuras y las aberturas del gabinete vienen provistas para propósitos de ventilación. Para asegurarse de la
operación adecuada del Monitor de Alta Definición y para protegerlo de calentamiento excesivo, estas aberturas no
deben obstruírse ni cubrirse.
• No obstruya las aberturas colocando el Monitor de Alta Defi nición en una cama, un sofá, una alfombra ni
ninguna otra superficie parecida.
• No coloque el Monitor de Alta Definición en una instalació n incorporada tal como un a estantería o una repis a a
menos que se provea la ventilación adecuada y se hayan seguido estrictamente las instrucciones del
fabricante.
Otros Avisos
• Evite exponer el Monitor de Alta Definición a la luz del sol d irecta o a temperaturas altas.
• Evite exponer el Monitor de Alta Definición a la hume da d, tanto circundante como ambiental.
• No intente efectuar reparaciones usted mism o. Su garantía no cubre las reparaciones llevadas a cabo o
intentadas por alguien que no esté autorizado por Westinghouse Digital.
• Si no va a utilizar su Monitor de Alta Definición durante un largo periodo de tiempo, desenchufe el Monitor de
Alta Definición y remueva las pilas del control remoto
Precauciones
• Evite tocar la pantalla. Es difícil quitar los aceites de la pi el.
• Nunca quite la cubierta posterior. Su Monitor de pantalla de cristal líquido contiene piezas de alto voltaje.
Usted puede sufrir serias lesiones si las toca.
• Evite exponer su Monitor de Alta Definición a la luz solar directa o a cualquier otra fuente de calor. Oriente su
Monitor de Alta Definición fuera del alcance de la luz solar directa para reducir los reflejos.
• Siempre trate su pantalla de Alta Definición con cui dado cuando la mueva.
• Coloque su Monitor de Alta Definición en un área bien ventilada; no coloque el Monitor de Alta Definición en
compartimientos con poco aire. No coloque nada que evite la disipación del calor encima de su Monitor de Alta
Definición.
• Asegúrese de que el área alrededor del Monitor de Alta Definición esté limpia y libre de humedad.
• No ponga objetos pesados en el Monitor de A lta Definición, los cables de video, o el cable de electricidad.
• Si el Monitor de Alta Definición emite humo, ruido anormal, u olor extraño, apáguelo inmediatamente y póngase
en contacto con el Centro de Servicio de Westinghouse.
• ADVERTENCIA – ¡Para Reducir El Riesgo De Incendio O De Shock Eléctrico, No Exponga El Monitor De
Alta Definición A La Lluvia O A La Humedad! El Monitor de Alta Definición no debe exponerse a goteos
o salpicaduras, y no deben ponerse sobre el Monitor objetos que estén llenos de líquido, tales como los
jarros
.
Español
2
Page 50

1) Lea éstas instrucciones.
2) Guarde éstas instrucciones.
3) Obedezca todas las Advertencias.
4) Siga las instrucciones.
5) No use el Monitor de Alta Definición cerca de agua.
6) Limpie sólo con un paño seco.
7) No cubra ninguna de las ranuras provistas para ventilación. Instálelo de acuerdo con las
instrucciones del fabricante.
8) No lo instale cerca de fuentes de calor tales como radiadores, salidas de calefacción,
estufas, u otros aparatos (incluyendo amplificadores) que pro ducen calor.
9) No intente evitar el proposito de seguridad del enchufe polarizado o con toma a tierra. Un
enchufe polarizado tiene dos clavijas con una más ancha que la otra. Un enchufe con toma
de tierra tiene dos clavijas y una tercera que es la toma de tierra. Si el enchufe provisto no
calza en la toma de corriente de la pared, consulte un electricista para que cambie la toma
de corriente obsoleta.
10) Proteja el cable de suministro eléctrico para que no lo pisen o pellizquen especialmente en
los extremos del cable.
11) Use sólo aditamentos/accesorios especificados por el fabricante.
12) Use sólo con el carro, estante, trípode, soporte, o mesa especificados por el fabricante, o
que se vende con el Monitor de Alta Definición. Cuando se usa un carro, tenga cuidado
cuando mueva el carro para evitar lesiones o daño.
13) Desenchufe el Monitor de Alta Definición (HD) durante una tormenta eléctrica o cuando no se
va a utilizar por mucho tiempo.
14) Remita todas las reparaciones a personal de servicio calificado. Se necesita hacer servicio
cuando el Monitor de Alta Definición (HD) se ha dañado de cualquier forma, tal como cuando
se daña el cable de alimentación eléctrica o el enchufe, se ha derramado líquido o algún
objeto ha caído sobre el Monitor de Alta Definición (HD), ha estado expuesto a lluvia o
humedad, no opera en forma normal, o se ha caído el TV.
Medidas de Seguridad de Instalación de la Antena
Toma de Tierra de Antena Exterior
Si se conecta una antena exterior o sistema de cable al Monitor de Alta Definición HD, asegúrese de que la
antena o el sistema de cable está conectado a una toma de tierra para evitar sobrevoltajes y acumulación
de cargas de electricidad estática. El Artículo 810 del Código Nacional de Electricidad, ANS/NFPA 70,
proporciona informaciones sobre toma de tierra apropiada para mástiles y estructuras de soporte, toma de
tierra del cable positivo a una unidad de descarga de antena, conexión a electrodos de tierra, y requisitos
para los electrodos de tierra.
Relámpagos
Para protección adicional del Monitor de Alta Definición (HD) durante una tormenta eléctrica, o cuando se
deja sin utilizar y sin observar durante mucho tiempo, desenchúfelo de la toma de corriente y desconecte la
antena o el sistema de cable. Ésto evitará daños al Monitor de Alta Definición (HD) durante una tormenta
eléctrica y sobrevoltajes. No desconecte la antena durante una tormenta fuerte – algún rayo puede caer
mientras usted tiene el cable, y le puede causar lesiones serias. Apague su Monitor de Alta Definición (HD)
y espere hasta que mejore el clima.
Líneas de Alto Voltaje
Los sistemas de antena exteriores no deben estar ubicados cerca de líneas elevadas de alto voltaje u otras
luces o circuitos eléctricos. Cuando se está instalando un sistema de antena exterior, se debe tener
extremo cuidado para tocar estas líneas de alto voltaje o circuitos.
Español
3
Page 51

Reglas de Seguridad
PRECAUCIÓN: El enchufe de suministro d e electricidad debe colocarse cerca del Monitor de Alta Definición y debe
estar fácilmente accesible. Utilice siempre el cable de alimentación apropiado que está certificado para su país
específico. Aquí abajo hay unos ejemplos:
EE.UU...............UL Suiza ............. SEV
Canadá.............CSA Gran Bretaña . BASE/BS
Alemania..........VDE Japón .............. Ley de Control de Aparatos Eléctricos
AVISO IMPORTANTE CON RESPECTO A LA SELECCIÓN DE CABLES DE ELECTRICIDAD
El cable eléctrico específico para este Monitor de A lta Definición viene adjunto y se ha seleccionado de acuerdo con el
país de destino y debe utilizarse para evitar el shock eléc trico. Utilice las reglas siguientes si es necesario reem plazar
los cables originales, o si los cables no vienen adjuntos. El receptáculo hembra de los cables debe cumplir con los
requisitos de IEC-60320 y debe tener el mismo aspecto que la Figur a A1 de abajo:
Figure A1 Figure A2
Español
Para Estados Unidos y Canadá
En Estados Unidos y Canadá, el enchufe macho es de estilo NEMA5-15 (Figura A2), con Certificación UL, y con
Etiqueta de CSA (Commodity Substance Approvals - Materia Prima A probada). Para los Monitores de Alta Definición
que se coloquen en un escritorio o en una mesa pue den util izarse c abl es de tipo SVT o SJT. Para los Monitores de Alta
Definición que se pongan directamente en el suelo pueden utilizars e solamente cables de tipo SJT. L os cables deben
seleccionarse según la categoría de corriente del Monitor de Alta Definición. Por favor consulte la tab la de abajo para
ver el criterio de selección de los cables de electricidad utilizados en Estados Unidos y Canadá.
Tipo de Cable
SJT
SVT
Declaración de Cumplimiento con la FCC
Este equipo se ha probado y cumple co n los límites de un aparato dig ital de Clas e B, de acuerdo co n la parte 15 de las
Reglas de la FCC (Federal Communications Commiss ion - Comisión Federal de Comunicaciones). Estos límites están
diseñados para proporcionar protección raz ona ble co ntra i nterferenc ias d añi nas en l as instalac ion es re side nciales. E ste
equipo genera, usa, y puede radiar energía de radiofrecuencia, y puede causar interferencia adversa a las
comunicaciones de radio si no se instala y se usa de ac uerdo con las instrucciones. Sin embargo, no se garantiza que
no se de interferencia en ninguna instal ació n determin ada. Si este eq uip o ca usa interfe renci a advers a a la r ece pción de
radio o de televisión, lo cual puede determinarse apagando y encendiendo el equipo, se le aconseja al usuario que
intente corregir la interferencia por medio de una o más de las medidas siguientes:
• Reoriente o mueva la antena de recepción.
• Aumente la separación entre el Monitor de pantalla de cristal líquido (LCD) y el receptor.
• Conecte el equipo a un enchufe o a un equipo diferentes del que tiene conectado el receptor.
• Consulte con el Centro de Servicio de Westinghouse o con un técnico de radio/Monitor experimentado para
obtener ayuda.
Advertencia de la FCC
Para asegurarse de que se sigue cumpliendo con la FCC, el usuario debe utilizar un cable de suministro de
electricidad con toma de tierra y el cable de interfase de video reforzado co n núcleos de ferrita fusionados que
se han provisto. Si se utiliza un cable BNC, use solamente un cable reforzado BNC (5). Además, los cambios o
las modificaciones no autorizados y no expresamente aprobados por Westinghouse Digital anularán la
autorización del usuario para operar este aparato.
Tamaño de Conductores del
Cable
18 AWG
16 AWG
14 AWG
18 AWG
17 AWG
Categoría Máxima de Corriente de la
Unidad
10 Amps
12 Amps
12 Amps
10 Amps
12 Amps
4
Page 52

Limpieza del Monitor de Alta Definición
• ASEGÚRESE DE QUE EL Monitor DE ALTA DEFINICIÓN ESTÁ APAGADO
• NUNCA ROCÍE NI VIERTA ALGÚN TIPO DE LÍQUIDO DIRECTAMENTE SOBRE LA
PANTALLA O EL GABINETE
Para limpiar la pantalla:
1. Limpie la pantalla con un paño limpio, suave y sin pelusa. Esto quita el polvo y otras
partículas.
2. Si todavía no está limpia, ponga una pequeña cantidad de limpiador sin amoniaco y sin
base de alcohol en un paño limpio, suave y sin pelusa y limpie la pantalla.
Para limpiar el gabinete:
1. Use un paño suave y seco.
2. Si todavía no está limpia, ponga una pequeña cantidad de detergente no abrasivo, sin
amoniaco, y sin base de alcohol en un paño suave y sin pelusa y limpie la superficie.
Descargo de Responsabilidad
Westinghouse Digital no recomienda el uso de limpiadores con amoniaco o con base de alcohol
para la pantalla o la caja del Monitor de Alta Definición. Se han recibido informes que dicen que
algunos limpiadores químicos han dañado la pantalla y/o la caja del Monitor de Alta Definición.
Westinghouse Digital no se hace responsable por los daños que resulten del uso de limpiadores
con amoniaco o con base de alcohol.
Español
5
Page 53

INSTALACIÓN
Contenido del Paquete
El paquete de su producto incluye:
• Monitor de Video de Alta Definición (HD) Westinghouse LVM-42w2 (42”) /
LVM-47w1 (47”)
• Control Remoto (con pilas)
• Cable de Alimentación
• Guía de Conexión Rápida
• Manual del Usuario
• Tarjeta de garantía
Español
6
Page 54

Aspecto Delantero del Monitor de Video de Alta Definición (HD)
Use los botones del lado derecho del Monitor de Alta Definición (HD) o en el control
remoto para visualizar el Menú de Pantalla (On Screen Display -OSD). Los controles del
OSD se definen en “Funciones del OSD” en la página 12.
Español
Parlantes
indicador de
receptor“IR” y LED
Aspecto Posterior del Monitor de Video de Alta Definición (HD)
7
Page 55
Aspecto Lateral del Monitor de Video de Alta Definición (HD)
Español
1. Menú ENCIENDE/APAGA el Menú OSD
Aumenta/Disminuye el volumen de
2. Volumen + / -
3. Selección /
OSD
4. Fuente de entrada
5. Botón de Encendido Enciende o Apaga ON/OFF
sonido o ajusta un control seleccionado
mientras está en el Menú OSD.
Selecciona un control mientras está en el
Menú OSD.
Selecciona la Entrada de Video Activa o
elige una selección mientras está en el
Menú OSD.
8
Page 56

5
Aspecto Lateral del Monitor de Video de Alta Definición (HD)
1. DVI2 (Soporta hasta 1080p Alta Definición Total)
Usando un cable DVI de 20 clavijas, conecte a una computadora, a un receptor
1
2
3
6
8
9
10
11
12
13
14
15
16
17
de cable/satélite Digital de Alta Definición (HD), Aparato para ser puesto sobre la
TV (Set-Top-Box) de Alta Definición, DVD u otro componente con salida DVI.
2. Entrada de Audio DVI2 (Derecha / Izquierda)
Conecte una fuente de audio DVI externa a éste enchufe.
3. Entrada HDMI
Conecte a una fuente externa de video tal como un receptor de cable/satélite
Digital de Alta Definición (HD), Aparato para ser puesto sobre la TV (Set-TopBox) de Alta Definición, Centro de Media de PC, o lector de DVD.
4. Entrada de Audio HDMI (Derecha / Izquierda)
Conecte una fuente de audio usando un convertidor de DVI-a-HDMI
5. Entrada de S-Video
Conecte a un componente de video externo tal como un lector de VHS.
6. Entrada de Video AV
Conecte a un componente de video externo tal como un lector de VHS o un
sistema de juegos de video.
7. Entrada de Audio AV y S-Video (Derecha / Izquierda)
Conecte una fuente de audio externa a éste enchufe; (Audio (R/L). Ésta conexión
soporta entrada de S-Video o AV.
8. Salida de Audio (Derecha / Izquierda)
Conecte ésta salida a un amplificador, receptor o procesador de sonido de audio
estéreo externo.
9. Entrada de Audio (Audio IN) VGA
Usando el cable proporcionado, conecte a la Salida de Audio (Audio out - Verde)
desde una computadora.
10. VGA
Usando un cable VGA de 15 clavijas, conecte a una computadora o a otro
componente con salida VGA.
11. Entrada de Audio DVI1 (Derecha / Izquierda)
Conecte una fuente de audio externa DVI a éste enchufe.
12. DVI1 (Soporta hasta 1080p Alta Definición Total)
Usando un cable DVI de 20 clavijas, conecte a una computadora, un receptor de
cable/satélite Digital de Alta Definición (HD), Aparato para ser puesto sobre la TV
(Set-Top-Box) de Alta Definición, DVD, u otro componente con salida DVI.
13. Entrada YPbPr1 (Alta Definición-HD)
Conecte a éstos enchufes, un componente de video externo tal como DVD o
sistema de juegos de video con salida de componente.
14. Entrada YPbPr2 (Alta definición-HD)
Conecte a éstos enchufes, un componente de video externo tal como DVD o
sistema de juegos de video con salida de componente.
15. Entrada de Audio 1YPbPr1 (Izquierda / Derecha)
Conecte una fuente de audio externa a éste enchufe.
16. Entrada de Audio 2 YPbPr2 (Izquierda / Derecha)
Conecte una fuente de audio externa a éste enchufe.
17. Entrada de Alimentación Eléctrica AC (AC IN - Power)
Conecte el cable de alimentación eléctrica de Entrada de Alimentación (AC IN) a
una fuente de alimentación eléctrica.
Español
9
Page 57

Control Remoto
El Control Remoto transmitirá hasta el Monitor HD desde una distancia de 3 mts.(10 feet).
1. ENCENDIDO (POWER):
Enciende y Apaga (On/Off)
2. ENTRADA (INPUT)
Selecciona de Fuente de Entrada
3. SELECCIÓN DE SUB-MENÚ ODS (OSD SUB-
MENÚ SELECTION)
Selecciona directamente una opción de sub-
menú OSD
4. MENÚ ODS ANTERIOR (PREVIOUS OSD
MENU)
Seleccciona el menú ODS anterior
5. MENÚ/SALIDA (MENU/EXIT)
Enciende o Apaga el Menú OSD.
6. CLASIFICACIÓN (SCALING)
Selecciona el formato de visualización de Video
“ESTÁNDARD” o “COMPLETO”
7. / / /
Control del MENÚ OSD
8. Entrar (Enter)
Ejecuta un comando
9. MUDO (MUTE)
Activa o Apaga el Sonido (On/Off)
10. INFORMACIÓN (INFO)
Muestra la Información de la Fuente y Canal
11. IMAGEN-SOBRE-IMAGEN (PIP)
Muestra sub-image encendida/apagada (On/Off)
12. CONGELACIÓN (FREEZE)
Congela la pantalla principal
13. VOLÚMEN (VOL - / +)
Ajuste de Volúmen (Up/Down)
14. FUENTE (SOURCE / )
Selecciona la Fuente (Up/Down)
15. YPbPr
Selecciona fuente de entrada YPbPr1 / YPbPr2
16. VGA
Selecciona fuente de entrada VGA
17. INTERFAZ DE VIDEO DIGITAL (DVI)
Selecciona fuente de entrada DVI1 / DVI2 / HDMI
18. S-Video
Selecciona fuente de entrada S-Video
19. AV
Selecciona fuente de entrada AV
Español
10
Page 58

Instalación
1. Inserte las Pilas en el Control Remoto
1) Remueva la tapa del compartimiento de pilas.
2) Inserte las pilas de acuerdo con las marcas (+) y (-) en el compartimiento de pilas.
Español
3) Re-asegure la tapa de las pilas.
ADVERTENCIA:
z Use solamente pilas AAA.
z No mezcle pilas nuevas con usadas. Esto puede producir partiduras y goteos que pueden
provocar incendio o lesión personal.
z Inserte las pilas de acuerdo con las marcas (+) y (-) Instalar las pilas incorrectamente
puede producir partiduras y goteos que pueden provocar incendio o lesión personal.
z Descarte las pilas de acu erdo con las leyes y reglamentos locales.
z Mantenga las pilas lejos de niños y animales regalones.
z Cuando no va a usar el control remoto por mucho tiempo, remueva las pilas.
11
Page 59

2. Conecte los cables de audio y video desde un PC
Conecte uno o todos los siguientes a la parte posterior del Monitor de Alta Definición
IMPORTANTE: Antes de comenzar, asegúrese de que el equipo está
apagado
CONEXIÓN VGA: Conecte un cable VGA análogo desde el puerto de SALIDA VGA
(VGA OUT) Al puerto de ENTRADA VGA (VGA IN) del Monitor de Alta Definición.
CONEXIÓN DVI1/DVI2: Conecte un cable Digital DVI desde el puerto de SALIDA
DVI (DVI OUT) de su PC a uno de los puertos DVI-HDCP del Monitor de Alta
Definición.
CONEXIÓN DE AUDIO: Conecte un cable mini-estéreo desde el puerto de SALIDA
DE AUDIO (AUDIO OUT) de su PC al puerto de ENTRADA DE AUDIO (AUDIO IN) del
Monitor de Alta Definición (HD).
3. Conecte AV, Component, S-Video a Componentes de Video (Video
Devices)
Conecte cables Audio/Video de componentes compatibles a la parte posterior del
Monitor de Alta Definición (HD).
.
Español
12
Page 60

4. Conectar los cables de alimentación eléctrica
Conecte el cable de alimentación eléctrica al Monitor de Alta Definición (HD) y luego
enchufe el cable de alimentación en un enchufe de pared con la toma de tierra apropiada.
5. Encender el Aparato
Apriete el botón de encendido en el lado derecho del Monitor de Alta Definición (HD) o
apriete el botón Rojo de encendido en el control remoto.
Español
6. Selecciona la fuente de entrada para el Monitor de Alta Definición
(HD) usando el menú OSD o el control remoto
7. Si se conecta a un PC (VGA/DVI1/DVI2):
Para obtener la mejor calidad de imagen, ajuste la resolución del Monitor de Alta
Definición (HD) a 1920 x 1080 a 60Hz (revise la guía de usuario de la tarjeta de
gráficos para ajustar ésta resolución).
13
Page 61

Funciones del Menú ODS
Todas la configuraciones de función del ODS son controladas ya sea por el control
remoto o por las teclas en el lado derecho del Monitor de Alta definición (HD).
Para visualizar el menú principal del OSD, apriete el botón Menú en el lado derecho de las
teclas de control en la parte delantera del Monitor de Alta Definición (HD) o la tecla MENÚ
en el control remoto. Use las teclas con flechas 3/4 para destacar el sub-menú OSD
deseado.
Español
Menú Principal
Para selecciona un sub-menú, apriete ▲/▼ en el lado derecho del Monitor de Alta
Definición (HD) o la tecla ▲/▼ en el control remoto. También, utilizando las teclas
numerales del control remoto, usted puede seleccionar directamente un sub-menú OSD.
14
Page 62

MENÚ DE IMAGEN:
Español
Nombre de
Función
Brillo Para ajustar el brillo de la pantalla
Contraste Para ajustar el contraste de la imagen
Saturación Para ajustar la saturación de color
Tonalidad Para ajustar el matiz de color
Temperatura
de Color
Nitidez
Relación de Aspecto Selecciona la visualización a “ESTÁNDARD” / “COMPLETA”
Iluminación
Posterior
Reestablecer Para reestablecer la configuración original de video
Para ajustar la Temperatura del color (Cálida, Neutral, Fría)
Para ajustar la nitidez de imagen
(La nitidez no se puede ajustar en la modalidad de PC)
Para ajustar la Iluminación Posterior
Función
15
Page 63

MENÚ DE PC:
Nombre de
Función
Ajuste Automático Automáticamente ajusta la fase horizontal de la imagen
Función
Español
Reloj Para ajustar el reloj
Fase Para ajustar la fase
Posición Para ajustar la posición vertical y horizontal de la imagen
NOTA: El menú de GRÁFICO está disponible solamente cuando se selecciona fuente
VGA.
16
Page 64

AJUSTES DE AUDIO:
Español
Nombre de
Función
Volumen Para ajustar el Volumen
Bajos Para ajustar los bajos
Agudos Para ajustar los agudos
Balance Para ajustar el Balance
Mudo Para Activar o Apagar el Sonido (OFF/ON)
Parlante Para seleccionar parlante interno o externo
Reestablecer Para reestablecer la configuración original de audio
Función
17
Page 65

IMAGEN-SOBRE-IMAGEN:
Español
Nombre de Función Función
Modo de
Visualización
Fuente Principal Selecciona fuentes de pantalla princi pal
Fuente de ImagenSobre-Imagen (PIP)
Cambio Cambia la fuente de la pantalla principal y la sub pantalla
Posición de Imagen-
Sobre-Imagen (PIP)
Tamaño de ImagenSobre-Imagen (PIP)
Fuente de Au dio Selecciona las fuentes de audio de la pantalla principal y sub-pantalla
Tabla 1:
SUB
Principal
VGA X O O O X X O O
DVI1 O X O O O O O O
AV O O X X O O O O
S-Video O O X X O O O O
YPbPr1 X O O O X X O O
YPbPr2 X O O O X X O O
DVI2 O O O O O O X X
HDMI O O O O O O X X
VGA DVI1 AV S-Video YPbPr1 YPbPr2 DVI2 HDMI
DESCONECTADO --> PIP --> PBP --> POP
VGA --> DVI1--> DVI2 --> AV --> S-Video--> YPbPr1 -->
YPbPr2 --> HDMI
Selección fuentes de sub pantalla
Por favor ver las especificaciones PIP/PBP/POP en la Tabla 1
Ajuste de posición vertical y horizontal de visualización de sub-p antalla
Ajuste de tamaño de visualización de sub-pantalla
(Pequeña -->Mediana --> Grande)
18
Page 66

A
A
MENÚ GENERAL:
Español
Nombre de
Función
Posición del Menú Ajuste de posición vertical y horizontal del OSD
Apagado del Menú Ajusta el tiempo de apagado automático del OSD
Idioma Selecciona el idioma del OSD
Desconexión
Temporizada
Transparencia Ajusta el nivel de transparencia del OSD
Sistema de Control
de Energía del
Monitor (DPMS)
Diodo Emisor de
Luz (LED)
Fuente Automática Activa o Apaga la función de fuente automática
Información del
Sistema
Reestablecimiento
de Fábrica
justa la desconexión temporizada para que apague
automáticamente
ctiva o Apaga el Sistema de Control de Energía del Monitor
(DPMS)
Enciende o Apaga el Diodo Emisor de Luz (LED)
Muestra fuente de entrada, tipo y señal
Reestablece la configuración por defecto de fábrica
Función
19
Page 67

Especificaciones
LVM-42w2 (42”) (42.02” área de visualización diagonal)
Tamaño del Panel Tipo
Color Recubrimiento Anti-reflex ivo + Recubrimiento Anti-reflejo
Ángulos de Visualización 176° (H) / 176° (V)
Señal de Entrada Video/Audio RGB Análogo x 1 (75 ohms, 0.7 Vp-p)/Mini-Estéreo x 1
H/V separado (TTL) para PC
fh: 30-80 kHz, fv: 50-75 Hz
Señal de Salida RCA (Izquierda/Derecha) Estéreo x 1
Compatibilidad HDTV 480i, 480P, 720P, 1080i, 1080p
Compatibilidad con PC Soportado 1920 x 1080 @ 60 Hz
(VGA, DVI1, & DVI2) 1280 x 1024 @ 60, 75 Hz
1280 x 768 @ 60, 75Hz
1024 x 768 @ 60, 75 Hz
800 x 600 @ 60, 75 Hz
640 x 480 @ 60, 75 Hz
720 x 400 @ 70 Hz
Salida de Parlantes 10W (x2 Canales) / Subwoofer x 1 (10W)
Alimentación Voltaje 100-240 VAC, 50/60 Hz (autoconmutador), 3.5A (MAX)
Condiciones de Operación Temperatura 0° C a + 35° C (32° F a + 95° F)
Humedad 10% a 90% (sin condensación)
Altitud Hasta 3,000 m, (9,842.520 feet)
Condiciones de
Almacenamiento
Humedad 10% a 90% (sin condensación)
Altitud Hasta 12,000 m, ( 39,370.079 feet)
Dimensiones Unidad
Peso Neto / Bruto
Reglamentos / Leyes FCC-B, UL/c-UL
Consumo de electricidad
Consumo de electricidad
Consumo de electricidad
Preset Timing Mode (Pre-ajustado para reducir borrado: 1920x1080 a 60Hz)
Advertencia: No configure la tarjetas de gráficos en su computador para que exceda estas tasas de refresco de imágenes; si las
tasas de refresco de imágenes están sobre las especificaciones, OSD mostrará un mensaje "Fuera de alcanc e" y la Pantalla de
Cristal Líquido (LCD) entrará en el modo de ahorro de energía.
Nota: Las especificaciones del productos están sujetas a cambios sin aviso.
Temperatura -20° C a + 60° C (-4° F a + 140° F)
Alimentación
Encendida
Alimentación
apagada
Función
de ahorro
LVM-47w1 (47”) (47.0” área de visualización diagonal)
TFT (Thin Film Transistor – Transistor de Película Fina), Matriz Activa (Active
Matrix) WXGA LCD, 1920 x 1080 línea vertical
DVI-D x 2 (soporte HDCP) / RCA (Izquierda/Derecha) x 2
DVI1 & DVI2 soporta hasta 1080p
Componente de Video (YPbPr) x 2 / RCA (Izquierda/Derecha) Estéreo x 2
YPbPr 1 & 2 soporta hasta 720p / 1080i / 1080p
Video Compuesto x 1 / S–Video x 1 / RCA (Izquierda/Derecha) Estéreo x 1
Soporta hasta 480i
HDMI x 1 / RCA (Izquierda/Derecha) Estéreo x 1
Soporta hasta 720p/1080i/1080p
LVM-42w2 (42”) 1050 mm (ancho) X 719 mm (alto) x 226 mm (profundidad)
41.4” (ancho) X 28.3” (alto) x 8.9” (profundi dad)
LVM-47w1 (47”) 1173.5 mm (ancho) X 793 mm (alto) x 248 mm (profundidad)
46.2” (ancho) x 31.2” (alto) x 9.8” (profundidad)
LVM-42w2 (42”) 57.3 lb (26kgs) / 73.8 lb (33.5kgs)
LVM-47w1 (47”) 78.9 lb (35.8kgs) / 94.4 lb (42.8kgs)
LVM-42w2 (42”) 240W (LED Blanco)
LVM-47w1 (47”) 290W (LED Blanco)
<1W
<3W (LED Blanco)
20
Español
Page 68

Solución de Problemas
No Se Enciende
• Asegúrese de que el botón de encendido está activado (ON). (LED Blanco).
• Asegúrese de que el cable de alimentación AC está bien conectado a una fuente de
alimentación AC de pared.
• Enchufe otro aparato eléctrico (como una radio) a la fuente de alimentación de pared
para verificar que esa fuente está proporcionando el voltaje apropiado.
Problemas de Interconexión de AUDIO
• Recuerde que la salida Video-S (S-Video) y Compuesto (Composite -AV) comparten la
misma fuente de audio.
Está Encendido (ON) pero No Hay Imagen en la Pantalla
• Verifique que el cable de video conectado al Monitor de Alta definición está bien
asegurado a la salida de video en la parte posterior de la computadora. Si el otro
extremo del cable de video no está conectado correctamente al Monitor de Alta
Definición, asegúrelo bien apretado.
• Ajuste el brillo y contraste.
• Si está usando una computadora Macintosh más antigua que G3, necesita un adaptador
Macintosh.
• Verifique la configuración de la Fuente.
Colores Anormales o Incorrectos
• Si falta cualquier color (rojo, verde, o azul), revise el cable de video para asegurar de que
está conectado correctamente. Clavijas sueltas o rotas en el cable conector pueden
causar una conexión incorrecta.
• Conecte el Monitor de Alta Definición (HD) a otra computadora.
Los Botones del Control Remoto No Funcionan
• Presione un sólo botón a la vez.
No Hay Sonido
• Compruebe la conexión de audio.
• Presione el botón MUTE en el control remoto, de manera que desaparezca MUTE de la
pantalla.
• Compruebe los ajustes de audio. Es posible que el ajuste de audio del Monitor de Alta
Definición (HD) está al mínimo.
• Presione la tecla de Volumen + (Arriba-UP) en el control remoto.
• Asegúrese de que la configuración de parlantes está ajustada a “interno / internal”.
El Control Remoto No Funciona
• Verifique que las pilas están instaladas correctamente.
• Cambie las pilas e instale pilas nuevas si es necesario.
Código de Control Remoto No Se Encuentra en un Control “Universal”
• Compre un control remoto separado “que aprende” o visite el sitio de internet:
www.westinghousedigital.com
¿Cómo Puedo Encontrar Más Ayuda?
• Visite el sitio de intenet: www.westinghousedigital.com
Contacte el Servicio de Clientes Westin ghouse llamando al (866) 287-5555 o escríbanos a:
service@westinghousedigital.com
para actualizar la información de códigos del control.
Español
21
Page 69

www.westinghousedigital.com
Westinghouse Digital Electronics
Santa Fe Springs, CA
SE-UM-4203-0601
 Loading...