

Page 1

GAS BUILT-IN COOKING APPLIANCES
OWNER'S MANUAL
Thank you for buying a Westinghouse oven.
Please read your owner's manual carefully, it provides
instructions on safe installation, use and maintenance.
Retain it for future reference.
Record the model and serial numbers of your oven.
Page 2

General warnings
• This appliance is not intended for use by persons (including children) with reduced physical, sensory or
mental capabilities, or lack of experience and knowledge, unless they have been given supervision or
instruction concerning use of the appliance by a person responsible for their safety.
• Children should be supervised to ensure that they do not play with the appliance.
• During use, this appliance becomes hot. Care should be taken to avoid touching hot surfaces, e.g.
oven door, heating elements or internal surfaces of the oven.
• This appliance must not be used as a space heater.
• In order to avoid a fire, the appliance must be kept clean and vents kept unobstructed.
• Do not spray aerosols in the vicinity of the appliance during operation.
• Do not store flammable materials in or under the appliance, e.g. Aerosols.
• Accessible parts will become hot when in use. To avoid burns and scalds children should be kept away.
• Do not line the bottom of the oven or grill with foil or cookware.
• Always use gloves when handling hot items inside grill or oven.
Grill
• For separate grill wallovens, the grill door must be left open whilst grilling.
• Always turn the grill off immediately after use as fat left there may catch fire.
• Do not cover the insert with foil, as fat left there may catch fire.
• Always keep the grill dish clean as any fat left may catch fire.
• Do not leave the grill on unattended.
• To avoid a fire, ensure that grill trays and fittings are always inserted into the appliance in accordance with
the instructions.
• Do not place thick portions of food under the grill. Foods may curl, catch and ignite.
• Accessible parts may become hot when grill is in use. Children should be kept away.
Oven
• During use the appliance becomes hot. Care should be taken to avoid touching the hot surfaces inside the
oven.
• Switch the appliance off before removing the oven light glass for globe replacement.
• To avoid an accident, ensure that oven shelves and fittings are always inserted into the appliance in
accordance with the instructions.
• Do not use the door as a shelf.
• Do not push down on the open oven door.
Installation, cleaning and servicing
• An authorised person must install this appliance. (Certificate of Compliance to be retained)
• Before using the appliance, ensure that all packing materials are removed from the appliance.
• In order to avoid any potential hazard, the enclosed installation instructions must be followed.
• Ensure that all specified appliance vents, openings and airspaces are not blocked.
• Where the appliance is built into a cabinet, the cabinet material must be capable of withstanding 70°C
• Only authorised personnel should carry out servicing. (Certificate of Compliance to be retained)
• Always ensure the appliance is switched off before cleaning or replacing parts.
• Do not use steam cleaners, as this may cause moisture build up.
• Always clean the appliance immediately after any food spillage.
• To maintain safe operation, it is recommended that the product be inspected every five years by an
authorised serviceperson.
• If rigid gas pipe is used for installation it should include sufficient loops to allow the appliance to be
removed from installed position without the need to disconnect the piping.
This appliance must be earthed.
• For appliances supplied with a supply cord, if the supply cord is damaged, it must be replaced by the
Manufacturer or its service agent or similarly qualified person in order to avoid a hazard.
• Where this appliance is installed in a marine craft or in a caravan, it shall not be used as a space heater.
SAFETY AND WARNING INSTRUCTIONS
Read the following carefully to avoid an accident.
2
Page 3

3
DESCRIPTION OF YOUR APPLIANCE ..................................................................................................................4
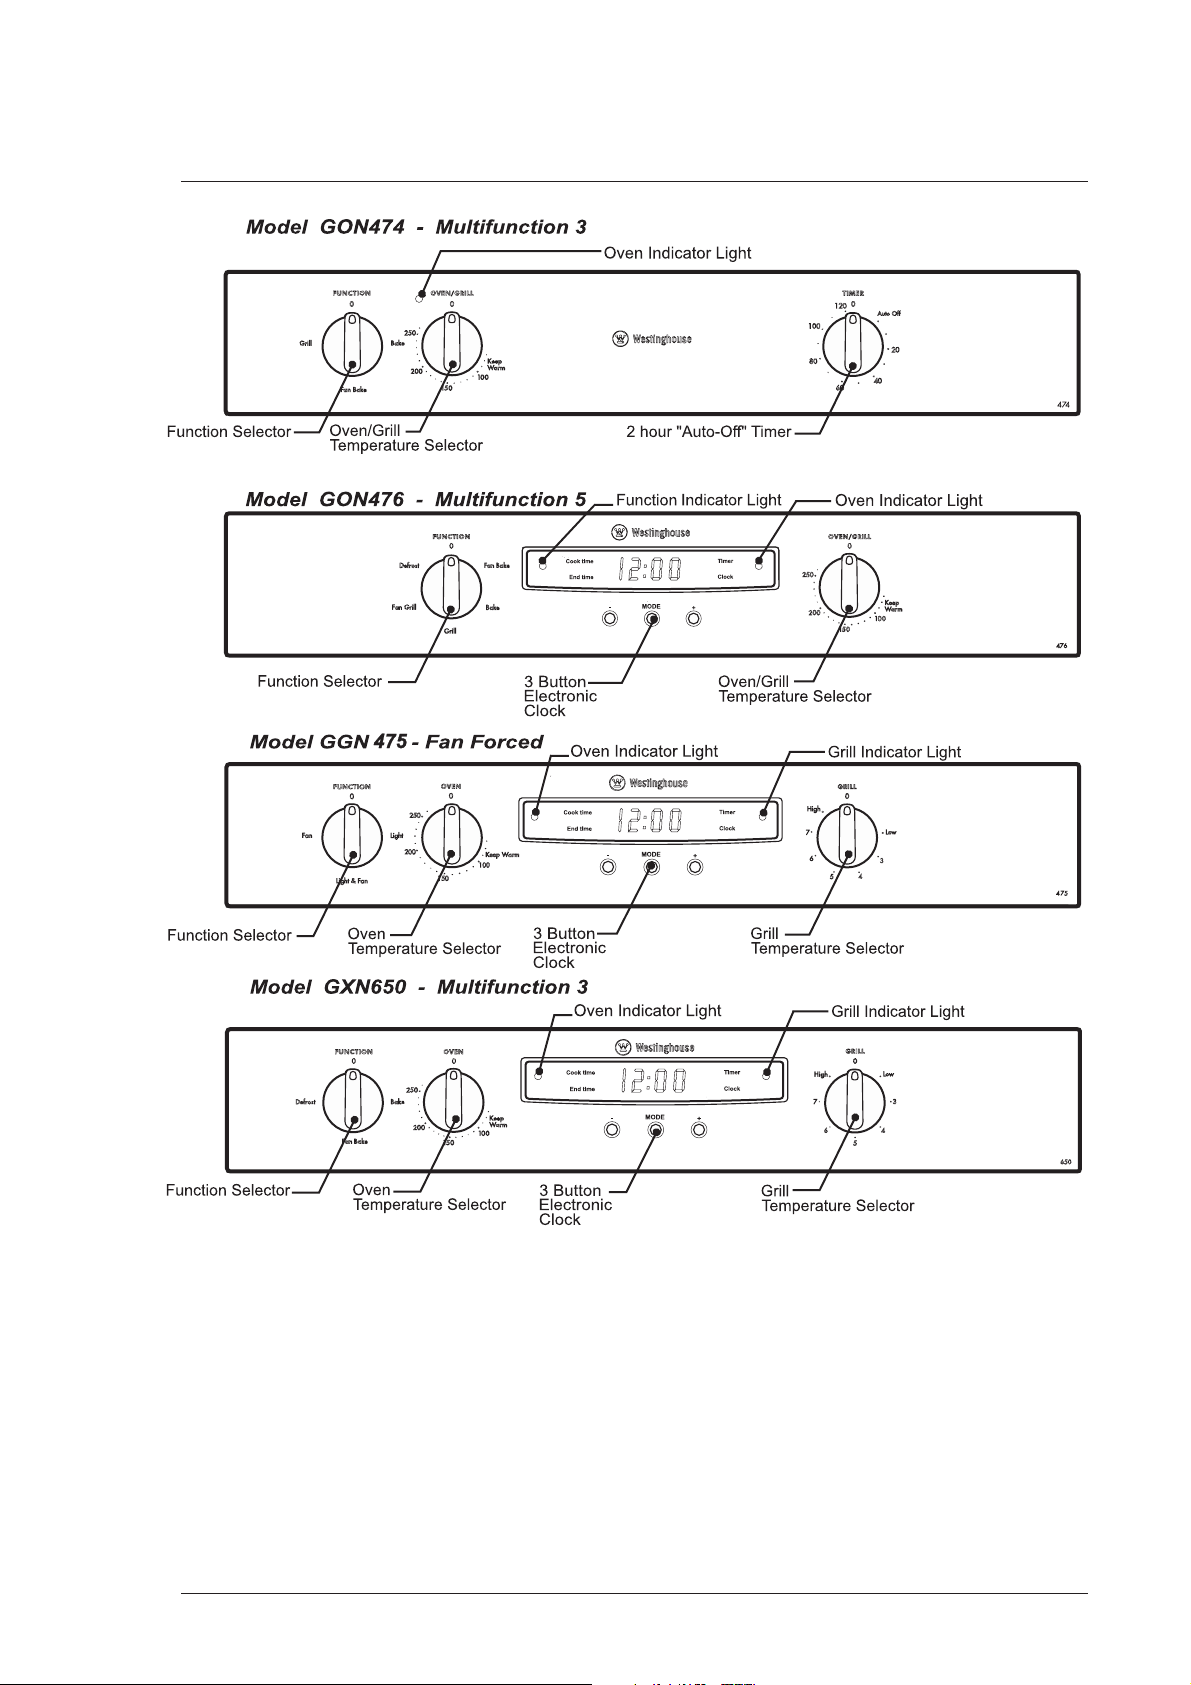
GON474 ........................................................................................................................................................4
GON476 ........................................................................................................................................................4
GGN475 ........................................................................................................................................................4
GXN650 ........................................................................................................................................................4
BEFORE OPERATING YOUR APPLIANCE FOR THE FIRST TIME.......................................................................5
Setting the time...........................................................................................................................................5
Preparing your appliance for the first time...............................................................................................5
Installing your oven furniture.....................................................................................................................5
USING YOUR OVEN...............................................................................................................................................7
Understanding your oven functions...........................................................................................................7
Cooling/venting fan.....................................................................................................................................8
Operating your oven temperature selector...............................................................................................8
Pre-heating your appliance.........................................................................................................................9
COOKING WITH YOUR TIMER............................................................................................................................10
2-hour “Auto Off” timer...........................................................................................................................10
3 button electronic clock...........................................................................................................................10
COOKING GUIDE..................................................................................................................................................12
Oven shelf location....................................................................................................................................12
Choosing the best oven settings...............................................................................................................13
Roasting meat.................................................................................................................................14
Roasting poultry and fish...............................................................................................................14
GRILLING GUIDE..................................................................................................................................................15
Grilling hints...............................................................................................................................................15
Guide to better grilling .............................................................................................................................15
Fan grill.......................................................................................................................................................15
DEALING WITH COOKING PROBLEMS.............................................................................................................16
CLEANING YOUR APPLIANCE ...........................................................................................................................17
Enamel........................................................................................................................................................17
Stainless Steel.............................................................................................................................................17
Glass............................................................................................................................................................17
Oven............................................................................................................................................................17
Cleaning your oven accessories.................................................................................................................18
ELECTRONIC BURNER CONTROL.......................................................................................................................20
SOLVING PROBLEMS...........................................................................................................................................21
Dealing with oven problems.....................................................................................................................21
INSTALLATION......................................................................................................................................................22
CONTENTS
Page 4
4
DESCRIPTION OF YOUR APPLIANCE
Page 5
5
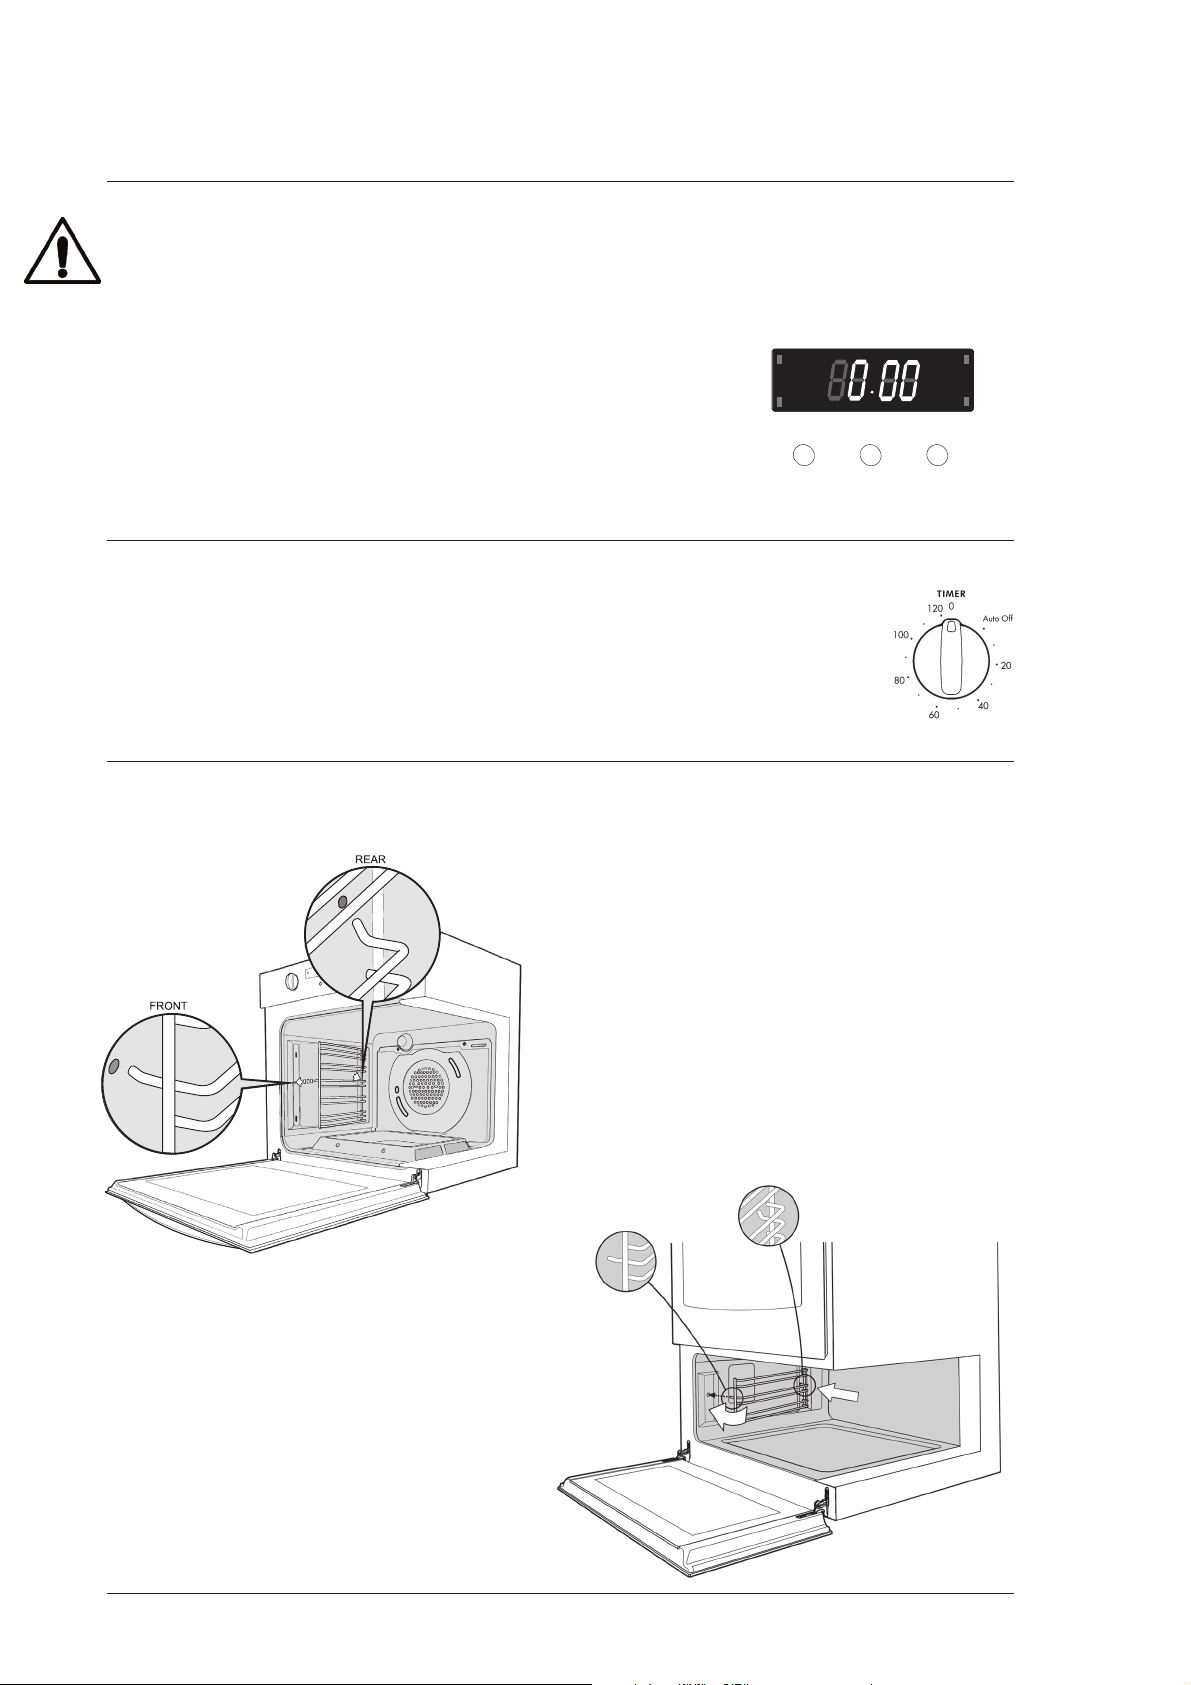
3 Button Electronic Clock
• After the appliance has been electrically connected "12.00"
will be displayed and the "clock indicator" will flash.
• To set the time of day, press the – or + buttons. 5 seconds
after the last change, the "clock indicator" will disappear,
confirming the time has been set.
• Note: The clock has a 24-hour display.
Setting the time
If you have purchased a model fitted with an electronic clock, you must set the time of day
before you can operate your appliance.
Preparing your appliance for the first time
BEFORE OPERATING YOUR APPLIANCE FOR THE FIRST TIME
• Please remove all internal boxes and bags from the oven before operation.
• Please wipe out the oven interior prior to operation with warm soapy water and polish
dry with a soft clean cloth. Do not close the oven door until the oven is completely dry.
• If your appliance is fitted with a 2-hour "Auto Off" timer, make sure it is set to the 'O'
marker for manual operation. See image.
Installing your oven furniture
The type of oven furniture you receive is dependant on the model you have purchased.
1. Side racks
The side racks that come with your oven can be
attached to either side of your oven.
• Insert the largest peg into rear access hole
provided. See diagram.
• Then locate the front peg into the front access
hole and push in firmly.
Front
Rear
cook time
end time
MODE
—
timer
clock
+
Page 6
6
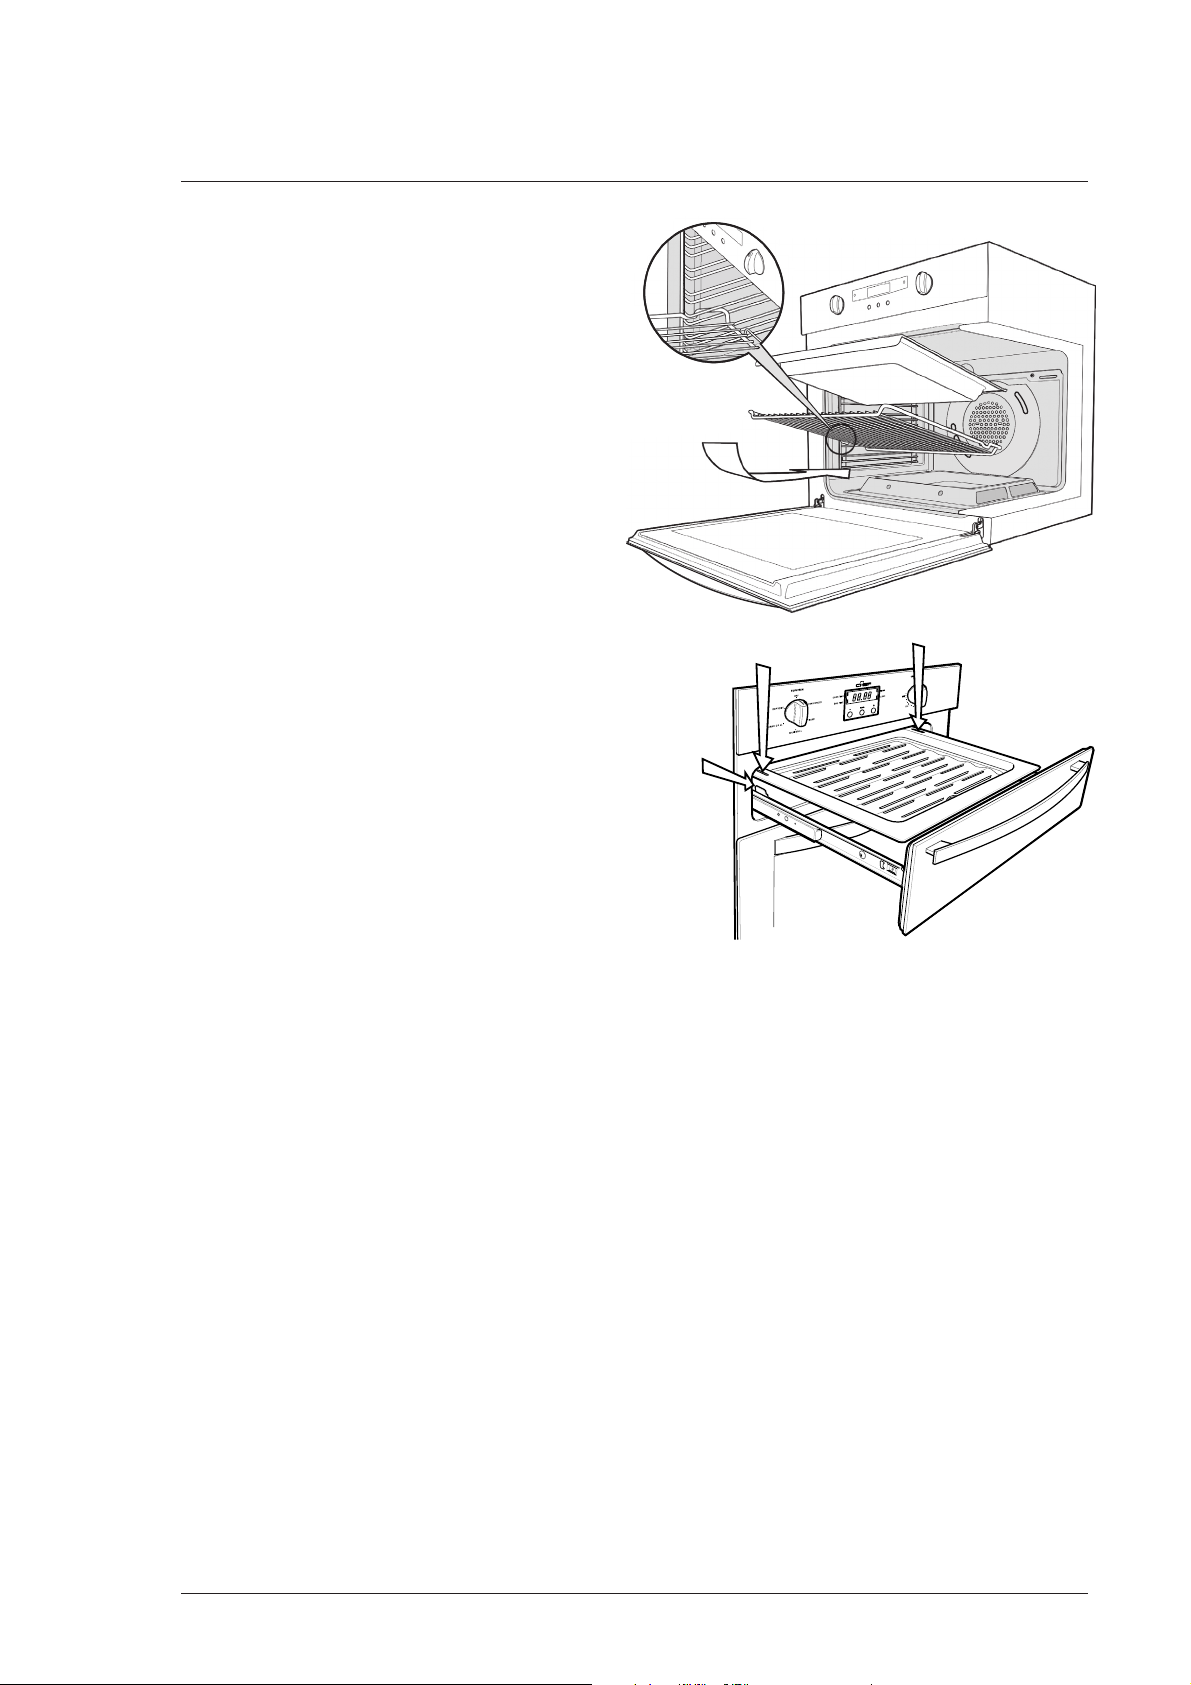
2. Shelves and trays
The shelves are designed so that they have
maximum travel but cannot be accidentally
pulled right out. The trays are designed the
same way and fit straight into the side racks.
• Locate the rear edge of the shelf/tray in
between 2 guide rails of the side rack - see
diagram. Ensure the same rail positions on
both sides of the oven are being engaged.
• With the front edge raised, begin to slide
the shelf into the oven.
• Once the detents have passed the front
edge of the side rack, the shelf can be
pushed completely in.
• When fully inserted the shelf/tray should
not interfere with the closed oven door.
• To insert the grill tray in a separate grill
underbench, fully open the grill drawer
and position the tray so that the slots on
the outer edges fit on the tabs on the
slides.
Separate grill underbench
BEFORE OPERATING YOUR APPLIANCE FOR THE FIRST TIME
Page 7
7
OVEN
Fan Bake
Heat comes from the gas “base heat” burner which is then circulated by the
fan. This fan circulates the hot air around the oven cavity so that you can put
your food in different places in the oven and still cook them at the same
time.
You can use the "fan bake" function for multi-shelf cooking, reheating
cooked foods, pastries and complete oven meals. It will cook at a lower
temperature and be faster than baking. Please note that some variation in
browning is normal.
Bake
Heat comes from the gas “base heat” burner below the food. The bottom
burner is below the floor of the oven which is controlled by the thermostat
and will turn on and off to maintain the set temperature.
You can use the “bake” function for single trays of biscuits, scones, muffins,
cakes, slices, casseroles, baked puddings, roasts and delicate egg dishes.
Defrost
The “defrost” function uses low temperature air which is circulated by the
fan. You can defrost (thaw) your food before you cook it. Also you may use
your “defrost” to raise your yeast dough or to dry fruit, vegetables or herbs.
GRILL
Grill (grill in oven models only)
The “grill” directs radiant heat from the powerful upper element onto the
food. You can use the “grill” function for tender cuts of meat, steak, chops,
sausages, fish, cheese toasties and other quick cooking foods. Grill with the
oven door closed. Preheat your grill for 3 minutes to get the best results. This
will help seal in the natural juices of steak, chops etc. for a better flavour. You
can slide your grill dish into either of the 2 spaces within the upper pairs of
support rails.
Fan Grill (grill in oven models only)
“Fan grill” offers you the benefits of both “bake” and traditional “grill”
functions. The grill element turns on and off to maintain the set temperature
while the fan circulates the heated air. The oven door remains closed for fan
grill. You can use “fan grill” for large cuts of meat in the oven which gives
you a result that is similar to “rotisserie” cooked meat. Put your food on a
shelf in the second lowest shelf position. Put the grill dish on the lowest shelf
position to catch any spills. When using “fan grill” it is not necessary to turn
the food over during the cooking cycle. Set temperature to 180°C.
Grill (separate grill models only)
The “grill” directs radiant heat from the powerful upper element onto the
food. You can use the “grill” function for tender cuts of meat, steak, chops,
sausages, fish, cheese toasties and other quick cooking foods. Grill with the
oven door open. Preheat your grill for 3 minutes to get the best results. This
will help seal in the natural juices of steak, chops etc. for a better flavour. The
grill dish is to be positioned between the upper pair of support rails.
Understanding your oven functions
Your oven will have a selection of the following functions. Refer to “Description of your
appliance” (page 4) to confirm what functions are available to you.
USING YOUR OVEN
Page 8
8
Cooling/Venting fan
Your built-in appliance is fitted with a cooling fan. It will operate whenever you are using your
oven or grill and will blow warm air across the top of the oven or grill door. In some appliances
the cooling fan may continue to operate after the appliance is turned off. This is to cool the
product.
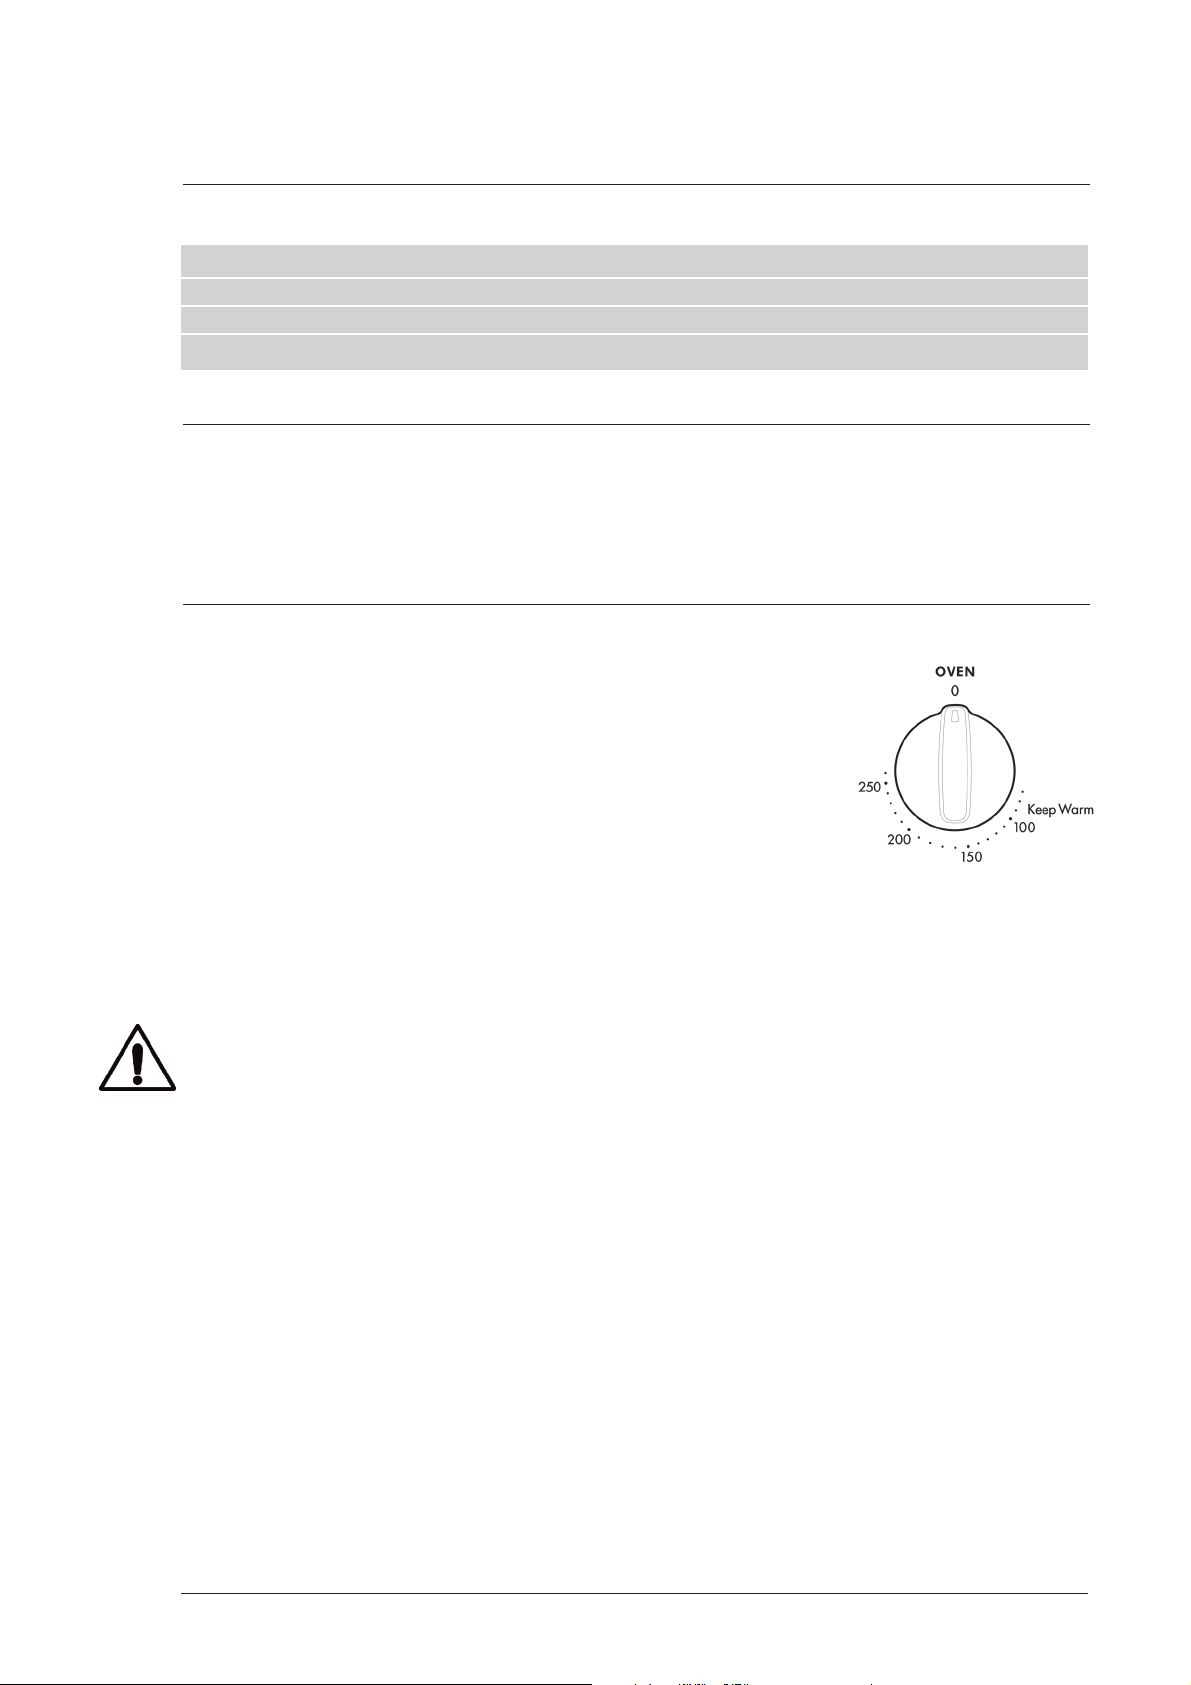
Operating your oven temperature selector
A thermostat controls the temperature in your appliance. The
temperature can be selected within the specified range. To set the
temperature, turn the temperature selector in a clockwise direction
to the desired setting. An indicator light above the temperature
selector will come on. When the temperature is reached, the heating
source switches itself off and the indicator light goes out. When the
oven temperature falls below the desired setting, the heating source
switches on and the indicator light comes on again. Once the food is
cooked, turn the temperature selector back in an anti-clockwise
direction. Do not force it right round in a clockwise direction as this
will result in damage to the thermostat.
NOTE: For multifunction ovens the desired cooking function must be selected before the oven will
operate. Once the desired function has been selected, use the temperature selector to set the
required temperature.
USING YOUR OVEN
Setting the time
If you have purchased a model fitted with an electronic clock you must set the time of day
before you can operate your appliance.
Product type Description Door position during grilling
Underbench Grill in oven models Door FULLY closed
Separate Grill Underbench Slide out grill drawer Drawer FULLY closed
Separate Grill Walloven Drop down grill door Door FULLY open
NOTE: Below is a table indicating the door position whilst grilling for each of the product types.
Page 9

9
USING YOUR OVEN
Pre-heating your appliance
Pre-heating your oven is recommended in cooking and grilling functions. Pre-heating your
appliance allows it to reach the required temperature quickly and efficiently.
When baking bread or cakes, load the oven as quickly as possible after pre-heating, only leaving
the oven door open for the shortest time. This will minimise loss of heat from the oven and ensure
the best results.
With "bake"
1. It is recommended you preheat your appliance when cooking or baking.
2. Set the desired preheat temperature, by rotating your oven temperature selector.
When the indicator light goes out the oven has reached the desired preset temperature, place
your food into the oven, close the door and set the timer if you desire.
With "grill"
Preheat the grill for at least 3 minutes to obtain best results. This will help to seal the natural
juices of steak, chops and other meats for a better flavour.
Setting temperatures
The following table displays the temperature settings for recipes which do not show actual
temperatures.
Conversion Table
Gas mark Fahrenheit °F Celsius °C Verbal
n/a 176° 80° Drying
n/a 194° 90° Drying
1/4 200° 93° Very Slow/Very Low
1/4 212° 100° Very Slow/Very Low
1/4 225° 107° Very Slow/Very Low
1/4 230° 110° Very Slow/Very Low
1/2 248° 120° Very Slow/Very Low
1/2 250° 121° Very Slow/Very Low
1/2 266° 130° Very Slow/Very Low
1 275° 135° Slow/Low
1 284° 140° Slow/Low
2 300° 149° Slow/Low
2 302° 150° Slow/Low
3 320° 160° Moderately Slow/Warm
3 325° 163° Moderately Slow/Warm
3 338° 170° Moderately Slow/Warm
4 350° 177° Moderate/Medium
4 356° 180° Moderate/Medium
5 374° 190° Moderate/Moderately Hot
5 375° 191° Moderate/Moderately Hot
6 392° 200° Moderately Hot
6 400° 204° Moderately Hot
7 425° 218° Hot
7 428° 220° Hot
8 446° 230° Hot/Very Hot
8 450° 232° Hot/Very Hot
9 464° 240° Very Hot
9 475° 246° Very Hot
9 482° 250° Very Hot
10 500° 260° Extremely Hot
Page 10

10
COOKING WITH YOUR TIMER
2-hour “Auto Off” timer
The 2-hour timer features an automatic oven "cut off". This means
that a cooking period of up to 120 minutes can be set. When the
timer has counted back to "Auto Off" a bell will sound and the
oven will automatically switch off. Once automatic baking is
complete, return to manual operation by setting the timer to the
'0' mark.
NOTE: It is not recommended to use this timer for short durations
(e.g. boiling eggs).
OPERATING THE PROGRAMMABLE CLOCK
3 button programmable timer
General features
Your 3 button programmable timer has the following features:
• Timer – your 3 button programmable timer allows you to set a
countdown time that will beep when the set time has elapsed.
• Cook time – You can set a cooking duration. A timer will count
down the preset cooking time, beep when the time has
elapsed and turn the oven off.
• End time – you can set a cooking finish time. A timer will count down the preset cooking time,
beep when the finish time has been reached and turn the oven off.
• Delayed start cooking time – You can combine the cook time and end time to switch the oven
on and off at a specific time during the day.
Note: Your 3 button programmable timer operates with your oven only.
Setting the time of day
You must set the time of day before you can operate your appliance. When power is supplied to
your oven “12.00“ will be displayed and the “clock” indicator will flash.
1. To set the time of day in hours and minutes, press the – or + buttons. 5 seconds after the last
change the “clock” indicator will disappear, confirming the time has been set.
Note: The clock has a 24-hour display.
Setting the timer
1. Press the “mode“ button until the “timer” indicator begins flashing.
2. Set the countdown time you want by using the – and + buttons. 5 seconds after the last change
the “timer” indicator will stop flashing, confirming the timer has been set.
3. To stop the beeper, press any button.
Setting the cooking duration “cook time”
1. Check the clock displays the correct time of day.
2. Select the desired oven function and temperature. The oven indicator light will glow and the
heating source will come on.
3. Press the “mode“ button until the “cook time” indicator begins flashing.
4. Set the cooking duration you want by using the – or + buttons. 5 seconds after the last change,
the “cook time” indicator will stop flashing, and the time of day will be displayed.
Note: Do not forget to add preheating time if necessary.
Setting the cooking finish time “end time”
1. Check the clock displays the correct time of day.
2. Select the desired oven function and temperature. The oven indicator light will glow and the
heating source will come on.
3. Press the “mode“ button until the “end time” indicator begins flashing.
cook time
end time
PROGRAM TIMER
—
MODE
timer
clock
+
Page 11

11
OPERATING THE PROGRAMMABLE CLOCK (Continued)
4. Enter the time of day you want to finish cooking by pressing the – or + buttons. 5 seconds after
the last change, the “end time” indicator will stop flashing and the current time of day will
be displayed.
Setting the delayed start cooking time
1. Program the “cook time“ and “end time“ as described in the relevant sections. Once both the
“cook time“ and “end time“ have been set, the “cook time“ and “end time” indicators will stop
flashing and the current time of day will be displayed.
On completion of cooking
The oven will turn off, the timer will beep and the “end time“ and/or “cook time“ indicators will
flash.
1. Turn the function and temperature controls to the off position.
2. Press any button to stop the timer from beeping.
Switching the clock display ON and OFF
1. Press any two buttons together for 2 seconds to switch ’off’ the display.
2. Press any button to switch the clock display ’on’ again.
Note: If a timer mode is set, then it is not possible to switch the display off.
Page 12

12
COOKING GUIDE
• Select the correct shelf location for food being cooked.
• Make sure dishes will fit into the oven before you switch it on.
• Keep edges of baking dishes at least 40mm from the side of the oven. This allows free circulation
of heat and ensures even cooking.
• Do not open the oven door more than necessary.
• Do not place foods with a lot of liquid into the oven with other foods. This will cause food to
steam and not brown.
• After the oven is turned off it retains the heat for some time. Use this heat to finish custards or
to dry bread.
• Do not use a lot of cooking oil when roasting. This will prevent splattering oil on the sides of
the oven and the oven door. Polyunsaturated fats can leave residue which is very difficult to
remove.
• When cooking things which require a high heat from below (e.g. tarts), place the cooking dish
on a scone tray in the desired shelf position.
• For sponges and cakes use aluminium, bright finished or non-stick utensils.
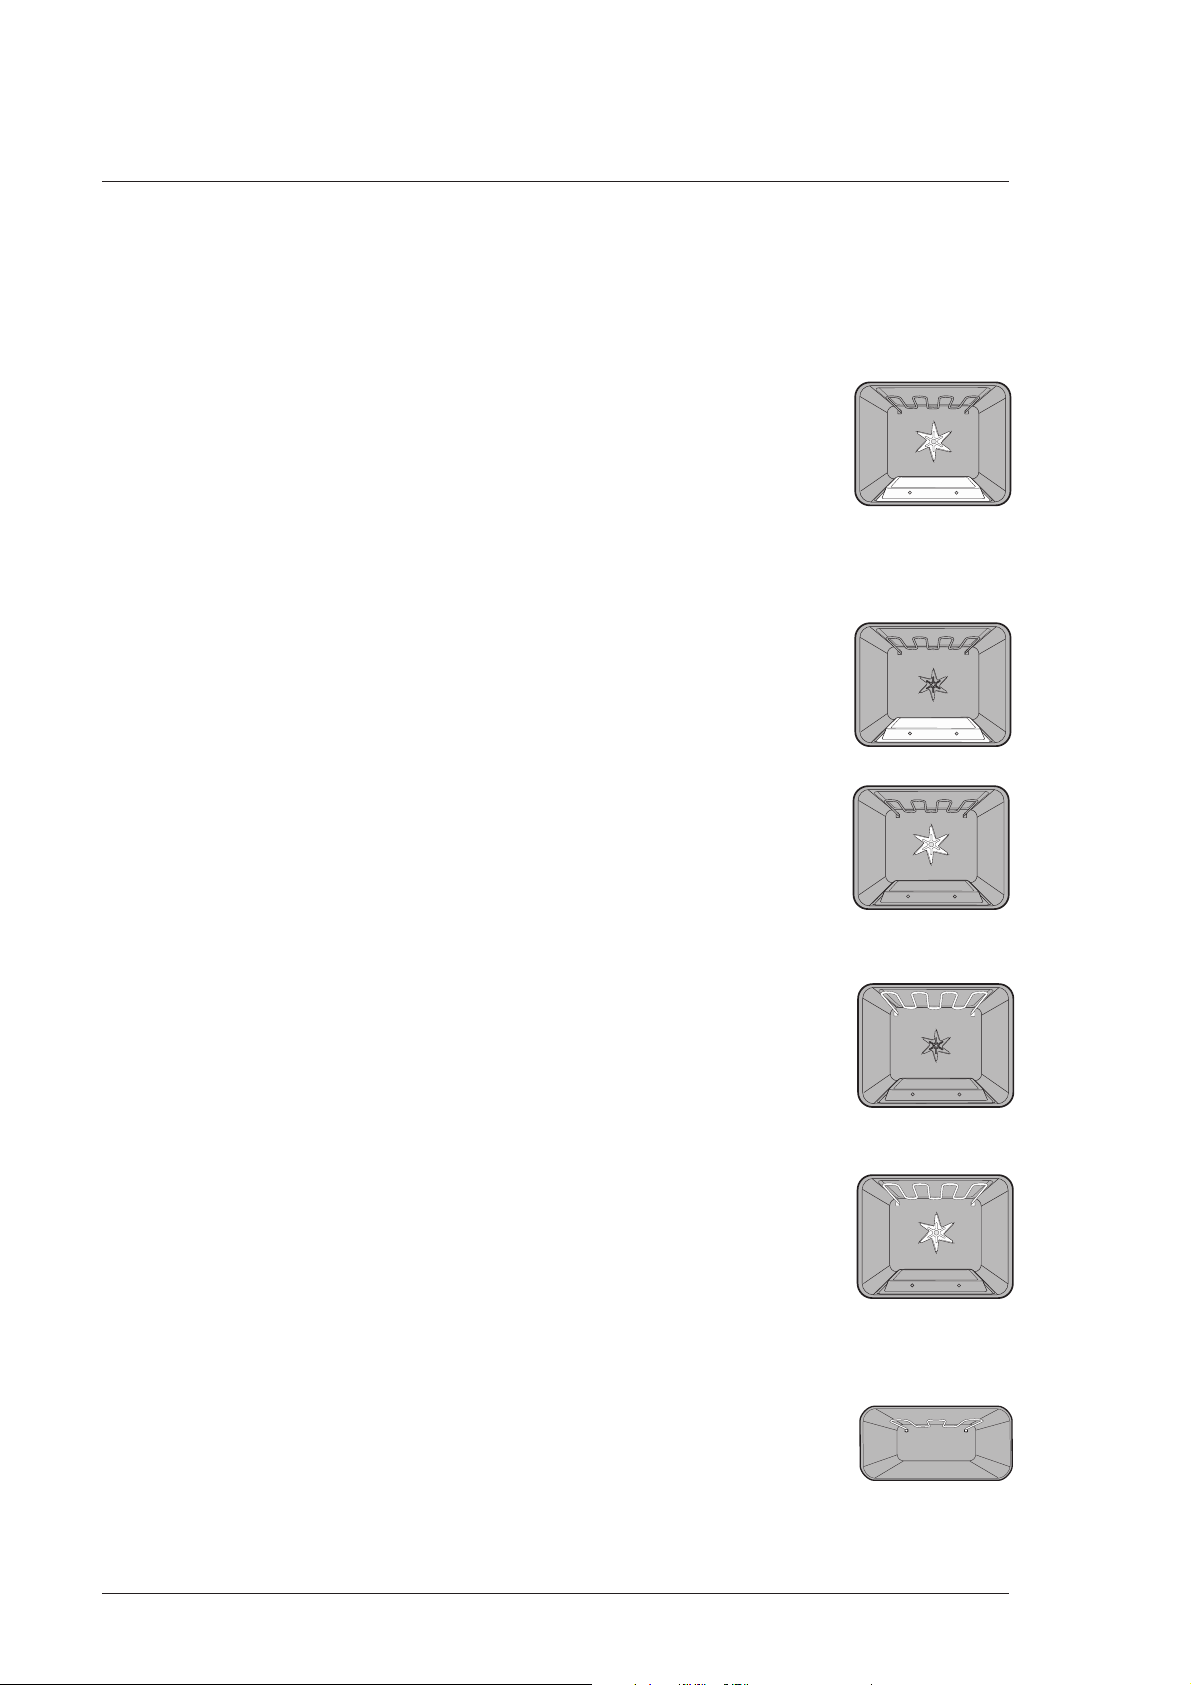
Oven shelf location
Your oven has five positions for shelves. These are numbered from 1
(the lowest shelf position) to 5 (the highest shelf position). See
diagram.
To give maximum space above and below the shelves, load them in
this way:
• When cooking with 1 shelf, use position 3.
• When cooking with 2 shelves, use position 2 and 5.
Use the oven efficiently, by cooking many trays of food at the same
time. For example:
• Cook 2 trays of scones, small cakes or sausage rolls.
• Cook a roast dinner at the same time as you cook chips or
vegetables.
5 Position Rack
5
4
3
2
1
Page 13

13
COOKING GUIDE
Modes without Oven Fan
Temperature Oven shelf Time in
Food in °C position* minutes
Scones Plain or fruit 220 2 10 -15
Biscuits Rolled 180 2 10 - 15
Spooned 190 2 12 - 15
Shortbread biscuits 160 1 or 2 30 - 35
Meringues Hard - individual 110 2 90
Soft - individual 180 2 15 - 20
Pavlova - 6 egg 110 1 75
Cakes Patty cakes 190 3 15 - 20
Sponge - 4 egg 180 2 20 - 30
Shallow butter cake 180 2 30 - 40
Rich fruit cake 150 2 180
Pastry - shortcrust Cornish pasties 200 / 180 2 40 - 45
Custard tart 200 / 180 1 10 / 20 - 30
Pastry - choux Cream puffs 210 2 25 - 30
Yeast goods Bread 210 1 25 - 30
* Counting from the bottom shelf up.
Modes with Oven Fan
Temperature Oven shelf Time in
Food in °C position* minutes
Scones Plain or fruit 210 Any 10 -15
Biscuits Rolled 170 2 & 4 10 - 15
Spooned 180 2 & 4 12 - 15
Shortbread biscuits 150 2 & 4 30 - 35
Meringues Hard - individual 100 Any 90
Soft - individual 165 Any 15 - 20
Pavlova - 6 egg 100 Any 75
Cakes Patty cakes 180 2 & 4 15 - 20
Sponge - 4 egg 170 2 20 - 30
Shallow butter cake 170 2 & 4 30 - 40
Rich fruit cake 130 2 180
Pastry - shortcrust Cornish pasties 180 / 160 2 40 - 45
Custard tart 190 / 170 2 20 - 30
Pastry - choux Cream puffs 200 2 & 4 25 - 30
Yeast goods Bread 200 Any 25 - 30
* Counting from the bottom shelf up. Refer to “oven shelf location” section for more detailed
information.
Page 14

14
COOKING GUIDE
Roasting Meat
1. Place the meat in the oven and set the
temperature between 180°C and 200°C. (It is
recommended to wrap your meats in an oven
roasting bag or foil to prevent fats and oils
from splattering, making it easier to clean
your oven.)
2. Use the grill / oven dish and smokeless grill
insert. Place the meat on the insert.
3. Do not pierce the meat, as this will allow juices
to escape.
4. When the meat is cooked, take the roast out of the oven, wrap in aluminum foil and leave to
stand for about 10 minutes. This will help retain the juices when the meat is carved. The table
shows temperatures and cooking times for different kinds of meat. These may vary depending
on the thickness or bone content of the meat.
Roasting poultry and fish
1. Place the poultry or fish in an oven set at a
moderate temperature of 180°C.
2. Place a layer of foil over the fish for about
three quarters of the cooking time.
The table shows temperatures and cooking
times for different kinds of fish and poultry.
These may vary depending on the thickness or
bone content of the meat.
Recommended Minutes per
Meat temperature kilogram
Beef 200°C Rare 35 - 40
Medium 45 - 50
Well done 55 - 60
Lamb 200°C Medium 40
Well done 60
Veal 180°C Well done 60
Pork 200°C Well done 60
Poultry
Recommended Minutes per
& fish temperature kilogram
Chicken 180°C 45 - 50
Duck 180 - 200°C 60 - 70
Turkey 180°C 40 - 45 (<10kg)
35 - 40 (>10kg)
Fish 180°C 20
Page 15

15
GRILLING GUIDE
Grilling hints
NOTE: Always clean the grill / oven dish after every use. Excessive fat build up may cause a fire.
As a method of cooking, grilling can be used to:
• Enhance the flavours of vegetables, fish, poultry and meat.
• Seal the surface of the food and retain the natural juices.
This table shows how to grill different types of meat:
Beef You can use tenderloin, rump, sirloin.
Brush with oil or melted butter, especially if the meat is very lean.
Lamb You can use loin chops, shortloin chops, chump chops, and forequarter chops.
Remove skin or cut at intervals to stop curling.
Brush with oil or melted butter.
Sausages Prick sausages to stop skin from bursting.
Poultry Divide into serving pieces.
Brush with oil.
Fish Brush with oil or melted butter and lemon juice.
Bacon Remove rind.
Grill flat and make into rolls.
Guide to better grilling
No definite times can be given for grilling
because this depends on your own tastes and
the size of the food. These times should only be
used as a guide and remember to turn the food
over half way through the cooking process.
For better grilling results, follow these easy instructions:
1. Remove oven / grill dish and smokeless grill insert and preheat grill for about 3 minutes.
2. Choose only prime cuts of meat or fish. If the cut is less than 5mm thick it will dry out. If the cut
is more than 40mm thick, the outside may burn whilst the inside remains raw.
3. Do not place aluminium foil under the food as this prevents fats and oils from draining away,
which could result in a fire.
4. Baste the food during cooking with butter, olive oil or marinade. Grilled food is better if
marinated before cooking.
5. Use tongs to turn food as a fork pierces the surface and will let juices escape.
Fan Grill (Multifunction grill in oven models only)
If your appliance has fan grill as a function, this will assist the grilling process by circulating the
heat evenly around the food. The recommended temperature setting is 180°C for all fan grilling
functions.
1. Use the smokeless grill insert and oven dish for all fan grilling.
2. Position the dish in the lower half of the oven, for best results.
3. Wipe off any oil or fat which spatters while the oven is still warm.
There is no need to turn the meat as both sides are cooked at the same time which means that
the food is succulent.
Steak 15 - 20 minutes
Chops 20 - 30 minutes
Fish 8 -10 minutes
Bacon 4 - 5 minutes
Product type Description Door position during grilling
Underbench Grill in oven models Door FULLY closed
Separate Grill Underbench Slide out grill drawer Drawer FULLY closed
Separate Grill Walloven Drop down grill door Door FULLY open
NOTE: Below is a table indicating the door position whilst grilling for each of the product types.
Page 16

16
DEALING WITH COOKING PROBLEMS (see also p.27)
RemediesCausesProblem
Uneven cooking
Baked products too brown on
top:
Baked products too brown on
bottom:
• Incorrect shelf position.
• Oven tray too large.
• Trays not centralised.
• Air flow in oven uneven.
• Grill dish affecting thermostat.
• Oven not preheated.
• Baking tins too large for the
recipe.
• Baking tins not evenly spaced.
• Products not evenly sized or
spaced on trays.
• Baking temperature too high.
• Baking tins too large for the
recipe.
• Baking tins are dark metal or
glass.
• Food too low in the oven.
• Oven door opened too
frequently during baking.
• Baking temperature too high.
• Grill dish affecting thermostat.
- Select shelf that puts food in the
centre of the oven.
- Experiment with other trays or dishes.
- Centre trays.
- Rotate food during cooking.
- Remove grill dish from oven on bake modes.
- Preheat the oven.
- Use correct size tins.
- Stagger baking tins at least 3cm
between tins and the oven walls.
- Make into same size and shape,
& spread evenly over trays.
- Lower the temperature.
- Use correct size tins.
- Change to shiny, light tins or lower
the temperature by 10°C.
- Cook one shelf higher.
- Don’t open the oven door until at least
half the cooking time has passed.
- Lower the temperature.
- Remove grill dish from oven on bake modes.
Cakes have a cracked, thick
crust:
Baked products are pale, flat
and undercooked:
Cakes fallen in the centre:
Roast meat & potatoes not
browning in fan oven:
Juices running out of meat:
Grilled meats overcooked on
outside & raw in the centre:
• Baking temperature too high.
• Food too high in oven.
• Cake batter over mixed.
• Pan too deep.
• Baking pans dark.
• Baking temperature too low.
• Food too low in oven.
• Baking time too short.
• Incorrect tin size.
• Baking temperature too low.
• Baking time too short.
• Proportions of Ingredients
incorrect in the recipe.
• Opening door too early in
baking.
• Poor hot air circulation.
• Grill dish affecting thermostat.
- Lower the temperature.
- Cook one shelf lower.
- Mix just long enough to combine
ingredients.
- Check size of pan and use
recommended size.
- Change to shiny pans.
- Raise the temperature.
- Cook one shelf higher.
- Increase cooking time.
- Use correct size tin.
- Raise the temperature.
- Increase cooking time.
- Check recipe.
- Do not open the door until the last
quarter of cooking time.
- Elevate food onto a rack to allow
air circulation.
- Remove grill dish from oven on bake modes.
- Do not pierce meat with fork, turn with tongs.
- Grill at lower insert position.
Grilled chops & steaks curling:
- Cut into fat every 2cm (
1
/2”).
Page 17

17
CLEANING YOUR APPLIANCE
IMPORTANT:
• Always make sure that the oven is electrically isolated before cleaning. This can be done via
the power point switch located nearby.
• Do not use steam cleaners.
• Do not line the bottom of the oven or grill with foil or cookware.
• Do not use sharp metal implements or utensils on any surface, as these may leave permanent
scratches or marks.
Enamel
• Rub persistent stains vigorously with a nylon scourer or creamed powder cleansers.
NOTE: You can also use household oven enamel cleaners - follow the manufacturer’s
instructions carefully.
• Do not use harsh abrasive cleaners, powder cleaners, steel wool or wax polishes.
Stainless steel
All grades of stainless steel can stain, discolour or became greasy. You must clean these areas
regularly by following the procedures below, if you want your appliance to look its best, perform
well and have a long life.
Care must be taken when wiping exposed stainless steel edges.…they can be sharp!
• Wash with warm soapy water and rinse with clean water.
• If you want a better look, wipe your appliance with a suitable stainless steel cleaner then wipe
with a soft lint free cloth.
• Use a stainless steel cleaner only
where the stainless steel is extremely dirty and / or discoloured.
A suitable cleaner can be purchased from Electrolux Service or Spares. See back cover.
NOTE: Make sure you follow the polish or brushing lines in the steel.
Glass
• Glass surfaces on doors and control panels are best cleaned immediately after soiling.
• A damp cloth may help remove baked on food deposits.
• Oven cleaners can be used to remove stubborn marks and stains.
Oven
• Always keep your appliance clean. Ensure that fats and oils do not accumulate around
elements, burners or fans.
• Always keep the oven dish, bake trays and smokeless grill insert clean, as any fat deposits may
catch fire.
• Always wrap your meats in foil or an oven roasting bag to minimise cleaning. Any
polyunsaturated fats can leave a varnish-like residue which is very difficult to remove.
Grill
• Always keep the grill dish and smokeless grill insert clean, as any fat deposits may catch fire.
Page 18

18
Cleaning your oven
accessories
Removing the trays and shelves from your
appliance
• Slide the dish and shelves towards you until
they reach the front stop.
• Tilt them up at the front to clear the side
supports, taking care not to spill the
contents.
• Lift them clear.
• Wash the dish and insert the shelves in hot
soapy water.
• Reverse the above steps to put the grill dish
and shelves back again.
• Ensure that they are placed between the 2
support wires. See page 7 for more details.
Removing the side racks (shelf
supports)
• Grasp the shelf supports at the front.
• Pull them firmly inwards.
• To install the shelf supports, see page 7.
Removing and replacing the oven
light
• Turn oven light glass anticlockwise
to remove it for globe replacement.
• A special high temperature resistant
globe should be used. This can be
purchased from the Electrolux
Customer Care Centre.
IMPORTANT: Make sure the
appliance is turned
off before
you remove or replace parts,
to avoid the possibility of
electric shock.
CLEANING YOUR APPLIANCE
Page 19

19
CLEANING YOUR APPLIANCE
Releasing the grill element
Retaining wire models
We have designed the upper
element with a hanger clip to help
you reach your oven roof for
cleaning.
Retaining wire models
• Lift element up carefully.
• Pull hanger clip to the left or
right to unhook it.
The element will drop down freely.
Page 20

20
Your gas oven is fitted with an electronic controller which manages the operation of the burner
and monitors the flame. This controller includes features which ensure the safe operation of your
appliance and will prevent the build up of unburnt gas, should a fault occur.
It is normal for the flame to turn on and off during cooking, to maintain a stable temperature in
the oven. The Thermostat Indicator Light indicates when the flame is on or igniting (indicator
glows), or when the flame is off (indicator off).
The burner flame can be seen by viewing through the 2 holes in the front of the burner cover.
Ignition and Response to Ignition Failure
The controller will attempt to ignite the flame when an oven function is selected and the
Thermostat turns on (indicator light changes from off to on). The controller will make up to 2
attempts to ignite the flame, stopping if a flame is detected by the controller. If by the end of the
2 attempts a flame is not detected then the burner and ignition will be turned off and a delay of
90 seconds will be observed. During this delay the controller will not respond to the Function and
Thermostat controls.
At the end of this delay, switch the Thermostat or Function Selector off and leave off for at least
5 seconds. Then switch the Thermostat and Function Selector on again to re-attempt ignition.
If the oven controls are left on when the delay ends then ignition will not be attempted until the
Thermostat or Function Selector is first turned off for 5 seconds.
Response to Flame Failure
If the controller cannot detect flame due to a fault, then the controller will respond
• firstly by attempting to re-light the burner with a sequence of up to 3 attempts and
• If the re-lighting sequence is not successful the burner will be shut off.
The re-lighting sequence will include up to 3 attempts to re-light the burner, stopping if a flame
is detected by the controller. If by the end of the re-lighting sequence a flame is not detected then
the burner and ignition will be turned off and a delay of 90 seconds will be observed. During this
delay the controller will not respond to the Function and Thermostat controls.
At the end of this delay, switch the Thermostat or Function Selector off and leave it off for at least
5 seconds. Then switch the thermostat and Function Selector on again to re-attempt ignition.
If the oven controls are left on when the delay ends then ignition will not be attempted until the
Thermostat or Function Selector is first turned off for 5 seconds.
Recognising a Safety Shut-down Condition
During normal cooking the Thermostat indicator light is on when the burner flame is igniting or
on, and the Thermostat indicator light is off when the flame is off.
If an oven function is selected and the Thermostat light is on, but the flame is not on or
attempting to ignite then the controller has invoked a safety shutdown of the burner. A 90 second
delay is observed from the time the shut-down occurred before the controller will respond to the
oven controls.
Once the delay period has ended the Thermostat or Function Selector must be turned off for at
least 5 seconds before oven functions can resume.
Power Failure
In the event of an interruption to mains power, the restoration of power will not cause the burner
to ignite if the controls were left on. However the grill element will resume heating on models
which do not have an electronic clock.
To resume operation of the appliance after a power interruption:
• First turn the Function Selector or Thermostat controls to the off position. The controls must
remain in this position for at least 5 seconds
• If the appliance has an electronic clock then set the time of day on the electronic clock.
Normal operation of the appliance may now resume.
ELECTRONIC BURNER CONTROL
Page 21

21
SOLVING PROBLEMS
Faults
If there is a problem with the oven and/or grill, please:
• Check the points listed below before calling for service. It may be possible to avoid a call by
fixing the problem yourself - and so continue cooking.
• For cooking problems refer to page 22.
NOTE: We may charge for service even in the guarantee period if your problem is due to the
causes listed below.
Data Plate
When you need information, service or replacement parts please:
• Tell us the 1. Model, 2. Model Number & 3. Serial Number shown on the data plate.
The data plate is visible when the oven or grill door is open.
If you need more information, please contact the Customer Care Centre on 1300 363 640
(Australia - Centre is open 8.00am - 5.00pm M - F Eastern Standard Time) or +649 573 2384 (New
Zealand - Centre is open 8.00am - 5.00pm M - F). If you have a warranty or spare parts enquiry,
you should call the number listed on the back page.
Problem Possible Cause
Oven or grill not working:
Oven light not working:
Oven not heating enough:
Oven not working:
Timer flashing on display:
Unit smoking when first used:
Door cannot be replaced
after removal
Excessive heat or condensation • Check cooling fan is working by feeling for air movement at
on control panel or knobs top of oven door. If no air movement is detected, call the Electrolux
Customer Care Centre.
NOTE: Only authorised personnel should carry out servicing.
• Time of day not set.
• Power not turned on.
• Gas supply turned off or LPG bottle empty.
• Controls are incorrectly set.
• Household fuse has blown or power supply is off.
NOTE: If the household fuse continues to blow, call the Electrolux
Customer Care Centre.
• Lamp blown or loose in socket.
• Household fuse has blown.
NOTE: If the household fuse continues to blow, call the Electrolux
Customer Care Centre.
• Foil or trays on bottom of oven.
• Timer is in
“AUTO”
mode. (Refer to timer operating instructions)
• Household fuse has blown.
NOTE: If the household fuse continues to blow, call the
Electrolux
Customer Care
Centre.
• Gas supply turned off or LPG bottle empty.
• The oven safety shutdown has enacted. Reset the controls, wait 90
seconds and then re-start the oven.
NOTE: If safety shutdown persists, call the
Electrolux Customer Care
Centre.
• Power failure or interruption.
NOTE: Reset time of day and any cooking functions you were using.
(Refer to TIMER operating instructions).
• Protective oils being removed.
• Stirrup not engaged properly.
Page 22

22
USE AN AUTHORISED PERSON
As stated in the local municipal building codes and other relevant statutory regulations.
• Refer to data plate for rating information and circuit diagram. The data plate is positioned
behind the bottom of the oven door. The circuit diagram is positioned on the top panel of
the appliance.
IMPORTANT: This appliance must be properly earthed.
• Do not lift the appliance by the door handles.
• Prepare the cupboard opening to match your appliance measurements. (See diagrams).
• Slide appliance into the cupboard, ensuring that the supply cable (where fitted) does not
kink.
• To prevent tipping, use the screws supplied to secure your oven into the cupboard. Use just
2 screws for underbench and separate grill underbench ovens, and 4 screws for separate
grill wallovens. Remove the bottom door in separate grill wallovens to provide access to
the bottom 2 screwing points (see illustrations on page 26 & 27).
• For appliances fitted with a supply flexible cord, if the cord is damaged, it must be
replaced by the manufacturer or its service agent or similarly qualified person in order to
avoid a hazard. The plug must be accessible after installation.
• Where the appliance is built into a cabinet, the cabinet material must be capable of
withstanding 70°C. Installation into low temperature tolerant cabinetry (e.g. vinyl coated)
may result in deterioration of the low temperature coating by discolouring or bubbling.
• If the appliance is installed adjacent to vinyl-wrapped surfaces, use an installation kit
available from the vinyl-wrap supplier.
• Electrolux Home Products cannot accept responsibility for damage caused by installation
into low temperature tolerant cabinets.
• After installation, test and ensure that the appliance operates correctly before handing it
over to the customer.
It is recommended that this product is not installed in an unvented living space, particularly
if that space incorporates sleeping quarters.
CAUTION: To avoid any potential hazard, you must follow our instructions below
when you install your appliance. Failure to install the appliance correctly could
invalidate any warranty or liability claims and lead to prosecution.
This appliance is only suitable for connection to fixed consumer piping where the fault
pressure is limited to 14kPa or less.
Refer clause 4.6.1 of A.S. 5601.
INSTALLATION
Page 23

23
INSTALLATION
Cabinet Construction for your appliance
For the best integration within a kitchen, install this appliance in a standard 600mm wide
cupboard that gives a flush fit with the surrounding cupboard fronts (figure A).
A recess of 20 mm is ideal. It can also be installed using a proud fit with the surrounding cupboard
(figure B).
NOTE: Your appliance must be mounted on a flat surface for the full width and depth of the
product.
Cleat
Figure A - Flush fit (top view)
Figure B - Proud fit (top view)
Cupboard
door
Cupboard
door
Infill panel
Cupboard front
20mm
Page 24

Gas Connection
Before commencing installation, check to
ensure the type of gas to which the
appliance is intended to be connected
matches the gas type given on the
appliance data plate.
Check the data plate (located behind the
oven door) to determine gas type. A gas
type label is located on the back panel near
the gas inlet.
A 1700mm long flexible hose is supplied in
the pack for installation purposes.
CONNECTING FLEXIBLE HOSE
• Place a spanner on the flats provided on the gas inlet to brace the inlet against the action of
wrenching when connecting the hose to the appliance gas inlet. Failure to do so may damage
the appliance.
• An approved thread sealing tape or compound is required for the connection between the hose
and the appliance gas inlet.
Appliances for operation on N.G. & S.N.G.
For N.G. and S.N.G appliances the supplied N.G. regulator must be fitted. For L.P.G appliances
(Propane or Universal LP) the test point fitting supplied must be fitted.
NOTE: The inlet of the regulator or test point fitting should be fitted to the consumer piping first.
The arrow on the regulator or test point fitting indicates the direction of gas flow. Then connect
the hose to the outlet of the regulator or test point fitting using the swivel connection on the
hose and fibre washer supplied.
Ensure the regulator or test point fitting is in a position that is accessible with the
appliance installed and which will allow the appliance to be withdrawn without
disconnecting the hose.
Check all joints and ensure that connections are sound.
24
GAS INSTALLATION INFORMATION
Internal
Flange
Important: Flat fibre washer
must be installed
(P/No. 115-009-011)
NG Regulator
(P/No. 294-001-031)
w
s Flo
a
G
To
ce
lian
pp
A
Flexible Hose
Page 25

25
GAS INSTALLATION INFORMATION
Operating Pressures
Supply and operating pressures for various gases and corresponding injector sizes for each burner.
Gas Type Supply Pressure (kPa) Nominal Test Point Oven injector
Pressure (kPa)
NG & SNG 1.13 - 5.00 1.00 1.50
Universal LP 2.75 2.75 0.82
Testing the Operation of the Appliance
After installation, test and ensure that the appliance operates correctly before handing it over to
the customer. The following procedure is recommended:
• Connect a manometer to the appliance pressure test point. This is located on the gas regulator.
(or test point fitting on L.P.G. models).
• Turn on the gas supply and electricity and operate the controls.
• Check ignition on all burners.
NOTE: Additional time needs to be allowed for the initial lighting as air has to be purged from
the pipes.
• Check the operating pressure and adjust the regulator to the appropriate setting for the gas
type, as given in the table above.
NOTE: The pressure should be set and locked while the oven is operating.
• Observe the flame appearance on the burner. If it is much larger or much smaller than
expected, the injector size may require checking. Where a flame is unsatisfactory refer to the
servicing instructions and correct the fault if possible.
• Check the operation of the timer, light and fan.
If the appliance cannot be adjusted to perform correctly, inform the customer of the problem and
affix an appropriate warning notice to the appliance. If the fault appears to be dangerous, the
appliance should be disconnected. However, if only a minor fault exists, the customer may wish to
use the appliance while awaiting service.
The customer should be advised that, in the event of a fault, they should contact the
manufacturer's local Service Organisation or the retailer from whom the appliance was purchased.
Underbench Ovens
Your underbench oven looks best when the control panel is directly under the benchtop. An
upper infill panel may have to be added if the cooktop placed above the benchtop is too deep.
Refer to cooktop installation instructions for required clearance between cooktop and oven.
NOTE: If a powerpoint is fitted it must be
accessible with the appliance installed.
545
595
Page 26

26
GAS INSTALLATION INFORMATION
Separate Grill Underbench
Separate Grill Underbench Ovens
Recommended Cabinet Design
NOTE TO INSTALLER: For Separate Grill
Underbench Installations where a Cooktop is
installed directly above the appliance, a
minimum clearance distance of 10mm must be
allowed for between the bottom of the
cooktop & the top of the Separate Grill
Underbench Oven.
Front View
NOTE: Power point connection must
be accessible with the appliance
installed.
Area for mounting of
power point.
Supporting shelf 8mm
below door line to give
perfect alignment of
cooker & cupboard (kick
panel notched to suit).
720mm Module(s)
Bench top
720mm Module(s)
Kick Panel
Infill panel (2)
Cleat (2)
Cooker
platform
545
725
USE 25mm LONG BLACK
INSTALLATION SCREWS
(AS SUPPLIED)
Page 27

27
GAS INSTALLATION INFORMATION
Separate Grill Walloven
Door Removal for Separate Grill Walloven installation
Removing the door from your appliance
• Open door fully.
• Rotate the two stirrups forwards so that they are engaged
together onto the hooks on the hinge arms.
• Hold both stirrups in place and lightly close the door. The
stirrups will now remain engaged.
• Close the door half way and lift it away from the oven.
• Do not lift the door by the handle, use one hand either side of
the door, keeping fingers clear of the hinge arms.
Replacing the door to your appliance
• Relocate both hinge arms at the same time into the front
housing.
• Ensure that the location notches on the bottom of the hinge
arms are positioned onto the lower cutout lip.
• Close the door partially to ensure that the location notch
drops into place.
• When the hinges are located, open the door fully and ensure
the stirrups are disengaged.
NOTE: Never use force and always ensure that the location notch is correctly engaged before
you operate the door.
IMPORTANT: Never lift or carry the door by the handle.
Do not immerse the door in water.
545
888
Page 28

HEADINGHEADING
COOKING APPLIANCE WARRANTY – AUSTRALIA
Service
ELECTROLUX HOME PRODUCTS PTY LTD
ABN 51 004 762 341
• Contact the people who know your oven best if you need service – during or after warranty.
• We are the national service organisation authorised by the manufacturer to service their products.
• Our technicians are factory trained.
• We offer guaranteed approved replacement parts and a full labour warranty as part of our service.
Please phone
131349
For the cost of a local call
(Australia only)
Spare Parts
ELECTROLUX HOME PRODUCTS PTY LTD.
ABN 51 004 762 341
For approved replacement parts for your appliance, your nearest stockist is only a phone call away!
Please phone
131350
For the cost of a local call
(Australia only)
P/N 342-1-522 ECN 06A151E 02/07
COOKING APPLIANCE WARRANTY – NEW ZEALAND
ELECTROLUX HOME PRODUCTS (NZ) LTD
3 Niall Burgess Road, Mt Wellington, AUCKLAND, NEW ZEALAND
(09) 573 2220
Product ........................................................................................ Date of Purchase ..........................................................
Model .......................................................................................... Serial Number ................................................................
Purchaser’s Name .....................................................................................................................................................................
Full Postal address ...................................................................................................................................................................
Retail (Shop) ............................................................................................................................................................................
Address
Please keep this information and your Proof of Date of Purchase to show the technician when you need service during the guarantee period.
SERVICE – NEW ZEALAND SPARE PARTS CENTRES
AUCKLAND
Electrolux Home Products (NZ) Ltd. 3-5 Niall Burgess Road, Mt.Wellington ....................(09) 573 2220
Appliance Parts World Limited, 154 Apirana Ave, Glen Innes............................................(09) 528 5555
Prime Distributors Limited, 533H Great South Road, Manukau........................................(09) 277 7399
WELLINGTON
Stemco, 144 Queens Rd, Lower Hutt,Wellington ..............................................................(04) 569 8142
CHRISTCHURCH
R Redpaths, 55 Ferry Road,Christchurch...........................................................................(03) 379 0446
Prime Distributors Ltd, Unit One, 15 Talfourd Place, Christchurch.....................................(03) 377 1009
DUNEDIN
South City Champion, 590 Hillside Road, Dunedin............................................................(03) 455 5443
SERVICE CENTRES
PLEASE PHONE
0800 106 610
FREE CALL
(New Zealand only)
For your nearest approved
Service Centre please look in
the Yellow Pages under
Appliance Repairs
OR
Call 0800 106 610
Nothing in this warranty, limits any rights you may have under the Trade Practices Act or any other Commonwealth or State
legislation. Such rights cannot be changed by the conditions in this warranty.
Subject to the conditions below, this appliance is warranted by Electrolux Home Products Pty. Ltd. A.B.N. 51 004 762 341,
parts on your appliance which the Company finds to be defective.
(the “Company”), to be free from defects in materials and workmanship for a period of 24 months following the date of
purchase (the “Warranty Per iod”).
Conditions of the warranty:
1 During the Warranty Period the Company, or its service agent, will only pay the cost of repairing or replacing all Company
2 The Company will decide if there are any defects in material and/or workmanship.
3 Light globes, batteries and filters are replaceable par ts and are not covered under this warranty.
4 This warranty applies only for mainland Australia and Tasmania.
5 The appliance must be installed and operated in accordance with the Company’s instructions.
negligence, misuse, fire or flood.
person other than someone authorised by the Company.
of transport of the appliance for service nor the service agent’s travelling costs to and from your home.
and insured. The Company does not accept any responsibility for loss or damage of the appliance prior to it being
received by the Company or its service agent.
electrical storm damage or incorrect power current.
damages or for loss, damage or expense or for personal injury or loss or destruction of property arising directly or
indirectly from the use or inability to use this appliance or any of its parts.
6 This warranty does not apply to normal wear and tear, or any service which is needed after an accident, alteration,
7 This warranty does not apply to damage caused if your appliance has been dismantled, repaired or serviced by any
8 If you live outside the service area of the Company or one of its service agents, this warranty does not cover the cost
9 If you are required to transport the appliance to the Company or its service agent, you must ensure it is securely packed
10 This warranty does not cover loss, damage or expense to this appliance caused directly or indirectly by power surges,
11 The Company (and any company related to the Company) will not be liable for any special, incidental or consequential
12 This warranty applies only to the original buyer.
this warranty.
13 This warranty is the only express warranty given by the Company.
14 If you are the original buyer please keep your proof of purchase, which will be required if you request service under
15 The Warranty Period is only applicable when your appliance is used at home by you and your family as consumers.
purchase.
16 Use of this appliance for commercial purposes is covered by this warranty for a period of 3 months from the date of
Please complete data below for your future reference.
Model: Serial No.:
Purchased from: Purchase Date:
the Company or its Authorised Service Centre find defective for a period of 24 months following the date of purchase
(the “Warranty Period”).
parts which they find are defective.
alteration or misuse.
person other than someone authorised by the Company.
of transport of the appliance for service nor the Authorised Service Centre’s travelling costs to and from your home.
and insured. The Company does not accept any responsibility for loss or damage prior to it being received by the Company
or its Authorised Service Centre.
electrical storm damage or incorrect power current.
damages or for loss, damage or expense directly or indirectly arising from the use or inability to use this appliance, or
for personal injury or loss or destruction of other property.
to the extent permitted by that Act, and all provisions of this warranty shall be read as modified to the extent necessary
This appliance is warranted by Electrolux Home Products (NZ) Ltd (“the Company”) from the date of purchase. The following
terms and conditions apply:
1 The Company or its Authorised Service Centre will pay the cost of repairing or replacing all parts of the appliance which
2 During the Warranty Period the Company or its Authorised Service Centre, will pay the cost of repairing or replacing all
3 Light globes, batteries and filters are replaceable parts and are not covered under this warranty.
4 The appliance must be installed and operated in accordance with the Company’s instructions.
5 This Warranty does not apply to normal wear and tear, or any service which is needed after an accident, negligence,
6 This Warranty also does not apply to damage caused if your appliance has been dismantled, repaired or serviced by any
7 If you live outside the service area of the Company or its Authorised Service Centre, this warranty does not cover the cost
8 If you are required to transport the appliance to the Company or its Authorised Service Centre, it must be securely packed
9 This warranty is the only express warranty given by the Company.
10 This Warranty does not cover loss, damage or expense to this appliance caused directly or indirectly by power surges,
11 The Company (and any company related to the Company) will not be liable for any special incidental or consequential
to give effect to that intention.
12 Nothing in this warranty is intended to limit the rights you may have under the Consumer Guarantees Act 1993, except
13 The Consumer Guarantees Act 1993 does not apply if your appliance is acquired for the purposes of a “business” (as
defined in that Act).
14 This warranty is limited to 90 days from date of purchase if the appliance is used for commercial use.
IMPORTANT NOTICE
Before calling a service technician please carefully check the warranty terms and conditions, the operating instructions and
service booklet if applicable. If the product fails for any of the customer responsibility reasons detailed therein, a service
fee will be charged. Please present proof of purchase to any Authorised Service Centre should warranty service be required.
 Loading...