

Page 1
EW39T5KW
Page 2

Contents
Safety and warnings.......................................................................................2-3
Introduction.....................................................................................................4
Stand installation guide.....................................................................................5
Installation................................................................................................... 6-9
Remote Control..............................................................................................10
Operation.................................................................................................. 11-13
-1-
Page 3
IMPORTANT SAFETY INSTRUCTION
1) Read these instructions.
2) Keep these instructions.
3) Heed all warnings.
4) Follow all instructions.
5) Do not use this Television near water.
6) Clean only with dry cloth.
7) Do not block any ventilation openings, install in
accordance with the instructions.
8) Do not install near any heat sources such as
radiations, heat registers, stoves, or other Telev ision
(including amplifiers) that produce heat.
9) Do not defeat the safety purpose of the polarized
plug. If the provided plug does not fit into your
outlet, consult an electrician for replacement of the
obsolete outlet.
10) Protected the power cord from being walked on
or pinched particularly at plugs, convenience
receptacles, and the point where they exit from the
Television.
11) Only use attachments/access ories specified by
the manufacturer.
12) Unplug this Television during lighting storms or
when unused for long periods of time.
13) Refer all servicing to qualified service personnel.
Servicing is required when the Television has been
damaged in any way, such a s; power-supply cord or
plug is damaged, liquid has been spilled or objects
have fallen into the Television, the Television h as
been exposed to rain or moisture, does not operate
normally, or has been dr opped.
14) Mains plug is used as the disconnect device, the
disconnect device shall remain readily operable.
15) The ventilation should not be impeded by
covering the ventilation openings with items, such as
newspapers, table-cloth, curtains, etc.
16) No naked flame sources, such as lighted candles,
should be placed on the Television.
17) Attention should be drawn to th e environmental
aspects of battery disposal.
18) The use of Television in moderat e climate.
19) The Television shall not be expo sed to dripping
or splashing and that no objects filled with liquids,
such as vases, shall be placed on the Television.
CAUT ION
RISK OF ELECTRIC SHOCK
DO NOT OPEN!
TO REDUCE THE RISK OF ELECTRIC SHOCK, DO
NOT REMOVE COVER (OR BACK).NO USER
SERVICEABLE PARTS INSIDE. REFER SERVICING
TO QUALIFIED SERVICE PERSONNEL.
The symbol indicates that dangerous
voltages constituting a risk of electric shock
are present within this unit.
CAUTION
SA FE TY AND WARNINGS
The symbol indicates that there are
important operating and maintenance
instructions in the literaturaccompanying this
unit.
WARNING:
To reduce the risk of fire or electric shock, do
not expose this Television to rain or moisture.
WARNING:
The batteries shall not be exposed to
excessive heat such as sunshine, fire or the
like.
WARNING:
The excessive sound pressure from earphones
and headphones can cause hearing loss.
This symbol indicates that this product
incorporates double insulation between
hazardous mains voltage and user accessible
parts. When servicing use only
identical replacement parts.
This marking indicates that this product should
not be disposed with other household wastes
throughout the EU. To prevent possible harm to
the environment or human health from
uncontrolled waste disposal, recycle it
responsibly to promote the sustainable reuse of
material resources. To return your used device,
please use the return and collection systems or
contact the retailer where the product was
purchased. They can take this product for
environmental safe recycling.
This Westinghouse product has earned the
ENERGY STAR® for meeting U.S. Federal
energy efficiency guidelines as set by the
Department of Energy and Environmental
Protection agency. The ENERGY STAR®
program exists to provide energy saving
guidelines and help promote energy efficient
products and practices. Changes to certain
features, settings and functions of this TV can
change and/or increase its power consumption.
Depending on how settings are changed, power
consumption may exceed the limits required
for ENERGY STAR® qualification.
-2-
Page 4
High voltages are used in the operation of this television
receiver. Do not the cabinet.
Refer servicing to qualified service personnel.
open
SA FE TY AND WARN IN GS
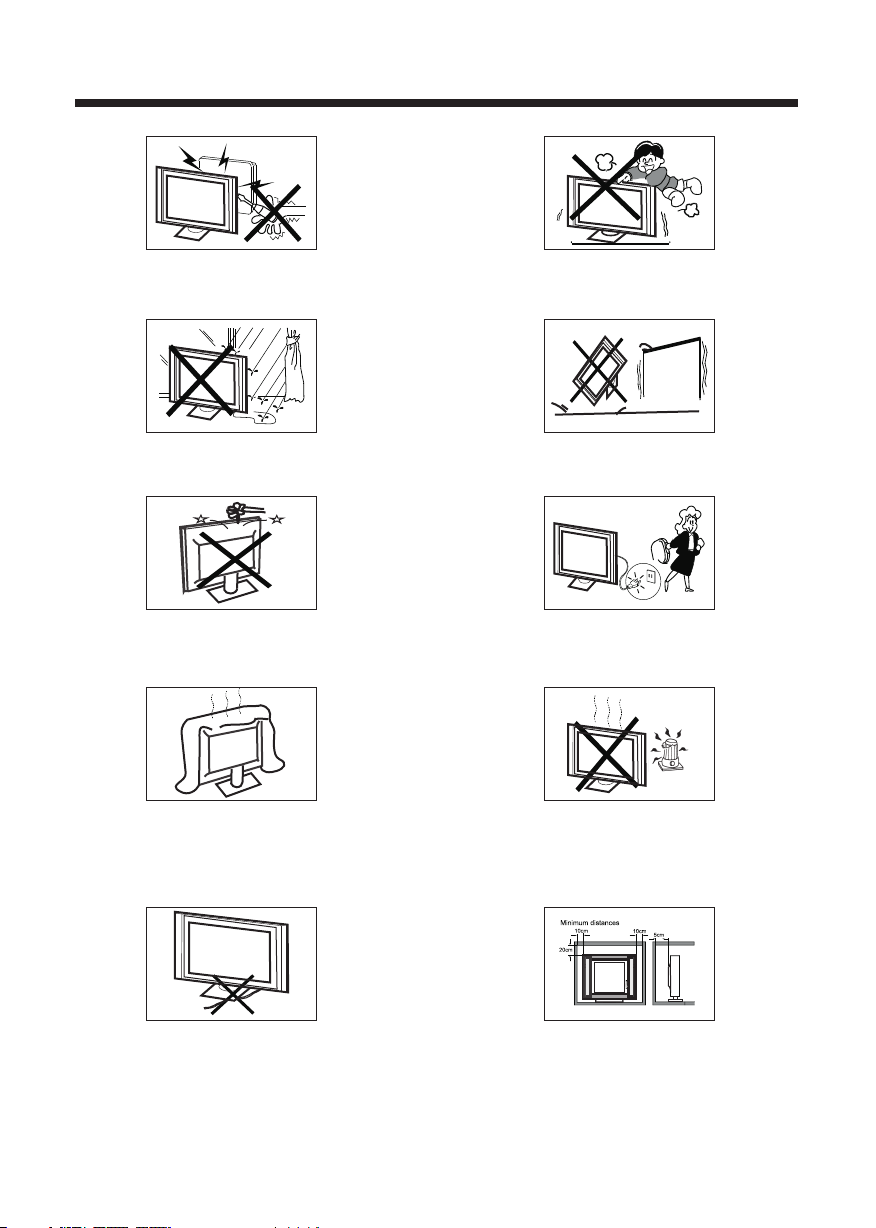
Never stand on, lean on, or suddenly push the television or
its stand. You should pay special attention to children.
Serious injury may result if it falls.
To prevent fire or electrical shock hazard, do not expose
the television receiver to rain or moisture.
Do not drop or push objects into the television cabinet
slots or openings. Never spill any kind of liquid on the
television receiver.
Do not block the ventilation holes on the back cover .
Adequate ventilation is essential to prevent failure of
electrical components.
of the TV
Do not place your television on an unstable cart, stand,
shelf or table. Serious injury to an individual and damage
to the television may result if it falls.
/or
When the tel evisi on receiver is not used for an
extended p eriod o f time, it is advisable to dis connect
the AC power co rd from the AC outlet.
Avoid exposing the television receiver to direct sunlight
and other sources of heat. Do not stand the television
receiver directly on other products which give off heat,
e.g. video cassette players and audio amplifiers. Do not
place naked flame sources, such as lighted candles on
the television. or near
Do not trap the power supply cord under the television
receiver s .' stand
If the television is to be built into a compartment or similar
enclosure, the minimum distances must be maintained. Heat
build-up can reduce the life of your television, and can also
be dangerous.
-3-
Dim:515*320mm(不包 括底座)
Page 5
Main features
■ Integrat ed ATSC TV tuner for HDTV broadcast recepti on
■ High brightness provides a vivid and brilliant picture
■ Deeper blac ks and brig hter whites with high contras t
■ Wide Screen aspe ct rat io (wide) for a complete home
theater ex perie nce
■ HDMI input for true digital connec tion
■ VGA port for con nection to PC
■ Built-in s tereo sp eaker sys tem
■ Full-fun ction Remote Control
Main parameter
INTRODUCTION
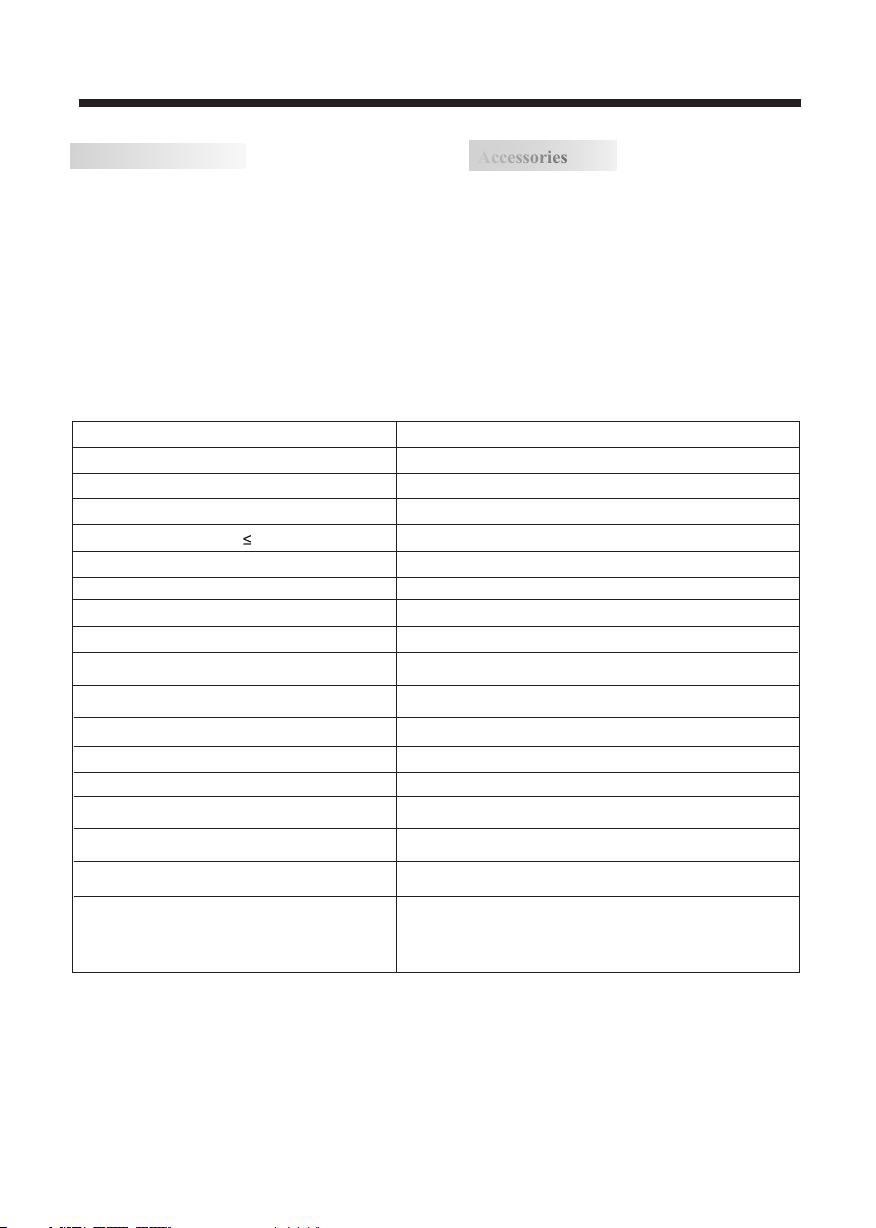
Accessories
Accessories
Power cabl e.... .................. ..... ........
Infrared R emote C ontrol............ ..... ...
User’s M anual .. ..... .................. ..... ...
Battery( AAA). .................. ..... ........... 2
1
1
1
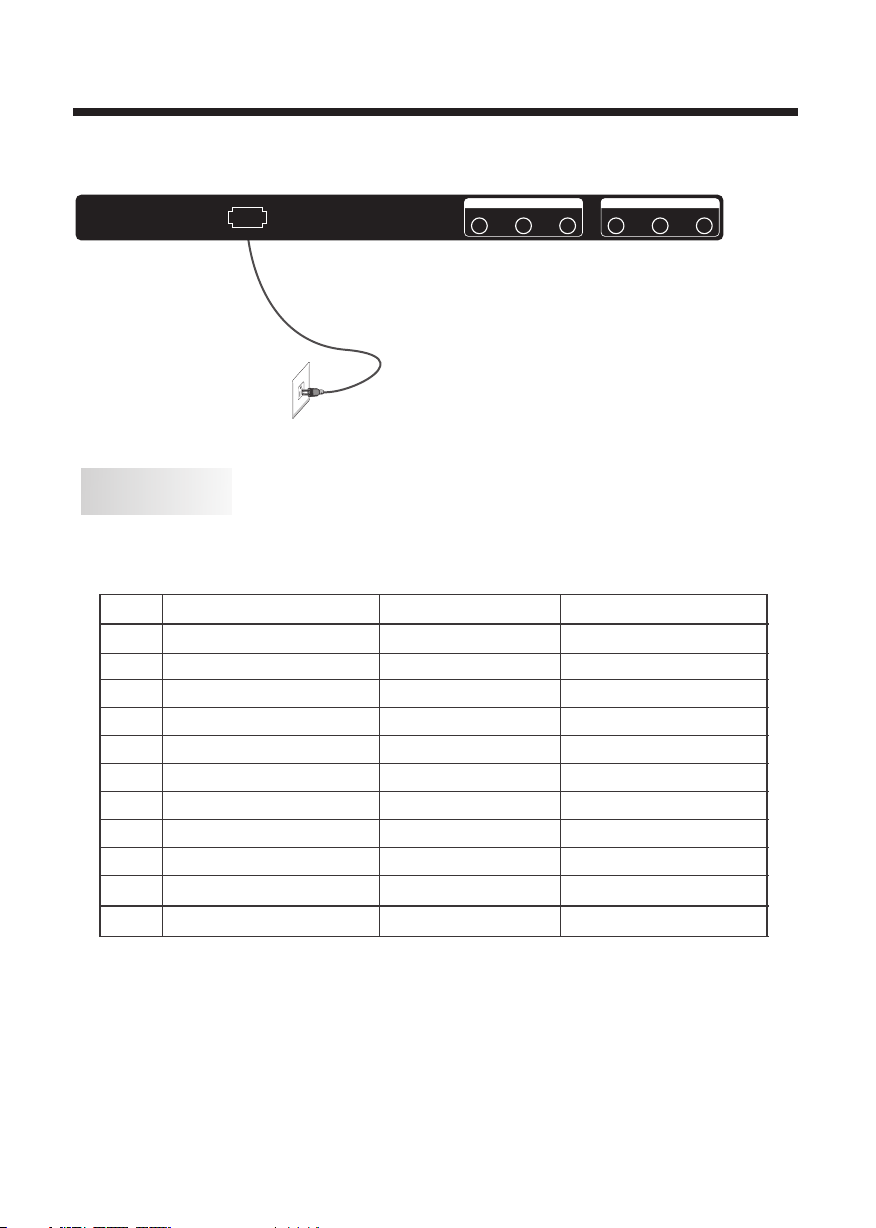
Viewing Picture Size (diagonal)
Resolution:
Power supp ly
Power cons umpti on
Audio Output Power (THD 7%):
Aspect Ratio:
TV System:
Video Signal System:
Receiving Channel:
High-Definition Multimedia Interface (HDMI) Input
YCb(Pb)Cr(Pr) Input
Composite Video Input
Analog RGB (VGA) Input
Audio Input x 2
Headphone Output
Coaxial Output
USB Input
Horizontal definition (TV line) Composite Video Input >=350
39 inches
1920 x 1080
AC 100-240V 50/60Hz
70W
2x8W
16:9
ATSC Digital system and NTSC Analog system
NTSC
Cable :1-135/ Air: 2-69 (ATV&DTV)
x 2
x 1
x 1
x 1
x 1
x 1
x 1
Video Input >=400
YCb(Pb)Cr(Pr) >=400
-4-
Page 6
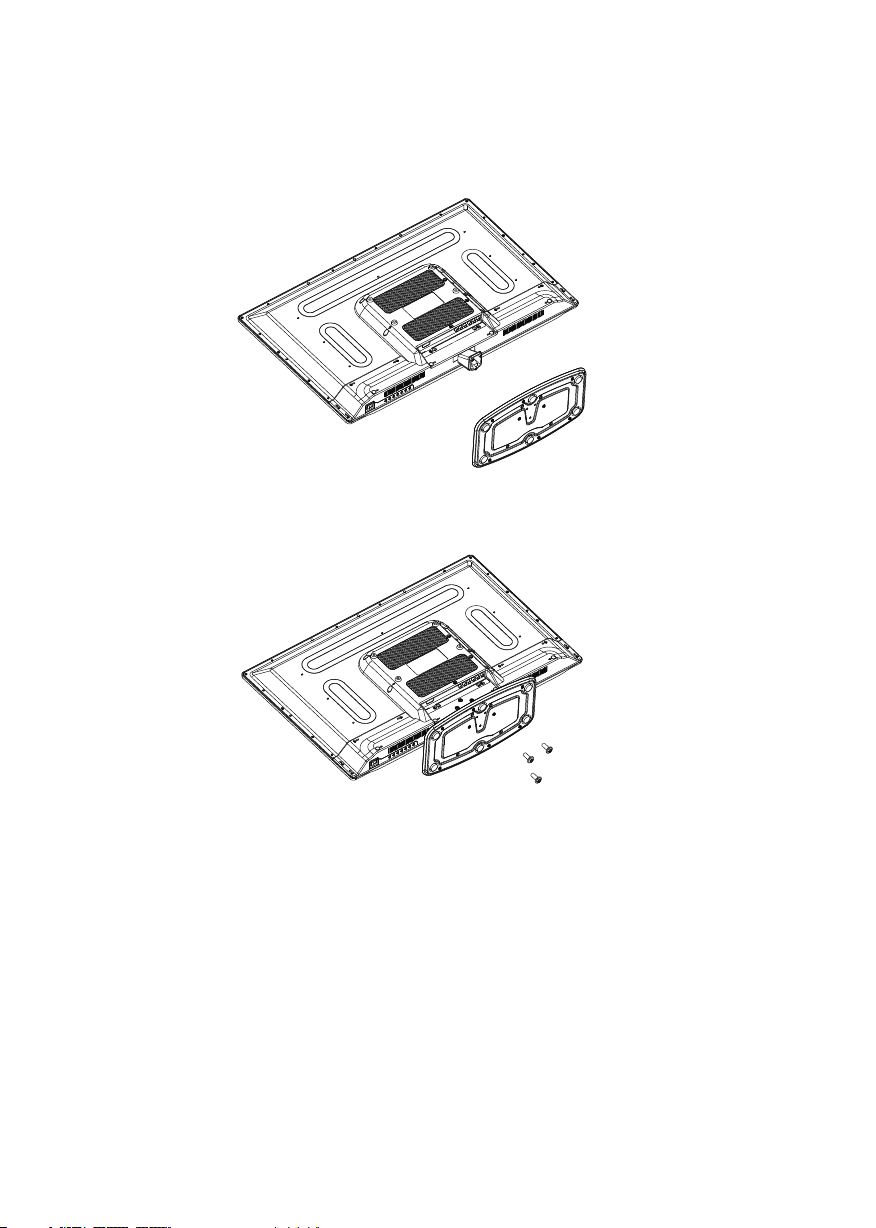
Base Stand Assembly Instruction
1. Place the TV with the display side down on a flat surface. Use a cloth to protect . the display
Position the stand base plate onto the bottom of the stand pole.
2. Attach the stand base plate to the stand pole by firmly tightening the supplied screw.
-5-
Page 7
INSTALLATION
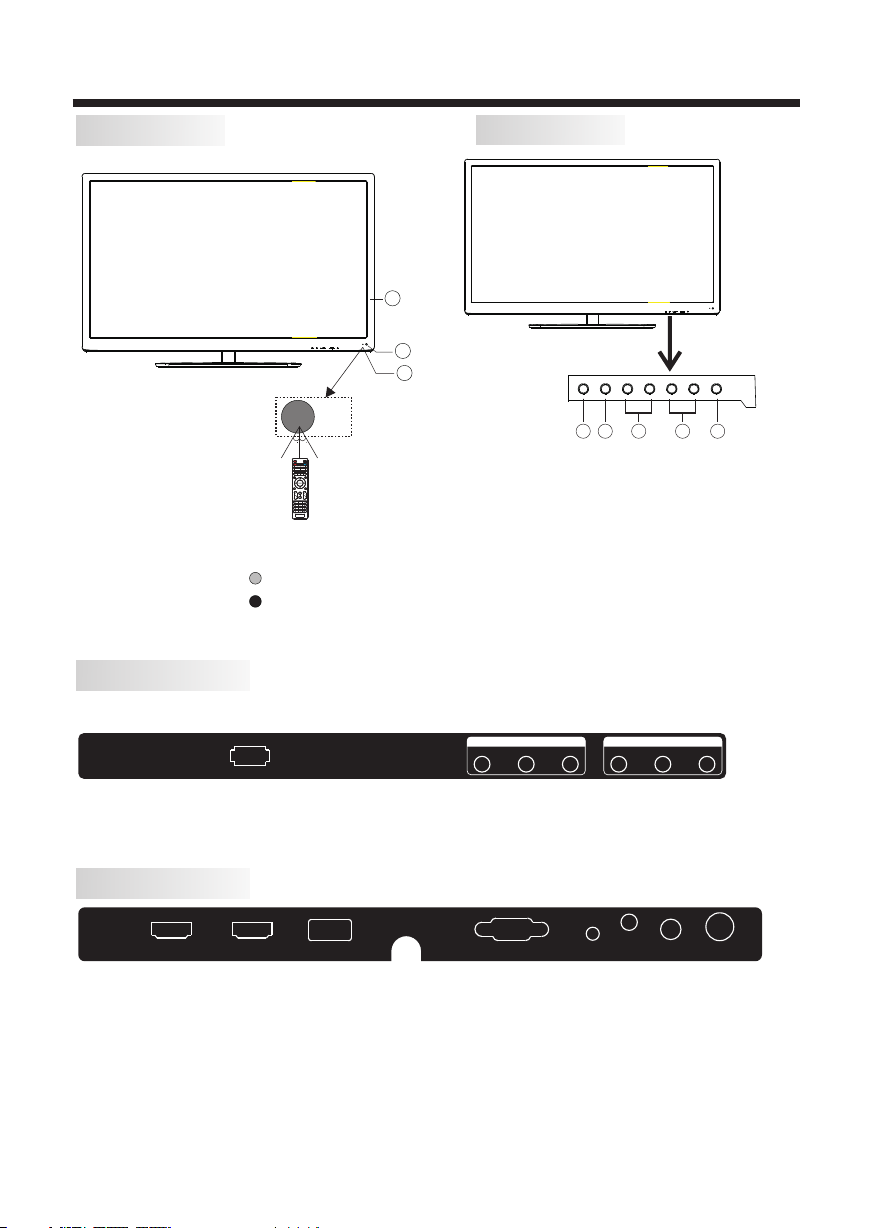
Front panel
30 30
1: Remote co ntrol s ensor.
2: Indicat or LED: B LUE POWER ON.
RED STAND BY.
3: Side panel k eys
REAR Connections
Side panel
3
1
2
1
3
2
1. SOURCE: Display the input source menu.
2. MENU: Display main MENU.
3. CH+/CH-: In TV mode, press "CH+" or "CH-" to
change the channel up and down. In MENU mode, press
"CH+" or "CH-" to select items in standby mode, press
"CH+" or "CH-" to turn on the TV.
4. VOL+/VOL-: Adjust sound level. In MENU mode,
press "VOL+ " or "VOL- " to adjust the item that you
selected.
5. STANDBY: Press this button to turn the unit ON
from STANDBY mode. Press it again to turn the set
back to STANDBY.
5
4
AC-I NPUT
100- 240V~ 50/60 HZ
VIDE O
COMP OSITE
L R
Y
COMP ONENT
Pb
Pr
All the terminals are (from left to right):
POWER SOCKET, VIDEO, AUDIO INPUT, YPbPr INPUT
Note: AV and YPbPr share one audio channel.
SIDE Connections
HDMI 1 HDMI 2 USB VGA PC AUDI O
All the terminals are (from left to right):
HDMI1, HDMI2, USB, VGA, PC AUDIO, HEADPHONE, COAXIAL, RF.
Note: 1. When HDMI has an input signal coming from a DVI source then the audio input signal must be
connected to the PC audio input.
2. The USB port just used for software upgrading.
-6-
HEAD PHONE
COAX IAL
R F
Page 8
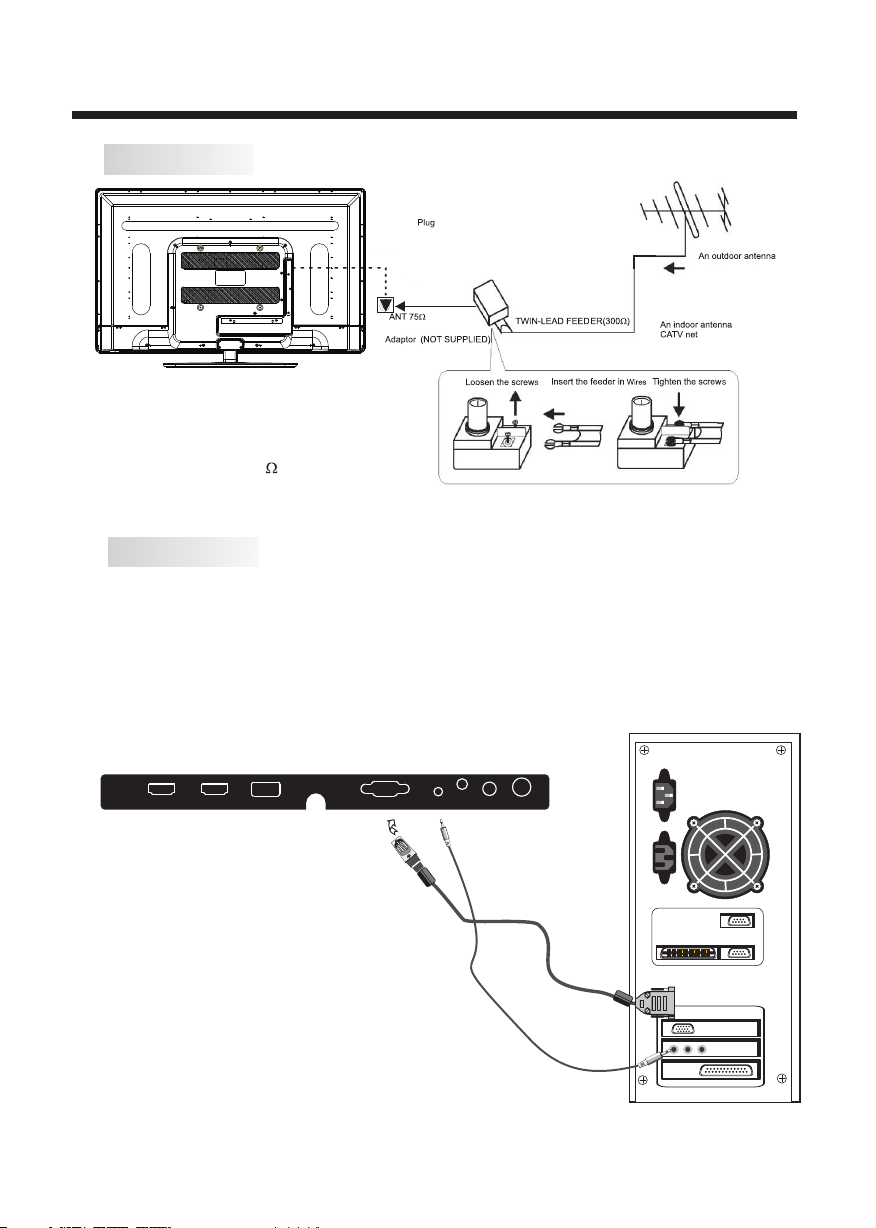
ANTENNA
Note:
Aerial connections: IEC (female).
Input impendance:75 unbalanced.
PC
STEPS:
Be sure both the TV and computer are set to
Power off.
1.Connect VGA and audio cable.
2.Connect the power cord.
3.Power on the TV, switch to PC mode.
4.Power on the PC.
This sequence is very important.
INSTALLATION
HDMI1 HDMI2 U SB VGA PC AUDIO
HEADP HONE
-7-
COAXI AL
R F
Page 9
INSTALLATION
PC
PRESET MODE
RESOLUTION
1
2
3
4
5
6
7
8
9
10
11
AC-I NPUT
100- 240V~ 50/60 HZ
720*400
640*480
640*480
800*600
800*600
1024*768
1024*768
1024*768
1280*1024
1280*1024
1366*768
VIDE O
COMP OSITE
L R
Y
COMP ONENT
Pb
Pr
V.Freq.(Hz) H.Freq.(KHz)
70
60
75
60
75
60
70
75
60
75
60
31.47
31.47
37.50
37.88
46.88
48.36
56.48
60.02
63.98
80.00
67.50
-8-
Page 10
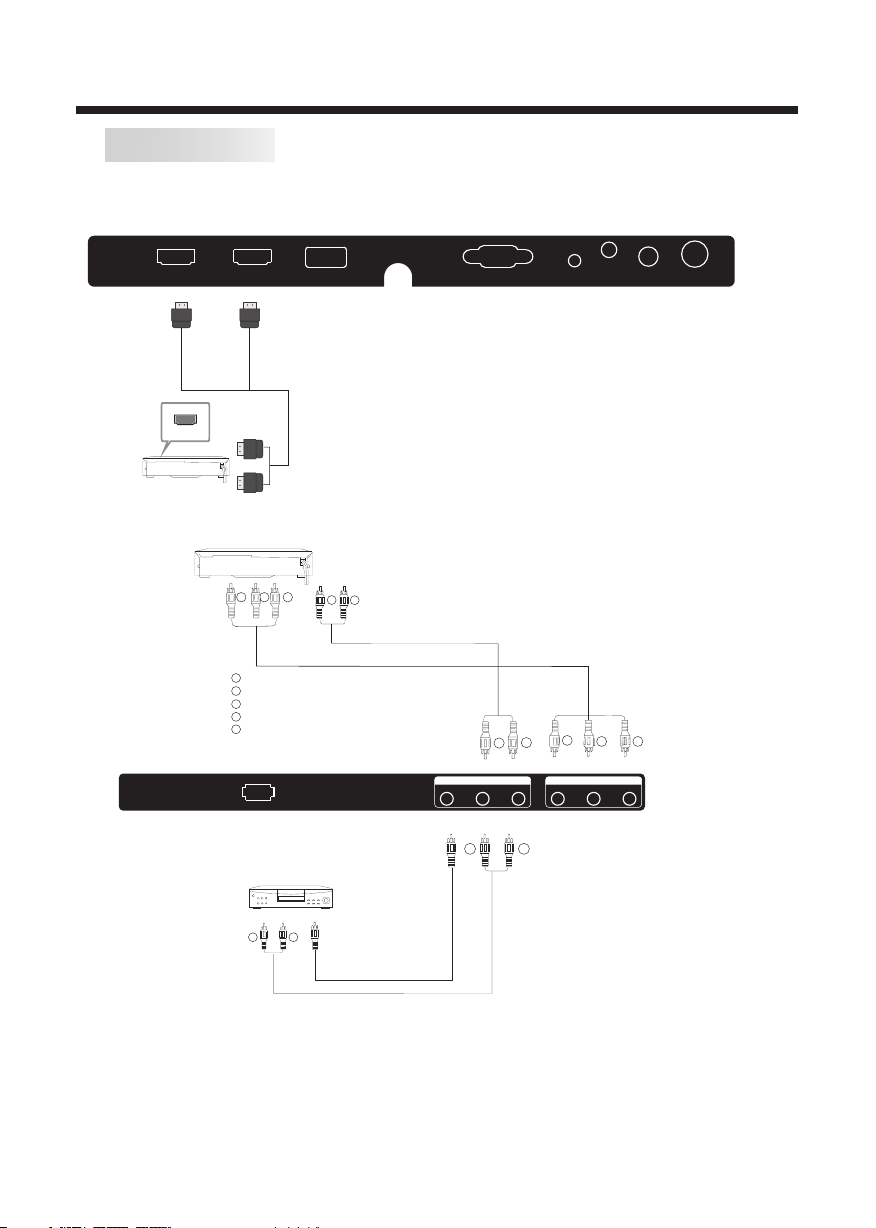
AV EQUIPMENT
You can use the input terminals on TV set rear as follows.
INSTALLATION
HDMI 1 HDMI 2 USB VGA PC AUDI O
HDMI
VIDEO EQUIPMENT with YPbPr
G
R
B
Y
Yellow (video)
W
White(audio L)
R
Red(audio R or Pr)
B
Blue(Pb)
G
Green(Y)
AC-IN PUT
100-2 40V~5 0/60H Z
W
R
G
R
W
VIDEO
COMPO SITE
L R
Y
COMPO NENT
HEAD PHONE
B
Pb
COAX IAL
Pr
R F
R
W R
VIDE O EQUIP MENT
W R
TO AUD IO OUTPU TS
TO VID EO
OUTP UTS
The television's inputs can be connected to the following types of equipment: VCR, multi disc player,
DVD, camcorder, video game or stereo system, etc.....
YPbPr can support these video formats:480i,576i,480p,576p,720p,1080i.
-9-
Page 11
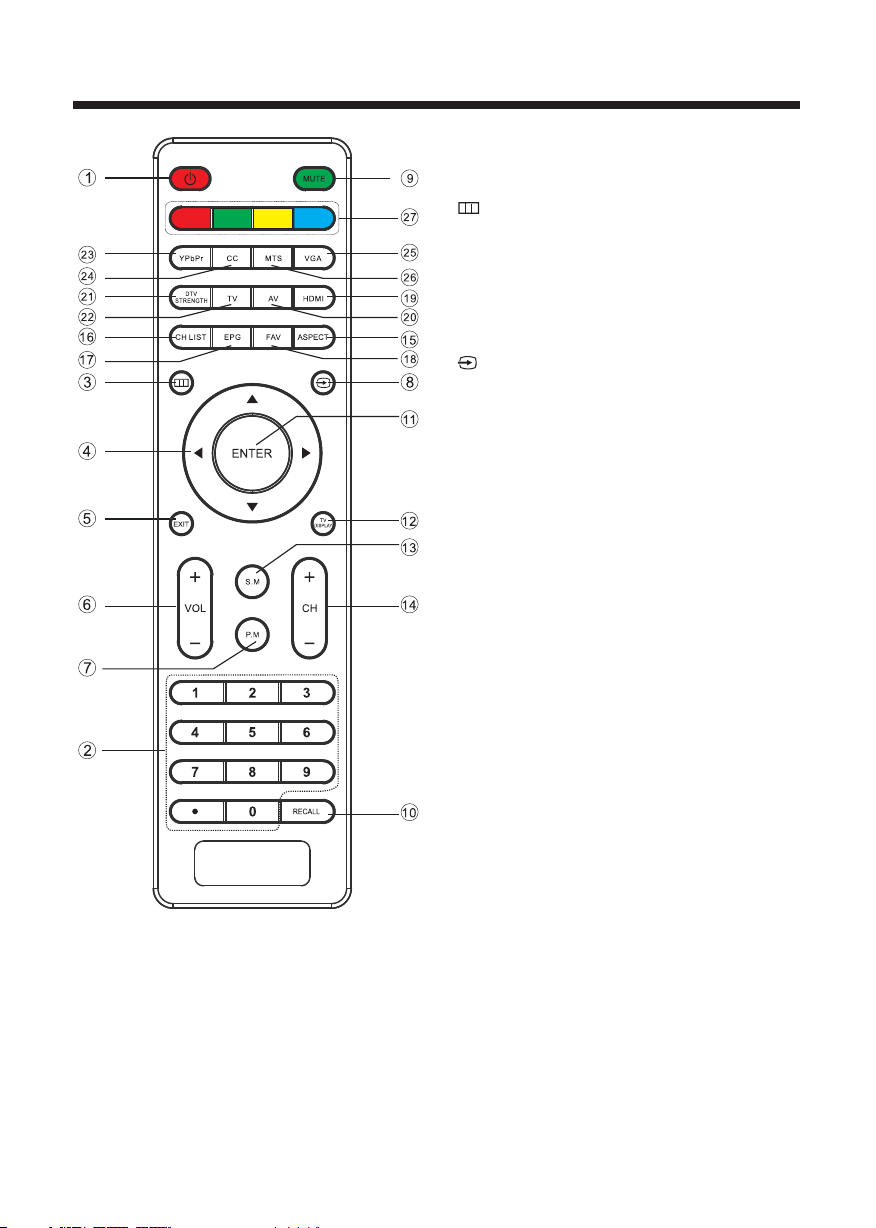
REMOTE CONTROL
1: POWER
To turn the TV on.
2: NUMBER KE Y
For direct a ccess t o .
3:
Displays t he main o n-screen menu.
4: CURSOR
To move within the m enu.
5: EXIT
To exit the menu.
6: VOL+/ To adjust sound level.
7: P.M
To switch picture mode.
8:
Press to dis play an d select the available vid eo sources.
9: MUTE
To disable or enab le the so und.
10: RECALL
To access the prev iousl y viewed channel.
11: ENTER
Confirms s elect ion.
12: TV DISPLAY
Displays /remo ves the program informat ion
13: S.M
To switch sound mode.
14: CH+/CH To access the next o r previ ous channel.
15: ASPECT
To change pictur e aspec t .
16: CH LIST
To display the cha nnel li st.
17: EPG
To display all the informat ion of DT V pro grams.
18: FAV
To access your favorite chan nels in digital TV mode.
19: HDMI
Hot key to go directl y to HDMI source.
20: AV
Hot key to go di rectl y to AV source.
21: DTV STRENGTH
To display the DTV signal stre ngth menu.
22: TV
Hot key to go dir ectly to TV sourc e.
23: YPbPr
Hot key to go di rectl y to YPbPr s ource .
24: CC
To enable or disab le the CC f unction.
25: VGA
Hot key to go di rectl y to VG A source.
26: MTS
To switch the sound stere o.
27: COLOR KE YS
Re served keys
channels
-10-
Page 12
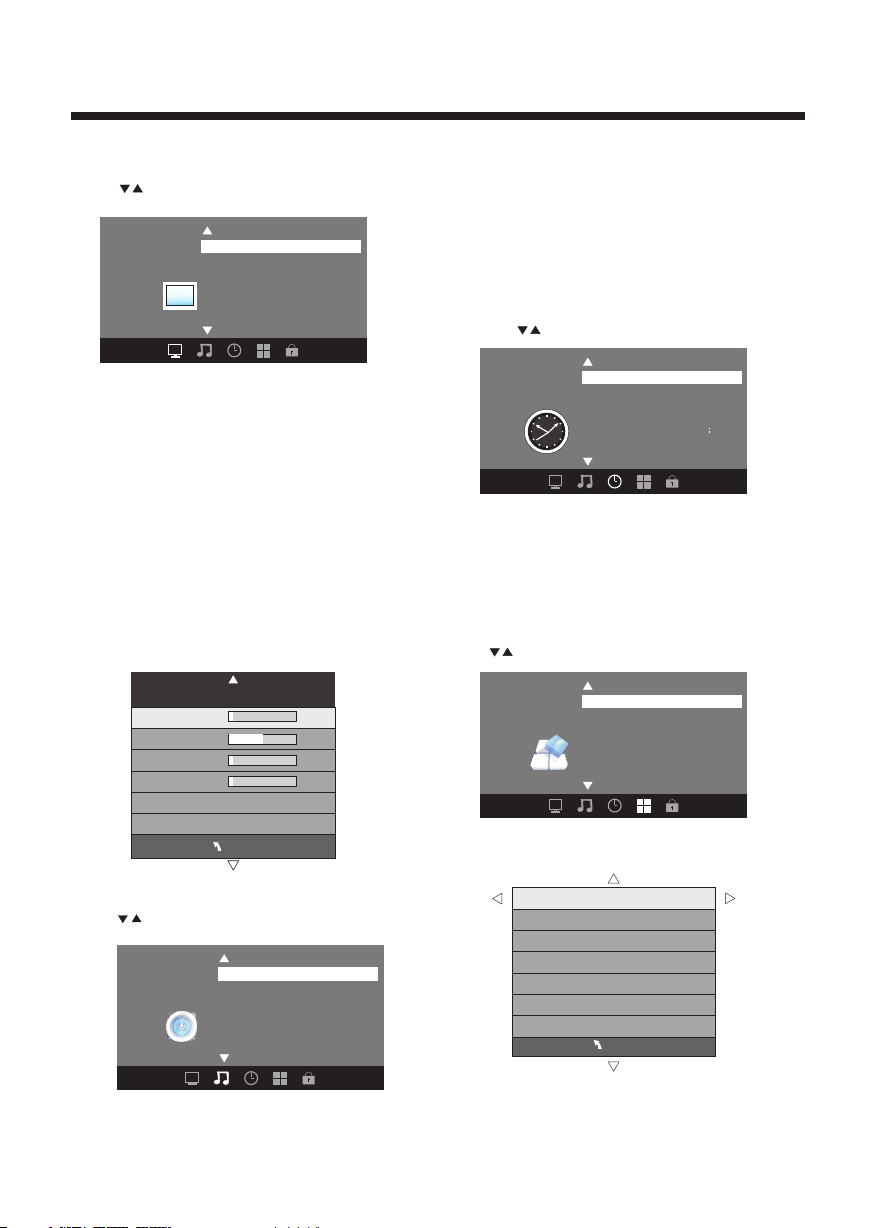
1. PICTURE MENU
In this menu ,you ca n adjust the picture effect her e,
such as cont rast, b rightness, etc.
Press to sel ect, pr ess OK to adjust.
Pic ture Mo de Stand ard
Col or Temper ature Norma l
VGA Se tting
Asp ect Rat io
Pic ture
< >
Noi se Redu ction M iddle
Fil l
OPERATION
Note:
1). There are five Sound M odes can be
selected :Stan dard,Music,Movie,S ports and Personal
2).Audio l angua ge is available in ATSC/TV
Programm ing onl y.
3).Auto vo lume is a vailable only when the inp ut signal
volume is to o large or the re is distortion.
3. TIMER MENU
In this menu , you can a djust the sleep timer, time zone,
etc. Press t o selec t,press OK to adjust.
Note:
1).If you wa nt to adj ust contrast, brightne ss, color,
and sharpn ess, th e picture mode must return t o
personal s tatus .
2).Tin t is avaliable in NTSC syste m only.
3).There a re thre e color temperature mode s can be
selected :Norm al,Warm and Cool .
1.1 Advance d
When PC Mode i s avail able.
Press OK but ton to se lect PC advanced setting
1).H-Pos : Adjust the horizontal pos ition o f the screen.
2).V-Pos: Adjust the v ertical position of the sc reen.
3).Clock : Fine tu ne the screen width.
4).Phase : Fine tu ne the phase of the screen. Us ually
don't adju st this i tem.
5).Auto: Au to adjust to fit the screen.
Advan ced
H-P os
H-P os
Clo ck
Pha se
Aut o
MEN U
2.AUDIO me nu
In this menu , you can a just the sound effect here.
Press to sel ect, pr ess OK to adjust.
Sou nd Mode St andar d
Aud io Lang uage E nglis h
Dig ital Ou tput PCM
Sur round S ound O ff
Aud io
<
AVL Off
<
Sle ep Timer Off
Time Z one Pac ific
DST O ff
Time F ormat 12 -hour
Time
<
Note:
1). Time zone , DST and the cl ock are available in
ATSC pr ogramming only, and the Clock can't be
adjust.
4.OPTION m enu
In this menu , you can a just the Menu language, Cl ose
Caption, R estor e Default etc.
Press to sel ect,p ress OK to adjust.
Opt ion
<
Clo ck ----/ --/-- - -
Men u Langu age Eng lish
Tran spare nt
Clo sed Cap tion
Res tore De fault
25%
<
<
4.1 Closed C aptio n
CC Mo de CC Off
Bas ic Sele ction C C1
Adv anced S elect ion Ser vicel
Opt ion
MEN U
-11-
Page 13
OPERATION
1).CC Mode : Switc hing close caption mode.
2). Advance d selection: only ATSC program is
availabl e.
3).Optio n: Used t o edit CC font.
Note:
1).Resto re Defa ult: Restore Default wil l clear all the
programs a nd rese t all the settings to defaul t value.
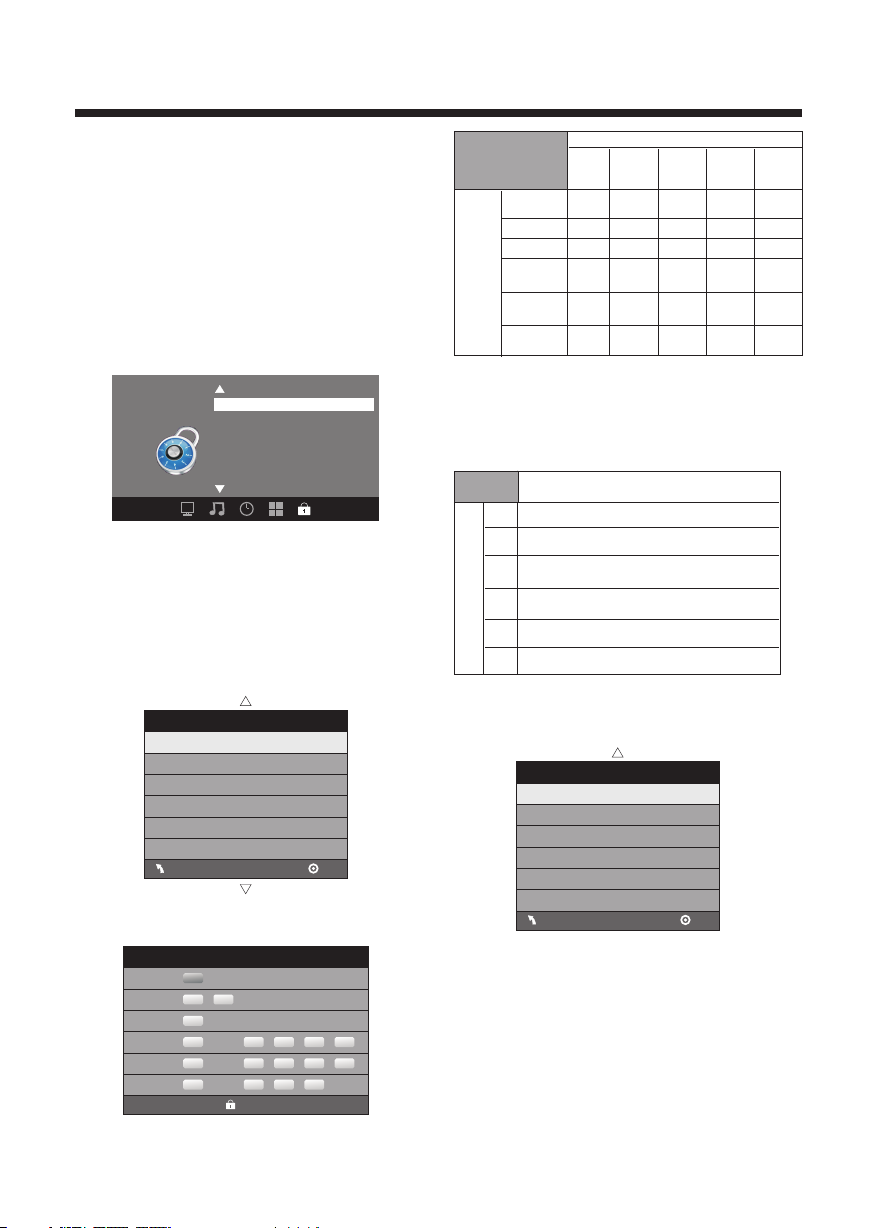
5.LOCK MEN U
In this menu , you can c hange the password and adj ust
the vchip se tting .
Enter the pa sswor d, it will go into the lock menu .
Factory de fault p assword is 6666.
Cha nge Pas sword
Sys tem Loc k
US
Can ada
Loc k
<
5.1 Change P asswo rd
1).Old pas sword : Input the old password.
2).New pas sword : Input the new password.
3).Confi rm pass word: Input the new passwo rd agai n.
5.2 System L ock
When the Sys tem Loc k switch is ON, the below
options li sted be low can be adjusted.
5.3 US
Press OK but ton the s creen will display as foll ow.
RRT Se tting
Res el RRT
Off
<
US
TV
MPAA
V
(Viol ence)
X
X
X
Des cript ion
Con tent
S
(Se xual
sit uatio n)
X
X
X
L
(Ad ult
lan guage )
X
X
X
D
(Se xuall y
sug gesti ve
dia log)
Parental
Rat ing Con tent
TV-Y (Al l
chil dren)
TV-Y7( Direc t to
orde r child ren)
Sug geste d
TV-G(G enera l
age
audi ence)
TV-PG( Paren tal
Guid ance
sugg ested )
TV-14( Paren ts
stro ngly
caut ioned )
TV-MA( Matur e
audi ence on ly)
And use the EN TER key t o switch lock/ unlock
feature.
Control
2).MPAA: Switching the mov ie-rating control leve l;
N/A, G, PG, PG -13, R, N C-17, X.
Rat ing
G Gen eral au dienc es, All Age s admit ted
PG
PG- 13
Age
R
NC- 17
X
5.4 Canada
Press OK but ton, th e screen will be displayed a s
follow:
FV
(Fa ntasy
vio lence )
X
Par ental G uidan ce sugg ested . Some ma teria l may not b e
Sui table f or chil dren.
Par ents st rongl y cauti oned. S ome mat erial . may be
Ina pprop riate f or chil dren un der 13.
Res trict . Under 1 7 requi res acc ompan ying pa rent or a dult
gua rdian (age va ries in s ome jur isdic tions )
No o ne 17 and u nder ad mitte d.
X is an o rder ra ting th at is uni fied wi th NC-1 7 but may b e
enc oded in t he data o f order m ovies .
Canada
Can ada Eng
Can ada Fre
X
X
MEN U
1).TV: Press OK bu tton, the screen will display as
follows:
TV RATIN G
ALL
TV-Y
ALL
TV-Y 7
TV-G
TV-P G
TV-1 4
TV-M A
FV
ALL
ALL
ALL
ALL
BLOC K
V
S
L D
V
S
L
V
S
L
OK
D
MEN U
1): Canada E nglis h: Switching the English r ating control
level: EXE MPT, C, C8+, G, PG, 14+, 18+.
OK
-12-
Page 14

OPERATION
Rat ing
E Exe mpt: In clude s news, s ports , docum ents an d other i nform ation
pro gramm ing: ta lk show s, musi c video s, and va riety p rogra mming .
C Chi ldren : Inten ded for y ounge r child ren und er the ag e of 8 year s.
Pay s caref ul atte ntion t o theme s that co uld thr eaten t heir se nse of
sec urity and wel l-bei ng.
C8+ C hildr en over 8 y ears ol d: Cont ains no p ortra yal of vi olenc e as the
pre ferre d, acce ptabl e, or onl y way to re solve c onfli ct; nor e ncour age
chi ldren t o imita te dang erous a cts whi ch they m ay see on t he scre en .
G Gen eral: C onsid ered ac cepta ble for a ll age gr oups, Ap propr iate
vie wing fo r the ent ire fam ily, cont ains ve ry litt le viol ence, p hysic al,
ver bal or em otion al.
PG Pa renta l Guida nce: In tende d for a gen eral au dienc e, but ma y not be
Age
sui table f or youn ger chi ldren ( under t he age of 8 ) becau se it cou ld
con tain co ntrov ersia l theme s or issu es.
14+ O ver 14 Years : Could c ontai n theme s where v iolen ce is one o f the
dom inant e lemen ts of the s toryl ine But i t must be i ntegr al to the
dev el opme nt of plo t or char acter. L angua ge usag e could b e profa ne
and n udity , p resen t withi n the con text of t heme.
18+ Ad ults: I ntend ed for vi ewers 1 8 years a nd olde r and mig ht cont ain
dep ictio ns of vio lence , which w hile re lated t o the dev elopm ent of
plo t, char acter o r theme s, are in tende d for adu lt view ing. Co uld
con tain gr aphic l angua ge and po rtray als of se creta ry and nu dity.
2).Canad a Frenc h: Switching the French- rating control
level: E, G, 8 ANS+, 1 3 ANS+, 16ANS+, 18AN S+.
Rat ing
E Exe mpt pro gramm ing
G Gen eral :A ll ages a nd chil dren, c ontai ns mini mal dir ect vio lence ,
but m ay be int egrat ed into t he plot i n a humor ous or un reali stic
man ner .
8an s+ Gene ral but i nadvi sable f or youn g child ren :Ma y be view ed by a
wid e publi c audie nce, bu t could c ontai n scene s distu rbing t o
Age
chi ldren u nder 8 wh o canno t disti nguis h betwe en imag inary a nd
rea l situa tions . Recom mende d for vie wing wi th pare n.
13a ns+ Ove r 13 year s: Coul d conta in scen es of fre quent v iolen t scene s
and i n tense v iolen ce.
16a ns+ Ove r 16 year s: Coul d conta in freq uent vi olent s cenes a nd viol ence.
18a ns+ Ove r 18 year s: Only f or adul t viewi ng. Cou ld cont ain fre quent
vio lent sc enes an d extre me viol ence.
5.5 RRT setti ng
in ATSC digital TV mode, it can be adjusted
5.6 Reset RRT:
Press OK but ton, th e screen will be displayed a s
follow:
6. Channel M ENU
In this menu , you can a djust digital and analog TV
Channels .
Press to sel ect,p ress OK to adjust.
Des cript ion
Des cript ion
Air /Cabl e Cable
Aut o Scan
Fav orite
Sho w/Hid e
Cha nnel
<
6.1 Air/Cab le:
Select Air TV signal and cable TV signal.
6.2 Auto Scan :
If it's the fi rst tim e you use the TV, you should scan all
the TV channels first,
Press OK but ton to co nfirm, you will see the menu
DTV S ignal
Auto Scan
Sca n all cha nnels
Dig ital ch annel o nly
Ana log cha nnel on ly
MEN U
Press OK but ton to se lect a scan type,you will se e the
message be low whi ch indicates auto search i s in
process.
OK
Auto Scan DTV+ATV
0
0
0
Pro gramm e(S)
Pro gramm e(S)
Pro gramm e(S)
Fou nd:
Ana log:
Dig ital:
1%. .. RF CH 2 DT V
6.3 Favori te:
Press OK but ton to ch oose/delete the favori te channel.
6.4 Show/H ide
Press OK but ton to di splay or hide current chan nel.
6.5 DTV signal
Display DT V strength s ignal. It can't be selected and
adjusted .
<
-13-
Page 15

6-9
10
11-13
5
-1-
Page 16

Ce prod uit Westinghouse a o btenu l'h omologati on
ENERG Y STAR® parce qu'il a s atisfai t aux
exige nces en matiè re d'efficacit é énergétiq ue
améri caines tell es que défi nies par le ministère
améri cain de l'Éne rgie et l'A gence américaine de
prote ction de l'en vironne ment. Le programme
ENERG Y STAR® existe afin d e fournir d es
direc tives en mati ère d'efficaci té énergéti que et de
promo uvoir des pro duits et de s pratiqu es
écoén ergétique s. Des modi fications faites sur
certa ines caract éristiq ues, conf iguration s et
fonct ions de ce télé viseur pe uvent modifier et/ou
augme nter sa conso mmation é lectrique. Selon les
modif ications ap portées a ux configurations, l a
conso mmation d'é lectric ité pourrait dépasse r le
seuil d 'homologa tion ENER GY STAR®.
-2-
Page 17

Dim:515*320mm(不包 括底座)
-3-
Page 18

Tuner TV ATSC int égré po ur la réc eptio n
d'émi ssion s TVH D
Une hau te lumi nosit é donna nt une im age
vive et b rilla nte
La lumi nosit é élevé e off re une im age viv e et bril lante .
Large f ormat d e l'écr an pour u n confo rt ciné ma
maiso n compl et
Le conn ecteu r d'ent rée HDM I vous ou vre les p ortes d e la
nouve lle ère d u numér ique.
Conne cteur V GA perme ttant d e racco rder un o rdina teur.
Systè me de hau t-par leurs s téréo i ntégr é.
Téléc omman de mult ifonc tion.
39
1920 x 1080
CA 100-2 40V 50/60Hz
Conso mmation d'é nergie
70W
2x8W
NTSC
Cordon d'a lim entat ion
Tél écomm and e infra rou ge
Gui de d'ut ili satio n
Piles (AAA )
USB
-4-
Page 19

Instructions d'assemblage du socle de base
-5-
Page 20

3
1
2
30 30
1: Récepteur de la télécommande
2: Témoin DEL : BLEU ALLUMÉ.
ROUGE VEILLE.
3: Touches du panneau latéral
1
3
1. SO URCE :
Pour aff icher l e Men u Sourc e.
2. ME NU :
Permet d'a ffi che r le menu p rin cipal .
3. CH +/CH- :
En mo de Té lévis ion , utili sez l es touc hes « C H+ » et « CH- »
pour chang er de c haîne d e tél évisi on. E n mode ME NU,
appuyez su r « CH+ » o u « CH- » pou r sél ectio nne r des
éléments e n mod e veill e, ap puyez s ur « CH + » ou « CH- »
pour allum er le t élévi seu r.
4. VO L+/VO L-:
Permet de ré gle r le volu me. S ous un ME NU, u tilisez le s
touches « VO L+ » et « V OL- » pou r rég ler l'o pti on séle cti onnée.
5. ATTE NTE
Appuyez su r cet te touc he po ur mett re en m arche l'un ité depuis
le mode STANDBY.
Appuyez à no uve au sur ce tte t ouche p our a ctive r à nou veau le
mode STAN DBY.
2
5
4
Connecteur situés sur le panneau arrière
AC-I NPUT
100- 240V~ 50/60 HZ
VIDE O
COMP OSITE
L R
Y
COMP ONENT
Pb
Pr
Présentation des connecteurs (de gauche à droite) :
CONNECTEUR D'ALIMENTATION, CONNECTEURS VIDEO,
CONNECTEUR D'ENTREE AUDIO, CONNECTEURS VIDEO YPbPr
Remarque : Les connecteurs AV et YPbPr partagent un connecteur audio.
Connecteurs situés sur le panneau latéral
HDMI 1 HDMI 2 USB VGA PC AUDI O
HEAD PHONE
COAX IAL
R F
Présentation des connecteurs (de gauche à droite) :
HDMI1, HDMI2, USB, VGA, ECOUTEURS, AUDIO HEADPHONE, COAXIAL, ANTENNE.
Remarque : 1. Lorsque HDMI offre un signal d'entrée p rovenant d'une source
DVI alors le signal d'entrée audio doit être connecté à l'entrée audio PC.
2. Le port USB n'est utilisé que pour les mises à jour du logiciel.
-6-
Page 21

HDMI1 HDMI2 U SB VGA PC AUDIO
HEADP HONE
-7-
COAXI AL
R F
Page 22

AC-I NPUT
100- 240V~ 50/60 HZ
VIDE O
COMP OSITE
L R
Y
COMP ONENT
Pb
Pr
11
1366*768
60
67.50
-8-
Page 23

HDMI 1 HDMI 2 USB VGA PC AUDI O
HDMI
G
R
B
W
R
HEAD PHONE
COAX IAL
R F
AC-I NPUT
100- 240V~ 50/60 HZ
W R
COMP OSITE
VIDE O
W R
L R
-9-
G
R
W
COMP ONENT
Y
R
B
Pb
Pr
Page 24

1: ALIMENTATION
Permet de mettr e en marche le t éléviseu r/active r le mode Attente.
2: TOUCH ES NUMERIQ UES
Permet de direc tement sai sir un numér o de chaîne.
3:
Perme t d'afficher l e menu principal .
4: TO UCHES DIRECTIO NNELLES
Perme t de se déplacer dan s les menus.
5: Quit ter
Perme t de quitter le menu .
6: Augm enter /Diminu er le vol ume
Perme t de régler le volum e.
7: P.M
Perme t de modifier le mod e d'affichag e.
8:
Appuy ez sur cette touch e pour sé lection ner une s ource
d'ent rée disponible .
9: MUET
Perme t d'act iver/dé sacti ver le son.
10: RAP PEL
Perme t de directement a ccéde r à la derniè re chaî ne
visua lisée.
11: EN TREE
Perme t de confirmer vot re séle ction.
12: AFF ICHAG E TV
Perme t d'afficher /masquer les inf ormations de la ch aîne de
télév ision sélectio nnée.
13: M.A .
Perme t de modifier le mod e audio.
14: Cha îne sui vante/C haîne p récéden te
Perme t d'acc éder à la cha îne de té lévisio n
précé dente/suivan te.
15: FOR MAT D'AFFICHA GE
Perme t de modifier le for mat d'a ffich age.
16: LIS TE DES CH AINES
Perme t d'afficher l a liste des chaîne s de télévision.
17: GCE
Perme t d'afficher l es information s des programmes TNT.
18: FAVORIS
En mode TNT, permet d'afficher l a liste d es chaîne s
favor ites.
19: HDM I
Touche de r accourci perme ttant de directe ment ac tiver la
sourc e d'entrée HDMI.
20: AV
Touche de r accourci perme ttant de directe ment ac tiver la
sourc e d'entrée AV.
21: PUI SSANC E DU SIGNAL TNT
Perme t d'afficher l es information s liées au signal TNT reç u.
22: Tél évision
Touche de r accourci perme ttant de directe ment ac tiver la
sourc e d'entrée Tél évision.
23: YPb Pr
Touche de r accourci perme ttant de directe ment ac tiver la
sourc e d'entrée vidéo YPbPr.
24: CC
Perme t d'act iver/dé sacti ver la fonc tion So us-titr age pou r
malen tendants.
25: VGA
Touche de r accourci perme ttant de directe ment ac tiver la
sourc e d'entrée VGA.
26: MTS
Perme t d'act iver le mod e Stéré o.
27: TOUCHES DE COULEU R
Touches s péciales
-10-
Page 25

1. MENU IMAGE
Ce menu perm et de rég ler les paramètres de l'im age
tels que con trast e, luminosité, etc.
Appuyez su r pour se d éplacer, appuyez sur OK
pour régle r.
Pic ture Mo de Stand ard
Col or Temper ature Norma l
VGA Se tting
Asp ect Rat io
Pic ture
< >
Noi se Redu ction M iddle
Fil l
Remarque :
1). Cinq mod es sono res peuvent être sélecti onnés :
Standard , Musiq ue, Films, Sports, Perso nnali sé.
2). La langu e audio n 'est disponible qu'en
programm ation ATSC / TV.
3). Le Volume automati que n'est disponible que
lorsque le v olume d u signal d'entrée est trop é levé ou
présente u ne dist orsion.
3. MENU TEMPS
Dans ce menu , vous po uvez régler la veille
automati que, le f useau horaire, etc. Appuyez sur
pour se séle ction ner, app uyez sur OK pour régler.
Remarque :
1). Pour rég ler con traste, luminosité, co uleur, et
netteté, i l faut êt re en mode personnalisé.
2). Teinte n'est disponibl e qu'av ec le système NTSC.
3). Trois mod es de température de coule ur peuv ent
être sélec tionn és : Normal, chaud et froid.
1.1 Av ancé
Lorsque le m ode PC es t disponible.
Appuyez su r la touc he OK pour sélectionner le r églage
PC avancé
1). Pos. H : pou r régle r la position horizontal e de
l'écran.
2). Pos. V : pour régler la position ver ticale de l'écran.
3). Horlog e : régla ge fin de la largeur de l'écran.
4). Phase : Ré glage f in de la phase de l'écran. En
général il v aut mie ux ne pas toucher ces paramè tres.
5). Auto : régl age automatique de l'écr an.
Advan ced
H-P os
H-P os
Clo ck
Pha se
Aut o
MEN U
2. Menu AUDIO
Dans ce menu , vous po uvez régler l'effet sonore.
Appuyez su r pour se d éplacer, appuyez sur OK
pour régle r.
Sou nd Mode St andar d
Aud io Lang uage E nglis h
Dig ital Ou tput PCM
Sur round S ound O ff
Aud io
<
AVL Off
<
Sle ep Timer Off
Time Z one Pac ific
DST O ff
Time F ormat 12 -hour
Time
<
Remarque :
1). Fuseau h orair e, heure d'été et horloge ne s ont
disponib les que d ans la programmation ATSC et
l'horlog e ne peut p as être réglée.
4. MENU OPTI ONS
Dans ce menu , vous po uvez régler la langue des
menus, des s ous-t itrages, restaurer les p aramètres par
défaut etc .
Appuyez su r pour se d éplacer, appuyez sur OK
pour régle r.
Opt ion
<
Clo ck ----/ --/-- - -
Men u Langu age Eng lish
Tran spare nt
Clo sed Cap tion
Res tore De fault
25%
<
<
4.1 Sous-t itrag e
CC Mo de CC Off
Bas ic Sele ction C C1
Adv anced S elect ion Ser vicel
Opt ion
MEN U
-11-
Page 26

1). Mode ST : Active r le mode sous-titrage.
2). Sélect ion ava ncée : disponible unique ment dans le
programm e ATSC.
3). Option : P ermet d e modifier la police du sous titrage.
Remarque :
1). Restau rer les p aramètres par défaut : Res taurer les
paramètr es par dé faut efface tous les programm es et
réinitia lise to us les paramètres à leurs va leurs par
défaut.p rogra ms and reset all the setting s to default
value.
5. MENU VERROUILLAGE
Dans ce menu , vous po uvez changer le mot de passe e t
effectuer le réglage v chip (puce antiviolenc e).
Entrez le mo t de pass e ; vous allez être dirigé dan s le
menu verro uilla ge.
Le mot de pass e par déf aut est 6666.
Cha nge Pas sword
Sys tem Loc k
US
Can ada
Loc k
<
5.1Chang er le mot de pas se
1). Ancien mo t de passe : Entrez l'ancien m ot de passe.
2). Nouvea u mot de pa sse : Entrez le nouveau mot de
passe.
3). Confir mez le mo t de passe : Rentrez le nouvea u
mot de passe .
5.2 Verrou illage du système
Lorsque le v errou illage du système est ON (ac tivé), on
peut régle r les opt ions ci-dessous.
5.3 US
Appuyez su r OK ; l'éc ran suivant sera affiché :
RRT Se tting
Res el RRT
Off
<
V
(Viol ence)
X
X
X
Des cript ion
Con tent
S
(Sc ènes
sex uelle s)
X
X
X
L
(La ngage
adu lte)
X
X
X
D
(Di alogu es
sug gesti fs)
X
X
Cont enu de la c lassi ficat ion
TV-Y(En fants
de tou s les âge s)
TV-Y7(D estin ées
à appr endre l 'ordr e
aux en fants )
Age
TV-G
sug géré
(Tout p ublic )
TV-PG
(Sup ervis ion
pare ntale s uggér ée)
TV-14(P résen ce
obli gatoi re des
pare nts)
TV-MA(A dulte s
seul ement )
Et utilise z la touc he ENTER pour verrouille r/déverrouiller
le Contrôl e paren tal.
2). MPAA (MOTION PICTU RE ASSOCIATIO N OF USA) :
définir le n iveau d e classification des fil ms ;
N/A, G, PG, PG -13, R, N C-17, X.
Cla ssifi catio n
G Gra nd publ ic, pou r tous le s âges
PG
PG- 13
Age
R
NC- 17
X
5.4 Canada
Appuyez su r OK ; l'éc ran US suivant sera affiché :
FV
(Viol ence
de fic tion)
X
Sur veill ance pa renta le sugg érée. C ertai nes ima ges
pou rraie nt ne pas c onven ir à des en fants .
Prés ence oblig atoire de s parents. C ertaines i mages
pour raient ne pa s convenir à de s enfants de m oins de 13 ans .
Res trein t. Avec des en fants d e moins d e 17 ans la
sup ervis ion d'a dulte s est rec omman dée(l 'âge va rie ave c
cer taine s jurid ictio ns)
Auc un moin s de 17 ans n 'est ad mis.
X est u ne clas sific ation q ui est fu sionn ée avec l a NC-17
mai s peut êt re ment ionné e dans le s donné es de cer tains
fil ms anci ens.
US
TV
MPAA
MEN U
OK
1). TV : Appuyez sur OK ; l'écran su ivant sera affiché :
TV RATIN G
ALL
TV-Y
ALL
TV-Y 7
TV-G
TV-P G
TV-1 4
TV-M A
FV
ALL
ALL
ALL
ALL
BLOC K
V
S
L D
V
S
L
V
S
L
Canada
Can ada Eng
Can ada Fre
MEN U
1): Canada An glais : définir le niveau de c lassification
des films : no n class é, C, C8+, G, PG, 14+, 18+.
D
-12-
OK
Page 27

Clas sific ation
E Non c lassé : C ompre nd nouv elles , sport , docum entai res et au tres
émi ssion s d'inf ormat ion : émi ssion -déba t, vidé os musi cales e t varié tés.
C Enf ants : de stiné es aux en fants d e moins d e 8 ans App orte un e
att entio n parti culiè re aux th èmes po uvant m enace r leur se ns de la
séc urité e t leur bi en-êt re.
C8+ E nfant s de plus d e 8 ans : ne co ntien t pas de sc ène de vi olenc e en
tan t que moy en préf éré, ac cepta ble ou un ique po ur réso udre un
con flit et n 'enco urage p as non pl us les en fants à i miter l es acte s
dan gereu x qu'il s ont pu vo ir à l'éc ran.
G Gra nd publ ic : cons idéré c omme ac cepta ble pou r tous le s group es
d'â ge, con vient à t oute la f amill e, cont ient tr ès peu de v iolen ce
phy sique , verba le ou affe ctive .
PG Gr and pub lic : con sidér é comme a ccept able po ur tous l es grou pes
Age
d'â ge, con vient à t oute la f amill e, cont ient tr ès peu de v iolen ce
phy sique , verba le ou affe ctive .
14+ P lus de 14 a ns : peut c onten ir des th èmes où l a viole nce est l 'un des
élé ments p rédom inant s de l'hi stoir e, mais e lle fai t parti e du
dév elopp ement d e l'int rigue o u du pers onnag e. Le lan gage ut ilisé
peu t être cr u et des sc ènes de n udité s ont mon trées d ans le co ntext e
du th ème.
18+ P lus de 14 a ns : peut c onten ir des th èmes où l a viole nce est l 'un des
élé ments p rédom inant s de l'hi stoir e, mais e lle fai t parti e du
dév elopp ement d e l'int rigue o u du pers onnag e. Le lan gage ut ilisé
peu t être cr u et des sc ènes de n udité s ont mon trées d ans le co ntext e
du th ème.
2). Canada F rança is : définir le niveau de clas sification
français e : E, G, 8AN S+, 13 ANS+, 16ANS+, 1 8ANS+ .
Des cript ion
Air /Cabl e Cable
Aut o Scan
Fav orite
Sho w/Hid e
Cha nnel
<
6.1 Air/câ ble :
Pour sélec tionn er le signal Air TV ou le signal
télévisi on par câ ble.
6.2 Recherche Automatique :
Lors de la pre mière u tilisation du télévise ur, vous
devez rech erche r toutes les chaînes d'abo rd.
Appuyez su r la touc he OK pour confirmer, le menu
suivant s' affiche :
DTV S ignal
<
Auto Scan
Sca n all cha nnels
Dig ital ch annel o nly
Ana log cha nnel on ly
Cla ssifi catio n
E Émi ssion n on clas sée
G Gra nd publ ic : pour t ous les â ges et le s enfan ts, con tient u n
min imum de v iolen ce dire cte, ma is peut ê tre int égrée à l 'intr igue
de ma nière h umori stiqu e ou fant aisis te.
8an s+ Gran d publi c mais dé conse illé au x jeune s enfan ts : peut ê tre
reg ardée p ar un larg e publi c mais pe ut cont enir de s scène s
Age
pou vant pe rturb er les en fants d e moins d e 8 ans qui n e peuve nt
pas f aire la d istin ction e ntre le s situa tions i magin aires e t la réal ité.
Il es t recom mandé d e regar der ces p rogra mmes av ec les pa rents .
13a ns+ Plu s de 13 ans : p eut con tenir d e nombr euses s cènes d e viole nce et
des s cènes d e viole nce int ense.
16a ns+ Plu s de 16 ans : p eut con tenir d e nombr euses s cènes d e viole nce et
des s cènes d e viole nce ext rême.
18a ns+ Plu s de 18 ans : r éserv é aux adu ltes. p eut con tenir d e nombr euses
scè nes de vi olenc e et des sc ènes de v iolen ce extr ême.
5.5 Réglag e RRT
Il peut être r églé da ns le mode TV numér ique ATSC
5.6 Restau rer RRT :
Appuyez su r OK ; l'éc ran suivant sera affiché :
6. MENU CHAN NEL
Dans ce menu , vous po uvez régler les chaînes TV
numériqu es et ana logiques.
Appuyez su r pour se d éplacer, appuyez sur OK
pour régle r.
Des cript ion
MEN U
Appuyez su r la touc he OK pour sélectionner le t ype de
recherch e, le mes sage ci-dessous s'affiche indiqu ant
que la reche rche au tomatique est en cours.
OK
Auto Scan DTV+ATV
0
0
0
Pro gramm e(S)
Pro gramm e(S)
Pro gramm e(S)
Fou nd:
Ana log:
Dig ital:
1%. .. RF CH 2 DT V
6.3 Favori s :
Appuyez su r la touc he OK pour
sélectio nner/ supprimer une chaîne de la l iste des
favoris.
6.4 Affich er/Masquer
Appuyez su r la touc he OK pour afficher/masquer la
chaîne act uelle .
6.5 Signal D TV
Affiche la force du sign al DTV. Il ne peut pas être
sélectio nné et ré glé.
-13-
Page 28

2-3
5-9
10
11-13
4
-1-
Page 29

Este produ cto de West inghouse ha ganado el prem io
ENERGY STAR® por cumplir c on las pa utas federales
de energía eficaz de los E stados Unidos, determinadas
por El Depar tamen to de Energía y la Agencia de
Protecci ón Ecol ógica. El programa de ENER GY STAR®
existe par a prove er pautas ahorrar energía y ayu dar a
promover l os prod uctos y prácticas de energía eficaz.
Cambios en c ierta s características, aju stes y funciones
de este tele visor p ueden cambiar y/o increm entar el
consumo el éctri co. Dependiendo de cómo lo s ajustes
sean cambi ados, e l consumo eléctrico pued e exceder los
limites re queri dos por la calificación de E NERGY
STAR®.
-2-
Page 30

Dim:515*320mm(不包 括底座)
-3-
Page 31

Características principales
Sintonizador integrado para TV ATSC para la
recepción de transmisiones de HDTV
■ El brillo intenso proporciona una imagen vívida
y brillante
Negros profundos y los blancos más brillantes con
elevado contraste
■ Relación de aspecto de Pantalla Panorámica (ancha)
para una experiencia completa de cine en casa
Entrada HDMI para una conexión digital verdadera
Puerto VGA para conexión a la PC
Sistema de altavoces estereofónicos incorporados
Mando a distancia con plena funcionalidad
Tensión de alimentación
Consumo de energía
Cable de alimentación
Mando a Distancia Infrarrojo
Manual de Usuario
Batería (AAA)
39
1920 x 1080
CC 100-240V 50/60Hz
70W
2x8W
NTSC
USB
Video
x 2
-4-
Page 32

Instrucción sobre el montaje del soporte base
-5-
Page 33

3
1
2
5
4
Pb
Pr
3: Teclas del panel lateral
30 30
EN ESPERA.
AC-I NPUT
100- 240V~ 50/60 HZ
1
3
1. SOURCE:
Muestra el m enú de la fuente de ent rada.
2. MENU:
Muestra el M ENU principal.
3. CANAL+/ CANAL-:
En el modo TV, pres ione “CH+” o “CH-” pa ra
cambiar el c anal hacia arriba y h acia abajo . En el
modo MENU, p ulse “CH+” o “CH-“ pa ra seleccionar
los elemen tos; en modo En Esper a pulse
“CH+” o “CH- ” para encender el TV.
4. VOL+/VOL-:
Ajusta el ni vel de sonido. En el mo do MENU presione
“VOL+” o “VO L-” para ajustar la o pción seleccion ada.
5. ESPERA
Presione e ste botón para ENCE NDER la unidad desd e
el modo de STANDBY. Presióne lo de nuevo para pasa r
otra vez al mo do de STANDBY.
COMP OSITE
VIDE O
L R
2
COMP ONENT
Y
Los terminales son (de izquierda a derecha):
RECEPTÁCULO DE ALIMENTACIÓN, VIDEO, ENTRADA DE AUDIO, ENTRADA YPbPr
Nota: AV y YPbPr comparten un canal de audio.
HDMI 1 HDMI 2 USB VGA PC AUDI O
HEAD PHONE
COAX IAL
R F
Los terminales son (de izquierda a derecha):
HDMI1, HDMI2, USB, VGA, AUDÍFONOS, HEADPHONE, COAXIAL, RF
Nota: 1. Cuando HDM tenga una señal de entrada procedente de una fuente DVI, la señal de
entrada de audio debe estar conectada a la entrada de audio del PC.
2. El puerto USB sólo se utiliza para actualizar el software.
-6-
Page 34

HDMI1 HDMI2 U SB VGA PC AUDIO
HEADP HONE
-7-
COAXI AL
R F
Page 35

AC-I NPUT
100- 240V~ 50/60 HZ
VIDE O
COMP OSITE
L R
Y
COMP ONENT
Pb
Pr
11
1366*768
60
67.50
-8-
Page 36

HDMI 1 HDM I2 USB VGA PC AUD IO
HDMI
G
R
B
W
R
HEAD PHONE
COAX IAL
R F
AC-I NPUT
100- 240V~ 50/60 HZ
W R
COMP OSITE
VIDE O
W R
-9-
W
L R
G
R
COMP ONENT
Y
R
B
Pb
Pr
Page 37

1: POWER
Para encen der el TV o ponerlo en modo de r eposo.
2: TECLAS NUMÉRICAS
Para acced er dire ctamente a un programa.
3:
Muestra el m enú pri ncipal en la pantalla.
4: CURSOR
Para mover se dent ro del menú.
5: EXIT
Se utiliza p ara sal ir del menú.
6: VOL+/-
Ajusta el ni vel de so nido.
7: P.M
Para conmu tar el mo do de la imagen.
8:
Presióne lo para m ostrar y seleccionar las f uentes de video
disponib les.
9: MUTE
Habilita o i nhabi lita el sonido.
10: RECUPE RAR
Para acced er al pro grama que se estaba viendo
anterior mente .
11: ENTER
Confirma l a selec ción.
12: VISUAL IZACI ÓN DE TV
Muestra o qu ita la in formación de la programa ción
13: S.M
Para conmu tar el mo do de sonido.
14: CH+/CH
Para acced er al Pro grama próximo o al anterio r.
15: ASPECT
Cambia el as pecto d e la imagen.
16: CH LIST
Usado para v isual izar la lista de canales.
17: EPG
Muestra to da la inf ormación de los programa s DTV.
18: FAV
Utilizad o para ac ceder a sus canales favori tos en el modo de
TV digital.
19: HDMI
Tecla caliente p ara ir di rectamente a la fuente HDM I.
20: AV
Tecla caliente p ara ir a la f uente de AV.
21: DTV STRENGTH
Muestra la i ntens idad de la señal DTV.
22: TV
Tecla caliente p ara ir a la f uente de TV.
23: YPbPr
Tecla caliente p ara ir di rectamente a la fuente YPbPr.
24: CC
Habilita o i nhabi lita la función CC.
25: VGA
Tecla caliente p ara ir a la f uente VGA.
26: MTS
Conmuta el s onido e stéreo.
27: TECLAS D E COLOR
Teclas reservadas
-10-
Page 38

Pic ture Mo de Stand ard
Col or Temper ature Norma l
VGA Se tting
Asp ect Rat io
Pic ture
< >
Noi se Redu ction M iddle
Fil l
Nota:
1). Hay 5 M odos de Sonid o para sele ccionar:
Están dar, Música, P elícula , Deporte s y Personal
2). El id ioma de Audio es tá dispon ible sólo en la
Progr amación ATSC/TV.
3). El vo lumen autom ático sól o está disp onible
cuand o el volumen de s eñal es dem asiado alto o
prese nta distors ión.
3. MENÚ DE HORA
En este m enú, puede aj ustar el te mporizador de
apaga do, la zona hor aria, etc . Pulse par a
selec cionar y puls e OK para aju star.
Sle ep Timer Off
Time Z one Pac ific
DST O ff
Time F ormat 12 -hour
Time
<
Clo ck -- --/-- /-- --
<
1.1 Avanzado
Cuand o el Modo PC está d isponib le.
Pulse e l botón OK para s eleccio nar la configuración
avanz ada de PC
1). Pos . H: Ajusta la pos ición hor izontal d e la
panta lla.
2). Pos . V: Ajusta la posici ón vertic al de la pantalla.
3). Rel oj: Ajuste pre ciso del an cho de pantalla.
4). Fas e: Ajuste prec iso de la fas e de la panta lla.
Norma lmente no se aj usta este e lemento.
5). Auto mático: Ajus te automá tico para a daptarse a
la pant alla.
Advan ced
H-P os
H-P os
Clo ck
Pha se
Aut o
MEN U
Sou nd Mode St andar d
Aud io Lang uage E nglis h
Dig ital Ou tput PCM
Sur round S ound O ff
Aud io
<
AVL Off
<
Nota:
1). La zo na horaria, e l horario d e verano y el reloj
sólo es tán disponi bles en la pr ogramación ATSC,
y el relo j no se puede aju star.
4. MENÚ D E OPCIONES
En este m enú puede aju star el Idi o0ma del Menú,
los Sub títulos par a Sordos, R estaura r los Valores
por Def ecto etc.
Pulse p ara desplaz arse, pul se OK para
ajust arlo.
Men u Langu age Eng lish
Opt ion
<
Tran spare nt
Clo sed Cap tion
Res tore De fault
25%
<
4.1 Sub títulos para Sordos
CC Mo de CC Off
Bas ic Sele ction C C1
Adv anced S elect ion Ser vicel
Opt ion
MEN U
-11-
Page 39

1). Modo CC: C onm utar el m odo d e subtí tul os.
2). Selecc ión Av anz ada: só lo di sponi ble e n progr ama
ATSC .
3). Opción : Se ut iliza p ara e ditar l a fue nte de lo s
Subtítul os.
Not a:
1). Restau rar Va lor es por De fec to: Res tau rar los Valores
por Defect o, bo rrará t odo s los pro gra mas y res tab lecerá
los ajuste s a su va lor por d efe cto.p rog rams an d res et all
the settin gs to d efaul t val ue.
5. ME NÚ DE BLO QUE O
En este menú p ued e cambi ar la c ontra señ a y ajust ar la
configur aci ón del “V- chi p”
Introduz ca la c ontra señ a, esto l e lle vará al m enú d e
bloqueo.
La contras eña p or defe cto e s 6666.
Cha nge Pas sword
Sys tem Loc k
US
Can ada
Loc k
<
5.1 Cambia r la Co ntras eña
1). Contra señ a antig ua: I ntrod uzc a la cont ras eña
antigua.
2). Nueva co ntr aseña : Int roduz ca la n ueva co ntr aseña.
3). Confir me Co ntras eña : Intro duz ca otra vez la n ueva
contrase ña.
5.2 Bloque o del S istem a
Cuando el in ter rupto r de Bl oqueo d el Si stema e stá e n
ON, s e puede n aju star la s sig uient es op cione s:
5.3 EE.UU.
Pulse el bot ón OK , la pant all a apare cer á como la d e
abajo:
RRT Se tting
Res el RRT
Off
<
US
TV
MPAA
X
X
X
X
X
X
X
X
X
X
X
X
Utilice la t ecla ENTER p ara con mut ar el blo queo/des bloqueo
de la funció n de Control P arent al.
2). MPAA: Con mutar e l nivel d e control de la clasifica ción
de pelí culas ;
N/A, G, P G, PG-1 3, R, NC- 17, X.
NC- M ayore s
de 17
X X es u na clas ifica ción un ifica da con NC -17, pe ro pued e
5.4 Can adá
Pulse e l botón OK, la pa ntalla ap arecerá como la
de abaj o:
No ad misib le para m enore s de 17.
est ar codi ficad a en los da tos de pe lícul as.
Canada
Can ada Eng
Can ada Fre
MEN U
1). TV: Pulse e l bot ón OK, la p ant alla ap are cerá co mo la
de abajo:
OK
TV RATIN G
ALL
TV-Y
ALL
TV-Y 7
TV-G
TV-P G
TV-1 4
TV-M A
FV
ALL
ALL
ALL
ALL
BLOC K
V
S
L D
V
S
L
V
S
L
MEN U
1): Ing lés Canadie nse: Conm utar el nivel de
contr ol de la clasif icación e n Inglés;
EXEMP T, C, C8+, G, PG, 14+, 18+.
D
OK
-12-
Page 40

Des cripc ión
Des cripc ión
MEN U
Clasificación
Exe nto Exe nto: In cluye n otici as, dep ortes , docum ental es y otra
pro grama ción de i nform ación : debat es, víd eos mus icale s
y pro grama s de vari edade s.
C Inf antil : Desti nado a ni ños peq ueños m enore s de 8 años .
Pre sta una e speci al aten ción a te mas que p odría n
ame nazar a s u sensa ción de s eguri dad y bie nesta r.
C8+ N iños ma yores d e 8 años: N o conti ene imá genes d e
vio lenci a como fo rma pre ferib le, ace ptabl e o única p ara
res olver c onfli ctos; n o incit a a los niñ os a imit ar cond uctas
pel igros as que pu diera n ver en la p antal la.
G Gen eral: C onsid erado a cepta ble par a todos l os grup os de
eda d, apro piado p ara el vi siona do por to da la fam ilia,
con tiene m uy poca v iolen cia fís ica, ve rbal o em ocion al.
PG Gu ía Pare ntal: S e recom ienda l a super visió n de adul tos
Eda d
res ponsa bles.
14+ M ás de 14 añ os: Pod ría con tener t emas do nde la vi olenc ia
es un o de los el ement os domi nante s de la his toria , pero
deb e integ rarse p or el des arrol lo del ar gumen to o el
per sonaj e. Pued e haber l engua je obsc eno y des nudos e n
el co ntext o del tem a.
18+ M ás de 18 añ os: Pro grama ción só lo para a dulto s.
2). Fra ncés Canadi ense: Con mutar el nivel de contro l de
la clas ificación e n Francés ; E, G, 8ANS+ , 13 ANS+,
16ANS +, 18ANS+.
Cla sific ación
E Pro grama ción ex enta
G Gen eral: Tod as las ed ades y ni ños, co ntien e una vio lenci a
dir ecta mí nima, p ero pue de esta r integ rada en e l
arg ument o de una fo rma hum oríst ica o no re alist a.
8an s+ gene ral, pe ro no rec omend able pa ra niño s peque ños.
Pue de vers e por una a udien cia muy a mplia , pero pu ede
Eda d
con tener e scena s pertu rbado ras par a menor es de 8 que
no pu eden di sting uir ent re las si tuaci ones im agina rias y
rea les. Re comen dado pa ra vers e con los p adres .
13a ns+ Más d e 13 años : Podrí a conte ner esc enas de v iolen cia
fre cuent e e inten sa.
16a ns+ Más d e 16 años : Podrí a conte ner fre cuent es esce nas
vio lenta s.
18a ns+ Más d e 18 años : Sólo pa ra visi onado p or adul tos. Po dría
con tener f recue ntes es cenas v iolen tas y vio lenci a extre ma.
5.5. Co nfigurar Clasifica ción por Re gión
en el mod o de TV digit al ATSC, pu ede ajust arse.
5.6 Res tablecer Clasifica ción por Re gión:
Pulse e l botón OK, la pa ntalla ap arecerá como la
de abaj o:
6. MENÚ C HANNEL
En este m enú puede aju star los ca nales de TV
digit ales y analóg icos.
Pulse p ara desplaz arse, pul se OK para
ajust arlo.
Air /Cabl e Cable
Aut o Scan
Fav orite
Sho w/Hid e
Cha nnel
<
6.1 Aire/Cable:
Selec cione señal d e TV por Air e y señal de TV
por Cab le.
6.2 Esc áner Automátic o:
Si es la pr imera vez que u tiliza el TV, primero
deber á escanear to dos los can ales de TV.
Pulse O K para confir mar, verá el m enú:
DTV S ignal
<
Auto Scan
Sca n all cha nnels
Dig ital ch annel o nly
Ana log cha nnel on ly
OK
Pulse e l botón OK para s eleccio nar el tipo de
escan eado. verá el m ensaje de a bajo, que indica
que la bú squeda auto mática es tá en curso.
Auto Scan DTV+ATV
0
0
0
Pro gramm e(S)
Pro gramm e(S)
Pro gramm e(S)
Fou nd:
Ana log:
Dig ital:
1%. .. RF CH 2 DT V
6.3 Fav orito:
Pulse O K para escoge r/elimi nar el canal favorito.
6.4 Mos trar/Ocultar
Pulse O K para mostra r u ocultar e l canal act ual.
6.5 Señ al DTV
Muest ra la fuerza de l a señal DTV. No pue de
selec cionarse ni a justars e.
-13-
Page 41

SE- UM-39 01- 1201
 Loading...