

Page 1
PREMIUM SERIES
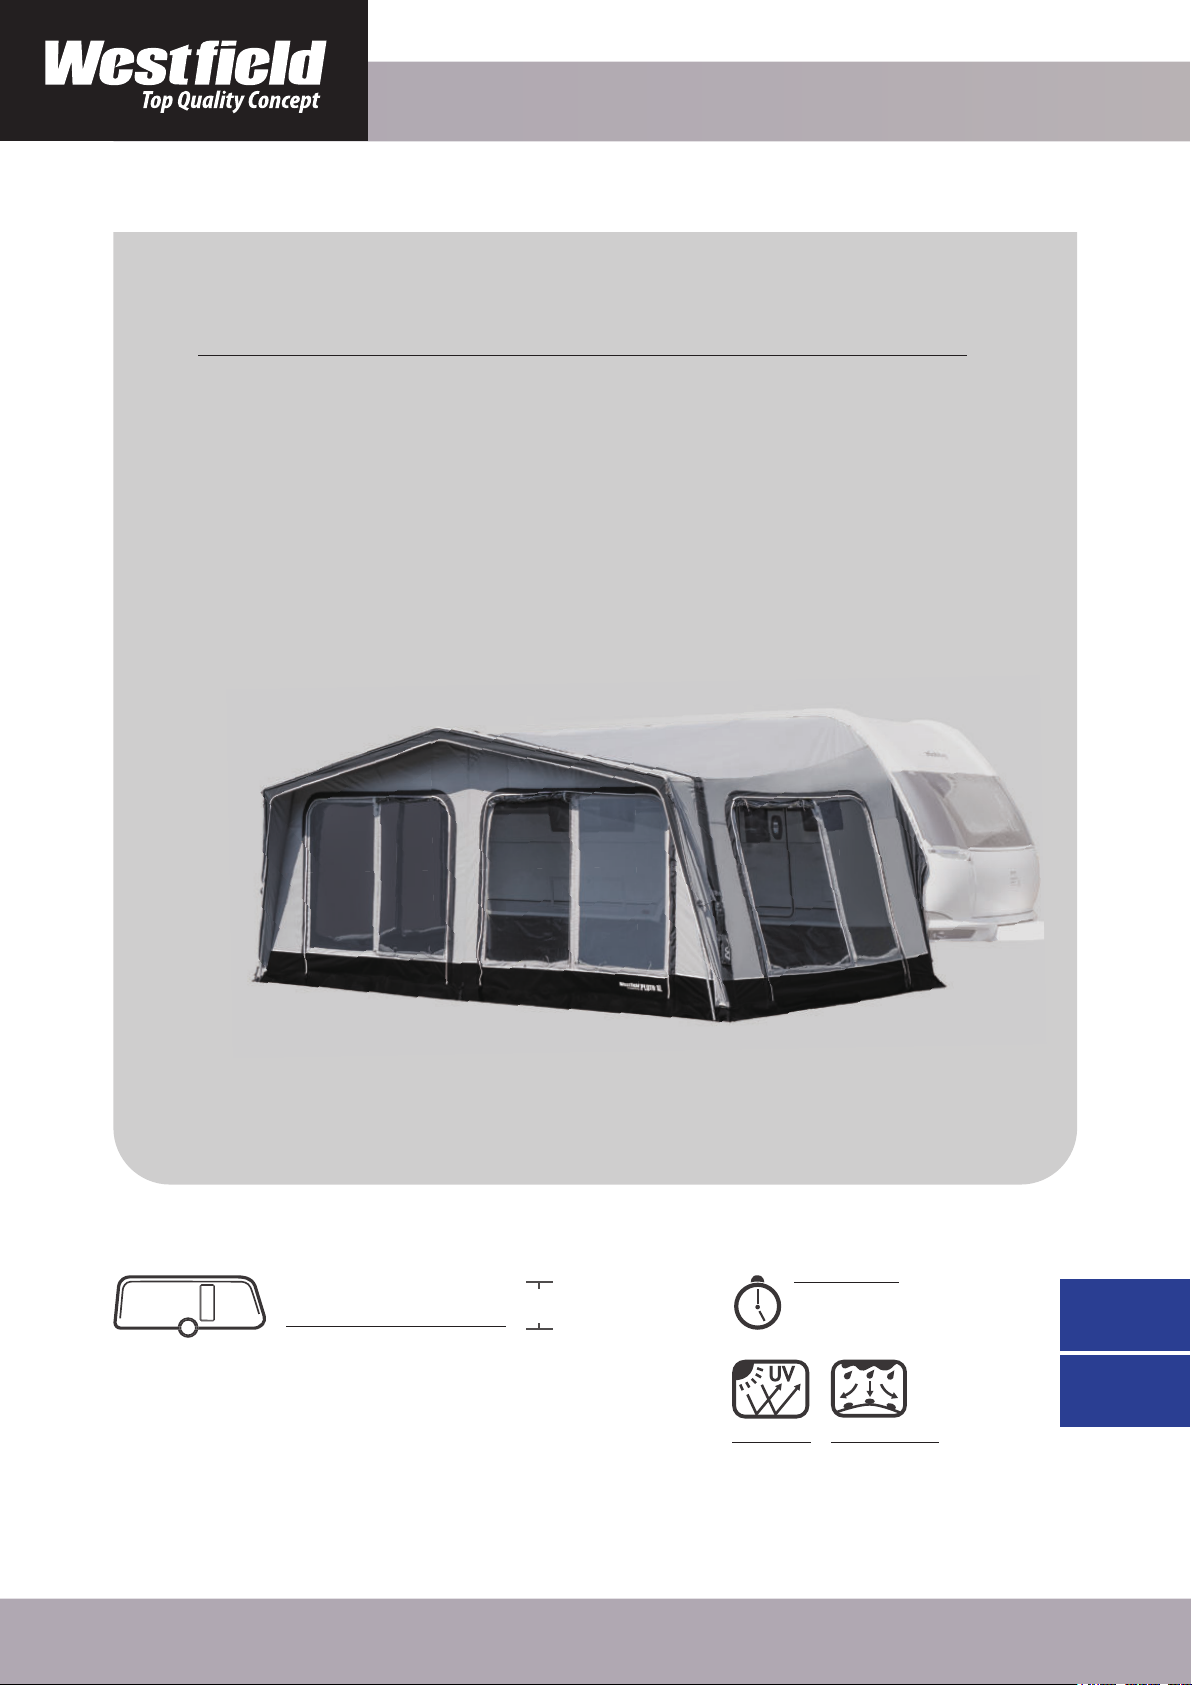
VOLLEINGEZOGENES WOHNWAGEN LUFTVORZELT
FULL SIZE CARAVAN AIR AWNING
PLUTO
VOLLEINGEZOGENES
CARAVAN LUFTVORZELT
FULL SIZE CARAVAN
AWNING
H= 240~260 cm
www.westfi eld-tqc.com
AUFBAUZEIT
SETUP TIME
20-30 min
UV-BESTÄNDIG
UVRESISTANT WATERREPELLENT
WASSERABWEISEND
DE
GB
Page 2
WILLKOMMEN
Vielen Dank, dass Sie sich für ein Vorzelt der „Premium Series“
WELCOME
von „
Sie diese Gebrauchsanweisung sorgfältig durch und beachten Sie
unsere Pege- und Sicherheitshinweise.
Thank you for purchasing this Westfield Top Quality Concept
awning. Please read these instructions for use fully and carefully
before using your awning. Please observe the care and safety inst-
ructions.
Westfield Top Quality Concept
“ entschieden haben. Bitte lesen
!
2
BEWAHREN SIE DIESES HANDBUCH SORGFÄLTIG AUF
KEEP THIS MANUAL FOR FUTURE REFERENCE.
PLUTO
Page 3

SUMMARY
ZUSAMMENFASSUNG
ALLGEMEINE EMPFEHLUNGEN UND VERWENDUNG
GENERAL RECOMMENDATIONS AND USAGE
2
STÜCKLISTE
OPTIONAL
AUFBAU
Vorbereiten
Zelt einziehen
Aufpumpen
Montieren des Vordachs
Seiten und Frontwände
Abspannung
Sturmleinen
PARTS LIST
OPTIONAL
INSTALLATION
Preparation
Insert Awning
Pumping
Pitching
Assembling the front canopy
Side and Front Panels
Storm Strap
5
6
7
8
9
11
12
13
Undichte Ventile und deren Reparatur
Leaking valves and how to fi x it
Entleeren
Ersetzen eines TPU-Luftschlauches
Replace a TPU air tube
PFLEGEANLEITUNG
GENERAL CARE AND USAGE INSTRUCTIONS
Defl ation
www.westfi eld-tqc.com
14
14
15
16
1
Page 4

ALLGEMEINE EMPFEHLUNGEN UND VERWENDUNG
Wir empfehlen die Verwendung einer zusätzlichen Bodenplane oder einer zusätzlichen Abdeckung, um Schäden an Ihrem Vorzelt zu vermeiden, welche während der Montage an Ihrem
Wohnwagen, Wohnmobil oder Fahrzeug entstehen können.
Bitte machen Sie sich mit dem Vorzelt vertraut, bevor Sie Ihre erste Reise antreten. Wir empfehlen einen Probeaufbau.
Legen Sie das Vorzelt auf einer sauberen und ebenen Fläche aus. Entfernen Sie Steine und Äste,
um mögliche Schäden zu vermeiden. Achten Sie auf aufkommenden Wind um Schäden zu vermeiden. Versuchen Sie, Ihr Vorzelt in einem windgeschützten Bereich aufzubauen.
Vermeiden Sie es, Ihr Vorzelt unter Bäumen aufzustellen, da Baumharz und andere Fremdkörper Ihr Vorzelt dauerhaft beschädigen oder verschmutzen können.
Bei allen beschichteten und nicht atmungsaktiven Materialien kommt es immer zu Kondensation.
Auf der kältesten Oberfläche des Vorzeltes bildet sich Kondenswasser, welches auf der Innenseite des Vorzeltes sichtbar sein kann. Kondensation, ist kein Herstellungsfehler oder Reklamationsgrund.
Kondenswasser kann durch gute Belüftung reduziert werden.
Das Vorzelt ist nur für den privaten Gebrauch und nicht für eine gewerbliche Nutzung entwickelt. Ebenfalls ist das Zelt nicht für den Dauereinsatz hergestellt.
Bitte vermeiden Sie jegliche Schneelast. Vorzelte sind nicht für die Schneelast ausgelegt.
Bei starken Winden und Stürmen muss das Vorzelt abgebaut werden, um Schäden am Produkt
zu vermeiden.
Öffnen Sie niemals die Reißverschlüsse an einem aufgeblasenen Luftschlauch, da sonst die
Luftsch läuche beschädigt werden können.
Die Ventile an den Luftschläuchen können sich mit der Zeit lösen, prüfen Sie vor jedem Einsatz,
ob die Ventile fest verschraubt sind.
2
PLUTO
Page 5

GENERAL RECOMMENDATIONS AND USAGE
We recommend the use of an additional groundsheet or covering to avoid any damage
to your awning whilst fitting it to your caravan, motor home or vehicle.
Please familiarize yourself with the awning before you go on your first trip. We recommend a test set-up before your trip.
Install your awning on a clean and even surface. Remove stones and branches to avoid
possible damage to your awning and make a note about the direction and strength of the
wind and always try to build your awning up in a wind-protected area.
Avoid setting up your awning under trees as tree sap and other debris can permanently
mark or damage your awning.
On all coated, non-breathable materials you will always get some condensation. This is
when condensed water forms on the coldest surface of the awning which can sometimes
be inside the awning.
Condensation is often mistaken for leaking and is not a reason for complaint or a fault of
the awning.
This can be lessened by ensuring the awning has adequate ventilation to allow increased
air flow and thus, reduce the condensation.
This awning is not built for permanent pitching or commercial use.
Please avoid any snow load. Air awnings are not built for winter camping.
In the case of strong winds and storms, the awning must be taken down in order to avoid
storm damage.
Never open the zips on any of the air tubes when they are inflated. This can lead to damage to the air tubes and your awning.
The valves on the air tubes can become loose over time even when not used, so before
you inflate your awning you should always check that the valves are tight otherwise they
could leak.
www.westeld-tqc.com
3
Page 6
PLUTO
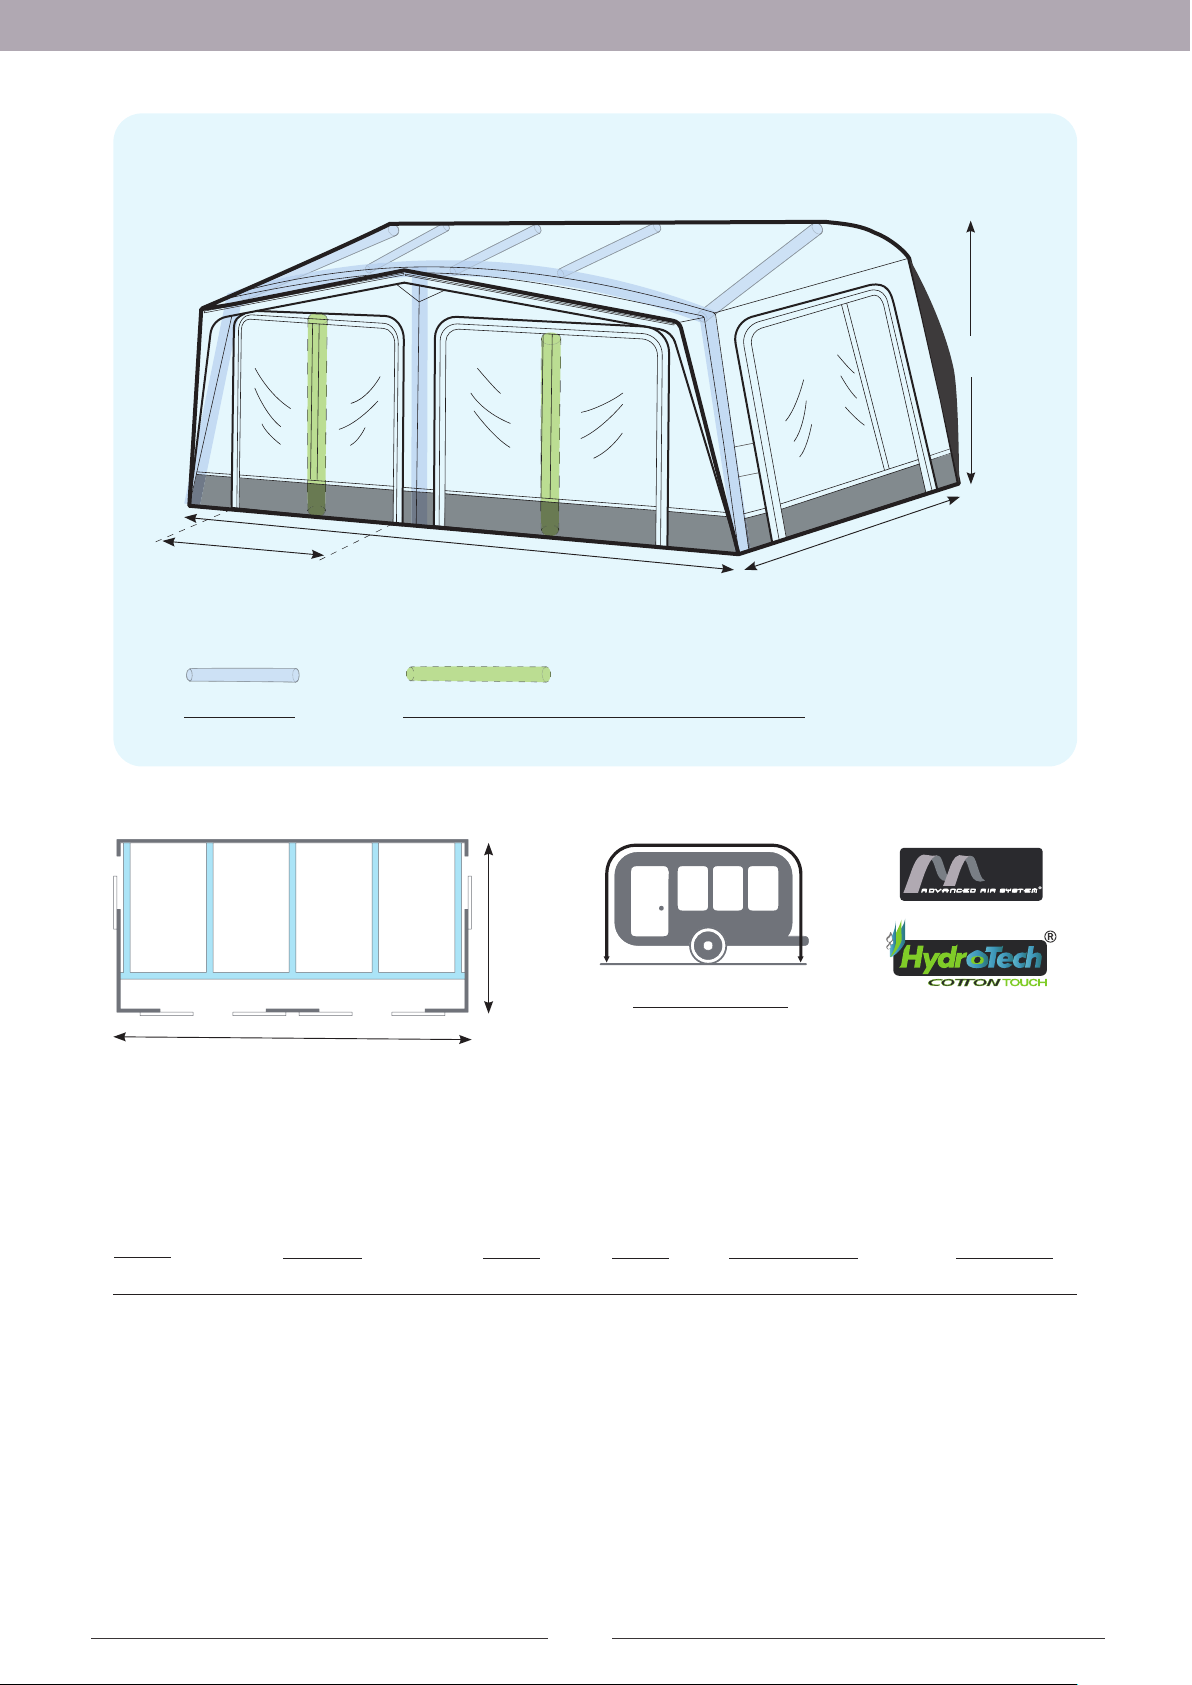
PLUTO 7: 205 cm
PLUTO 8~12: 210 cm
PREMIUM SERIES
240~260 cm
250 cm
490~665 cm
Größe
Size
Luftschläuche
Air tubes
490~665 cm
Art.-Nr.
Item no.
zusätzliche Luftschläuche (Ab Größe 10 inklusive)
Additional air tubes(Included from size 10)
250 cm
UMLAUFMASSE
A-MEASUREMENT
PLUTO 7~12
Breite Tiefe
Width Depth
Umlaufmaße
A-Measurement
Stehhöhe
Height
PLUTO 7
PLUTO 8
PLUTO 9
PLUTO 10
PLUTO 11
PLUTO 12
4
12020370700001
12020370800001
12020370900001
12020371000001
12020371100001
12020371200001
490 cm 250 cm
525 cm 250 cm
560 cm 250 cm
595 cm 250 cm
630 cm
665 cm
250 cm
250 cm
PLUTO
911 ~ 945 cm 240 ~ 255 cm
946 ~ 980 cm
981 ~ 1015 cm
1016 ~ 1050 cm
1051 ~ 1085 cm
1086 ~ 1120 cm
240 ~ 255 cm
240 ~ 255 cm
240 ~ 255 cm
240 ~ 255 cm
240 ~ 255 cm
Page 7
PREMIUM SERIES
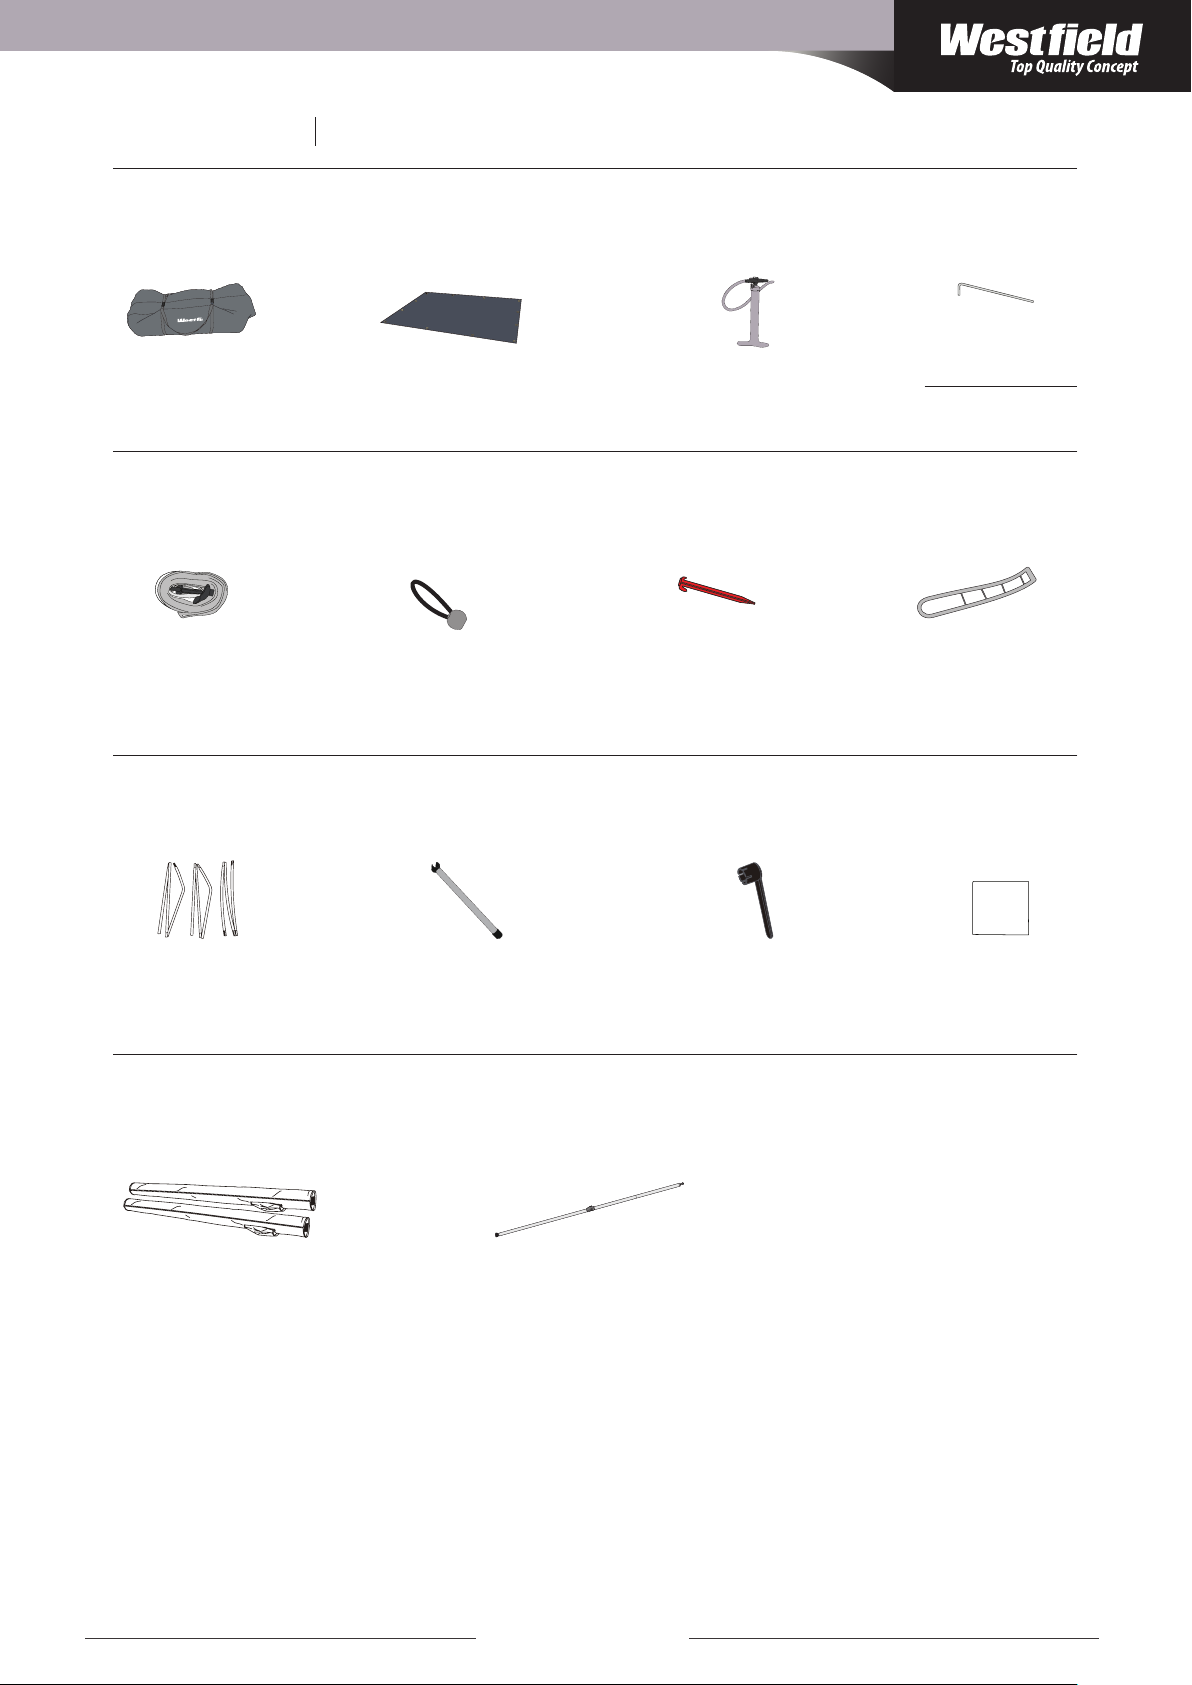
STÜCKLISTE
Tragetasche
Carry Bag
x 2
Sturmleinen
Storm Strap
x 8 x 8
PARTS LIST
Windschürze und Radblende
Draft Skirt and Wheel Cover
x 1
Elastikspanner
Elastic Ring
Pumpe mit Sicherheitsventil
Pump & Safety Pressure Valve
x 1
ABS Heringe
ABS Peg
(
/ Size 7)
x 52
x 56
x 58
Gr. 7
(
Gr. 8~11
(
Gr.12
/ Size 8~11)
/ Size 12)
Stahlerdnägel
je nach der Größe
depending on the size
Leitergummis
Pegging Ladder
(
x 40
x 44
x 46
Gr. 7
(
Gr.8~11
(
Gr.12
Steel Pegs
x 12~17
/ Size 7)
/ Size 8~11)
/ Size 12)
/
Frontgestänge
Front Canopy Pole
Luftgestange Set
Front Air Tube Set
x 2
nur für Gr.10~12/
optional für Gr. 7~9/
only for Size 10~12
Short Front Canopy Pole
optional for Size 7~9
Frontstützen
Verandastange
Veranda Pole
x 1
Ventilspanner
Valve spanner
TPU Reparaturset
TPU Repair Patch
TPU
1.Clean repair area thoroughly
2.Press patch fiemly over puncture
3.Do not inflate for four(4)hours to
allow repair to set
x 2x 1x 1 x 3
www.westeld-tqc.com
5
Page 8
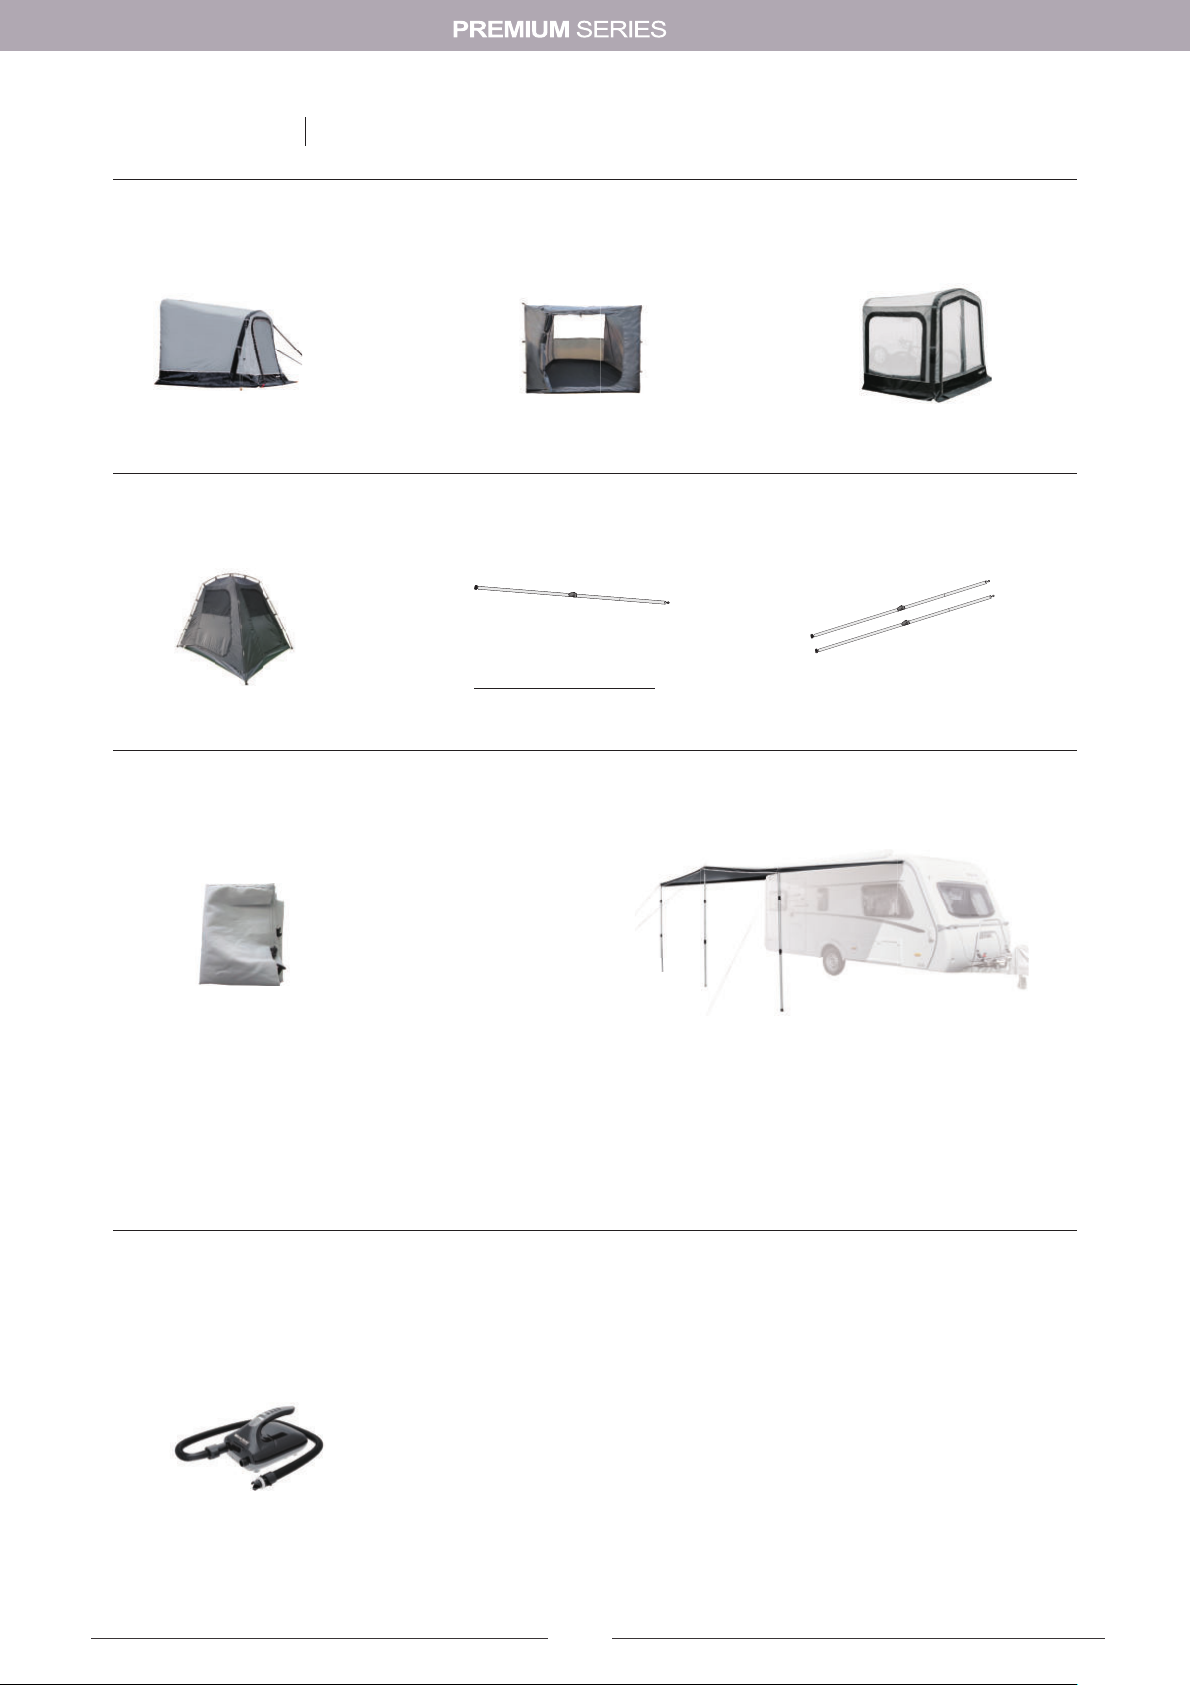
OPTIONAL
OPTIONAL
Universalanbau
Universal Annex
Art.-Nr. 12020370002000
Universal Freistehendes Innenzelt
Universal Freestanding Inner tent
Art.-Nr. 12040243202000
Innenhimmel
Inner Roof
Universalanbau Innenzelt
Universal Annex Inner Tent
Art.-Nr. 12020370004000
Verandastange
Veranda Pole
Art.-Nr. 12020370003000
für Gr.7~10/
Art.-Nr. 12020371103000
für Gr.11~12/
for Size 7~10
for Size 11
~12
Anbau ERIS
Annex ERIS
Art.-Nr. 12020612000000
Aufstellstangen-Set
Rear pole kit
Art.-Nr. 12010203504000
CANOPY SHADY PRO
für
für
für
für
für
für
/
for
/
for
/
for
/
for
/
for
/
for
PLUTO 7
PLUTO 8
PLUTO 9
PLUTO 10
PLUTO 11
PLUTO 12
(Art.-Nr. 12020370704000)
(Art.-Nr. 12020370804000)
(Art.-Nr. 12020370904000)
(Art.-Nr. 12020371004000)
(Art.-Nr. 12020371104000)
(Art.-Nr. 12020371204000)
Elektrische Pumpe
Electrical Pump
Art.-Nr. 12930010000000
für
für
für
für
für
für
/
for
PLUTO 7
/
for
PLUTO 8
/
for
PLUTO 9
/
for
PLUTO 10
/
for
PLUTO 11
/
for
PLUTO 12
(Art.-Nr. 12022235420000)
(Art.-Nr. 12022235440000)
(Art.-Nr. 12022235480000)
(Art.-Nr. 12022235500000)
(Art.-Nr. 12022235530000)
(Art.-Nr. 12022235560000)
6
PLUTO
Page 9
1
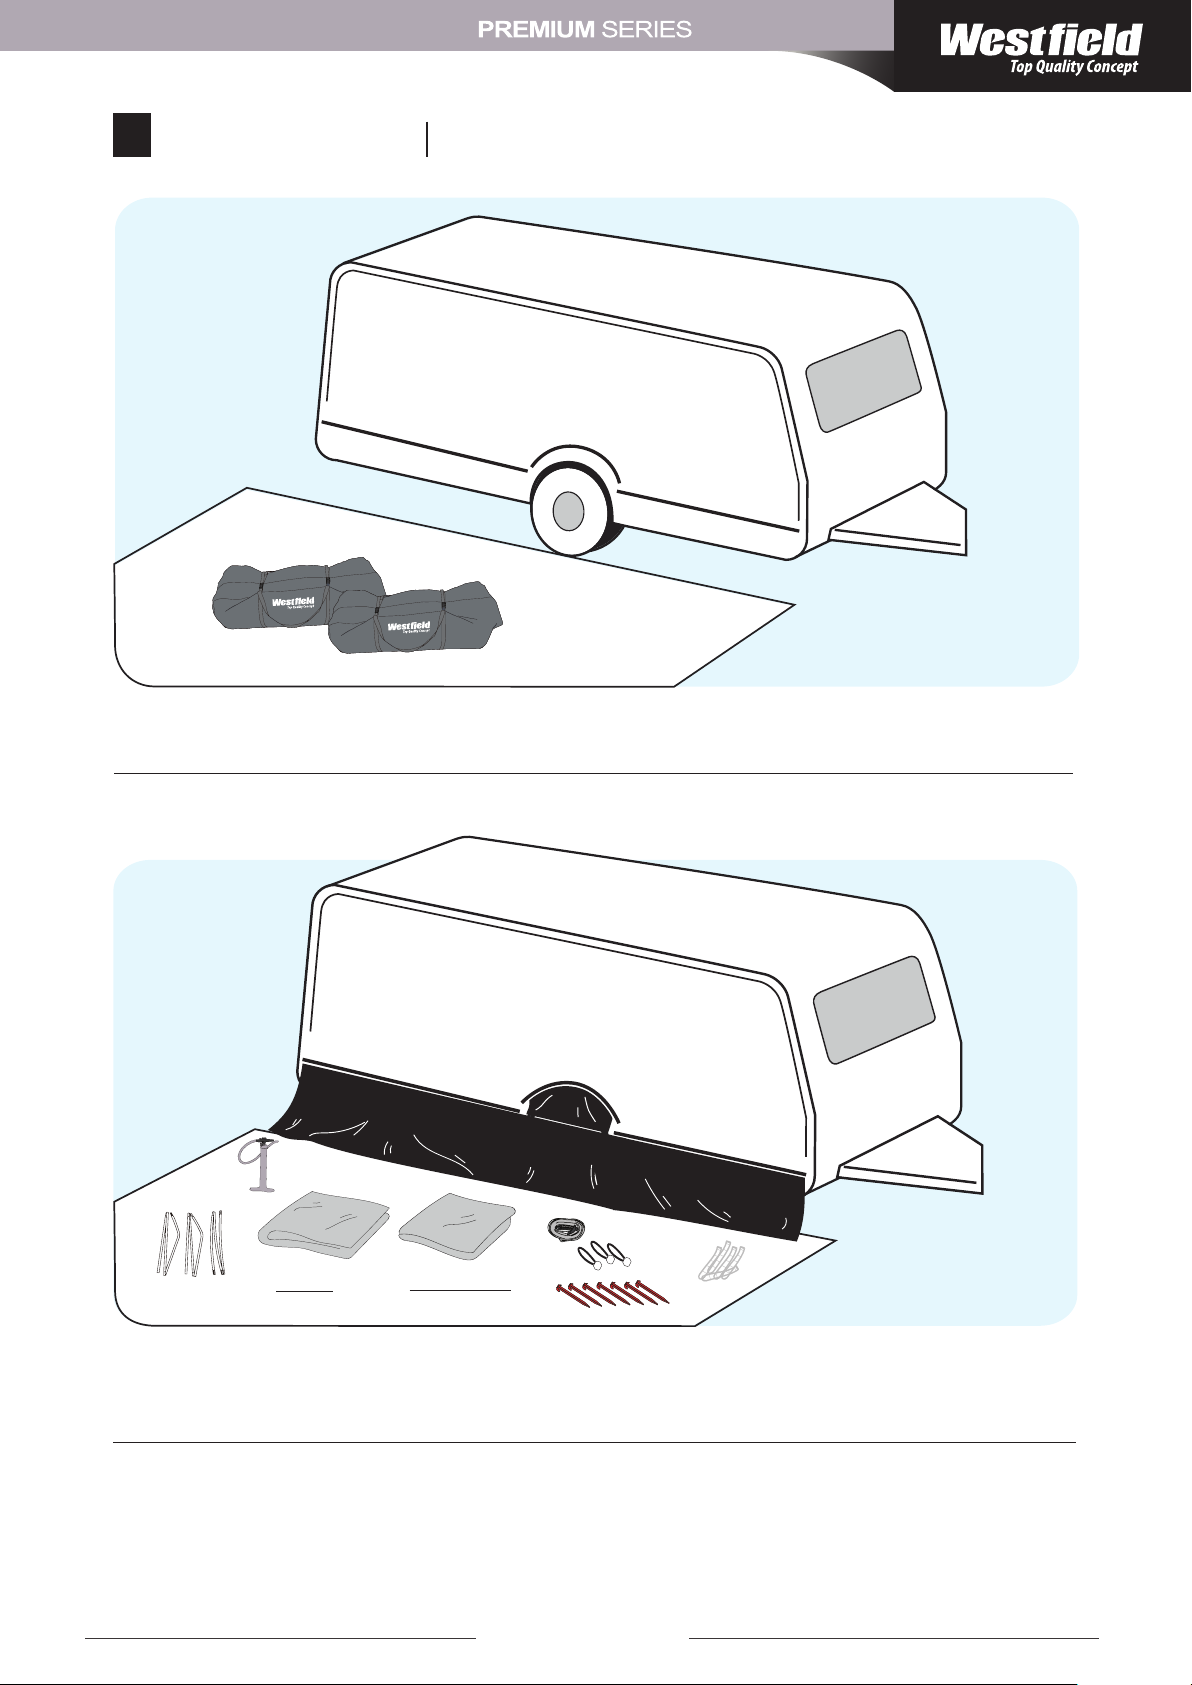
Vorbereitung
Nutzen Sie immer eine Plane oder einen Zeltteppich als Unterlage, um Beschädigungen und Verschmutzungen
beim Einfedeln zu vermeiden.
Preparation
Always use a groundsheet or a tent carpet as a base. To avoid damage and avoiding contamination during
assembling.
Vorzelt
Awning
Bei Bedarf schieben Sie die Windschürze in die dafür vorgesehene Kederschiene unten am Fahrzeug. Befestigen
Sie dann die Radabdeckung in der vorgesehenen Halterung oder verbinden Sie diese mit der Windschürze mittels
der mitgelieferten Doppelkederschiene.
Wand Elemente
Panels
If nequired t the draft skirt by sliding it into the lower rail on the bottom of your caravan, motorhome or vehicle.
The wheel cover either slides into the rail on the wheel arch or uses the gure of eight tubing and connects to
the top of the draft skirt.
www.westeld-tqc.com
7
Page 10
2
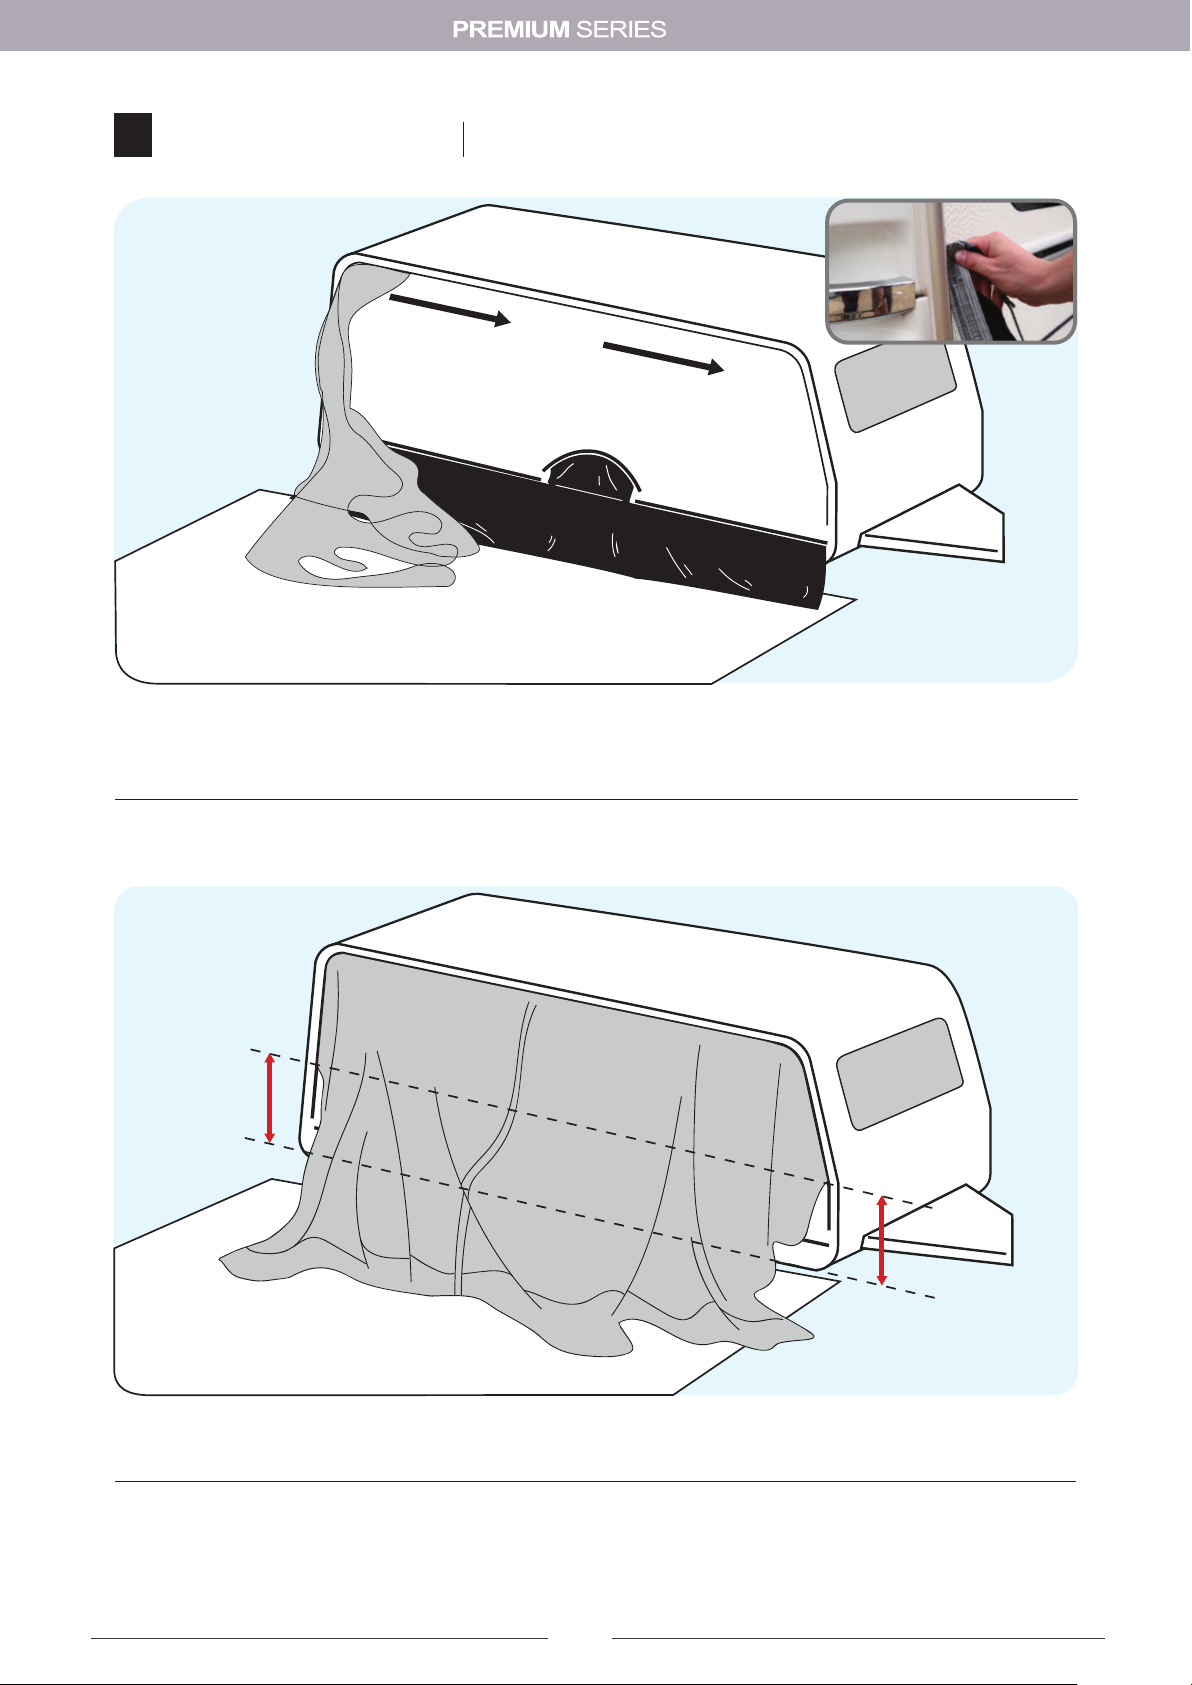
Zelt einziehen
Insert Awning
Für einen erleichterten Aufbau beim einkedern empfehlen wir alle Wandelemente zu entfernen. Ziehen Sie das
Vorzelt in die Kederschiene ein und richten Sie es aus.
For an easy sliding the awning into the caravanrail we advise to take out all side and front elements. Slide
the awning beading into the caravanrail and align to the desired position.
Achten Sie darauf das Sie das Zelt nach dem Einziehen gleichmäßig ausrichten. Ein nachträgliches anpassen ist
nachher nicht mehr möglich.
Please note that you align your awning equally. Afterwards changing the position is not possible.
8
PLUTO
Page 11
3
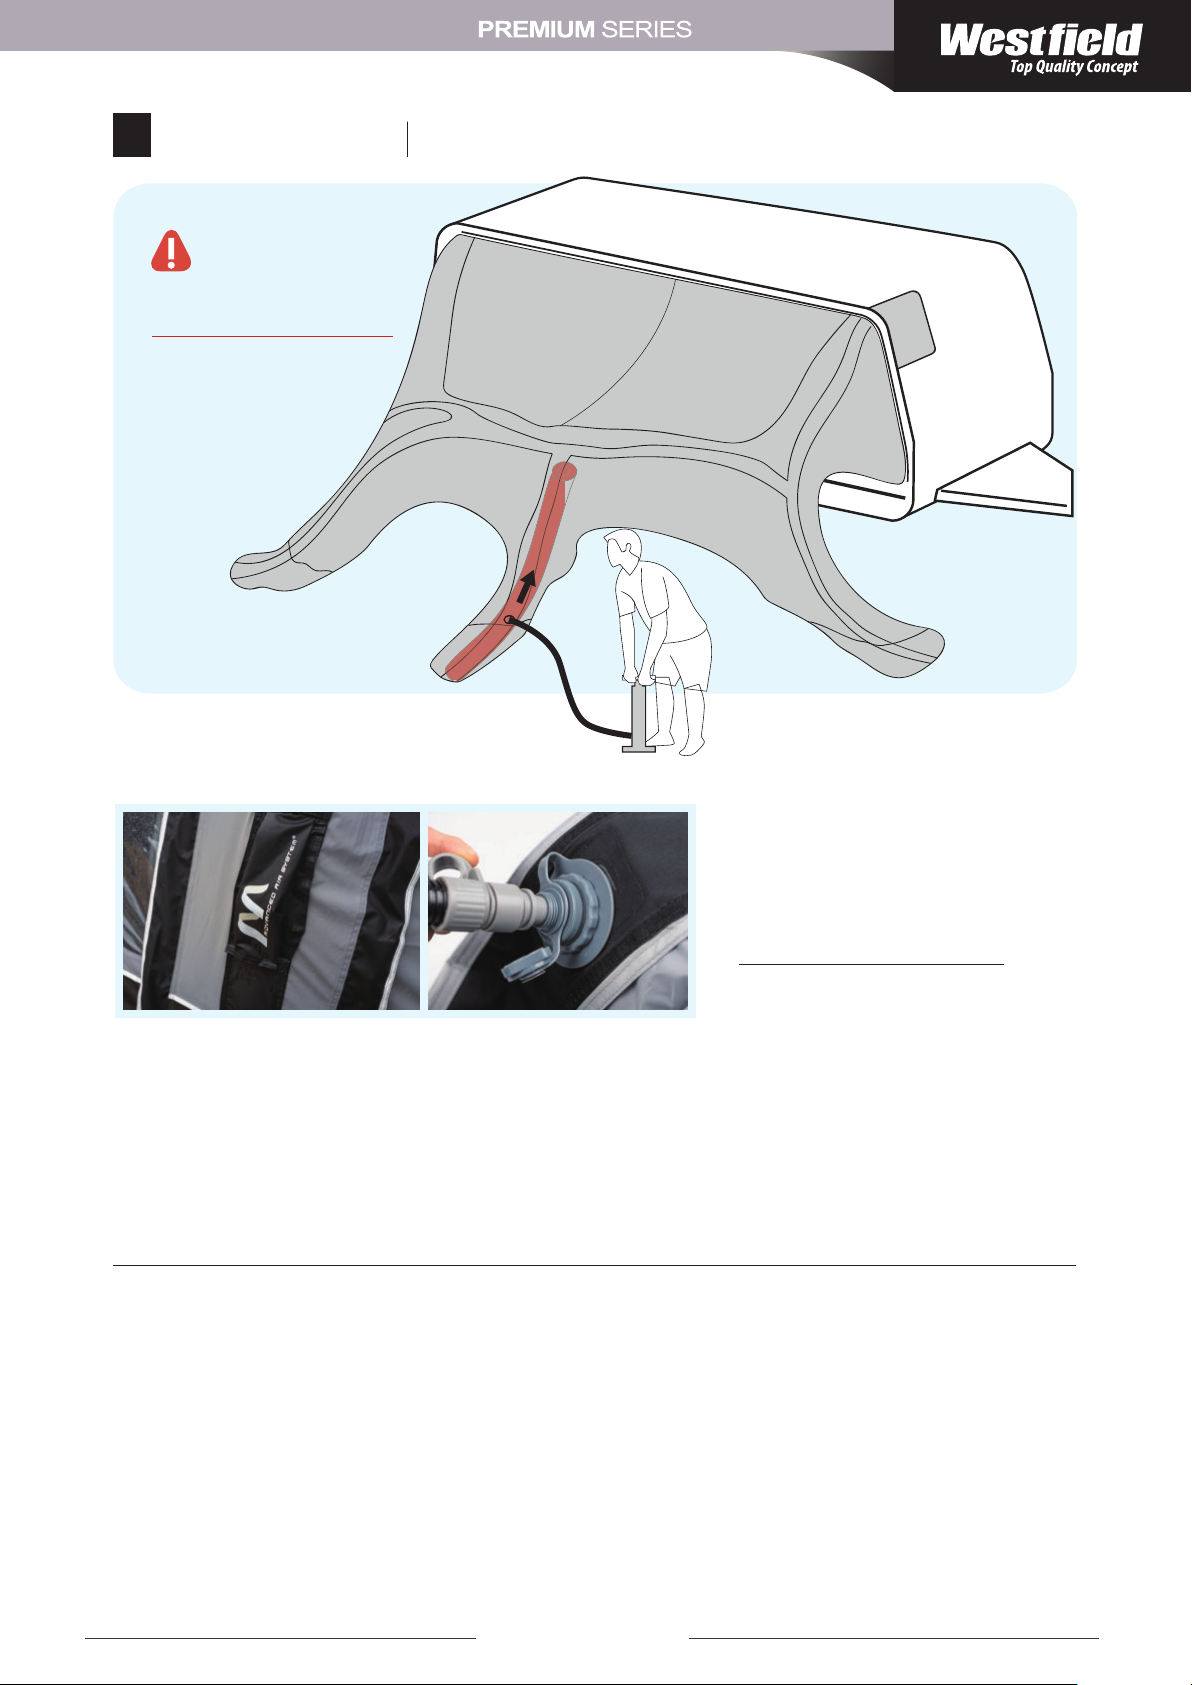
Aufpumpen
Pumpen Sie zuerst den
mittleren Luftschlauch auf.
Pump the middle airtube
at rst.
Pumping
Abgebildet ist der Anschluss der
elektrischen Pumpe
Shown is the connection
of the electric pump
1. Verwenden Sie zum Aufpumpen nur die mitgelieferte Pumpe.
2. Pumpen Sie das Vorzelt vorsichtig mit etwa 50% der Luftmenge auf (ca. 3-4 PSI)
3. Prüfen Sie im Inneren des Zeltes ob sich die Luftschläuche verdreht haben, um Beschädigungen zu vermeiden.
4. Pumpen Sie Ihr Vorzelt nun vollständig auf. Wenn Sie den erforderlichen Druck von 7 PSI erreicht haben, öffnet
sich das Überdruckventil der Pumpe.
5. Schliessen Sie die Schutzkappe des Ventiles um einen Luftverlust zu vermeiden.
6. Je nach Bodenbeschaffenheit, empfehlen wir die Luftgestänge mittels Distanzstücken auszurichten.
1. Only use the original pump delivered together with your awning.
2. Please pump carafully with only about 50% pressure about 3 to 4 PSI.
3. Check inside of the awning whether the airtubes are twisted, in order to avoid damages.
4. Now you can pump the tubes to the full pressure of 7 PSI. Above 7 PSI the pressure valve from the airpump will automatically open to avoid overpressure.
5. Close the protective cap on the valve to avoide loss of pressure.
6. Depending on the soil texture we recommend the use of distance sets to align your airtubes.
www.westeld-tqc.com
9
Page 12
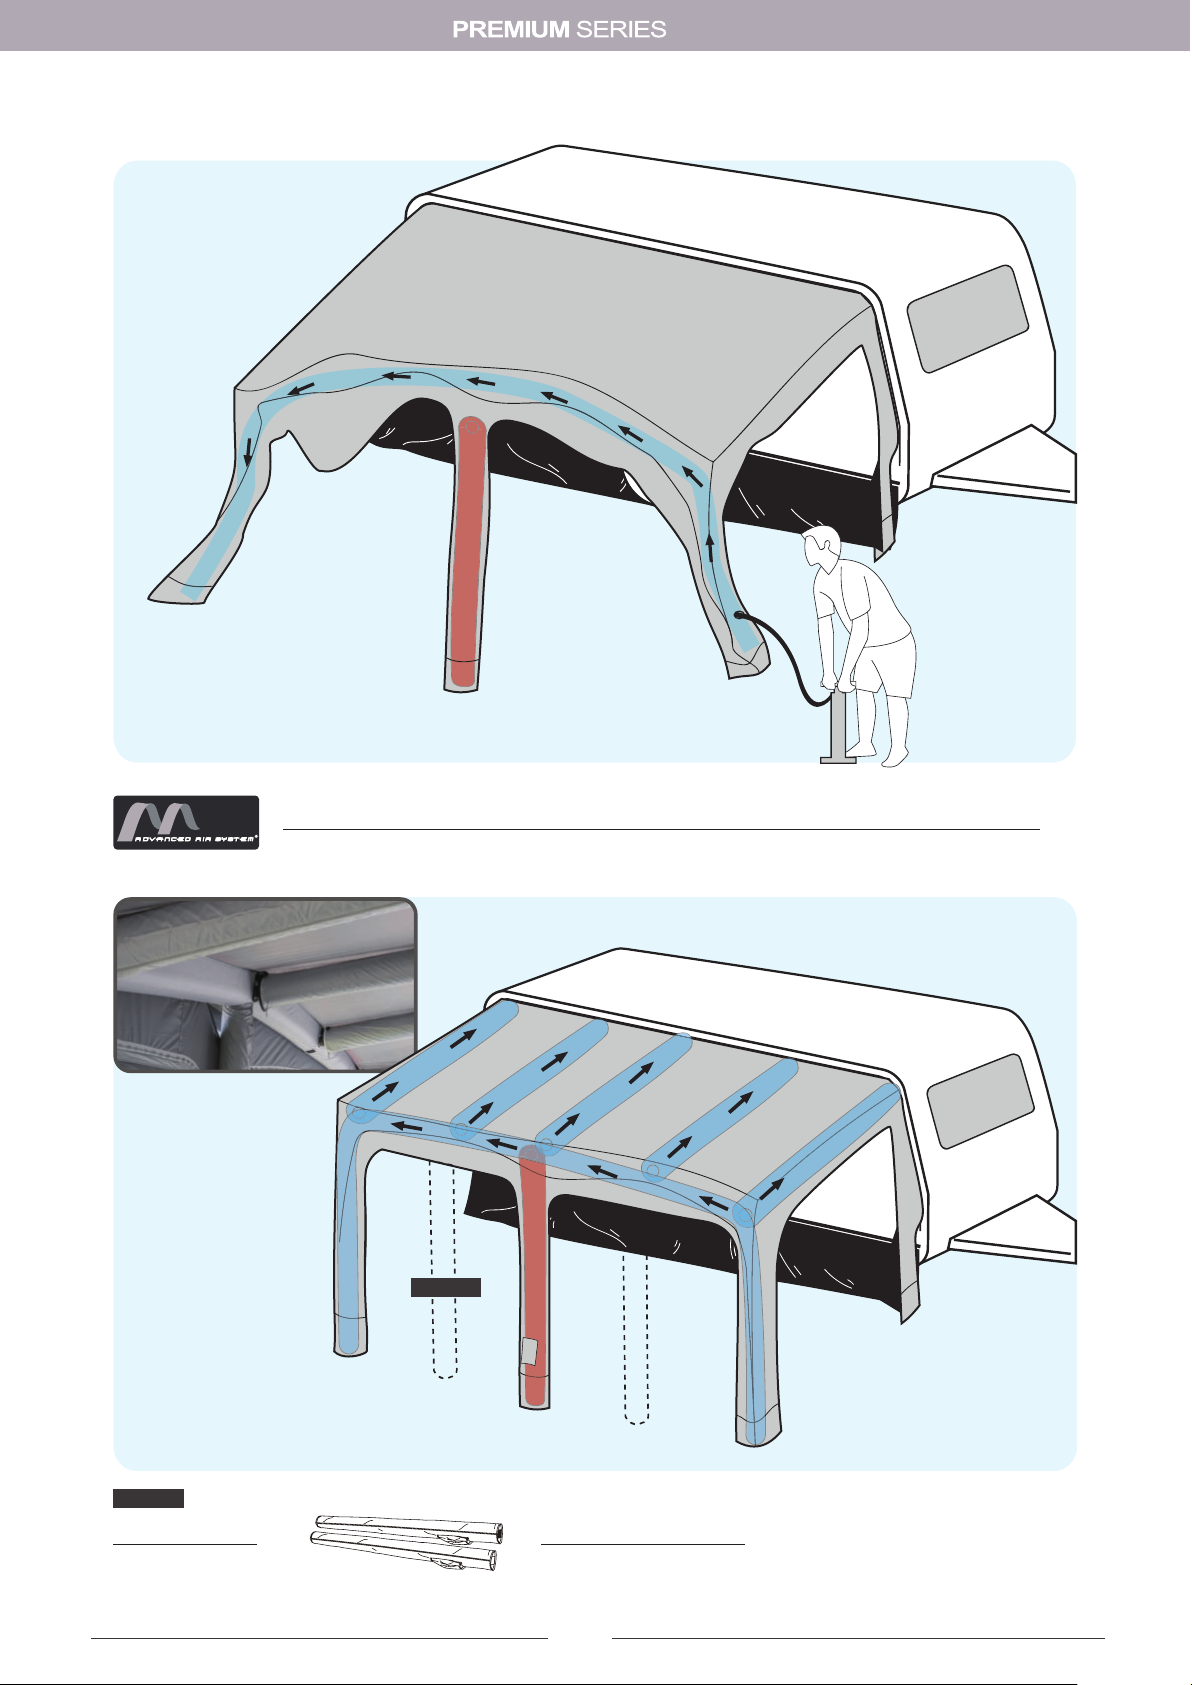
Durch unser AAS System können Sie Ihr gesamtes Zelt an nur einem Ventil aufpumpen.
Our AAS system enables you to pump up your awning using only one valve point.
OPTIONAL
10
OPTIONAL
Luftgestange Set
Front Air Tube Set
Inklusive bei Gr.10~11
inkluded in Size 10~11
PLUTO
Page 13
4
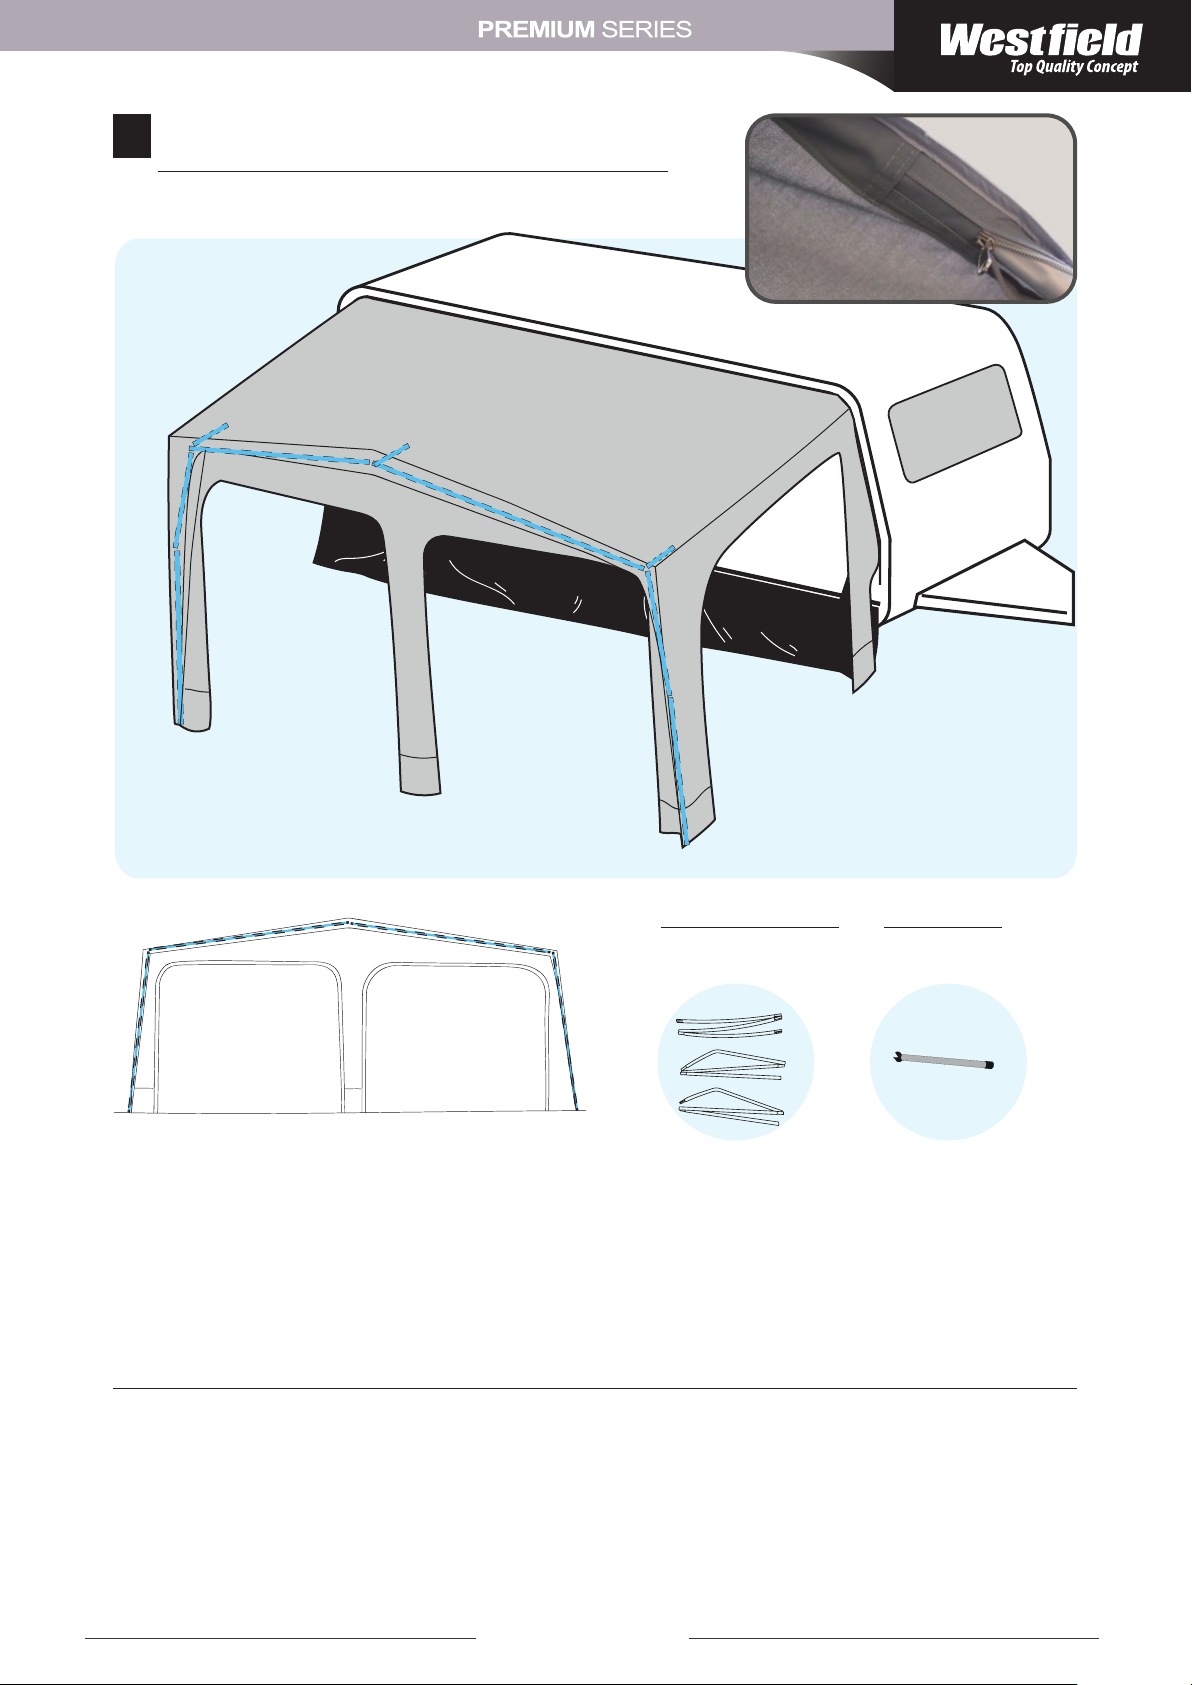
Montieren des Vordachs
Assembling the front canopy
c
b
b
c
a
c
b
Frontgestänge
a
b
Front Canopy Pole
a
Frontstützen
Short Front
Canopy Pole
b
b
1. Stecken Sie zunächst das dreiteilige Frontgestänge zusammen.
2. Fedeln Sie zunächst nur das obere Teilstück(b) des Frontgestänges ein.
3. Stecken Sie nun die beiden Seitliche Teilstücke(a) des Frontgestänges zusammen und verbinden diese nun mit
dem bereits eingefedelten Teilstück.
4. Schliessen Sie die beiden Reissverschlüsse des Gestängekanals.
5. Setzen Sie noch die 3 Frontstützen ein, die das Vordach spannen.
1. At rst assemble the three-part fronttube.
2. Then transit the toptube into the awningtube.
3. Put together the two site tubes and connect these to the roof tube already slided in.
4. Close both zippers at the side.
5. Put the 3 short tubes in place to tense up the front canopy.
www.westeld-tqc.com
c
x 3
11
Page 14
5
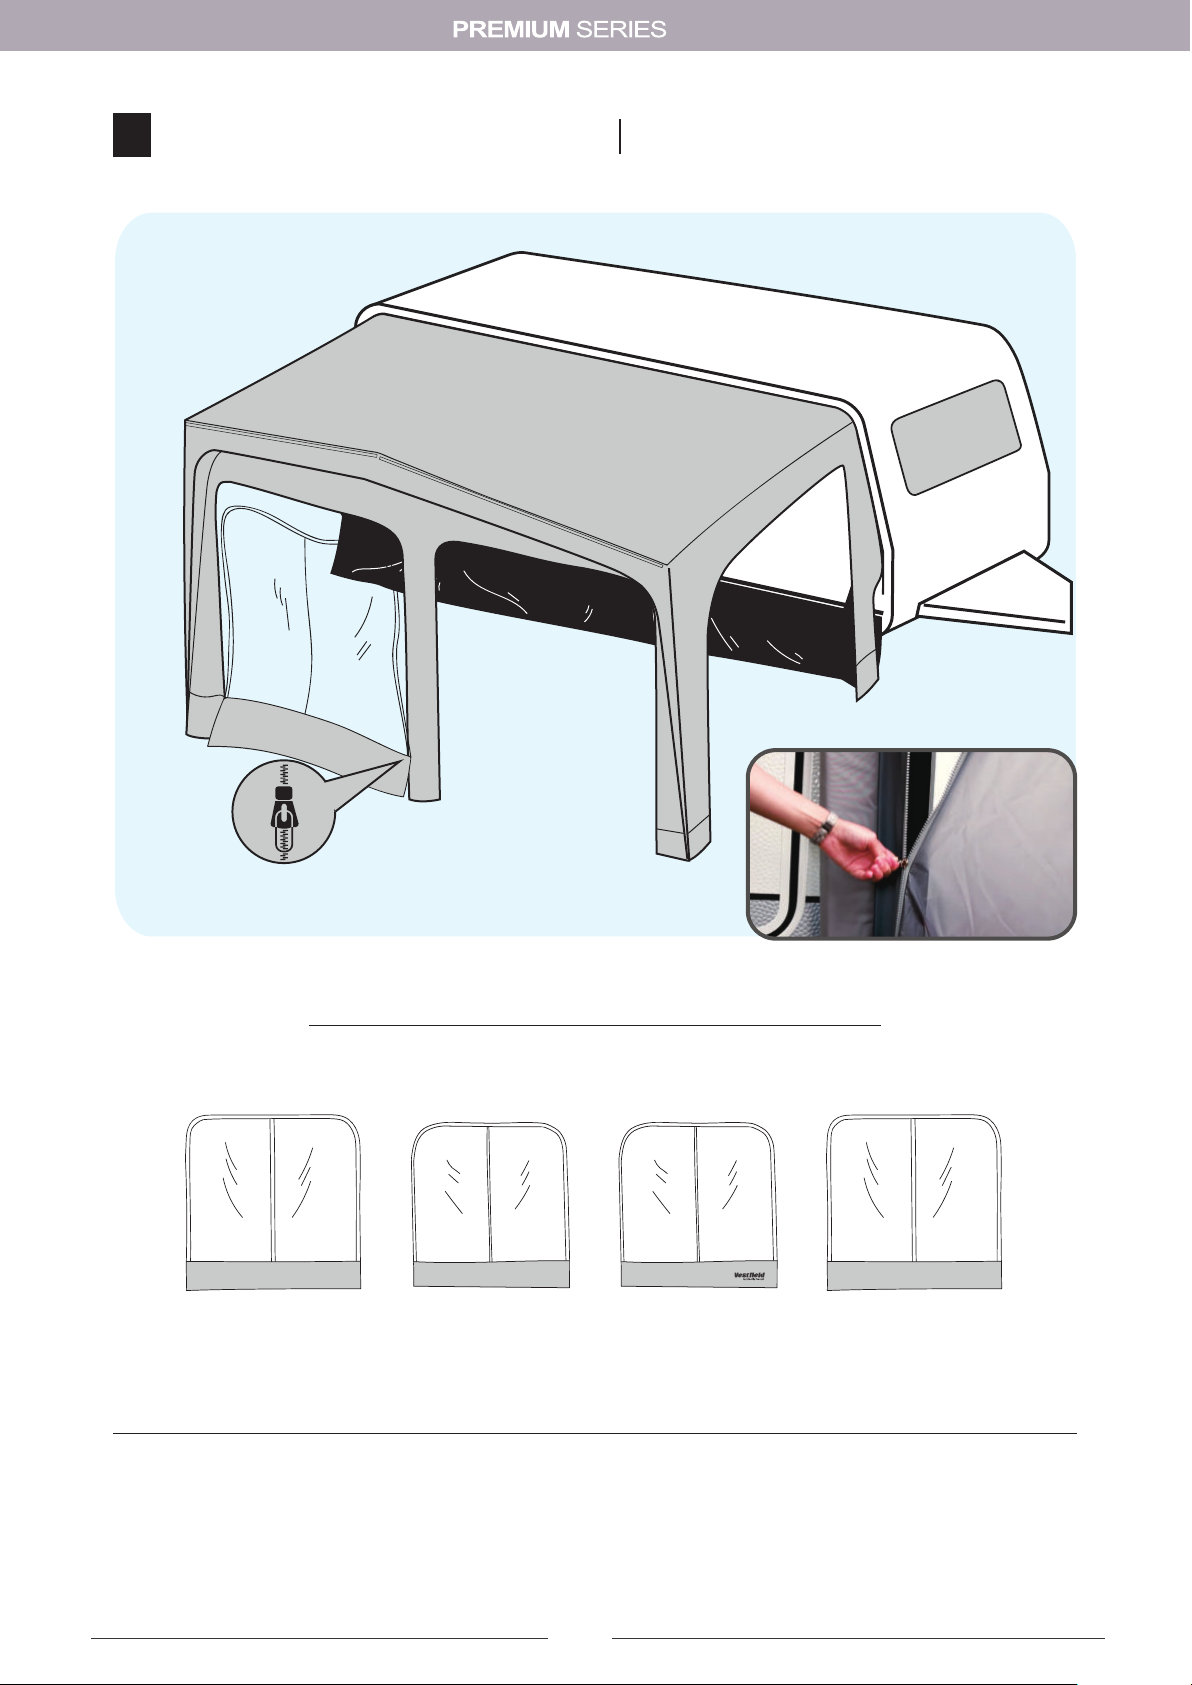
Seiten und Frontwände
Side and Front Panels
Bei Bedarf Seiten und Frontwände einziehen
Zip side and front panels on if required
Nach dem Aufpumpen setzten Sie bitte alle Seiten und Frontelemente in das Vorzelt ein. Achten Sie bit te darauf
das Zelt nicht vorher abzuspannen.
After pumping up your awning all front and side pannels can be zipped in. Please note that you do not peg your
awning before zipping in the panels.
12
PLUTO
Page 15
6
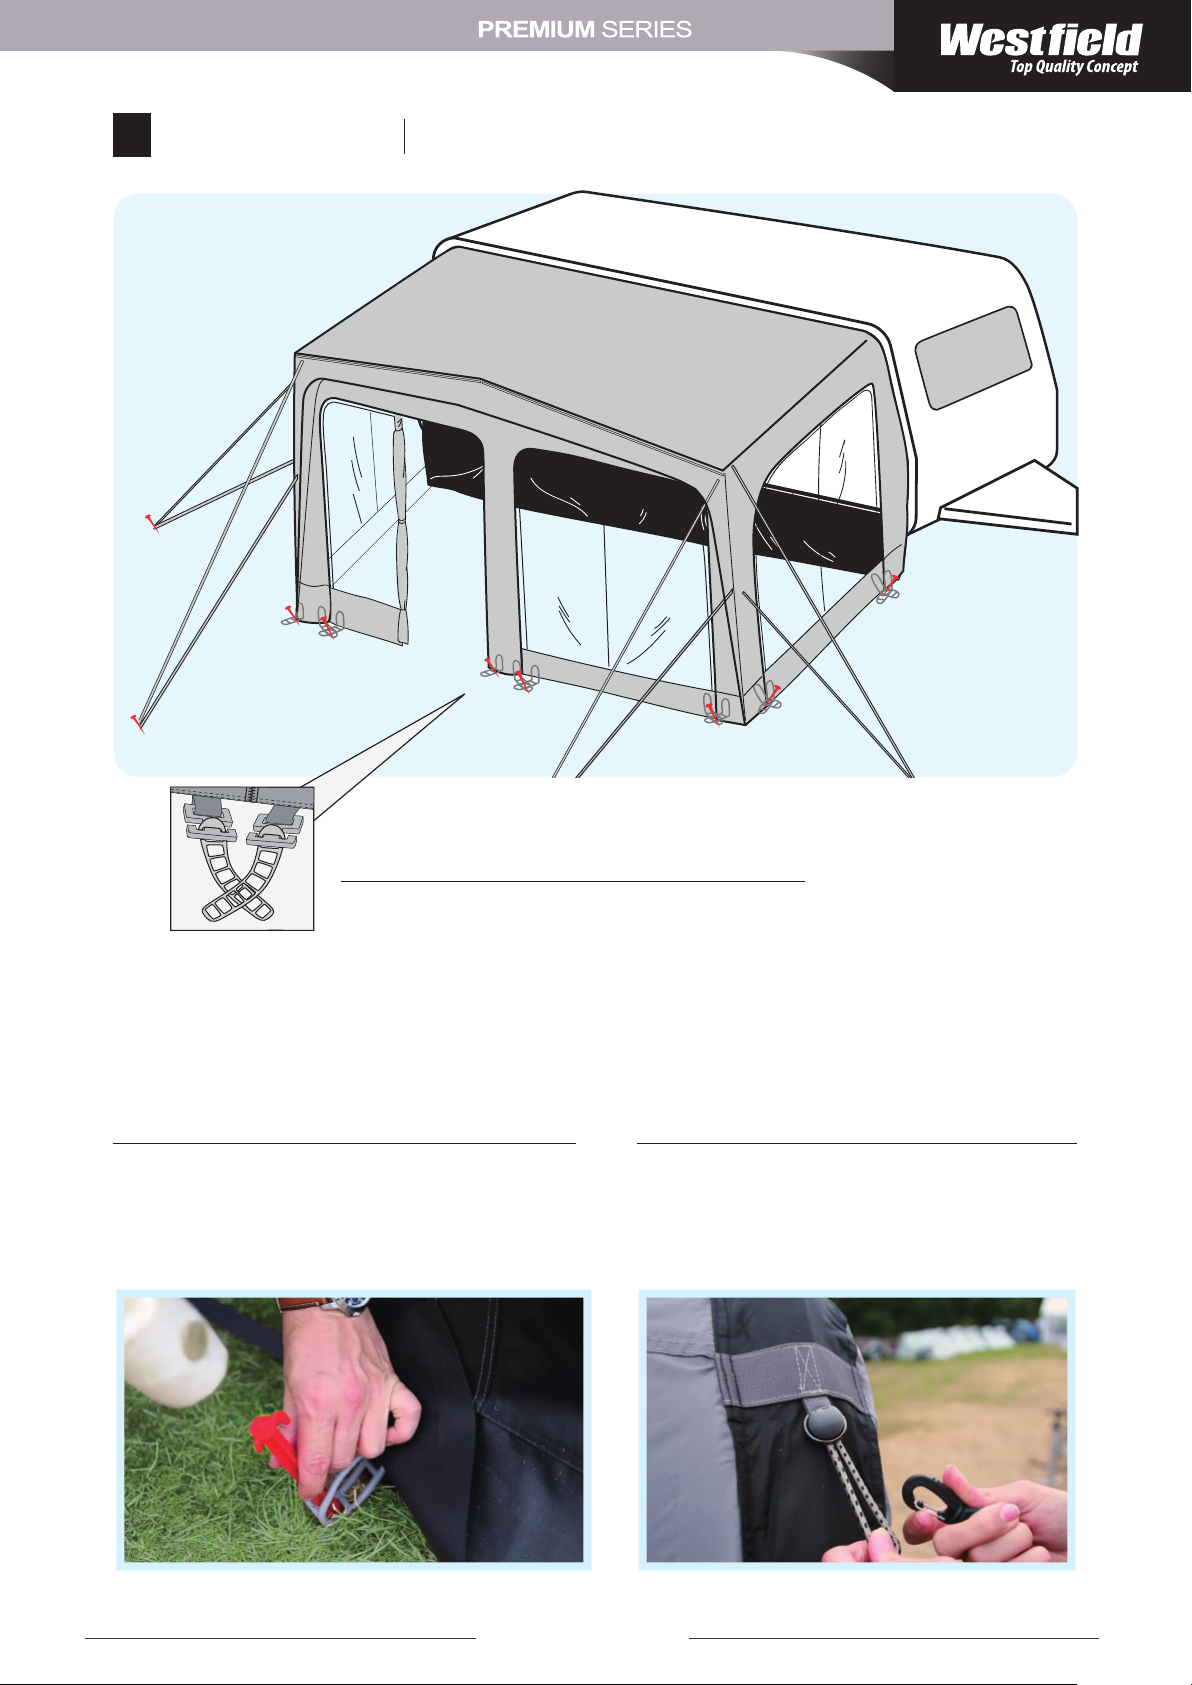
Abspannen
Pitching
Zur Entlastung der Reißverschluss sollten die Leitergummis
immer über Kreuz befestigt werden
To relieve the strain on the zip, the ladder elastics should
always be fastened crosswise
Spannen Sie nun Ihr Vorzelt ab. Beginnen Sie immer
am Fahrzeug und gehen dann nach außen. Setzen Sie
die im Lieferumfang enthaltene Heringe immer leicht
schräg (siehe Abbildung A). Spannen Sie immer alle
Abspannpunkte ab.
Peg your awning now. Always start at the vehicle and
then go outside. Always set the supplied pegs at a
slight angle (see illustration A). Always use all guying
points.
A
Zur Zugentlastung setzen Sie bitte immer zwischen
Abspanngurte und Abspannring die mitgeliefer ten
Elastikspanner. Diese regulieren Übermäßige Spannungen und vermeiden somit, dass Ihr Vorzelt Schaden nimmt.
For strain relief, please always put the included
elastics between the straps and the tension ring
These regulate excessive tension and thus avoid
damage to your awning.
www.westfi eld-tqc.com
13
Page 16
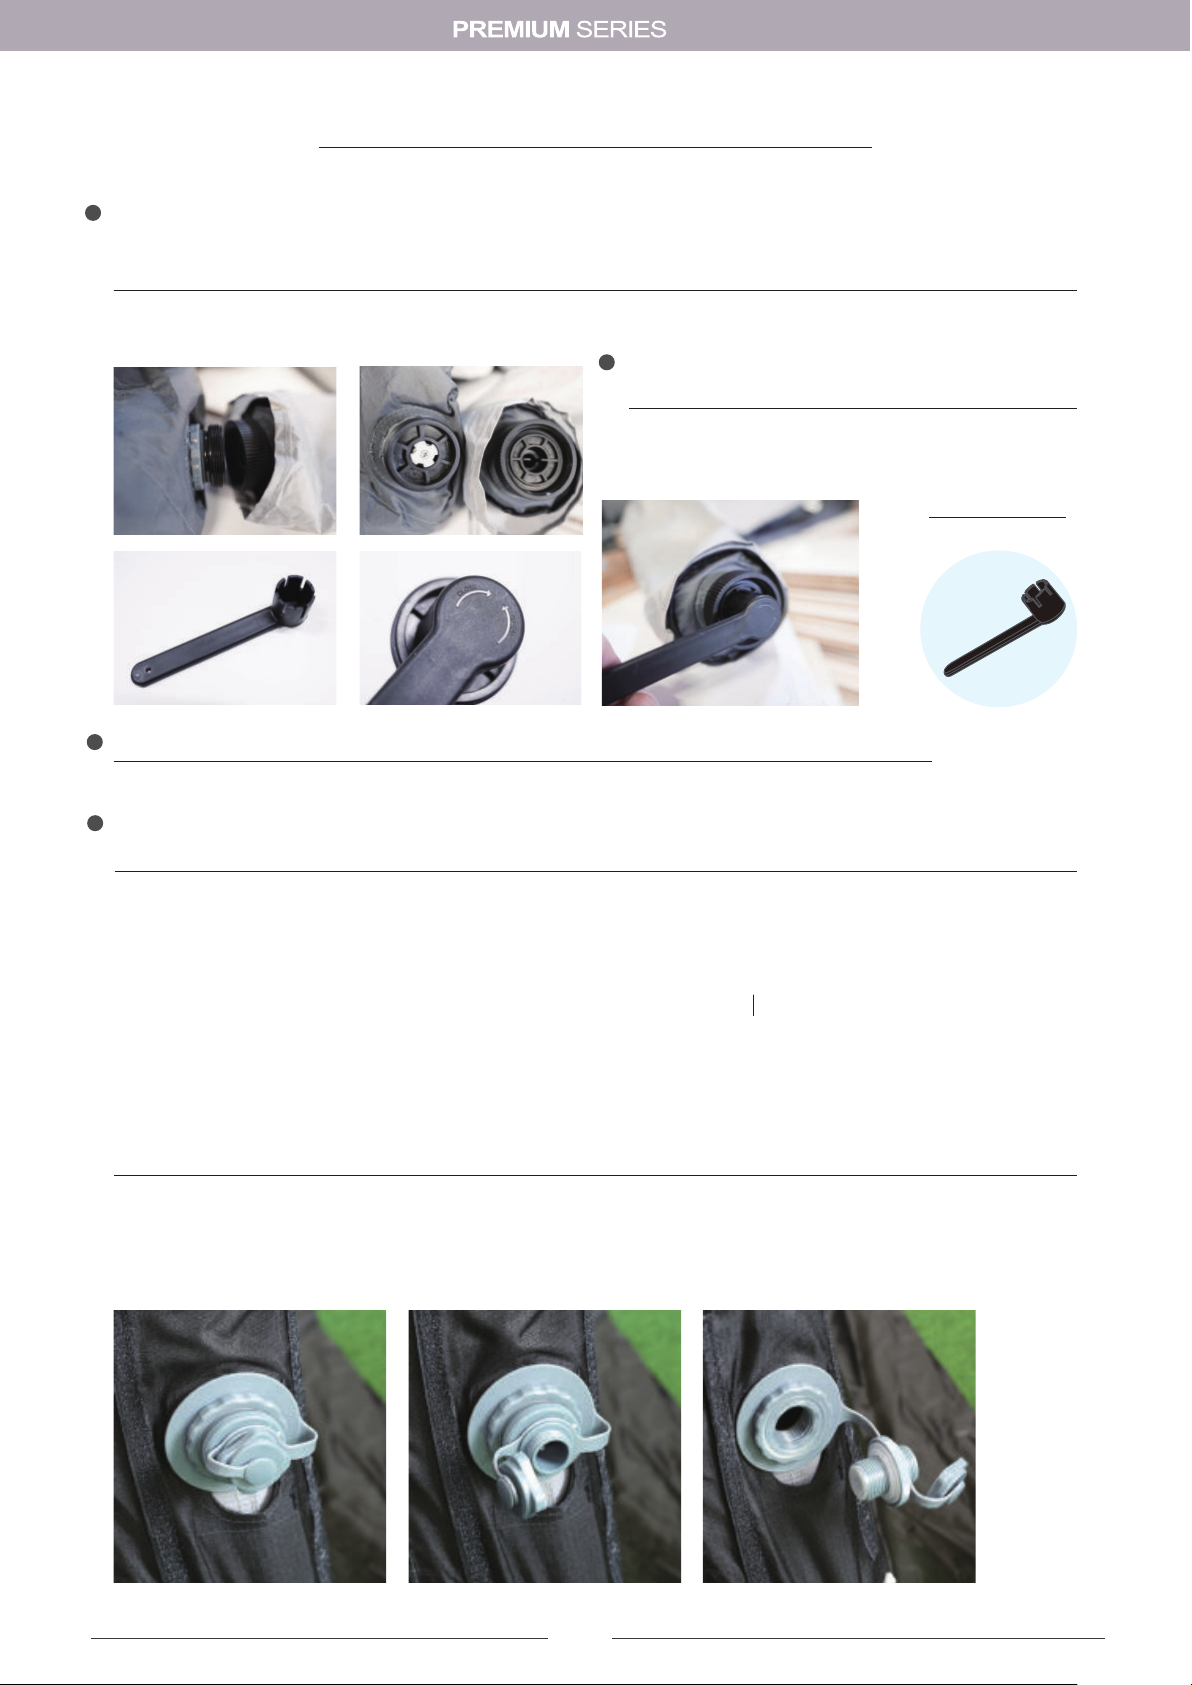
UNDICHTE VENTILE UND DEREN REPARATUR
LEAKING VALVES AND HOW TO FIX THEM
Ermitteln Sie das undichte Ventil und lösen Sie es durch Drehen gegen den Uhrzeigersinn aus dem Gewinde.
Hierbei entweicht ein Teil der Luft, bis das Ventil komplett gelöst und entfernt ist. Das verbleibende Ventil, welches sich noch im Schlauch befindet, riegelt nun sofort den Luftverlust ab.
Locate the leaking valve & undo by twisting anti-clockwise, you will hear air coming out but once released
from it’s connection this should stop.
Wie auf dem Bild zu sehen, das verbleibende Ventil
im Schlauch.
This should leave you with a connection like the
picture.
Ventilspanner
valve spanner
Nun benötigen Sie den mitgelieferten Ventilspanner, welcher in der Zubehörtasche verstaut ist.
Locate the valve tool from inside of the awning peg bag.
Setzen Sie den Ventilspanner in das Ventil an und spannen dieses vorsichtig nach. Achten Sie darauf, dass nicht
zu viel Spannung auf das Ventil ausgeübt wird.
Insert the valve tool into the grooves and while holding the grey connection turn the handle clockwise. This
should tighten the valve & stop any leaking air from escaping from the tube (please be careful not to over-
tighten the connection).
DAS ENTLEEREN DES LUFTSCHLAUCHES DEFLATION
Zum Entleeren der Luft, schrauben Sie vorsichtig und langsam die Rückschlagventile aus den Luftgestängen.
Achten Sie, dass die Schläuche und das Ventil unter Druck stehen und Ihnen keinen Schaden zufügen. Zum Verpacken des Vorzeltes, sollten die Ventile entfernt werden. Bitte achten Sie beim erneuten Aufbau des Vorzeltes,
dass die Ventile ordnungsgemäß und fest eingeschraubt sind, bitte achten Sie darauf, dass die Ventildichtungen
beim Zusammenschrauben nicht geknickt werden.
To deate the air tube, carefully unscrew the valves out of the air tubes. Please be aware that the air will rush
out very quickly so unscrew the valve slowly to help release the pressure slowly.
To help with packing the awning away, the valves should be left out as this allows any trapped air to escape
when the awning is packed away.
14
14
PLUTO
Page 17
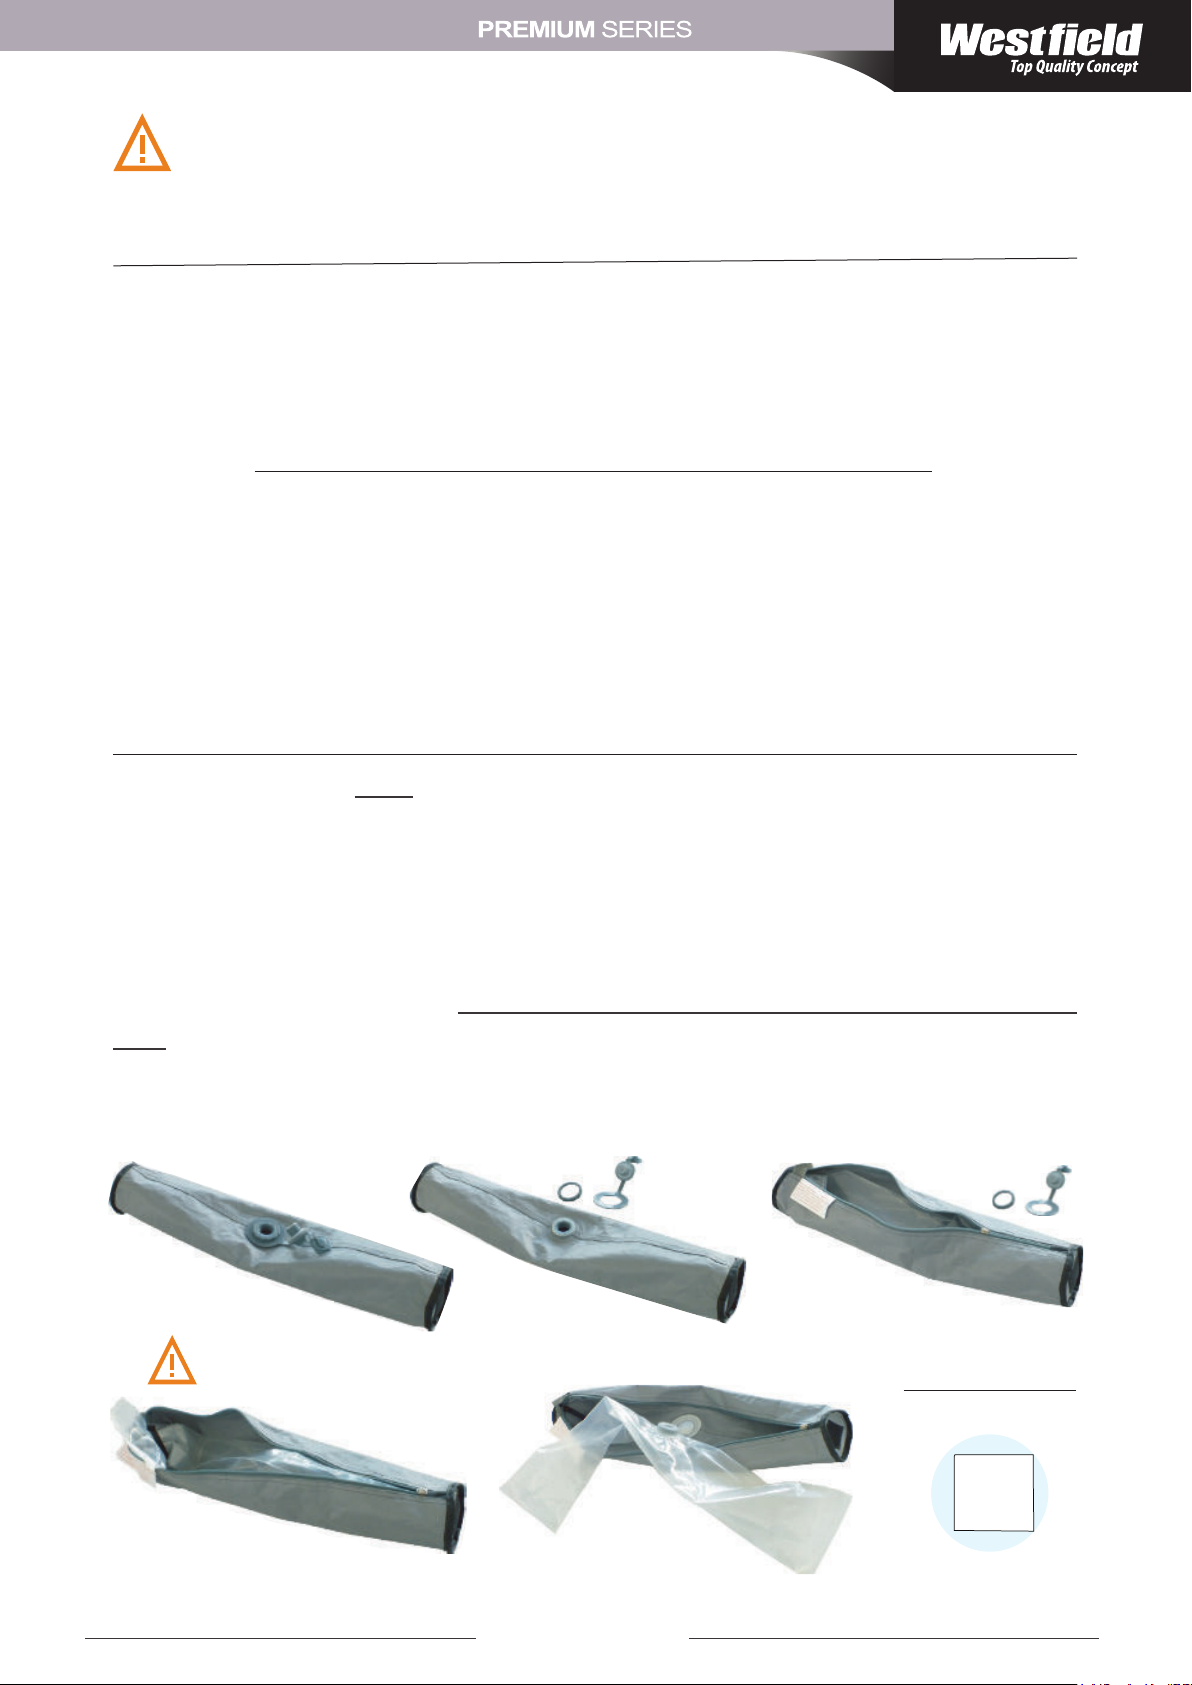
Der Reißverschluss des Schlauchmantels ist gegen Öffnen gesichert. Öffnen Sie diesen
nie, solange der Luftschlauch mit Luft gefüllt ist, um Beschädigungen zu vermeiden
muss der Reißverschluss stets geschlossen bleiben. Versichern Sie sich, dass die Luftschläuche
ordnungsgemäß in den Mänteln verstaut sind und alle Reißverschlüsse geschlossen sind.
The zipper of the reinforced Air tube sleeves is secured against opening via the use of a tie. If you
remove this tie for any reason, it must be replaced before using the awning again. Never open it
when the air tube is under pressure. To avoid damage, the zipper must remain closed. Ensure that
the air tubes are properly stored in the sleeves and all zippers are closed.
AUSTAUSCH ODER REPARATUR DES LUFTSCHLAUCHES
REPLACING A TPU AIR TUBE
Entleeren Sie die komplette Luft aus dem Luftschlauch. Hierzu schrauben Sie das gesamte Ventil aus
dem Luftkanal, um die komplette Luft zu entleeren. Öffnen Sie beide Reißverschlüsse und tauschen/
reparieren Sie den TPU Luftschlauch. Setzen Sie den neuen bzw. den reparierten Luftschlauch in umgekehrter Reihenfolge wieder ein. Achten Sie darauf, dass sich der Schlauch nicht verdreht. Fixieren
Sie das Schraubventil. Wir empfehlen den Reißverschluss des ersten Mantels wieder mittels Kabelbinder zu sichern, um ein versehentliches Öffnen zu vermeiden.
Deate the air tube fully. Never replace or repair a tube before deating it fully.
Break the plastic ties on the sleeve of the air tube and unzip the sleeve. Then remover the protecti-
ve cover and air tubefrom inside the sleeve. Break the plastic ties on the protective cover and unzip
the protective cover. Remove the TPU bladder from inside the protection cover.
Now simply replace the tube, place inside the protective cover being careful to ensure that is not
twisted as a twist in the bladder could cause damage when it is inated. Once the tube has been
tted zip the protective cover shut. You must then relock the zips with new plastic tie or similar so-
lution. If you do not relock the zips then you could well cause damage to your awning when it is
inated.
www.westeld-tqc.com
TPU Reparaturset
TPU Repair Patch
TPU
1.Clean repair area thoroughly
2.Press patch fiemly over puncture
3.Do not inflate for four(4)hours to
allow repair to set
15
Page 18

PFLEGEANLEITUNG
NÄHTE
Die Hauptnähte Ihres Zeltes sind gegen Undichtigkeit mittels Nahtbandes verschweißt. Die restlichen
Nähte oder Beschädigungen an Nahtbändern bzw. undichte Nähte können mit Nahtdichter behandelt
werden. Für Nahtdichter kontaktieren Sie bitte Ihren Fachhändler.
UV-STRAHLUNG
Das Zelt ist nicht für den Dauereinsatz entwickelt. Durch permanente UV Bestrahlung, wird das Material
geschwächt. Farbveränderungen und veränderte Materialstabilität sind die Folge. Bei sachgemäßem
Einsatz und regelmäßiger Pflege verfügt das Zelt über eine lange Lebenszeit. Verwitterung durch zu
starke UV Bestrahlung wird nicht durch die Garantie abgedeckt.
KONDENSATION
Bei beschichteten, nicht atmenden Materialien lagert sich stets Kondenswasser auf der kältesten Fläche
des Außenzeltes ab. Kondenswasser wird oftmals mit Undichtigkeit verwechselt und ist kein Reklamationsgrund. Durch eine starke und dauerhafte Belüftung kann Kondenswasser vermindert werden.
VERWENDUNGSZWECK
Dieses Zelt ist für den privaten und nicht kommerziellen Einsatz entwickelt. Dieses Luftvorzelt ist nicht
für den dauerhaften oder saisonalen Einsatz gedacht. Die Garantie deckt dies nicht ab. Bei Sturm oder
Schneefall muss das Zelt, um Beschädigungen zu vermeiden, abgebaut werden.
AUFBEWAHRUNG UND REINIGUNG
Bitte lagern Sie Ihr Zelt gereinigt und trocken. Zur Reinigung empfehlen wir ausschließlich Wasser und
ein weiches Reinigungstuch. Gröbere Verschmutzungen sollten vorab im trockenem Zustand abgebürstet werden. Verpacken Sie Ihr Zelt nach der Reinigung in der mitgelieferten Transporttasche und lagern
Sie es an einem trockenen Ort.
VORSICHTSMAßREGELN ZU FEUER UND LÜFTUNG
16
• Bei Verwendung von Gas oder anderen Verbrennungsgeräten ist zusätzliche Lüftung notwendig
• Keine heißen Geräte in der Nähe der Wände, des Daches oder der Vorhänge aufstellen
• Immer die Sicherheitshinweise für diese Geräte beachten
• Niemals Kindern erlauben, in der Nähe von heißen Geräten zu spielen
• Durchgänge freihalten
• Stellen Sie sicher, dass Sie die Vorkehrungen gegen Feuer auf dem Gelände kennen
• Stellen Sie sicher, dass die Lüftungsöffnungen zu jeder Zeit geöffnet sind, um Ersticken zu verhindern.
PLUTO
Page 19

GENERAL CARE AND USAGE INSTRUCTIONS
CANVAS SEAMS
The main seams of this awning are taped to ensure water protection. These can become damaged over time
but can be repaired and resealed by using seam sealer. For the bestresults, we recommend contacting your
dealer to nd out which products to use.
UV DEGRADATION
UV degradation causes the material to go brittle, fade or change color. The time it takes to do this will differ
depending upon how often you use it and what the weather is like when you do. It is a natural process which
affects all materials used outdoors. This awning is coated to help prevent this process, but it does not stop it,
it only helps slow it down. You can help protect against this degradation by regular care and proong of the
awning. The awning should be regularly cleaned and reproofed to ensure that mold and mildew do not build
up and damage the awning. After cleaning your awning, you should always reproof the awning as cleaning the
awning will damage the UV coating on the material. For the best results, we recommend contacting your dealer
to nd out which products to use. Weathering due to excessive UV degradation is not covered by the warranty.
CONDENSATION
All coated, non-breathing materials suffer from condensation. The amount of condensation depends upon the
weather conditions and the environment (such as wet ground etc.). During condensation, water can collect
on the fabric of the awning. If enough condensation forms this can run down the awning and drip off seams
or any other stitching point. It can be lessened by ventilation. Ventilating your awning allows air to ow though
the awning and lessens the buildup of condensation. Condensation is often mistaken for leaking and is not a
reason for complaint or a fault of the awning.
USAGE
This awning is designed for private and non-commercial use. This air awning is not for permanent or for sea-
sonal site use. The warranty does not cover this. In case of storms or snowfall, the awning must be taken down
to avoid damage.
STORAGE AND CLEANING
Please store your awning dry. If you must take your awning down when it is wet, you must unpack it within a
week and allow it to dry out before packing it away. This is to ensure that mold and mildew do not build up as
this can lead to damage on your awning and is not covered under your warranty. To clean this awning, we re-
commend using a specic tent or awning cleaner or just water and a soft cleaning cloth. Heavy soiling should
be allowed to dry and brushed with a soft brush beforehand. After cleaning your awning, you should always
reproof it as the UV coating on your awning could be damaged during cleaning. For the best results, we recom-
mend contacting your dealer to nd out which products to use.
FIRE AND VENTILATION PRECAUTIONS
• If using gas or other combustion appliances additional ventilation is required
• Do not place hot appliances near the walls, roof or curtains
• Always observe the safety instructions for these appliances
• Never allow children to play near hot appliances
• Keep exits clear
• Make sure you know the re precaution arrangements on the site
• Make sure ventilation openings are open all the time to avoid suffocation
www.westeld-tqc.com
17
Page 20
Die Zeichnungen in dieser Bedienungsanleitung dienen nur zu Anschauungszwecken. Das tatsächliche
Produkt kann vom Aussehen von den Zeichnungen abweichen. Der Hersteller behält sich das Recht vor,
Änderungen in den Spezifi kationen und den Funktionen vorzunehmen, ohne diese vorher anzukündigen.
Sollten Sie Fragen zum Produkt oder Schwierigkeiten mit dem Produkt haben, wenden Sie sich bitte an
den Händler, bei dem Sie das Produkt erworben haben. Ihr lokaler Händler ist am besten in der Lage Ihnen umgehend bei Fragen oder Problemen zu helfen.
Drawings in this manual are for illustration purposes only, actual product may vary. Manufacturer reserves the right to change any speci cation or features without prior notice. Should you have any questions about your product or experience any dif culties, please contact the retailer from which you pur-
chased the product. Your local retailer is in the best position to promptly address any requirements.
PLUTO 7 Art.-Nr.12020370700001
PLUTO
PLUTO 8 Art.-Nr.12020370800001
PLUTO 9 Art.-Nr.12020370900001
PLUTO 10 Art.-Nr.12020371000001
PLUTO 11 Art.-Nr.12020371100001
PLUTO 12 Art.-Nr.12020371200001
Westfi eld Outdoors GmbH
Siemesdyk 60
47807 Krefeld, Germany
www.west eld-tqc.com
After Sales Service: service.vorzelte@west eldoutdoors.eu
DE
GB
März.2023
 Loading...