

Western Digital WDBWVL0120KBK, WDBWVL0160KBK, WDBYVE0040KBK, WDBWVL0080KBK, WDBYVE0080KBK User Manual
Page 1
™
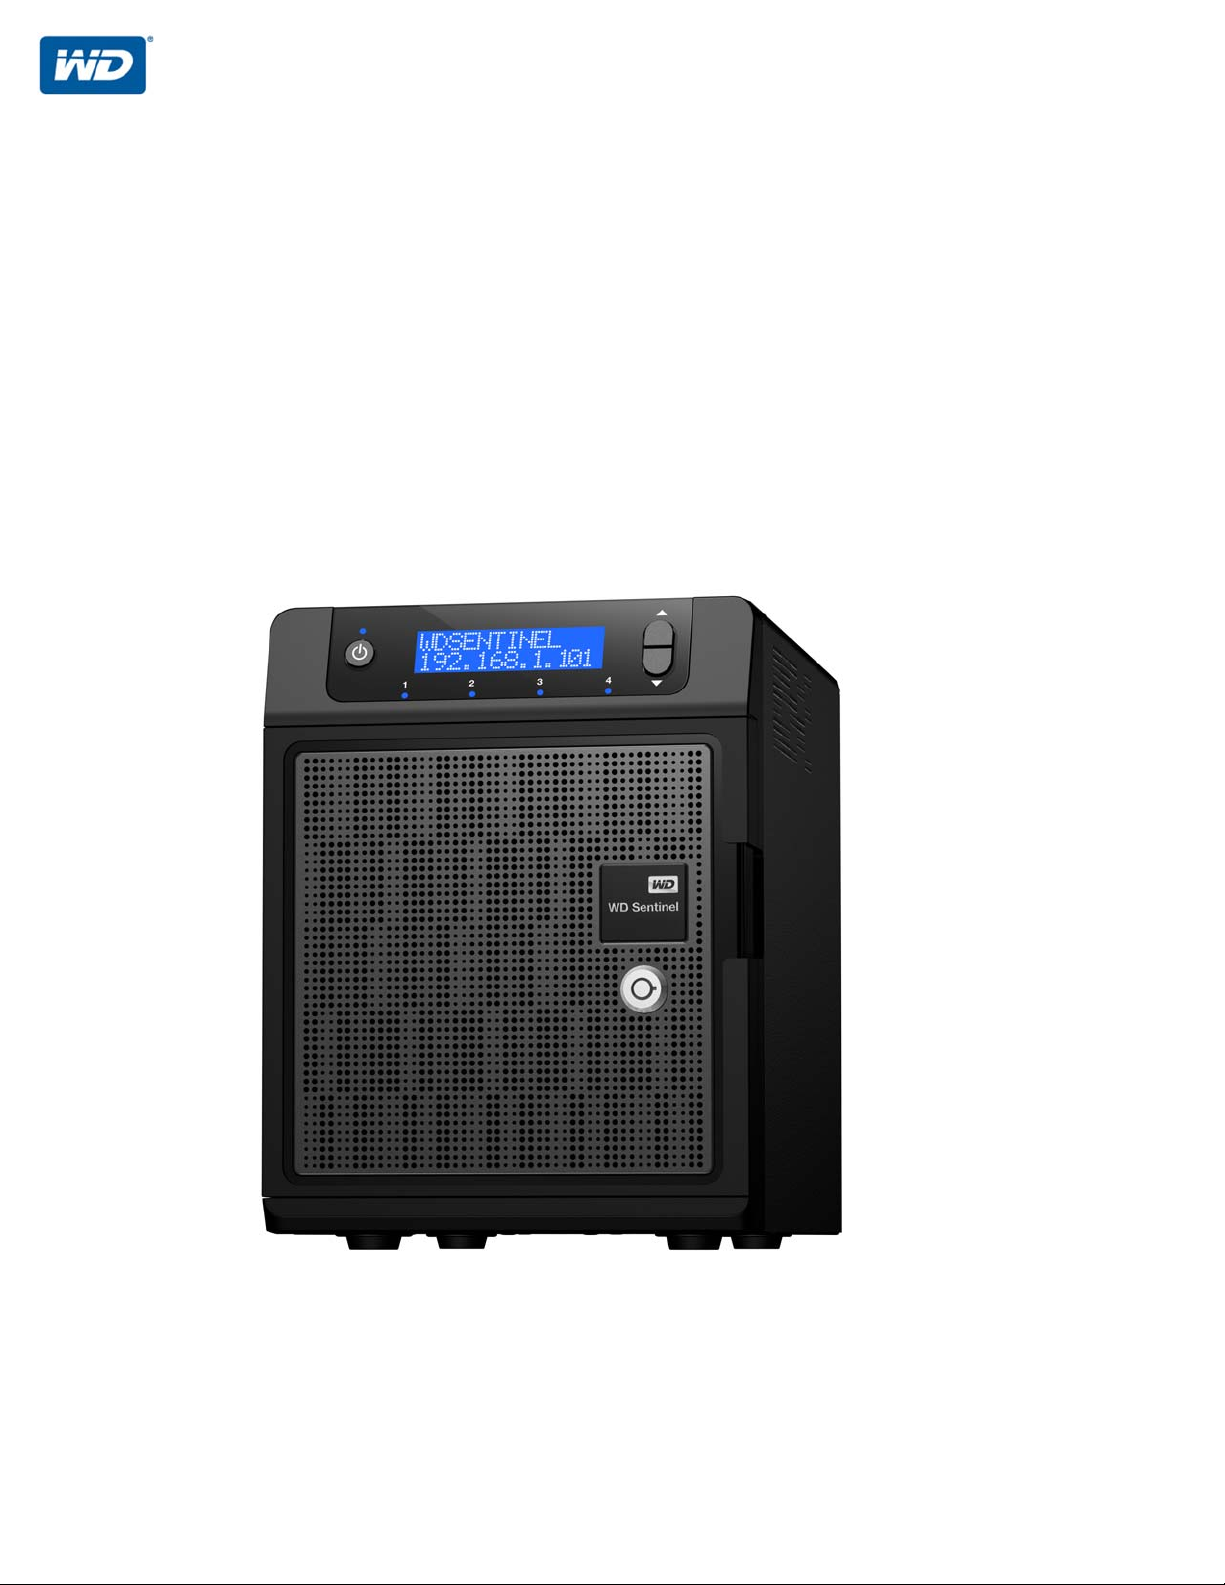
WD Sentinel DS5100/DS6100
Ultra-compact Storage Plus Server
Administrator and Maintenance Guide
Page 2

WD® Service and Support
Should you encounter any problem, please give us an opportunity to address it before returning this
product. Most technical support questions can be answered through our knowledge base or email
support service at http://support.wd.com. If the answer is not available or if you prefer, please
contact WD at the best telephone number shown below.
WD Guardian™ Services premium Technical Support and Extended Warranty services are also
available for Small Business customers. Contact WD Technical support at http://support.wd.com
for information about this extra level of support and how to obtain it.
Your product includes 30 days of free telephone support during the 1-year standard limited warranty
period. This 30-day period starts on the date of your first telephone contact with WD Technical
Support. Email support is free for the entire warranty period and our extensive knowledge base is
available 24/7. To help us keep you informed of new features and services, remember to register
your product on the Registration page on the user interface or online at http://register.wd.com.
WD Guardian Services
When you need a little help from an expert, we’ll take care of you! WD Guardian Services offers
flexible, affordable and hassle-free technical support and extended warranty plans with a variety of
benefits. Choose the plan that works best for your business. Visit www.wdguardian.com for details.
Accessing Online Support
Visit our product support website at http://support.wd.com and choose from these topics:
• Downloads - Download drivers, software, and updates for your WD product.
• Registration - Register your WD product to get the latest updates and special offers.
• Warranty & RMA Services - Get Warranty, Product Replacement (RMA), RMA Status, and
Data Recovery Information.
• Knowledge Base - Enter keyword, phrase, answer ID, or PID.
• Installation - Get manuals, installation guides, and documentation for your WD product.
• WD Community - Share your thoughts and connect with other WD users.
Page 3

Contacting WD Technical Support
When contacting WD for support, have your WD product serial number, system hardware, and
system software versions available.
North America Europe (toll free)*
English / Spanish 855.556.5117 (00800 27549338)
Europe
South America
Chile 1230 020 5871
Colombia 009 800 83247788
Venezuela 0800 100 2855
Peru 0800 54003
Uruguay 000 413 598 3787 Australia 1800 429 861 / 0011 800 2275 4932
Argentina 0800 4440839 China 800 820 6682 / 400 627 6682
Brazil 0800 7704932 Hong Kong 3057 9031
0021 800 83247788 India 1800 200 5789 / 1800 419 5591
Middle East
Africa
Russia
Asia Pacific
Indonesia 001 803 852 3993
Japan 0800 805 7293
Korea 02 2120 3415
Malaysia 1800 817 477
New Zealand 0508 555 639 / 00800 2275 4932
Philippines 1800 1855 0277
Singapore 1800 608 6008
Taiwan 0800 225 593
Thailand 00 1800 852 5913
Other countries +86 21 2603 7560
00800 ASK4 WDEU
+31 880062100
+31 880062100
+31 880062100
8 10 8002 335 5011
* Toll free number available in the following countries: Austria, Belgium, Czech Republic, Denmark, France, Germany, Ireland, Italy,
Netherlands, Norway, Poland, Slovakia, Spain, Sweden, Switzerland, United Kingdom.
Registering Your WD Product
Register your WD product to get the latest updates and special offers. You can easily register your
product on the user interface of the product software or online at http://register.wd.com.
Page 4

Table of Contents
WD® Service and Support................................ii
WD Guardian Services ...................................ii
1 Important User Information ....................1
Important Safety Instructions ..............................1
Handling Precautions ....................................2
Recording Your WD Product Information .....................2
About This Guide .......................................2
2 Product Overview ............................3
Getting to Know Your WD Sentinel DS5100/DS6100 Server ......3
Key Features ..........................................3
System Requirements and Compatibility Information ............7
Technical Specifications ..................................8
Product Views ........................................10
Indicators............................................12
LEDs ...............................................12
Where to Find Help ....................................13
3 Connecting the Server and Getting Started ......14
User Roles and Responsibilities ...........................14
How the WD Sentinel Fits into Your Office ...................15
Connecting the WD Sentinel Server to Your Network ...........16
Setting up your WD Sentinel Server (one time only) ............17
Connecting your Computers .............................21
4 Managing the WD Sentinel Server (Dashboard) . . 25
Setting up WD Sentinel Server & Connecting Computers ........25
Accessing the Dashboard ...............................25
Tips for Performing Dashboard Tasks ......................27
Adding a User Account .................................27
Performing Dashboard Tasks.............................29
Using the Home Page ..................................29
Managing User Accounts................................31
Managing Devices .....................................31
Managing Storage .....................................32
Monitoring Applications .................................33
Monitoring System Health and Alerts .......................33
Updating Software .....................................37
WD SENTINEL DS5100/DS6100
ADMINISTRATOR AND MAINTENANCE GUIDE
TABLE OF CONTENTS – i
Page 5

Managing Server Settings ...............................39
Shutting Down and Rebooting the Server ...................40
5 Managing Storage on the WD Sentinel Server ....42
WD Sentinel Server RAID Storage .........................42
Storage Spaces .......................................43
Setting Up Your Drives ..................................43
Recovering from a Failed Drive............................48
Using USB Storage ....................................48
Moving a Server Folder .................................50
6 Using the WD Sentinel Server’s Features .......52
Using the Launchpad (Internal Users) .......................52
Accessing Shared Folders Over Your Network ................58
Accessing Computers and Shared Folders Remotely ...........59
Backing up (Windows PC) ...............................60
Backing up with Time Machine (Mac) .......................64
Recovering/Restoring (Windows PC) .......................67
Recovering/Restoring (Mac) ..............................69
Backing up your WD Sentinel Server .......................70
Recovering a WD Sentinel Server Image or Resetting the Boot
Drives to Factory Defaults .............................70
7 Best Practices ..............................71
Setting up the WD Sentinel Server .........................71
Setting up Client Computers .............................71
Using the WD Sentinel Server Efficiently .....................71
Replacing Drives ......................................72
Sharing Files with External Users ..........................72
Shutting Down ........................................72
8 Troubleshooting ............................73
First Steps Checklist ...................................73
Specific Problems and Corrective Actions ...................73
9 Regulatory and Warranty Information...........78
Regulatory Compliance .................................78
Limited Warranty ......................................79
GNU General Public License (“GPL”) .......................80
WD SENTINEL DS5100/DS6100
ADMINISTRATOR AND MAINTENANCE GUIDE
TABLE OF CONTENTS – ii
Page 6

10 Appendix ..................................81
Hardware Replacement Procedures........................81
Before You Begin......................................81
Replacing a Hard Drive .................................82
Replacing a Server Fan .................................85
Removing the Unit Cover ................................87
Replacing the SODIMM Memory Module ....................88
Adding a Boot Drive ...................................91
WD RAID Storage Utility .................................93
WD Sentinel DS5100/DS6100 Administrator Reference Sheet . . .100
11 Index.....................................101
WD SENTINEL DS5100/DS6100
ADMINISTRATOR AND MAINTENANCE GUIDE
TABLE OF CONTENTS – iii
Page 7

Important User Information
IMPORTANT USER INFORMATION
1
Important Safety Instructions
Handling Precautions
Recording Your WD Product Information
About This Guide
Important Safety Instructions
This device is designed and manufactured to assure personal safety. Improper use can
result in electric shock or fire hazard. The safeguards incorporated into this unit will protect
you if you observe the following procedures for installation, use, and servicing.
Follow all warnings and instructions marked on the product.
Unplug this product from the wall outlet before cleaning. Do not use liquid cleaners or
aerosol cleaners. Use a damp cloth for cleaning.
Do not use this product near any liquids.
Do not place this product on an unstable surface. The product may fall, causing serious
damage to the product.
Do not drop the product.
Do not block the slots and openings on the back or bottom side of the chassis; to
ensure proper ventilation and reliable operation of the product and to protect it from
overheating, these openings must not be blocked or covered. Making sure the server is
standing upright also helps prevent overheating.
Operate this product only from the type of power indicated on the marking label. If you
are not sure of the type of power available, consult your dealer or local power company.
Do not allow anything to rest on the power cord. Do not locate this product where
persons will walk on the cord.
Never push objects of any kind into this product through the chassis slots as they may
touch dangerous voltage points or short out parts that could result in a fire or electric
shock.
Ensure that you keep the door lock keys that come with your WD Sentinel device in a
safe place.
Unplug this product from the wall outlet and refer servicing to qualified service personnel
under the following conditions:
- When the power cord or plug is damaged or frayed.
- If liquid has been spilled on the product.
- If the product has been exposed to rain or water.
- If the product does not operate normally when the operating instructions are fol-
lowed. Adjust only those controls that are covered by the operating instructions
since improper adjustment may result in damage and require extensive work by a
qualified technician to return the product to normal condition.
- If the product has been dropped or the chassis has been damaged.
- If the product exhibits a distinct change in performance, contact WD Customer Sup-
port at
http://support.wd.com.
WARNING! The WD Sentinel™ Server uses a lithium battery, type CR2032. There
is danger of an explosion if the battery is incorrectly replaced.
Replace only with the same or equivalent battery type recommended
by the manufacturer. Dispose of used batteries according to the
manufacturer’s instructions.
WD SENTINEL DS5100/DS6100
ADMINISTRATOR AND MAINTENANCE GUIDE
1
Page 8

IMPORTANT USER INFORMATION
Handling Precautions
WD products are precision instruments and must be handled with care during unpacking
and installation. The WD Sentinel server may be damaged by rough handling, shock, or
vibration. Be aware of the following precautions when unpacking and installing your external
storage product:
Do not drop or jolt the WD Sentinel server.
Do not move the unit while it is powered on.
Do not use this product as a portable drive.
Recording Your WD Product Information
Remember to write down the following WD product information, which is used for setup and
technical support. Your WD product information is found on the label on the bottom of the
device.
Serial Number
Model Number
Purchase Date
System and Software Notes
About This Guide
This Administrator and Maintenance Guide provides detailed instructions and information for
WD-specific interface elements and functions. Unless otherwise noted, refer to
Microsoft
following conventions:
Convention Used for...
Bold font Names of items on a page such as menus, buttons, option names, fields, and
Note: Extra, but not vital, information
Important: Essential Information to know or to prevent problems when using the
WARNING! Vital information for operating the WD Sentinel server or to prevent damage to
® Online Help for standard interface elements and functions. This guide uses the
tabs that the user must click or complete and keys the user must press.
WD Sentinel server
the server or your computer.
WD SENTINEL DS5100/DS6100
ADMINISTRATOR AND MAINTENANCE GUIDE
2
Page 9

2
2
PRODUCT OVERVIEW
Product Overview
Getting to Know Your WD Sentinel DS5100/DS6100 Server
Key Features
System Requirements and Compatibility Information
Technical Specifications
Product Views
Indicators
LEDs
Where to Find Help
Getting to Know Your WD Sentinel DS5100/DS6100 Server
Congratulations on your purchase of the WD Sentinel DS5100/DS6100 Ultra-compact
Storage Plus Server. Designed for storage plus server capabilities, the
WD Sentinel DS5100/DS6100 is ideal for small businesses that are looking for an ultracompact unified storage solution with an integrated iSCSI SAN, NAS and server-based
backup technology. Featuring hard drives optimized for reliability, quality and performance,
an Intel
system, it offers the flexibility to make technology decisions based on individual business
needs and provides highly secure access to data and line of business applications, even
when working remotely.
® Xeon™ processor and Microsoft® Windows Server® 2012 R2 Essentials operating
Key Features
Ultra-compact storage plus server for Small Business: WD Sentinel DS5100/DS6100
device is ideal for small businesses that need their first business server to be installed and
on-boarded for first use right out of the box with an Active Directory and Primary Domain
Controller. It is easy to setup and use and provides a unified storage solution with an
integrated iSCSI SAN, NAS, and server-based backup technology. Designed to be “plug
and play,” the WD Sentinel DS5100/DS6100 includes pre-installed hard-drives, an operating
system and all of the necessary software tools to complete the on-boarding and protect the
data on a small business network. Complexity has been reduced, so once it’s set up, it
intelligently manages drive and network status, reducing maintenance time so you can focus
on your business.
Windows Server 2012 R2 Essentials: WD Sentinel DS5100/DS6100 comes pre-installed
with Windows Server 2012 R2 Essentials, an ideal operating system for small businesses. It
provides a powerful and flexible solution that helps protect your business data while allowing
you to access the information you need from virtually anywhere with almost any device. It
provides an easy setup, installation, and migration experiences, a simplified management
experience and better network-wide security features. It also incorporates the latest
Microsoft technologies for management, networking, data storage and backup, security,
document and folder sharing. Windows Server 2012 R2 Essentials supports up to 25 users
and 50 devices. When your business needs exceed the limit, you can purchase an additional
license and upgrade to Windows Server 2012 R2 Standard.
Support for Line-of-Business Applications: In addition to leveraging the backup, shared
storage and cloud-based services capabilities of the WD Sentinel DS5100/DS6100 device,
small business owners can use it as an application server for running on-premise or cloudbased line-of-business applications, including Office 365™.
WD SENTINEL DS5100/DS6100
ADMINISTRATOR AND MAINTENANCE GUIDE
3
Page 10

PRODUCT OVERVIEW
Built-in Active Directory and Primary Domain Controller: Small businesses need to
keep their data secure and must be able to restrict user access to it. The Active Directory
and Primary Domain Controller in the WD Sentinel DS5100/DS6100 provide centralized
management and security by authenticating and authorizing all users and computers on the
network. It assigns and enforces security policies for all computers, so when a user logs into
a computer that is part of a Windows domain, Active Directory checks the submitted
password and determines what data the user is able to access.
All inclusive data protection for small business: We combined hardware and software
from industry leaders to deliver a reliable, secure and easy-to-manage all-in-one server
designed specifically for small office environments. The WD Sentinel DS5100/DS6100
features:
Pre-configured Datacenter-class hard drives optimized for performance, quality and
reliability.
Protect your data on the 3.5” WD hard drives with either RAID (0, 1, 5, 10) or Windows
Storage Spaces depending on user set up.
Built with an Intel Xeon processor inside, WD Sentinel DS5100/DS6100 keeps your
business running smoothly with server-class features that help protect critical business
data with redundant storage capabilities and allows quick recovery in the event of a
failure.
Windows Server 2012 R2 Essentials–An ideal server for small businesses, Windows
Server 2012 R2 Essentials provides a powerful and flexible solution that helps protect
your business data while allowing you to access the information you need from virtually
anywhere with almost any device. It provides easier setup, installation and migration
experiences, a simplified management experience and better network-wide security
features. It also incorporates the latest Microsoft technologies for management,
networking, data storage and backup, and provides integration capabilities for cloudbased applications and services.
Backup server for up to 25 users and 50 computers: WD Sentinel DS5100/DS6100
includes Windows Server 2012 R2 Essentials software, providing centralized automated
server-based backup for up to 50 Windows or Mac client computers in your network so
there’s no need to purchase additional backup software.
Easy setup and administration: WD Sentinel DS5100/DS6100 includes the hardware and
software needed to centralize your business files. Once it’s set up, administration is easy
because it intelligently manages drive and network status, reducing maintenance time so
you can focus on your business.
Anywhere Access and built-in VPN: WD Sentinel DS5100/DS6100 is a centralized
storage solution with secure remote access. In addition to being able to access shared
business data while inside the local network, the server provides an “always on” network
storage solution that provides small businesses with access to data from virtually anywhere.
Data can be accessed through any device, including a desktop, laptop, smartphone or a
tablet. The anywhere access feature also supports remote system administration so small
business owners, their trusted employees or IT administrators can perform administrative
functions when not in the office.
WD SENTINEL DS5100/DS6100
ADMINISTRATOR AND MAINTENANCE GUIDE
4
Page 11

PRODUCT OVERVIEW
Virtualize WD Sentinel storage using iSCSI Target: WD Sentinel DS5100/DS6100
supports iSCSI. IT Pro’s and advanced users have the ability to partition their WD Sentinel
for both NAS File based storage as well as IP-SAN with the iSCSI Target. This capability
enables the administrator to create multiple iSCSI targets to meet the specific needs of their
dynamic IT environments.
Enterprise-grade backup and restore software: The backup and restore software
included with the WD Sentinel DS5100/DS6100 saves time and space by performing a full
Bare Metal backup the first time and then, through block-level deduplication, backs up only
the data that has changed since the previous backup. In the event of a data loss or a drive
failure on a client computer, the WD Sentinel DS5100/DS6100’s fast and easy restore
function finds your files or lets you restore an entire system to get you up and running again.
Local and remote automatic backup and restore is supported for both Windows and
Mac OS
® clients.
Pre-loaded Boot Drive(s): WD Sentinel DS5100/DS6100 comes with the 2.5-inch boot
drive(s) pre-loaded with Windows Server 2012 R2 Essentials and specialized hardware
services and drivers. The pre-loaded boot drive(s) provides the ability to keep the OS
running from the boot drive while redeploying or changing applications and folders running
on the large capacity data drives. This allows small businesses to save time, as there is no
need to install from a DVD or search for any specialized drivers to install online.
Flexible Capacity: WD Sentinel DS5100/DS6100 offers various storage capacities so you
can choose the capacity option that’s right for your business. It is also designed to be user
serviceable, with the ability to buy 2 TB, 3 TB and 4 TB expansion/replacement kits and
other parts.
Dual Gigabit Ethernet ports: WD Sentinel DS5100/DS6100 comes with two Ethernet
ports that can be configured for fault tolerance, aggregated for high performance, or used
for two separate LANs.
Dual power supply: WD Sentinel DS5100/DS6100 offers dual power supplies, so in the
event of a power surge or other failure damage to the internal power supply, the second
power supply will take over, providing small businesses with the added peace of mind
knowing that their server will remain operational.
Choice of Disaster Recovery Options: WD Sentinel DS5100/DS6100 offers a choice of
disaster recovery protection options providing small businesses with the peace of mind that
their business data is secure. They can choose to protect their data using local disaster
recovery through network share (LAN & WAN) or local disaster recovery through DAS.
WD Guardian Services - Global Service & Support: When you need a little help from an
expert, we’ll take care of you! WD Guardian Services offers flexible, affordable and hasslefree technical support and extended warranty plans with a variety of benefits. Choose the
plan that works best for your business. With the purchase of the
WD Sentinel DS5100/DS6100, WD is offering one FREE year of WD Guardian Pro, which will
be auto activated upon product registration. For details about WD Guardian Services, visit
www.wdguardian.com.
Why WD?: WD has been making hard drives for over 40 years. We know how to build
drives to store and protect your data because we understand that your company’s data is
paramount to your business success.
WD SENTINEL DS5100/DS6100
ADMINISTRATOR AND MAINTENANCE GUIDE
5
Page 12
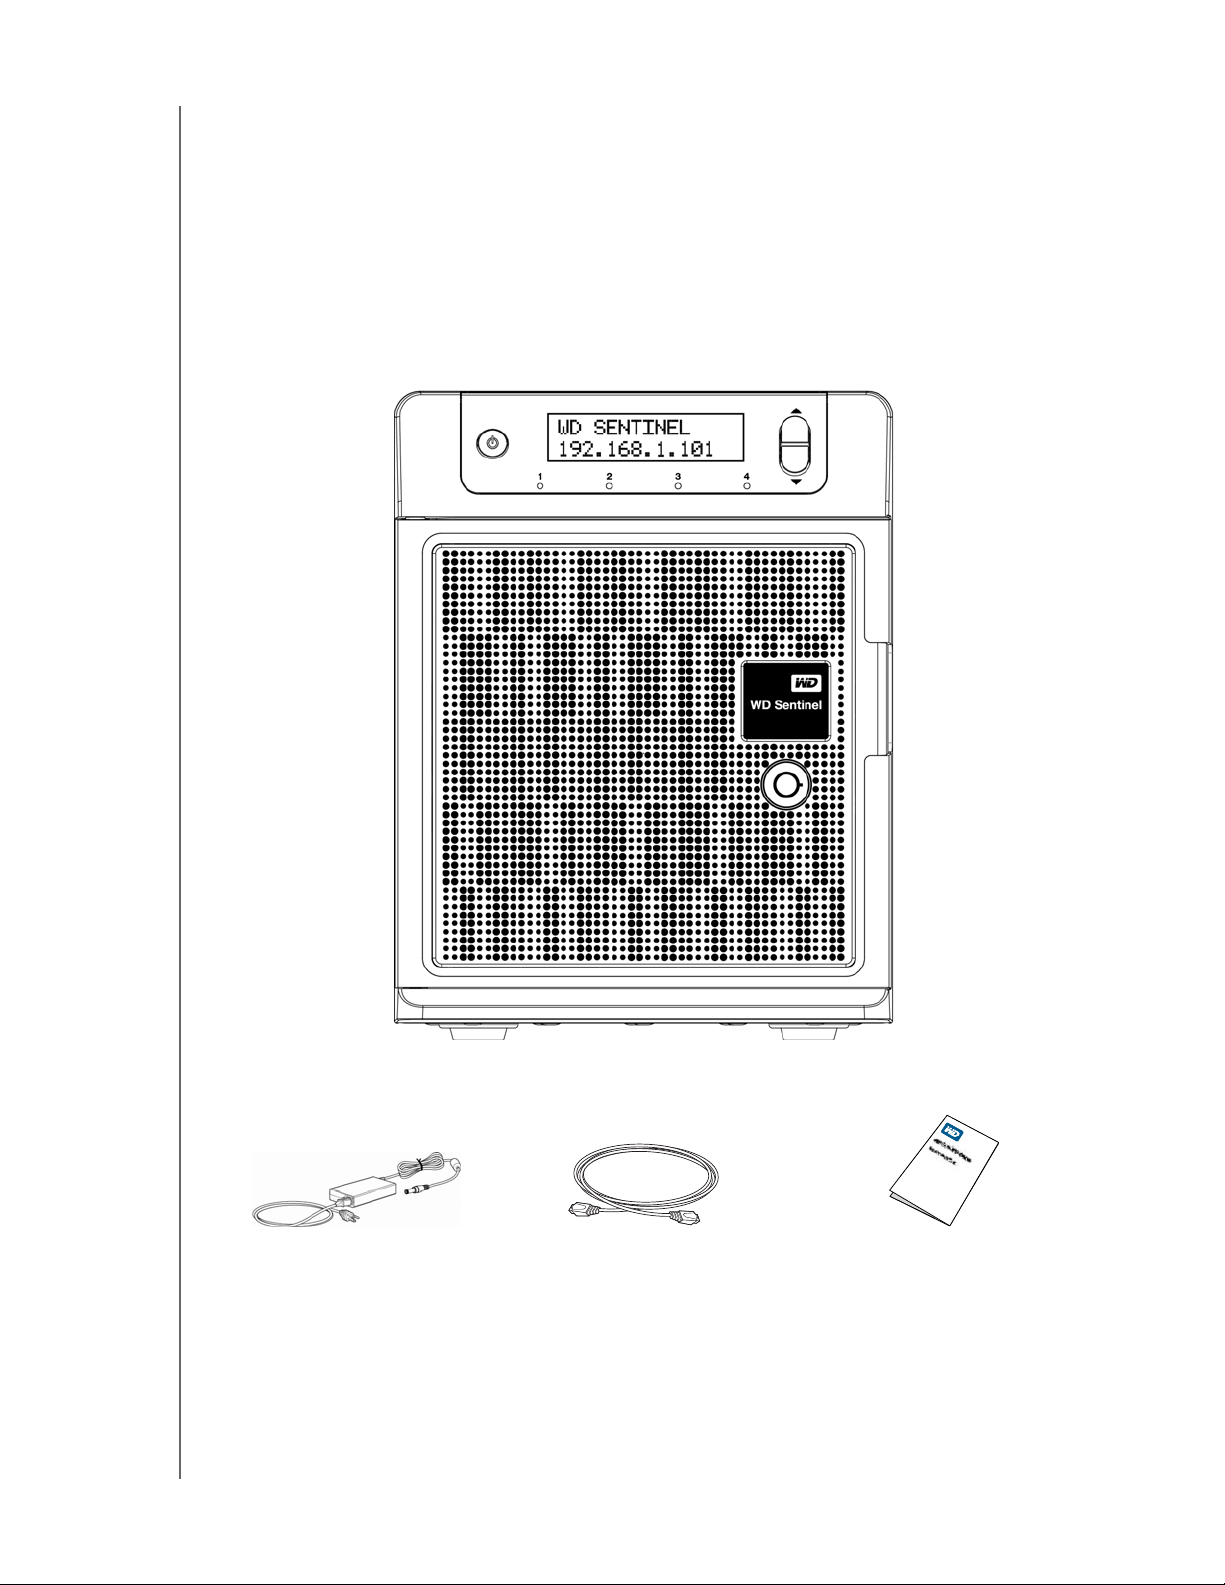
Package Contents
Ultra-compact Storage Plus Server
1 RJ-45 Ethernet cable
1 -1.8 meter power adaptor with cord (WD Sentinel DS5100)
2 -1.8 meter power adaptors with cords (WD Sentinel DS6100)
2 door lock keys
Basic Installation Guide
PRODUCT OVERVIEW
1.8 meter power cord and
power adaptor
WD SENTINEL DS5100/DS6100
ADMINISTRATOR AND MAINTENANCE GUIDE
WD Sentinel
DS5100/DS6100
Ethernet cable Basic Install Guide
6
Page 13

For information on additional accessories, visit:
PRODUCT OVERVIEW
US
Europe • Austria: www.wdstore.de
All others Contact WD Technical Support in your region. For a list of Technical
www.shopwd.com or www.wdstore.com
• United Kingdom: www.wdstore.eu
• France: www.wdstore.fr
• Italy: www.wdstore.it
• Germany: www.wdstore.de
• Spain: www.wdstore.es
• Netherlands: www.wdstore.nl
• Rest of EU Countries: www.shopwd.eu or www.wdstore.eu
Support contacts, visit
Base Answer ID 1048.
http://support.wd.com and see Knowledge
System Requirements and Compatibility Information
Requirement Description
Client Operating System
Backup Compatibility
(for Connector Software)
File Sharing Support File sharing support for Linux, UNIX, and other Windows operating systems
Local Network • Router/switch (Gigabit Ethernet recommended to maximize
Broadband Access Required for remote access outside the LAN
Display and Peripherals • Super VGA (800 x 600) or higher-resolution monitor
Windows 8
• Basic (x86 and x64)
• Pro (x86 and x64)
• Enterprise (x86 and x64)
Windows 7
• Home Basic (x86 and x64)
• Home Premium (x86 and x64)
• Professional (x86 and x64)
• Ultimate (x86 and x64)
• Enterprise (x86 and x64)
• Starter (x86)
Mac OS X
• Leopard
• Snow Leopard
• Lion
• Mountain Lion
performance)
• USB Keyboard
• USB Mouse or compatible pointing device
WD SENTINEL DS5100/DS6100
ADMINISTRATOR AND MAINTENANCE GUIDE
7
Page 14

Technical Specifications
Specification Description
Interfaces • 2 High performance (10/100/1000) Gigabit Ethernet
connections
• 4 ports of powered USB 3.0
• 2 ports of powered USB 2.0
• 1 VGA Port
Supported protocols CIFS/SMB, NFS, HTTP, HTTPS, WebDAV, AFP
Internal hard drives 4 WD 3.5-inch SATA Best in Class hard drives with
RAID-specific time-limited error recovery (TLER)
Pioneered by WD, this feature prevents drive fallout caused by the
extended hard drive error-recovery processes common to desktop
drives.
Approved Drive Models
For a complete list of approved drive models, search for Answer ID
9443 in the WD Knowledge Base at http://support.wd.com.
CPU • WD Sentinel DS5100: Xeon E3-1220Lv2 Duel Core
• WD Sentinel DS6100: Xeon E3-1265Lv2 Quad Core
Memory • WD Sentinel DS5100: 2 - 4 GBytes SODIMM DDR3-1600
• WD Sentinel DS6100:2-8GBytes SODIMM DDR3-1600
Drive bays • 4 3.5 inch hard drive bays
• Hot swap capable
• Trayless design
RAID level • Redundant Storage supported
• Windows Storage Spaces
• RAID Levels 0, 1, 5, 10
Physical dimensions • Length: 26 inches (660 mm)
• Width: 19 inches (482.1 mm)
• Height: 1.75 inches (44 mm)
Weight • 8 TB and 12 TB: 26.627 lbs (12.078 kgs)
• 16 TB: 27.112 lbs (12.298 kgs)
Capacities WD Sentinel DS5100
• 4TB (2 x 2TB)
• 8TB (4 x 2TB)
WD Sentinel DS6100
• 8TB (2 x 4TB)
• 12TB(4x3TB)
• 16TB(4x4TB)
Power WD Sentinel DS5100
• 1 external power supply
• 1 external power port for failover (optional)
WD Sentinel DS6100
• 2 external power supplies
Power supply • Input voltage: 100 to 240 V AC
• Input frequency: 50 to 60 Hz
• Output voltage: 19V DC, up to 7.9A
Temperature • Operating temperature: 0 to 35 °C (32 to 95 °F)
• Non-operating temperature: -40 to 70°C (-40 to 158 °F)
Switches • Power
• Recovery
• LCM Scroll buttons
PRODUCT OVERVIEW
WD SENTINEL DS5100/DS6100
ADMINISTRATOR AND MAINTENANCE GUIDE
8
Page 15

Specification Description
LEDs 1 Power LED
• Flashing blue indicates boot status
• Flashings RED indicates a fault condition
• Solid blue once booted, and there are no pending fault
conditions, indicates a good operational state
• Black indicates inactive state
2 Ethernet Port LEDs
• Flashing green indicates activity
• Solid amber indicates that there is a link connection
• Black indicates inactive state
4 Drive Tray LEDs
• Flashing blue or solid blue indicates drive activity
• Solid RED indicates drive fault (Drive must be replaced)
Operating System Windows Server 2012 R2 Essentials
Backups 50-client computer support for backup (Windows and Mac OS
Client computers)
Restore • Bare metal restore for Windows clients
• File/folder level restore
PRODUCT OVERVIEW
WD SENTINEL DS5100/DS6100
ADMINISTRATOR AND MAINTENANCE GUIDE
9
Page 16
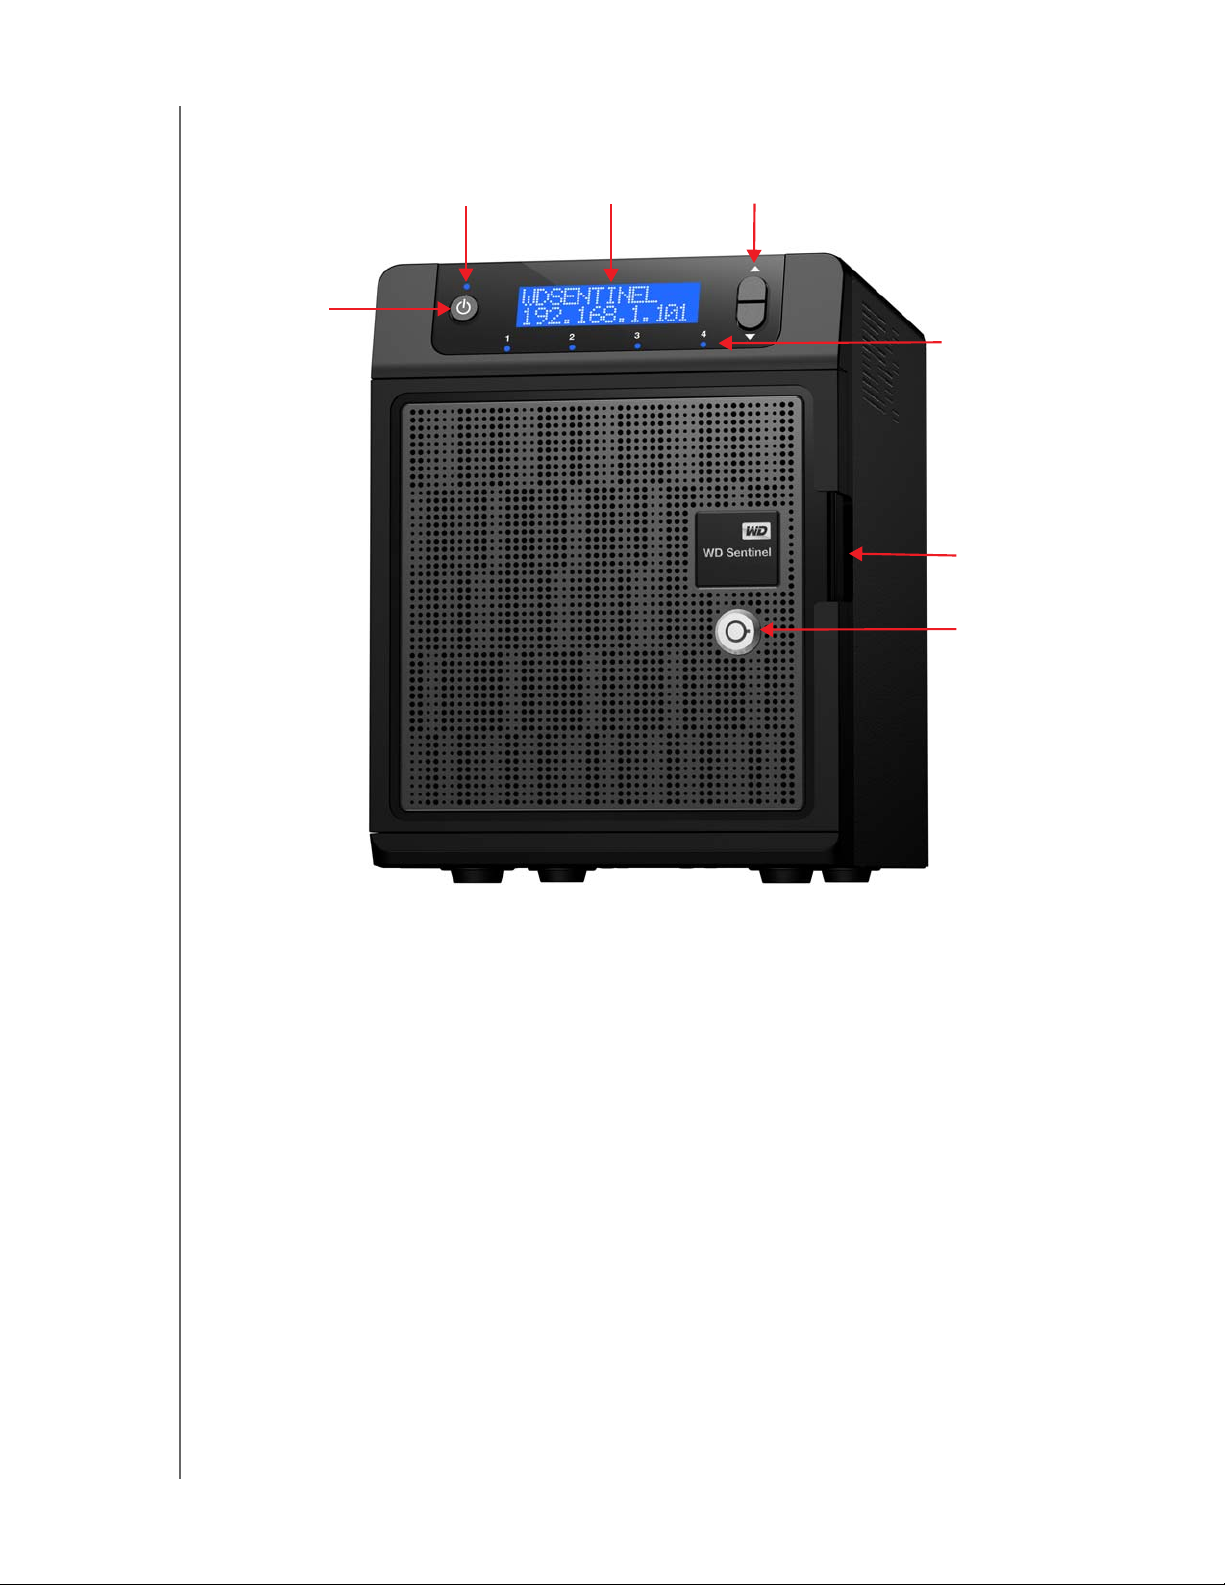
Product Views
Front View
PRODUCT OVERVIEW
Power button
Power / Status LED
LCD Display Scroll buttons
Status LEDs
Drive Door
Drive Door
Lock
WD SENTINEL DS5100/DS6100
ADMINISTRATOR AND MAINTENANCE GUIDE
10
Page 17
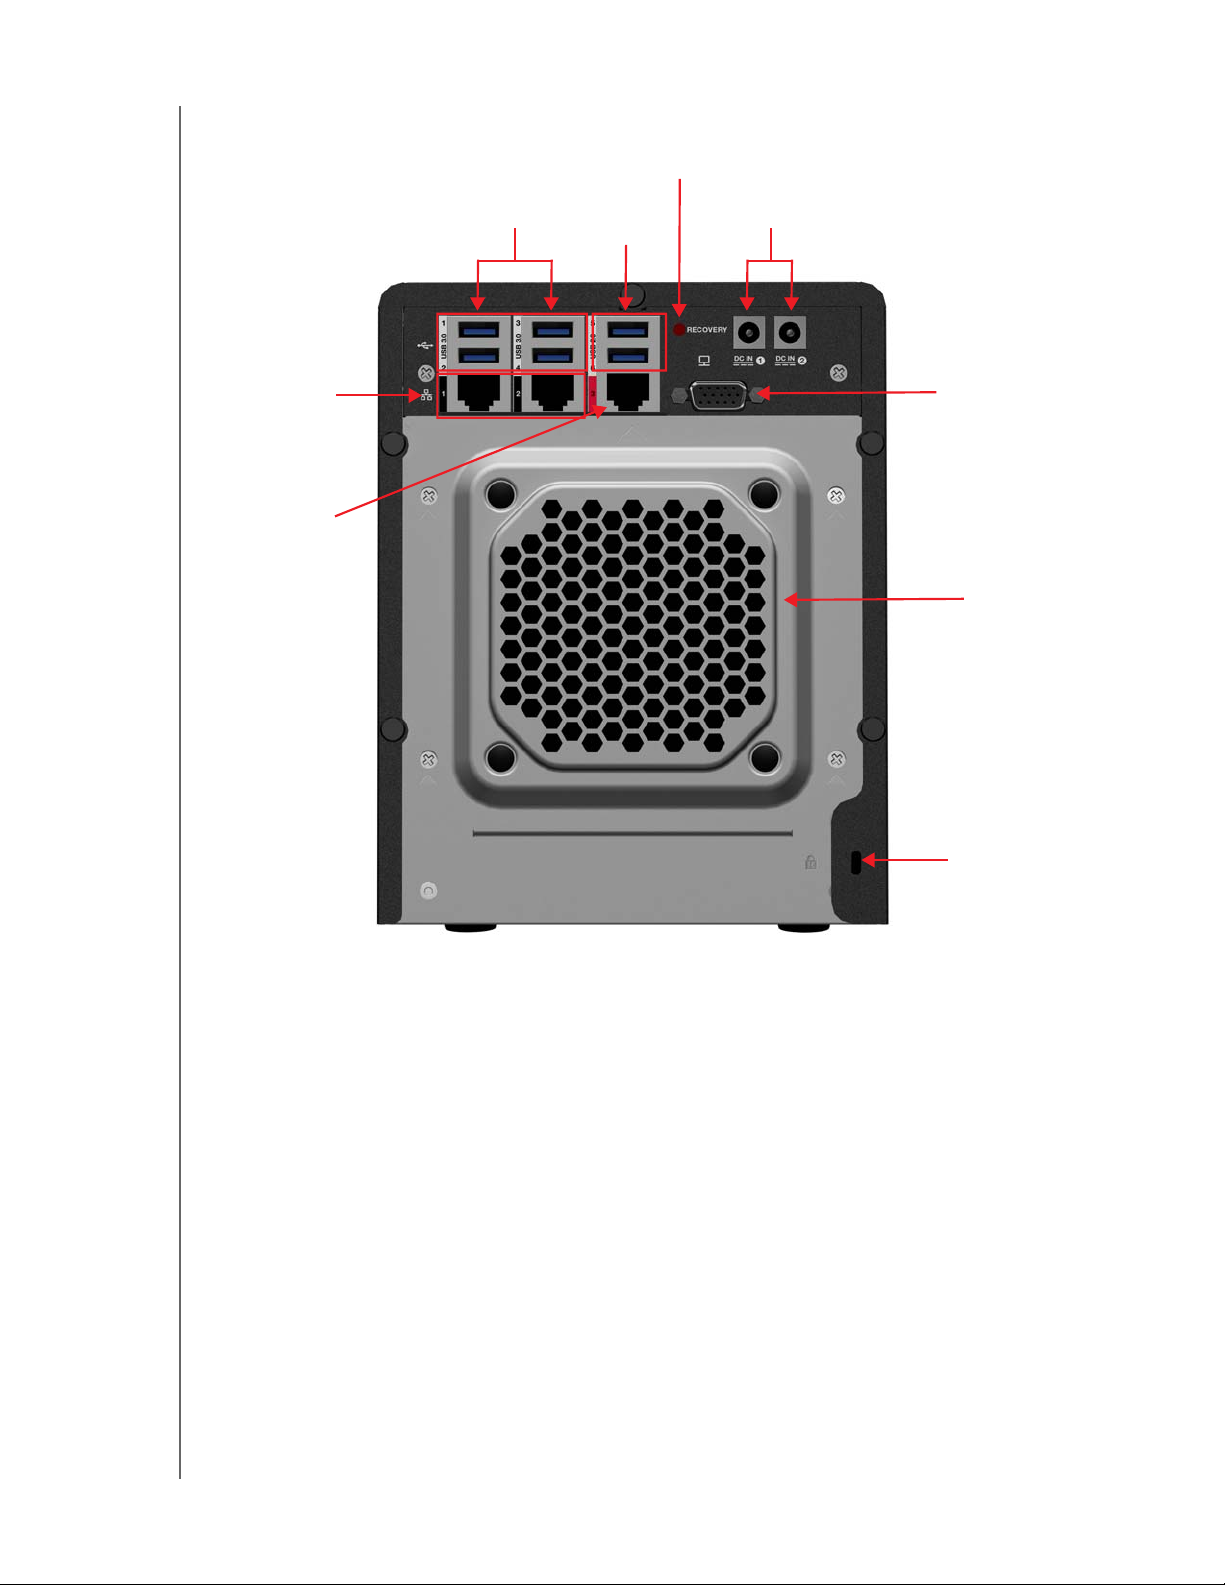
Back View
PRODUCT OVERVIEW
Recovery button
Gigabit
Ethernet ports
1&2
Gigabit
Ethernet ports
(for future use)
USB 3.0 ports
External DC In
Power port
USB 2.0 ports
VGA port
System
Fan
Kensington®
Security Slot
WD SENTINEL DS5100/DS6100
ADMINISTRATOR AND MAINTENANCE GUIDE
11
Page 18

PRODUCT OVERVIEW
Indicators
Component Icon Description
Ethernet ports Connect the device to a local network.
DC In connector Connects the device to a DC power cord and the power outlet.
Recovery button
USB ports Connects with USB 2.0 and 3.0 devices such as a USB storage, USB mouse,
VGA port Connects to your VGA monitor
Kensington
security slot
RECOVERY
Button on the back of the server recovers the server (including the operating
system) while using a USB drive in an event of an OS corruption.
USB keyboard, or a UPS.
For drive security, the device is equipped with a security slot that supports a
standard Kensington security cable. Visit http://www.kensington.com/ for
more information.
LEDs
The LEDs on the WD Sentinel identify the status of the unit.
LED Color State Description
Power LED Black Off WD Sentinel server is currently inactive.
Blue Solid WD Sentinel server has successfully booted the
software and is operational.
Red Flashing Indicates that a serious fault has occurred and
needs immediate attention.
Drive LEDs Black Off If the LED is off while other drive LEDs are on, no
drive is installed in the bay.
Blue Flashing Drive is currently active. Note that all lights in a RAID
Red Solid Indicates drive failure. Replace this drive as soon as
Ethernet
Port
WD SENTINEL DS5100/DS6100
ADMINISTRATOR AND MAINTENANCE GUIDE
Black Off Indicates an inactive state.
Green Flashing Indicates link activity.
Amber Solid Indicates that there is a link connection
system are active at the same time by design.
possible. The system is no longer RAID protected
until the drive is replaced and the RAID structure is
repaired.
12
Page 19
PRODUCT OVERVIEW
Where to Find Help
This manual provides step-by-step instructions and other important information regarding
your WD product. It is meant for the person serving as the administrator of the
WD Sentinel DS5100/DS6100. You can download translated versions and updates to this
manual from http://products.wd.com/updates. For more information and news about this
product, visit our website at http://www.wd.com/.
Additional Reference Description
Basic Installation Guide Included in the product box or available at
http://products.wd.com/WDSentinel-DS5100 or
http://products.wd.com/WDSentinel-DS6100 helps you install the
WD Sentinel server.
WD Online Help Specific descriptions and instructions accessed on
WD-specific (Monitor) pages on the Dashboard.
Microsoft Online Help • Access detailed explanations and instructions for a particular
page by clicking the Help button at the top right of the
Dashboard.
• Search for help on a specific topic or term by entering it in the
Microsoft Online Help search field at the top right of the page.
• Access the entire Microsoft Online Help system by clicking
Microsoft Online Help.
Important: Not all Microsoft Online Help is applicable to the
WD Sentinel DS5100/DS6100. The WD Online Help and this Administrator's
Guide take precedence over the Microsoft Online Help.
WD SENTINEL DS5100/DS6100
ADMINISTRATOR AND MAINTENANCE GUIDE
13
Page 20

3
CONNECTING THE SERVER AND GETTING STARTED
Connecting the Server and Getting Started
User Roles and Responsibilities
How the WD Sentinel Fits into Your Office
Connecting the WD Sentinel Server to Your Network
Setting up your WD Sentinel Server (one time only)
Connecting your Computers
This chapter steps you though the process of connecting and setting up your
WD Sentinel DS5100/DS6100 server and connecting it to computers in your network.
User Roles and Responsibilities
Types of WD Sentinel DS5100/DS6100 Users
At a high level there are two categories of users who need to access one or more features of
your WD Sentinel server.
Administrator—This is the person who performs the setup and routine
management tasks on the WD Sentinel server. This person is also the holder of the
Administrator password of your WD Sentinel server.
Users—You can have up to 25 user accounts on your WD Sentinel server. These
can be:
- Internal Users – The internal users are typically the employees (including the
Administrator) in your office, working locally or occasionally from a remote location (e.g. Sales Staff), who need to access business data and server resources.
- External Users – The external users are the customers and business
partners with whom you need to exchange business data.
The WD Sentinel server offers different paradigms for each type of user. The table below
provides a view into the usage model and tasks for each category of users.
Administrator
(e.g., Business Owner)
Primary Setup Tasks
• Physically connects the
WD Sentinel server to the
network.
• Configures the
WD Sentinel server itself. This
is a one-time procedure.
• Creates the Business
Infrastructure by setting the
Primary Domain names for the
business.
Example: Contoso.com
• Joins a Mac or Windows PC to
the Domain and WD Sentinel
server storage by installing
Connector software on it.
Internal Users
(e.g., Employees)
Primary Setup Tasks
• None
Primary Setup Tasks
• None
External Users
(e.g., Clients or Business
Partners)
WD SENTINEL DS5100/DS6100
ADMINISTRATOR AND MAINTENANCE GUIDE
14
Page 21
CONNECTING THE SERVER AND GETTING STARTED
Administrator
(e.g., Business Owner)
Primary User Interface
• Dashboard - Signs in using the
Administrator password (no
username required).
Dashboard Task Examples
• Sets up user accounts and
assigns permissions.
• Manages shared folders.
• Sets up and manages
automatic backup schedule.
• Manages WD Sentinel server
settings, resolves any alerts,
and monitors server
performance.
• Sets up Remote Web Access.
• Manages updates.
• Creates and manages iSCSI
targets.
Note: For each user account, the WD Sentinel server enables the Administrator to set granular permissions
for various shared folders as well as server resources, such as Remote Web Access. At all times, the
users are only able to access the data on the server and other server resources for which they have
permissions.
Primary Interface
• Launchpad - Signs in using the
Secondary Interface
• Remote Web Access -
Launchpad Task Examples
• Accesses data on shared
• Starts manual backups.
• Launches Remote Web
Remote Web Access Task
Examples
• Accesses data on shared
• Connects to the PCs in the
Internal Users
(e.g., Employees)
assigned user name and
password.
While accessing remotely,
signs in using the assigned
user name and password.
storage.
Access.
storage.
office remotely.
Primary Interface
• Remote Web Access - Signs in
Remote Web Access Task
Examples
• Accesses data on shared
External Users
(e.g., Clients or Business
Partners)
using the assigned user name
and password.
storage.
How the WD Sentinel Fits into Your Office
WD SENTINEL DS5100/DS6100
ADMINISTRATOR AND MAINTENANCE GUIDE
15
Page 22

CONNECTING THE SERVER AND GETTING STARTED
Connecting the WD Sentinel Server to Your Network
Use the following steps to physically connect your WD Sentinel DS5100/DS6100 server to
your network.
1. Connect your monitor to the VGA port on the rear of your WD Sentinel server.
2. Connect your USB keyboard and USB mouse to the USB ports on the back of your
WD Sentinel server.
3. Using the provided ethernet cable, connect the WD Sentinel server (either ethernet
port 1 or 2) to a DHCP-enabled LAN.
4. Using the provided AC adaptor, connect the WD Sentinel server to an electrical outlet
or a UPS.
5. Turn on your monitor.
6. Press the power button on the front of your WD Sentinel unit.
Once the WD Sentinel boot up process is complete, the W indows Server 2012
Essentials Settings screen displays. The Power LED on the front of the
WD Sentinel server will display a solid blue light.
WARNING! This process takes a few minutes. Do not interrupt the process. Do
not power off or disconnect the WD Sentinel server.
WD SENTINEL DS5100/DS6100
ADMINISTRATOR AND MAINTENANCE GUIDE
16
Page 23
CONNECTING THE SERVER AND GETTING STARTED
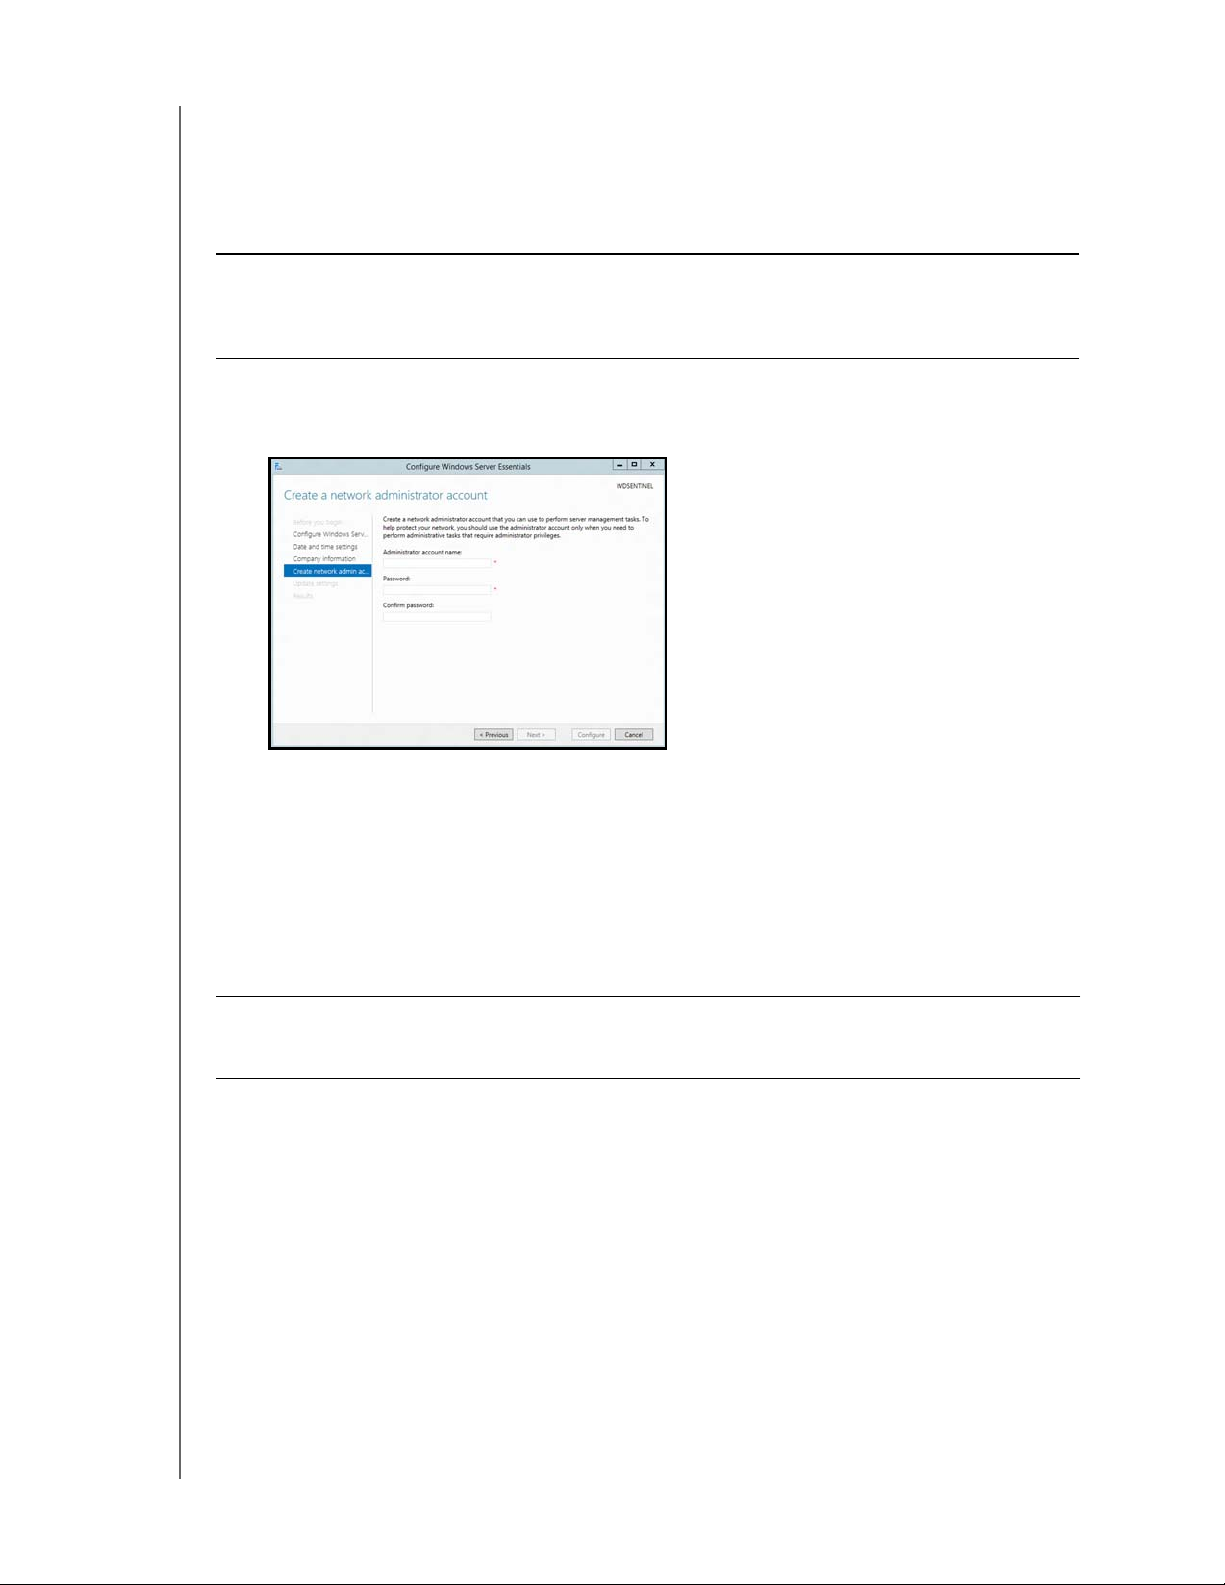
Setting up your WD Sentinel Server (one time only)
Your WD Sentinel server is now ready to be configured. This section describes how to use
the one time setup wizard to configure your server for first use.
Important: Ensure that you complete the entire process outlined in steps 1- 10 below.
If these steps are not followed, your WD Sentinel will not work properly.
1. Select the server language from the list provided.
2. Verify the localization settings, or select the correct values from the drop-down lists,
then click Next.
3. Read the Microsoft and Western Digital license agreements, then click I accept.
The installation begins. Once the initial process is complete, you’ll see the Configure
Windows Server Essentials screen display.
Important: This process can take2-3minutes. Do not interrupt the process. Do not
power off or disconnect the WD Sentinel server.
WD SENTINEL DS5100/DS6100
ADMINISTRATOR AND MAINTENANCE GUIDE
17
Page 24
CONNECTING THE SERVER AND GETTING STARTED
4. Review the Configure Windows Server Essentials screen, then click Next.
5. Review the date and time ensuring that it is correct, then click Next.
If you need to change the system date and time settings:
- Click Change system date and time settings.
- Click Change date and time... on the Date and Time screen.
- Update the date and time, then click OK.
- Click OK, then click Next.
6. Enter your Company information for your device, then click Next.
a. Enter your company name. You can type up to 254 characters in this field.
b. Enter your internal domain name (also known as the Primary Domain). This is the
internal domain groups your server and client computers share as a common
database of user names, passwords, and other common information. The name
can be up to 15 characters long, can contain letters, numbers and dashes (-), can
not start with a dash, must not contain spaces, and must not contain only
numbers.
WD SENTINEL DS5100/DS6100
ADMINISTRATOR AND MAINTENANCE GUIDE
18
Page 25
CONNECTING THE SERVER AND GETTING STARTED
c. A suggested server name will be generated for you when you enter your company
name. If you’d like to change this server name, enter a unique server name that is
different than the default name “WDSENTINEL.” The name can be up to 15
characters long, can contain letters, numbers and dashes (-), can not start with a
dash, must not contain spaces, and must not contain only numbers.
WARNING! THIS IS THE ONLY TIME YOU CAN NAME YOUR
WD SENTINEL SERVER. You must assign it a unique name to avoid
naming conflicts should you ever have more than one
WD Sentinel server on the network.
7. Create your administrator account information, then click Next. The Administrator
account should only be used to administer the server. Use a standard user account for
tasks that do not require administrative credentials.
a. Enter an Administrator account name. This name can contain up to 19 characters,
cannot be the same as the server name or the pre-defined user names such as
“administrator” or “guest.”
b. Enter and confirm a password (must be at least 8 characters long and contain at
least three of the following categories: uppercase letters, lowercase letters,
numbers, and symbols; spaces are allowed.) This is the Administrator password.
You will use it later to connect the client computers to your WD Sentinel server and
to access the Administrator Dashboard.
WARNING! If you forget the Administrator password, it may not be possible to
recover it, and you could potentially lose all of your data. Make sure
to record the password and keep it in a safe location.
WD SENTINEL DS5100/DS6100
ADMINISTRATOR AND MAINTENANCE GUIDE
19
Page 26

CONNECTING THE SERVER AND GETTING STARTED
8. Select your Update settings. This specifies how you’d like your device to install system
updates.
9. Click Configure.
Important: This process can take an hour or more and may restart more than once. Do
not interrupt the process. Do not power off or disconnect the WD Sentinel server.
10. Review the information on the Configuration Completed screen, then click Close.
Windows Server 2012 R2 is now installed.
WD SENTINEL DS5100/DS6100
ADMINISTRATOR AND MAINTENANCE GUIDE
20
Page 27
CONNECTING THE SERVER AND GETTING STARTED
Connecting your Computers
Once you’ve set up your WD Sentinel server, you can connect up to 50 Windows PCs or
Mac computers to your device.
Installing the Connector software joins the client computer to your WD Sentinel Server and
installs Launchpad and Dashboard.
Users use Launchpad to access server resources for which they have the rights.
The Administrator (you) accesses Dashboard for such tasks as managing the
WD Sentinel server, setting up user accounts, and managing access to shared
folders.
Important Steps
Before installing Connector software on a computer, ensure that:
The computers have all the latest mandatory and optional operating system
updates installed.
There are no active backups in progress on the WD Sentinel server.
Note: Check for active backups on the Dashboard’s Devices tab. The screen displays
backups in progress.
Once the Connector software is installed, set up an automated scheduled backup (for after
working hours) using the Dashboard. Running a manual backup during the initial connection
process will impact overall system performance.
Connecting a Windows PC
Use the following procedure to connect a Windows PC to the WD Sentinel server.
For steps on connecting a Mac using the Connector software, see “Connecting a Mac” on
page 23
1. In the address field of an open browser window, enter
2. Click Download software for Windows:
3. At the warning prompts, click Run and Yes as appropriate.
.
http://<servername>/connect. Example: http://myserver/connect.
<servername> is the name you gave your server in
“Connecting the WD Sentinel Server to Your Network” on page 16.
Note: If prompted to do so, type the user name and password of an account that has
administrator permissions on this client computer.
WD SENTINEL DS5100/DS6100
ADMINISTRATOR AND MAINTENANCE GUIDE
21
Page 28
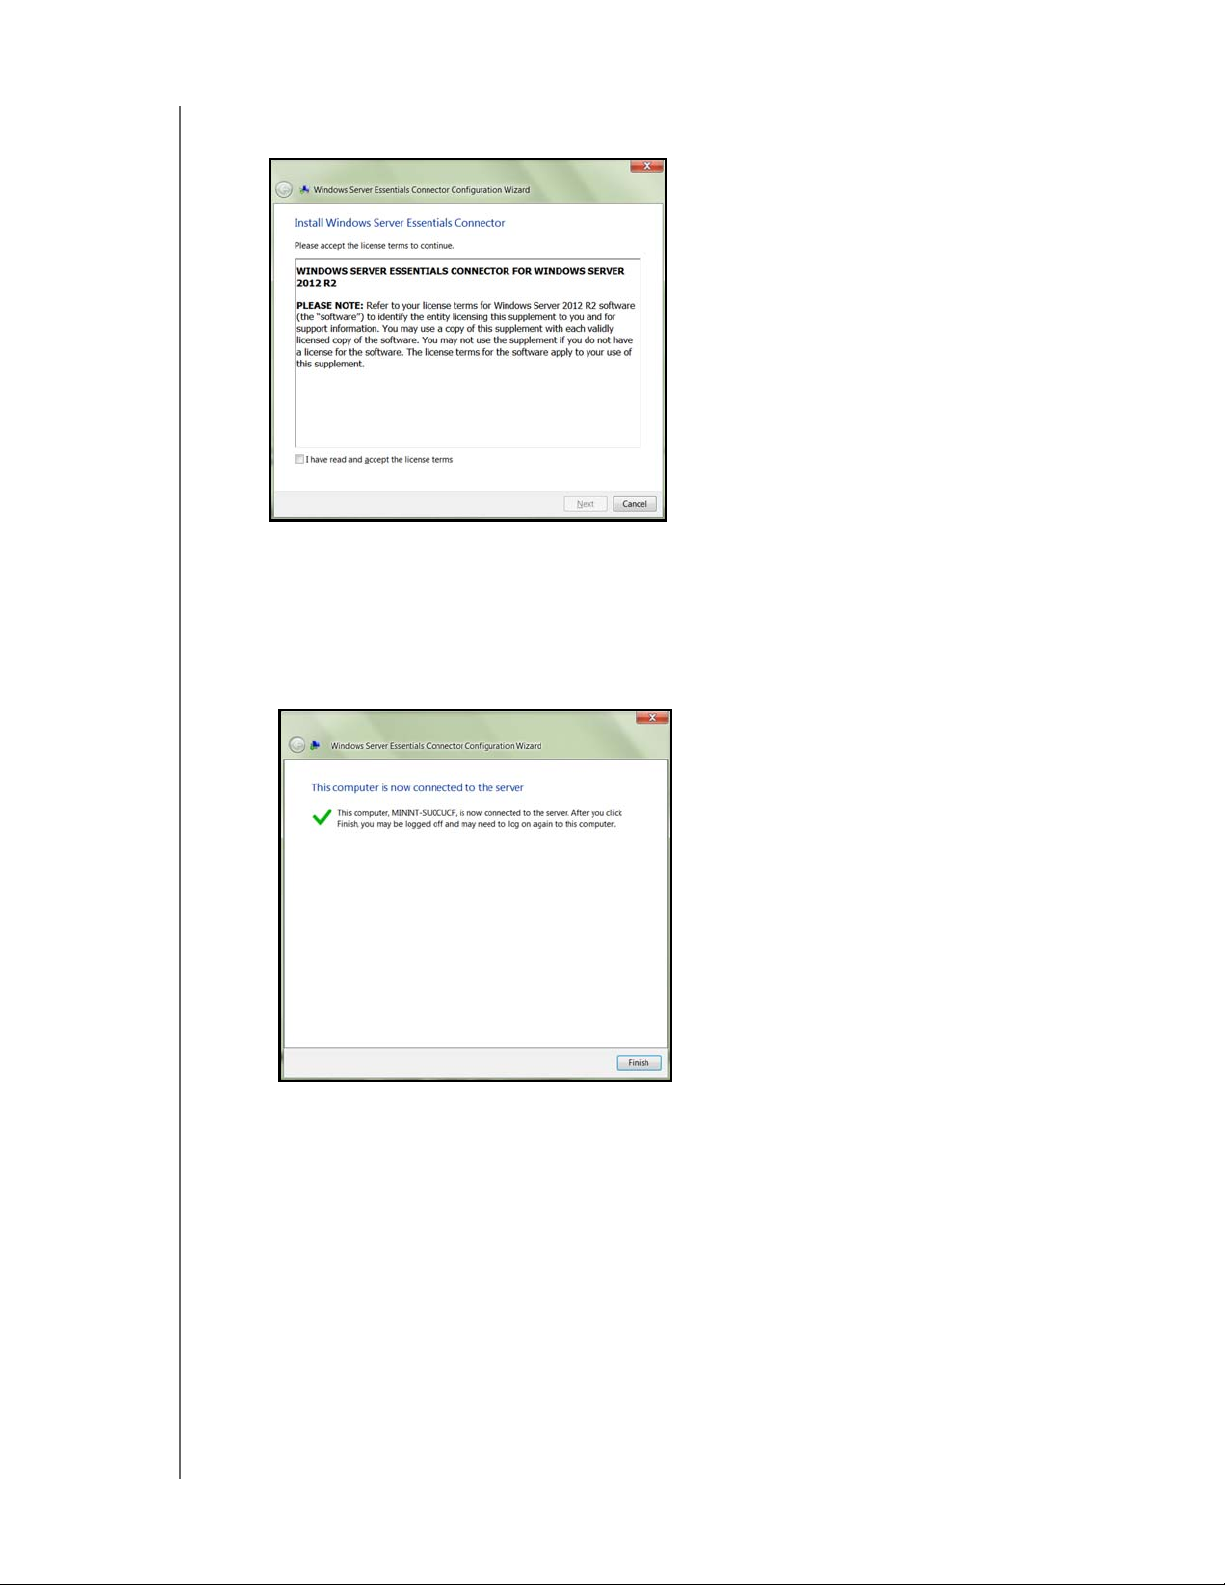
CONNECTING THE SERVER AND GETTING STARTED
4. Review the Windows Server Essentials Connector license terms, then click I have
read and accept the license terms checkbox.
5. Click Next.
Installation begins. The progress bar identifies where you are in the installation
process. The installation process may take 30 minutes or more to complete.
6. Once the installation is completed, follow the steps outlined in the Windows Server
Essentials Connector Configuration Wizard.
7. When the Connector Configuration is completed, click Finish.
WD SENTINEL DS5100/DS6100
ADMINISTRATOR AND MAINTENANCE GUIDE
22
Page 29
CONNECTING THE SERVER AND GETTING STARTED
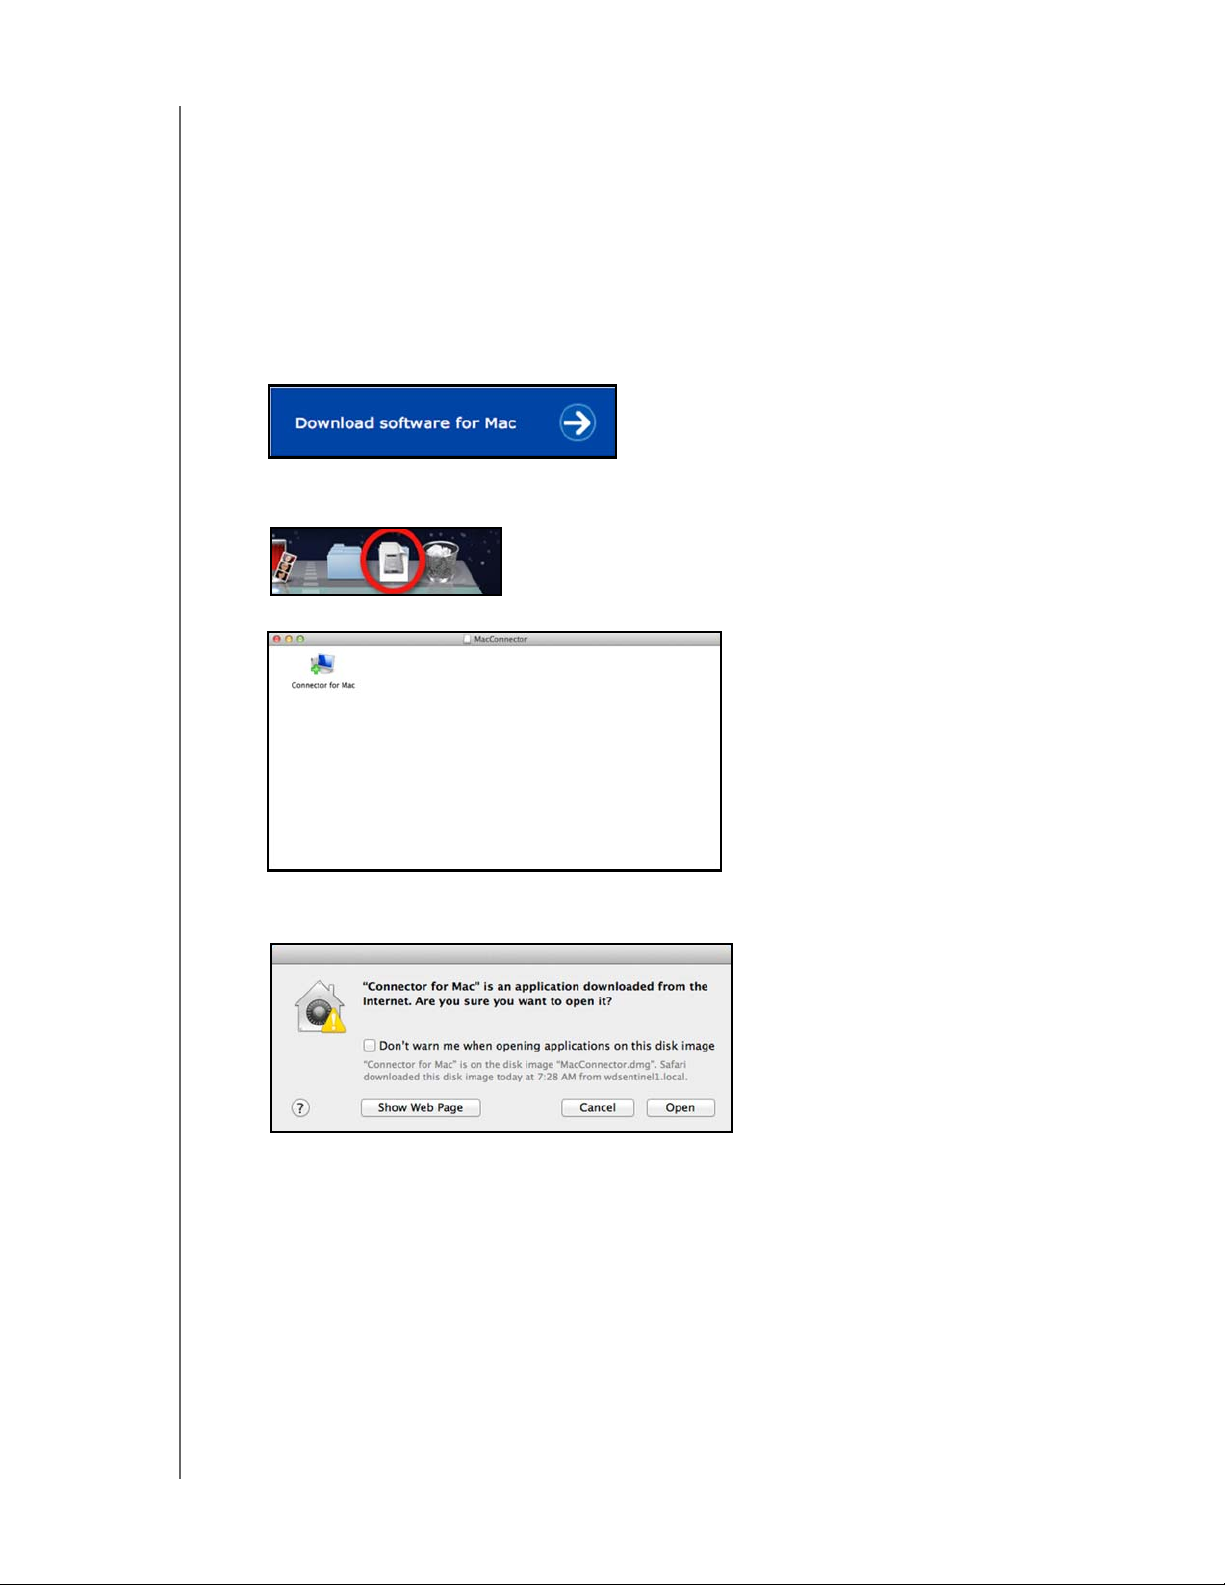
Connecting a Mac
Use the following procedure to connect your Mac computer to the WD Sentinel server.
For steps on connecting a Windows PC using the Connector software, see “Connecting a
Windows PC” on page 21.
1. In the address field of an open browser window on the Mac you’d like to connect,
enter http://<servername>.local/connect.
Example: http://myserver.local/connect<servername> is the name you gave your
server in “Connecting the WD Sentinel Server to Your Network” on page 16.
2. Click Download software for Mac:
The Mac Connector software downloads to your Download directory.
3. Click the Download icon on the Menu bar at the bottom of the screen:
4. Select MacConnector.dmg. The MacConnector window opens.
5. Double-click Connector for Mac.
6. Review the warning screen, then click Open.
Note: If prompted to do so, type the user name and password of an account that has
administrator permissions on this client computer.
WD SENTINEL DS5100/DS6100
ADMINISTRATOR AND MAINTENANCE GUIDE
23
Page 30
CONNECTING THE SERVER AND GETTING STARTED
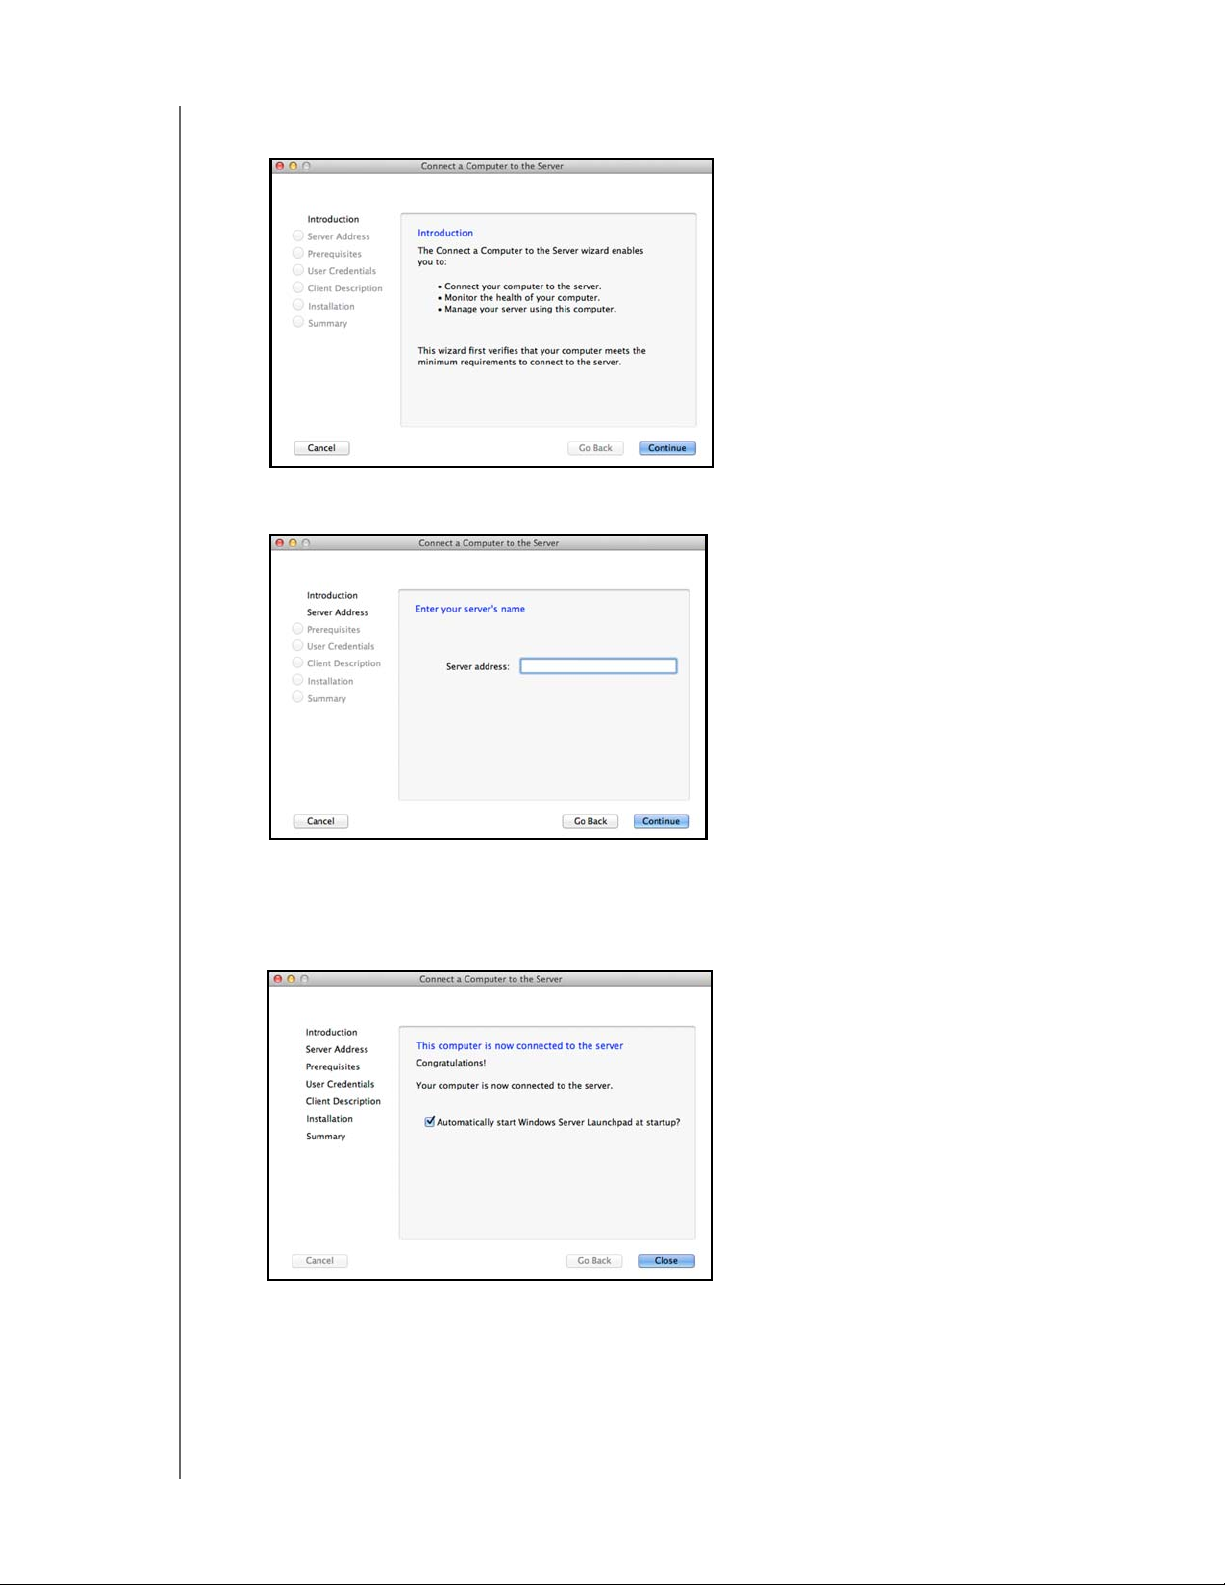
7. Review the “Connect a Computer to the Server” wizard Introduction, then click
Continue.
8. Enter the name you gave your server in “Connecting the WD Sentinel Server to Your
Network” on page 16, then click Continue. (Example: companyserver)
The software checks to ensure that your Mac meets the required prerequisites.
9. Follow the steps outlined in the Connect a Computer to the Server Wizard.
10. When the installation is completed, select the checkbox for opening the Windows
Server Launchpad at startup, then click Close
.
WD SENTINEL DS5100/DS6100
ADMINISTRATOR AND MAINTENANCE GUIDE
24
Page 31

MANAGING THE WD SENTINEL SERVER (DASHBOARD)
Managing the WD Sentinel Server (Dashboard)
4
Setting up WD Sentinel Server & Connecting Computers
Accessing the Dashboard
Adding a User Account
Performing Dashboard Tasks
Using the Home Page
Managing User Accounts
Managing Devices
Managing Storage
Monitoring Applications
Monitoring System Health and Alerts
Updating Software
Managing Server Settings
Shutting Down and Rebooting the Server
Setting up WD Sentinel Server & Connecting Computers
This chapter assumes you have followed the Administrator's Basic Install Guide to initialize
the WD Sentinel server and have connected at least one computer to the server. To review
the setup steps See “Connecting the Server and Getting Started” on page 14. of this
manual.
Important: As a best practice, perform the tasks outlined in this guide using a client
computer on which you’ve installed the connector software, not directly
from the WD Sentinel server.
Accessing the Dashboard
To access the Dashboard:
Note: The Dashboard cannot be access from a Mac computer.
If your operating systems
is...
Windows 8
Windows 7
Then...
• On your keyboard, click the Windows button .
• On the Start page, right-click in a blank area of the screen.
• Select All apps .
• Under Windows Server Essentials, click Windows Server
• Click >All Programs >Windows Server Essentials>Windows
Essentials Dashboard.
Server Essentials Dashboard
.
WD SENTINEL DS5100/DS6100
ADMINISTRATOR AND MAINTENANCE GUIDE
25
Page 32

MANAGING THE WD SENTINEL SERVER (DASHBOARD)
1. On the Dashboard Sign in page, enter the Administrator account name and password
(created during setup) and click the right arrow:
The Dashboard Home page displays:
Navigation bar
Alerts icon
Settings and Help
Category pane Task pane Action pane
WD SENTINEL DS5100/DS6100
ADMINISTRATOR AND MAINTENANCE GUIDE
26
Page 33

MANAGING THE WD SENTINEL SERVER (DASHBOARD)
Tips for Performing Dashboard Tasks
When you initially open the Dashboard, a list of task displays on the Home page. Some of
the tasks listed are necessary to finish setting up your WD Sentinel server properly. To help
you prioritize these tasks, we’ve provided list of tasks and the order that we suggest you
perform these tasks.
Task Priority Task Description
1 Setup your drives Setting up your WD Sentinel drives allows
you to configure your device using either
RAID or Storage Spaces.
See “Setting Up Your Drives” on page 43.
2 Add Server Folders Server folders make it possible to group files
together.
3 Add User Accounts User Accounts allow you to provide
individual users with the ability to log onto the
network and access network resources.
See “Adding a User Account” on page 27.
4 Setup Server Backup Helps to protect your server data by backing
it up on a regular schedule.
See “Backing up your WD Sentinel Server”
on page 70.
You can access the tasks listed above, from the Dashboard Home page on the Tasks pane.
Adding a User Account
Use the following steps to add a user account to the WD Sentinel server.
1. Open the WD Sentinel Dashboard (See “Accessing the Dashboard” on page 25.)
2. Click Users on the Navigation menu.
3. Select Add a user account in the Users Tasks section of the Task Pane.
WD SENTINEL DS5100/DS6100
ADMINISTRATOR AND MAINTENANCE GUIDE
27
Page 34

MANAGING THE WD SENTINEL SERVER (DASHBOARD)
4. Enter the following information:
a. First Name, Last Name: Enter the user’s first and last name.
b. User account name: Enter a user account name. This is used to log into the
Launchpad.
c. Password, Confirm Password: Enter your password for the assigned user, then
enter the same password to confirm the password.
d. Level of access: Select Standard user or Administrator.
5. Click Next.
6. Select the access levels for the user account from the pull-down menu.
Read Only: Allows the user to only read the information in the associated files.
Read/Write: Allows the user to create, change, and delete the information in the to the
associated files.
No Access: Choose this setting to deny access to a shared folder.
7. Click Next.
8. Place a check next to the information you’d like the user to access using the Anywhere
Access feature.
Select Virtual Private Network (VPN) to allow VPN access for this user.
Select Allow Remote Web Access you want to allow web access for this user, then select
the links you will allow this user once they have web access.
WD SENTINEL DS5100/DS6100
ADMINISTRATOR AND MAINTENANCE GUIDE
28
Page 35

MANAGING THE WD SENTINEL SERVER (DASHBOARD)
9. Click Create Account.
10. Click Close. Provide the user with their new user name and password.
Performing Dashboard Tasks
The Administrator uses the Dashboard to perform management and maintenance tasks you
use to control how your server behaves on your network, who can access it, what
information can be stored and retrieved, how it is organized, protected, and made available
remotely.
For information about an additional task, backing up a computer to the WD Sentinel server,
see “Backing up (Windows PC)” on page 60.
Using the Home Page
The Home page provides quick access to tasks and information that help you customize
your server and configure key features.
WD SENTINEL DS5100/DS6100
ADMINISTRATOR AND MAINTENANCE GUIDE
29
Page 36

MANAGING THE WD SENTINEL SERVER (DASHBOARD)
The Category pane, on the left side of the page, provides quick access to
information and configuration tools that help you set up and customize the server.
Click a category to display tasks and resources that are associated with that
category.
The Task pane in the middle of the page, lists some of the recommended tasks to
perform the first time you sign in to the Dashboard. To perform these tasks from
the Home page, just click the relevant links.
The Action pane on the right side of the page, provides a brief description of the
task and offers links to associated actions.
The rest of this chapter discusses the tasks the Administrator can perform on the
Dashboard.
Important: Ensure that you perform the tasks outlined on the Home page Task pane
prior to performing other tasks.
For a full description of the typical components of a page, including the Critical, Warning,
and Informational Alert icons, see the Microsoft Online Help.
Home Page Category Pane
The Home page contains five areas, summarized below:
Tab Description
Setup Complete basic tasks that will get you started with the
WD Sentinel server. For information about these tasks,
see the Microsoft Online Help.
Best Practices:
• Complete the Setup tasks on the Home page of the
Dashboard.
• Create at least one active user account the first
time you access the Dashboard.
Services
Add-Ins
Quick Status
Help Click a link to visit the Microsoft Online Help. You can
Integrated your WD Sentinel server with business
productivity and collaboration solutions.
Select add-ins to enhance your server and business.
Displays high-level server status. Click a status to view
information and configuration options for that feature.
When you complete all of the tasks in the SETUP
category, this category appears at the top of the
Category pane.
also enter a word or term in the Search box to search
for help on within the Microsoft Online Help.
Home Page Tasks Pane
The center pane displays the various tasks that can be performed to enhance the properties
of the WD Sentinel server. This list of task and information changes depending on the
category selected in the left Category pane.
WD SENTINEL DS5100/DS6100
ADMINISTRATOR AND MAINTENANCE GUIDE
30
Page 37

MANAGING THE WD SENTINEL SERVER (DASHBOARD)
Home Page Action Pane
The Action pane displays a brief description of the selected task. You are also presented
with the opportunity to open configuration wizards to act on the selected task or, in some
cases, skip a task.
Managing User Accounts
The Users tab allows you to add and manage up to 25 user accounts.
On the navigation bar, click Users.
You can now:
View, add, manage, delete, and activate/deactivate user accounts.
Manage domain user accounts (if joined to an Active Directory Domain).
Manage passwords.
Set password policies.
Manage Anywhere Access.
Assign user access privileges to shared folders and server resources.
View remote connection status.
For detailed instructions on performing any of these tasks, consult
Microsoft Online Help.
Managing Devices
After you connect your computers to the Windows Server 2012 Essentials network, you can
view the health and backup status of computers on the network and configure backups for
the server and client computers. You can also apply group policies to Windows 7 and
Windows 8 client computers to help make them more secure. Available tasks include:
Viewing a list of computers connected to your server.
Viewing computer properties and health alerts for each connected computer.
Setting up and managing computer backups.
Restoring files and folders to computers.
Establish a Remote Desktop connection to a computer
Customize Computer Backup and File History settings
WD SENTINEL DS5100/DS6100
ADMINISTRATOR AND MAINTENANCE GUIDE
31
Page 38

MANAGING THE WD SENTINEL SERVER (DASHBOARD)
For detailed instructions on performing any of these tasks, consult Microsoft Online Help.
Managing Storage
The Storage section contains two tabs:
The Server Folders tab allows you to view and manage the properties of the
server folders. This page also includes tasks to open and add server folders.
Note: If you have data files saved on the C: drive (your boot drive), See “Moving a
Server Folder” on page 50. to move these files to your data drives.
The Hard Drives tab allows you to view and check the health of the drives that
are attached to your server.
For detailed instructions on performing any of these tasks, consult
Microsoft Online Help.
WD SENTINEL DS5100/DS6100
ADMINISTRATOR AND MAINTENANCE GUIDE
32
Page 39

MANAGING THE WD SENTINEL SERVER (DASHBOARD)
Monitoring Applications
The Applications section of the Windows Server 2012 Essentials Dashboard includes tasks
that help you view and manage the Add-ins that are installed on the server and to discover
new add-ins Microsoft Pinpoint
For detailed instructions on monitoring add-ins and using Microsoft Pinpoint, consult
Microsoft Online Help.
®.
Monitoring System Health and Alerts
The Monitor page of the Dashboard includes tasks that help you view and manage the WD
Sentinel server storage system. To open the Monitor module, click the Monitor icon on the
navigation bar. The Monitor module includes two tabs, Health and Software Update, and
related tasks in the panel on the right.
Health Tab
The Health tab and related tasks enable you to monitor the status of the storage drives,
RAID configuration, power supplies, temperatures, fans, CPU, audible alerts, and network
connections.
WD SENTINEL DS5100/DS6100
ADMINISTRATOR AND MAINTENANCE GUIDE
33
Page 40

MANAGING THE WD SENTINEL SERVER (DASHBOARD)
To open the Health tab, click the Monitor icon on the navigation bar:
Settings Description
Network Health
Ethernet1&2
System Temperature System: The temperature within the server enclosure.
Displays the status (Connected or Not connected) of the server's
network connection(s). If you use both Ethernet ports and one
fails, the other takes over, allowing the WD Sentinel server to
remains operational over the network.
Power Adapter
1&2
CPU: The status, temperature, and status description for the
CPU.
The status may be:
• Normal
• Warm
• Hot
CPU Fan
: The status, fan RPM and status description for the CPU
fan. The status may be:
• Normal
• Warm
• Hot
System Fan
: The status, fan RPM, and status description of the
System fan. The status may be:
• Normal
• Warm
• Hot
The server has two power ports. If you use both and one fails, the
other takes over and the WD Sentinel server remains operational.
The status may be:
• Active
• Inactive
WD SENTINEL DS5100/DS6100
ADMINISTRATOR AND MAINTENANCE GUIDE
34
Page 41

MANAGING THE WD SENTINEL SERVER (DASHBOARD)
Settings Description
Audible Alerts The status of the warning and critical alerts for WD Sentinel server.
The audible alerts may be:
•On
•Off
Action
: Click Configure to set Audible Alerts (See “Set audible
alerts” on page 37.).
Internal Storage
Displays storage information associated with the WD Sentinel
server. The WD Sentinel server holds up to four of WD’s hard
drives optimized for quality, reliability and performance.
Data Drives & Boot Drives
Displays the type, status, size, and model number of the data
drives used by your WD Sentinel server. For a list of compatible
data drives, visit http://support.wd.com and see Knowledge Base
Answer ID 9443.
Type of Drives: The type of drive used within your device:
• Preferred: Indicates that this is a preferred drive. Preferred drives
preform optimally with your device and should always be used
whenever possible. Preferred drives are fully tested and approved
for use with your device. The message text displays in green.
• Supported: Indicates that this is a supported drive. Supported
drives are not the optimal drives for your device but are part of the
same drive family. These drives are not fully tested with this
device. The message text displays in green.
• Unsupported: Indicates that this is an unsupported drive.
Unsupported drives have not been tested with this device and
should be used at your own risk. The message text displays in
red.
WARNING: Using an unsupported drive in your device
immediately voids your warranty and may cause damage to your
device and data.
Status of Drives:
• Normal
• Failed!: Visit WD Store to replace.
CAUTION: Imminent failure detected. Please replace this hard
drive immediately.
The status of a drive may be:
Action: Click Configure to set up your data drives (See “Setting
Up Your Drives” on page 43.)
WD SENTINEL DS5100/DS6100
ADMINISTRATOR AND MAINTENANCE GUIDE
35
Page 42

MANAGING THE WD SENTINEL SERVER (DASHBOARD)
Health Tasks
Find compatible hard drives
To view a list of WD drives that can be used in the WD Sentinel server:
Click Compatible Hard Drives in the Task pane. A pop-up screen lists each drive
with its model number, description, and maximum capacity.
Click WD Store to purchase compatible drives.
Click OK to exit.
To buy a compatible WD drives that can be used in the WD Sentinel server:
Click Buy on the right side of the Internal Storage area of the Health tab.
Follow the instructions on the screen to purchase your WD compatable drive.
Request Support
The Request Support function collects information about your WD Sentinel device and
sends a diagnostic report to the WD Support server. It then opens the WD Support website,
where you can enter a few details regarding the problem to route it to the appropriate
support team.
Note: If you do not want to submit the diagnostic logs, use the regular
WD Support page at http://support.wd.com.
To access WD Customer Support automatically:
1. Click Request Support in the Tasks pane. The Request Support window displays.
2. After reading the information on the screen, click the “I agree and would like to
proceed.” check box, then click Proceed. The WD Support Ask a Question page
displays.
Note: The first time you do this, an Internet Explorer Security Screen displays. Clear the
check box and click Close.
3. Complete the online form and click Submit Question. A diagnostic report of the
WD Sentinel server is automatically attaches to the form. Your request is added to the
WD Support queue and assigned a confirmation number. You will receive an email
from WD Support regarding your question.
Important: For faster service/phone service, call WD Support. For the latest
phone numbers and contact information in your region, see
“Contacting WD Technical Support” on page iii or
http://support.wd.com. Have your confirmation ready when you call.
View system performance
Monitor your system performance using the Windows Resource Monitor which is available
from the Advanced tasks pane. The Resource Monitor allow you to see and control how
your system resources (such as the CPU, memory, disk, and network) are being used by
processes and services.
WD SENTINEL DS5100/DS6100
ADMINISTRATOR AND MAINTENANCE GUIDE
36
Page 43

MANAGING THE WD SENTINEL SERVER (DASHBOARD)
To access the Windows Resource Monitor:
Click View System Performance in the Advanced tasks pane. The Resource
Monitor displays.
For complete instructions on how to use the Windows Resource Monitor, click F1 within the
Windows Resource Monitor application.
Set audible alerts
The Audible Alert provides audible notification from your WD Sentinel server when there are
warnings or critical alerts to the server.
To set Audible Alerts:
1. Click Audible Alerts Settings in the Advanced tasks pane. The Audible Control
window displays.
2. Click Select next to the type of alert for which you like to hear an alarm.
Warning: The alarm sounds for all warning alerts.
Critical: The alarm sounds for all critical alerts.
3. Click Save. Your audible alarm has been set. When an alert of the type you selected
occurs, an audible sound will emit from your WD Sentinel server.
Updating Software
Periodically, WD issues software updates for your WD Sentinel server. The Software Update
tab within the Monitor module allows you to update WD Sentinel device software
automatically or manually. Please note that this tab only allows you to apply software
updates issued by WD. To manage or apply Microsoft software updates, go to Server
Settings on the Dashboard.
A best practice to ensure that your system software stays current is to enable automatic
updates on your WD Sentinel server (See “Automatic Updates of WD Software” on
page 38.)
WD SENTINEL DS5100/DS6100
ADMINISTRATOR AND MAINTENANCE GUIDE
37
Page 44

MANAGING THE WD SENTINEL SERVER (DASHBOARD)
Manual Updates of WD Software
To check for software updates and update the software:
1. Click the Software Updates tab.
2. You have two options. You may check for updates online or update from a file:
To use the online update:
a. Click Check for Updates.
b. If an update is available, click Download and Install to update your
WD Sentinel server.
To update from a file:
a. The software update files can also be downloaded from the WD Support site at
http://support.wd.com.
Once you download the available firmware updates for the
WD Sentinel server, copy the file to a shared folder such as the Documents share
on the server and select the file to update.
b. Click Update from file and then locate and select the update file you copied to
your server.
c. Click Open. The system applies the software update. The system automatically
restarts the server if a reboot is required to complete the software update.
Automatic Updates of WD Software
Enabling Automatic Updates on your WD Sentinel server causes the server to check for
available software updates from WD on a scheduled basis and apply the updates
automatically.
To set a schedule for automatic updates:
1. In the Automatic Updates section, click Enable.
WD SENTINEL DS5100/DS6100
ADMINISTRATOR AND MAINTENANCE GUIDE
38
Page 45

MANAGING THE WD SENTINEL SERVER (DASHBOARD)
2. Click the Change link and select the day and time you want the WD Sentinel server to
check for updates every week, and if an update is available, install it. (Example: every
Sunday at 3:00 AM)
3. Click Apply.
Updating Microsoft Software
You can update the Microsoft software for the WD Sentinel DS5100/DS6100 using the
Server Settings page. See “Managing Server Settings,” below.
Managing Server Settings
Important: Unless otherwise noted,
Microsoft Online Help provides complete
instructions for using these pages.
1. Click Settings on the icon bar to enable, set up, and control WD Sentinel server
settings.
2. The General page displays. The left panel contains links to the rest of the Server
Settings pages.
Following is a summary of the purpose of each of the Server Settings pages.
General
Shutdown or restart the server—This is the safest method to shut down or
restart the server. It insures that the RAID system shuts down cleanly. See
“Shutting Down and Rebooting the Server” on page 40 for instructions.
Change the date, time, and location of the server—You can change the
settings you established at initialization.
Change the behavior of the Windows update—You can change the settings
for updating the Microsoft software.
WD SENTINEL DS5100/DS6100
ADMINISTRATOR AND MAINTENANCE GUIDE
39
Page 46

MANAGING THE WD SENTINEL SERVER (DASHBOARD)
Anywhere Access
Anywhere Access enables your network users to access WD Sentinel server resources from
any location with an Internet connection, at any time, and on any device. You can access
shared folders and files (that you have permission for) on the server as well as on your
networked computer.
Enabling Anywhere Access
Use the following steps to enable Anywhere Access on the Settings page. Anywhere Access
is turned off by default.
Note: The Home page provides a Setup task for enabling Anywhere Access by clicking the
Setting Up Anywhere Access link.
1. Under Settings, click Anywhere Access in the panel on the left.
2. Click Configure and complete the wizard to set up your router, set a domain name,
and change Internet settings.
3. Grant Remote Web Access privileges if you want a user to access the
WD Sentinel server, shared folders, computers, media, Home page links, and the
Dashboard (administrators only) when you create or update a user account.
To view a user’s current privileges, click the Users icon in the Navigation bar.
Note: The Guest account cannot have Remote Web Access.
Note: Refer to Microsoft Online Help for detailed information about setting up remote web
access and for troubleshooting connection issues.
Shutting Down and Rebooting the Server
The WD Sentinel server is intended to be on at all times, providing shared data and backup
services. A best practice is to avoid turning the unit off. However, if it does become
necessary (for example, moving the server to a different location), follow the procedures
below to shut down or reboot the server
It is very important that the WD Sentinel server be shut down or restarted in a clean and
graceful manner through the Settings section in the Dashboard.
WARNING! To avoid a potentially unclean shutdown that could corrupt the
RAID configuration, shut down the server through the Dashboard.
To shut down or restart using the Dashboard (Preferred method):
1. Click Settings in the icon bar.
WD SENTINEL DS5100/DS6100
ADMINISTRATOR AND MAINTENANCE GUIDE
40
Page 47

MANAGING THE WD SENTINEL SERVER (DASHBOARD)
2. To shut down, right-click the red button in the lower left corner of the page and select
Shut down.
3. To restart, right-click the arrow and select Restart
.
4. When the confirmation message appears, click Ye s .
Note: You can also shut down your WD Sentinel server by holding the power button on the
front of the device for a few seconds and then releasing it. The “Shutting Down”
message displays on the front of the unit.
Rebooting the WD Sentinel Server
Following is the cleanest procedure for rebooting the WD Sentinel server.
Note: This procedure should only be used after you’ve logged into the Dashboard and
created a user account.
1. On the Dashboard Home page, click the Settings link on the upper right of the
window.
2. On the bottom left of the General screen, click the shutdown arrow and select
Restart:
WD SENTINEL DS5100/DS6100
ADMINISTRATOR AND MAINTENANCE GUIDE
41
Page 48

5
MANAGING STORAGE ON THE WD SENTINEL SERVER
Managing Storage on the WD Sentinel Server
WD Sentinel Server RAID Storage
Storage Spaces
Setting Up Your Drives
Using USB Storage
Moving a Server Folder
WD Sentinel Server RAID Storage
RAID is the acronym for Redundant Array of Independent Disks. The WD Sentinel server
provides automatic RAID service to assure the integrity of the storage system. For
redundancy, a minimum of two drives must be active. The operating system and all data are
protected by the RAID structure. The server automates the management of the RAID.
Your WD Sentinel server uses RAID 5, which offers fast performance by striping data across
all drives, This RAID level provides the system with both redundancy and optimum capacity.
2 TB Drives 3 TB Drives 4 TB Drives
RAID Level 5 (4
Drives)
8 TB Capacity 12 TB
Capacity
16 TB
Capacity
If a drive in the array fails, the data and operating system are still intact, and the
WD Sentinel server continues to provide service.
Important: If you have one bad drive, the server operates normally. However, if a
second drive fails, the server will no longer operate. You will need to
recover the server and/or replace the failed drive(s). A best practice
is to have a replacement drive readily available.
The WD Sentinel server lets you know when a drive fails in the following ways:
The LED below the bad drive is solid red.
The Power LED on the WD Sentinel server flashes red, indicating a serious fault.
An email Alert is posted if you have set it up to do so. (See “Monitoring System
Health and Alerts” on page 33.)
To recover from a failed drive, simply replace the drive (the one with the red LED over the
drive) with an approved drive for the WD Sentinel server (see “Find compatible hard drives”
on page 36)
Once replaced, complete the steps outlined in “Recovering from a Failed Drive” on page 48
to integrates the new drive into the RAID array. This process takes many hours to
accomplish. Progress of this operation appears on the Dashboard. While the server is
verifying the RAID array, your data continues to be available although the performance may
be impacted.
The WD Sentinel server RAID system has no downgrade options. Once available capacity
has been increased, the Administrator cannot decide to subsequently reduce capacity by
removing a drive. The removal of a drive degrades the RAID and makes it vulnerable to
single drive failure.
WD SENTINEL DS5100/DS6100
ADMINISTRATOR AND MAINTENANCE GUIDE
42
Page 49

MANAGING STORAGE ON THE WD SENTINEL SERVER
Storage Spaces
Storage Spaces is a Windows storage virtualization technology which succeeds Logical
Disk Manager and allows for the organization of physical disks into logical volumes similar to
Logical Volume Manager (Linux), RAID1 or RAID5, but at a higher abstraction level.
A storage space behaves like a physical disk to the user, with thin provisioning of available
disk space. The spaces are organized within a storage pool, i.e. a collection of physical
disks, that can span multiple disks of different sizes, performance or technology (USB,
SATA, SAS). The same storage pool can host multiple storage spaces. Storage Spaces
have built-in resiliency from disk failures, which is achieved by either disk mirroring or striping
with parity across the physical disks.
Setting Up Your Drives
Use the following steps to set up your WD Sentinel device drives.
1. On the Dashboard Home page, click Setup>Set up your drives.
2. Select Click to start setting up your drives. The Set Up Your Drives wizard
displays.
WD SENTINEL DS5100/DS6100
ADMINISTRATOR AND MAINTENANCE GUIDE
43
Page 50

MANAGING STORAGE ON THE WD SENTINEL SERVER
3. Select your storage method. Options are:
Storage Spaces: A Windows Server 2012 technology that allows you to virtualize
storage by grouping industry-standard disks into storage pools. Virtual disks called
storage spaces are then created from the available capacity in the storage pools.
RAID: Redundant Array of Independent Disks (RAID) lets you store the same data
in different places on multiple hard drives, providing necessary redundancy, greater
performance, and data integrity.
4. Click Next.
For Storage Spaced, continue to “Setting up Storage Spaces” on page 44
For RAID, continue to “Setting Up RAID Storage” on page 45.
Setting up Storage Spaces
1. On the Storage Spaces screen, click Create a new pool and storage space.
2. At the warning prompts, click Ye s .
3. Select the drive(s) you’d like to set up with Storage Spaces, then click Create Pools.
WD SENTINEL DS5100/DS6100
ADMINISTRATOR AND MAINTENANCE GUIDE
44
Page 51

MANAGING STORAGE ON THE WD SENTINEL SERVER
4. Enter the size, resiliency type, and size of your new storage space. then click Create
Storage Space. Your storage space is created.
Setting Up RAID Storage
1. On the WD RAID Storage Utility screen, in the Storage area, select Adapter 0.
2. Hover your mouse over the Operations tab, then select Create RAID.
WD SENTINEL DS5100/DS6100
ADMINISTRATOR AND MAINTENANCE GUIDE
45
Page 52

MANAGING STORAGE ON THE WD SENTINEL SERVER
3. On the Create Options pull-down menu, select a RAID option.
It is a best practice to select RAID 5 for your WD Sentinel server storage.
4. Click Submit.
5. Click OK. Your RAID storage is created. Now, lets mount your new disk.
6. Right-click the lower-left corner of your desktop, then select Disk Management.
WD SENTINEL DS5100/DS6100
ADMINISTRATOR AND MAINTENANCE GUIDE
46
Page 53

MANAGING STORAGE ON THE WD SENTINEL SERVER
7. On the Initialize Disk screen, click OK.
8. On the Disk Management screen, right-click your initialized disk (Disk 1). then select
New Simple Volume.
9. Follow the steps outlined in the New Simple Volume Wizard.
10. Once the volume is created, click the to close the DIsk Management screen.
11. On the WD RAID Storage Utility, click the to close the screen. Your RAID volume is
now created and mounted.
WD SENTINEL DS5100/DS6100
ADMINISTRATOR AND MAINTENANCE GUIDE
47
Page 54

MANAGING STORAGE ON THE WD SENTINEL SERVER
Recovering from a Failed Drive
Use the following steps to recover from a failed drive.
1. Replace the drive (the one with the red LED over the drive) with an approved drive for
the WD Sentinel server (see “Find compatible hard drives” on page 36).
2. Once replaced, access the device Dashboard Monitor page.
3. Click the Configure link, located on the Health tab in the Internal Storage area.
4. Complete the steps outlined in “Setting up Storage Spaces” on page 44 or “Setting
Up RAID Storage” on page 45 to integrates the new drive into the RAID array.
Using USB Storage
The WD Sentinel server has two USB 2.0 port and four USB 3.0 ports on the back panel of
the unit. The USB 3.0 ports can connect to external USB 2.0 or USB 3.0 storage devices or
to a UPS device for power outage conditions. For example, WD My Passport or WD My
Passport Essentials may be used to connect to the WD Sentinel server. You can share this
data on your USB drive with other users connected to the server by using the Dashboard,
which treats the USB drive as a share. You can set user privileges just as you do with shared
folders on the WD Sentinel server’s drives. The server manages UPS capability through a
USB port for communication and to ensure an orderly shut down.
Back View
USB 3.0 ports USB 2.0 ports
To share data on a USB drive:
1. Connect a USB drive to one of the six USB ports.
2. On the Dashboard, click the Storage icon.
3. Click the Server Folders tab.
WD SENTINEL DS5100/DS6100
ADMINISTRATOR AND MAINTENANCE GUIDE
48
Page 55

MANAGING STORAGE ON THE WD SENTINEL SERVER
4. In the Task bar, click Add a folder.
5. Enter a name for the folder.
6. Click Browse and select a folder on the USB drive. Note that a shared folder cannot
be created at the root of the USB drive.
7. Click OK and follow the instructions on the screen.
To stop sharing data on a USB drive:
1. On the Dashboard, click the Servers Folders and Hard Drives icon.
2. Click the Server Folders tab, then select the folder you want to stop sharing.
WD SENTINEL DS5100/DS6100
ADMINISTRATOR AND MAINTENANCE GUIDE
49
Page 56

MANAGING STORAGE ON THE WD SENTINEL SERVER
3. On the Task bar, click Stop sharing the folder.
4. Click Ye s , then click Close.
Moving a Server Folder
It is a best practice to move any folders you may have on your server boot drive (C:) to your
shared data drives. Use the following steps to move a folder on your server to another
location on your server. When you perform this task, ensure that the new location has a
maximum amount of free space.
Note: If possible, avoid moving a shared folder to your server’s system drive (such as C:\ )
This may take away the necessary drive space required for your operating system
and its updates.
Note: Avoid moving share folders to an external hard drive. Once moved, you may not be
able to access these files in a folder on an external drive because they can be easily
disconnected. Instead creating the folder on an internal drive is recommended.
A server folder cannot be moved to the following locations and will result in an error if any
one of these locations is selected for a move:
a hard drive that is not formatted with the NTFS or ReFS file system.
the %windir% folder.
a mapped network drive.
a folder that contains a shared folder.
a hard drive that is located under Device with Removable Storage.
a sub-folder of a shared folder.
Before you move a folder ensure that:
You’ve backed up your device (See “Backing up your WD Sentinel Server” on
page 70.).
None of the files within the folder you’d like to move are currently in use.
Use the following steps to move a server folder.
1. On the Dashboard, click Storage.
2. On the Server Folders tab, select the folder that you want to move.
3. In the Tasks pane, click Move the folder.
WD SENTINEL DS5100/DS6100
ADMINISTRATOR AND MAINTENANCE GUIDE
50
Page 57

MANAGING STORAGE ON THE WD SENTINEL SERVER
4. Follow the steps outlined in the Move a folder wizard.
WD SENTINEL DS5100/DS6100
ADMINISTRATOR AND MAINTENANCE GUIDE
51
Page 58

USING THE WD SENTINEL SERVER’S FEATURES
Using the WD Sentinel Server’s Features
6
Using the Launchpad (Internal Users)
Accessing Shared Folders Over Your Network
Accessing Computers and Shared Folders Remotely
Backing up (Windows PC)
Backing up with Time Machine (Mac)
Recovering/Restoring (Windows PC)
Recovering/Restoring (Mac)
Backing up your WD Sentinel Server
Recovering a WD Sentinel Server Image or Resetting the Boot Drives to Factory Defaults
This chapter describes the routine tasks that both the Administrator and permitted users
perform on the WD Sentinel server.
Using the Launchpad (Internal Users)
After you, the Administrator, use the Dashboard to set up users with a user name,
password, and permissions, they can access the Launchpad Sign-in page using one of the
following methods:
Best Practice: Ideally, you set up a user name and password for yourself and have
given it all access privileges so you too can use the Launchpad
shortcuts.
Accessing the Launchpad
To access the Launchpad (Windows):
If your operating systems
is...
Windows 8 From Apps Page:
Do one of the following...
• On your keyboard, click the Windows button .
• On the Start page, right-click in a blank area of the screen.
• Select All apps .
• Under Windows Server Essentials, click Windows Server
Launchpad.
From Desktop:
• Double-click the Launchpad icon .
From System Tray
• Right-click the Launchpad icon and select Open
Launchpad.
:
WD SENTINEL DS5100/DS6100
ADMINISTRATOR AND MAINTENANCE GUIDE
52
Page 59

USING THE WD SENTINEL SERVER’S FEATURES
If your operating systems
Do one of the following...
is...
Windows 7 From Start Menu:
• Click >All Programs >Windows Server 2012
Essentials>Windows Server Launchpad
From Desktop:
• Double-click the Launchpad icon .
From System Tray
• Right-click the Launchpad icon and select Open
Launchpad.
:
.
Once you’ve accessed the Launchpad Sign In screen, use the following step to sign in and
use the Launchpad.
1. Enter your user name and password.
2. Click the arrow to display the Launchpad.
The Launchpad lists four tasks that authorized users can perform: Backup, Remote Web
Access, Shared Folders and Dashboard.
Note: The Dashboard option is only useful to a user with Administrative privileges and
knowledge of the Administrator password.
WD SENTINEL DS5100/DS6100
ADMINISTRATOR AND MAINTENANCE GUIDE
53
Page 60

To access the Launchpad (Mac):
1. Do one of the following:
Double-click the Launchpad icon on your Mac Toolbar.
Select Finder>Applications>Windows Server Launchpad
USING THE WD SENTINEL SERVER’S FEATURES
Once you’ve accessed the LaunchPad Sign In screen, use the following steps to sign in and
use the Launchpad.
1. Enter your user name and password.
2. Click the arrow to display the Launchpad. It lists four tasks: Backup, Remote Web
Access, and Shared Folders.
WD SENTINEL DS5100/DS6100
ADMINISTRATOR AND MAINTENANCE GUIDE
54
Page 61

USING THE WD SENTINEL SERVER’S FEATURES
Selecting Launchpad Options (Windows PC or Mac Computer)
To select Launchpad options:
IF you want to... THEN... AND...
Back up your Windows
PC to the WD Sentinel
server manually
Back up your Mac to
the WD Sentinel Server
using Time Machine
Use Remote Web
Access:
• Enable remote web
access for users with
Remote Access
Privileges
• Access the server
from a remote location
(all users)
• Change a user
password (by the
user)
Access shared folders
on the server
Manage the server
(Windows PCs and
Administrators only)
Click Backup. Continue to “Backing up (Windows
PC)” on page 60.
Click
Backup. Continue to “Backing up with Time
Machine (Mac)” on page 64.
Click Remote Web
Access
.
Continue to “Accessing Computers
and Shared Folders Remotely” on
page 59.
Click Shared
Folders
.
Continue to “Accessing Shared
Folders Over Your Network” on
page 58.
Click Dashboard. Enter the Administrator password
and continue to “Managing the WD
Sentinel Server (Dashboard)” on
page 25.
Managing the Launchpad
To disable the Launchpad after signing in (Windows):
1. Sign in to the Launchpad.
2. Click the menu arrow at the top right and select Settings from the drop-down menu.
WD SENTINEL DS5100/DS6100
ADMINISTRATOR AND MAINTENANCE GUIDE
55
Page 62

USING THE WD SENTINEL SERVER’S FEATURES
3. Clear the Automatically run the Connector when I sign in to Windows check
box, and click OK.
To disable the Launchpad after signing in (Mac):
1. Sign in to the Launchpad.
2. Click the menu arrow at the top right and select Settings from the drop-down menu.
3. Clear the Automatically run Windows Server Launchpad when I log in check
box, and click the Close button .
You can also change the type of alerts that display on the Launchpad selecting whether to allow
Microsoft to send you information about it in this window, and setup your Time Machine backups.
WD SENTINEL DS5100/DS6100
ADMINISTRATOR AND MAINTENANCE GUIDE
56
Page 63

USING THE WD SENTINEL SERVER’S FEATURES
To uninstall the Launchpad (Connector Software) on a Windows PC:
Note: When you uninstall Launchpad, you also uninstall Dashboard. They can
not be uninstalled separately.
If your operating systems
Then...
is...
Windows 8
Windows 7
• On your keyboard, click the Windows button .
• On the Start page, right-click in a blank area of the screen.
• Select All apps .
• Under Windows Server 2012 Essentials, right-click Windows
Server Launchpad.
• Select Uninstall .
• Click >Control Panel (Windows 7/Vista).
• Click Start>Control Panel (Windows XP).
• Click Uninstall a Program.
• From the list, select Windows Server 2012 Essentials Connector.
• Click Uninstall.
- If the User Account Control window displays, click Allow.
- If the Windows Server 2012 Essentials Connector page displays
suggesting that you close the Launchpad, click OK.
Note: You must reboot the computer before installing another
Connector.
To uninstall the Launchpad (Connector Software) on a Mac:
You must uninstall Launchpad from three Macintosh® HD folders: Users, Applications, and
Library.
1. Quit the Launchpad.
2. In the Finder pane, click Applications. Drag and drop Windows Server Launchpad
into the Trash icon. The Launchpad icon no longer appears in the dock.
3. Click Finder>Devices>Macintosh HD.
4. Click Library>Application Support>Microsoft. Drag and drop Launchpad into the
Trash icon.
5. Click Library>Preferences. Drag and drop “com.microsoft.launchpad.plist” into
the Trash icon.
6. Right-click the Trash icon and select Empty Trash.
WD SENTINEL DS5100/DS6100
ADMINISTRATOR AND MAINTENANCE GUIDE
57
Page 64

USING THE WD SENTINEL SERVER’S FEATURES
Accessing Shared Folders Over Your Network
Launchpad (Windows)
1. On the Launchpad, click Shared Folders. A set of folders similar to the one below
displays:
2. Double-click a folder to open it, then click the file you want to access. Your access (as
a general user) depends on the permissions assigned to you by the Administrator.
Launchpad (Mac)
1. On the Launchpad, click Shared Folders.
2. Select the shared folder you’d like to mount on your Mac, then click
OK.
If all shared folders are mounted on your Mac, click Cancel, then open Finder. Click the IP
Address of your WD Sentinel under Shared to display your Shared Folders.
3. The selected shared folder displays in Finder.
WD SENTINEL DS5100/DS6100
ADMINISTRATOR AND MAINTENANCE GUIDE
58
Page 65

USING THE WD SENTINEL SERVER’S FEATURES
Accessing Computers and Shared Folders Remotely
This section assumes that the Administrator has completed the setup and configuration for
Remote Web Access through the Dashboard.
You can access files stored on the WD Sentinel DS5100/DS6100 anywhere, as long as you
have access to the Internet.
Note: You must use Internet Explorer 8 or higher to access a PC using the Remote Web
Access feature. See “Specific Problems and Corrective Actions” on page 73.
Logging In
1. On the Launchpad, click Remote Web Access or on a web browser, enter the
domain address for your WD Sentinel server. This is the domain address the
Administrator configured while setting up Remote Web Access on your WD Sentinel
server. The following web page displays in your browser.
2. Enter the WD Sentinel server user name and password set up with the appropriate
permissions, then click the Sign in to display the Remote Web Access: Home
window:
WD SENTINEL DS5100/DS6100
ADMINISTRATOR AND MAINTENANCE GUIDE
59
Page 66

USING THE WD SENTINEL SERVER’S FEATURES
Remote Web Access Home Page
The Remote window includes the following sections:
Note: You can also use the navigation links at the top of the window to view these
sections.
Devices
Note: Connecting to computers or the WD Sentinel server using Remote Web Access
requires the Internet Explorer browser.
Click Connect to connect to your WD Sentinel server or to a computer on your
network.
- If the Internet Explorer you are using does not have Active X Client, click
install it, then complete the wizard.
Shared Folders
Access shared folders on the WD Sentinel server. A user with "Read & Write" access to a
particular shared folder is able to modify the contents of the existing files, upload new files,
or delete files from the folder.
OK to
Note: Only the folders for which the user has permissions are displayed under Shared
Folders on Remote Web Access.
Links
Displays useful links to Microsoft information.
Backing up (Windows PC)
The WD Sentinel server backup is based upon block level de-duplication, a process that
backs up data without unnecessarily backing up the same data more than once. This
powerful process uses less network traffic for execution, provides a full back-up at each
backup time (although it behaves as if it is incremental), and by executing de-duplication
across all client computers, the storage capacity requirements are significantly reduced.
Backup becomes an automatic process for a computer once you install Connector software
on it. With Connector software installed, all volumes and all NTFS data on that computer are
backed up.
Note: For information on backing up your Mac using Time Machine, See “Backing up with
Time Machine (Mac)” on page 64.
WD SENTINEL DS5100/DS6100
ADMINISTRATOR AND MAINTENANCE GUIDE
60
Page 67

USING THE WD SENTINEL SERVER’S FEATURES
Scheduling Automatic Backups (Dashboard only)
To set a schedule for future backups:
1. Access the Dashboard.
2. Click the Devices icon on the navigation bar to display a list of computers and servers
on your network:
3. Click Customize Backup for the computer in the Device Tasks panel.
WD SENTINEL DS5100/DS6100
ADMINISTRATOR AND MAINTENANCE GUIDE
61
Page 68

USING THE WD SENTINEL SERVER’S FEATURES
4. Select Back up all of my files and folders (Recommended).
5. Review the backup information to ensure that it is correct, then click Save changes.
The selected computer is now setup for automatic backup.
6. Click Close.
WD SENTINEL DS5100/DS6100
ADMINISTRATOR AND MAINTENANCE GUIDE
62
Page 69

USING THE WD SENTINEL SERVER’S FEATURES
Initiating Backups
By default, backups are performed at night for up to 50 client computers in a sequential
order. If the client computer is asleep or hibernating at that time, the backup software can be
enabled to wake up the client computer, back it up, and put it back to sleep.
You may start a manual backup either through the Launchpad on the computer being
backed up or through the Dashboard.
Backup Using the Launchpad
Note: For information on accessing the Launchpad, see “Using the Launchpad
(Internal Users)” on page 52).
1. On the Launchpad, click Backup. The Backup Properties page displays:
Note: If you want the computer to automatically wake up for scheduled backups, select
the check box.
2. Click Start backup.
3. Enter a name for the backup and click OK.
The Backup Properties page re-displays and tracks the progress of the backup.
WD SENTINEL DS5100/DS6100
ADMINISTRATOR AND MAINTENANCE GUIDE
63
Page 70

USING THE WD SENTINEL SERVER’S FEATURES
4. Click OK to apply the change, close the page, and return to the Launchpad while the
backup continues.
The message that the backup was successful displays on the page and on the
Dashboard. For more information about the backup process, see Microsoft Online
Help.
Backup Using the Dashboard
1. Click Devices on the navigation bar to display a list of computers and servers on your
network:
2. Select the computer you want to back up.
3. Click Start a Backup for the computer in the Task pane. For further instructions,
see Microsoft Online Help.
Backing up with Time Machine (Mac)
For Mac users, Time Machine® allows you to backup data to your WD Sentinel server. Time
Machine automatically backs up your entire Mac, including system files, applications,
accounts, preferences, email messages, music, photos, movies, and documents.
Note: Time Machine keeps hourly backups for the past 24 hours, daily backups for the
past month, and weekly backups until your backup drive is full.
To take advantage of the Time Machine backup capabilities, you must install the server
connector software on your Mac (see “Connecting a Mac” on page 23) and create a user
account within the WD Sentinel server (see “Adding a User Account” on page 27).
Note: Your Mac must be connect to the same network as your WD Sentinel server.
For additional information on Time Machine, consult your Mac OS documentation.
Note: For information on backing up your PC, See “Backing up (Windows PC)” on
page 60.
WD SENTINEL DS5100/DS6100
ADMINISTRATOR AND MAINTENANCE GUIDE
64
Page 71

USING THE WD SENTINEL SERVER’S FEATURES
Scheduling Automatic Backups (Time Machine)
To set up and schedule Time Machine to back up files to your WD Sentinel server:
1. Use one of the following methods to open Time Machine.
Click the Time Machine icon in the Dock:
Click the Apple® menu > System Preferences and select Time Machine.
Click Go > Applications and select Time Machine.
2. If this is your first time creating a backup, the following screen displays:
3. Click Set Up Time Machine to display the Time Machine Preferences screen:
4. Click Select Backup Disk and select the WD Sentinel server for your backups.
5. Click Use Backup Disk. A screen prompts for your user name and password.
WD SENTINEL DS5100/DS6100
ADMINISTRATOR AND MAINTENANCE GUIDE
65
Page 72

USING THE WD SENTINEL SERVER’S FEATURES
6. Enter the user name and password of an account that has administrator permissions on
this client computer, then click OK.
7. Select Registered User.
8. Enter your assigned WD Sentinel User Name and Password in the Name and
Password fields:
9. Click Connect. The Preferences screen returns.
10. To start automatic backups, move the slider to ON.
Time Machine begins backing up your files. The first backup may take some time, but
subsequent backups are faster because Time Machine only backs up new or changed
items.
Time Machine backs up your computer every hour and keeps the following backup sets:
Every hour for 24 hours
Every day for the past month
Weekly until the WD Sentinel drive is full.
Note: If a backup is interrupted, for example, if the computer goes into sleep mode, it will
resume automatically once the computer is available.
WD SENTINEL DS5100/DS6100
ADMINISTRATOR AND MAINTENANCE GUIDE
66
Page 73

USING THE WD SENTINEL SERVER’S FEATURES
To see information such as available capacity and the date and time of the oldest, latest, and
next backup, select Open Time Machine Preferences on the Time Machine drop-down
menu:
Recovering/Restoring (Windows PC)
The WD Sentinel server provides two options for recovering lost or corrupted data:
Restore a Computer—Restores all data and settings of a Windows PC
computer or a storage device connected to the WD Sentinel server.
Recover File/Folders —Recovers individual files or folders.
Note: For information on recovering/restoring data on your Mac using Time Machine, See
“Recovering/Restoring (Mac)” on page 69.
Restoring Windows PC Computers
Use the following steps to restore files, versions of files, or your entire system for your
Windows PC.
1. Click Devices on the navigation bar.
2. Select the computer that was backed up.
3. In the panel on the right, click Restore files or folders for the computer
.
WD SENTINEL DS5100/DS6100
ADMINISTRATOR AND MAINTENANCE GUIDE
67
Page 74

USING THE WD SENTINEL SERVER’S FEATURES
4. Click Next.
5. Select the information you’d like to restore from the list provided, then click Next.
6. Select a location for your restored backup. You can accept the location provided in the
field, or click Browse and select another location. Once you’ve selected a different
location, click OK to close the Browse window.
WD SENTINEL DS5100/DS6100
ADMINISTRATOR AND MAINTENANCE GUIDE
68
Page 75

USING THE WD SENTINEL SERVER’S FEATURES
7. Click Next. The restored backup is copied to the selected location. Once done, the
successfully restored screen appears.
8. Do one of the following:.
Click Open the Restore location to view your restored information.
Click Restore more files or folders to restore more information.
Click Close to close the Restore Files or Folders screen.
Recovering/Restoring (Mac)
Time Machine allows you to restore files, versions of files, or your entire system. For
additional information on recovering or restoring your system files, consult your
Apple documentation.
Note: For information on recovering/restoring data on your PC, See “Recovering/Restoring
(Windows PC)” on page 67.
1. On the Launchpad, click Backup. Your Time Machine backups display.
2. Select the date you’d like to restore to from the time line on the right of the screen.
3. Click Restore in the bottom right-hand side of your screen.
WD SENTINEL DS5100/DS6100
ADMINISTRATOR AND MAINTENANCE GUIDE
69
Page 76

USING THE WD SENTINEL SERVER’S FEATURES
Backing up your WD Sentinel Server
Backing up your WD Sentinel server allows you to protect your operating system, system
state, volumes, files, and application data. For information on how to back up your
WD Sentinel server, see Microsoft Online Help/Manage Backup and Restore/Manage Server
Backup.
Recovering a WD Sentinel Server Image or Resetting the Boot Drives to Factory Defaults
This feature recovers your WD Sentinel server image from a previously created Windows
server backup. If a Windows server backup can not be retrieved, this process will restore the
unit to its factory default settings.
Use the following steps to recover your WD Sentinel Server image or reset the boot drives to
factory defaults.
1. From your WD Sentinel server desktop, move your mouse to the right corner of the
screen.
2. On the Charms bar, select Settings .
3. Click Power.
4. Hold down the Shift key on your keyboard, then click Restart.
5. Click Continue.
6. Select Troubleshoot from the options displayed.
7. Select one of the following options, depending on the type of recovery you’d like to
perform:
WD Factory Restore: This options will re-image the operating system/boot
drives to their factory default levels.
WARNING! All prior information/data on the boot drives will be lost. Data drives
are not affected by this action.
Advanced Options: This option provides you with additional troubleshooting
options.
- Select System Image Recovery to recover your data from a previous
backup. Once this option is selected, you will be prompted for your
Administrator password.
- Follow the instructions displayed on your screen to complete the process.
8. Once the process is complete, your WD Sentinel server reboots. Log into the device
using your Administrator password.
WD SENTINEL DS5100/DS6100
ADMINISTRATOR AND MAINTENANCE GUIDE
70
Page 77

Best Practices
BEST PRACTICES
7
Setting up the WD Sentinel Server
Setting up Client Computers
Using the WD Sentinel Server Efficiently
Replacing Drives
Sharing Files with External Users
Shutting Down
The following practices help you use the WD Sentinel server and protect your data efficiently
and safely.
Setting up the WD Sentinel Server
Change the default name of WD Sentinel to something unique. This avoids
conflicts when another WD Sentinel server is added to your network in the future.
Make sure Ethernet 1 and Ethernet 2 are on the same network subnet.
Add the server to your domain. This allows users to use the same login and
password for both the Launchpad and their computer.
If you decide to lock the drives, make sure the password is stored in a safe place.
Set user password policy to at least medium security.
Enable Microsoft Automatic Updates to find and apply the latest Microsoft
software update.
Enable WD Automatic Updates to find and apply the latest WD software update.
Set up Automatic Alert Notification for real-time notifications of any problems with
the WD Sentinel server.
Set up Remote Web Access using Ports 443 and Port 80. If your router or IP
provider blocks these ports, you may need to consult with your IP provider for
assistance.
Do not remove the Windows page file! Some critical functions use the
system’s paging file. Removing the page file can potentially leave your system
unusable with the possibility of data loss. To maintain the reliability of your system
and its redundant resources, do not modify the paging file whatsoever.
Setting up Client Computers
Before loading the Connector software to add a computer to the
WD Sentinel server for backup, be sure that the computer’s operating system is
fully up-to-date.
When adding client computers to the WD Sentinel server, it is best not to have any
backups active.
Using the WD Sentinel Server Efficiently
The WD Sentinel server has many jobs to perform. Share data during business
hours, and back up the computers during hours of inactivity. Keep the server
powered on 24/7 to do its work.
To avoid RAID issues, always use Sentinel with a UPS.
Enable e-mail alerts. Receiving your alerts by email allows you to monitor certain
server issues as they occur.
WD SENTINEL DS5100/DS6100
ADMINISTRATOR AND MAINTENANCE GUIDE
71
Page 78

Replacing Drives
The online removal of a drive forces a rebuild when the drive is replaced. Until the
rebuild is complete, the RAID system is degraded and unrecoverable failure will
occur should another drive be removed. Only remove one drive at a time between
rebuilds.
Avoid pulling a drive out unless there is a failure.
When a drive needs replacement, the WD Sentinel server is still functional but
subject to a second drive failure that would result in the loss of data. To minimize
this vulnerable time, a good practice is to have another drive ready to replace the
failed drive.
Sharing Files with External Users
Create Employee-Specific Private Folders/Assign Permissions—Depending on the
nature of your business and organizational structure, you may want to create a
shared folder for each employee and give the respective employee Read/Write
permissions for that folder.
Create Shares for Vendors or Clients/Access Remotely—The built-in Remote Web
Access feature enables collaboration on files and data not only among your
employees but also with your clients and vendors.
BEST PRACTICES
As a best practice, create a unique user account for each client and vendor you
want to exchange data with and create a dedicated Shared Folder for each such
external user. To prevent giving external users access to your sensitive data, make
sure that the user accounts you create have the appropriate permissions for only
the folders you have created for them.
To start collaborating with your external users, just provide them with the domain
address of your WD Sentinel server and their user name and password.
Shutting Down
Unclean shutdowns are hard on RAIDed systems. The WD Sentinel server
recognizes an unclean shut down and upon the reapplication of power, begins a
long sequence of examining the RAID for errors and bringing the RAID
configuration back into alignment. This sequence can take many hours. To avoid
this situation and to assure that the unit always experiences clean shutdowns and
the best data integrity, use an Uninterruptible Power Supply (UPS).
Note: Performance is affected during a RAID rebuild and verification.
To avoid possible corruption, do not unplug the power from the unit while it is
running.
WD SENTINEL DS5100/DS6100
ADMINISTRATOR AND MAINTENANCE GUIDE
72
Page 79

Troubleshooting
TROUBLESHOOTING
8
First Steps Checklist
Specific Problems and Corrective Actions
For any issue, first ensure that you are using the latest firmware for the
WD Sentinel server. See “Updating Software” on page 37 for instructions.
First Steps Checklist
Is the power supply plugged in to the wall outlet and the drive?
Are all cables correctly connected and secured?
Is the power on? If not, see “LEDs” on page 12.
Specific Problems and Corrective Actions
The following section contains specific problems that may arise during the use of the
WD Sentinel server and provides possible solutions.
LEDs do not light up
1. Make sure the power cord is connected correctly.
2. Make sure that the wall outlet has power. Test it by plugging in another device.
3. Confirm the network cable is properly connected to the WD Sentinel server and the
network switch or router.
4. Make sure the network switch or router has power.
5. Use a different network cable and port on the network switch or router. Temporarily
swapping the WD Sentinel’s cable port with a working network device may identify any
failing cables and ports.
Connecting to Shared Folders on a WD Sentinel server from a Windows PC on which Launchpad is not installed
Windows 8:
1. On your keyboard, click the Windows logo key +E
2. On the Computer screen toolbar, select Map Network Drive, then select Map
Network Drive.
WD SENTINEL DS5100/DS6100
ADMINISTRATOR AND MAINTENANCE GUIDE
73
Page 80

TROUBLESHOOTING
3. From the Drive drop-down list, choose the letter that you want the WD Sentinel server
to have in Computer
.
4. Click Browse to find the folder that you want to map, or type the path to the server
using the format \\ServerName\FolderName. For example, if the share is called
Documents, and your server is called MyServer, you would enter
\\MyServer\Documents.
5. If you want the drive to reconnect whenever the computer is rebooted, click the
Reconnect at logon check box.
6. Click Finish.
Windows 7:
1. Right-click Computer and select Map Network Drive.
2. From the Drive drop-down list, choose the letter that you want the WD Sentinel server
to have in Computer
.
3. Click Browse to find the folder that you want to map, or type the path to the server
using the format \\ServerName\FolderName. For example, if the share is called
Documents, and your server is called MyServer, you would enter
\\MyServer\Documents.
4. If you want the drive to reconnect whenever the computer is rebooted, click the
Reconnect at logon check box.
5. Click Finish.
Cannot access Windows PCs via Remote Access
Internet Explorer 8 or greater is required to access a Windows PC using the Remote Web
Access feature of the WD Sentinel server. There is an Active X Client requirement that comes
standard with these browsers. For more information, see Knowledge Base Answer ID 8578.
WD SENTINEL DS5100/DS6100
ADMINISTRATOR AND MAINTENANCE GUIDE
74
Page 81

TROUBLESHOOTING
LCD Messages
The LCD displays various messages for you to review. Provided below is a list of messages,
a description of the message and possible responses for that message.
LCD Description Troubleshooting
<Host Name> Displays the name of your WD
Sentinel server.
<IP Address> Displays the IP address of your WD
Sentinel server.
If the IP address does not display,
ensure that your device is
connected by ethernet cable to
your router.
Backup Failed The software backup has failed. This error occurs when the backup
you are running is unsuccessful.
Rerun the backup to clear this
problem.
BIOS Corrupted Your BIOS is corrupted Contact Technical Support for
assistance.
BIOS Degraded Your BIOS is degraded The system is unable to boot from
the primary BIOS and is currently
running on the secondary BIOS.
BIOS Repaired
Reboot
Required
BIOS Updated
Reboot
Required
Your system is currently running on
the secondary BIOS. A reboot is
required to attempt a repair of your
BIOS.
The primary BIOS has been
updated, A system reboot is
required.
Your system is running on the
secondary BIOS. An attempt will be
made during the reboot to run the
system on the primary BIOS.
Reboot the system. This allows the
updated BIOS to take affect.
BIOS Updating The BIOS is updating. Your system BIOS is currently
updating. Do not disconnect the
power or interrupt the process until
the update is complete.
BMC Updating The BMC is updating. The BMC is currently updating. Do
not disconnect the power or
interrupt the process until the
update is complete.
Boot Drive
<Drive Name>
Failed
WD SENTINEL DS5100/DS6100
ADMINISTRATOR AND MAINTENANCE GUIDE
The operating system (OS) boot
drive has failed to boot into
Windows.
Replace the identified boot drive.
• Access the Dashboard (See
“Accessing the Dashboard” on
page 25.)
• Click Monitor on the navigation
bar.
• Check Internal Storage>Boot
Drive area to review the status of
your drive.
• Obtain and install a comparable
boot drive.
75
Page 82

LCD Description Troubleshooting
TROUBLESHOOTING
Boot Drive
<Drive Name>
Over Temp
Boot Volume
Degraded
The operating system (OS) boot
drive has exceeded the normal
operating temperature.
One of the operating system (OS)
drives has failed. The system will
operate but in a degraded state.
Check the airflow around your
device and the system fan
operation.
Replace the identified boot drive.
• Access the Dashboard (See
“Accessing the Dashboard” on
page 25.)
• Click Monitor on the navigation
bar.
• Check Internal Storage>Boot
Drive area to review the status of
your drive.
• Obtain and install a comparable
boot drive.
Capacity Low Available disk space is low. Storage capacity on your device is
low. You will need to add additional
drives to expand the device
storage.
Drive Count Displays the number of drives
currently on your device.
The total drive count in the system.
This includes the boot drive(s) and
the data drives.
Drive Failed One of the data drives failed. Your data drives are currently
running in RAID protection mode.
Replace the failed drive.
• Access the Dashboard (See
“Accessing the Dashboard” on
page 25.)
• Click Monitor on the navigation
bar.
• Check Internal Storage>Data
Drive area to review the status of
your drive.
• Obtain and install a comparable
data drive.
Drive Over Temp The data drive has exceeded the
normal operating temperature.
Ethernet
<port #>
Ethernet port 1 or port 2 is
disconnected.
Disconnected
Fan Failed The system’s primary fan (DS5100/
DS6100) or the CPU fan (DS6100)
has failed.
Imminent Drive
Failure
S.M.A.R.T early detection found a
premature drive failure condition on
one of the data drives.
WD SENTINEL DS5100/DS6100
ADMINISTRATOR AND MAINTENANCE GUIDE
Check the airflow around your
device and the system fan
operation.
Reconnect the ethernet cable to
the identified port.
The primary or CPU fan has failed.
Replace the applicable failed fan.
Replace the defective drive as soon
as possible to stop RAID from
going into a degraded state.
76
Page 83

LCD Description Troubleshooting
TROUBLESHOOTING
Imminent
Failure Boot
Drive <Drive
S.M.A.R.T early detection found a
premature drive failure condition on
one of the boot drives.
Name>
Invalid Drive The inserted drive is not compatible
with the device.
Invalid Drive
Capacity
The new drive capacity is either
greater or smaller than the drive you
replaced.
Network
Disconnected
Power Supply
The ethernet port does not have
network activity.
Power supply 1 or 2 failed. Replace the defective power
<Supply #>
Failed
Replace the defective drive as soon
as possible to stop RAID from
going into a degraded state.
Replace the inserted drive with an
approved drive. See
Dashboard>Monitor> Tasks for a
list of approved drives.
Replace the inserted drive with a
drive that has the correct drive
capacity.
Restore network connectivity.
supply.
• Access the Dashboard (See
“Accessing the Dashboard” on
page 25.)
• Click Monitor on the navigation
bar.
• Check the Power Adapter area to
review the status of your power
supply.
• Obtain and install a comparable
power supply.
Reboot
Required
Software
Update
Complete
Software
Update
Downloading
Software
Update Reboot
Required
WD Software
Update
Available
The system requires a reboot. Safely reboot the system.
The software update process is
complete.
A software update is being
downloaded to the system.
The software update is complete.
The system requires a reboot.
Check the Alert Viewer to verify the
completion of the software update.
Allow the process to fully complete.
No action is required.
The reboot is normally automatic. If
it does not occur, perform a manual
reboot.
There is a WD software update
available for download.
Access and perform the update.
• Access the Dashboard (See
“Accessing the Dashboard” on
page 25.)
• Click Monitor on the navigation
bar.
• Click the Software Update tab.
• Click Check for Updates.
• Click Download and Install to
update the software.
WD Software
The WD software update failed. Repeat the Software update
Update Failed
WD SENTINEL DS5100/DS6100
ADMINISTRATOR AND MAINTENANCE GUIDE
process again.
77
Page 84

REGULATORY AND WARRANTY INFORMATION
Regulatory and Warranty Information
10
Regulatory Compliance
Limited Warranty
GNU General Public License (“GPL”)
Regulatory Compliance
FCC Class B Information
Operation of this device is subject to the following conditions:
This device may not cause harmful interference.
This device must accept any interference received, including interference that may
cause undesired operation.
This device has been tested and found to comply with the limits of a Class B digital device,
pursuant to Part 15 of the FCC Rules. These limits are designed to provide reasonable
protection against harmful interference in a residential installation. This unit generates, uses,
and can radiate radio frequency energy and, if not installed and used in accordance with the
instructions, may cause harmful interference to radio or television reception. However, there
is no guarantee that interference will not occur in a particular installation. If this equipment
does cause harmful interference to radio or television reception, which can be determined
by turning the equipment off and on, you are encouraged to try to correct the interference by
one or more of the following measures:
Reorient or relocate the receiving antenna.
Increase the separation between the equipment and the receiver.
Connect the equipment into an outlet or a circuit different from that to which the
receiver is connected.
Consult the dealer or an experienced radio/television technician for help.
Any changes or modifications not expressly approved by WD could void the user's authority
to operate this equipment.
Changes or modifications not expressly approved by the party responsible for compliance
could void the user’s authority to operate the equipment.
ICES/NMB-003 Compliance
Cet appareil de la classe B est conforme à la norme NMB-003 du Canada.
This device complies with Canadian ICES-003 Class B.
WD SENTINEL DS5100/DS6100
ADMINISTRATOR AND MAINTENANCE GUIDE
78
Page 85

REGULATORY AND WARRANTY INFORMATION
Safety Compliance
Approved for US and Canada. CAN/CSA-C22.2 No. 60950-1: Safety of Information
Technology Equipment.
Approuvé pour les Etats-Unis et le Canada. CAN/CSA-C22.2 No. 60950-1: Sûreté
d'équipement de technologie de l'information.
This product is intended to be supplied by a listed limited power source, double insulated, or
direct plug-in power unit marked “Class 1.”
CAUTION!
Danger of explosion if the battery is incorrectly replaced. Replace only
with the same or equivalent type recommended by the equipment manufacturer.
Dispose of used batteries according to manufacturer’s instructions.
CE Compliance for Europe
Verified to comply with EN55022 for RF emission; EN-55024 for Generic Immunity, as
applicable; and EN-60950-1 for Safety.
Environmental Compliance (China)
Obtaining Service
WD values your business and always attempts to provide you the very best of service. If this
Product requires maintenance, either contact the dealer from whom you originally
purchased the Product or visit our product support website at http://support.wd.com for
information on how to obtain service or a Return Material Authorization (RMA). If it is
determined that the Product may be defective, you will be given an RMA number and
instructions for Product return. An unauthorized return (i.e., one for which an RMA number
has not been issued) will be returned to you at your expense. Authorized returns must be
shipped in an approved shipping container, prepaid and insured, to the address provided on
your return paperwork. Your original box and packaging materials should be kept for storing
or shipping your WD product. To conclusively establish the period of warranty, check the
warranty expiration (serial number required) via http://support.wd.com. WD shall have no
liability for lost data regardless of the cause, recovery of lost data, or data contained in any
Product placed in its possession.
Limited Warranty
WD warrants that the Product, in the course of its normal use, will for the term defined
below, be free from defects in material and workmanship and will conform to WD's
specification therefor. The term of your limited warranty depends on the country in which
your Product was purchased. The term of your limited warranty is for 1 years in the North,
South and Central America region, 2 years in the Europe, the Middle East and Africa region,
and 1 years in the Asia Pacific region, unless otherwise required by law. The term of your
WD SENTINEL DS5100/DS6100
ADMINISTRATOR AND MAINTENANCE GUIDE
79
Page 86

REGULATORY AND WARRANTY INFORMATION
limited warranty period shall commence on the purchase date appearing on your purchase
receipt. WD may at its discretion make extended warranties available for purchase. WD shall
have no liability for any Product returned if WD determines that the Product was stolen from
WD or that the asserted defect a) is not present, b) cannot reasonably be rectified because
of damage occurring before WD receives the Product, or c) is attributable to misuse,
improper installation, alteration (including removing or obliterating labels and opening or
removing external enclosures, including the mounting frame, unless the product is on the list
of limited user-serviceable products and the specific alteration is within the scope of the
applicable instructions, as found at
http://support.wd.com), accident or mishandling while in
the possession of someone other than WD. Subject to the limitations specified above, your
sole and exclusive warranty shall be, during the period of warranty specified above and at
WD's option, the repair or replacement of the Product with an equivalent or better Product.
The foregoing warranty of WD shall extend to repaired or replaced Products for the balance
of the applicable period of the original warranty or ninety (90) days from the date of shipment
of a repaired or replaced Product, whichever is longer. The foregoing limited warranty is
WD's sole warranty and is applicable only to products sold as new. The remedies provided
herein are in lieu of a) any and all other remedies and warranties, whether expressed, implied
or statutory, including but not limited to, any implied warranty of merchantability or fitness for
a particular purpose, and b) any and all obligations and liabilities of WD for damages
including, but not limited to accidental, consequential, or special damages, or any financial
loss, lost profits or expenses, or lost data arising out of or in connection with the purchase,
use, or performance of the Product, even if WD has been advised of the possibility of such
damages. In the United States, some states do not allow exclusion or limitations of
incidental or consequential damages, so the limitations above may not apply to you. This
warranty gives you specific legal rights, and you may also have other rights which vary from
state to state.
GNU General Public License (“GPL”)
Firmware incorporated into this product may include third party copyrighted software
licensed under the GPL or Lesser General Public License ("LGPL") (collectively, “GPL
Software”) and not Western Digital’s End User License Agreement. In accordance with the
GPL, if applicable: 1) the source code for the GPL Software may be downloaded at no
charge from
http://support.wd.com/download/gpl or by calling Customer Support within three years of the
date of purchase; 2) you may re-use, re-distribute, and modify the GPL Software; 3) with
respect solely to the GPL Software, no warranty is provided, to the extent permitted by
applicable law; and 4) a copy of the GPL is included herewith, may be obtained at
http://www.gnu.org, and may also be found at http://support.wd.com/download/gpl.
Modification of or tampering with the Software, including but not limited to any Open Source
Software, is solely at your own risk. Western Digital is not responsible for any such
modification or tampering. Western Digital will not support any product in which you have or
have attempted to modify the Software supplied by Western Digital.
http://support.wd.com/download/gpl or obtained on CD for a nominal charge from
WD SENTINEL DS5100/DS6100
ADMINISTRATOR AND MAINTENANCE GUIDE
80
Page 87

9
APPENDIX
Appendix
Hardware Replacement Procedures
WD RAID Storage Utility
WD Sentinel DS5100/DS6100 Administrator Reference Sheet
Hardware Replacement Procedures
Before You Begin
Replacing a Hard Drive
Removing the Unit Cover
Replacing the SODIMM Memory Module
Adding a Boot Drive
This chapter provides the steps necessary to replace the following components designed for
replacement for the WD Sentinel DS5100/DS6100.
Hard Drive
Fans
SODIMM Memory Module
Power Supply
Boot Drive
The WD Sentinel is also designed to be easily mounted on a rack.
Before You Begin
Ensure that you have the correct replacement unit.
Review the procedures before beginning to replace a part.
WD SENTINEL DS5100/DS6100
ADMINISTRATOR AND MAINTENANCE GUIDE
81
Page 88

APPENDIX
Replacing a Hard Drive
It is simple to replace a drive in your WD Sentinel server. First, make sure to go to the WD
Store to purchase a compatible replacement drive. For a complete list of approved drive
models, search for Answer ID 9443 in the WD Knowledge Base at http://support.wd.com.
The drives in the WD Sentinel server are “hot swappable.” This means that the
WD Sentinel server can remain powered on while you replace the drive. Once replaced,
complete the steps outlined in “Recovering from a Failed Drive” on page 48 to integrates the
new drive into the RAID array.
Drive Types
Provided below is a description of the types of hard drives you can use to replace an existing
drive.
The type of drive used in your device can be found within on the device Dashboard
Monitor Page on the Health tab.
Hard Drive Type Description
Preferred Preferred drives preform optimally with your device and should
always be used whenever possible. Preferred drives are fully
tested and approved for use with your device.
Supported Supported drives are not the optimal drives for your device but are
part of the same drive family. These drives are not fully tested with
this device.
Unsupported Unsupported drives have not been tested with this device and
should be used at your own risk. The LED on the front of your
device is Red.
WARNING! Using an unsupported drive in your device
immediately voids your warranty and may
cause damage to your device and data.
Unsupported drives must be enabled before the drive can be
used with your device. If you choose to use an unsupported hard
drive, use the following steps after the drive has been replaced in
the device to enable the drive.
Note: There are certain unsupported hard drives that you cannot
1. Access the device Dashboard Monitor page.
2. Select the Health tab, if not already selected.
3. Identify the unsupported drive in the Internal Storage area.
4. Click Enable, located to the right of the drive Type.
5. Read the alert disclaimer, then select Yes if you’d like to
6. Click Configure at the top of the Internal Storage area.
7. Set up your hard drive (See “Setting Up Your Drives” on
enable. For those drives, there is a Learn More link with
information on how to obtain a WD preferred drive.
Unsupported displays in red in the Type column.
enable your current unsupported drive.
page 43.)
The LED on the front of your device will change to blue.
WD SENTINEL DS5100/DS6100
ADMINISTRATOR AND MAINTENANCE GUIDE
82
Page 89

What you’ll Need:
Replacement hard drive
Replacing a Hard Drive
Use the following steps to replace a drive in your WD Sentinel server.
1. Unlock and open the drive door (Figure 1).
APPENDIX
Figure 1. Open drive door
2. For a failed drive, verify that the LED for the failed drive is solid red.
3. Pull the handle on the front of the hard drive toward you.
4. When it snaps open, pull the hard drive toward you to remove it. (Figure 2).
Figure 2. Remove hard drive
WD SENTINEL DS5100/DS6100
ADMINISTRATOR AND MAINTENANCE GUIDE
83
Page 90

APPENDIX
5. Slide the approved replacement drive into the drive bay, making sure that it is properly
seated and is facing the correct direction.
Figure 3. Replace hard drive
6. Using some force, snap the drive handle shut.
7. Close and lock the door on the front of the server, making sure it snaps shut.
8. The LED remains blank until the rebuild is complete. The rebuild percentage displays
on the LCD.
WD SENTINEL DS5100/DS6100
ADMINISTRATOR AND MAINTENANCE GUIDE
84
Page 91

APPENDIX
Replacing a Server Fan
When a fan requires replacement, you will receive an e-mail Alert indicating that there is a
problem with one of your WD Sentinel server fans.
The fans in the WD Sentinel server are “cold swappable.” This means that the WD Sentinel
server must be shut down prior to your fan replacement. To shut down your WD Sentinel
server, follow the steps outline in “Shutting Down and Rebooting the Server” on page 40.
Important: To avoid electrostatic discharge (ESD) problems, ground yourself by
touching metal before handling the device.
What you’ll Need:
Phillips screwdriver
Replacement server fan
Replacing a Server Fan
1. Shut down the server.
2. Disconnect all external connections.
3. Place the unit on a clean and stable surface.
4. On the back of the unit, loosen and remove the four (4) Fan Plate mounting screws
(Figure 5).
Figure 4. Remove Fan Plate mounting screws
WD SENTINEL DS5100/DS6100
ADMINISTRATOR AND MAINTENANCE GUIDE
85
Page 92

APPENDIX
5. Carefully lower the fan plate toward you then lift the fan plate out of the unit (Figure 5).
Figure 5. Remove fan
WARNING! Before removing the fan plate completely from the unit, detach the fan
interface connector from the back plane PCBA.
6. Gently place the replacement fan into the unit, ensuring that the orientation of the fan
is correct and that the fan interface connector is connected.
7. Replace and tighten the four (4) Fan Plate mounting screws.
8. Do not over-tighten the mounting screws.
9. Reconnect all of the cables for the device.
10. Restart the server.
Important: Do not disassemble the fan. Return the entire assembly intact to WD, if
instructed to do so.
WD SENTINEL DS5100/DS6100
ADMINISTRATOR AND MAINTENANCE GUIDE
86
Page 93

APPENDIX
Removing the Unit Cover
Use the following steps remove the cover on the WD Sentinel DS5100/DS6100 device.
These steps are necessary to replace certain internal parts.
Important: To avoid electrostatic discharge (ESD) problems, ground yourself by
touching metal before handling the device.
To shut down your WD Sentinel server, follow the steps outline in “Shutting Down and
Rebooting the Server” on page 40.
What you’ll Need:
Phillips screwdriver
Removing the Unit Cover
1. Before getting started, shut down the server and disconnect all external connections.
2. Place the unit on a clean and stable surface, with the back of the unit facing you.
3. Release five (5) screws on the back of the unit (Figure 6).
Figure 6. Unscrew and remove unit cover
4. Pull the unit cover toward you up to release the cover.
(Figure 6).
WD SENTINEL DS5100/DS6100
ADMINISTRATOR AND MAINTENANCE GUIDE
87
Page 94

APPENDIX
Replacing the SODIMM Memory Module
The SODIMM memory module in the WD Sentinel server is “cold swappable.” This means
that the WD Sentinel server must be shut down prior to your module replacement. To shut
down your WD Sentinel server, follow the steps outline in “Shutting Down and Rebooting the
Server” on page 40.
Important: To avoid electrostatic discharge (ESD) problems, ground yourself by
touching metal before handling the device.
What you’ll Need:
Phillips screwdriver
Replacement SODIMM Memory module
Replacing a SODIMM Memory Module
1. Shut down the server.
2. Disconnect all external connections.
3. Follow the steps outlined in “Removing the Unit Cover” on page 87.
4. Disconnect all cables attached to the assembly.
Important: Ensure that you carefully lift the ZIF connector gate and remove the ZIF
Display Connector.
WD SENTINEL DS5100/DS6100
ADMINISTRATOR AND MAINTENANCE GUIDE
88
Page 95

APPENDIX
5. On the top of the unit, loosen and remove the six (6) screws holding the PCBA unit in
place.
Figure 7. Remove screws from PCBA unit
6. Carefully lift the PCBA up and away from the rest of the unit, then gently place the
flipped assembly on a stable flat surface.
WARNING! Ensure that the connector clears the plate when removing the
assembly.
7. Remove and replace or add additional 2PL-SODIMM module(s).
Note: This unit uses memory in coordinated pairs and are color-coded. For a list of
valid memory configurations, search for Answer ID 9999 in the WD Knowledge Base
at http://support.wd.com.
Figure 8. Replace 4PL-SODIMM module
WD SENTINEL DS5100/DS6100
ADMINISTRATOR AND MAINTENANCE GUIDE
89
Page 96

APPENDIX
8. Once the 2PL-SODIMM module has been added or updated, replace the PCBA back
on the WD Sentinel device, ensuring that the cables are again attached to the
assembly and that the PCBA is properly seated. Replace and tighten the six (6) screws
holding the PCBA in place.
Note: Do not over-tighten the PCBA screws.
9. Replace the unit cover and replace and tighten the five (5) exterior screws.
Note: Do not over-tighten the exterior screws.
10. Connect all external connections.
11. Restart the server.
WD SENTINEL DS5100/DS6100
ADMINISTRATOR AND MAINTENANCE GUIDE
90
Page 97

APPENDIX
Adding a Boot Drive
The WD Sentinel server comes with either one (DS5100) or two (DS6100) 2.5-inch boot
drive pre-loaded with Windows Server 2012 R2 Essentials and specialized hardware
services and drivers. The pre-loaded boot drive(s) provides the ability to keep the OS
running from the boot drive while redeploying or changing applications and folders running
on the large capacity data drives.
The boot drive in the WD Sentinel DS5100 server are “cold swappable.” This means that the
WD Sentinel server must be shut down prior to adding a boot drive. To shut down your WD
Sentinel server, follow the steps outline in “Shutting Down and Rebooting the Server” on
page 40.
Important: To avoid electrostatic discharge (ESD) problems, ground yourself by
touching metal before handling the device.
What you’ll Need:
Phillips screwdriver
Flat-head screwdriver
Boot Drive kit
Adding a Boot Drive
1. Prepare your boot drive for insertion:
Using a flat-head screwdriver, attach the brace bar to the boot drive.
2. Shut down the server.
3. Disconnect all external connections.
4. Follow the steps outlined in “Removing the Unit Cover” on page 87.
5. On the right or left side of the unit, find an empty bracket for your boot drive.
Empty boot drive
bracket
6. With the boot drive pins facing the back of the device, gently push your boot drive into
the empty boot drive bracket.
7. Place and tighten two (2) screws, attaching the brace bar on the boot drive to the unit.
WD SENTINEL DS5100/DS6100
ADMINISTRATOR AND MAINTENANCE GUIDE
91
Page 98

8. Replace the unit cover and replace and tighten the five (5) exterior screws.
Note: Do not over-tighten the exterior screws.
9. Connect all external connections.
10. Restart the server.
APPENDIX
WD SENTINEL DS5100/DS6100
ADMINISTRATOR AND MAINTENANCE GUIDE
92
Page 99

APPENDIX
WD RAID Storage Utility
The WD RAID Storage Utility allows you to configure and maintain the RAID storage on your
WD Sentinel server.
Accessing the WD RAID Storage Utility
There are two main ways to access the WD RAID Storage Utility:
Initially, when setting up your drives, you’re able to access the utility from the
Dashboard Home page by clicking Setting up your drives in the Task pane and
Selecting RAID from the Set Up your Drives wizard.
Once your drives have been setup for RAID storage, you can access the utility
from the Dashboard Storage tab by selecting Configure in the Internal Storage
area.
On your WD Sentinel server desktop, double-click the WD RAID Storage Utility
icon in the Windows tray.
Using the Home Page
The Home page allows you to access the tasks and information that help you configure and
manage your WD Sentinel server RAID storage.
Storage Management
Pane
Event Logs
Pane
Property Pane
WD SENTINEL DS5100/DS6100
ADMINISTRATOR AND MAINTENANCE GUIDE
93
Page 100

APPENDIX
Storage Management Pane
The Storage Management pane uses a tree view to list and show physical and virtual
devices attached to the WD Sentinel server, including:
Adapter
Virtual Disks
Physical Devices
Properties Pane
The Properties pan lists the properties of the device selected in the Storage Management
pane. The Properties pane contains two tabs at the top:
Property: Select Property to view or modify the properties of the device selected
in the Storage Management pane.
Operation: Roll over the Operation tab to view a menu of operations that can be
performed on the device selected in the Storage Management pane.
Event Logs Pane
The Events Logs pane lists adapter events. The events are categorized into informational,
warning, and error events.
Operations Tab Tasks
Use the following steps to perform tasks on your RAID virtual disks.
Initialization
Use the following steps to create a background initialization of your RAID virtual disks.
1. On the WD Raid Storage Utility Home screen, in the Storage Management pane,
select the Virtual Disk.
WD SENTINEL DS5100/DS6100
ADMINISTRATOR AND MAINTENANCE GUIDE
94
 Loading...