

Page 1
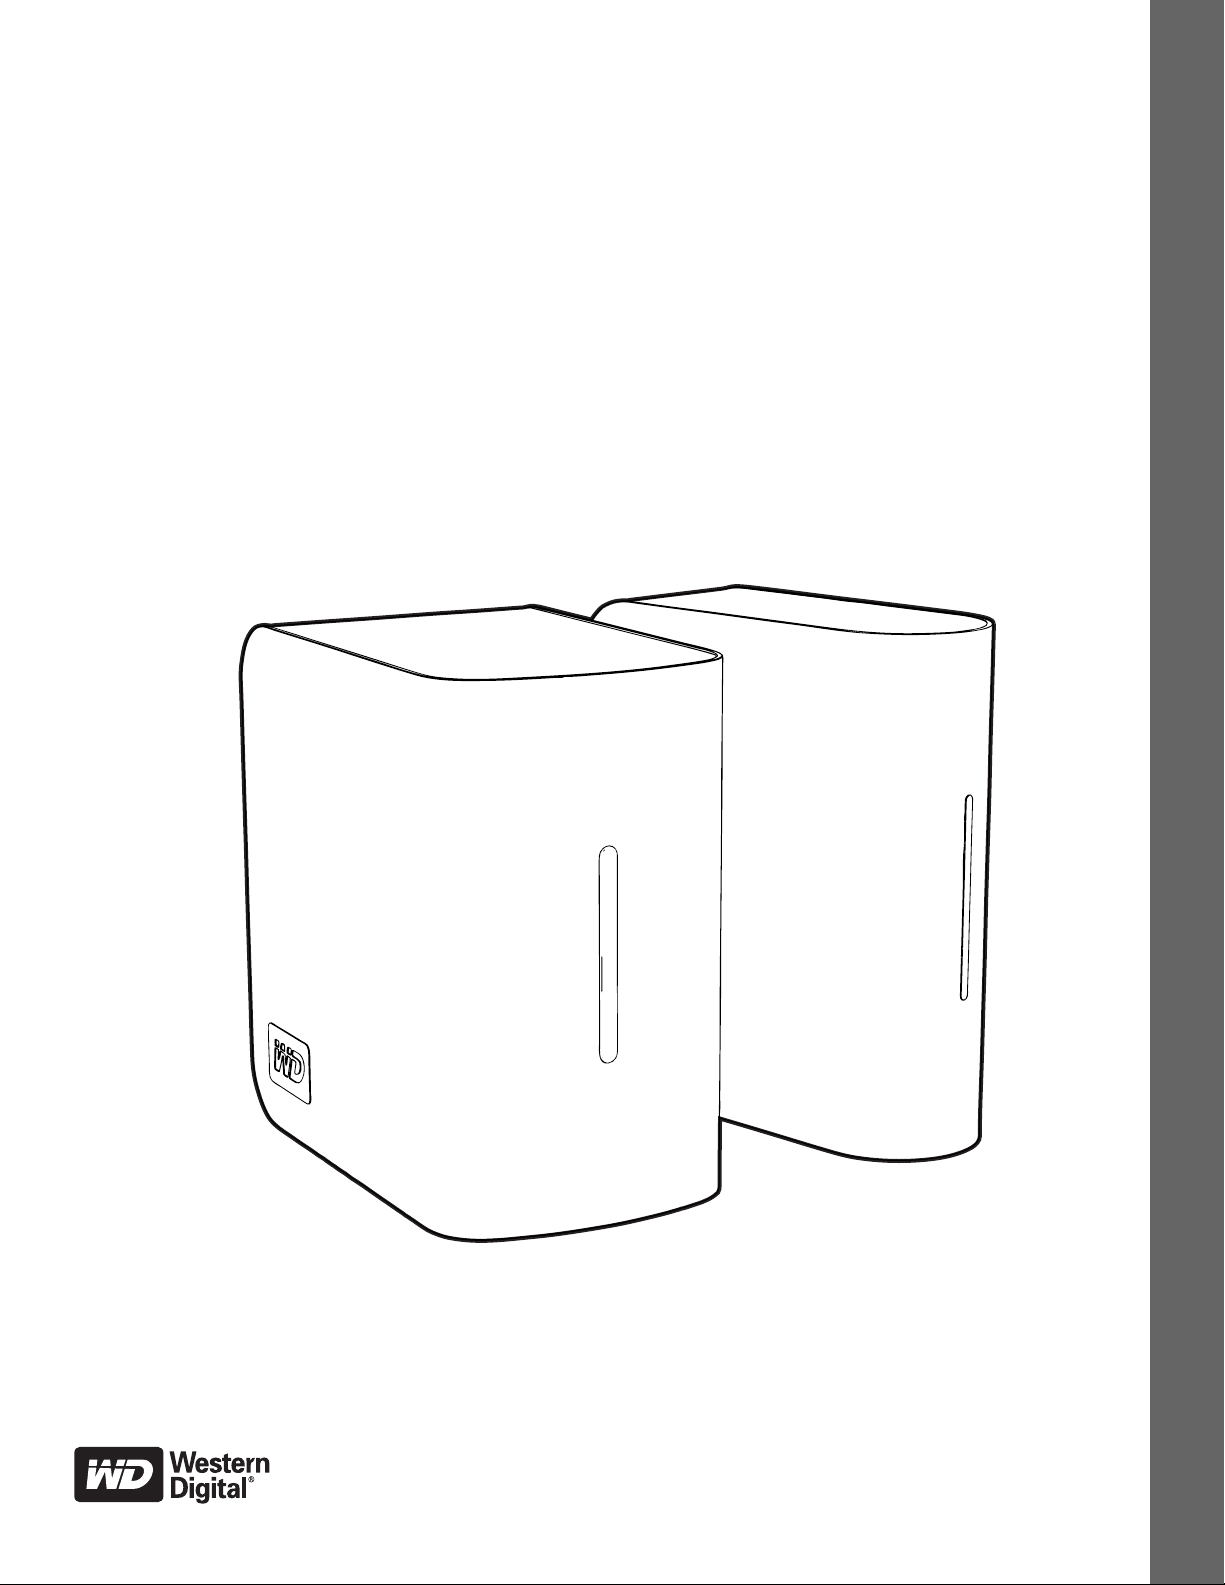
My Book
World Edition
User Manual
Single and Dual-drive Network Storage Systems
®
™
Page 2

Important Safety Instructions
1. Follow all warnings and instructions marked on the product.
2. Unplug this product from the wall outlet before cleaning. Do not use liquid
cleaners or aerosol cleaners. Use a damp cloth for cleaning.
3. Do not use this product near any liquids.
4. Do not place this product on an unstable surface. The product may fall, causing
serious damage to the product.
5. Do not drop the product.
6. Do not block the slots and openings on the back or bottom side of the chassis; to
ensure proper ventilation and reliable operation of the product and to protect it
from overheating, these openings must not be blocked or covered.
7. Operate this product only from the type of power indicated on the marking label. If
you are not sure of the type of power available, consult your dealer or local power
company.
8. Do not allow anything to rest on the power cord. Do not locate this product where
persons will walk on the cord.
9. If an extension cord is used with this product, make sure that the total ampere
rating of the equipment plugged into the extension cord does not exceed the
extension cord ampere rating. Also, make sure that the total rating of all products
plugged into the wall outlet does not exceed the fuse rating.
10.Never push objects of any kind into this product through the chassis slots as they
may touch dangerous voltage points or short out parts that could result in a fire or
electric shock.
11.Unplug this product from the wall outlet and refer servicing to qualified service
personnel under the following conditions:
a When the power cord or plug is damaged or frayed.
b If liquid has been spilled on the product.
c If the product has been exposed to rain or water.
d If the product does not operate normally when the operating instructions are followed. Adjust
only those controls that are covered by the operating instructions since improper adjustment
may result in damage and require extensive work by a qualified technician to restore the
product to normal condition.
e If the product has been dropped or the chassis has been damaged.
f If the product exhibits a distinct change in performance, indicating a need for service.
12.In accordance with workstation regulation standards, do not place this device in
the visual field of the user due to the glossy front of the case.
Page 3

Table of Contents
WD Service and Support
Registering Your WD Product . . . . . . . . . . . . . . . . . . . . . . . . . . . . . . . . 1
1 Overview. . . . . . . . . . . . . . . . . . . . . . . . . . . . . . . . . . . . .2
Introduction . . . . . . . . . . . . . . . . . . . . . . . . . . . . . . . . . . . . . . . . . . . . . . . 2
Drive Format. . . . . . . . . . . . . . . . . . . . . . . . . . . . . . . . . . . . . . . . . . . . . . . 2
Specifications . . . . . . . . . . . . . . . . . . . . . . . . . . . . . . . . . . . . . . . . . . . . . 3
Kit Contents . . . . . . . . . . . . . . . . . . . . . . . . . . . . . . . . . . . . . . . . . . . . . . . 4
Accessories . . . . . . . . . . . . . . . . . . . . . . . . . . . . . . . . . . . . . . . . . . . . . . . 4
System Requirements . . . . . . . . . . . . . . . . . . . . . . . . . . . . . . . . . . . . . . . 5
Pre-installation . . . . . . . . . . . . . . . . . . . . . . . . . . . . . . . . . . . . . . . . . . . . . 5
Recording Your WD Product Information . . . . . . . . . . . . . . . . . . . . . . . 6
System View . . . . . . . . . . . . . . . . . . . . . . . . . . . . . . . . . . . . . . . . . . . . . . 7
Ports . . . . . . . . . . . . . . . . . . . . . . . . . . . . . . . . . . . . . . . . . . . . . . . . . . . . 7
Reset Button . . . . . . . . . . . . . . . . . . . . . . . . . . . . . . . . . . . . . . . . . . . . . . 7
Power Button . . . . . . . . . . . . . . . . . . . . . . . . . . . . . . . . . . . . . . . . . . . . . . 8
Kensington Security Slot . . . . . . . . . . . . . . . . . . . . . . . . . . . . . . . . . . . . 8
LED Indicators (Lights) . . . . . . . . . . . . . . . . . . . . . . . . . . . . . . . . . . . . . . 9
2 My Book World Edition Basic Setup . . . . . . . . . . . .10
Step 1: Connect My Book World Edition to the Network . . . . . . . . . 10
Step 2: Access My Book World Edition on the Network . . . . . . . . . 11
Congratulations! . . . . . . . . . . . . . . . . . . . . . . . . . . . . . . . . . . . . . . . . . . 19
My Book World Edition File Storage . . . . . . . . . . . . . . . . . . . . . . . . . . 20
3 How to Back Up Computers on the Network . . . . .21
WD Anywhere Backup . . . . . . . . . . . . . . . . . . . . . . . . . . . . . . . . . . . . . 21
Installing WD Anywhere Backup . . . . . . . . . . . . . . . . . . . . . . . . . . . . . 21
Configuring WD Anywhere Backup . . . . . . . . . . . . . . . . . . . . . . . . . . 24
4 MioNet Remote Access . . . . . . . . . . . . . . . . . . . . . . .33
Overview. . . . . . . . . . . . . . . . . . . . . . . . . . . . . . . . . . . . . . . . . . . . . . . . . 33
Remote Access Setup . . . . . . . . . . . . . . . . . . . . . . . . . . . . . . . . . . . . . 33
Using MioNet . . . . . . . . . . . . . . . . . . . . . . . . . . . . . . . . . . . . . . . . . . . . . 35
TABLE OF CONTENTS – i
Page 4

5 How to Play/Stream Video, Music & Photos . . . . .36
Media Server Overview. . . . . . . . . . . . . . . . . . . . . . . . . . . . . . . . . . . . . 36
Media Types Supported . . . . . . . . . . . . . . . . . . . . . . . . . . . . . . . . . . . . 36
Media Storage . . . . . . . . . . . . . . . . . . . . . . . . . . . . . . . . . . . . . . . . . . . . 37
Media Devices . . . . . . . . . . . . . . . . . . . . . . . . . . . . . . . . . . . . . . . . . . . . 38
6 Using iTunes with My Book World Edition . . . . . . .44
iTunes Media Server Overview. . . . . . . . . . . . . . . . . . . . . . . . . . . . . . . 44
Media Types Supported . . . . . . . . . . . . . . . . . . . . . . . . . . . . . . . . . . . . 44
Storing Content . . . . . . . . . . . . . . . . . . . . . . . . . . . . . . . . . . . . . . . . . . . 44
Streaming Audio in iTunes . . . . . . . . . . . . . . . . . . . . . . . . . . . . . . . . . . 44
7 Connecting a USB Hard Drive. . . . . . . . . . . . . . . . . .46
Copy Manager . . . . . . . . . . . . . . . . . . . . . . . . . . . . . . . . . . . . . . . . . . . . 46
8 Using WD Discovery . . . . . . . . . . . . . . . . . . . . . . . . . .47
Mapping a Network Drive . . . . . . . . . . . . . . . . . . . . . . . . . . . . . . . . . . . 47
Browse Network Shares (Windows only) . . . . . . . . . . . . . . . . . . . . . . 50
Desktop Shortcut Creation (Windows only). . . . . . . . . . . . . . . . . . . . 52
9 Network Storage Manager . . . . . . . . . . . . . . . . . . . .53
Configuring My Book World Edition . . . . . . . . . . . . . . . . . . . . . . . . . . 53
Network Storage Manager Features . . . . . . . . . . . . . . . . . . . . . . . . . . 59
User Interface Overview . . . . . . . . . . . . . . . . . . . . . . . . . . . . . . . . . . . . 60
Basic Mode . . . . . . . . . . . . . . . . . . . . . . . . . . . . . . . . . . . . . . . . . . . . . . 62
Advanced Mode. . . . . . . . . . . . . . . . . . . . . . . . . . . . . . . . . . . . . . . . . . . 71
10 Accessing Data via FTP . . . . . . . . . . . . . . . . . . . . . .117
11 Scheduled Downloads . . . . . . . . . . . . . . . . . . . . . . .118
Downloader Features . . . . . . . . . . . . . . . . . . . . . . . . . . . . . . . . . . . . . 119
12 Copy Manager . . . . . . . . . . . . . . . . . . . . . . . . . . . . . .123
Connect a USB hard drive . . . . . . . . . . . . . . . . . . . . . . . . . . . . . . . . . 123
Accessing Copy Manager . . . . . . . . . . . . . . . . . . . . . . . . . . . . . . . . . 123
NAS to USB Copy . . . . . . . . . . . . . . . . . . . . . . . . . . . . . . . . . . . . . . . 124
USB to NAS Copy . . . . . . . . . . . . . . . . . . . . . . . . . . . . . . . . . . . . . . . 125
TABLE OF CONTENTS – ii
Page 5

13 Replacing a Drive (My Book World Edition II) . . .128
14 Troubleshooting . . . . . . . . . . . . . . . . . . . . . . . . . . . .132
15 Appendix. . . . . . . . . . . . . . . . . . . . . . . . . . . . . . . . . . .138
Regulatory Compliance. . . . . . . . . . . . . . . . . . . . . . . . . . . . . . . . . . . . 138
Environmental Compliance (China) . . . . . . . . . . . . . . . . . . . . . . . . . . 139
Warranty Information. . . . . . . . . . . . . . . . . . . . . . . . . . . . . . . . . . . . . . 139
GNU General Public License (“GPL”). . . . . . . . . . . . . . . . . . . . . . . . 140
WD Service and Support . . . . . . . . . . . . . . . . . . . . . . . . . . . . . . . . . . 141
Index . . . . . . . . . . . . . . . . . . . . . . . . . . . . . . . . . . . . . .142
TABLE OF CONTENTS – iii
Page 6

MY BOOK WORLD EDITION
USER MANUAL
WD Service and Support
Should you encounter any problem, please give us an opportunity to address it
before returning this product. Most technical support questions can be answered
through our knowledge base or e-mail support service at support.wdc.com. If the
answer is not available or, if you prefer, please contact WD at the best telephone
number shown below.
Your product includes 30 days of free telephone support during the warranty period.
This 30-day period starts on the date of your first telephone contact with WD
technical support. E-mail support is free for the entire warranty period and our
extensive knowledge base is available 24/7. To help us keep you informed of new
features and services, remember to register your product online at
https://www.wdc.com/register.
Accessing Online Support
Visit our product support website at support.wdc.com and choose from these topics:
• Downloads - Download drivers, software, and updates for your WD product.
• Registration - Register your WD product to get the latest updates and special
offers.
• Warranty & RMA Services - Get Warranty, Product Replacement (RMA), RMA
Status, and Data Recovery Information.
• Knowledge Base - Search by keyword, phrase, or answer ID.
• Installation - Get online installation help for your WD product or software.
Contacting WD Technical Support
When contacting WD for support, have your WD product serial number, system
hardware, and system software versions available.
North America
English 800.ASK.4WDC Australia 1 800 42 9861
(800.275.4932) China 800 820 6682/+65 62430496
Spanish 800.832.4778 Hong Kong +800 6008 6008
Europe (toll free)*
Europe
Middle East
Africa
* Toll free number available in the following countries: Austria, Belgium, Denmark, France, Germany, Ireland,
Italy, Netherlands, Norway, Spain, Sweden, Switzerland, United Kingdom.
00800 ASK4
WDEU
(00800
27549338)
+31 880062100
+31 880062100
+31 880062100
Asia Pacific
India 1 800 11 9393 (MNTL)/1 800 200 5789 (Reliance)
011 26384700 (Pilot Line)
Indonesia +803 852 9439
Japan 00 531 650442
Korea 02 703 6550
Malaysia +800 6008 6008/1 800 88 1908/+65 62430496
Philippines 1 800 1441 0159
Singapore +800 6008 6008/+800 608 6008/+65
62430496
Taiwan +800 6008 6008/+65 62430496
Registering Your WD Product
Your WD product includes 30 days of free technical support during the applicable
warranty period for your product. The 30-day period commences on the date of your
first telephone contact with WD technical support. Register online at
register.wdc.com.
WD SERVICE AND SUPPORT - 1
Page 7

1
MY BOOK WORLD EDITION
USER MANUAL
Overview
Introduction
Congratulations on your purchase of My Book® World Edition™, a high-speed network
attached storage system with a space-saving footprint. This system is equipped with
one or two WD drives using WD GreenPower™ technology for efficient cooling and
power saving. The high-speed interface delivers high performance for small offices or
home users and is ideal for backing up and sharing files over the internet.
This user manual provides step-by-step installation instructions and other important
information regarding your WD product. For the latest WD product information and
news, visit our website at www.westerndigital.com.
Drive Format
My Book World Edition is a single-drive configuration. My Book World Edition II is a
dual-drive system that is pre-configured to RAID 1 (Mirrored) mode for extra data
protection. If one drive fails in RAID 1, the system will still run, and your data will be
preserved. You can replace the failed drive and restore the system. My Book World
Edition II also supports RAID 0 (Striped) mode for maximum capacity and
accelerated performance. For more information, including instructions on changing
the RAID configuration for My Book World Edition II, see “Volumes and RAID
Management” on page 93.
OVERVIEW - 2
Page 8

Specifications
Ethernet High performance (10/100/1000) Gigabit Ethernet connection
Internal hard drive WD 3.5-inch SATA hard drive
MY BOOK WORLD EDITION
USER MANUAL
External USB storage
NTFS, FAT/, HFS+
file systems supported
Supported protocols HTTP, HTTPS, CIFS/SMB, NFS, FTP, AFP
I/O ports • USB 2.0 port (for USB device expansion)
• Ethernet (RJ-45) port
Supported clients • Windows
•Mac OS
®
XP/Vista (latest service packs required)*
®
X Tiger® or Leopard
®
Physical dimensions My Book World Edition
• Length: 6.5 in (165 mm)
• Width: 5.4 in (137 mm)
• Height: 2.1 in (54 mm)
• Weight: 2.6 lb (1.18 kg)
My Book World Edition II
• Length: 6.5 in (165 mm)
• Width: 6.0 in (152 mm)
• Height: 3.8 in (97 mm)
•Weight: 5.5 lb (2.5 kg)
Power consumption • Input voltage: 100V to 240V AC
• Input frequency: 50 to 60 Hz
Environmental • Operating temperature: 5 to 35 °C (41 to 95 °F)
• Non-operating temperature: -20 to 65°C (-4 to 149 °F)
OVERVIEW - 3
Page 9
Kit Contents
Network storage system
MY BOOK WORLD EDITION
USER MANUAL
AC adapter*
Ethernet cable
Installation CD with
application software
Quick Install Guide
and user manual
1 2
1 USA, Japan, Taiwan, Brazil,
Mexico, Colombia
2 Europe, Korea, Brazil, Chile
3 United Kingdom
4 5
3
4 China
5 Australia, New Zealand,
Argentina
1 2
or
1 USA, Japan, Taiwan, Brazil,
Mexico, Colombia
2 Europe, Korea, Brazil, Chile
3 United Kingdom
*Global AC adapter configurations
4 5
3
4China
5 Australia, New Zealand,
Argentina
Accessories
Visit shopwd.com (U.S. only) to view additional accessories like cables, power
supplies, additional hard drives, and drive mounting rails for this product. Outside the
U.S., visit support.wdc.com.
OVERVIEW - 4
Page 10

MY BOOK WORLD EDITION
USER MANUAL
System Requirements
Note: For optimum performance, the following system and network requirements are
recommended. Compatibility may vary depending on user’s hardware configuration
and operating system.
Important: For highest performance and reliability, it is recommended that
you install the latest updates and service pack (SP). For Macintosh, go to
the Apple menu and select Software Update. For Windows, go to the
Start menu and select Windows Update.
Client computer
• Ethernet connection (network adapter, router, switch, or hub)
• Operating system
• Windows XP/Vista
• Mac OS X Tiger or Leopard
• Web browser (Internet Explorer 6.0 SP1 and later on Windows platforms
supported by this product, Safari 2.0 and later on Mac platforms supported by
this product, Firefox 2.0 and later on supported Windows and Mac platforms)
• Adobe Flash ActiveX 9 or higher (required for WD Discovery™)
Local network
• Router/switch (Gigabit required to maximize performance)
Wide Area Network
• Broadband internet connection required for remote access using MioNet
Pre-installation
Before unpacking and installing the system, select a suitable site for the system for
maximum efficiency. Place the device in a site that is:
• Near a grounded power outlet
• Clean and dust free
• On a stable surface free from vibration
• Well-ventilated and away from sources of heat
• Secluded from electromagnetic fields from electrical devices such as air
conditioners, radio, TV transmitters.
OVERVIEW - 5
Page 11

MY BOOK WORLD EDITION
USER MANUAL
Recording Your WD Product Information
In the following table, write the serial number and model number of your new WD
product found on the label on the bottom of the device. Also, write the purchase date
and other notes such as your operating system and version. This information is
necessary for setup and technical support.
Serial Number:
Model Number:
Purchase Date:
System and Software Notes:
OVERVIEW - 6
Page 12
System View
LED
MY BOOK WORLD EDITION
USER MANUAL
Power button
USB port
(for expansion only)
Ethernet port
Reset button
Kensington®
Security Slot
Ports
Component Icon Description
USB port Connects to a USB hard drive for additional storage. Do not use the USB port to
Ethernet port Connects the device to a local network.
Reset button Press to restore the admin user name and password for the device.
Power port Connects the device to an AC adapter and the power outlet.
connect directly to a computer.
Note: This port makes it possible to create backups of digital files from a USB
hard drive to the device and vice-versa using the Copy Manager feature. See
“Copy Manager” on page 123 for detailed instructions.
Reset Button
The reset button restores configuration settings such as the network mode/IP
address and admin name and password to default factory settings without erasing
shared folders and volumes. For more information on how to reset the system, see
“Resetting the network storage system” on page 132.
OVERVIEW - 7
Page 13

MY BOOK WORLD EDITION
USER MANUAL
Power Button
Important: The device powers on automatically upon initial connection to
power, which may take up to three minutes. During this time, do not press
the power button. After the initial setup, you will need to use the power
button to turn the unit on and off.
The power button turns the device on or off. To turn on the device, press the power
button and hold it down until the bottom LED illuminates, then release. Holding the
button down for four seconds powers off the device.
When power is applied to the unit by plugging in the external power supply
connected to the DC plug connector, the unit automatically powers up. This ensures
the unit will automatically restart after a power failure.
If you power down a My Book World Edition by pressing the power button, and
disconnect and then reconnect the power plug, the unit powers up for about 30
seconds and then powers itself down. This ensures that the unit will not turn on
accidently and remain on if there is a power failure. You will need to press the power
button to turn the unit on.
Kensington Security Slot
For drive security, the device is equipped with a security slot, which supports a
standard Kensington security cable. For more information on the Kensington security
slot and available products, visit www.kensington.com.
OVERVIEW - 8
Page 14

MY BOOK WORLD EDITION
USER MANUAL
LED Indicators (Lights)
The Power/Activity and Capacity Gauge indicators are represented by a single bar of
six LEDs (lights) on the front panel of the drive.
Power/Activity LED Behavior
Power On Sequence
Appearance Drive State
Bottom LED dimmed Powering up
LEDs light up in sequence from bottom to top Transitioning to drive ready
Normal Operation
Appearance Drive State
Capacity Gauge, steady illumination (see below) Power-on state, ready for use
Moving up and down Drive in use
Slow flashing (every four seconds) System standby
Capacity Gauge
When the device is turned on, the Capacity Gauge indicates space used on the drive
by fully illuminating six sections in an upward vertical direction. Each section
represents approximately 17 percent of drive capacity. Because this drive is
preformatted, the first section is illuminated upon installation.
Power Down Sequence
Appearance Drive State
Dimming up/dimming down in an odd/even alternating
pattern
Device Events
Appearance Drive State
Bottom LED dimmed, top LED flashing Boot unsuccessful
Fast flashing (every half second) My Book system event, action required
Continuous “center out” sweep pattern Unit failure
Drive powering down
(see “System Events” on page 136)
OVERVIEW - 9
Page 15
2
MY BOOK WORLD EDITION
My Book World Edition Basic Setup
Step 1: Connect My Book World Edition to the Network
Follow the steps below to connect the network storage system to a small
home/office network.
4
2
1
3
USER MANUAL
1. Connect one end of the Ethernet cable into the Ethernet port located on the back
of the device.
2. Connect the other end of the Ethernet cable directly into a LAN port in a router or
network switch.
3. Connect the end of the adapter into the DC power supply socket located on the
back of the device.
4. Plug the AC adapter into a power outlet. The unit powers up automatically.
Important: Wait for the network storage system to finish powering up (approximately
three minutes) before configuring the device. During this time, do not press the power
button. The bottom LED on the front of the My Book device fully illuminates.
To power down the device, press and hold down the power button down for at
least four seconds.
MY BOOK WORLD EDITION BASIC SETUP - 10
Page 16
MY BOOK WORLD EDITION
USER MANUAL
Step 2: Access My Book World Edition on the Network
You can easily find your My Book World Edition on the local area network (LAN)
using WD Discovery™. Follow the appropriate procedure below:
• Windows XP on page 11
• Windows Vista on page 14
• Macintosh Leopard on page 17
• Macintosh Tiger on page 18
Note: The WD Discovery application on the included CD should be installed on every PC connected
to the LAN from which you intend to access your My Book World Edition.
Windows XP
1. Turn on your computer and wait for the operating system to load.
2. Insert the software-installing CD into the CD or DVD ROM drive.
Note: If AutoPlay is disabled on your computer, you must install the utilities manually. To enable the
AutoPlay option, click Start and click My Computer. A new window opens. Locate and right-click
the CD/DVD drive. When the menu window opens, click the AutoPlay option. The main CD
Installer screen displays.
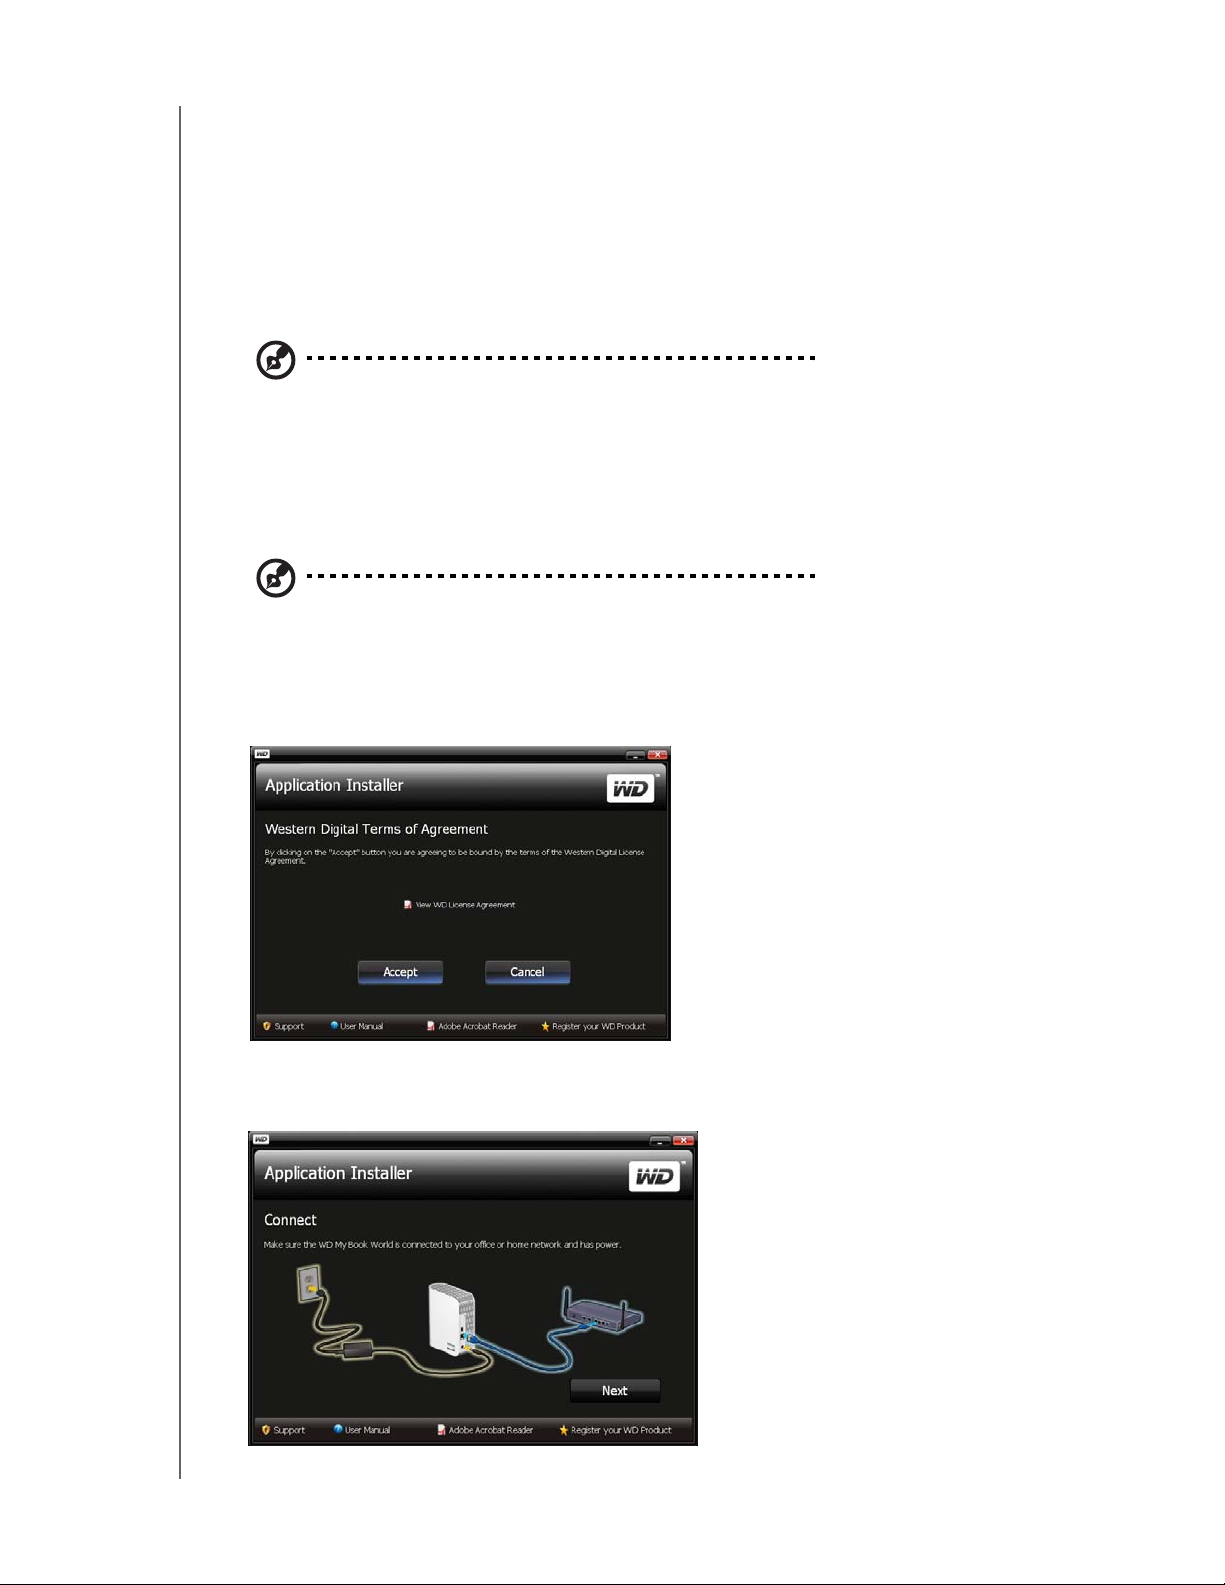
3. Click Accept in the Terms of Agreement screen.
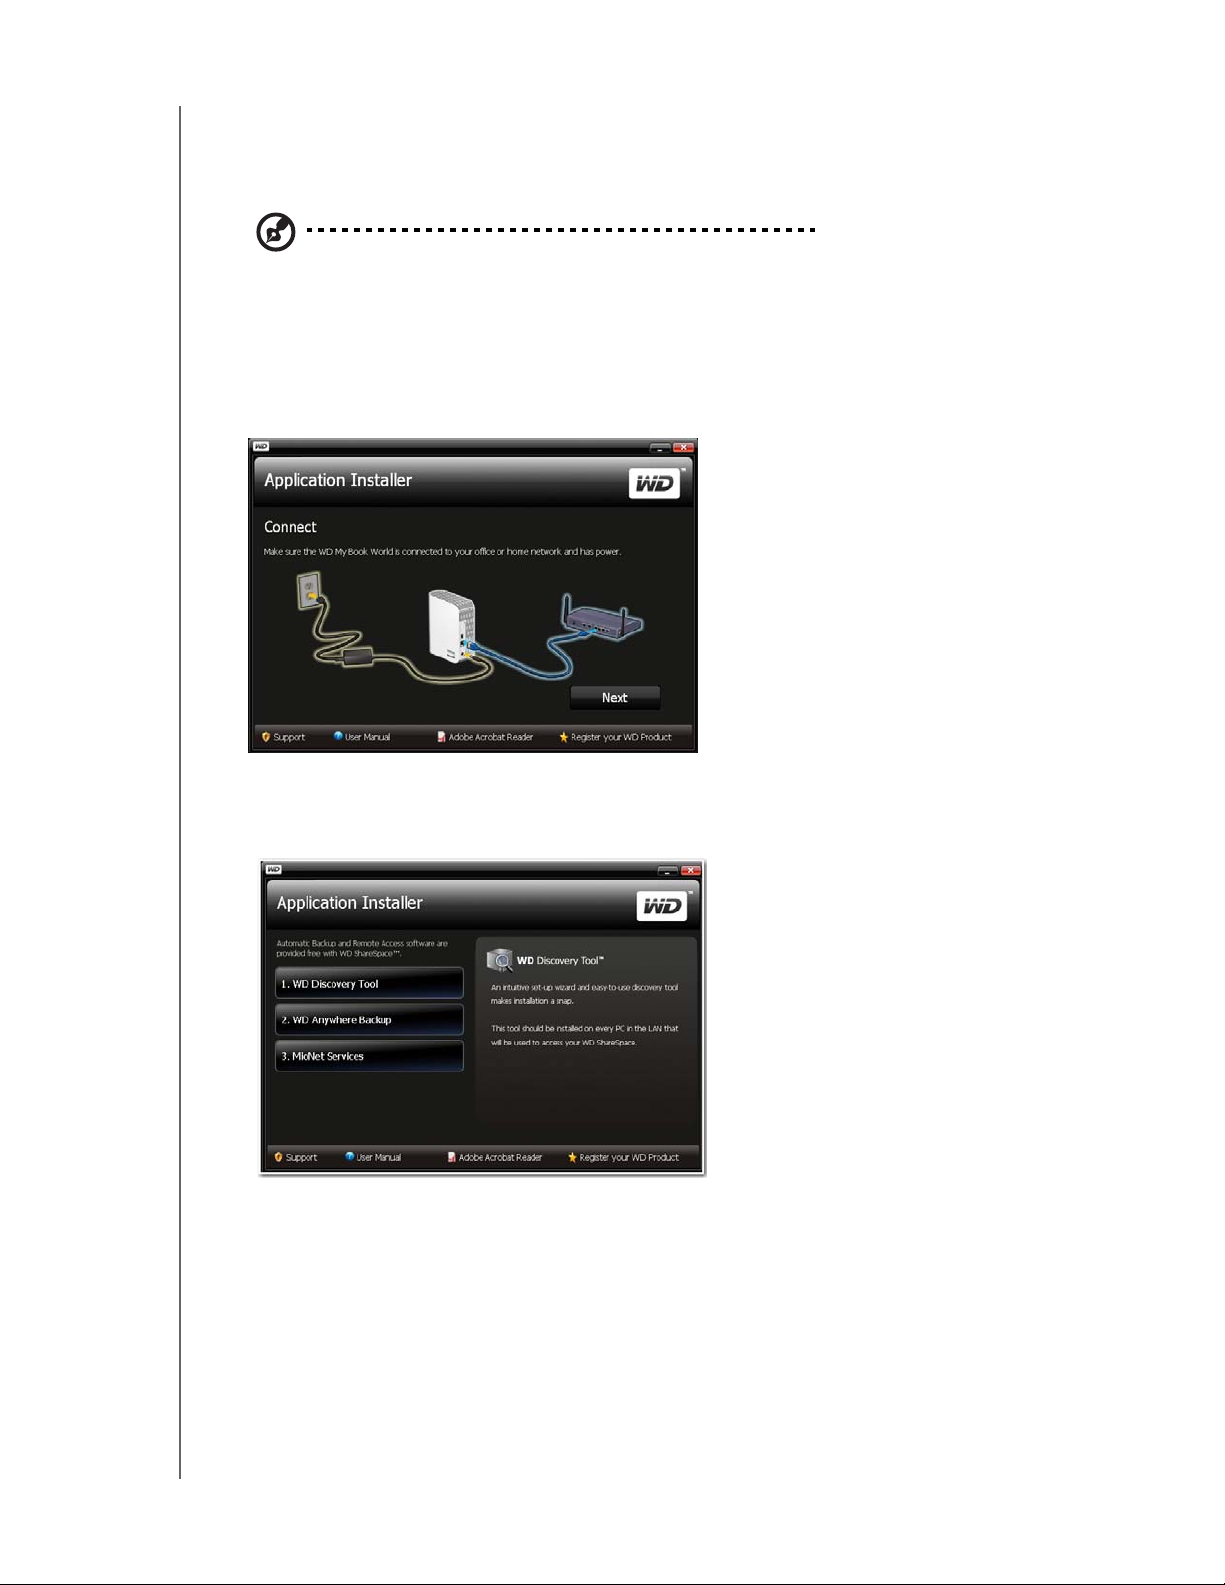
4. If you have connected the My Book device properly as shown in the Connect
screen, click Next.
MY BOOK WORLD EDITION BASIC SETUP - 11
Page 17
MY BOOK WORLD EDITION
USER MANUAL
5. The Application Installer screen opens, displaying a list of options. Click WD
Discovery Tool. Once the WD Discovery Tool installation is complete, it will
automatically launch and the WD Discovery icon will display on your desktop.
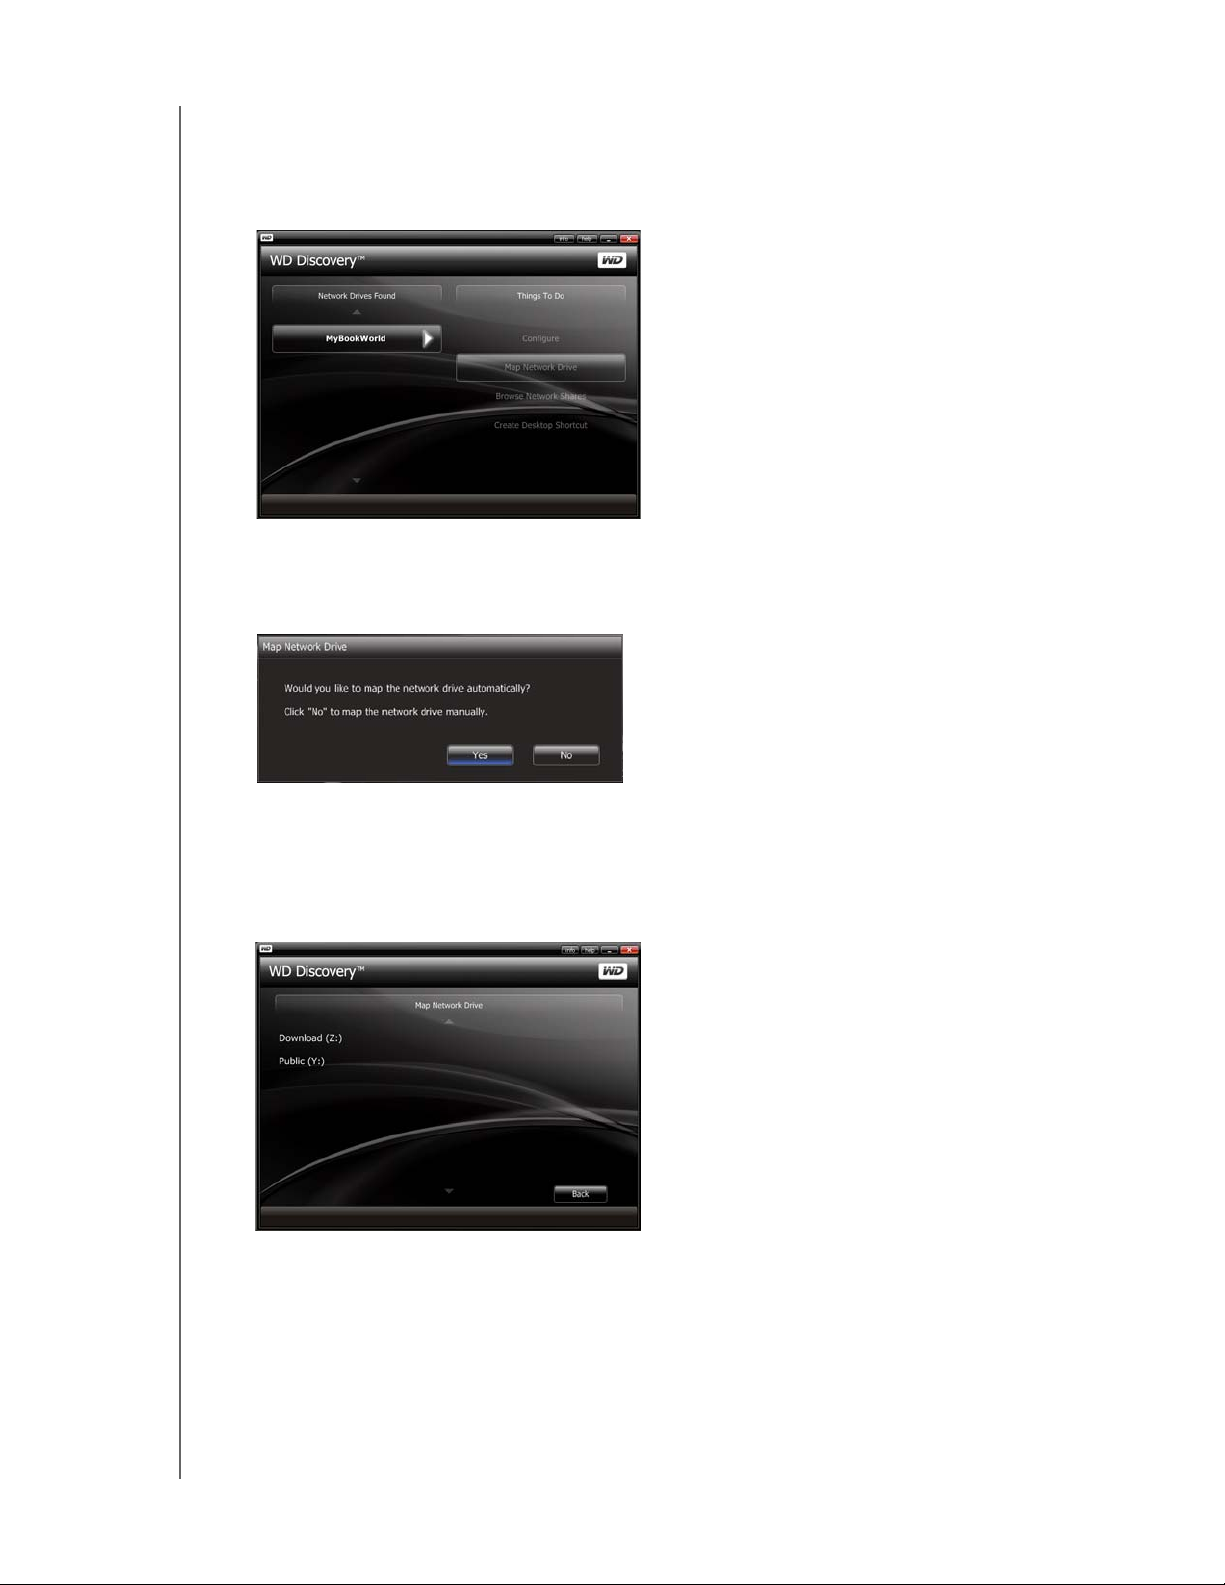
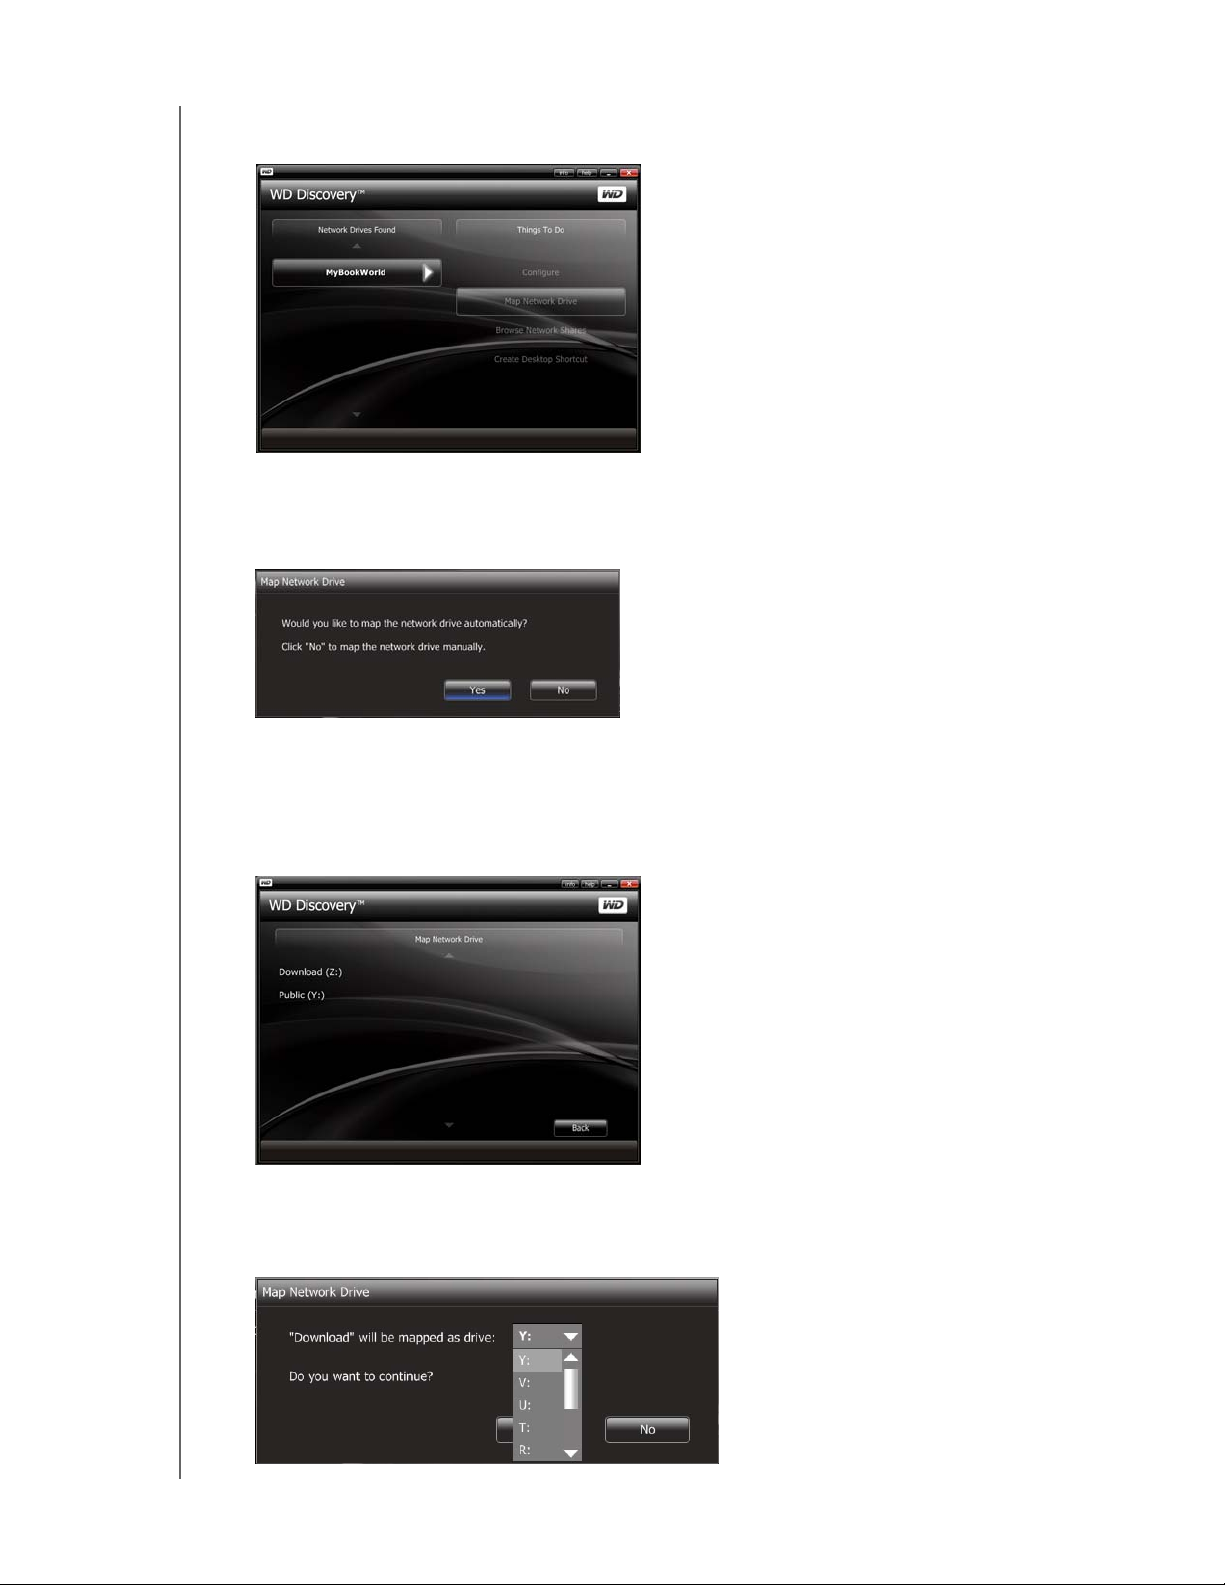
6. Click MyBookWorld and click Map Network Drive in the Things to Do list.
A message appears asking whether you want to map the drive automatically. If
you want to map the drive manually, skip to step 8.
7. Click Yes.
.
All share folders available on the device will be mapped as network drives
automatically. Available drive letters are assigned backwards from Z.
When mapping completes, the share folders appear as network drives in the
WD Discovery screen. Click Back to return to the main page.
MY BOOK WORLD EDITION BASIC SETUP - 12
Page 18
MY BOOK WORLD EDITION
USER MANUAL
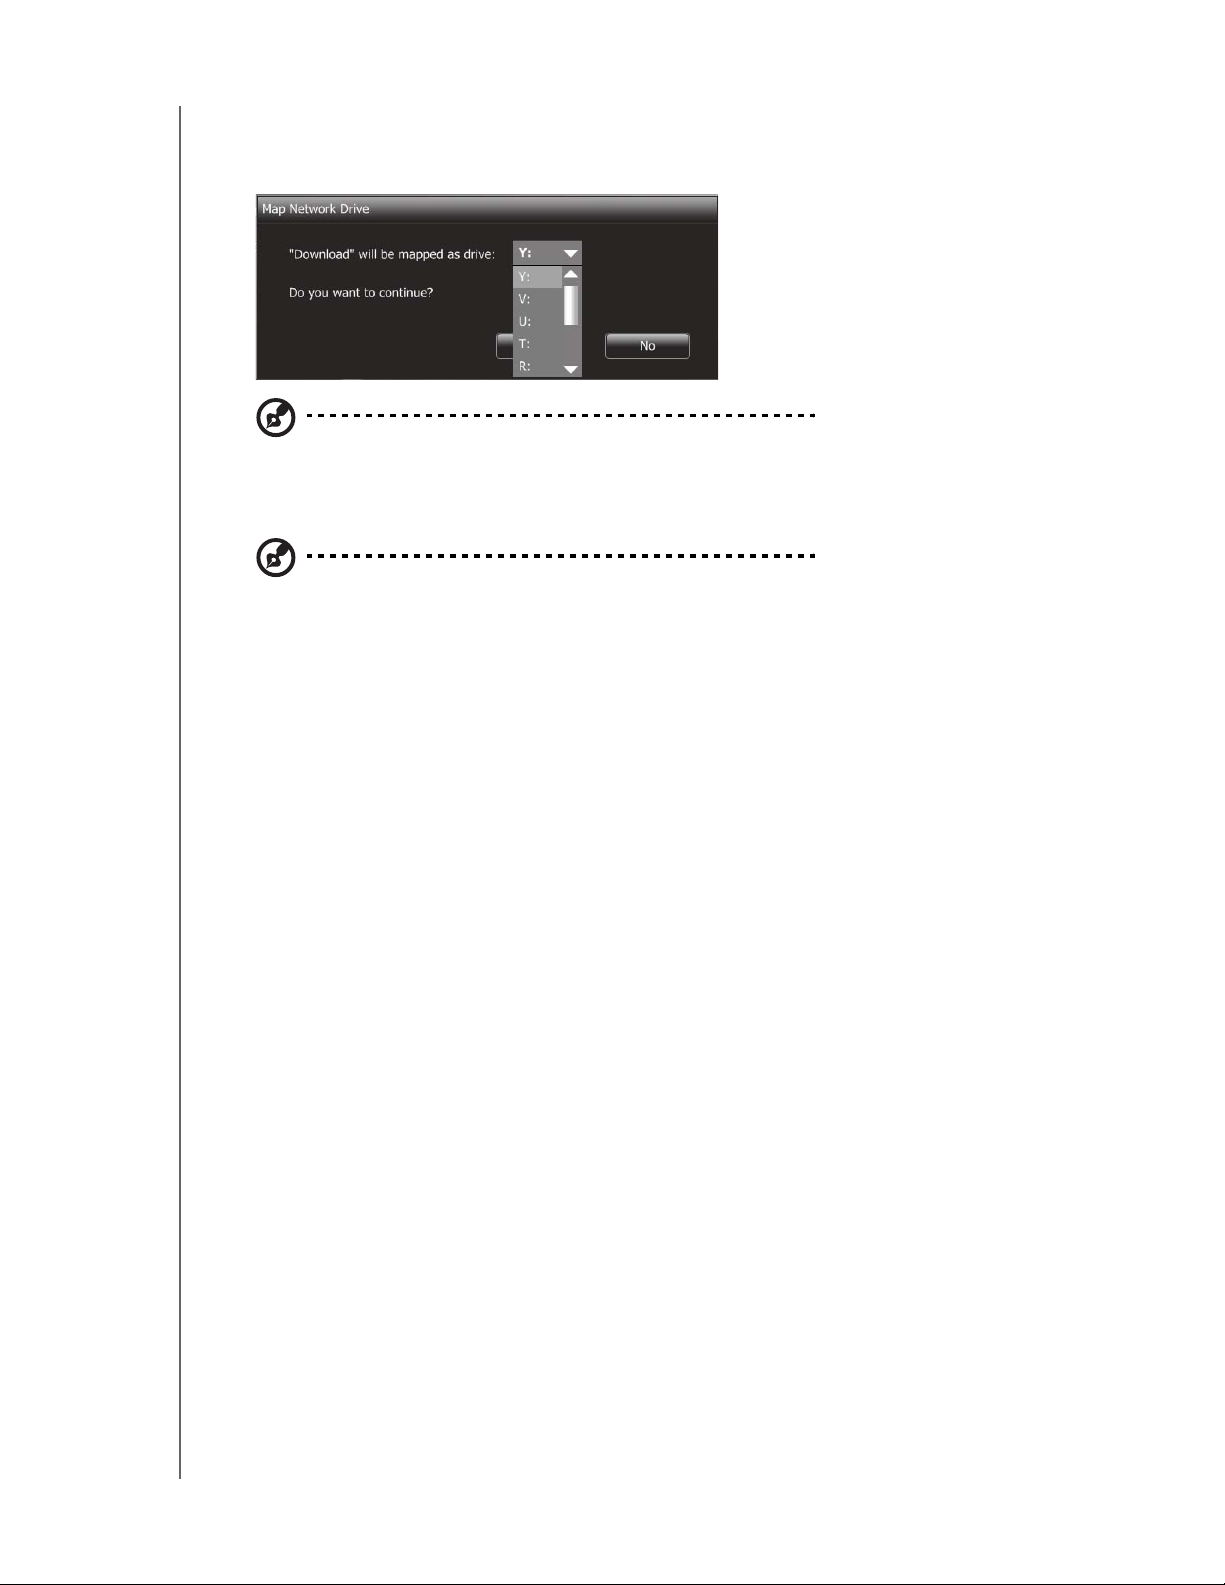
8. Manual drive mapping: Click No. All share folders on the device are listed onscreen. Select a folder name, then select a drive letter. Click Yes to complete
drive letter assignment.
Note: Once a unit is mapped to a network drive, automatically or manually, it keeps the same drive
letter.
9. Close the WD Discovery Tool.
Note: WD Discovery is only used for initial configuration. You can access the storage drives on My
Computer.
10.Click Start and then My Computer. The network drives display. You can now
drag and drop files into the network drive folders using My Computer or
Windows Explorer.
MY BOOK WORLD EDITION BASIC SETUP - 13
Page 19
MY BOOK WORLD EDITION
USER MANUAL
Windows Vista
1. Turn on your computer and wait for the operating system to load.
2. Insert the software-installing CD into the CD or DVD ROM drive.
Note: If AutoPlay is disabled on your computer, you must install the utilities manually. To do this, click
Start and then Computer. A new window opens. Locate and right-click the CD/DVD drive. When
the menu window opens, click the Install or Run Program option. The main CD Installer screen
displays.
3. If you have connected the My Book device properly as shown in the Connect
screen, click Next.
4. The Application Installer screen opens, displaying a list of options. Click
WD Discovery Tool. Once the WD Discovery Tool installation is complete, it will
automatically launch and the WD Discovery icon displays on your desktop.
MY BOOK WORLD EDITION BASIC SETUP - 14
Page 20
MY BOOK WORLD EDITION
USER MANUAL
5. Click MyBookWorld and then click Map Network Drive in the Things to Do
list.
A message appears asking whether you want to map the drive automatically. If
you want to map a drive manually, skip to step 7.
6. Click Yes.
All share folders available on the device will be mapped as network drives
automatically. Available drive letters are assigned backwards from Z.
When mapping completes, the share folders appear as network drives in the
WD Discovery screen. Click Back to return to the main page.
7. Manual drive mapping: Click No. All share folders on the device are listed onscreen. Select a folder name and then select a drive letter. Click Yes to complete
drive letter assignment.
MY BOOK WORLD EDITION BASIC SETUP - 15
Page 21

MY BOOK WORLD EDITION
Note: Once a unit is automatically or manually mapped to a network drive, it retains the same drive
letter.
USER MANUAL
8. Close the WD Discovery Tool.
Note: WD Discovery is only used for initial configuration. You can access the storage drives on My
Computer.
9. Click Computer. The network drives display. You can now drag and drop files
into the network drive folders using Computer or Windows Explorer.
MY BOOK WORLD EDITION BASIC SETUP - 16
Page 22
MY BOOK WORLD EDITION
USER MANUAL
Macintosh Leopard
1. Turn on your computer and wait for the operating system to load.
2. Open Finder.
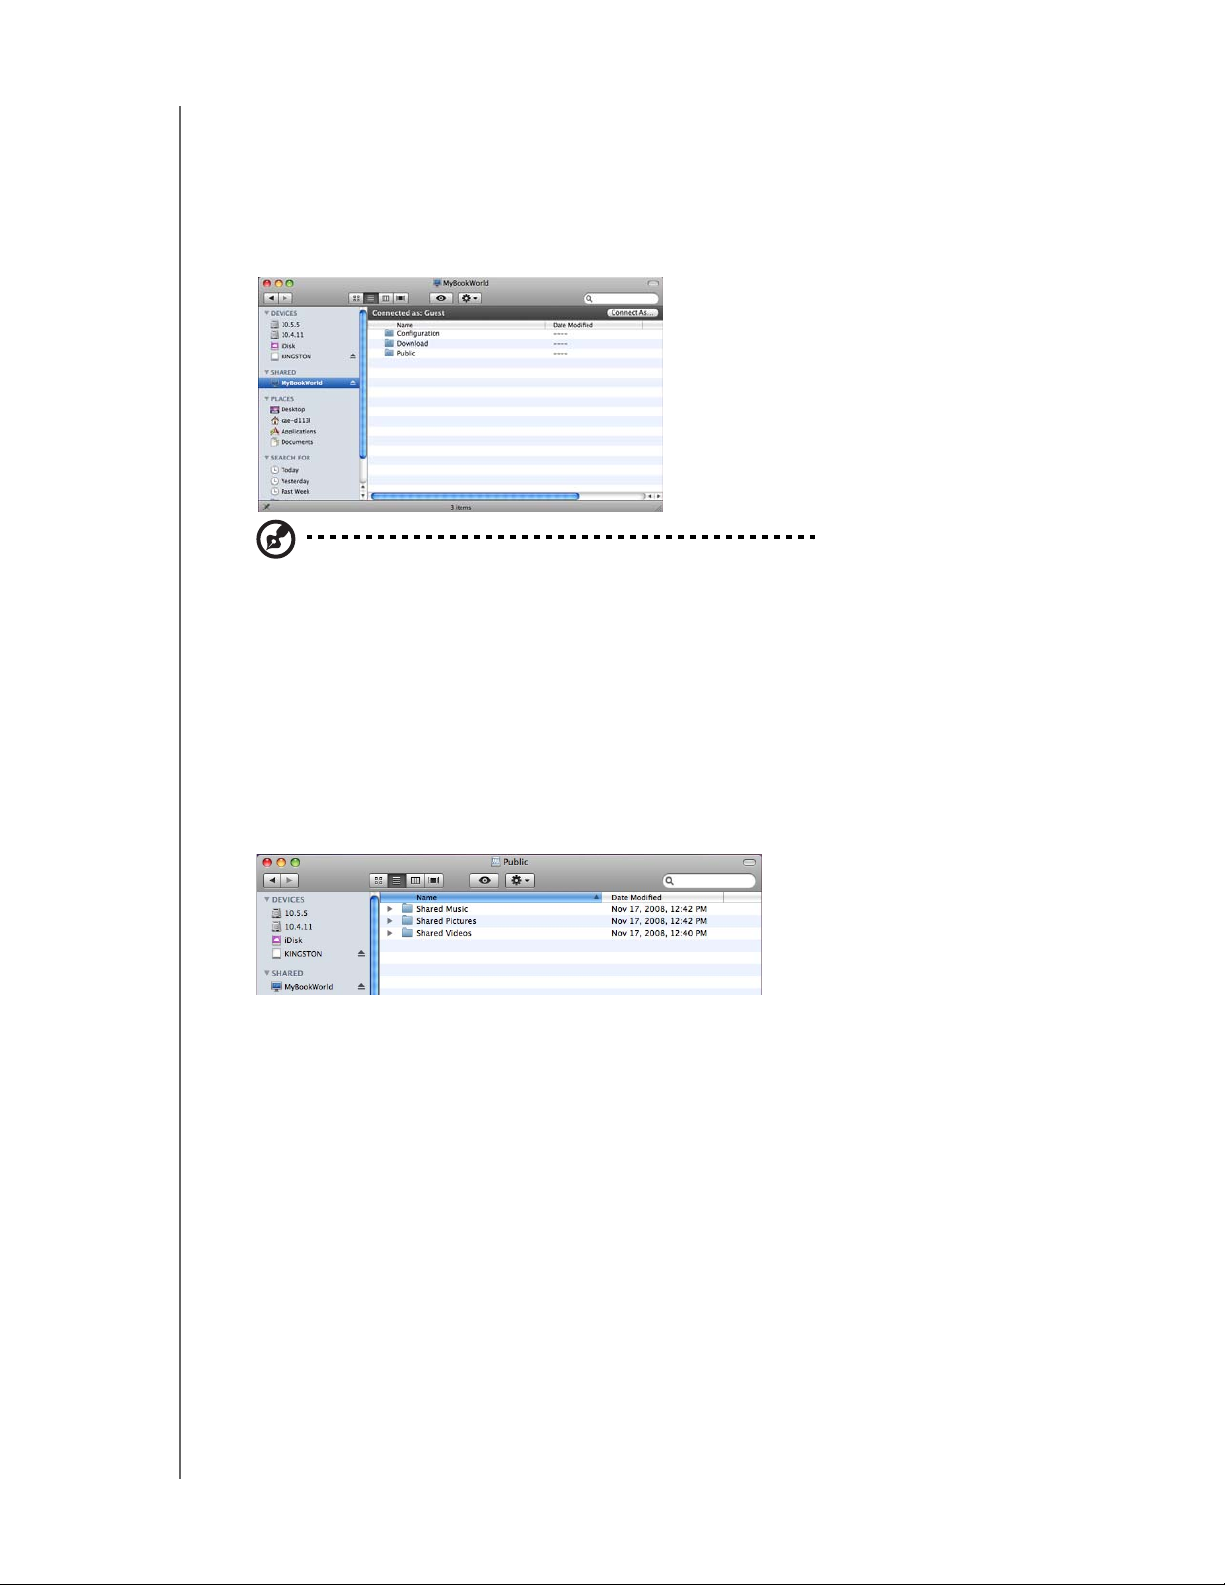
3. In Finder, click mybookworld in the Shared list (if necessary, click All and then
double-click mybookworld).
Note: Configuration is a read-only share containing only a Help file and the login page.
4. Double-click the Public share, and then click OK. The share may appear as a
shared drive icon on the desktop depending on your preferences.
To make the shared drive icon permanent on the desktop, create an alias:
(a) Click the item you wish to alias and hold down the mouse button.
(b) While holding down the
want the alias to appear, and let go of the mouse button. Instead of moving the original item,
this will create an alias at the new location.
Cmd and Option keys simultaneously, drag the item to where you
You can now drag and drop files into the network drive folders using Finder.
MY BOOK WORLD EDITION BASIC SETUP - 17
Page 23
MY BOOK WORLD EDITION
USER MANUAL
Macintosh Tiger
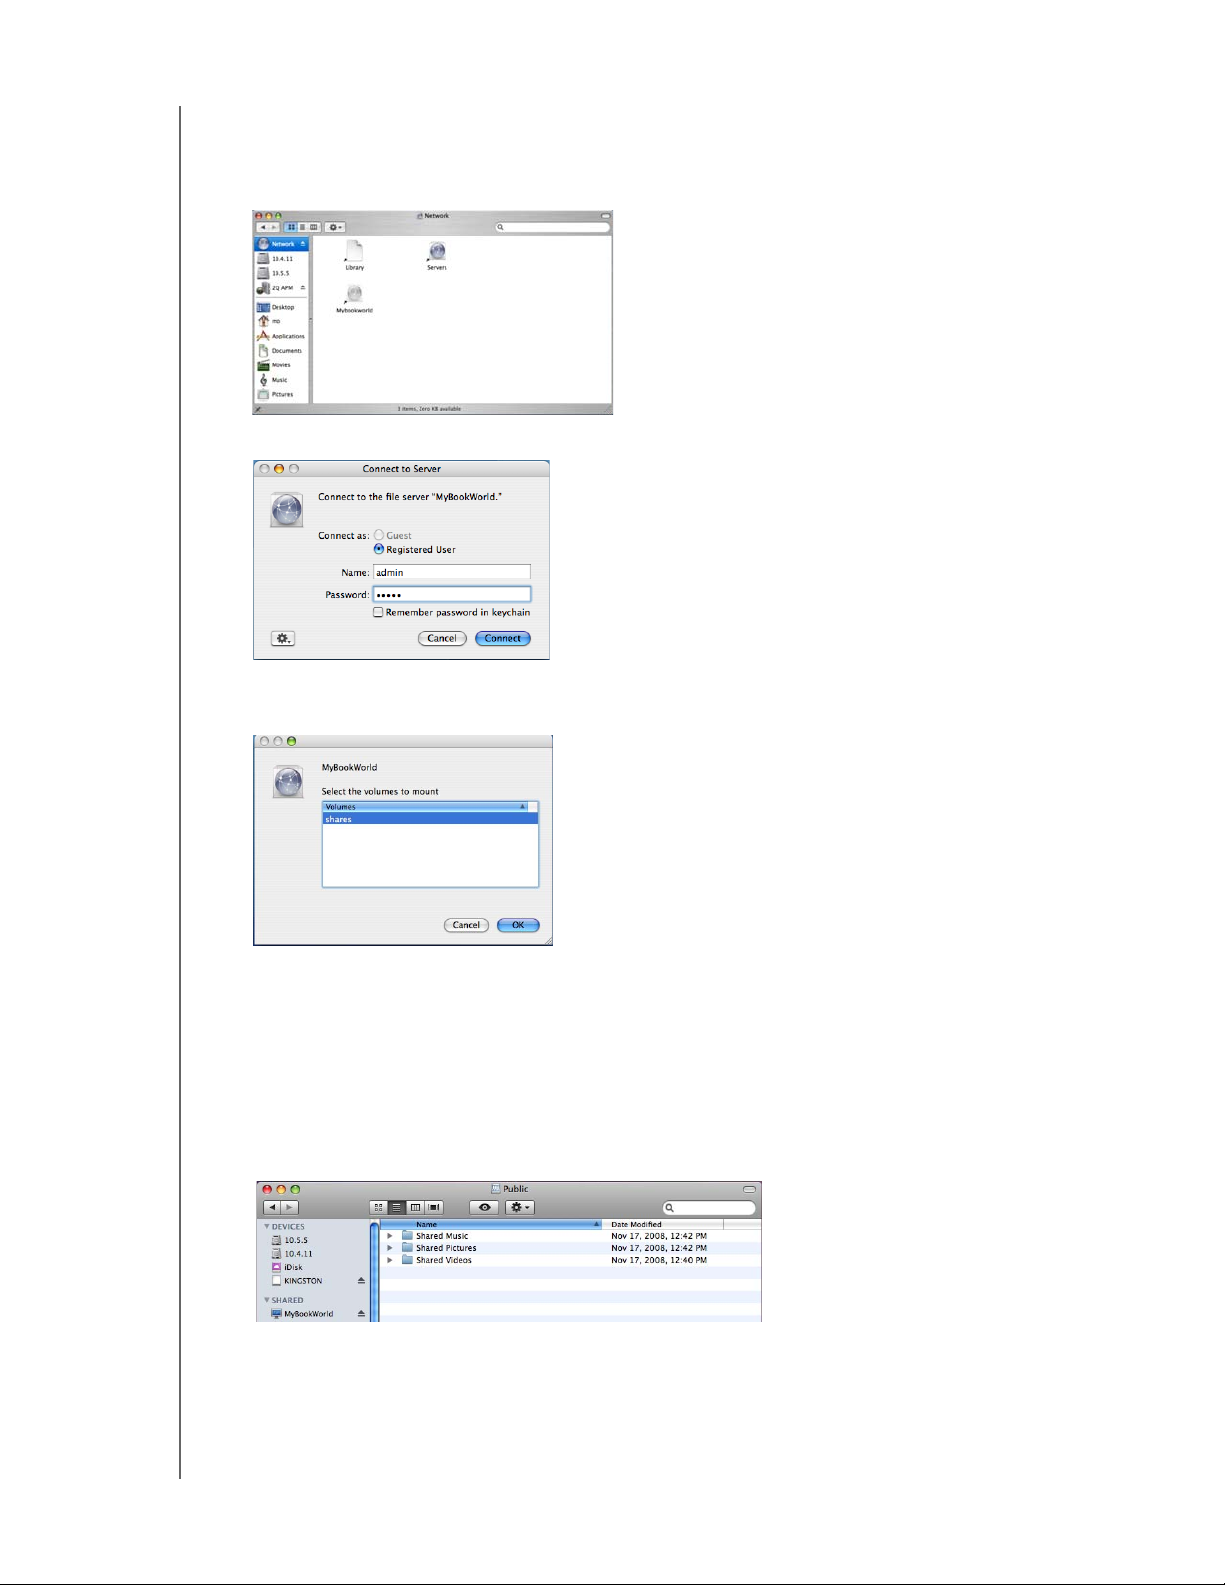
1. Turn on your computer and wait for the operating system to load.
2. Open Finder. Click Network and then double-click the Mybookworld icon.
3. Type “admin” in both the Name and Password fields, and then click Connect.
4. Make sure that shares is highlighted in the Select the volumes to mount list,
and then click OK.
The share may appear as a shared drive icon on the desktop depending on your
preferences. To make the shared drive icon permanent on the desktop, create an
alias:
(a) Click the item you wish to alias and hold down the mouse button.
(b) While holding down the
want the alias to appear, and let go of the mouse button. Instead of moving the original item,
this will create an alias at the new location.
Cmd and Option keys simultaneously, drag the item to where you
MY BOOK WORLD EDITION BASIC SETUP - 18
Page 24
MY BOOK WORLD EDITION
USER MANUAL
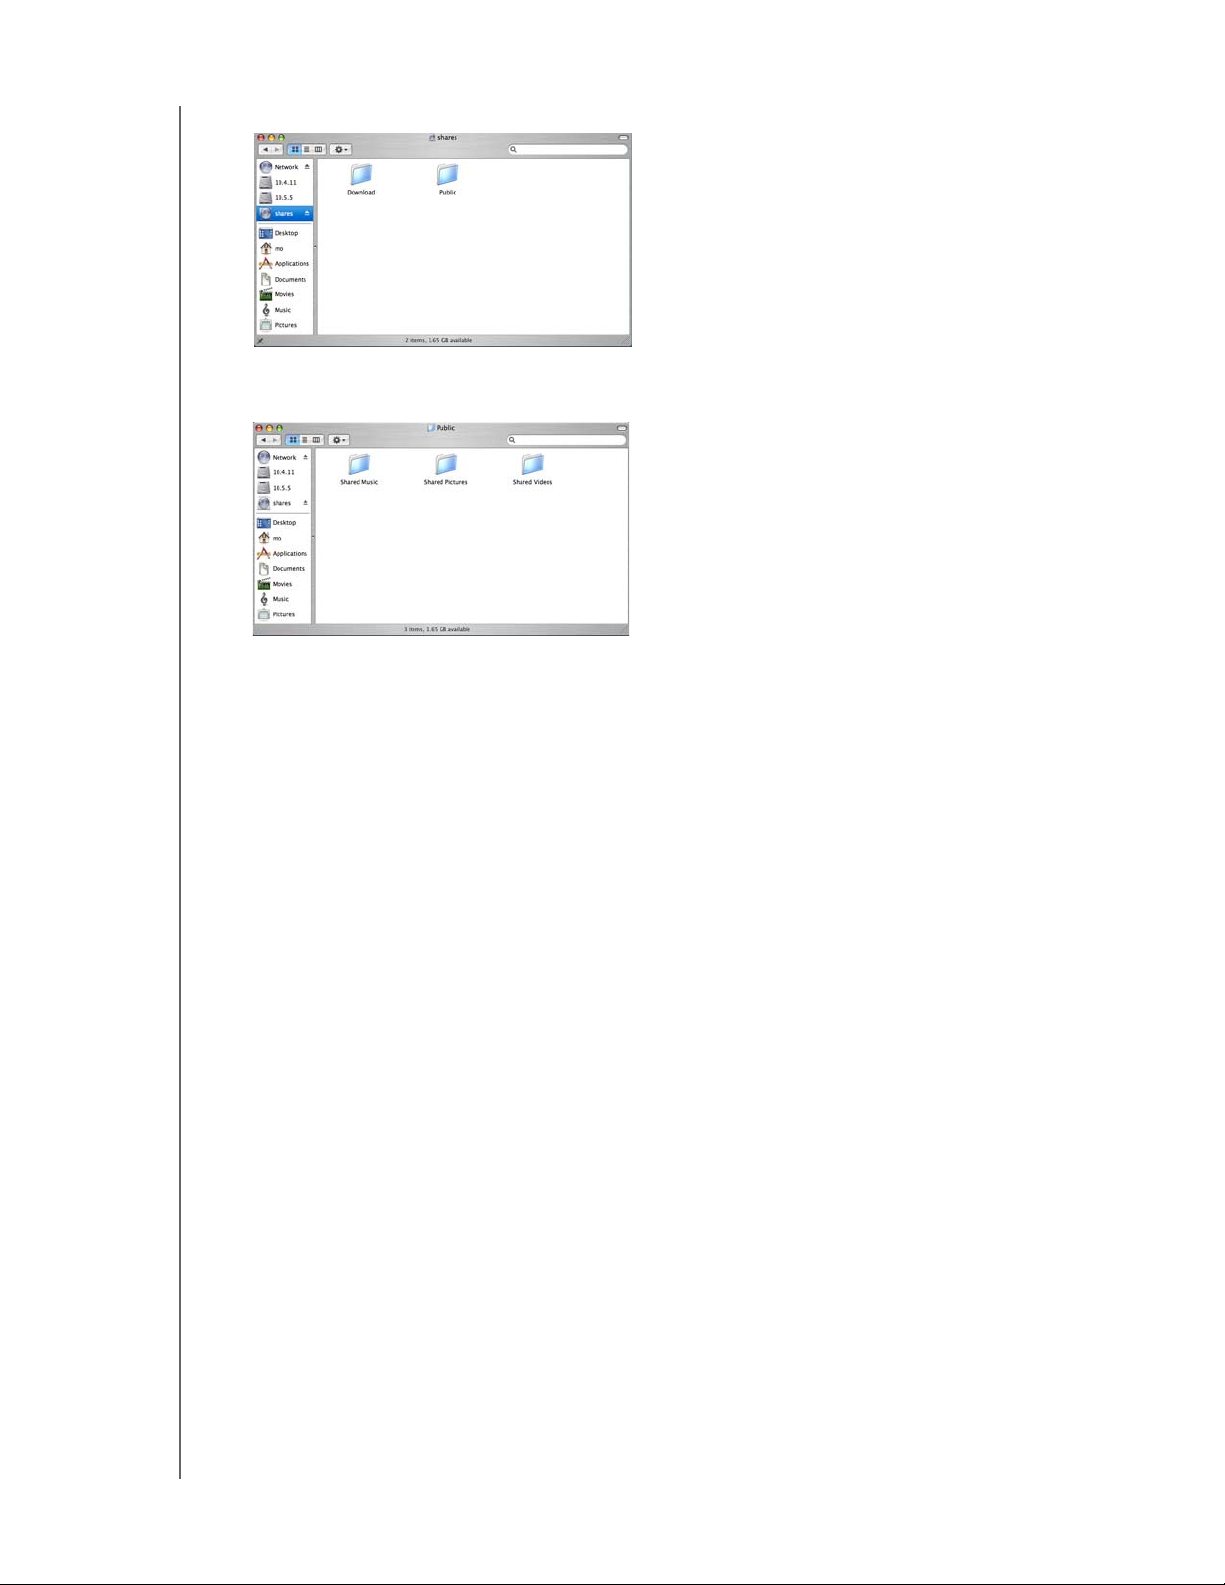
5. In Finder, click shares to display the Download and Public folders.
6. Double-click the Public folder. You can now drag and drop files into the shared
folders using Finder.
Congratulations!
Your My Book World Edition is now ready for use and is accessible as a drive letter in
My Computer (Windows) or a shared drive icon on the desktop (Macintosh). You can
now drag and drop files into your My Book device and move files from My Book to
any computer in your network that has been set up according to the instructions
above.
This user manual contains information and instructions for all other basic and
advanced My Book device management functions, including:
• Backing up your computer (see “How to Back Up Computers on the Network” on
page 21)
• Accessing My Book from a remote computer (see “MioNet Remote Access” on
page 33)
• Playing and streaming media (see “How to Play/Stream Video, Music & Photos”
on page 36)
• Using iTunes service (see “Using iTunes with My Book World Edition” on page
44)
• Connecting a USB drive for additional storage and file exchange (see
“Connecting a USB Hard Drive” on page 46 and “Copy Manager” on page 123)
• Configuring the My Book device and network settings, set e-mail or window
alerts, change the administrator password, perform firmware upgrades, restore
system to factory defaults, configure RAID (My Book World Edition II only),
manage file share preferences, set the backup destination folder, set disk quotas,
set a share folder for users, add, modify, and delete users and groups, and
change all user and group permissions (read/write, read only, no access) to
shares/folders and USB storage devices (see “Network Storage Manager” on
page 53)
MY BOOK WORLD EDITION BASIC SETUP - 19
Page 25

MY BOOK WORLD EDITION
USER MANUAL
My Book World Edition File Storage
You can access and store content on My Book World Edition via network shares.
Shares are folders that can be used to organize and store files on your
My Book World Edition network storage system. Shares can be shared with everyone
(public) or with selected users on your network (private).
The device comes preconfigured with three preconfigured and populated shares:
• Public—created automatically after initial setup
• Shared Music - folder for storing music files you want to share with other users.
• Shared Pictures - folder for storing image files you want to share with other users.
• Shared Videos - for storing video files you want to share with other users.
Important: Do not change or delete these default share folders.
Disruption of file sharing could result. These are the default folders for the
Media Server (Twonky Media) and iTunes Service. For more information on
how to use Twonky media, see “How to Play/Stream Video, Music &
Photos” on page 36. For more information on how to use the iTunes
service, see “Using iTunes with My Book World Edition” on page 44.
• Download—for saving files using Downloader (see “Scheduled Downloads” on
page 118).
• Configuration—this is a read-only share containing only a Help file and the login
page. It is not meant for sharing or storing data and should not be modified.
MY BOOK WORLD EDITION BASIC SETUP - 20
Page 26

3
MY BOOK WORLD EDITION
USER MANUAL
How to Back Up Computers on the Network
WD Anywhere Backup
WD Anywhere Backup automatic backup software allows you to set up continuous
backup for up to five computers in your network. Select the files you want to back up,
then set it and forget it; every time you save a change it’s automatically backed up.
Installing WD Anywhere Backup
Important: You must have your My Book World Edition connected to you local area
network and powered on before you install WD Anywhere Backup software. This will
ensure that the WD Anywhere Backup recognizes your My Book World Edition and will
install as the full software version instead of the 30 Day trial version.
Windows
1. Turn on your computer and wait for the operating system to load.
2. Insert the software CD into the CD-ROM drive.
Note: If AutoPlay is disabled on your computer, you must install the utilities
manually. Click Start and then Computer (Windows Vista) or
My Computer (Windows XP). Double-click Setup.exe in the root directory of
the CD.
3. Windows Vista: Click Run setup.exe and then click Allow.
4. Click Accept in the Terms of Agreement screen.
5. If you have connected the device properly as shown in the Connect screen, click
Next.
6. Click WD Anywhere Backup.
Note: It may take a minute or two for the next screen to display.
7. Select your preferred language from the list and click OK.
HOW TO BACK UP COMPUTERS ON THE NETWORK - 21
Page 27

MY BOOK WORLD EDITION
8. Close all other open applications then click Next to continue.
9. If you accept the terms of the agreement, click I Agree to continue.
USER MANUAL
10.After WD Anywhere Backup has finished installing, click Finish to begin using
WD Anywhere Backup.
HOW TO BACK UP COMPUTERS ON THE NETWORK - 22
Page 28
MY BOOK WORLD EDITION
USER MANUAL
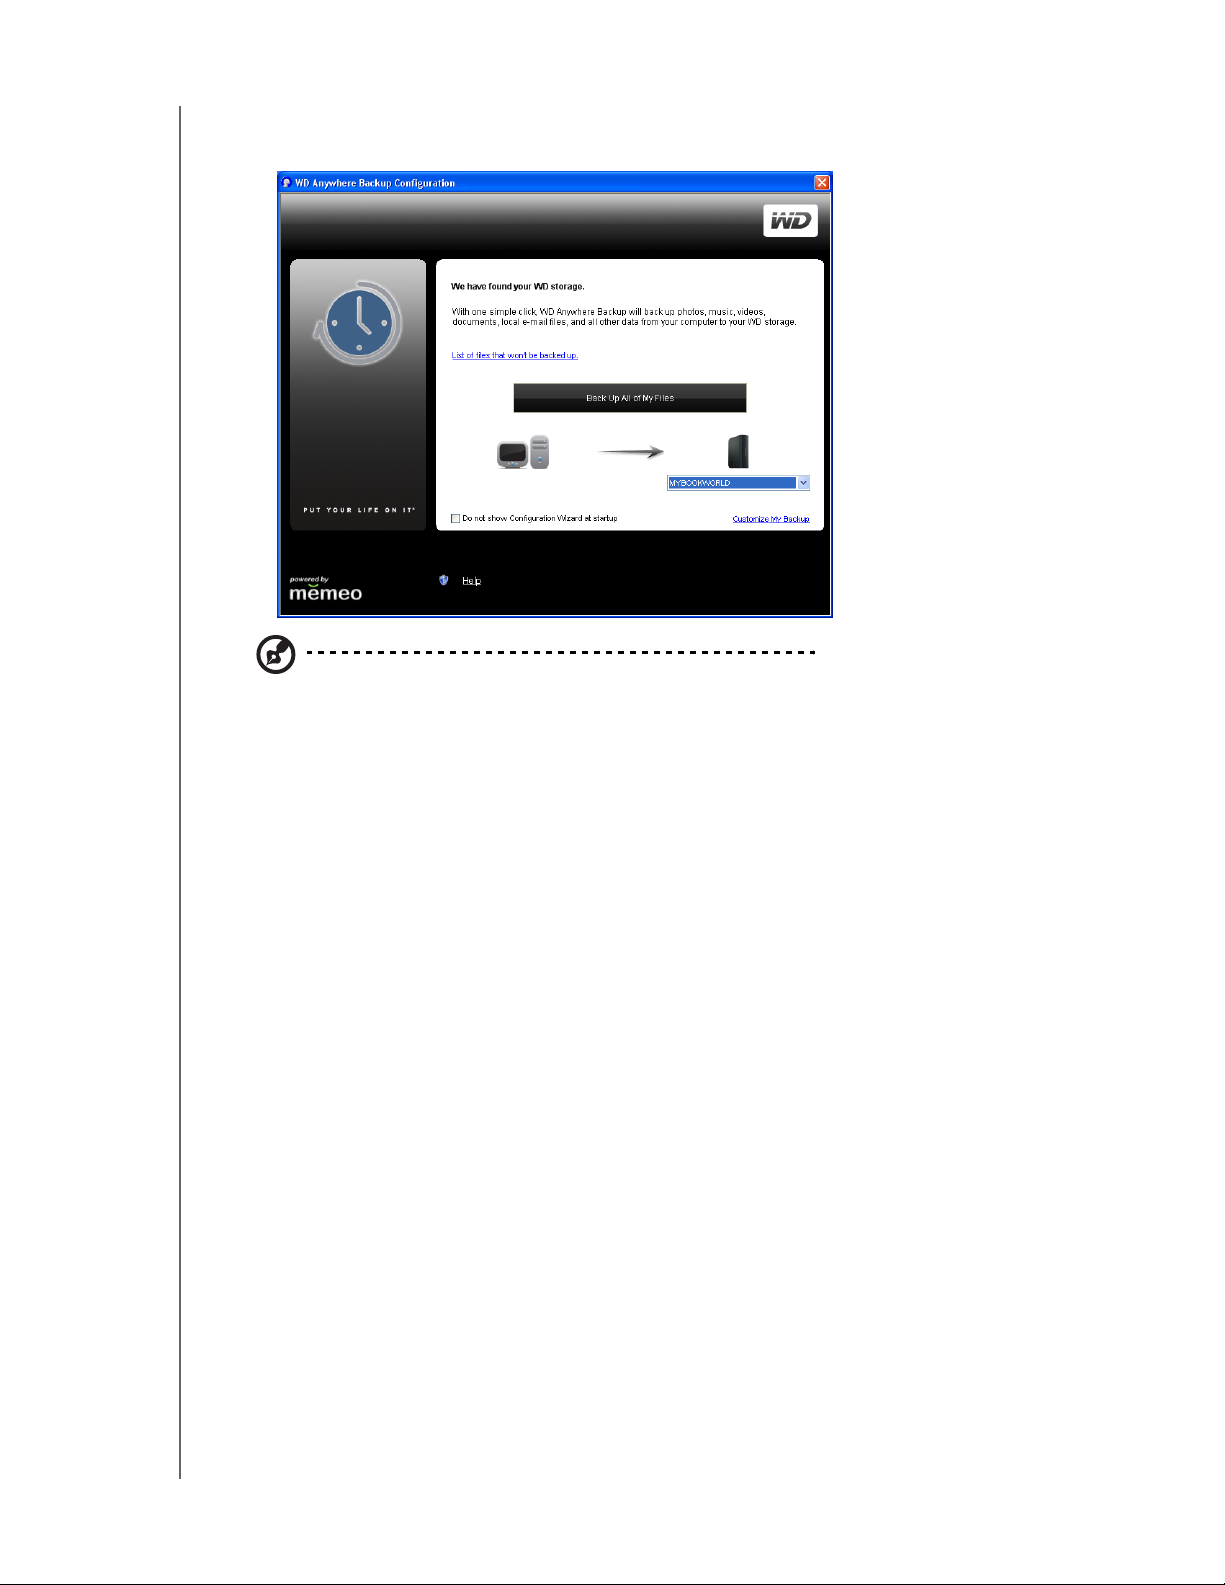
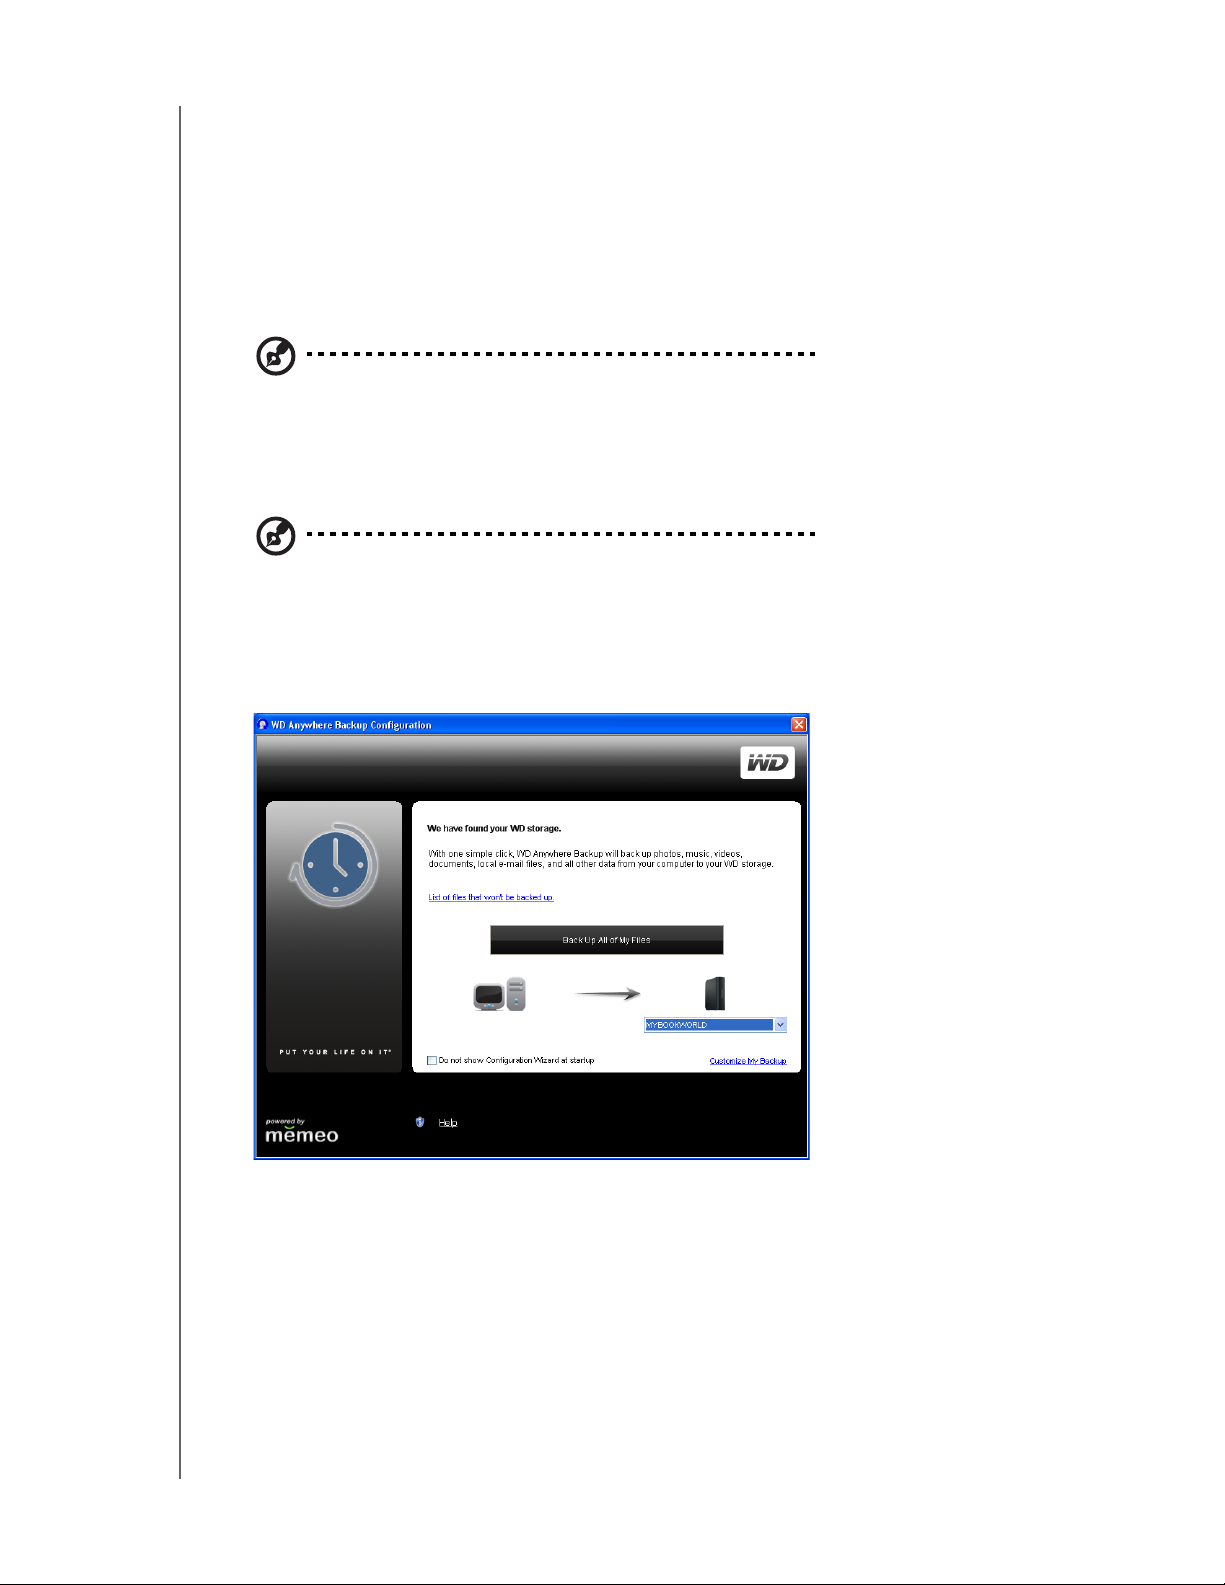
The WD Anywhere Backup Configuration screen displays. Continue with “OneClick Backup” on page 24.
Note: The WD Anywhere Backup icon now displays on your desktop, and WD Anywhere Backup
is listed in Program Files.
Macintosh
1. Turn on your computer and wait for the operating system to load.
2. Insert the software CD into the CD-ROM drive.
3. Double-click the My Book World Edition CD icon that mounts to the desktop.
4. Open the WD_Mac_Tools folder and double-click WDAnywhereBackup.dmg.
HOW TO BACK UP COMPUTERS ON THE NETWORK - 23
Page 29
MY BOOK WORLD EDITION
USER MANUAL
Configuring WD Anywhere Backup
One-Click Backup
WD Anywhere Backup allows you to back up all contents of your computer’s hard
drive with the click of a button. This feature backs up all your data to the network
storage system so you can restore all your data in the event that your computer’s
hard drive crashes.
Note: The backup does not include application files, such as MS Word or Adobe Acrobat, temporary
and log files, virtual hard disk files, files in the system folders.
When you first install WD Anywhere Backup, the WD Anywhere Backup
Configuration screen displays.
Note: The screen below only appears when you have My Book World Edition attached to your
computer’s local area network.
1. You have two options:
(a) To start an automatic and complete backup of your computer’s hard drive, click Back Up
All of My Files. Continue with step 2.
(b) To customize the backup, click the
screen displays. Continue with step 3 in “How to Create a Backup Plan” on page 27.
Customize My Backup link. The Welcome
HOW TO BACK UP COMPUTERS ON THE NETWORK - 24
Page 30
MY BOOK WORLD EDITION
USER MANUAL
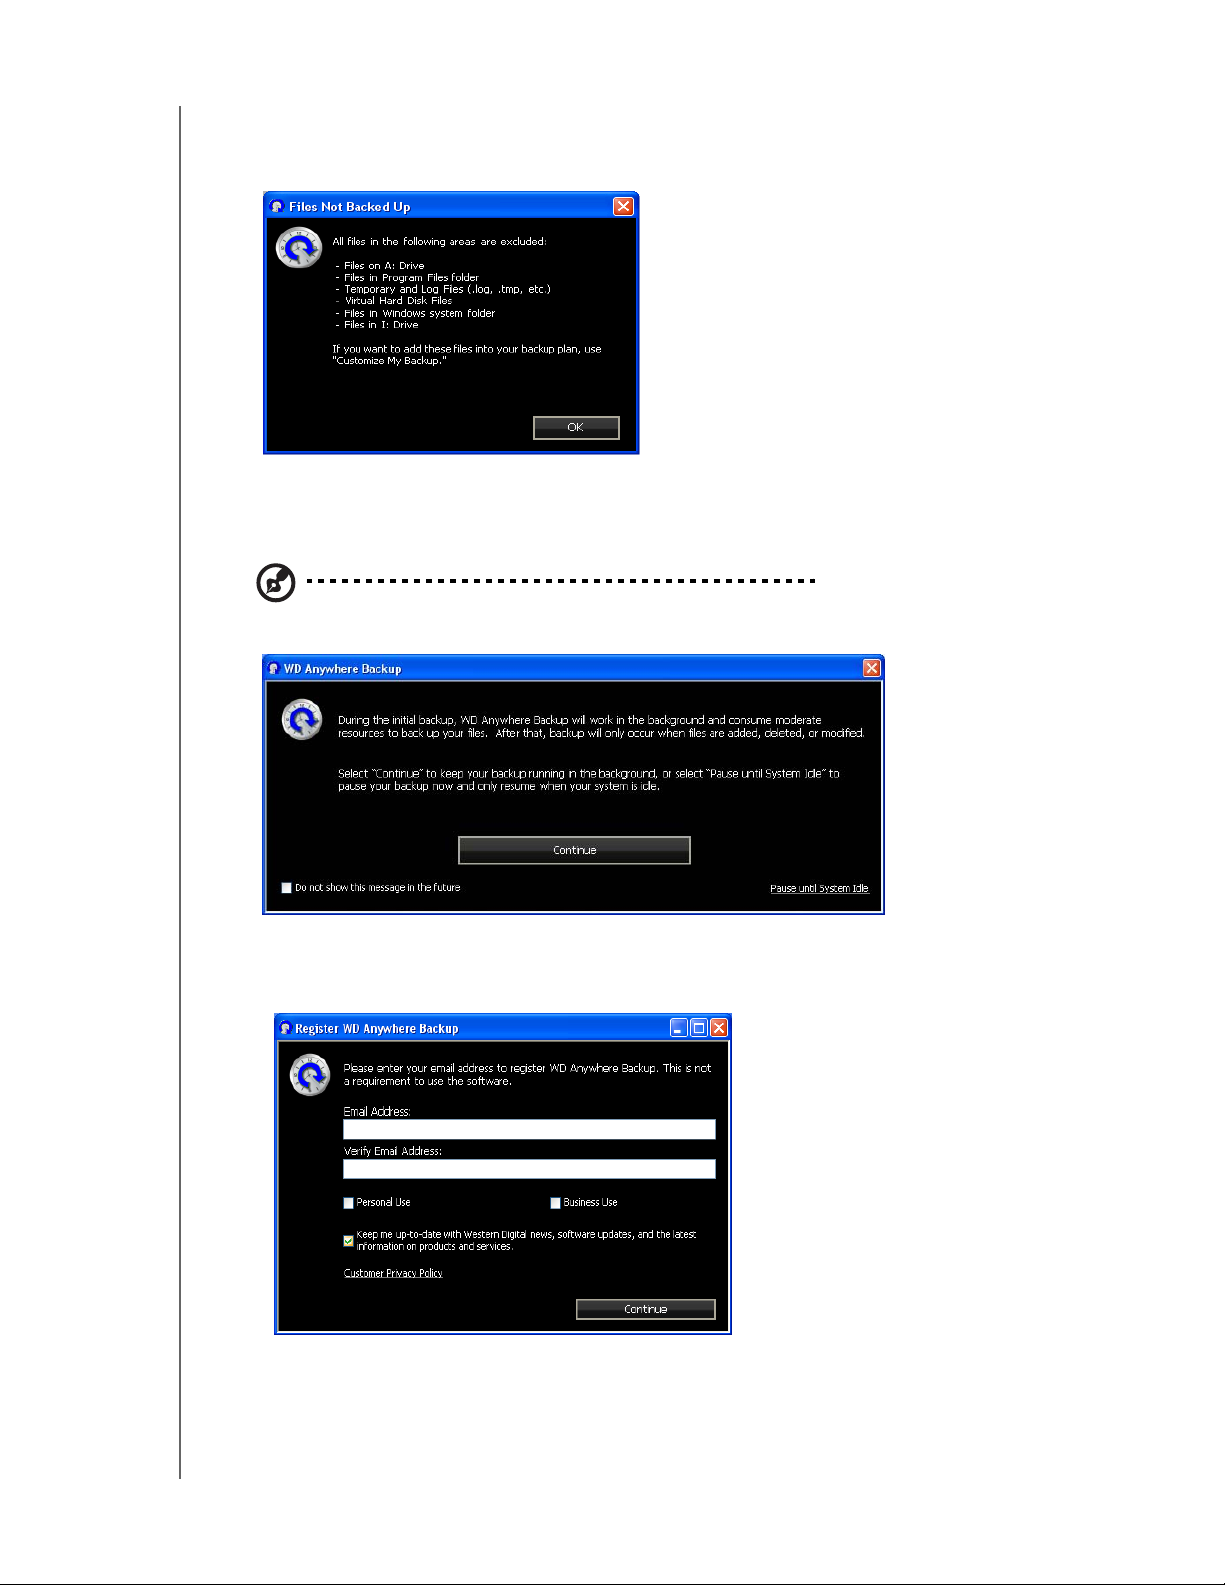
2. A message displays a list of files that will not be backed up. For information on
backing up those files, see “How to Create a Backup Plan” on page 27. Click
OK.
3. A message explains that initial backup will use moderate resources on your
computer. To pause the backup, click Pause until System Idle. To keep the
backup running in the background, click Continue.
Note: If you do not want these messages to display in the future, click Do not show Configuration
Wizard at startup.
4. A registration screen displays. If desired, enter the registration information. Click
Continue.
HOW TO BACK UP COMPUTERS ON THE NETWORK - 25
Page 31

MY BOOK WORLD EDITION
The WD Anywhere Backup screen displays the progress of the backup.
When the backup has finished, a backup complete message displays.
USER MANUAL
HOW TO BACK UP COMPUTERS ON THE NETWORK - 26
Page 32

MY BOOK WORLD EDITION
USER MANUAL
How to Create a Backup Plan
Creating and customizing a backup plan allows you to automatically safeguard
against data loss.
1. If WD Anywhere Backup is not already running, click the WD Anywhere Backup
icon on the desktop.
2. Click Create.
3. The welcome screen displays. Click Next.
HOW TO BACK UP COMPUTERS ON THE NETWORK - 27
Page 33

MY BOOK WORLD EDITION
USER MANUAL
4. Click Network Places to locate your My Book World Edition on your local area
network. Click Next.
5. Click All Items from SmartPicks.
HOW TO BACK UP COMPUTERS ON THE NETWORK - 28
Page 34

MY BOOK WORLD EDITION
USER MANUAL
6. The SmartPicks screen displays, listing common file types that you can back up.
Select each file type you want to back up. When finished, click Next.
7. Name your backup plan and click Next. You can create additional backup plans
by repeating the steps above.
HOW TO BACK UP COMPUTERS ON THE NETWORK - 29
Page 35

MY BOOK WORLD EDITION
USER MANUAL
8. A confirmation screen displays. Click Done.
9. A message explains that initial backup will use moderate resources on your
computer. To pause the backup, click Pause until System Idle. To keep the
backup running in the background, click Continue.
The WD Anywhere Backup screen displays the progress of the backup.
HOW TO BACK UP COMPUTERS ON THE NETWORK - 30
Page 36

MY BOOK WORLD EDITION
USER MANUAL
When the backup finishes, the Backup Complete screen displays.
Editing a Plan
Click the menu icon to add or remove files to and from backup plans, keep multiple
revisions of files on hand for recall, and remove entire plans.
HOW TO BACK UP COMPUTERS ON THE NETWORK - 31
Page 37

MY BOOK WORLD EDITION
USER MANUAL
Restoring a Backup Plan
You can restore a backup plan in the event that you have accidentally deleted a file,
want to compare file versions, or have lost all data due to a hard drive crash on your
computer.
1. Click View and Restore.
2. Click a backup plan in the Select a Plan list, or to search for a backup plan,
enter the name in the Search by File Name field and click Search.
3. Click the box(es) next to the folders or files you want to restore.
4. Select a location to restore your files from the Restore Files to list.
5. Click Restore.
HOW TO BACK UP COMPUTERS ON THE NETWORK - 32
Page 38

4
MY BOOK WORLD EDITION
USER MANUAL
MioNet Remote Access
Overview
Access your photos, music, documents, and videos from anywhere, anytime using
MioNet secure remote access services from WD. MioNet makes remote file access
and sharing seamless, simple and very secure. Just follow the steps to register your
My Book World into your secure MioNet account. Then you can access your content
from any web browser in the world with your unique username and password.
MioNet also enables you to share a folder of pictures on your My Book World with
friends (no upload required) or a folder of documents with your business colleagues.
Invitees can view the content you share with them, but nothing else.
Remote Access Setup
My Book World Edition comes with MioNet enabled by default. The Remote
Access menu in Network Storage Manager allows you to further configure the
MioNet service on the storage device. See “Remote Access” on page 69 for further
details.
Note: A mouse-over of the registration status shows the MioNet account name if the device is
registered. To register with MioNet, go to: http://www.mionet.com/mybook.
Windows
1. Turn on your computer and wait for the operating system to load.
2. Insert the software CD into the CD-ROM drive.
Note: If AutoPlay is disabled on your computer, you must install the utilities
manually. Click Start and then Computer (Windows Vista) or
My Computer (Windows XP). Double-click Setup.exe in the root directory of
the CD.
3. Windows Vista: Click Run setup.exe and then click Allow.
4. Click Accept in the Terms of Agreement screen.
5. If you have connected the device properly as shown in the Connect screen, click
Next.
MIONET REMOTE ACCESS - 33
Page 39

MY BOOK WORLD EDITION
6. Click MioNet Services.
The MioNet registration screen displays.
7. Complete the registration form and click Submit to create an account.
USER MANUAL
8. A confirmation message displays. Click OK.
MIONET REMOTE ACCESS - 34
Page 40

MY BOOK WORLD EDITION
USER MANUAL
9. When MioNet finds the My Book World Edition you are registering, enter a name
for the device and click OK.
A list of the folders stored on your My Book World Edition displays.
Using MioNet
Following are guidelines for using MioNet:
1. Go to www.mionet.com/web
access your files.
2. Enter the MioNet username and password you created.
Your My Book World folders display in the My Resources tab of MioNet, as
they did when you set up your account.
3. Select a folder to see a list of all the sub-folders and files. You can now use
your browser to access your entire collection of music, photos, movies, and
documents.
4. Double-click any file to open it locally. Depending on the operating system,
you may be able to drag and drop files from your My Book World to the remote
computer and vice versa.
5. See the instructions within MioNet to share a folder of pictures or documents
with others.
from most PCs or Macs in the world to securely
MIONET REMOTE ACCESS - 35
Page 41

5
MY BOOK WORLD EDITION
USER MANUAL
How to Play/Stream Video, Music & Photos
Media Server Overview
My Book World Edition serves as your home's central media hub. It enables you to
stream photos, music, and videos to your home entertainment center and/or other
PCs on your home network.
The Twonky Media server application searches for all the media (for example, videos,
photos, and music) stored on the My Book World Edition connected to your home
network. The server is pre-set, so you can just transfer your multimedia content to the
respective shared folders on your My Book World Edition (described on the next
page), and you are ready to stream and view content on your home entertainment
center, game consoles (for example, XBOX 360, Playstation 3, or DLNA 1.5 Digital
Media Adapters), and other PCs on your home network. Visit www.twonkymedia.com
for further information on Twonky Media.
Media Types Supported
Audio Video Images
MP3
WMA
WAV
LPCM
OGG vorbis
FLAC
M4A
M4B
MP4
3GP
AAC
MP2
AC3
MPA
MP1
AIF
Note: Some devices may not support playback of all these files. Please refer to your device’s user
manual to see which formats are supported.
MPEG1
MPEG2
MPEG4
AVI / DivX
WMV
VOB
3GP
VDR
ASF
MPE,
DVR-MS
Xvid
M1V
M4V
JPEG
PNG
TIF
BMP
HOW TO PLAY/STREAM VIDEO, MUSIC & PHOTOS - 36
Page 42

MY BOOK WORLD EDITION
USER MANUAL
Media Storage
You can access and store media content on My Book World Edition via network
shares. Shares are folders that can be used to organize and store files on your
My Book World Edition network storage system. Shares can be shared with everyone
(public) or with selected users on your network (private).
The device comes pre-configured with the Public network share, which contains the
following folders for media storage:
• Shared Music - folder for storing music files you want to share with other users
• Shared Pictures - folder for storing image files you want to share with other users
• Shared Videos - for storing video files you want to share with other users
Important: Do not change or delete these default share folders.
Disruption of file sharing could result. These are the default folders for the
Media Server (Twonky Media) and iTunes Service. For more information on
how to use Twonky media, see “Media Server” on page 105. For more
information on how to use the iTunes service, see “iTunes” on page 105.
How and where to add media content to the shared folders
1. Open the Internet Explorer.
2. Copy your music files to the Shared Music folder and under the Public folder on
My Book World.
3. Follow the same process to place your videos and pictures into their respective
Shared Pictures and Shared Video folders.
Important: Make sure to sort and add your media content to the
corresponding shared folders. (e.g., music files must go into the Shared
Music folders). If you do not do this, your content will not display correctly
through your digital media adapter.
HOW TO PLAY/STREAM VIDEO, MUSIC & PHOTOS - 37
Page 43

MY BOOK WORLD EDITION
USER MANUAL
Media Devices
Now that you have copied your files to their corresponding folders, you can use a
variety of media devices to stream media. The following types are discussed in this
section:
• Windows Media Player 11 (Windows Vista) on page 38.
• Xbox 360 on page 40.
• Xbox 360 - New User Interface on page 41.
• Playstation 3 on page page 41.
• Digital Picture Frames on page 41.
• Network Music Player on page 42.
• Digital Media Adapters on page page 42.
• DLNA Devices on page page 43.
Windows Media Player 11 (Windows Vista)
How to stream media using Windows Media Player 11 Library
1. Click Control Panel > Network and Sharing Center.
2. Click Customize.
HOW TO PLAY/STREAM VIDEO, MUSIC & PHOTOS - 38
Page 44

MY BOOK WORLD EDITION
USER MANUAL
3. Click Private, and then click Next.
4. Launch Windows Media Player (Start > All Programs > Windows Media
Player)
5. Click Library > Media Sharing.
HOW TO PLAY/STREAM VIDEO, MUSIC & PHOTOS - 39
Page 45

MY BOOK WORLD EDITION
USER MANUAL
6. Click Find media that others are sharing, and then click OK.
7. Select a media type (Music, Pictures, or Video) and click PVConnect on
MyBookWorld.
8. Double-click the media file you want to play.
Xbox 360
1. Ensure that your Xbox 360 and My Book World Edition are powered on and
connected to your local area network. The main Xbox screen displays five screens
you can scroll through (Marketplace, XBox Live, Media and Network).
Note: If you have any devices with Window Media Center, the XBOX 360 will display a user
interface screen asking you to connect to that device. Click B to exit.
2. Scroll to the Media Screen and select the Music option (you have three options Music, Pictures, and Videos). The Source screen displays.
3. Click MyBookWorld or the My Book World Edition device name you created
previously. The Music player screen displays with the device name at the top of
the screen.
4. Click Songs to view the songs stored in your Shared Music folder.
5. Use the music player navigation buttons on the screen to play your music files.
6. To view your pictures or play video content that are on your My Book World
Edition, go back to step 3 and repeat the steps, selecting the appropriate media
(Picture or Video).
HOW TO PLAY/STREAM VIDEO, MUSIC & PHOTOS - 40
Page 46

MY BOOK WORLD EDITION
USER MANUAL
XBOX 360 - New User Interface
1. Ensure that your XBox 360 and MyBookWorld are powered on and connected to
your local area network.
2. From the main Xbox user interface, scroll to the My XBox screen
3. Use the D-Pad and scroll to the right until you see Video, Music and Picture
Library options.
4. Select any one of these three options by pressing the A button on your controller.
The Select Source screen displays.
5. Select the MyBookWorld option based on the device name you created
previously and press the A button. You will see the media content stored on your
MyBookWorld unit.
6. Using the controller, scroll through to view and play your media content.
Playstation 3
1. Ensure that your Playstation 3 and My Book World Edition are powered on and
connected to your local area network. You will see the main user interface with a
series of options displayed horizontally across your TV screen.
2. Using the directional buttons (left and right) on the PS3 controller, navigate to
Music, Photo or Video depending on which type of media you want to play, and
press the X button.
3. Using the directional buttons (up and down), scroll and select MyBookWorld (or
the new device name that you created previously) by pressing the X button. You
will now see a list of folders (Music, Photo and Video) to the right of the
MyBookWorld icon.
4. Make sure that you select the folder that corresponds to option you selected back
in Step 2. For example, if you select Photo from the main user interface screen,
open the corresponding Photo folder to the right of the MyBookWorld icon,
otherwise your content will not display properly.
Digital Picture Frames
The following are general steps for setting up digital photo frames:
1. Ensure that your My Book World Edition is connected to your home’s local
network and is powered on.
2. Follow the user instructions provided with your wireless digital photo frame to
proceed through any initial setup or installation of drivers.
3. Using the navigation feature on your wireless digital photo frame, scan and detect
the My Book World Edition on your network.
4. Depending on the brand of photo frame you have, you may need to access
Settings/Network Setup page in the user interface to establish connection so that
your photo frame can link to your My Book World Edition. Please refer to your
DMA’s user guide for specific instructions.
HOW TO PLAY/STREAM VIDEO, MUSIC & PHOTOS - 41
Page 47

MY BOOK WORLD EDITION
USER MANUAL
5. Once you have a connection between your wireless photo frame and the My
Book World Edition, access the Media screen on your photo frame that will
provide you the option to view your pictures.
Please refer to your wireless photo frame user guide for supported picture file formats and
instructions on accessing and viewing your pictures.
Network Music Player
The following are general steps for using a network music player to access My Book
World Edition:
1. Connect My Book World Edition to your local area network and power on the
device.
2. Connect and configure your network music player on your home’s wired or
wireless network switch or router.
3. Turn on your network music player.
4. If connected properly, you will find the device name of your My Book World
Edition.
5. Navigate through the network music player’s user interface to locate and play
music stored on your My Book World Edition.
Note: Please refer to your network music player user guide for specific instructions on connecting to
a network attached storage system and how to access and play your media content.
Digital Media Adapters
The following are general steps for using a Digital Media Adapter to access to My
Book World Edition:
1. Connect My Book World Edition to your local area network and power on the
device.
2. Make sure that your DMA device is connected to your TV and powered on.
3. The main screen of your DMA device displays.
4. Depending on the DMA device, you may need to access the Settings/Network
Setup screen in the user interface to establish a connection between your DMA
and My Book World Edition. Please refer to your DMA’s user guide for specific
instructions.
5. Once you have a connection established between your DMA and My Book World
Edition, access the Media screen on your DMA to view your pictures or stream
music and video content from the My Book World Edition.
Note: Please refer to your DMA’s user guide for specific instructions on connecting to the My Book
World Edition and how to access and play your media content.
HOW TO PLAY/STREAM VIDEO, MUSIC & PHOTOS - 42
Page 48

MY BOOK WORLD EDITION
USER MANUAL
DLNA® Devices
See specific DLNA media device user manuals for instructions on connecting a
DLNA device to your local area network so you can access content on My Book
World Edition. Go to www.dlna.org for a list of DLNA-certified devices and for further
information.
HOW TO PLAY/STREAM VIDEO, MUSIC & PHOTOS - 43
Page 49

6
MY BOOK WORLD EDITION
USER MANUAL
Using iTunes with My Book World Edition
iTunes Media Server Overview
With the iTunes Media Server Service, you or anyone connected to the network
storage system can play music files stored on the system using iTunes. This service
creates a virtual music library on the device and treats it as an iTunes repository,
making it possible for music files to stream from the network storage system to
Windows or Mac computers running iTunes.
Media Types Supported
The iTunes Server Service supports the following file types:
•*.mp3
• *.wav
• *.aac
Note: The iTunes server service requires the presence of the ‘/Public/Shared Music’ share folder. Do
not rename or delete Shared Music if you want to use the iTunes server. You must recreate or
rename the ‘/Public/Shared Music’ folder if it has been deleted or renamed.
Storing Content
See “Step 2: Access My Book World Edition on the Network” on page 11 for
instructions on moving your media files to My Book World Edition’s ‘/Public/Shared
Music’ default folder.
Streaming Audio in iTunes
The iTunes Service is enabled by default in the Network Storage Manager utility. See
“To enable or disable the iTunes Server Service:” on page 106 for more information.
1. Launch iTunes on your computer.
2. Click MyBookWorld under the Shared section of the left pane. If you have
copied music to the /Public/Shared Music folder and it is in a format supported
by iTunes, it should be listed in the right pane.
3. Double-click an audio file to play.
USING ITUNES WITH MY BOOK WORLD EDITION - 44
Page 50

MY BOOK WORLD EDITION
USER MANUAL
The audio file is streamed in iTunes and audio files from the network storage
system are displayed under the Shared list.
Note: For optimal performance, streaming music or video should be performed on the Local Area
Network and not remotely over the Wide Area Network.
USING ITUNES WITH MY BOOK WORLD EDITION - 45
Page 51

7
MY BOOK WORLD EDITION
USER MANUAL
Connecting a USB Hard Drive
Connect a USB hard drive to the USB port on the rear of your My Book World
Edition for additional storage. The USB drive will appear as a Folder Share in
Network Storage Manager. See “Folder Shares” on page 66 (Basic Mode) or “Folder
Shares” on page 96 (Advanced Mode) for details.
Important: USB hard drives that are formatted with FAT32 are limited to
only 4 GB that can be copied for each file. If you try to transfer files that are
larger, you may encounter a Copy Termination error.
Note: The network storage system supports external USB storage; USB optical drives (CD/DVD
combo or a DVD dual/multi drive) are not supported.
Copy Manager
The network storage system’s Copy Manager feature allows you to back up data
from the USB hard drive to My Book World Edition or back up data from the My Book
World Edition to the USB hard drive. See “Copy Manager” on page 123 for
instructions.
Important: When backing up data, always connect the USB hard drive
directly to a USB port on the network storage system. Do not use a USB
hub. Ensure that the destination drive has enough free space to store the
amount of data being transferred.
CONNECTING A USB HARD DRIVE - 46
Page 52

8
MY BOOK WORLD EDITION
USER MANUAL
Using WD Discovery
WD Discovery is an exclusive web-based utility that aids in the installation of the My
Book World Edition network drive. The easy-to-use software enables you to quickly
locate and set up the My Book World Edition on your home network from any
Windows computer. With WD Discovery, you can easily map network drives, browse
its shared folders, and create a desktop shortcut for quick access to your My Book
World Edition.
.WD Discovery provides the following options:
If you want to access the advanced options in the Network
Storage Manager interface, you must configure your My Book
device. See “Configuring My Book World Edition” on page 53.
Automatically map a network drive so you can easily share and
store data on your My Book World Edition. See “Mapping a
Network Drive” on page 47.
Easily browse network shares without having to manually enter
drive paths. See “Browse Network Shares (Windows only)” on
page 50.
Create a desktop shortcut that points to a networked My Book
World Edition. See “Desktop Shortcut Creation (Windows only)”
on page 52.
Mapping a Network Drive
To access and store data on My Book World Edition after setting up the device, you
must first map a network drive to one or more of the default shares. You must install
the WD Discovery application on each Windows XP or Vista computer in your
network to automatically map a network drive, browse network shares, or create a
desktop shortcut.
Windows XP
Note: Follow the steps below only if you have not installed WD discovery as instructed in “Windows
XP” on page 11.
1. Turn on your computer and wait for the operating system to load.
2. If WD Discovery is not running, click Start > Programs > WD Discovery or
double-click the WD Discovery icon on your desktop.
USING WD DISCOVERY - 47
Page 53

MY BOOK WORLD EDITION
USER MANUAL
3. Click the device you want to map in the Network Drives Found list and click Map
Network Drive in the Things to Do list.
A message appears asking whether you want to map the drive automatically. If
you want to map the drive manually, skip to step 5.
4. Click Yes. If you want to map the drive manually, skip to step 5.
All share folders available on the device will be mapped as network drives
automatically. Available drive letters are assigned backwards from Z.
When mapping completes, the share folders appear as network drives in the
WD Discovery screen. Click Back to return to the main page.
5. Manual drive mapping: Click No. All share folders on the device are listed onscreen. Select a folder name, then select a drive letter. Click Yes to complete
drive letter assignment.
USING WD DISCOVERY - 48
Page 54

MY BOOK WORLD EDITION
USER MANUAL
6. Click My Computer. The network drives display. You can now drag and drop
files into the network drive folders using My Computer or Windows Explorer.
Windows Vista
Note: Follow the steps below only if you have not installed WD discovery as instructed in “Windows
Vista” on page 14.
1. Turn on your computer and wait for the operating system to load.
2. Select the device you want to configure and click Map Network Drive in the
Things To Do list.
A message appears asking whether you want to map the drive automatically. If
you want to map a drive manually, skip to step 4.
3. Click Yes. Skip to step 4 if you want to map the drive manually.
All share folders available on the device will be mapped as network drives
automatically. Available drive letters are assigned backwards from Z.
When mapping completes, the share folders appear as network drives in the WD
Discovery screen. Click Back to return to the main page.
USING WD DISCOVERY - 49
Page 55

MY BOOK WORLD EDITION
USER MANUAL
4. Manual drive mapping: Click No. All share folders on the device are listed onscreen. Select a folder name, then select a drive letter. Click Yes to complete
drive letter assignment.
5. Click Computer. The network drives display. You can now drag and drop files
into the network drive folders using Computer or Windows Explorer.
Note: Once the WD Discovery Tool installation is complete, it will automatically launch and
the WD Discovery icon displays on your desktop.
Mac OS X
See drive mapping instructions under Basic Setup on page 47.
Browse Network Shares (Windows only)
To access data on a share using WD Discovery:
Use WD Discovery to easily browse network shares without having to manually enter
drive paths.
1. Ensure that the device is powered on and connected to the network.
2. Click Start > Programs > WD Discovery or double-click the WD Discovery
icon on your desktop.
3. Click MyBookWorld in the Network Drives Found list and click Browse
Network Shares in the Things To Do list.
USING WD DISCOVERY - 50
Page 56

MY BOOK WORLD EDITION
USER MANUAL
4. After successful login, the share folders on the device are listed. Click a network
share path to view and access share files in Windows Explorer.
5. Copy your music files into the Shared Music folder, your video files into the
Shared Videos folder, and your photos and pictures into the Shared Pictures
folder.
USING WD DISCOVERY - 51
Page 57

MY BOOK WORLD EDITION
USER MANUAL
Desktop Shortcut Creation (Windows only)
WD Discovery can create a desktop shortcut that points to a networked
My Book World Edition. Follow these steps to create a desktop shortcut:
1. Ensure that the device is powered on and connected to the network.
2. Click Start > Programs > WD Discovery or double-click the WD Discovery
icon on your desktop.
3. Click MyBookWorld in the Network Drives Found list, and then click Create
Desktop Shortcut in the Things To Do list.
4. A dialog appears informing you that the desktop shortcut has been created
successfully. Click OK.
USING WD DISCOVERY - 52
Page 58

9
MY BOOK WORLD EDITION
USER MANUAL
Network Storage Manager
Network Storage Manager is a powerful and convenient web-based management
and configuration solution for My Book World Edition.
Note: Accessing and setting up the Network Storage Manager is not required to begin using your
My Book World Edition right away.
Configuring My Book World Edition
You must first configure your My Book World Edition before using the Network
Storage Manager user interface. Follow the instructions below for Windows or Mac.
Windows XP/Vista
Note: Follow the steps below only if you have not installed WD Discovery Tool as instructed on
page 11. Otherwise, launch WD Discovery Tool using the desktop icon and continue with step 7.
1. Turn on your computer and wait for the operating system to load.
2. Insert the software CD into the CD-ROM drive.
Note: If AutoPlay is disabled on your computer, you must install the utilities manually. Click Start and
then Computer (Windows Vista) or My Computer (Windows XP). Double-click Setup.exe in the
root directory of the CD.
3. Windows Vista: Click Run setup.exe, and then click Allow.
4. Click Accept in the Terms of Agreement screen.
5. If you have connected the device properly as shown in the Connect screen, click
Next.
6. The Application Installer screen opens, displaying a list of options. Click WD
Discovery Tool.
7. The WD Discovery screen displays. Click MyBookWorld in the Network Drives
Found list and point to and click Configure.
NETWORK STORAGE MANAGER - 53
Page 59

MY BOOK WORLD EDITION
USER MANUAL
8. The login page appears. Continue device setup by following the instructions for
“Setting up the Device” on page 54.
Mac OS X
1. Turn on your computer and wait for the operating system to load.
2. Open the Safari web browser.
3. Click the Bookmarks link in the upper left corner of the screen.
4. Click Bonjour, then double-click MyBookWorld.
5. The login page appears. Continue device setup by following the instructions for
“Setting up the Device” on page 54.
Setting up the Device
Follow the steps below to continue setting up the device for all operating systems.
1. Enter “admin” in both the Administrator Name and Password fields.
2. Select a language from the Language list and click Login.
NETWORK STORAGE MANAGER - 54
Page 60

3. Click Next.
4. Read the license agreement, and then click I Agree.
MY BOOK WORLD EDITION
USER MANUAL
5. In the Initial Setup screen, do the following:
(a) Enter a name in the Device Name field (up to 15 characters, including alphanumeric and
dash ‘-’).
Note: The device name is used to identify the storage device connected to the network and appears
in My Network Places. To connect more than one storage device to the same network, you must
specify a unique device name for each storage device.
Caution: Renaming My Book World Edition forces all the network
computers to remap their shared network resources. Change the device
name only when necessary.
(b) Enter a brief description of the device in the Device Description field. The maximum length
of the description is 42 alphanumeric characters.
(c) Select a time zone from the Time Zone list.
(d) If necessary, adjust the date and time manually using the Date & Time lists.
NETWORK STORAGE MANAGER - 55
Page 61

MY BOOK WORLD EDITION
USER MANUAL
Click Next.
6. Enter a new admin password in the New Admin Password field. Retype the
new password in the Confirm Password field. Click Next.
Note: If you forget your admin password, you must reset the device to its default configuration using
the reset button. See “Reset Button” on page 7 for instructions.
NETWORK STORAGE MANAGER - 56
Page 62

MY BOOK WORLD EDITION
USER MANUAL
7. Accept the default DHCP (Dynamic Host Configuration Protocol) client settings.
If you are not using DHCP, click Static and manually assign the IP address. Click
Next.
8. The Summary screen displays. Click Finish.
Note: If you are using Windows XP or Vista, you may notice a warning notice bar display during the
final initialization of your My Book World Edition. The bar warns that the Internet Explorer has
blocked an Active X controller message. This warning disappears on its own, or you can click the X
button to the right of the bar. This warning does not affect setting up your drive.
NETWORK STORAGE MANAGER - 57
Page 63

MY BOOK WORLD EDITION
USER MANUAL
Accessing Network Storage Manager
You can manage and configure your My Book World Edition by entering the
web-based user interface.
Note: Accessing and setting up the Network Storage Manager is not required to begin using your
My Book World Edition.
Important: You must configure My Book World Edition before using
Network Storage Manager. Follow the instructions under “Configuring My
Book World Edition” on page 53.
Windows
1. Ensure that the device is powered on and connected to the network.
2. If WD Discovery is not running, click Start > All Programs > WD Discovery.
3. Click MyBookWorld in the Network Drives Found list and point to and click
Configure in the Things To Do list.
4. The login page appears. Type in the administrator name and password (the
default password is “admin” unless it has already been changed by the
administrator). In the Tool list, click Network Storage Manager. In the
Language list, click the language for your region. Click Login.
Mac
1. Turn on your computer and wait for the operating system to load.
2. Open the Safari web browser.
3. Click the Bookmarks link in the upper left corner of the screen.
4. Click Bonjour, then double-click MyBookWorld.
5. The login page appears. Type in the administrator name and password. In the
Tool list, click Network Storage Manager. In the Language list, click the
language for your region. Click Login.
NETWORK STORAGE MANAGER - 58
Page 64

MY BOOK WORLD EDITION
USER MANUAL
Network Storage Manager Features
The web-based management utility includes the following features:
• LAN access—the device supports local area network access of the web-based
user interface, enabling management from anywhere in the network.
• Secured access—the device can be accessed and configured by the
web-based, password protected user interface over SSL (Secure Socket Layer).
• E-mail notification—in the event of warnings or errors related to temperatures,
hard drive, network, or USB connection, administrators are automatically alerted
by e-mail.
• Multiple management levels—users can be assigned different rights. The
device supports two levels: full access and read only.
• Update via web—firmware updates can be downloaded and installed on the
device from a computer on the LAN.
• Disk management—the web-based user interface allows administrators to
monitor internal hard drives and USB hard drives connected to the device.
• SMART support—includes SMART (Smart Monitoring Analysis and Reporting
Technology) feature for detecting and reporting the status of the SATA hard
drives.
• USB storage support—allows reliable data backup from a USB storage device
to the device.
• Support for file sharing—allows file sharing over the network.
• RAID support (My Book World Edition II)—allows RAID configuring of the
hard drives.
• Support for Windows and Mac systems—allows users on different platforms
to share files using CIFS (Common Internet File System), NFS (Network File
System), FTP (File Transfer Protocol), or AFP (Apple File Protocol) protocols.
• iTunes streaming support—allows users connected to the device to stream
audio files to iTunes on their computers.
• Twonky Media server—provides fast, convenient navigation and searching of
all your media files.
• Remote shutdown or reboot—allows administrators to power off or reboot the
device from any computer on the LAN.
• System log—an efficient instrument in analysing and solving technical issues.
Updating the Firmware
To keep your system up to date, go to Network Storage Manager > Advanced
Mode > System > Update to upgrade the firmware. For more information, see
“Update (Firmware)” on page 77.
NETWORK STORAGE MANAGER - 59
Page 65

MY BOOK WORLD EDITION
USER MANUAL
User Interface Overview
The web-based user interface is designed to logically access and manage the
features of the device. Upon logging in, the web user interface defaults to basic
mode. Basic mode provides access to the most common device configuration
options.
The advanced mode page includes six tabs and each tab is subdivided into several
menu buttons providing advanced task management functions. The toolbar located
on the upper right allows you to switch from the advanced mode and basic mode any
time.
NETWORK STORAGE MANAGER - 60
Page 66

MY BOOK WORLD EDITION
USER MANUAL
Toolbar
The toolbar located on the upper right of the Network Storage Manager user
interface includes the following commands.
Function Description
Advanced Allows you to switch the user interface from basic to advanced mode.
Basic Allows you to switch the user interface from advanced to basic mode.
Help Displays online help.
Logout Closes the browser session and exits the utility.
NETWORK STORAGE MANAGER - 61
Page 67

MY BOOK WORLD EDITION
USER MANUAL
Basic Mode
The basic mode provides access to the most common configuration options.
Click any of the menu buttons to display more configuration options. The table below
describes the menu options available in basic mode.
Category Description
Device Name Enter a device name and description. For more details, see “Device Name” on page 63.
Date & Time Set the system date and time manually or set the NTP server to synchronize the device. For
more details, see “Date & Time” on page 63.
Network Configure the network connection. For more details, see “Network” on page 64.
Users Create and delete user accounts and change the user password. For more details, see
“Users” on page 65.
Folder Shares Access configuration details relating to how shares are made available through this storage
device. This menu also displays a list of mounted volumes and their available shares. When a
USB hard drive is connected to the device, the USB hard drive displays as USB share. For
more details, see “Folder Shares” on page 66.
System Status Displays general information about the storage device, such as device name, firmware version,
current date/time, system uptime, IP address, volume usage, and volume RAID type. For more
details, see “System Status” on page 68.
Remote Access Enables or disables the MioNet software. Computers running MioNet can remotely access
and share files on the storage device over the internet.
Note: Available only on computers running Windows. For more details, see “Remote Access”
on page 69.
Shutdown/
Reboot
Performs device shutdown or reboot from any computer on the local area network (LAN). For
more details, see “Shutdown/Reboot” on page 69.
NETWORK STORAGE MANAGER - 62
Page 68

MY BOOK WORLD EDITION
USER MANUAL
Device Name
Use this option to enter or change a device name and/or a description of the device.
The device name is the name by which your My Book World Edition is identified on
the LAN.
1. Click Device Name in basic mode home screen.
2. Enter or change the text in the Device Name and/or Device Description fields.
3. Click Submit.
Date & Time
The date and time is synchronized automatically to the NTP (network time protocol)
server by default. You have the option to set the date and time manually or allow the
NTP to access the internet to automatically set the time.
Note: Time displays in 24-hour format only.
1. Click Date & Time in the Basic mode home screen.
2. Deselect Enable to set the time manually.
3. To synchronize the date and time automatically, click Enable.
NETWORK STORAGE MANAGER - 63
Page 69

MY BOOK WORLD EDITION
USER MANUAL
4. Click Submit.
Network
The device’s network mode is set to DHCP Client by default, which is appropriate
for most environments. By selecting Static IP, you can set the network mode and
change the IP address, netmask, gateway, and DNS (Domain Name Service) server
IP address.
To configure the network settings:
1. Click Network in the Basic mode home screen.
2. In the Network Mode drop-down menu, select a network mode. Selecting DHCP
Client as a network mode causes the device to obtain an IP address
automatically from the local DHCP server. Selecting Static IP as a network
mode requires you to enter IP information such as IP address, Default Gateway,
and DNS Servers.
3. Click Submit.
NETWORK STORAGE MANAGER - 64
Page 70

MY BOOK WORLD EDITION
USER MANUAL
Users
Creating users allows the administrator to share data on My Book World Edition
across the network by creating user accounts. The administrator can also edit and
delete user accounts in the Users menu.
Users Screen Icons
Icon Description
Denotes a user private share.
This user is NOT set up as a private share.
This user IS set up as a private share.
Click this icon to change the user password.
Click this icon to delete a user.
Click this icon to add a user.
To create a new user account:
1. Click Users in the basic mode home screen.
2. Click the Add icon .
3. Enter the user name in the User Name field.
4. Enter the user’s full name in the Full Name field.
5. Enter the password in the Password field.
Note: The user name and password can contain up to 15 characters, including alphabetic, numeric,
underscore, space, and most special characters.
6. Re-enter the password in the Confirm Password field.
7. Create a private user share at the same time by clicking Yes next to Create User
Private Share. The new user is granted full access to the private share. The
private share name is the same as the user name.
NETWORK STORAGE MANAGER - 65
Page 71

MY BOOK WORLD EDITION
USER MANUAL
8. Click Submit.
To change a user password:
1. Click the Change Password icon next to the appropriate user account.
2. Make the necessary changes, and then click Submit.
To delete an existing user account:
1. Select the user account you want to delete, and then click the Delete icon .
2. Click OK.
For more user configuration options using the Network Storage Manager advanced
mode, see “Users” on page 107.
Folder Shares
Shares are folders that can be used to organize and store files on your
My Book World Edition network storage system. Shares can be shared with everyone
(public) or with selected users on your network (private).
The device comes preconfigured with three shares:
• Public—created automatically after initial setup
• Shared Music - folder for storing music files you want to share with other users.
• Shared Pictures - folder for storing image files you want to share with other users.
• Shared Videos - for storing video files you want to share with other users.
Important: Do not change or delete these default share folders.
Disruption of file sharing could result. These are the default folders for the
Media Server (Twonky Media) and iTunes Service. For more information on
how to use Twonky media, see “Media Server” on page 105. For more
information on how to use the iTunes service, see “iTunes” on page 105.
• Download—for saving files using Downloader (see “Scheduled Downloads” on
page 118).
• Configuration—this is a read-only share containing only a Help file and the login
page. It is not meant for sharing or storing data and should not be modified.
The administrator can create private shares accessible only by user name and
password when setting up a user account (see “To create a new user account:” on
NETWORK STORAGE MANAGER - 66
Page 72

MY BOOK WORLD EDITION
USER MANUAL
page 65), or by setting permissions on an existing share (see “Folder Share
Permissions” on page 110).
You must first access Network Storage Manager to create a share. See “Accessing
Network Storage Manager” on page 58.
The Folder Shares menu provides access to a list of available shares.
Folder Shares Screen Icons
Icon Description
Denotes a user private share.
This user is NOT set up as a private share.
This user IS set up as a private share.
Click this icon to delete a share.
Click this icon to add a share.
To create a share:
1. Click Folder Shares in the Basic mode home screen.
2. Click the Add icon .
3. Enter a share name in the Share field. The share name can contain up to 32
characters, including alphabetic, numeric, or underscore characters.
4. Enter a brief description in the Description field.
NETWORK STORAGE MANAGER - 67
Page 73

5. Click Submit.
To delete existing shares:
WARNING: Deleting a share erases all data on the share. All files and
folders on the share will be lost.
MY BOOK WORLD EDITION
USER MANUAL
1. Select the share to delete.
2. Click the Delete icon .
3. Click OK.
System Status
The System Status option displays general information about the system, such as
device name, firmware version, current date/time, system uptime, IP address, volume
usage, and volume RAID type. Click System Status in the basic mode home screen
to access system information
NETWORK STORAGE MANAGER - 68
Page 74

MY BOOK WORLD EDITION
USER MANUAL
Remote Access
My Book World Edition comes with MioNet enabled by default. The Remote
Access menu allows you to configure the MioNet service on the storage device,
MioNet service status messages:
• MioNet service connection status
• Started - MioNet service is started
• Stopped - MioNet service is stopped and will start on system restart.
• Disabled - MioNet service is disabled and will not start on system restart.
• MioNet registration status
• Unregistered - Not currently registered to a MioNet account
• Registered - Already registered to a MioNet account
Note: A mouse-over of the registration status shows the MioNet account name if the device is
registered. To register with MioNet, go to: www.mionet.com/MyBookWorld.
Shutdown/Reboot
The Shutdown/Reboot menu allows you to perform a system reboot or shutdown.
To perform network storage system shutdown:
1. Click Shutdown/Reboot in the basic mode home screen.
2. On the Shutdown/Reboot page, click Shutdown.
NETWORK STORAGE MANAGER - 69
Page 75

3. Click OK.
To perform network storage system reboot:
1. Click Shutdown/Reboot in the basic mode home screen.
2. On the Shutdown/Reboot page, click Reboot.
3. Click OK.
MY BOOK WORLD EDITION
USER MANUAL
NETWORK STORAGE MANAGER - 70
Page 76

MY BOOK WORLD EDITION
USER MANUAL
Advanced Mode
Advanced mode provides access to additional options not available in the basic
mode. When in basic mode, click Advanced Mode on the toolbar to view Network
Storage Manager in advanced mode.
The advanced mode page include six tabs, each subdivided into several menu
buttons providing more management options for maximum flexibility and security of
the device. The table below describes the tab options available in advanced mode.
Tab Description
System The System tab allows you to configure the general system settings, set e-mail or window
alerts, change the administrator password, perform firmware upgrades, perform system
configuration file backups, restore system to factory defaults, activate or deactivate the
system LEDs, generate an SSL certificate, enable power saving, and perform device
shutdown or reboot. For more details, see “System” on page 72.
Network The Network tab has access to all network configuration options, such as setting DHCP /
Static, changing the IP address, netmask, gateway, DNS server IP address, configure jumbo
frame size feature, and configuring membership in a domain or workgroup. For more details
“Network” on page 85.
Storage The Storage tab provides a list of all supported drives it locates on the system. It also allows
you to configure the RAID capability of the hard drives (My Book World Edition II only),
manage file share preferences, set the backup destination folder, set disk quotas, and set a
share folder for users. For more details, see “Storage” on page 91.
Media The Media tab allows you to enable or disable the streaming option in iTunes or access the
Twonky Media server. For more details, see “Media” on page 104.
Users The Users tab allows you to add, modify, and delete users and groups, and change all user
and group permissions (read/write, read only, no access) to shares/folders and USB storage
devices. For more details, see “Users” on page 107.
Status The Status tab displays general information about the system such as device name, firmware
version, current date/time, machine up-time, memory and swap activity, and load averages.
This tab also allows viewing of logs from the system, Common Internet File System (CIFS), or
File Transfer Protocol (FTP). For more details, “Status” on page 113.
NETWORK STORAGE MANAGER - 71
Page 77

MY BOOK WORLD EDITION
USER MANUAL
System
The System tab allows you to set the system date and time, set up alerts, change the
admin password, perform software or firmware upgrades, create a backup copy of
the system files, restore system to factory defaults, generate and set up an SSL
certificate, or perform system reboot or shutdown.
The System tab provides access to the following configuration options:
• General Setup
•Alerts Setup
• Admin Password
• Update
• Restore Configuration
• Advanced
• Shutdown/Reboot
NETWORK STORAGE MANAGER - 72
Page 78

MY BOOK WORLD EDITION
General Setup
USER MANUAL
The General Setup submenu allows you to perform basic configuration of device.
Here, you can provide a name and brief description for the device, select a
compatible web access protocol, and set the time zone. You can set the date and
time manually or enable automatic time synchronization via NTP (Network Time
Protocol) Service. You can also manually specify the IP address of the NTP servers to
which you want to synchronize.
To configure system general setup settings:
1. Assign a device name for this storage device in the Device Name field. The device
name can contain up to 15 characters, including alphabetic, numeric, space, and
most special characters.
2. Enter the brief description for this storage device in the Device Description field.
The maximum length of the description must not be more than 256 alphanumeric
characters.
3. In web access protocol, select either of the following web access protocols:
• Hypertext Transfer Protocol (HTTP) is a communications protocol for the transfer of
information on the intranet and the World Wide Web.
• Hypertext Transfer Protocol over Secure Socket Layer or HTTPS is a URL scheme
used to indicate a secure HTTP connection. It is syntactically identical to the http:// scheme
normally used for accessing resources using HTTP. HTTPS provides a more secure means of
configuring your device, but may affect the responsiveness of the user interface.
4. To set the date and time manually, deselect Enable next to NTP Service.
5. Select a time zone from the Time Zone list.
6. Adjust the date and time manually in the Date & Time lists.
7. Click Submit.
NETWORK STORAGE MANAGER - 73
Page 79

MY BOOK WORLD EDITION
Alerts Setup
USER MANUAL
Using the Alerts Setup submenu, you can configure e-mails or popup messages that
provide alerts for system conditions, over temperature; hard drive, volume, network,
and USB status; and user and group events. These alerts help the system
administrator(s) manage and detect events or errors.
Note: E-mail alerts may not work with some ISPs using strong spam filtering. For further information,
go to support.wdc.com and search the knowledge base for answer ID 2570.
To set up automatic e-mail notifications:
1. Click Enable next to Email Notification.
2. Enter the name of the SMTP server or an IP address to be used for sending email in the SMTP Server field (check with your ISP provider for the SMTP server
name).
3. Enter the port number to be used when connected for SMTP sending in the
SMTP Port field.
4. Click Enable next to SMTP Authentication if required, then enter the user name
and password.
5. Enter the e-mail address where you want to send an e-mail message when an
event occurs in the Email Recipients field. Up to five e-mail addresses can be
added at a time.
6. Click Send Test Mail to send a test alert and confirm your settings are correct.
NETWORK STORAGE MANAGER - 74
Page 80

7. Click Submit.
MY BOOK WORLD EDITION
USER MANUAL
To configure alerts to send pop-up messages when an event occurs:
Note: Pop-up notification only works with Windows XP.
For a list of events, see “System Events” on page 136.
1. On the Alerts Setup page, click Enable next to Pop-Up Notification.
2. Enter the name of the computer in the Notified Devices field. When an event
occurs, a pop-up message will appear on the computer. Up to five computer
names can be added to the alert list.
Note: To find the name of your computer, click Start and right-click Computer or My Computer,
click Properties, and then click the Computer Name tab (Windows XP).
3. Click Send Test Pop-up to send a test alert and confirm that the settings are
correct.
Note: Make sure the Messenger Service is activated on the computers to which you want to send
the pop-up message when an event occurs. To enable Messenger Service, go to Start > Control
Panel > Administrative Tools > Services > Messenger. You can test the Messenger Service
by clicking Send Test Pop-up. Make sure printer and file sharing is selected as an exception if the
Windows Firewall is enabled in Windows XP.
NETWORK STORAGE MANAGER - 75
Page 81

4. Click Submit.
MY BOOK WORLD EDITION
USER MANUAL
Admin Password
The Admin Password menu allows you to change the administrator’s password.
To change the administrator's password:
1. In the Old Password field, enter the old password.
2. In the New Password field, enter the new password. The maximum length of the
password must not be more than 16 alphanumeric characters. The password is
case sensitive and should be entered exactly in the same way each time.
3. In the Confirm Password field, re-enter the new password.
4. Click Submit.
NETWORK STORAGE MANAGER - 76
Page 82

MY BOOK WORLD EDITION
Update (Firmware)
USER MANUAL
The Update menu provides information about the current firmware version and allows
you to perform a firmware update either automatically or manually.
Automated
The Automated tab provides information about the current firmware version and
connects to the WD website for automatic downloading of the latest firmware.
1. Click Check For New Firmware.
2. Click Download if new firmware is available.
3. Click Upgrade. Wait for the update process to complete.
NETWORK STORAGE MANAGER - 77
Page 83

MY BOOK WORLD EDITION
USER MANUAL
Warning! Do not interrupt a firmware upgrade in progress, doing so may
cause the device to malfunction or render it unable to boot.
After your firmware has been updated, the device will reboot. The user interface
redirects to the System Information page after the update has completed.
Manual
The Manual tab allows you to install the firmware manually.
1. Download the latest firmware file from support.wdc.com.
2. Enter the path to the firmware file or click Browse to locate the file.
Important: Do not rename the firmware file.
3. Click Submit to transfer the firmware file from the computer to the network
storage system. The update process may take a few minutes to complete.
Warning! Do not interrupt a firmware upgrade in progress, doing so may
cause the device to malfunction or render it unable to boot.
NETWORK STORAGE MANAGER - 78
Page 84

MY BOOK WORLD EDITION
USER MANUAL
After your firmware has been updated, the device will reboot. The web user interface
redirects to the System Information page after the update is completed.
Restore Configuration
The Restore Configuration menu allows you to save or restore system configuration
settings or revert to factory default settings.
NETWORK STORAGE MANAGER - 79
Page 85

MY BOOK WORLD EDITION
To back up the current system configuration settings:
1. On the Configuration page, click Save Current Configuration.
USER MANUAL
2. Click Save.
3. Specify a file name and location for saving the file.
4. Click Save.
To restore configuration settings:
1. On the Configuration page, click Browse.
2. Select the previously saved system configuration file.
3. Click Open.
4. Click General Restore. Selecting General Restore will restore all features to
previously saved settings (data volume and shares settings excepted). All current
system configurations will be lost.
5. Click OK.
NETWORK STORAGE MANAGER - 80
Page 86

MY BOOK WORLD EDITION
To restore the device to factory defaults:
USER MANUAL
Performing a factory default reset will erase all settings in the network storage
system. System configuration will reset the device to default factory settings. All
information and data will be lost. The LAN settings (including port settings) are not
changed. After the reset, the administrator login/password will be changed to
“admin/admin.”
Important: Save the current configuration prior to restoring the factory
default settings.
1. On the Configuration page, click Restore Factory Default.
2. Click OK.
During the system restore process, the system will turn off power LED and blink
backup LED. Wait until the system restore process is completed.
Note: You cannot access the configuration web pages if you forget the administrator password, IP
address setting, or device name. Use the reset button to restore these settings (including IP setting,
device name and administrator password) to factory default configuration. To use this function, press
and hold the reset button on the back of the device (next to power interface) for at least 10 seconds.
The system reboots automatically and you can then use the default settings to access the device.
Advanced
Configure the system for root access, SSL certificate/key, power saving, and LED
control using the Advanced menu.
NETWORK STORAGE MANAGER - 81
Page 87

MY BOOK WORLD EDITION
To enable SSH access:
USER MANUAL
Enabling SSH access allows login to a console window using SSH for diagnostic
use. The default root user password is displayed for the user.
1. Click Enable under Root Access.
2. Click Submit.
NETWORK STORAGE MANAGER - 82
Page 88

MY BOOK WORLD EDITION
To generate an SSL certificate and key pair automatically:
USER MANUAL
Configure the system for a secure connection by generating a key and an SSL
certificate automatically or manually using the Advanced menu.
1. On the Advanced Setup page, click the highlighted word HERE. The SSL
Certificate/Key Generation dialog appears.
2. Enter the identification information you want to include in the SSL certificate/key
pair, and then click Submit.
To generate a SSL certificate and key pair manually:
1. Generate a RSA private key.
2. Generate a RSA private key by typing the following commands on a Linux system
(e.g. Redhat or Fedora).
/usr/bin/openssl genrsa 1024 > server.key
/bin/cat server.key
3. Copy and paste to the Key field of SSL certificate/key on the Advanced Setup
page.
4. Create a self-signed certificate by typing the following commands:
/usr/bin/openssl req -new -key server.key -x509 -out server.crt
/bin/cat server.crt
5. Copy and paste to the Certificate field of SSL certificate/key on the Advanced
Setup page.
6. Click Submit.
To enable HDD standby:
If the HDD Standby function is enabled, the hard drives go into standby mode to save
power after a fixed period of no activity. This period varies from two to seven minutes.
1. Click Enable next to HDD Standby.
2. Click Submit.
NETWORK STORAGE MANAGER - 83
Page 89

MY BOOK WORLD EDITION
To enable LED control:
USER MANUAL
The LED indicator function can be enabled or disabled using LED control. LED status
is enabled by default. Follow these steps to turn off LED control:
1. Uncheck Enable next to LED Status.
2. Click Submit.
Shutdown/Reboot
The Shutdown/Reboot menu allows you to perform system reboot or shutdown.
To perform network storage system shutdown:
1. Click Shutdown/Reboot in the System tab home screen.
2. On the Shutdown/Reboot page, click Shutdown.
3. Click OK.
To perform network storage system reboot:
1. Click Shutdown/Reboot in the System tab home screen.
2. On the Shutdown/Reboot page, click Reboot.
3. Click OK.
NETWORK STORAGE MANAGER - 84
Page 90

MY BOOK WORLD EDITION
Network
The Network tab provides access to the following configuration options:
• LAN
• Services
• Workgroup
• Remote Access
USER MANUAL
LAN
The LAN submenu allows access to all network configuration options including
setting the connection method, changing the IP address, netmask, gateway, and
DNS (Domain Name Service) server IP address, and enabling the jumbo frame
feature.
NETWORK STORAGE MANAGER - 85
Page 91

MY BOOK WORLD EDITION
To configure the network settings:
Note: If connected to a home network, contact the Internet Service Provider (ISP) to obtain the static
IP address.
USER MANUAL
1. In the Network Mode drop-down menu, select a network mode. Selecting DHCP
Client as a network mode will cause this storage device to obtain an IP address
automatically from the local DHCP server. Selecting Static IP as a network mode
requires you to assign IP information such as IP address, Default Gateway, and
DNS Servers.
2. If your network link speed is 1000 Mbps in the MTU Size menu, enter the MTU
(Maximum Transmission Unit) value for the jumbo frame. The default MTU setting
for Jumbo Frames is 1500 bytes. The network card on the client computer must
support jumbo frame.
Note: For the MTU size larger than '1500', the client machine and the network switch must also
support the same MTU size. The common MTU size for jumbo frame is '9004'. The rule for
calculating valid MTU is (MTU size - 1500) mod 8 = 0 ('xxx mod 8' means the value 'xxx' can be
divided by 8).
The range of valid IP addresses for each class:
- Class A: 1.0.0.1 to 126.255.255.254
- Class B: 128.1.0.1 to 191.255.255.254
- Class C: 192.0.1.1 to 223.255.254.254
3. Click Submit.
NETWORK STORAGE MANAGER - 86
Page 92

MY BOOK WORLD EDITION
Services
USER MANUAL
The Services menu allows you to set protocols for sharing files and folders on the
device.
• Universal Plug and Play (UPnP) is a set of computer network protocols that
simplifies the implementation of networks in the home by allowing devices to
connect seamlessly.
• Hypertext Transfer Protocol (HTTP) is a communications protocol for the
transfer of information on the intranet and the World Wide Web.
• Hypertext Transfer Protocol over Secure Socket Layer or HTTPS is a URL
scheme used to indicate a secure HTTP connection. It is syntactically identical to
the http:// scheme normally used for accessing resources using HTTP.
• File Transfer Protocol (FTP) is a network protocol used to transfer data from
one computer to another through a network, such as the internet, using an FTP
client program. FTP is a popular choice for exchanging files independent of the
operating systems involved.
• Network File System (NFS) is a network file system protocol that allows a user
on a client computer to access files over a network as easily as if the network
devices were attached to its local disks.
• Apple File Protocol (AFP) is a network protocol that offers file services for Mac
computers. AFP is enabled by default
NETWORK STORAGE MANAGER - 87
Page 93

MY BOOK WORLD EDITION
To enable UPnP NAT Traversal for Web Access & FTP:
USER MANUAL
1. Click Enable in UPnP for Web Access & FTP.
2. Click Submit.
The UPnP NAT Traversal combines with the UPnP feature and NAT feature.
Universal Plug and Play (UPnP) is an architecture for pervasive peer-to-peer
network connectivity of PCs and intelligent devices. The Network Address
Translation (NAT) is used in gateway devices that form the boundary between the
public Internet and the private LAN. As IP packets from the private LAN traverse
the gateway, NAT translates a private IP address and port number to a public IP
address and port number, tracking those translations to keep individual sessions
intact.
To enable a network service:
1. Click Enable in network service.
2. If you have selected FTP as your network service, click Yes to enable or click No
to disable anonymous login, and then click Submit.
3. If you have selected NFS or AFP as your network service, the IP allowed field
appears. You will be prompted to enter the IP filters that are allowed for NFS
service. Click Add to add a new IP filter, and then click Submit.
4. You can specify particular port numbers for HTTP, HTTPS, and FTP services
respectively. Instead of selecting the Default radio button, you can specify the
port number between 8000 and 10000 for each service.
Note: In IP Allowed field of NFS service, '*' means allow all IP addresses. If you intend to allow
specified IP addresses or range, please modify '*' in IP Allowed field.
Mount point for NFS share is /nfs/SHARENAME, Ex. /nfs/Public
Workgroup
The Workgroup menu allows you to set up the network storage device as a
workgroup or a domain member. The default setting is Workgroup. Unlike
workgroups, domains are controlled from a central location (domain controller) and
require central authentication before you can join them. Workgroups, in contrast, are
much simpler to control. As long as you know the workgroup name, you can add any
computer to a workgroup.
If your network uses a domain (i.e., has a Windows ADS), you may wish to connect
this device as a domain member. When configured as a domain member, the device
will ask the ADS to authenticate users. Therefore, as a domain member, the device
provides user-level security.
When joining a domain, the device must be authorized by the domain's administrator.
A user must enter the Domain Name, Domain Controller IP Address, Administrator
Name, and Administrator Password for the authorization.
NETWORK STORAGE MANAGER - 88
Page 94

MY BOOK WORLD EDITION
To set up a workgroup name:
1. Click Workgroup.
2. Enter a name for your workgroup in the Workgroup Name field.
3. Click Submit.
USER MANUAL
To set up a domain name (Windows 2003 Server only):
1. Click Domain Member.
2. Enter the domain name in the Domain Name field.
3. Enter the domain controller IP address in Domain Controller IP Address field.
4. Enter the Administrator name in the Administrator field.
5. Enter the Administrator password in the Administrator Password field.
Note: The local user and domain user share the same access control rights if the user name of the
local and domain users are the same (FTP service excluded).
6. Click Submit.
NETWORK STORAGE MANAGER - 89
Page 95

MY BOOK WORLD EDITION
Remote Access
USER MANUAL
My Book World Edition comes with MioNet enabled by default. If MioNet is not
already installed on the client computer, follow the instructions under “Configuring
My Book World Edition” on page 53. The Remote Access menu allows you to
configure the MioNet service on the storage device,
MioNet service status messages:
• MioNet service connection status
• Started - MioNet service is started
• Stopped - MioNet service is stopped and will start on system restart.
• Disabled - MioNet service is disabled and will not start on system restart.
• MioNet registration status
• Unregistered - Not currently registered to a MioNet account
• Registered - Already registered to a MioNet account
Note: A mouse-over of the registration status shows the MioNet account name if the device is
registered. To register with MioNet, go to: www.mionet.com/MyBookWorld.
NETWORK STORAGE MANAGER - 90
Page 96

MY BOOK WORLD EDITION
USER MANUAL
Storage
The Storage tab provides all necessary options required for individual storage disk
configuration and maintenance. This tab also includes an option to change the
system’s RAID configuration, set a share name, and format and safely remove the
USB hard drives connected to the system.
The Storage tab provides the following configuration options:
• Disk Manager
• Volumes & RAID Management
• Folder Shares
• USB Shares
•Quota
• Downloads
NETWORK STORAGE MANAGER - 91
Page 97

MY BOOK WORLD EDITION
Disk Manager
USER MANUAL
The Disk Manager submenu displays the connected hard drives in the device. This
submenu also displays detailed information about the hard drives, such as disk size,
disk description, and status.
Drive status messages include the following:
• Good—Indicates the hard drive is accessible and functioning normally.
• Failed—Indicates a fatal error has occurred on the hard drive(s). See “Replacing
a Drive (My Book World Edition II)” on page 128 for drive replacement
instructions.
• Foreign—Indicates the device has detected a hard drive containing user data
(e.g., the drive was used with another computer and contains data that is not
recognized).
To clean up disk:
If the hard drive is foreign or unused, the Clean Disk icon appears on the right
side of the Disk Management table. Clean Disk allows you to clean all data on the
drive.
To safely remove disk:
If the hard drive is unused, the Safely Remove Disk icon appears on the right side
of the Disk Management table, and allows you to safely remove the drive.
NETWORK STORAGE MANAGER - 92
Page 98

MY BOOK WORLD EDITION
Volumes and RAID Management
USER MANUAL
The Volumes menu includes two tabs—Manage Volume and Manage RAID
(My Book World Edition II only).
Manage Volume
The Manage Volume tab lists all the volumes available on the device and provides
detailed information about each volume such as volume name, volume type (RAID
type), disk or disks associated with the volume, usage, total size, and volume status.
Volume status messages include the following:
• Good—Indicates the volume is accessible and hard drive is functioning normally.
• Failed—Indicates a volume cannot be started automatically, the disk may be
damaged or the file system may be corrupt.
• Resyncing—Occurs when creating a mirror or when a mirrored volume is being
resynchronized.
• Formatting—Indicates volume is being formatted or system is creating an ext3
(third extended) file system for a Linux operating system.
• Degraded—Missing one drive in a RAID 1 configuration.
• Recovering—The failed drive is being copied to a working drive in a RAID 1
(mirrored) configuration.
NETWORK STORAGE MANAGER - 93
Page 99

MY BOOK WORLD EDITION
Manage RAID (My Book World Edition II)
USER MANUAL
Configure RAID on the hard drives using the Manage RAID tab on the Volume
Management submenu. The default RAID configuration is RAID 1 (Mirrored).
WARNING! Changing the RAID configuration causes all volumes and
data to be lost.
RAID (Redundant Array of Independent Drives) refers to an array of multiple
independent hard drives that provide high performance and reliability. RAID function
depends on the number of drives present and the RAID level selected.
The network storage system supports the following RAID levels:
• RAID 0 (Striped) - Provides data striping (spreading out blocks of each file
across multiple hard drives) but no redundancy. This improves performance but
does not deliver fault tolerance. If one drive fails then all data in the array is lost.
• RAID 1 (Mirrored) - Provides disk mirroring. Mirroring creates an exact copy (or
mirror) of a set of data on two drives, which increases reliability compared to a
single drive. If either drive fails, the other continues to function as a single drive
until the failed drive is replaced. Note this RAID type has the highest disk
overhead (100%) of all RAID types.
• Span (Spanned) - Combines drives into a linear fashion to create one large
logical volume. Unlike RAID 0, which “stripes” all data bitwise to both drives, the
volume is linear across both drives. A spanned drive is literally like a single bigger
drive, in that files written to the volume earlier go to the “beginning” of the volume,
on the first physical drive. As the volume fills, files written later are written toward
the “end” of the volume, on the second drive. Like RAID 0, no data redundancy is
provided. If one of the drives fails, all data is lost.
• JBOD (Just a Bunch of Disks) - In JBOD mode, two drives are provided as two
separate volumes. This is the only mode on the My Book World Edition II for
which there are two data volumes. If one of the drives in a JBOD volume fails, only
the user data on that volume is lost.
NETWORK STORAGE MANAGER - 94
Page 100

MY BOOK WORLD EDITION
To configure the Manage RAID tab:
Note: Be sure to back up all data before configuring RAID. All data stored in the hard drive is lost
when changing the RAID configuration.
USER MANUAL
1. Click the Manage RAID tab.
2. Select a RAID configuration
DataVolume is the default volume.
If the volume RAID type is Span and there are new disks in the system, the Extend
icon appears on the side of the Volume Management table.
3. Click Submit.
Manage RAID Options (My Book World Edition II)
Any existing mode can be changed to any other available mode using the Manage
RAID option. The following table provides the available modes and data availability for
a My Book World Edition II with one drive after adding a second drive.
Starting Configuration Ending Configuration User data condition after second
drive added
JBOD (1 Volume) Spanned (Linear) Deleted
JBOD (1 Volume) JBOD (two volumes) Still available
JBOD (1 Volume) RAID 0 (Striped) Deleted
JBOD (one volume) RAID 1 (Mirrored) Deleted
RAID 1 (Mirrored) Spanned (Linear) Deleted
RAID 1 (Mirrored) JBOD (two volumes) Deleted
RAID 1 (Mirrored) RAID 0 (Striped) Deleted
RAID 1 (Mirrored) RAID 1 (Mirrored) Still available after rebuild
All “1 Drive” configurations for the My Book World Edition II are considered
“Degraded” RAID modes. When a drive fails in a My Book World Edition II with two
NETWORK STORAGE MANAGER - 95
 Loading...