

Page 1
WD Sentinel RX4100
™
Small Business Storage Server
Administrator and Maintenance Guide
Page 2

WD® Service and Support
Should you encounter any problem, please give us an opportunity to address it before returning this
product. Most technical support questions can be answered through our knowledge base or email
support service at http://support.wd.com. If the answer is not available or if you prefer, please
contact WD at the best telephone number shown below.
WD Guardian™ Services premium Technical Support and Extended Warranty services are also
available for Small Business Customers. Contact WD Technical support at http://support.wd.com
for information about this extra level of support and how to obtain it.
Your product includes 30 days of free telephone support during the 3-year standard limited warranty
period. This 30-day period starts on the date of your first telephone contact with WD Technical
Support. Email support is free for the entire warranty period and our extensive knowledge base is
available 24/7. To help us keep you informed of new features and services, remember to register
your product on the Registration page on the user interface or online at http://register.wd.com.
WD Guardian Services
When you need a little help from an expert, we’ll take care of you! WD Guardian Services offers
flexible, affordable and hassle-free technical support and extended warranty plans with a variety of
benefits. Choose the plan that works best for your business. Visit www.wdguardian.com for details.
Accessing Online Support
Visit our product support website at http://support.wd.com and choose from these topics:
• Downloads - Download drivers, software, and updates for your WD product.
• Registration - Register your WD product to get the latest updates and special offers.
• Warranty & RMA Services - Get Warranty, Product Replacement (RMA), RMA Status, and
Data Recovery Information.
• Knowledge Base - Enter keyword, phrase, answer ID, or PID.
• Installation - Get manuals, installation guides, and documentation for your WD product.
• WD Community - Share your thoughts and connect with other WD users.
Page 3

Contacting WD Technical Support
When contacting WD for support, have your WD product serial number, system hardware, and
system software versions available.
United States & Canada Europe
United States 855.556.5117 Belgium 00 80021102110
Canada 855.556.5117 Cyprus 00 80021102110
Mexico & South America
Argentina 00 80021102110 Estonia 00 80021102110
Brazil 0021 80021102110 Finland 990 80021102110
Columbia 009 80021102110 France 00 80021102110
Grenada 00 80021102110 Germany 00 80021102110
Panama 00 80021102110 Greece 00 80021102110
Peru 00 80021102110 Hungary 00 80021102110
Uruguay 00 80021102110 Iceland 00 80021102110
Africa
South Africa 09 80021102110 Italy 00 80021102110
Asia Pacific
Australia 0011 800.2110.2110 Norway 00 80021102110
China 00 800.2110.2110 Poland 00 80021102110
Hong Kong 001 800.2110.2110 Portugal 00 80021102110
Japan 010 800.2110.2110 Sweden 00 80021102110
Malaysia 00 800.2110.2110
New Zealand 00 800.2110.2110 United Kingdom, The 00 80021102110
Philippines 00 800.2110.2110
Singapore 001 800.2110.2110
Taiwan 00 800.2110.2110
Thailand 001 800.2110.2110
Israel 014 80021102110
(Telekom Malaysia IDD)
(Singtel IDD)
(Chunghwa IDD)
Czech Republic 00 80021102110
Denmark 009 80021102110
999 80021102110
Ireland 00 80021102110
Luxembourg 00 80021102110
Netherlands, The 00 80021102110
Swiss Confederation, The 00 80021102110
Registering Your WD Product
Register your WD product to get the latest updates and special offers. You can easily register your
product on the user interface of the product software or online at http://register.wd.com.
Page 4

Table of Contents
WD® Service and Support. . . . . . . . . . . . . . . . . . . . . . . . . . . . . . . . ii
WD Guardian Services . . . . . . . . . . . . . . . . . . . . . . . . . . . . . . . . . . . ii
1 Important User Information . . . . . . . . . . . . . . . . . . . . 1
Important Safety Instructions . . . . . . . . . . . . . . . . . . . . . . . . . . . . . . 1
Handling Precautions . . . . . . . . . . . . . . . . . . . . . . . . . . . . . . . . . . . . 2
Recording Your WD Product Information . . . . . . . . . . . . . . . . . . . . . 2
About This Guide . . . . . . . . . . . . . . . . . . . . . . . . . . . . . . . . . . . . . . . 2
2 Product Overview . . . . . . . . . . . . . . . . . . . . . . . . . . . . 3
Getting to Know Your WD Sentinel RX4100 Server . . . . . . . . . . . . . 3
Key Features . . . . . . . . . . . . . . . . . . . . . . . . . . . . . . . . . . . . . . . . . . 3
System Requirements and Compatibility Information . . . . . . . . . . . . 7
Technical Specifications . . . . . . . . . . . . . . . . . . . . . . . . . . . . . . . . . . 8
Product Views . . . . . . . . . . . . . . . . . . . . . . . . . . . . . . . . . . . . . . . . . 9
Indicators. . . . . . . . . . . . . . . . . . . . . . . . . . . . . . . . . . . . . . . . . . . . 10
Where to Find Help . . . . . . . . . . . . . . . . . . . . . . . . . . . . . . . . . . . . 12
3 Connecting the Server and Getting Started . . . . . . 13
User Roles and Responsibilities . . . . . . . . . . . . . . . . . . . . . . . . . . . 13
How the WD Sentinel RX4100 Fits into Your Office . . . . . . . . . . . . 15
Connecting the WD Sentinel RX4100 Server to Your Network (Preferred Method)15
Connecting the WD Sentinel RX4100 Server from a Client
Computer (Optional Method) . . . . . . . . . . . . . . . . . . . . . . . . . . . . . . . . . . 16
Setting up your WD Sentinel Server (one time only) . . . . . . . . . . . . 17
Connecting your Computers . . . . . . . . . . . . . . . . . . . . . . . . . . . . . 20
Rebooting the WD Sentinel Server . . . . . . . . . . . . . . . . . . . . . . . . . 26
4 Managing the WD Sentinel Server (Dashboard) . . 28
Setting up WD Sentinel Server & Connecting Computers. . . . . . . . 28
Accessing the Dashboard . . . . . . . . . . . . . . . . . . . . . . . . . . . . . . . 28
Adding a User Account . . . . . . . . . . . . . . . . . . . . . . . . . . . . . . . . . 31
Performing Dashboard Tasks . . . . . . . . . . . . . . . . . . . . . . . . . . . . . 33
Using the Home Page . . . . . . . . . . . . . . . . . . . . . . . . . . . . . . . . . . 33
Managing User Accounts . . . . . . . . . . . . . . . . . . . . . . . . . . . . . . . 34
Managing Computers and Backups . . . . . . . . . . . . . . . . . . . . . . . 35
Managing Server Folders and Hard Drives . . . . . . . . . . . . . . . . . . 35
Monitoring Add-ins . . . . . . . . . . . . . . . . . . . . . . . . . . . . . . . . . . . . 35
Monitoring System Health and Alerts . . . . . . . . . . . . . . . . . . . . . . 35
WD SENTINEL RX4100
ADMINISTRATOR AND MAINTENANCE GUIDE
TA B L E O F C O NT E NT S – i
Page 5

Updating Software . . . . . . . . . . . . . . . . . . . . . . . . . . . . . . . . . . . . . 39
Managing Server Settings . . . . . . . . . . . . . . . . . . . . . . . . . . . . . . . 43
Shutting Down the Server . . . . . . . . . . . . . . . . . . . . . . . . . . . . . . . 45
5 Managing Storage on the WD Sentinel Server . . . . 46
WD Sentinel Server RAID Storage . . . . . . . . . . . . . . . . . . . . . . . . . 46
Using USB Storage . . . . . . . . . . . . . . . . . . . . . . . . . . . . . . . . . . . . 47
6 Using the WD Sentinel Server’s Features . . . . . . . 49
Using the Launchpad (Internal Users). . . . . . . . . . . . . . . . . . . . . . . 49
Accessing Shared Folders Over Your Network. . . . . . . . . . . . . . . . 56
Accessing Computers and Shared Folders Remotely. . . . . . . . . . . 57
Backing up (Windows PC) . . . . . . . . . . . . . . . . . . . . . . . . . . . . . . . 58
Backing up with Time Machine (Mac) . . . . . . . . . . . . . . . . . . . . . . . 61
Recovering/Restoring (Windows PC) . . . . . . . . . . . . . . . . . . . . . . . 64
Recovering/Restoring (Mac) . . . . . . . . . . . . . . . . . . . . . . . . . . . . . . 65
Backing up your WD Sentinel Server . . . . . . . . . . . . . . . . . . . . . . . 66
Recovering the WD Sentinel Server to Factory Defaults . . . . . . . . . 66
7 Best Practices . . . . . . . . . . . . . . . . . . . . . . . . . . . . . . 81
Setting up the WD Sentinel RX4100 . . . . . . . . . . . . . . . . . . . . . . . . 81
Setting up Client Computers . . . . . . . . . . . . . . . . . . . . . . . . . . . . . 81
Using the WD Sentinel RX4100 Efficiently . . . . . . . . . . . . . . . . . . . 81
Replacing Drives . . . . . . . . . . . . . . . . . . . . . . . . . . . . . . . . . . . . . . 82
Sharing Files with External Users . . . . . . . . . . . . . . . . . . . . . . . . . . 82
Shutting Down . . . . . . . . . . . . . . . . . . . . . . . . . . . . . . . . . . . . . . . . 82
8 Troubleshooting . . . . . . . . . . . . . . . . . . . . . . . . . . . . 83
First Steps Checklist . . . . . . . . . . . . . . . . . . . . . . . . . . . . . . . . . . . 83
Specific Problems and Corrective Actions . . . . . . . . . . . . . . . . . . . 83
9 Managing iSCSI Storage . . . . . . . . . . . . . . . . . . . . . 85
iSCSI Overview . . . . . . . . . . . . . . . . . . . . . . . . . . . . . . . . . . . . . . . 85
iSCSI Roles . . . . . . . . . . . . . . . . . . . . . . . . . . . . . . . . . . . . . . . . . . 85
Managing iSCSI Targets . . . . . . . . . . . . . . . . . . . . . . . . . . . . . . . . 85
10 Regulatory and Warranty Information. . . . . . . . . . . 90
Regulatory Compliance . . . . . . . . . . . . . . . . . . . . . . . . . . . . . . . . . 90
Limited Warranty . . . . . . . . . . . . . . . . . . . . . . . . . . . . . . . . . . . . . . 92
WD SENTINEL RX4100
ADMINISTRATOR AND MAINTENANCE GUIDE
TABLE OF CONTENTS – ii
Page 6

GNU General Public License (“GPL”) . . . . . . . . . . . . . . . . . . . . . . . 93
11 Appendix . . . . . . . . . . . . . . . . . . . . . . . . . . . . . . . . . . 94
Hardware Replacement Procedures . . . . . . . . . . . . . . . . . . . . . . . 94
Before You Begin. . . . . . . . . . . . . . . . . . . . . . . . . . . . . . . . . . . . . . 94
Installing the WD Sentinel Bezel . . . . . . . . . . . . . . . . . . . . . . . . . . . 95
Replacing a Hard Drive . . . . . . . . . . . . . . . . . . . . . . . . . . . . . . . . . 96
Removing the Unit Cover . . . . . . . . . . . . . . . . . . . . . . . . . . . . . . . . 98
Replacing the Internal Power Supply . . . . . . . . . . . . . . . . . . . . . . 100
Replacing a Server Fan . . . . . . . . . . . . . . . . . . . . . . . . . . . . . . . . 102
Replacing the Riser Card . . . . . . . . . . . . . . . . . . . . . . . . . . . . . . . 104
Replacing the Mid-plane Card . . . . . . . . . . . . . . . . . . . . . . . . . . . 105
WD Sentinel RX4100 Administrator Reference Sheet . . . . . . . . . . 106
12 Index. . . . . . . . . . . . . . . . . . . . . . . . . . . . . . . . . . . . . 107
13 Addendum . . . . . . . . . . . . . . . . . . . . . . . . . . . . . . . . 111
Apple File Protocol (AFP) No Longer Supported. . . . . . . . . . . . . . 111
WD SENTINEL RX4100
ADMINISTRATOR AND MAINTENANCE GUIDE
TABLE OF CONTENTS – iii
Page 7

IMPORTANT USER INFORMATION
1
Important User Information
Important Safety Instructions
Handling Precautions
Recording Your WD Product Information
About This Guide
Important Safety Instructions
This device is designed and manufactured to assure personal safety. Improper use can
result in electric shock or fire hazard. The safeguards incorporated into this unit will protect
you if you observe the following procedures for installation, use, and servicing.
Follow all warnings and instructions marked on the product.
Unplug this product from the wall outlet before cleaning. Do not use liquid cleaners or
aerosol cleaners. Use a damp cloth for cleaning.
Do not use this product near any liquids.
Do not place this product on an unstable surface. The product may fall, causing serious
damage to the product.
Do not drop the product.
Do not block the slots and openings on the back or bottom side of the chassis; to
ensure proper ventilation and reliable operation of the product and to protect it from
overheating, these openings must not be blocked or covered. Making sure the server is
standing upright also helps prevent overheating.
Operate this product only from the type of power indicated on the marking label. If you
are not sure of the type of power available, consult your dealer or local power company.
Do not allow anything to rest on the power cord. Do not locate this product where
persons will walk on the cord.
If an extension cord is used with this product, make sure that the total ampere rating of
the equipment plugged into the extension cord does not exceed the extension cord
ampere rating. Also, make sure that the total rating of all products plugged into the wall
outlet does not exceed the fuse rating.
Never push objects of any kind into this product through the chassis slots as they may
touch dangerous voltage points or short out parts that could result in a fire or electric
shock.
Unplug this product from the wall outlet and refer servicing to qualified service personnel
under the following conditions:
- When the power cord or plug is damaged or frayed.
- If liquid has been spilled on the product.
- If the product has been exposed to rain or water.
- If the product does not operate normally when the operating instructions are fol-
lowed. Adjust only those controls that are covered by the operating instructions
since improper adjustment may result in damage and require extensive work by a
qualified technician to return the product to normal condition.
- If the product has been dropped or the chassis has been damaged.
WD SENTINEL RX4100
ADMINISTRATOR AND MAINTENANCE GUIDE
1
Page 8

IMPORTANT USER INFORMATION
- If the product exhibits a distinct change in performance, contact WD Customer Sup-
port at
WARNING! The WD Sentinel™ Server uses a lithium battery, type CR2032. There
http://support.wd.com.
is danger of an explosion if the battery is incorrectly replaced.
Replace only with the same or equivalent battery type recommended
by the manufacturer. Dispose of used batteries according to the
manufacturer’s instructions.
Handling Precautions
WD products are precision instruments and must be handled with care during unpacking
and installation. The WD Sentinel server may be damaged by rough handling, shock, or
vibration. Be aware of the following precautions when unpacking and installing your external
storage product:
Do not drop or jolt the WD Sentinel server.
Do not move the unit while it is powered on.
Do not use this product as a portable drive.
Recording Your WD Product Information
Remember to write down the following WD product information, which is used for setup and
technical support. Your WD product information is found on the label on the bottom of the
device.
Serial Number
Model Number
Purchase Date
System and Software Notes
About This Guide
This Administrator and Maintenance Guide provides detailed instructions and information for
WD-specific interface elements and functions. Unless otherwise noted, refer to
Microsoft
following conventions:
Convention Used for ...
Bold font Names of items on a page such as menus, buttons, option names, fields, and
Note: Extra, but not vital, information
Important: Essential Information to know or to prevent problems when using the
WARNING! Vital information for operating the WD Sentinel server or to prevent damage to
® Online Help for standard interface elements and functions. This guide uses the
tabs that the user must click or complete and keys the user must press.
WD Sentinel server
the server or your computer.
WD SENTINEL RX4100
ADMINISTRATOR AND MAINTENANCE GUIDE
2
Page 9

PRODUCT OVERVIEW
2
2
Product Overview
Getting to Know Your WD Sentinel RX4100 Server
Key Features
System Requirements and Compatibility Information
Technical Specifications
Product Views
Indicators
Where to Find Help
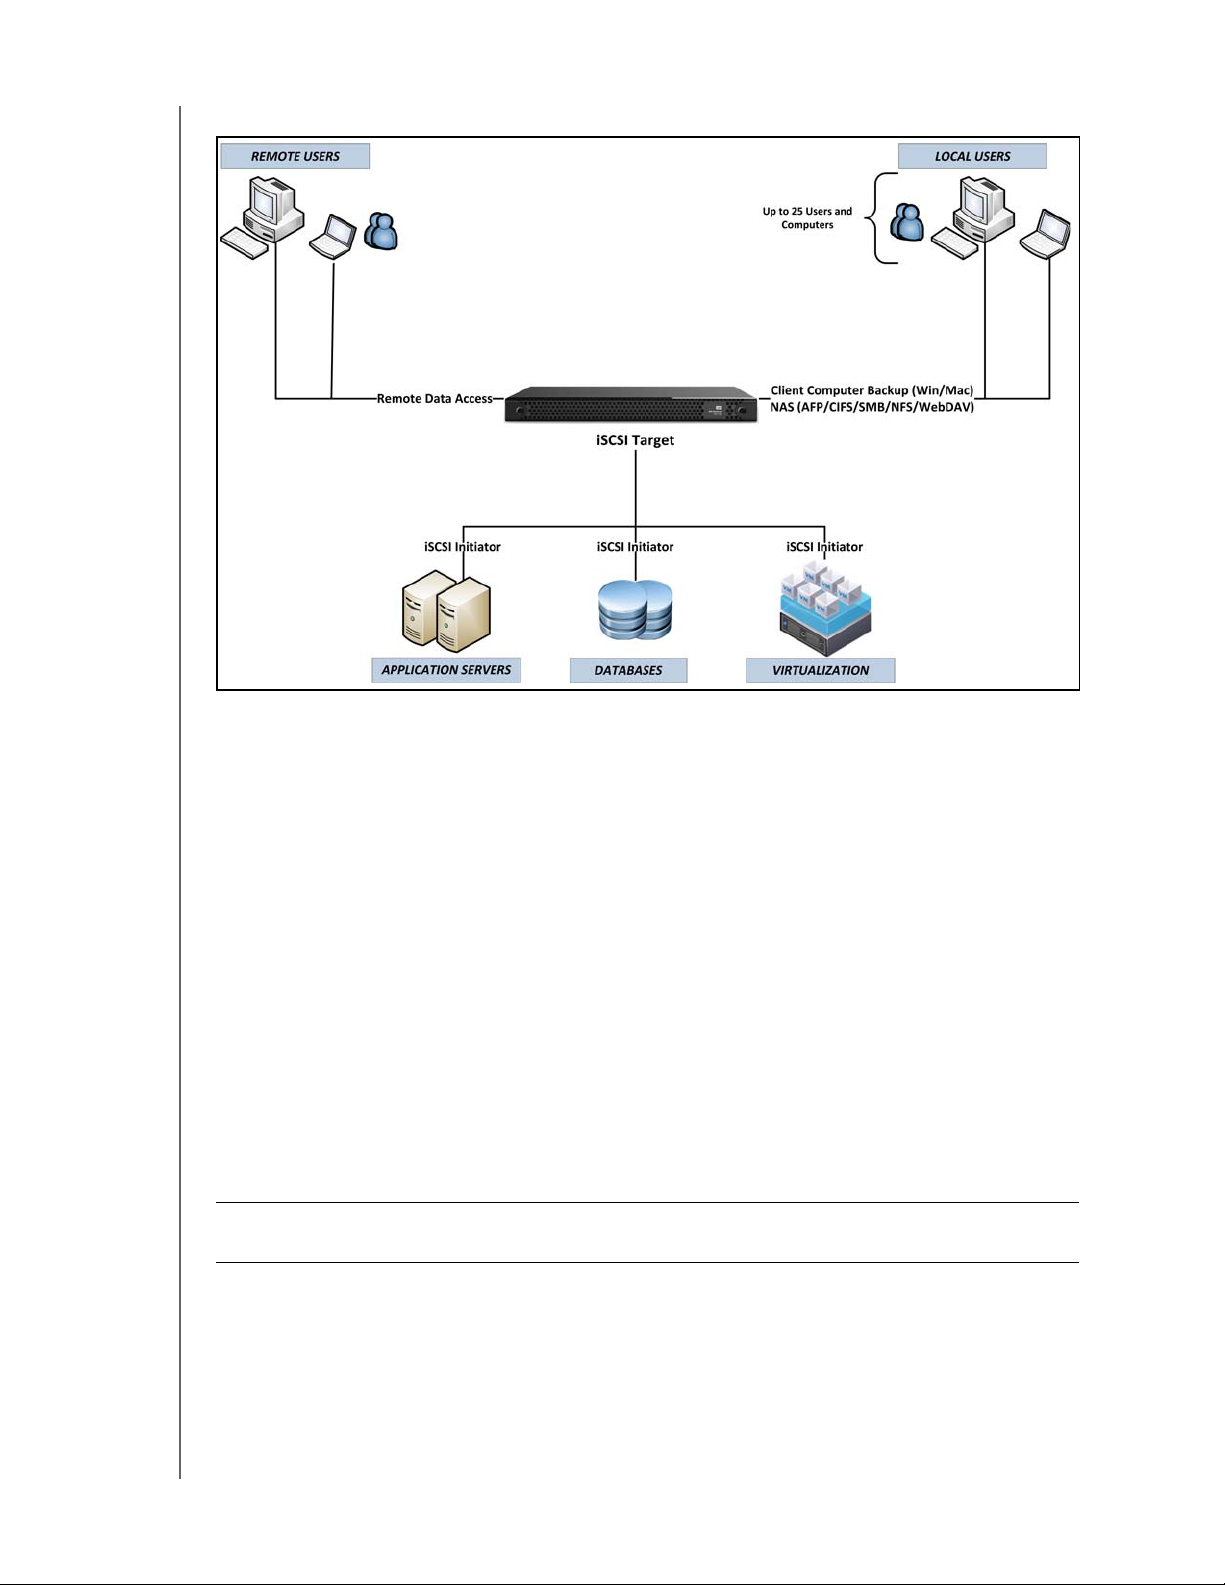
Getting to Know Your WD Sentinel RX4100 Server
Congratulations on your purchase of the WD Sentinel RX4100 Small Business Storage
Server. Whether you’re an IT expert or not, WD Sentinel RX4100 is easy to install and
provides secure unified storage (NAS and iSCSI SAN), complete data protection for up to 25
computers, and remote file access for your employees and trusted vendors while in the
office or from anywhere.
Key Features
Easy installation: The easy setup process allows you to integrate WD Sentinel RX4100 into
your office network like a pro. The administration dashboard quickly guides you through the
process including adding users, setting up data access, creating shared folders, and
scheduling backups.
Easy administration: WD Sentinel RX4100 is the ideal storage server for small business in
1U rack mountable design. Its easy administration features include four drive bays with hot
swappable design; redundant user-serviceable power supplies; user-serviceable fans and
email alerts. In the event that an IT professional’s assistance is needed, the WD Sentinel
RX4100 allows them to manage the server remotely. Now that’s easy!
Comprehensive data protection for your entire office has never been easier.
The drives inside: Pre-configured with hard drives optimized for reliability, quality and
performance.
RAID: Pre-configured with RAID 5 for added data protection and drive redundancy.
Automatic backup and restore software for Windows® clients: The included
backup software saves time and space by performing a full Bare Metal Backup the first
time and then automatically backing up only the data that has changed since the
previous backup – using block-level deduplication technology. In the event of a data loss
or a drive failure on a client computer, the WD Sentinel RX4100’s fast and easy restore
function finds your files or lets you restore an entire system to get you up and running
again quickly.
Time Machine backup support for Mac OS® clients: WD Sentinel RX4100 offers
seamless support for backing up Mac OS clients to your WD Sentinel server using the
Apple Time Machine backup utility.
Dual Ethernet ports: Comes pre-configured in Adaptive Fault Tolerance, which keeps
your network available by automatically switching to the second Ethernet port if the first
one should fail.
WD SENTINEL RX4100
ADMINISTRATOR AND MAINTENANCE GUIDE
3
Page 10

PRODUCT OVERVIEW
Optional dual power supply: WD Sentinel RX4100 offers the small business owner the
option of adding a redundant external power supply that will take over should a power
surge or other failure damage the internal power supply. With the optional external
power supply you have the added peace of mind knowing that your system will remain
operational and available.
Optional off-site disaster recovery protection: Protect your business data against a
disaster by creating an off-site copy to the cloud using KeepVault
wdc.keepvault.com.
®*. Learn more at
Secure remote access: WD Sentinel RX4100 is perfect for businesses with employees
working remotely or in home offices. You have the security of knowing all your business files
are safely stored on your WD Sentinel RX4100 small business storage server. With built-in
secure remote access, remote employees, contractors, or clients with access permissions
can securely access business data from any computer with an Internet connection.
Leading-edge performance: With dual Gigabit Ethernet connectivity, WD Sentinel
RX4100 delivers read speeds up to 105 MB/s through the Gigabit Ethernet interface. That's
three times faster than most network drives in this category today.
Note: As tested using a file transfer simulator using two sets of large files averaged over 10 runs.
Fully Compatible with Mac OS Clients: WD Sentinel RX4100 supports Apple® Filing
Protocol (AFP), which provides complete compatibility for Mac OS-based client machines.
Discover WD Sentinel RX4100 automatically using Bonjour
OS clients using Apple’s Time Machine
® backup utility, enjoy faster data transfer over
®, seamlessly back up your Mac
Ethernet using AFP, and manage your WD Sentinel RX4100 server using the Administration
Dashboard application for Mac.
Virtualize WD Sentinel storage using iSCSI Target: WD Sentinel RX4100 offers built-in
iSCSI target functionality integrated within Dashboard to easily manage the setup,
administration and deployment of iSCSI Storage. IT Pro’s and advanced users have the
ability to partition their WD Sentinel RX4100 for both NAS File-based storage as well as
iSCSI-SAN with the iSCSI Target solution powered by StarWind
®. This capability enables
the Administrator to create and manage multiple iSCSI targets to meet the specific needs of
their dynamic IT environments.
A total solution with industry-leading technology partners: We combined hardware
and software from industry leaders to deliver a reliable, secure and easy-to-manage storage
server designed specifically for small business environments. WD Sentinel RX4100 features:
Best-in-class hard drives – Equipped with hard drives that feature high capacity
storage, peak performance and best-in-class reliability.
Intel® Atom™ processor – Built with Intel Atom dual core processor inside, WD
Sentinel™ RX4100 can easily handle your small business’s day-to-day computing and
file storage demands.
Windows Storage Server 2008 R2 Essentials – Microsoft Windows Storage Server
2008 R2 Essentials operating system provides the intuitive, reliable and scalable storage
solution your small business needs to quickly and efficiently organize, protect and share
your critical business data using the familiar Windows user experience. With enterpriseclass, server-based, block-level de-dupe backup capability you can be confident that
your data is well protected.
*Pre-installed in US-only models
WD SENTINEL RX4100
ADMINISTRATOR AND MAINTENANCE GUIDE
4
Page 11

PRODUCT OVERVIEW
Real-time system status through the administration dashboard: Receive critical
system updates via the built-in email alerts functionality. Or view real-time updates for the
system, RAID and network status through WD Sentinel’s dashboard, which includes easyto-use task wizards to help you set backup schedules, administer user accounts and
manage public and private shares.
Compatible with multiple operating systems: WD Sentinel RX4100 includes the
Connector software for Windows XP, Windows Vista
®, Windows 7, Windows 8, Mac OS X
Mountain Lion, Mac OS X Lion, Mac OS Snow Leopard and Mac OS X Leopard. Support for
major network file-system protocols enables cross-platform compatibility and file sharing
among Windows, Mac
® and Linux®/UNIX® operating systems. Supports Time Machine
backup for Mac OS clients. Compatibility may vary depending on user’s hardware
configuration and operating system.
Stream digital media anywhere in your network: With the built-in DLNA
® server your
employees can access any shared media libraries on the network rather than maintaining
copies on their individual computers. You can also stream digital content like videos, music,
or digital signage for employees, vendors or clients using remote web access.
Optional off-site disaster recovery service*: Every small business should have a plan to
protect its data from an unforeseen disaster (fire, flood, earthquake, etc.). KeepVault is an
off-site cloud-based data backup and disaster recovery solution that’s integrated within
WD Sentinel’s administration dashboard. It’s easy to use and cost-effective and provides
built-in support for data encryption and compression for secure and faster data transfer.
WD Guardian Services: When you need a little help from an expert, we’ll take care of you!
WD Guardian Services offers flexible, affordable and hassle-free technical support and
extended warranty plans with a variety of benefits. Choose the plan that works best for your
business. Visit www.wdguardian.com for details.
Why WD?: Western Digital has been making hard drives for over 40 years. We know how to
build drives to store and protect your data because we understand that your company’s
data is paramount to your business success.
*Pre-installed in US-only models
WD SENTINEL RX4100
ADMINISTRATOR AND MAINTENANCE GUIDE
5
Page 12
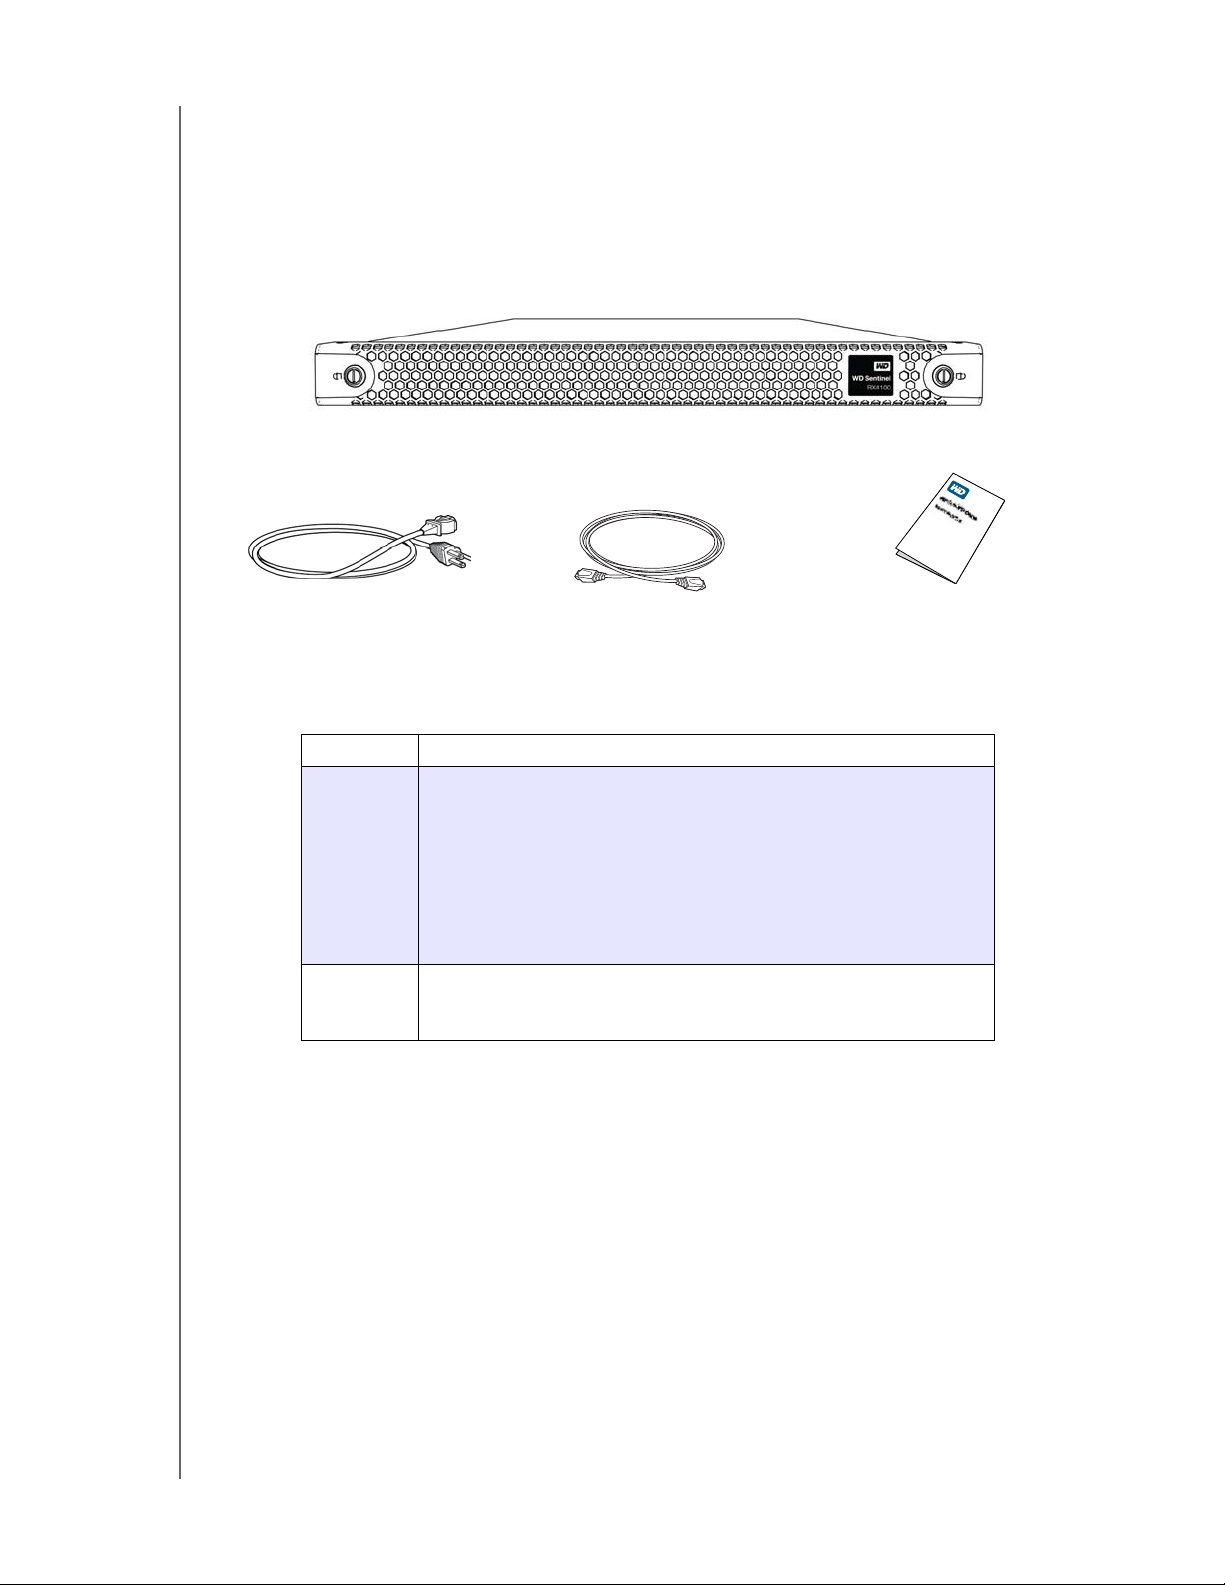
Package Contents
WD Sentinel RX4100
1.8 meter power cord
Ethernet cable
Basic Install Guide
Small Business Storage Server
1 RJ-45 Ethernet cable
1.8 meter power cord
Basic Installation Guide
PRODUCT OVERVIEW
For information on additional accessories, visit:
US
Europe •Austria: www.wdstore.de
All others Contact WD Technical Support in your region. For a list of Technical
www.shopwd.com or www.wdstore.com
• United Kingdom: www.wdstore.eu
•France: www.wdstore.fr
•Italy: www.wdstore.it
•Germany: www.wdstore.de
•Spain: www.wdstore.es
•Netherlands: www.wdstore.nl
• Rest of EU Countries: www.shopwd.eu or www.wdstore.eu
Support contacts, visit
Base Answer ID 1048.
http://support.wd.com and see Knowledge
WD SENTINEL RX4100
ADMINISTRATOR AND MAINTENANCE GUIDE
6
Page 13

PRODUCT OVERVIEW
System Requirements and Compatibility Information
Requirement Description
Client Operating System
Compatibility
Local Network • Router/switch (Gigabit Ethernet recommended to maximize
Broadband Access Required for remote access outside the LAN
Display and Peripherals • Super VGA (800 x 600) or higher-resolution monitor
Windows 8
• Basic (x86 and x64)
• Pro (x86 and x64)
• Enterprise (x86 and x64)
Windows 7
• Home Basic (x86 and x64)
• Home Premium (x86 and x64)
• Professional (x86 and x64)
• Ultimate (x86 and x64)
• Enterprise (x86 and x64)
• Starter (x86)
Windows Vista
• Home Basic with Service Pack 2 (SP2) (x86 x64)
• Home Premium with SP2 (x86 and x64)
• Business with SP2 (x86 and x64)
• Ultimate with SP2 (x86 and x64)
• Enterprise with SP2 (x86 and x64)
• Starter with SP2 (x86)
Windows XP
• Home with Service Pack 3 (SP3)
• Professional with SP3
• Media Center 2005 with SP3
Mac OS X
•Leopard
•Snow Leopard
•Lion
• Mountain Lion
File sharing support for Linux and UNIX
performance)
•DHCP enabled
•USB Keyboard
• USB Mouse or compatible pointing device
WD SENTINEL RX4100
ADMINISTRATOR AND MAINTENANCE GUIDE
7
Page 14

Technical Specifications
Specification Description
Interfaces • High performance (10/100/1000) Gigabit Ethernet connection
• 2 ports of powered USB 3.0
• 1 port of powered USB 2.0
I/O ports • 2 Ethernet (RJ-45 Ports)
• 2 USB 3.0 Ports
• 1 USB 2.0 Port
• 1 VGA Port
Supported protocols CIFS/SMB, NFS, HTTP, HTTPS, WebDAV, AFP
Internal hard drives 4 WD 3.5-inch SATA Best in Class hard drives with
RAID-specific time-limited error recovery (TLER)
Pioneered by WD, this feature prevents drive fallout caused by the
extended hard drive error-recovery processes common to desktop
drives.
Approved Drive Models
For a complete list of approved drive models, search for Answer ID
9443 in the WD Knowledge Base at http://support.wd.com.
PRODUCT OVERVIEW
CPU Intel Atom Dual Core 1.80 Ghz
Memory 4 GBytes SODIMM DDR3-800
Drive bays • 4 3.5 inch hard drive bays
• Hot swap capable
• Trayed design
RAID level • RAID 5 with automatic rebuild functionality
Physical dimensions • Length: 26 inches (660 mm)
• Width: 19 inches (482.1 mm)
• Height: 1.75 inches (44 mm)
Weight • 8 TB and 12 TB: 26.627 lbs (12.078 kgs)
• 16 TB: 27.112 lbs (12.298 kgs)
Capacities • 8 TB (4 x 2 TB); 6 TB Usable
• 12 TB (4 x 3 TB); 9 TB Usable
• 16 TB (4 x 4 TB); 12 TB Usable
Power • 1 internal power supply
• 1 external power port for failover (optional)
Power supply • Input voltage: 100 to 240 V AC
• Input frequency: 50 to 60 Hz
• Output voltage: 19V DC, up to 6.32A
Temperature • Operating temperature: 0 to 35 °C (32 to 95 °F)
• Non-operating temperature: -40 to 70°C (-40 to 158 °F)
Switches • Power
• Recovery
WD SENTINEL RX4100
ADMINISTRATOR AND MAINTENANCE GUIDE
8
Page 15
Specification Description
Bezel Lock Bezel LockBezel
LEDs 1 Drive Activity LED
• Flashing blue indicates data transfer to/from any drive
• Black indicates no drive activity
1 Drive Warning LED
• Solid RED indicates fault on any drive.
• Black indicates no drive warnings
1 Drive Status LED
• Flashing blue indicates data transfer to/from any drive
• Solid RED indicates a drive fault
• Black indicates no drive activity
1 Power LED
• Flashing blue indicates boot status
• Flashings RED indicates a fault condition
• Solid blue once booted, and there are no pending fault
conditions, indicates a good operational state
• Black indicates inactive state
2 Ethernet Port LEDs
• Flashing green indicates activity
• Solid amber indicates that there is a link connection
• Black indicates inactive state
4 Drive Tray LEDs
• Flashing blue or solid blue indicates drive activity
• Solid RED indicates drive fault (Drive must be replaced)
Operating System Windows Storage Server 2008 R2 Essentials
Backups 25-client computer support for backup (Windows and Mac OS
Client computers)
Restore • Bare metal restore for Windows clients
• File/folder level restore
PRODUCT OVERVIEW
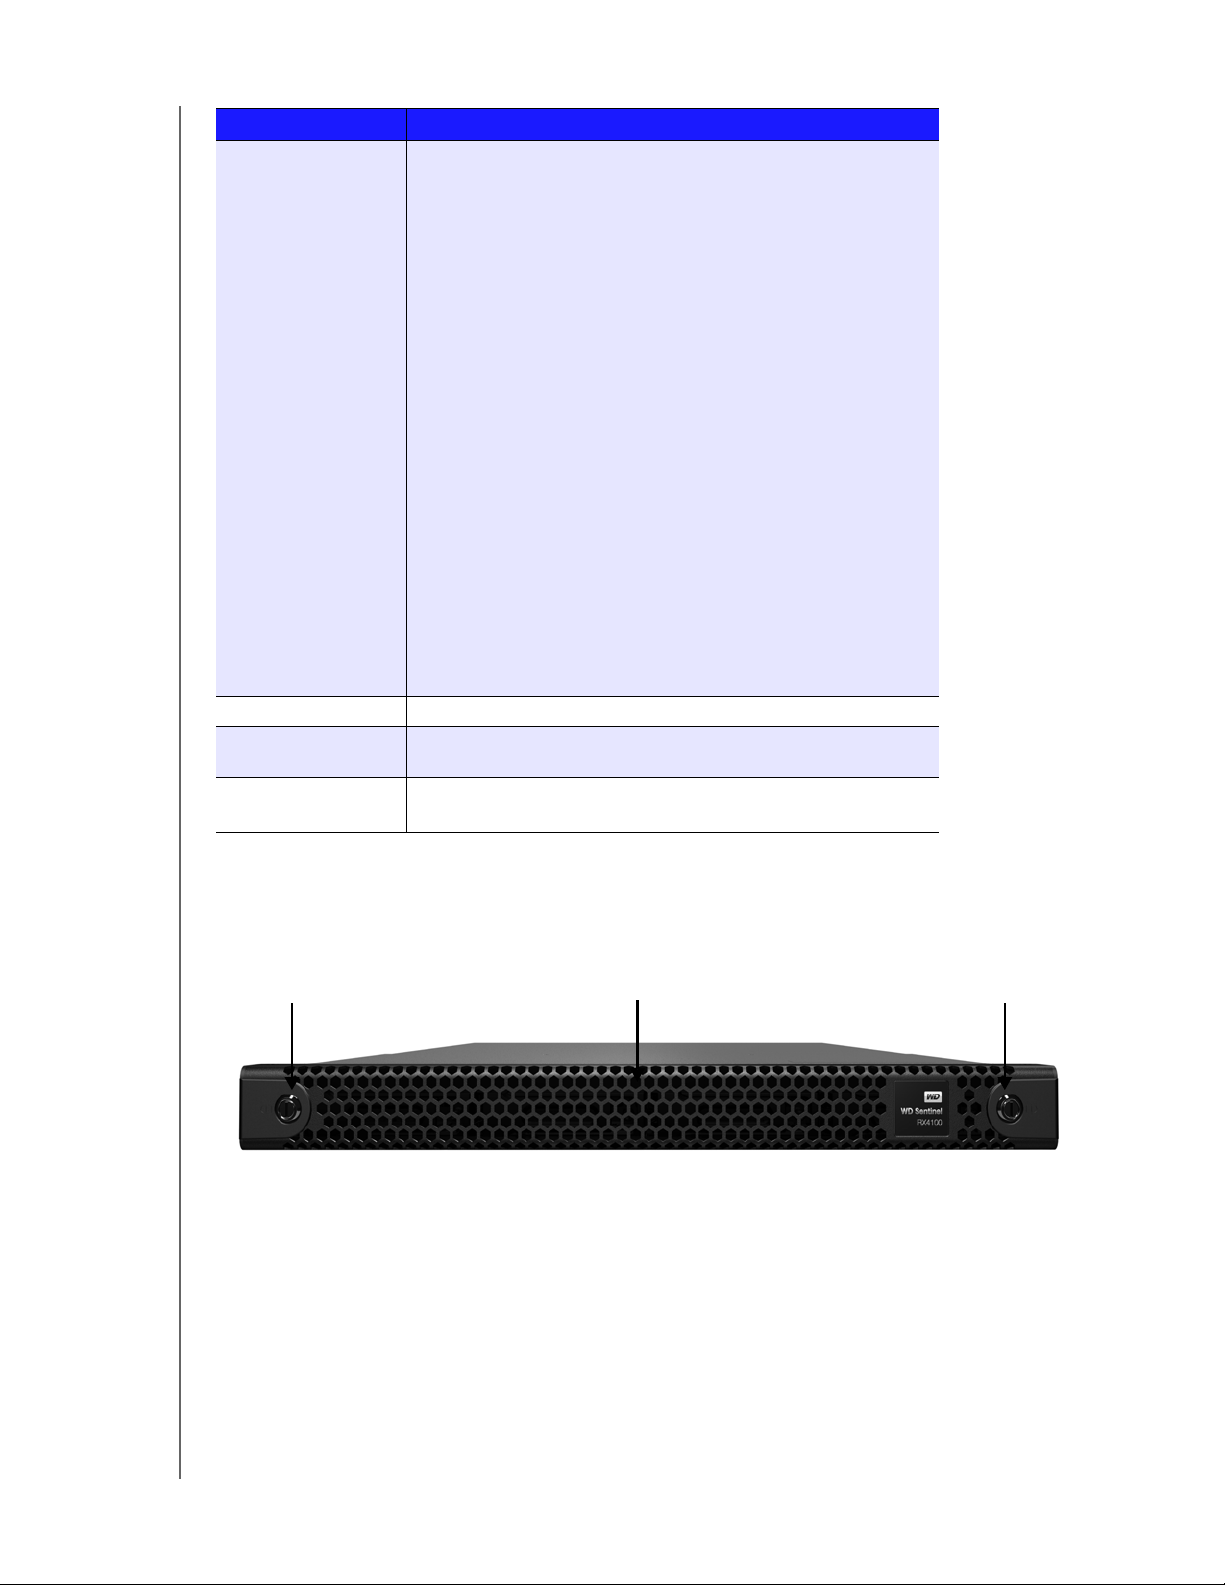
Product Views
Front View (With Bezel)
WD SENTINEL RX4100
ADMINISTRATOR AND MAINTENANCE GUIDE
9
Page 16
Front View (Without Bezel)
USB 2.0 port
Power Button
Status LEDs
Drive Trays
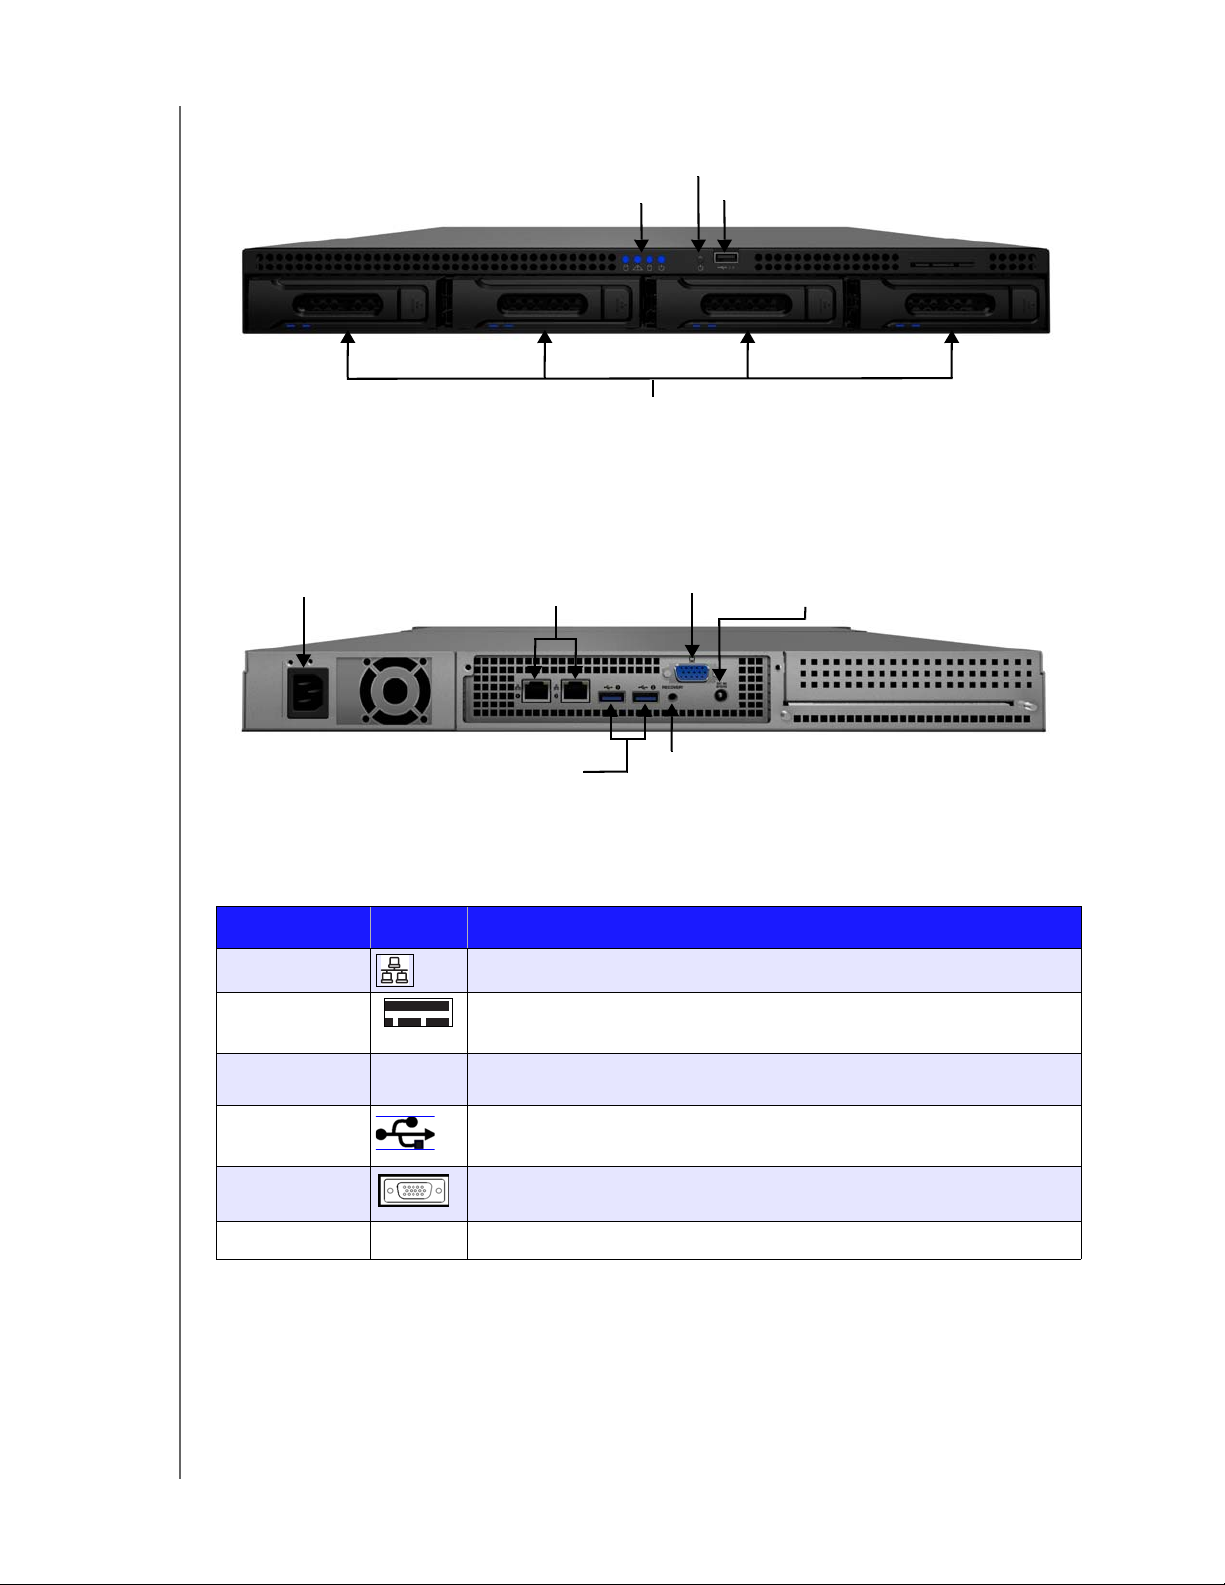
Internal Power
Supply port
VGA port
USB 3.0 ports
1 & 2
Gigabit Ethernet
ports 1 & 2
Recovery button
External DC In
Power port
Back View
PRODUCT OVERVIEW
Indicators
Component Icon Description
Ethernet ports Connect the device to a local network.
Power port Connects the device to an AC power cord and the power outlet.
Recovery button
USB ports Connects with USB 2.0 and 3.0 devices such as a USB storage, USB mouse,
VGA port Connects to your VGA monitor
DC In connector Connects the device to a DC power cord and the power outlet.
RECOVERY
Button on the back of the server recovers the server (including the operating
system) while using a USB drive in an event of an OS corruption.
USB keyboard, or a UPS.
WD SENTINEL RX4100
ADMINISTRATOR AND MAINTENANCE GUIDE
10
Page 17

LEDs
The LEDs on the WD Sentinel identify the status of the unit.
LED Color State Description
Power LED Black Off WD Sentinel server is currently inactive.
Blue Flashing WD Sentinel server is currently booting the software.
Blue Solid WD Sentinel server has successfully booted the
software and is operational.
Red Flashing Indicates that a serious fault has occurred and
needs immediate attention.
PRODUCT OVERVIEW
Drive
Activity
Drive
Warning
Drive Status Black Off Indicates no drive status activity.
Drive LEDs Black Off If the LED is off while other drive LEDs are on, no
Ethernet
Port
Black Off Indicates no drive activity.
Blue Flashing Indicates that data is transferring to/from the drives.
Black Off Indicates no drive warning activity.
Red Solid Indicates that a serious fault has occurred on the
drives.
Blue Flashing Indicates data transfer to/from drives.
Red Solid Indicates a drive fault.
drive is installed in the bay.
Blue Flashing Drive is currently active. Note that all lights in a RAID
system are active at the same time by design.
Red Solid Indicates drive failure. Replace this drive as soon as
possible. The system is no longer RAID protected
until the drive is replaced and the RAID structure is
repaired.
Black Off Indicates an inactive state.
Green Flashing Indicates link activity.
Amber Solid Indicates that there is a link connection
WD SENTINEL RX4100
ADMINISTRATOR AND MAINTENANCE GUIDE
11
Page 18
PRODUCT OVERVIEW
Where to Find Help
This manual provides step-by-step instructions and other important information regarding
your WD product. It is meant for the person serving as the administrator of the
WD Sentinel RX4100. You can download translated versions and updates to this manual
from http://products.wd.com/updates. For more information and news about this product,
visit our website at http://www.wd.com/.
Additional Reference Description
Basic Installation Guide Included in the product box or available at
http://products.wd.com/WDSentinel-RX4100 helps you install the
WD Sentinel server.
WD Online Help Specific descriptions and instructions accessed on
WD-specific (Monitor) pages on the Dashboard.
Microsoft Online Help • Access detailed explanations and instructions for a particular
page by clicking the Help
Dashboard.
• Search for help on a specific topic or term by entering it in the
Microsoft Online Help search field at the top right of the page.
• Access the entire Microsoft Online Help system by clicking
Microsoft Online Help.
button at the top right of the
Important: Not all Microsoft Online Help is applicable to the WD Sentinel RX4100.
The WD Online Help and this Administrator's Guide take precedence over the
Microsoft Online Help.
WD SENTINEL RX4100
ADMINISTRATOR AND MAINTENANCE GUIDE
12
Page 19

CONNECTING THE SERVER AND GETTING STARTED
3
Connecting the Server and Getting Started
User Roles and Responsibilities
How the WD Sentinel RX4100 Fits into Your Office
Connecting the WD Sentinel RX4100 Server to Your Network (Preferred Method)
Connecting the WD Sentinel RX4100 Server from a Client Computer (Optional Method)
Setting up your WD Sentinel Server (one time only)
Connecting your Computers
Rebooting the WD Sentinel Server
This chapter steps you though the process of connecting and setting up your WD Sentinel
RX4100 server and connecting it to computers in your network.
User Roles and Responsibilities
Types of WD Sentinel RX4100 Users
At a high level there are two categories of users who need to access one or more features of
your WD Sentinel server.
Administrator—This is the person who performs the setup and routine management
tasks on the WD Sentinel server. This person is also the holder of the Administrator
password of your WD Sentinel server.
Users—You can have up to 25 user accounts on your WD Sentinel server. These can
be:
- Internal Users – The internal users are typically the employees (including the Admin-
istrator) in your office, working locally or occasionally from a remote location (e.g.
Sales Staff), who need to access business data and server resources.
- External Users – The external users are the customers and business
partners with whom you need to exchange business data.
The WD Sentinel server offers different paradigms for each type of user. The table below
provides a view into the usage model and tasks for each category of users.
Administrator
(e.g., Business Owner)
Primary Setup Tasks
• Physically connects the
WD Sentinel server to the
network.
• Configures the
WD Sentinel server itself. This
is a one-time procedure.
• Connects a Mac or Windows
PC to the WD Sentinel server
by installing Connector
software on it.
Internal Users
(e.g., Employees)
Primary Setup Tasks
•None
Primary Setup Tasks
•None
External Users
(e.g., Clients or Business
Partners)
WD SENTINEL RX4100
ADMINISTRATOR AND MAINTENANCE GUIDE
13
Page 20

CONNECTING THE SERVER AND GETTING STARTED
Administrator
(e.g., Business Owner)
Primary User Interface
• Dashboard - Signs in using the
Administrator password (no
username required).
Dashboard Task Examples
• Sets up user accounts and
assigns permissions.
• Manages shared folders.
• Sets up and manages
automatic backup schedule.
• Manages WD Sentinel server
settings, resolves any alerts,
and monitors server
performance.
• Sets up Remote Web Access.
• Manages updates.
• Creates and manages iSCSI
targets.
Note: For each user account, the WD Sentinel server enables the Administrator to set granular permissions
for various shared folders as well as server resources, such as Remote Web Access. At all times, the
users are only able to access the data on the server and other server resources for which they have
permissions.
Primary Interface
• Launchpad - Signs in using the
Secondary Interface
• Remote Web Access -
Launchpad Task Examples
• Accesses data on shared
• Starts manual backups.
• Launches Remote Web
Remote Web Access Task
Examples
• Accesses data on shared
• Connects to the PCs in the
• Accesses media library.
Internal Users
(e.g., Employees)
assigned user name and
password.
While accessing remotely,
signs in using the assigned
user name and password.
storage.
Access.
storage.
office remotely.
Primary Interface
• Remote Web Access - Signs in
Remote Web Access Task
Examples
• Accesses data on shared
• Accesses media library.
External Users
(e.g., Clients or Business
Partners)
using the assigned user name
and password.
storage.
WD SENTINEL RX4100
ADMINISTRATOR AND MAINTENANCE GUIDE
14
Page 21
CONNECTING THE SERVER AND GETTING STARTED
How the WD Sentinel RX4100 Fits into Your Office
Connecting the WD Sentinel RX4100 Server to Your Network (Preferred Method)
Use the following steps to physically connect your WD Sentinel RX4100 to your network.
1. Connect your monitor to the VGA port on the rear of your WD Sentinel server.
2. Connect your USB keyboard and USB mouse to the USB ports on your WD Sentinel
server.
3. Using the provided ethernet cable, connect the WD Sentinel server (either ethernet port
1 or 2) to a DHCP-enabled LAN.
4. Using the provided AC power cord, connect the WD Sentinel server to an electrical
outlet or a UPS.
5. Turn on your monitor.
6. Press the power button on the front of your WD Sentinel unit.
Once the WD Sentinel boot up process is complete, the Windows Storage Server 2008
R2 Language Selection screen displays. The Power LED on the front of the WD Sentinel
server will display a solid blue light.
WARNING! This process takes a few minutes. Do not interrupt the process. Do
not power off or disconnect the WD Sentinel server.
WD SENTINEL RX4100
ADMINISTRATOR AND MAINTENANCE GUIDE
15
Page 22
CONNECTING THE SERVER AND GETTING STARTED
Connecting the WD Sentinel RX4100 Server from a Client Computer (Optional Method)
As an alternative, you can set up your WD Sentinel RX4100 using a client computer without
connecting a monitor, keyboard, and mouse to your server. Use the following steps to
connect your WD Sentinel RX4100 to your network from a client computer.
1. Using the provided ethernet cable, connect the WD Sentinel server (either ethernet port
1 or 2) to a DHCP-enabled LAN.
2. Using the provided AC power cord, connect the WD Sentinel server to an electrical
outlet or a UPS.
3. Press the power button on the front of your WD Sentinel unit.
Once the WD Sentinel boot up process is complete, the LED on the front of the
WD Sentinel server will display a solid blue light.
WARNING! This process takes a few minutes. Do not interrupt the process. Do
not power off or disconnect the WD Sentinel server.
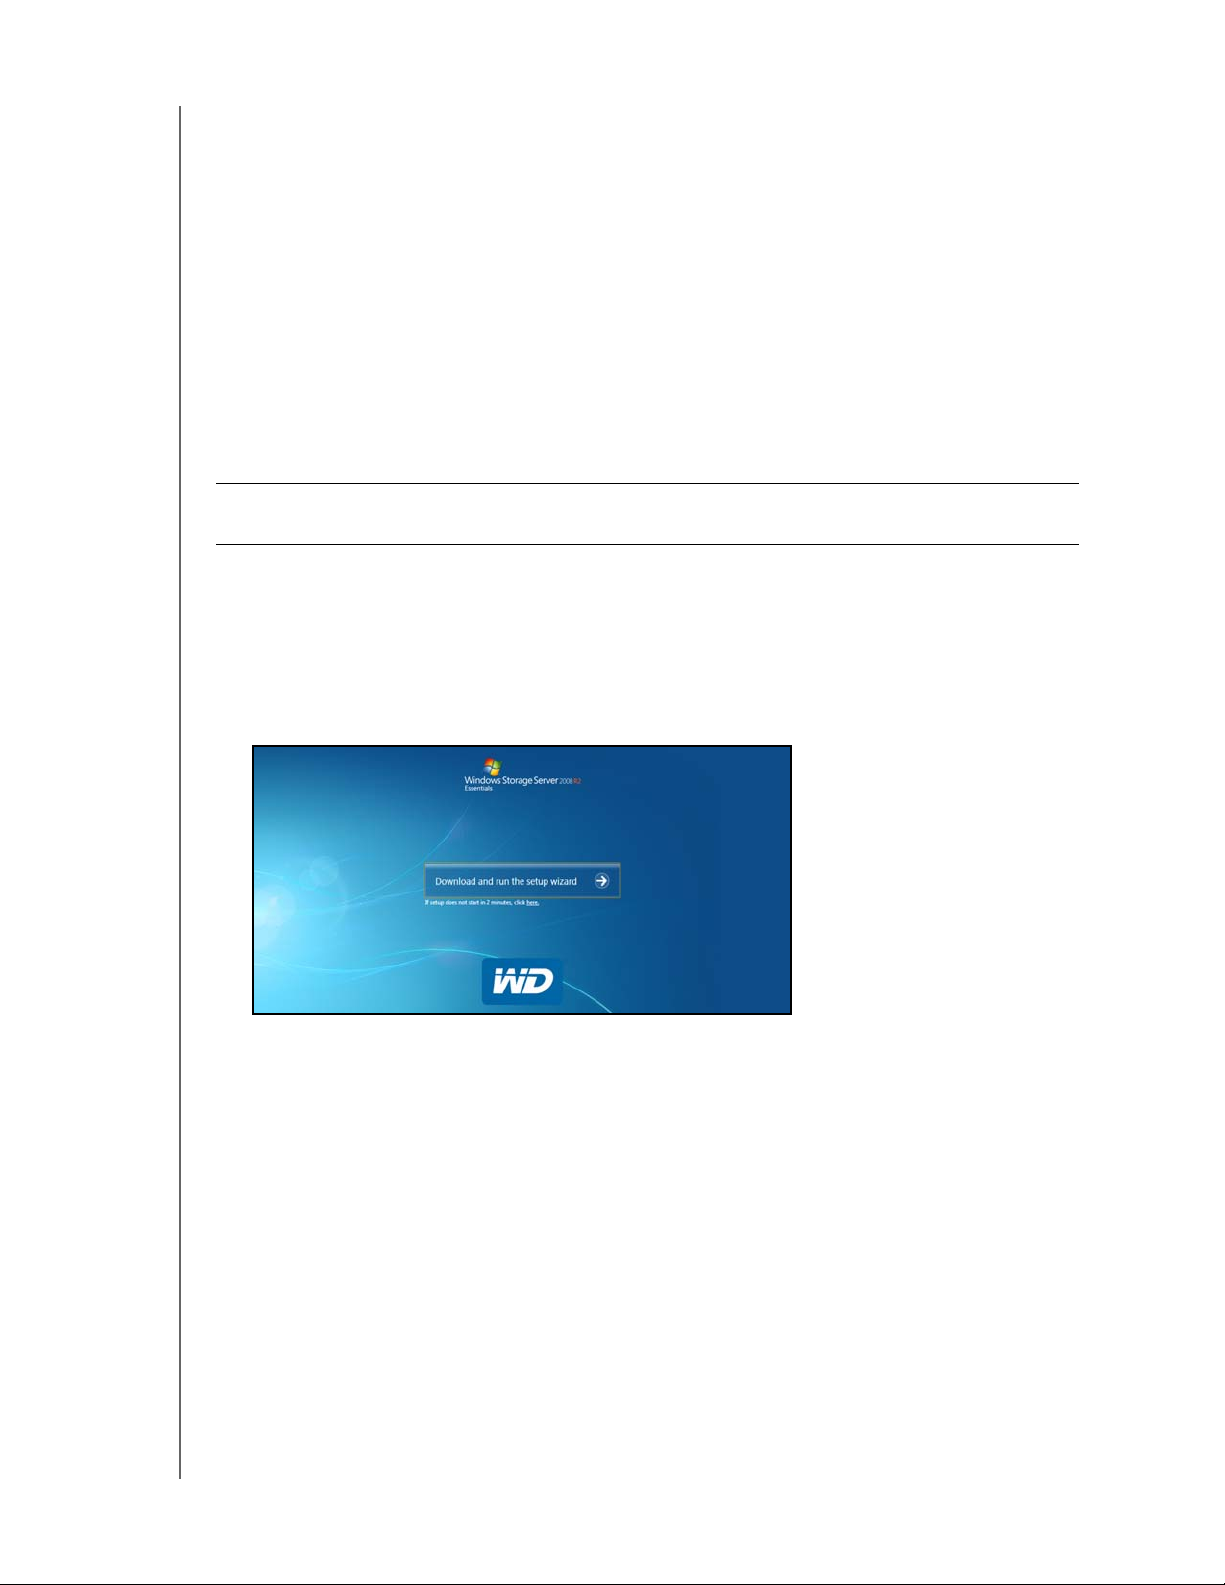
4. In the address field of an open browser window, type http://WDSENTINEL/Setup.
Note: The default server name (i.e., WDSENTINEL) is used to access the WD Sentinel
setup screen in your browser. If other devices using the same name are located on
your network, you will first have to either disconnect the device before setting up
your new WD Sentinel server, or obtain the IP address of your new WD Server. Once
the IP address is obtained, type http://<IP address>/setup in your browser window.
5. Select Download and run the setup wizard button.
6. At the warning prompts, click Run and Yes as appropriate.
WD SENTINEL RX4100
ADMINISTRATOR AND MAINTENANCE GUIDE
16
Page 23
CONNECTING THE SERVER AND GETTING STARTED
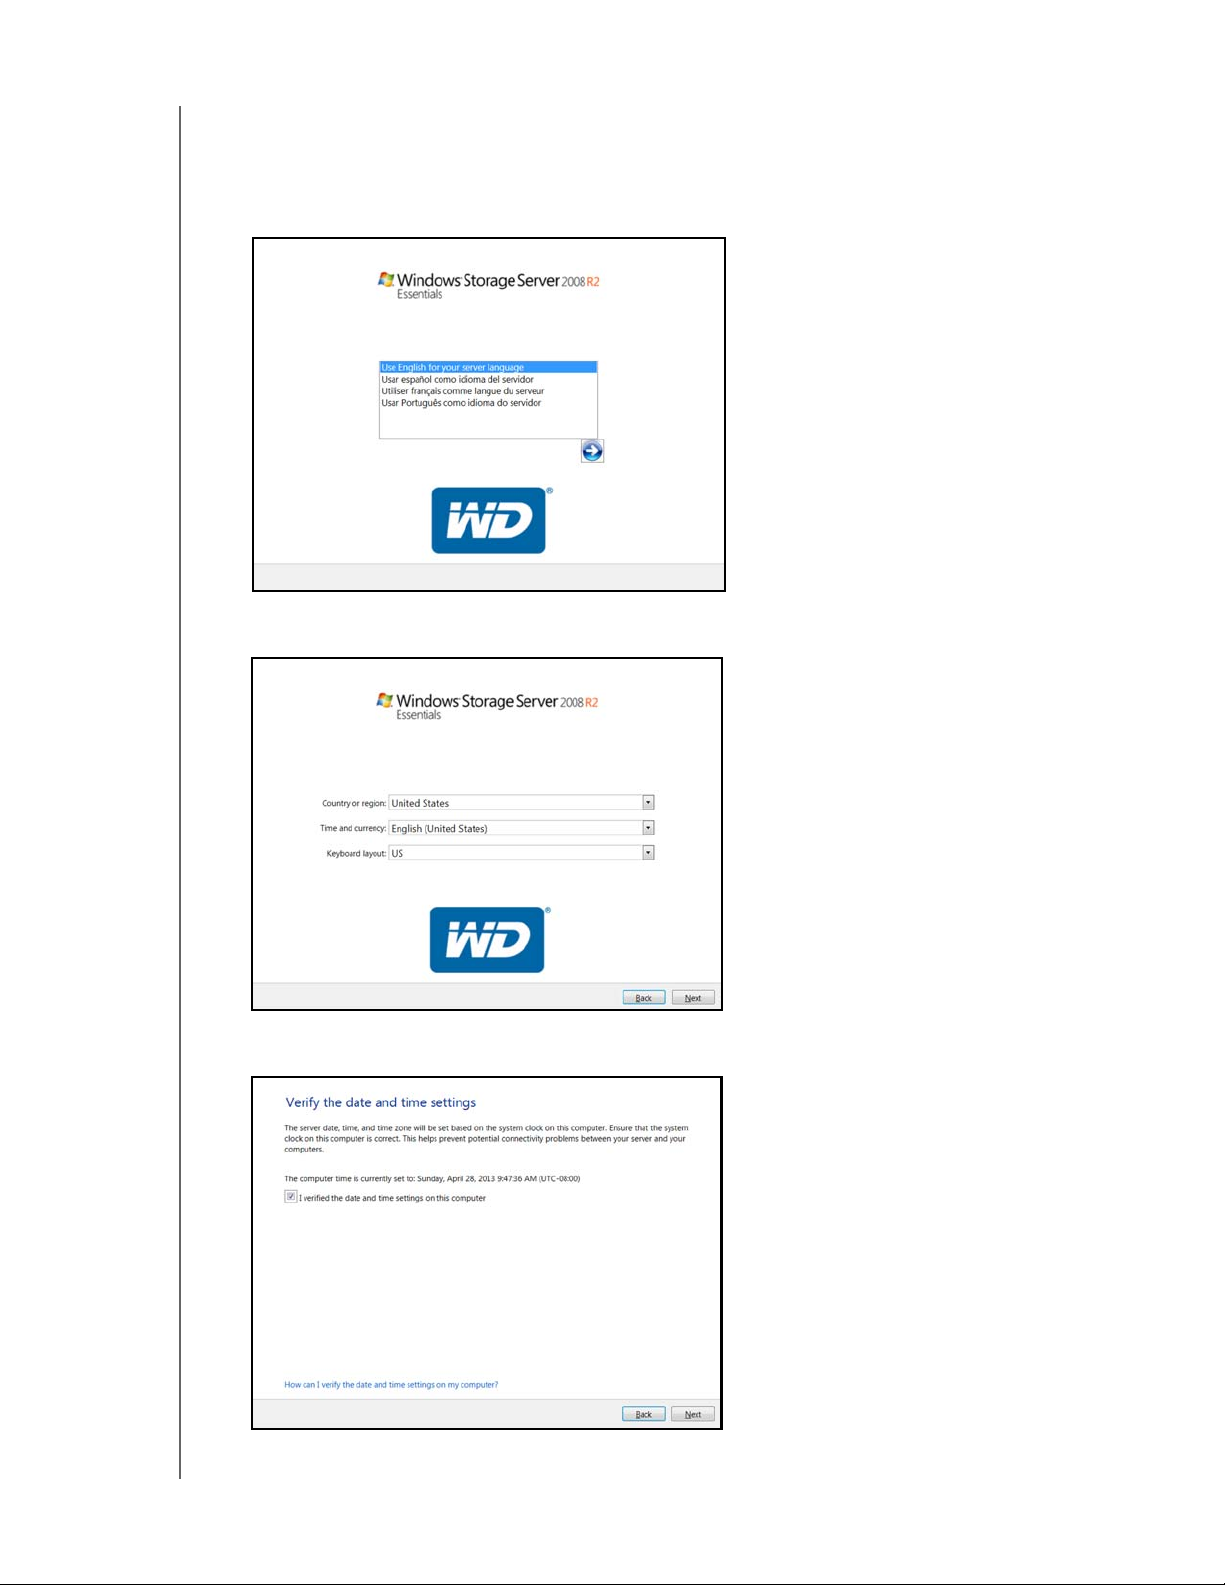
Setting up your WD Sentinel Server (one time only)
Your WD Sentinel RX4100 server is now ready to be configured. This section describes how
to use the one time setup wizard to configure your server for first use.
1. Select the server language from the list provided and click the arrow to continue.
2. Verify the localization settings, or select the correct values from the drop-down lists, then
click Next.
3. Review the date and time, and select the checkbox to verify the settings, then click
Next.
WD SENTINEL RX4100
ADMINISTRATOR AND MAINTENANCE GUIDE
17
Page 24
CONNECTING THE SERVER AND GETTING STARTED
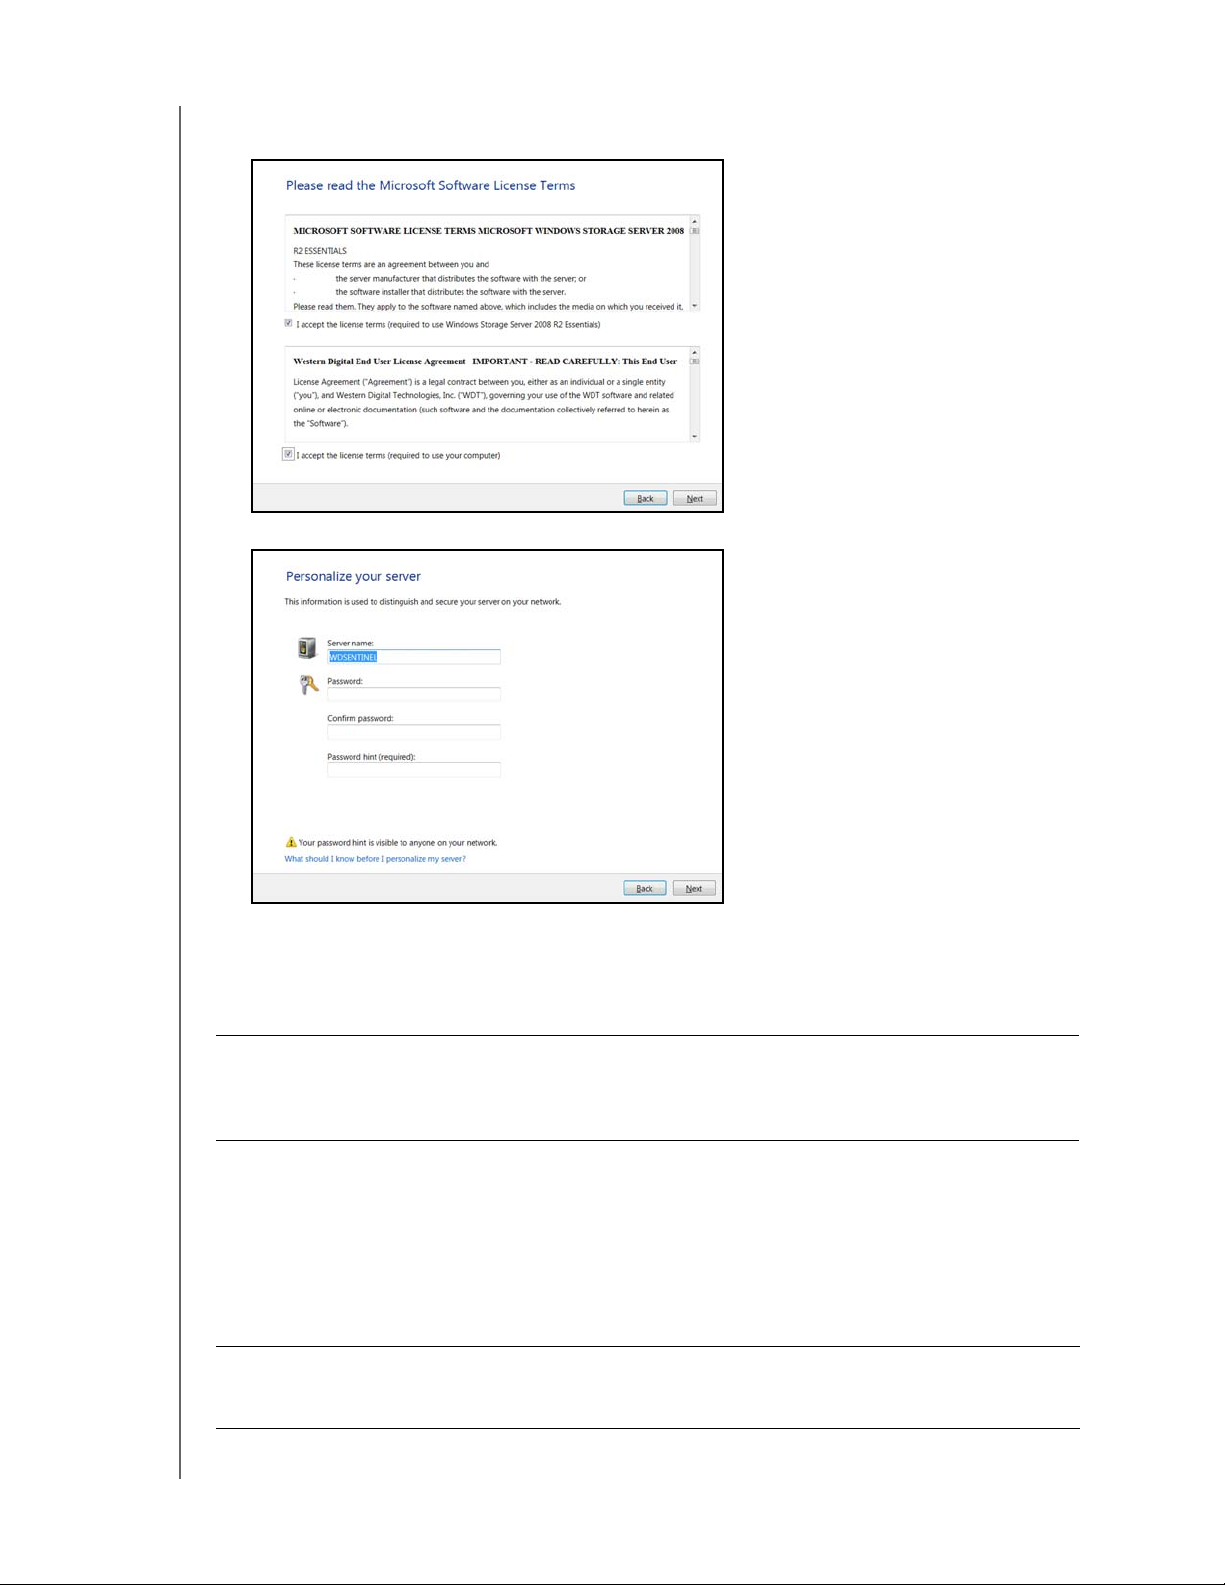
4. Read the Microsoft and Western Digital license agreements, select both checkboxes to
accept the license terms, then click Next.
5. Personalize your WD Sentinel server:
a. The WD Sentinel server has a default name of WDSENTINEL. Enter a unique name
for your WD Sentinel server, for example, Company-Name (must contain 1-12
characters; may be upper case, lower case, numeric, or a combination; may include
hyphens but no spaces or special characters).
WARNING! THIS IS THE ONLY TIME YOU CAN NAME YOUR WD SENTINEL
SERVER. You must assign it a unique name to avoid naming
conflicts should you ever have more than one WD Sentinel server
on the network.
b. Enter and confirm a password (must be at least 8 characters long and contain at
least three of the following categories: uppercase letters, lowercase letters,
numbers, and symbols; spaces are allowed.) This is the Administrator password.
You will use it later to connect the client computers to your WD Sentinel server and
to access the Administration Dashboard.
c. Enter a hint to remind you of the password.
WARNING! If you forget the Administrator password, it may not be possible to
recover it, and you could potentially lose all of your data. Make sure
to record the password and keep it in a safe location.
WD SENTINEL RX4100
ADMINISTRATOR AND MAINTENANCE GUIDE
18
Page 25

CONNECTING THE SERVER AND GETTING STARTED
6. Click Next and specify how the server software updates should occur. Make a selection:
Note: If you choose the first or second option on this screen, the subsequent installation
process may take longer, depending on Windows updates that may be available at
this time.
The installation begins. The progress bar on the screen informs you of the installation’s
progress.
Important: This process can take an hour or more and may restart more than once.
Do not interrupt the process. Do not power off or disconnect the
WD Sentinel server.
The completion screen appears:
Your WD Sentinel server configuration is complete and the server is ready for
use!
7. Click Connect to connect the computer you’re using to the server. To connect a
computer, proceed to “Connecting your Computers” on page 20.
WD SENTINEL RX4100
ADMINISTRATOR AND MAINTENANCE GUIDE
19
Page 26
CONNECTING THE SERVER AND GETTING STARTED
Connecting your Computers
Once you’ve set up your WD Sentinel server, you can connect up to 25 Windows PCs or
Mac computers to your WD Sentinel server.
Installing the Connector software joins the client computer to your WD Sentinel Server and
installs Launchpad and Dashboard.
Users use Launchpad to access server resources they have rights to.
The Administrator (you) accesses Dashboard for such tasks as managing the
WD Sentinel server, setting up user accounts, and managing access to shared folders.
Important Steps
Before installing Connector software on a computer, ensure that:
The computers have all the latest mandatory and optional operating system updates
installed.
There are no active backups in progress on the WD Sentinel server.
Note: Check for active backups on the Dashboard’s Computers and Backup tab. The
screen displays backups in progress.
Once the Connector software is installed, set up an automated scheduled backup (for after
working hours ) using the Dashboard. Running a manual backup during the initial connection
process will impact overall system performance.
Connecting a Windows PC
Use the following procedure to connect a Windows PC to the WD Sentinel server.
For steps on connecting a Mac using the Connector software, see “Connecting a Mac” on
page 23
1. In the address field of an open browser window, enter
2. Click Download software for Windows:
3. At the warning prompts, click Run and Yes as appropriate.
.
http://<servername>/connect. Example: http://myserver/connect.
<servername> is the name you gave your server in “Connecting the WD Sentinel
RX4100 Server from a Client Computer (Optional Method)” on page 16.
If you clicked Connect in Step 7 on page 19, continue to Step 2.
Note: If prompted to do so, type the user name and password of an account that has
administrator permissions on this client computer.
WD SENTINEL RX4100
ADMINISTRATOR AND MAINTENANCE GUIDE
20
Page 27
CONNECTING THE SERVER AND GETTING STARTED
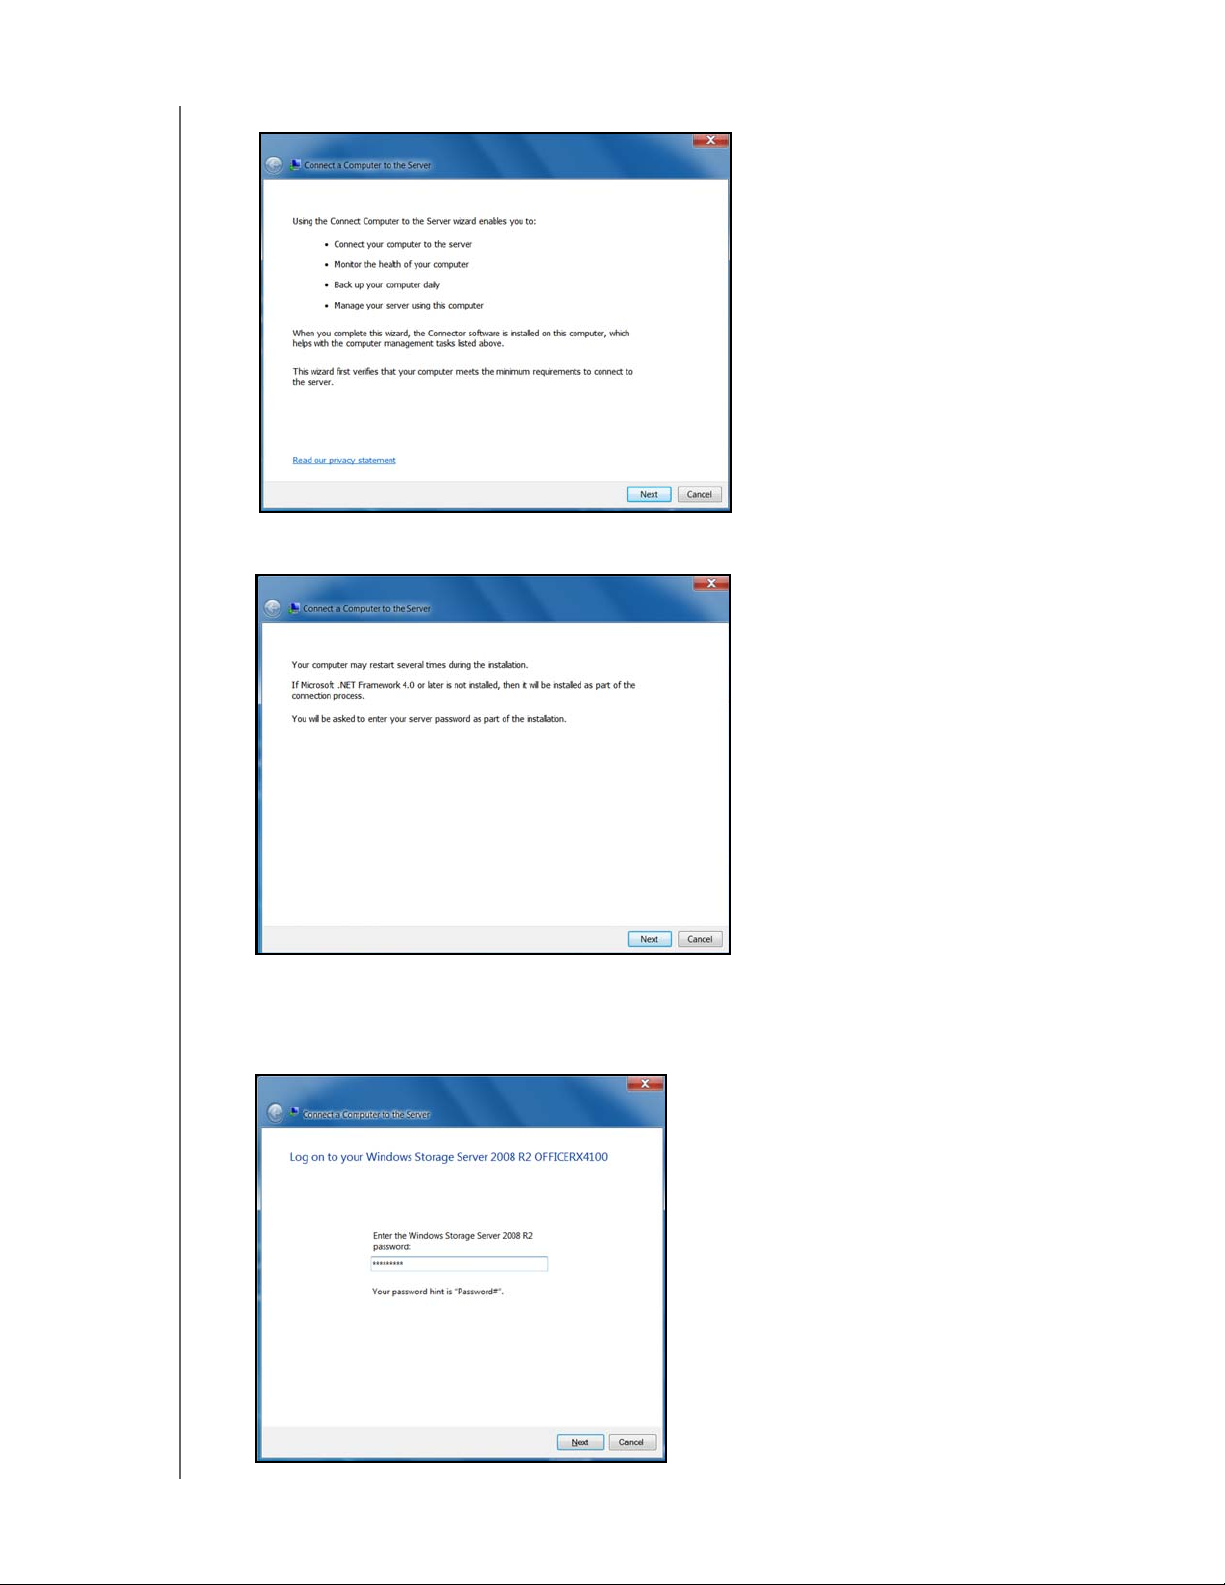
4. Review the overview of the Connect Computer to the Server wizard, then click Next.
5. Read the information about events that may occur during the installation, then click
Next.
6. Installation begins. The progress bar identifies where you are in the installation process.
The installation process may take 30 minutes or more to complete.
7. At the logon screen, enter the Administrator password for your WD Sentinel server, then
click Next.
WD SENTINEL RX4100
ADMINISTRATOR AND MAINTENANCE GUIDE
21
Page 28
CONNECTING THE SERVER AND GETTING STARTED
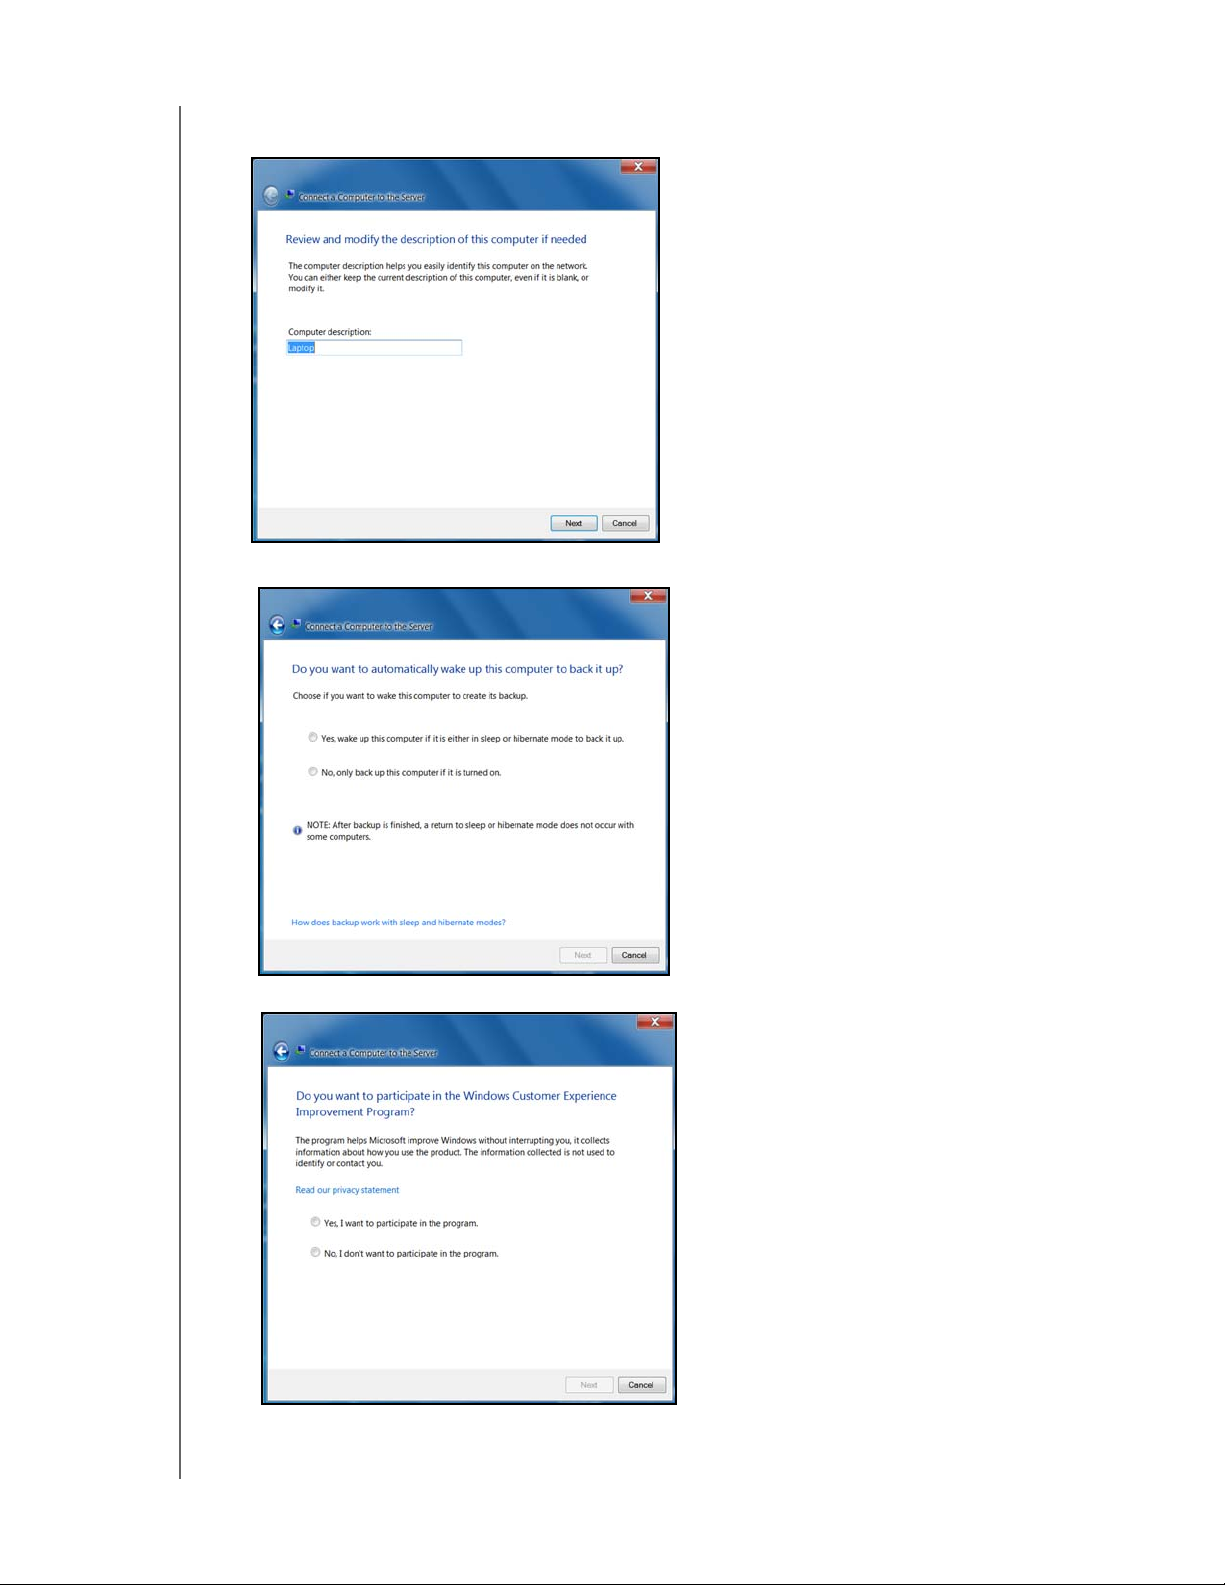
8. Enter a unique description for your computer so the server will be able to distinguish
yours from others on the network, then click Next.
9. Review and select a wake-up option, then click Next.
10. Review the Microsoft program options, make a selection, then click Next.
WD SENTINEL RX4100
ADMINISTRATOR AND MAINTENANCE GUIDE
22
Page 29
CONNECTING THE SERVER AND GETTING STARTED
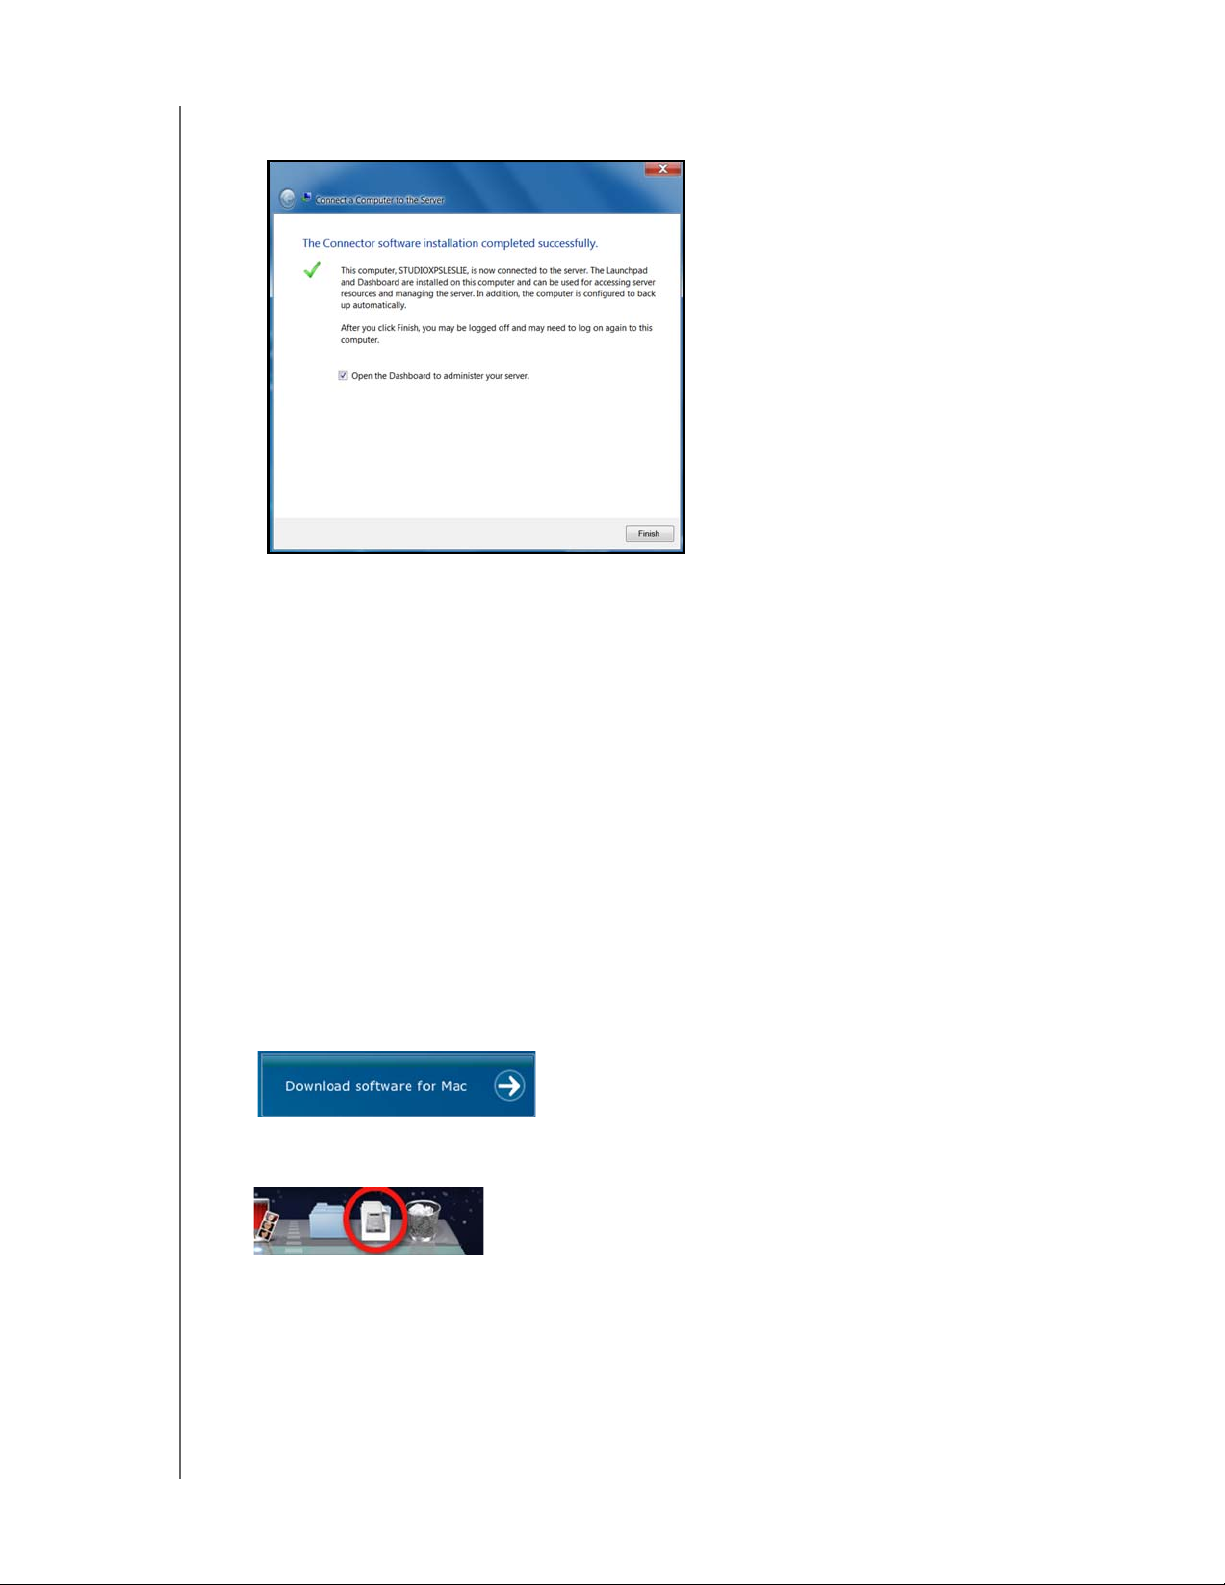
11. The installation completes. Select the checkbox for opening the Dashboard to
configure and monitor the WD Sentinel server. Click Finish:
Note: It is a best practice to select the Open Dashboard to administer your server option
and launch the Dashboard after finishing the Connector software installation. To take
advantage of shared storage capabilities of your WD Sentinel server, on the
Dashboard, create a user account (and assign access privileges to the shared
folders.
12. Close the browser. If you selected the checkbox, the Dashboard Sign in screen
displays.
Connecting a Mac
Use the following procedure to connect your Mac computer to the WD Sentinel server.
For steps on connecting a Windows PC using the Connector software, see “Connecting a
Windows PC” on page 20.
1. In the address field of an open browser window on the Mac you’d like to connect, enter
http://<servername>.local/connect. Example: http://myserver.local/connect
<servername> is the name you gave your server in “Connecting the WD Sentinel
RX4100 Server from a Client Computer (Optional Method)” on page 16.
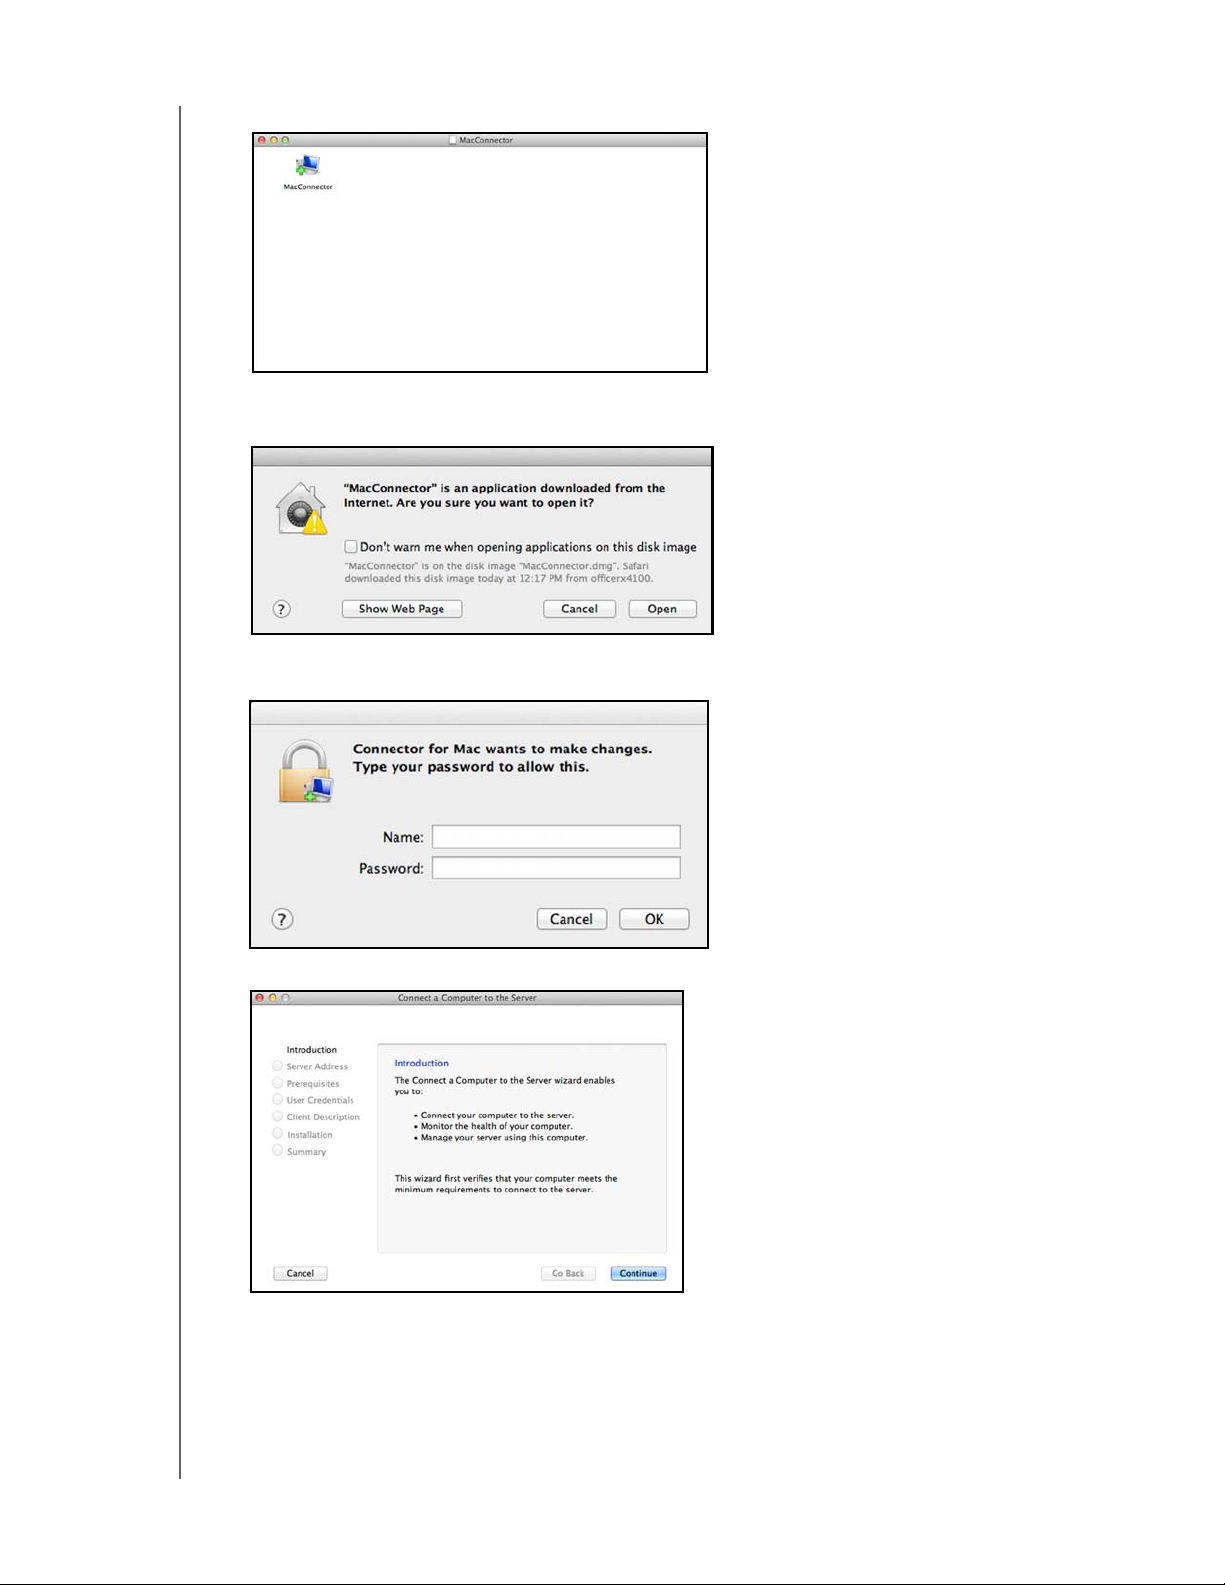
2. Click Download software for Mac:
The Mac Connector software downloads to your Download directory.
3. Click the Download
icon on the Menu bar at the bottom of the screen:
WD SENTINEL RX4100
ADMINISTRATOR AND MAINTENANCE GUIDE
23
Page 30
CONNECTING THE SERVER AND GETTING STARTED
4. Select MacConnector.dmg. The MacConnector window opens.
5. Double-click MacConnector.
6. Review the warning screen, then click Open.
7. Enter the user name and password of an account that has administrator permissions on
this client computer, then click OK.
8. Review the “Connect Computer to the Server” wizard, then click Continue.
WD SENTINEL RX4100
ADMINISTRATOR AND MAINTENANCE GUIDE
24
Page 31

CONNECTING THE SERVER AND GETTING STARTED
9. Enter the name you gave your server in “Connecting the WD Sentinel RX4100 Server
from a Client Computer (Optional Method)” on page 16, then click Continue. (Example:
myserver)
The software checks to ensure that your Mac meets the required prerequisites.
10. Once completed, enter an identifying name for your computer, then click Continue.
11. Enter the Administrator password for your WD Sentinel server, then click Continue.
WD SENTINEL RX4100
ADMINISTRATOR AND MAINTENANCE GUIDE
25
Page 32

CONNECTING THE SERVER AND GETTING STARTED
12. Enter a unique description for your computer so the server will be able to distinguish
yours from others on the network, then click Continue.
13. The installation completes. If not selected, select the checkbox for opening the
Windows Server Launchpad at startup, then click Close
.
Note: It is a best practice to select the Open Dashboard to administer your server option
and launch the Dashboard after finishing the Connector software installation. To take
advantage of shared storage capabilities of your WD Sentinel server, on the
Dashboard, create a user account and assign access privileges to the shared
folders.
Rebooting the WD Sentinel Server
Following is the cleanest procedure for rebooting the WD Sentinel server.
Note: This procedure should only be used after you’ve logged into the Dashboard and
1. On the Dashboard Home page, click the Server Settings link on the upper right of the
window.
created a user account.
WD SENTINEL RX4100
ADMINISTRATOR AND MAINTENANCE GUIDE
26
Page 33

CONNECTING THE SERVER AND GETTING STARTED
2. On the bottom left of the General screen, click the shutdown arrow and select Restart:
WD SENTINEL RX4100
ADMINISTRATOR AND MAINTENANCE GUIDE
27
Page 34

MANAGING THE WD SENTINEL SERVER (DASHBOARD)
4
Managing the WD Sentinel Server (Dashboard)
Setting up WD Sentinel Server & Connecting Computers
Accessing the Dashboard
Adding a User Account
Performing Dashboard Tasks
Using the Home Page
Managing User Accounts
Managing Computers and Backups
Managing Server Folders and Hard Drives
Monitoring Add-ins
Monitoring System Health and Alerts
Updating Software
Managing Server Settings
Shutting Down the Server
Setting up WD Sentinel Server & Connecting Computers
This chapter assumes you have followed the Administrator's Basic Install Guide to initialize
the WD Sentinel server and have connected at least one computer to the server. To review
the setup steps see “Connecting the Server and Getting Started” on page 13 of this manual.
Important: As a best practice, perform the tasks outlined in this guide using a client
computer on which you’ve installed the connector software, not directly from
the WD Sentinel server.
Accessing the Dashboard
To access the Dashboard from the Server:
1. Click >All Programs >Windows Storage Server 2008 R2>Windows Storage
Server 2008 R2 Dashboard.
2. On the Dashboard Sign in page, enter the Administrator password (created during
setup) and click the right arrow:
WD SENTINEL RX4100
ADMINISTRATOR AND MAINTENANCE GUIDE
28
Page 35

To access the Dashboard (Windows):
MANAGING THE WD SENTINEL SERVER (DASHBOARD)
If you’re operating systems
Then...
is...
Windows 8 • On your keyboard, click the Windows button .
• On the Metro Start page, right-click in a blank area of the screen.
• Select All apps .
• Under Windows Server Storage Server 2000 R2, click Windows
Server 2008 R2 Dashboard.
Windows 7
Windows Vista
Windows XP • Click Start>Programs>Windows Storage Server 2008
• Click >All Programs >Windows Storage Server 2008
R2>Windows Storage Server 2008 R2 Dashboard.
R2>Windows Storage Server 2008 R2 Dashboard
3. On the Dashboard Sign in page, enter the Administrator password (created during
setup) and click the right arrow:
To access the Dashboard (Mac):
1. In the Application folder, select Windows Server Dashboard.
2. For first time sign-in, enter the server name,
(obtained in Step 5 of “Setting up your WD Sentinel Server (one time only)” on page 17)
and the Administrator password (created during setup).
3. Enter the following information on the Remote Desktop Connection screen:
User Name: Enter Administrator.
Administrator Password: The password you created during setup.
Computer Name: The server name you created during setup.
WD SENTINEL RX4100
ADMINISTRATOR AND MAINTENANCE GUIDE
29
Page 36

The Dashboard appears:
Navigation icons
Ta bs
Tas k s P a n e
Alerts and Server Settings
Help icon
The Dashboard Home page displays:
MANAGING THE WD SENTINEL SERVER (DASHBOARD)
WD SENTINEL RX4100
ADMINISTRATOR AND MAINTENANCE GUIDE
30
Page 37

MANAGING THE WD SENTINEL SERVER (DASHBOARD)
Adding a User Account
Use the following steps to add a user account to the WD Sentinel server.
1. Open the WD Sentinel Dashboard (see “Accessing the Dashboard” on page 28)
2. Click Users on the Navigation menu.
3. Select Add a user account in the Task Pane.
4. Enter the following information:
a. First Name, Last Name: Enter the user’s first and last name.
b. User account name: Enter a user account name. This is used to log into the
Launchpad.
c. Password, Confirm Password: Enter your password for the assigned user, then enter
the same password to confirm the password.
5. Click Next.
6. Select the access levels for the user account from the pull-down menu.
Read Only: Allows the user to only read the information in the associated files.
Read/Write: Allows the user to create, change, and delete the information in the to the
associated files.
No Access: Choose this setting to deny access to a shared folder.
WD SENTINEL RX4100
ADMINISTRATOR AND MAINTENANCE GUIDE
31
Page 38

MANAGING THE WD SENTINEL SERVER (DASHBOARD)
7. Click Next.
8. Place a check next to the information you’d like the user to access using the Remote
Web Access feature.
Select Server Dashboard (administrator access required) to view global alerts about
your server.
Select Do not allow Remote Access if you want to deny web access for this user.
9. Click Create Account.
10. Click Close. Provide the user with their new user name and password.
WD SENTINEL RX4100
ADMINISTRATOR AND MAINTENANCE GUIDE
32
Page 39

MANAGING THE WD SENTINEL SERVER (DASHBOARD)
Performing Dashboard Tasks
The Administrator uses the Dashboard to perform administrative tasks such as creating user
accounts, setting up access privileges to shared folders and other server resources,
managing shared folders, and monitoring the WD Sentinel server.
For information about an additional task, backing up a computer to the WD Sentinel server,
see “Backing up (Windows PC)” on page 58.
Using the Home Page
The main part of the Home page lists some of the recommended tasks to perform the first
time you sign in to the Dashboard. To perform these tasks from the Home page, just click
the relevant links. The panel on the right offers easy access to the WD Sentinel RX4100
community and to WD resources. The rest of this chapter discusses the tasks the
Administrator can perform on the Dashboard.
Important: Ensure that you perform the tasks outlined on the Home tab Getting Started
Tasks prior to performing other tasks.
For a full description of the typical components of a page, including the Critical, Warning,
and Informational Alert icons, see the Microsoft Online Help.
WD SENTINEL RX4100
ADMINISTRATOR AND MAINTENANCE GUIDE
33
Page 40

MANAGING THE WD SENTINEL SERVER (DASHBOARD)
Home Page Tabs
The Home page contains four tabs, summarized below:
Ta b Description
Home
WD Guardian Services Western Digital offers WD Guardian Services for Small
About Displays basic information such as product serial number, IP
Registration Allows you to register your server with WD. Once registered
Complete basic tasks that will get you started with the
WD Sentinel server. For information about these tasks, see
the Microsoft Online Help.
Best Practices:
• Complete the Getting Started tasks on the Home page of
the Dashboard.
• Create at least one active user account the first
time you access the Dashboard.
Business customers. Choose from various technical support
plans and extended warranty services that work best for your
business. For more information, visit www.wdguardian.com.
address, and software version.
you will receive notifications of product and firmware
updates, newsletter, information about new product, and
services as well as periodic special offers from WD.
Enter the required information and click Register. Optionally,
enter the Partner ID of the WD Partner who helped you
purchase or install your WD Sentinel server.
Home Page Tasks Panel
The panel on the right of the Home page displays links to useful WD websites and resources
to make the best of your WD Sentinel server.
Managing User Accounts
On the navigation bar, click the Users icon. You can now:
View, add, manage, delete, and activate/deactivate user accounts.
Use the guest account.
Manage domain user accounts (if joined to an Active Directory Domain).
Manage passwords.
Manage Remote Web Access.
Assign user access privileges to shared folders and server resources.
For detailed instructions on performing any of these tasks, consult Microsoft Online Help.
WD SENTINEL RX4100
ADMINISTRATOR AND MAINTENANCE GUIDE
34
Page 41

MANAGING THE WD SENTINEL SERVER (DASHBOARD)
Managing Computers and Backups
After you’ve connect your computers to the Windows Storage Server 2008 R2 Essentials
network, you can manage the computers from a central location in the Computers and
Backup section of the Dashboard including:
Viewing a list of computers connected to your server.
Viewing computer properties and health alerts for each connected computer.
Setting up and managing computer backups.
Restoring files and folders to computers.
Manage backup schedule for automatic Windows client backup.
Manage Retention policy for the Windows client backup data.
For detailed instructions on performing any of these tasks, consult Microsoft Online Help.
Managing Server Folders and Hard Drives
The Server Folders and Hard Drives section contains two tabs:
The Server tab allows you to view and manage the properties of the shared folders
on your server including:
- Managing your company’s shared folders.
- Accessing shared folders locally or remotely.
- Uploading or download files locally or remotely.
The Hard Drives tab allows you to view and check the health of the drives that are
attached to your server.
For detailed instructions on performing any of these tasks, consult Microsoft Online Help.
Monitoring Add-ins
The Add-ins section of the Windows Storage Server 2008 R2 Essentials Dashboard
includes tasks that help you view and manage the Add-ins that are installed on the server.
For detailed instructions on monitoring add-ins, consult Microsoft Online Help.
Monitoring System Health and Alerts
The Monitor module of the Dashboard includes tasks that help you view and manage the
WD Sentinel server storage system. To open the Monitor module, click the Monitor icon on
the navigation bar. The Monitor module includes two tabs, Health and Software Update,
and related tasks in the panel on the right.
WD SENTINEL RX4100
ADMINISTRATOR AND MAINTENANCE GUIDE
35
Page 42

MANAGING THE WD SENTINEL SERVER (DASHBOARD)
Health Tab
The Health tab and related tasks enable you to monitor the status of the storage drives,
RAID configuration, power supplies, temperatures, fans, CPU, and network connections.
To open the
Health tab, click the Monitor icon on the navigation bar:
Settings Description
Network Health
Ethernet 1 & 2
Storage Displays storage information associated with the WD Sentinel server. The
Displays the status (Connected or Not connected) of the server's network
connection(s). If you use both Ethernet ports and one fails, the other
takes over, allowing the WD Sentinel server to remains operational over
the network.
WD Sentinel server holds up to four of WD’s hard drives optimized for
quality, reliability and performance and features RAID 5 to enhance
performance and data protection.
RAID is an acronym for Redundant Array of Independent Disks. The
server uses RAID 5, which offers fast performance by striping data across
all drives. This arrangement protects data by dedicating a quarter of each
drive to fault tolerance, leaving three quarters of the system capacity
available for data storage.
Type: RAID level
Total Capacity:
Available Capacity: Amount of storage (TB) left available for use.
Alert Threshold: The percentage of storage capacity used above which
you receive alert notifications that the storage is approaching maximum
threshold.
Status: The status of the server storage may be:
• Healthy–All drives are in the optimal state.
• Degraded–A single drive failed; data is protected, but
Status of drives 1-4: The status of a drive may be:
•Normal
• Failed!: Visit WD Store to replace.
• CAUTION: Imminent failure detected. Please replace this hard
WD SENTINEL RX4100
ADMINISTRATOR AND MAINTENANCE GUIDE
Maximum amount of storage space (TB) available.
performance is degraded. (A failed drive must be replaced with a
healthy drive as soon as possible to fully protect your server and
data.)
drive immediately.
36
Page 43

MANAGING THE WD SENTINEL SERVER (DASHBOARD)
Settings Description
System Temperature Enclosure: The temperature within the server enclosure.
CPUs 1 & 2: The status, temperature, and status description for each
CPU. (The server does not have two physical CPUs but instead uses a
dual core CPU. CPU 1 and CPU 2 represent the details for each core.)
The status may be:
•Normal
•Warm
•Hot
Cooling Fans The status of the server’s cooling fan may be:
•Active
•Inactive
Indicates the speed of revolutions in RPMs.
Power Supplies
1 & 2
The server has two power supplies. If you use both and one fails, the
other takes over and the WD Sentinel server remains operational. The
status may be:
•Active
•Inactive
Health Tasks
Find compatible hard drives
To view a list of WD drives that can be used in the WD Sentinel server:
1. Click Compatible Hard Drives
its model number, description, and maximum capacity.
2. If desired, click the WD Store button to view or buy additional drives.
3. To exit, click OK.
Request Support
The Request Support function collects information about your WD Sentinel and sends a
diagnostic report to the WD Support server. It then opens the WD Support website, where
you can enter a few details regarding the problem to route it to the appropriate support
team.
Note: If you do not want to submit the diagnostic logs, use the regular
WD Support page at http://support.wd.com.
To access WD Customer Support automatically:
1. Click Request Support in the Tasks pane. The Request Support window displays.
2. After reading the information on the screen, click the “I agree and would like to proceed.”
checkbox, then click Proceed. The WD Support Ask a Question page displays.
in the Task pane. A pop-up screen lists each drive with
Note: The first time you do this, an Internet Explorer Security Screen displays. Clear
the check box and click Close.
WD SENTINEL RX4100
ADMINISTRATOR AND MAINTENANCE GUIDE
37
Page 44

MANAGING THE WD SENTINEL SERVER (DASHBOARD)
3. Complete the online form and click Submit Question. A diagnostic report of the
WD Sentinel server is automatically attaches to the form. Your request is added to the
WD Support queue and assigned a confirmation number. You will receive an email from
WD Support regarding your question.
Important: For faster service/phone service, call WD Support. For the latest phone
numbers and contact information in your region, see “Contacting WD
Technical Support” on page iii or http://support.wd.com. Have your
confirmation ready when you call.
Lock/Unlock
For security reasons, you can lock or unlock the drives. You cannot lock or unlock an
individual drive; you either lock them all or unlock them all, using a password you create
here. This password may be but does not have to be the same as the WD Sentinel server
Administrator password.
Important: Store your password in a secure place. If the password is lost, there is no way
to get it back or unlock the drives, and all of its data may be lost.
To lock the drives:
1. In the Advanced tasks area, click Lock drives. The following screen displays:
2. Read the message, then click the checkbox.
3. Click Next.
4. In the Set Password field, enter your password.
5. In the Confirm Password field, confirm your password,
6. In the Password Hint field, enter a hint to remind you of the password.
7. Click Next.
WD SENTINEL RX4100
ADMINISTRATOR AND MAINTENANCE GUIDE
38
Page 45

MANAGING THE WD SENTINEL SERVER (DASHBOARD)
To unlock drives:
1. Click Unlock drives.
2. In the Old Password field, enter your password.
3. Click Unlock drives.
To change the password:
1. Click Unlock drives.
2. In the Old Password field, enter the current password.
3. In the New Password field, enter your new Password.
4. In the Confirm Password field, confirm your new password
5. In the Password Hint field, enter a hint to remind you of the password.
6. Click OK.
Updating Software
Periodically, WD issues software updates for your WD Sentinel RX4100 server. The Software
Update tab within the Monitor module allows you to update WD Sentinel RX4100 software
automatically or manually. Please note that this tab only allows you to apply software
updates issued by WD. To manage or apply Microsoft software updates, go to Server
Settings on the Dashboard.
A best practice to ensure that your system software stays current is to enable automatic
updates on your WD Sentinel server (see “Automatic Updates of WD Software” on page 43)
Manual Updates of WD Software
To check for software updates and update the software:
1. Click the Software Updates
tab.
WD SENTINEL RX4100
ADMINISTRATOR AND MAINTENANCE GUIDE
39
Page 46

MANAGING THE WD SENTINEL SERVER (DASHBOARD)
2. You have two options. You may check for updates online or update from a file:
To use the online update:
a. Click Check for Updates.
b. If an update is available, click Download and Install to update your
WD Sentinel server.
To update from a file:
a. The software update files can also be downloaded from the WD Support site at
http://support.wd.com.
Once you download the available firmware updates for the
WD Sentinel RX4100 server, copy the file to a shared folder such as the Documents
share on the server and select the file to update.
b. Click Update from file and then locate and select the update file you copied to your
server.
c. Click Open. The system applies the software update. The system automatically
restarts the server if a reboot is required to complete the software update.
Setting Global Alerts
In order to receive alerts about your system and to be notified of software updates, it is
necessary that you set up global alerts for your WD Sentinel server. Use the following steps
to set up your global alerts.
1. Open the Launchpad (see “Accessing the Launchpad” on page 49).
2. Click the menu arrow on the top right and select Settings from the drop-down menu.
3. Under Scope of alerts to be presented, select Local and Network.
4. Click Apply, then click OK.
WD SENTINEL RX4100
ADMINISTRATOR AND MAINTENANCE GUIDE
40
Page 47

MANAGING THE WD SENTINEL SERVER (DASHBOARD)
Setting Email Alerts
Receiving your alerts by email allows you to monitor certain server issues as they occur. Use
the following steps to set up email alerts.
1. On the Dashboard Home Page, click the Alert Viewer.
2. Click Set up email notification for alerts at the bottom of the Alert Viewer.
3. Click Enable.
WD SENTINEL RX4100
ADMINISTRATOR AND MAINTENANCE GUIDE
41
Page 48

MANAGING THE WD SENTINEL SERVER (DASHBOARD)
4. Review the settings, then click OK.
5. Enter the email address where you’d like to receive the server alerts.
6. Click Apply and send email to ensure that email alert is working.
7. Click Close.
8. Click OK. Your email alert is now set up.
WD SENTINEL RX4100
ADMINISTRATOR AND MAINTENANCE GUIDE
42
Page 49

MANAGING THE WD SENTINEL SERVER (DASHBOARD)
Automatic Updates of WD Software
Enabling Automatic Updates on your WD Sentinel server causes the server to check
for available software updates from WD on a scheduled basis and apply the updates
automatically.
To set a schedule for automatic updates:
1. In the Automatic Updates section, click Enable.
2. Click the Change link and select the day and time you want the WD Sentinel server to
check for updates every week, and if an update is available, install it. (Example: every
Sunday at 3:00 AM)
3. Click Apply.
Updating Microsoft Software
You can update the Microsoft software for the WD Sentinel RX4100 using the Server
Settings page. See “Managing Server Settings,” below.
Managing Server Settings
Important: Unless otherwise noted, Microsoft Online Help provides complete instructions
for using these pages.
1. Click Server Settings on the icon bar to enable, set up, and control WD Sentinel server
settings.
2. The General page displays. The left panel contains links to the rest of the Server Settings
pages.
WD SENTINEL RX4100
ADMINISTRATOR AND MAINTENANCE GUIDE
43
Page 50

MANAGING THE WD SENTINEL SERVER (DASHBOARD)
Following is a summary of the purpose of each of the Server Settings pages.
General
Shutdown or restart the server—This is the safest method to shut down or
restart the server. It insures that the RAID system shuts down cleanly. See “Shutting
Down the Server” on page 45 for instructions.
Change the date, time, and location of the server—You can change the
settings you established at initialization.
Change the behavior of the Windows update—You can change the settings for
updating the Microsoft software.
Media
Enable or disable media (DLNA) services, set the video streaming quality, and define the
folders to be used for the media. By default, media service is enabled, and the default
Picture, Music, and Video folders are set to distribute the media.
HomeGroup
When creating a HomeGroup, establish which folders are to be shared through the
HomeGroup. Note that HomeGroup is only available for Windows 7 clients.
Remote Web Access
With Remote Web Access enabled, you can access the WD Sentinel server from any device
using a web browser, such as Internet Explorer, from anywhere with Internet access. You
can access shared folders and files (that you have permission for) on the server as well as on
your networked computer.
Enabling Remote Web Access
Enable or disable Remote Web Access on the Server Settings page. Remote Web Access is
turned off by default.
Note: The Home page provides a Getting Started task for enabling Remote Web
Access by clicking link to the process.
WD SENTINEL RX4100
ADMINISTRATOR AND MAINTENANCE GUIDE
44
Page 51

MANAGING THE WD SENTINEL SERVER (DASHBOARD)
1. Under Server Settings, click Remote Web Access in the panel on the left.
2. Click Tur n o n
and complete the wizard to set up your router, set a domain name, and
change Internet settings.
3. Grant Remote Web Access privileges if you want a user to access the
WD Sentinel server, shared folders, computers, media, Home page links, and the
Dashboard (administrators only) when you create or update a user account.
To view a user’s current privileges, click the Users icon in the Navigation bar.
Note: The Guest account cannot have Remote Web Access.
Note: Refer to Microsoft Online Help for detailed information about setting up
remote web access and for troubleshooting connection issues.
Domain
This option is available for networks that have an Active Domain server for user control. A
domain is a group of computers under the control of a server known as the domain
controller. In the case of the WD Sentinel RX4100, it enhances security by allowing only
users with necessary permissions to access the server. Refer to Microsoft Online Help for
detailed information. For information on acceptable domains, go to http://support.wd.com
and search for Knowledge Base Answer ID 8549.
Shutting Down the Server
The WD Sentinel server is intended to be on at all times, providing shared data and backup
services. A best practice is to avoid turning the unit off. However, if it does become
necessary (for example, moving the server to a different location), then follow the procedures
below.
It is very important that the WD Sentinel server be shut down or restarted in a clean and
graceful manner through the Server Settings section in the Dashboard.
WARNING! To avoid a potentially unclean shutdown that could corrupt the RAID
configuration, shut down the server through the Dashboard.
To shut down or restart using the Dashboard (Preferred method):
1. Click Server Settings in the icon bar.
2. To shut down, right-click the red button in the lower left corner of the page and select
Shut down.
3. To restart, right-click the arrow and select Restart
4. When the confirmation message appears, click Yes .
.
WD SENTINEL RX4100
ADMINISTRATOR AND MAINTENANCE GUIDE
45
Page 52

MANAGING STORAGE ON THE WD SENTINEL SERVER
5
Managing Storage on the WD Sentinel Server
WD Sentinel Server RAID Storage
Using USB Storage
WD Sentinel Server RAID Storage
RAID is the acronym for Redundant Array of Independent Disks. The WD Sentinel server
provides automatic RAID service to assure the integrity of the storage system. For
redundancy, a minimum of two drives must be active. The operating system and all data are
protected by the RAID structure. The server automates the management of the RAID.
Your WD Sentinel server uses RAID 5, which offers fast performance by striping data across
all drives, This RAID level provides the system with both redundancy and optimum capacity.
2 TB Drives 3 TB Drives 4 TB Drives
RAID Level 5 (4 Drives) 8 TB Capacity 12 TB Capacity 16 TB Capacity
If a drive in the array fails, the data and operating system are still intact, and the
WD Sentinel server continues to provide service.
Important: If you have one bad drive, the server operates normally. However, if a
second drive fails, the server will no longer operate. You will need to
recover the server and/or replace the failed drive(s). A best practice is
to have a replacement drive readily available.
The WD Sentinel server lets you know when a drive fails in the following ways:
The LED below the bad drive is solid red.
The Power LED on the WD Sentinel server flashes red, indicating a serious fault.
An email Alert is posted if you have set it up to do so. (See “Monitoring System
Health and Alerts” on page 35.)
To recover from a failed drive, simply replace the drive (the one with the red LED over the
drive) with an approved drive for the WD Sentinel server (see “Find compatible hard drives”
on page 37). The WD Sentinel server validates the replaced drive and automatically
integrates it into the RAID array. This operation takes many hours to accomplish. Progress of
this operation appears on the Dashboard. It is not necessary to power off or disengage the
WD Sentinel server to perform this operation. While the server is verifying the RAID array,
your data continues to be available although the performance may be impacted.
The WD Sentinel server RAID system has no downgrade options. Once available capacity
has been increased, the Administrator cannot decide to subsequently reduce capacity by
removing a drive. The removal of a drive degrades the RAID and makes it vulnerable to
single drive failure.
WD SENTINEL RX4100
ADMINISTRATOR AND MAINTENANCE GUIDE
46
Page 53

MANAGING STORAGE ON THE WD SENTINEL SERVER
USB 2.0 port
USB 3.0 ports
Using USB Storage
The WD Sentinel server has one USB 2.0 port on the front panel and two USB 3.0 ports on
the back panel of the unit. The USB 3.0 ports can connect to external USB 2.0 or USB 3.0
storage devices or to a UPS device for power outage conditions. For example, WD My
Passport or WD My Passport Essentials may be used to connect to the WD Sentinel server.
You can share this data on your USB drive with other users connected to the server by using
the Dashboard, which treats the USB drive as a share. You can set user privileges just as
you do with shared folders on the WD Sentinel server’s drives. The server manages UPS
capability through a USB port for communication and to ensure an orderly shut down.
Front View
Back View
To share data on a USB drive:
1. Connect a USB drive to either of the three USB ports.
2. On the Dashboard, click the Servers Folders and Hard Drives icon.
3. Click the Server Folders tab.
4. In the Task bar, click Add a folder.
WD SENTINEL RX4100
ADMINISTRATOR AND MAINTENANCE GUIDE
47
Page 54

MANAGING STORAGE ON THE WD SENTINEL SERVER
5. Enter a name for the folder.
6. Click Browse and select a folder on the USB drive. Note that a shared folder cannot be
created at the root of the USB drive.
7. Click OK and follow the instructions on the screen.
To stop sharing data on a USB drive:
1. On the Dashboard, click the Servers Folders and Hard Drives icon.
2. Click the Server Folders tab, then select the folder you want to stop sharing.
3. On the Task bar, click Stop sharing the folder.
4. Click Yes , then click Close.
WD SENTINEL RX4100
ADMINISTRATOR AND MAINTENANCE GUIDE
48
Page 55

USING THE WD SENTINEL SERVER’S FEATURES
6
Using the WD Sentinel Server’s Features
Using the Launchpad (Internal Users)
Accessing Shared Folders Over Your Network
Accessing Computers and Shared Folders Remotely
Backing up (Windows PC)
Backing up with Time Machine (Mac)
Recovering/Restoring (Windows PC)
Recovering/Restoring (Mac)
Backing up your WD Sentinel Server
Recovering the WD Sentinel Server to Factory Defaults
This chapter describes the routine tasks that both the Administrator and permitted users
perform on the WD Sentinel server.
Using the Launchpad (Internal Users)
After you, the Administrator, use the Dashboard to set up users with a user name,
password, and permissions, they can access the Launchpad Sign-in page using one of the
following methods:
Best Practice: Ideally, you set up a user name and password for yourself and have
given it all access privileges so you too can use the Launchpad
shortcuts.
Accessing the Launchpad
To access the Launchpad (Windows):
If you’re operating systems
is...
Windows 8 From Apps Page:
Do one of the following...
• On your keyboard, click the Windows button .
• On the Metro Start page, right-click in a blank area of the screen.
• Select All apps .
• Under Windows Server Storage Server 2000 R2, click Windows
Server 2008 R2 Launchpad.
From Desktop:
• Double-click the Launchpad icon .
From System Tray:
• Right-click the Launchpad icon and select Open
Launchpad.
WD SENTINEL RX4100
ADMINISTRATOR AND MAINTENANCE GUIDE
49
Page 56

USING THE WD SENTINEL SERVER’S FEATURES
If you’re operating systems
Do one of the following...
is...
Windows 7
Windows Vista
Windows XP From Start Menu:
From Start Menu:
•Click >All Programs >Windows Storage Server 2008
R2>Windows Storage Server 2008 R2 Launchpad
From Desktop:
• Double-click the Launchpad icon .
From System Tray:
• Right-click the Launchpad icon and select Open
Launchpad.
• Click Start>Programs>Windows Storage Server 2008
R2>Windows Storage Server 2008 R2 Launchpad.
From Desktop:
• Double-click the Launchpad icon .
From System Tray:
• Right-click the Launchpad icon and select Open
Launchpad.
.
1. Enter your user name and password.
WD SENTINEL RX4100
ADMINISTRATOR AND MAINTENANCE GUIDE
50
Page 57

USING THE WD SENTINEL SERVER’S FEATURES
2. Click the right arrow to display the Launchpad, which lists four tasks that authorized
users can perform: Backup, Remote Web Access, Shared Folders
Note: The Dashboard option is only useful to a user with Administrative privileges
and knowledge of the Administrator password.
and Dashboard.
To access the Launchpad (Mac):
1. Do one of the following:
Double-click the Launchpad icon on your Mac Toolbar.
Select Finder>Applications>Windows Server Launchpad
Once you’ve accessed the LaunchPad Sign In screen, use the following steps to sign in and
use the Launchpad.
WD SENTINEL RX4100
ADMINISTRATOR AND MAINTENANCE GUIDE
51
Page 58

USING THE WD SENTINEL SERVER’S FEATURES
1. Enter your user name and password.
2. Click the arrow to display the Launchpad. It lists four tasks: Backup, Remote Web
Access, Shared Folders, and Add-ins.
Selecting Launchpad Options (Windows PC or Mac Computer)
To select Launchpad options:
IF you want to . . . THEN . . . AND ...
Back up your Windows PC
to the WD Sentinel server
manually
Back up your Mac to the
WD Sentinel Server using
Time Machine
WD SENTINEL RX4100
ADMINISTRATOR AND MAINTENANCE GUIDE
Click Backup. Continue to “Backing up (Windows
PC)” on page 58.
Click Backup. Continue to “Backing up with Time
Machine (Mac)” on page 61.
52
Page 59

USING THE WD SENTINEL SERVER’S FEATURES
IF you want to . . . THEN . . . AND ...
Use Remote Web Access:
• Enable remote web
access for users with
Remote Access
Privileges
• Access the server from
a remote location (all
users)
• Change a user
password (by the user)
Access shared folders on
the server
Manage the server
(Windows PCs and
Administrators only)
Manage the server (Mac
and Administrators only)
Managing the Launchpad
Click Remote Web
Access.
Click Shared
Folders.
Click Dashboard. Enter the Administrator password and
Click Add In, then
click Dashboard.
Continue to “Remote Web Access” on
page 44 and “Accessing Computers
and Shared Folders Remotely” on
page 57.
Continue to “Accessing Shared Folders
Over Your Network” on page 56.
continue to “Managing the WD Sentinel
Server (Dashboard)” on page 28.
Enter User Name (Administrator) and
Password (the password you created
at setup), then continue to“Managing
the WD Sentinel Server (Dashboard)”
on page 28.
To disable the Launchpad after signing in (Windows):
1. Sign in to the Launchpad.
2. Click the menu arrow at the top right and select Settings from the drop-down menu.
WD SENTINEL RX4100
ADMINISTRATOR AND MAINTENANCE GUIDE
53
Page 60

USING THE WD SENTINEL SERVER’S FEATURES
3. Clear the Automatically run the Launchpad when I log on to Windows check box,
and click OK.
Note: You can also change the type of alerts that display on the Launchpad and
select whether to allow Microsoft to send you information about it in this
window.
To disable the Launchpad after signing in (Mac):
1. Sign in to the Launchpad.
2. Click the menu arrow at the top right and select Settings from the drop-down menu.
3. Clear the Automatically run Windows Server Launchpad when I log in
and click the Close button .
check box,
You can also change the type of alerts that display on the Launchpad selecting whether to allow
Microsoft to send you information about it in this window, and setup your Time Machine backups.
WD SENTINEL RX4100
ADMINISTRATOR AND MAINTENANCE GUIDE
54
Page 61

USING THE WD SENTINEL SERVER’S FEATURES
To uninstall the Launchpad (Connector Software) on a Windows PC:
Note: When you uninstall Launchpad, you also uninstall Dashboard. They can not
be uninstalled separately.
If you’re operating systems
Then...
is...
Windows 8 • On your keyboard, click the Windows button .
• On the Metro Start page, right-click in a blank area of the screen.
• Select All apps .
• Under Windows Server Storage Server 2000 R2, right-click Windows
Server 2008 R2 Launchpad.
• Select Uninstall .
Windows 7
Windows Vista
Windows XP
• Click >Control Panel (Windows 7/Vista).
• Click Start>Control Panel (Windows XP).
• Click Uninstall a Program.
• From the list, select Windows Storage Server 2008 R2 Connector.
• Click Uninstall.
- If the User Account Control window displays, click Allow.
- If the Windows Storage Server 2008 R2 Essentials Connector
page displays suggesting that you close the Launchpad, click OK.
Note: You must reboot the computer before installing another
Connector.
To uninstall the Launchpad (Connector Software) on a Mac:
You must uninstall Launchpad from three Macintosh® HD folders: Users, Applications, and
Library.
1. Quit the Launchpad.
2. In the Finder pane, click Applications. Drag and drop Windows Server Launchpad
into the Tra s h icon. The Launchpad icon no longer appears in the dock.
3. Click
Finder>Devices>Macintosh HD.
4. Click Library>Application Support>Microsoft. Drag and drop Launchpad into the
Tras h icon.
5. Click Library>Preferences. Drag and drop “com.microsoft.launchpad.plist” into the
Tras h icon.
6. Right-click the Trash icon and select
WD SENTINEL RX4100
ADMINISTRATOR AND MAINTENANCE GUIDE
55
Page 62

USING THE WD SENTINEL SERVER’S FEATURES
Accessing Shared Folders Over Your Network
Launchpad (Windows)
1. On the Launchpad, click Shared Folders. A set of folders similar to the one below
displays:
2. Double-click a folder to open it, then click the file you want to access. Your access (as a
general user) depends on the permissions assigned to you by the Administrator.
Launchpad (Mac)
1. On the Launchpad, click Shared Folders.
2. Select the shared folder you’d like to mount on your Mac, then click
OK.
If all shared folders are mounted on your Mac, click Cancel, then open Finder. Click
the IP Address of your WD Sentinel under Shared to display your Shared Folders.
3. The selected shared folder displays on your desktop.
WD SENTINEL RX4100
ADMINISTRATOR AND MAINTENANCE GUIDE
56
Page 63

USING THE WD SENTINEL SERVER’S FEATURES
Accessing Computers and Shared Folders Remotely
This section assumes that the Administrator has completed the setup and configuration for
Remote Web Access through the Dashboard.
You can access files stored on the WD Sentinel RX4100 anywhere, as long as you have
access to the Internet.
Note: You must use Internet Explorer 8 or 9 to access a PC using the Remote Web
Access feature. See “Specific Problems and Corrective Actions” on page 83.
Logging In
1. On the Launchpad, click Remote Web Access or on a web browser, enter the domain
address for your WD Sentinel server. This is the domain address the Administrator
configured while setting up Remote Web Access on your WD Sentinel server. The
following web page displays in your browser.
2. Enter your WD Sentinel server user name and password, then click the arrow to display
the Remote Web Access: Home for User window:
WD SENTINEL RX4100
ADMINISTRATOR AND MAINTENANCE GUIDE
57
Page 64

USING THE WD SENTINEL SERVER’S FEATURES
Remote Web Access Home Page
The Remote window includes the following sections:
Note: You can also use the navigation links at the top of the window to view these
sections.
Computers
Note: Connecting to computers or the WD Sentinel server using Remote Web
Access requires the Internet Explorer browser.
Click Connect to connect to your WD Sentinel server or to a computer on your
network.
- If the Internet Explorer you are using does not have Active X Client, click
install it, then complete the wizard.
Shared Folders
Access shared folders on the WD Sentinel server. The folders may include Documents,
Pictures, Music, Video, Recorded TV, and any additional shared folders the Administrator
may create using the Dashboard
folder is able to modify the contents of the existing files, upload new files, or delete files from
the folder.
. A user with "Read & Write" access to a particular shared
OK to
Note: Only the folders for which the user has permissions are displayed under
Shared Folders on Remote Web Access.
Media Library
Browse through your pictures, music, videos, and recorded videos. The WD Sentinel server
automatically discovers the media files and adds them to your media library. The built-in
media capabilities allow you to view your pictures in a slideshow, steam digital music, or
stream videos over the web.
Backing up (Windows PC)
The WD Sentinel server backup is based upon block level de-duplication, a process that
backs up data without unnecessarily backing up the same data more than once. This
powerful process uses less network traffic for execution, provides a full back-up at each
backup time (although it behaves as if it is incremental), and by executing de-duplication
across all client computers, the storage capacity requirements are significantly reduced.
Backup becomes an automatic process for a computer once you install Connector software
on it. With Connector software installed, all volumes and all NTFS data on that computer are
backed up.
Note: For information on backing up your Mac using Time Machine, See “Backing up with
Time Machine (Mac)” on page 61.
WD SENTINEL RX4100
ADMINISTRATOR AND MAINTENANCE GUIDE
58
Page 65

USING THE WD SENTINEL SERVER’S FEATURES
Scheduling Automatic Backups (Dashboard only)
To set a schedule for future backups:
1. Access the Dashboard.
2. Click the Computers and Backups
computers and servers on your network:
icon on the navigation bar to display a list of
3. Click Additional client computer backup tasks
in the task panel.
4. Enter the Start time and End time for daily backups and click OK.
Initiating Backups
By default, backups are performed at night for up to 25 client computers in a sequential
order. If the client computer is asleep or hibernating at that time, the backup software can be
enabled to wake up the client computer, back it up, and put it back to sleep.
You may start a backup either through the Launchpad on the computer being backed up
or through the Dashboard.
WD SENTINEL RX4100
ADMINISTRATOR AND MAINTENANCE GUIDE
59
Page 66

USING THE WD SENTINEL SERVER’S FEATURES
Backup Using the Launchpad
Note: For information on accessing the Launchpad, see “Using the Launchpad
(Internal Users)” on page 49).
1. On the Launchpad, click Backup. The Backup Properties page displays:
2. Click Start backup.
3. Enter a name for the backup and click OK:
The Backup Properties page re-displays and tracks the progress of the backup.
Note: If you want the computer to automatically wake up for scheduled backups,
select the check box.
4. Click OK to apply the change, close the page, and return to the Launchpad while the
backup continues.
The message that the backup was successful displays on the page and on the
Dashboard. For more information about the backup process, see Microsoft Online Help.
WD SENTINEL RX4100
ADMINISTRATOR AND MAINTENANCE GUIDE
60
Page 67

USING THE WD SENTINEL SERVER’S FEATURES
Backup Using the Dashboard
1. Click the Computers and Backups icon on the navigation bar to display a list of
computers and servers on your network:
2. Select the computer you want to back up.
3. Click Start a Backup for the Computer in the Task pane. For further instructions, see
Microsoft Online Help.
Backing up with Time Machine (Mac)
For Mac users, Time Machine allows you to backup data to your WD Sentinel server. Time
Machine automatically backs up your entire Mac, including system files, applications,
accounts, preferences, email messages, music, photos, movies, and documents.
Note: Time Machine keeps hourly backups for the past 24 hours, daily backups for the
past month, and weekly backups until your backup drive is full.
To take advantage of the Time Machine backup capabilities, you must install the server
connector software on your Mac (see “Connecting a Mac” on page 23) and create a user
account within the WD Sentinel server (see “Adding a User Account” on page 31).
Note: Your Mac must be connect to the same network as your WD Sentinel server.
For additional information on Time Machine, consult your Mac OS documentation.
Note: For information on backing up your PC, See “Backing up (Windows PC)” on
page 58.
Scheduling Automatic Backups (Time Machine)
To set up and schedule Time Machine to back up files to your WD Sentinel server:
1. Use one of the following methods to open Time Machine.
Click the Time Machine icon in the Dock:
Click the Apple menu > System Preferences and select Time Machine.
Click Go > Applications and select Time Machine.
WD SENTINEL RX4100
ADMINISTRATOR AND MAINTENANCE GUIDE
61
Page 68

USING THE WD SENTINEL SERVER’S FEATURES
2. If this is your first time creating a backup, the following screen displays:
3. Click Set Up Time Machine
to display the Time Machine Preferences screen:
4. Click Select Disk and select the WD Sentinel server for your backups.
5. Click Use Backup Disk. A screen prompts for your user name and password.
6. Enter the user name and password of an account that has administrator permissions on
this client computer, then click OK.
7. Select Registered User.
WD SENTINEL RX4100
ADMINISTRATOR AND MAINTENANCE GUIDE
62
Page 69

USING THE WD SENTINEL SERVER’S FEATURES
8. Enter your assigned WD Sentinel User Name and Password in the Name and Password
fields:
9. Click Connect. The Preferences screen returns.
10. To start automatic backups, move the slider to ON.
Time Machine begins backing up your files. The first backup may take some time, but
subsequent backups are faster because Time Machine only backs up new or changed
items.
Time Machine backs up your computer every hour and keeps the following backup sets:
Every hour for 24 hours
Every day for the past month
Weekly until the WD Sentinel drive is full.
Note: If a backup is interrupted, for example, if the computer goes into sleep mode,
it will resume automatically once the computer is available.
To see information such as available capacity and the date and time of the oldest, latest, and
next backup, select Open Time Machine Preferences on the Time Machine drop-down
menu:
WD SENTINEL RX4100
ADMINISTRATOR AND MAINTENANCE GUIDE
63
Page 70

USING THE WD SENTINEL SERVER’S FEATURES
Recovering/Restoring (Windows PC)
The WD Sentinel server provides two options for recovering lost or corrupted data:
Restore a Computer—Restores all data and settings of a Windows PC computer
or a storage device connected to the WD Sentinel server.
Recover File/Folders —Recovers individual files or folders.
Note: For information on recovering/restoring data on your Mac using Time Machine, See
“Recovering/Restoring (Mac)” on page 65.
Restoring Windows PC Computers (Bare Metal Restore)
This feature restores a Windows PC connected to your WD Sentinel server. Should your
computer experience an unfavorable event such as a hard drive crash, the Recovery feature
reinstalls the operating system, software applications, and all the data. This type of recovery
is known as a bare-metal restore; it recovers everything that was on the computer when it
was backed up.
Best Practice: You may need some network drivers. Save them to a USB flash
drive.
To restore a Windows PC that has been backed up:
1. Click Computers and Backups on the navigation bar.
2. Select the computer that was backed up.
3. Insert a USB flash device into one of the WD Sentinel server’s USB ports.
4. In the panel on the right, click Additional Client Computer Backup Tasks
Tools:
and then
5. Click Create key... to generate a bootable USB flash key (configuration file) on the
connected USB flash drive. You will use the key to boot the PC and download the
backed-up system. Follow the wizard to complete the process.
6. Remove the USB flash drive from the WD Sentinel server and connect it to the computer
you want to restore.
WD SENTINEL RX4100
ADMINISTRATOR AND MAINTENANCE GUIDE
64
Page 71

USING THE WD SENTINEL SERVER’S FEATURES
7. Boot the Windows PC from the USB flash drive:
a. Start the computer.
b. Depending on your computer, press F12 or another key that displays boot options.
c. From the Boot menu, select USB Device.
d. On the Windows Boot Manager, select a Windows operating system for a full-system restore.
The Full System Restore wizard Welcome screen displays.
- If a message indicates that you do not have the correct network card driver,
insert the USB flash drive with the driver into another USB port on the Windows
PC, and follow the steps in the wizard to restore the computer.
- If you do have the correct driver, click
Continue and complete the steps in the
wizard to restore the computer.
Note: Refer to Microsoft Online Help for additional information.
To recover individual files and folders:
1. Click the Computers and Backups icon and select the computer from which you
would like to recover the backup files.
2. In the Task panel, click Restore Files or Folders for the Computer. The server
displays a list of your backups.
3. Select the backup that has the files and folders you want to restore and click Next.
4. Follow the wizard to select the files and folders and recover them to your computer. See
Microsoft Online Help for additional information.
Recovering/Restoring (Mac)
Time Machine allows you to restore files, versions of files, or your entire system. For
additional information on recovering or restoring your system files, consult your
Apple documentation.
Note: For information on recovering/restoring data on your PC, See “Recovering/Restoring
(Windows PC)” on page 64.
WD SENTINEL RX4100
ADMINISTRATOR AND MAINTENANCE GUIDE
65
Page 72

USING THE WD SENTINEL SERVER’S FEATURES
1. On the Launchpad, click Backup. Your Time Machine backups display.
2. Select the date you’d like to restore to from the time line on the right of the screen.
3. Click Restore in the bottom right-hand side of your screen.
Backing up your WD Sentinel Server
Backing up your WD Sentinel server allows you to protect your operating system, system
state, volumes, files, and application data. For information on how to back up your
WD Sentinel server, see Microsoft Online Help/Backing Up your Server.
Recovering the WD Sentinel Server to Factory Defaults
This feature recovers your WD Sentinel server, a process that may be necessary in case the
server has a virus that cannot be deleted, bad or corrupted server configuration settings
prevent you from starting the server, or the system drive(s) failed.
Best Practice: You may lose some of your data, depending on the type of recovery you
perform.
Requirements
Virtual DVD software
Note: Free virtual DVD software is available on the internet. See “Create a Virtual
DVD” on page 67.
2.0 USB flash drive, 16 GB - 32 GB
Windows PC
DVD burner or DVD emulation software
Note: Free DVD emulation software is available on the Internet. For more information
on emulation software, see Knowledge Base Answer ID 8561.
WD SENTINEL RX4100
ADMINISTRATOR AND MAINTENANCE GUIDE
66
Page 73

USING THE WD SENTINEL SERVER’S FEATURES
Create a Virtual DVD
WARNING! WD does not assist in the installation of third party programs such as
a Virtual DVD. The information provided below is to assist customers
with the creation of a recovery disk for a WD Sentinel RX4100.
Western Digital is not responsible for any damage to your computer
or data resulting from using third party software.
1. Download the Server Recovery ISO file and save it to a preferred location on your
computer.
2. Download and install a virtual DVD software program. Available virtual DVD programs
include:
PowerISO (http://www.poweriso.com/)
Virtual CloneDrive (http://www.slysoft.com)
3. Following your third-party software instructions, mount the Server Recovery ISO to a
virtual DVD.
Run the Virtual DVD
1. Mount the Recovery DVD into your computer following the instructions for your virtual
DVD software.
If you are running Windows 8, Windows 7, Windows Vista, click Run Setup.exe on
the window that displays:
If you are running on a Windows XP computer, by clicking Setup.exe under My
Computer.
2. After the application runs, a Server Recovery Utility window appears with three options:
Unlock my drives
Recreate my storage
Perform a recovery
These options are explained below.
WD SENTINEL RX4100
ADMINISTRATOR AND MAINTENANCE GUIDE
67
Page 74

USING THE WD SENTINEL SERVER’S FEATURES
Unlock my drives
Unlock my drives unlocks the WD Sentinel server’s drives if they are locked. (See “Lock/
Unlock” on page 38.) Before starting any recovery process, unlock the drives with an unlock
key.
To create an unlock key:
1. On the Server Recovery Utilities window, click Unlock my drives.
2. Click Next and enter the password previously set to lock the drives. Keep in mind that
this password is not the WD Sentinel server’s Administrator password. It is the locked
drives password (see “Lock/Unlock” on page 38). If the Administrator password was
used to lock the drives, enter it here. or123
WD SENTINEL RX4100
ADMINISTRATOR AND MAINTENANCE GUIDE
68
Page 75

USING THE WD SENTINEL SERVER’S FEATURES
3. Insert the USB flash drive into the Windows PC USB port. The USB flash drive should
appear in the Select USB flash drive drop-down list.
4. If the USB flash drive is not on the list, click Refresh and search for it.
5. After locating the USB flash drive, click the “I understand...” check box to indicate that
you know the process will delete all files and folders on your USB flash drive.
6. Click Next to display the “Congratulations and Next Steps” page.
7. Follow the steps listed on this page:
a. Shut down the WD Sentinel server.
b. Insert the USB flash drive into one of the server’s USB ports.
c. Restart your server while holding the recovery button on the back of the unit.
Note: This may require 2 people to perform.
d. Allow the recovery process to complete.
WD SENTINEL RX4100
ADMINISTRATOR AND MAINTENANCE GUIDE
69
Page 76

USING THE WD SENTINEL SERVER’S FEATURES
Recreating the storage
The “Recreate my storage” option recreates the storage partition and RAID for your
WD Sentinel server.
WARNING! Only use this option if you are replacing all drives or if the partition or
RAID is corrupted. This option may delete user data.
1. On the Server Recovery Utilities page, click Recreate my storage.
2. Read the caution, then click the “I understand...” check box to indicate you know the
process may erase the data on the WD Sentinel server’s drives while it recreates the
server’s configuration..
WD SENTINEL RX4100
ADMINISTRATOR AND MAINTENANCE GUIDE
70
Page 77

USING THE WD SENTINEL SERVER’S FEATURES
3. Insert the USB flash drive into the USB port of the Windows PC, and click Next to
display the following page for using the USB key:
4. The USB flash drive should appear in the Select USB flash drive drop-down list. If the
USB flash drive is not on the list, click Refresh and search for it.
5. After locating the USB flash drive, click the check box acknowledging that you know that
when you click Next, all files and folders on the USB flash drive will be deleted.
6. Click Next. A progress bar displays while the USB flash drive is being prepared.
WD SENTINEL RX4100
ADMINISTRATOR AND MAINTENANCE GUIDE
71
Page 78

USING THE WD SENTINEL SERVER’S FEATURES
7. Upon completion of the process, the Recreate Storage page displays:
8. Follow the instructions under Next Steps:
a. Shut down the WD Sentinel server.
b. Insert the USB flash drive into one of the server’s USB ports.
c. Restart your server while pressing and holding the Recovery button on the back of the
server.
Note: This may require 2 people to perform.
d. Continue to hold the Recovery button until the “Windows loading files” screen appears.
Release the Recovery button.
e. Allow the recovery process to complete.
Performing a Recovery
This option enables the Administrator to restore the server to factory defaults with or without
deleting all contents stored on the WD Sentinel server.
1. On the Server Recovery Utilities window, click Perform a recovery:
WD SENTINEL RX4100
ADMINISTRATOR AND MAINTENANCE GUIDE
72
Page 79

2. Click Next. The Getting Started page displays:
USING THE WD SENTINEL SERVER’S FEATURES
3. Read the information on the screen.
If you have previously created a bootable recovery USB flash drive, click the Skip
creating the bootable USB flash drive check box and continue to Step 9.
Click Next. The Create a bootable USB flash drive for server recovery screen displays:
WD SENTINEL RX4100
ADMINISTRATOR AND MAINTENANCE GUIDE
73
Page 80

USING THE WD SENTINEL SERVER’S FEATURES
4. Insert the USB flash drive into the USB port of the Windows PC, and click Next.
The Prepare the USB flash drive for server recovery screen displays.
5. Your USB flash drive should appear in the Select USB flash drive drop-down list. If it is
not on the list, click Refresh and search for it.
6. After locating the USB drive, click the check box to acknowledge that you know clicking
Next will delete all files and folders on the USB flash drive.
7. Click Next. The Preparing the USB flash drive for server recovery screen displays.
WD SENTINEL RX4100
ADMINISTRATOR AND MAINTENANCE GUIDE
74
Page 81

USING THE WD SENTINEL SERVER’S FEATURES
8. The recovery application on the DVD prepares the USB drive. This process can take up
to 15 minutes to complete.
After the USB drive preparation is done, the Start your server in recovery mode screen
displays.
9. Follow the additional instructions that appear on the screen to guide you through the
recovery process:
a. Shut down the WD Sentinel server.
b. Connect a monitor to the server if one is not already connected.
c. Insert the USB flash drive into one of the server's USB ports.
WD SENTINEL RX4100
ADMINISTRATOR AND MAINTENANCE GUIDE
75
Page 82

USING THE WD SENTINEL SERVER’S FEATURES
d. Restart your server while pressing and holding the Recovery button on the back of the
server.
Note: This may require 2 people to perform.
e. Continue to hold the Recovery button until “WINDOWS IS LOADING FILES,” then release the
Recovery button, leaving the USB flash drive connected to the WD Sentinel server.
The monitor displays “RECOVERY INITIALIZING.”
f. When the monitor connected to your server displays “RECOVERY STARTED,” return to your
computer and click Next. This connects the server to your computer.
10. Click Next.
11. Select the option you’d like to use to restore your server.
WD SENTINEL RX4100
ADMINISTRATOR AND MAINTENANCE GUIDE
76
Page 83

If you have a backup for the server, select the first bullet. This is the recommended
method of recovery.
If you want to restore the server to its factory default settings, select the second
bullet.
Note: This option deletes all settings, user accounts and installed applications.
12. Click Next.
USING THE WD SENTINEL SERVER’S FEATURES
13. Select a restore option:.
Select the first option to reset the server but keep the data on the hard drives.
WD SENTINEL RX4100
ADMINISTRATOR AND MAINTENANCE GUIDE
77
Page 84

USING THE WD SENTINEL SERVER’S FEATURES
Select the second option to reset the server and delete all data from the internal hard
drives or external hard drives connected to the eSATA ports. This will not affect hard
drives connected to the USB ports.
14. Click the check box at the bottom of the screen indicating that you understand that all
of your existing settings and installed applications will be reset to factory defaults, then
click Next.
WD SENTINEL RX4100
ADMINISTRATOR AND MAINTENANCE GUIDE
78
Page 85

USING THE WD SENTINEL SERVER’S FEATURES
15. Review the information on the screen. If you agree, click Next. The server begins
recovery.
WARNING! Various device drivers are installed and will display on the server’s
monitor during the restoration process. Let the system recovery
continue without responding to the information on the screen until
the Set Up Windows Storage Server 2008 R2 Essentials server
language screen displays.
Sample system recovery screen
WD SENTINEL RX4100
ADMINISTRATOR AND MAINTENANCE GUIDE
79
Page 86

USING THE WD SENTINEL SERVER’S FEATURES
Once the recover is complete the following screen displays on your client computer:
16. Click Close.
17. In the address field of an open browser window, enter http://WDSENTINEL.
18. Set up your WD Sentinel RX4100 server using the steps outlined in “Setting up your
WD Sentinel Server (one time only)” on page 17. For more information, see
Microsoft Online Help.
WD SENTINEL RX4100
ADMINISTRATOR AND MAINTENANCE GUIDE
80
Page 87

BEST PRACTICES
7
Best Practices
Setting up the WD Sentinel RX4100
Setting up Client Computers
Using the WD Sentinel RX4100 Efficiently
Replacing Drives
Sharing Files with External Users
Shutting Down
The following practices help you use the WD Sentinel RX4100 and protect your data
efficiently and safely.
Setting up the WD Sentinel RX4100
Change the default name of WD Sentinel to something unique. This avoids conflicts
when another WD Sentinel server is added to your network in the future.
Make sure Ethernet 1 and Ethernet 2 are on the same network subnet.
Add the server to your domain. This allows users to use the same login and
password for both the Launchpad and their computer.
If you decide to lock the drives, make sure the password is stored in a safe place.
Set user password policy to at least medium security.
Enable Microsoft Automatic Updates to find and apply the latest Microsoft software
update.
Enable WD Automatic Updates to find and apply the latest WD software update.
Set up Automatic Alert Notification for real-time notifications of any problems with
the WD Sentinel server.
Set up Remote Web Access using Ports 443 and Port 80. If your router or IP
provider blocks these ports, you may need to consult with your IP provider for
assistance.
Do not remove the Windows page file! Some critical functions use the system’s
paging file. Removing the page file can potentially leave your system unusable with
the possibility of data loss. To maintain the reliability of your system and its redundant
resources, do not modify the paging file whatsoever.
Setting up Client Computers
Before loading the Connector software to add a computer to the
WD Sentinel server for backup, be sure that the computer’s operating system is fully
up-to-date.
When adding client computers to the WD Sentinel server, it is best not to have any
backups active.
Using the WD Sentinel RX4100 Efficiently
The WD Sentinel server has many jobs to perform. Share data during business
hours, and back up the computers during hours of inactivity. Keep the server
powered on 24/7 to do its work.
To avoid RAID issues, always use Sentinel with a UPS.
Enable e-mail alerts. Receiving your alerts by email allows you to monitor certain
server issues as they occur.
WD SENTINEL RX4100
ADMINISTRATOR AND MAINTENANCE GUIDE
81
Page 88

Replacing Drives
The online removal of a drive forces a rebuild when the drive is replaced. Until the
rebuild is complete, the RAID system is degraded and unrecoverable failure will
occur should another drive be removed. Only remove one drive at a time between
rebuilds.
Avoid pulling a drive out unless there is a failure.
When a drive needs replacement, the WD Sentinel server is still functional but
subject to a second drive failure that would result in the loss of data. To minimize this
vulnerable time, a good practice is to have another drive ready to replace the failed
drive.
Sharing Files with External Users
Create Employee-Specific Private Folders/Assign Permissions—Depending on the
nature of your business and organizational structure, you may want to create a
shared folder for each employee and give the respective employee Read/Write
permissions for that folder.
Create Shares for Vendors or Clients/Access Remotely—The built-in Remote Web
Access feature enables collaboration on files and data not only among your
employees but also with your clients and vendors.
As a best practice, create a unique user account for each client and vendor you
want to exchange data with and create a dedicated Shared Folder for each such
external user. To prevent giving external users access to your sensitive data, make
sure that the user accounts you create have the appropriate permissions for only the
folders you have created for them.
To start collaborating with your external users, just provide them with the domain
address of your WD Sentinel server and their user name and password.
BEST PRACTICES
Shutting Down
Unclean shutdowns are hard on RAIDed systems. The WD Sentinel server
recognizes an unclean shut down and upon the reapplication of power, begins a
long sequence of examining the RAID for errors and bringing the RAID configuration
back into alignment. This sequence can take many hours. To avoid this situation and
to assure that the unit always experiences clean shutdowns and the best data
integrity, use an Uninterruptible Power Supply (UPS).
Note: Performance is affected during a RAID rebuild and verification.
To avoid possible corruption, do not unplug the power from the unit while it is
running.
WD SENTINEL RX4100
ADMINISTRATOR AND MAINTENANCE GUIDE
82
Page 89

TRO UBLESHOOTI NG
8
Troubleshooting
First Steps Checklist
Specific Problems and Corrective Actions
For any issue, first ensure that you are using the latest firmware for the
WD Sentinel server. See “Updating Software” on page 39 for instructions.
First Steps Checklist
Is the power supply plugged in to the wall outlet and the drive?
Are all cables correctly connected and secured?
Is the power on? If not, see “LEDs” on page 11.
Specific Problems and Corrective Actions
The following section contains specific problems that may arise during the use of the
WD Sentinel server and provides possible solutions.
LEDs do not light up
1. Make sure the power cord is connected correctly.
2. Make sure that the wall outlet has power. Test it by plugging in another device.
3. Confirm the network cable is properly connected to the WD Sentinel server and the
network switch or router.
4. Make sure the network switch or router has power.
5. Use a different network cable and port on the network switch or router. Temporarily
swapping the WD Sentinel’s cable port with a working network device may identify any
failing cables and ports.
Connecting to Shared Folders on a WD Sentinel server from a Windows PC on which Launchpad is not installed
Windows 8:
1. On your keyboard, click the Windows logo key + E
2. On the Computer screen toolbar, select Map Network Drive, then select Map
Network Drive.
WD SENTINEL RX4100
ADMINISTRATOR AND MAINTENANCE GUIDE
83
Page 90

TRO UBLESHOOTI NG
3. From the Drive drop-down list, choose the letter that you want the WD Sentinel server
to have in Computer
.
4. Click Browse to find the folder that you want to map, or type the path to the server
using the format \\ServerName\FolderName. For example, if the share is called
Documents, and your server is called MyServer, you would enter
\\MyServer\Documents.
5. If you want the drive to reconnect whenever the computer is rebooted, click the
Reconnect at logon check box.
6. Click Finish.
Windows 7 / Vista / XP:
1. Right-click (My) Computer and select Map Network Drive.
2. From the Drive drop-down list, choose the letter that you want the WD Sentinel server
to have in (My)
Computer.
3. Click Browse to find the folder that you want to map, or type the path to the server
using the format \\ServerName\FolderName. For example, if the share is called
Documents, and your server is called MyServer, you would enter
\\MyServer\Documents.
4. If you want the drive to reconnect whenever the computer is rebooted, click the
Reconnect at logon check box.
5. Click Finish.
Cannot access Windows PCs via Remote Access
Internet Explorer 8 or greater is required to access a Windows PC using the Remote Web
Access feature of the WD Sentinel server. There is an Active X Client requirement that comes
standard with these browsers. For more information, see Knowledge Base Answer ID 8578.
WD SENTINEL RX4100
ADMINISTRATOR AND MAINTENANCE GUIDE
84
Page 91

MANAGING ISCSI STORAGE
9
Managing iSCSI Storage
iSCSI Overview
iSCSI Roles
Managing iSCSI Targets
iSCSI Overview
Internet SCSI (iSCSI) is an industry standard developed to enable transmission of SCSI
block storage commands and data over an existing IP network by using the TCP/IP
protocol. The encapsulated SCSI commands and data can be transmitted over a local area
network (LAN) or a wide area network (WAN). As with traditional SCSI, an iSCSI storage
solution requires at least one “initiator” residing on the client computer and at least one
“target” residing on the storage server.
Once the connection is established between the iSCSI initiator and the iSCSI target, the
operating system on the iSCSI initiator sees the storage as a local storage device that can
be formatted, read and written in the usual manner.
Your WD Sentinel server allows you to create and manage iSCSI targets. The iSCSI target
provides storage, similar to a local hard disk drive, but is accessed over a network rather
than locally. The iSCSI target is protected by the underlying RAID structure of the WD
Sentinel server.
iSCSI Roles
Initiator: A client computer that accesses storage devices using SCSI commands over an
IP network.
Ta rg et : A network-attached storage device that provides access to logical disks (which can
be created on the WD Sentinel server).
Managing iSCSI Targets
Click the iSCSI icon to open the iSCSI page:
WD SENTINEL RX4100
ADMINISTRATOR AND MAINTENANCE GUIDE
85
Page 92

MANAGING ISCSI STORAGE
Setting Description
Alias The user-friendly name used as an additional descriptive
name for the target.
Status The status of your target.
• xx initiators connected.
•Disabled
Security The assigned security for the target.
• None: No security has been assigned to this target
• CHAP: Challenge Handshake Authentication
Protocol (CHAP) security has been assigned to the
target.
Size The size of the target (e.g., 4, GB, 1 TB)
Server Capacity Displays the total amount of space on your server and how it
is distributed (i.e., available server space; used server space).
Create an iSCSI Target
To create an iSCSI Target that can be used in the WD Sentinel RX4100 server:
1. Click Create an iSCSI Target in the ISCSI Tasks pane. The New iSCSI Target window
appears.
2. In the Alias field, enter an alias for your target. The alias should be a descriptive name for
your target.
3. In the Size field, enter the size of your target, then select the unit of information (e.g. KB,
MB, GB, TB) from the pull-down menu.
Note: Available space displays to the right of this field.
WD SENTINEL RX4100
ADMINISTRATOR AND MAINTENANCE GUIDE
86
Page 93

MANAGING ISCSI STORAGE
4. Click Create this target from an existing image file to create a target from an
existing image file.
Note: Use this step only if you have an existing iSCSI target image file.
a. Select the … button.
b. On the “Image file to use:” window, navigate to the location of your target image file,
then click Open.
5. Select the security type for your target.
None: Does not assign security for your target.
CHAP: Assigns Challenge Handshake Authentication Protocol (CHAP) security to
your target.
- If you’d like to change your User Name, click Edit. Note that the name must match
your initiator CHAP name.
- Enter your Target Secret. The Target Secret is a security key that must be between
12 to 16 alphanumeric characters.
6. Click Create Target.
Edit an iSCSI Target
1. On the iSCSI Tasks pane, click Edit Target Settings.
2. Modify the required and optional settings as desired.
3. Click Modify Target.
WD SENTINEL RX4100
ADMINISTRATOR AND MAINTENANCE GUIDE
87
Page 94

MANAGING ISCSI STORAGE
Disable an iSCSI Target
Note: Disabling your iSCSI Target temporarily suspends the target, but does not remove it.
If you’d like to permanently remove the target, See “Deleting an iSCSI Target” on
page 89.
1. In the iSCSI tab, select the target you’d like to disable.
2. In the iSCSI Tasks pane, click Disable Target. The Disable a Target message appears.
3. Click Disable Target. Disabled now displays in the Status column.
Enabling an iSCSI Target
1. In the iSCSI tab, select the disabled Target you’d like to enable.
2. In the iSCSI Task pane, click Enable Target. Your target is now enabled.
WD SENTINEL RX4100
ADMINISTRATOR AND MAINTENANCE GUIDE
88
Page 95

MANAGING ISCSI STORAGE
Deleting an iSCSI Target
WARNING! Deleting your iSCSI Target completely removes the target. If you’d
like to temporarily disable the target, See “Disable an iSCSI Target”
on page 88.
1. In the iSCSI tab, select the target you’d like to delete.
2. In the Task Pane, click Delete Target. The Delete a Target message displays.
3. Click Delete Target. Your Target is deleted and removed from the iSCSI target list.
Exporting an iSCSI Target
1. On your desktop, open Windows Explorer.
2. Under Network, select your WD Sentinel device.
3. Select the folder to which you’ve saved your iSCSI Target image files (usually the
Server>TargetImageFiles folder).
4. Right-click the target you’d like to export and select Copy from the menu.
5. Navigate to a different folder.
6. Right-click in the folder and select Paste. Your iSCSI Target image file is now “exported”
to a different folder.
Note: The target image files will have the same name as the iSCSI target you just copied
and will have a ".img" file extension.
Importing an iSCSI Target
To i m po r t a n iS C SI Ta rg e t i n to your WD Sentinel, follow the steps outlined in “Create an
iSCSI Target” on page 86, following step 4 (selecting the Create this target from an existing
image file checkbox) to import your iSCSI target.
WD SENTINEL RX4100
ADMINISTRATOR AND MAINTENANCE GUIDE
89
Page 96

REGULATORY AND WARRANTY INFORMATION
10
Regulatory and Warranty Information
Regulatory Compliance
Limited Warranty
GNU General Public License (“GPL”)
Regulatory Compliance
FCC Class A Information
This device has been tested and found to comply with the limits of a Class A digital device,
pursuant to Part 15 of the FCC Rules. These limits are designed to provide reasonable
protection against harmful interference in a residential installation. This unit generates, uses,
and can radiate radio frequency energy and, if not installed and used in accordance with the
instructions, may cause harmful interference to radio or television reception. However, there
is no guarantee that interference will not occur in a particular installation. Any changes or
modifications not expressly approved by WD could void the user's authority to operate this
equipment.
The following booklet, prepared by the Federal Communications Commission, may be
helpful: How to Identify and Resolve Radio/TV Interference Problems. This booklet is Stock
No. 004-000-00345-4 available from the US Government Printing Office, Washington,
DC 20402.
The provided Ethernet cable must be used between the unit and network connection to
comply with FCC Part 15 Class A and EN-55022 Class A.
Operation of this device is subject to the following two conditions: (1) This device may not
cause harmful interference, and (2) this device must accept any interference received,
including interference that may cause undesired operation.
Changes or modifications not expressly approved by the party responsible for compliance
could void the user’s authority to operate the equipment.
(a) For a Class A digital device or peripheral, the instructions furnished the user shall include
the following or similar statement, placed in a prominent location in the text of the manual:
Note: This equipment has been tested and found to comply with the limits for a Class A
digital device, pursuant to part 15 of the FCC Rules. These limits are designed to provide
reasonable protection against harmful interference when the equipment is operated in a
commercial environment. This equipment generates, uses, and can radiate radio frequency
energy and, if not installed and used in accordance with the instruction manual, may cause
harmful interference to radio communications. Operation of this equipment in a residential
area is likely to cause harmful interference in which case the user will be required to correct
the interference at his own expense.
(b) For a Class B digital device or peripheral, the instructions furnished the user shall include
the following or similar statement, placed in a prominent location in the text of the manual:
Note: This equipment has been tested and found to comply with the limits for a Class B
digital device, pursuant to part 15 of the FCC Rules. These limits are designed to provide
reasonable protection against harmful interference in a residential installation. This
equipment generates, uses and can radiate radio frequency energy and, if not installed and
used in accordance with the instructions, may cause harmful interference to radio
communications. However, there is no guarantee that interference will not occur in a
particular installation. If this equipment does cause harmful interference to radio or television
WD SENTINEL RX4100
ADMINISTRATOR AND MAINTENANCE GUIDE
90
Page 97

REGULATORY AND WARRANTY INFORMATION
reception, which can be determined by turning the equipment off and on, the user is
encouraged to try to correct the interference by one or more of the following measures:
Reorient or relocate the receiving antenna.
Increase the separation between the equipment and receiver.
Connect the equipment into an outlet on a circuit different from that to which
the receiver is connected.
Consult the dealer or an experienced radio/TV technician for help.
ICES/NMB-003 Compliance
Cet appareil de la classe B est conforme à la norme NMB-003 du Canada.
This device complies with Canadian ICES-003 Class A.
Safety Compliance
Approved for US and Canada. CAN/CSA-C22.2 No. 60950-1, UL 60950-1-07: Safety of
Information Technology Equipment.
Approuvé pour les Etats-Unis et le Canada. CAN/CSA-C22.2 No. 60950-1-07 : Sûreté
d'équipement de technologie de l'information.
This product is intended to be supplied by a listed limited power source, double insulated, or
direct plug-in power unit marked “Class 1.”
This equipment is to be deployed in restricted access location only.
Rack Mount Instructions - The following or similar rack-mount instructions are included
with the installation instructions:
- Elevated Operating Ambient - If installed in a closed or multi-unit rack assembly,
the operating ambient temperature of the rack environment may be greater than
room ambient. Therefore, consideration should be given to installing the equipment in an environment compatible with the maximum ambient temperature (Tma)
specified by the manufacturer.
- Reduced Air Flow - Installation of the equipment in a rack should be such that the
amount of air flow required for safe operation of the equipment is not compromised.
- Mechanical Loading - Mounting of the equipment in the rack should be such that
a hazardous condition is not achieved due to uneven mechanical loading.
- Circuit Overloading - Consideration should be given to the connection of the
equipment to the supply circuit and the effect that overloading of the circuits might
have on overcurrent protection and supply wiring. Appropriate consideration of
equipment nameplate ratings should be used when addressing this concern.
- Reliable Earthing - Reliable earthing of rack-mounted equipment should be main-
tained. Particular attention should be given to supply connections other than direct
connections to the branch circuit (e.g. use of power strips).
CAUTION!
Danger of explosion if the battery is incorrectly replaced. Replace only
with the same or equivalent type recommended by the equipment manufacturer.
Dispose of used batteries according to manufacturer’s instructions.
CE Compliance for Europe
Verified to comply with EN55022 for RF emission; EN-55024 for Generic Immunity, as
applicable; and EN-60950-1 for Safety.
WD SENTINEL RX4100
ADMINISTRATOR AND MAINTENANCE GUIDE
91
Page 98

REGULATORY AND WARRANTY INFORMATION
Environmental Compliance (China)
Obtaining Service
WD values your business and always attempts to provide you the very best of service. If this
Product requires maintenance, either contact the dealer from whom you originally
purchased the Product or visit our product support website at http://support.wd.com for
information on how to obtain service or a Return Material Authorization (RMA). If it is
determined that the Product may be defective, you will be given an RMA number and
instructions for Product return. An unauthorized return (i.e., one for which an RMA number
has not been issued) will be returned to you at your expense. Authorized returns must be
shipped in an approved shipping container, prepaid and insured, to the address provided on
your return paperwork. Your original box and packaging materials should be kept for storing
or shipping your WD product. To conclusively establish the period of warranty, check the
warranty expiration (serial number required) via http://support.wd.com. WD shall have no
liability for lost data regardless of the cause, recovery of lost data, or data contained in any
Product placed in its possession.
Limited Warranty
WD warrants that the Product, in the course of its normal use, will for the term defined
below, be free from defects in material and workmanship and will conform to WD's
specification therefor. The term of your limited warranty depends on the country in which
your Product was purchased. The term of your limited warranty is for 3 years in the North,
South and Central America region, 3 years in the Europe, the Middle East and Africa region,
and 3 years in the Asia Pacific region, unless otherwise required by law. The term of your
limited warranty period shall commence on the purchase date appearing on your purchase
receipt. WD may at its discretion make extended warranties available for purchase. WD shall
have no liability for any Product returned if WD determines that the Product was stolen from
WD or that the asserted defect a) is not present, b) cannot reasonably be rectified because
of damage occurring before WD receives the Product, or c) is attributable to misuse,
improper installation, alteration (including removing or obliterating labels and opening or
removing external enclosures, including the mounting frame, unless the product is on the list
of limited user-serviceable products and the specific alteration is within the scope of the
applicable instructions, as found at
the possession of someone other than WD. Subject to the limitations specified above, your
sole and exclusive warranty shall be, during the period of warranty specified above and at
WD's option, the repair or replacement of the Product with an equivalent or better Product.
The foregoing warranty of WD shall extend to repaired or replaced Products for the balance
of the applicable period of the original warranty or ninety (90) days from the date of shipment
of a repaired or replaced Product, whichever is longer. The foregoing limited warranty is
WD's sole warranty and is applicable only to products sold as new. The remedies provided
herein are in lieu of a) any and all other remedies and warranties, whether expressed, implied
or statutory, including but not limited to, any implied warranty of merchantability or fitness for
a particular purpose, and b) any and all obligations and liabilities of WD for damages
http://support.wd.com), accident or mishandling while in
WD SENTINEL RX4100
ADMINISTRATOR AND MAINTENANCE GUIDE
92
Page 99

REGULATORY AND WARRANTY INFORMATION
including, but not limited to accidental, consequential, or special damages, or any financial
loss, lost profits or expenses, or lost data arising out of or in connection with the purchase,
use, or performance of the Product, even if WD has been advised of the possibility of such
damages. In the United States, some states do not allow exclusion or limitations of
incidental or consequential damages, so the limitations above may not apply to you. This
warranty gives you specific legal rights, and you may also have other rights which vary from
state to state.
GNU General Public License (“GPL”)
Firmware incorporated into this product may include third party copyrighted software
licensed under the GPL or Lesser General Public License ("LGPL") (collectively, “GPL
Software”) and not Western Digital’s End User License Agreement. In accordance with the
GPL, if applicable: 1) the source code for the GPL Software may be downloaded at no
charge from
http://support.wd.com/download/gpl
date of purchase; 2) you may re-use, re-distribute, and modify the GPL Software; 3) with
respect solely to the GPL Software, no warranty is provided, to the extent permitted by
applicable law; and 4) a copy of the GPL is included herewith, may be obtained at
http://www.gnu.org, and may also be found at http://support.wd.com/download/gpl.
http://support.wd.com/download/gpl or obtained on CD for a nominal charge from
or by calling Customer Support within three years of the
Modification of or tampering with the Software, including but not limited to any Open Source
Software, is solely at your own risk. Western Digital is not responsible for any such
modification or tampering. Western Digital will not support any product in which you have or
have attempted to modify the Software supplied by Western Digital.
WD SENTINEL RX4100
ADMINISTRATOR AND MAINTENANCE GUIDE
93
Page 100

APPENDIX
11
Appendix
Hardware Replacement Procedures
WD Sentinel RX4100 Administrator Reference Sheet
Hardware Replacement Procedures
Before You Begin
Installing the WD Sentinel Bezel
Replacing a Hard Drive
Removing the Unit Cover
Replacing the Internal Power Supply
Replacing a Server Fan
Replacing the Riser Card
Replacing the Mid-plane Card
This chapter provides the steps necessary to replace the following components designed for
replacement for the WD Sentinel RX4100.
Hard Drive
Power Supply
Fans
Riser
Midplane
The WD Sentinel is also designed to be easily mounted on a rack.
Before You Begin
Ensure that you have the correct replacement unit.
Review the procedures before beginning to replace a part.
WD SENTINEL RX4100
ADMINISTRATOR AND MAINTENANCE GUIDE
94
 Loading...