

Page 1
™
WD Sentinel DX4200
Storage Server
Administrator and Maintenance Guide
Page 2

WD® Service and Support
Should you encounter any problem, please give us an opportunity to address it before returning this
product. Most technical support questions can be answered through our knowledge base or email
support service at http://support.wd.com. If the answer is not available or if you prefer, please
contact WD at the best telephone number shown below.
Your product includes 30 days of free telephone support during the 2-year standard limited warranty
period. This 30-day period starts on the date of your first telephone contact with WD Technical
Support. Email support is free for the entire warranty period and our extensive knowledge base is
available 24/7. To help us keep you informed of new features and services, remember to register
your product on the Registration page on the user interface or online at http://register.wd.com.
WD Guardian Services
When you need a little help from an expert, we’ll take care of you! WD Guardian Services offers
flexible, affordable and hassle-free technical support and extended warranty plans with a variety of
benefits. Choose the plan that works best for your business. Visit www.wdguardian.com for details.
Accessing Online Support
Visit our product support website at http://support.wd.com and choose from these topics:
• Downloads - Download drivers, software, and updates for your WD Product.
• WD Support Portal - Register your WD products and get support information customized
to your needs.
• Warranty & RMA Services - Get Warranty, Product Replacement (RMA), RMA Status, and
Data Recovery Information.
• Knowledge Base - Enter keyword, phrase, answer ID, or PID.
• Installation - Get manuals, installation guides, and documentation for your WD product.
• WD Community - Share your thoughts and connect with other WD users.
Contacting WD Technical Support
When contacting WD for support, have your WD product serial number, system hardware, and
system software versions available.
North America Europe (toll free)*
English / Spanish 855.556.5117 (00800 27549338)
Europe
South America
Chile 1230 020 5871
Colombia 009 800 83247788
Venezuela 0800 100 2855
Peru 0800 54003
Uruguay 000 413 598 3787 Australia 1800 429 861 / 0011 800 2275 4932
Argentina 0800 4440839 China 800 820 6682 / 400 627 6682
Brazil 0800 7704932 Hong Kong 3057 9031
0021 800 83247788 India 1800 200 5789 / 1800 419 5591
Middle East
Africa
Russia
Asia Pacific
Indonesia 001 803 852 3993
Japan 0800 805 7293
Korea 02 2120 3415
Malaysia 1800 817 477
New Zealand 0508 555 639 / 00800 2275 4932
Philippines 1800 1855 0277
Singapore 1800 608 6008
Taiwan 0800 225 593
Thailand 00 1800 852 5913
Other countries +86 21 2603 7560
00800 ASK4 WDEU
+31 880062100
+31 880062100
+31 880062100
8 10 8002 335 5011
* Toll free number available in the following countries: Austria, Belgium, Czech Republic, Denmark, France, Germany, Ireland, Italy,
Netherlands, Norway, Poland, Slovakia, Spain, Sweden, Switzerland, United Kingdom.
Page 3

Table of Contents
WD® Service and Support................................ii
WD Guardian Services ...................................ii
1 Important User Information ....................1
Important Safety Instructions ..............................1
Handling Precautions ....................................2
Recording Your WD Product Information .....................2
About This Guide .......................................2
2 Product Overview ............................3
Getting to Know Your WD Sentinel DX4200 Server .............3
Key Features ..........................................3
System Requirements and Compatibility Information ............6
Technical Specifications..................................7
Product Views .........................................8
Indicators............................................10
LEDs ...............................................10
Where to Find Help ....................................11
3 Connecting the Server and Getting Started ......12
Administrator Responsibilities.............................12
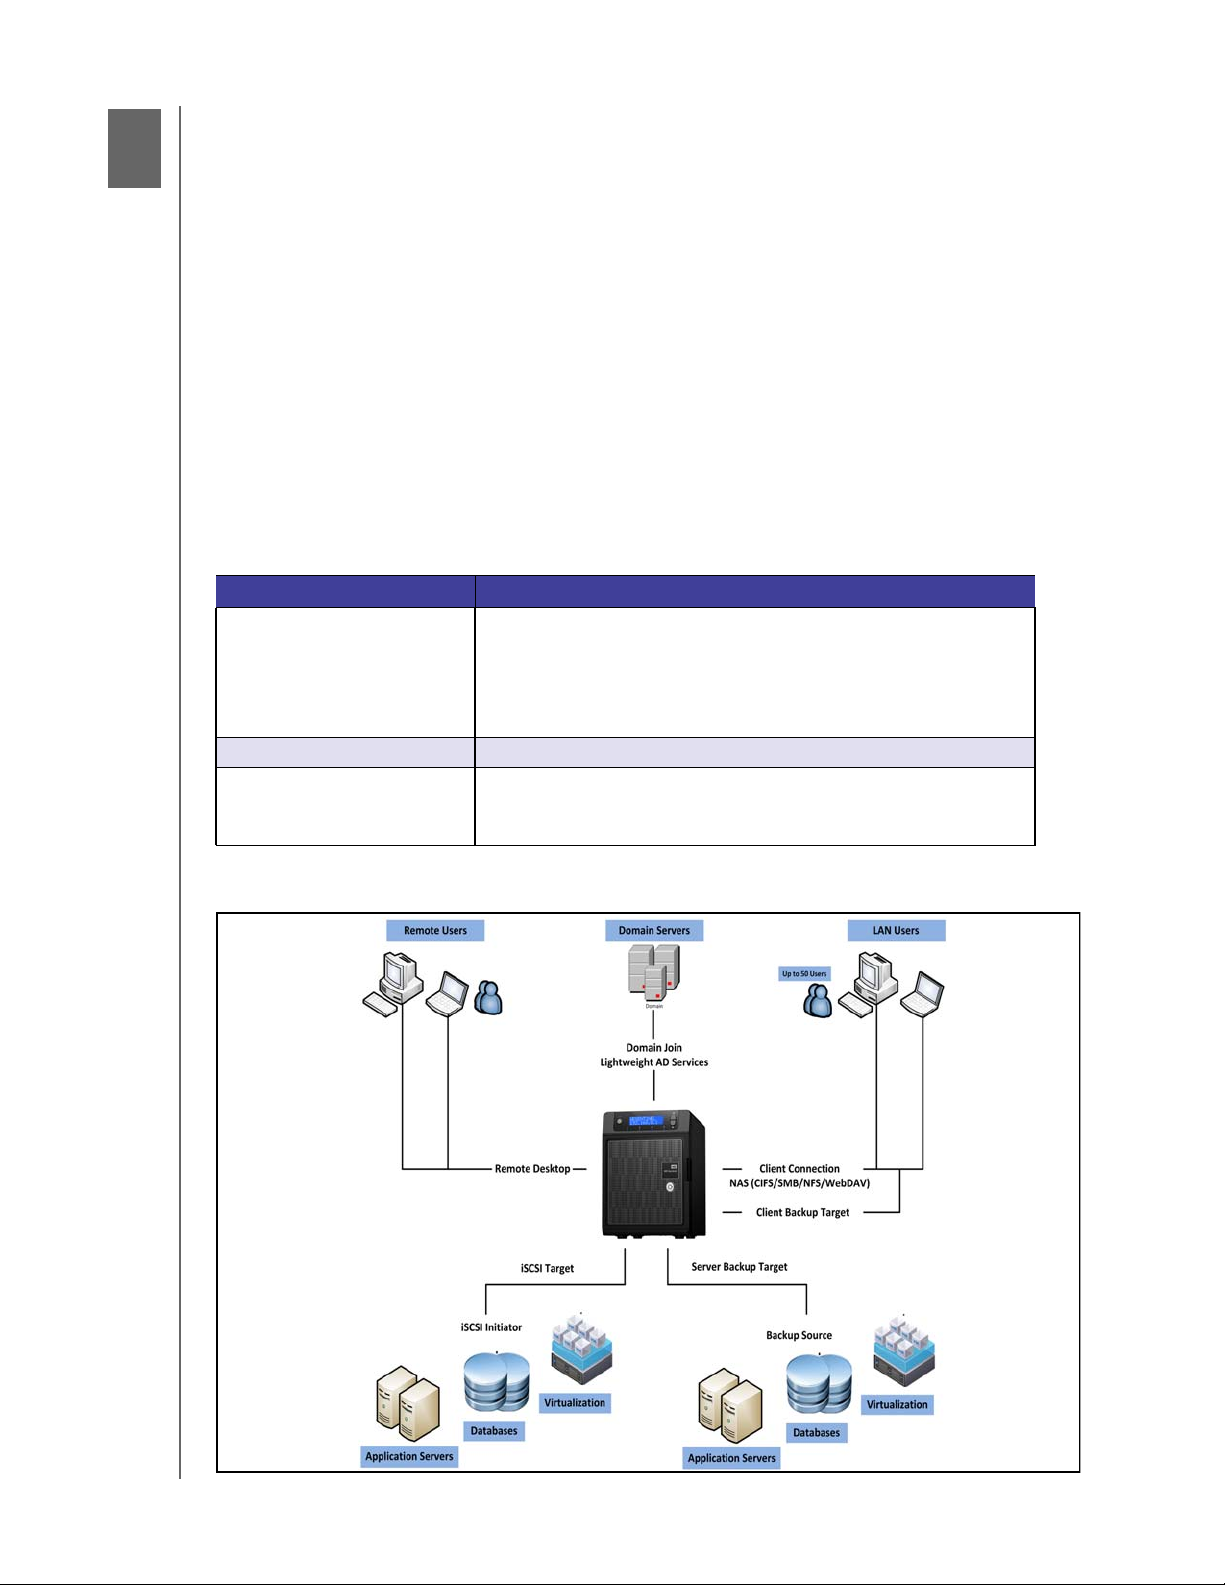
How the WD Sentinel Fits into Your Office ...................12
Connecting the WD Sentinel Server to Your Network ...........13
Setting up your WD Sentinel Server (one time only) ............14
4 Managing the WD Sentinel Server..............18
WD StorCentral .......................................18
Shutting Down and Rebooting the Server ...................31
5 Managing Storage on the WD Sentinel Server ....32
Storage Spaces .......................................32
Setting Up Your Drives..................................32
Recovering from a Failed Drive............................32
6 Best Practices ..............................33
Setting up the WD Sentinel Server .........................33
Using the WD Sentinel Server Efficiently .....................33
WD SENTINEL DX4200
ADMINISTRATOR AND MAINTENANCE GUIDE
TABLE OF CONTENTS – i
Page 4

Replacing Drives ......................................33
Shutting Down ........................................34
7 Troubleshooting ............................35
First Steps Checklist ...................................35
Specific Problems and Corrective Actions ...................35
8 Regulatory and Warranty Information...........38
Regulatory Compliance .................................38
Limited Warranty ......................................40
9 Appendix ..................................42
Hardware Replacement Procedures........................42
Before You Begin......................................42
Replacing a Hard Drive .................................43
Replacing a Server Fan .................................46
Removing the Unit Cover ................................48
Replacing the SODIMM Memory Module ....................49
Adding a Boot Drive ...................................52
WD Sentinel DX4200 Administrator Reference Sheet ...........53
10 Index......................................54
WD SENTINEL DX4200
ADMINISTRATOR AND MAINTENANCE GUIDE
TABLE OF CONTENTS – ii
Page 5

Important User Information
IMPORTANT USER INFORMATION
1
Important Safety Instructions
Handling Precautions
Recording Your WD Product Information
About This Guide
Important Safety Instructions
This device is designed and manufactured to assure personal safety. Improper use can
result in electric shock or fire hazard. The safeguards incorporated into this unit will protect
you if you observe the following procedures for installation, use, and servicing.
Follow all warnings and instructions marked on the product.
Unplug this product from the wall outlet before cleaning. Do not use liquid cleaners or
aerosol cleaners. Use a damp cloth for cleaning.
Do not use this product near any liquids.
Do not place this product on an unstable surface. The product may fall, causing serious
damage to the product.
Do not drop the product.
Do not block the slots and openings on the back or bottom side of the chassis; to
ensure proper ventilation and reliable operation of the product and to protect it from
overheating, these openings must not be blocked or covered. Making sure the server is
standing upright also helps prevent overheating.
Operate this product only from the type of power indicated on the marking label. If you
are not sure of the type of power available, consult your dealer or local power company.
Do not allow anything to rest on the power cord. Do not locate this product where
persons will walk on the cord.
Never push objects of any kind into this product through the chassis slots as they may
touch dangerous voltage points or short out parts that could result in a fire or electric
shock.
Ensure that you keep the door lock keys that come with your WD Sentinel device in a
safe place.
Unplug this product from the wall outlet and refer servicing to qualified service personnel
under the following conditions:
- When the power cord or plug is damaged or frayed.
- If liquid has been spilled on the product.
- If the product has been exposed to rain or water.
- If the product does not operate normally when the operating instructions are fol-
lowed. Adjust only those controls that are covered by the operating instructions
since improper adjustment may result in damage and require extensive work by a
qualified technician to return the product to normal condition.
- If the product has been dropped or the chassis has been damaged.
- If the product exhibits a distinct change in performance, contact WD Customer Sup-
port at
http://support.wd.com.
WARNING! The WD Sentinel™ Server uses a lithium battery, type CR2032. There
is danger of an explosion if the battery is incorrectly replaced.
Replace only with the same or equivalent battery type recommended
by the manufacturer. Dispose of used batteries according to the
manufacturer’s instructions.
WD SENTINEL DX4200
ADMINISTRATOR AND MAINTENANCE GUIDE
1
Page 6

IMPORTANT USER INFORMATION
Handling Precautions
WD products are precision instruments and must be handled with care during unpacking
and installation. The WD Sentinel server may be damaged by rough handling, shock, or
vibration. Be aware of the following precautions when unpacking and installing your external
storage product:
Do not drop or jolt the WD Sentinel server.
Do not move the unit while it is powered on.
Do not use this product as a portable drive.
Recording Your WD Product Information
Remember to write down the following WD product information, which is used for setup and
technical support. Your WD product information is found on the label on the bottom of the
device.
Serial Number
Model Number
Purchase Date
System and Software Notes
About This Guide
This Administrator and Maintenance Guide provides detailed instructions and information for
WD-specific interface elements and functions. Unless otherwise noted, refer to
Microsoft
following conventions:
Convention Used for...
Bold font Names of items on a page such as menus, buttons, option names, fields, and
Note: Extra, but not vital, information
Important: Essential Information to know or to prevent problems when using the
WARNING! Vital information for operating the WD Sentinel server or to prevent damage to
® Online Help for standard interface elements and functions. This guide uses the
tabs that the user must click or complete and keys the user must press.
WD Sentinel server
the server or your computer.
WD SENTINEL DX4200
ADMINISTRATOR AND MAINTENANCE GUIDE
2
Page 7

2
2
PRODUCT OVERVIEW
Product Overview
Getting to Know Your WD Sentinel DX4200 Server
Key Features
System Requirements and Compatibility Information
Technical Specifications
Product Views
Indicators
LEDs
Where to Find Help
Getting to Know Your WD Sentinel DX4200 Server
Congratulations on your purchase of the WD Sentinel DX4200 Windows Storage Server.
Your WD Sentinel DX4200 device delivers a reliable, easy-to-deploy and manage storage
server designed for small business or workgroup environments. The
WD Sentinel DX4200 Storage Server provides secure centralized storage and seamlessly
integrates within almost any existing infrastructure.
Your WD Sentinel DX4200 features an easy-to-use WD StorCentral Dashboard, hard drives
optimized for reliability, quality, and performance, an Intel Atom dual-core processor, and
Windows Storage Server 2012 R2 Workgroup.
Key Features
WD StorCentral Dashboard
The WD Sentinel DX4200’s proprietary dashboard includes easy-to-use task wizards for
initial set up and common management tasks like storage configuration. It also provides an
at-a-glance summary of the system status, and manages networking, alerts, registration,
software updates, performance, and health monitoring.
WD enterprise-class hard drives
Equipped with WD Se hard drives that feature high capacity storage, peak performance and
24/7 datacenter-caliber reliability.
Seamless Integration
The WD Sentinel DX4200 easily integrates into workgroups, Active Directory, and most other
environments. Within the Active Directory environment, Microsoft’s Server Manager offers a
single view of all servers joined to the domain.
Security
WD Sentinel DX4200 has multiple layers of security. Beginning with physical security, the
WD Sentinel DX4200 has a bezel lock to prevent hard drives from being removed from the
system. It also includes a Kensington-style lock slot to secure the DX4200 to a desk. Upon
power up, the BIOS creates a secure UEFI boot environment. This prevents unauthorized
access to your company data by preventing booting from root kits. The Windows Storage
Server 2012 R2 Workgroup also contains layers of security. The WD Sentinel DX4200 can
manage users locally with multiple levels of access, and can be fully integrated into and
existing Active Directory.
WD SENTINEL DX4200
ADMINISTRATOR AND MAINTENANCE GUIDE
3
Page 8

PRODUCT OVERVIEW
Windows Storage Spaces
With Windows Storage Spaces, you can create large storage spaces and add more drives
to them when you run low on pool capacity. With the minimum of at least two WD-populated
drives, you can have two or more drives in the storage pool (data parity) and create storage
spaces that won’t be affected in the event of a drive failure.
Pre-installed Boot Drive
WD Sentinel DX4200 comes with one 2.5 inch boot drive pre-installed with
Windows Storage Server 2012 R2 Workgroup and specialized hardware services and
drivers. The pre-installed boot drive provides the ability to keep the OS running from the
boot drive while redeploying or changing applications and running folders on the large
capacity data drives. This allows businesses to save deployment time, as there is no need to
install from a DVD or search for any specialized drivers to install online. The
WD Sentinel DX4200 comes with the option to add a second boot drive with RAID 1 data
redundancy.
Redundant power capabilities
WD Sentinel DX4200 offers dual power supply ports, so in the event of a power surge or
other failure damage to the power supply, the second power supply will take over, providing
small businesses with the added peace of mind knowing that their server will remain
operational.
Dual Gigabit Ethernet Ports
WD Sentinel DX4200 comes with two Ethernet ports that can be configured for fault
tolerance, aggregated for high performance, or used for two separate LANs.
A Total Solution with Industry-Leading Technology Partners
The WD Sentinel DX4200 combines hardware and software from industry leaders to deliver
a reliable, secure, and easy-to-manage storage server designed specifically for
medium-sized businesses to small enterprise environments. WD Sentinel DX4200 features:
Unified Storage - The WD Sentinel DX4200 delivers an ultra-compact and quiet unified
storage solution with NAS functionality for file sharing and iSCSI SAN for block level storage
for virtualized environments.
Intel®Atom®processor – Built with an Atom dual core processor inside, with 4 GB
ECC RAM expandable to 16 GB RAM, the WD Sentinel DX4200 can easily handle your
business’s computing and file storage demands.
Windows®Storage Server 2012 R2 Workgroup – The dependable Microsoft
Windows Storage Server 2012 R2 Workgroup operating system provides the cost effective,
reliable, and easy-to deploy and manage storage solution your business needs to quickly
and efficiently organize, protect, and share your critical business data using the familiar
Windows user experience.
WD Guardian Services
When you need a little help from an expert, we’ll take care of you! WD Guardian™ Services
offers flexible, affordable and hassle-free technical support and extended warranty plans
with a variety of benefits. Choose the plan that works best for your business. With the
purchase of the WD Sentinel DX4200, WD is offering one FREE year of WD Guardian Pro,
which will be auto activated upon product registration. For details about WD Guardian
Services, visit www.wdguardian.com.
Why WD
WD has been making hard drives for over 40 years. We know how to build drives to store
and protect your data because we understand that your company’s data is paramount to
your business success.
WD SENTINEL DX4200
ADMINISTRATOR AND MAINTENANCE GUIDE
4
Page 9
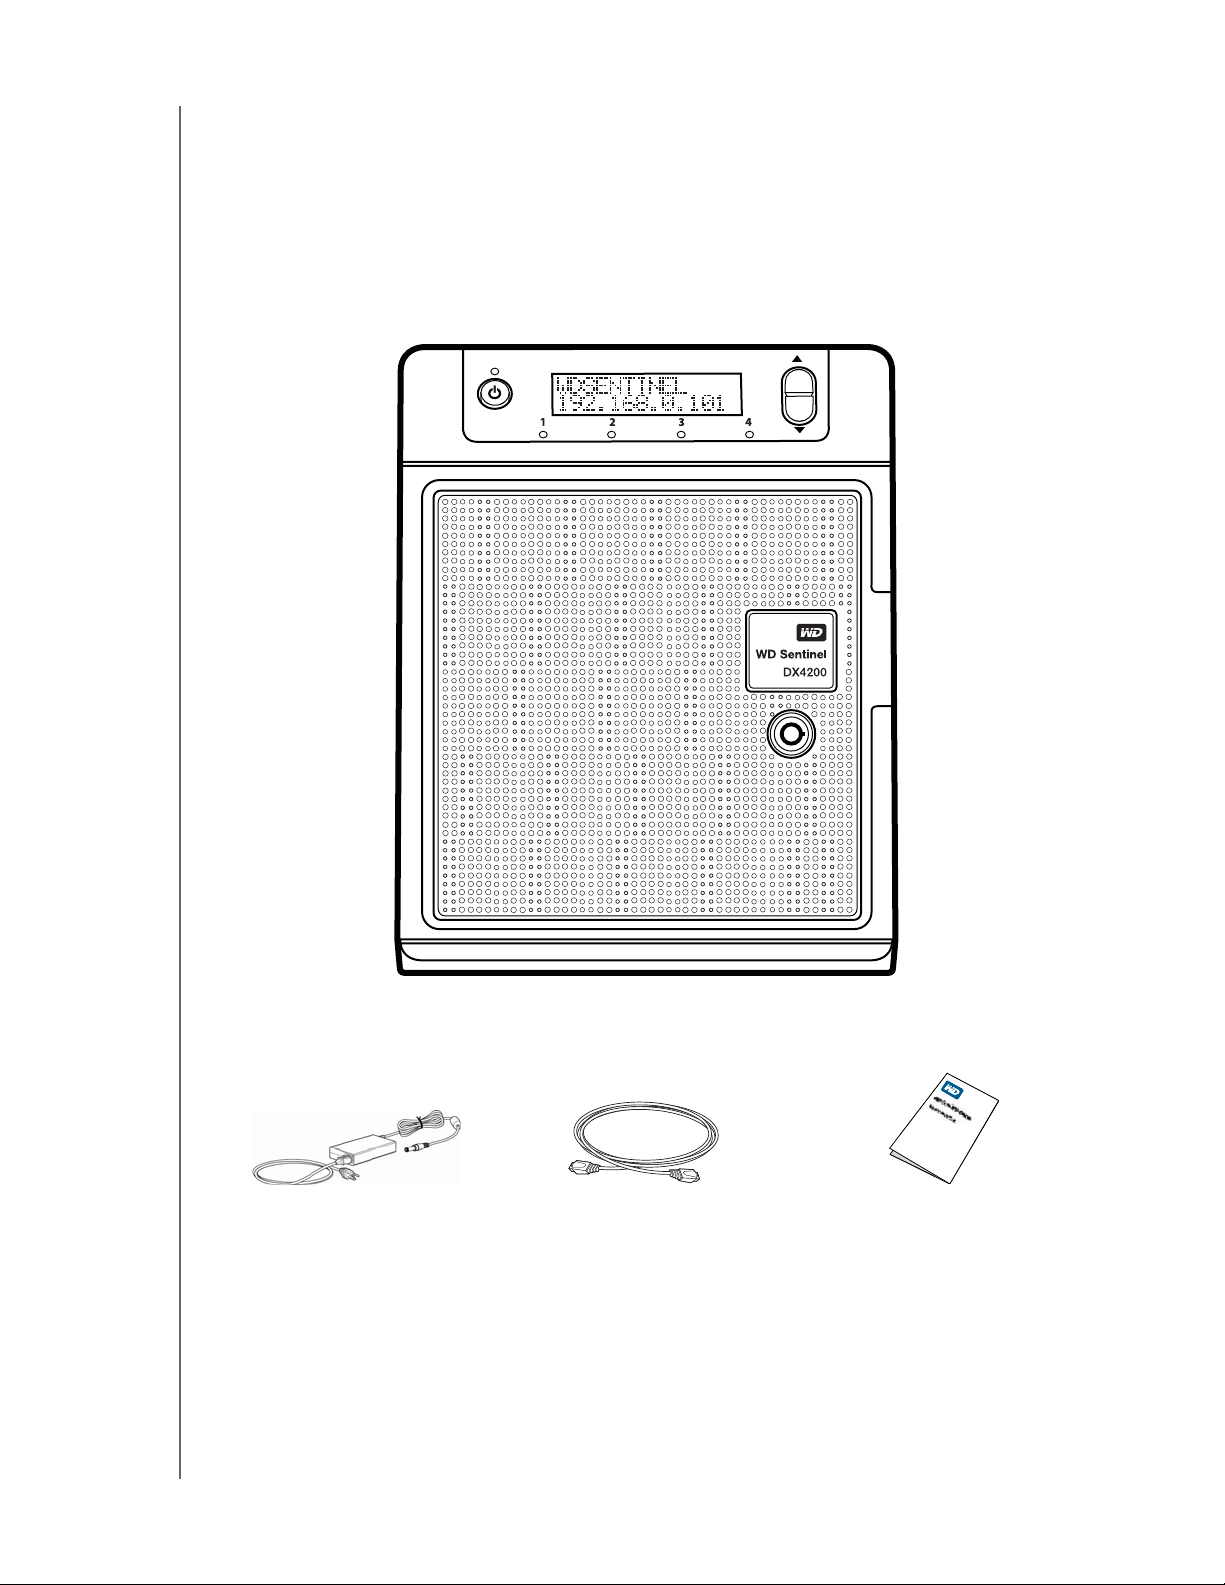
Package Contents
WD Sentinel Storage Server
1 RJ-45 Ethernet cable
1 -1.8 meter power adaptors with cord
2 door lock keys
Basic Installation Guide
PRODUCT OVERVIEW
1.8 meter power cord and
power adaptor
WD SENTINEL DX4200
ADMINISTRATOR AND MAINTENANCE GUIDE
WD Sentinel
DX4200
Ethernet cable Basic Install Guide
5
Page 10
PRODUCT OVERVIEW
For information on additional accessories, visit:
US www.shopwd.com or www.wdstore.com
Europe
• Austria: www.wdstore.de
• United Kingdom: www.wdstore.eu
• France: www.wdstore.fr
• Italy: www.wdstore.it
• Germany: www.wdstore.de
• Spain: www.wdstore.es
• Netherlands: www.wdstore.nl
• Rest of EU Countries: www.shopwd.eu or www.wdstore.eu
All others Contact WD Technical Support in your region. For a list of
Technical Support contacts, visit http://support.wd.com and see
Knowledge Base Answer ID 1048.
System Requirements and Compatibility Information
Requirement Description
File Sharing Support /
Client Operating System
Local Network Router/switch (Gigabit Ethernet recommended to maximize
Display and Peripherals
File sharing support for Linux, UNIX, and Windows operating
systems.
performance)
• Super VGA (800 x 600) or higher-resolution monitor
• USB Keyboard
• USB Mouse or compatible pointing device
WD SENTINEL DX4200
ADMINISTRATOR AND MAINTENANCE GUIDE
6
Page 11

Technical Specifications
Specification Description
Interfaces
Supported protocols CIFS/SMB, NFS, HTTP, HTTPS, WebDAV
• 2 High performance (10/100/1000) Gigabit Ethernet
connections
• 4 ports of powered USB 3.0
• 1 VGA Port
• 2 Power Supplies (DC in)
PRODUCT OVERVIEW
Internal hard drives
Internal boot drive
CPU
Memory
Drive bays
RAID level
Physical dimensions
Weight
Capacities
Power
Power supply
Temperature
Switches
4 WD 3.5-inch SATA Best in Class hard drives
Pioneered by WD, this feature prevents drive fallout caused by the
extended hard drive error-recovery processes common to desktop
drives.
Approved Drive Models
For a complete list of approved drive models, search for Answer ID
9443 in the WD Knowledge Base at http://support.wd.com.
1 WD 2.5-inch SATA Best in Class hard drive with
RAID-specific time-limited error recovery (TLER)
Pioneered by WD, this feature prevents drive fallout caused by the
extended hard drive error-recovery processes common to desktop
drives.
Approved Drive Models
For a complete list of approved drive models, search for Answer ID
9443 in the WD Knowledge Base at http://support.wd.com.
• Intel® AtomTMC2338 Dual Core
• 4 GBytes ECC (expandable to 16 GB)
• 4 3.5 inch hard drive bays
• Hot swap capable
• Trayless design
• Redundant Storage supported
• Windows Storage Spaces
• RAID Level 1 for boot drive
• Length: 8.80 inches (223.5 mm)
• Width: 6.69 inches (170.0 mm)
• Height: 8.10 inches (205.7 mm)
• 8 TB: 11.33 lbs (5.14 kgs)
• 16 TB: 14.64 lbs (6.64 kgs)
• 8TB (2 x 4TB)
• 16TB (4 x 4TB)
• 2 DC power ports
• 1 Power Supply included (optional second)
• Input voltage: 100 to 240 V AC
• Input frequency: 50 to 60 Hz
• Output voltage: 19V DC, up to 7.9A
• Operating temperature: 0 to 35 °C (32 to 95 °F)
• Non-operating temperature: -40 to 70°C (-40 to 158 °F)
• Power
• Recovery
• LCM Scroll buttons
WD SENTINEL DX4200
ADMINISTRATOR AND MAINTENANCE GUIDE
7
Page 12

Specification Description
LEDs
1 Power LED
• Solid Blue indicates boot status
• Solid blue once booted, with no pending fault conditions,
indicates a good operational state
• Flashings RED indicates a fault condition
2 Ethernet Port LEDs
• Flashing green indicates activity
• Solid amber indicates that there is a link connection
• Off indicates inactive state
4 Drive Tray LEDs
• Flashing blue indicates drive activity
• Solid blue indicates drive is connected
• Solid RED indicates drive fault (Drive must be replaced)
Operating System Windows Storage Server 2012 R2 Workgroup
Product Views
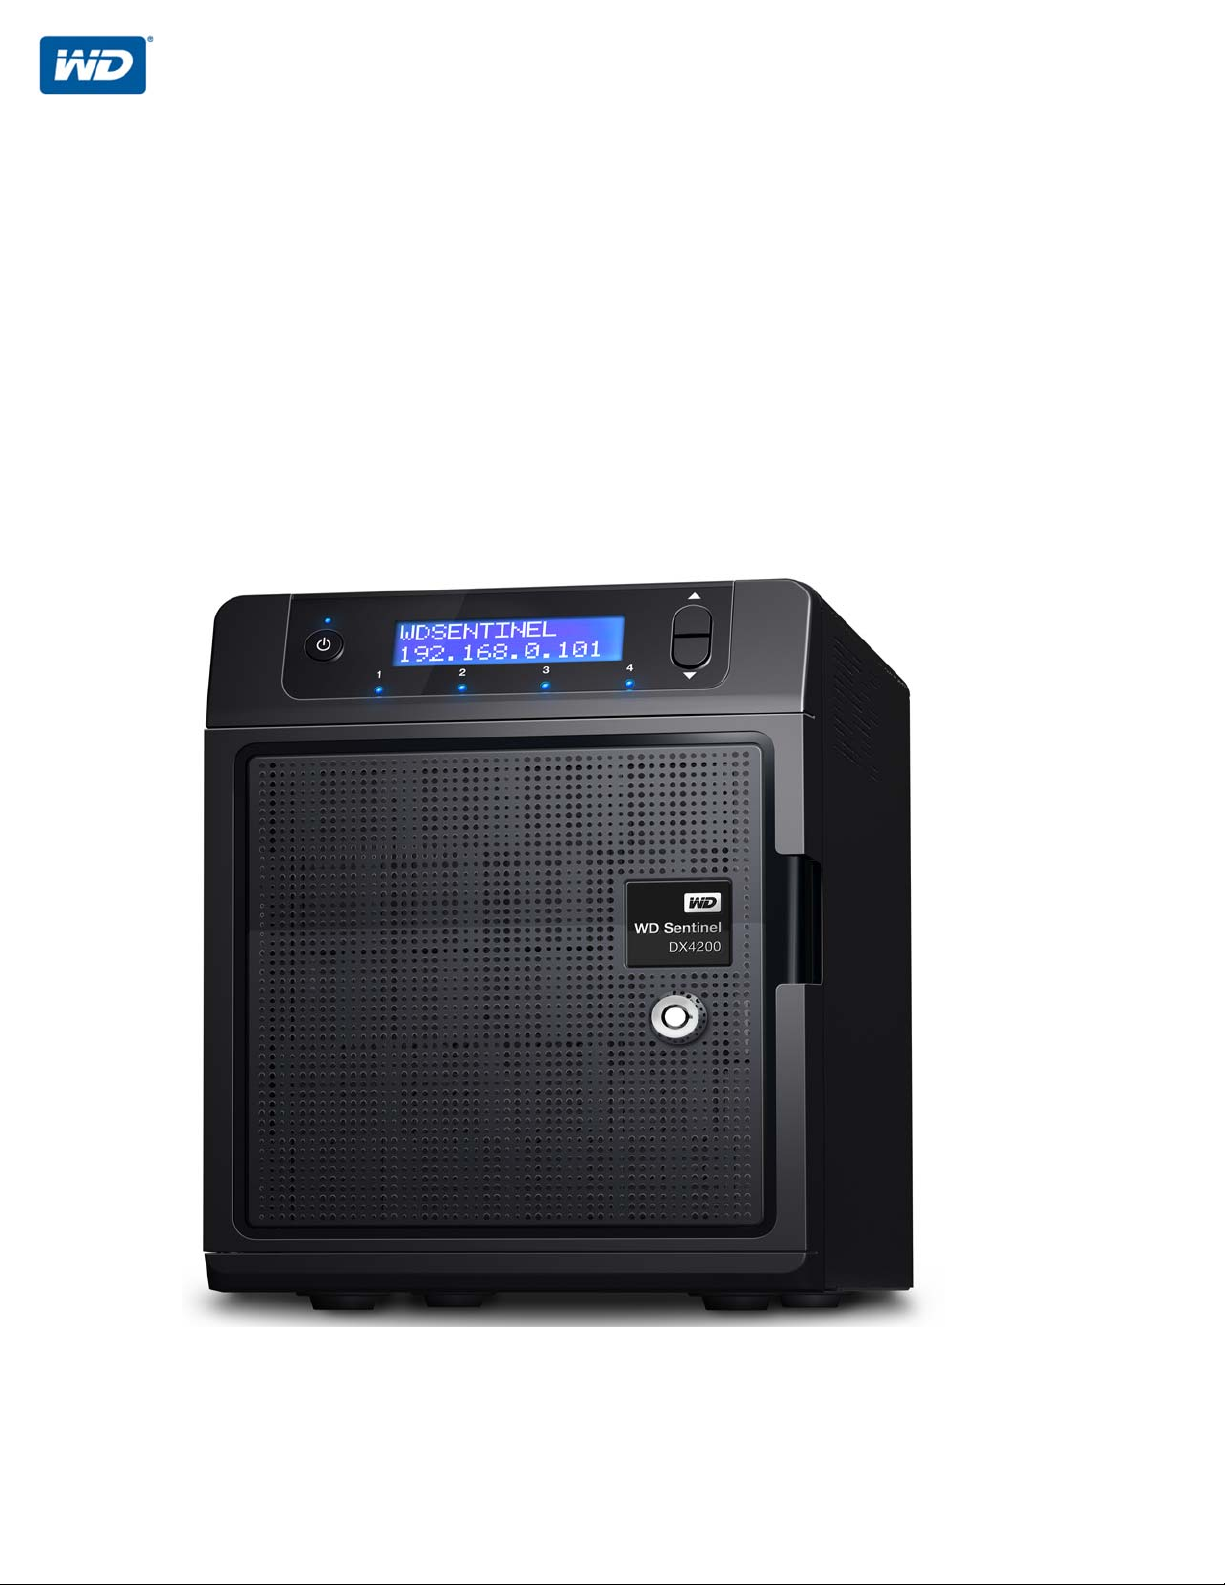
Front View
PRODUCT OVERVIEW
Power button
Power / Status LED
LCD Display Scroll buttons
HDD
Status LEDs
Drive Door
Drive Door
Lock
WD SENTINEL DX4200
ADMINISTRATOR AND MAINTENANCE GUIDE
8
Page 13
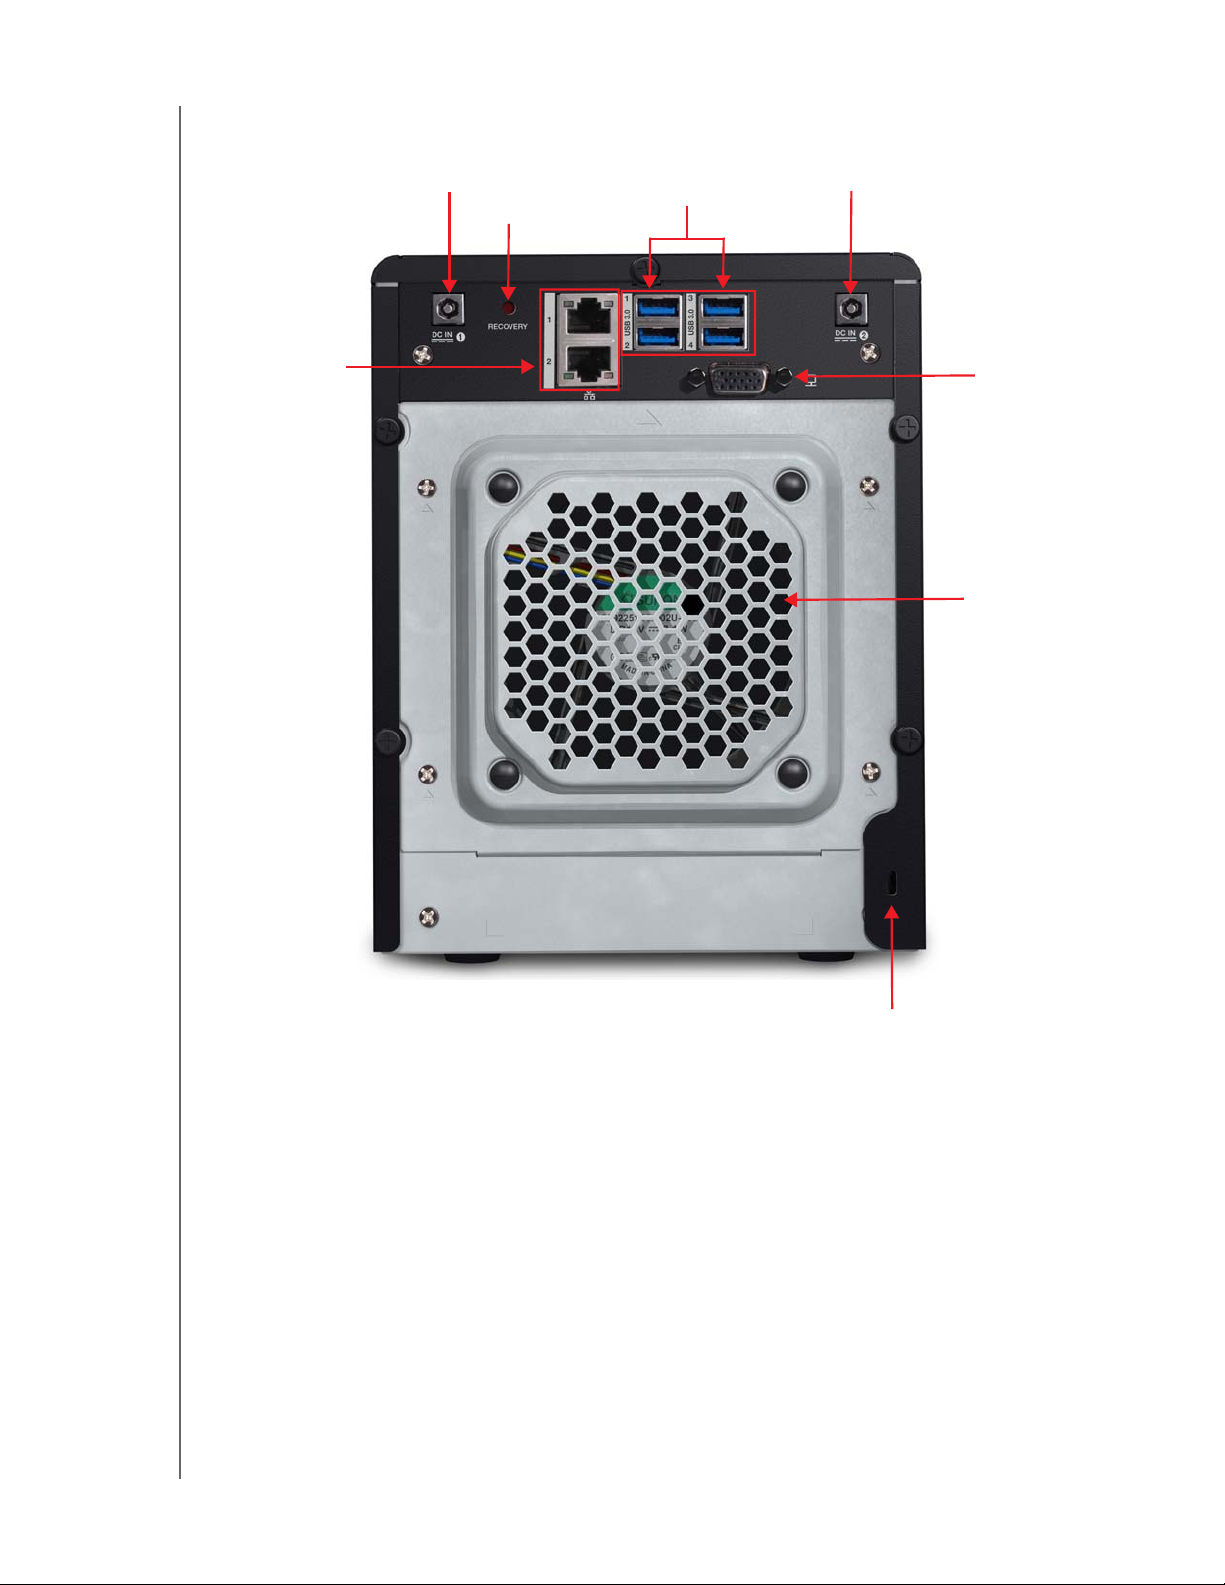
Back View
PRODUCT OVERVIEW
Gigabit
Ethernet ports
1&2
External DC In
Power port
Recovery
button
USB 3.0 ports
External DC In
Power port
VGA port
System
Fan
WD SENTINEL DX4200
ADMINISTRATOR AND MAINTENANCE GUIDE
Kensington®
Security Slot
9
Page 14
PRODUCT OVERVIEW
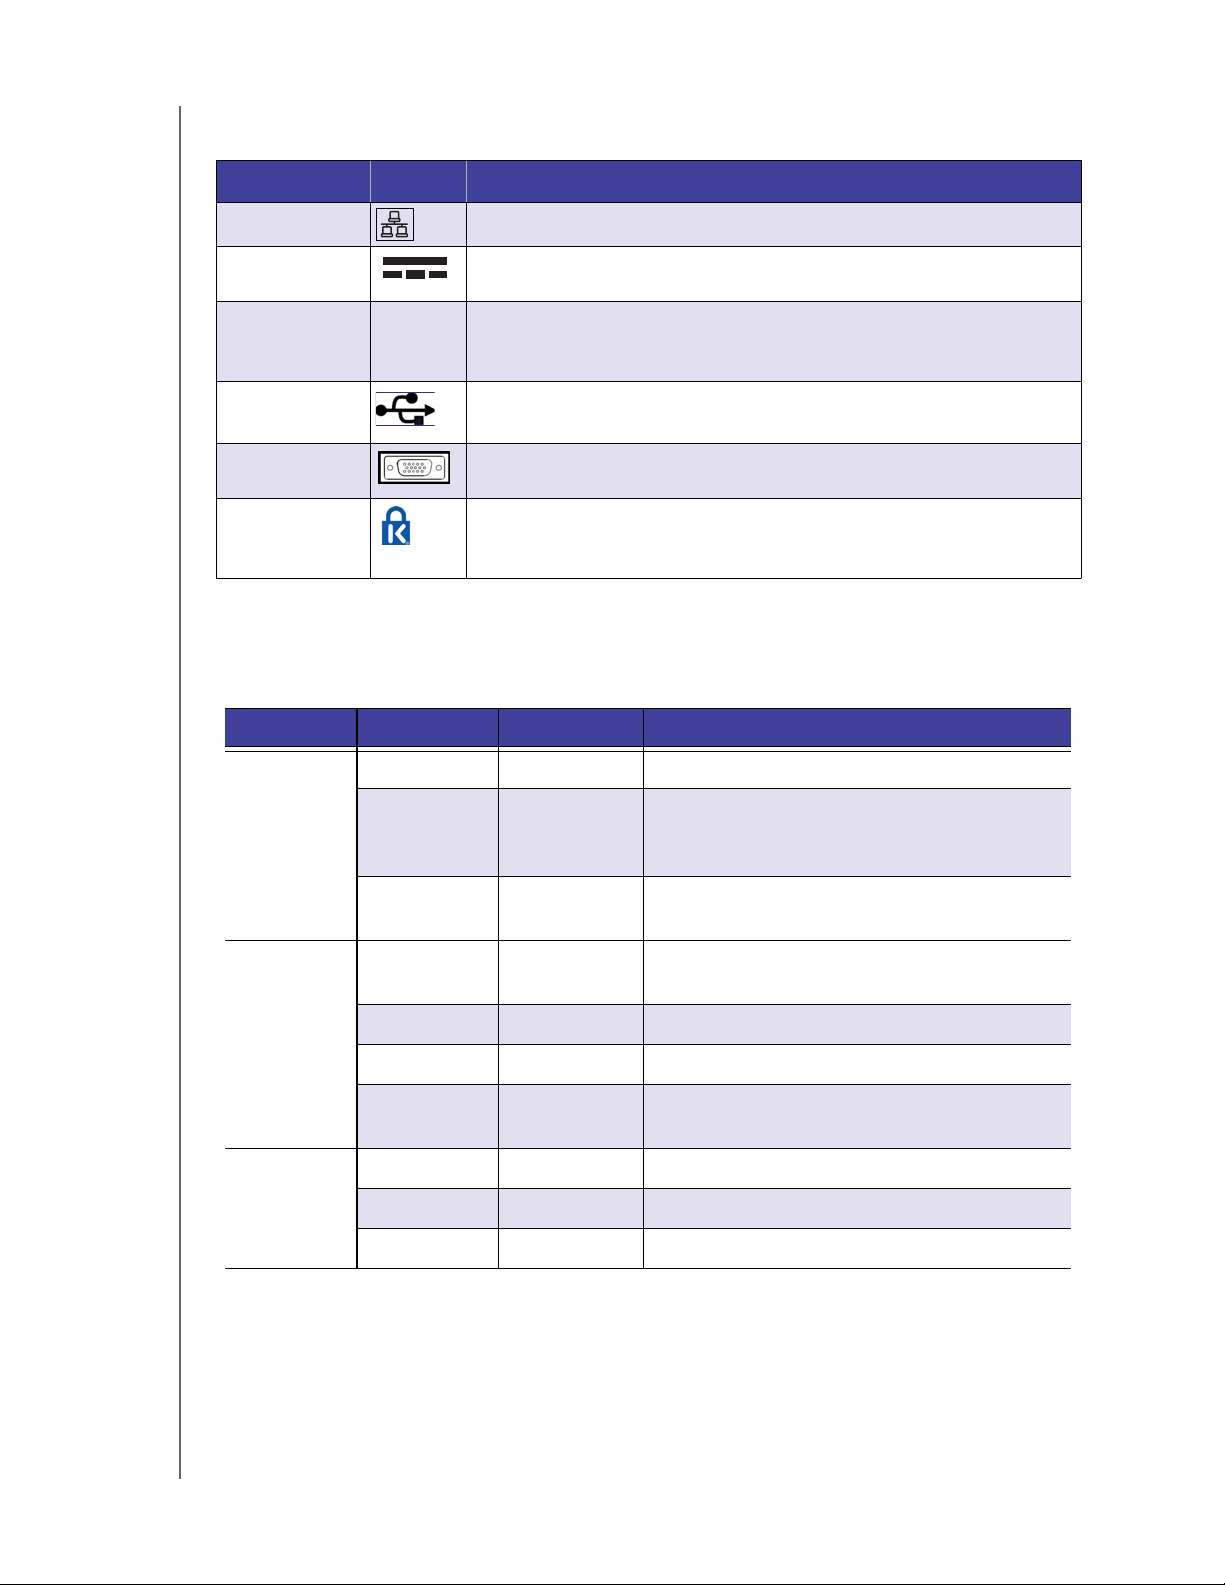
Indicators
Component Icon Description
Ethernet ports Connects the device to a local network.
DC In connector Connects the device to a DC power cord and the power outlet.
Recovery button
RECOVERY
Button on the back of the server recovers the server (including the
operating system) while using a USB drive in an event of an OS
corruption.
USB ports Connects with USB 3.0 devices such as a USB storage, USB mouse,
USB keyboard, or a UPS.
VGA port Connects to your VGA monitor
Kensington
security slot
For drive security, the device is equipped with a security slot that
supports a standard Kensington security cable.
Visit http://www.kensington.com/ for more information.
LEDs
The LEDs on the WD Sentinel device identify the status of the unit.
LED Color State Description
Power LED
---- Off WD Sentinel server is currently inactive.
Blue Solid WD Sentinel server is booting or has
successfully booted the software and is
operational.
Drive LEDs
Ethernet
Port
Red Flashing Indicates that a serious fault has occurred and
needs immediate attention.
---- Off If the LED is off while other drive LEDs are on,
no drive is installed in the bay.
Blue Solid Drive is connected.
Blue Flashing Drive is currently active.
Red Solid Indicates drive failure. Replace this drive as
soon as possible.
---- Off Indicates an inactive state.
Green Flashing Indicates link activity.
Amber Solid Indicates that there is a link connection.
WD SENTINEL DX4200
ADMINISTRATOR AND MAINTENANCE GUIDE
10
Page 15

PRODUCT OVERVIEW
Where to Find Help
This manual provides step-by-step instructions and other important information regarding
your WD product. It is meant for the person serving as the administrator of the
WD Sentinel DX4200 device. You can download translated versions and updates to this
manual from http://products.wd.com/updates. For more information and news about this
product, visit our website at http://www.wd.com/.
Additional Reference Description
Basic Installation Guide Included in the product box or available at
http://products.wd.com/WDSentinel-DX4200; helps you install the
WD Sentinel device.
WD Online Help Specific descriptions and instructions accessed on
WD StorCentral.
Microsoft Online Help
• Access detailed explanations and instructions for Windows
Storage Manager by clicking the Help button within the
application.
• Search for help on a specific topic or term by entering it in the
Microsoft Online Help search field in the top right of any
Windows Storage Manager page.
• Access the entire Microsoft Online Help system by clicking
Microsoft Online Help.
Important: Not all Microsoft Online Help is applicable to the
WD Sentinel DX4200. The WD Online Help and this Administrator's Guide
take precedence over the Microsoft Online Help.
WD SENTINEL DX4200
ADMINISTRATOR AND MAINTENANCE GUIDE
11
Page 16
3
CONNECTING THE SERVER AND GETTING STARTED
Connecting the Server and Getting Started
Administrator Responsibilities
How the WD Sentinel Fits into Your Office
Connecting the WD Sentinel Server to Your Network
Setting up your WD Sentinel Server (one time only)
This chapter steps you though the process of connecting and setting up your
WD Sentinel DX4200 server.
Administrator Responsibilities
At a high level, the Administrator performs the setup and routine management tasks on the
WD Sentinel server. This person also holds the Administrator password for your
WD Sentinel server.
The table below provides a view into some of the Administrator’s tasks:
Tasks
Primary Setup • Physically connects the WD Sentinel server to the network.
• Configures the WD Sentinel server itself. This is a one-time
procedure.
• Completes product registration for the WD Sentinel server.
• Joins the WD Sentinel server to the Domain.
Primary User Interface • Signs in using the Administrator password (no username required).
Task Examples • Manages WD Sentinel server settings, resolves any alerts, and
monitors server performance.
• Creates and manages iSCSI targets.
How the WD Sentinel Fits into Your Office
WD SENTINEL DX4200
ADMINISTRATOR AND MAINTENANCE GUIDE
12
Page 17
CONNECTING THE SERVER AND GETTING STARTED
Connecting the WD Sentinel Server to Your Network
Use the following steps to physically connect your WD Sentinel DX4200 server to your
network.
1. Connect your monitor to the VGA port on the rear of your WD Sentinel server.
2. Connect your USB keyboard and USB mouse to the USB ports on the back of your
WD Sentinel server.
3. Using the provided ethernet cable, connect the WD Sentinel server (either ethernet
port 1 or 2) to a DHCP-enabled LAN.
4. Using the provided AC adaptors, connect the WD Sentinel server to an electrical outlet
or a UPS.
5. Turn on your monitor.
6. Press the power button on the front of your WD Sentinel unit.
Once the WD Sentinel boot up process is complete, the Windows Storage Server
Settings screen displays. The Power LED on the front of the WD Sentinel server will
display a solid blue light.
WARNING! This process takes a few minutes. Do not interrupt the process. Do
not power off or disconnect the WD Sentinel server.
WD SENTINEL DX4200
ADMINISTRATOR AND MAINTENANCE GUIDE
13
Page 18
CONNECTING THE SERVER AND GETTING STARTED
Setting up your WD Sentinel Server (one time only)
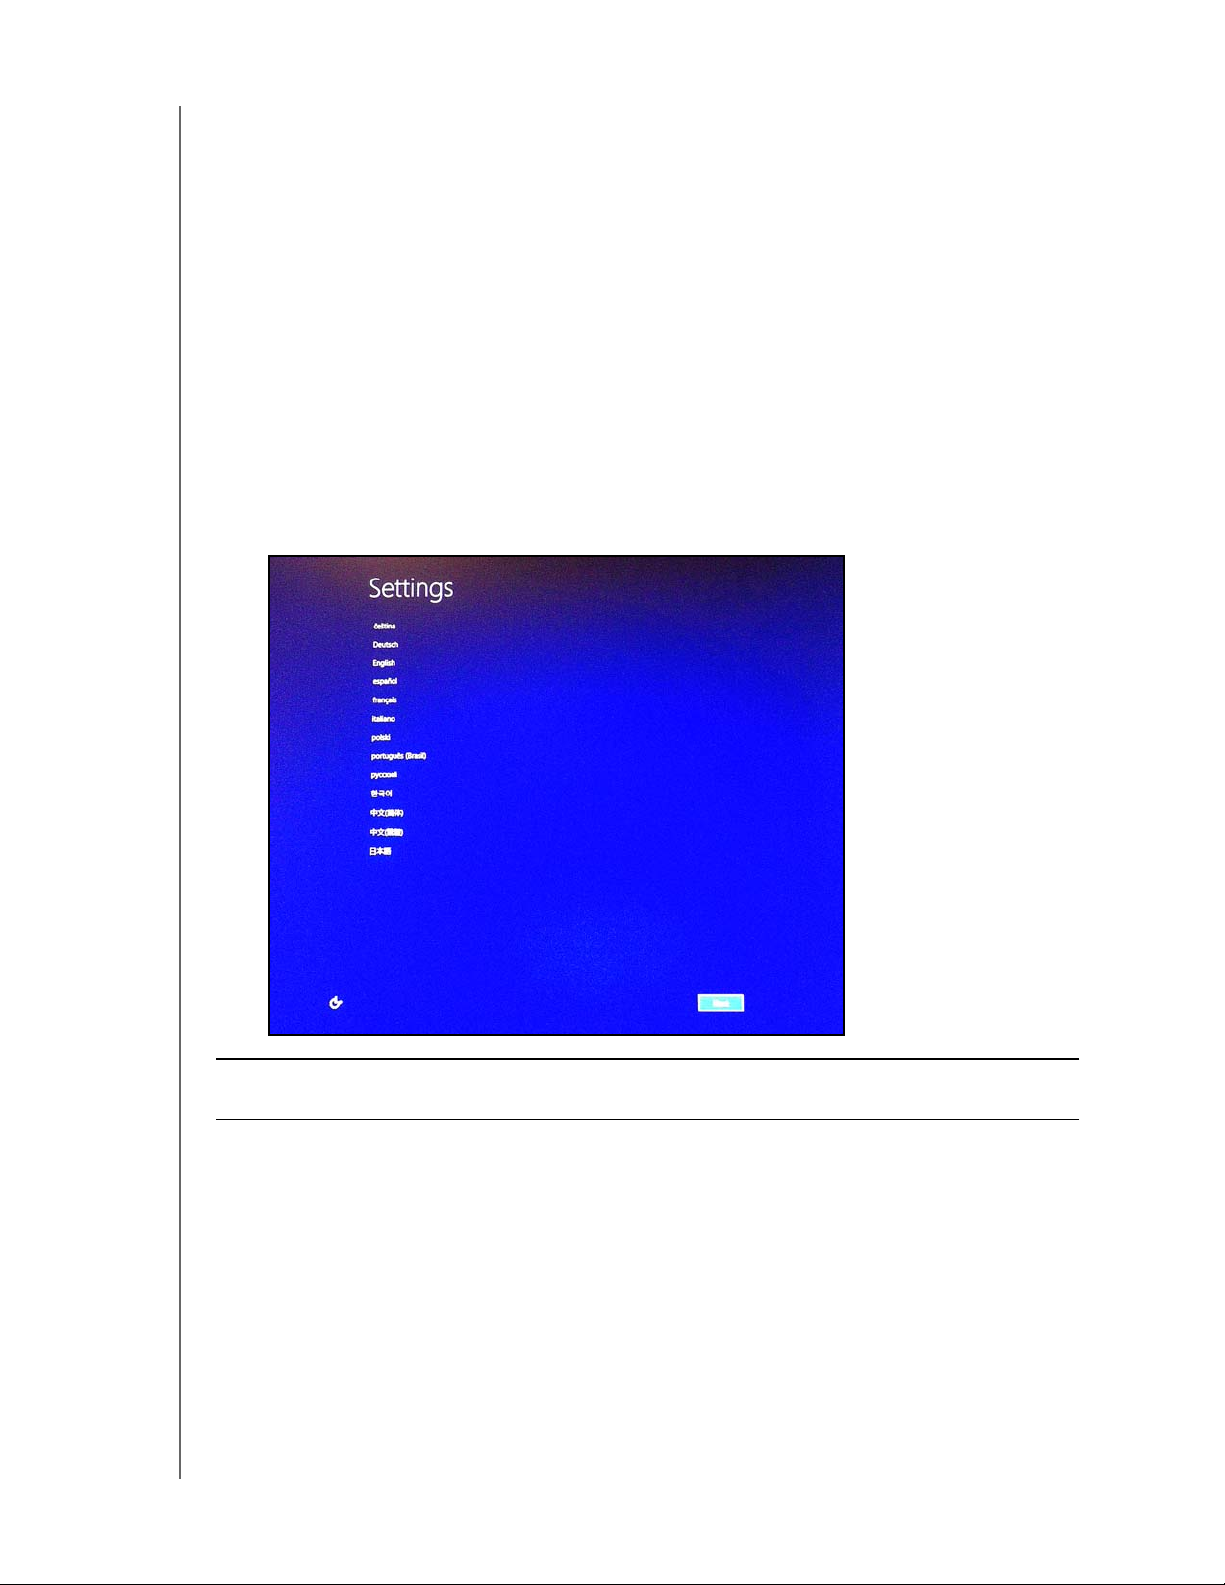
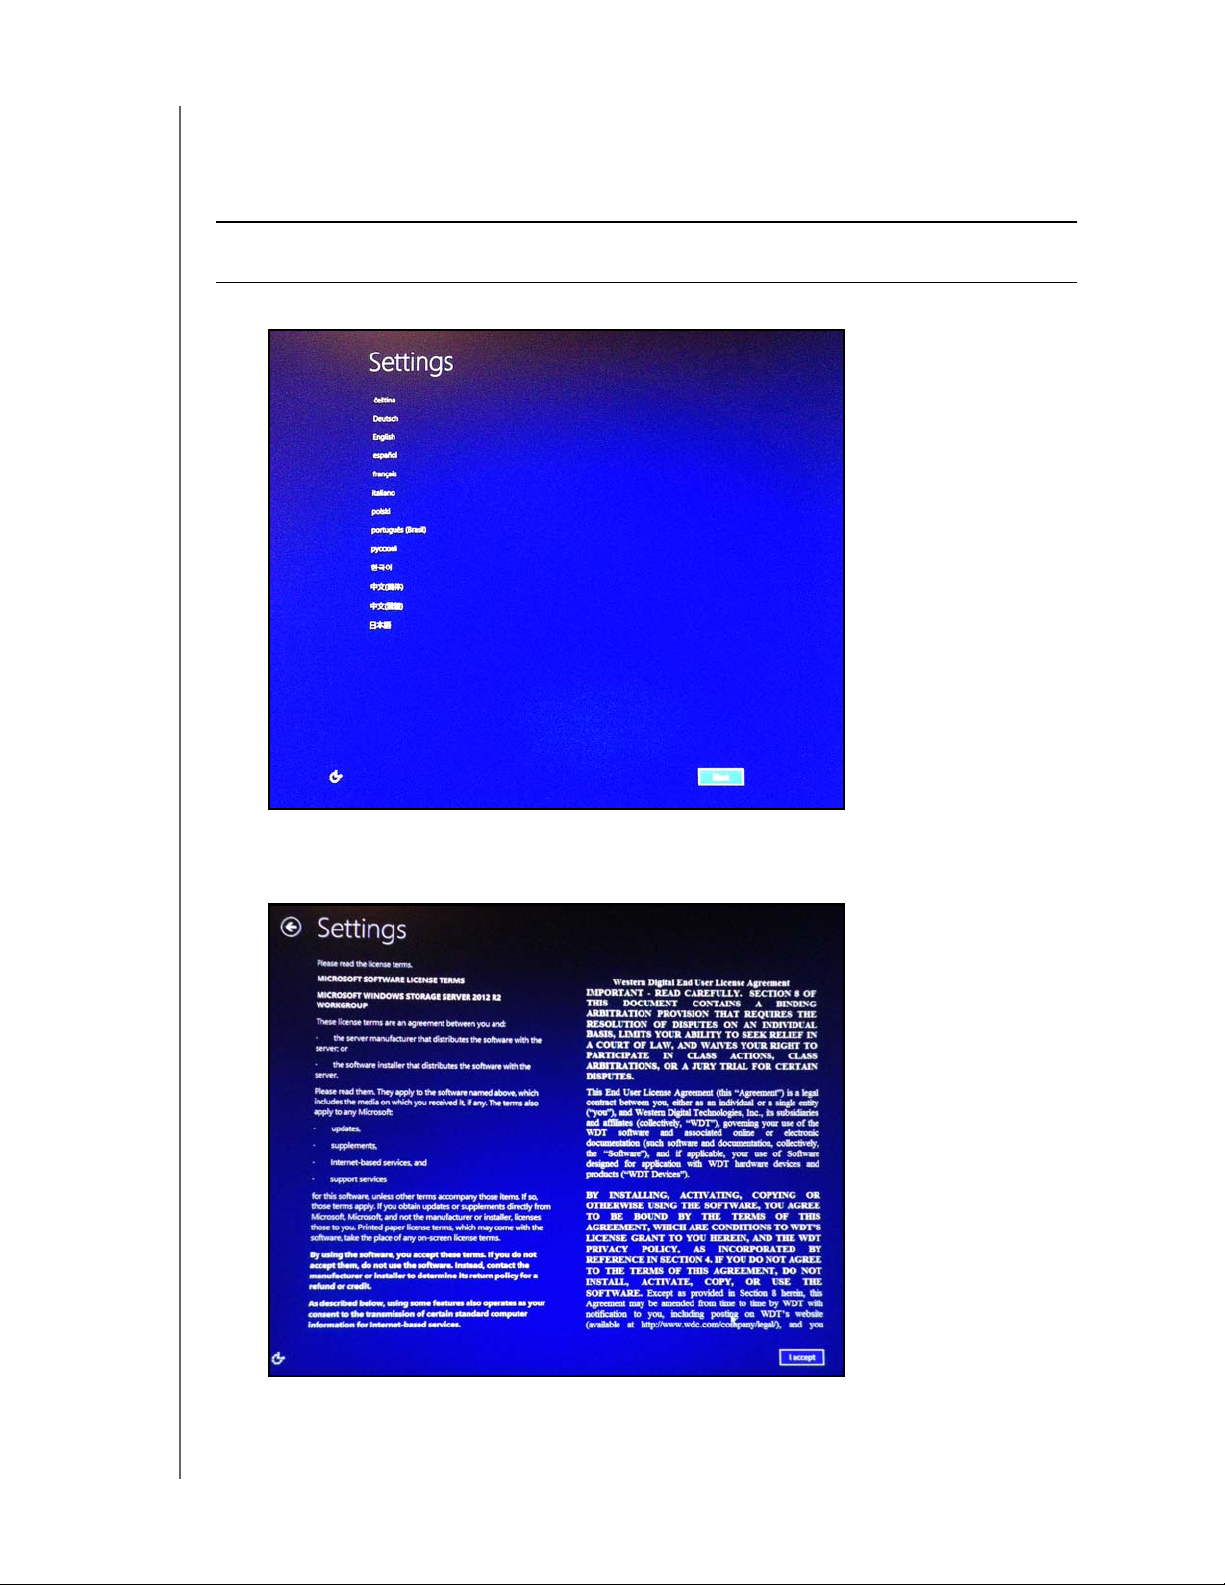
Your WD Sentinel server is now ready to be configured. This section describes how to use
the one time setup wizard to configure your server for first use.
Important: Ensure that you complete the entire process outlined in steps 1- 11 below.
If these steps are not followed, your WD Sentinel will not work properly.
1. Select a language from the localization list,
2. Verify the localization settings or select the correct values from the drop-down lists,
then click Next.
3. Read the Microsoft and Western Digital license agreements, then click I accept.
WD SENTINEL DX4200
ADMINISTRATOR AND MAINTENANCE GUIDE
14
Page 19

CONNECTING THE SERVER AND GETTING STARTED
4. Enter and confirm the Administrator password (must be at least 8 characters long and
contain at least three of the following categories: uppercase letters, lowercase letters,
numbers, and symbols; spaces are allowed). You will use this user name and
password later to connect to your WD Sentinel device to access the Administrator
Dashboard.
WARNING! If you forget the Administrator password, it may not be possible to
recover it, and you could potentially lose all of your data. Use the
“WD Sentinel DX4200 Administrator Reference Sheet” on page 53
to record the password and keep it in a safe location.
5. Click Finish. The installation begins. Once the initial process is complete, you’ll see
the WD Device Setup Wizard.
Important: This process can take2-3minutes. Do not interrupt the process. Do not
power off or disconnect the WD Sentinel server.
6. Review the WD Device Setup screen, then click Next.
WD SENTINEL DX4200
ADMINISTRATOR AND MAINTENANCE GUIDE
15
Page 20

CONNECTING THE SERVER AND GETTING STARTED
7. Select Enable E-mail alerts to send an email when an alert occurs on your device,
then complete the following fields:
Note: To skip this step, click Skip.
a. E-mail Recipient: Enter the email addresses of those individuals who will receive
an email from your WD Sentinel when an alert occurs.
b. From E-mail Address: Enter the address from which the email will be sent. (e.g.
server@contasa.com).
c. Select one of the following options:
- Use WD SMTP Server: Select this option to use the WD SMTP server for
email.
- Use My SMTP Server: Select this option to use your own SMTP server for
email, then complete the following fields:
• Server Name: Enter the name of your SMTP server.
• Port: Enter the Port for your SMTP server.
• This server requires a secure connection (SSL): Select this option if the server requires a
secure connection.
• This server requires authentication: Select this option if the server requires authentication,
then complete the following fields:
- Username: Enter the authentication User Name for the identified server.
- Password: Enter the authentication Password for the identified server.
d. Select Send test e-mail to test the email you’ve set up for your alerts.
e. Click Next.
WD SENTINEL DX4200
ADMINISTRATOR AND MAINTENANCE GUIDE
16
Page 21

CONNECTING THE SERVER AND GETTING STARTED
8. Select the check box next to all updates on the screen, if updates are available, then
click Next.
Note: To skip this step, click Skip
The Software update Status screen displays the progress of your update.
When the update is finished, the following screen displays.
9. Click Launch Server Manager to begin configuring your WD Sentinel device using
Storage Spaces. The Server Manager displays.
10. Follow the steps outlined by in the Microsoft Storage Server Online Help to configure
the WD Sentinel device using Storage Spaces.
11. Click Finish on the WD Device Setup to close the setup screen.
WD SENTINEL DX4200
ADMINISTRATOR AND MAINTENANCE GUIDE
17
Page 22

Managing the WD Sentinel Server
MANAGING THE WD SENTINEL SERVER
4
WD StorCentral
Shutting Down and Rebooting the Server
This chapter assumes you have followed the Administrator's Basic Install Guide to initialize
the WD Sentinel server or have followed the steps outlined in “Connecting the Server and
Getting Started” on page 12.
Important: As a best practice, perform the tasks outlined in this guide on a client
computer using Remote Desktop, not directly from the
WD Sentinel server.
WD StorCentral
WD StorCentral provides a window into your WD Sentinel device, allowing you to:
View at-a-glance device information.
Manage software updates.
Get information on your device drives.
View the health of your device.
When you initially open WD StorCentral, the Home page provides at-a-glance device
information and a Navigation bar. Use the following steps to access and use
WD StorCentral.
Accessing WD StorCentral
To access WD StorCentral:
On the Desktop, double-click the WD StorCentral icon.
WD SENTINEL DX4200
ADMINISTRATOR AND MAINTENANCE GUIDE
18
Page 23

The WD StorCentral Home page displays:
Navigation pane
WD StorCentral
MANAGING THE WD SENTINEL SERVER
Alerts icon
Navigation Bar
The Navigation Bar allows you to access the features available within WD StorCentral.
Navigation Task Description
Home The Home page provides at-a-glance information about your WD Sentinel device.
Health The Health page allows you to monitor the status of the drives, power supplies,
temperatures, fan, and CPU.
Storage The Storage page allows you to view the status of your storage pools, perform disk
management, and buy preferred drives for your device.
Settings The Settings page allows you to register your device, enable and perform software
updates, and setup email and audible alerts.
Help The Help page provides ways to get additional help for your device.
WD SENTINEL DX4200
ADMINISTRATOR AND MAINTENANCE GUIDE
19
Page 24

MANAGING THE WD SENTINEL SERVER
Home
The Home page provides at-a-glance data designed to give you the information you need to
manage your device.
System Capacity
The System Capacity area provides the amount of allocated and unallocated capacity on
your device. Allocated capacity displays in green; unallocated capacity displays in gray.
WD SENTINEL DX4200
ADMINISTRATOR AND MAINTENANCE GUIDE
20
Page 25

MANAGING THE WD SENTINEL SERVER
System Alerts
The System Alerts area identifies the number of system messages currently active on your
device. There are 3 types of system alerts:
Critical: Critical alerts are sent when an error or a problem occurs with your
device, usually a system failure.
Warning: Warning alerts present a condition that might cause a problem in the
future.
Informational: These alerts are updates on non-vital system information.
To view System Alert details:
Click the magnifying glass in the right corner of the System Alert area. The System
Alerts screen displays.
To Save, Delete or Ignore a System Alert:
1. On the Home page, System Alerts area, click the magnifying glass in the right corner.
2. On the System Alerts screen, select the alert you’d like to save, delete, or ignore.
3. Click the Save, Delete,orIgnore button, depending on the action you’d like to
perform on the alert.
4. Click Close to close the System Alerts screen.
System Utilization
The System Utilization graph displays the percentage of CPU and memory your device is
currently using.
WD SENTINEL DX4200
ADMINISTRATOR AND MAINTENANCE GUIDE
21
Page 26

MANAGING THE WD SENTINEL SERVER
Domain Information
The Domain Information for your device displays in this area. This includes the server name
and the domain name.
To view Domain details:
Click the magnifying glass in the right corner of the Domain area. The System
Properties dialog displays. From the System Properties dialog, you can update the
Computer Name, set-up your device for remote access, manage devices on your
server, and manage user profiles.
Network
The Network area displays the IP address, link rate, and status of your network connections
for each active port.
To view Network details:
Click the magnifying glass in the right corner of the Network area. The Network
Connections dialog displays.
WD SENTINEL DX4200
ADMINISTRATOR AND MAINTENANCE GUIDE
22
Page 27

MANAGING THE WD SENTINEL SERVER
Health Page
The Health page allows you to monitor the temperature of the boot drive, storage drives and
CPU, identifies power supply activity, and indicates the speed of the fan. The Health page is
divided into two areas: System and Power Supply. To open the Health Page, click the
Health tab on the Navigation bar.
System
The System area displays the status and temperature of the boot drive, storage drives, boot
drive RAID control, memory, and CPU. It also displays the system fan RPMs.
System Settings Description
Name The name of the system component (e.g., fan, drive, CPU).
Status The status of the identified system component. The status may be:
• OK
• Unknown: This normally occurs when the server is attepmting to obtain
system information.
• Failed
Value The value associated with the system component.
• For CPU, Memory, and data drives, the value is the temperature of the
component.
• For system fan, the value is rotations per minute (RPM).
WD SENTINEL DX4200
ADMINISTRATOR AND MAINTENANCE GUIDE
23
Page 28

MANAGING THE WD SENTINEL SERVER
Power Supply
The Power Supply area displays the status and the on/off value for each power supply.
Power Settings Description
Name The name of the power supply component (e.g., Power supply 1, Power supply 2).
Status The status of the identified power supply. The status may be:
• Active
• Inactive
Storage
The Storage page allows you to:
Manage the data drives through the Server Manager application.
Buy replacement storage from the WD Store.
View the hard drive properties and health.
To open the Storage Page, click Storage on the Navigation bar.
WD SENTINEL DX4200
ADMINISTRATOR AND MAINTENANCE GUIDE
24
Page 29

MANAGING THE WD SENTINEL SERVER
Managing Storage
The WD Sentinel server drives are managed using Server Manager. The Server Manager
console provides you with a consolidated view of the server, including information about
server configuration, status of installed roles, and links for adding and removing roles and
features. For additional information, see the Microsoft Server Manager Online Help.
Accessing Server Manager:
On the Storage page, click Manage Storage.
Buy
The Buy button allow quick access to the WD Store where you can access drives that are
compatible with your device.
Accessing the WD Store:
On the Storage page, click Buy.
Allocated / Unallocated Capacity
The Allocated Capacity and Unallocated Capacity areas provides information about the
allocated /unallocated portion of your device drives.
Boot Drive Volume
Storage Spaces Pool
Allocated / Unallocated
Capacity Details
Boot Drive Volume / Storage Spaces Pool
This area identifies the boot drive volume and storage pools currently available on your
device. These areas identifies the name of the volume / pool, the RAID level (if applicable),
and the health of the pool.
To access the details of each volume / pool, click the volume / pool you’d like to
view.
WD SENTINEL DX4200
ADMINISTRATOR AND MAINTENANCE GUIDE
25
Page 30

MANAGING THE WD SENTINEL SERVER
Allocated / Unallocated Capacity Details:
Provided below is a description of the information available in the Allocated Capacity Details
and the Unallocated Capacity Details areas:
Details Description
Resiliency • RAID level: This area identifies the RAID level for the boot drive.
• Total Pool Capacity: Displays the total capacity of the selected pool.
The health of the pool displays at the bottom of this area.
Partitions and Volumes This area displays the partitions and volumes that currently exist on the selected
pool.
• Click the arrow to expand or contract this area.
The health of the partition and volumes displays also displays in this area.
Drives The Drives area displays the following information related to the drives associated
with the selected pool.
• Drive: The name of the drive.
• Category: Identifies the type of drive being used by your device:
- Preferred: Indicates that this is a preferred drive. Preferred drives
perform optimally with your device and should always be used whenever
possible. Preferred drives are fully tested and approved for use with your
device. The message text displays in green.
- Supported: Indicates that this is a supported drive. Supported drives are
not the optimal drives for your device but are part of the same drive family.
These drives are not fully tested with this device. The message text
displays in green.
- Unsupported: Indicates that this is an unsupported drive. Unsupported
drives have not been tested with this device and should be used at your
own risk. The message text displays in red.
WARNING! WD is not responsible for data loss due to the use of
• Status: The status of a drive may be:
unsupported drives.
- OK
- Degraded
- Warning
- In Service
- Predicted Failure: Visit WD Store to replace
CAUTION! Imminent failure detected. Please replace this hard drive
• Spares: Indicates whether the drive has been set up as a Hot Spare which will
automatically replace a failed disks in a storage pool.
• Health: The health of the drive may be:
immediately.
- Healthy
- Degraded
- In Service
- Predictive Failure: Visit WD Store to replace
• Capacity: The drive capacity.
• Description: The drive description
• Action: Action that can be performed on the identified drive.
- Buy: Click Buy to purchase a Preferred WD Drive.
WD SENTINEL DX4200
ADMINISTRATOR AND MAINTENANCE GUIDE
26
Page 31

MANAGING THE WD SENTINEL SERVER
Settings
The Settings Page allows you to register your device, update the device software, and
set up audible and email alerts. To open the Settings Page, click Settings on the
Navigation bar.
Product Registration
The Product Registration area allows you to register your device with WD. Registering your
device allows you to get the latest updates and special offers.
To register your device:
1. On the Settings page, click Register.
2. Complete the following fields on the WD Registration dialog:
First Name, Last Name: Enter your first and last name.
E-mail, Confirm E-mail: Enter your contact email, then reenter your email to
confirm that it is correct.
Partner ID: Enter your Partner ID, if you have one.
Select the Keep me up to date with important product updates and other
information checkbox.
3. Click Finish.
WD SENTINEL DX4200
ADMINISTRATOR AND MAINTENANCE GUIDE
27
Page 32

MANAGING THE WD SENTINEL SERVER
Software Updates
Periodically, WD issues software updates for your WD Sentinel server. The Software Update
area allows you to update WD Sentinel device software automatically or manually. Please
note that this area only allows you to apply software updates issued by WD.
A best practice to ensure that your system software stays current is to enable automatic
updates on your WD Sentinel server (See “Automatic Updates of WD Software”on
page 28).
Note: If your boot drive is rebuilding, the software will not allow you to update your device
until the rebuild is complete.
Manual Updates of WD Software
To check for software updates:
1. In the Software Updates area, click Check for Updates.
If a software update is available, click Install Update.
If there is no software update, click Cancel.
To update from a file:
1. Software update files can also be downloaded from the WD Support site at
http://support.wd.com.
2. Once you download the available firmware updates for the WD Sentinel server, unzip
the file to a folder on the server.
Note: Do not uses spaces when creating your folder name.
3. In the Software Updates area, click Update from Folder.
4. Locate the saved firmware update file on the server (folder name will be AllPackages),
then click OK. The system applies the software update.
If a system reboot is necessary, you will be required to manually restart your server
(See “Shutting Down and Rebooting the Server” on page 31).
Automatic Updates of WD Software
Enabling Automatic Updates on your WD Sentinel server causes the server to check for
available software updates from WD on a scheduled basis and applies the update
automatically.
To set a schedule for automatic updates:
1. In the Automatic Updates area, click Enable automatic updates.
2. Select the day and time you want the WD Sentinel server to check for updates every
week, and if an update is available, install it. (Example: every Sunday at 3:00 AM)
If a system reboot is necessary, you will be required to manually restart your server
(See “Shutting Down and Rebooting the Server” on page 31).
WD SENTINEL DX4200
ADMINISTRATOR AND MAINTENANCE GUIDE
28
Page 33

MANAGING THE WD SENTINEL SERVER
Setup Email Alerts
Receiving email alerts allows you to monitor certain server issues as they occur.
To setup email alerts:
1. In the Setup E-mail Alerts area, click Setup.
2. Select Enable E-mail alerts to send an email when an alert occurs on your device,
then complete the following fields:
a. E-mail Recipient: Enter the email addresses of those individuals who will receive
an email from your WD Sentinel when an alert occurs.
b. From E-mail Address: Enter the address from which the email will be sent.
(e.g. server@contasa.com).
c. Select one of the following options:
- Use WD SMTP Server: Select this option to use the WD SMTP server for
email.
- Use My SMTP Server: Select this option to use your own SMTP server for
email, then complete the following fields:
• Server Name: Enter the name of your SMTP server.
• Port: Enter the Port for your SMTP server.
• This server requires a secure connection (SSL): Select this option if the server requires a
secure connection.
• This server requires authentication: Select this option if the server requires authentication,
then complete the following fields:
- Username: Enter the authentication User Name for the identified server.
- Password: Enter the authentication Password for the identified server.
3. Select Send test e-mail to test the email you’ve set up for your alerts.
4. Click Save.
Audible Alerts
The Audible Alert provides aural notification from your WD Sentinel server when there are
warnings or critical alerts to the server.
To set and disable audible alerts:
1. In the Audible Alerts area, click the checkbox next to the type of alert for which you’d
like to hear an alarm.
Enable Critical beeps: The alarm sounds for all critical alerts.
Enable Warning beeps: The alarm sounds for all warning alerts.
Your audible alarm has been set. When an alert of the type you selected occurs, an
audible sound will emit from your WD Sentinel server.
2. To disable Audible Alerts, deselect the checkbox next to the alarm you’d like to
disable.
WD SENTINEL DX4200
ADMINISTRATOR AND MAINTENANCE GUIDE
29
Page 34

MANAGING THE WD SENTINEL SERVER
Help
The Help page identifies the software version, copyright information, and ways for you to get
help for your device. To open the Help Page, click Help on the Navigation bar.
About
The About area identifies the current version of the software.
Support
The Support area provides several options for obtaining assistance for your
WD Sentinel DX4200 device.
To access WD Customer Support:
1. Click Request Support. The Request Support window displays.
2. After reading the information on the screen, click the “I agree and would like to
proceed.” check box, then click Proceed. The WD Support Ask a Question page
displays.
Note: The first time you do this, an Internet Explorer Security Screen displays. Clear the
check box and click Close.
3. Complete the online form and click Submit Question. A diagnostic report of the
WD Sentinel server automatically attaches to the form. Your request is added to the
WD Support queue and assigned a confirmation number. You will receive an email
from WD Support regarding your question.
Important: For faster service/phone service, call WD Support. For the latest phone
numbers and contact information in your region, see “Contacting WD
Technical Support” on page iii or http://support.wd.com. Have your
confirmation number ready when you call.
To view a list of compatible drives for your device:
Click Compatible hard drives. The current list of compatible hard drives displays in
your browser.
WD SENTINEL DX4200
ADMINISTRATOR AND MAINTENANCE GUIDE
30
Page 35

MANAGING THE WD SENTINEL SERVER
Shutting Down and Rebooting the Server
The WD Sentinel server is intended to be on at all times, providing shared data. A best
practice is to avoid turning the unit off. However, if it does become necessary (for example,
moving the server to a different location or performing a software update), follow the
procedures below to shut down or restart the server.
It is very important that the WD Sentinel server be shut down or restarted in a clean and
graceful manner through the Windows Settings function.
WARNING! To avoid a potentially unclean shutdown that could corrupt the
configuration, shut down the server through Windows Settings.
To shut down or restart the WD Sentinel device (Preferred method):
1. On the Windows desktop, move your mouse to the lower right-hand corner of the
screen and click the Settings button.
2. Click Power, then select Shut down or Restart.
3. From the pull-down menu, select a reason for your shut down or restart, then click
Continue.
Note: You can also shut down your WD Sentinel server by double-tapping the power
button on the front of the device. The “Shutting Down” message displays on the
front of the unit.
WD SENTINEL DX4200
ADMINISTRATOR AND MAINTENANCE GUIDE
31
Page 36

5
MANAGING STORAGE ON THE WD SENTINEL SERVER
Managing Storage on the WD Sentinel Server
Storage Spaces
Setting Up Your Drives
Recovering from a Failed Drive
Storage Spaces
Storage Spaces is a Windows storage virtualization technology which succeeds Logical
Disk Manager and allows for the organization of physical disks into logical volumes similar to
Logical Volume Manager (Linux) or RAID levels 0, 1, 5, and 10, but at a higher abstraction
level.
A Storage Space behaves like a physical disk to the user, with optional thin provisioning. The
spaces are organized within a storage pool, i.e. a collection of physical disks, that can span
multiple disks of different sizes, performance or technology (USB, SATA). The same storage
pool can host multiple storage spaces. Storage Spaces have built-in resiliency from disk
failures, which is achieved by either disk mirroring or striping with parity across the physical
disks.
Setting Up Your Drives
Follow the steps outlined by in the Microsoft Storage Server Online Help to configure and
setup Storage Spaces on your WD Sentinel device.
Recovering from a Failed Drive
The WD Sentinel server lets you know when a drive fails in the following ways:
The LED above the bad drive is solid red.
The Power LED on the WD Sentinel server flashes red, indicating a serious fault.
An email Alert is posted if you have set it up to do so. (See “Setup Email Alerts” on
page 29.)
To recover from a failed drive:
1. Replace the drive (the one with the red LED over the drive) with an approved drive for
the WD Sentinel server (See “To view a list of compatible drives for your device:”on
page 30.)
2. Once replaced, follow the steps outlined by in the Microsoft Storage Server Online
Help to configure the WD Sentinel device using Storage Spaces.
WD SENTINEL DX4200
ADMINISTRATOR AND MAINTENANCE GUIDE
32
Page 37

6
BEST PRACTICES
Best Practices
Setting up the WD Sentinel Server
Using the WD Sentinel Server Efficiently
Replacing Drives
Shutting Down
The following practices help you use the WD Sentinel server and protect your data efficiently
and safely.
Setting up the WD Sentinel Server
Change the default name of WD Sentinel to something unique. This avoids
conflicts when another WD Sentinel server is added to your network in the future.
Make sure Ethernet 1 and Ethernet 2 are on the same network subnet.
Add the server to your domain. This allows users to use the same login and
password.
Make sure the password is stored in a safe place.
Set user password policy to at least medium security.
Enable Microsoft Automatic Updates to find and apply the latest Microsoft
software update.
Enable WD Automatic Updates to find and apply the latest WD software update.
Set up Automatic Alert Notification for real-time notifications of any problems with
the WD Sentinel server.
Do not remove the Windows page file! Some critical functions use the
system’s paging file. Removing the page file can potentially leave your system
unusable with the possibility of data loss. To maintain the reliability of your system
and its redundant resources, do not modify the paging file whatsoever.
Using the WD Sentinel Server Efficiently
The WD Sentinel server has many jobs to perform. Share data during business
hours, and back up the computers during hours of inactivity. Keep the server
powered on 24/7 to do its work.
Always use the WD Sentinel device with a UPS.
Enable email alerts. Receiving your alerts by email allows you to monitor certain
server issues as they occur.
Replacing Drives
When a data drive is removed, Storage Spaces will be degraded if another data
drive fails or is removed. Only remove one drive at a time between rebuilds. Once a
failed drive is replaced, manually rebuild the drive using Server Manager.
Avoid pulling a drive out unless there is a failure.
When a data drive needs replacement, the WD Sentinel server is still functional but
is subject to a second drive failure that would result in the loss of data. To minimize
this vulnerable time, a good practice is to have another drive ready to replace the
failed drive.
WD SENTINEL DX4200
ADMINISTRATOR AND MAINTENANCE GUIDE
33
Page 38

Shutting Down
Unclean shutdowns are hard on your system. To assure that the unit always
experiences clean shutdowns and the best data integrity, use an Uninterruptible
Power Supply (UPS).
To avoid possible corruption, do not unplug the power from the unit while it is
running.
BEST PRACTICES
WD SENTINEL DX4200
ADMINISTRATOR AND MAINTENANCE GUIDE
34
Page 39

7
TROUBLESHOOTING
Troubleshooting
First Steps Checklist
Specific Problems and Corrective Actions
For any issue, first ensure that you are using the latest firmware for the
WD Sentinel server. See “Software Updates” on page 28 for instructions.
First Steps Checklist
Is the power supply plugged in to the wall outlet and the server?
Are all cables correctly connected and secured?
Is the power on? If not, see “LEDs” on page 10.
Specific Problems and Corrective Actions
The following section contains specific problems that may arise during the use of the
WD Sentinel server and provides possible solutions.
LEDs do not light up
1. Make sure the power cord is connected correctly.
2. Make sure that the wall outlet has power. Test it by plugging in another device.
3. Confirm the network cable is properly connected to the WD Sentinel server and the
network switch or router.
4. Make sure the network switch or router has power.
5. Use a different network cable and port on the network switch or router. Temporarily
swapping the WD Sentinel’s cable port with a working network device may identify any
failing cables and ports.
LCD Messages
The LCD displays various messages for you to review. Provided below is a list of messages,
a description of the message and possible responses for that message.
LCD Description Troubleshooting
<Host Name> Displays the name of your
WD Sentinel server.
<IP Address> Displays the IP address of your
WD Sentinel server.
N/A
If the IP address does not display,
ensure that your device is
connected by ethernet cable to
your router.
BIOS Corrupted Your BIOS is corrupted Contact Technical Support for
assistance.
BIOS Degraded Your BIOS is degraded The system is unable to boot from
the primary BIOS and is currently
running on the secondary BIOS.
WD SENTINEL DX4200
ADMINISTRATOR AND MAINTENANCE GUIDE
35
Page 40

LCD Description Troubleshooting
TROUBLESHOOTING
BIOS Repaired
Reboot
Required
BIOS Updated
Reboot
Required
Your system is currently running on
the secondary BIOS. A reboot is
required to attempt a repair of your
BIOS.
The primary BIOS has been
updated, A system reboot is
required.
Your system is running on the
secondary BIOS. An attempt will be
made during the reboot to run the
system on the primary BIOS.
Reboot the system. This allows the
updated BIOS to take affect.
BIOS Updating The BIOS is updating. Your system BIOS is currently
updating. Do not disconnect the
power or interrupt the process until
the update is complete.
Boot Drive
<Drive Name>
Over Temp
Boot Volume
Degraded
The operating system (OS) boot
drive has exceeded the normal
operating temperature.
One of the operating system (OS)
drives has failed. The system will
operate but in a degraded state.
Check the airflow around your
device and the system fan
operation.
Replace the identified boot drive.
• Access WD StorCentral (See “WD
StorCentral” on page 18).
• Click Storage on the navigation
bar.
• In the Allocated Capacity area,
select your boot drive.
• In the Action column, select Buy.
• Obtain and install a compatible
boot drive.
Drive Count Displays the number of drives
currently on your device.
The total drive count in the system.
This includes the boot drive(s) and
the data drives.
Drive Failed One of the data drives failed. Your boot drive(s) is currently
running in RAID protection mode.
Replace the failed drive.
• Access WD StorCentral (See “WD
StorCentral” on page 18).
• Click Storage on the navigation
bar.
• In the Allocated Capacity area,
select the failed drive.
• In the Action column, select Buy.
• Obtain and install a compatible
boot drive.
Drive Over Temp The data drive has exceeded the
normal operating temperature.
Check the airflow around your
device and the system fan
operation.
Ethernet
<port #>
Ethernet port 1 or port 2 is
disconnected.
Reconnect the ethernet cable to
the identified port.
Disconnected
Fan Failed The system’s fan has failed. The fan has failed. Replace the
failed fan.
WD SENTINEL DX4200
ADMINISTRATOR AND MAINTENANCE GUIDE
36
Page 41

LCD Description Troubleshooting
TROUBLESHOOTING
Imminent Drive
Failure
S.M.A.R.T early detection found a
premature drive failure condition on
one of the data drives.
Imminent
Failure Boot
Drive <Drive
S.M.A.R.T early detection found a
premature drive failure condition on
one of the boot drives.
Name>
Invalid Drive The inserted drive is not compatible
with the device.
Invalid Drive
Capacity
The new drive capacity is either
greater or smaller than the drive you
replaced.
Network
Disconnected
Power Supply
The ethernet port does not have
network activity.
Power supply 1 or 2 failed. Replace the defective power
<Supply #>
Failed
Replace the defective drive as soon
as possible to stop RAID from
going into a degraded state.
Replace the defective drive as soon
as possible to stop RAID from
going into a degraded state.
Replace the inserted drive with an
approved drive. For a complete list
of approved drive models, search
for Answer ID 9443 in the WD
Knowledge Base at
http://support.wd.com.
Replace the inserted drive with a
drive that has the correct drive
capacity.
Restore network connectivity.
supply.
• Access WD StorCentral (See “WD
StorCentral” on page 18)
• Click Health on the navigation bar.
• Check the Power Supply area to
review the status of your power
supply.
• Obtain and install a compatible
power supply.
Reboot
The system requires a reboot. Safely reboot the system.
Required
Software
Update
The software update process is
complete.
Complete
Software
Update
A software update is being
downloaded to the system.
Downloading
WD Software
Update
There is a WD software update
available for download.
Available
WD Software
The WD software update failed. Repeat the Software update
Update Failed
WD SENTINEL DX4200
ADMINISTRATOR AND MAINTENANCE GUIDE
Check the System Alerts in
WD StorCentral to verify the
completion of the software update.
Allow the process to fully complete.
No action is required.
See “Software Updates” on
page 28 to access and perform the
update.
process again.
37
Page 42

REGULATORY AND WARRANTY INFORMATION
Regulatory and Warranty Information
8
Regulatory Compliance
Limited Warranty
Regulatory Compliance
FCC Class B Information
Operation of this device is subject to the following conditions:
This device may not cause harmful interference.
This device must accept any interference received, including interference that may
cause undesired operation.
This device has been tested and found to comply with the limits of a Class B digital device,
pursuant to Part 15 of the FCC Rules. These limits are designed to provide reasonable
protection against harmful interference in a residential installation. This unit generates, uses,
and can radiate radio frequency energy and, if not installed and used in accordance with the
instructions, may cause harmful interference to radio or television reception. However, there
is no guarantee that interference will not occur in a particular installation. If this equipment
does cause harmful interference to radio or television reception, which can be determined
by turning the equipment off and on, you are encouraged to try to correct the interference by
one or more of the following measures:
Reorient or relocate the receiving antenna.
Increase the separation between the equipment and the receiver.
Connect the equipment into an outlet or a circuit different from that to which the
receiver is connected.
Consult the dealer or an experienced radio/television technician for help.
Any changes or modifications not expressly approved by WD could void the user's authority
to operate this equipment.
Changes or modifications not expressly approved by the party responsible for compliance
could void the user’s authority to operate the equipment.
ICES/NMB-3 (B) Compliance
Cet appareil de la classe B est conforme à la norme NMB-3 (B) du Canada.
This device complies with ICES-3 (B).
WD SENTINEL DX4200
ADMINISTRATOR AND MAINTENANCE GUIDE
38
Page 43

REGULATORY AND WARRANTY INFORMATION
(p y)
ὤ㦹ⷸ ㇠㟝㣄G㙼⇨ⱬ
ἽGὤὤ
ᴴ㥉㟝G㥉⸨䋩㐔ὤὤ
㢨Gὤὤ⏈Gᴴ㥉㟝㡰⦐G㤸㣄䑀㤵䚝㻝㦥㡸G䚐Gὤὤ
⦐㉐G㨰ᶤ㫴㜡㜄㉐⏈GⱰ⦔G⯜☔G㫴㜡㜄㉐G㇠㟝䚔
㍌G㢼㏩⏼␘U
ὤ㦹ⷸ ㇠㟝㣄G㙼⇨ⱬ
Safety Compliance
Approved for US and Canada. CAN/CSA-C22.2 No. 60950-1: Safety of Information
Technology Equipment.
Approuvé pour les Etats-Unis et le Canada. CAN/CSA-C22.2 No. 60950-1: Sûreté
d'équipement de technologie de l'information.
This product is intended to be supplied by a listed limited power source, double insulated, or
direct plug-in power unit marked “Class 1.”
CAUTION! Danger of explosion if the battery is incorrectly replaced. Replace only
with the same or equivalent type recommended by the equipment manufacturer.
Dispose of used batteries according to manufacturer’s instructions.
CE Compliance for Europe
Verified to comply with EN55022 for RF emission; EN-55024 for Generic Immunity, as
applicable; and EN-60950-1 for Safety.
KC Notice (Republic of Korea only)
iGἽὤὤ
Oᴴ㥉㟝ⵝ㋕䋩㐔ὤ㣄㣠PG
Class B Device 1 Please note that this device has been approved for non-business purposes and may be used in
any environment, including residential areas.
Korean KCC certification ID: MSIP-REM-WDT-D8C
ɋɜɟɞɟɧɢɹ ɞɥɹ Ɍɚɦɨɠɟɧɧɨɝɨ ɋɨɸɡɚ (ɬɨɥɶɤɨ ɞɥɹ Ɋɨɫɫɢɢ)
Ʉɨɨɪɞɢɧɚɬɵ ɞɥɹ ɫɜɹɡɢ ɩɨ ɜɨɩɪɨɫɚɦ Ɍɚɦɨɠɟɧɧɨɝɨ ɋɨɸɡɚ:
ɈɈɈ «Ⱦɨɮɢɧ»
Ɋɨɫɫɢɹ, 140573, Ɇɨɫɤɨɜɫɤɚɹ ɨɛɥɚɫɬɶ, Ɉɡɟɪɫɤɢɣ ɪɚɣɨɧ, ɫɟɥɨ Ȼɨɹɪɤɢɧɨ
Ƚɨɥ ɭ ɛɨɜɚ Ʌ.ɇ.
+7 495 223 6008
local.declarant@gmail.com
Ⱦɚɬɚ ɢɡɝɨɬɨɜɥɟɧɢɹ ɭɤɚɡɚɧɚ ɧɚ ɦɚɪɤɢɪɨɜɤɟ ɨɛɨɪɭɞɨɜɚɧɢɹ.
(Manufacturing date marked on the equipment.)
VCCI Statement
㢨ὤὤ⏈ᴴ㥉㟝OiGἽPG㤸㣄䑀㤵䚝ὤὤ⦐㉐㨰⦐
ᴴ㥉㜄㉐㇠㟝䚌⏈ᶷ㡸⯝㤵㡰⦐䚌⮤SG⯜☔㫴㜡㜄
㉐㇠㟝䚔㍌㢼㏩⏼␘
WD SENTINEL DX4200
ADMINISTRATOR AND MAINTENANCE GUIDE
39
Page 44

REGULATORY AND WARRANTY INFORMATION
Environmental Compliance (China)
Obtaining Service
WD values your business and always attempts to provide you the very best of service. If this
Product requires maintenance, either contact the dealer from whom you originally
purchased the Product or visit our product support website at http://support.wd.com for
information on how to obtain service or a Return Material Authorization (RMA). If it is
determined that the Product may be defective, you will be given an RMA number and
instructions for Product return. An unauthorized return (i.e., one for which an RMA number
has not been issued) will be returned to you at your expense. Authorized returns must be
shipped in an approved shipping container, prepaid and insured, to the address provided on
your return paperwork. Your original box and packaging materials should be kept for storing
or shipping your WD product. To conclusively establish the period of warranty, check the
warranty expiration (serial number required) via http://support.wd.com. WD shall have no
liability for lost data regardless of the cause, recovery of lost data, or data contained in any
Product placed in its possession.
Limited Warranty
WD warrants that the Product, in the course of its normal use, will for the term defined
below, be free from defects in material and workmanship and will conform to WD's
specification therefor. The term of your limited warranty depends on the country in which
your Product was purchased. The term of your limited warranty is for 2 years in the North,
South and Central America region, 2 years in the Europe, the Middle East and Africa region,
and 2 years in the Asia Pacific region, unless otherwise required by law. The term of your
limited warranty period shall commence on the purchase date appearing on your purchase
receipt. WD may at its discretion make extended warranties available for purchase. WD shall
have no liability for any Product returned if WD determines that the Product was stolen from
WD or that the asserted defect a) is not present, b) cannot reasonably be rectified because
of damage occurring before WD receives the Product, or c) is attributable to misuse,
improper installation, alteration (including removing or obliterating labels and opening or
removing external enclosures, including the mounting frame, unless the product is on the list
of limited user-serviceable products and the specific alteration is within the scope of the
applicable instructions, as found at
the possession of someone other than WD. Subject to the limitations specified above, your
sole and exclusive warranty shall be, during the period of warranty specified above and at
WD's option, the repair or replacement of the Product with an equivalent or better Product.
The foregoing warranty of WD shall extend to repaired or replaced Products for the balance
of the applicable period of the original warranty or ninety (90) days from the date of shipment
of a repaired or replaced Product, whichever is longer. The foregoing limited warranty is
WD's sole warranty and is applicable only to products sold as new. The remedies provided
herein are in lieu of a) any and all other remedies and warranties, whether expressed, implied
or statutory, including but not limited to, any implied warranty of merchantability or fitness for
a particular purpose, and b) any and all obligations and liabilities of WD for damages
http://support.wd.com, accident or mishandling while in
WD SENTINEL DX4200
ADMINISTRATOR AND MAINTENANCE GUIDE
40
Page 45

REGULATORY AND WARRANTY INFORMATION
including, but not limited to accidental, consequential, or special damages, or any financial
loss, lost profits or expenses, or lost data arising out of or in connection with the purchase,
use, or performance of the Product, even if WD has been advised of the possibility of such
damages. In the United States, some states do not allow exclusion or limitations of
incidental or consequential damages, so the limitations above may not apply to you. This
warranty gives you specific legal rights, and you may also have other rights which vary from
state to state.
WD SENTINEL DX4200
ADMINISTRATOR AND MAINTENANCE GUIDE
41
Page 46

9
APPENDIX
Appendix
Hardware Replacement Procedures
WD Sentinel DX4200 Administrator Reference Sheet
Hardware Replacement Procedures
Before You Begin
Replacing a Hard Drive
Removing the Unit Cover
Replacing the SODIMM Memory Module
Adding a Boot Drive
This chapter provides the steps necessary to replace the following components designed for
replacement for the WD Sentinel DX4200.
Hard Drive
Fan
SODIMM Memory Module
Power Supply
Boot Drive
Before You Begin
Ensure that you have the correct replacement unit.
Review the procedures before beginning to replace a part.
WD SENTINEL DX4200
ADMINISTRATOR AND MAINTENANCE GUIDE
42
Page 47

APPENDIX
Replacing a Hard Drive
It is simple to replace a drive in your WD Sentinel server. First, make sure to go to the
WD Store to purchase a compatible replacement drive. For a complete list of approved drive
models, search for Answer ID 9443 in the WD Knowledge Base at http://support.wd.com.
1. The drives in the WD Sentinel server are “hot swappable.” This means that the
WD Sentinel server can remain powered on while you replace the drive.
2. Once replaced, follow the steps outlined by in the Microsoft Storage Server Online
Help to configure the WD Sentinel device using Storage Spaces.
Drive Categories
Provided below is a description of the category of hard drives you can use to replace an
existing drive.
WD StorCentral Storage page in the Catagory column.
Hard Drive Catagory Description
Preferred Preferred drives preform optimally with your device and should
Supported Supported drives are not the optimal drives for your device but are
Unsupported Unsupported drives have not been tested with this device and
The type of drive used in your device can be found on the
always be used whenever possible. Preferred drives are fully
tested and approved for use with your device.
part of the same drive family. These drives are not fully tested with
this device.
should be used at your own risk. The LED on the front of your
device is Red.
WARNING! WD is not responsible for data loss due
to the use of unsupported drives.
Unsupported drives must be enabled before the drive can be
used with your device. If you choose to use an unsupported hard
drive, use the following steps after the drive has been replaced in
the device to enable the drive.
Note: There are certain unsupported hard drives that you cannot
1. Access WD StorCentral.
2. On the Navigation bar, select Storage, if not already
3. In the Unallocated Capacity area, click the box identifying the
4. Click Enable, located to the Action column.
5. Read the alert disclaimer, then select Ye s if you’d like to
6. Follow the steps outlined by in the Microsoft Storage Server
enable. For those drives, there is a Learn More link with
information on how to obtain a WD preferred drive.
selected.
unsupported drive. Unsupported displays in red in the
Category column of the Unallocated Capacity Details area.
enable your current unsupported drive.
Online Help to configure the WD Sentinel device using
Storage Spaces.
WD SENTINEL DX4200
ADMINISTRATOR AND MAINTENANCE GUIDE
43
Page 48

What you’ll Need:
Replacement hard drive
Replacing a Hard Drive
Use the following steps to replace a drive in your WD Sentinel server.
1. Unlock and open the drive door (Figure 1).
APPENDIX
Figure 1. Open drive door
2. For a failed drive, verify that the LED for the failed drive is solid red.
3. Pull the handle on the front of the hard drive toward you.
4. When it snaps open, pull the hard drive toward you to remove it. (Figure 2).
Figure 2. Remove hard drive
WD SENTINEL DX4200
ADMINISTRATOR AND MAINTENANCE GUIDE
44
Page 49

APPENDIX
5. Slide the approved replacement drive into the drive bay, making sure that it is properly
seated and is facing the correct direction.
Figure 3. Replace hard drive
6. Using some force, snap the drive handle shut.
7. Close and lock the door on the front of the server, making sure it snaps shut.
8. Follow the steps outlined by in the Microsoft Storage Server Online Help to configure
and setup your new data drive.
WD SENTINEL DX4200
ADMINISTRATOR AND MAINTENANCE GUIDE
45
Page 50

APPENDIX
Replacing a Server Fan
When a fan requires replacement, you will receive an email Alert indicating that there is a
problem with the WD Sentinel server fan.
The fan in the WD Sentinel server are “cold swappable.” This means that the WD Sentinel
server must be shut down prior to your fan replacement. To shut down your WD Sentinel
server, follow the steps outline in “Shutting Down and Rebooting the Server” on page 31.
Important: To avoid electrostatic discharge (ESD) problems, ground yourself by
touching metal before handling the device.
What you’ll Need:
Phillips screwdriver
Replacement server fan
Replacing a Server Fan
1. Shut down the server.
2. Disconnect all external connections.
3. Place the unit on a clean and stable surface.
4. On the back of the unit, loosen and remove the four (4) Fan Plate mounting screws
(Figure 5).
Figure 4. Remove Fan Plate mounting screws
WD SENTINEL DX4200
ADMINISTRATOR AND MAINTENANCE GUIDE
46
Page 51

APPENDIX
5. Carefully lower the fan plate toward you then lift the fan plate out of the unit (Figure 5).
Figure 5. Remove fan
WARNING! Before removing the fan plate completely from the unit, detach the fan
interface connector from the back plane PCBA.
6. Gently place the replacement fan into the unit, ensuring that the orientation of the fan
is correct and that the fan interface connector is connected.
7. Replace and tighten the four (4) Fan Plate mounting screws.
8. Do not over-tighten the mounting screws.
9. Reconnect all of the cables for the device.
10. Restart the server.
Important: Do not disassemble the fan. Return the entire assembly intact to WD, if
instructed to do so.
WD SENTINEL DX4200
ADMINISTRATOR AND MAINTENANCE GUIDE
47
Page 52

APPENDIX
Removing the Unit Cover
Use the following steps remove the cover on the WD Sentinel DX4200 device. These steps
are necessary to replace certain internal parts.
Important: To avoid electrostatic discharge (ESD) problems, ground yourself by
touching metal before handling the device.
To shut down your WD Sentinel server, follow the steps outline in “Shutting Down and
Rebooting the Server” on page 31.
What you’ll Need:
Phillips screwdriver
Removing the Unit Cover
1. Before getting started, shut down the server and disconnect all external connections.
2. Place the unit on a clean and stable surface, with the back of the unit facing you.
3. Release five (5) screws on the back of the unit (Figure 6).
Figure 6. Unscrew and remove unit cover
4. Pull the unit cover toward you up to release the cover.
(Figure 6).
WD SENTINEL DX4200
ADMINISTRATOR AND MAINTENANCE GUIDE
48
Page 53

APPENDIX
Replacing the SODIMM Memory Module
The SODIMM memory module in the WD Sentinel server is “cold swappable.” This means
that the WD Sentinel server must be shut down prior to your module replacement. To shut
down your WD Sentinel server, follow the steps outline in “Shutting Down and Rebooting the
Server” on page 31.
For details about the memory module, memory types, and drive requirements, search for
Answer ID 9999 in the WD Knowledge Base at http://support.wd.com
.
Important: To avoid electrostatic discharge (ESD) problems, ground yourself by
touching metal before handling the device.
What you’ll Need:
Phillips screwdriver
Replacement SODIMM Memory module
Replacing a SODIMM Memory Module
1. Shut down the server.
2. Disconnect all external connections.
3. Follow the steps outlined in “Removing the Unit Cover” on page 48.
4. Disconnect all cables attached to the assembly.
Video
Connector
Display
Connector
Important: Ensure that you carefully lift the ZIF connector gate and remove the ZIF
Display Connector.
WD SENTINEL DX4200
ADMINISTRATOR AND MAINTENANCE GUIDE
49
Page 54

APPENDIX
5. On the top of the unit, loosen and remove the six (6) screws holding the PCBA unit in
place.
Figure 7. Remove screws from PCBA unit
6. Carefully lift the PCBA up and away from the rest of the unit, then gently place the
flipped assembly on a stable flat surface.
WARNING! Ensure that the connector clears the plate when removing the
assembly.
7. Remove and replace or add additional 2PL-SODIMM module(s).
Note: This unit uses memory in coordinated pairs and are color-coded. For a list of
valid memory configurations, search for Answer ID 9999 in the WD Knowledge Base
at http://support.wd.com.
Figure 8. Replace 4PL-SODIMM module
WD SENTINEL DX4200
ADMINISTRATOR AND MAINTENANCE GUIDE
50
Page 55

APPENDIX
8. Once the 2PL-SODIMM module has been added or updated, replace the PCBA back
on the WD Sentinel device, ensuring that the cables are again attached to the
assembly and that the PCBA is properly seated. Replace and tighten the six (6) screws
holding the PCBA in place.
Note: Do not over-tighten the PCBA screws.
9. Replace the unit cover and replace and tighten the five (5) exterior screws.
Note: Do not over-tighten the exterior screws.
10. Connect all external connections.
11. Restart the server.
WD SENTINEL DX4200
ADMINISTRATOR AND MAINTENANCE GUIDE
51
Page 56

APPENDIX
Adding a Boot Drive
The WD Sentinel server comes a 2.5-inch boot drive pre-installed with Windows Storage
Server 2012 R2 Workgroup and specialized hardware services and drivers. The pre-installed
boot drive(s) provides the ability to keep the OS running from the boot drive while
redeploying or changing applications and folders running on the large capacity data drives.
The boot drive in the WD Sentinel DS5100 server are “cold swappable.” This means that the
WD Sentinel server must be shut down prior to adding a boot drive. To shut down your WD
Sentinel server, follow the steps outline in “Shutting Down and Rebooting the Server” on
page 31.
Important: To avoid electrostatic discharge (ESD) problems, ground yourself by
touching metal before handling the device.
What you’ll Need:
Phillips screwdriver
Boot Drive kit
Adding a Boot Drive
1. Shut down the server.
2. Disconnect all external connections.
3. Follow the steps outlined in “Removing the Unit Cover” on page 48.
4. Using a Phillips screwdriver, attach the brace bar to the boot drive.
5. On the right or left side of the unit, find an empty bracket for your boot drive.
Empty boot drive
bracket
6. With the boot drive pins facing the back of the device, gently push your boot drive into
the empty boot drive bracket.
7. Place and tighten two (2) screws, attaching the brace bar on the boot drive to the unit.
8. Replace the unit cover and replace and tighten the five (5) exterior screws.
Note: Do not over-tighten the exterior screws.
9. Connect all external connections.
10. Restart the server.
WD SENTINEL DX4200
ADMINISTRATOR AND MAINTENANCE GUIDE
52
Page 57

APPENDIX
WD Sentinel DX4200 Administrator Reference Sheet
Provided below is a reference sheet that allows you to keep all of the useful information
associated with your WD Sentinel DX4200 server in one location. Enter the information
identified below and keep this checklist in a safe location for future reference.
WD Sentinel DX4200 Server Name:__________________________________
WD Sentinel DX4200 IP Address:
Static IP Address: ____________________________________________
Dynamic IP Address: _________________________________________
WD Sentinel DX4200 Server Password:____________________________
User Name: ____________________________________
Domain Name: __________________________________
WD SENTINEL DX4200
ADMINISTRATOR AND MAINTENANCE GUIDE
53
Page 58

INDEX
Index
A
accessing WD StorCentral 18
accessories 5
Administrator Reference Sheet 53
Administrator responsibility 12
Allocated / Unallocated Capacity 25
audible alerts 29
automatically updating WD software
28
B
best practices
replacing drives 33
setting up WD Sentinel DX4200 33
shutting down 34
using efficiently 33
Boot Drive
adding 52
C
China RoHS 40
compliance 38
regulatory 38
safety 39
connecting your device 13
Customer Support
contacts ii
D
DC In connector 10
description of WD Sentinel DX4200 3
document conventions 2
Domain Information 22
drives
setting up your 32
E
email alerts 29
enabling an unsupported drive 43
environmental compliance (China) 40
ethernet ports 10
F
failed drive
recovering 32
fan
replacing 46
FCC Class B information 38
H
handling precautions 2
hard drive
replacing 43
help
where to find 11
I
ICES/NMB-3(B) compliance 38
indicators 10
K
KC Notice 39
Kensington security slot 10
key features 3
L
LCD Messages 35
LED indications 10
Drive LEDs 10
Ethernet Port 10
Power LED 10
M
Managing Storage 25
N
Network 22
O
office uses 12
online product registration ii
operating system requirements 6
P
package contents 5
password
Administrator 12
Power Supply 24
product information
recording 2
Product Registration 27
product registration ii
R
recovering a failed drive 32
recovery button 10
reference resources 11
registration, online ii
regulatory compliance 38
removing the server cover 48
requirements
operating systems 6
RoHS 40
WD SENTINEL DX4200
ADMINISTRATOR AND MAINTENANCE GUIDE
54
Page 59

INDEX
S
safety compliance 39
safety instructions 1
scheduling WD software updates 28
server
setting up 18
shutting down 31
server fan
replacing 46
service
obtaining 40
setting up your server 14
shutting down the server 31
software updates 28
WD 28
specifications 7
storage
managing 32
Storage Spaces 32
Storage Spaces
storage 32
System Alerts 21
system capacity 20
System information 23
System Utilization 21
T
technical specifications 7
Technical Support contacts list ii
troubleshooting
checklist 35
drive not connecting to network 35
LEDs do not light up 35
U
unsupported drives
enabling 43
updates
software 28
updating WD Software 28
USB ports 10
user assistance 11
user roles and responsibilities 12
warning
lithium battery 1
unclean shutdown 31
unsupported drives 26
WD limited warranty 40
WD Sentinel DX4200
back view 9
components 10
connecting to your network (preferred
method) 13
front view 8
how it fits into your office 12
Key Features 3
package contents 5
setting up 14
shutting down 31
WD Sentinel DX4200 Administrator Refer-
ence Sheet 53
WD Service 40
WD software
automatic updates 28
manual updates 28
WD StorCentral
accessing 18
domain information 22
Health page 22
Help page 30
Home page 20
Navigation Bar 19
network 22
power supply 24
Settings page 27
Storage page 24
system 23
system alerts 21
System Capacity 20
system utilization 21
V
VCCI Statement 39
VGA port 10
W
Warning
unsupported drives 43
WD SENTINEL DX4200
ADMINISTRATOR AND MAINTENANCE GUIDE
55
Page 60

Information furnished by WD is believed to be accurate and reliable; however, no responsibility is assumed by
WD for its use nor for any infringement of patents or other rights of third parties which may result from its use.
No license is granted by implication or otherwise under any patent or patent rights of WD. WD reserves the
right to change specifications at any time without notice.
Western Digital, WD, and the WD logo are registered trademarks of Western Digital Technologies, Inc. in the
U.S. and other countries; WD Sentinel is a trademark of Western Digital Technologies, Inc in the U.S. and
other countries. Other marks may be mentioned herein that belong to other companies.
© 2014 Western Digital Technologies, Inc. All rights reserved.
Western Digital Corporation
3355 Michelson Drive, Suite 100
Irvine, California 92612 U.S.A.
.
4779-705131-A00 September 2014
 Loading...