

Page 1
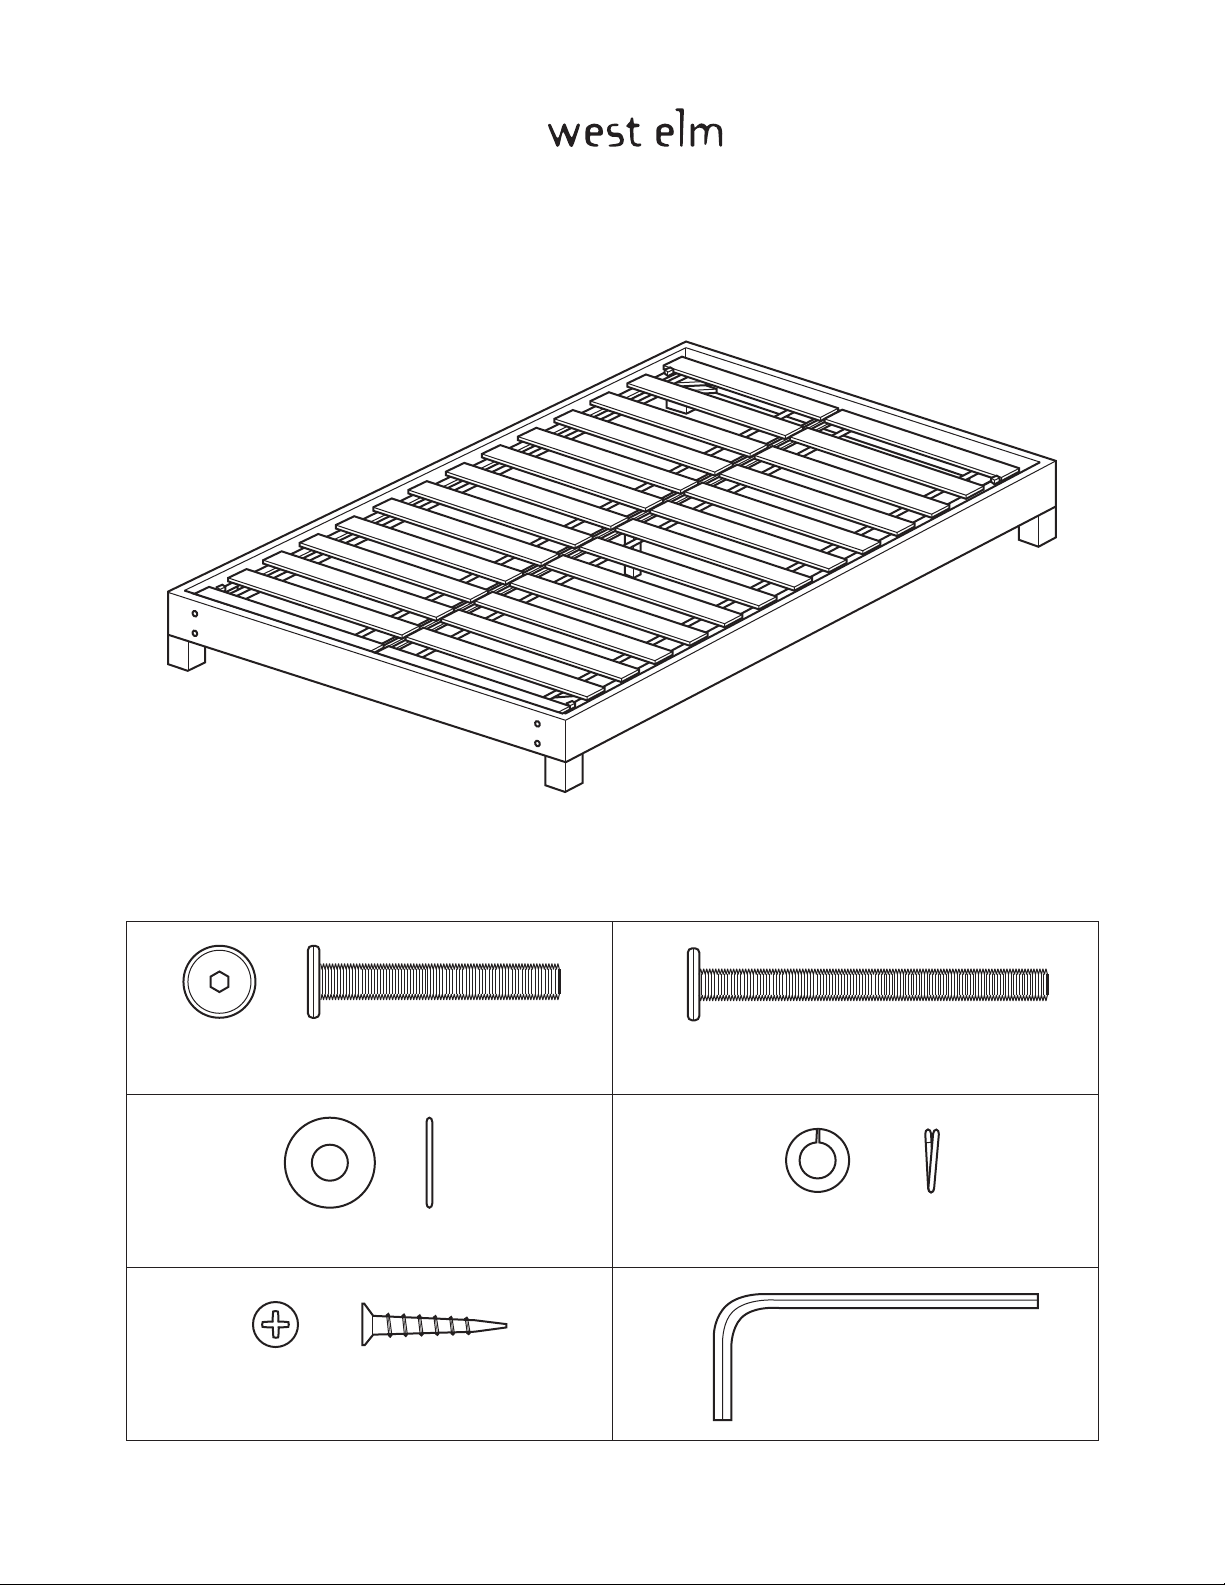
: wood bed frame
assembly instructions
A
bolt: 1/4”DIA x 1 3/4”
4x
C
metal washer
4x
E
screw: 5/16”DIA x 1 1/4”
708689/7086846/7086218/7085798/8281388/7086903/7002991/7002868/7001860/7329410/6957922/6957914/6957898/6957856/
7329188/7870009/7869977/7869944/7868805/7868615 - 03/07
4x
B
D
F
bolt: 1/4”DIA x 2 1/2”
lock washer
allen key
22x
26x
1x
page 1 of 10
Page 2
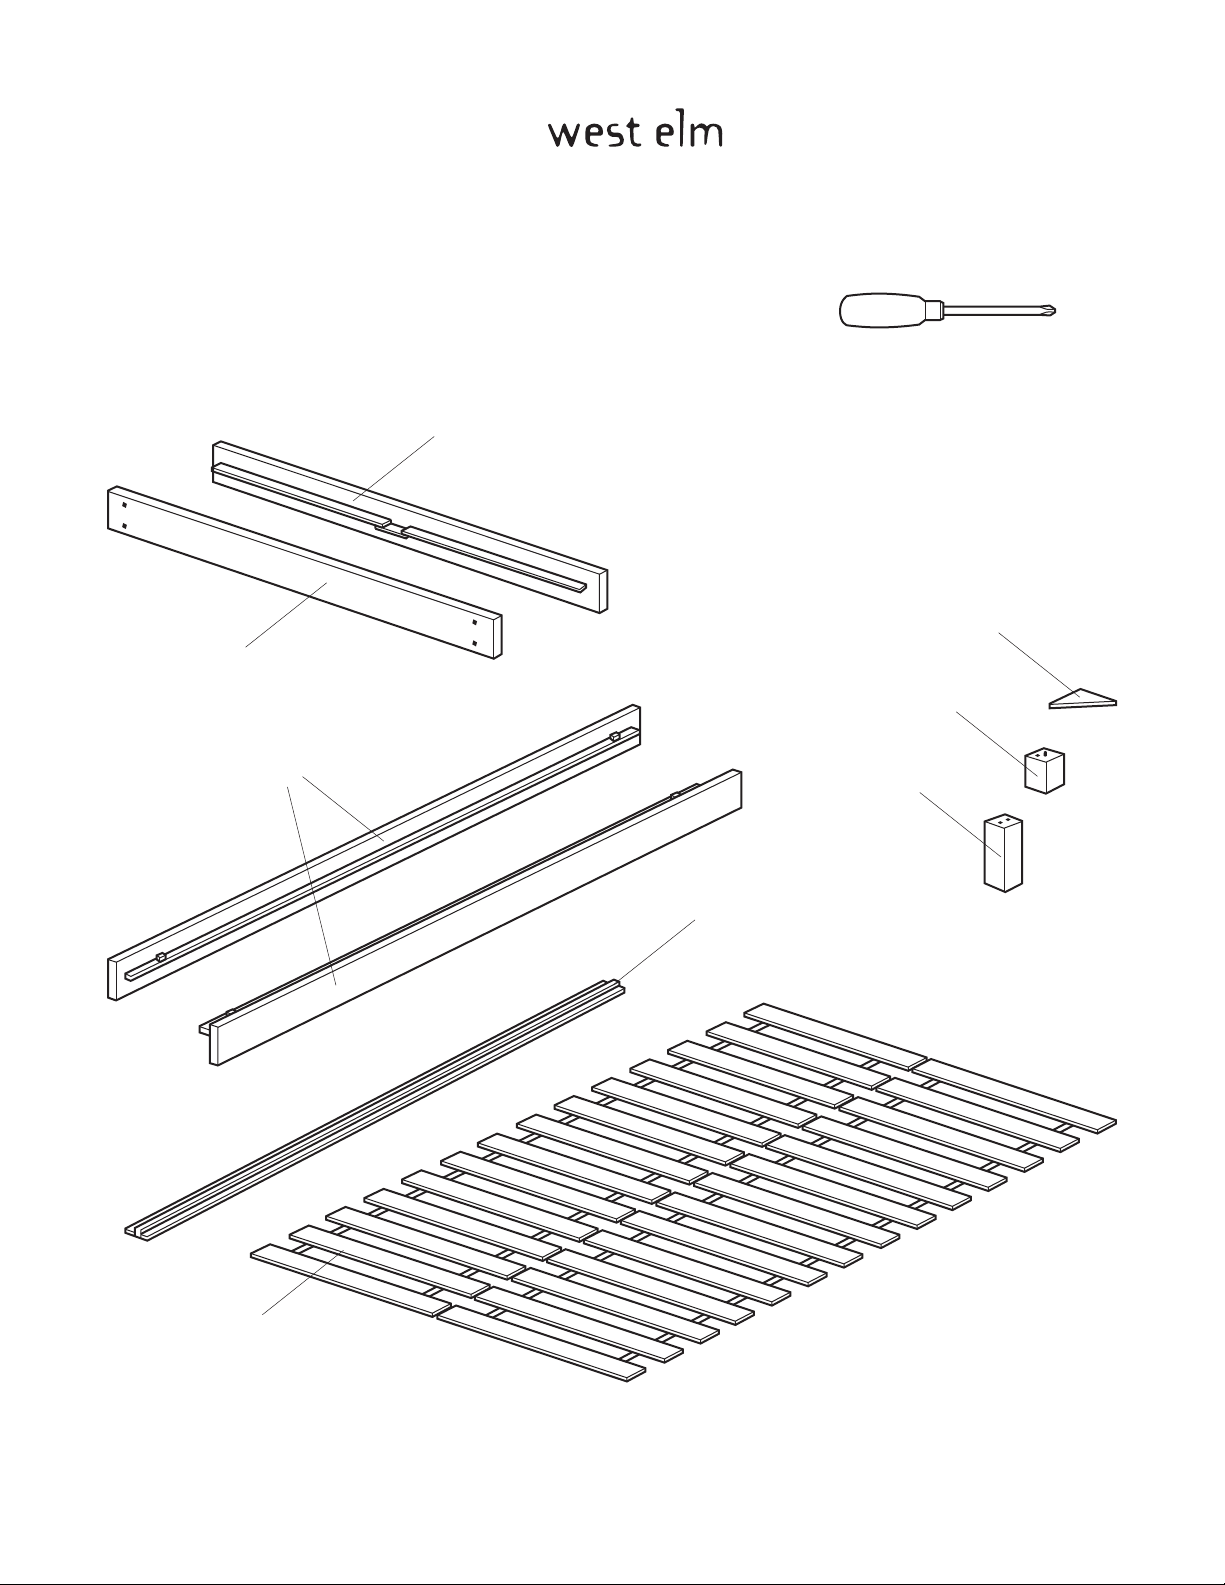
: wood bed frame
assembly instructions
! Tools required:
! Do not throw away packaging materials until
assembly is complete.
headboard
bedsides (2x)
footboard
! Assemble this item on a soft surface, such as
cardboard or carpet, to protect the finish.
corner support (8x)
corner leg (4x)
center leg (3x)
(cal king, king,
queen and
full sizes only)
center support
(cal king, king, queen and full sizes only)
bedslats
(cal king, king, queen and full sizes
have 2 sets. twin size has one set.)
708689/7086846/7086218/7085798/8281388/7086903/7002991/7002868/7001860/7329410/6957922/6957914/6957898/6957856/
7329188/7870009/7869977/7869944/7868805/7868615 - 03/07
page 2 of 10
Page 3
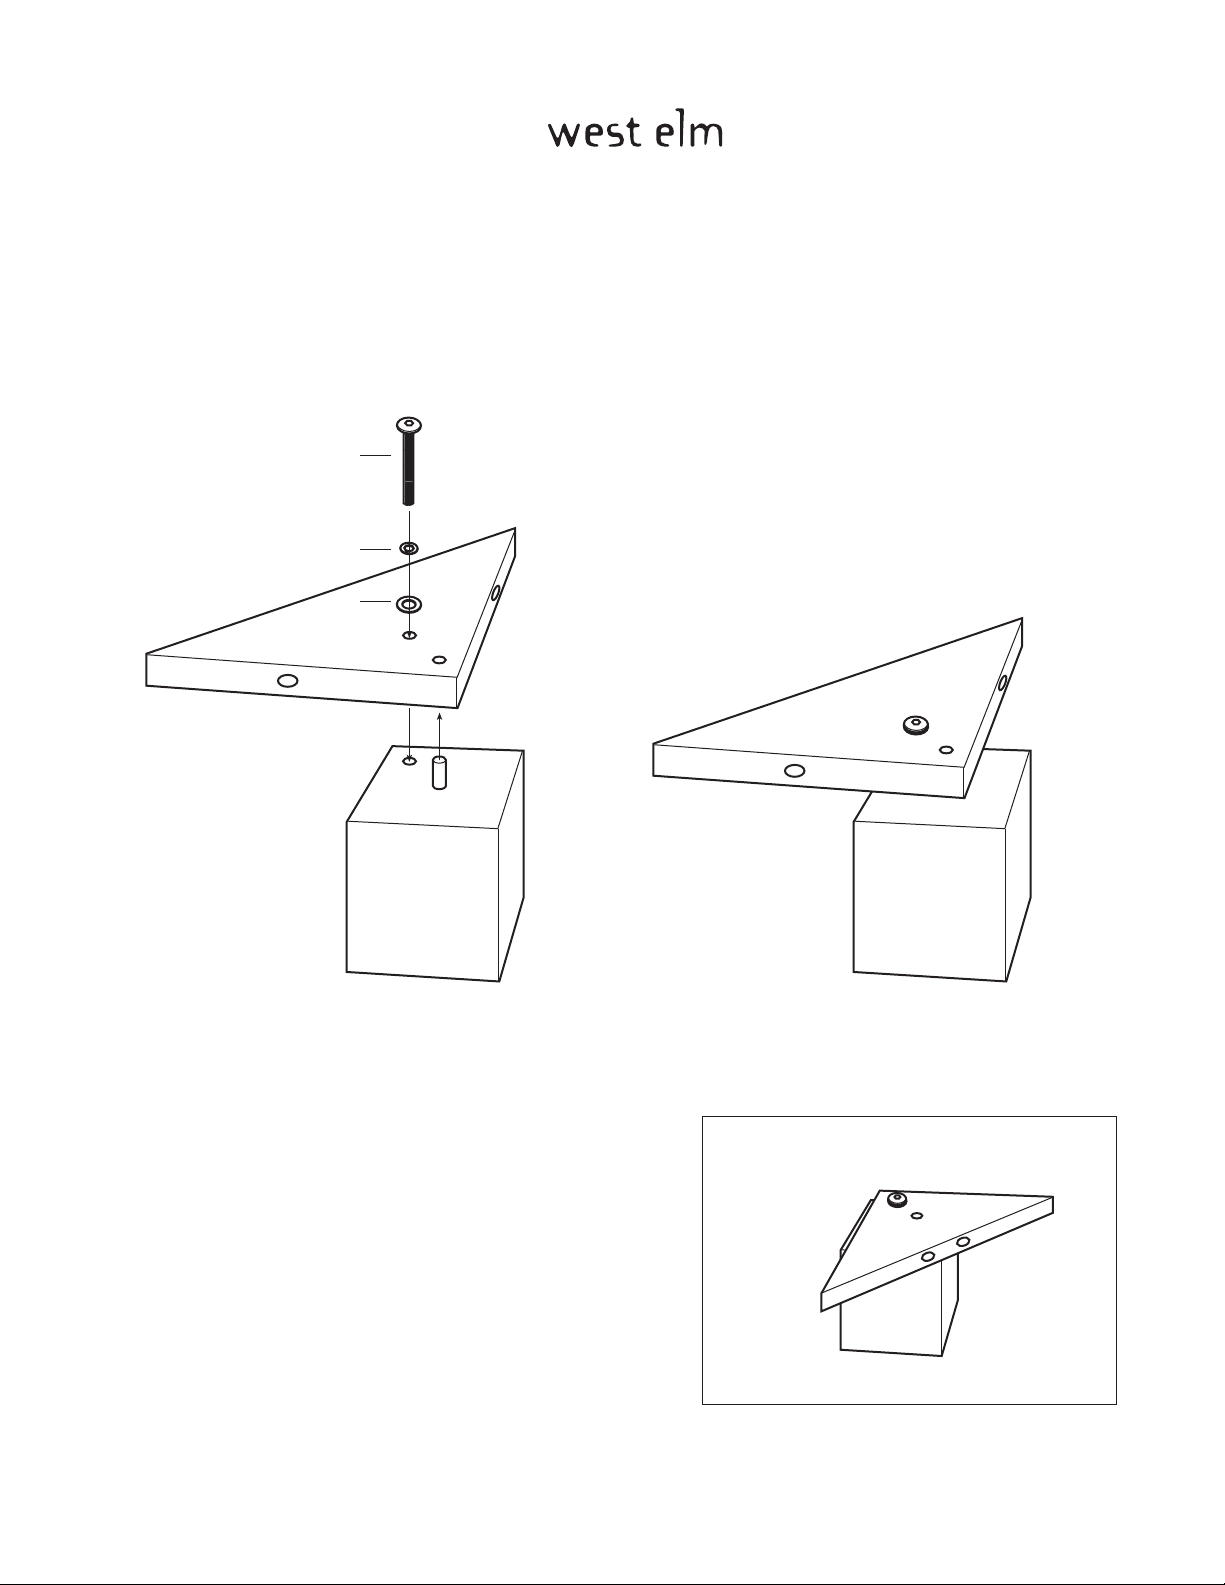
: wood bed frame
assembly instructions
1. Attach corner support to the feet using bolt (A), lock washer (D) and metal washer (C). Align hardware as shown.
A
D
C
! Incorrect assembly.
708689/7086846/7086218/7085798/8281388/7086903/7002991/7002868/7001860/7329410/6957922/6957914/6957898/6957856/
7329188/7870009/7869977/7869944/7868805/7868615 - 03/07
page 3 of 10
Page 4

: wood bed frame
assembly instructions
2. Insert the bedsides in the head and footboard as shown. The holes on the inside of the bedframe are to be positioned on the the top side.
4x
708689/7086846/7086218/7085798/8281388/7086903/7002991/7002868/7001860/7329410/6957922/6957914/6957898/6957856/
7329188/7870009/7869977/7869944/7868805/7868615 - 03/07
page 4 of 10
Page 5

3. Attach corner supports with feet to bed frame using bolt (B) and lock washer (D).
: wood bed frame
assembly instructions
8x
D
708689/7086846/7086218/7085798/8281388/7086903/7002991/7002868/7001860/7329410/6957922/6957914/6957898/6957856/
7329188/7870009/7869977/7869944/7868805/7868615 - 03/07
B
page 5 of 10
Page 6

: wood bed frame
assembly instructions
4. Turn the bed upright. Attach corner support to the footboard of the bed using bolt (B) and lock washers (D).
4x
708689/7086846/7086218/7085798/8281388/7086903/7002991/7002868/7001860/7329410/6957922/6957914/6957898/6957856/
7329188/7870009/7869977/7869944/7868805/7868615 - 03/07
D
B
page 6 of 10
Page 7

: wood bed frame
5. FOR BED FRAME WITH HEADBOARD:
Attach headboard now. Follow mounting instructions included with the headboard. Then move to Step 6.
FOR BED FRAME WITHOUT HEADBOARD:
Go directly to Step 6.
6. Attach two remaining corner supports to the bed frame using bolt (B) and lock washer (D).
assembly instructions
4x
D
B
708689/7086846/7086218/7085798/8281388/7086903/7002991/7002868/7001860/7329410/6957922/6957914/6957898/6957856/
7329188/7870009/7869977/7869944/7868805/7868615 - 03/07
page 7 of 10
Page 8

: wooden bed frame
assembly instructions
7. FOR CAL KING, KING, QUEEN AND FULL BEDFRAMES ONLY:
Insert bolt (B) and lock washer (D) through pre-drilled holes in center support and into center legs as shown. Tighten with allen key (F).
6x
708689/7086846/7086218/7085798/8281388/7086903/7002991/7002868/7001860/7329410/6957922/6957914/6957898/6957856/
7329188/7870009/7869977/7869944/7868805/7868615 - 03/07
B
D
page 8 of 10
Page 9

8. FOR CAL KING, KING, QUEEN AND FULL BEDFRAMES ONLY:
Align center support in bedframe and attach with screws (E) as shown.
: wooden bed frame
assembly instructions
4x
E
708689/7086846/7086218/7085798/8281388/7086903/7002991/7002868/7001860/7329410/6957922/6957914/6957898/6957856/
7329188/7870009/7869977/7869944/7868805/7868615 - 03/07
page 9 of 10
Page 10

: wooden bed frame
assembly instructions
8. Install slats. Position the bedslats as shown. There are stoppers attached at each end of the bed to prevent
the bedslats from moving. If you are unable to fit the slats easily, we recommend that you unscrew the
midbeam from the foot and headrail (as shown in step 7), set the slats in place, and rescrew the midbeam
to the foot and headrail. The fit is tight to ensure that the slats are firmly in place.
CARE INSTRUCTIONS.
Hardware may loosen over time. Periodically check that all connections are tight.
Wipe with a soft, dry cloth. To protect the finish, avoid the use of all chemicals and household cleaners.
708689/7086846/7086218/7085798/8281388/7086903/7002991/7002868/7001860/7329410/6957922/6957914/6957898/6957856/
7329188/7870009/7869977/7869944/7868805/7868615 - 03/07
page 10 of 10
 Loading...