

Page 1
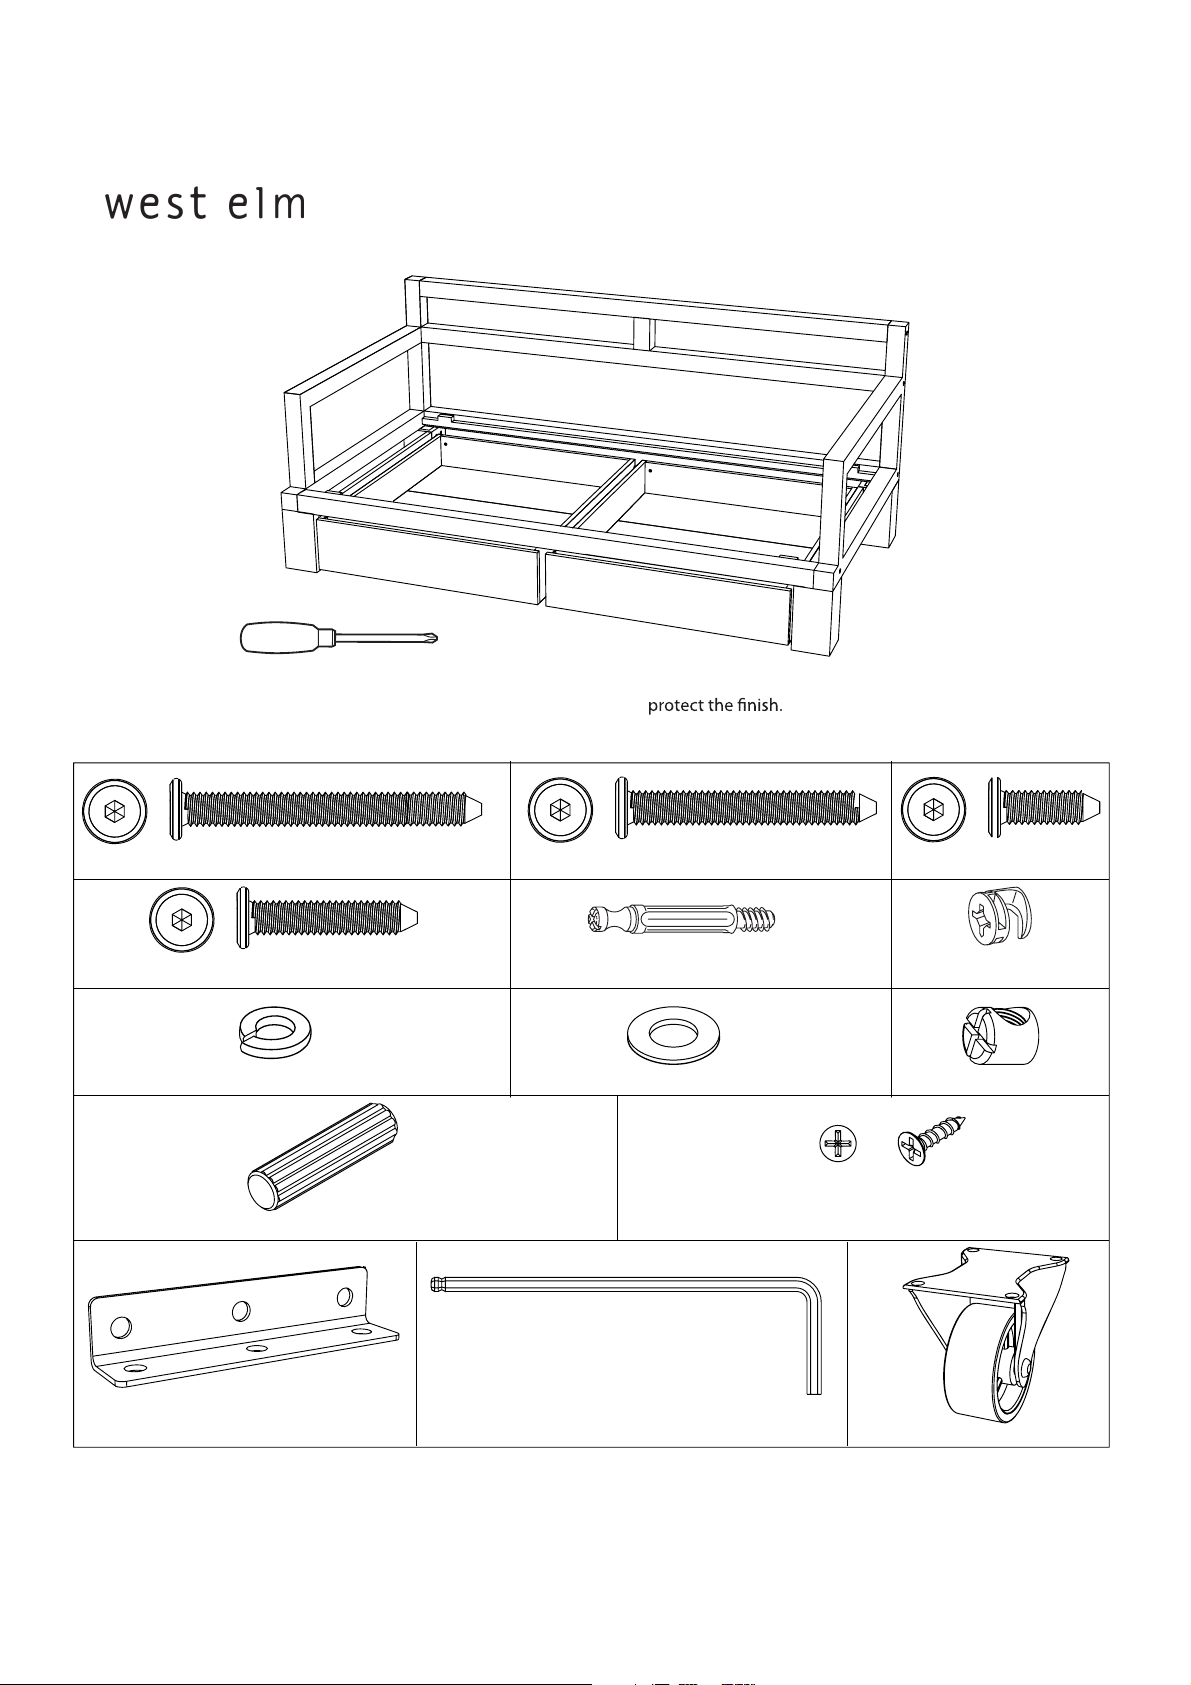
! Tools required:
! Do not throw away packaging materials until assembly is complete.
! Assemble this item on a soft surface, such as cardboard or carpet, to
! Proper assembly of this item requires 2 people.
storage daybed
assembly instructions
A
D
G
J
L
60mm bolt 9x
35mm bolt 18x
spring washer 59x
wood dowel 12x
50mm bolt 8x 20mm bolt 24x
E
H
minifix bolt 4x minifix nut 4x
flat washer 59x barrel nut 8x
K
x1 yek nellax4 tekcarb-L
castor screw 32x
CB
F
I
NM
castor 8x
8593592/8593576 - 02-06-09
Page 1 of 9
Page 2
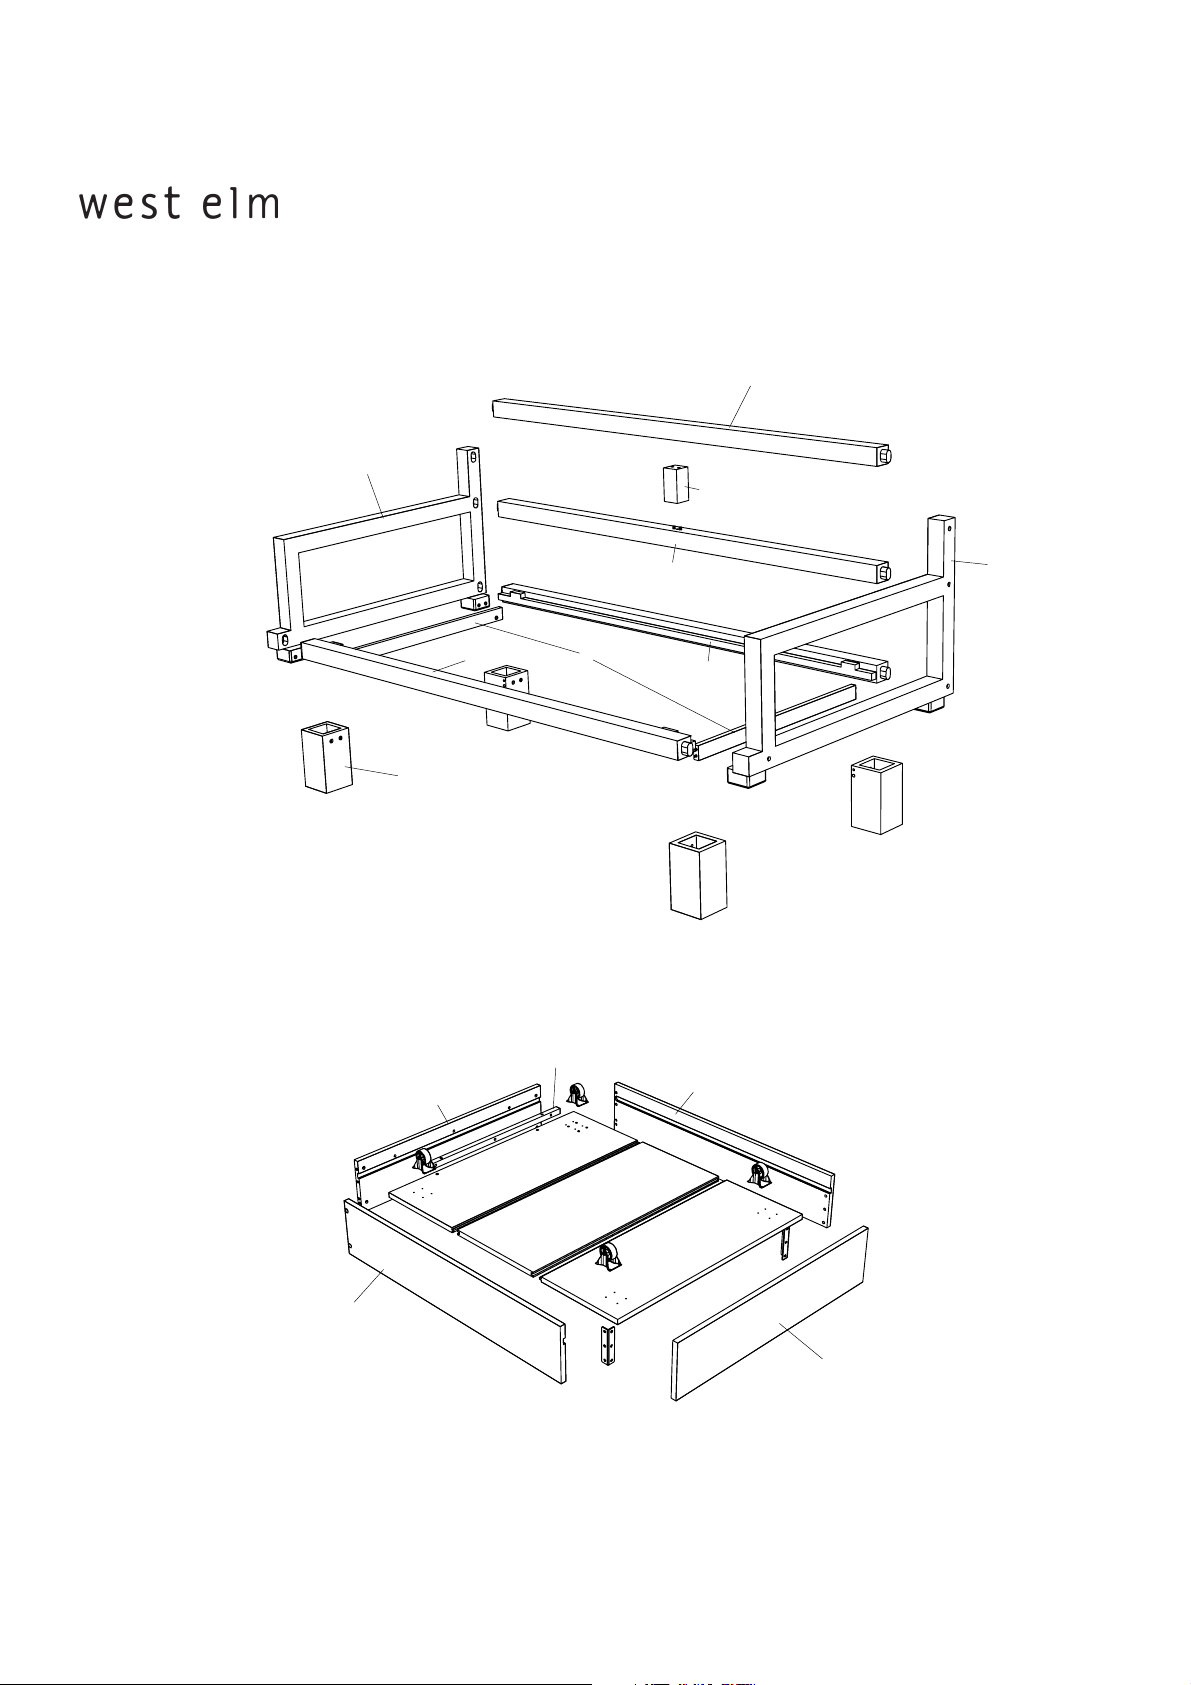
storage daybed
assembly instructions
For ease of identification, parts are numbered sequentially in the order they are assembled.
9
3
8
7
11
2
6
12
5
1
FRAME ASSEMBLY
10
4
13
8593592/8593576 - 02-06-09
14
15
16
DRAWER BOX ASSEMBLY
(viewed upside down)
17
Page 2 of 9
Page 3
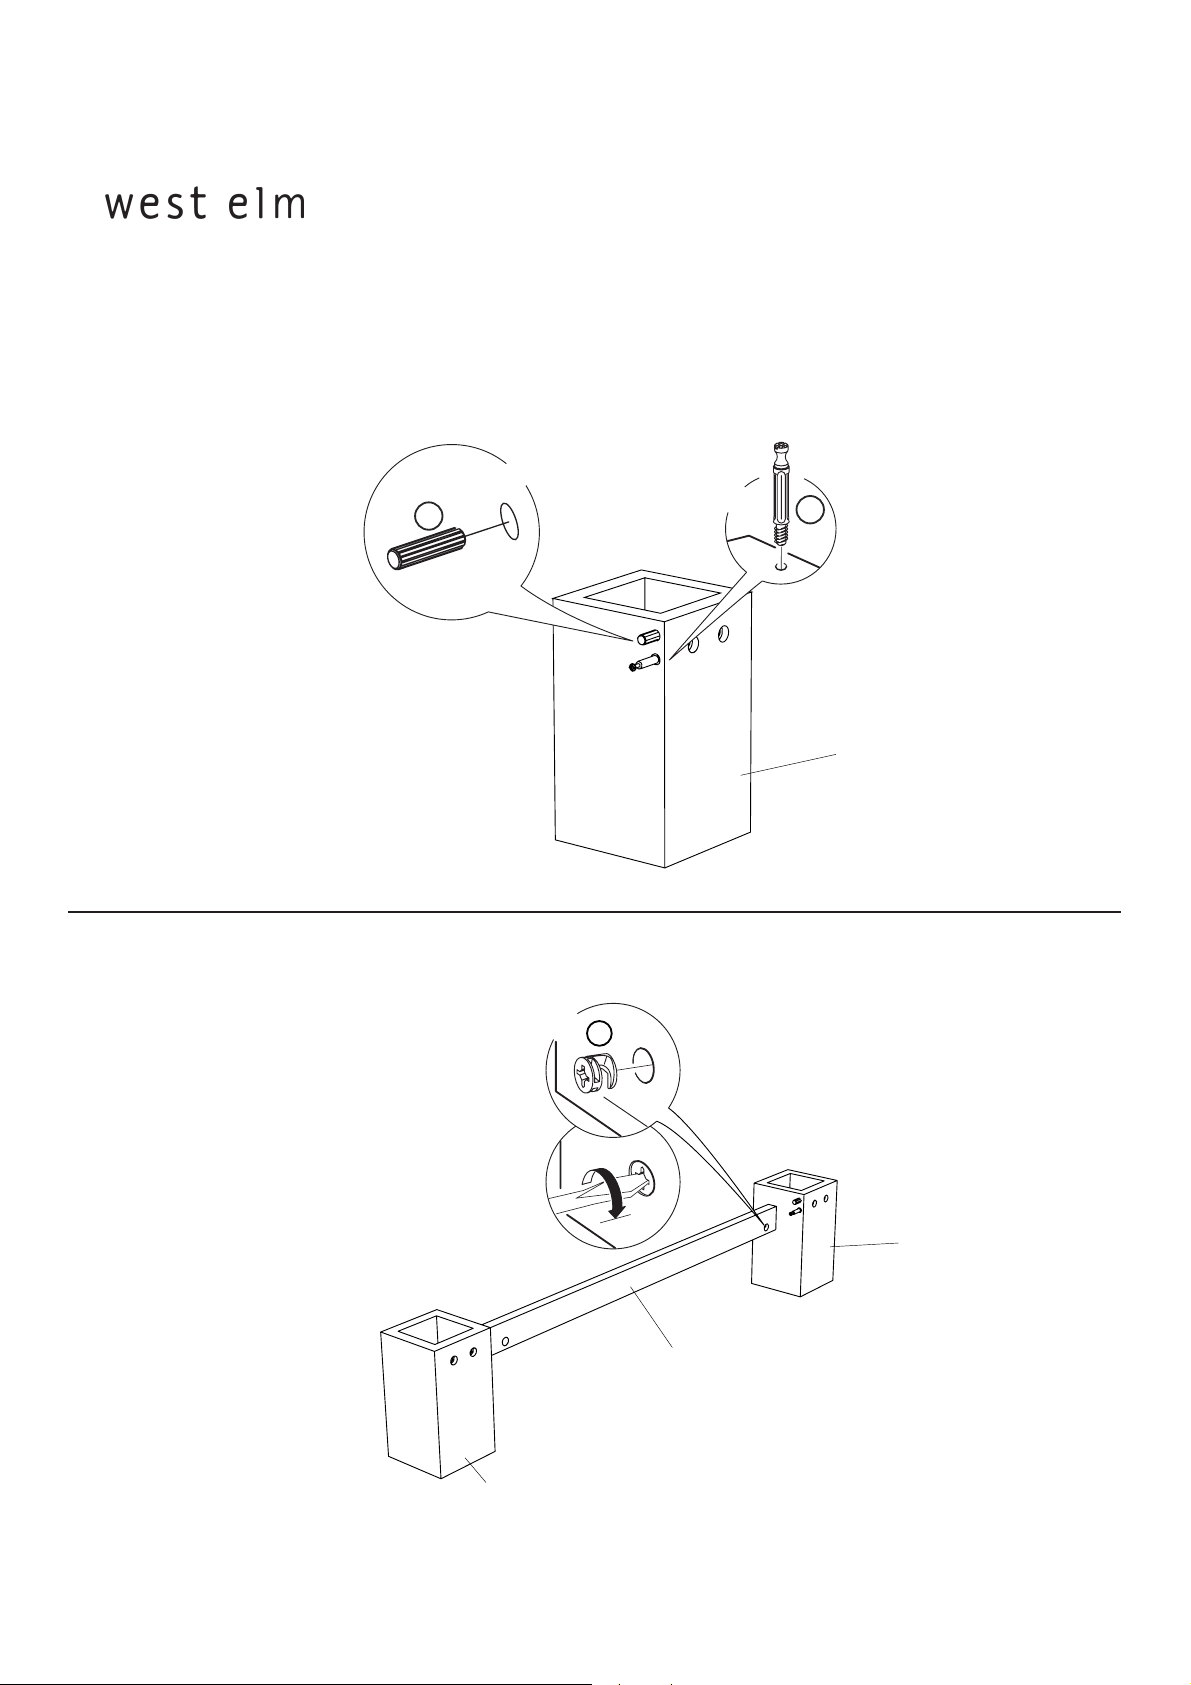
storage daybed
assembly instructions
1. Insert wood dowel (J) and minifix bolt (E) in the pre-drilled holes in the feet (1) as illustrated. Do not
tighten the minifix bolt excessively.
Repeat this step for all the four feet.
1X
J
1X
E
1
2. Position the stretcher (2) as shown between the feet (1) and insert the minifix nut (F) in the pre-drilled
hole as illustrated. Turn the minifix nut 180 degrees using a screw driver to lock it with the minifix bolt.
2x
F
1
2
8593592/8593576 - 02-06-09
1
Page 3 of 9
Page 4

storage daybed
assembly instructions
3. Insert the side frame (3 & 4) into the feet from above. Insert 35mm bolts (D) with spring washer (G) and flat
washer (H). Tighten using allen key (M).
3 & 4
4x
H
G
D
4. Position the side frame assemblies and insert the rails as illustrated. You will recognise the bottom rails
(5 & 6) by the mattress support cleats. The upper rail (7) may be identified using the detailed illustration
on the right.
7
6x
H
G
A
8593592/8593576 - 02-06-09
6
5
Three holes on top surface
Page 4 of 9
Page 5

storage daybed
assembly instructions
5. Insert wood dowels (J) in the four pre-drilled holes in the spacer (8). Set the spacer (8) in position and then
place the top rail (9) above the spacer as illustrated. Insert 60mm bolts (A) with spring washers (G) and flat
washers (H) through the pre-drilled holes. Tighten all the bolts in the assembly fully, using allen key (M).
3x
G
H
A
9
8
8
Drawer assembly
6. Insert wood dowels (J) in the pre-drilled holes in the drawer back panel (10), as shown. Attach the drawer
cleat (11) to the drawer back panel and insert 35mm bolts (D) with spring washers (G) and flat washers (H)
in the three pre-drilled holes in the cleat. Tighten with allen key (M).
4X
J
10
11
8593592/8593576 - 02-06-09
3x
G
H
Page 5 of 9
D
Page 6

storage daybed
assembly instructions
7. Attach drawer sides (12 & 13) to the drawer back. Insert 50mm bolts (B) with spring washers (G) and flat
washers (H) as shown. Insert barrel nuts in to the pre-drilled holes in drawer back. Thread the 50mm bolts
into the barrel nuts using your fingers. Tighten with allen key (M).
4X
H
G
I
12
B
13
8. Slide drawer bottom (14) with pre-drilled holes for the 35mm bolts into the groove in the drawer sides, as
shown. Insert 35mm bolts (D) with spring washers (G) and flat washers (H) into the pre-drilled holes.
Tighten with allen key (M).
2x
D
G
H
14
8593592/8593576 - 02-06-09
Page 6 of 9
Page 7

storage daybed
assembly instructions
9. Turn the drawer assembly up. Slide the center drawer bottom (15) and the outer drawer bottom (16) (ensure
the pre-drilled holes for the castors are facing down).
15
16
10. Attach L-brackets (L) to drawer sides using 20mm bolts (C), spring washers (G) and flat washers (H).
Tighten with allen key (M).
2x
L
H
G
C
8593592/8593576 - 02-06-09
Page 7 of 9
Page 8

storage daybed
assembly instructions
11. Attach the drawer front (17) to the assembly. Insert 20mm bolts (C) with spring washers (G) and
flat washers (H) in to the holes in the L-bracket. Tighten with allen key (M).
2x
H
17
G
C
12. Turn the drawer assembly upside down. Attach the castors (N) to the drawer using the castor screws (K).
Tighten with a phillips screw driver (not provided).
4x
K
N
Page 8 of 9
8593592/8593576 - 02-06-09
Page 9

13. Roll the drawers underneath the daybed. Assembly is complete.
storage daybed
assembly instructions
CARE INSTRUCTIONS:
Hardware may loosen over time. Periodically check that all connections are tight.
and household cleaners.
8593592/8593576 - 02-06-09
Page 9 of 9
 Loading...