

Page 1
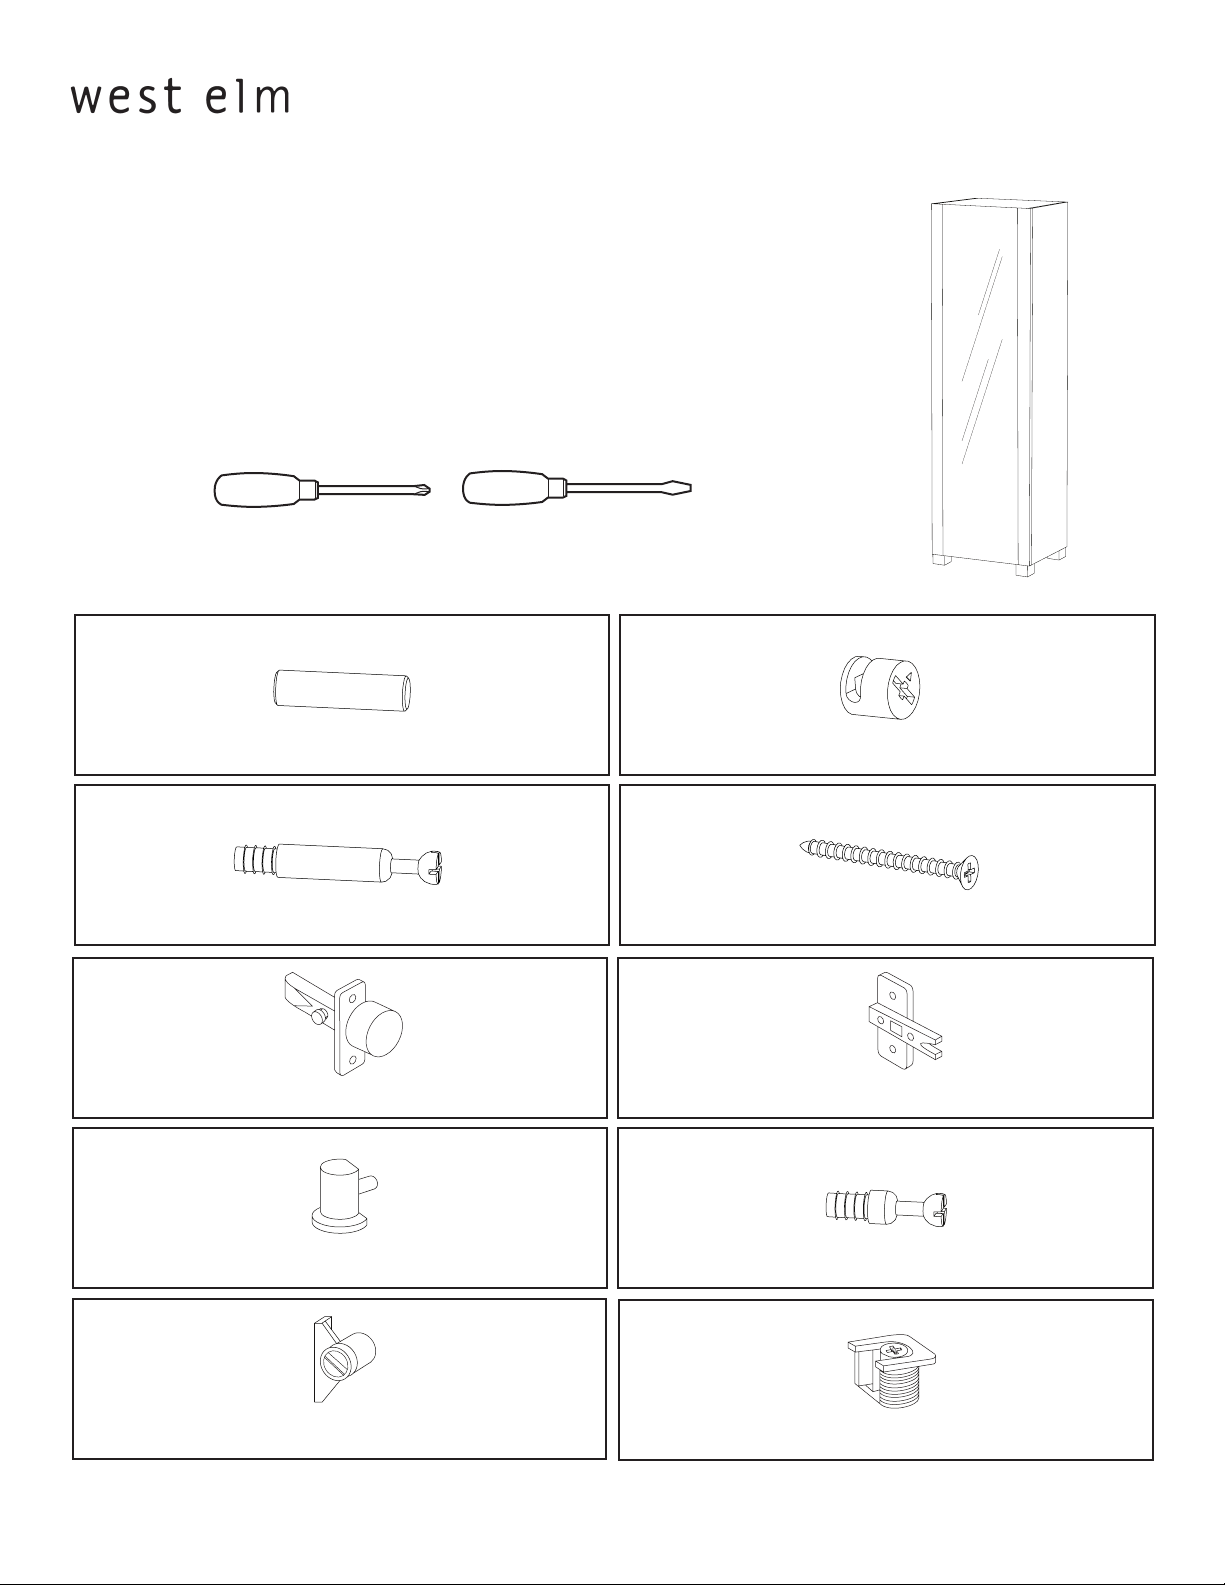
! Tools required:
! Do not throw away packaging materials until assembly is complete.
! Assemble this item on a soft surface, such as cardboard or carpet, to protect nish.
! Proper assembly of this item requires 2 people.
A B
mirror cabinet
assembly instructions
wood dowel 6x cam lock 2x
C D
cam screw 2x
E F
hinge 3x
G
shelf pins 24x
I
long screws 8x
hinge plate 3x
H
cam pin x
J
door catch 2x
cam pin lock x
Page of 09750365 - 09/07
Page 2

mirror cabinet
assembly instructions
LK
medium screws 2x short screws 6x
M
O
magnet plate 2x
N
leveling foot 4x
anti-tip kit x
Page 2 of 09750365 - 09/07
Page 3

mirror cabinet
assembly instructions
. Insert dowels (A) and cam screws (C) into both side panels as shown. Tighten cam screws with a phillips screwdriver.
2. Insert dowels (A) into back panel and set into top and bottom panels as shown.
3. Screw cam pin (H) into hole in back panel and tighten with a phillips screwdriver.
C
A
A
H
Page 3 of 09750365 - 09/07
Page 4

4. Push cam pin lock (J) into recess on center shelf.
B
5. Set center shelf over cam pin and tighten cam pin lock with a phillips screwdriver as shown.
mirror cabinet
assembly instructions
J
6. Set cam locks (B) into top, bottom, and center shelf panels. Be sure the arrow on the cam locks face towards the hole in the
panel edge as shown. This will allow for correct tightening in steps 6 and 7.
Page 4 of 09750365 - 09/07
Page 5

mirror cabinet
finished edge
finished edge
assembly instructions
7. Set side panel onto assembly, inserting dowels into holes and cams into cam locks. Orient the nished edge toward the top as
shown. Tighten cam locks with athead screwdriver.
8. Turn cabinet over and repeat assembly for the second side panel.
Page 5 of 09750365 - 09/07
Page 6

mirror cabinet
D
N
assembly instructions
9. Fasten feet to base using long screws (D). Tighten screws using a phillips screwdriver. Insert levelers (N) into each foot.
0. Insert shelf pins (G) at desired loactions and set in shelves.
G
Page 6 of 09750365 - 09/07
Page 7

mirror cabinet
assembly instructions
. Fasten hinges (E) to front door using medium screws (K) as shown. Tighten screws using a phillips screwdriver.
2. Attach magnet plates (M) using short screws (L).
K
E
L
M
3. Lay down cabinet on its left side and fasten hinge plates (F) to side panel inside cabinet using medium screws (K) as shown.
Top hinge plate attaches to 2 pre-drilled holes at the top of left side panel. These holes are located slightly in front of a long line of
shelf pin holes. Middle plate attaches to 2 pre-drilled holes immediately above the (xed) center shelf. Bottom hinge plate attaches
to 2 pre-drilled holes at the bottom of left side panel. Tighten screws using a phillips screwdriver.
NOTE: If you prefer cabinet to open from right side, simply mount hinge plates (F) on right side panel instead of left side panel.
If you are going to mount the door onto LEFT side panel, you need to attach the MIDDLE hinge plate to the 2 pre-drilled holes immediately ABOVE the (xed) center shelf. If you are going to mount the door onto RIGHT side panel, you need to attach the
MIDDLE hinge plate to the 2 pre-drilled holes immediately BELOW the (xed) center shelf.
K
F
Page 7 of 09750365 - 09/07
Page 8

mirror cabinet
assembly instructions
4. Stand cabinet upright. Fasten door catches (I) onto inside of right side panel of cabinet using pre-drilled pilot holes and short
screws (L) as shown. Tighten screws using phillips screwdriver (Note: door catches can be adjusted for proper t).
I
L
I
L
5. Attach door hinges (E) to hinge plates (F) by sliding metal hinges onto previously attached hinge plates on left side panel and
securing each hinge using hinge screws and phillips screwdriver.
NOTE: See next page for proceedure to adjust hinges for proper t.
E
F
Page 8 of 09750365 - 09/07
Page 9

Hinges are adjustable. A combination of these adjustments may be necessary to level doors.
mirror cabinet
assembly instructions
1. For side adjustment
Loosen screw A, adjust gap with screw B and
re-tighten screw A.
2. For depth adjustment
Loosen screw A, push hinge arm forwards or
backwards, re-tighten screw A and secure screw B
with a /4 turn clockwise.
A
B
3. For height adjustment
Loosen screw C, adjust door height and re-tighten
screw C.
A
B
C
C
Page 9 of 09750365 - 09/07
Page 10

mirror cabinet
assembly instructions
WE STRONGLY SUGGEST THAT, WHENEVER POSSIBLE, YOU ATTACH THE INCLUDED ANTI-TIPPING STRAP.
. Attach one end of strap to top panel using short screw and washer included.
2. Insert wall anchor (not included) into wall at appropriate height (same height as strap attached to furniture).
3. Attach other end of anti-tipping strap to this anchor using washer (included) and screw (not included).
wall
CARE INSTRUCTIONS
Hardware may loosen over time. Periodically check that all connections are tight.
Wipe with a soft, dry cloth. To protect nish, avoid the use of chemicals and household cleaners.
Page 0 of 09750365 - 09/07
 Loading...