

Page 1
Important Safety Instructions:
•These instructions are provided for your safety. It is very important that they are read carefully and com
pletely before installing xture.
•We strongly recommend that a professional electrician install all direct wired xtures.
•This xture has been rated for up to one 60-Watt max. TYPE A bulb. To avoid the risk of re, do not exceed
the recommended wattage.
Pre-Assembly:
•Remove all parts and hardware from box along with any plastic protective packaging.
•Do not discard any contents until after assembly is complete, to avoid accidentally discarding small parts or
hardware.
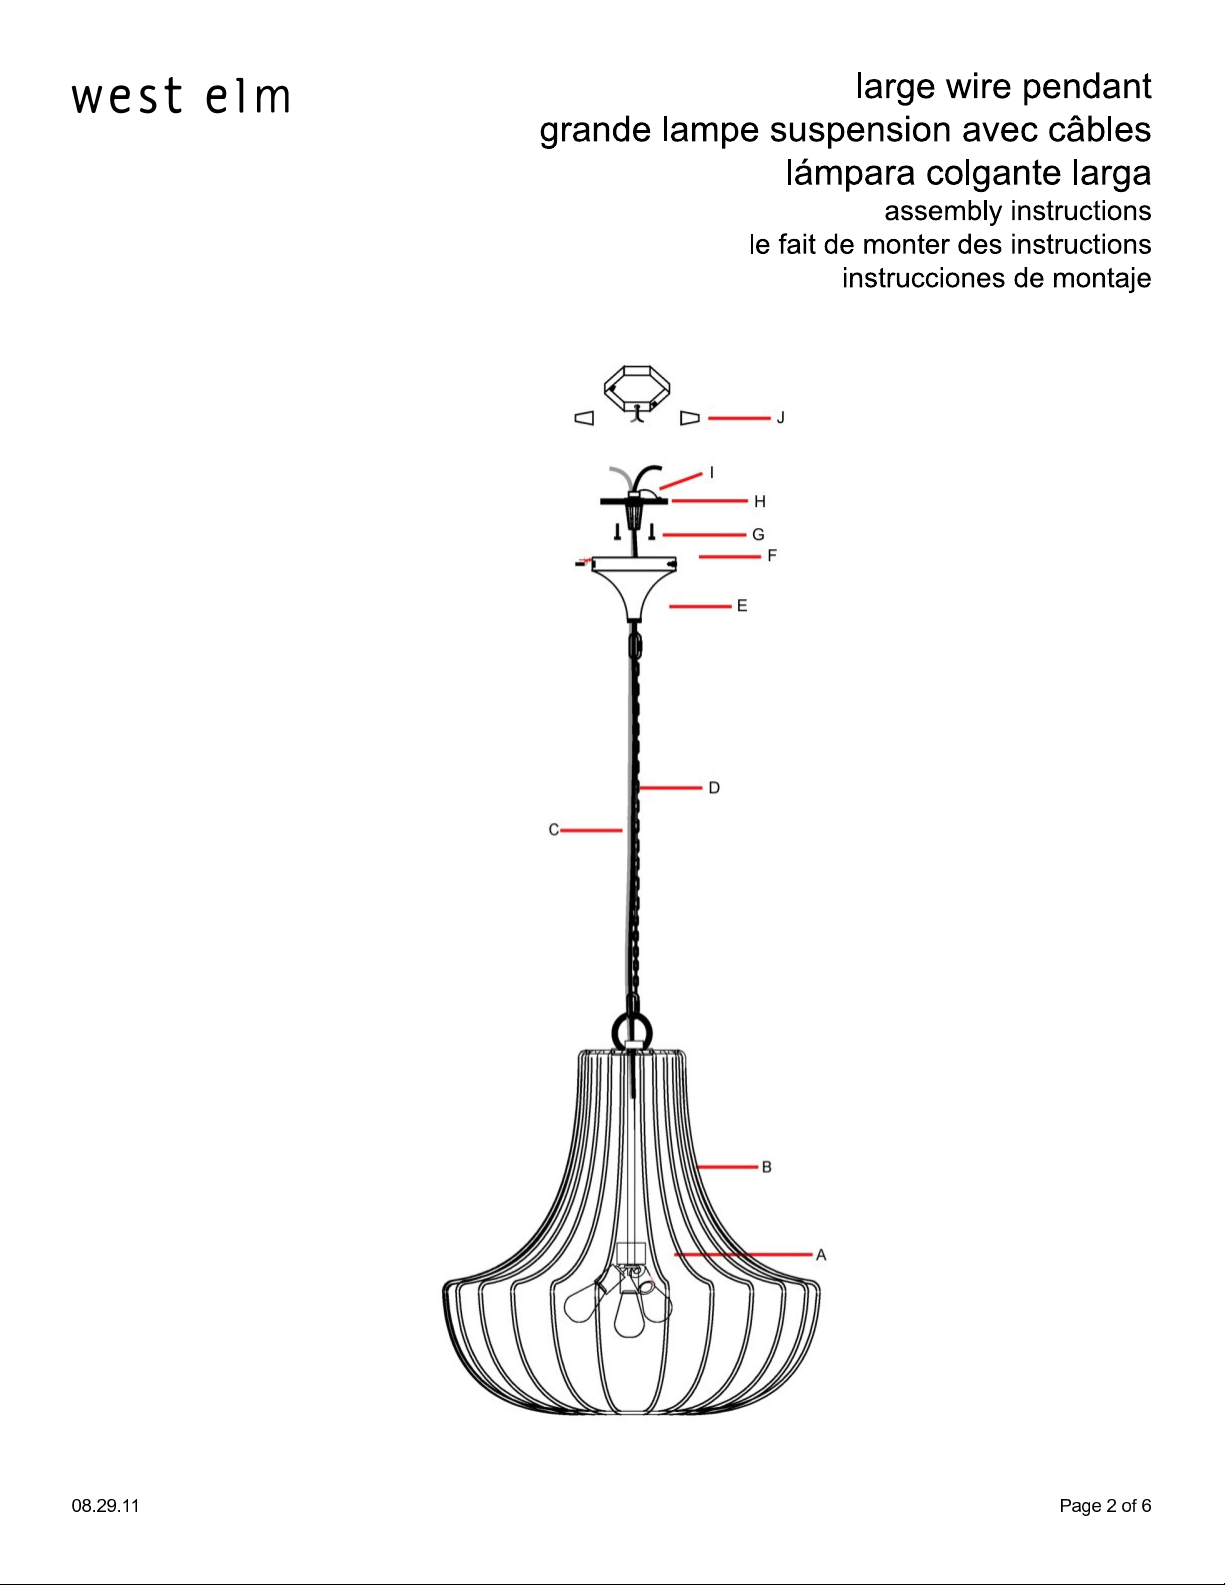
Parts Enclosed:
•(1) Lighting xture (B)
•(1) Cord (C)
•(1) Chain (D)
•(1) Canopy (E)
•(1) Mounting Plate (H)
To Install:
1.SHUT OFF THE MAIN ELECTRICAL SUPPLY FROM THE FUSE BOX / CIRCUIT BREAKER.
2.Slide the canopy down over the cord.
3.Gently pull the wiring down from ceiling junction box and allow it to hang.
4.Carefully inspect the pendant's xture wires. The NEUTRAL FIXTURE WIRE has a white covering. The HOT
FIXTURE WIRE has a black covering. The GROUND WIRE has a green covering and is already connected to
the ground screw (H) near the mark “GND” on the mounting plate.
5.Attach the GROUND WIRE from the xture to the GROUND JUNCTION BOX WIRE from the outlet (usually
green or bare wire). Fasten each together with a plastic wire connector and wrap the connection with
electrical tape. Be sure that no wire strands are exposed. If your outlet box DOES NOT have a GROUND
WIRE, leave the xture’s ground wire as is, attached to the green ground screw. IT IS IMPERATIVE THAT THE
OUTLET BOX IN YOUR HOME BE PROPERLY GROUNDED.
6.Connect the NEUTRAL FIXTURE WIRE to the NEUTRAL JUNCTION BOX WIRE (usually white). Fasten each to
gether with a wire connector and wrap the connection with electrical tape. Be sure no strands are ex
posed.
7.Connect the HOT FIXTURE WIRE to the HOT JUNCTION BOX WIRE (usually black). Fasten each together with
a plastic wire connector (J) and wrap the connection with electrical tape. Be sure no wire strands are ex
posed. DO NOT REVERSE THE HOT AND NEUTRAL CONNECTIONS OR SAFETY WILL BE COMPROMISED.
8.Gently tuck the wire connections neatly into the ceiling junction box.
9.Attach the mounting plate (I) to the ceiling outlet box with two mounting screws (H) using a screwdriver.
10.Raise the canopy until it is ush with the ceiling. Align canopy side holes with mounting plate side holes
and tighten Allen screws(F)with the help of Allen key provided. Important: Make sure no extra weight is
applied to the cord.
11.Insert three 60W maximum Type A bulb (not included).
12.Restore power to the main electrical supply and test xture.
13.Assembly in complete.
Care Instructions:
Wipe with a soft dry cloth. Do not use abrasives or household cleaners.
Hardware Included:
•(2) Mounting screws (G)
•(1) Ground screw (I)
•(2) Allen screws(F)
•(1) Allen key
To install you will need:
•(2) Plastic wire connectors (J)
•Two people recommended
•Screwdriver
•Electrical Tape
•Wire cutters
Page 2
Page 3

Consignes de sécurité importantes:
•Ces instructions sont fournies pour votre sécurité. Il est important que vous les lisiez en entier et en détails
avant de commencer l’installation de ce luminaire.
•Nous recommandons vivement l’installation des câbles par un électricien professionnel.
•Ce luminaire a été évalué pour utilisation avec une ampoule de Type A de 60 Watts maximum. Pour éviter
tout risque d’incendie, de pas dépasser le voltage maximum indiqué.
Avant de commencer l’assemblage:
•Sortez toutes les pièces et le matériel des cartons d’emballage ainsi que tout emballage de protection en
plastique.
•Conservez tous les éléments jusqu’à la n de l’assemblage pour éviter de jeter accidentellement petites
pièces ou matériel.
Pièces fournies:
•(1) Lampe suspension (B)
•(1) Cordon (C)
•(1) Chaine (D)
•(1) Voûte (E)
•(1) Plaque de montage (H)
Piezas Incluidas:
(1)Tornillo tierra (I)
(2)Tornillos de montaje (G)
(2)Tornillos Allen (F)
(1) Llave Allen
Para instalar necesitará:
Cinta eléctrica
Destornillador
Se recomienda dos personas
(2)Conectores plásticos (J)
Cortador de cable
Pour l’installation:
1.ETEIGNEZ LE SYSTEME D'ALIMENTATION ELECTRIQUE PRINCIPAL DE LA BOITE A FUSIBLES/DISJONCTEUR.
2.Faites glisser la voûte le long du cordon.
3.Tirez doucement sur les câbles pour les faire pendre de la boite de jonction du plafond.
4.Etudiez attentivement les ls du luminaire. Le FIL NEUTRE a une gaine blanche. Le FIL PHASE a une gaine
noire. Le FIL DE TERRE a une gaine verte et est déjà connecté aux vis de terre (I) près de la marque “GND”
sur la plaque de montage.
5.Attachez le FIL DE TERRE DU LUMINAIRE à la BOITE DE JONCTION POUR FIL DE TERRE de la prise (le l
est en général vert ou non gainé). Attachez les ls ensemble avec un embout de connexion en plastique
et enroulez du ruban adhésif électrique autour du point de connexion. Véri ez qu'aucun brin de l ne
dépasse. Si votre boîte NE CONTIENT PAS de FIL DE TERRE, laissez le l de terre du luminaire tel qu’il est,
attaché aux vis de terre vertes. IL EST IMPERATIF QUE LA BOITE A PRISES DE VOTRE DOMICILE SOIT BIEN
MISE A TERRE.
6.Connectez le FIL NEUTRE DU LUMINAIRE à la BOITE DE JONCTION NEUTRE (blanche en général). Attachez
ensemble avec un embout de connexion en plastique puis enroulez du ruban adhésif électrique autour
du point de connexion. Véri ez qu'aucun brin de l ne dépasse.
7.Connectez le FIL PHASE DU LUMINAIRE à la BOITE DE JONCTION PHASE (noire en général). Attachez
ensemble avec un embout de connexion en plastique (J) puis enroulez la connexion dans du ruban
adhésif électrique. Véri ez qu'aucun brin de l ne dépasse. N'INVERSEZ PAS LES CONNEXIONS NEUTRE ET
PHASE OU LA SURETE DE VOTRE INSTALLATION SERA COMPROMISE.
8.Rentrez les connexions soigneusement dans la boîte de jonction du plafond.
9.Attachez la plaque de montage (H) à la boîte à prises du plafond avec deux vis de montage fournies (G) et
un tournevis.
10.Remontez la voûte le long du cordon jusqu’à ce qu’elle soit bien contre le plafond. Alignez les trous si
tués sur la voûte avec ceux de la plaque de montage puis xez avec des vis Allen (F) que vous visserez
avec la clé Allen fournie. Important: Véri ez qu’aucun autre poids ne repose sur le cordon.
11.Insérez trois ampoules de Type A de 60 Watts maximum (non fournies).
12.Rétablissez le courant sur la boîte à fusibles pour tester le luminaire.
13.L’assemblage est maintenant terminé.
Entretien:
Nettoyez avec un chi on doux et sec. N’utilisez pas de produits abrasifs ou de produits d’entretien.
!" # $ % & $ ' '
Page 4

( ) * + , - . /0 1 2 3 4 2 5 5
Page 5

Instrucciones de cuidado
Limpie con un trapo suave y seco.
Evite el uso de químicos o limpiadores abrasivos ya
que pueden dañar el acabado
Intstrucciones de Seguridad Importante:
. Se proporcionan estas instrucciones para su seguridad. Es importante que las lea de manera detallada y completa antes de ens
amblar la unidad de iluminación.
. Recomendamos la instalación por parte deun electricista profesional.
. Esta unidad ha sido aprobada para hasta (1) bombillo incandescente standard TIPO A 60-vatios maximo. Para evitar el riesgo de
fuego, se recomienda no exceder el vatiaje recomendado.
Pre-ensamblaje:
. Retire todas las partes y piezas de las caja, junto con cualquier material de embalaje.
. No descarte ningun contenido hasta que haya nalizado el ensamblaje para evitar la perdida accidental de cualquier parte o
pieza pequeña.
Partes Incluidas:
(1) Unidad de Iluminación (B)
(1) Cable (C)
(1) Cadena (D)
(1) Dosel (E)
(1) Plato de montaje (H)
Piezas Incluidas:
(1)Tornillo tierra (I)
(2)Tornillos de montaje (G)
(2)Tornillos Allen (F)
(1) Llave Allen
Para instalar necesitará:
Cinta eléctrica
Destornillador
Se recomienda dos personas
(2)Conectores plásticos (J)
Cortador de cable
Instrucciones de Ensamblaje:
1.APAGUE LA FUESTE DE PODER DE LA CAJA DE FUSIBLES.
2.Deslice el dosel sobre el cable.
3.Con cuidado hale los cables desde la caja en el techo y permita que cuelguen.
4.Inspeccione cuidadosamente los cables de la unidad de iluminacion. El CABLE NEUTRAL DE LA UNIDAD es blanco. El CABLE
CALIENTE DE LA UNIDAD es negro. El CABLE TIERRA es verde y ya está conectado al tornillo tierra (H) cerca de las siglas “GND” en
el plato de montaje.
5.Conecte el CABLE TIERRA de la unidad al CABLE TIERRA DE LA CAJA de CONECCION, de la salida de la caja de
coneccion(regularmente verde o expuesto). Conecte ambos con un Conector de Cable (c) y luego cubra la coneccion con cinta
electrica. Asegurese que no hay cable expuesto. Si su caja de conecciones NO TIENE TORNILLO TIERRA, déjelo de esa manera, co
nectado al tornillo tierra de color verde. ES MUY IMPORTANTE QUE LA CAJA DE CONECCION EN SU CASA ESTE CORRECTAMENTE
ATERRADO!
6.Conecte la el CABLE NEUTRAL DE LA UNIDAD al CABLE NEUTRAL DE LA CAJA DE CONECCION (usualmente blanco). Conecte
ambos con un Conector de Cable (J) y cubra la coneccion con cinta electrica. Asegurese que no quede cable expuesto.
7.Conecte el CABLE CALIENTE DE LA UNIDAD al CABLE CALIENTE DE LA CAJA DE CONECCION (usualmente negro). Conecte ambos
con un Conector de Cable (J) y cubra la coneccion con cinta electrica. Asegurese que no quede cable expuesto. ASEGURESE DE
NO REVERTIR LAS CONECCIONES NEUTRAL Y CALIENTE YA QUE PUEDE COMPROMETER LA SEGURIDAD.
8.Inserte las conecciones de cable a la caja de coneccion en el techo.
9.Coloque el Plato de montaje (I) sobre la caja en el techo utilizando los tornillos de montaje (H). Apriete con un destornillador.
10.Levante el dosel hasta que quede al ras del techo. En le los agujeros en el dosel con los agujeros en el plato de montaje y
apriete los tornillos allen (F) con la llave allen suministrada.Importante: Asegurese de no aplicar peso extra al clable.
11.Inserte un bombillo TIPO A de 60 vatios máximo, (no incluido).
12.Restablezca la electricidad.
13.Ha terminado el ensamblaje.
6 7 8 9 : ; < => ? @ A B @ C C
Page 6

D E F G H I J HK L M N O M P P
 Loading...