

Page 1
Ladder Shelf Media Console
Échelle Console
Consola de estantería de escalera
6061816, 6061027 - Aug 30, 2016 Page 1 of 19
Imported by
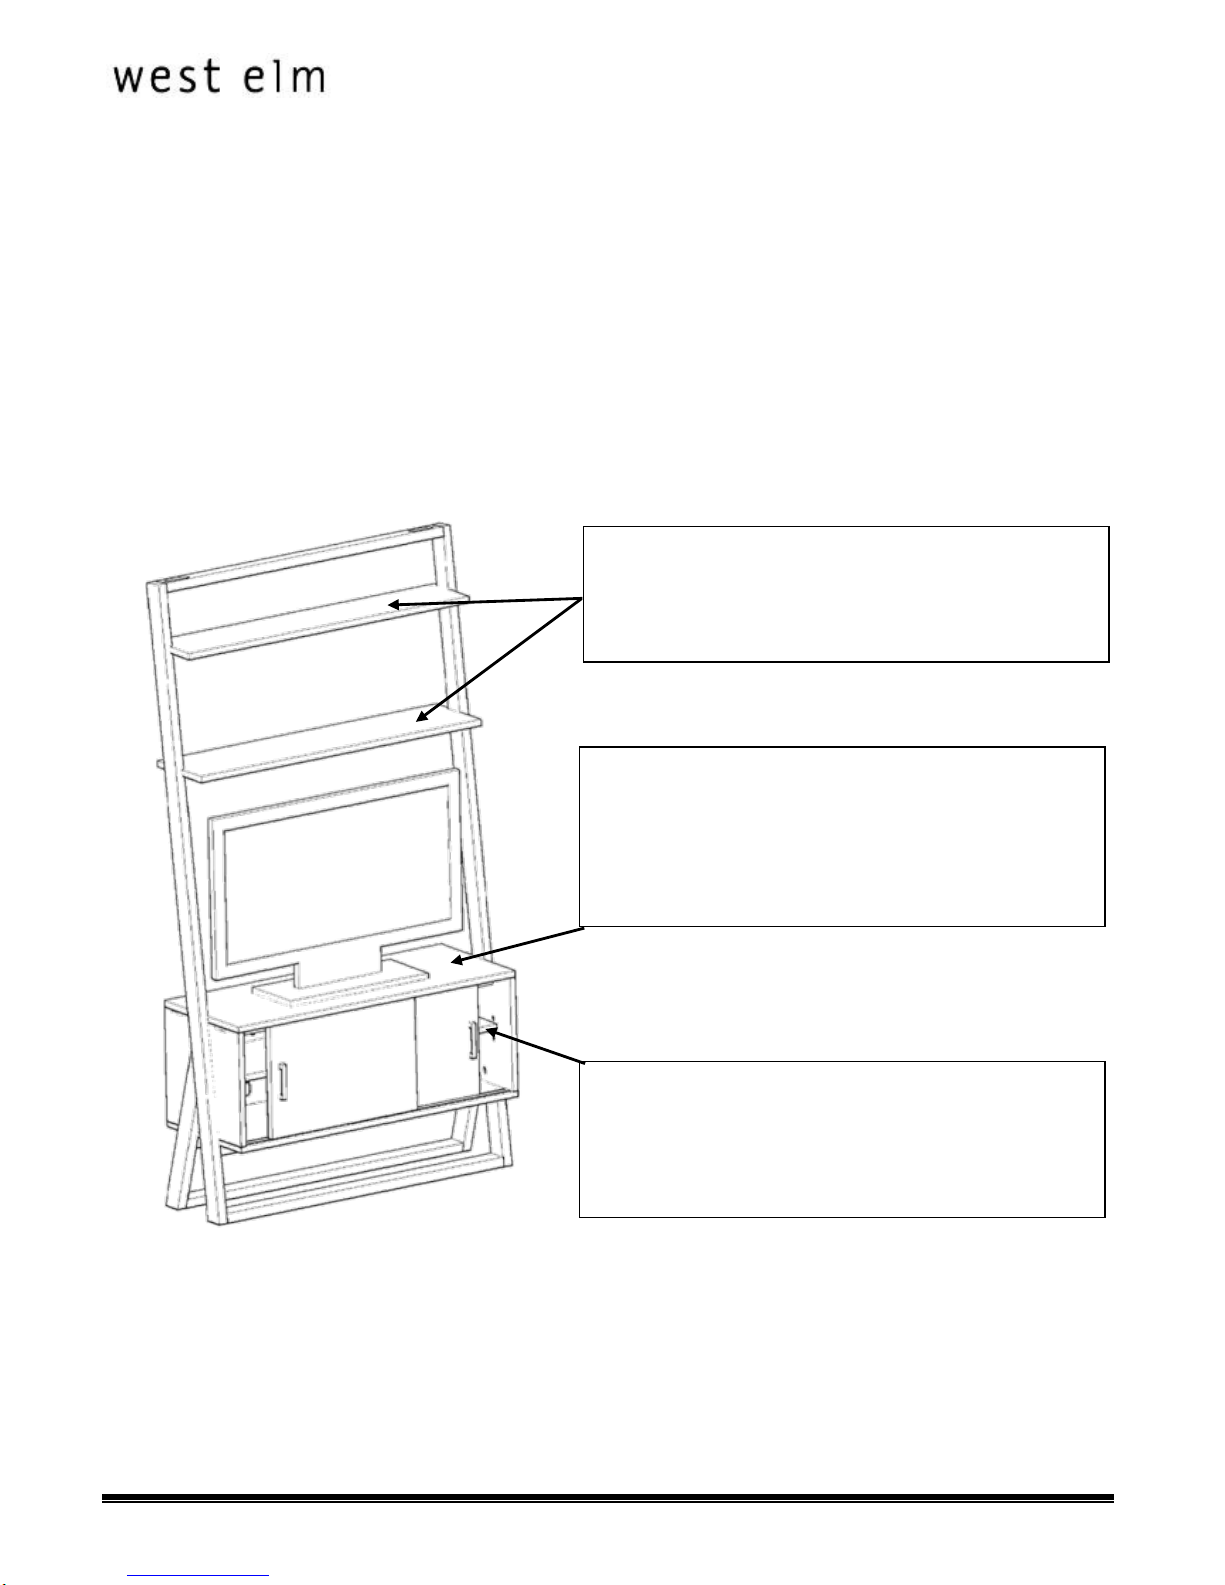
Product weighing 20 pounds (9 kgs) maximum per shelf.
Poids supporté par une étagère : 20 livres (9 kg) maximum
Producto con un peso máximo de 20 libras (9 kgs) por
estante.
Product weighing 135 pounds (61.4 kgs) maximum per
shelf.
Poids supporté par une étagère : 135 livres (61.4 g)
maximum
Producto con un peso máximo de 135 libras (61.4 kgs) por
estante.
Product weighing 25 pounds (11.3 kgs) maximum per shelf.
Poids supporté par une étagère : 25 livres (11.3 kg)
maximum
Producto con un peso máximo de 25 libras (11.3 kgs) por
estante.
Page 2

Ladder Shelf Media Console
Échelle Console
Consola de estantería de escalera
6061816, 6061027 - Aug 30, 2016 Page 2 of 19
West Elm
3250 Van Ness, San Francisco, CA 94109
! WARNING
For use with televisions weighing 135 lbs / 61.4 (Kg) or less with a maximum width of 68 inches
/ 172.72 (cm) which represents the overall width or inside dimension of the unit the TV will be placed on.
Attention : this unit is not rated for use with a CRT type television.
! WARNING
Death or serious injury may occur when children climb on audio and/or video equipment furniture. A remote
control or toys placed on the furnishing may encourage a child to climb on the furnishing and as a result the
furnishing may tip over on to the child.
! WARNING
Relocating audio and/or video equipment to furniture not specifically designed to support audio and/or video
equipment may result in death or serious injury due to the furnishing collapsing or over turning onto a child.
All other support shelves should not be loaded more than 25 lbs.
DO NOT EXCEED RECOMMENDED LOAD. Use with heavier televisions may result in instability causing tip over
resulting in death or serious injury.
Please use caution when using electrical equipment. Improper use could result in the risk of fire, electric shock or
injury to persons associated with the use of this unit during operation, user-maintenance, loading, storage, and, as
applicable, electrical issues including grounding or double-insulation.
Electronic components generate heat that may cause damage to the equipment. Please refer to the manufacturer’s
owner’s manual for space and ventilations requirements.
Do not allow children under 16 years to move cart.
! WARNING! DO NOT MOUNT THIS ITEM ABOVE CRIBS, BEDS, OR CHANGING TABLES.
! AVERTISSEMENT! NE PAS MONTER CET ARTICLE AU-DESSUS DES BERCEAUX, DES LITS OU
DES TABLES À LANGER.
! ADVERTENCIA! NO ENSAMBLAR ESTE ARTÍCULO SOBRE CUNAS, CAMAS O CAMBIADORES DE
BEBÉ.
Importé par
Page 3

Ladder Shelf Media Console
Échelle Console
Consola de estantería de escalera
6061816, 6061027 - Aug 30, 2016 Page 3 of 19
West Elm
3250 Van Ness, San Francisco, CA 94109
! MISE EN GARDE
Pour utilisation avec des téléviseurs pesant moins de 135 lb/ 61.4 kg et étant d’une largeur maximale de 68 po/
172.72 cm ce qui représente la largeur totale ou la dimension intérieure de l'unité sur laquelle le téléviseur sera
posé.
Attention: cette unité n’a pas été conçue pour être utilisée avec un téléviseur à écran cathodique.
! MISE EN GARDE
La mort ou des blessures graves peuvent se produire lorsque des enfants grimpent sur un meuble d’équipement
audio et/ou vidéo. Une télécommande ou des jouets placés sur le meuble peuvent encourager un enfant à grimper
sur le meuble, ce qui peut causer le basculement du meuble sur l’enfant.
! MISE EN GARDE
Déplacer l’équipement audio et/ou vidéo sur un meuble n’étant pas conçu spécifiquement pour le soutien
d’équipement audio et/ou vidéo, peut causer la mort ou des blessures graves dues au meuble qui bascule ou qui se
renverse sur l’enfant.
Toutes autres étagères de soutien ne doivent pas recevoir une charge de plus de 25 lb /11.3 kg.
NE PAS DÉPASSER LA CHARGE RECOMMANDÉE. L’utilisation avec des téléviseurs plus lourds peut rendre l’unité
instable, le faire basculer et causer la mort ou des blessures graves.
Veuillez être prudent lorsque vous utilisez des appareils électriques. Une utilisation inadéquate peut entraîner des
risques d'incendie, de décharge électrique ou de blessures liées à l'utilisation de l’appareil en cours de
fonctionnement, de maintenance, de chargement, de rangement et, le cas échéant, des problèmes électriques
incluant la mise à la terre ou l’isolation double.
Les composants électroniques produisent de la chaleur pouvant endommager l’équipement. Veuillez vous référer au
manuel d’utilisateur du fabricant pour les exigences d’espace et de ventilation.
Ne pas permettre aux enfants de moins de 16 ans de déplacer le chariot.
! WARNING! DO NOT MOUNT THIS ITEM ABOVE CRIBS, BEDS, OR CHANGING TABLES.
! AVERTISSEMENT! NE PAS MONTER CET ARTICLE AU-DESSUS DES BERCEAUX, DES LITS OU
DES TABLES À LANGER.
! ADVERTENCIA! NO ENSAMBLAR ESTE ARTÍCULO SOBRE CUNAS, CAMAS O CAMBIADORES DE
BEBÉ.
Importado por
Page 4
Ladder Shelf Media Console
Échelle Console
Consola de estantería de escalera
6061816, 6061027 - Aug 30, 2016 Page 4 of 19
West Elm
3250 Van Ness, San Francisco, CA 94109
! PRECAUCIÓN
Para uso con televisores que pesen 135 lbs /61.4 (Kg) o menos y de un ancho máximo de 68 pulgadas/172.72 (cm)
que representa en ancho o dimensión de la unidad donde va a colocar el televisor.
Atención: esta unidad no esta aprovada para uso con televisores tipo CRT.
! PRECAUCIÓN
Lesiones serias o muerte pueden ocurrir si el niño sube a un mueble para audio o video. Colocar el control remoto o
juguetes sobre el mueble puede hacer que el niño se suba al mueble y este caiga sobre el niño.
! PRECAUCIÓN
Colocar equipos de auido o video en muebles que no están diseñados para ello, puede resultaren lesiones serias o
muerte debido a la caida del mueble sobre el niño.
El resto de las repisas no debe cargarse con más de 25 lbs/11.3 Kgs.
NO EXCEDA LA CARGA RECOMENDADA. El uso con televisores más pesados puede resultar en inestabilidad causando
que el mueble se voltee resultando en lesiones serias o muerte.
Por favor tenga cuidado al utilizar equipos elétricos. El uso indebido puede resultar en riesgo de fuego, choque
elétrico o lesiones a personas involucradas en el uso de la unidad durante la operación, manteniento, carga,
almacenaje y, cuando aplique, problemas eléctricos incluyendo aterramiento o aislamiento doble.
Los componentes eléctricos generan calor que pueden causar daño al equipo. Por favor revise el manual de
instrucciones del fabricante referente a requerimientos de espacio y ventilación.
No permita que los niños menores de 16 años muevan el mueble.
! WARNING! DO NOT MOUNT THIS ITEM ABOVE CRIBS, BEDS, OR CHANGING TABLES.
! AVERTISSEMENT! NE PAS MONTER CET ARTICLE AU-DESSUS DES BERCEAUX, DES LITS OU
DES TABLES À LANGER.
! ADVERTENCIA! NO ENSAMBLAR ESTE ARTÍCULO SOBRE CUNAS, CAMAS O CAMBIADORES DE
BEBÉ.
! Tools required :
Page 5

Ladder Shelf Media Console
Échelle Console
Consola de estantería de escalera
6061816, 6061027 - Aug 30, 2016 Page 5 of 19
! Outils nécessaires :
! Herramientas necesarias:
- Screw Driver (+) Head / Tournevis (+) Tête / Destornillador de cabeza (+)
- 1/4” Drill Bit / Fleuret 1/4 po / Broca de 1/4”
! Do not throw away packaging materials until assembly is complete.
! Ne pas jeter les matériaux d’emballage avant la fin de l’assemblage.
! No desechar los materiales del empaque hasta haber completado el ensamblaje.
! Assemble this item on a soft surface, such as cardboard or carpet, to protect finish.
! Assembler cet article sur une surface douce, telle qu’un carton ou un tapis, pour protéger la finition.
! Ensamblar este artículo en una superficie suave, como un cartón o una alfombra, para proteger el acabado.
! Proper assembly of this item requires 2 people.
! Deux personnes sont requises pour l’assemblage approprié de cet article.
! El ensamblaje apropiado de este artículo requiere de 2 personas.
CARE INSTRUCTIONS / INSTRUCTIONS D’ENTRETIEN / INSTRUCCIONES DE CUIDADO:
Hardware may loosen overtime. Periodically check that all connections are tight. Wipe with a soft, dry cloth. To protect
finish, avoid the use of chemicals and household cleaners. All hot serving dishes should be placed on a pad. Any liquid
spilled onto the furniture should be cleaned up immediately with a damp cloth.
Le matériel peut se desserrer avec le temps. Vérifier de temps en temps que toutes les fixations sont bien serrées.
Essuyer avec un chiffon doux et sec. Pour protéger la finition, éviter l’utilisation des produits chimiques et des produits
de nettoyage domestiques. Les plats de service chauds doivent être placés sur un tampon. Les liquides déversés sur le
meuble doivent être immédiatement nettoyés avec un chiffon humide.
Las piezas de ferretería pueden aflojarse con el tiempo. Controlar periódicamente que estén bien ajustadas. Limpiar
con un paño suave y seco. Para proteger el acabado evitar el uso de químicos y limpiadores de uso hogareño. Todos los
platos calientes que se sirvan se deben colocar sobre un posa fuentes. Si se derrama cualquier tipo de líquido en la
estantería se debe limpiar de inmediato con un paño húmedo.
COMPONENT OF SKU # 6061816, 6061027.
Page 6

Ladder Shelf Media Console
Échelle Console
Consola de estantería de escalera
6061816, 6061027 - Aug 30, 2016 Page 6 of 19
A
B
C
D
E
F
G
H
I
J
K
L
M
N
HARDWARE
Middle Shelf – 1x
Middle Shelf – 1x
Middle Shelf – 1x
Top Panel – 1x
Top Panel – 1x
Top Panel – 1x
Topbar – 1x
Topbar – 1x
Topbar – 1x
Top Shelf – 1x
Top Shelf – 1x
Top Shelf – 1x
Top Panel Crossbar – 1x
Top Panel Crossbar – 1x
Top Panel Crossbar – 1x
Center Divider – 1x
Devider – 1x
Devider – 1x
Doors – 2x (Back 1x/Front 1x)
Doors – 2x (Back 1x/Front 1x)
Doors – 2x (Back 1x/Front 1x)
Side Panel – 2x (Left 1x/Right 1x)
Side Panel – 2x (Left 1x/Right 1x)
Side Panel – 2x (Left 1x/Right 1x)
COMPONENT OF SKU #_____
Back Panel – 1x
Back Panel – 1x
Back Panel – 1x
Front Bottombar – 1x
Front Bottombar – 1x
Front Bottombar – 1x
Rear Bottombar – 1x
Rear Bottombar – 1x
Rear Bottombar – 1x
Bottom Panel Crossbar – 2x
Bottom Panel Crossbar – 2x
Bottom Panel Crossbar – 2x
O
Bottom panel – 1x
Bottom panel – 1x
Bottom panel – 1x
Adjustable shelf – 2x
Adjustable shelf – 2x
Adjustable shelf – 2x
Left Post–1x
Left Post–1x
Left Post–1x
Right Post–1x
Right Post –1x
Right Post –1x
P
Rear L Post–1x
Rear L Post–1x
Rear L Post–1x
Rear R Post–1x
Rear R Post –1x
Rear R Post –1x
Page 7

Ladder Shelf Media Console
Échelle Console
Consola de estantería de escalera
6061816, 6061027 - Aug 30, 2016 Page 7 of 19
Allen Bolt M6x40 mm – 20x
Spring Washer Ø8 mm – 10x
Halfmoon Washer – 10x
Stud-Solver Anchor – 1x
Mounting Plate – 1x
Allen Key 4 mm – 2x
Screws 8 x 1-1/2” – 11x
Screws 8 x 5/8” – 17x
Metal Plate – 2x
Screws 8 x 1/2” – 4x
Wooden Dowel 8 x 30mm – 28x
Handle – 2x
Bolt – 4x
Mounting Screw – 6x
JF Bolt – 6x
Allen Key 5 mm – 1x
Pin Shelf – 8x
16
Page 8

Ladder Shelf Media Console
Échelle Console
Consola de estantería de escalera
6061816, 6061027 - Aug 30, 2016 Page 8 of 19
1. Take the Top Panel (D) and then attach the Mounting Screw (14) on predrill according to the image using a
Screwdriver.
Top Shelf (B)
Top Shelf (B)
Top Shelf (B)
Divider (F)
Divider (F)
divider (F)
Top Bar (A)
Top Bar (A)
Top Bar (A)
Middle Shelf (C)
Middle Shelf (C)
Middle Shelf (C)
Right Post (P)
Right Post (P)
Right Post (P)
Top Panel (D)
Top Panel (D)
Top Panel (D)
Back Panel (I)
Back Panel (I)
Back Panel (I)
Left Post (O)
Left Post (O)
Left Post (O)
Left Side Panel (E)
Left Side Panel (E)
Left Side Panel (E)
Rear Left Post (O)
Rear Left Post (O)
Rear Left Post (O)
Bottom Panel Crossbar (M)
Bottom Panel Crossbar (M)
Bottom Panel Crossbar (M)
Rear Bottom Bar (L)
Rear Bottom Bar (L)
Rear Bottom Bar (L)
Doors (J)
Doors (J)
Doors (J)
Adjustable Shelf (G)
Adjustable Shelf (G)
Adjustable Shelf (G)
Top Panel Crossbar (N)
Top Panel Crossbar (N)
Top Panel Crossbar (N)
Rear Right Post (P)
Rear Right Post (P)
Rear Right Post (P)
Bottom Panel (H)
Bottom Panel (H)
Bottom Panel (H)
Front Bottom Bar (K)
Front Bottom Bar (K)
Front Bottom Bar (K)
Right Side Panel (E)
Right Side Panel (E)
Right Side Panel (E)
Page 9

Ladder Shelf Media Console
Échelle Console
Consola de estantería de escalera
6061816, 6061027 - Aug 30, 2016 Page 9 of 19
1. Take the Top Panel (D) and then attach the Mounting Screw (14) on predrill according to the image using a
Screwdriver.
1. Take the Top Panel (D) and then attach the Mounting Screw (14) on predrill according to the image using a
Screwdriver.
2. Attach Center Divider (F) on to Top Panel (D) by hooking the metal plate in the Center Divider (F) to mounting
screw attached on Top Panel (D), slide forward divider to tighten.
2. Attach Divider (F) on to Top Panel (D) center part, hook the metal plate in the Divider (F) to mounting screw
attached on Top Panel (D), slide forward divider to tighten.
2. Attach Divider (F) on to Top Panel (D) center part, hook the metal plate in the Divider (F) to mounting screw
attached on Top Panel (D), slide forward divider to tighten.
3. Attach the Top Crossbar (N) by sliding it to left or right side enter through the notch on Center Divider (F)
3. Attach the Top Crossbar (N) by sliding it to left or right side enter through the hole Devider (F).
D
14 D F
enter
enter
slide
enter
slide
locked
Page 10

Ladder Shelf Media Console
Échelle Console
Consola de estantería de escalera
6061816, 6061027 - Aug 30, 2016 Page 10 of 19
3. Attach the Top Crossbar (N) by sliding it to left or right side enter through the hole Devider (F).
4. Attach the Right and Left Side Panel (E) with linking Mounting Screw (14) on the side edge of the Top Panel
(D), then tightly secure it by sliding it forward.
4. Attach the Right and Left Side Panel (E) with linking Mounting Screw (14) on the side edge of the Top Panel
(D), then tightly secure it by sliding it forward.
4. Attach the Right and Left Side Panel (E) with linking Mounting Screw (14) on the side edge of the Top Panel
(D), then tightly secure it by sliding it forward.
5. Tightly secure Top Panel Crossbar (N) using 4pcs of Screw (7), ensure the Screw (7) goes through predrilled
hole.
N
F
E - Right
E – left
slide
Right
Left
enter
locked
Page 11

Ladder Shelf Media Console
Échelle Console
Consola de estantería de escalera
6061816, 6061027 - Aug 30, 2016 Page 11 of 19
after it is completed insert 6 pcs of Dowel (11) into the Divider (F) and the Right and Left Side Panel (E).
5. Tightly secure Top Panel Crossbar (N) using 4pcs of Screw (7), make sure the Screw (7) enter to predrilled hole.
after it is completed insert 6 pcs of Dowel (11) into the Divider (F) and the Right and Left Side Panel (E).
5. Tightly secure Top Panel Crossbar (N) using 4pcs of Screw (7), make sure the Screw (7) enter to predrilled hole.
after it is completed insert 6 pcs of Dowel (11) into the Divider (F) and the Right and Left Side Panel (E).
6. Attach Bottom Panel (H) to the side panel and divider panel by aligning the dowel holes, then fasten with 8pcs
of Allen Bolt (1) and tighten with Allen Key (6).
6. Attach Bottom Panel (H) to the side panel and divider panel by adjusting the dowel holes, then fasten with
8pcs of Allen Bolt (1) and tighten with Allen Key (6).
6. Attach Bottom Panel (H) to the side panel and divider panel by adjusting the dowel holes, then fasten with
8pcs of Allen Bolt (1) and tighten with Allen Key (6).
7. Install 2 pcs of Bottom Panel Crossbar (M) to the Bottom Panel (H), fasten it with 3 pcs of Screw (7) on each
crossbar and tighten with a Screwdriver.
7
11 6 H
1
Page 12

Ladder Shelf Media Console
Échelle Console
Consola de estantería de escalera
6061816, 6061027 - Aug 30, 2016 Page 12 of 19
7. Install 2 pcs of Bottom Panel Crossbar (M) to the Bottom Panel (H), fasten it with 3 pcs of Screw (7) on each
crossbar and tighten with a Screwdriver.
7. Install 2 pcs of Bottom Panel Crossbar (M) to the Bottom Panel (H), fasten it with 3 pcs of Screw (7) on each
crossbar and tighten with a Screwdriver.
8. After completed installing storage cabinet, next step is to put together the legs.
Prepare Right & Left Post (O&P) and Right & Left Rear Post (O&P).
Attach Right & Left Rear Post (O&P) to Right & Left Post (O&P) by inserting a Dowel (11) into the hole then
fasten with Allen Bolt (1) and tighten with Allen Key (6).
9. Prepare assembled Left Post (O) by installing 10pcs of Dowel (11) into the holes as shown below.
7 M M
O/P
O/P
6
11 1 H
Page 13

Ladder Shelf Media Console
Échelle Console
Consola de estantería de escalera
6061816, 6061027 - Aug 30, 2016 Page 13 of 19
9. Prepare Left Post (O) that already assembled then install 10pcs of Dowel (11) into the hole as per shown on
below images.
9. Prepare Left Post (O) that already assembled then install 10pcs of Dowel (11) into the hole as per shown on
below images.
10. Take Front Bottombar (K), Rear Bottombar (L), Storage Cabinet, Middle Shelf (C), Top Shelf (B), Topbar (A)
attached into Left Post (O) as per images shown below, lock down using Allen Bolt (1), Spring Washer (2) &
Halfmoon Washer (3) and tighten it using Allen Key 4mm (6).
For storage cabinet lock down using 3pcs of JF Bolt (15) and tighten it using Allen Key 5mm (17).
11. Insert 10pcs of Dowel (11) into the hole as per shown on below images.
11. Insert 10pcs of Dowel (11) into the hole as per shown on below images.
11 A B C L K 6
1
15
(3x)
17 O 2 3 O 1 2
3
Page 14

Ladder Shelf Media Console
Échelle Console
Consola de estantería de escalera
6061816, 6061027 - Aug 30, 2016 Page 14 of 19
11. Insert 10pcs of Dowel (11) into the hole as per shown on below images.
12. Attach Right Post as per images below, lock down using Allen Bolt (1), Spring Washer (2) & Halfmoon Washer
(3) and tighten it using Allen Key 4 mm (6).
For storage cabinet lock down using3pcs of JF Bolt (15) and tighten it using Allen Key 5 mm (17).
12. Attach Right Post as per images below, lock down using Allen Bolt (1), Spring Washer (2) & Halfmoon Washer
(3) and tighten it using Allen Key 4 mm (6).
For storage cabinet lock down using3pcs of JF Bolt (15) and tighten it using Allen Key 5 mm (17).
12. Attach Right Post as per images below, lock down using Allen Bolt (1), Spring Washer (2) & Halfmoon Washer
(3) and tighten it using Allen Key 4 mm (6).
For storage cabinet lock down using3pcs of JF Bolt (15) and tighten it using Allen Key 5 mm (17).
13. Install the Back Door (J), put bottom side 1
st
to rail then continues by pushing top side into the top rail,
Push up the button on the door hardware into the top rail to hold & lock the door in place.
17
11 P 1
15
(3x)
2 3 6
Page 15

Ladder Shelf Media Console
Échelle Console
Consola de estantería de escalera
6061816, 6061027 - Aug 30, 2016 Page 15 of 19
13. Install the Back Door (J), put bottom side 1
st
to rail then continues by pushing top side into the top rail,
Push up the button on the door hardware into the top rail to hold & lock the door in place.
13. Install the Back Door (J), put bottom side 1
st
to rail then continues by pushing top side into the top rail,
Push up the button on the door hardware into the top rail to hold & lock the door in place.
14. Install the Front Door (J), put bottom side 1
st
to rail then continues by pushing top side into the top rail,
Push up the button on the door hardware into the top rail to hold the door in place.
14. Install the Front Door (J), put bottom side 1
st
to rail then continues by pushing top side into the top rail,
Push up the button on the door hardware into the top rail to hold the door in place.
14. Install the Front Door (J), put bottom side 1
st
to rail then continues by pushing top side into the top rail,
Push up the button on the door hardware into the top rail to hold the door in place.
15. Attach the Handle (12) to both doors, lock handle using 2pcs of Bolt (13) and tighten it using Screwdriver.
15. Attach the Handle (12) to both doors, lock handle using 2pcs of Bolt (13) and tighten it using Screwdriver.
J
(Back)
J
(Front)
Press up button to lock and
Press down button to unlock
1 2 1
2
Press up button to lock and
Press down button to unlock
Page 16

Ladder Shelf Media Console
Échelle Console
Consola de estantería de escalera
6061816, 6061027 - Aug 30, 2016 Page 16 of 19
15. Attach the Handle (12) to both doors, lock handle using 2pcs of Bolt (13) and tighten it using Screwdriver.
16. Attach 8pcs of Pin Shelf (16) into the Side Panels and Divider.
16. Attach 8pcs of Pin Shelf (16) into the Side Panels and Divider.
16. Attach 8pcs of Pin Shelf (16) into the Side Panels and Divider.
17. Put the adjustable Shelf (G) inside storage/ Put the adjustable Shelf (G) inside storage/ Put the adjustable Shelf
(G) inside storage.
16
13
12
Page 17

Ladder Shelf Media Console
Échelle Console
Consola de estantería de escalera
6061816, 6061027 - Aug 30, 2016 Page 17 of 19
18. Install the Back Panel (I) using 16pcs of Screw (8) and tighten it using Screwdriver/ Install the Back Panel (I)
using 16pcs of Screw (8) and tighten it using Screwdriver / Install the Back Panel (I) using 16pcs of Screw (8) and
tighten it using Screwdriver.
19. For securing the Ladder Shelf Media Console from tipping.
Drill the wall with 1/4” Drill Bit and install the Stud-Solver Anchor (4), align the Mounting Plate (5) on the
Middle Shelf (C) to the Stud-Solver Anchor (4) on the wall.
8
(16x)
G I BACK
Page 18

Ladder Shelf Media Console
Échelle Console
Consola de estantería de escalera
6061816, 6061027 - Aug 30, 2016 Page 18 of 19
Secure using Screws (8) and tighten with Screwdriver.
19. For securing the Ladder Shelf Media Console from tipping.
Drill the wall with 1/4” Drill Bit and install the Stud-Solver Anchor (4), align the Mounting Plate (5) on the
Middle Shelf (C) to the Stud-Solver Anchor (4) on the wall.
Secure using Screws (8) and tighten with Screwdriver.
19. For securing the Ladder Shelf Media Console from tipping.
Drill the wall with 1/4” Drill Bit and install the Stud-Solver Anchor (4), align the Mounting Plate (5) on the
Middle Shelf (C) to the Stud-Solver Anchor (4) on the wall.
Secure using Screws (8) and tighten with Screwdriver.
MULTIPLE LEANING WALL SHELVES/DESK ASSEMBLY
1
2
3
14 5 C 8 7
Page 19

Ladder Shelf Media Console
Échelle Console
Consola de estantería de escalera
6061816, 6061027 - Aug 30, 2016 Page 19 of 19
PLUSIEURS ÉTAGÈRES MURALES INCLINÉES/ASSEMBLAGE DU BUREAU
ENSAMBLAJE DE ESCRITORIO INCLINADO DE PARED CON MÚLTIPLES ESTANTES
20. If you purchased multiple leaning items, it is suggested that every two or more item be secured together. As
shown, connect every 2 units with 2 connecting plates. Attach each plate with 4 medium screws using a
screwdriver. Repeat steps for each additional leaning unit item.
20. Si vous avez acheté plusieurs objets inclinés, il est suggéré de fixer deux ou plusieurs objets ensemble. Comme
illustré, connecter chaque 2 unités à l’aide de 2 cales de montage. Fixer chaque cale avec 4 vis moyennes à
l’aide d’un tournevis. Répéter les étapes pour chaque objet incliné supplémentaire.
20. Si compró múltiples artículos inclinados, se recomienda asegurar cada dos o más artículos juntos. Como se
muestra, conectar cada dos unidades con 2 placas de conexión. Fijar cada placa con 4 tornillos medios y un
destornillador. Repetir los pasos para cada unidad inclinada adicional del artículo.
From the back side, align the holes on the metal plate to the corresponding holes on the back frame, secure
using screws and tighten with screw driver.
À partir de la partie arrière, aligner les trous sur la plaque métallique aux trous correspondants sur le cadre
arrière, fixer à l’aide des vis et serrer à l’aide du tournevis.
Desde la parte trasera, alinear los orificios en la placa de metal con los orificios correspondientes en la
estructura trasera, asegurar con tornillos y ajustar con un destornillador.
 Loading...