

Page 1
Important Safety Instructions:
•These instructions are provided for your safety. It is very important that they are read carefully and completely be
fore beginning the installation of this lighting xture.
•THIS PRODUCT MUST BE INSTALLED IN ACCORDANCE WITH THE APPLICABLE INSTALLATION CODES BY A PERSON
FAMILIAR WITH THE CONSTRUCTION AND OPERATION OF THE PRODUCT AND THE HAZARDS INVOLVED.
•We strongly recommend that a professional electrician install all direct wire xtures.
•This xture has been rated for up to (3) 60-Watt maximum Type A standard incandescent light bulbs (not
included) or 13-watt compact uorescent bulb (not included). To avoid the risk of re, do not exceed the
recommended lamp wattage.
•The lighting xture is meant for indoor use. It must be connected only to 3-wire, single-phase electrical
supply systems (provided with Ground wire or equivalent protection system).
• Save this instruction.
WARNING:
• To reduce the risk of re, electrical shock or personal injury, always turn o light xture and unplug, allowing it to
cool prior to replacing light bulb.
• Do not touch bulb when xture is turned on.
• Do not look directly at lit bulb. Keep ammable materials away from lit bulb.
SHUT OFF ALL THE MAIN ELECTRICAL SUPPLY FROM THE FUSE BOX / CIRCUIT BREAKER
Pre-assembly:
•Remove all parts and hardware from box along with any plastic protective packaging. Do not discard any contents
until after assembly is complete to avoid accidentally discarding small parts or hardware.
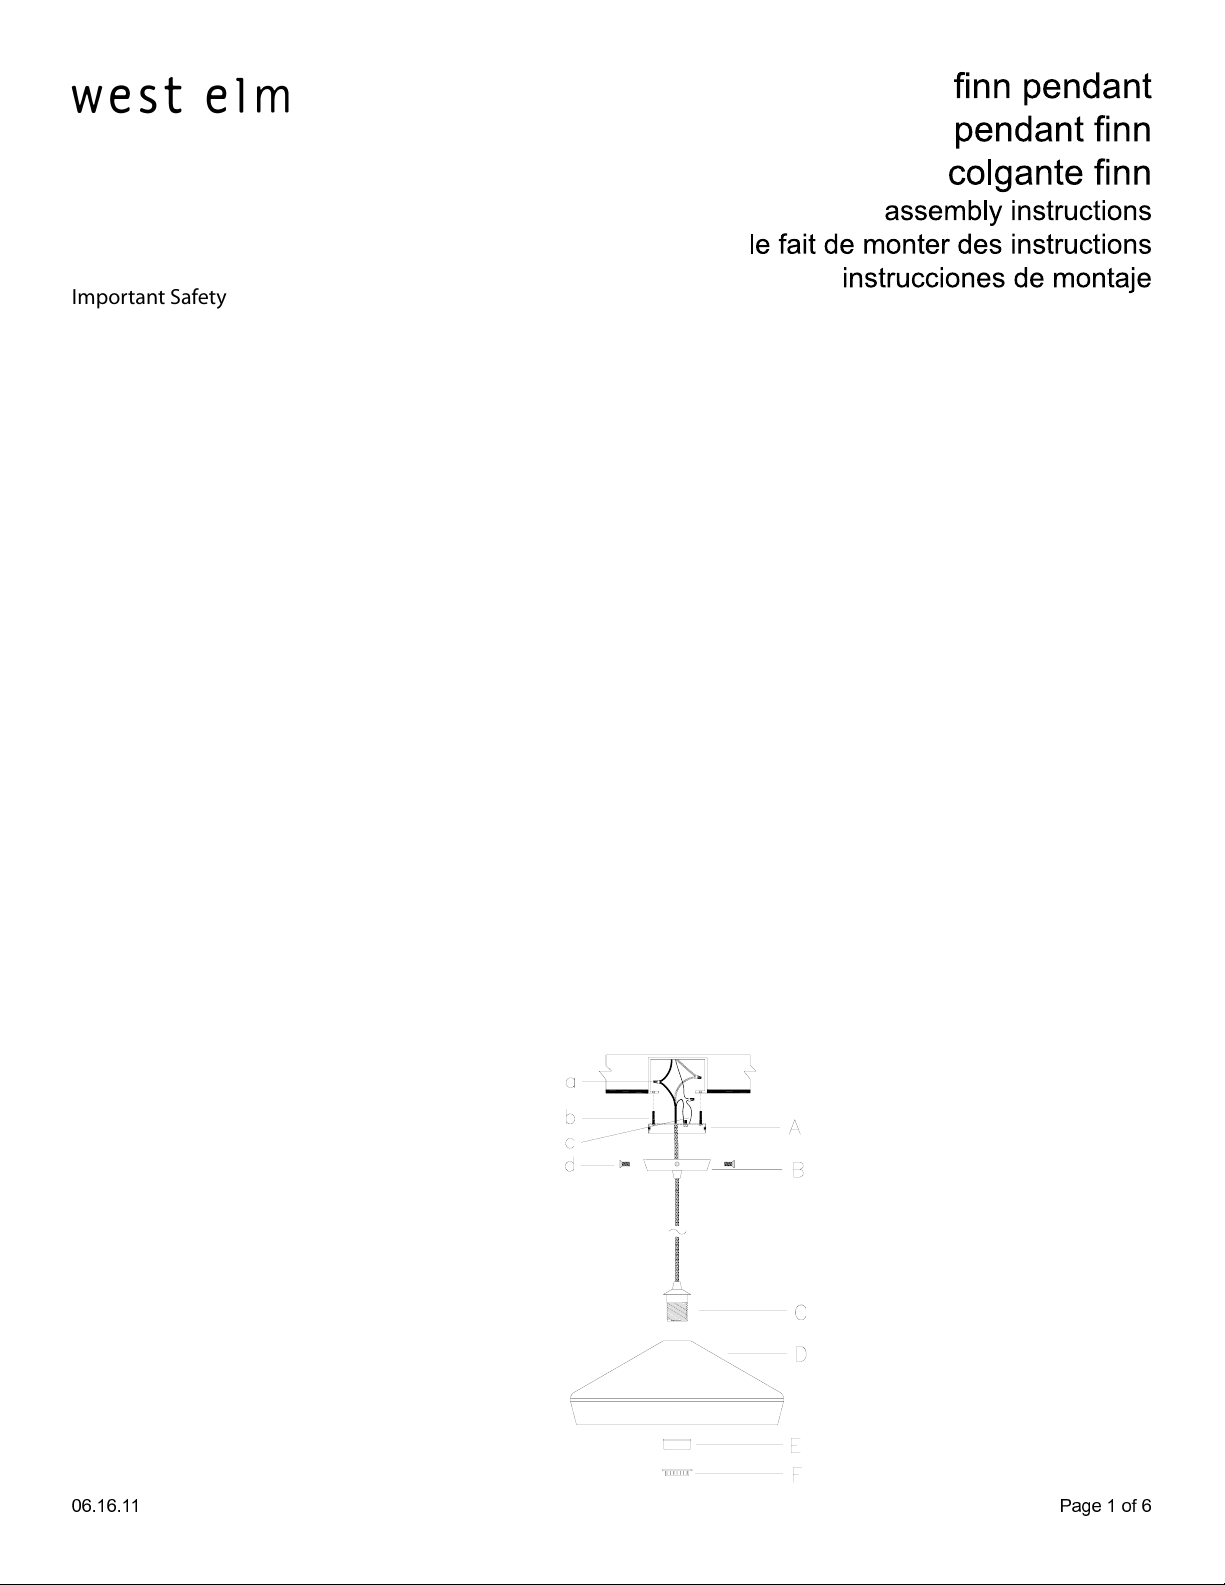
PARTS INCLUDED: HARDWARE ENCLOSED: TOOLS REQUIRED (not included)
(1)Mounting Plate (A) (3) Plastic wire connectors (a) 1. Electrical tape
(1)Canopy (B) (2) Mounting screws (b) 2. Screwdriver
(1)Socket (C) (1) Green ground screw (c) 3. Two people recommended
(1)Shade (D) (4) Flat head screws (d)
(1)Socket Cup (E)
(1) Shade Ring (F)
Page 2
To Assemble:
1. Carefully unpack all xture parts and hardware and lay them on a clean workspace.
2. Gently pull wiring down from ceiling junction box. Loosen the allen set screw on the canopy with the tool
provided and adjust the length of cord to achieve the desired hanging length. Tighten the allen set screw.
Cut o excess wire.
3. Carefully inspect the pendant’s xture wires. The NEUTRAL FIXTURE WIRE is marked in “N”. The HOT FIX
TURE WIRE is marked in “L”. And the GROUND WIRE is marked “Earth”.
4. Attach the Ground Wire from the xture to the Ground Junction Box Wire from the outlet (usually green or
bare wire). Fasten each together with a Plastic Wire Connector (a) and wrap the connection with electrical
tape. Be sure that no wire strands are exposed. If your outlet box DOES NOT have a GROUND WIRE, be sure
to insert the Green Ground Screw (c) into the Mounting Plate (A) facing DOWN, and wrap the xture’s bare
ground bare ground wire around the Green Ground Screw (c). IT IS IMPERATIVE THAT THE OUTLET BOX
IN YOUR HOME BE PROPERLY GROUNDED.
5. Connect the NEUTRAL FIXTURE WIRE (Marked “N”) to the NEUTRAL JUNCTION BOX WIRE (usually white).
Fasten each together with a Plastic Wire Connector (a) and wrap the connection with electrical tape. Be
sure no wire strands are exposed.
6. Connect the HOT FIXTURE WIRE (Marked “L”) to the HOT JUNCTION BOX WIRE (usually black).
Fasten each together with a Plastic Wire Connector (a) and wrap the connection with electrical tape. Be
sure no wire strands are exposed. DO NOT REVERSE THE HOT AND NEUTRAL CONNECTIONS OR SAFETY
WILL BE COMPROMISED.
7. Gently tuck the wire connections neatly into the ceiling junction box.
8. Attach the Mounting Plate (A) to the ceiling outlet box using the enclosed Mounting Screws (b). Tighten
screws with a screwdriver.
9. Pull Canopy (B) up over the Mounting Plate (A), align the holes in the Mounting Plate (A) with the
holes in the Canopy (B).
10. Insert the Flat Head Screws (d) and tighten with a screwdriver.
11. Unscrew the Shade Ring (F) from the Socket (C), place the Shade (D) onto the Socket (C), and attach
the Socket Cup (E) around the Socket (C), then secure it by turning the Shade Ring (F) in a clockwise
direction.
12. Insert a bulb-Max 60 watt maximum TYPE A standard incandescent light bulb (not included) or 13-watt
compact uorescent bulb (not included) into the socket (B). DO NOT EXCEED SPECIFIED WATTAGE.
13. Restore power to junction box and test xture.
Care instructions:
• Wipe clean with a soft, dry cloth or static duster.
• Always avoid the use of harsh chemicals or abrasive cleaners as they may cause damage to the xture’s
nish.
Page 3

Importantes Consignes de Sécurité:
• Ces instructions sont fournies pour votre sécurité. Il est important que vous les lisiez en entier et en détails
avant de commencer l’assemblage.
• CET ARTICLE DOIT ETRE INSTALLE PAR UNE PERSONNE FAMILIERE AVEC LA CONSTRUCTION ET L’UTILISATION
DE CE TYPE DE PRODUIT ET LES RISQUES ENCOURUS ET QUI PEUT L’INSTALLER EN SUIVANT BIEN LES REGU
LATIONS RELATIVES A CE TYPE DE PRODUIT.
• Nous recommandons vivement l’installation des câbles électriques par un électricien professionnel.
• Cet article a été évalué pour utilisation avec (3) ampoules standard incandescentes de Type A de 60 Watts
maximum (non fournies) ou des ampoules compactes uorescentes de 13 Watts (non fournies). Pour éviter
tout risque d’incendie, ne pas dépasser le voltage recommandé.
• Ce luminaire est conçu pour utilisation à l’intérieur. Il peut être connecté uniquement avec un système élec
trique à 3 câbles et de phase simple (avec système de protection avec prise de terre ou équivalent).
• Conservez ces instructions.
AVERTISSEMENT:
• Pour réduire tout risque d'incendie, choc électrique ou blessure corporelle, toujours éteindre et débrancher
le chandelier puis le laisser refroidir avant de changer les ampoules.
• Ne jamais toucher les ampoules quand le chandelier est allumé. Ne jamais regarder directement une am
poule.
• Tenir tout objet in ammable éloigné des ampoules. ETEIGNEZ LE SYSTEME ELECTRIQUE PRINCIPAL SUR LA
BOITE A FUSIBLES / DISJONCTEUR.
Avant de commencer l’assemblage:
• Sortez toutes les pièces et le matériel du carton d’emballage ainsi que tout emballage de protection en plas
tique.
• Conservez tous les éléments jusqu’à la n de l’assemblage pour éviter de jeter accidentellement petites
pièces ou matériel.
PIECES FOURNIES: MATERIEL FOURNI: OUTILS REQUIS (non fournis)
(1) Plaque de xation (A) (3) Embouts de connexioon en plastique (a) 1. Ruban adhésif électrique
(1) Voûte (B) (2) Vis de montage (b) 2. Tournevis
(1) Douille (C) (1) Vis de terre verte (c) 3. Deux adultes
(1) Abat-jour (D) (4) Vis à têtes plates (d)
(1) Bouchon de l’abat-jour (E)
(1) Anneau de l’abat-jour (F)
Page 4

1.De manera cuidadosa desempaque todas las partes y piezas y coloquelas en un lugar de trabajo despe
jado.
2. Tirez doucement sur le câblage en baisse par boîte de jonction de plafond. Desserrer la vis allen sur la
canopée avec l’outil fourni et ajuster la longueur du cordon pour atteindre la longueur désirée pendaison.
Serrer la vis de réglage Allen. Coupez l’excédent de câble.
3.Inspeccione cuidadosamente los cables de la unidad de iluminacion. El CABLE NEUTRAL DE LA UNIDAD
está marcado con la letra “N”. El CABLE CALIENTE DE LA UNIDAD está marcado con la letra “L”. El CABLE
TIERRA tiene escrito “Earth”.
4.Conecte el CABLE TIERRA de la unidad al CABLE TIERRA DE LA CAJA de CONECCION, de la salida de la
caja de coneccion(regularmente con una linea verde en su longitud). Conecte ambos con un Conector
de Cable (a) y luego cubra la conección con cinta electrica. Asegurese que no hay cable expuesto. Si su
caja de conección NO tiene un CABLE TIERRA , inserte el tornillo verde tierra (c) en el plato de montaje (A)
con la cara hacia abajo, y enrolle el cable tierra de la unidad alrededor del tornillo tierra (c). ES MUY IM
PORTANTE QUE LA CAJA DE CONECCION EN SU CASA ESTE CORRECTAMENTE ATERRADO!
5.Conecte el CABLE NEUTRAL DE LA UNIDAD al CABLE NEUTRAL DE LA CAJA DE CONECCION. Conecte am
bos con un Conector de Cable (a) y cubra la coneccion con cinta electrica. Asegurese que no quede cable
expuesto.
6.Conecte el CABLE CALIENTE DE LA UNIDAD (Marcado “L”) al CABLE CALIENTE DE LA CAJA DE CONECCION.
Conecte ambos con un Conector de Cable (a) y cubra la coneccion con cinta electrica. Asegurese que no
quede cable expuesto. ASEGURESE DE NO REVERTIR LAS CONECCIONES NEUTRAL Y CALIENTE YA QUE
PUEDE COMPROMETER LA SEGURIDAD.
7.Inserte las conecciones de cable a la caja de coneccion en el techo.
8.Coloque el plato de montaje (A), sobre la caja de conección utilizando los tornillos de montaje (b). Aprie
te con un destornillador.
9.Coloque el dósel (B) sobre el plato de montaje (A), en le los agujeros en el plato de montaje (A) con los
agujeros en el dósel (B).
10. Inserte los tornillos de cabeza plana (d) y apriete con un destornillador.
11.Destornille el anillo de pantalla (I) del sócate (F), coloque la pantalla (G) sobre el sócate (F), y anexe la
copa de sócate (H) sobre el sócate (F), asegure dando vueltas al anillo de pantalla (I) en sentido de las
manillas del reloj.
12.Con los pasos anteriores puede anlizar el ensamblaje de las otras dos pantallas (G)
13.Inserte un bombillo standard incandecente Tipo A de de 60 vatios (no incluido) o comapcto uorescente
de 13 vatios en el sócate (B). NO EXCEDA EL VATIAJE RECOMENDADO.
14.Restablezca la fuente de poder y pruebe la unidad.
Instrucciones de cuidado
Limpie con un paño suave, limpio y seco.
Siempre evite utilizar químicos o limpiadores abrasivos ya que pueden dañar el acabado de la unidad.
! " # $ % & '( ' ) * ' ) * *
Page 5

Intstrucciones de Seguridad Importante:
. Se proporcionan estas instrucciones para su seguridad. Es importante que las lea de manera detallada y completa
antes de ensamblar la unidad de iluminación.
. ESTE PRODUCTO DEBE SER INSTALADO DE ACUERDO A TODOS LOS CODIGOS DE INSTALACION APLICABLES POR UNA
PERSONA FAMILIARIZADA CON LA CONSTRUCCION Y OPERACION DEL PRODUCTO Y LOS PELIGROS RELACIONADOS.
. Se recomienda la instalacion por parte de un electricista profesional para todas las unidades de cable. Esta unidad ha
sido aprobada para hasta (3) bombillos incandescente standard TIPO A 60-vatios maximo (no inlcuidos) o bombillos
de 13 vatios compacto uorescente (no incluidos). Para evitar el riesgo de fuego, se recomienda no exceder el va
tiaje recomendado.
. Esta unidad de iluminación está diseñada para uso en interiores. Debe conectarse solo a una fuente de 3 cables de
sistema de fase sencilla (con cable de tierra o sistema de protección equivalente)
Guarde estas instrucciones.
Precaución:
. Para reducir el riesgo de fuego, choque electrico o lesiones personales, siempre apague la lampara y permita que se
enfrie antes de cambiar el bombillo.
. No toque el bombillo cuando la unidad este encendida.
. No mire al bombillo directamente cuando esté encendido.
. Mantenga todos los materiales in amables lejos del bombillo encendido. APAGUE LA FUENTE DE ENERGÍA PRINCI
PAL DE LA CAJA DE CIRCUITOS/FUSIBLES
Pre-ensamblaje:
. Retire todas las partes y piezas de las caja, junto con cualquier material de embalaje.
. No descarte ningun contenido hasta que haya nalizado el ensamblaje para evitar la perdida accidental de cualquier
parte o pieza pequeña.
Partes Incluidas:
(1) Plato de Montaje (A)
(1) Dosel (B)
(1) Tubo de 6” (C)
(3) Tubo de 12” (D)
(1) Unidad de iluminación (E)
(3) Sócates (F)
(3) Pantallas (G)
(3) Copas de Sócate (H)
(3) Anillos de Pantalla (I)
Para instalar necesitará:
Cinta eléctrica
Destornillador
Se recomienda dos personas
Piezas Incluidas:
(3) Conectores plásticos para cable (a)
(2) Tornillos de montaje (b)
(1) Tornillo Tierra Verde (c)
(4) Tornillos cabeza plana (d)
+ , - . / 0 1 23 2 4 5 2 4 5 5
Page 6

Instrucciones de Ensamblaje:
1.De manera cuidadosa desempaque todas las partes y piezas y coloquelas en un lugar de trabajo despejado.
2. Tire suavemente hacia abajo el cableado de la caja de unión del techo. A oje el tornillo allen en la copa
con la herramienta proporcionada y ajustar la longitud de la cuerda para conseguir la longitud deseada colgando. Apriete el tornillo allen. Cortar el exceso de cable.
3.Inspeccione cuidadosamente los cables de la unidad de iluminacion. El CABLE NEUTRAL DE LA UNIDAD
está marcado con la letra “N”. El CABLE CALIENTE DE LA UNIDAD está marcado con la letra “L”. El CABLE
TIERRA tiene escrito “Earth”.
4.Conecte el CABLE TIERRA de la unidad al CABLE TIERRA DE LA CAJA de CONECCION, de la salida de la caja
de coneccion(regularmente con una linea verde en su longitud). Conecte ambos con un Conector de Cable
(a) y luego cubra la conección con cinta electrica. Asegurese que no hay cable expuesto. Si su caja de conección NO tiene un CABLE TIERRA , inserte el tornillo verde tierra (c) en el plato de montaje (A) con la cara hacia
abajo, y enrolle el cable tierra de la unidad alrededor del tornillo tierra (c). ES MUY IMPORTANTE QUE LA
CAJA DE CONECCION EN SU CASA ESTE CORRECTAMENTE ATERRADO!
5.Conecte el CABLE NEUTRAL DE LA UNIDAD al CABLE NEUTRAL DE LA CAJA DE CONECCION. Conecte ambos con un Conector de Cable (a) y cubra la coneccion con cinta electrica. Asegurese que no quede cable
expuesto.
6.Conecte el CABLE CALIENTE DE LA UNIDAD (Marcado “L”) al CABLE CALIENTE DE LA CAJA DE CONECCION.
Conecte ambos con un Conector de Cable (a) y cubra la coneccion con cinta electrica. Asegurese que no
quede cable expuesto. ASEGURESE DE NO REVERTIR LAS CONECCIONES NEUTRAL Y CALIENTE YA QUE PUEDE COMPROMETER LA SEGURIDAD.
7.Inserte las conecciones de cable a la caja de coneccion en el techo.
8.Coloque el plato de montaje (A), sobre la caja de conección utilizando los tornillos de montaje (b). Apriete
con un destornillador.
9.Coloque el dósel (B) sobre el plato de montaje (A), en le los agujeros en el plato de montaje (A) con los
agujeros en el dósel (B).
10. Inserte los tornillos de cabeza plana (d) y apriete con un destornillador.
11.Destornille el anillo de pantalla (I) del sócate (F), coloque la pantalla (G) sobre el sócate (F), y anexe la copa
de sócate (H) sobre el sócate (F), asegure dando vueltas al anillo de pantalla (I) en sentido de las manillas del
reloj.
12.Con los pasos anteriores puede anlizar el ensamblaje de las otras dos pantallas (G)
13.Inserte un bombillo standard incandecente Tipo A de de 60 vatios (no incluido) o comapcto uorescente
de 13 vatios en el sócate (B). NO EXCEDA EL VATIAJE RECOMENDADO.
14.Restablezca la fuente de poder y pruebe la unidad.
Instrucciones de cuidado
Limpie con un paño suave, limpio y seco.
Siempre evite utilizar químicos o limpiadores abrasivos ya que pueden dañar el acabado de la unidad.
6 7 8 9 : ; < := : > ? : > ? ?
 Loading...