

Page 1

bond lateral fi le cabinet
assembly instructions
! Tools required:
! Do not throw away packaging materials until assembly is complete.
! Assemble this item on a soft surface, such as cardboard or carpet, to protect fi nish.
! Proper assembly of this item requires 2 people.
Page 1 of 107087851 - 09-29-08
Page 2

bond lateral fi le cabinet
assembly instructions
Hardware
AB
cam bolt 12x cam lock 12x
C
wood dowel 14x
D
bolt 8x
EF
spring washer 8x fl at washer 8x
G
long wood screw 22x
H
metal fi le bar 8x
Anti tip kit
Mounting Plate 4x Nylon Strap 2x
Large Screw 2x
Small Screw 2x
wall anchor 2x
Page 2 of 107087851 - 09-29-08
Page 3

bond lateral fi le cabinet
assembly instructions
12
frame 1x upper rail 1x
3
front rail 1x
4
back rail 1x
56
leg frame 2x rail 2x
7
top panel 1x
8
upper drawer frame 1x
910
11
lower drawer frame 1x drawer bottom panel 2x
12
drawer front panel 2x
drawer bottom rail 2x
Page 3 of 107087851 - 09-29-08
Page 4

bond lateral fi le cabinet
assembly instructions
1. Locate the 1 upper rail (2) and 1 front rail (3) and insert cam locks (B) into the holes as shown.
Note: the front rail (3) has 3 more bolt holes in it.
2. Lay the frame (1) on a clean smooth surface and open the hinged sides outward to 90 degrees.
3. Insert wooden dowels (C) into holes as shown. Screw cam bolts (A) into holes as shown.
C
A
Page 4 of 107087851 - 09-29-08
Page 5

bond lateral fi le cabinet
assembly instructions
4. Insert wooden dowels (C) into bottom of frame. Align back rail with theses dowels and attach using
bolt (D), spring washer (E), and at washer (F). Tighten with allen key.
C
F
E
D
Page 5 of 107087851 - 09-29-08
Page 6

bond lateral fi le cabinet
5. Locate the rails (6). Insert cam locks (B) into each end like the drawing shows.
6. Screw in cam bolts (A) into each leg frame (5) as shown.
assembly instructions
7. Assemble bottom frame by attaching the 2 rails (6) to the 2 leg frames (5) and tighten cam locks (B) with
supplied allen key.
Page 6 of 107087851 - 09-29-08
Page 7

bond lateral fi le cabinet
assembly instructions
8. Align assembled base frame with the holes in the bottom of the cabinet and attach using bolt (D),
spring washer (E), and at washer (F).
F
E
D
9. Screw cam bolt (A) into bottom of top panel (7). Insert wooden dowels (C) into top of cabinet frame.
Insert cam locks (B) into holes in top of cabinet sides. Align holes and place top panel down onto
cabinet. Tighten Cam locks (B) with phillips head screwdriver 1/2 turn.
Page 7 of 107087851 - 09-29-08
Page 8

bond lateral fi le cabinet
assembly instructions
10. Unfold upper drawer frame (8) and lower drawer frame (9). Slide drawer bottom panel (10) into slots
on sides of
11. Align drawer front panels (11) to drawer frames (8 & 9). Attach using long screws (G), tighten with phillips
head screwdriver. DO NOT OVERTIGHTEN.
12. Attach drawer bottom rail (12) to the bottom of each drawer using long screws(G). Tighten with
phillips head screwdriver. DO NOT OVERTIGHTEN.
Page 8 of 107087851 - 09-29-08
Page 9

bond lateral fi le cabinet
assembly instructions
13. After drawers are assembled insert metal le bars (H) where you would like them.
They will work for letter or legal les.
14. Insert drawers into cabinet. Align drawer guides and push drawer rmly into case until it closes all the
way into the case. Make sure that you install the top drawer into the top slot and the bottom drawer
into the bottom slot. Note the location of the bracket on the side of the drawers. The top drawer bracket
is near the bottom of the drawer, the top drawer bracket is near the top of the drawer.
NOTE: Install top drawer rst. Make sure
that the top arm of the anti tip device is
pulled forward towards the front of the
case before installing top drawer.
Top Drawer
Bottom Drawer
Page 9 of 107087851 - 09-29-08
Page 10
bond lateral fi le cabinet
assembly instructions
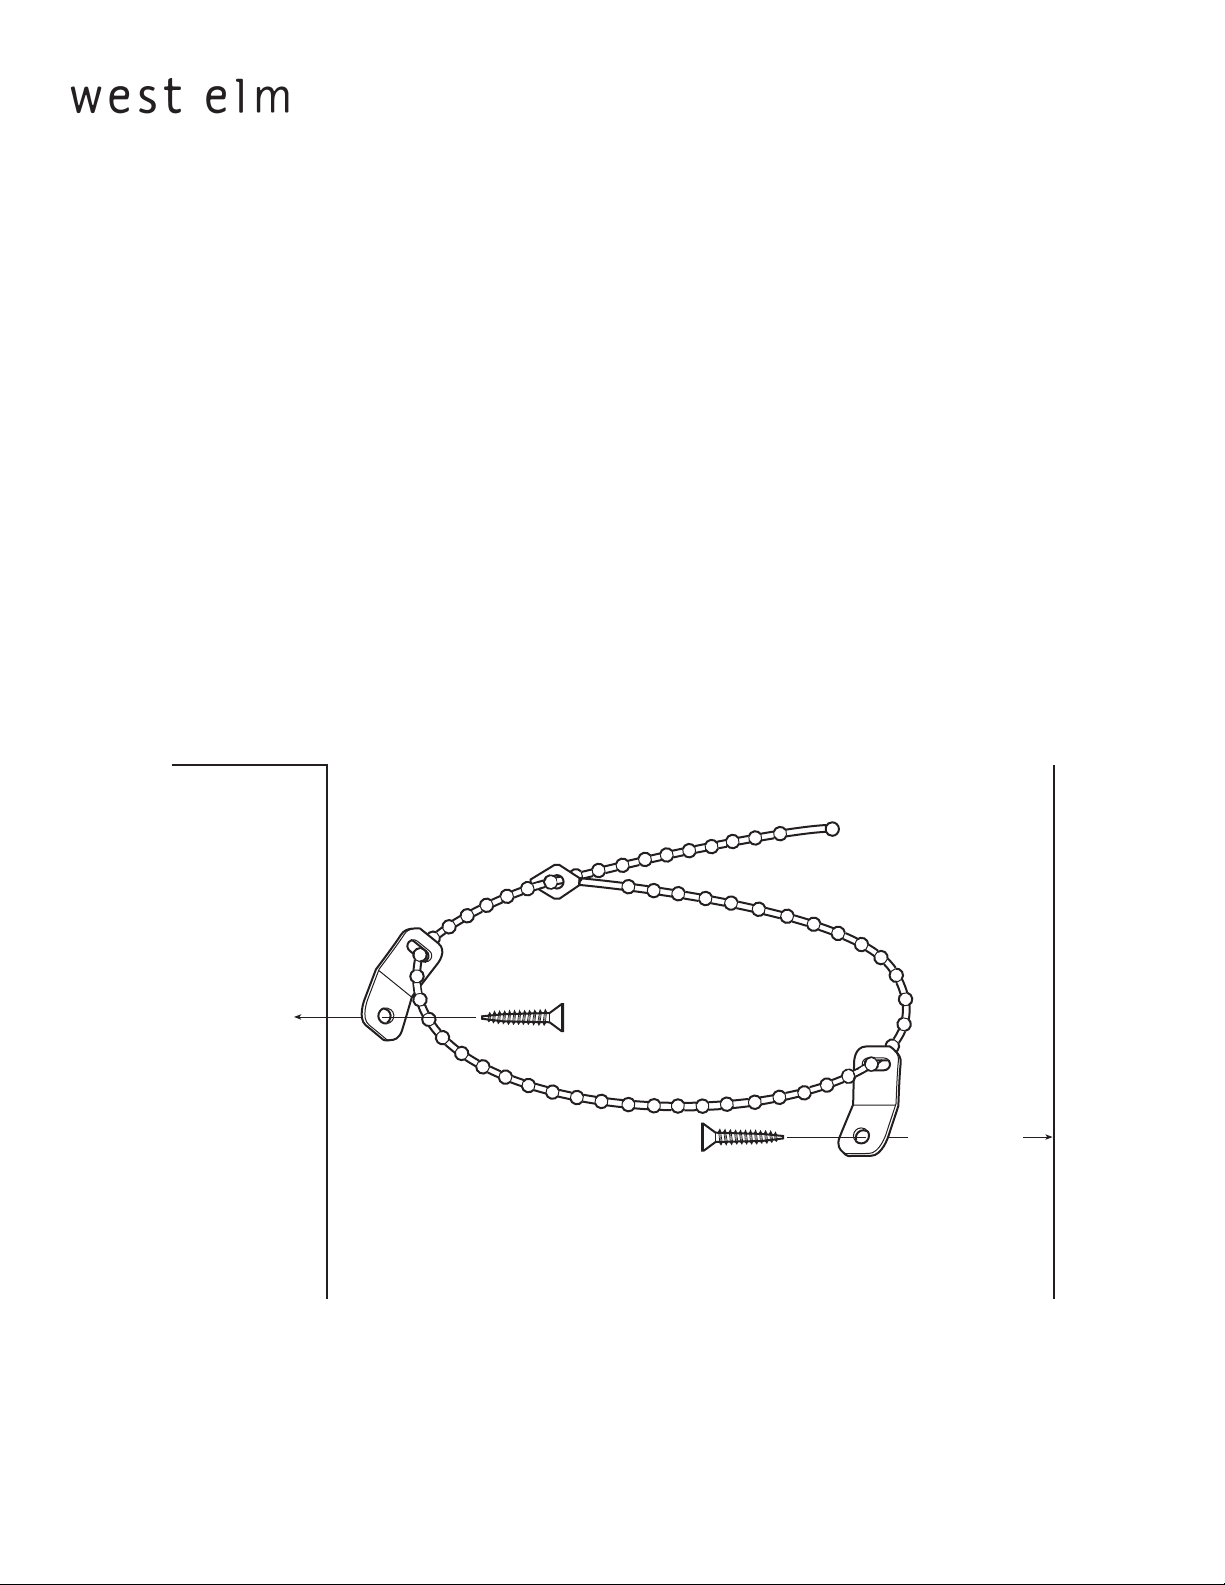
OVER BALANCE. To prevent injury and property damage from unexpected tipping of furniture, we highly recommend
installation of the two (2) sets of overbalance protection hardware included with this product.
1. Attach the two mounting brackets securely to the back edge of the furniture. Place one on
each of the side panels.
2. Determine where the furniture is to be placed and mark location on the wall for the other two
mounting bracket screw holes. It should be placed approximately 2” below the bracket mounted
to the furniture.
3. Drill a 3/16” hole in the wall. Press the plastic anchor into the hole and gently tap until the
flange on the anchor is against the wall surface.
4. Position the bracket over the anchor and use a screw to securely attach the bracket to the wall.
Repeat steps 3 and 4 for the second bracket .
5. Place the furniture so the brackets on the back edge is in line with the brackets on the wall.
6. Lace an end of the nylon restraint strap down through each bracket. Bring both ends together
and slide the beaded end of the strap through the keyhole shaped slot in the other end until
snug. Pull down on the beaded end until it snap locks into the keyhole slot.
7. To double lock, return the beaded end back through the keyhole.
8. Check to make sure the strap is securely laced and locked to the brackets.
back side.
9. Repeat steps 6 through 8 for the second bracket set.
wall.
CARE INSTRUCTIONS
Hardware may loosen overtime. Periodically check that all connections are tight.
Wipe with a soft, dry cloth. To protect nish, avoid the use of chemicals and household cleaners.
Page 10 of 107087851 - 09-29-08
 Loading...