

Page 1
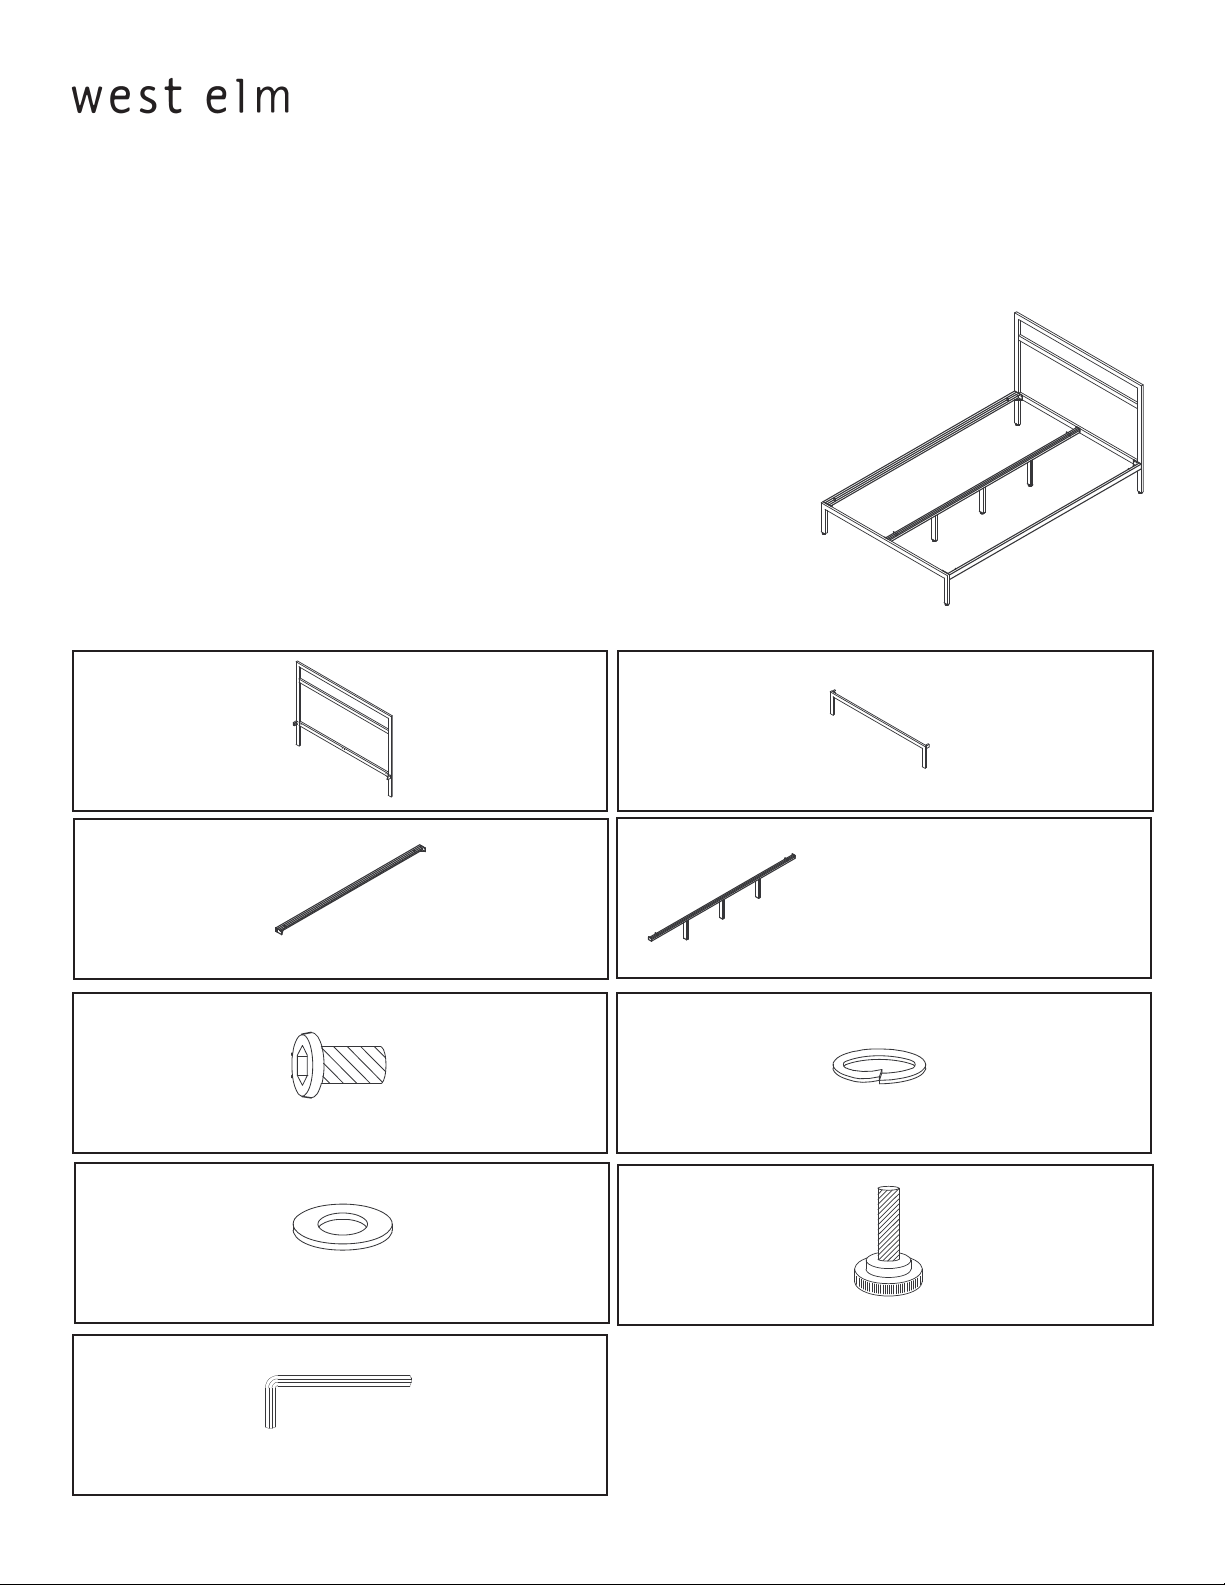
2x2 metal bed
lit métallique 2x2
2x2 cama de metal
assembly instructions
le fait de monter des instructions
! Do not throw away packaging materials until assembly is complete.
! Assemble this item on a soft surface, such as cardboard or carpet, to protect finish.
! Proper assembly of this item requires 2 people.
! Ne jetez pas le matériel d’emballage avant d’avoir terminé le montage.
! Montez cet article sur une surface lisse, telle que du carton ou un tapis, pour en protéger la finition
! Deux personnes sont nécessaires pour monter cet article de façon adéquate.
! No deseche los materiales de embalaje hasta terminar de armar el producto.
! Ensamble el producto sobre una superficie suave, como cartón o alfombra, para proteger su acabado.
! Se requieren 2 personas para armar adecuadamente el producto.
AB
instrucciones de montaje
C
E
G
1x 1x
!Does not come with twin frame!
!Cette pièce n’est pas présente en cas
d’encadrement double!
!No incluido con la cama twin!
2x
D
1x
F
20x
20x
H
20x
7x
I
1x
Page 1 of 402.08.10
Page 2
2x2 metal bed
lit métallique 2x2
2x2 cama de metal
assembly instructions
le fait de monter des instructions
instrucciones de montaje
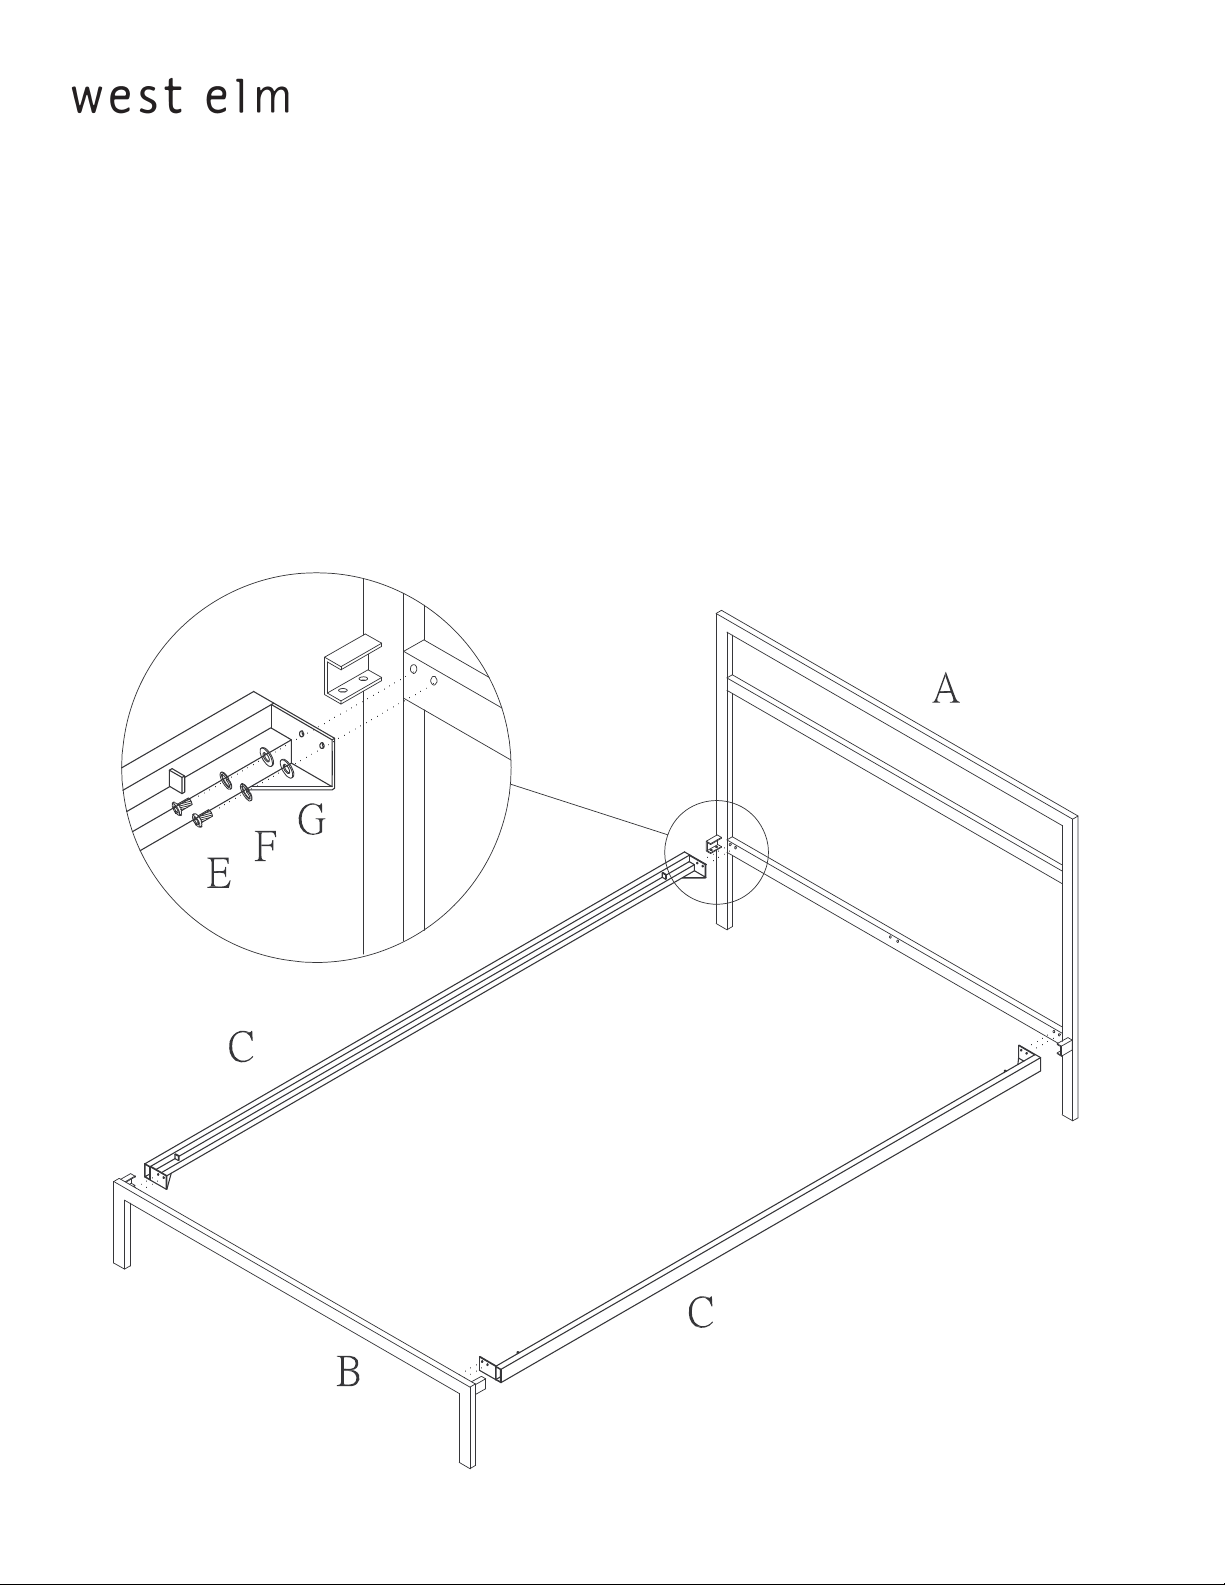
1.Align rails (C) with the headboard (A). Insert bolt (E), lock washer (F), and at washer (G). Tighten with
supplied hex key. Repeat for opposite side. Align footboard (B). Insert bolt (E), lock washer (F), and at
washer (G). Tighten with supplied hex key.
1. Aligner les rails (C) avec la tête de lit (A). Insérer les boulons (E), la rondelle frein (F), la rondelle plate (G).
Serrer avec la clé hexagonale fournie. Répéter pour l’autre coté. Aligner le pied de lit (B). Insérer le boulon
(E), la rondelle frein (F), et la rondelle plate (G). Serrer avec la clé hexagonale fournie.
1. En le los rieles (C) con la cabecera de la cama (A). Inserte perno (E), arandela de seguridad (F), y arandela
plana (G). Apriete con la llave hexagonal suministrada. Repita para el lado opuesto. En le la parte inferior
(B). Inserte el perno (E), arandela de seguridad (F), y arandela plana (G). Apriete con la llave hexagonal
suministrada.
Page 2 of 402.08.10
Page 3

2x2 metal bed
lit métallique 2x2
2x2 cama de metal
assembly instructions
le fait de monter des instructions
instrucciones de montaje
NOTE: Twin frames do not come with center support rail (D)! Skip this step.
2. Align center support rail (D) with headbaord (A). Insert bolt (E), lock washer (F), and at washer (G). Tighten
with supplied hex key. Insert bolt (E), lock washer (F), and at washer (G) into the footboard (B). Tighten
with supplied hex key.
2. Aligner le rail central de support (D) avec la tête de lit (A). Insérer le boulon (E), la rondelle frein (F), la ron
delle plate (G). Serrer avec la clé hexagonale fournie. Insérer le boulon (E), la rondelle frein (F) er la rondelle
plate (G) dans le pied de lit (B). Serrer avec la clé hexagonale fournie.
2. En le el riel central (D) con la cabecera de la cama (A). Inserte el perno (E), arandela de seguridad (F), y
arandela plana (G).Apriete con la llave hexagonal suministrada. Inserte el perno (E), arandela de seguridad
(F), y arandela plana (G) en la parte inferior (B). Apriete con la llave hexagonal suministrada.
Page 3 of 402.08.10
Page 4

2x2 metal bed
lit métallique 2x2
2x2 cama de metal
assembly instructions
le fait de monter des instructions
instrucciones de montaje
3. Insert bolt (E), lock washer (F), and at washer (G) into the bottom of the side rails like the drawing shows.
Tighten with supplied hex key. Insert adjustable levelers (H) in the bottom of the legs of the headboard
and the footboard. Hand tighten levelers. You may need to adjust the levelers to accomodate uneven
ooring.
3. Insérer le boulon (E), la rondelle frein (F) et la rondelle plate (G) dans le fond des rails latéraux comme
montré dans le dessin. Serrer avec la clé hexagonale fournie. Insérer les niveleurs réglables (H) aux extrémi
tés inférieures des jambes de la tête et du pied de lit. Serrer à main les niveleurs. Peut-être vous aurez be
soin de régler les niveleurs pour accommoder l’article sur des planchers irréguliers.
3. Inserte el perno (E), arandela de seguridad (F), y arandela plana (G) en la parte inferior de los rieles como
se muestra en el grá co. Apriete con la llave hexagonal suministrada. Inserte los niveladores ajustables (H)
en la parte inferior de las patas de la cabecera y de la parte inferior. Apriete los niveladores con las manos.
Quizá necesite ajustar los niveladores para acomodarlos a su piso.
CARE INSTRUCTIONS
Hardware may loosen overtime. Periodically check that all connections are tight.
Wipe with a soft, dry cloth. To protect nish, avoid the use of chemicals and household cleaners.
les pieces de xation peuvent se desserrer apres un certain temps. Veri ez de temps a autre
pour vous assurer que tous les raccords sont serrés.
Essuyez avec un chi on doux et sec. Pour eviter d’endommager la nition, n’utilisez pas de
produits chimiques ni de nettoyants ménagers.
Los herrajes se peuden a ojar con el tiempo. Revise periodicamente qur todas las
conexiones estén bien apretadas.
Use un trapo suave y seco para limpiar. Para proteger el acabado, no utilice limpiadores
domésticos ni productos químicos.
Page 4 of 402.08.10
 Loading...