

Installation/User Guide
Model # – WebShare
Part # – 030-300109 Rev C
Revision Date – 09/2000
EBSHARE
W
2000 Westell, Inc.
ADSL
36R566 P
ROXY ROUTER
User Guide
Printed in the USA
030-300109C

Model # –WebShare
Part # – 030-300109 Rev C
Revision Date – 09/2000
Installation/User Guide
S
OFTWARE LICENSE AGREEMENT
READ THE TERMS AND CONDITIONS OF THIS LICENSE AGREEMENT CAREFULLY. THIS SOFTWARE IS COPYRIGHTED AND LICENSED (NOT SOLD).
BY SELECTING “I ACCEPT” YOU ARE ACCEPTING AND AGREEING TO THE TERMS OF THIS LICENSE AGREEMENT. IF YOU ARE NOT WILLING TO BE
BOUND BY THE TERMS OF THIS LICENSE AGREEMENT, YOU SHOULD PROMPTLY RETURN THE SOFTWARE TO W ESTELL TECHNOLOGIES, INC.
AND YOU WILL RECEIVE A REFUND OF THE LICENSE FEE PAID. THIS LICENSE AGREEMENT REPRESENTS THE ENTIRE AGREEMENT
CONCERNING THE SOFTWARE BETWEEN YOU AND W ESTELL TECHNOLOGIES, INC. (REFERRED TO AS "LICENSOR"), AND IT SUPERSEDES ANY
PRIOR PROPOSAL, REPRESENTATION, OR UNDERSTANDING BETWEEN THE PARTIES.
1. License Grant. Licensor hereby grants to you, and you accept, a nonex clusive license to use the SOFTWARE Diskettes and the com puter program s contained
therein in machine-readable, object code form only (collectively referred to as the "SOFTWA RE" ), and the accom panying User Docum entation, onl y as authorized
in this License Agreement. The SOFTWARE may be used only in connection with the number of systems for which you have paid license fees as dictated in your
support agreement. You agree that you will not assign, sublicense, transfer, pledge, lease, rent, or share your rights under t his License Agreement. You agree
that you may not reverse assemble, reverse compile, or otherwise translate the SOFTWARE.
You may retain the SOFTWARE D iskettes for backup purposes only. In addition, you may make one copy of the SOFTWARE in any storage m edium for back up
purposes only. You may make one copy of the User's Manual for backup purposes only. Any such copies of the SOFTWARE or the U ser's Manual shall include
Licensor's copyright and other proprietary notices. Except as authorized under this paragraph, no copies of the SOFTWARE or any portions thereof may be made
by you or any person under your authority or control.
2. Licensor's Rights. You acknowledge and agree that the SOFTWARE and the User's Manual are proprietary products of Licensor protected under U.S.
copyright law. You further acknowledge and agree that all right, title, and interests in and to the SOFTW AR E, i ncluding associ ated intell ectual property rights, are
and shall remain with Licensor. This License Agreement does not convey to you an interest in or to the SOFTWARE, but only a li mited ri ght of use revocable in
accordance with the terms of this License Agreement.
3. License Fees. The fees paid by you under the support agreement are paid in consideration of the licenses granted under this License Agreement.
4. Term. This License Agreement is effective upon your opening of this package and shall continue until term inated. You m ay terminate this License A greem ent
at any time by returning the SOFTWARE and all copies thereof and extracts therefrom to Licensor. Licensor may terminate this L icense Agreement upon the
breach by you of any term hereof. Upon such termination by Licensor, you agree to return to Licensor the SOFTWARE and all copies and portions thereof.
5. Limited Warranty. Licensor warrants, for your benefit alone, for a period of 90 days from the date of commencement of thi s Li cense Agreement (referred to as
the "Warranty Period") that the SOFTWARE Diskettes in which the SOFTWARE is contained are free from defects in material and workmanship. Licensor further
warrants, for your benefit alone, that during the Warranty Period the SOFTWARE shal l operate substanti ally in accordance with the functional specificati ons in the
User's Manual. If during the Warranty Period, a defect in the SOFTWA RE appears, you may return the SOFTWARE to Licensor for replacement. You agree that
the foregoing constitutes your sole and exclusive remedy for breach by Licensor of any warranties made under this Agreement. EXCEPT FOR THE
WARRANTIES SET FORTH ABOVE, THE SOFTWARE DISKETTES, AND THE SOFTWARE CONTAINED THEREIN, ARE LICENSED "AS IS," AND
LICENSOR DISCLAIMS ANY AND ALL OTHER WARRANTIES, WHETHER EXPRESS OR IMPLIED, INCLUDING, WITHOUT LIMITATION, ANY IMPLIED
WARRANTIES OF MERCHANTABILITY OR FITNESS FOR A PARTICULAR PURPOSE.
6. Limitation of Liability. Licensor's cumulative liability to you or any other party for any loss or damages resulting from any claims, demands, or actions arising out
of or relating to this Agreement shall not exceed the license fee paid to Licensor for the use of the SOFTW ARE. In no event shall Licensor be liable for any
indirect, incidental, consequential, special, or exemplary damages or lost profits, even if Licensor has been advised of the possibility of such damages. SOME
STATES DO NOT ALLOW THE LIMITATION OR EXCLUSION OF LIABILITY FOR INCIDENTAL OR CONSEQUENTIAL DAMAGES, SO THE ABOVE
LIMITATION OR EXCLUSION MAY NOT APPLY TO YOU.
7. Governing Law. This License Agreement shall be construed and governed in accordance with the laws of the State of Illinois. You submit to the jurisdiction of
the state and federal courts of the state of Illinois and agree that venue is proper in those courts with regard to any litigation arising under this Agreement.
8. Costs of Litigation. If any action is brought by either party to this License Agreement against the other party regarding the subject matter hereof, the prevailing
party shall be entitled to recover, in addition to any other relief granted, reasonable attorney fees and expenses of litigation.
9. Severability. Should any term of this License Agreement be declared void or unenforceable by any court of competent jurisdiction, such declaration shall have
no effect on the remaining terms hereof.
10. No Waiver. The fail ure of either party to enforce any rights granted hereunder or to take action against the other party in the event of any breach hereunder
shall not be deemed a waiver by that party as to subsequent enforcement of rights or subsequent actions in the event of future breaches.
This equipment has been tested and f ound to c omply with the limits for a Class B digital device, pursuant to Par t
15 of the FCC Rules. These limits are designed to provide reasonable protection against har mful interference in
a residential installation. This equipm ent generates, uses and can radiate radio frequency energy and, if not
installed and used in accordance with the instructions, may cause harmf ul inter f erenc e to r adio communications.
However, there is no guarantee that interference will not occur in a particular installation. If this equipment does
cause harmful inter ference to radio or television reception, which can be determined by turning the equipm ent
OFF
and ON, the user is encouraged to try to correct the interference by one or more of the following measures:
•
Reorient or relocate the receiving antenna.
•
Increase the separation between the equipment and receiver.
•
Connect the equipment to a different circuit from that to which the receiver is connected.
•
Consult the dealer or an experienced radio/TV technician for help.
2000 Westell, Inc.
FCC COMPLIANCE NOTE
i Printed in the USA
030-300109C

Model # –WebShare
Part # – 030-300109 Rev C
Revision Date – 09/2000
Installation/User Guide
This equipment also complies with Part 68 of the FCC rules. ON the bottom of this equipment is a label that contains,
among other information, the FCC registration number and ringer equivalence number (REN) for this equipment. If
requested, this information must be provided to the telephone company.
An FCC compliant telephone cord and modular plug is provided with the equipment. This equipment is designated to be
connected to the telephone network or premises wiring using a compatible modular jack which is Part 68 compliant. See
Installation Instructions for details.
If this terminal equipment, 36R505 USB ADSL modem, causes harm to the telephone network, the telephone company will
notify you in advance that temporary discontinuance of service may be required. But if advance notification is not practical,
the telephone company will notify the customer as soon as possible. Also, you will be advised of your right to file a
complaint with the FCC if you believe it is necessary.
The telephone company may make changes in its facilities, equipment, operations or procedures that could affect the
operation of the equipment. If this happens, the telephone company will provide advance notice in order for you to make
the necessary modifications to maintain uninterrupted service.
If you experience trouble with this equipment, 36R505 USB ADSL modem, do not try to repair yourself. The equipment can
not be repaired in the field and must be returned to the manufacturer. Please contact: Westell Customer Support,
(630)898-2500. D
O NOT
return damaged merchandise to Westell until you have first obtained a Return Material
Authorization from Westell. For return of material, contact your Westell Customer Support representative.
This equipment can not be used on public coin phone service provided by the telephone company. Connection to party line
service is subject to state tariffs.
CANADA CERTIFICATION NOTICE
The Industry Canada label identifies certified equipment. This certification means that the equipment meets certain
telecommunications network protective, operational and safety requirements as prescribed in the appropriate Terminal
Equipment Technical Requirements document(s). The department does not guarantee the equipment will operate to the
user's satisfaction.
Before installing this equipment, users should ensure that it is permissible to be connected to the facilities of the local
Telecommunications Company. The equipment must also be installed using an acceptable method of connection. The
customer should be aware that compliance with the above conditions might not prevent degradation of service in some
situations.
A representative designated by the supplier should coordinate repairs to certified equipment. Any repairs or alterations
made by the user to this equipment, or equipment malfunctions, may give the telecommunications company cause to
request the user to disconnect the equipment.
Users should ensure for their own protection that the electrical ground connections of the power utility, telephone lines and
internal metallic water pipe system, if present, are connected together. This precaution may be particularly important in
rural areas.
CAUTION
Users should not attempt to make such connections themselves, but should contact the
appropriate electrical inspection authority, or electrician, as appropriate.
TRADEMARKS
The respective companies own all trademarks.
2000 Westell, Inc.
ii Printed in the USA
030-300109C

Model # –WebShare
Part # – 030-300109 Rev C
Revision Date – 09/2000
Installation/User Guide
CONTENTS
ADSL WEBSHARE PROXY ROUTER USER GUIDE ............................................................................................5
RODUCT DESCRIPTION
1. P
....................................................................................................................................5
WebShare Proxy Router Benefits...................................................................................................................5
Minimum System Requirements.....................................................................................................................5
1.1 Inspection.................................................................................................................................................6
1.2 Package Contents....................................................................................................................................6
AFETY
2. S
NSTALLATION
3. I
............................................................................................................................................................6
...................................................................................................................................................7
3.1 Installing on Hollow, Drywall Surfaces (Optional).....................................................................................7
3.2 Single User Setup ....................................................................................................................................7
3.3 Multiple User Setup...................................................................................................................................8
3.4 Connectors.............................................................................................................................................10
3.5 LED Indicators........................................................................................................................................10
NSTALLING THE WEBSHARE UTILITIES SETUP SOFTWARE ON YOUR
4. I
PC ..........................................................12
4.1 WebShare Utilities Setup Installation Procedure ...................................................................................12
4.1.1 Windows 95, 98 and NT .................................................................................................................................13
4.1.2 TCP/IP Configuration......................................................................................................................................14
4.1.3 Enabling DHCP for Windows NT....................................................................................................................16
4.1.4 Disabling Autodial.......................................................................................................................................18
ETTING UP YOUR ACCOUNT
5. S
..........................................................................................................................19
5.1 Account Parameters...............................................................................................................................19
5.1.1 Setting or Verifying VPI/VCI Parameters........................................................................................................20
ONNECTING TO AN ACCOUNT
6. C
........................................................................................................................21
6.1 Activating a PPP Session.......................................................................................................................21
6.2 Disconnecting from a PPP Session .......................................................................................................24
ONFIGURING WEBSHARE
7. C
..............................................................................................................................25
7.1 Accessing the WebShare Management Interface .................................................................................25
7.2 Adding and Configuring Additional WebShare Accounts.......................................................................26
EBSHARE MANAGEMENT INTERFACE
8. W
...........................................................................................................29
8.1. Management Menu ...............................................................................................................................29
8.1.1 Home Page.....................................................................................................................................................29
8.1.1.1 Home Page Main Window ......................................................................................................................30
8.1.1.2 Connections............................................................................................................................................30
8.1.1.3 Connect/Disconnect................................................................................................................................30
8.1.1.4 Edit/New..................................................................................................................................................30
8.1.1.5 Status......................................................................................................................................................30
8.1.1.6 Building New Accounts...........................................................................................................................31
8.1.1.7 Setting DNS Primary and Secondary IP Addresses ...............................................................................31
8.1.1.8 Connecting to a PPP Account.................................................................................................................31
8.1.2. Diagnostics....................................................................................................................................................31
8.1.2.1 Accessing the Main Diagnostics Page....................................................................................................31
8.1.2.2 Test All....................................................................................................................................................32
8.1.2.3 Self-Test..................................................................................................................................................33
8.1.2.4 WebShare Proxy Router.........................................................................................................................33
8.1.2.5 PPP Connection......................................................................................................................................33
8.1.2.6 IP Router.................................................................................................................................................33
8.1.2.7 PING.......................................................................................................................................................34
8.1.3 New Software Installation Page......................................................................................................................34
8.1.4 LAN Advanced Page ......................................................................................................................................34
8.1.4.1 Accessing the LAN Advanced Configuration Dialog Box........................................................................34
2000 Westell, Inc.
iii Printed in the USA
030-300109C

Model # –WebShare
Part # – 030-300109 Rev C
Revision Date – 09/2000
Installation/User Guide
8.1.4.2 Router IP Discovery and Factory Default Reset .....................................................................................35
8.1.4.3 IP Address ..............................................................................................................................................36
8.1.4.4 Subnet Mask..........................................................................................................................................36
8.1.4.5 Domain Naming System (DNS) Primary................................................................................................36
8.1.4.6 Domain Naming System (DNS) Secondary............................................................................................37
8.1.4.7 Dynamic Host Configuration Protocol (DHCP)........................................................................................37
8.1.4.8 DHCP Base Address...............................................................................................................................37
8.1.4.9 DHCP End Address ................................................................................................................................37
8.1.4.10 Inactivity Timer Timeout........................................................................................................................37
8.1.4.11 Static NAT.............................................................................................................................................37
8.1.5 About Page.....................................................................................................................................................37
ROUBLESHOOTING
9. T
........................................................................................................................................38
9.1 WebShare Error Messages...................................................................................................................38
RODUCT ASSISTANCE AND GENERAL INQUIRIES
10. P
...........................................................................................39
10.1 Product Return.....................................................................................................................................39
10.2 Inspection.............................................................................................................................................40
RODUCT SPECIFICATIONS
11. P
...........................................................................................................................40
APPENDIX A .........................................................................................................................................................42
INDOWS
W
2000, A
PPLE
MAC/IMAC, L
INUX SUPPORT
.........................................................................................42
INDEX....................................................................................................................................................................43
2000 Westell, Inc.
iv Printed in the USA
030-300109C

Model # –WebShare
Part # – 030-300109 Rev C
Revision Date – 09/2000
Installation/User Guide
ADSL WEBSHARE PROXY ROUTER USER GUIDE
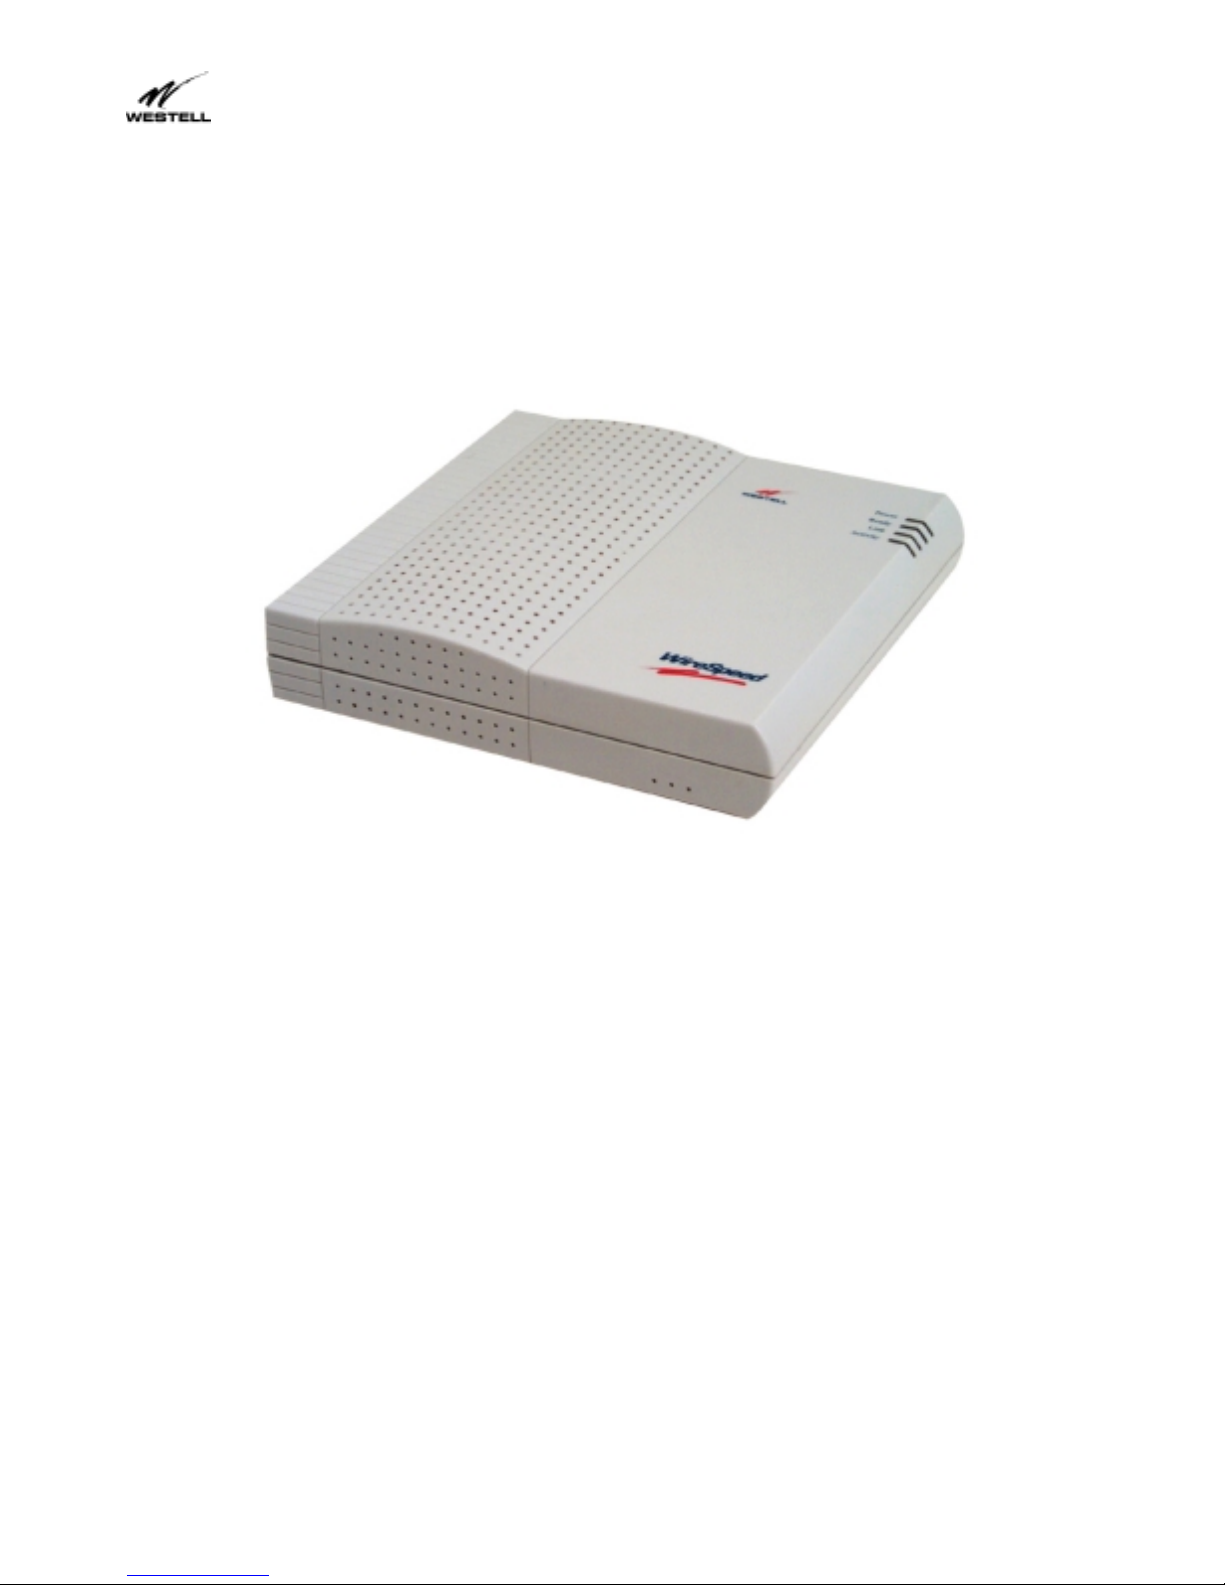
1. Product Description
Wes tell’s WebShare Proxy Router uses an ex isting phone line to pr ovide multiple users with a
reliable, high-speed, Internet access for home or office. The WebShare Proxy Router
converts an existing phone line into a dedicated, high-speed connection ending the
inconvenience of dial-up modems and busy signals.
The W ebShare Proxy Router provides downstream data rates of 8 Mbps and upstream rates
of 800 kbps, 140 times faster than a 56K analog m odem. Unlik e traditional analog modems ,
with Westell’s WebShare Proxy Router the same phone line can be used for voice/fax
communications and high-speed Internet access simultaneously, eliminating the need for
separate voice and data lines.
Westell’s WebShare Proxy Router enables multiple users to simultaneously share a single high-speed ADSL
Internet connection. WebShare is the perfect solution for a low cost multi-user residential or small business
network.
The WebShare Proxy Router uses the widely popular Point to Point Protocol over Ethernet (PPPoE) data
protocol to connect to your Internet service provider (ISP). LAN network setup is a breeze through the use of
Network Address Translation (NAT) and Dynamic Host Control Protocol (DHCP). With NAT, your Westell
WireSpeed Ethernet WebShare Proxy Router is viewed by the Internet as a single IP address. This hides the IP
addresses of the PCs on the LAN from the Internet providing a simple form of network security. W ith DHCP,
WebShare will autom atically assign an IP address to each PC on the network, thereby removing the chore of
local IP address management.
WebShare Proxy Router Benefits
•
Multiple Users can share a single Internet connection
•
No need to tie up a PC to serve as a router
•
No need to pay for multiple IP addresses
•
No need to load Point to Point Protocol over Ethernet (WebShare) on each of the networked PCs
•
Can retain IP addresses of the existing LAN
Minimum System Requirements
The following requirements outline the minimum system for WebShare:
•
Westell WireSpeed Modem
•
Pentium or equivalent and above class machines
•
Microsoft Windows 95, 98, or NT 4.0
•
Internet Explorer 4.x or Netscape Navigator 4.x installed
•
At least 16 MB RAM
•
5 MB of Free Hard Drive Space
•
Ethernet Connection between upgrading PC and ADSL Modem
•
TCP/IP Protocol stack installed
2000 Westell, Inc.
5
Printed in the USA
030-300109C

Model # –WebShare
Part # – 030-300109 Rev C
Revision Date – 09/2000
Installation/User Guide
•
Multi-port Ethernet 10BaseT hub (for multiple users)
•
VGA Monitor
•
Cross over Ethernet cable for Modem to Ethernet Hub
•
VPI/VCI Values (provided by your service provider)
•
PPPoE Support (provided by your service provider)
ADSL signals must be blocked from reaching eac h telephone, answering machine, fax machine, conventional
computer mode or any similar conventional devices. Failure to do s o may degrade telephone voice quality and
ADSL performance. There are two ways to block the ADSL signal from telephone equipment:
Method 1. Microfilters – Install a microfilter at each telephone jac k being used for a phone, answering
machine, fax mac hine or other telephone device. Microfilter installation is sim ple and requires no tools
or telephone rewiring. Just unplug the telephone device from the baseboard or wall mount and snap in a
microfilter, then snap in the telephone devic e. Contact Westell to obtain a m icrofilter kit (W estell part
number A90-36FK201) which contains multiple microfilters for your installation.
Method 2: POTS Splitter – Install a POTS splitter (Westell model 32RTPSGNA1) at the telephone
service entry point. Installation of a POTS splitter may require telephone rewiring, therefore, POTS
splitter installation is typically performed by your service provider. If you choose to use a POTS splitter ,
contact your telephone company or service provider for installation.
1.1 Inspection
Upon receipt, thoroughly inspect the unit for damage. If the unit has been damaged during transit, report the
damage immediately to the Transportation Company and Wes tell Custom er Support. T he transportation car rier
assumes responsibility for safe delivery of goods. Refer to Section 10 for further information.
1.2 Package Contents
The WebShare Proxy Router is shipped with a power supply and straight through Ethernet cable.
You may have to supply the following cables:
•
10BaseT crossover cable with RJ45 connectors for Ethernet hub to WebShare Proxy Router
connection
•
RJ11 modular cable for phone line to WebShare Proxy Router connection
2. Safety
Follow these safety precautions before installing any electronic equipment:
1. Never install any telephone wiring during a lightning storm.
2. Never install telephone jacks in wet locations unless the jack is specifically designed for wet locations.
3. Never touch uninsulated telephone wires or terminals unless the telephone line has been disconnected
at the network interface.
4. Use caution when installing or modifying telephone lines.
5. When installed, this equipment is to be used behind devices that provide primary lightning protection.
Risk of electric shock. Voltages up to 140 Vdc (with reference to ground)
may be present on telecommunications circuits.
2000 Westell, Inc.
WARNING
6
Printed in the USA
030-300109C

Model # –WebShare
Part # – 030-300109 Rev C
Revision Date – 09/2000
Installation/User Guide
3. Installation
The WebShare Proxy Router operates up to 300 feet (91.4 M) from a PC or Ethernet hub over 100-Ohm,
Category 5 cable.
If the WebShare Proxy Router is to be installed on a wall, follow the instructions in Paragraph 3.1. When the unit
is secured to the wall, proceed to Paragraph 3.2 for instructions on connecting the unit.
3.1 Installing on Hollow, Drywall Surfaces (Optional)
To mount the WebShare Proxy Router to a wall:
1. Obtain two pan-head screws (one #8 and one #6) and two #4 - #8 wall anchors (not provided).
2. Place the WebShare Proxy Router against the wall where it is to be mounted, note and m ark the upper
keyhole slot and screw location.
3. Drill a 3/16” hole for the upper anchor and insert the anchor and lar ger (#8) screw until the face of the
screw is approximately 3/16” from the wall.
4. Test fit the unit on the screw, and adjust the screw depth for a sliding fit.
5. With a pencil, mark the opening in lower mounting tab. Remove the unit from the wall.
6. Drill a 3/16” hole for the lower anchor and insert anchor. Hang the unit on the upper screw.
7. Insert the smaller (#6) screw through the hole in the lower mounting tab.
8. Tighten the lower screw lightly with a screwdriver. Do not overtighten.
3.2 Single User Setup
Refer to the wiring diagrams shown in Figure 1 and Figure 3.
1. Connect the power supply cord to the power connector on the side of the unit and plug it into the wall power
receptacle.
2. Connect a standard RJ11 telephone cable from the LINE connector to the ADSL-equipped phone line.
3. Connec t the straight 10BaseT c able (inc luded with this package) to the ETHERNET connector on the s ide of
the unit to the interface on the computer. A crossover cable may be required when connecting to other
equipment, such as an Ethernet hub (See Section 3.3 “Multiple User Setup” below).
4. Turn the power switch ON.
5. The Ready LED should be a solid green indicating that the power self-test has succes sfully completed and
the unit is synchronized with the ADSL line card. It may take up to 70 seconds for the unit to synchronize
with the central office ADSL unit.
2000 Westell, Inc.
7
Printed in the USA
030-300109C

Model # –WebShare
Part # – 030-300109 Rev C
Revision Date – 09/2000
Installation/User Guide
6. The Link LED should be solid green indicating that the CPE connection has been made.
7. During use, a pulsing yellow Activity LED indicates that data is being transmitted and received on the
Ethernet interface.
8. Proceed to section 4 to configure the software.
TO ADSL LINE
LINE
POWER
WEBSHARE
ETHERNET
TO PC/LAN HUB
TO 117 VAC
Figure 1. WebShare Proxy Router Single User Setup Connections
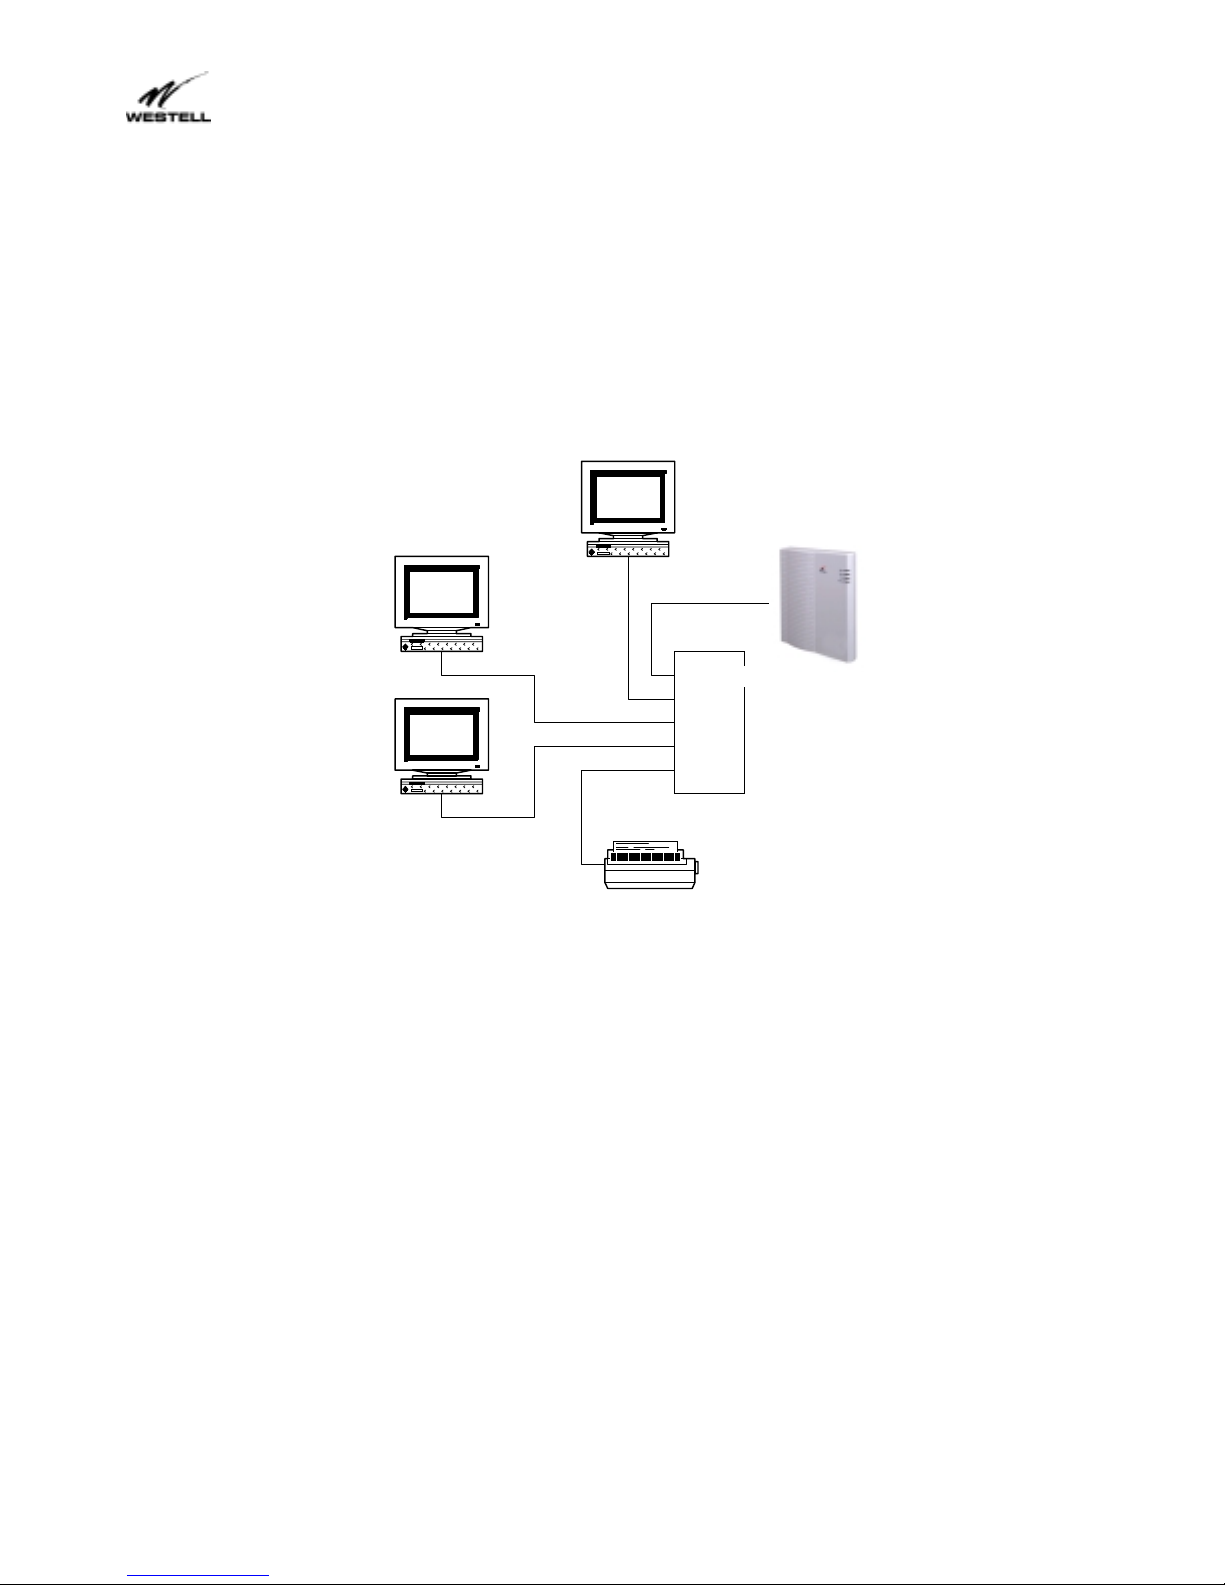
3.3 Multiple User Setup
Refer to the wiring diagrams in Figure 2 and Figure 3.
1. Connect the power supply cord to the power connector on the side of the WebShare Proxy Router and
plug into a power receptacle.
2. Connect a standard RJ11 telephone cable from the LINE connector to the ADSL-equipped phone line.
3. Obtain a multi-port Ethernet Hub (available separately). Ensure that the hub includes enough Ethernet
ports to meet the requirements of the network.
4. Connect the straight 10BaseT cable (inc luded with this package) to the jac k labeled ETHERNET on the
side of the unit to the jack-designated uplink on the Ethernet Hub. With some Ethernet Hubs, a
crossover cable (available separ ately) may be required. Please see the doc um entation inc luded with the
selected Ethernet hub.
5. Connect each additional PC to the Ethernet hub.
6. Turn the power switch ON.
2000 Westell, Inc.
8
Printed in the USA
030-300109C
Model # –WebShare
Part # – 030-300109 Rev C
Revision Date – 09/2000
Installation/User Guide
7. The Ready LED should be a solid green indicating that the power self-test has suc cessfully completed
and the unit is synchronized with the ADSL line card. It may take up to 70 seconds for the unit to
synchronize with the central office ADSL unit.
8. The Link LED should be solid green indicating that the CPE connection has been made.
9. During use, a pulsing yellow Activity LED indicates that data is being transmitted and received on the
Ethernet interface.
10. Proceed to section 4 to configure the software.
PC
PC
PC
All connections made with
10BaseT Straight-through
cable with RJ45 plug
terminations
UPLINK
PORT 1
PORT 2
PORT 3
PORT 4
ETHERNET HUB
PRINTER
Figure 2. Typical WebShare Multi-User Setup Connections
2000 Westell, Inc.
9
Printed in the USA
030-300109C
Model # –WebShare
,
g
Part # – 030-300109 Rev C
Revision Date – 09/2000
Installation/User Guide
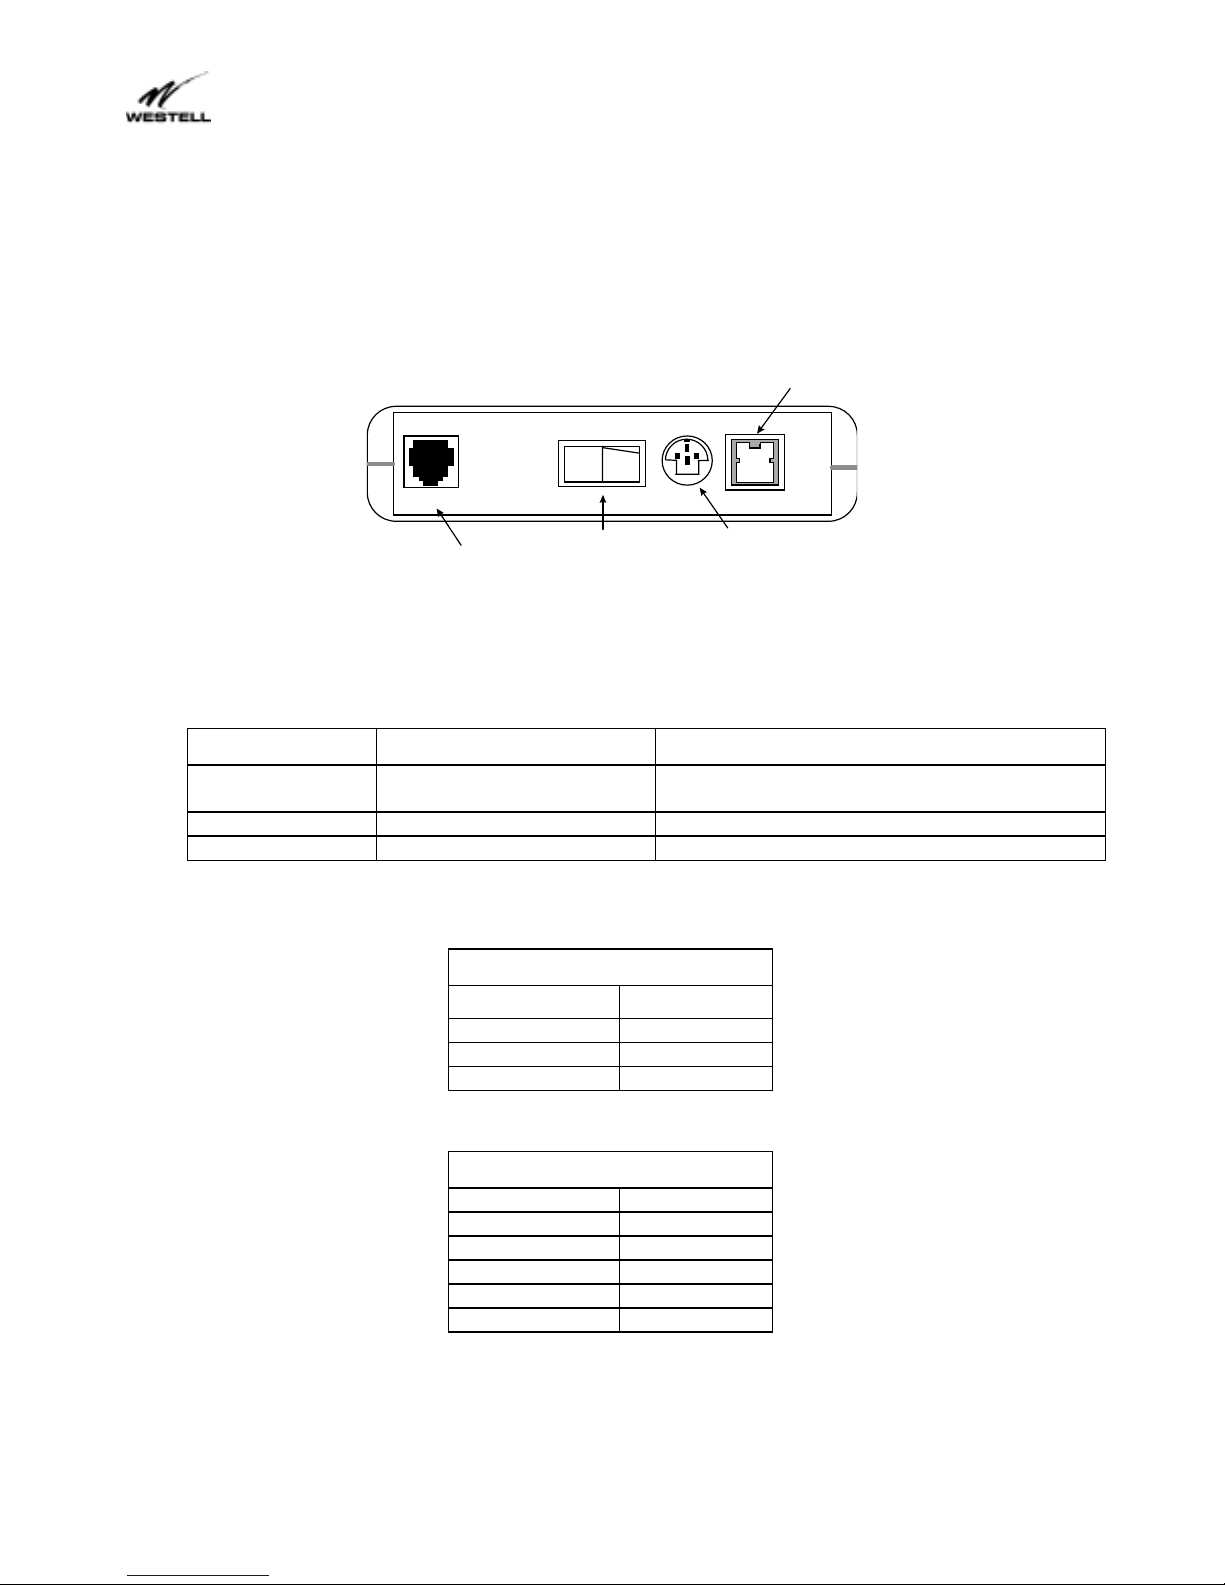
3.4 Connectors
There are connectors on the side panel of the WebShare Proxy Router (Figure 3) f or Power, an ON /OFF s witch,
6-pin RJ11 DSL (LINE) connector and 8-pin RJ45 ETHERNET connector for customer terminal equipment.
Tables 1 - 3 list the connector types and pinout designations.
10BaseT
CONNECTOR
LINE
DSL CONNECTOR
POWER
ON/OFF
SWITCH
ETHERNET
POWER
CONNECTOR
24 VAC
0.4 A
50-60 Hz
S-0109-A
Figure 3. WebShare Proxy Router (Side Panel)
Table 1. WebShare Proxy Router Connectors
Connector Name Connector Type Description
LINE 6-pin (RJ11) modular jack POTS/DSL is used to connect the telephone
jack with ADSL
POWER 3-pin mini-DIN connector Connects power cord
ETHERNET 8-pin (RJ45) jack Connects to PC or 10BaseT hub
Table 2. LINE Connector Pinouts
LINE Pinouts (RJ11)
Pin #
1, 2, 5, 6 Not Used
3DSL Tip
4DSL Rin
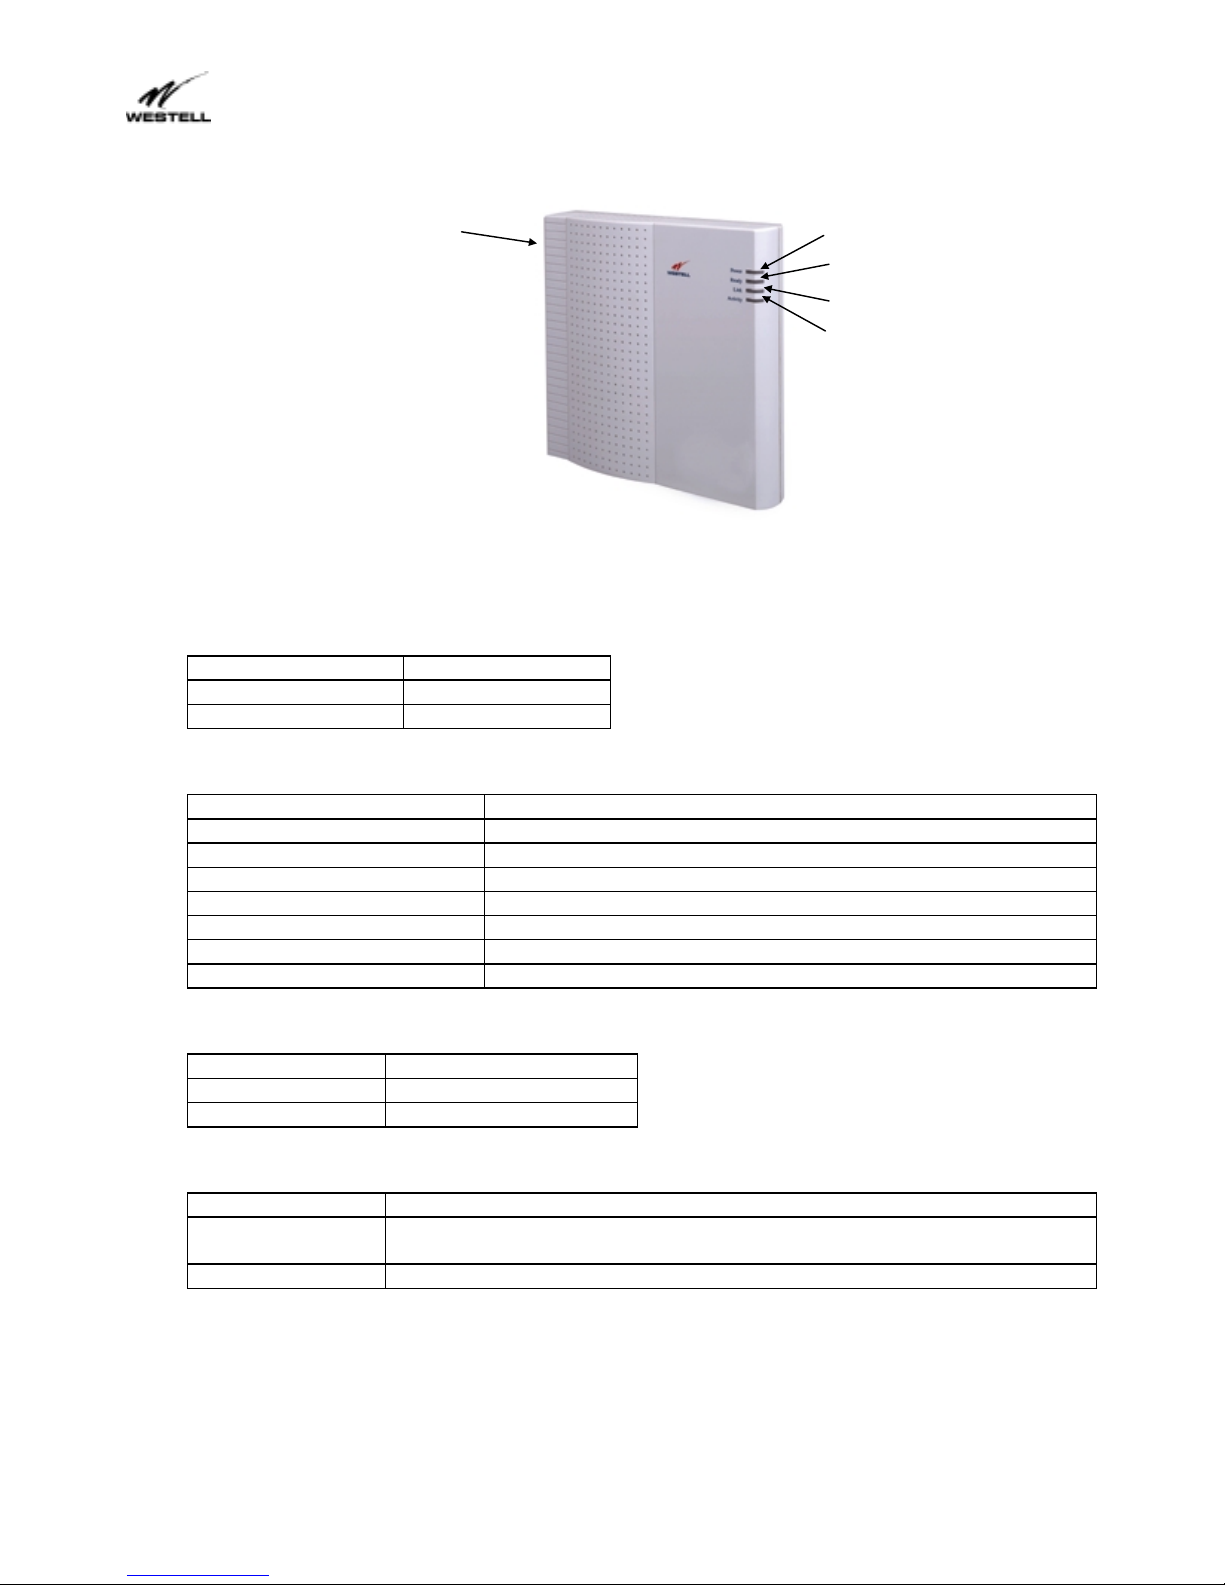
3.5 LED Indicators
The LED indicators shown in Figure 4 are used to verify the unit’s operation and status.
2000 Westell, Inc.
Table 3. ETHERNET Connector Pinouts
ETHERNET Pinouts (RJ45)
Pin #
1Rx+
2Rx3Tx+
4, 5, 7, 8 Not Used
6Tx-
10
Printed in the USA
030-300109C
Installation/User Guide
Model # –WebShare
Part # – 030-300109 Rev C
Revision Date – 09/2000
Power
Ready
Connections are
located on the side
Figure 4. WebShare Proxy Router (Front)
State Description
Solid Green Power ON
No Light No power
Power
Ready
Link
Activity
S-236P-A
Link
Activity
State Description
Slow Flashing Green Power ON and passed power-up diagnostics (1 flash/sec)
Moderate Flashing Green Power ON and attempting synchronization (2 flashes/sec)
Solid Green Power ON and synchronized with the ADSL line card
Solid Red Hardware power-up in progress
Blinking Red Unit failed power-up diagnostic
Alternating Red/Green Proxy Router diagnostic failed
No Light No power
State Description
Solid Green Link established
No Light No 10Base-T link
State Description
Pulsing Yellow Data being transmitted. Pulses should match the r eception or trans m ission of
Ethernet data.
No Light No data on Ethernet interface
2000 Westell, Inc.
11
Printed in the USA
030-300109C

Model # –WebShare
Part # – 030-300109 Rev C
Revision Date – 09/2000
Installation/User Guide
4. Installing the WebShare Utilities Setup Software on Your PC
4.1 WebShare Utilities Setup Installation Procedure
Account parameters must be added to WebShare before connecting to your ISP or Corporate LAN. Use the
Westell provided WebShare Setup Utility to simplify the set up of the following:
•
Selection of the desired Ethernet Adapter (in instances where more than one Ethernet adapter exists on
the PC).
•
Automatic enabling of DHCP (referred to “Obtain IP Address Automatically” in Windows 95, 98)
•
Automatic assignment of the WebShare gateway address of 192.168.0.1
•
Simplified service provider account information installation via the Account Install screen.
•
Installation of the WebShare IP Discovery (Useful in the event that the factory WebShare Proxy Router IP
settings have been altered from the default values)
If desired, the WebShare Setup Utility can be used on each PC in a multiple PC environment. Alternately, the
remaining networked PC’s can use the WebShare Proxy Router by enabling DHCP (referred to as “Obtain an IP
Automatically” in Windows). In this instance, access to the WebShare home page is accomplished by entering
the URL of 192.168.0.1 in your browser.
To use the Westell provided WebShare Setup Utility, proceed to section 4.1.1.
2000 Westell, Inc.
12
Printed in the USA
030-300109C
Model # –WebShare
Part # – 030-300109 Rev C
Revision Date – 09/2000
Installation/User Guide
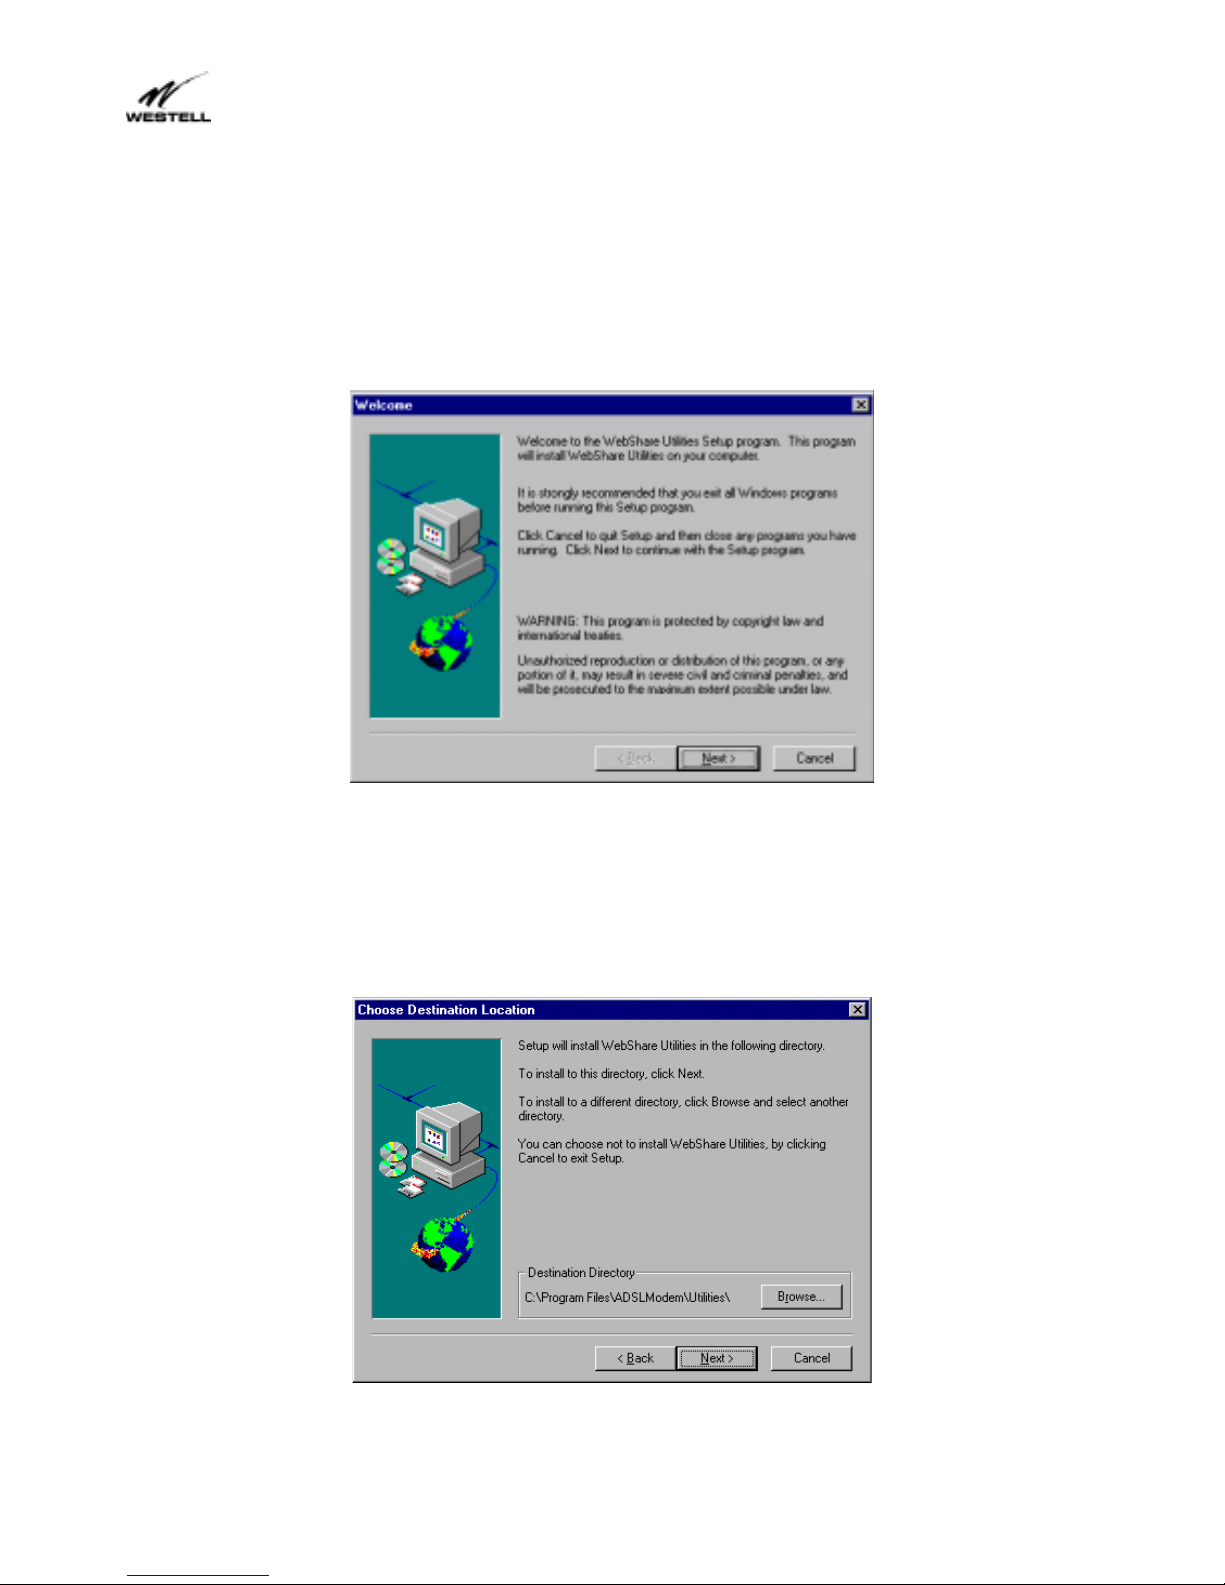
4.1.1 Windows 95, 98 and NT
To install the WebShare Setup Utility on your PC, insert the W ebShare Setup Utility CD-ROM into the CD-RO M
drive. From the Start menu, select
Run
and type the following line:
E:\win32\setup.exe (where “E” is the designation of the CD-ROM drive)
Follow the installation wizard. Figure 5 shows the Welcome window.
Next
Click
Click
The
.
Yes
to accept the license agreement.
Choose Destination Location
drive.
Figure 5. Welcome Window
window (Figure 6) shows you where the application is stored on your hard
2000 Westell, Inc.
Figure 6. Destination Location Window
13
Printed in the USA
030-300109C

Model # –WebShare
Part # – 030-300109 Rev C
Revision Date – 09/2000
Installation/User Guide
4.1.2 TCP/IP Configuration
It is recommended that Dynamic Hos t Configuration Protocol (DHCP) be enabled on the adapter connec ted to
your WebShare Proxy Router. If you have multiple Ethernet adapters, select the one to be used with the
WebShare Proxy Router. Figure 7 shows an example of a window with multiple Ethernet connections.
Figure 7. TCP/IP Configuration Window
The IP address should be left at the factory default shown in Figure 8.
Figure 8. IP Address Window
Click Next to display the Check Setup Inform ation window (Figure 9). This window shows the cur rent settings
that you have provided.
2000 Westell, Inc.
14
Printed in the USA
030-300109C

Installation/User Guide
Model # –WebShare
Part # – 030-300109 Rev C
Revision Date – 09/2000
Figure 9. Check Setup Information Window
Next
Click
to install the Account Setup Utility.
If you are using Windows 95/98, you have to restart the computer for the installation parameters to take effect.
Select
Yes I want to restart my computer now
to restart the PC as shown in Figure 10.
Figure 10. Setup Complete, Restart Window (Windows 95/98)
If you are using Windows 95/98, the installation pr ocess is com pleted. Click Finish to com plete the installation
(Figure 10). Proceed to Section 4.1.4 to disable the autodial feature.
NOTE:
2000 Westell, Inc.
For Windows NT users, DHCP must be enabled. Continue with 4.1.3. See Figure 11.
15
Printed in the USA
030-300109C

Installation/User Guide
4.1.3 Enabling DHCP for Windows NT
Model # –WebShare
Part # – 030-300109 Rev C
Revision Date – 09/2000
Figure 11. Setup Complete, Restart Window (Windows NT)
Finish
Click
to display the Readme.txt file (Figure 12). This file contains the information required by Windows NT
users to enable DHCP, and additional application information. W e suggest printing the Readme.txt file (Figure
12) for future installation reference.
Figure 12. README.TXT File
To enable DHCP for Windows NT, use the following procedure:
1. From
Start
, select
Settings
>
2. Double-click the Network
2000 Westell, Inc.
Control Panel
.
icon and the networking dialog box appears.
16
Printed in the USA
030-300109C

Installation/User Guide
Model # –WebShare
Part # – 030-300109 Rev C
Revision Date – 09/2000
3. Select the
Protocols
4. Double-click the
tab and all the Network Protocols on your PC will be displayed.
TCP/IP Protocol
item and the
TCP/IP Properties
folder will appear.
5. From the adapter drop-down menu, select the Ethernet adapter that is going to be used with the WebShare
Proxy Router.
6. Select the
Obtain an IP address from a DHCP server
automatically configure your PC. Click the
7. Click the OK button in the
TCP/IP Properties
8. Close the Network box and close the Control box.
2000 Westell, Inc.
option button. A dialog box states that DHCP will
Yes
button to enable DHCP.
window to enable DHCP.
17
Printed in the USA
030-300109C

Model # –WebShare
Part # – 030-300109 Rev C
Revision Date – 09/2000
Installation/User Guide
9. Restart your computer.
4.1.4 Disabling Autodial
A browser is typically set to dial into a user’s ISP connection automatically when the browser is launched. In
order to access the Internet through your “always-on” ADSL line, the autodial feature must be disabled.
Dial-Up Settings
Your Connection dial-up setting must be set to
Never dial a connection
. Follow this procedure to verify and/or
change your dial-up setting:
1. Click
Start
2. From the
3. The
Internet Options
4. In the
Settings
>
Control Panel
Dial-up settings
Control Panel
, click
screen, double-click
screen appears. Click the
.
Internet Options
Connections
box, make sure that the option button for
.
tab.
Never dial a connection
(If you have not yet set up any connections, the Dial-up settings box will be dimmed (grayed-out).
5. Click OK.
is selected.
Internet Options Screen (Internet Explorer 5)
2000 Westell, Inc.
18
Printed in the USA
030-300109C

Model # –WebShare
Part # – 030-300109 Rev C
Revision Date – 09/2000
Installation/User Guide
5. Setting Up Your Account
This section show you how to set up your initial WebShare account.
NOTE
In a LAN, or multiple PC environments, this process needs only to be
completed on the computer connected to the WebShare Proxy Router.
5.1 Account Parameters
Account parameters are required before connecting to your service provider. The account parameters to be
entered in the Account Install window are obtained from your service provider . User ID and Ac count Descr iption
are the only required parameters. DNS Prim ary and DNS Secondary are optional parameters that your service
provider may require in some cases.
The Account Description is a word or phrase created by the user to describes the account. It is used by the
WebShare Pr oxy Router to coordinate with the service provider. For example, the following parameter s were
obtained from a service provider:
User ID: Snape@inet
DNS Primary: 204.48.31.10 (optional)
DNS Secondary: 204.48.31.11 (optional)
With the following user-defined input:
Account Description: Account 2
Procedure:
1. Open your Internet browser. In the address bar (location bar), type 192.168.0.1 and press ENT ER.
The WebShare Home page containing PPP Status and PPP Connections windows will appear.
2000 Westell, Inc.
Figure 13. WebShare Home Page
19
Printed in the USA
030-300109C

Installation/User Guide
Model # –WebShare
Part # – 030-300109 Rev C
Revision Date – 09/2000
2. On the
Account
PPP Connections
window appears.
Figure 14. Configure Account Screen
window of the WebShare Home Page, click
New…
The
Configure
3. In the
4. In the
5. Click
Description
User ID
Save
. The new account will now appear in the
field, type the Account Description you have chosen to call this connection.
field, type the user ID given to you by your service provider.
PPP Connections
window.
5.1.1 Setting or Verifying VPI/VCI Parameters
Your service provider will provide you with a VPI (Virtual Path Indicator) and VCI (Virtual Channel Indicator)
which are path assignments for your ADSL connection. WebShare defaults to VPI = 0 and VCI = 35. To verify
your VPI/VCI settings, select LAN Advanced from the WebShare Home Page Menu.
The WebShare LAN Advanced Configuration window (Figure 15) displays the current configuration settings.
If the information in the fields for the VPI and VCI agree with what your service provider provides, click
otherwise enter the correct information and click
Save
.
Cancel
,
2000 Westell, Inc.
20
Printed in the USA
030-300109C

Installation/User Guide
Model # –WebShare
Part # – 030-300109 Rev C
Revision Date – 09/2000
Figure 15. Lan Advanced Configuration Window
Congratulations! You have just configured your first ac count. If you would like to add additional accounts at this
time, refer to Section 7.2.
To connect to your new account, proceed with Section 6.
Connecting to an Account
6.
Verify that the Ready LED of the WebShare Proxy Router is a solid green and at least one PPP account is
installed before activating a PPP session with your ISP.
6.1 Activating a PPP Session
To activate a PPP session, follow these steps:
1. Click the
Figure 16.
Connect
button of the desired PPP account to be activated on the Home page as shown in
2000 Westell, Inc.
21
Printed in the USA
030-300109C

Installation/User Guide
Model # –WebShare
Part # – 030-300109 Rev C
Revision Date – 09/2000
Figure 16. WebShare Home Page
2. In the Connect window shown in Figure 17, enter your password (r eceived from the ISP) f or the User ID
of that account. (Note: A valid password must start and end with something other than a space)
Figure 17. Connect Window
3. Click the
After the first connection is m ade, the
Connect
button.
Connect Succeeded
window (Figure 18) informs you that a PPP session
is established.
2000 Westell, Inc.
22
Printed in the USA
030-300109C

Model # –WebShare
Part # – 030-300109 Rev C
Revision Date – 09/2000
Installation/User Guide
Figure 18. Connection Succeeded Window
When a PPP ses s ion becomes active, the WebShare Home page will return with a Disconnect button in plac e of
the Connect button (Figure 19). The
icon replaces the icon signifying that a PPP session has been
established. The PPP Status window also turns green and indicates the connected Account.
After the PPP account connects to the ISP, you can browse the Internet by entering the desired universal
resource locator (URL) directly into the Address box of your browser.
You’re now ready to surf the Web!
Try: http://www.westell.com
2000 Westell, Inc.
Figure 19. Active PPP Account Home Page
23
Printed in the USA
030-300109C

Installation/User Guide
Model # –WebShare
Part # – 030-300109 Rev C
Revision Date – 09/2000
Figure 20. Westell Home Page
6.2 Disconnecting from a PPP Session
To exit a PPP session, return to the WebShare Home Page by:
•
Maximizing WebShare, if you minimized the Home Page before surfing
•
Selecting WebShare from Bookmarks or Favorites
•
Closing your browser and double clicking the
Click the
Disconnect
button on the WebShare Home page.
If ANY user disconnects a session, all active users are interrupted.
The
icon in place of the icon signifies that a PPP session has been disconnected. Close your Web
browser.
To begin another PPP session, click the
WebShare
WebShare
CAUTION
icon on your desktop.
WebShare
icon on your desktop
2000 Westell, Inc.
24
Printed in the USA
030-300109C

Model # –WebShare
Part # – 030-300109 Rev C
Revision Date – 09/2000
Installation/User Guide
7. Configuring WebShare
Use this section when adding new accounts or changing account parameters.
7.1 Accessing the WebShare Management Interface
To access the Web browser management interface, perform the following steps:
1. Make sure that your computer is turned OFF.
2. Verify that an Ethernet connection is established between your computer and the WebShare Proxy
Router.
3. Turn the WebShare Proxy Router ON.
4. Turn the computer power
ON.
Note: Because the computer gets the IP address from the WebShare Proxy Router, these steps ens ure the
WebShare Proxy Router is on before the computer boots up.
5. After the operating system has completely loaded, verify that the Link indicator light on the top of the
WebShare Proxy Router is steady green.
6. Click on the WebShare icon on the desktop.
Figure 21 shows the initial Home page of a WebShare Proxy Router that contains no PPP accounts.
2000 Westell, Inc.
25
Printed in the USA
030-300109C

Installation/User Guide
Model # –WebShare
Part # – 030-300109 Rev C
Revision Date – 09/2000
Figure 21. WebShare Initial Home Page
7.2 Adding and Configuring Additional WebShare Accounts
To configure another PPP account, the following information must be obtained from your service provider:
•
User ID
•
Password
•
Primary DNS IP address (optional)
•
Secondary DNS IP address (optional)
1. Click the
New
button (Figure 21) and enter the user ID obtained from your ISP into the
the dialog box.
2. Enter a description of the acc ount into the
Description
field of the dialog box (Figure 22). T his can be
any set of alphanumeric characters that make a user-f riendly description for reference (e.g. Account 1,
Sales 1, Sales 2, etc.).
User ID
field of
2000 Westell, Inc.
26
Printed in the USA
030-300109C

Installation/User Guide
Model # –WebShare
Part # – 030-300109 Rev C
Revision Date – 09/2000
Figure 22. PPP Account Configuration Dialog Box
3. Click
4. The
Configure Account
Figure 23.
Save
to commit those values to WebShare.
window disappears and a new row appears on the Home page as shown in
Figure 23. PPP Accounts
If your ISP supplies the DNS IP addresses, these address es need to be added to the new PPP ac count via the
account editing capability.
1. Click the
Configure Account
2000 Westell, Inc.
Edit
button (Figure 23) for the configured account, then click the
window (Figure 22). The
Advanced Configuration
27
Advanced
button in the
window (Figure 24) appears.
Printed in the USA
030-300109C

Installation/User Guide
Model # –WebShare
Part # – 030-300109 Rev C
Revision Date – 09/2000
Figure 24. Advanced Configuration Window
2. In the
Advanced Configuration
window (Figure 24), enter the DNS IP values supplied by your service
provider.
3. Select the
Save
button to commit these values to WebShare.
To add more PPP accounts to WebShare, repeat the configuration process outlined above.
CAUTION
With multiple accounts, when ANY user attempts to establish a session with an idle account
while another session is active, a warning is displayed (Figure 25). If the OK button is selected,
the currently active session is disconnected and all current user activity is interrupted
2000 Westell, Inc.
Figure 25. Session Conflict Warning
28
Printed in the USA
030-300109C

Model # –WebShare
Part # – 030-300109 Rev C
Revision Date – 09/2000
Installation/User Guide
8. WebShare Management Interface
8.1. Management Menu
Selecting the WebShare icon on the desktop activates your web browser and establishes a home page for
WebShare. A
the other management pages available for configuration, status, control and other operation information for
WebShare.
Home
The Westell Menu (Figure 26) on the WebShare
management Home page (Figure 27) provides access to all
the configured PPP accounts and allows PPP session
control.
Management Menu
(Figure 26) is located in the left portion of your home page. It provides links to
Diagnostics
Provides WebShare Proxy Router and PPP session
diagnostic capability (Figures 28 and 29).
Installation
Provides a method for installing an upgrade to WebShare
software (Figure 30).
LAN Advanced
Allows the editing of local Ethernet interface configuration
parameters (Figure 31).
About
Contains the model number, serial number and software
versions of WebShare (Figure 34).
Help
Provides help information for the management page being
displayed
.
Figure 26. Menu
8.1.1 Home Page
The W ebShare Home page (Figur e 27) provides access to all of the conf igured PPP accounts and allows PPP
session control.
2000 Westell, Inc.
29
Printed in the USA
030-300109C

Model # –WebShare
Part # – 030-300109 Rev C
Revision Date – 09/2000
Installation/User Guide
Figure 27. WebShare Home Page
8.1.1.1 Home Page Main Window
This window contains a list of PPP accounts. Each PPP account is contained within a row of the table. Each r ow
contains several columns and provides information about the account. The fields are defined in the sections
immediately following.
This list will always contain one empty account field to be used for building new acc ounts . This account field has
an empty description field and a New button on the right side.
8.1.1.2 Connections
The PPP Connections screen provides a window for the description of each individual PPP ac count. The text
string is the user-friendly description you entered in the Configure Account dialog box.
8.1.1.3 Connect/Disconnect
The Connect/Disconnect button provides PPP session control for the associated ac count. This allows you to
connect and disconnect from various PPP accounts, when desired.
This button changes depending upon the state of the PPP session. If the account is inactive, the button will
appear as Connect. If the account is active it will appear as Disconnect.
8.1.1.4 Edit/New
The Edit/New button provides access to the PPP session parameters specific to the particular account.
8.1.1.5 Status
Status
The
column indicates the state of each PPP account.
This icon shows that the account is INACTIVE. (No connection established.) Click
Connect
to
activate the connection.
This icon shows that a PPP account is ACTIVE. (A connection is currently active.) Clicking on this
icon will disconnect the user. (An empty account has no icon in the Status column.)
2000 Westell, Inc.
30
Printed in the USA
030-300109C

Installation/User Guide
8.1.1.6 Building New Accounts
Adding a New Account to the Home Page (Detailed in Section 7.2):
Model # –WebShare
Part # – 030-300109 Rev C
Revision Date – 09/2000
Click the
New
Description
button. Within the
field and the user ID defined by your ISP. Click the
Configure Account
dialog box, type a description of the account into the
Save
button in the dialog box to commit the new
account information to the WebShare Proxy Router.
8.1.1.7 Setting DNS Primary and Secondary IP Addresses
It may be necessary to modify the DNS Primary and Secondary IP addresses for a specific PPP account (consult
with your Service provider).
To accomplish this:
1. Click the
Edit
button of the appropriate PPP account. The
Configure Account
dialog box appears.
2. Click the
Advanced
button.
3. Enter the appr opr iate IP addres s es s upplied by your service provider into the appropriate DNS f ields of the
Advanced Configuration
dialog box.
4. Click the
Save
button in the dialog box to commit the new acc ount information to the WebShar e Proxy
Router.
8.1.1.8 Connecting to a PPP Account
Click the Connect button. Within the Connect dialog box, enter the account password. Click the Connect button.
8.1.2. Diagnostics
8.1.2.1 Accessing the Main Diagnostics Page
Select the
Diagnostics
menu item from the WebShare management menu to access the Diagnostics page.
Figure 28 shows the window before any diagnostics have been performed.
2000 Westell, Inc.
31
Printed in the USA
030-300109C

Installation/User Guide
Model # –WebShare
Part # – 030-300109 Rev C
Revision Date – 09/2000
Figure 28. Diagnostics Window
8.1.2.2 Test All
Test All
The
button will execute all of the tests sequentially beginning with the Self Test and ending with Ping.
Figure 29 shows the Diagnostics window returned after clicking the
Figure 29. Diagnostics Window
Test All
button.
2000 Westell, Inc.
32
Printed in the USA
030-300109C

Model # –WebShare
Part # – 030-300109 Rev C
Revision Date – 09/2000
Installation/User Guide
8.1.2.3 Self-Test
Self-Test
The
button starts a testing process that verifies the integrity of all PPP account information.
Error Messages:
•
Success – All stored information verified correctly.
•
Failure – An error was detected in the stored PPP account information. The information needs to be re-
entered.
8.1.2.4 WebShare Proxy Router
This test button initiates a testing process that verifies management communications with the WebShare Proxy
Router transceiver.
Error Messages:
•
In Service – The WebShare Proxy Router is synchronized with the central office Channel Unit and is ready to
send/receive data.
•
Out of Service – The WebShare Proxy Router transceiver is NOT synchronized with the central office
Channel Unit, but is functioning properly. (This could be caused by the connector cable not plugged into the
WebShare Proxy Router or the access jack properly)
•
Failure – The WebShare Proxy Router transceiver is not functioning properly.
8.1.2.5 PPP Connection
This Test button initiates a testing process that verifies connectivity with the service provider’s Remote Access
Server (RAS).
Error Messages:
•
Success – The WebShare Proxy Router has a verified connection with the ISP and is ready to send/receive
data.
•
No PPP Connection – There is no link between the WebShare Proxy Router and the central office
equipment.
•
Failure – A PPP session is active, but WebShare failed to get a response from the Remote Access Server.
8.1.2.6 IP Router
The Test button initiates a test that pings the remote IP address linked by the PPP session establishment.
Error Messages:
•
Success – A response was obtained from the remote IP address.
2000 Westell, Inc.
33
Printed in the USA
030-300109C

Model # –WebShare
Part # – 030-300109 Rev C
Revision Date – 09/2000
Installation/User Guide
•
No PPP Connection – There isn’t any link between the WebShare Proxy Router and the central office
equipment.
•
Failure – There is no response from the remote IP address.
8.1.2.7 PING
The Test button initiates a ‘ping’ to the host IP address specified within the ping host entry field. A PING (Packet
Internet Groper) is a protocol program for sending a signal to see whether another network host or other device
is on-line and responding. This application will tell you if a particular entity is presently connected to the Internet.
It is used to check if a machine on the Internet is alive and reachable.
Error Messages:
•
Success – A response was obtained from the IP address entered.
•
No PPP Connection – There isn’t any link between the WebShare Proxy Router and the Central Office
Equipment.
•
Failure – There is no response from the specified IP address.
8.1.3 New Software Installation Page
This screen (F igure 30) is reserved f or installing future sof tware upgrades. W estell will provide instructions with
new upgrades.
Figure 30. Installation Window
8.1.4 LAN Advanced Page
8.1.4.1 Accessing the LAN Advanced Configuration Dialog Box
LAN Advanced Configuration
The
any of the WebShare management windows.
2000 Westell, Inc.
dialog box is accessed by selecting the ‘LAN Advanced’ m enu item from
34
Printed in the USA
030-300109C

Model # –WebShare
Part # – 030-300109 Rev C
Revision Date – 09/2000
Installation/User Guide
This window displays the local Ethernet characteristics inc luding the IP address, subnet mask, DNS proxy IP
addresses, and the state of the DHCP server, as shown in Figure 31.
These parameters are stor ed and rem ain in WebShare until changed, or the def ault values are r eset with the ‘IP
Discovery and Default Reset’ Utility. See Section 7.2.
WARNING
If the IP address is changed, WebShare will not respond to the default IP address of
192.168.0.1. Be sure to change the URL to the new IP address when accessing the
management pages.
Figure 31. LAN Advanced Configuration Dialog Box
8.1.4.2 Router IP Discovery and Factory Default Reset
To return Ethernet characteristics to the factory default, Select
WebShare IP Discovery
2000 Westell, Inc.
Default Reset
and
Start
Programs
>
WebShare Utilities
>
>
.
35
Printed in the USA
030-300109C

Installation/User Guide
Model # –WebShare
Part # – 030-300109 Rev C
Revision Date – 09/2000
Figure 32. WebShare IP Default Reset Utility Dialog Box
Click the
Default Reset
button, shown in Figure 29, to restore the factory default values (Figure 28).
Figure 33. Default Reset Dialog Box
Click OK to return to the default settings.
8.1.4.3 IP Address
The Internet Protocol (IP) address is a unique 32-bit number used to identify the host computer connected to a
TCP/IP network. The value of the IP Address is represented in a dotted decimal format. WebShare assigns
192.168.0.1 to this address by default. This value may be changed to any valid IP address e.g. an existing
address assigned for local LAN administration. Note: If the default IP Address needs to be changed, the DHCP
Base and End addresses will also have to be adjusted. All changes will be entered in the LAN Advanced
Configuration screen.
8.1.4.4 Subnet Mask
The subnet mask is a 32-bit number used to identify the network and host segments of an IP address. This
value is represented in the same dotted decimal format as the IP address. This is the subnet mask associated
with the IP address above. This value should not be set to a subnet address greater than 255.255.255.248 to
accommodate the WebShare IP.
The default value for the subnet mask is 255.255.255.0.
8.1.4.5 Domain Naming System (DNS) Primary
The domain naming system is a convention used for identifying computers attached to the Internet or a Local
Area Network (LAN). A host to resolve a domain name to the IP address uses the main DNS server. The
secondary or backup DNS server performs the same function as the main server.
This IP address represents the address that WebShare uses to respond to primary DNS queries from your
computer. The default value is 192.168.0.2.
2000 Westell, Inc.
36
Printed in the USA
030-300109C

Model # –WebShare
Part # – 030-300109 Rev C
Revision Date – 09/2000
Installation/User Guide
8.1.4.6 Domain Naming System (DNS) Secondary
This IP address represents the address that WebShare uses to respond to secondary DNS queries from your
computer.
The default value is 192.168.0.3.
8.1.4.7 Dynamic Host Configuration Protocol (DHCP)
DHCP is a protocol used to automate the administration of IP addresses within a local area network. A server
provides the IP allocation for computer hosts that are running a DHCP client. This controls the state of the local
WebShare DHCP Server.
The default value is
enabled
.
8.1.4.8 DHCP Base Address
This is the first address in the block of IP addresses between the ‘base’ and ‘end’ addresses allocated by the
DHCP server.
The default value is 192.168.0.10.
8.1.4.9 DHCP End Address
This is the last address in the block of IP addresses between the ‘base’ and ‘end’ addresses that the DHCP
server allocates.
The default value is 192.168.0.73.
8.1.4.10 Inactivity Timer Timeout
WebShare provides an Inactivity Timer that closes an active PPP session if there has been no traffic through the
WebShare Proxy Router either from or to any user. The timeout value may be adjusted within the LAN
Advanced Configuration window shown in Figure 31 (page 29). For a session to be “always on”, select the
Inactivity Timer Disable
option.
The Inactivity Timeout Value determines the length of time a session will remain connected with no data flow
from either direction. The default setting is disabled. To enable, select LAN Advanced from the Management
menu. In the LAN Advanced Configuration window, select the Enable option and enter an Inactivity Timeout time
in minutes. The valid range is from 0 to 9999 minutes. A zero will have the same affect as disabling the timer.
Click the Save button in the dialog box to commit the new account information to the WebShare Proxy Router.
8.1.4.11 Static NAT
Static NAT allows you to designate a LAN shared PC as a server (e.g. for a web page). Enter the IP address of
the designated PC in the
Enable
.
Static NAT IP
8.1.5 About Page
The About page (Figure 34) provides the model number and version information for WebShare. This information
is necessary when calling for technical support.
2000 Westell, Inc.
location of the
LAN Advanced Configuration Window
37
and click
Printed in the USA
030-300109C

Installation/User Guide
Model # –WebShare
Part # – 030-300109 Rev C
Revision Date – 09/2000
Figure 34. About Window
9. Troubleshooting
9.1 WebShare Error Messages
Figure 35 shows an example of an error message window. The following text lists other error messages that
may be seen and how to correct them.
Figure 35. Example of Error Message
E1000 – WebShare Proxy Router Not Connected
Description – The WebShare Proxy Router has not achieved synchronization. The WebShare Proxy
Router may take several minutes to achieve synchronization.
Remedy – Check the DSL cables and connections. If all connections are correct and the problem
persists, contact your service provider.
2000 Westell, Inc.
38
Printed in the USA
030-300109C

Installation/User Guide
E1001 – Network Circuit Not Available
Description – The ATM virtual circuit has not been established within the ADSL Router.
Remedy – Contact your ISP.
E1002 – PPP Remote Access Server (RAS) Not Available
Model # –WebShare
Part # – 030-300109 Rev C
Revision Date – 09/2000
Description – There is no response from the RAS while attempting to activate a PPP
Remedy – Contact your ISP.
E1003 – Invalid Login
Description – An invalid User ID and/or password was used.
Remedy – Check the User ID and ensure that it is a valid account, then retry the password. Contact
your ISP if this problem persists.
E1005 – IP Remote Router Not Available
Description – The remote router is not responding.
Remedy – Contact your ISP.
E1008 – Configuration Information Corrupt
Description – The PPP account or Advanced Configuration information is corrupt.
Remedy – Delete the PPP accounts and re-enter the account information and the Advanced
Configuration information.
10. Product Assistance and General Inquiries
account.
10.1 Product Return
For technical assistance, contact:
Westell Customer Support
750 North Commons Drive
Aurora, Illinois 60504
Phone: 1-630-898-2500
Fax: 1-630-375-4931
Web Address (Westell’s Web Store): www.westell.com
2000 Westell, Inc.
39
Printed in the USA
030-300109C

Model # –WebShare
Part # – 030-300109 Rev C
Revision Date – 09/2000
Installation/User Guide
10.2 Inspection
O NOT
D
(RMA) from Westell. For return of material, contact your Westell Customer Support representative.
D
W
E
P
P
C
E
E
LINE (DSL) C
DSL
EMC
S
R
return damaged merchandise to Westell until you have first obtained a Return Material Authorization
11. Product Specifications
IMENSIONS
Height – 7.5 in (19 cm)
Width – 7.78 in (19.76 cm)
Depth – 1.9 in (4.82 cm)
EIGHT
Approx. 2.30 lbs. (1.04 kg) with power supply
NVIRONMENTAL
Ambient Operating Temperature – +32 to +113°F (0 to +45°C)
Relative Humidity – 5 to 95%, non-condensing
OWER SUPPLY
120 VAC (±10%) wall-mount power supply
OWER CONSUMPTION
Less than 10 watts typical from 120 VAC
ONNECTORS
POWER – 3-pin mini-DIN connector
LINE (DSL) – 6-pin (RJ11) modular jack
ETHERNET – 8-pin (RJ45) modular jack
THERNET CONNECTOR PINOUT
An RJ45 type that carries the Receive data on Pins 1 and 2, and the Transmit data on Pins 3 and 6
THERNET INTERFACE
Provides transmit and receive data paths for 10BaseT Network Connection.
ONNECTOR PINOUT
An RJ11 type that carries combined ADSL and POTS signals on Pins 3 and 4.
DSL Line Code – Discrete MultiTone (DMT) (Alcatel)
DSL Rates – 32 kbps to 8 Mbps downstream and 32 kbps to 800 kbps upstream
Power Spectral Density – -40 dBm/Hz
DSL Impedance – 100 Ohms
DSL Performance – per Category 1 in ANSI T1.413
FCC, Class B
EN50081-1, Class B
EN50082-1
GR-1089-CORE, Issue 2
AFETY
UL 1950
cUL
EN60950
EGULATORY APPROVAL
UL
CSA
2000 Westell, Inc.
40
Printed in the USA
030-300109C

Installation/User Guide
Routing
•
Up to 64 users with a user supplied Ethernet hub
•
Network Address Translation (NAT )
•
Dynamic Host Control Protocol (DHCP) - Automatic or Manual Local Address Assignment
•
DHCP Host Configuration
•
DNS Proxy Implementation
Transport and Application Protocol Support
•
TCP, UDP, ICMP, SMTP, NNTP, FTP, HTTP, HTTPS, SSL
•
RealAudio/Video, Microsoft NetMeeting, VDOLive, Win Frames, Xprotocol, H.323 (Over LAN
environment), All direct play games
Traffic Management
•
PPP over AAL5
•
Link Control Protocol
•
CHAP and PAP Authentication
•
IP Control Protocol (IPCP): RFC – 1332
•
IPCP Configuration Options
– IP Address Configuration
– Preliminary and Secondary DNS
•
Address Proxy (Patent Pending)
•
PPP Echo Request-Reply
•
Internet Control Message Protocol
•
Router Advertisement /Solicitation
•
ICMP Echo Request/Reply (Ping)
•
ARP
•
Path MTU Discovery
Model # –WebShare
Part # – 030-300109 Rev C
Revision Date – 09/2000
Minimum System Requirements
•
Microsoft® Windows™ 95, 98 or NT 4.0
•
Microsoft® Internet Explorer™ 4.x or higher, or Netscape Navigator ™ 4.x or higher
•
5 MB of free Hard Drive space
•
Ethernet 10BaseT connection between the computer and ADSL Router
•
TCP / IP Protocol stack installed
•
Multi-Port Ethernet 10BaseT Hub
•
Cross-Over Ethernet cable for WebShare Proxy Router to Ethernet Hub
•
VPI/VCI Values (provided by your Service provider)
•
PPPoE Support (provided by your Service provider)
•
16 MB Ram
Configuration
•
User configurable parameters include:
-
Account name and password
-
Static or Dynamic Router IP Address
-
DHCP Function (Enable/Disable)
-
DHCP Base Address
-
Primary and Secondary DNS server address
-
Inactivity Timer (Enable/Disable)
-
Static NAT (Enable/Disable)
-
Virtual Path Indicator (VPI)/Virtual Circuit Indicator (VCI)
2000 Westell, Inc.
41
Printed in the USA
030-300109C

Model # –WebShare
Part # – 030-300109 Rev C
Revision Date – 09/2000
Installation/User Guide
APPENDIX A
Windows 2000, Apple MAC/iMAC, Linux Support
PCs running Windows 2000, Apple MAC and Linux operating systems can be installed in a network that is using
WebShare by simply configuring the Windows 2000, Apple MAC or Linux PC to support DHCP. Once DHCP is
enabled simply attach the PC to the network hub, launch the browser and begin surfing. To enable access to
WebShare, launch the browser and enter the URL 192.168.0.1. Make this URL a favorite or a bookmark.
2000 Westell, Inc.
42
Printed in the USA
030-300109C

Installation/User Guide
Model # –WebShare
Part # – 030-300109 Rev C
Revision Date – 09/2000
INDEX
A
About Page, 38
Account Information Setup, 20
Account Parameters, 20
Activating a PPP Session, 22
Adding a PPP Account, 27
ADSL Modem, 34
Advanced Local Configuration, 35
B
Building New Accounts, 32
C
Configuring a PPP Account, 27
Configuring the Personal Router, 26
Connect/Disconnect, 31
Connecting a PPP Account, 32
Connecting to an Account, 22
Connections, 31
D
DHCP, 38
DHCP Base Address, 38
DHCP End Address, 38
Diagnostics, 32
DNS Primary, 37
DNS Secondary, 38
E
I
Inactivity Timeout, 38
Inactivity Timeout Adjustment, 38
Installation of Account PPP PC Setup Utility, 12
IP Address, 37
IP Router, 34
M
Minimum System Requirements, 5
N
New Software Installation Page, 35
P
Personal Router Management Interface, 26
PING, 35
PPP Connection, 34
PPP Connection List, 31
Product Return, 40
R
Router IP Discovery and Factory Default Reset, 36
S
Self-Test, 34
Status, 31
Subnet Mask, 37
Edit/New, 31
Enabling DHCP, 17
Error Messages, Personal Router, 39
H
Home Page, 30
2000 Westell, Inc.
T
Technical Assistance, 40
Test All, 33
43
Printed in the USA
030-300109C
 Loading...