

Westell N04005-SVU/L0806 User Manual
Firmware Manual 0806-40A
Version 1.0.x
Noran Tel
a subsidiary of Westell, Inc.
SITE VU MINI
N04005-SVU/L0806
Firmware: Local Port / Telnet Configuration
CHASSIS
GND
ON
PWR
OFF
Noran Tel
www.norantel.com
BAT GND
ETHERNET
10BaseT
PWR CRIT MAJ MIN UNIT
CONFIG LOCK
SERVICE
PORT
Gene ra lInf ormation
This document describes how to configure
SiteVu remote units using the local port
(service port) via USB and/or using the Telnet
option over Ethernet.
Any VT100 compatible Telnet client software
and serial communication software may be
used to communicate to the SiteVu remote unit.
Both configuration options provide a full textbased user interface for configuring the
SiteVu remote unit. This manual describes
A1+
A2+
A3+
A5+
A6+
REFD1D2D3D4
REPROGRAM
OFF
RESET
ALM
NEW
DATA
A4+
H1
H2
A2-
A3-
A5-
A6-
A4-
A1-
COM
COM
ALM
NO
NC
MIN
CRT
MAJ
how to configure the SiteVu remote unit using
the Service Port. There are minor differences
between the Service Port and Telnet
configuration options. These differences will be
discussed as required throughout the manual.
The numbers displayed in parentheses (#) after
a title is what a user would type on the SiteVu
remote unit screens to access the submenu.
Noran Tel Page 1 of 16
a subsidiary of Westell, Inc

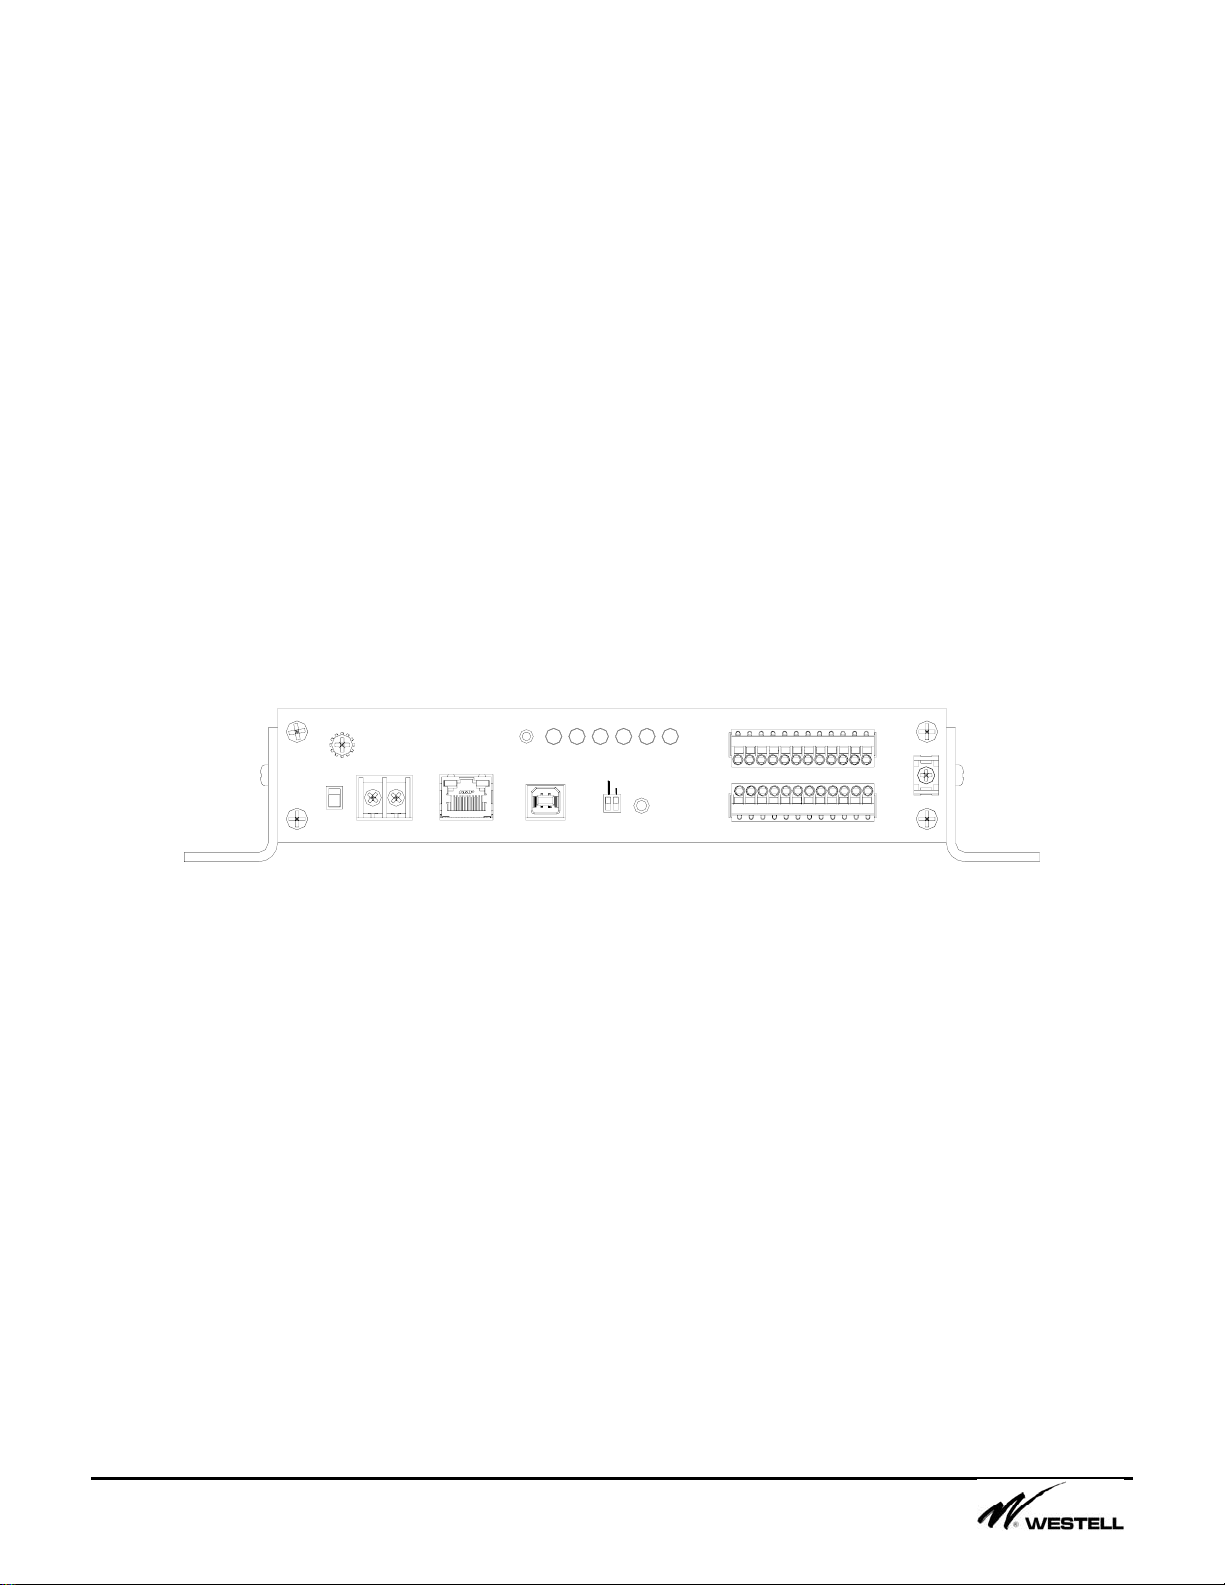
Connections
The Service Port connection requires a
standard USB cable connection from the
SiteVu remote unit to PC or laptop that
contains the serial communication software.
If the SiteVu remote unit is powered when the
USB is connected and the communication
software is running, the user can press the
<Enter> key to display the “Noran Tel SiteVu
Telnet Service Login:” screen.
The user can then type their username and
password. Even though the user is on a
Service Port connection the remote unit creates
a communication block to emulate a partial
Telnet connection to the remote unit.
Similarly, when using the Telnet option to
access the SiteVu remote unit, “Noran Tel
SiteVu Telnet Service Login:” is displayed.
Note: The factory default username and password is Norantel. Both
the password and username are case sensitive.
Note: T his assumes a user has already configured the Ethernet
settings, enabled the Telnet option, setup a username and password on
the selected SiteVu remote unit for this connection to be allowed.
Note: Only four Telnet connections are allowed to connect to the
SiteVu remote unit at one given time.
Note: The SiteVu remote unit will disconnect an idle connection
(Telnet or Service Port) once the Inactivity Timeout setting in the
Telnet menu is achieved.
At the login prompt the user can type in the
Username, press <Enter> and then the
Password, press <enter>. After 3 failed login
attempts the connection is dropped. The user
must wait a set amount of time (Security Lock
Out time) before trying to reconnect via Telnet.
After a successful login the Site Vu Main Menu
is displayed.
If 3 failed logins occur for the same username,
the username becomes locked and the failed
login attempt is logged in the security menu. A
user-definable lock message and userdefinable lockout time can be set in the
Security Menu. A user that has access to the
Security menu can unlock all locked users.
More information about this can be found in the
security menu.
Noran Tel Page 2 of 16
a subsidiary of Westell, Inc

Contents
A. SITEVU MAIN MENU ............................................................................................................................. 4
1. COMMUNICATION SETTINGS MENU (1) .......................................................................................... 5
1.1 ETHERNET SETTINGS MENU (1) .............................................................................................. 5
1.2 SNMP SETTINGS MENU (2) .................................................................................................... 5
1.3 NTP SETTINGS MENU (3) ........................................................................................................ 6
1.4 TELNET SETTINGS (4) .............................................................................................................. 6
2. LOG VIEWER (2) .................................................................................................................................. 6
3. DIGITAL INPUTS (3) ............................................................................................................................ 7
3.1 DIGITAL INPUT CONFIGURATION MENU .................................................................................. 7
4. ANALOG INPUTS (4) ........................................................................................................................... 8
4.1 ANALOG INPUT CONFIGURATION MENU ................................................................................. 8
5. DIGITAL OUTPUTS (5) ........................................................................................................................ 9
6. CURRENT ALARMS (6) ...................................................................................................................... 9
7. SECURITY (7) ..................................................................................................................................... 10
7.1 USER PROPERTIES MENU (1-5) ............................................................................................. 10
7.2 SECURITY LOG MENU (6) ...................................................................................................... 10
7.3 ACCESS CONTROL LIST MENU (7) ......................................................................................... 11
7.4 SECURITY LOCKOUT MENU ITEMS (8-10) ............................................................................. 11
8. FILE TRANSFER MENU (TFTP) (8) ................................................................................................ 11
8.1 CONFIGURATION FILE SETTINGS (3-5) .................................................................................. 11
8.2 FIRMWARE FILE SETTINGS (6) ............................................................................................... 12
8.3 LOG FILE SETTINGS (7-8) ...................................................................................................... 12
9. SYSTEM INFORMATION (9) ............................................................................................................ 13
10. SYSTEM PROPERTIES (10) ............................................................................................................ 13
10.1 LCD SCREEN SAVER (1) ....................................................................................................... 14
11. BATTERY RUNDOWN CONTROL (11) ......................................................................................... 14
11.1 BATTERY RUNDOWN SETTINGS (1-3) .................................................................................... 14
11.2 BATTERY RUNDOWN FILES (4-7) .......................................................................................... 14
DOWNLOADING WITH TFTP ................................................................................................................. 15
DOWNLOADING WITH XMODEM ......................................................................................................... 15
Noran Tel Page 3 of 16
a subsidiary of Westell, Inc
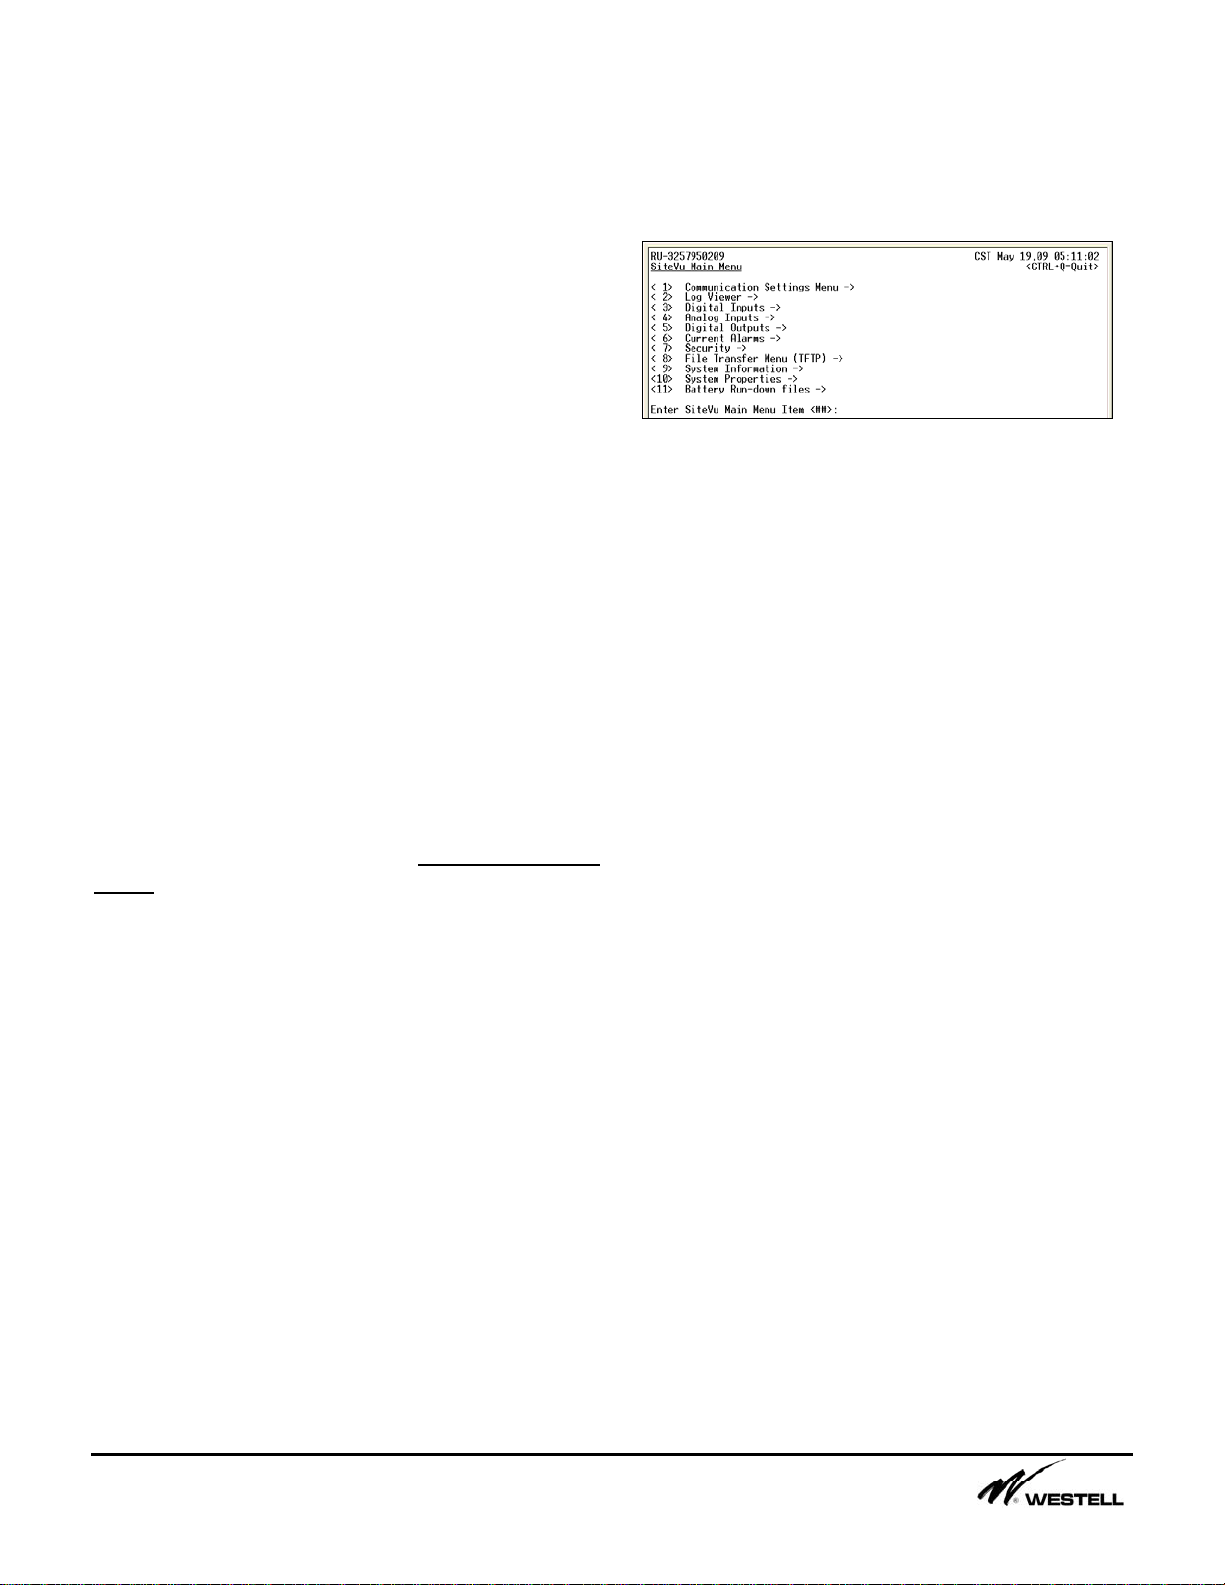
A. SiteVu Main Menu
All the menus have a similar look and feel as
well as try to operate in a consistent manner.
• Numbers between “<” and “>” signs are
action numbers.
• Typing a number and pressing <Enter> will
either bring up a new menu or select a
setting that may be changed.
• When a menu items contain a right arrow
(→) a submenu will open to display more
menu options.
• Text after a colon (:) is the setting for that
item and may be changed by the user.
• Press ESC to back out of submenus
• Press Y or y and <enter> to change settings
• Press N or n and <enter> to discard
changes
• Press Ctrl+B to go to Main Menu
• Press Ctrl+Q to close current connection
When entering a submenu, the previous menus
are displayed on the top row of the serial
communication software screen along with the
current menu the user is viewing. For example,
if the user is viewing the SNMP Settings Menu,
“(Main/Comm_settings) -> SNMP Settings
Menu” is displayed. The text underlined after
the arrow is the current menu. Text inside the
brackets refers to previous menus. The user
can back out of the current menu to return to
these previous menus.
When the user types in a number that is
associated with changing a setting (a menu
item that contains a colon) and presses the
<Enter> key, the menu item selected is
displayed along with its previous setting. Also,
a prompt is displayed for the user to enter a
new value for the setting. This prompt will
contain an example of how to enter a new
value. After the user types or selects the new
setting for the menu item and presses the
<Enter> key, a conformation prompt is
displayed to accept the or discard the change.
The SiteVu Main menu is shown in Figure A-1
and contains the following options:
Figure A-1 Site Vu Mini Main Menu
¾ Communication Settings Menu (1)
• Configure the communication options
¾ Log Viewer (2)
• View the 1000 most recent alarm events
¾ Digital Inputs (3)
• View the status of the digital inputs
• Configure the digital input sensors
¾ Analog Inputs (4)
• View the status of the analog inputs
• Configure the analog input sensors
¾ Digital Outputs (5)
• View the status of the digital output relay
• Configure the digital output relay
¾ Current Alarms (6)
• View all the current active alarms
¾ Security (7)
• Configure users and set access levels
• View the security log
• Configure Access Control List (ACL)
¾ File Transfer Menu (TFTP) (8)
• Setup files for remote firmware upgrade
• Upload and download configuration files
• Download event/security logs
¾ System Information (9)
• View extra information
¾ System Properties (10)
• Set the time and the remote units name
¾ Battery Run-down Files (11)
• Rename and delete files
• Modify Battery Run-down settings
Noran Tel Page 4 of 16
a subsidiary of Westell, Inc
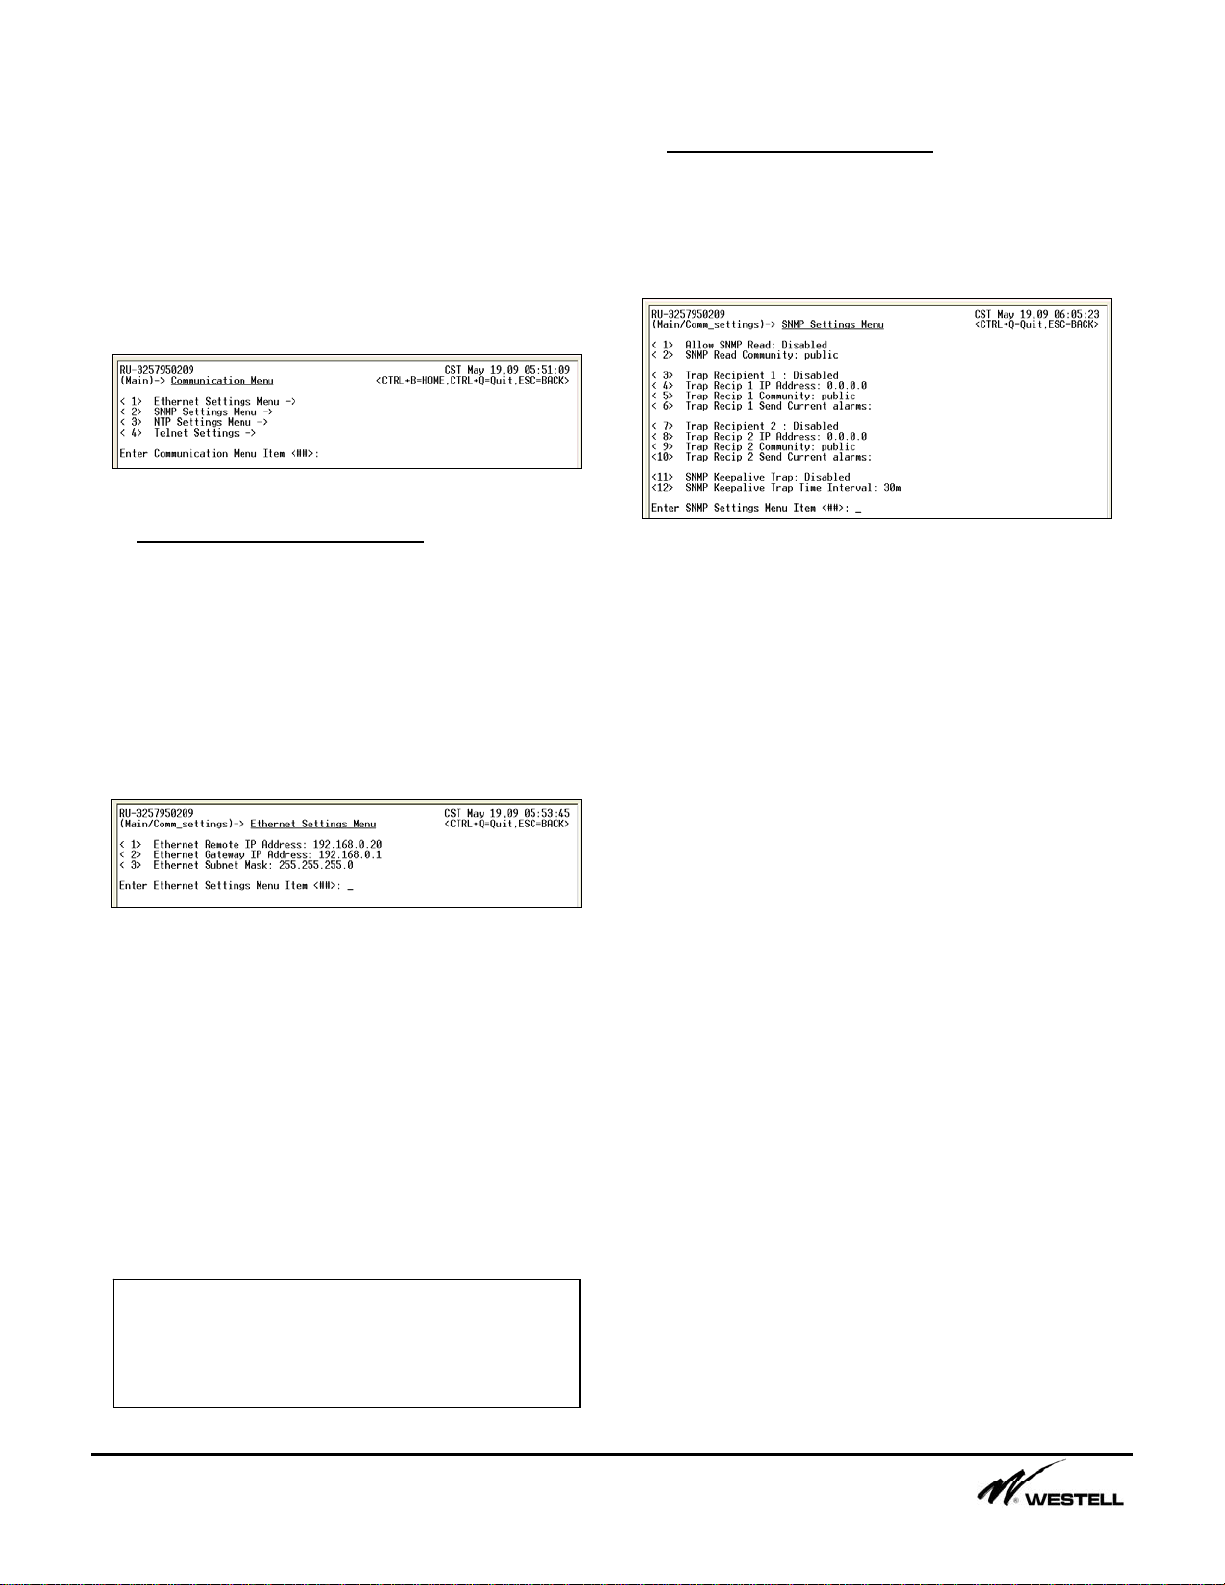
1. Communication Settings Menu (1)
When a user types 1 and presses the <enter>
key Figure 1-1 “Communication Settings
Menu” is displayed.
This menu provides submenus for configuring
communication options for the Site Vu.
1.2 SNMP Settings Menu (2)
This menu allows the user to configure the
SiteVu remote unit to send SNMP v1 traps to
Network Management Station(s). Figure 1-3
displays the menu item settings for this menu.
Figure 1-1 Communications Settings Menu
1.1 Ethernet Settings Menu (1)
This submenu allows a user to configure the
SiteVu remote unit for operation on a network.
Figure 1-2 displays the options that may be
changed on this submenu. These menu items
must be configured to communicate to the
remote unit over Telnet, to have the remote unit
send SNMP traps, and to have the remote unit
communicate to a time server.
Figure 1-2 Ethernet Settings Menu
The Ethernet Remote IP address is a statically
assigned IP address for the Site Vu connected
on the local area network.
The Ethernet Gateway IP address is the IP
address for the gateway on the local area
network that the Site Vu is connected to.
The Ethernet Subnet Mask is the network mask
for the Site Vu connected to the local area
network.
Note: These menu items can NOT be
changed when using a Telnet session. They
can only be configured when using the
Service Port on the Site Vu remote unit.
Figure 1-3 SNMP Settings Menu
The Allow SNMP Read menu item can be
enabled to allow a user to view the SiteVu’s
information via a SNMP Network Management
Station (NMS).
The SNMP Read Community menu item is the
keyword required at the NMS to view the Site
Vu through the NMS software.
The Site Vu can send events to two SNMP
Trap recipients. A recipient must be enabled in
order for the Site Vu to send traps. An IP
address must be setup for each recipient. The
community string is the keyword that the
associated trap monitor uses. “Send Current
Alarms” allows the user to force any current
alarms out to the SNMP trap manager.
The SNMP Keepalive Trap menu item can be
enabled so the remote unit will send out a trap
to the configured recipients. This trap contains
the remote unit’s name (syslocation) and the
current alarm counts for each severity Level.
The user can define the time interval between 5
minutes and 32,727 minutes (22 days 18 hours
7 minutes). The user can enter a time directly
in minutes (e.g. “300”) or qualify it in days (d),
hours (h) and minutes (m) (e.g. “1d 10h 50 m”)
Noran Tel Page 5 of 16
a subsidiary of Westell, Inc
 Loading...