


IRESPEED
W
ADSL M
ODEM
(M
ODEL
SER GUIDE
U
517)
©Copyright 2001 Westell, Inc. 030-300194 Rev. A
Printed in the United States of America November 2001

WireSpeed ADSL Modem
CONTENTS
WIRESPEED MODEM USER GUIDE ................................................................................................................ 1
Overview..................................................................................................................................................... 1
WebShare Benefits..................................................................................................................................... 1
Minimum System Requirements................................................................................................................. 1
ADSL MODEM INSTALLATION.......................................................................................................................... 2
Connecting the ADSL Modem .................................................................................................................... 2
Cable Connectors ....................................................................................................................................... 2
LED Indicators ............................................................................................................................................ 4
WEBSHARE INSTALLATION UTILITIES ........................................................................................................... 5
Running WebShare Installation Utilities ..................................................................................................... 5
Running WebShare Installation Utilities for Windows Operating Systems................................................. 5
Disabling Autodial ....................................................................................................................................... 9
SETTING UP YOUR WEBSHARE ACCOUNT ................................................................................................. 10
The WebShare Icon.................................................................................................................................. 10
Setting Account Parameters..................................................................................................................... 10
Adding and Configuring Additional WebShare Accounts ......................................................................... 11
CONNECTING TO AN ACCOUNT ................................................................................................................... 14
Activating a PPP Session ......................................................................................................................... 14
Disconnecting from a PPP Session.......................................................................................................... 18
ADVANCED CONFIGURATION ....................................................................................................................... 19
Restarting WebShare ............................................................................................................................... 19
The WebShare Management Interface Menu .......................................................................................... 20
The Management Menu ........................................................................................................................... 20
The Home Page........................................................................................................................................ 21
PPP Status....................................................................................................................................... 21
PPP Connections ............................................................................................................................. 21
Connect/Disconnect Button ............................................................................................................. 21
New Button....................................................................................................................................... 21
Edit Button........................................................................................................................................ 22
Connection Status............................................................................................................................ 22
Building New Accounts ............................................................................................................................. 22
IP Addresses Assigned as Part of PPP Session Setup ........................................................................... 22
Diagnostics ............................................................................................................................................... 23
Accessing the Main Diagnostics Page............................................................................................. 23
Test All ............................................................................................................................................. 23
Self-Test........................................................................................................................................... 24
ADSL Modem................................................................................................................................... 24
ATM Loopback ............................................................................................................................................. 24
Ethernet to PPPoE ........................................................................................................................... 25
PPP Connection............................................................................................................................... 25
IP Remote Router ............................................................................................................................ 25
DNS.................................................................................................................................................. 25
IP to Inernet...................................................................................................................................... 25
PING ................................................................................................................................................ 26
Diagnostic Log File ................................................................................................................................... 26
The LAN Advanced Configuration Page .................................................................................................. 28
Accessing the LAN Advanced Configuration Dialog Box ................................................................ 28
IP Address........................................................................................................................................ 29
Subnet Mask .................................................................................................................................... 29
030-300194 Rev. A ii

WireSpeed ADSL Modem
Domain Name System (DNS) Primary ............................................................................................ 29
Domain Naming System (DNS) Secondary..................................................................................... 29
Dynamic Host Configuration Protocol (DHCP) ................................................................................ 29
Static NAT ........................................................................................................................................ 29
LAN PC IP Address ......................................................................................................................... 30
Inactivity Timer Timeout................................................................................................................... 30
VPI/VCI Parameters ................................................................................................................................. 30
Viewing VPI/VCI Parameters ........................................................................................................... 30
Changing VPI/VCI Settings .............................................................................................................. 31
VIRTUAL PRIVATE NETWORK SUPPORT ..................................................................................................... 32
VPN Requirements ................................................................................................................................... 32
I
NSTALLING
VPN......................................................................................................................................... 32
Installing VPN for Windows 98/Me ........................................................................................................... 32
Creating a VPN Connection ..................................................................................................................... 33
Creating a VPN Connection for Windows 98 ........................................................................................... 33
Creating a VPN Connection for Windows Me .......................................................................................... 33
Creating a VPN Connection for Windows 2000 ....................................................................................... 34
Using a VPN Connection (Windows 2000)............................................................................................... 38
Disconnecting a VPN Connection (Windows 2000) ................................................................................. 38
C
ONFIGURING
VPN
FOR WINDOWS
NT........................................................................................................ 39
Installing PPTP for Windows NT .............................................................................................................. 39
Creating a New VPN Phonebook Entry for Windows NT ......................................................................... 40
Logging On to a VPN Server .................................................................................................................... 40
Disconnecting a VPN Connection ............................................................................................................ 41
The WebShare About Page...................................................................................................................... 42
WebShare Help ........................................................................................................................................ 42
TECHNICAL SUPPORT INFORMATION ......................................................................................................... 43
Westell Technical Support........................................................................................................................ 43
Warranty and Repairs............................................................................................................................... 43
PRODUCT SPECIFICATIONS.......................................................................................................................... 44
APPENDIX ........................................................................................................................................................ 45
INDEX................................................................................................................................................................................46
REGULATORY INFORMATION ....................................................................................................................... 47
SOFTWARE LICENSE AGREEMENT.............................................................................................................. 48
PUBLICATION INFORMATION .................................................................................................................................... 50
030-300194 Rev. A iii

WireSpeed ADSL Modem
WIRESPEED MODEM USER GUIDE
O
VERVIEW
In addition to the many features Westell modem users have enjoyed throughout the years, we have embedded a PPPoE
shim in our modem so you no longer have to install any other software to get connected. We have also added VPN support
via PPTP so that you can tunnel into your corporate network, as well as, true “Always-On" connection that enables you to
save your session password. In addition to these new features, your Westell WireSpeed ADSL Ethernet modem is software
upgradeable so that as your home or small office needs change, you can upgrade your existing hardware to a networking
solution with our widely popular WebShare networking software.
With over one million Westell WireSpeed™ modem users and valuable experience, Westell has
developed our newest Westell WireSpeed ADSL Ethernet modem. Westell's WireSpeed ADSL
Ethernet modem uses existing home or office phone lines to provide reliable, high-speed internet
access. With your WireSpeed ADSL modem, an existing phone line becomes a dedicated "always on"
connection, eliminating annoying dial-up modems and busy signals from your service provider.
Westell's WireSpeed ADSL Ethernet modem is capable of downstream data rates of up to 8 Mbps and
upstream data rates of up to 800 Kbps, making the WireSpeed ADSL Ethernet modem up to 140 times
faster than a 56 Kbps analog modem.
WebShare Benefits
• Does not require shim for PPPoE, eliminating third-party software
• Uses current LAN IP address
• Software upgradeable
• Always-on connection
• VPN support via PPTP
• PPTP/L2TP/IPSEC VPN Support (Tunnel Mode)
Minimum System Requirements
The following requirements outline the minimum system for WireSpeed:
• Pentium 166 MHz processor or equivalent
• Microsoft Windows 98, Windows Millennium, Windows 2000, or Windows NT 4.0
• Internet Explorer 4.x or Netscape Navigator 4.x installed
• At least 16 MB RAM
• Five MB of free hard drive space
• Ethernet connection between upgrading PC and ADSL modem
• TCP/IP protocol stack installed
• VGA monitor
• Crossover Ethernet cable for modem to Ethernet hub
• VPI/VCI values (provided by your service provider)
• PPPoA/PPPoE support (provided by your service provider)
030-300194 Rev. A 1
Overview
WireSpeed ADSL Modem
ADSL MODEM INSTALLATION
This section explains the procedures for installing Westell’s WireSpeed ADSL modem. The modem operates up to 300 feet
(91.4 meters) from a PC or Ethernet hub over 100-Ohm, Category 5 cable.
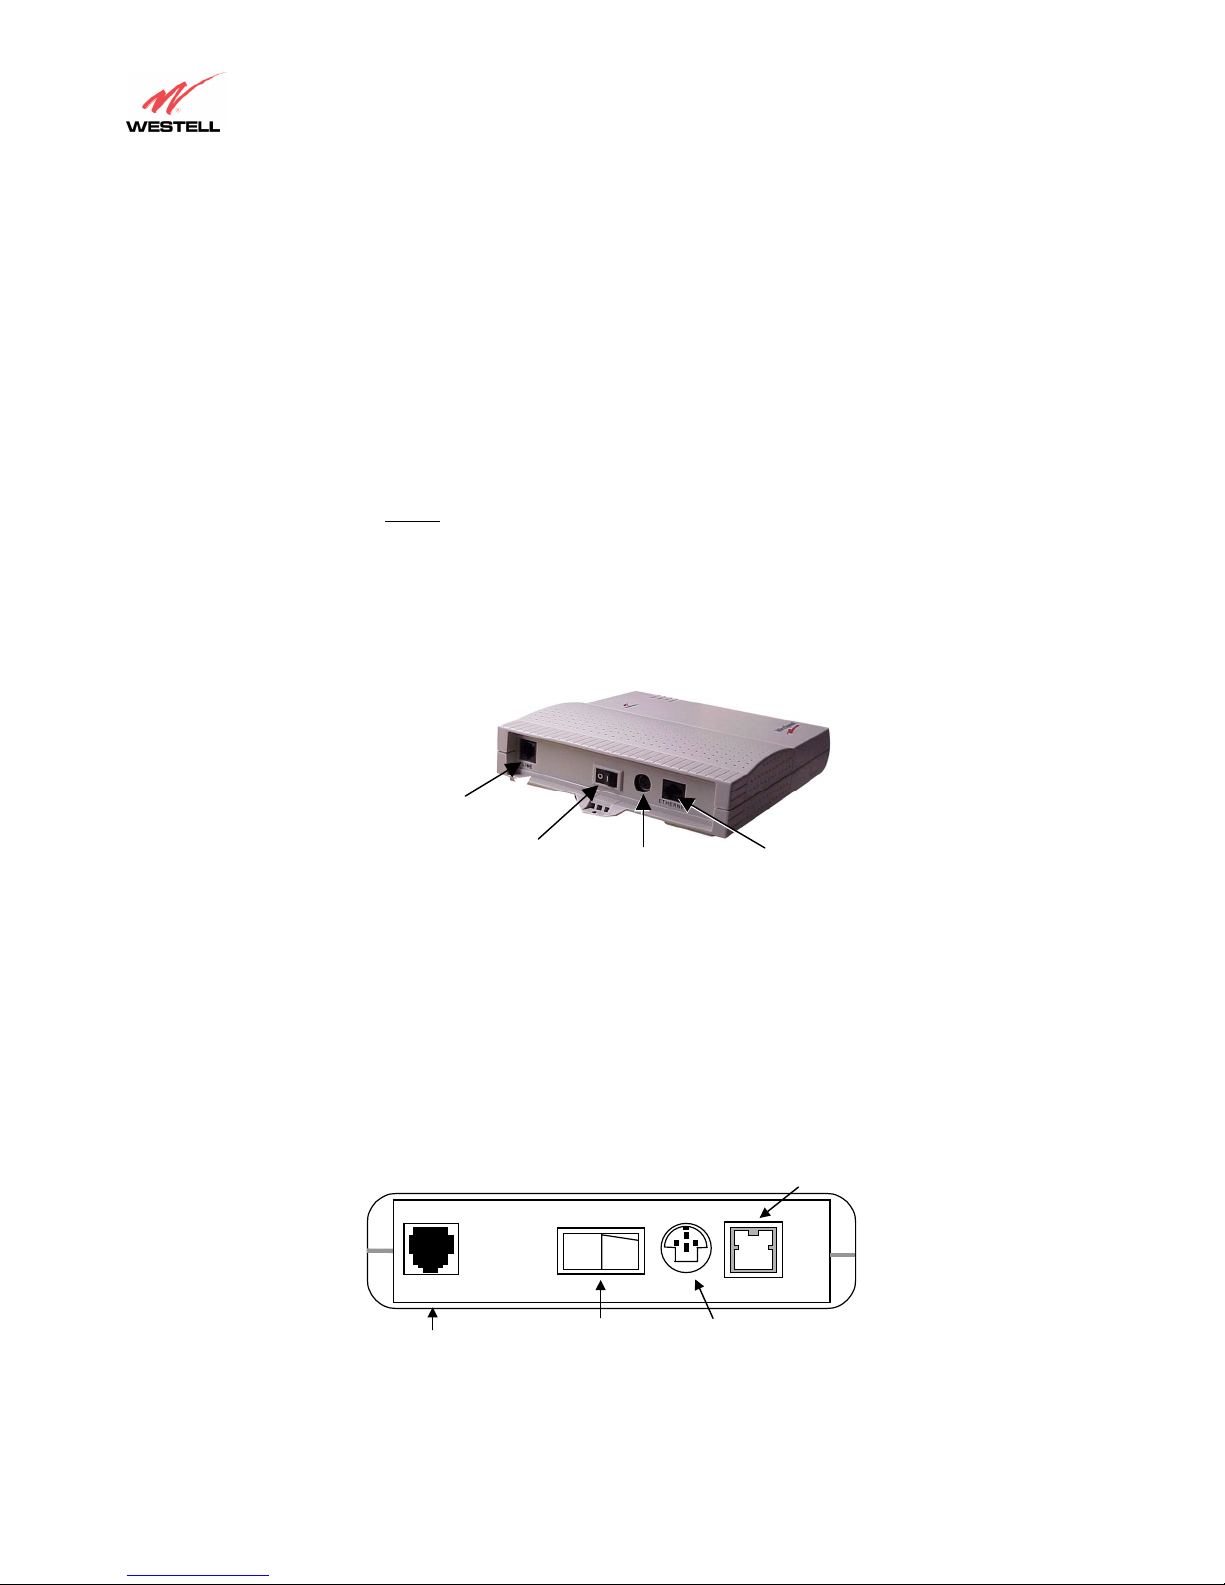
Connecting the ADSL Modem
Refer to the diagrams shown in Figure 1 and Figure 2, and to the steps below to connect the ADSL modem.
1. Connect the power supply cord to the power connector on the rear panel of the ADSL modem. Plug the other end of
the power supply cord into an AC wall socket.
2. Connect the DSL phone cable from the jack on the rear panel of the modem to the DSL-equipped telephone line jack
on the wall. IMPORTANT: Do not
3. Connect the Ethernet cable (included with this package) to the ETHERNET connector on the rear panel of the ADSL
modem and to the Ethernet port on your computer.
4. Turn the power switch ON and wait for the Ready LED to light solid green.
use a DSL filter on this connection.
DSL LINE
ON/OFF
SWITCH
POWER
CONNECTOR
ETHERNET
CONNECTOR
Figure 1. WireSpeed Single-User Setup Connections
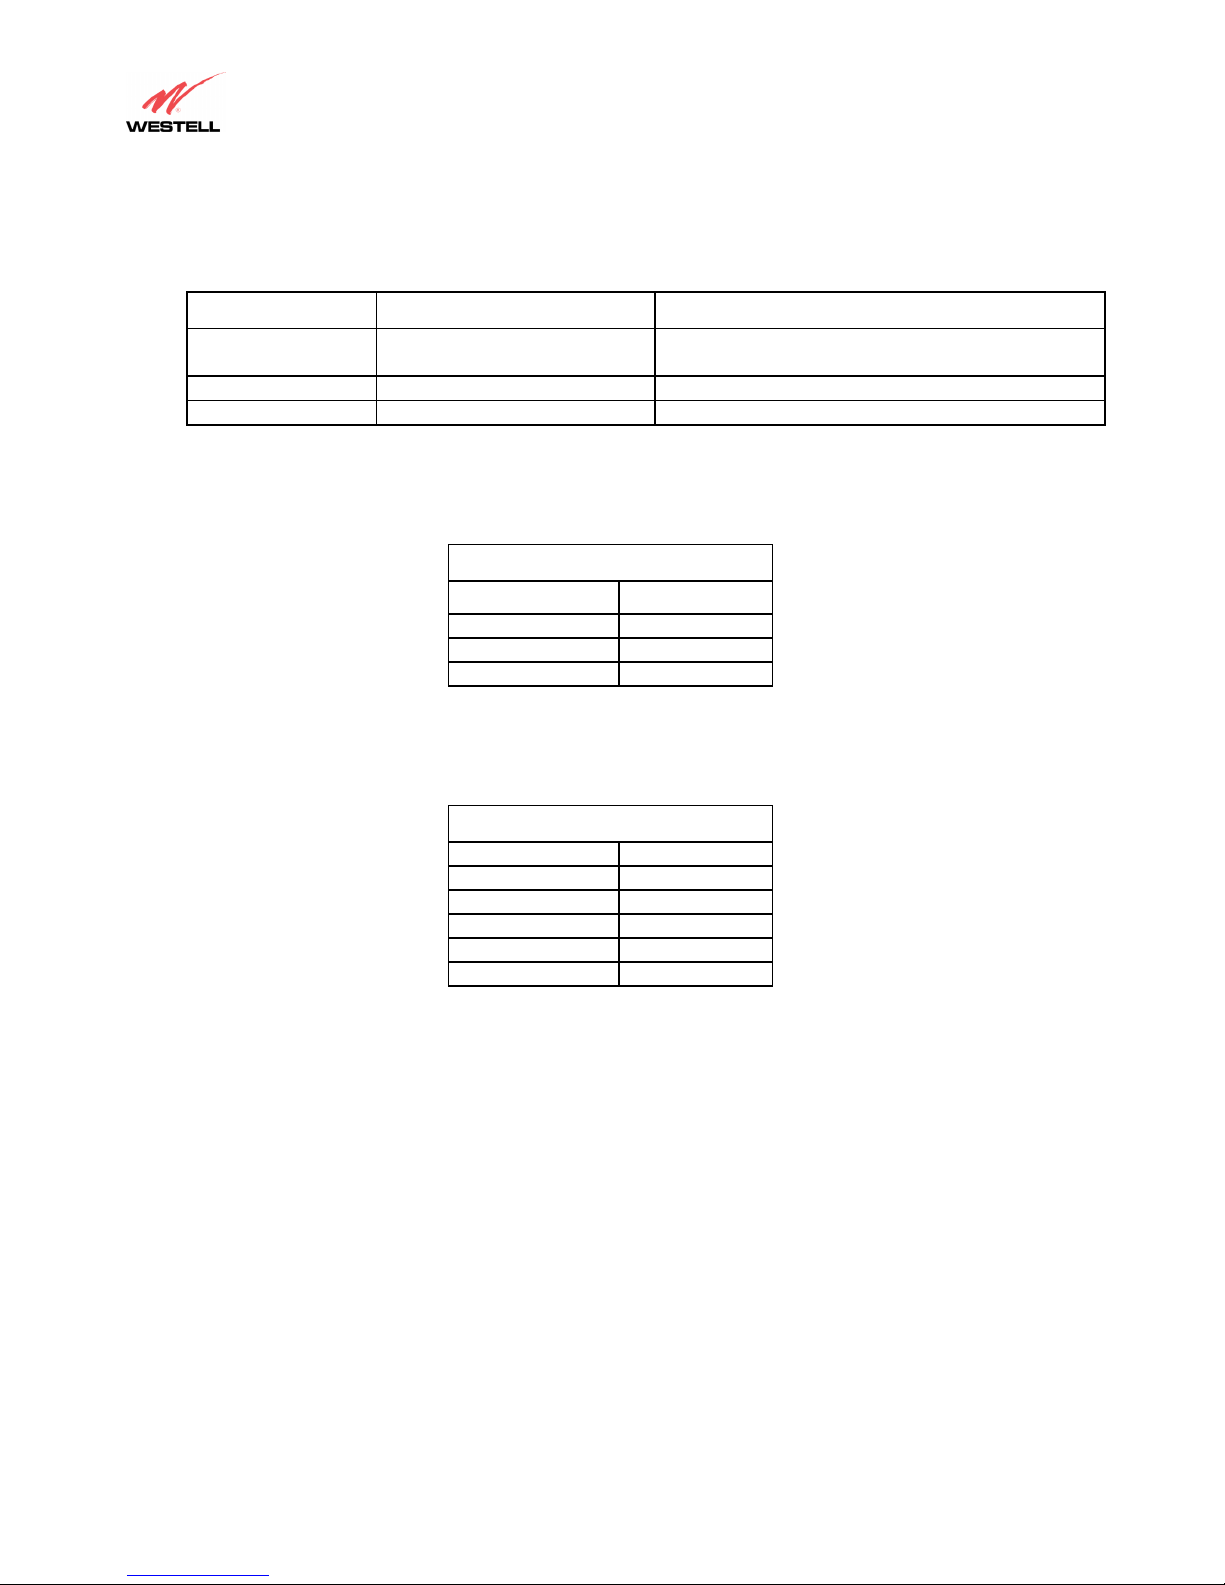
Cable Connectors
Three connectors are located on the rear panel of the WireSpeed modem (Figure 2 and Figure 3): a Power connector, a 6pin RJ-11 DSL (LINE) connector, and an 8-pin RJ-45 ETHERNET connector for customer terminal equipment. The
ON/OFF switch is also located on the rear panel. Table 1 through Table 3 lists the connector types and pinout designations.
O
I
LINE
DSL CONNECTOR
POWER
SWITCH
POWER
CONNECTOR
Figure 2. WireSpeed Modem (Connector Panel)
10Base-T
CONNECTOR
ETHERNET
030-300194 Rev. A 2
WireSpeed Installation
WireSpeed ADSL Modem
Connector Name Connector Type Description
DSL 6-pin (RJ-11) modular jack Connects to an ADSL-equipped telephone jack or
POWER 3-pin mini-DIN connector Connects power cord
ETHERNET 8-pin (RJ-45) modular jack Connects Ethernet device to the PC or 10Base-T hub
Table 1. WireSpeed Connectors
DSL connection of POTS splitter.
Table 2. DSL Pinouts
LINE Pinouts (RJ-11)
Pin #
1, 2, 5, 6 Not Used
3 DSL Tip
4 DSL Ring
Table 3. ETHERNET Pinouts
ETHERNET Pinouts (RJ-45)
Pin #
1 Rx+
2 Rx3 Tx+
4, 5, 7, 8 Not Used
6 Tx-
030-300194 Rev. A 3
WireSpeed Installation
WireSpeed ADSL Modem
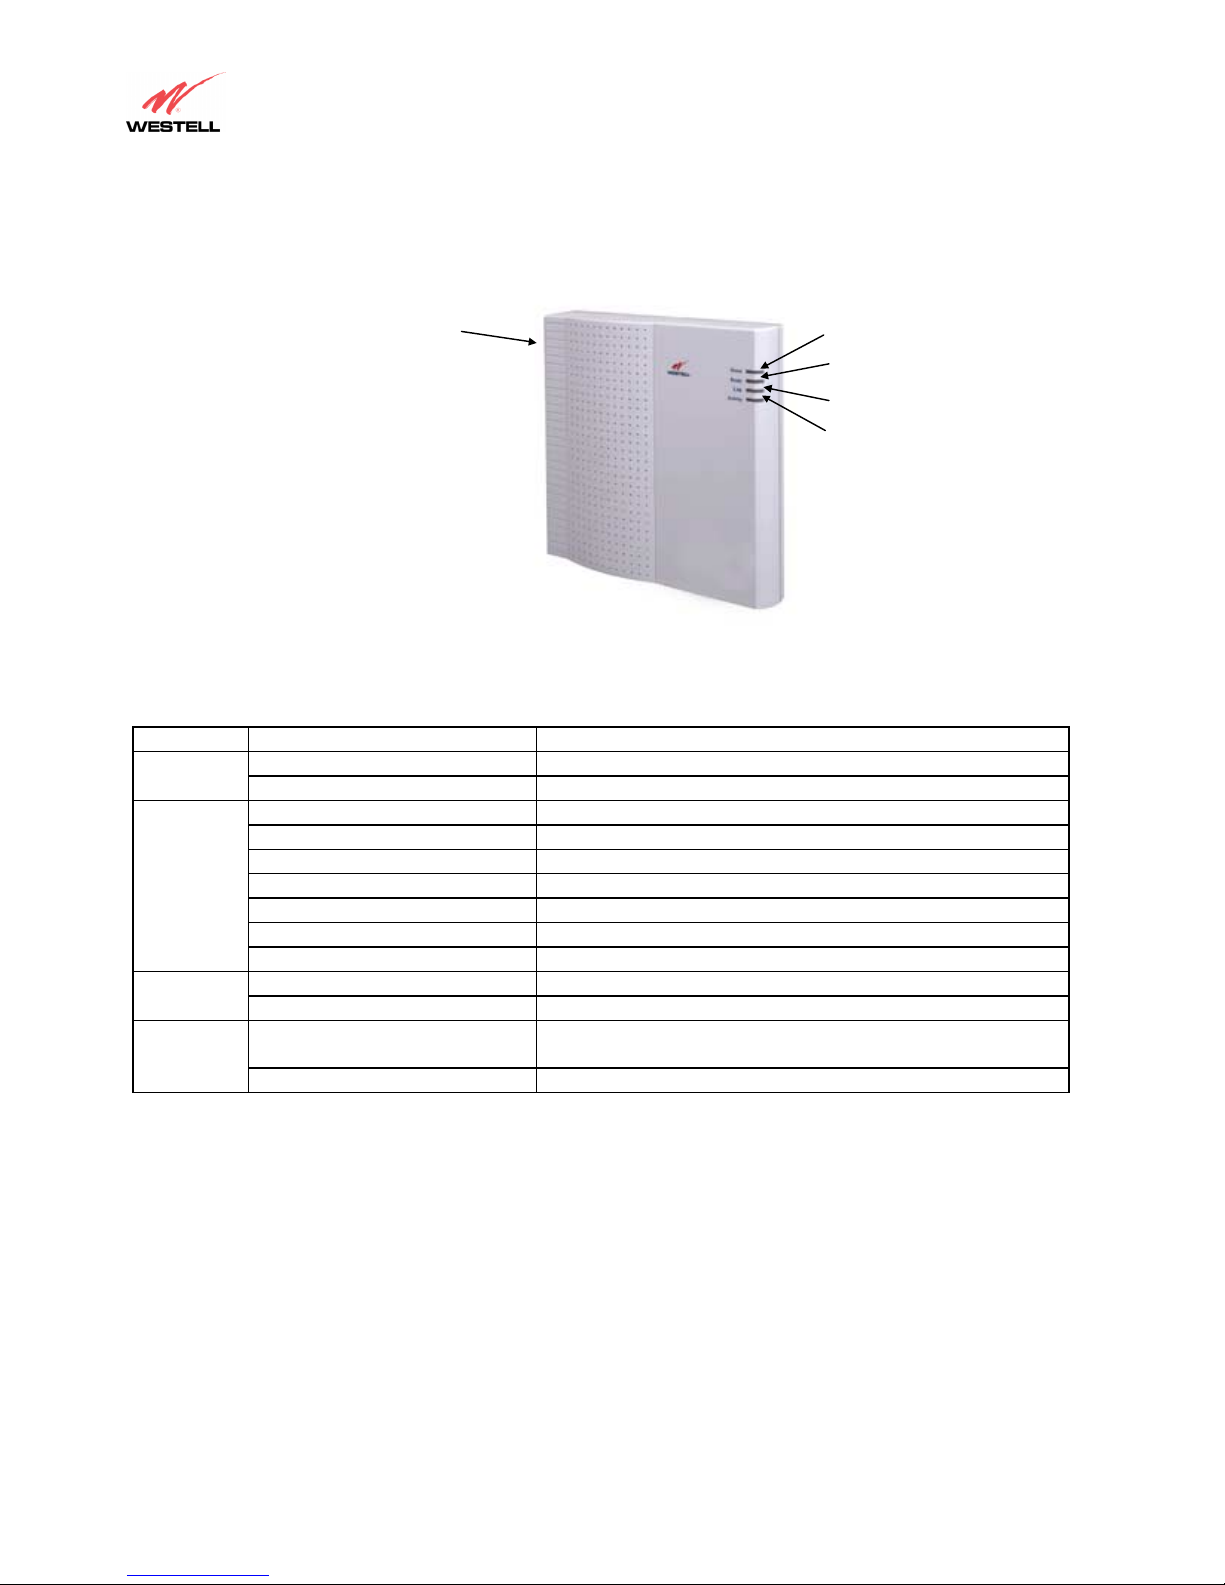
LED Indicators
The LED indicators shown in Figure 3 are used to verify the unit’s operation and status.
Connections are
located on the rear
Figure 3. WireSpeed Modem (Front)
Power
Ready
Link
Activity
LED State Description
POWER
READY
Solid Green Power ON
No Light
No power
Slow Flashing Green Power ON and passed power-up diagnostics (1 flash/sec)
Moderate Flashing Green Power ON and attempting synchronization (2 flashes/sec)
Solid Green Power ON and synchronized with the ADSL line card
Solid Red Hardware power-up in progress
Blinking Red Unit failed power-up diagnostic
Alternating Red/Green Modem diagnostic failed
No Light No power
LINK
Solid Green Link established
No Light No 10Base-T link
ACTIVITY
Pulsing Yellow Data being transmitted. Pulses should match the
reception or transmission of Ethernet data.
No Light No data on Ethernet interface
Table 4. LED States
Note: Modem LEDs will flash while powering up. This intermittent flashing should not be confused with actual operation
status.
030-300194 Rev. A 4
WireSpeed Installation

WireSpeed ADSL Modem
WEBSHARE INSTALLATION UTILITIES
Running WebShare Installation Utilities
Account parameters must be added to WebShare before connecting to your ISP or Corporate LAN. Use the Westellprovided WebShare Installation Utilities to simplify the setup of the following:
• Selection of the Ethernet adapter (in instances where more than one Ethernet adapter exists on the PC)
• Automatic configuring of DHCP (Dynamic Host Configuration Protocol)
• Automatic assignment of the WebShare gateway URL address of 192.168.0.1
• Simplified installation of service provider account information via the Configure Account screen
We recommend using the WebShare Installation Utilities to automatically configure DHCP. If necessary, DHCP may be
enabled manually.
Running WebShare Installation Utilities for Windows Operating Systems
To install WebShare Installation Utilities on your computer, insert the WebShare Installation Utilities CD into the CDROM drive. The CD should run automatically. If it does not, click Start > Run from the taskbar and type the following
line:
E:\win32\setup.exe (where “E” is the designation of the CD-ROM drive)
Find and double-click on the WebShare executable program. The Welcome screen appears.
1.
2. Click Next. The Function Selection window appears.
030-300194 Rev. A
Figure 4. Welcome Window
5
WebShare Installation Utilities
WireSpeed ADSL Modem
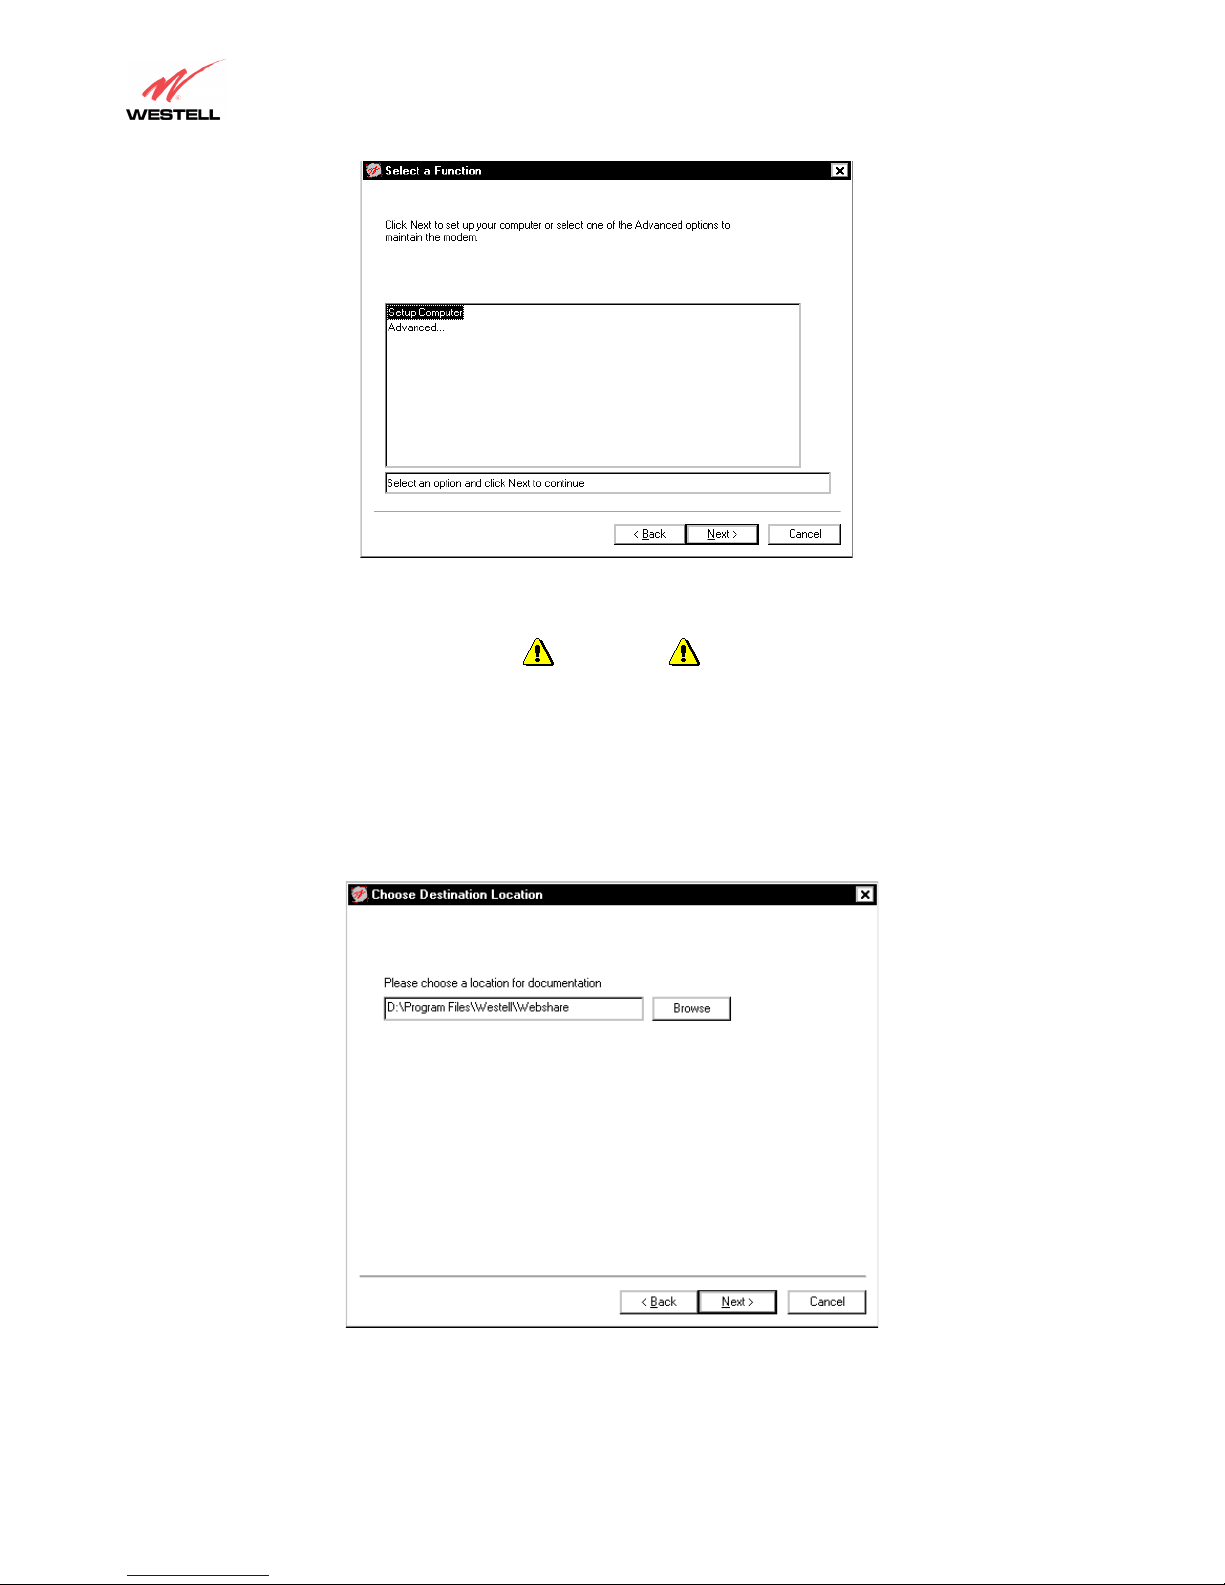
Figure 5. Function Selection
CAUTION
Do not select the default option!
3. Setup Computer, is the default function. Click Next.
Note: Use the advanced options when directed by technical support only.
4. The Choose Destination Location window shows the location where user documentation will be placed. (The
documentation file is named Webshare_Usr_Gd.pdf.)
030-300194 Rev. A 6
Figure 6. Destination Location
WebShare Installation Utilities
WireSpeed ADSL Modem
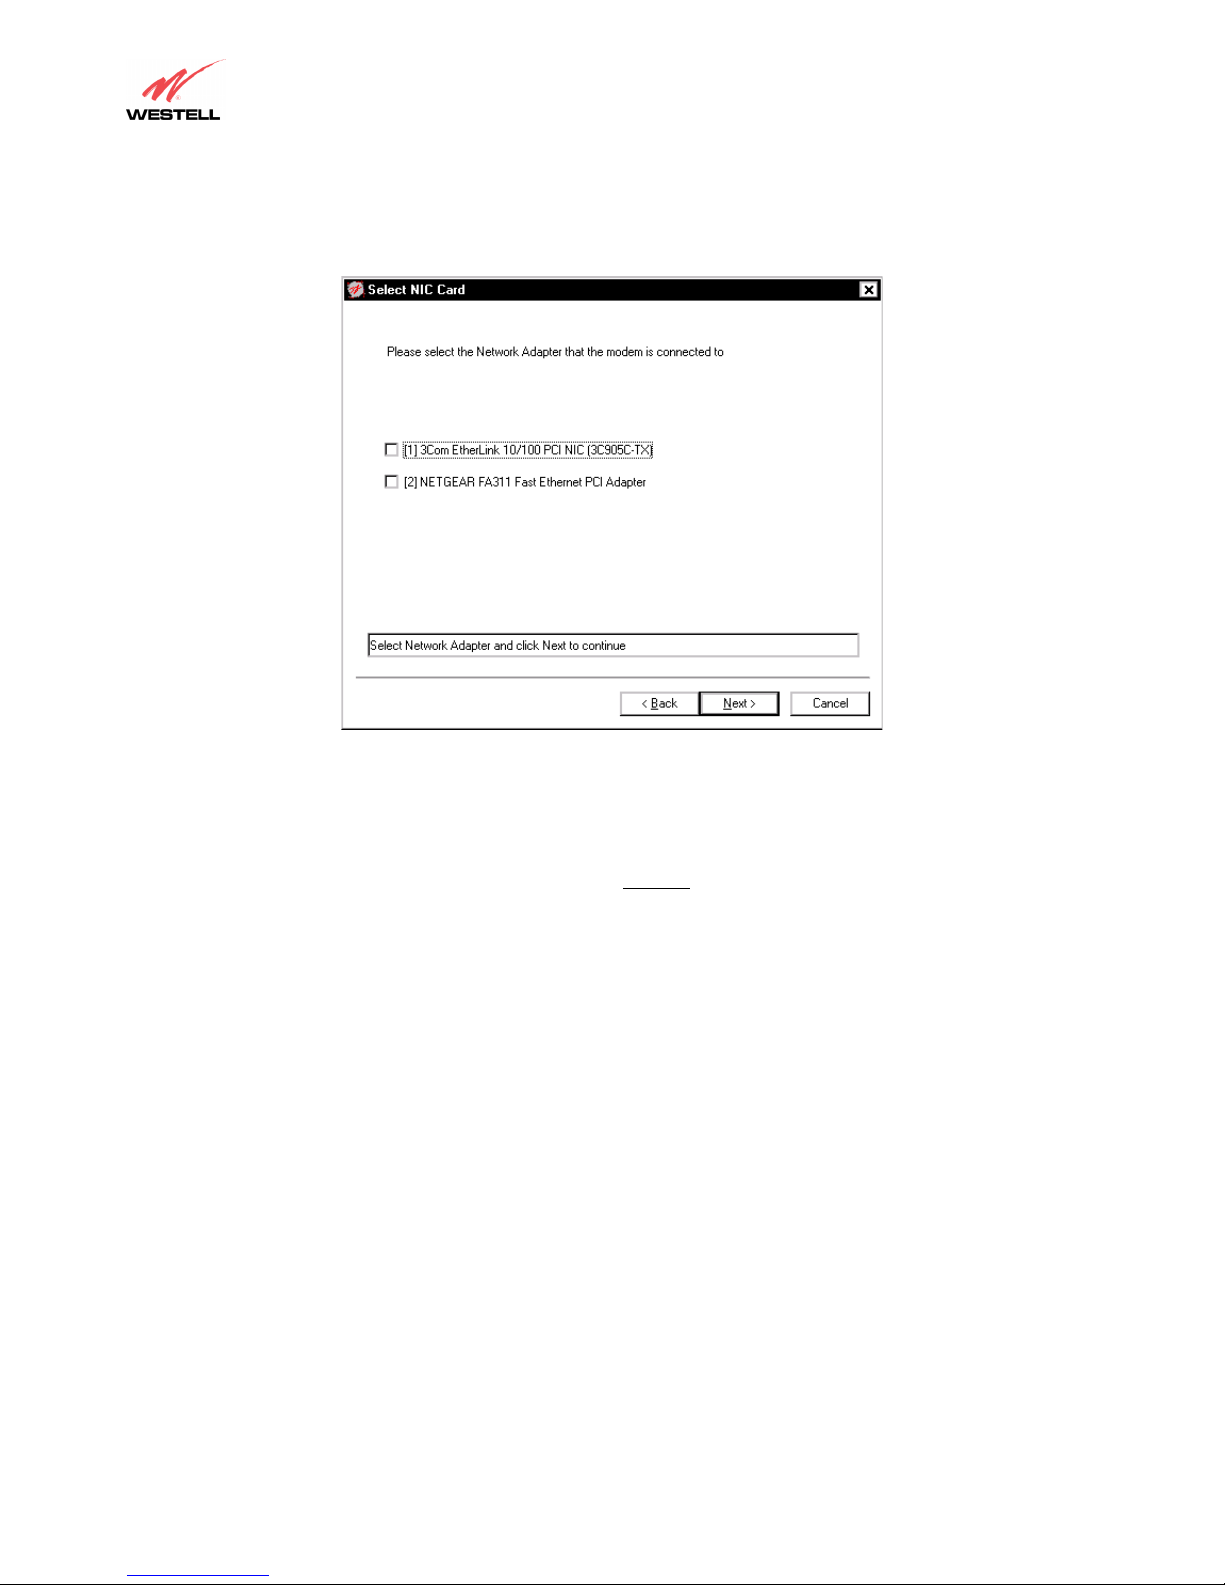
5. Click Next. The Select NIC Card window appears. (Note: This screen will NOT appear if your computer has only one
adapter.)
Figure 7. NIC Card (Adapter)
6. Click the option button for your network adapter, then click Next.
NOTE: If you have multiple Ethernet adapters, select the one to be used with the WireSpeed. Figure 7 shows a
window displaying multiple adapters. Be sure to select the physical
adapter that is connected to your ADSL modem.
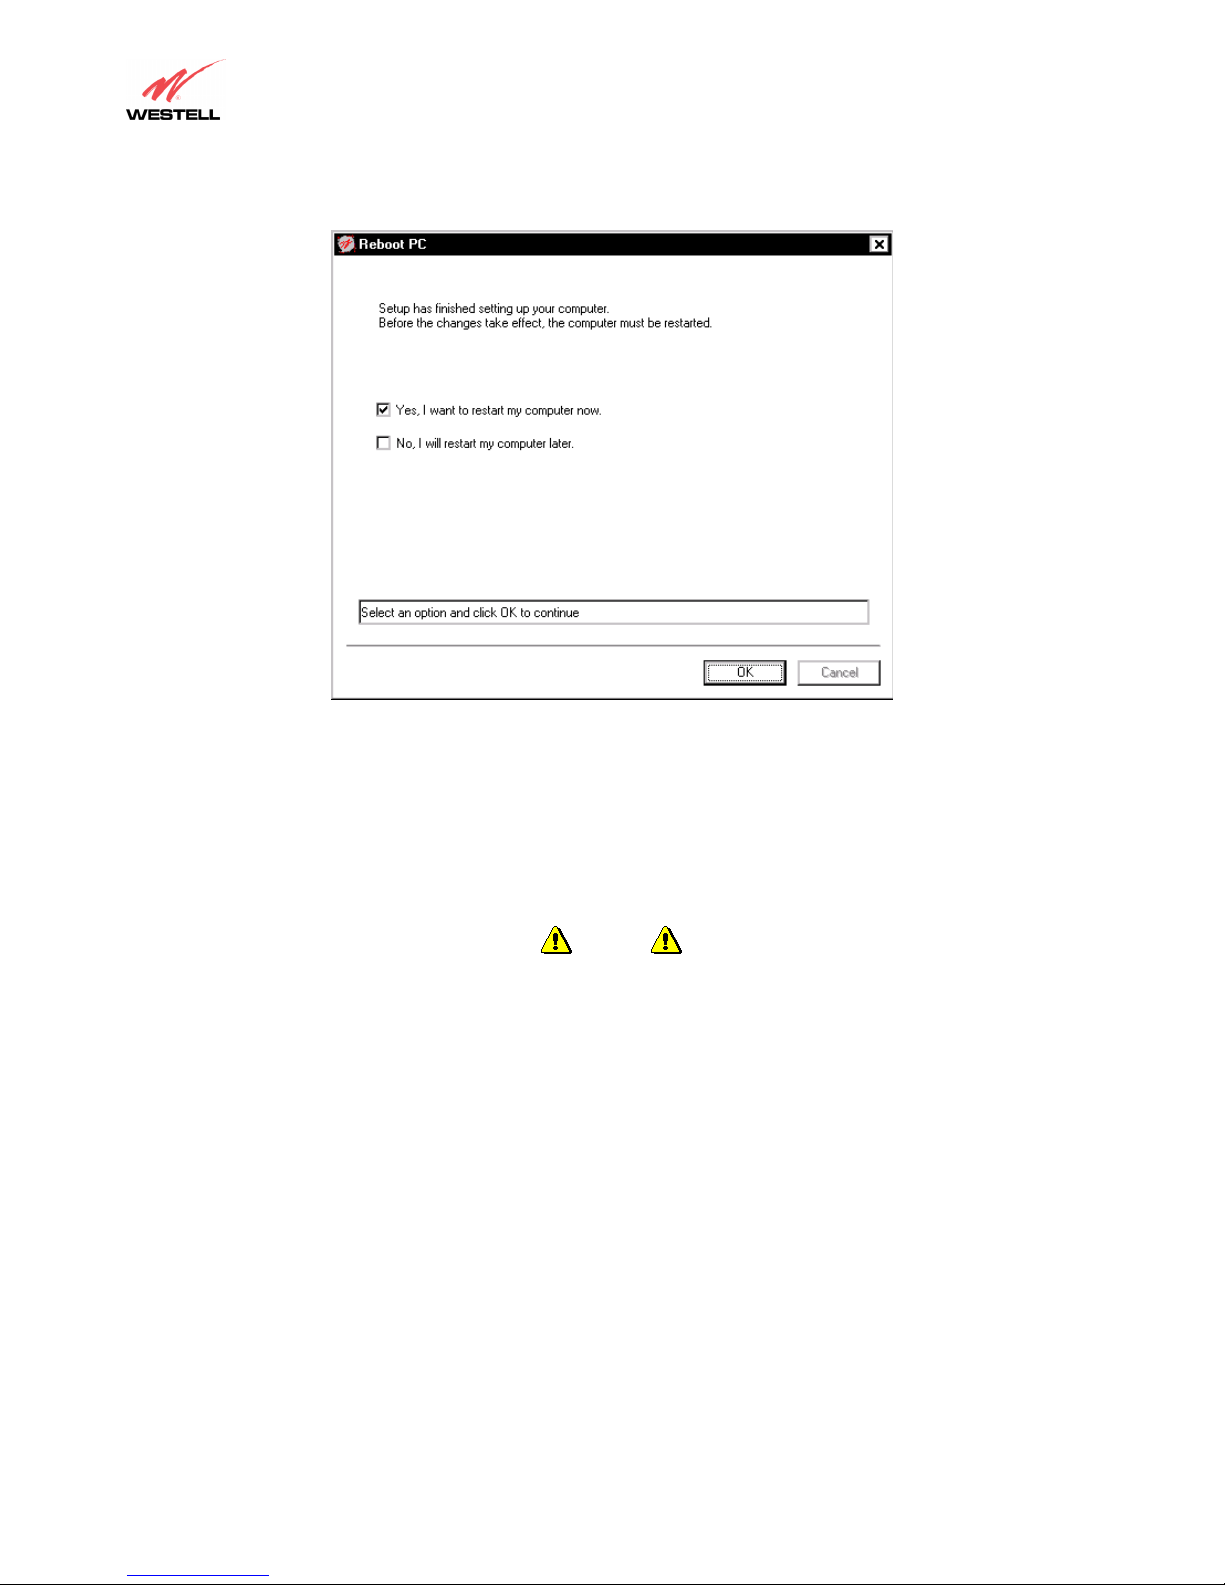
7. When the setup is complete, the Reboot PC window appears. Setting changes will not take effect until the computer
has been restarted.
8. Select Yes I want to restart my computer now to restart the PC.
Note: Before clicking Finish, remove the Westell CD-ROM from the CD-ROM drive.
030-300194 Rev. A 7
WebShare Installation Utilities
WireSpeed ADSL Modem
Figure 8. Reboot PC
This completes the basic WebShare setup process. When your computer restarts, the WebShare Home Page will appear. If
you do not wish to set up a WebShare account at this time, you may open the WebShare Home Page later by clicking on the
WebShare icon on your desktop.
NOTE
Windows Internet Explorer users should proceed to the next page for instructions on
disabling the autodial feature.
030-300194 Rev. A 8
WebShare Installation Utilities
WireSpeed ADSL Modem
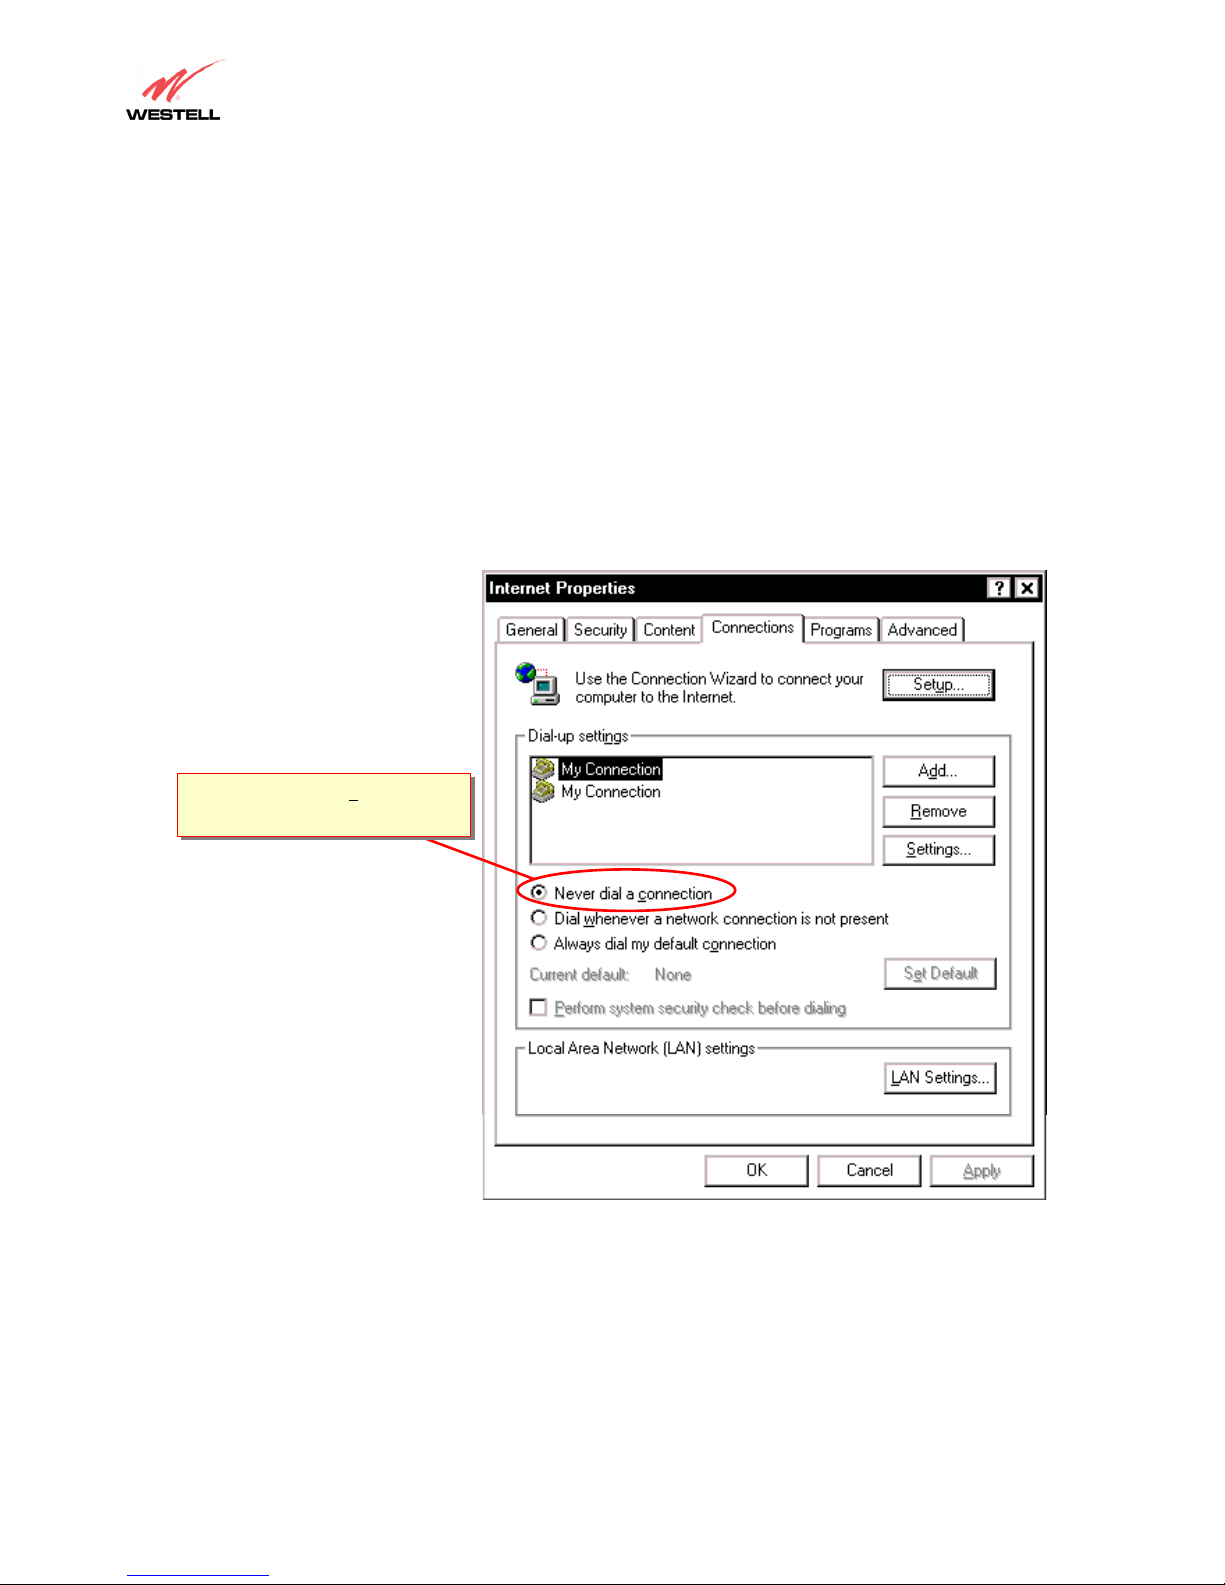
Disabling Autodial
A browser is typically set to dial into an ISP connection automatically when the browser is launched. In order to access the
Internet through your “always-on” ADSL line, the autodial feature must be disabled.
Dial-Up Settings
Your Connection dial-up setting must be set to Never dial a connection. Follow this procedure to verify and/or change
your dial-up setting:
1. Click Start > Settings, click Control Panel.
2. From the Control Panel screen, double-click Internet Options.
3. The Internet Options screen appears. Click the Connections tab.
4. In the Dial-up settings box, make sure that the option button for Never dial a connection is selected. NOTE: If
the Dial-up Settings box is dimmed (grayed out), it means you have not yet set up any connections. If this is the
case, you do not need to change any settings.
5. Click OK.
Select
“Never dial a connection”
to disable the autodial feature.
Figure 9. Internet Options Screen (Internet Explorer 5)
030-300194 Rev. A 9
WebShare Installation Utilities
WireSpeed ADSL Modem
SETTING UP YOUR WEBSHARE ACCOUNT
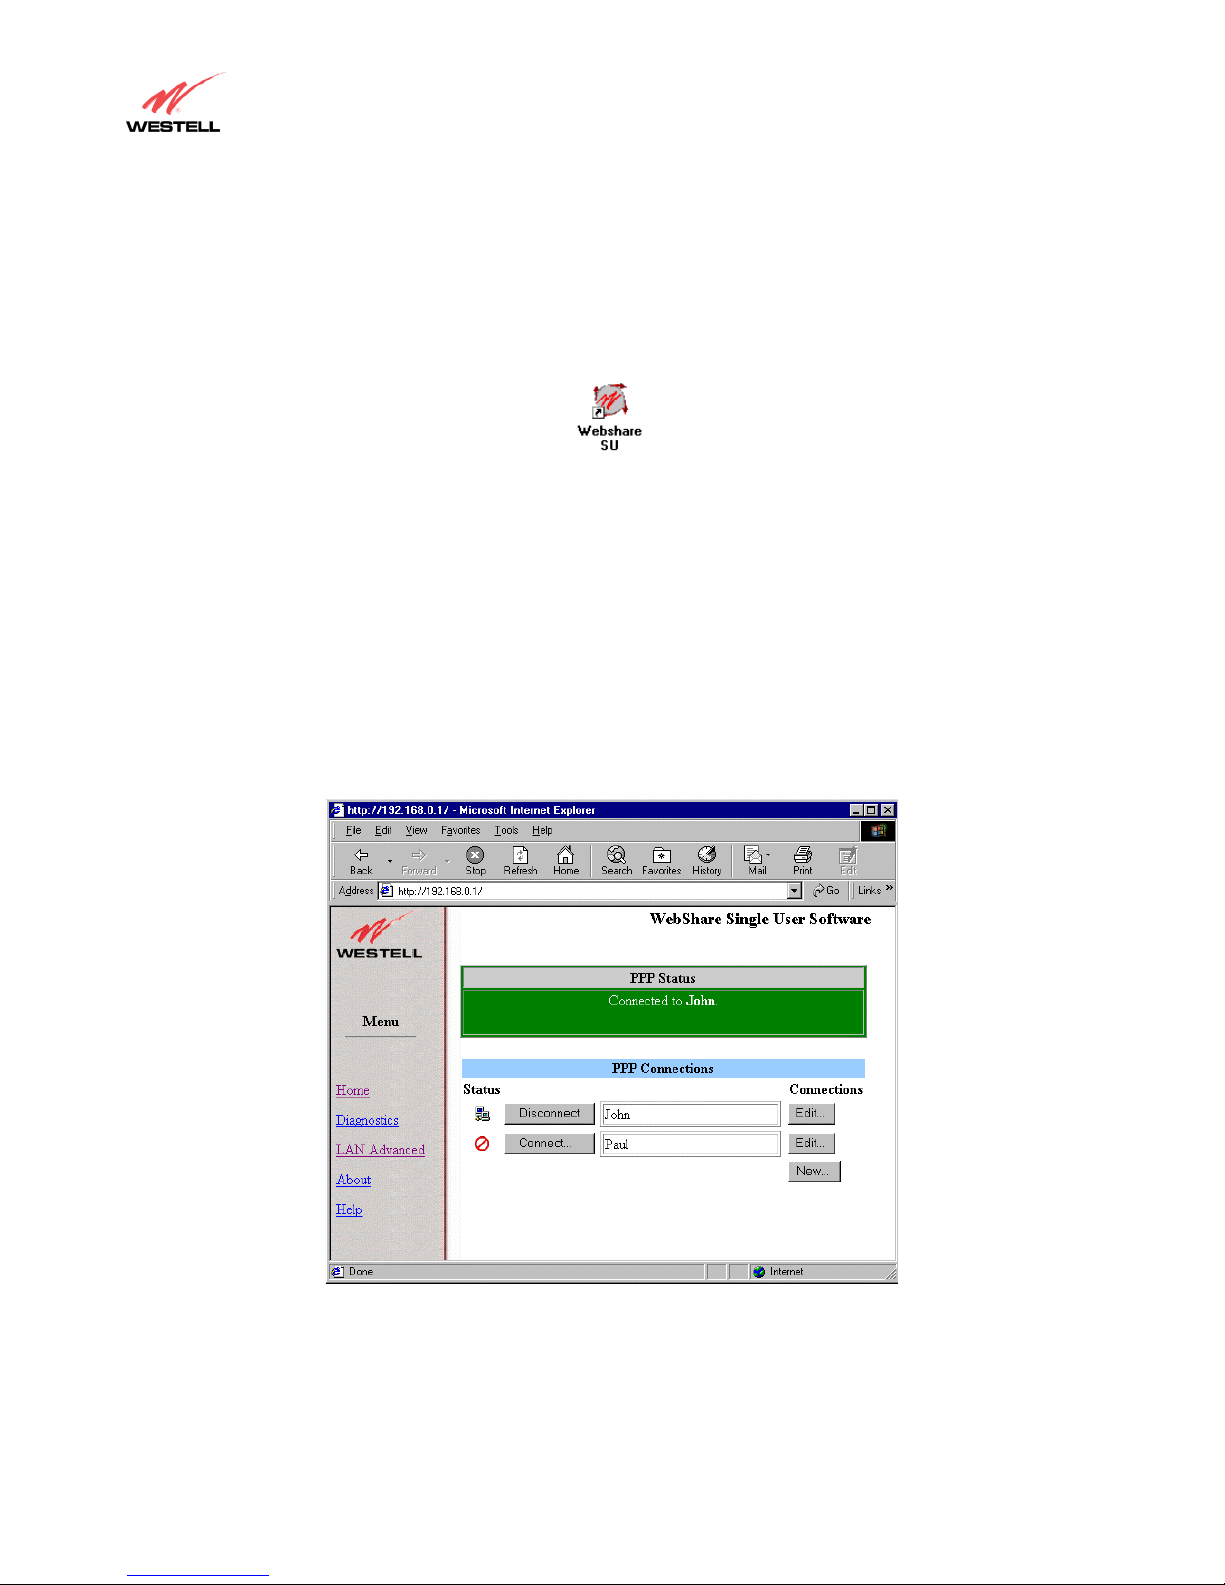
The WebShare Icon
This section shows you how to set up your initial WebShare account. The installation program will also place a WebShare
icon on your desktop. The icon will assist you in setting up your WebShare account.
Figure 10. The WebShare Icon
NOTE: The Home Page may also be accessed by opening the browser, typing 192.168.0.1 in the address bar (location bar),
and pressing ENTER.
Setting Account Parameters
Account parameters are required before connecting to your service provider. The account parameters to be entered in the
Configure Account dialog box are obtained from your service provider. User ID and Account Description are the only
required parameters.
Procedure:
1. To add account parameters, open the WebShare Home Page by clicking the WebShare icon on your desktop.
The WebShare Home Page containing PPP Status and PPP Connections windows appears.
030-300194 Rev. A 10 Setting Up Your WebShare Account
Figure 11. WebShare Home Page
WireSpeed ADSL Modem
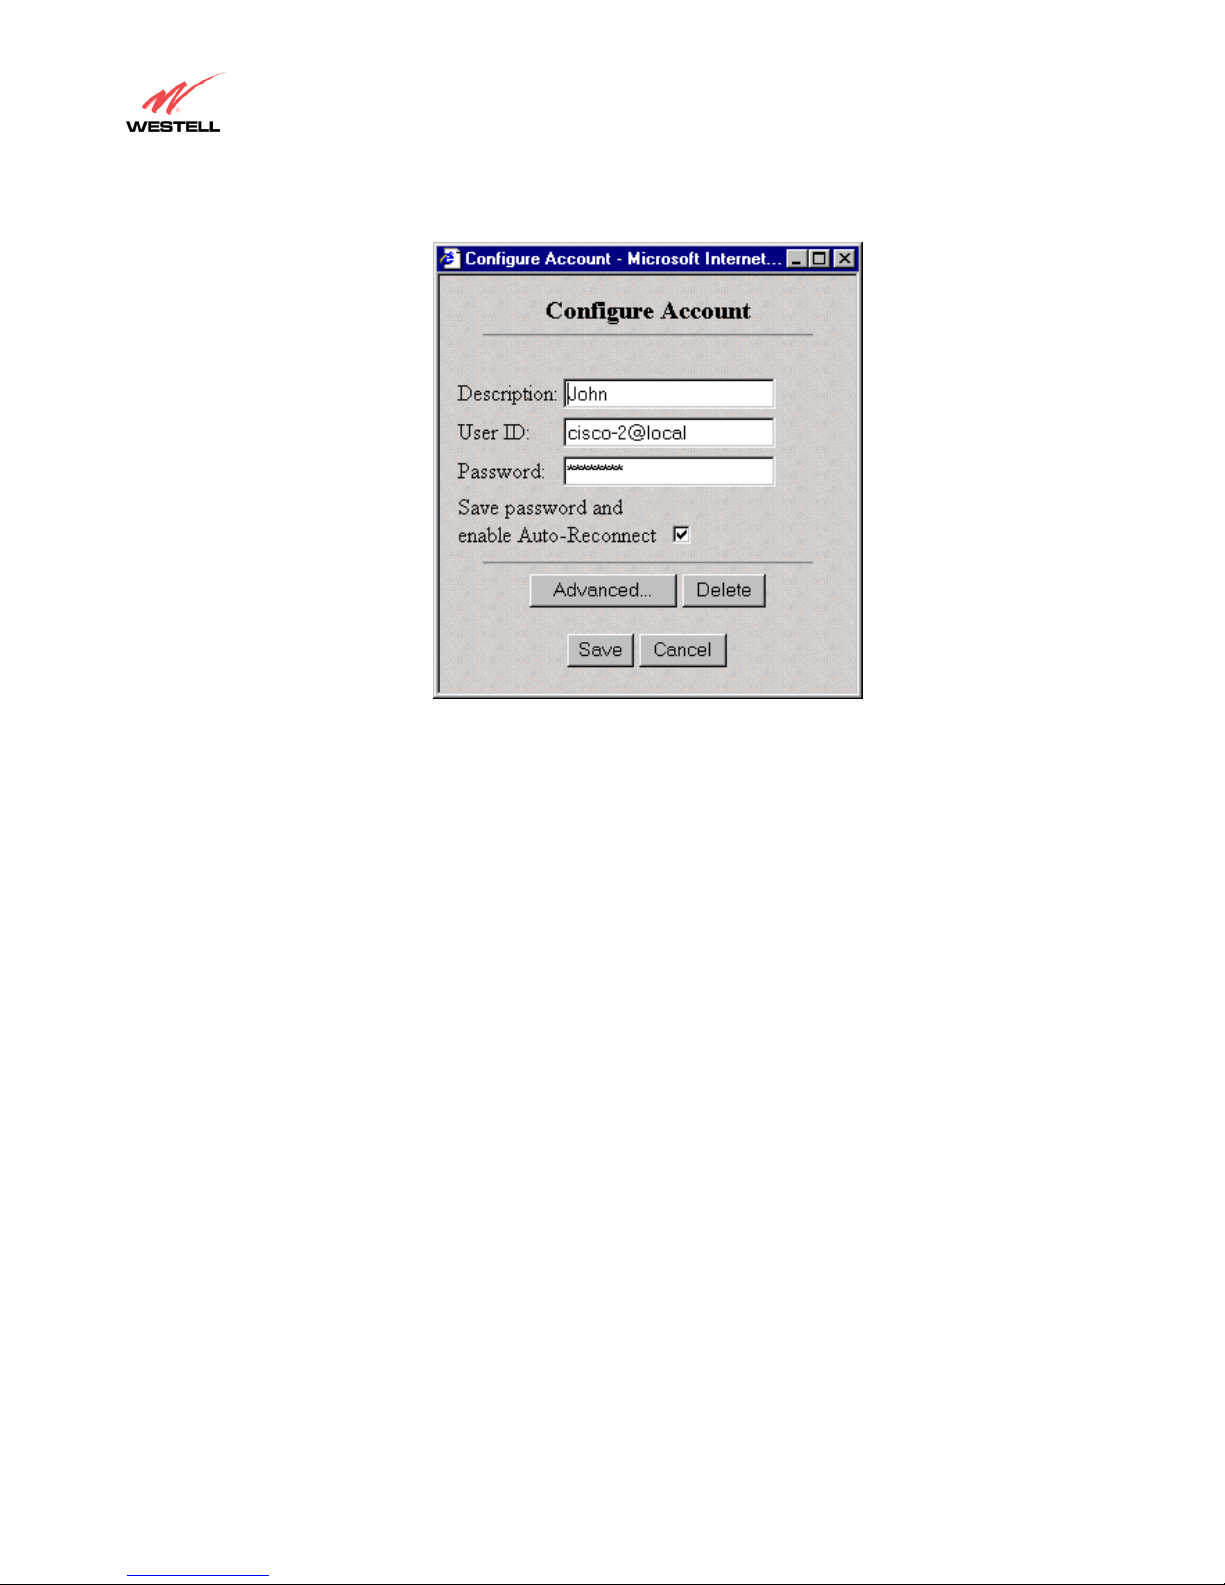
2. Under PPP Connections, click New. The Configure Account window appears. This is where you set the
account parameters.
Figure 12. Configure Account Window
The Description is a word or phrase created to identify the account. For example, the following parameters were
obtained from a service provider:
User ID: cisco-2@local
Password: ******
With the following user-defined input:
Account Description: John
The Account Description is the name that will appear on the WebShare Home Page under PPP Connections.
3. In the Description field, type the account description you have chosen to call this connection.
4. In the User ID field, type the user ID given to you by your service provider.
5. Click Save. The new account will now appear in the WebShare PPP Connections window.
Congratulations! You have just configured your first account. Connecting to an Account shows how to establish a
connection.
Adding and Configuring Additional WebShare Accounts
To configure another PPP account, the following information must be obtained from your service provider:
• User ID
• Password
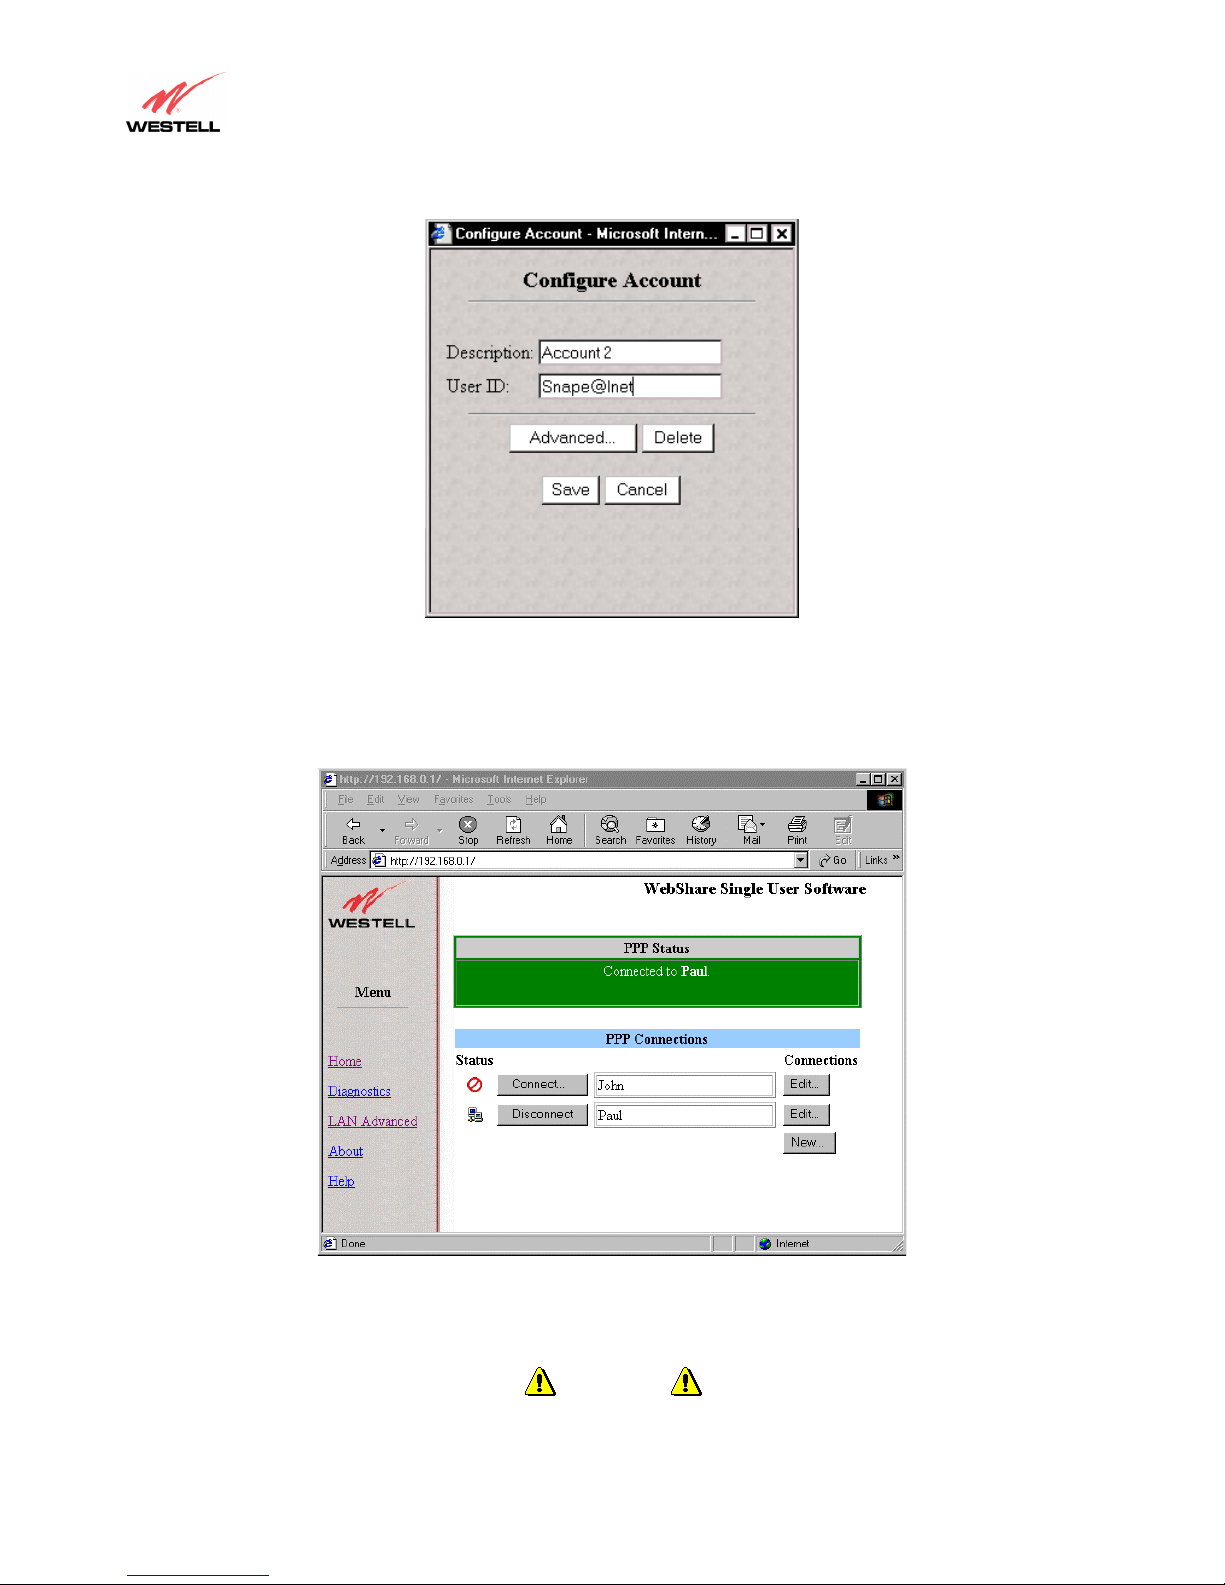
1. On the WebShare Home Page under PPP Connections, click the New button. The Configure Account window
opens.
2. In the Description field, enter a description or name you wish to call the account. This can be any set of
alphanumeric characters that make a user-friendly description for reference (e.g. Account 2, John, Sales 1, Internet
1, etc.) WebShare holds up to eight accounts.
030-300194 Rev. A 11 Setting Up Your WebShare Account
WireSpeed ADSL Modem
3. In the User ID field, enter the user ID obtained from your ISP.
Figure 13. Configure Account Dialog Box
3. Click Save to commit these values to WebShare.
4. The Configure Account window closes and a new entry appears under PPP Connections on the Home Page.
Figure 14. PPP Connections
To add more PPP accounts, repeat the configuration process described above. WebShare holds a maximum of eight
accounts.
030-300194 Rev. A 12 Setting Up Your WebShare Account
CAUTION
WireSpeed ADSL Modem
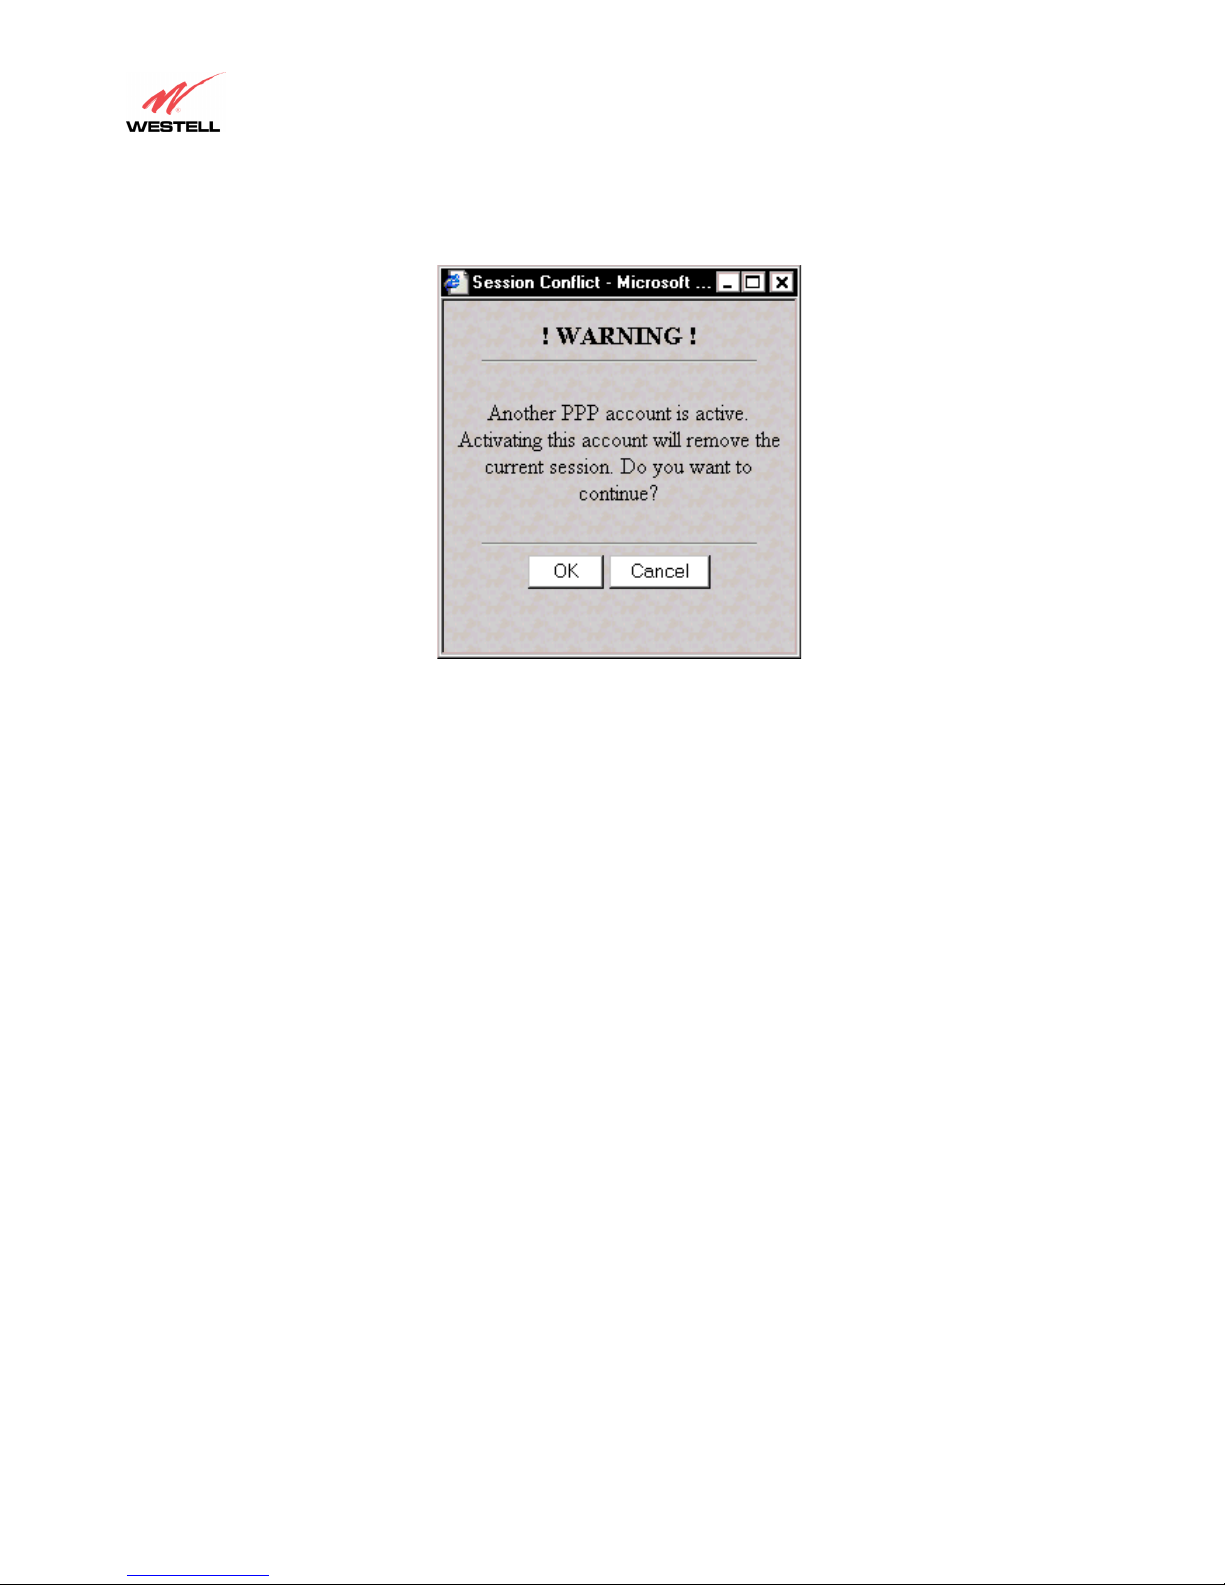
Only one account may be active at a time. Establishing a session for an idle
account while another session is active will disconnect the currently active
session.
Figure 15. Session Conflict Warning
The Session Conflict warning indicates that a session is already active.
030-300194 Rev. A 13 Setting Up Your WebShare Account

WireSpeed ADSL Modem
CONNECTING TO AN ACCOUNT
Verify that the Ready LED of the modem is solid green and at least one PPP account has been created before activating a
PPP session with your ISP.
Activating a PPP Session
To activate a PPP session, follow these steps:
1. Click the Connect button of the PPP account to activate the Home Page as shown in below.
Figure 16. WebShare Home Page
030-300194 Rev. A 14
Connecting to a WebShare Account

WireSpeed ADSL Modem
2. In the Connect window enter your password (received from the ISP) for the User ID of that account. (A valid
password must start and end with something other than a space.)
3. After you have entered your password, you can save the password by checking the Save password and enable
Auto-Reconnect box, or you can bypass this feature and click Connect.
Figure 17. Connect with option to save password
4. If you choose to save your password the window below will appear:
Figure 18. Connect Window
030-300194 Rev. A 15
Connecting to a WebShare Account

WireSpeed ADSL Modem
5. Click the Connect button. A Connecting screen appears briefly. Once a connection is made, a Connected to
<connection> message appears in the PPP Status box to inform you that a PPP session has been established on
the connection you chose. (Where “<connection>” is the name of your connection.)
Figure 19. Connecting Window
When a PPP session becomes active, the WebShare Home Page will show a Disconnect button in place of the
Connect button in the PPP Connections section. The
icon replaces the icon signifying that a PPP session
has been established. The PPP Status window turns green and displays the connected Account.
PPP Status
message
Connection
status icons
Change PPP
description,
view settings,
Create a new
connection
Session Connect/Disconnect button
030-300194 Rev. A 16
PPP accounts
Figure 20. Connection Window
Connecting to a WebShare Account

WireSpeed ADSL Modem
After the PPP account connects to the ISP, you can browse the Internet by entering the desired URL (Universal
Resource Locator) directly into the Address box (Location box) of your browser. You’re now ready to surf the
Internet!
Try: http://www.westell.com
Figure 21. Westell Home Page
030-300194 Rev. A 17
Connecting to a WebShare Account

WireSpeed ADSL Modem
Disconnecting from a PPP Session
Your PPP connection remains live unless you disconnect it. Use the following procedure to disconnect an active PPP
connection.
Procedure:
1. Return to the WebShare Home Page. Use any of the following methods:
• Maximize WebShare, if you minimized the Home Page before surfing
• Select WebShare from your Bookmarks or Favorites
• Close your browser and double-click the WebShare icon on your desktop
2. On the WebShare Home Page, click the Disconnect button for your account on the WebShare Home Page. The
disconnect Warning screen appears. Click OK.
CAUTION
If ANY user disconnects a session, ALL active users are interrupted.
Figure 22. Disconnect Warning
3. On the WebShare Home Page, the
icon in place of the icon signifies that a PPP session has been disconnected.
Close your Web browser.
To begin another PPP session, click the WebShare icon on your desktop.
030-300194 Rev. A 18
Connecting to a WebShare Account

WireSpeed ADSL Modem
ADVANCED CONFIGURATION
This section covers the WebShare Management Interface features and includes instructions on changing WebShare settings.
Restarting WebShare
When adding, deleting, or modifying WebShare settings, the modem must be restarted for the changes to take effect.
When WebShare is saving information, a "Please wait ..." warning appears. Wait until the screen returns to an active state
before continuing. Certain actions (especially powering off the modem) during such activities may cause configuration
data to be lost and cause problems with applications.
1. After making a setting change, click Save. WebShare will prompt you for a restart. The following window appears:
Figure 23. Restart Window
2. Click OK. The following screen appears:
Figure 24. Rebooting Window
3. The restart happens automatically and may take up to twenty seconds.
CAUTION
Do not turn the modem off while a restart is in progress or changes will be lost. You do
not need to turn the modem or your PC off and on.
030-300194 Rev. A 19
Advanced Configuration

WireSpeed ADSL Modem
The WebShare Management Interface Menu
Selecting the WebShare icon on the desktop activates your web browser and establishes a home page for WebShare. A
Management Menu is located in the left portion of your home page. It provides links to the other management pages
available for configuration, status, control and other operation information for WebShare.
Home
The WebShare Menu on the WebShare Home Page provides
access to all the configured PPP accounts and allows PPP session
control. This is the page you used when setting up your first
account.
Diagnostics
Provides modem and PPP session diagnostic capability.
LAN Advanced
Allows the editing of local Ethernet interface configuration
parameters.
About
Contains the model number, serial number and software versions
of WebShare
Help
Provides help information for the management page being
displayed.
Figure 25. Management Menu
030-300194 Rev. A 20
Advanced Configuration

WireSpeed ADSL Modem
The Home Page
The WebShare Home Page provides access to all of the configured PPP accounts and allows users to establish connections,
create accounts and edit accounts. This is the same screen you used when you set up an account on page 10.
Figure 26. WebShare Home Page
PPP Status
The PPP Status box displays the color-coded status for the current connection state:
Blue = connection idle
Green = connection established
Red = error
In addition to the color-coding, the box may contain error message text.
PPP Connections
The PPP Connections section provides a description of each individual PPP account. The text string is the user-friendly
description you entered in the Configure Account dialog box. Other fields for this section are defined below.
Connect/Disconnect Button
The Connect/Disconnect button provides PPP session control for the associated account. This allows you to connect and
disconnect from various PPP accounts, when desired. The state of the Connect/Disconnect button depends on the state of
the PPP session. If the account is inactive, the button reads Connect. If the account is active, it reads Disconnect.
New Button
The New button gives users the ability to create new accounts. The Edit button lets users change the account description
and view configuration data.
030-300194 Rev. A 21
Advanced Configuration

WireSpeed ADSL Modem
Edit Button
The Edit button allows users to change settings for an account. Note: User ID and passwords are usually assigned by the
service provider. Users may freely change the account Description.
Connection Status
The Status column indicates the connection status of each PPP account.
This icon shows that the account is INACTIVE. (No connection established.) Click Connect to activate the
connection.
This icon shows that a PPP account is ACTIVE. (A connection is currently active.) Clicking on this icon will
disconnect the user. (An empty account has no icon in the Status column.)
Building New Accounts
To add a new account to the Home Page, see “Setting Up Your WebShare Account” on page 10 and “Adding and
Configuring Additional WebShare Accounts” on page 11.)
Click the New button. In the Configure Account dialog box, type a description of the account into the Description field
and the user ID defined by your ISP. Click the Save button in the dialog box to commit the new account information to
WebShare.
IP Addresses Assigned as Part of PPP Session Setup
When a PPP session is established, your service provider’s PPP server assigns an IP address to your modem’s DSL
interface. It also informs your modem of the IP addresses to which it should send DNS requests. It may be necessary to
verify one of these IP addresses for a specific PPP account while troubleshooting. To view the current settings for an
account:
1. Click the Edit button of the appropriate PPP account. The Configure Account dialog box appears.
2. Click the Advanced button to view the DNS and IP information.
Figure 27. Advanced Configuration (Sample values. Actual data may vary.)
The Advanced Configuration dialog box displays your DNS IP values. These values and the Network PPP IP only
appear when a connection is established. Settings cannot be changed on the Advanced Configuration dialog box.
030-300194 Rev. A 22
Advanced Configuration

WireSpeed ADSL Modem
Diagnostics
Accessing the Main Diagnostics Page
Select the Diagnostics menu item from the WebShare management menu to display the Diagnostics page. The figure
below shows the Diagnostics window before any diagnostic tests have been performed.
Figure 28. Diagnostics Window (before diagnostic tests have been performed)
Test All
The Test All button will execute all of the tests sequentially beginning with the Self-Test and ending with PING.
NOTE
To get a valid PING result, you must enter an IP address in the PING fields.
030-300194 Rev. A 23
Advanced Configuration

WireSpeed ADSL Modem
The figure below shows the Diagnostics window returned after clicking the Test All button and providing PING IP address
values.
Figure 29. Diagnostics Window (Sample values. Actual data may vary.)
Self-Test
This test verifies the integrity of all data stored in the modem.
Messages:
• Success: All stored information verified correctly.
• Failure: An error was detected in the stored data. The information needs to be re-entered.
ADSL Modem
This test verifies management communications with the modem transceiver.
Messages:
• In Service: The modem is synchronized with the central office Channel Unit and is ready to send/receive data.
• Out of Service: The modem transceiver is NOT synchronized with the central office Channel Unit, but is
functioning properly. (This may happen if the connector cable is not correctly plugged into the modem or the
access jack.)
• Not Tested: A previous test has failed, causing further tests to be skipped.
ATM Loopback
This test verifies ATM connectivity with the service provider’s equipment. It sends F5 Pings to the remote router and
verifies that the expected response arrives. (Note that some providers do not configure their equipment to respond to F5
Pings, and so a failure of this test may not indicate a problem. For this reason, tests will continue even if this test should
fail.)
Messages:
• Success: The F5 Pings worked as expected. ATM connectivity to the provider’s router is verified.
030-300194 Rev. A 24
Advanced Configuration

WireSpeed ADSL Modem
• No Response: The provider’s equipment did not respond as expected.
• Not Tested: A previous test has failed, causing further tests to be skipped.
Ethernet to PPPoE
This test verifies that PPPoE Discovery has been completed and a PPPoE session exists with the provider’s router.
Messages:
• Established: The modem has completed PPPoE Discovery and has an active PPPoE session with the provider.
• Not Established: The modem has not completed PPPoE Discovery.
• Not Applicable: The modem is running in PPPoA mode and thus does not require a PPPoE session.
• Not Tested: A previous test has failed, causing further tests to be skipped.
PPP Connection
This test button initiates a testing process that verifies connectivity with the service provider’s Remote Access Server
(RAS).
Messages:
• Success: The modem has a verified connection with the ISP and is ready to send and receive data.
• No PPP Connection: There is no link between the modem and the central office equipment.
• Not Available: A PPP session is active, but the modem failed to get a response from the Remote Access Server.
• Not Tested: A previous test has failed, causing further tests to be skipped.
IP Remote Router
This test generates an IP Ping to the provider’s router and awaits the response.
Messages:
• Success: A response was received from the remote IP address.
• Not Available: There is no PPP link between the modem and the central office equipment.
• Not Applicable: The router did not give its IP address to the modem, so an IP Ping cannot be initiated.
• Not Tested: A previous test has failed, causing further tests to be skipped.
DNS
This test performs a DNS (Domain Name System) loopup to verify that the modem is in contact with the DNS Server. DNS
maps names to IP addresses. (The Diagnostic Log (see below) will list the queried name and the resulting IP address.)
Messages:
• Success: A response was received from the DNS Server.
• Not Response: No response was received from the DNS Server..
• No Such Host: The DNS Server was unable to find an IP address for the given name.
• Not Tested: A previous test has failed, causing further tests to be skipped.
IP to Internet
This test performs an IP PING (Packet Internet Groper) to the host whose IP address was obtained by the DNS test above.
This test verifies IP connectivity with that host. Note that many Internet-accessible host are configured to disallow PINGs,
and thus a failure of this test does not always indicate a problem. (The Diagnostic LOG (see below) will list the PINGed IP
address.)
Messages:
030-300194 Rev. A 25
Advanced Configuration

WireSpeed ADSL Modem
• Success: A PING response was received from the Internet host.
• Not Response: No PING response arrived from the Internet host.
• Not Tested: A previous test has failed, causing further tests to be skipped.
PING
This test button initiates an IP PING to any host IP address or name specified in the PING data fields. A PING (Packet
Internet Groper) is a protocol program for sending a signal to see whether another network host or other device is on-line
and responding. This application will tell you if a particular entity is presently alive and reachable on the Internet.
Check the radio button to indicate whether to PING by IP address or by name (e.g., www.yahoo.com
). In the case of PING
by name, the modem first issues a DNS request (see DNS above) to find an IP address for the given name. Then if the DNS
request succeeds, the IP address is filled in below the name and an IP PING is sent to that IP address.
Note that many Internet-accessible hosts are configured to disallow PINGs, and thus a failure of this test does not always
indicate a problem.
Messages:
Success: A response was obtained from the IP address entered.
•
•
No Response: No PING response arrived from the IP address entered.
• Unknown Host: The DNS query failed to find an IP address for the given host name.
• No PPP Connection: No link found between the modem and the Central Office equipment.
The figure below shows the PING window after a response was obtained from the IP address entered.
Figure 30. PING Window (Sample values. Actual data may vary.)
Diagnostic Log File
The Diagnostic Log File records the significant events that have occurred since the modem’s last reboot. The log file
displays a snapshot of the modem’s current status, showing configuration and state information for ADSL, IP, etc. After
displaying the current status, the log of events begins.
System metrics indicate the status of the modem at any given time. They fall into three categories: DSL statistics, ATM
statistics, and ETHERNET statistics. A key near the top of the log identifies each of the various metrics in the listing.
The View Diagnostic Log File button lets you display the Log File either with or without system metrics interspersed
between the events. If you elect to display the log with metrics, every listed event will be preceded by the prior 10 seconds’
set of system metrics, spaced at 2-second intervals. This is intended to give you an opportunity to observe any trends
leading up to an unexpected event. If you elect to display the log without metrics, all of the same events are listed, but the
metrics are skipped.
030-300194 Rev. A 26
Advanced Configuration

WireSpeed ADSL Modem
Events in the log are time stamped, with the timestamp indicating time since last reboot. The clock time of the PC on which
the Log File is being viewed is also listed near the top of the log, allowing you to map time since reboot to time of day.
The Save Diagnostic Log File button lets you save the contents of the Log File directly to a file. In Netscape browsers a
dialog will appear prompting you to enter a name into which the log’s contents are to be saved. In Internet Explorer
browsers, you simply display the log file and use the “File/Save As…” menu item to save its contents. The figure below
shows the Diagnostic Log File window.
Figure 31. Diagnostic Log File Window
030-300194 Rev. A 27
Advanced Configuration

WireSpeed ADSL Modem
The LAN Advanced Configuration Page
Accessing the LAN Advanced Configuration Dialog Box
The LAN Advanced Configuration dialog box is accessed by selecting the LAN Advanced menu item from any of the
WebShare management windows.
The LAN Advanced Configuration dialog box displays the local Ethernet characteristics including the IP address, subnet
mask, DNS proxy IP addresses, and the state of the DHCP server. After making any changes to this data, click the Save
button to save the new account information. You will be prompted for a modem restart. Allow 20 seconds for the restart to
complete. Interrupting the restart process may cause you to lose your setting data. (See “Restarting WebShare” on page
19.)
These parameters are stored and remain in WebShare until changed, or until the default values are reset with the IP Reset
Utility for WebShare. (Option 3 on the Function Selection screen. See page 6.)
CAUTION
If the IP address is changed, WebShare will not respond to the default IP address of
192.168.0.1. Be sure to change the URL to the new IP address when accessing the
management pages.
Figure 32. LAN Advanced Configuration Window (Sample values. Actual data may vary.)
030-300194 Rev. A 28
Advanced Configuration

WireSpeed ADSL Modem
IP Address
The Internet Protocol (IP) address is a unique 32-bit number used to identify the host computer connected to a TCP/IP
network. The value of the IP Address is represented in a dotted decimal format. WebShare assigns 192.168.0.1 to this
address by default. This value may be changed to any valid IP address e.g. an existing address assigned for local LAN
administration. Note: If the default IP Address needs to be changed, the DHCP Base and End addresses will also have to be
adjusted. All changes will be entered in the LAN Advanced Configuration screen.
Subnet Mask
The subnet mask is a 32-bit number used to identify the network and host segments of an IP address. This value is
represented in the same dotted decimal format as the IP address. This is the subnet mask associated with the IP address
above. This value should not be set to a subnet address greater than 255.255.255.248 to accommodate the WebShare IP.
The default value for the subnet mask is 255.255.255.0.
Domain Name System (DNS) Primary
The domain naming system is a convention used for identifying computers attached to the Internet or a Local Area Network
(LAN). DNS maps a name to its corresponding IP address. A host desiring to resolve a domain name to the IP address uses
the main DNS server. The secondary or backup DNS server performs the same function as the main server.
This IP address represents the address that WebShare uses to respond to primary DNS queries from your
computer. The default value is 192.168.0.2.
Domain Naming System (DNS) Secondary
This IP address represents the address that WebShare uses to respond to secondary DNS queries from your computer.
The default value is 192.168.0.3.
Dynamic Host Configuration Protocol (DHCP)
DHCP is a protocol used to automate the administration of IP addresses within a local area network. A server provides the
IP allocation for computer hosts that are running a DHCP client. This controls the state of the local WebShare DHCP
Server.
The default value is enabled.
Static NAT
If enabled, Static NAT makes it possible to specify an IP address to which WebShare should direct unsolicited inbound
traffic. For example, it lets you allow users on the Internet to access your local Web server.
The default value is enabled.
030-300194 Rev. A 29
Advanced Configuration

WireSpeed ADSL Modem
LAN PC IP Address
This IP address serves two purposes. If DHCP is enabled, this is the IP address that will be assigned to the DHCP client
computer. If Static NAT is enabled, this is the IP address to which that traffic will be directed.
The default value is 192.168.0.10.
Inactivity Timer Timeout
WebShare provides an Inactivity Timer that closes an active PPP session if there has been no traffic through the modem
from or to any user. The timeout value may be adjusted on the LAN Advanced Configuration window. For a session to be
“always on”, select the Inactivity Timer Disable option.
The Inactivity Timeout Value determines the length of time a session will remain connected with no data flow in either
direction. The default setting is disabled. To enable, select LAN Advanced from the Management menu. In the LAN
Advanced Configuration window, select the Enable option and enter an Inactivity Timeout time in minutes. The valid range
is from 0 to 9999 minutes. A zero has the same effect as disabling the timer.
VPI/VCI Parameters
Viewing VPI/VCI Parameters
Your service provider will provide you with a VPI (Virtual Path Indicator) and VCI (Virtual Channel Indicator), which are
path assignments for your ADSL connection. To verify your VPI/VCI settings, select LAN Advanced from the WebShare
Home Page Menu.
The WebShare LAN Advanced Configuration window shows the current configuration settings.
NOTE
Westell modems are shipped with VPI/VCI preset for your area. If these need to be
changed, contact your service provider for the correct settings and follow the
instructions on the next page.
030-300194 Rev. A 30
Advanced Configuration

WireSpeed ADSL Modem
VPI/VCI settings
Figure 33. LAN Advanced Configuration Window
Changing VPI/VCI Settings
CAUTION
Do not change your VPI/VCI settings unless instructed to do so by your service provider!
Current VPI/VCI settings are located on the LAN Advanced window. To change them, type the correct numbers in the
fields provided and click the Save button at the bottom of the screen. The setting change will not take place until the
modem has restarted. Follow the on-screen instructions.
030-300194 Rev. A 31
Advanced Configuration

WireSpeed ADSL Modem
VIRTUAL PRIVATE NETWORK SUPPORT
Your WireSpeed modem supports Virtual Private Networks (VPN). VPN allows users working at home or at an off-site
location to create a direct “tunnel” to a corporate LAN server. The VPN is a point-to-point connection between the user’s
computer and another network (usually a corporate LAN). This direct connection avoids much of the Internet congestion
and allows secure communication and encryption.
The WireSpeed modem VPN feature supports the PPP-to-PPTP relaying protocol. Settings for VPN must be made to both
sides of the VPN “tunnel” connection: the user PC and the corporate LAN server.
NOTE: Before creating a VPN connection, you must have created a PPP account and established a PPP session.
VPN Requirements
To operate the VPN feature of your Westell modem, the following requirements must be met:
• Service Provider. Your service provider must provide the following:
– VPI/VCI values for PPP service
– User ID and password
If you already have DSL service, use your existing user ID and password.
• Personal Computer. Your computer must support Point-to-Point and Point-to-Point Tunneling Protocol (PPTP).
Please refer to your original operating system documentation to see if your PC supports these protocols.
• Operating System. Your Westell modem supports VPN on Windows 98, Windows Me, Windows 2000, and Windows
NT operating systems.
• TCP/IP. Prior to establishing PPTP tunnels, IP addresses must be properly configured at both ends of the PPTP tunnel.
This means both your PC and the PPTP server for your corporate LAN.
• Corporate LAN. Check with your corporate IT or LAN group to make sure that such connections are supported. You
will need the IP address or host name of the corporate LAN server.
NSTALLING
I
VPN
The following sections describe how to install VPN client and create a connection for Windows 98 and later operating
systems.
Installing VPN for Windows 98/Me
Use this four-step process to install VPN client for Windows 98 or Windows Me (Millennium Edition).
1. Click Start, point to Settings, click Control Panel, and then double-click Add/Remove Programs.
2. Click the Windows Setup tab.
3. Click Communications, click Details, click to select the Virtual Private Networking check box, and then click
OK.
Click OK, and then click Yes to restart your computer.
4.
You may now create a VPN connection. See the appropriate section for your operating system.
030-300194 Rev. A 32
Advanced Configuration

WireSpeed ADSL Modem
Creating a VPN Connection
After you have installed VPN, you must create a new connection in Dial-Up Networking.
NOTE: You need the host name or IP address of your corporate LAN (or other service provider) to make this connection.
Check with the administrator of the server to which you are trying to connect to get this information. Some systems may
require DNS settings for VPN connections. Check with the system administrator.
Creating a VPN Connection for Windows 98
To create a VPN connection for Windows 98:
1. Double Click My Computer and then double-click on Dial-Up Networking.
2. Double-click Make New Connection.
3. In the Type a name for the computer you are dialing box, type the name that you want to use for the connection.
4. In the Select a device box, choose Microsoft VPN Adapter, and then click Next.
5. In the Host name or IP Address box, type the name of the server or the IP address.
6. Click Next, and then click Finish.
Creating a VPN Connection for Windows Me
To create a VPN connection for Windows Millennium Edition:
1. Click Start, point to Settings, click Control Panel, and then double-click Dial-Up Networking.
2. Double-click Make New Connection.
3. In the Type a name for the computer you are dialing box, type the name that you want to use for the
connection.
4. In the Select a device box, choose Microsoft VPN Adapter, and then click Next.
5. In the Host name or IP Address box, type the name of the server or the IP address.
6. Click Next, and then click Finish.
030-300194 Rev. A 33
Advanced Configuration

WireSpeed ADSL Modem
Creating a VPN Connection for Windows 2000
To connect to a VPN server on a corporate LAN, you need to first make sure that you are connected to the Internet by
connecting to your ISP. Connecting to the Internet puts you on the same worldwide Internet backbone where the corporate
VPN server is connected. Next, you make a second connection to create a VPN connection.
To create this second connection to the corporate server, follow this procedure:
1. Click Start, Settings, Network and Dial-up Connections and select Make New Connection to start the Network
Connection Wizard.
2. From the Network Connection Type screen, select Connect to a private network through the Internet.
The Public Network screen appears.
030-300194 Rev. A 34
Figure 34. Network Connection Type
Advanced Configuration

WireSpeed ADSL Modem
3. On the Public Network screen, select the option Do not dial the initial connection. Click Next.
Figure 35. The Public Network Screen
4. On the Destination Address screen, type the host name or IP address of the corporate LAN to which you are
connecting. Click Next.
Figure 36. Destination Address
The Connection Availability screen appears.
030-300194 Rev. A 35
Advanced Configuration

WireSpeed ADSL Modem
5. On the Connection Availability screen, click the option Only for myself. Click Next.
Figure 37. Connection Availability
6. Follow the on-screen instructions to finish the wizard.
030-300194 Rev. A 36
Advanced Configuration

WireSpeed ADSL Modem
When you use your connection, by default you will only have the option to type your user name and password.
Domain Option
A corporate LAN connection may prompt remote users for a domain name for full access to features such as corporate
e-mail and file sharing.
To add the domain option, follow these steps:
1. Click your connection icon (or click Start, point to Settings, Network and Dial-up Connections and click your
connection name).
2. The Connect To dialog box opens. (The name of your connection appears in the title bar.)
3. Click Properties. On the Options tab select the box Include Windows logon domain, as shown below.
4. Click OK.
030-300194 Rev. A 37
Figure 38. Including Windows Logon Domain
Advanced Configuration

WireSpeed ADSL Modem
Using a VPN Connection (Windows 2000)
After configuring the connection, follow these steps to establish a connection:
1. Double-click the icon in the Dial-Up Networking folder or click the shortcut on your desktop.
2. The Connect to window appears. (The name of your connection appears in the title bar.) Type the User name and
Password. If using the domain option, type the Logon domain name.
The figure below shows the Connect To screen with (right) and without (left) the domain option.
NOTE: To avoid entering the password each time, you can save it by checking Save Password. The next time you
establish this connection, both User name and Password are displayed automatically. (The password field is encrypted
for security.) If you are using the domain option, the Logon domain will also be saved.
Domain OptionDefault
Figure 39. Connect To Screen
3. Click Connect.
4. The Connecting To window appears briefly.
5. You can now open your Web browser.
NOTE: While connected, you can open the Connected To window by double-clicking the minimized icon in the task bar.
Disconnecting a VPN Connection (Windows 2000)
Use the following steps to release a VPN connection:
1. If minimized, double-click the connection icon in the task bar.
2. In the Connected To window, click Disconnect. The VPN connection no longer exists.
030-300194 Rev. A 38
Advanced Configuration

WireSpeed ADSL Modem
ONFIGURING
C
This section describes how to create and set up PPP/PPTP Dial-Up connections for Windows NT.
NOTE: Make sure that Microsoft Service Pack 3 has been installed on your computer before creating PPTP tunnel sessions.
VPN
FOR WINDOWS
NT
Installing PPTP for Windows NT
Before you create VPN connections, install the PPTP networking protocol as follows:
1. From the Windows taskbar, click Start > Control Panel > Network.
2. The Network window appears. Click the Protocol tab then click Add.
3. The Select Network Protocol window opens. Select the Point To Point Tunneling Protocol from the list. Click OK.
4. Setup will copy some Windows NT files and prompt you for the correct path. You may have to explore the Windows
CD to find the folder appropriate for your system. Specify the path and click Continue. The installation will load the
necessary PPTP files.
5. The PPTP Configuration window opens. Enter the number of connections you wish to make. For most users, this will
be one. Click OK.
6. A setup message appears. Click OK to begin configuring the RAS.
NOTE: This completes the first part of the installation, adding PPTP as a remote protocol. The remaining steps of the
installation configure the RAS for PPTP.
7. The Remote Access Setup window appears and lists the modem that is already set up. To add the new VPN ports to
RAS, click Add.
8. The Add RAS Device window appears. Each port must be added individually. To add a port, double-click on the
correct port and click OK. Repeat steps 7 and 8 for each VPN.
9. By default, the ports are configured for dial-in only. To change this, in the Remote Access Setup window, select a port
and click Configure.
10. The Configure Port Usage window opens. Select Dial-out only and click OK.
11. Repeat steps 9 and 10 for each port you wish to configure before proceeding to step 12.
12. To define which PPTP tunneled protocols you will allow through the VPNs, highlight each port and click Network.
The Network Configuration window opens. Enable the IP protocol. Click OK.
13. Click Continue, and then click Close. The computer will prompt you for a restart for the changes to take effect. Click
Yes.
030-300194 Rev. A 39
Advanced Configuration

WireSpeed ADSL Modem
Creating a New VPN Phonebook Entry for Windows NT
The following procedure tells how to create a VPN Phonebook entry for use with a corporate LAN or dial-up transport. A
VPN connection contains the IP address of a PPTP server and the user account information for that server. WebShare
allows you to create and store up to eight accounts for VPN and other types of connections.
To create a VPN connection to a server on your corporate LAN:
1. Click My Computer > Dial-Up Networking.
2. The Dial-Up Networking window appears. The Phonebook entry selection box lists all existing PPTP connections.
Click New to create a new connection.
3. The New Phonebook Entry Wizard opens.
4. Enter a name for the tunnel you are creating. The PPTP tunnel will be saved in the phonebook under this name. Click
Next.
5. The Server window opens. Activate all the options that apply to your tunnel. Click Next.
6. The Phone Number window opens. Enter the Phone Number of the dial-up server you are calling. (The IP address or
DNS host name of the PPTP server on your corporate LAN.)
7. Click Next.
NOTE: Multiple Numbers. You can assign more than one phone number (IP address or DNS host name) to each entry. This
can be useful if you have a pool of host names and addresses to connect to. To do this, click Alternates.
8. The New Phonebook Entry Wizard informs you that the new tunnel was successfully created. Click Finish. The
tunnel definition is saved and added to the Phonebook entries.
Logging On to a VPN Server
After the connection to your VPN server has been created, proceed as follows to log on:
1. Click My Computer > Dial-Up Networking.
2. The Dial-Up Networking window opens. In the Phonebook Selection box, select the tunnel you want to set up and
click Dial.
3. The Connect To window appears. Enter your password for the VPN server. To save your password, click the Save
Password check box.
4. Enter the optional information in the Domain box. (This is only required for some Microsoft NT VPN servers.) Click
OK.
5. The Connecting to <connection name> window appears and displays the status of the connection process. Once the
connection is established, the window is minimized to the taskbar.
030-300194 Rev. A 40
Advanced Configuration

WireSpeed ADSL Modem
Disconnecting a VPN Connection
Use these steps to close a PPTP tunnel:
1. Click the connection icon for the tunnel you wish to close.
2. Click Disconnect.
The VPN connection to your service provider or corporate LAN has been disconnected.
030-300194 Rev. A 41
Advanced Configuration
WireSpeed ADSL Modem
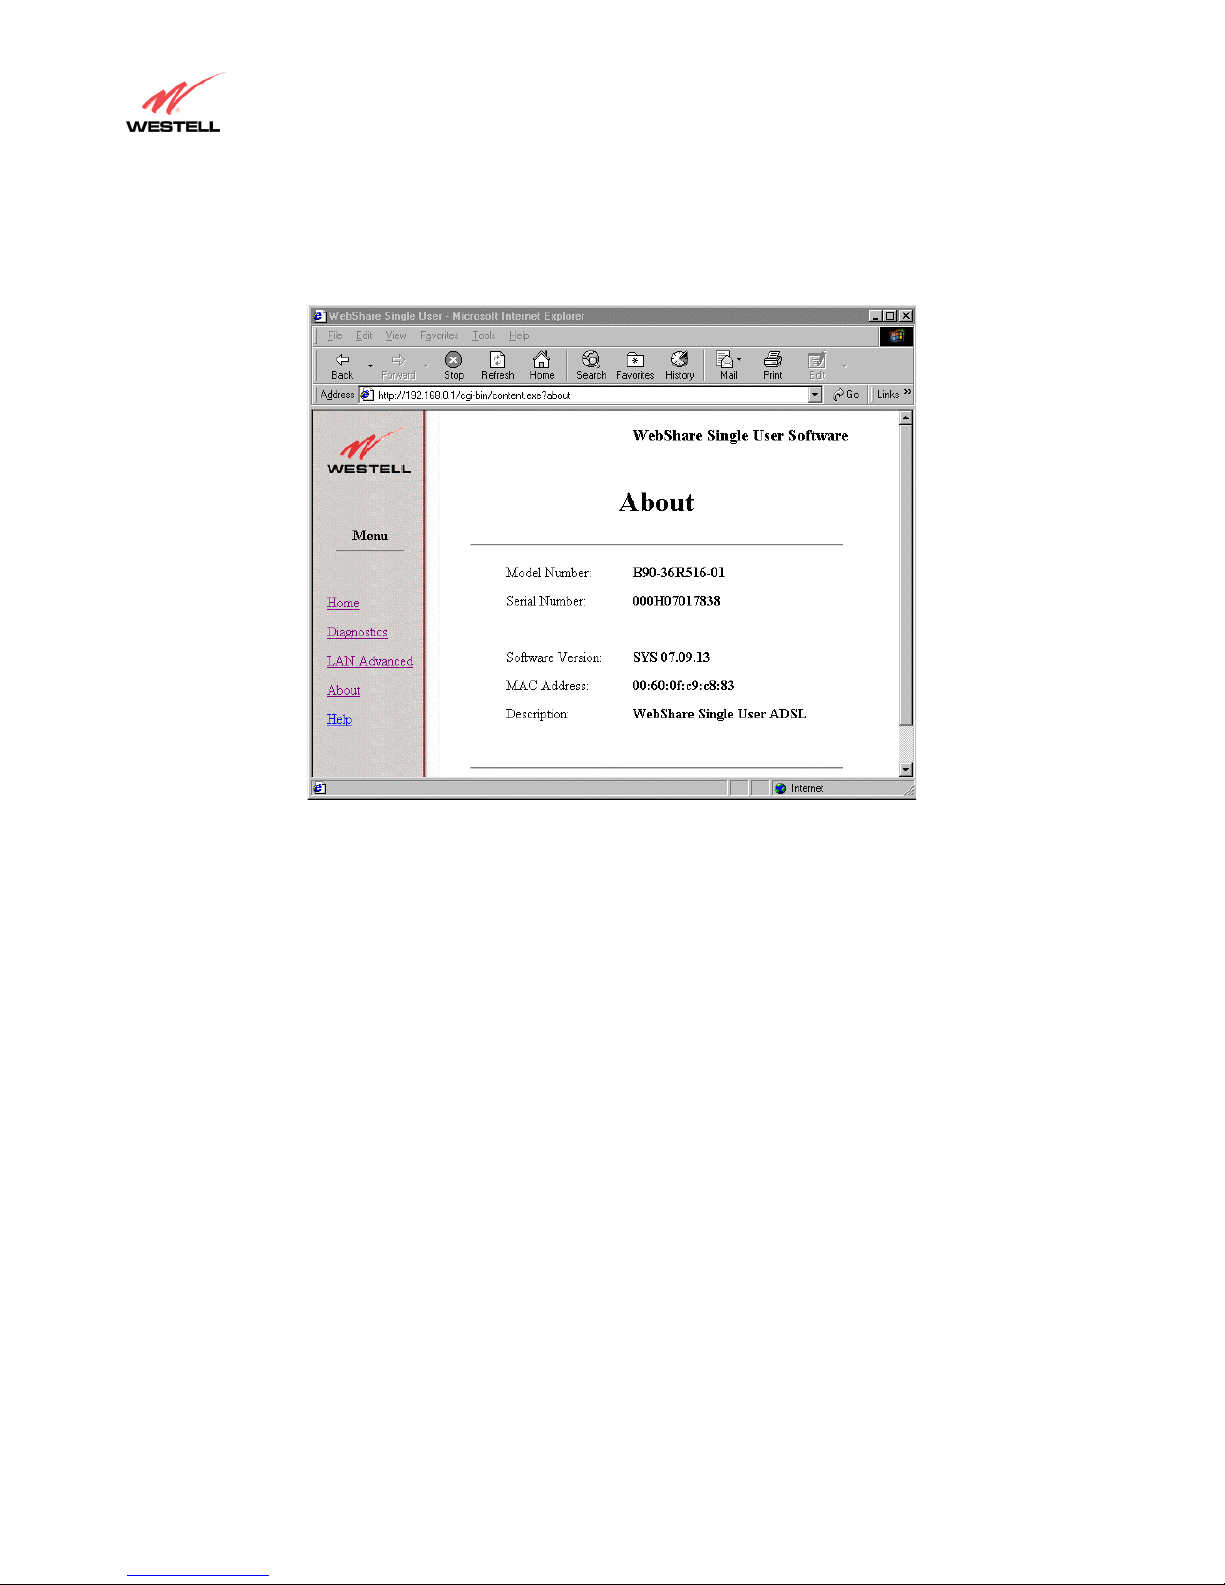
The WebShare About Page
The About page provides the model number and version information for WebShare. This information is necessary when
calling for technical support. (Sample data shown below–your information will vary.)
Figure 40. WebShare About Window (Actual data may vary.)
WebShare Help
The Help feature on the WebShare Management Menu is context-sensitive. Clicking Help will display information about
the page that you are currently viewing.
030-300194 Rev. A 42
Advanced Configuration

WireSpeed ADSL Modem
TECHNICAL SUPPORT INFORMATION
Westell Technical Support
If technical or customer assistance is required, contact Westell by using one of the following options:
Phone: 1-630-375-4500
email: global_support@westell.com
Visit Westell at www.westell.com
service requests.
Warranty & Repairs
Warranty
Westell warrants this product to be free from defects at the time of shipment. Westell also warrants this product to be fully
functional for the time period specified by the terms and conditions of the warranty. Any attempt to repair or modify the
equipment by anyone other than an authorized Westell representative will void the warranty.
Repairs
Westell will repair any defective Westell equipment without cost during the warranty period if the unit is defective for any
reason other than abuse, improper use, improper installation, or acts of nature. Before returning the defective equipment,
request a Return Material Authorization (RMA) number from Westell. Once an RMA number is obtained, return the
defective unit, freight prepaid, along with a brief description of the problem to:
Westell, Inc.
ATTN: R.G.M Department
750 N. Commons Drive
Aurora, IL 60504-7940
Westell will continue to repair or replace faulty equipment beyond the warranty period for a nominal charge. Contact
Westell Technical Support Representative for details.
to obtain additional information, view frequently asked questions, or enter on-line
030-300194 Rev. A 43
Customer and Technical Services

WireSpeed ADSL Modem
PRODUCT SPECIFICATIONS
R
OUTING
• Dynamic Host Control Protocol (DHCP) - Automatic or Manual Local Address Assignment
• Network Address Translation (NAT)
• DNS Proxy Implementation
T
RANSPORT AND APPLICATION PROTOCOL SUPPORT
• TCP, UDP, ICMP, SMTP, NNTP, FTP, HTTP, HTTPS, SSL, DNS, PPTP
• PPTP/L2TP/IPSEC VPN Support (Tunnel Mode)
T
RAFFIC MANAGEMENT
• PPP over AAL5
• Link Control Protocol
• CHAP and PAP Authentication
• IP Control Protocol (IPCP): RFC – 1332
• IPCP Configuration Options
– IP Address Configuration
– Preliminary and Secondary DNS
• Address Proxy (Patent Pending)
• PPP Echo Request-Reply
• Internet Control Message Protocol
• Router Advertisement /Solicitation
• ICMP Echo Request/Reply (Ping)
• ARP
• Path MTU Discovery
M
INIMUM SYSTEM REQUIREMENTS
• Westell ADSL Ethernet modem
• Microsoft® Windows 98, Windows ME, Windows 2000, or Windows NT 4.0
• Microsoft® Internet Explorer™ 4.x or higher, or Netscape Navigator ™ 4.x or higher
• 5 MB of free Hard Drive space
• 16 MB RAM
• Ethernet 10Base-T network interface card
• TCP/IP Protocol stack installed
• Multi-Port Ethernet 10Base-T Hub (optional)
• Crossover Ethernet cable for modem to Ethernet Hub
• VPI/VCI Values (provided by your service provider)
• PPPoA/PPPoE support (provided by your service provider)
C
ONFIGURATION
• User configurable parameters include:
- Account name and password
- DHCP Function (Enable/Disable)
- DHCP Base Address
- Primary and Secondary DNS server address
- Password (secret) - used to respond to CHAP/PAP challenges
- True “Always On” functionality. (User can configure modem to remember password.)
030-300194 Rev. A 44
Product Specifications

WireSpeed ADSL Modem
APPENDIX
AC AND LINUX SUPPORT
M
The WebShare Installation Utility will not run on Macintosh or Linux computers. However, computers running Macintosh
and Linux operating systems can be installed on a network that is using WebShare by simply configuring the Macintosh or
Linux computer to support DHCP. Once DHCP is enabled simply attach the computer to the network hub, launch the
browser and begin surfing. To enable access to WebShare, launch the browser and enter the URL 192.168.0.1. Make this
URL a favorite or a bookmark on the browser.
030-300194 Rev. A 45
Appendix

WireSpeed ADSL Modem
A
About Page, 42
Account Information Setup, 11
Account Parameters, 11
Activating a PPP Session, 16
Adding a WebShare Account, 12
ADSL Modem, 25
Autodial, 10
Autodial, disabling, 10
Auto-Reconnect, 17
B
Building New Accounts, 23
C
Configuring a WebShare Account, 12
Connect/Disconnect button, 22
Connecting to an Account, 16
D
DHCP, 29
Diagnostics, 24
DNS Primary, 29
DNS Secondary, 29
DNS settings, 23
INDEX
Linux, 53
M
Macintosh, 53
Management Menu, 21
Minimum System Requirements, 1
Modem restart, 20
N
New, 22
New Software Installation Page, 27
P
PING, 26
PPP Connection, 25
PPP Connections, 22
PPP Status, 22
Product Return, 50
Product specifications, 51
R
Restarting WebShare, 20
Return Material Authorization, 50
RMA, 50
S
E
Edit, 23
Error Messages, 48
F
Factory Default Reset, 48
H
Help feature, 42
Home Page, 22
I
Inactivity Timeout, 30
Inactivity Timeout Adjustment, 30
Installation of Account PPP PC Setup Utility, 6
Installing VPN, 32
IP Address, 29
IP Router, 26
L
LAN Advanced page, 28
LAN PC IP Address, 30
030-300194 Rev. A 46
Save Password feature, 17
Self-Test, 25
Software installation problems, 43
Static NAT, 29
Status column, connection status, 23
Subnet Mask, 29
T
Technical Assistance, 50
Test All, 24
V
virtual private networks, 32
VPI/VCI changes, 31
VPI/VCI parameters, 30
VPN for Windows 2000, 34
VPN for Windows 98/Me, 32
VPN for Windows NT, 39
VPN support, 32
W
WebShare Home Page, 22
WebShare icon, 11
Index

WireSpeed ADSL Modem
REGULATORY INFORMATION
FCC COMPLIANCE NOTE
This equipment has been tested and found to comply with the limits for a Class B digital device, pursuant to Part 15 of the
FCC Rules. These limits are designed to provide reasonable protection against harmful interference in a residential
installation. This equipment generates, uses and can radiate radio frequency energy and, if not installed and used in
accordance with the instructions, may cause harmful interference to radio communications. However, there is no guarantee
that interference will not occur in a particular installation. If this equipment does cause harmful interference to radio or
television reception, which can be determined by turning the equipment
and ON, the user is encouraged to try to correct
OFF
the interference by one or more of the following measures:
• Reorient or relocate the receiving antenna.
• Increase the separation between the equipment and receiver.
• Connect the equipment to a different circuit from that to which the receiver is connected.
• Consult the dealer or an experienced radio/TV technician for help.
This equipment also complies with Part 68 of the FCC rules. ON the bottom of this equipment is a label that contains,
among other information, the FCC registration number and ringer equivalence number (REN) for this equipment. If
requested, this information must be provided to the telephone company.
An FCC compliant telephone cord and modular plug is provided with the equipment. This equipment is designated to be
connected to the telephone network or premises wiring using a compatible modular jack that is Part 68 compliant. See
Installation Instructions for details.
If this terminal equipment causes harm to the telephone network, the telephone company will notify you in advance that
temporary discontinuance of service may be required. But if advance notification is not practical, the telephone company
will notify the customer as soon as possible. Also, you will be advised of your right to file a complaint with the FCC if you
believe it is necessary.
The telephone company may make changes in its facilities, equipment, operations or procedures that could affect the
operation of the equipment. If this happens, the telephone company will provide advance notice in order for you to make
the necessary modifications to maintain uninterrupted service.
If you experience trouble with this equipment do not try to repair yourself. The equipment cannot be repaired in the field
and must be returned to the manufacturer. Please contact: Westell Customer Support, (630) 375-4500. D
O NOT
return
damaged merchandise to Westell until you have first obtained a Return Material Authorization from Westell. For return of
material, contact your Westell Customer Support representative.
This equipment cannot be used on public coin phone service provided by the telephone company. Connection to party line
service is subject to state tariffs.
CANADA CERTIFICATION NOTICE
The Industry Canada label identifies certified equipment. This certification means that the equipment meets certain
telecommunications network protective, operational and safety requirements as prescribed in the appropriate Terminal
Equipment Technical Requirements document(s). The department does not guarantee the equipment will operate to the
user's satisfaction.
Before installing this equipment, users should ensure that it is permissible to be connected to the facilities of the local
Telecommunications Company. The equipment must also be installed using an acceptable method of connection. The
customer should be aware that compliance with the above conditions might not prevent degradation of service in some
situations.
A representative designated by the supplier should coordinate repairs to certified equipment. Any repairs or alterations
made by the user to this equipment, or equipment malfunctions, may give the telecommunications company cause to
request the user to disconnect the equipment.
030-300194 Rev. A 47 Regulatory Information

WireSpeed ADSL Modem
Users should ensure for their own protection that the electrical ground connections of the power utility, telephone lines and
internal metallic water pipe system, if present, are connected together. This precaution may be particularly important in
rural areas.
CAUTION
Users should not attempt to make such connections themselves, but should contact the appropriate electrical
inspection authority, or electrician, as appropriate.
SOFTWARE LICENSE AGREEMENT
READ THE TERMS AND CONDITIONS OF THIS LICENSE AGREEMENT CAREFULLY. THIS SOFTWARE IS
COPYRIGHTED AND LICENSED (NOT SOLD). BY SELECTING “I ACCEPT” YOU ARE ACCEPTING AND
AGREEING TO THE TERMS OF THIS LICENSE AGREEMENT. IF YOU ARE NOT WILLING TO BE BOUND BY
THE TERMS OF THIS LICENSE AGREEMENT, YOU SHOULD PROMPTLY RETURN THE SOFTWARE TO
WESTELL TECHNOLOGIES, INC. AND YOU WILL RECEIVE A REFUND OF THE LICENSE FEE PAID. THIS
LICENSE AGREEMENT REPRESENTS THE ENTIRE AGREEMENT CONCERNING THE SOFTWARE BETWEEN
YOU AND WESTELL TECHNOLOGIES, INC. (REFERRED TO AS "LICENSOR"), AND IT SUPERSEDES ANY
PRIOR PROPOSAL, REPRESENTATION, OR UNDERSTANDING BETWEEN THE PARTIES.
1. License Grant. Licensor hereby grants to you, and you accept, a nonexclusive license to use the SOFTWARE Diskettes
and the computer programs contained therein in machine-readable, object code form only (collectively referred to as the
"SOFTWARE"), and the accompanying User Documentation, only as authorized in this License Agreement. The
SOFTWARE may be used only in connection with the number of systems for which you have paid license fees as dictated
in your support agreement. You agree that you will not assign, sublicense, transfer, pledge, lease, rent, or share your rights
under this License Agreement. You agree that you may not reverse assemble, reverse compile, or otherwise translate the
SOFTWARE.
You may retain the SOFTWARE Diskettes for backup purposes only. In addition, you may make one copy of the
SOFTWARE in any storage medium for backup purposes only. You may make one copy of the User's Manual for backup
purposes only. Any such copies of the SOFTWARE or the User's Manual shall include Licensor's copyright and other
proprietary notices. Except as authorized under this paragraph, no copies of the SOFTWARE or any portions thereof may
be made by you or any person under your authority or control.
2. Licensor's Rights. You acknowledge and agree that the SOFTWARE and the User's Manual are proprietary products of
Licensor protected under U.S. copyright law. You further acknowledge and agree that all right, title, and interests in and to
the SOFTWARE, including associated intellectual property rights, are and shall remain with Licensor. This License
Agreement does not convey to you an interest in or to the SOFTWARE, but only a limited right of use revocable in
accordance with the terms of this License Agreement.
3. License Fees. The fees paid by you under the support agreement are paid in consideration of the licenses granted under
this License Agreement.
4. Term. This License Agreement is effective upon your opening of this package and shall continue until terminated. You
may terminate this License Agreement at any time by returning the SOFTWARE and all copies thereof and extracts
therefrom to Licensor. Licensor may terminate this License Agreement upon the breach by you of any term hereof. Upon
such termination by Licensor, you agree to return to Licensor the SOFTWARE and all copies and portions thereof.
5. Limited Warranty. Licensor warrants, for your benefit alone, for a period of 90 days from the date of commencement of
this License Agreement (referred to as the "Warranty Period") that the SOFTWARE Diskettes in which the SOFTWARE is
contained are free from defects in material and workmanship. Licensor further warrants, for your benefit alone, that during
the Warranty Period the SOFTWARE shall operate substantially in accordance with the functional specifications in the
User's Manual. If during the Warranty Period, a defect in the SOFTWARE appears, you may return the SOFTWARE to
Licensor for replacement. You agree that the foregoing constitutes your sole and exclusive remedy for breach by Licensor
of any warranties made under this Agreement. EXCEPT FOR THE WARRANTIES SET FORTH ABOVE, THE
SOFTWARE DISKETTES, AND THE SOFTWARE CONTAINED THEREIN, ARE LICENSED "AS IS," AND
LICENSOR DISCLAIMS ANY AND ALL OTHER WARRANTIES, WHETHER EXPRESS OR IMPLIED,
INCLUDING, WITHOUT LIMITATION, ANY IMPLIED WARRANTIES OF MERCHANTABILITY OR FITNESS
FOR A PARTICULAR PURPOSE.
030-300194 Rev. A 48 Regulatory Information

WireSpeed ADSL Modem
6. Limitation of Liability. Licensor's cumulative liability to you or any other party for any loss or damages resulting from
any claims, demands, or actions arising out of or relating to this Agreement shall not exceed the license fee paid to Licensor
for the use of the SOFTWARE. In no event shall Licensor be liable for any indirect, incidental, consequential, special, or
exemplary damages or lost profits, even if Licensor has been advised of the possibility of such damages. SOME STATES
DO NOT ALLOW THE LIMITATION OR EXCLUSION OF LIABILITY FOR INCIDENTAL OR CONSEQUENTIAL
DAMAGES, SO THE ABOVE LIMITATION OR EXCLUSION MAY NOT APPLY TO YOU.
7. Governing Law. This License Agreement shall be construed and governed in accordance with the laws of the State of
Illinois. You submit to the jurisdiction of the state and federal courts of the state of Illinois and agree that venue is proper
in those courts with regard to any litigation arising under this Agreement.
8. Costs of Litigation. If any action is brought by either party to this License Agreement against the other party regarding
the subject matter hereof, the prevailing party shall be entitled to recover, in addition to any other relief granted, reasonable
attorney fees and expenses of litigation.
9. Severability. Should any term of this License Agreement be declared void or unenforceable by any court of competent
jurisdiction, such declaration shall have no effect on the remaining terms hereof.
10. No Waiver. The failure of either party to enforce any rights granted hereunder or to take action against the other party
in the event of any breach hereunder shall not be deemed a waiver by that party as to subsequent enforcement of rights or
subsequent actions in the event of future breaches.
030-300194 Rev. A 49 Regulatory Information

WireSpeed ADSL Modem
PUBLICATION INFORMATION
WireSpeed ADSL Modem User Guide
Document Part Number 030-300194 Rev. A
Created November 2001
© 2001, Westell, Inc.
All rights reserved. Printed in USA.
Westell, Inc.
750 North Commons Drive
Aurora, Illinois 60504 USA
www.westell.com
Trademarks
WireSpeed™ and WireSpeed Pro™ are trademarks of Westell, Inc.
All other trademarks are owned by the respective companies.
030-300194 Rev. A 50 Regulatory Information
 Loading...