

Page 1

Softbox
™
Stripbank
™
Octabank
Quick Start Guide
Page 2
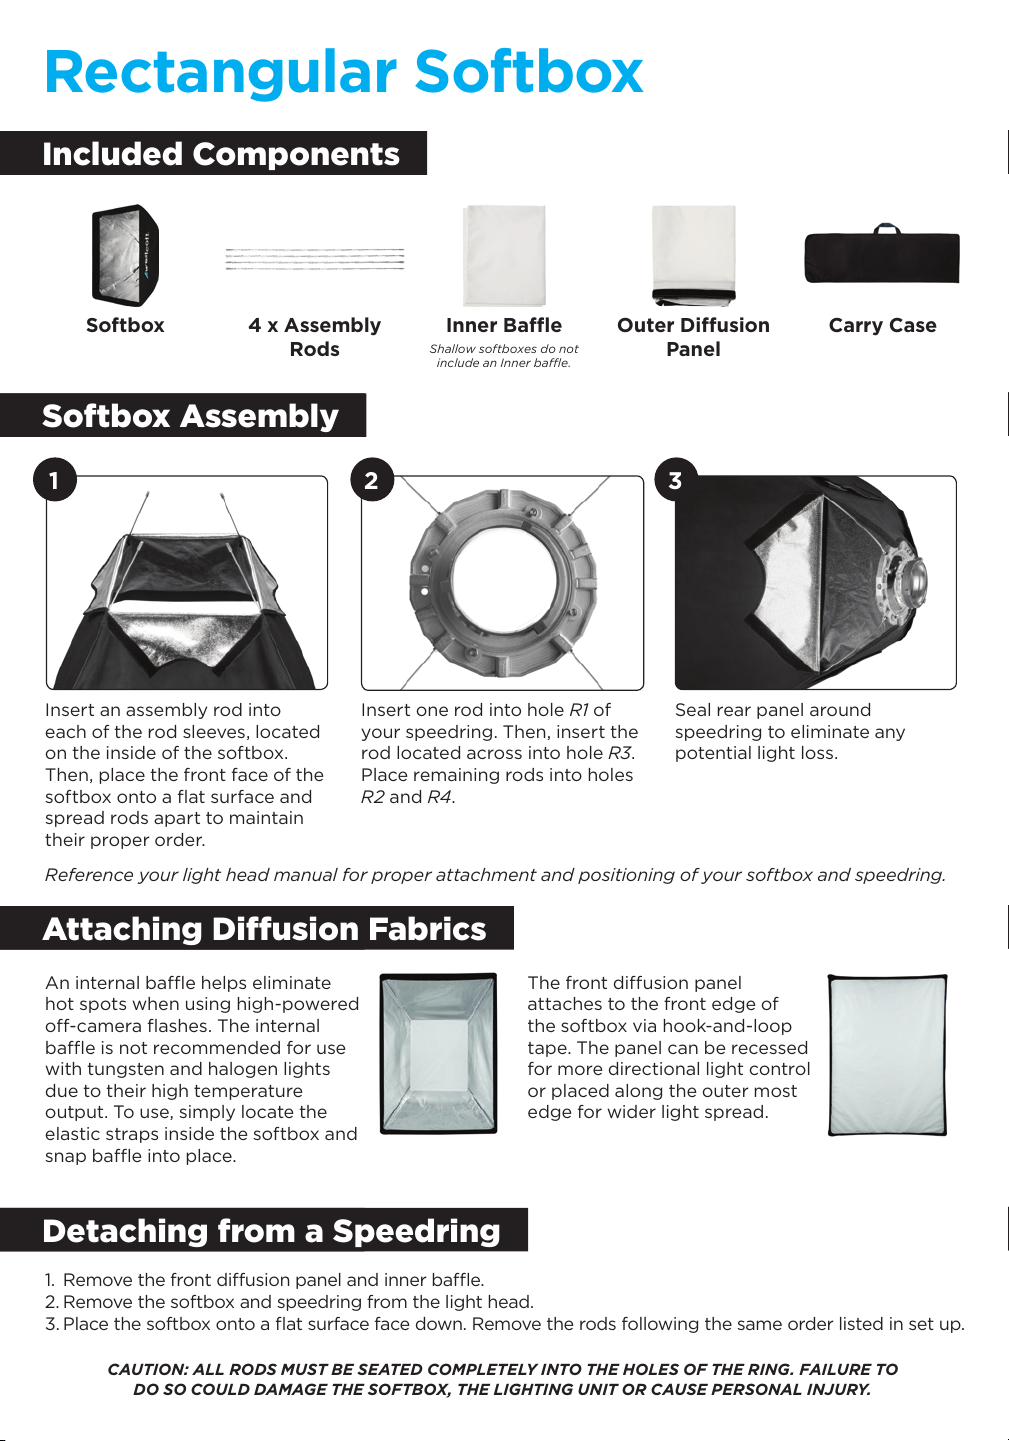
Seal rear panel around
speedring to eliminate any
potential light loss.
Insert one rod into hole R1 of
your speedring. Then, insert the
rod located across into hole R3.
Place remaining rods into holes
R2 and R4.
321
Insert an assembly rod into
each of the rod sleeves, located
on the inside of the softbox.
Then, place the front face of the
softbox onto a flat surface and
spread rods apart to maintain
their proper order.
An internal bae helps eliminate
hot spots when using high-powered
o-camera flashes. The internal
bae is not recommended for use
with tungsten and halogen lights
due to their high temperature
output. To use, simply locate the
elastic straps inside the softbox and
snap bae into place.
The front diusion panel
attaches to the front edge of
the softbox via hook-and-loop
tape. The panel can be recessed
for more directional light control
or placed along the outer most
edge for wider light spread.
Reference your light head manual for proper attachment and positioning of your softbox and speedring.
CAUTION: ALL RODS MUST BE SEATED COMPLETELY INTO THE HOLES OF THE RING. FAILURE TO
DO SO COULD DAMAGE THE SOFTBOX, THE LIGHTING UNIT OR CAUSE PERSONAL INJURY.
Softbox Assembly
Attaching Diusion Fabrics
Detaching from a Speedring
Included Components
Rectangular Softbox
Softbox 4 x Assembly
Rods
Inner Bae
Shallow softboxes do not
include an Inner bae.
Outer Diusion
Panel
Carry Case
1. Remove the front diusion panel and inner bae.
2. Remove the softbox and speedring from the light head.
3. Place the softbox onto a flat surface face down. Remove the rods following the same order listed in set up.
Page 3
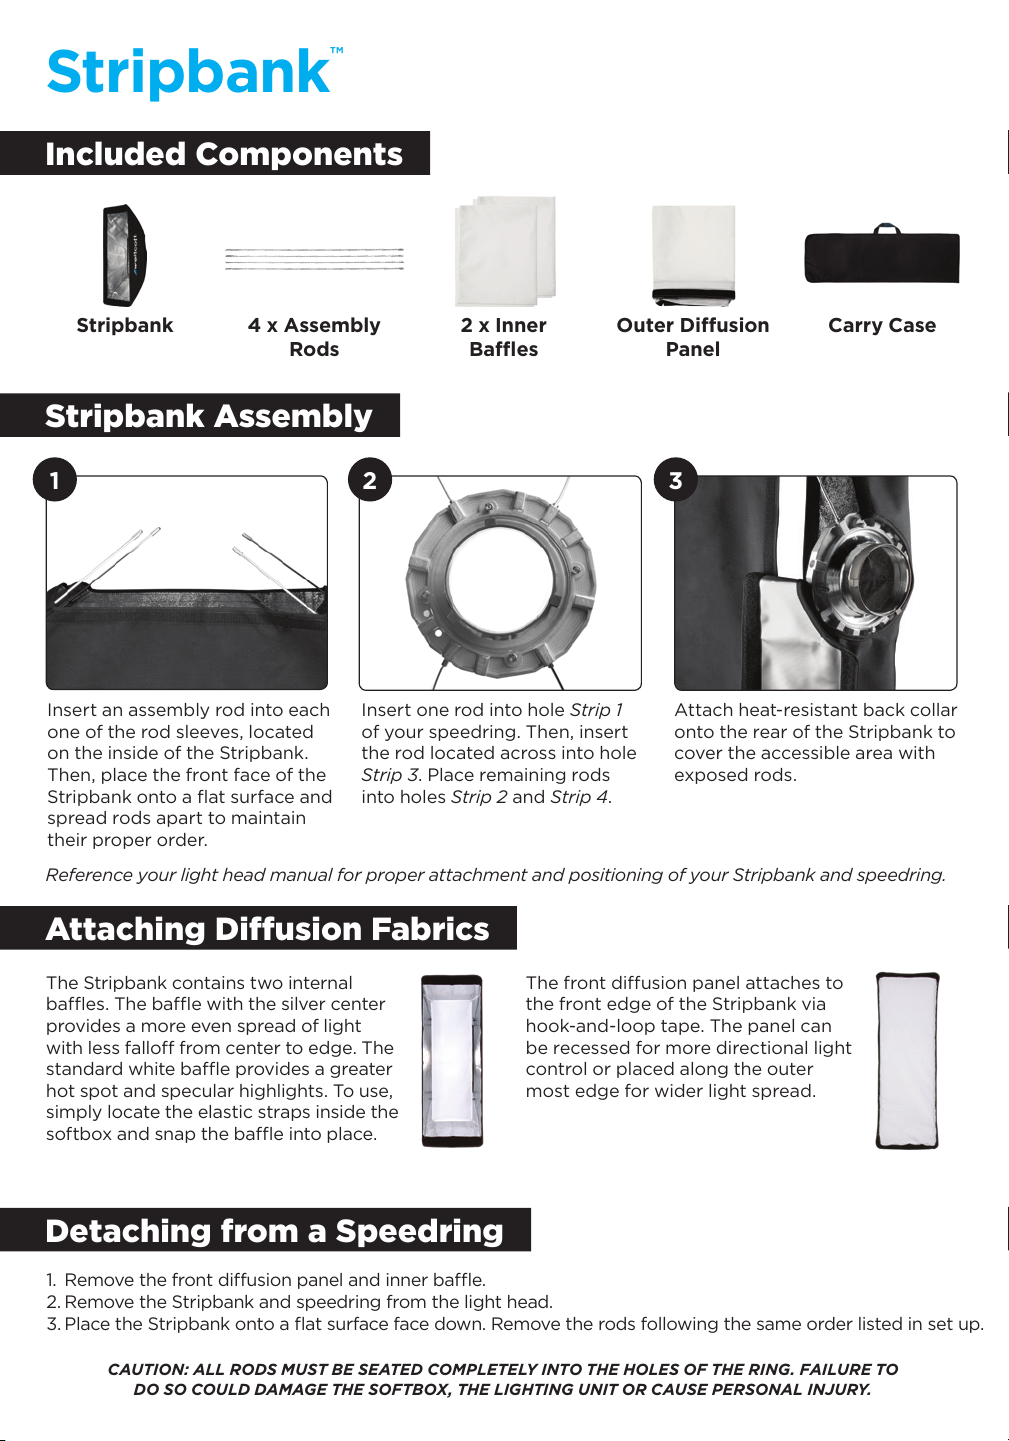
The front diusion panel attaches to
the front edge of the Stripbank via
hook-and-loop tape. The panel can
be recessed for more directional light
control or placed along the outer
most edge for wider light spread.
21
Attach heat-resistant back collar
onto the rear of the Stripbank to
cover the accessible area with
exposed rods.
3
Insert an assembly rod into each
one of the rod sleeves, located
on the inside of the Stripbank.
Then, place the front face of the
Stripbank onto a flat surface and
spread rods apart to maintain
their proper order.
Insert one rod into hole Strip 1
of your speedring. Then, insert
the rod located across into hole
Strip 3. Place remaining rods
into holes Strip 2 and Strip 4.
The Stripbank contains two internal
baes. The bae with the silver center
provides a more even spread of light
with less fallo from center to edge. The
standard white bae provides a greater
hot spot and specular highlights. To use,
simply locate the elastic straps inside the
softbox and snap the bae into place.
Reference your light head manual for proper attachment and positioning of your Stripbank and speedring.
CAUTION: ALL RODS MUST BE SEATED COMPLETELY INTO THE HOLES OF THE RING. FAILURE TO
DO SO COULD DAMAGE THE SOFTBOX, THE LIGHTING UNIT OR CAUSE PERSONAL INJURY.
Included Components
Attaching Diusion Fabrics
Detaching from a Speedring
Stripbank Assembly
Stripbank
™
Stripbank 4 x Assembly
Rods
2 x Inner
Baes
Outer Diusion
Panel
Carry Case
1. Remove the front diusion panel and inner bae.
2. Remove the Stripbank and speedring from the light head.
3. Place the Stripbank onto a flat surface face down. Remove the rods following the same order listed in set up.
Page 4
CAUTION: ALL RODS MUST BE SEATED COMPLETELY INTO THE HOLES OF THE RING. FAILURE TO
DO SO COULD DAMAGE THE SOFTBOX, THE LIGHTING UNIT OR CAUSE PERSONAL INJURY.
1 2 3
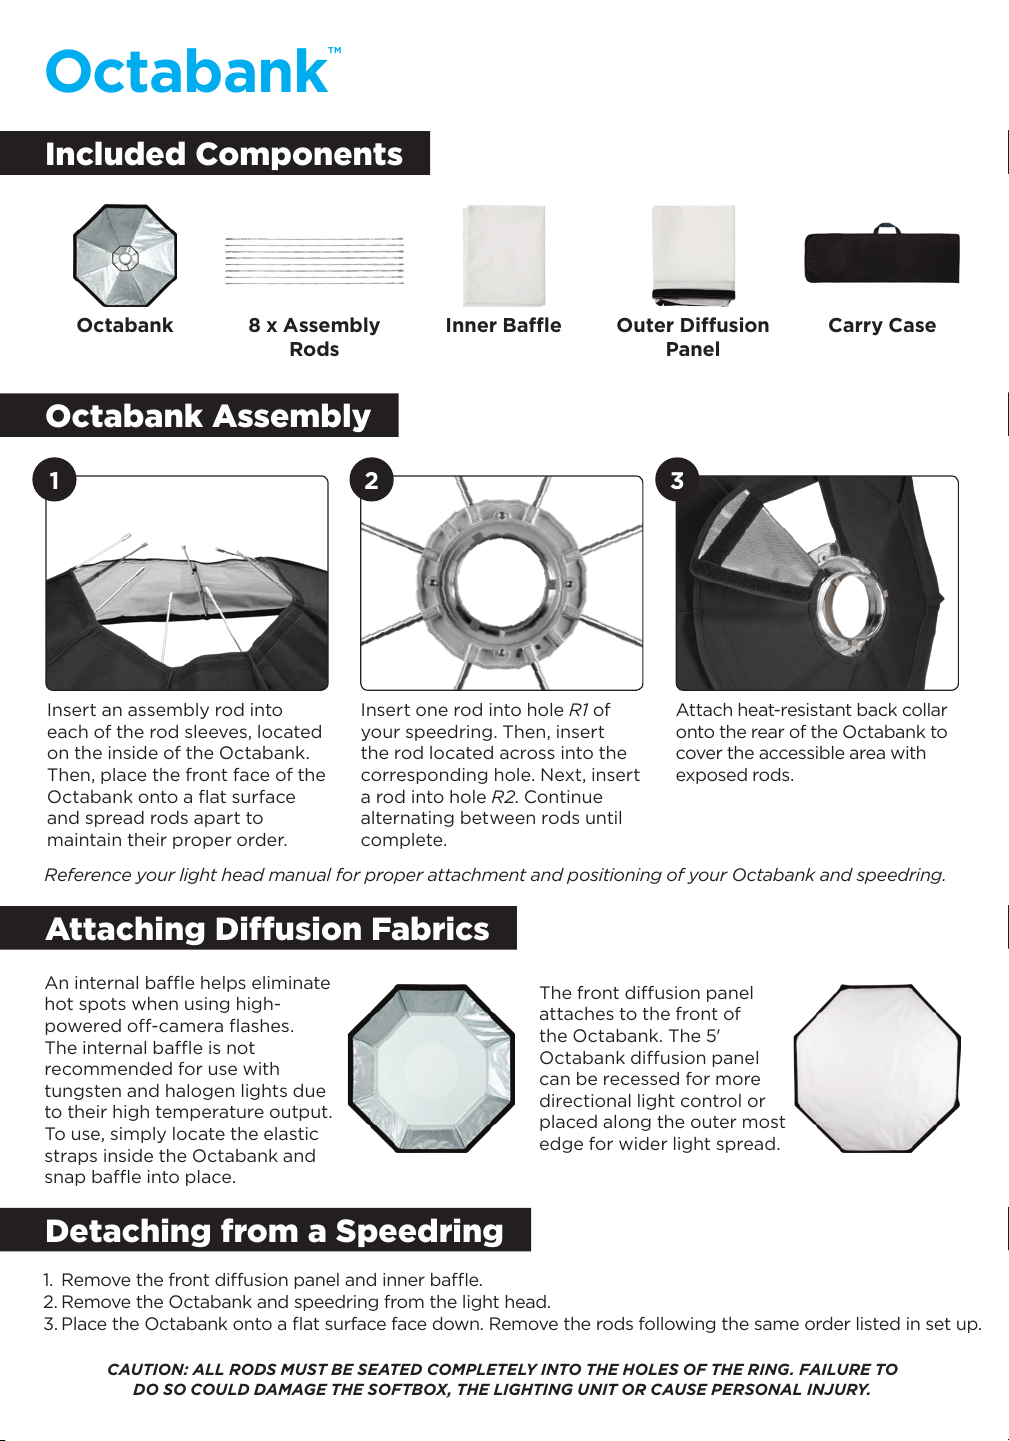
Attach heat-resistant back collar
onto the rear of the Octabank to
cover the accessible area with
exposed rods.
Insert one rod into hole R1 of
your speedring. Then, insert
the rod located across into the
corresponding hole. Next, insert
a rod into hole R2. Continue
alternating between rods until
complete.
Insert an assembly rod into
each of the rod sleeves, located
on the inside of the Octabank.
Then, place the front face of the
Octabank onto a flat surface
and spread rods apart to
maintain their proper order.
An internal bae helps eliminate
hot spots when using high-
powered o-camera flashes.
The internal bae is not
recommended for use with
tungsten and halogen lights due
to their high temperature output.
To use, simply locate the elastic
straps inside the Octabank and
snap bae into place.
The front diusion panel
attaches to the front of
the Octabank. The 5'
Octabank diusion panel
can be recessed for more
directional light control or
placed along the outer most
edge for wider light spread.
Reference your light head manual for proper attachment and positioning of your Octabank and speedring.
Octabank Assembly
Included Components
Attaching Diusion Fabrics
Detaching from a Speedring
Octabank
™
Octabank 8 x Assembly
Rods
Inner Bae Outer Diusion
Panel
Carry Case
1. Remove the front diusion panel and inner bae.
2. Remove the Octabank and speedring from the light head.
3. Place the Octabank onto a flat surface face down. Remove the rods following the same order listed in set up.
Page 5
Visit FJWESTCOTT.COM for more details and availability.
Care Instructions
Optional Accessories
Westcott Cares About the Environment
Recycling electronics and light bulbs is a great way to reduce your environmental impact and
ensure that you’re playing your part in preserving an environment that can be enjoyed by future
generations. Many retail stores have bins designed for recycling these items. You can also contact
a local recycling center to inquire about recycling your electronics and bulbs there.
Gently spot clean diusion panels by hand with a damp cloth. Do not apply cleaner
to the reflective surface, as this may damage the product.
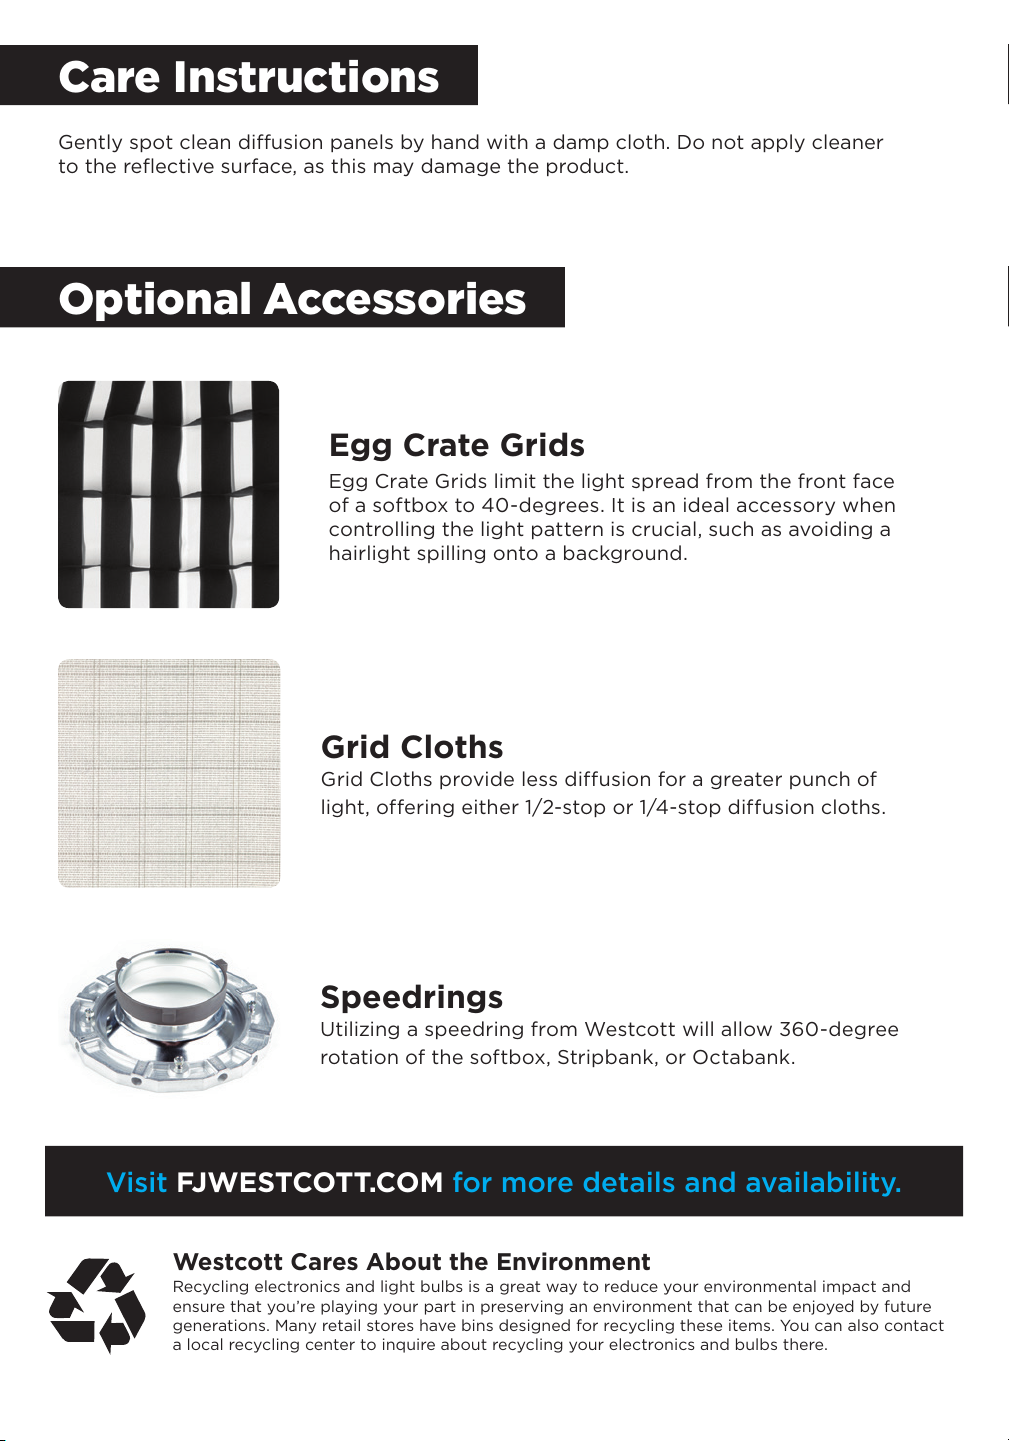
Egg Crate Grids
Egg Crate Grids limit the light spread from the front face
of a softbox to 40-degrees. It is an ideal accessory when
controlling the light pattern is crucial, such as avoiding a
hairlight spilling onto a background.
Grid Cloths
Grid Cloths provide less diffusion for a greater punch of
light, offering either 1/2-stop or 1/4-stop diffusion cloths.
Speedrings
Utilizing a speedring from Westcott will allow 360-degree
rotation of the softbox, Stripbank, or Octabank.
Page 6

Warranty
Westcott’s warranty obligations for this Softbox, Stripbank, or Octabank (“product”) are
limited to the following terms.
The F.J. Westcott Co. (“Westcott”) warrants this Westcott branded product against defects
in materials and workmanship under normal use for a period of TEN (10) YEARS from the
date of retail purchase from Westcott or an authorized retailer by the original end-user
purchaser (“Warranty Period”). If a defect arises and a valid claim is received within the
Warranty Period, at its option and to the extent permitted by law, Westcott will either (1)
repair the defect at no charge, using new or refurbished replacement parts, or (2) exchange
the product with a product that is new or which has been manufactured from new or
serviceable used parts and is at least functionally equivalent to the original product. This
Limited Warranty applies only to products manufactured by or for Westcott that can be
identified by the Westcott trademark, trade name, or logo affixed to them.
This warranty does not apply to: (a) damage caused by accident, abuse, misuse, flood, fire,
earthquake, mold, or other external causes; (b) damage caused by operating the product
outside the permitted or intended uses described by Westcott; (c) a product or part that
has been modified to alter functionality or capability without the written permission of
Westcott; or (d) cosmetic damage, including but not limited to scratches, bends, and faded
fabric.
Disclaimer: By purchasing, borrowing and/or using this product for any event, both public
or private, you, the customer, accepts all responsibility and releases Westcott, and its
associates, of any and all liability in the event of manufacturer’s defect, malfunction or
misuse of the product which may lead to further injuries or complications unforeseen by
the user. Westcott is not responsible for any potential or incurred damage caused by failure
to properly mount, hang, or store the product, which includes, but is not limited to damage
to cameras, electronics, electrical equipment, buildings, building materials, personal injury,
death, or disability, fire damage, or any and all other damage not mentioned previously.
Please contact Westcott’s Repair Department for a Return Authorization Number “RMA”
prior to requesting warranty service. This RMA must be clearly written on the outside of the
box to the left of the shipping label. Items sent in without pre-authorization or that do not
fall under the limited warranty will be returned at the expense of the sender.
Repair Department: 800-886-1689 / 419-243-7311 (International)
Email: [email protected]
Shipping: F.J. Westcott Co, 1425-B Holland Rd. Maumee, OH 43537
Register your new gear online at FJ WE STC OT T.CO M/ RE GI ST ER
Visit FJWESTCOTT.COM for videos, pro tips, inspiration, and more!
Westcott products are made to the company’s traditionally high standards of quality and comply with all
applicable government safety regulations and requirements. In an eort to provide the best quality products
possible, we periodically make product modifications. Actual products may not be identical to items pictured.
Designed in Ohio, USA. Assembled in Korea. © F.J. Westcott Co. All rights reserved.EA0218
 Loading...