

Page 1
BACK TO BASICS
PRESERVING A TRADITION
FOOD DEHYDRATOR
For Healthy, Natural
Snacks Anytime!
Model FD-600
INSTRUCTION MANUAL
Before operating this unit, please read instructions completely.
Page 2

MAKING YOUR OWN DRIED FOODS IS
FUN, EASY & DELICIOUS
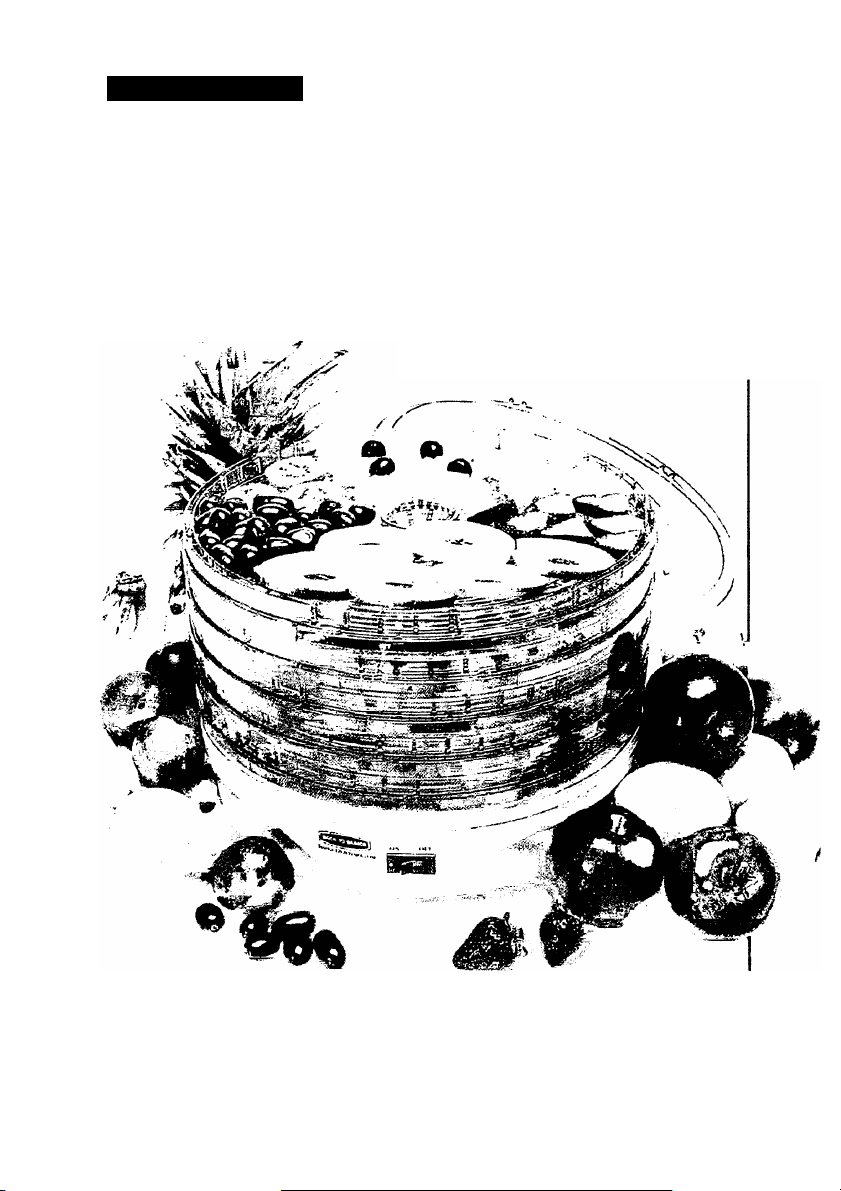
Congratulations on your purchase of the Back To Basics Food
Dehydrator. You’ll love the convenience and ease of drying your own
trail foods, healthy and nutritional snacks, and tasty jerky all without
chemicals and preservatives. You’ll be surprised at the savings over
store-bought dried foods, too. Your new Food Dryer will pay for itself
many times over while providing better tasting, more nutritious foods.
Go ahead
........
dry it, you'll like it!
TABLE OF CONTENTS
IMPORTANT SAFEGUARDS
FOOD HANDLING WARNINGS......................................................... 3
SELECTING FOODS TO DRY........................................................... 3
DRYING TIMES.................................................................................. 3
BASIC OPERATING INSTRUCTIONS
CLEANING INSTRUCTIONS
DRYING FRUITS................................................................................ 5
PRETREATMENTS FOR FRUIT........................................................ 5
ROTATING TRAYS
DRYNESS TEST
FRUITS THAT DRY BEST.................................................................. 7
MAKING FRUIT LEATHER............................................................... 8
DRYING VEGETABLES.................................................................... 9
PRETREATMENTS FOR VEGETABLES
VEGETABLES THAT DRY BEST..................................................... 10
DRYING MEATS
DRYING HERBS & SPICES............................................................ 12
............................................................................
................................................................................
............................................................................
............................................................
.............................................
.............................................................
..........................................
2
4
4
6
6
11
9
STORAGE/PACKAGING.................................................................. 13
REHYDRATING METHODS............................................................. 14
RECIPES TO GET YOU STARTED
FOOD DEHYDRATOR ACCESSORIES
WARRANTY & SERVICE
.................................................................
.................................................
..........................................
15
18
19
Page 3

fWIPORTANT SAFEGUARDS
When using electrical appliances, basic safety precautions should
always be followed including the following.
1. READ ALL INSTRUCTIONS BEFORE USING.
2. Do not touch hot surfaces.
3. To protect against electrical shock do not imnrterse cord, plugs, or
the base assembly in water or other liquid.
4. Close supervision is necessary when any appliance is used by or
near children.
5. Unplug from outlet when not in use and before cleaning. Allow to
cool before putting on or taking off parts
6. Do not operate any appliance with a damaged cord or plug or after
the appliance malfunctions, or has been damaged In any manner.
Return appliance to the nearest authorized service facility for
examination, repair, or electricai or mechanical adjustment.
7. The use of accessory attachments not recommended or sold by the
appliance manufacturer may cause fire, electric shock or injury.
8. Do not use outdoors,
9. Do not let cord hang over edge of table or counter or touch hot
surfaces.
10. Do not place on or near a hot gas or electric burner or in a heated
oven.
11. Do not use appliance for other than intended use.
12. Be sure to turn switch to OFF position after each use of your Food
Dehydrator.
13. To disconnect, grip plug and pull from wall outlet. Never pull on
cord.
14. Never leave the house while the appliance is on.
15. Operate this appliance only on heat resistant cooking surface such
as tile, formica or any surface with heat resistant finish.
16. A short cord set is provided to reduce the hazards resulting from
becoming entangled in or tripping over a longer cord. Extension
cords may be used if care is exercised in their use.
A. The marked electrical rating of the extension cord should be at
least as great as the electrical rating of the appliance.
B. The extension cord should be arranged so that It will not drape
over the countertop where it can be pulled on by children or
tripped over accidentally.
SAVE THESE INSTRUCTIONS
This Food Dehydrator is intended for household use only.
Page 4

FOOD HANDLING WARNINGS
The following food handling practices must be followed to prevent food
borne illnesses. This is the case with all foods, fresh and dried.
» Wash hands thoroughly before handling food, and wash again each
time they touch anything other than food.
• Keep your work area, all equipment and utensils clean.
• Wash trays and lid of dehydrator between each use.
• Avoid touching foods as much as possible. Use tongs, forks, and
other utensils instead of hands if possible.
• Keep hands away from mouth, nose and hair when handling food.
• Avoid handling food when ill or with sores or cuts on hands.
• Keep animals and pets away from food preparation areas.
Failure to follow these practices could result in bacteria growth in the
food product or storage container which could result in serious illness.
SELECTING FOODS TO DRY
Foods to dry should be in prime condition. Because sugar is not added,
as it is to canned foods, dried underripe fruits may have a flat, often
bitter taste. Tree ripened fruits have the highest natural sugar and best
flavor for drying. Vegetables should be fresh and tender when dried.
Avoid overripe fruits and vegetables, and cut away any bruised or
spoiled portions. Remember that if it’s good for eating, it will be good for
drying.
DRYING TIMES
There are so many variables that it is difficult to estimate exact times for
drying. Variables include the outside temperature and humidity, now full
the dehydrator is loaded, and the type and thickness of foods to be
dried. Here are some guidelines:
Fruits or vegetables, sliced 1/4 to 3/8-inch thick - 6 to 10 hours.
Fruit halves, dried skin side down -12 to 20 hours.
Fruits with skins, halved and pitted (cherries or raisins) -12 to 24 hours
Fruit Leather - 6 to 12 hours
Page 5
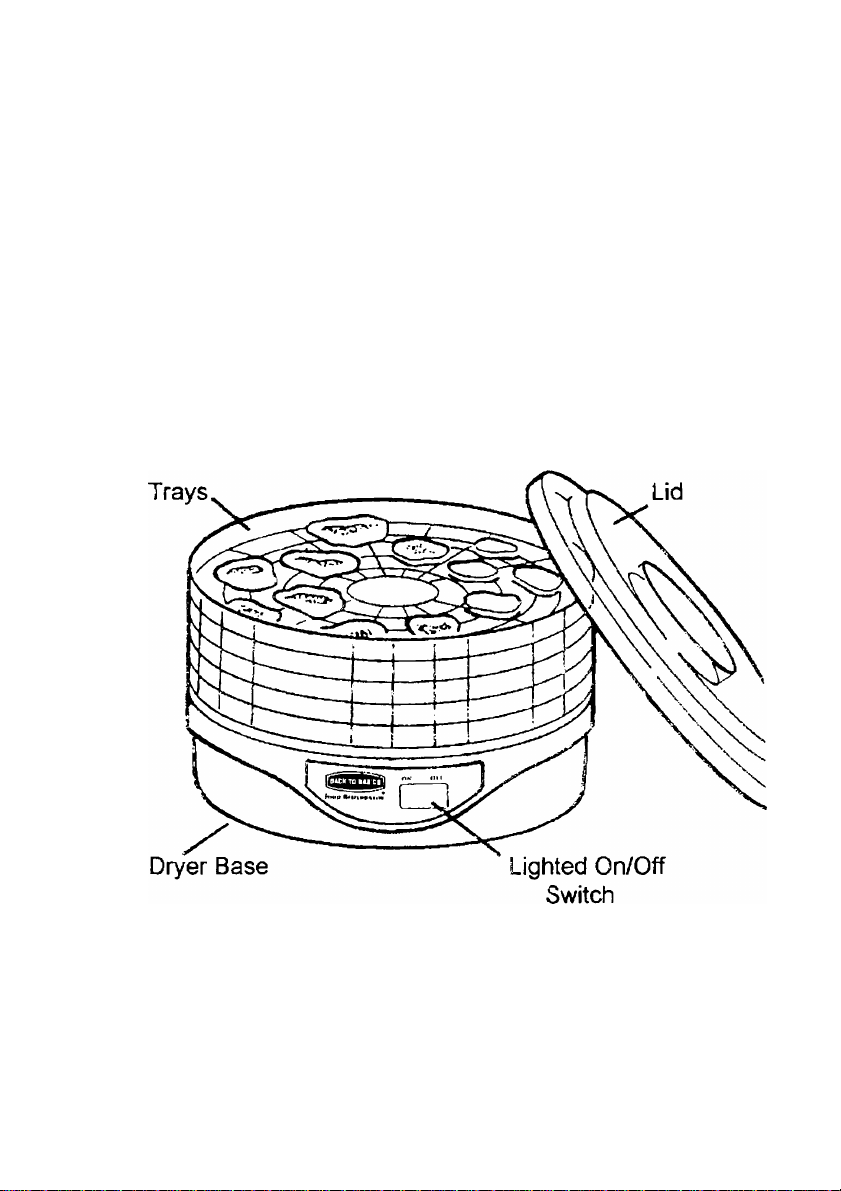
BASIC OPERATING INSTRUCTIONS
• Before using your Food Dehydrator for the first time, wash the trays
and lid in warm, soapy water and rinse well. Wash the outer surface
of the base with a moist sponge and mild detergent. AVOID
SPILLING WATER OR LIQUIDS IN OPENINGS IN THE BASE. DO
NOT IMMERSE BASE UNIT IN WATER OR ANY OTHER LIQUID.
• Place the base unit on a heat resistant counter top such as tile or
formica. Plug the unit into a proper wall outlet, if desired, you may
preheat the unit while the last tray of food is prepared.
• Arrange food to dry on each of the trays without overlapping the
pieces. Stack trays with prepared food and place on the dryer base.
Place the lid on top. Check food frequently (every 1/2 hour) near
the end of the drying time and remove individual pieces as they are
dry. When foods are all the same size and thickness, they will dry
evenly and at the same rate.
CLEANING INSTRUCTIONS
Unplug from electrical outlet before cleaning. Wash trays and lid in
warm, soapy water. Some dried on foods are easier to remove after
trays have soaked for 10-15 minutes. Trays can be washed on top rack
of dishwasher if desired. Rinse well, then dry. Wipe dryer base with
damp cloth only. DO NOT IMMERSE BASE IN WATER.
Page 6

DRYING FRUITS
Wash fmits well and remove any bruised or overripe portions. Peel if
desired. Larger fruits may be halved or quartered. If pieces of fruit vary
in size, they may be sliced 1/4 to 3/8 inch thick for more even drying.
Smaller fruits such as grapes and cherries may be dried whole. Remove
pits or stones from fruits such as prunes, cherries, apricots, etc.
Fruits that have been artificially waxed to prevent moisture loss should
always be peeled. Peeling is optional with other fruits. Dried pear skins
tend to be grainy and peach peels are a little fuzzy.
Most fruits can be placed directly on the drying trays as they are
prepared...pineapples, grapes, strawberries, prunes, etc.
However, apples, apricots, bananas, peaches and pears turn brown
when the cut surfaces are exposed to the air due to oxidation and the
reaction of enzymes. These fruits may be pretreated (explained below)
to slow b'^owning and to prevent loss of Vitamins A and C.
PRETREATMENTS FOR FRUIT
You need not pretreat fruit in order to dry it. However, pretreatment
often makes fruit look better, increases the shelf life and can even
enhance the nutritional value of some foods. Experiment with both
treated and untreated food to see which will best suit your needs.
Remember, proper storage is critical to the quality of the stored product
whether treated or untreated.
NATURAL PRETREATMENTS
Use pineapple , lemon, orange or lime juice as a natural alternative to
other pretreatments to reduce browning. Slipe fruit directly into juice.
Remove promptly (about 2 minutes) and place on trays. Fruits may also
be dipped in honey, spices, jello powders or sprinkled with coconut to
give them a delicious dried flavor. Use your imagination and make your
own flavored dip.
ASCORBIC ACID-CITRIC ACID
These two acids help to prevent browning. Dissolve 2 tablespoons of
ascorbic acid and 2 tablespoons of citric acid in 1 gallon of water. Dip
cut fruits into solution for no more than 2 minutes. Drain, then
Immediately place on tray to dry.
Page 7

POPPING BACKS
When drying fmit halves, especially apricots, it has been suggested that
popping the back (“inside out”) will speed the drying time. This is true,
but it also resuits in the loss of the nutritional juices to the bottom of the
dehydrator. Instead, cut each half in half again to give the end product
more nutritional value, a brighter color, and faster reconstitution
capabilities. Apricots will turn black during drying if too ripe.
CHECKING
Some fruits have a natural protective wax coating, such as figs, prunes,
grapes, blueberries, cranberries, etc. To speed drying, rt is necessary to
pretreat these fruits by dipping them into boiling water for 1 to 2 minutes,
depending on the size and toughness of the skin. This makes the skin
more porous by removing the natural wax coating and thereby speeds
up the drying time. The faster drying helps reduce the nutritional loss.
This process is called checking because small lines appear on the fruit
skin and allow the moisture to escape. The lines are too fine to be
visible.
ROTATING TRAYS
Your new Food Dehydrator is designed to rely on natural heat
convection to carry away moist air from the food. Trays should be
rotated during the processing period to insure even drying. Trays
nearest the bottom exposed to the hottest driest air will dry more rapidly.
So simply move them up and move the ones on top to the bottom.
DRYNESS TEST
Fruits should be pliable and leathery with no pockets of moisture. There
is a tendency to over dry fruits until they are tough and hard. Overdried
fruits do not store as well as properly dried fruits, do not taste as good,
and have less nutritional value. Properly dried fruits should contain
about 15 to 18% moisture and feel soft but not squishy.
Vegetables should be tough or brittle. They store best when they
contain about 5% moisture.
Page 8

FRUITS THAT DRY BEST
FRUIT PREPARATION &
PRETREATMENT
Apples
Apricots
Bananas
Berries
Cherries
Cocon u*
Figs
Grapes
Papayas
Peaches
Pears
Pineapple
Prunes
Core and slice in 1/4 inch
ring. Prefreat if desired.
Halve and pit. Pretreat
for best color and flavor.
Slice lengttiv^e or
crosswise 1 /4 Inch thick.
Barely ripe bananas hold
their color and nave the
nicest flavor.
Only strav/berries ary well.
Berries with seeds do not
dry well. Slice strawberries
3/8 inch thick.
Remove stems and pits.
Dry v^oie or halves.
Drain the milk, crack, and
remove meat. Slice 1/4
inch thick.
Remove stems; halve or
quarter. Dry skin side
down.
Seedless varieties onK,
Dry as is, or skins may be
cracked by steaming.
Peel thinly and slice 3/8
inch thicK.
Peei, pit, cut in 3/8 inch
rings. Pretreat if desired.
Peel thinly and slice 3/8
inch thick. Pretreat if
desired.
Peel and slice 3/8 inch
thick In rounds.
Halve, pit and dry skin
side down.
USES
SUITABILITY
FOR LEATHER
Snacks,
granola,
cookies.
Meat
dishes,
salads,
desserts,
baking.
Baking,
snacks.
Snacks,
cerea!
Snacks,
use as
rai^ns.
Snacks,
baking.
Snacks,
baking.
Snacks,
baking.
Snacks. Poor.
Breads,
cobblers,
& cookies.
Snacks,
baking.
Snacks,
baking.
Snacks,
baking.
Excellent;
combines wen
with most other
fruits.
Excellent; 1 tsp.
of Citric Acid per
quart of puree
holds color bette'.
Better in
combination; color
turns dark.
Excellent.
Excellent; aimond
extract is nice for
flavoring.
Use grated as a
garnish for other
fruit leathers.
Only in
combination.
Fair to good,
depending on
type of grape.
Excellent, nice
sweetened with
honey.
Better in
combination.
Better in
combination.
Excellent.
Page 9

MAKING FRUIT LEATHER
Fruit leathers, also called fruit taffies or fruit rolls, are easy to make in
your FOOD DEHYDRATOR. Fruit leather is a perfect “take along”
snack, high in energy and nutrition. Because fruit leather is made from
a fresh fmit puree, a solid surface must be used to dry on. If you poured
it directly on the trays, it would seep through the openings. You may
cover the regular trays with plastic wrap, cut to fit the circular trays.
Fruit leathers are best made from fully ripe fruits. Wash fruits carefully,
cut away any bruised or spoiled portions of the fruit, remove the pits or
stones and blend in a blender. Peeling Is not necessary unless the peels
will detract from the finished product, as in pears or peaches. Fruit
leather from very seedy berries is best when at least some of the seeds
are removed witn a sieve. If the fruit will not begin blending by itself,
add a little fruit juice to begin the biending process. Add a smal! amount
of honey or com syrup if sweetening is needed, remembering that the
sweetness wii! concentrate as the leather dries. Honey or com syrup
does not crystallize during storage in the finished leather. Sugar
sweetened leather gets brittle during storage.
Pour puree 1/4 inch thick in a circle on the soljd trays. When using
plastic wrap instead of the fruit roll tray, leave 1/2 inch free near the
center and around the outer edge.
Lemon juice, orange Juice, fresh pineapple or slightly cooked apple, mix
well with most fruits and add additional flavor. Some fruits are best
when used in combination with other fruits, so experiment with different
combinations.
It is fun to vary the flavor of fruit leather by adding spices or flavorings
such as cinnamon, nutmeg, almond extract, or vanilla.
For a change in texture, try sprinkling the wet fruit leather puree with
grated fresh or flaked coconut, nuts, finely chopped dried fruit, sesame
or sunflower seeds. Remember to store garnished fruit leather in the
refrigerator or freezer as it has a shorter shelf life than plain fruit leather
when stored at room temperature.
Fruit leather is dry when it is no longer sticky to touch, yet still pliable.
Remove from the dehydrator while still warm, cut In quarters, and roll.
Wrap tightly In plastic wrap designed for the microwave or freezer (It Is
airtight and moisture proof), then store in an airtight container. Fruit
leather will usually maintain good quality up to a year when properly
packaged and stored at room temperature. To keep them fresher, or for
longer storage, refrigerate or freeze.
8
Page 10

DRYING VEGETABLES
Vegetables dried at home require a little more effort In processing and
storage than do fruits because they are low in acid and have little sugar.
Some vegetables such as broccoli or asparagus have a poor quality
when rehydrated, and are better frozen than dried. Others, such as
potatoes, are available at reasonable prices all year round and may not
be worth your time to dry them unless they are used for lightweight
camping. Be selective in the vegetables you choose to dry, following
the recommended guidelines. Vegetables that are not listed do not dry
well. Dry vegetables until they are tough or brittle and package
according to directions under STORAGE.
PREPARATION
Select only the highest quality, fresh, crisp and tender vegetables for
drying. Wash vegetables carefully just before processing to remove dirt
and bacteria. Most vegetables should be peeled, trimmed, cut, or
shredded prior to drying.
PRETREATMENTS FC R VEGETABLES
Steam blanching vegetables prior to drying destroys the enzymes that
produce off flavors during storage, resulting in poor texture and poor
rehydration. Steam blanching is preferred over water blanching
because there is less flavor and vitamin loss. Microwave blanching is
aiso excellent and usually keeps a brighter color in the vegetables.
STEAM BLANCHING
Layer prepared vegetables in the top portion of a steamer, no more than
2 to 2-1/2 inches deep. Steam until the vegetables are heated all the
way through, but are not cooked enough to eat (usually 2 to 3 minutes).
Small pieces may need occasional stirring to steam blanch evenly.
Transfer steamed vegetables directly to drying trays, working as quickly
as possible.
MICROWAVE BLANCHING
Microwave ovens are convenient for blanching fresh vegetables.
Prepare vegetables as for steam blanching. Place vegetables with small
amount of water (refer to your microwave oven cooking chart) in a
covered casserole dish. Cook for only 1/4 to 1/3 the time specified in
the chart, stirring well after half of the blanching time. Microwave
blanched vegetables will be more brightly colored than those that are
steam blanched. Transfer blanched vegetables directly to drying trays,
working as quickly as possible.
Page 11

VEGETABLES THAT DRY BEST
VEGETABLES
Beans, green
Beets
Carrots
Com
Garlic
Mushrooms
Onions
Peas
Peppers
Potatoes
Tomatoes
PREPARATION &
PRETREATMENT
Snip off ends; slice diagonally
in 1 inch segments. Steam
or microwave blanch. Quick
freezing for 30-45 minutes
prior to placing in dehydrator
tenderizes the beans.
Use small tender beets.
Steam until almost tender.
Slice 3/8 inch thick.
Peel, dice 3/8 inch thick and
steam or microwave blanch.
Husk and remove silk.
Steam or microwave blanch;
cut from cob.
Separate and peel cloves; cut
in half lengthwise.
Remove any woody portions
from stem. Slice lengthwise
3/8 inch thick.
Trim ends and remove paper
shell. Dice 1/4 to 3/8 inch
thick.
Shell and steam or
microwave blanch.
Remove core, dice or slice
3/8 inch thick.
Peel and slice 1/4 to 3/8 inch
thick. Steam or microwave
blanch. Rinse well in cold
water to remove gelled
starch.
Core and slice in 3/8 inch
thick slices.
USES AFTER
DRYING
Soups, stews, or
casseroles.
Flake in blender to
use in soups, salads,
pickled beets.
Dry soup mixes;
grated for carrot
cake.
Fritters, chowders,
soups, stews.
Powder in blender
for seasoning.
Use in eggs,
spaghetti, or
creamed dishes.
Seasonings.
Soups, stews, or
cream sauces.
Seasonings, soups,
stews.
Hash brown
potatoes, soups.
Powder in blender
and use as salad
sprinkles or in place
of tomato sauce.
10
Page 12

DRYING MEATS
Meats or fish can be dried using two different methods, (1) dr^'ng without
cooking and (2) drying cooked meats.
Jerking meats, or processing without prior cooking, yields tough chewy but
great tasting meat. The meats are soaked in a salt based marinade, trier
dried.
Meats and fish can be cooked prior to drying. Proper cooking kills trie
bacteria present in raw meats and fish prior to drying. The dried meat and
fish products can be used for stews, sandwich spreads, or stroganoff. The
light weight of dried meats makes them idea! to take along on camping or
backpacking trios. Dried meats and fisn can be reconstituted by adding
wate.’, then used for many recipes.
Meats for drying should be LEAN WiTH AS LITTLE FAT as possible. Fat wii.’
spoil during storage. FlanK steak o^ round steak is an excellent choice tor
making jerky. Meats that work best for stews or sandwich spreads need tc
be of choice quality and tender. ALL FAT SHOULD BE REMOVED.
Meats, for purposes other than jerky, need to be cooked orio^ to drying. You
can use leftover roast or steak to dry. or cook meats specifically for drying.
Leftover turkey v^ll make excellent snacks for iater.
Fish should be as fresh as possible.
MAKING BEEF JERKY
Slice the flank or round steak into ttw strips or slices. Cutting the meat while
It is frozen may make cutting easier. Cut across the grain for more tender
jerk^^ Place in prepared marinade for 3 hours or overnight in an airtighi
container. Do not use a metal container. (See Homemade Jerky, p.17)
Place the strips or slices onto the tray. Do not overlap. Dry until it crackswhen bent, about 8-15 hours. Store in airtight container for up to 2 weeks.
Tc maintain the best flavor, refrigerate. Use within 3 montns.
MAKING FISH JERK>r
Use fresh fish cut into strips. Larger fish work better. Properly dean fish and
keep cold prior to drying to help reduce spoiling. Remove the bones and cut
into strips. Soak in mixture of 1 quart water and 1/2 cup salt. Refrigerate 30
minutes. Remove from liquid, pat dry.
Place into flat pan and sprinkle liberally vnth a salted seasoning mixture. Use
at least 1 tablespoon salt per 2 pounds of fish. Cover and refrigerate for
about 6 hours.
Then place seasoned strips onto trays to dry. Don’t overlap. Dry until no
moisture appears, but not until brittle. Refrigerate dried fish to ensure flavor.
Keeps up to 3 months refrigerated.
1
Page 13

DRIED MEATS AND FISH THAT HAVE BEEN COOKED
Thoroughly cook the fish or meat. Remove any visible fat Cut into 1/2*
cubes. Place on trays and dry until no moisture is present. Store in
airtight container at room temperature for 2 weeks. Store in freezer for
up to 2 months.
Reconstitute by soaking In water or broth for up to 1 hour. Add to your
favorite recipes.
DRYING HERBS AND SPICES
Properly clean herbs or spices prior to drying.
Almost any herb or spice can be used for drying. These can be dried
right on the stalk or stem. Remove the stems and leaves once these are
dried. Labeling the herbs of spices prior to drying will help make
identification much easier once dried.
Place in plastic bags in the whole form, then store in a cool, dry place.
Crush or rup leaves when ready to use. This helps to keep flavor intact.
Make sure herbs are totally dry. Any hint of moisture will spoil the herbs.
Be especially careful when drying basil.
FLOWERS
Select flowers that are unblemished and fresh. Cut so that the stem or
stalk can be arranged on the tray without bending. If it is bent, it will
remain bent once dried.
POTPOURRI
Flowers or herbs offer a wide variety of choices for potpourri. Choose
your favorites and experiment with mixing your own potpourris. Keep
records so that you can duplicate the scent next time. Place flower
heads on trays, without overlapping. Dry, then mix together to form the
potpourri. Your whole house will smell great as the flowers are drying..
Scented oils can be added to your potpourri to help rejuvenate the scent.
12
Page 14

STORAGE / PACKAGING
DRIED FOODS MUST BE PROPERLY PACKAGED IN ORDER TO
KEEP WELL. After drying, let foods cool completely, then package your
dried foods in freezer plastic bags, squeezing out as much air as
possible. Heat-sealable bags may also be used. Store the plastic bags
inside airtight metal, plastic or glass containers. Storing foods in rigid
containers without first putting them into freezer bags exposes the dried
foods to air. Vacuum packaging equipment for home use is available in
some stores around the country. Vacuum packaging will greatly extend
shelf life.
STORAGE CONDITIONS
Store properiy packaged dried foods in a cool, dark place. The cooler
the food is kept, the longer the optimal quality will be maintained. For
every 18®F drop in temperature, the shelf life increases 2 to 3 times. If
you have room in a refrigerator or freezer, keep your dried foods there.
Otherwise, find the coolest place in your home to store dried foods.
Light also causes the quality and nutritive value to deteriorate. Keep
dried foods in the dark or in opaque containers.
SHELF LIFE
Fmits have a naturally high sugar and acid content, which allows them to
dry well and store for longer periods of time than vegetables. When
properiy packaged and stored at room temperature or below (70®F or
less), most fruits will maintain a high quality and nutritional value up to a
year. Most vegetables are best when eaten within six months.
Your dehydrated food should be checked about once a month. Should
you find mold growing on a piece of the dried food, scrape it off and then
pasteurize the contents.
To pasteurize the contents, spread food on a cookie sheet and bake in
oven for 15 minutes at 175 degrees Fahrenheit. Repack in a clean, air
tight container.
Page 15

REHYDRATING METHODS
Dried foods taste great as is, or they can be rehydrated close to their
own original texture. Rehydrated fruits are great in pies and sauces.
Vegetables are used in stews, soups and casseroles.
Various methods for rehydrating are outlined here. Choose the method
that best fits your needs.
COLD WATER METHOD FOR FRUIT
« Soak fruit in refrigerator to keep free of molds or bacteria. Soak for
a few hours, until fruits reach desired consistency. Use enough
water to just barely cover fruits.
• One cup of dried fruits will yield about 2 cups of rehydrated fruit.
• Do not over soak fruits, this tends to reduce flavor and make them
soggy.
COLD WATER METHOD FOR VEGETABLES
• Wash vegetables in clean water. Soak in clean, unsalted water for
2-10 hours in a covered pan. Smaller pieces need shorter soaking
times, larger pieces of produce will have longer times.
• Add seasonings at the end of rehydrating, not during.
• One cup of dried vegetables will yield about 2 cups of rehydrated
vegetables.
BOILING WATER METHOD
Place 1 cup of fruit into 1 cup of water, simmer until tender. Place 1 cup
of vegetables into 1 cup of boiling water. Set aside and let soak for 5 to
20 minutes. This varies depending on the type of vegetable. After
soaking, use the vegetables for soups, stews or casseroles.
STEAMING METHOD
Fruits can be softened by steaming for about 3-5 minutes. This method
is ideal when using fruits for milk shakes or baking.
COOKING METHOD
Simply add the vegetables to the desired recipe. Be sure to add enough
extra water to sufficiently rehydrate the produce.
14
Page 16

RECIPES TO GET YOU STARTED
APPLE CINNAMON RINGS
Peel and core apples. Slice into 1/4 inch rings. Sprinkle with cinnamon or
sugar/cinnamon mixture, if desired. Dry until leathery.
GLAZED BANANA CHIPS
Slice bananas into 1/4 inch slices and place into lemon juice. Soak for a few
minutes, then drain on paper towel. Sprinkle with cinnamon or your favorite
jello. Dry leathery to crispy depending on your preference.
HONEY GLAZED BANANA CHIPS
Mix 1/4 cup water and 1/4 cup honey. Add sliced banana. Drain the sprinkle
with cinnamon or your favorite spice to add an extra touch.
PINEAPPLE CHIPS
Remove outside rind from fresh pineapple. Slice 1/4 to 3/8 inch thick and cut
into strips or chunks. Dry until leathery.
FRUIT & NUT MIX
Slice bananas, strawberries and pineapple (canned or fresh) uniformly, about
1/4 inch thick. After dried and cooled add mixed nuts.
SASIC FRUIT LEATHER / FRUIT ROLLS
Take any ripe fruit or berry and puree it in your blender with a small amount of
apple or orange juice to help liquefy the fruit. Add honey or corn syrup to taste
if desired. Place plastic wrap (not wax paper or aluminum foil) on trays and
pour pureed mixture 1/4 inch thick. When dry enough to remove wrap, turn
over and continue drying until leather-like. Roll-up if desired.
APPLE LEATHER
Prepare one quart of chopped apples by removing cores but not skins. Place
just enough water in your blender, with a few apple chunks to start the blending
action. Keep adding apples until consistency is like applesauce. Place plastic
wrap on trays and pour pureed mixtúrete 1/4 inch thick. When dry enough,
remove wrap and turn over to continue drying until leathery. Roll-up, slice and
serve.
STRAWBERRY LEATHER
Place 2 cups of fresh strawberries into blender with a small amount of apple
juice to help liquefy them. Pour through fine strainer screen to remove some of
the seeds Line tray(s) with clastic wrap, then pour puree evenly onto tray
spreading 1/4 inch thick with a spatula. Dry until leather (ike.
LEATHER VARIATIONS
Combine apples and strawberries or other combinations of fruits. Add honey or
corn syrup to taste. Sprinkle on cinnamon, coconut, crushed nuts, or favorite
spice if desired. Remember, anything that tastes good in the blender will taste
good as a leather.
15
Page 17

NATURAL GRANOLA
0 cups rolled instant oats
cup wheat germ
1/2
3/4
cup raisins or dried cherries
3/4
cup chopped dried apples
1/2
cup chopped dated
1
cup chopped nuts
Mix all ingredients together. Spread out on the plastic wrapped trays. Dry until
hard, then store in an airtight bag. Ideal for healthy breakfast or snack anytime
of the day.
1/2 cup honey
1/3
cup firmly packed
brown sugar
A
teaspoon vanilla
i
1 teaspoon cinnamon
FAVORITE TRAIL MIX
1 cup sunflower seeds
1 cup carob chips
1 cup raisins (dehydrated grapes)
1 cup diced apricots
1 cup diced pears
Simply combine the above dried ingredients for a nutritional snack at home, in
the office and car, or on the trail. Also makes a great gift idea.
1 cup broken cashews
1 cup coconut strips (pared)
1 cup diced apples
1 cup diced peaches
1 cup slivered almonds
DRIED SOUP MIX
1/2 cup dehydrated onion 1/2 cup dehydrated green beans
1 cup dehydrated carrots 1/2 cup oehydrated corn
1/2 cup dehydrated celery tops 1/2 cup dehydrated zucchini
2 cups dehydrated tomatoes 1 cup dehydrated potatoes
Place the above ingredients or any combination of your favorite dried
vegetables into an airtight container. Add dry rice or noodles and dried meat if
desired. When ready to use place 2 cups of dried mix into 2 cups of boiling
water. Cover and simmer until tender. Add bouillon or seasonings to taste.
CREAM OF TOMATO SOUP
2 cups milk
2 iabjespoqns flour
'' thirf slice onion
2 tablespoons soft butter
Dash of garlic salt
Heat milk in saucepan. Put 2 cups of tomatoes in blender and fill to the 2 cup
measure with water. Let stand 5 minutes and puree until smooth. Add the
remaining ingredients and process until smooth. Remove feeder cap and slowly
pour the hot milk into the mixture while processing. Reheat over low heat and.
serve immediately. Makes 4 servings.
2 cups dehydrated tomatoes
1 tablespoon sugar
Dash of pepper
1 teaspoon salt
SMOKED NUTS
4 cups nuts (peanuts,
walnuts, almonds, etc.)
1 tablespoon honey
Mix ail ingredients in a bowl and let sit for 60 minutes,
to dry aoout 2-3 hours.
1/4 teaspoon liquid smoke
3/4 cup water
1 tablespoon salt
Drain and place on tray
16
Page 18

HONEY NUTS
4 CUDS nuts of your choice
2 tablespoons honey
1/2 teaspoon cinnamor.
Mix ingredients in bowl and marinate for 60 minutes. Drain and place on trays
to dry. Requires 3 to 5 hours to dry completely.
3/4 cups wate'.
tablespoon sah
1/2 teaspoon nutmec
HOMEMADE JERIO'
Fish or any kind of meat can be prepared this way. Mix in a bowl 1/2 cup of
Soy Sauce, 1/2 cup Worcestershire Sauce, 4 tablespoons brown sugar and 4
tablespoons of liquid smoke (optional). Slice meat into 1/8 inch thick slices and
brush each piece of meat weli with sauce. Lay coated meat flat in glass or
crock bowl. (DO NOT USE METAL BOWL.) Sprinkle with salt, garlic powder,
and coarsely ground pepper. Stack seasoned meat in bowl and leave overnight.
Lav meat on trays and ary until leather like. Store in giass jars with hoies
punched in the lid.
GERMAN DUTCH APPLE CAKE
3 cups dehydrated apples
3
cups water
2
large eggs
1
cup vegetable oil
cups sugar
2
Soak apples until reconstituted. Mix eggs and oil until foamy and add sugar,
flour, soda, 1 1/2 teaspoon water and cinnamon. Mix together nuts and drained
apples. Spread in oblong pan and bake at 350® for 50-60 minutes.
2
cups flour
teaspoon sooe
1 1/2 teaspoon water
1
teaspoon cinnamon
1
cup chopped nuts
ICING
[
3 oz. cream cheese
1 teaspoon melted butter
Spread over warm German Dutch Apple Cake.
1/4
teaspoon vanilla
1 cup powdered sugar
ORANGE PEAR BARS
1/4 cup butter
1/2 cup brown sugar
1
egg
1
teaspoon grated orange peel
1/4
cup plus 3 Tbsp white flour
1/4 cup plus 3 Tbsp wheat flour
1/2
teaspoon baking powder
Simmer dried pears in water and 1 Tablespoon brown sugar for five minutes.
Drain well. Cream butter, brown sugar, egg and orange peel, beat weli. Add
dry ingredients, then milk, orange Juice and pears. Mix. Pour into greased 8
inch square pan and bake at 350® for 25 minutes. Cook, sprinkle with sifted
powdered sugar. Makes 16 squares.
teaspoon soda
3/4
1/4 cup milk
1/4 cup orange Juice
1/2
cup chopped dried pears with
peels, water to cover
1 Tablespoon brown sugar
17
Page 19

APPLE PIE
2 cups water
2 cups dried apples
1/2 cup sugar
1 teaspoon dnnamon
1 unbaked pie shell
Simmer apples in water until tender. Add sugar, flour and spices, mix.
Pour into pie shell. Dot with butter.
1/4 teaspoon allspice
1 tablespoon mace
1 tablespoon butter
2 tablespoons flour
TOPPING
1/2 cup butter or margarine
1/2 cup brown sugar
1/2 cup flour
Mix ingredients with forte until crumbly. Sprinkle on top of apple mixture.
Bake in preheated 425® F oven for 15 minutes, reduce heat to 350® F,
bake for 35 minutes until slightly browned and bubbly.
Makes 1-9 inch pie.
VARIATIONS
Substitute peaches for apples to make peach pie.
Eliminate topping and use a second pie emst to top. Cut slits into pie
crust to let steam escape.
FOOD DEHYDRATOR ACCESSORIES
To Help You Get the’Most Enjoyment from Your Food Dehydrator.
#FD-604 SET OF 2 SOLID
FRUIT ROLL-UP TRAYS
Perfect for making fruit
leathers and roll-ups.
#FD-602 SET OF 2
EXTRA DRYING TRAYS
Expand the capacity
of your Food Dryer.
Use no more than 9
total trays for most
effective drying.
Page 20

WARRANTY & SERVICE
Your Back To Basics Food Dehydrator is warranted for one year from
the date of purchase to be free from mechanical defects in material and
workmanship. The manufacturer’s obligation is limited to replacing or
repairing such defects during the warranty period at no charge, providing
the product is sent pre-pald to BACK TO BASICS PRODUCTS, INC.,
675 WEST 14600 SOUTH, BLUFFDALE, UTAH 84065. Back To
Basics will pay for return postage. This warranty does not cover damage
from misuse of this product.
If Service is Required, Do Not Return to Store.
1. Send a note to us explaining the problem. Be sure to include your
name, address, and phone number.
2. For faster service, call (800) 688-1989.
3. Most service problems are resolved by replacing a broken or
defective part. If this is not the case we will give you instructions for
returning the unit.
OTHER QUALITY PRODUCTS
APPLE/POTATO PEELER
STEAM CANNER
STEAM JUICER
m
J
ICE SHAVER
BACK TO BASICS produces many quality products designed to make food
preparation easier and much more fun. See them at your local dealer.
BACK TO BASICS PRODUCTS, INC.
675 WEST 14600 SOUTH, BLUFFDALE, UTAH 84065
GRAl
NMILL
(800)-688-1989
 Loading...