

Page 1

Page 2
Important Safety
Instruction
CAUTION
RISK OF ELECTRIC SHOCK
DO NOT OPEN
CAUT IO N: TO REDUCE THE RISK OF ELECTRIC SHOCK, DO NOT
REMOVE COVER(OR BACK).NO USE-SERVICEABLE PARTS INSIDE.
REFER SERVICING TO QUALIFIED SERVICE PERSONNEL
The lightning flash with arrowhead symbol, within an equilateral
tr iangle, i s in tended to al ert t he users to the pres ence of
uninsulated"dangerous voltage" within the product's enclosure that
may be of sufficient magnitude to constitute a risk of electric to
persons.
The exclamation point within an equilateral triangle is intended to
al ert th e use r to the pr esenc e of impor tant oper ating and
maintenance*servicing) instructions in the literature accompanying
the appliance.
WARNI NG : TO REDUCE THE RISK OF FIRE OR ELECTR C SHOCK.DOI
POWER SUPPLY
Connect the supplied adapter to the side of the unit in the slot marked "DC 5V
IN" . Plug the two-prong end of the power cord to an AC 100-240V outlet. If
you have difficulty inserting the plug, turn in over and reinsert it. If the unit will
not be used for a long time disconnect the plug from outlet.
NOTE
Before plugging the power cord into an AC outlet, make sure that all the
connections have been made.
CAUTION
These servicing instruction are for use by qualified service personnel only. To
reduce the risk of electric shock, do not perform any servicing other than that
contained in the operating instructions unless you are qualified to do so.
Refer to service manual for servicing instructions. To reduce the risk of fire or
electric shock, do not expose this apparatus to rain or moisture.
Important Safety
Instruction
NOTES
1) Read these instructions
2) Keep these instructions
3) Heed all warnings
4) Follow all instructions
5)Do not use this apparatus near water
6) Clean only with a damp cloth
7) Do not block any of the ventilation opening. Install in accordance with
the manufacture's instructions.
8) Do not install near any heat sources such as radiators. Stoves, or other
apparatus (including amplifies)that produce heat.
9) Do not defeat the safety purpose of the polarized or grounding-type
plug, A polarized plug has two blades and a third grounding prong. The
wide blade or the third prong is provided for your safety. When the
provided plug does not fit into your outlet, consult an electrician for
replacement of the obsolete outlet.
10) Protect the power cord from being walked on or pinched particularly at
plugs, convenience receptacles, and the point where they exit from the
apparatus.
11) Only use attachments/accessories specified by the manufacturer.
12)Use only with a cart, stand, tripod, bracket, or table specified by the
manufacturer, or sold with the apparatus. When a cart is used, use
caution when moving the apparatus combination to avoid injury from tipover.
13) Unplug this apparatus during lighting storms or when unused for long
periods of time.
14)Refer all servicing to qualified service personnel. Servicing is required
when the apparatus has been damaged in any way. Such as power-supply
cord or plug is damaged, liquid has been spilled or object have fallen into
the apparatus, the apparatus has been exposed to rain or moisture, does
not operate normally, or has been dropped.
15 )Apparatus shall not be exposed to dripping or splashing and no objects
filled with liquids, such as vases ,shall be placed on apparatus.
Page 3
Important Safety
Instruction
Accessories
War ning
Failure to avoid the following potentially hazardous situations may result
in injury or property damage.
The unit is designed to provide you with route suggestions. It does not
reflect road closures or road conditions, traffic congestion, weather
conditions, or other factors that may effect safety or timing while driving.
Use the unit only as a navigational aid. Do not attempt to use the unit for
any purpose requiring precise measurement of direction, distance,
location, or topography. This product should not be used to determine
ground proximity for aircraft navigation.
This device complies with part 15 of the FCC Rules. Operation is subject to
the following two conditions:
(1) This device may not cause harmful interference, and
(2 ) This dev ice mus t acce pt any interfe renc e rece ived in clud ing
interference that may cause undesired operation.
The images in this manual are only for reference and they
may be different from the actual ones.
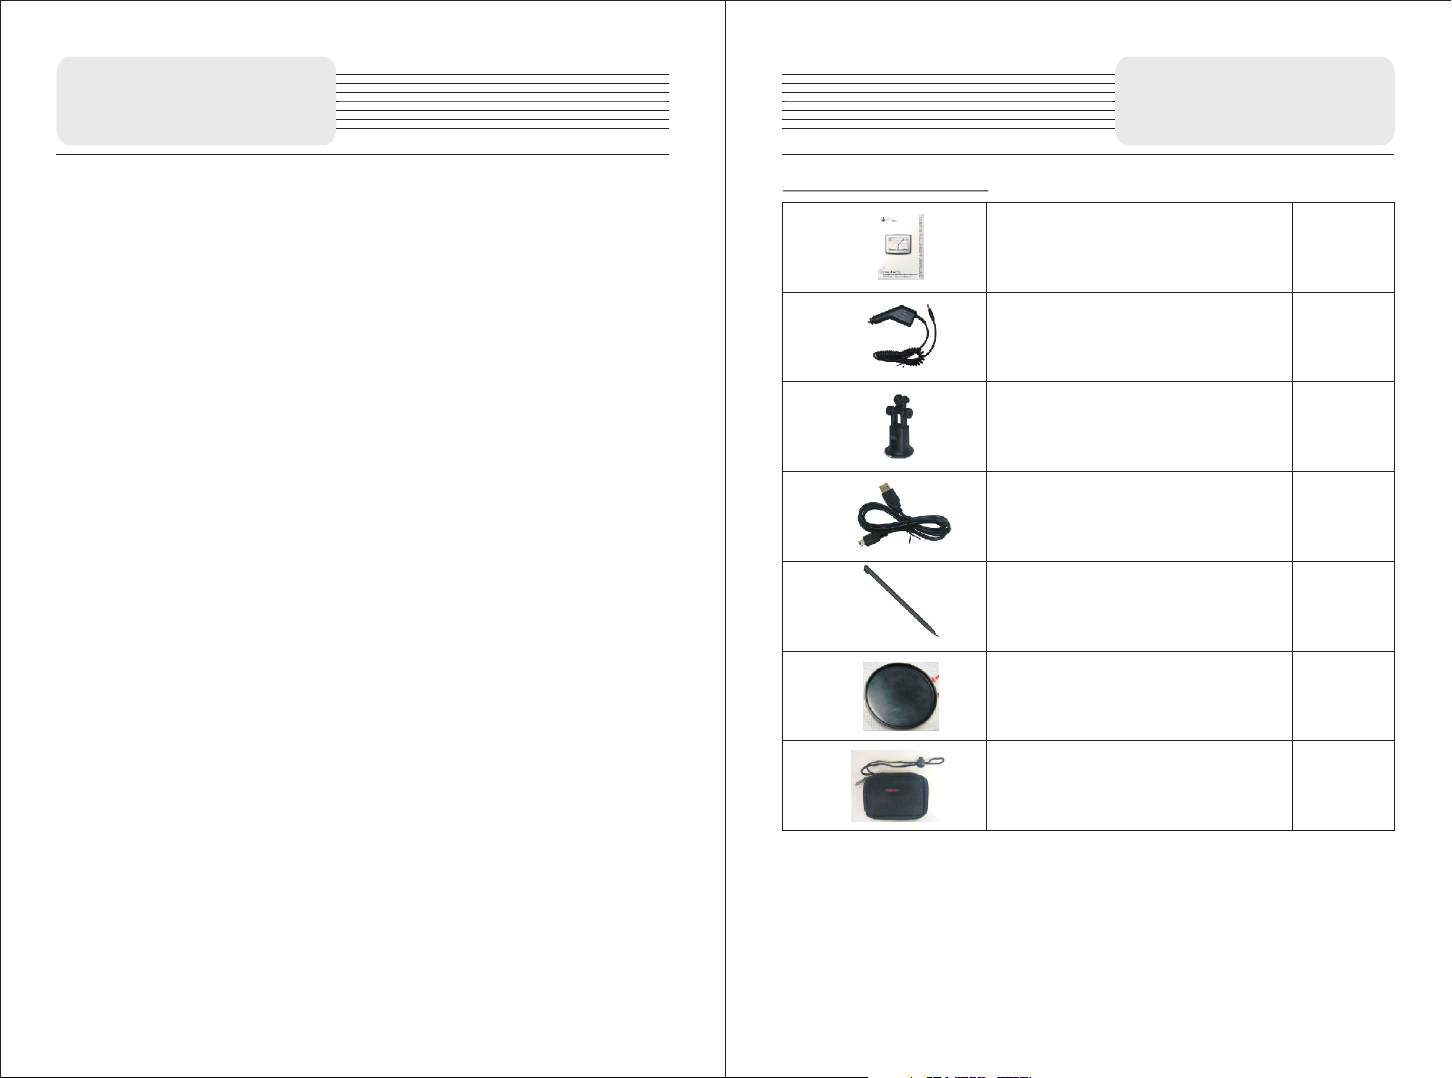
Accessories list
Owner's Manual
Car Adaptor
Mounting Bracket
USB Cable
Touch Pen
Dashboard mount disk
2
1
1
1
1
1
Pouch
1
Note
Acce ss ories and t he ir parts nu mbers are s ub ject to mod if ication w it hout
prio r no tice due to i mp rovements .
Page 4
CONTENTS
Chapter Ⅰ
Chapter I Preparation for use
1.1 Introductions to appearance and buttons
1.2 Charge
1.3 ON/OFF
1.4 Use of touch pen
1.5 Communication with computer
Chapter II Introduction to use
2.1 Introduction for main interface and main functions
2.2 Maintain P3 navigation device
Chapter III Audio Player
3.1 Function and Features
3.2 Interface and Operation
Chapter IV Setting
4.1 Volume setup
4.2 Power supply setup
4.3 Backlight setup
4.4 Time and date setup
4.5
Language selection
4.6 Calibration
Chapter V Troubleshooting
Chapter VI Specifications
Ch a p t er I Pr e p ari n g t h e P3 f o r U se
This cha p t e r gu i d es you to ge t th e P3 st arted, and also describ e s th e
basi c o p e r ations of the n a v i g ation device .
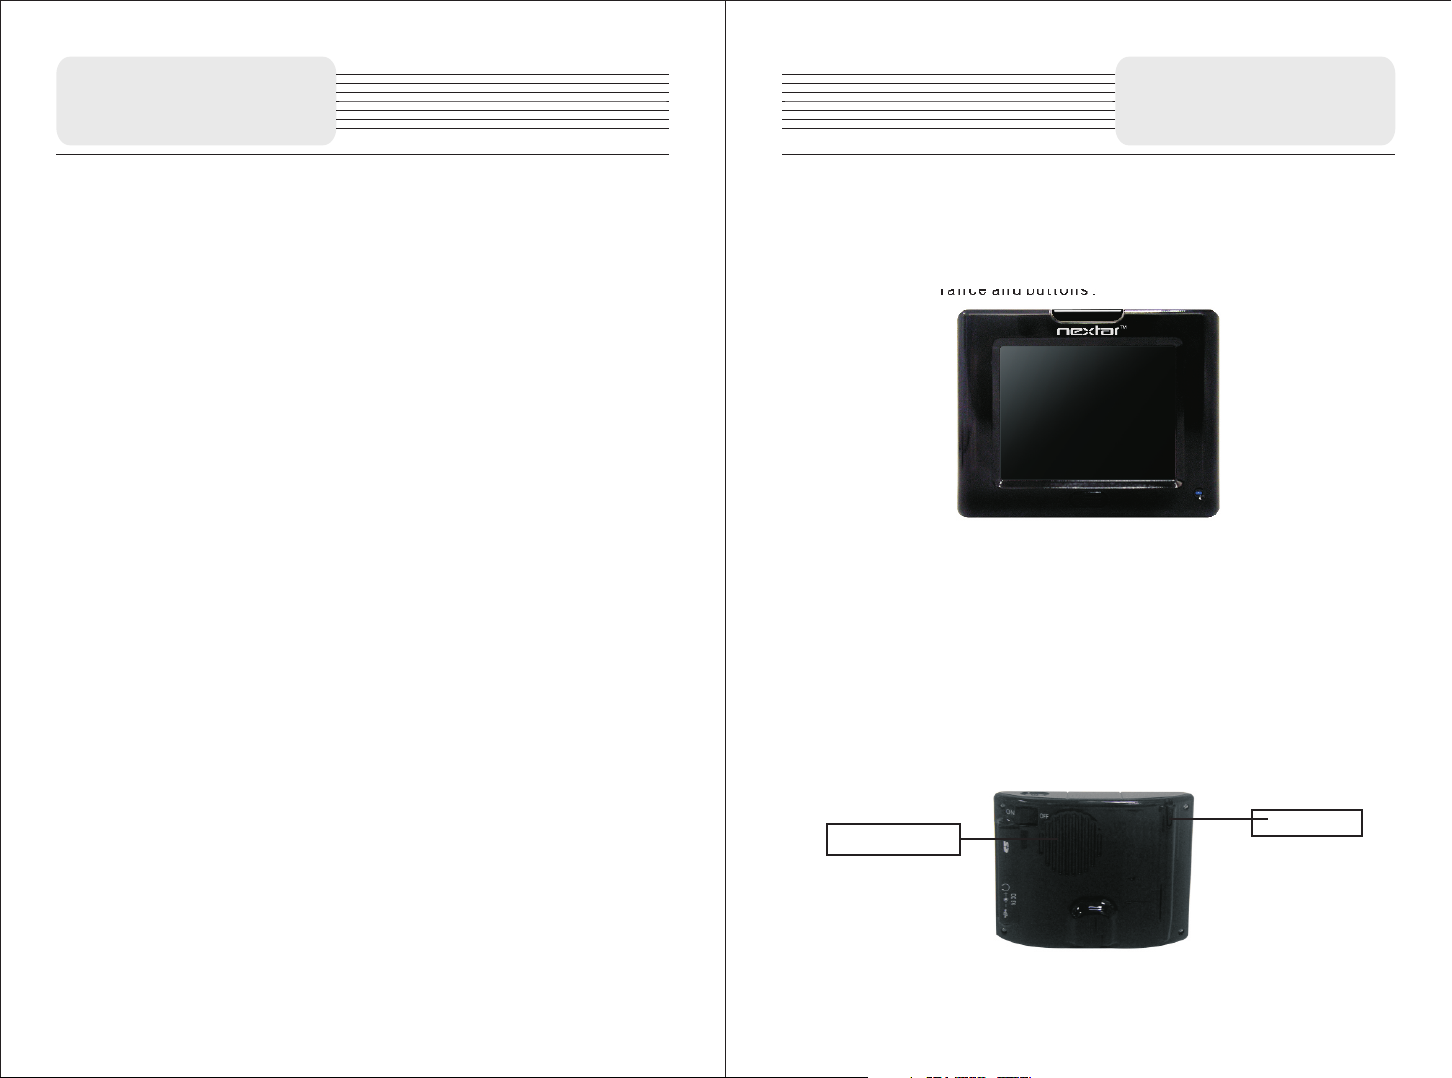
1.1 Introduc t i o n t o a p p e a r a n c e a n d b u t t o n s
1.1.1 Front appearance and bu t t o n s :
【Descripti o n】
1. Charge indicator: Blue light indicates the charging state, and it goes
out when the charging is completed; A Red Light indicates that the
current system is operating.
2. LCD touch screen: 320*240 pixels true color, providing you a perfect
visual experience and a supporting touch function;
3. MENU button: If the current state is 'power on', hold and press the
MENU power button. The system will automatically shut down and
change into energy saving mode. If the current state is 'power off'
and the battery power has not yet been exhausted, hold and press
the power this button and the system will startup
1.1. 2 Ba ck appear an ce and butt on s:
Lound speaker
STYLUS
Page 5

Chapter Chapter
Chapter Ⅰ
1.1. 3 Le ft-side a pp earance a nd b uttons
【Description】
Power Socket: DC port is connected with the charge power supply; used
when charging the navigation device
ON/OFF butt on
1.2 Ch ar ging the de vi ce for initia l us e
1.2. 1 For init ia l use, pl ea se charg e t he battery fully; the st eps are a s
foll ow s:
1 Plug DC end of charge adapter into the power socket on the left-side of
the device; Plug the other end into the main's supply;
The P3 navigation device has two power supply modes: battery power
supply and main power supply.
When the GPS navigation device is not connected to the charging
adapter,it obtains power from a lithium polymer battery. The battery
consumption sign [ ] is visible on the up left corner of the main
system interface. The battery capacity bar [ ] of the
power-setup interface shows the current residual battery capacity.
When the GPS navigation device is connected to the external charging
adapter, it obtains power from the external power supply.。
【 Attention】 The Power Adaptor is not included in the accessories we
offer.
This navigation device has a built-in, irreplaceable lithium polymer
battery. Under normal conditions (such as low backlight brightness), a
fully charged battery can continuously work for about 10 hours. The actual
battery supply time varies depending on how you use the GPS navigation
device. Cer tain functions (audio, video, high brightness backlight)
consume a large amount of energy and may significantly reduce supply
time.
SD ca rd slot
Earphone Socket
Power Socket
USB Socket
【Note】The device has a built-in, irreplaceable lithium battery. To avoid the
risk of fire or burning, please do not open, perforate, hit the battery or discard it
in fire or water. The battery will burst, blast or release dangerous chemicals.
When the charge indicator switches on (blue light), it indicates that the
navigation device is in a charging state. Charging requires a few hours, please
be patient and do not cut off power until the blue light is off. When the charge is
completed, remove the adaptor plug from the mains supply.
For later use, when the battery power decreases or is exhausted, please
charge it promptly.
1.2. 2 Ch arging by c ar a dapter:
1. Plug one end of the car adapter into the socket on the left side of the
device body;
2. Plug the other end of the car adapter into the ignition to supply power
for P3 while charging.
【Note】Please plug the adapter only after the vehicle starts, to avoid damage
caused by instant power impact on equipment.
1.3 Po we r ON/OFF
ON/OFF is controlled by the power button.
1.3.1 ON:
Please check the following:
1.The battery power is adequate, or plugged into the adapter,
2.SD card is inserted into the SD/MMC slot correctly, and the inserted SD
card has the system operating program.
Press the power button at the back of the machine to turn the device on.
【Note】During the first orientation please choose an open space with no upper
shelter; Please stay at the same place, for the orientation needs a few minutes
to complete, so wait patiently.
1.3.2OFF:
Press the power button at the back of the machine to turn the device off.
Chapter Ⅰ
Page 6

Chapter Ⅰ
Chapter Ⅰ
1.4 Us in g the touch p en
The touch pen (stylus) is your tool to communicate with P3.
1. Click:
Click on a menu o n the screen with the tip of touch pen, to open the menu and
use the menu functions.
2. Drag:
First click one point on the map with the pen tip, then move the pen tip, to
move within the map and locate the map position you wish.
【Note】A touch pen with a damaged tip, a ball pen or any other edged and
rough object may cause scratches and damage of the LCD screen. Please
use an undamaged touch pen. Don't use a broken touch pen
1.5 Co mm unicati ng w ith the compu te r
Connect to the computer via the MINI USB interface at the right side of the
GPS navigation device body. See the below figure for details:
System requirements:
-Windows 98SE, ME, 20000 and XP(Driver required for Windows 98SE)
-Windows 98SE, ME, 20000 and XP(Driver required for Windows 98SE)
-DVD Rom Drive(for map upgrade purposes)
-Intel PentiumII 233Mhz
-64MB RAM
-50MB available hard drive space
-256-color display adapter and monitor
(16 bit color required)
It allows files to be copied between the navigation device and the computer.
You can also back-up files from the GPS navigation device io the computer to
restore data to the GPS navigation device when necessary.
1. Please confirm that the GPS navigation device is in working condition
and MICROSOFT ACTIVESYENC software has been installed.
2. Connect the MINI USB of USB cable [ ] to the MINI USB port on
the left side of the GPS body, and the connect standard USB port
[ ] to the USB Host of computer;
3. After connecting to a computer, the device automatically recognizes
new hardware; the GPS navigation device suspends current running
programs and switches into the computer communication interface;
4. After communication is completed, remove the MINI USB cable. The GPS
navigation device continues to run the suspended programs.
【 Note】 Data Security: Please backup system data into external storage
devices before upgrading system data. Our company shall not be held
responsible for system data damage or loss.
【 Note】 During the connection between the GPS navigation device and
computer, the GPS navigation device will suspend other operations.
【 Note】 During the connection between the GPS navigation device and
computer, executing any of the following actions causes the system to
terminate communication with the computer and result loss of un-transmitted
data.:
1. Removing the MINI USB cable;
2. Pressing power button to turn off;
3. Using the reset button or battery switch to restart system;
4. Clicking the close button on the upper right corner of the window.
Page 7

Chapter Ⅱ
Basic Operations
Chapter Ⅱ
Basic Operations
Chapter II Basic Operations
This chapter provides a brief introduction to the main interface of the
device and also issues basic guidelines to maintain and preserve the
device.
2.1 Ma in interf ac e and its fun ct ions
2.1. 1 Ma in interf ac e of system :
NAVI GATION
Setting
Function description:
In the main menu, there are three items for selecting. Touch the corresponding
item to enter.
Tap ( )to enter navigation mode, tap( ) to enter the MP3 player,
tap ( ) to enter the settings menu.
2.2 Ma in taining t he P 3 navigatio n de vice
With proper care, the GPS navigation device can be a reliable navigation and
recreation mate. Please comply with the instructions given below to maintain
the device and ensure long-life and error-free use of the GPS navigation device.
? Protect screen: Pressing the touch screen hard will damage screen.
Please use the touch pen to click and operate the GPS navigation device. Use a
soft cloth sprayed with a little industrial glass cleanser to clean the screen.
Avoid directly spraying cleanser onto the screen.
【Note】 You must close the GPS navigation device before cleaning the touch
screen.
? Don't drop the device: Dropping the device from heights, a sudden impact
and similar actions may cause damage to precision components like the screen.
MUSIC
【Note】 Accidental damage is excluded from the scope of the maintenance
contract.
? Avoid using the device in the following environments: Rapid temperature
change, high temperatures(over ), low temperatures ( below ), high
pressure, dusty locations, static-prone locations, damp places. Avoid corrosive
liquids that corrode the navigation device. Avoid and prevent immersion in any
liquid.
? Avoid radiation interference: Radiation interference from other electronic
devices may affect the proper display of the GPS n avigation device screen. The
elimination of the interference source will restore the normal display of the
screen.
【Note】 In case of air freight, we recommend that the device body be kept
within b aggage and pass X-ray detection system to avoid the m agnetic d etector
or the magnetic stick (handheld device of security guards ) when passing the
airport security examination channel. These devices may damage the system
data. Our company shall be not responsible for any data loss incurred.
Avoid direct intense light: Don't expose the GPS navigation device to direct
intense light or UV rays to maximize its service life.
60° 0°
Page 8

Chapter Ⅲ Using
the Audio Player
Chapter Ⅲ Using
the Audio Player
This chapter explains how to play your favorite music using P3 audio player,
and transform it into your portable MP3.
3.1 Fu nc tions and f ea tures
The audio player supports WMA9, MP3 and WAV format audio files; you can
randomly set any play sequence.
Before using the audio player function, please copy your audio file to any folder
in the storage card.
3.2 In te rface and o pe ration
3.2.1. Click the icon in the main interface of the system to open up
musi c
audio player; The screen depicted below is displayed:
The table below explains the functions of each icon in the above screen.
Indicat es that the song has been
suspended/stopped .Click to continue
playing.
Click to stop song playing
Play previous song
Play next song
Use tou ch pen to dra g bu tton le ft / right t o ad just
volum e, left to decre as e volum e, and ri ght to
incre ase vol ume
Use touc h pen to drag the butto n l ef t / right to a djust
the proc ess. Mov e t he pen left to ret urn to a certain
point and con tinue playin g, and r ight to forward to a
certa in poin t and con ti nue pla ying
Displays the played time of a song
MUTE/UNMUTE
Returns to the previous interface with
music still running
4:50
PL YA
STOP
PREVIOUS
NEXT
VOLUME
PROGRESS
TIME
MUTE/
UNMUTE
RETURN
PLAYING
CIRCULARLY
ENTER INTO
AUDIO FILES
PLAYING
RANDOMLY
Select to circle random play
View your Audio files
Selects Ordinal play
Page 9

Chapter Ⅲ Using
the Audio Player
Chapter Ⅳ
Setting
3.2.2 Interface of audio folder:
The screen below shows the Audio folder interface
The table below explains the icons in the above screen
Delete the songs
to playing files
PREVIOUS
NEXT PAGE
PREVIOUS
NEXT SONG
PL YA
BACK
Tap this button to delete songs
from the playlist
Displays the content of
previous /next page
Play previous/next song
Play the song you select immediately
Returns to the previous interface with
music still running
This chapter explains the steps to be carried out to setup the device for
operation.
Click the “Settings” icon to enter the “Settings” menu and set up the
system. The setup function includes: “Calibrate Setup”, “Power Setup”,
“Backlight Setup”, “Date And Time Setup”, “Language Setup” And “Volume
Setup”.
The table below depict the icons and their functions
Language
Backlight
Date and time
Power
Volume
Calibrate
information
Displays system language options and system
outlook options.
Adjus ts the backl ight of t he touch scr ee n; Enables t he user to adj ust
the inter val time f or L ED-of f wh en p ower is su pplie d by batte ry a nd t he
inter val tim e for LED -o ff wh en power is s uppli ed by mai ns
Sets the date for the s ys te m; Sets the time for the system;
Enables the user to c ho os e the time-zone for the system.
Examines the current battery level.
Adjusts the volume of the speak er ; The volume of start/close
indicating tone c an t hu s be adjusted
Calibrate the sensitivity of the touch screen
Page 10

Chapter Ⅳ
Setting
Chapter Ⅳ
Setting
4.1 Volume se tu p
Tap in the setting menu to enter Volume settings menu for volume
Volum e
adjusting, as shown below.
Tap buttons to adjust the volume. Then tap v to confirm
or tap × to cancel.
4.2 Po we r setup
Tap in the setting menu to enter Power menu for the current battery
Pow er
status, as shown below.
4.3 Ba ck light set up
Tap in the setting menu to enter Brightness for backlight adjusting,
Bright ness
as shown below.
Tap to adjust the backlight level.
After setting up, tap v to confirm or tap × to cancel.
4.4 Time and d at e setup
Tap in the setting menu to enter Time and Date setting menu for
Time and Dat e
changing to the current time zone, as below shown:
The power menu will display the current battery status. Tap v to return.
Tap to select the proper Time Zone. Tap to select the
corresponding date/time to adjust, then tap to change the
correspondings.
Then tap v to confirm or tap × to cancel.
Page 11

Chapter Ⅳ
Setting
Chapter Ⅴ
4.5 Lang ua ge select io n
Tap in the setting menu to enter languages setting menu for
language selecting, as below shown
Tap to select the languages.Then tap v to confirm or
langu ages
ENGLISH
tap × to cancel
4.6 Cali br ate
Tap in the settings menu to calibrate, the screen will display.
This item is used to calibrate the sensitivity of the touch screen. Tap the center
of “+” as it moves around the screen. If you touch the center of “+”every time,
it will disappear after having moved through a cycle(center? top left? bottom
left? bottom right? top right). Tap the screen to return to the settings menu.
Note: If “+” doesn't disappear, you should calibrate again.
cali brate
Use of M ou nt Acces so ries
When using the unit in vehicle, you can use the supplied mount accessories to
mount the unit in the vehicle.
If you want to mount the unit to the dashboard, you can use the adhesive disk:
1) Choose a clean, dry spot on your dashboard;
2) Peel off protection liner from the back of the disk;
3) Attach the disk to your dashboard;
4) Mount the bracket to the adhesive disk.
Chapter Troub le s hooting
Take steps described in the tables below to solve simple problems before
contacting customer service.
If you suspect something wrong with this unit, immediately turn the power off
and disconnect the power connector from the unit. Never try to repair the unit
yourself because it is dangerous to do so.
Problem Possi bl e ca use Possible Solution
There is no sound
There is no picture
Othe r po ssibili ti es:
Ⅴ
The volume may be tur ne d do wn
The brightness ma y by t ur ned down
Turn up the volume
Adjust the bright ne ss
of the LCD
Static or other external interference may cause the unit function
abnormally. In order to recover normal status, please unplug the power supply
cord and then plug it into the outlet again to reset the unit. If the problems still
exist, please cut off the power supply and consult your service center or the
qualified technician.
Page 12

Chapter Ⅵ Specification
Chapter Ⅵ
TFT Screen size
Frequency Response
Audio Signal-to-noise Rate
Audio distoution or noise
Channel Separation
Dynamic Range
Power
Power Consumption
Dimensions
Weight
AC 100~240V,50/60Hz;DC5V
110mm×85mm 25mm(L*W*D)×
3.5 inches
20Hz 20KHz~
≥80db
= - 20db(1KHz)
≥70db(1KHz)
≥85db(1KHz)
<8W
About 0.2kg
DESI GN AND SPECIF ICATIONS AR E SUBJECT TO
CHANG E WITHOUT N OTICE.
 Loading...