

Page 1

WEST BEND
ELECTRONIC STAND MIXER
Register this and other West Bend products through our website: www.westbend.com
Care and Use Instructions
TO PREVENT PERSONA L INJURY OR PROPERTY DAMAGE, RE AD AND FOLLOW
THE IN STRU CTION S AND W ARN INGS IN THIS C ARE A ND USE INSTR UCTIO N
MANUAL.
This booklet contains important and helpful information on your new product. Please file it for handy reference to instructions
for proper use and care, warranty information.
For your personal reference, attach dated sales receipt for warranty proof or purchase and complete the following information:
Date Purchased or received as a gift: _____________________________________________
Where purchased and price if known: _____________________________________________
L5482
1
Page 2
IMPORTANT SAFEGUA RDS
When using electrical appliances, basic safety precautio ns should always be followed including the
following:
Re ad all instructions b efore using.
T o protect against electrical shock do not put mixer, its cord or plug in water or other liquid.
Clos e supervision is necessary when an y appliance is used by or near children.
Al ways check that the control is OFF before plugging cord into wall outlet. To disconnect,
turn the control to O FF, then remove plug fro m wall outlet.
U nplug from outlet when not in use, before putting on or taking off parts and be fore cleaning.
Av oid conta cting movi ng parts. Keep hand s, hair, clo thing, as well as spa tulas and o ther
utensils away from beaters during operation to prevent injury to persons, and/or damage to the
mixer.
Re move beater s from mixer before was hing.
Do not operate any appliance with a damaged cord or plug, or if the appliance malfunctions, or
has been damaged in any manner.
T he use of attachments not recommended or sold by the appliance manufacturer may cause
fire, electric shock or injury.
Do not place on, or near a hot gas or elec tric burner or in a heated o ven.
Do not use outdoors.
Do not let cord hang over the edge of tab le, counter, or surface area, or touch hot s urfaces,
including the stove.
Do not use appliance for other than intended use.
Do not leav e appliance unattended while it is operating.
SAVE THESE INSTRUCTIONS
Your stand Mixer needs no special care other than cleaning. If servicing becomes necessary, return your mixer to The West
Bend Company. See Warranty section in this booklet for service details. Do not attempt to repair it yourself. For household
use only.
Electric Cord Statement
CAUTION: Your Stand Mixer has a short cord as a safety precaution to prevent personal injury or
property damage resulting from pulling, tripping or becoming en tangled with the cord. Do not allow
children to be near or use this appliance without close adult supervisio n. If you must use a longer
cord set or an extension cord when using the stand mixer, the cord must be arranged so it will not
drape or hang over the edge o f a countertop, tabletop or surface area where it can be pulled on by
children or tripped over. To prevent electric shock, personal injury or fire, the electrical rating of the
extension cord you use must be the same or more than the amperage of the Stand Mixer (amperage is
marked on underside of mixer
Important Safety Instructions
This appliance has a polarized plug (one blade is wider than the other). As a safety feat ure, this plug
will fit in a polar ized outlet only one way. If the plug does not fit fully in the outlet , reverse the
plug. If it still d oes not fit, contact a q ualified electricia n. Never use with an e xtension cord unless
plug can be fully inserted. Do not atte mpt to defeat this safety feature.
).
2
Page 3

SPECIAL NOTE: When first using your mixer, you may note an off odor from the motor. This is
normal and will dissipate as the motor is broken in.
• Clean Before Using
Before using your mixer the first time, wash the bowls, beaters and the dough hooks in hot soapy
water with a dishcloth, r inse and dry. These parts may also be washed in an automatic dishwasher.
Wipe mixer head, stand and turntable with a damp cloth and dry.
CAUTION: To prevent perso nal injury or electric shock, do not immerse mixer, its cord or plug in
water or other liquid.
Your mix er is now read y to use.
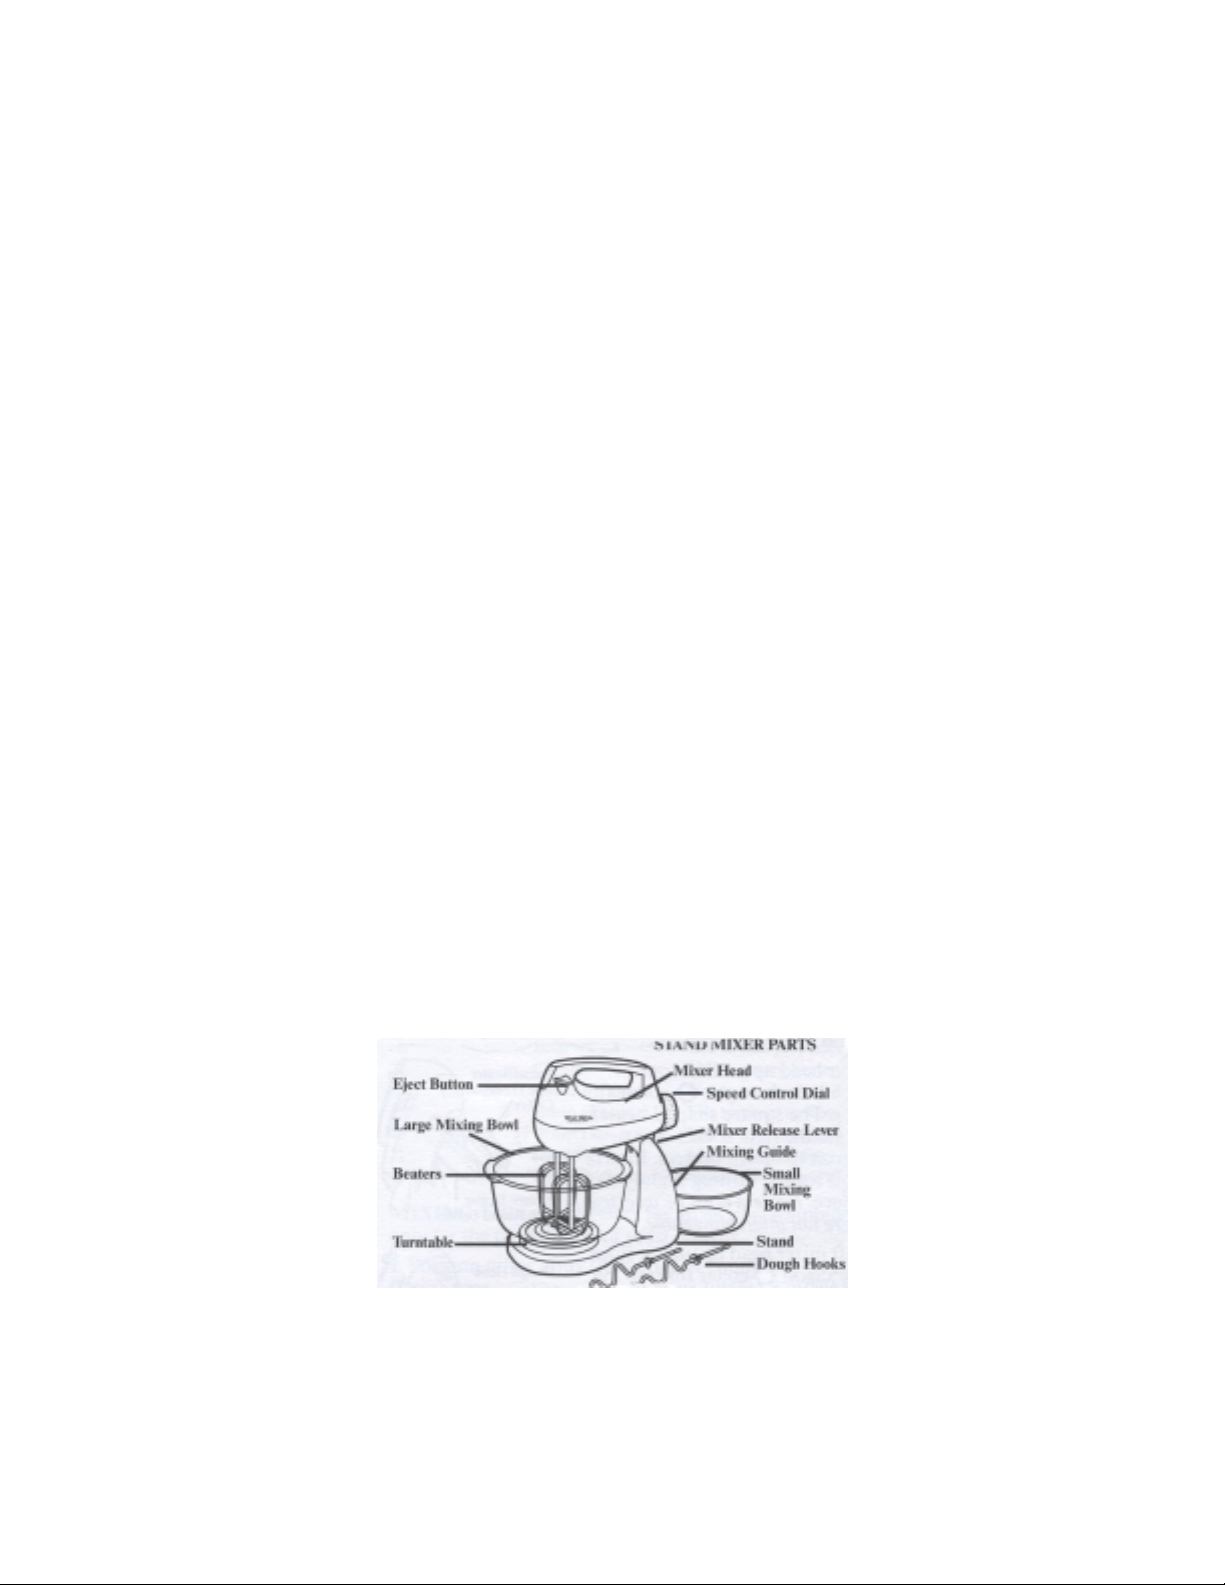
• To Assemble Mixe r - Your mixer requires some assembly before using. Do not plug into
electrical outlet unt il after mixer is assembled.
1. o attach mixer to stand, press and hold down
mixer release lever at top of stand. Then position
mixer head on stand so metal pin on underside
of mixer fits into groove belo w release lever.
When engaged, release the lever. Make sure
mixer is securely attached to stand before using.
MIXER SHOULD NOT BE USED AS A H AND
MIXER. IT MUST A LWAYS BE USED ON THE
STAND.
2. Place turntable onto platform of sta nd, aligning
extension on underside into corre ct opening for size
bowl being used, Small or Large. Lip on underside
of bowl will fit i nto groove on turntab le
3. To insert beaters, lift mixer head up until it stops. The round
shaped beater with the Hexagon collar fits into the left socket
of mixer. The square shaped beater, with ro und collar, fits into
the right socket. See sy mbols on underside of mixer to match
beaters. Insert beaters by pushing shaft into socket, turn ing
slightly if needed until they lock in place. Beaters must be
inserted into correct socket as they are not interchangeable
.
4. To insert dough hooks, lift mixer head up until it stops. The
dough hook with the Hexagon collar fits into the left socket and
the dough hook with the round collar fits into the rig ht socket.
See symbols on underside of mixer to match hooks. Turn hooks
slightly if needed until they lock in place. Dough hooks must be
inserted into correct socket as they are not interchangeable
.
• To Use Mixer
1. Make sure speed control dial is set at O FF position and mixer is
securely attached to the stand before using. MIXER SHOULD
NOT BE USED AS A HAND MIXER. USE ONLY ON STAND.
DO NOT USE MIXER UNATTENDED.
2. Position turntable accor ding to size bowl being used. Position bowl o nto turntable.
3. Insert b eaters or do ugh hooks i nto correct sockets.
3
Page 4

4. Add ingredients to bowl as recipe direct s. Plug cord into a 120 volt AC electrical outlet
ONLY. Turn speed control dial clockwise to start mixing. Always begin mixing at a lower
speed setting to prevent spattering. Then increase to desired speed for mixing task. Speed
setting can be adjusted during operation by turning dial for ward and back. Use mixing guide
as reference, aligning speed setting with indicator dot, at or between numbered settings. If
you need to scrape the bowl during use, always turn mixer off, the continue mixing.
CAUTION: To prevent per sonal injury or damage to mixer, avoid contact with beaters and dough
hooks during operation. Keep hands, hair, clothing as well as spatulas and other utensils away fro m
beaters and dough hooks.
5. When mixing is complete, turn speed control dial to OFF position and unplug cord from
electrical outlet. Lift mixer head up until it stops.
6. Remove beaters or hooks by pressing EJ ECT button, located by mixer handle, while grasping
the shafts. Bea ters will be released a utomatically. Do no t try to pull beater s out of sockets.
Use rubber spatula to clea n off beaters.
MIXING GUIDE
Speed Mixing
Setting Task Example
1 Knead Use to knead dough
2 Stir Use to begin mixing
3 Fold Use to gently blend ingredients
4 Blend Use to blend two or more ingredients
5 Mix Use to mix ingredients to form a smoot h batter
6 Beat Use to mix prepackaged ca ke mixes
7 Cream Use to cream butter or shortening and sugar
8 Mash Potatoes Use to mas h cooked potatoes
9 Whip Cream Use to prepare whipped cream
10 Whip Desserts Use to prepar e fluffy desserts
11 Frosting Use to prepare frostings
12 Egg Whites Use to whip egg whites
MIXING TIPS: U se beaters for all mixing/whipping tasks. Use dough hooks only for the
preparation of yeast dough’s.
1. Position mixer away from edge of countertop as mixer may move slightly during use.
2. Maximum capacity of the Large mixing bowl is 4 quarts; the Small mixing bowl 1-1/2 quarts. Do
not fill bowls more than half full with ingredients.
3. Do not exceed using 4 cups of flour in a recipe.
4. When preparing recipes, use the mixing guide to help select correct mixing speed. If recipes
recommend using a Low, Medium or High speed, use speeds 1-3 for Low, speeds 5-7 for Medium
and speeds 10-12 for High.
5. Add ingredients to bowl as recommended i n recipe for best results.
6. Begin mixing at lowest speed, then increase to higher speed to prevent spattering.
7. Mix for time recommended in recipe. Avoid o vermixing.
8. Turn mixer off and use a rubber spat ula to scrape side of bowl as needed. Do not scrap e bowl
while mixer is running.
9. Should an object, such as a spoon or spatula, fal l into the bowl while mixing, immediately turn
mixer off. Unplug. Then remove objec t.
4
Page 5

10.When beatin g eggs whites, be sure beaters and bowl are com pletely clean and dry. A
small amount of fat on beaters or bowl will affect whipping performance.
11. When making bread dough, add 1 cup of dry ingredients to liquid ingredients. Mi x at speed 3 to
combine. Reduce to speed 1 and add re maining ingredients. If bowl is turning too fast, decrease
speed – between 1 and off. Knead until do ugh becomes smooth and elastic, about 10 to 15
minutes . Do not p ut hands ne ar dough ho oks when mixer is o n.
12. Stainless steel bowls may be used in conventional oven. Do not use stainless steel mixing bowls
in microwave oven.
13. Always use dry oven mitts when handling hot mixing bowls.
14. Do not attempt to use a dough hook with a beater as damage to mixer will occur.
15. Do not leave mixer unattended during use.
• Beater-Driv e Rotation Adjus tment
The adjustment for proper beater-drive rotatio n of the bowl is preset at the factory. On occasion, a
slight adjustment may be needed if the bowl fails to rotate freely during use.
When properly adjusted, the pla stic button on the bottom of the ro und shaped beater should just rest
on the bottom of the bowl with the mixer head lowered.
If an adjustment is necessary, unp lug mixer from electrical outlet. Tilt mixer
head up until it stops. With fingers, loosen top locking nut. Using Phillips
screwdriver turn adjustment screw clockwise to lower mixer head, or
counterclockwise to raise the mixer head. When properly adjusted, retighten
locking nut with fingers. See Diagram.
SPECIAL NOTE: This adjustment is only necessary for the mixing beaters
and does not apply to the dough hooks, as they should not touch bottom of bowl
during use.
• Cleaning Mixer
CAUTION: To prevent per sonal injury or electric shock, do not immerse mixer, its cord or plug i n
water or other liquid.
1. Turn mixer OFF and unplug cord from electrical outlet before cleaning.
2. With beaters or hooks removed, wipe mixer, stand a nd turntable with a damp cloth and dry. To
remove mixer head for cleaning, tilt mixer heat up to a 45° angle and press mixer release lever.
3. Wash beaters, hooks and bowls in hot soapy water with a soft cloth, rinse and dry. Beaters, hooks
and blows may also be cleaned in an automatic dishwasher.
Do not use any abrasive scouring pad s or cleansers on bowls; beaters or hooks as scratching ca n
occur. Also, do not allow beaters or hooks to soak in water for extended periods of time (several
hours or overnig ht) to prevent damage to metal finish.
• Storing Mixer
For compact storage, position turntable for Small bowl. Nest bowls on turntable with beaters and
hooks inside Small bowl. Lower mixer head. Secure cord with tie fastener.
5
Page 6

• Replacement Parts
Replacement parts, such as beaters, dough hoo ks, bowls may be ordered on line at www.westbend.com
or obtained directly from the company’s Customer Ser vice Department. Write or call:
The West B end Comp any
Attn: Customer Ser vice
P.O. Box 2780
West Bend, WI 53095-2780
(262) 334-6949
Be sure to include the model number of your mixer. A description of the part you want and the
quantit y. Along with t his informat ion please i nclude your na me, mailin g address and yo ur Visa,
MasterCard, Discover credit card number for the billing of the part(s) to you. A shipping and
handling fee will be added to your total charge plus your area tax for the following residents;
Wisconsin, Illinois, Georgia. Or to send a check or money ord er call 262- 334-6949 to obtain
purchase amount. Please allow 2 weeks for delivery.
90 DAY WARRANTY
Your We st Bend Warranty covers failures in the materials and workmanship of this Stand Mixer for
90 days from the date of purchase. Any failed p art of the Stand Mixer will be replaced without
charge.
This warr anty gives yo u specific lega l rights, and you may also have other rights , which vary fro m
state to state. This warr anty does not cover damage to the Stand Mixer c aused by misuse, abuse,
accidents or alteratio ns to the Stand Mixer.
If you think the Stand Mixer has failed and is within it’s warranty period, please carefully package
and return the Stand Mixer prepaid and insured with a description of the difficulty to:
The West Bend Company
Attn: Housewares Returned Goods
1100 Schmidt Road
West Bend, WI. 53090-1961
(262) 334-6949
Please ensure that you enclose the sales slip or proof of date of purchase in order to assure warranty
covers.
WEST BEND
L5482
6
 Loading...