

Page 1
B
LENDER
Instruction Manual
Register this and other Focus Electrics products through our website:
www.registerfocus.com
Important Safeguards ............................................................................................... 2
Before Using for the First Time ................................................................................ 3
Using Your Blender .................................................................................................. 3
Helpful Hints ............................................................................................................. 5
Cleaning Your Blender ............................................................................................. 6
Warranty ................................................................................................................. 12
SAVE THIS INSTRUCTION MANUAL FOR FUTURE REFERENCE
2009 West Bend®, a Brand of Focus Electrics, LLC.
www.focuselectrics.com
Page 2

IMPORTANT SAFEGUARDS
To prevent personal injury or property damage, read and follow all instructions
and warnings.
When using electrical appliances, basic safety precautions should always be
followed including the following:
• Read all instructions, including these important safeguards and the care and use
instructions in this manual.
• Do not use appliance for other than intended use.
• The use of accessory attachments not recommended by Focus Electrics may
cause fire, electric shock or injury.
• Do not operate if the blender is not working properly or if it has been damaged in
any manner. For service information see warranty page.
• Do not leave unit unattended while plugged into an electrical outlet.
• Keep hands and utensils out of the blending jar while blending to reduce the risk
of severe injury to persons or damage to the blender. A scraper may be used
but must be used only when the blender is unplugged and not in operation.
• Do not attempt to repair this appliance yourself.
•
Blades are sharp. Use extreme caution during assembly, while operating,
disassembly and cleaning.
•
Do not use if blades are broken, cracked or loose.
•
Always operate blender with lid in place.
•
Always hold blending jar while processing for stability.
•
Do not leave blender unattended while it is operating.
•
Do not remove blending jar from base until the motor has stopped completely.
•
Do not use a cracked, chipped or broken blending jar.
•
When blending hot liquids, remove lid cap.
•
Avoid contacting moving parts.
•
To reduce the risk of injury, never place cutting assembly blades on motor base
without blending jar properly attached.
•
Do not use this appliance on the stovetop, under broiler, in the oven, in the
refrigerator or freezer.
•
To protect against electric shock, do not immerse cord, plugs, or other electric
parts in water or other liquids.
•
Do not operate any appliance with a damaged cord or plug.
•
Do not use this appliance outdoors.
•
Do not plug cord into wall outlet unless power switch is in “OFF” position.
•
Always turn control to “OFF” and unplug the appliance from outlet when not in
use, before cleaning. Allow to cool before putting on or taking off parts and
before cleaning.
2
Page 3

•
A short power-supply cord is provided to reduce risks resulting from becoming
entangled in or tripping over a longer cord.
•
Longer detachable power-supply cords or extension cords are available and
may be used if care is exercised in their use. While use of an extension cord is
not recommended, if you must use one, the marked electrical rating of the
detachable power-supply cord or extension cord should be at least as great as
the electrical rating of the appliance. If the appliance is of the grounded type,
the extension cord should be a grounding-type 3-wire cord. The cord should be
arranged so that it will not drape over the counter top or tabletop where it can be
pulled by children or tripped over.
•
This appliance has a polarized plug (one blade is wider than the other). To
reduce the risk of electric shock, this plug is intended to fit into a polarized outlet
only one way. If the plug does not fit fully into the outlet, reverse the plug. If it
still does not fit, contact a qualified electrician. Do not attempt to modify the plug
in any way.
•
Do not use an outlet or extension cord if the plug fits loosely or if the outlet or
extension cord feels hot.
•
Do not attempt to use a voltage converter or other device to adapt your blender
to a different outlet or voltage, as damage will occur.
•
Close supervision is always necessary when any appliance is used by or near
children.
•
Do not allow cord to hang over any edge where a child can reach it. Arrange
cord to avoid pulling, tripping or entanglement.
•
The blending jar is designed for use with this appliance only. Do not use the
blending jar provided with this appliance for any other appliance or application.
•
Do not place blending jar on hot surface or in a heated oven.
•
Use caution when cleaning blending jar with blades assembled. Wipe exterior
with damp cloth, and only rinse interior. If necessary to clean inside of blending
jar, disassemble and clean following the instructions in the assembly and
cleaning sections of this manual.
•
Do not use a cracked blending jar or a blending jar having a loose or weakened
cutting blade retainer.
•
Do not clean blending jar with cleansers, steel wool pads, or other abrasive
materials.
•
For household use only.
SAVE THESE INSTRUCTIONS
3
Page 4
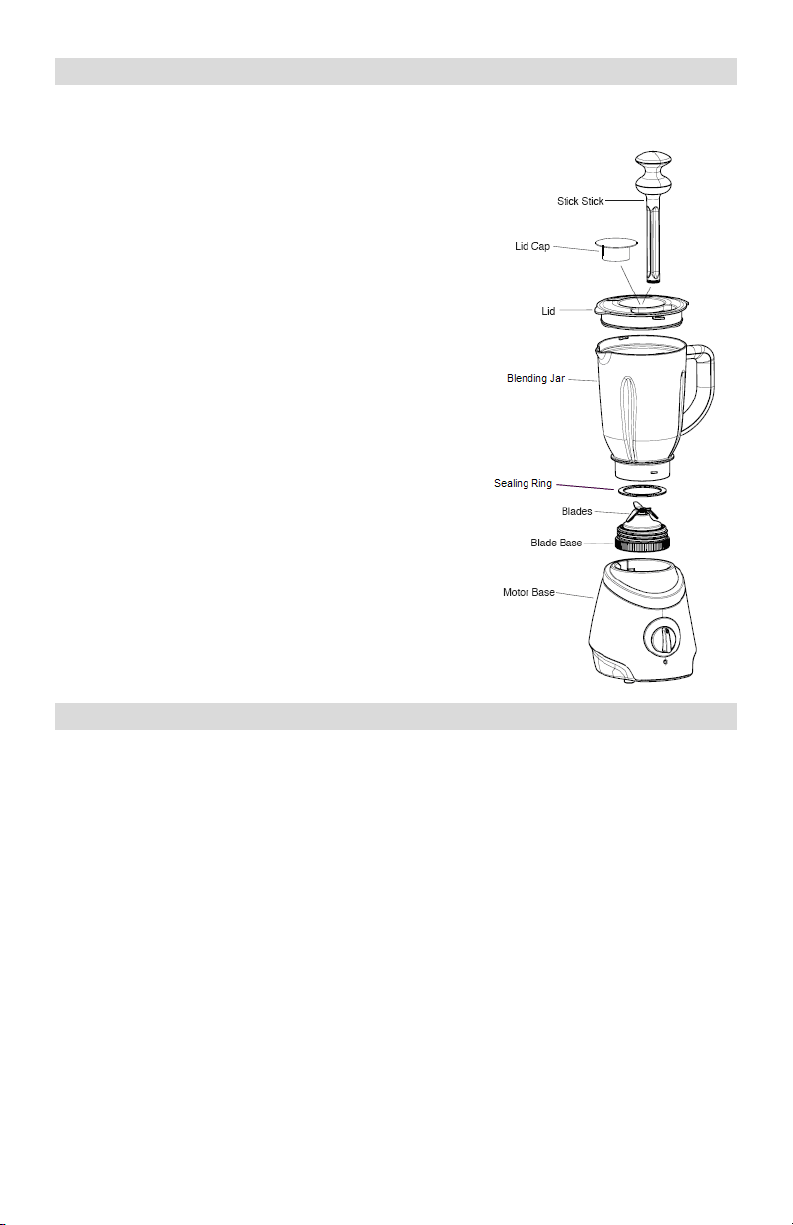
A
SSEMBLING YOUR BLENDER
Please check all packaging material carefully before discarding. Accessory
parts may be contained within the packaging material.
Caution: Follow these important steps to
assemble, tighten and mount blending jar quickly
and correctly. Injury may result if moving blades
are accidentally exposed. Unplug appliance from
electrical outlet before assembling, removing, or
cleaning. Never place motor base or cord in water
or any other liquids.
1. Put the seal ring on the outer rim of the blade
base.
2. Thread blade base to jar.
3. Place assembled blending jar onto motor base
with handle to the right. Be sure the bottom of
attached blade base assembly is sitting flat on
the motor base. Turn clockwise to lock in
place.
4. Place lid on top of blending jar; turn clockwise
to lock in place. Insert stir stick, or place lid
cap in center of lid and turn clockwise to lock in
place.
5. Your blender is now ready for use.
U
SING YOUR BLENDER
1. Make sure blender is unplugged. Place blender motor base on a clean, dry
surface.
2. Place the blending jar onto the motor base and turn counter-clockwise to lock
into place.
3. Add ingredients to the blending jar and replace the lid. Lock lid in place by
turning clockwise.
4. Before starting, insert the stir stick or lid cap in center of lid. Place hand on the
stir stick knob or rest it on jar cover when starting and running motor. When
using the stir stick turn the stir stick counter-clockwise to thoroughly mix the
ingredients.
5. You may add more ingredients through the hole in the center of the lid. When
finished adding ingredients, cover the hole with the lid cap, and then plug cord
into outlet.
6. Always operate blender on a clean, dry surface to prevent air from carrying
foreign material or water into the motor.
4
Page 5

7. PULSE: Pulse allows you to create short bursts of power. To use the pulse
function, repeatedly rotate and release the speed dial to “PULSE.” The PULSE
function should be used in the initial stages of blending ice and frozen
ingredients for smoothies and other frozen drinks. The PULSE function should
also be used to break apart larger pieces of food or to control the texture of food
when chunkier results are desired.
8. BLENDING: Choose a speed for blending the ingredients by rotating speed dial
and selecting speed (whip, mix, grate, blend and pulse).
9. The blue LED light will be on during operation.
10. Use rubber spatula to push ingredients to be chopped into liquid portion of
recipe ONLY when motor is OFF.
11. Switch to a higher speed if the motor seems to labor when processing to prevent
overloading of the motor.
12. Stop the blending process by turning to the “OFF" position.
13. Wait until blades stop rotating before removing blending jar.
14. Remove blender jar by turning counter-clockwise on base to
unlock.
STIR STICK OPERATION – When in use and while the machine
is running, stir or rotate the Stir Stick in a counter-clockwise
direction so that the Stir Stick scrapes or contacts the sides of
the blending jar. This stirring operation will aid in mixing the
contents of the blending jar by forcing the ingredients into the
mixing blades.
H
ELPFUL HINTS
•
Always add liquid ingredients to the blending jar first and then add remaining
solid or frozen ingredients. This will prevent excessive wear on the motor and
ensure that the ingredients are properly blended. Do not fill above the “MAX” fill
line (48 oz/6 cups).
•
To add other ingredients when the blender is operating, remove stir stick or lid
cap from lid and add ingredients through opening. Replace lid cap and lock in
place before processing.
•
The stir stick may be used to assist in making frozen drinks or for blending any
other types of ingredients. When the stir stick is not being used, be sure to place
the lid cap over the hole in the center of the lid.
•
Turn the stir stick counter-clockwise for best mixing results.
•
When chopping dry ingredients such as breadcrumbs, nuts, spices, etc., make
sure that the blending jar and blades are completely dry.
•
The pulse speed should be operated in short bursts. As the pulse speed is
activated and released, the blades should stop rotating between pulses.
5
Page 6

•
Do not attempt to mix or knead heavy dough, mash potatoes, beat egg whites,
grind raw meat, or extract juices from fruits or vegetables. This blender is not
made to perform these tasks.
•
Do not over-blend foods. Most ingredients should be properly blended or
chopped in seconds.
•
Do not operate motor base for longer than 3 minutes at a time; allow 5 minutes
before running motor again.
•
If the motor stalls, turn off and unplug the unit. Remove a portion of the
ingredients before attempting to continue.
•
Do not add boiling liquids to the blending jar.
•
Cut all firm fruits and vegetables, cooked meats, fish, and seafoods into pieces
no larger than ¾“ (1.8cm) to 1” (2.5cm). Cut all kinds of cheeses into pieces no
larger than ¾” (1.8cm).
•
Allow cooked vegetables and broth to cool before pouring into blending jar for
processing.
C
LEANING YOUR BLENDER
1. Switch blender to “OFF” position and unplug from electrical outlet.
2. Blender parts are corrosion resistant, sanitary, and easily cleaned. Before first
use and after every use, separate parts and clean thoroughly in warm, soapy
water, rinse and dry well. Be careful of blades when washing and drying. DO
NOT WASH ANY PARTS IN THE DISHWASHER.
3. Wipe blender base, control knob, and cord with a damp cloth or sponge. To
remove stubborn stains, use a mild, non-abrasive cleanser. Never immerse the
motor base in water.
4. Check all components before reassembly. If the processing blades are stuck or
difficult to turn, DO NOT USE BLENDER. To check, carefully use a scraper or
protective hand covering to turn the blades in a counter-clockwise direction
(opposite edges are sharp). Blades should turn freely.
5. If the blending jar is chipped or cracked, DO NOT USE BLENDER - further use
could result in the blender jar breaking. If you need to take the blades out,
please use a cloth or protective hand covering to remove blade base.
6
Page 7

P
RODUCT WARRANTY
Appliance 1 Year Limited Warranty
Focus Electrics, LLC (“Focus Electrics”) warrants this appliance from failures in the material
and workmanship for one (1) year from the date of original purchase with proof of purchase,
provided the appliance is operated and maintained in conformity with the provided Instruction
Manual. Any failed part of the appliance will be repaired or replaced without charge at Focus
Electrics’ discretion. This warranty applies to indoor household use only.
This warranty does not cover any damage, including discoloration, to any non-stick surface of
the appliance. This warranty is null and void, as determined solely by Focus Electrics if the
appliance is damaged through accident, misuse, abuse, negligence, scratching, or if the
appliance is altered in any way.
THIS WARRANTY IS IN LIEU OF ALL IMPLIED WARRANTIES, INCLUDING WARRANTIES
OF MERCHANTABILITY, FITNESS FOR A PARTICULAR PURPOSE, PERFORMANCE, OR
OTHERWISE, WHICH ARE HEREBY EXCLUDED. IN NO EVENT SHALL FOCUS
ELECTRICS BE LIABLE FOR ANY DAMAGES, WHETHER DIRECT, INDIRECT,
INCIDENTAL, FORSEEABLE, CONSEQUENTIAL, OR SPECIAL, ARISING OUT OF OR IN
CONNECTION WITH THIS APPLIANCE.
If you think the appliance has failed or requires service within its warranty period, please
contact the Focus Electrics Customer Service Department at (866) 290-1851, or e-mail us at
service@focuselectrics.com. A receipt proving the original purchase date will be required for all
warranty claims, hand written receipts are not accepted. You may also be required to return
the appliance for inspection and evaluation. Return shipping costs are not refundable. Focus
Electrics is not responsible for returns lost in transit.
Replacement parts, if available, may be ordered directly from Focus Electrics, LLC several
ways. Order online at www.focuselectrics.com, e-mail service@focuselectrics.com, over the
phone by calling (866)290-1851, or by writing to:
Focus Electrics, LLC
Attn: Customer Service
P. O. Box 2780
West Bend, WI 53095
To order with a check or money order, please first contact Customer Service for an order total.
Mail your payment along with a letter stating the model or catalog number of your appliance,
which can be found on the bottom or back of the appliance, a description of the part or parts
you are ordering, and the quantity you would like. Your check should be made payable to
Focus Electrics, LLC.
Your state/province’s sales tax and a shipping fee will be added to your total charge. Please
allow two weeks for processing and delivery.
This manual contains important and helpful information regarding the safe use and care of your
new Focus Electrics product. For future reference, attach dated sales receipt for warranty proof
of purchase and record the following information:
Date purchased or received as gift: _______________________________________________
Where purchased and price, if known: _____________________________________________
Item number and Date Code (shown bottom/back of product):___________________________
L5700A 11/09 West Bend®, a Brand of Focus Electrics, LLC. Printed in China
Valid only in USA and Canada
R
EPLACEMENT PARTS
7
Page 8

N
OTES
8
Page 9

MIXEUR
Manuel d’instructions
Enregistrez ce produit et d’autres produits Focus Electrics sur notre site Web:
w w w . r e gi ste rf oc us . c o m
Précautions Importantes .......................................................................................... 2
Avant la Première Utilisation .................................................................................... 4
Mode d’emploi de Votre Mixeur ................................................................................ 5
Astuces .................................................................................................................... 6
Nettoyage de Votre Mixeur ....................................................................................... 7
Garantie ................................................................................................................... 8
CONSERVEZ CE MANUEL D’INSTRUCTIONS POUR RÉFÉRENCE FUTURE
2009 West Bend®, una Marca de Focus Electrics, LLC.
www.focuselectrics.com
Page 10

PRECAUTIONS IMPORTANTES
Pour écarter tout risque de blessure et de dégâts matériels, lisez et suivez
toutes ces instructions et tous ces avertissements.
Lorsque vous utilisez des appareils électriques, prenez toujours les précautions de
base, notamment:
•
Lisez toutes les instructions, y compris ces mises en garde importantes et le
mode d’emploi et d’entretien décrit dans ce manuel.
•
N’utilisez pas l’appareil pour une autre utilisation que l’utilisation indiquée.
•
L’utilisation d’accessoires non recommandés par Focus Electrics risque de
causer un incendie, une électrocution ou des blessures.
•
N’utilisez pas le mixeur s’il fonctionne mal ou a été endommagé d’une autre
manière. Pour des renseignements concernant les réparations, voir la page de
garantie.
•
Ne le laissez pas sans surveillance lorsqu’il est branché sur une prise
électrique.
•
Maintenez les mains et les ustensiles à l’extérieur du pichet à mixer pendant le
mélange pour réduire le risque de blessure grave ou de détérioration du mixeur.
Vous pourrez utiliser une spatule uniquement avec le mixeur débranché.
•
N’essayez pas de réparer vous-même l’appareil.
•
Les lames sont coupantes. Soyez extrêmement prudent durant l’assemblage, le
fonctionnement, le démontage et le nettoyage.
•
N’utilisez pas l’appareil si les lames sont cassées, fendues ou détachées.
•
Utilisez toujours le mixeur avec le couvercle en place.
•
Tenez toujours le pichet à mixer pendant le mélange pour assurer sa stabilité.
•
Ne laissez pas sans surveillance le mixeur en cours de fonctionnement.
•
Ne retirez pas le pichet à mixer de la base avant l’arrêt complet du moteur.
•
N’utilisez pas un pichet à mixer fissuré, ébréché ou brisé.
•
Lorsque vous mélangez des liquides chauds, retirez le cache du couvercle.
•
N’utilisez pas cet appareil sur des brûleurs de cuisinière, sous un gril, dans un
four, dans un réfrigérateur ou un congélateur.
•
Évitez tout contact avec les pièces en mouvement.
•
Afin de réduire le risque de blessure, ne placez jamais les lames de découpe
sur la base motorisée si le pichet à mixer n’est pas correctement fixé.
•
Afin de vous protéger contre tout choc électrique, n’immergez pas le cordon, les
fiches ni toute autre pièce électrique dans l’eau ni dans tout autre liquide.
•
N’utilisez pas un appareil dont le cordon ou la fiche est endommagé.
•
N’utilisez pas cet appareil à l’extérieur.
•
Ne branchez pas le cordon sur une prise murale si l’interrupteur de l’appareil
n’est pas sur position « ARRÊT. »
•
Éteignez et débranchez toujours l’appareil de la prise secteur lorsqu’il n’est pas
utilisé et avant de le nettoyer. Laissez l’appareil refroidir avant la mise en place
ou le retrait de pièces et avant tout nettoyage.
2
Page 11

•
Le cordon d’alimentation fourni est court pour réduire les risques qu’une
personne se prenne les pieds ou trébuche sur un cordon plus long.
•
Des cordons d’alimentations plus longs détachables ou des cordons de rallonge
sont disponibles et peuvent être utilisés à condition de faire preuve de prudence
lors de leur utilisation. Bien que l’utilisation d’un cordon de rallonge ne soit pas
recommandée, si vous devez en utiliser un, la puissance nominale indiquée
pour le cordon d’alimentation détachable ou pour le cordon de rallonge devrait
être au moins aussi importante que la puissance nominale de l’appareil. Si
l’appareil est de type raccordé à la terre, le cordon de rallonge devrait être relié
à la terre et composé de trois fils. Le cordon devrait être disposé de manière à
ne pas pendre depuis le plan de travail d’où il risque d’être tiré par des enfants
ou d’où quelqu’un pourrait s’y prendre les pieds.
•
Cet appareil est pourvu d’une fiche polarisée (une lame est plus large que
l’autre). Pour réduire le risque d’électrocution, cette fiche est conçue pour
s’encastrer dans une prise secteur polarisée dans un sens uniquement. Si la
fiche ne s’insère pas complètement dans la prise secteur, retournez la fiche. Si
elle ne s’encastre toujours pas, contactez un électricien qualifié. Ne tentez pas
de modifier la fiche de quelque manière que ce soit.
•
N’utilisez pas une prise électrique ou une rallonge si la fiche est lâche à
l’intérieur de la prise ou si la prise ou la rallonge est chaude.
•
N’essayez pas d’utiliser un convertisseur de tension ou un autre appareil pour
adapter le mixeur à une prise ou tension différente, sous peine de dommages.
•
Une surveillance étroite est nécessaire lorsque vous cet appareil est utilisé par
ou à proximité d’enfants.
•
Ne laissez pas pendre le cordon à un endroit accessible à un enfant. Disposez
le cordon de manière à ce que personne ne puisse tirer ou trébucher dessus, ni
s’emmêler dedans.
•
Le pichet à mixer est conçu pour être utilisé avec cet appareil uniquement.
N’utilisez pas le pichet de mixage fourni avec cet appareil avec tout autre
appareil ni pour toute autre application.
•
Ne placez pas le pichet à mixer sur une surface à haute température ni dans un
four chaud.
•
Faites preuve de prudence lorsque vous nettoyez le pichet à mixer et que les
lames sont montées. Essuyez l’extérieur avec un torchon humide, et ne rincez
que l’intérieur. S’il est nécessaire de nettoyer l’intérieur du pichet à mixer,
démontez-le et nettoyez-le suivant les instructions des sections de ce manuel
consacrées à l’assemblage et au nettoyage.
•
N’utilisez pas un pichet à mixer fissuré ou un pichet à mixer dont le dispositif de
retenue de la lame serait desserré ou affaibli.
•
Ne nettoyez pas le pichet à mixer avec des détergents, des éponges en laine de
fer, ou tout autre matériau abrasif.
•
Pour usage domestique uniquement.
CONSERVEZ CES INSTRUCTIONS
3
Page 12

A
VANT LA PREMIÈRE UTILISATION
Veuillez vérifier la totalité de l’emballage avec attention avant de le jeter. De
nombreuses pièces accessoires sont contenues dans l’emballage.
Attention : Suivez ces étapes importantes pour assembler, serrer et monter le
pichet rapidement et correctement Une blessure peut se produire si des lames en
mouvement sont exposées par erreur. Débranchez l’appareil de la prise secteur
avant de l’assembler, de retirer un accessoire ou de le nettoyer. Ne plongez jamais
le moteur ou le cordon dans de l’eau ni dans aucun autre liquide.
Avant de procéder à l’assemblage de votre mixeur, lavez toutes les pièces
détachables à l’eau savonneuse chaude, rincez méticuleusement puis séchez ces
pièces.
1. Placez la bague d’étanchéité sur l’extrémité
extérieure de la base des lames.
2. Vissez la base des lames sur le pichet.
3. Placez le pichet assemblé sur la base
contenant le moteur en positionnant la poignée
vers la droite. Assurez-vous que le bas de
l’ensemble de la base et des lames fixées
repose à plat sur la base contenant le moteur.
Tournez dans le sens des aiguilles d’une
montre pour verrouiller le pichet en place.
4. Placez le couvercle au-dessus du pichet,
tournez dans le sens des aiguilles d’une
montre pour le verrouiller en place. Insérez le
mélangeur, ou placez le cache translucide du
couvercle au centre du couvercle et tournez
dans le sens des aiguilles d’une montre pour le
verrouiller en place.
5. Votre mixeur est maintenant prêt à l’emploi.
.
M
ODE D’EMPLOI DE VOTRE MIXEUR
1. Assurez-vous que le mixeur est débranché. Placez la base contenant le moteur
du mixeur sur une surface propre et sèche.
2. Placez le pichet de mélange sur la base contenant le moteur et tournez dans le
sens inverse des aiguilles d’une montre pour le verrouiller en place.
3. Ajoutez des ingrédients au pichet et remettez le couvercle en place. Verrouillez
le couvercle en place en le faisant tourner dans le sens des aiguilles d’une
montre.
4. Avant de commencer, insérez le mélangeur ou le cache translucide au centre
du couvercle. Placez la main sur la poignée du mélangeur ou reposez-la sur le
couvercle du pichet lorsque vous démarrez et que vous faites tourner le moteur.
Lorsque vous utilisez le mélangeur, faites-le pivoter dans le sens inverse des
aiguilles d’une montre pour bien mélanger les ingrédients.
5. Vous pouvez ajouter d’autres ingrédients par le trou au centre du couvercle.
Lorsque vous avez fini d’ajouter les ingrédients, couvrez le trou avec le cache
translucide, puis branchez le cordon sur la prise secteur.
6. Utilisez toujours le mixeur sur une surface propre et sèche pour empêcher que
l’air ne fasse pénétrer des corps étrangers ou de l’eau dans le moteur.
4
Page 13

7. LE MODE PAR IMPULSIONS : Le bouton des impulsions vous permet de créer
de courtes impulsions puissantes. Pour utiliser la fonction « PULSE, » faite
picoter et relâchez de manière répétitive le cadran de vitesse vers « PULSE. »
La fonction « PULSE » devrait être utilisée dans les phases initiales du mélange
de la glace et des ingrédients surgelés pour les smoothies et les autres
boissons glacées. La fonction « PULSE » devrait également être utilisée pour
diviser des morceaux plus gros d’aliments ou pour contrôler la texture des
aliments lorsque des résultats plus grossiers sont souhaités.
8. COMMENCER À MIXER : Choisissez une vitesse pour mixer les ingrédients en
faisant pivoter le cadran de vitesse et en sélectionnant une vitesse (fouetter,
mixer, râper, mélanger et impulsions).
9. La DEL bleue s’allume pendant le fonctionnement.
10. Utilisez une spatule en caoutchouc pour pousser les ingrédients à émincer dans
la portion liquide de la recette UNIQUEMENT lorsque le moteur est à l’ARRÊT.
11. Passer à une vitesse plus élevée si le moteur semble peiner en mixant pour
éviter toute surcharge du moteur.
12. POUR CESSER DE MIXER : Arrêtez le processus de mixage en positionnant le
bouton sur « OFF. »
13. Patientez jusqu’à ce que les lames cessent de pivoter avant de retirer le pichet.
14. Retirez le pichet en le tournant dans le sens inverse des
aiguilles d’une montre sur la base pour le déverrouiller.
UTILISATION DU MÉLANGEUR – Lorsque vous utilisez le
mélangeur et lorsque l’appareil fonctionne, mélangez ou faites
pivoter le Mélangeur dans le sens inverse des aiguilles d’une
montre de sorte que le Mélangeur râpe ou entre en contact avec les
parois du pichet à mixer. Cette opération de mélange va contribuer
au mélange du contenu du pichet à mixer en forçant les ingrédients
à rencontrer les lames.
A
STUCES
•
Ajoutez toujours les ingrédients liquides au pichet en premier puis ajoutez les
ingrédients solides ou surgelés restants. Ceci empêchera toute usure excessive
du moteur et garantira que les ingrédients soient correctement mélangés. Ne
remplissez pas le pichet au-dessus de la Ligne de remplissage « MAX » (48
oz/1.4 L/6 tasses).
•
Pour ajouter d’autres ingrédients pendant le fonctionnement du mixeur, retirez le
cache translucide du couvercle et ajoutez les ingrédients par l’ouverture.
Remettez le cache translucide en place avant de mixer.
•
Le mélangeur peut être utilisé pour aider à la préparation de boissons glacées
ou pour le mélange de tout autre type d’ingrédient. Lorsque vous n’utilisez pas
le mélangeur, assurez-vous de placer le cache translucide sur le trou au centre
du couvercle.
•
Tournez le mélangeur dans le sens inverse des aiguilles d’une montre pour un
meilleur résultat de mixage.
•
Lorsque vous émincez des ingrédients secs comme des croûtes de pain, des
noix, des épices, etc., assurez-vous que le pichet et les lames sont
complètement secs.
5
Page 14

•
Le mode « PULSE » devrait être utilisé par brèves impulsions. Lorsque le mode
« PULSE » est activé puis relâché, les lames doivent arrêter de tourner entre les
impulsions.
•
Ne tentez pas de mixer ou de pétrir une pâte lourde, de la purée de pommes de
terre, de battre des blancs d’œufs, de hacher de la viande crue, ou d’extraire
des jus de fruits ou de légumes. Ce mixeur n’est pas conçu pour effectuer ces
tâches.
•
Ne mélangez pas les aliments de façon excessive. La plupart des ingrédients
devraient être correctement mélangés ou émincés en quelques secondes.
•
N’utilisez pas la base contenant le moteur pendant plus de 3 minutes à la fois ;
patientez 5 minutes avant de faire tourner le moteur à nouveau.
•
Si le moteur cale, mettez hors tension et débranchez l’appareil. Retirez une
partie des ingrédients avant de tenter de continuer.
•
N’ajoutez pas de liquides en ébullition dans le pichet.
•
Coupez tous les fruits fermes et les légumes, les viandes cuites, le poisson et
les fruits de mer en morceaux de ¾“ (1,8cm) à 1” (2,5cm) maximum. Découpez
tous les types de fromages en morceaux de ¾” (1,8cm) maximum.
•
Laissez les légumes cuits et les bouillons refroidir avant de la verser dans le
pichet pour les mixer.
N
ETTOYAGE DU MIXEUR
1. Placez l’interrupteur du mixeur sur « OFF » et débranchez l’appareil de la prise
secteur.
2. Les pièces du mixeur résistent à la corrosion, elles sont hygiéniques et se lavent
facilement. Avant la première utilisation et après chaque utilisation, séparez les
pièces et nettoyez-les méticuleusement à l’eau savonneuse chaude puis rincez
et séchez-les bien. Faites attention aux lames de mélange lorsque vous les
lavez et les séchez. NE LAVEZ AUCUNE PIÈCE AU LAVE-VAISSELLE.
3. Essuyez la base du mixeur, le bouton de commande, et le cordon à l’aide d’un
chiffon ou d’une éponge humide. Pour éliminer les taches tenaces, utilisez un
détergent non abrasif e puissance moyenne. Ne plongez jamais la base du
moteur dans de l’eau.
4. Vérifiez la totalité des composants avant de procéder au remontage. Si les
lames de mixage sont coincées ou difficiles à tourner, N’UTILISEZ PAS LE
MIXEUR. Pour vérifier, utilisez prudemment une râpe ou une protection
couvrant la maison pour tourner les lames dans le sens inverse des aiguilles
d’une montre (les extrémités opposées sont tranchantes). Les lames devraient
tourner librement.
5. Si le pichet est ébréché ou fissuré, N’UTILISEZ PAS LE MIXEUR – toute
utilisation supplémentaire pourrait faire casser le pichet. Si vous avez besoin de
retirer les lames, veuillez utiliser un chiffon ou une protection couvrant la main
pour retirer la base contenant les lames.
6
Page 15

G
ARANTIE DU PRODUIT
Garantie limitée de 1 an de l’appareil
Focus Electrics, LLC (« Focus Electrics ») garantit cet appareil contre tout défaut de pièces et
de main d’ œuvre pendant un (1) an à compter de la date d’achat d’origine avec un justificatif
d’achat, à condition que l’appareil soit utilisé et entretenu conformément aux recommandations
du Mode d’emploi fourni. Toute pièce défaillante de l’appareil sera réparée ou remplacée sans
frais à la discrétion de Focus Electrics. La présente garantie s’applique pour une utilisation
domestique à l’intérieur uniquement.
Cette garantie ne prend pas en charge les dégâts, y compris la décoloration, subis par toute
surface antiadhésive de l’appareil. Cette garantie est nulle et non avenue, tel que défini
uniquement par Focus Electrics si l’appareil est détérioré par accident, mauvaise utilisation,
utilisation abusive, négligence, rayure, ou si l’appareil est détérioré de quelque manière que ce
soit.
LA PRÉSENTE GARANTIE ANNULE ET REMPLACE TOUTES LES GARANTIES INDUITES,
NOTAMMENT LES GARANTIES DE COMMERCIALISATION, D’ADAPTATION À UN USAGE
PARTICULIER, DE PERFORMANCE, OU AUTRE, QUI SONT ICI EXCLUES. EN AUCUN
CAS FOCUS ELECTRICS NE POURRA ÊTRE TENUE POUR RESPONSABLE DE TOUT
DÉGÂT, QUE CELUI-CI SOIT DIRECT, INDIRECT, SECONDAIRE, PRÉVISIBLE, INDUIT OU
PARTICULIER, RÉSULTANT DE OU EN RAPPORT AVEC CET APPAREIL.
Si vous pensez que cet appareil est défectueux ou a besoin d’être réparé pendant la durée de
sa garantie, veuillez contacter le Service clientèle de Focus Electrics au (866) 290 –1851 ou
nous adresser un e-mail à service@focuselectrics.com
non remboursables. Un justificatif prouvant la date d’achat d’origine sera exigé pour toutes les
demandes de prise en charge dans le cadre de la garantie, les factures manuscrites ne sont
pas acceptées. Focus Electrics n’est pas responsable pour les retours perdus pendant le
transport.
Valable uniquement aux USA et au Canada
P
IÈCES DE RECHANGE
Les pièces de rechange, lorsque celles-ci sont disponibles, peuvent être commandées
directement auprès de Focus Electrics en ligne sur www.focuselectrics.com, ou vous pouvez
téléphoner ou envoyer un e-mail au service entretien au numéro/à l’adresse e-mail ci-dessus,
ou vous pouvez nous écrire à :
Focus Electrics, LLC
Attn : Service clientèle
P. O. Box 2780
West Bend, WI 53095
Assurez-vous d’inclure le numéro de catalogue/modèle de votre appareil (situé sur le
dessous/à l’arrière de l’appareil) accompagné d’une description et de la quantité de la pièce
que vous souhaitez commander. Ajoutez également votre nom, votre adresse postale, un
numéro de carte Visa/MasterCard, une date d’expiration ainsi que le nom tel qu’il apparaît sur
la carte. Vous pouvez payer par chèque à l’ordre de Focus Electrics, LLC. Appelez le Service
clientèle pour obtenir le montant de l’achat. La taxe de vente de votre état ainsi que des frais
d’expédition/de traitement seront ajoutés au total de la facture. Veuillez patienter deux (2)
semaines pour la livraison.
Ce manuel contient des informations importantes et utiles concernant l’utilisation sans danger et l’entretien
de votre nouveau produit Focus Electrics. Pour une consultation ultérieure, fixez le ticket de caisse daté pour
servir de justificatif d’achat et inscrivez les informations suivantes :
Date d’achat ou de réception en cadeau : _______________________________________________
Lieu d’achat et prix, si connus : _____________________________________________
Numéro de l’article et Code de date (dessous/arrière de l’appareil) :___________________________
L5700A 11/09 West Bend®, una Marca de Focus Electrics, LLC. Printed in China
. Les frais d’expédition de retour sont
7
Page 16

N
OTES
L5700A 11/09 West Bend®, una Marca de Focus Electrics, LLC. Printed in China
8
Page 17

LICUADORA
Manual de instrucciones
Registre éste y otros productos de Focus Electrics en nuestro sitio:
w w w . r e gi ste rf oc us . c o m e n I n t e r ne t
Precauciones Importantes ........................................................................................ 2
Antes de Usar por Primera Vez ................................................................................ 4
Uso de la Licuadora ................................................................................................. 5
Consejos Prácticos................................................................................................... 6
Limpieza de la Licuadora ......................................................................................... 7
Garantía ................................................................................................................... 8
CONSERVE ESTE MANUAL DE INSTRUCCIONES COMO REFERENCIA PARA
2009 West Bend®, une Marque de Focus Electrics, LLC.
EL FUTURO
www.focuselectrics.com
Page 18

PRECAUCIONES IMPORTANTES
Para evitar lesiones personales o daños materiales, lea y acate todas las
instrucciones y advertencias.
Al utilizar aparatos eléctricos, siempre deben acatarse las precauciones básicas de
seguridad incluyendo las siguientes:
•
Lea todas las instrucciones, incluyendo estas precauciones importantes, así
como las instrucciones de uso y cuidado en este manual.
•
No utilice el aparato para usos distintos del indicado.
•
Los accesorios que puedan ser adjuntados y que no sean recomendados por
Focus Electrics puedan causar lesiones.
•
No lo opere cuando no funcione correctamente o haya sido dañado de algún
modo. Para informacion sobre el centro de servicio, refierase a la página de
garantía.
•
No deje la unidad desatendida cuando esté enchufada en un tomacorriente
eléctrico.
•
Cuando se esté licuando, mantenga las manos y utensilios fuera de la jarra de
la licuadora para reducir el riesgo de lesiones graves a personas o daños a la
licuadora. Puede usarse un raspador, pero sólo cuando la licuadora esté
apagada y desenchufada del tomacorriente.
•
No trate de reparar este aparato usted mismo.
•
Las hojas son filosas. Tenga sumo cuidado al armar, hacer funcionar, desarmar
y limpiar la unidad.
•
No la use si las hojas están rotas, agrietadas o sueltas.
•
Siempre opere la licuadora con la tapa puesta.
•
Para tener estabilidad, siempre sostenga el asa de la jarra mientras esté
operando la licuadora.
•
No deje la licuadora desatendida cuando esté en uso.
•
No retire la jarra de la base hasta que el motor se haya parado por completo.
•
No use una jarra rajada, desconchada o rota.
•
Al licuar líquidos calientes, retire el tapón de la tapa.
•
Evite contato con piezas en movimiento.
•
Para reducir el riesgo de lesiones, nunca coloque el ensamble de la cuchilla en
la base del motor sin la jarra de la licuadora debidamente fijada al ensamble.
•
No use este aparato sobre una estufa o cocina, debajo de un asador, en el
horno, el refrigerador o el congelador.
•
Para protegerse contra descargas eléctricas, no sumeja el cable, enchufes ni
otras piezas eléctricas en agua u otros líquidos.
•
No opere ningún aparato cuyo cable de alimentación o enchufe estén dañados.
•
No use este aparato a la intemperie.
•
No enchufe el cable en el tomacorriente si el interruptor no está en la posición
“OFF” (apagado).
• Siempre gire el control a la posición “OFF” (apagado) y desenchufe el aparato
del tomacorriente cuando no esté en uso y antes de limpiarlo. Deje que se enfrie
antes de poner o quitar alguna parte, y antes de limpiar.
2
Page 19

• Se suministra un cordón eléctrico corto para reducir los riesgos que resultan de
enredarse o tropezarse con un cordón eléctrico más largo.
• Hay disponibles cordones de alimentación eléctrica desmontables más largos o
extensiones eléctricas y pueden ser utilizados si se ejerce cuidado al usarlos.
Mientras el uso de una extensión eléctrica no es recomendado, si usted debe
usar una, la capacidad eléctrica nominal marcada en el cordón desmontable de
alimentación eléctrica o la extensión eléctrica deberá ser al menos la misma que
la capacidad eléctrica nominal del artefacto electrodoméstico. Si el artefacto
electrodoméstico es del tipo conectado a tierra, la extensión eléctrica deberá ser
un cordón eléctrico de 3 hilos con conexión a tierra. El cordón eléctrico debería
ser extendido de tal manera que no pase sobre encimeras o mesas donde
pueda ser tirado por niños o tropezarse con el mismo.
• Este artefacto tiene un enchufe polarizado (una clavija es más ancha que la
otra). Para reducir el riesgo de descarga eléctrica, este enchufe está diseñado
para encajar de una sola manera en un tomacorriente polarizado. Invierta el
enchufe si éste no encaja completamente en el tomacorriente o en el cable de
extensión. Si todavía no encaja, póngase en contacto con un electricista
calificado. No trate de modificar el enchufe de manera alguna.
• No use un tomacorriente o cable de extensión si el enchufe calza flojamente,
o si el tomacorriente o el cable de extensión se calientan.
• No use un convertidor de tensión ni ningún otro dispositivo para adaptar la
licuadora a un tomacorriente o voltaje distinto, ya que podría dañarla.
•
Se requiere de supervisión adulta cuando cualquier artefacto electrodoméstico
sea usado por o cerca de niños.
•
No permita que el cable cuelgue de algún borde, donde pueda ser alcanzado
por los niños. Coloque el cable de modo que impida lesiones que resulten del
halar, tropezarse o enredarse en el mismo.
•
La jarra de la licuadora está diseñada para usarse solamente con este
electrodoméstico. No utilice la jarra provista con este artefacto con ningún otro
artefacto electrodoméstico o aplicación.
•
No coloque la jarra de la licuadora sobre una superficie caliente o en un horno
caliente.
•
Tenga cuidado al limpiar la jarra de la licuadora con las cuchillas puestas.
Limpie el exterior con un paño húmedo, y sólo enjuague el interior. Si fuese
necesario limpiar la jarra de la licuadora por dentro, desmóntela y límpiela
siguiendo las instrucciones en las secciones de ensamble y limpieza de este
manual.
•
No utilice la jarra de la licuadora si está agrietada o si tiene el retén de las
cuchillas aflojado o debilitado.
•
No limpie la jarra con limpiadores abrasivos, esponjas de lana de acero u otros
materiales abrasivos.
•
Para uso doméstico solamente.
CONSERVE ESTAS INSTRUCCIONES
3
Page 20

A
NTES DE USAR POR PRIMERA VEZ
Sírvase revisar con cuidado todo el material de empaque antes de desecharlo.
El material de empaque contiene muchas partes accesorias.
Precaución: Siga estos importantes pasos para armar, apretar y montar la jarra de
la licuadora de manera rápida y correcta. Puede lesionarse si las cuchillas móviles
quedasen accidentalmente expuestas. Desenchufe el artefacto electrodoméstico
del tomacorriente antes de armarlo, retirarlo, o limpiarlo. Nunca coloque el base del
motor o el cordón eléctrico en agua u otros líquidos.
Antes de ensamblar la licuadora, lave todas las partes sueltas en agua caliente
jabonosa, enjuáguelas a fondo y séquelas
1. Coloque el aro sello sobre el borde externo de la
base de la cuchilla.
2. Enrosque la base de la cuchilla a la jarra.
3. Coloque la jarra de la licuadora armada sobre la
base del motor con el asa a la derecha.
Asegúrese de que la parte inferior de la base de
la cuchilla armada esté asentada parejamente
sobre la base del motor. Gírela en el sentido de
las agujas del reloj para asegurarla en su lugar. Al
usar la varilla de mezclar gírela en dirección
contraria a las agujas del reloj para mezclar a
fondo los ingredientes.
4. Coloque la tapa sobre la jarra de la licuadora;
déle vuelta en el sentido de las agujas del reloj
para asegurarla en su lugar. Inserte la varilla de
mezclar, o coloque el tapón transparente en el
centro de la tapa y gírela en dirección a las agujas
del reloj para asegurarla en su lugar.
5. La licuadora está ahora lista para utilizarse
U
SO DE LA LICUADORA
1. Asegúrese de que la licuadora esté desenchufada. Coloque la base del motor
de la licuadora sobre una superficie seca y limpia.
2. Coloque la jarra de la licuadora en la base del motor y déle vuelta en dirección
contraria a las agujas del reloj para asegurarla en su lugar.
3. Añada los ingredientes a la jarra de la licuadora y vuelva a colocar la tapa.
Asegure la tapa en su lugar dándole vuelta en el sentido de las agujas del reloj.
4. Antes de comenzar, inserte la varilla de mezclar o el tapón transparente en el
centro de la tapa. Coloque la mano sobre la perilla de la varilla de mezclar o
apóyela sobre la tapa de la jarra al arrancar el motor y mientras éste funcione.
Al usar la varilla de mezclar gírela en dirección contraria a las agujas del reloj
para mezclar a fondo los ingredientes.
5. Usted puede añadir más ingredientes a través del agujero en el centro de la
tapa. Cuándo haya terminado de añadir los ingredientes, cubra el agujero con el
tapón transparente, y luego enchufe el cordón eléctrico en el tomacorriente.
6. Siempre haga funcionar la licuadora sobre una superficie limpia y seca para
evitar que el aire arrastre materia extraña o agua dentro del motor.
4
Page 21

7.
PARA USAR EL MODO PULSAR: El botón pulsar le permite crear ráfagas
cortas de potencia. Para utilizar la función PULSE (pulsar), repetidamente haga
girar y liberar el dial de velocidades hacia PULSE (pulsar). La función PULSE
(pulsar) deberá ser usada en las etapas iniciales al licuar hielo e ingredientes
congelados para preparar batidos de frutas y otras bebidas congeladas. La
función PULSE (pulsar) también debe usarse para romper trozos grandes de
alimentos o para controlar la textura de los alimentos cuando se desean
pedazos más gruesos.
8. PARA COMENZAR A LICUAR: Elija una velocidad para licuar los ingredientes
haciendo girar el dial de velocidades y seleccionando la velocidad (batir [whip],
mezclar [mix], rallar [grate], licuar [blend] y pulsar [pulse]).
9. La luz LED azul estará encendida durante la operación.
10. Use una espátula de goma para empujar los ingredientes que se están picando
hacia la parte líquida de la receta SÓLO cuando el motor esté APAGADO.
11. Para prevenir la sobrecarga del motor, cambie a una velocidad más alta si el
motor pareciera estar forzado al procesar.
12. PARA PARAR DE LICUAR: Pare el proceso de licuado girando a la posición
“OFF” (apagado).
13. Antes de retirar la jarra de la licuadora, espere a que las
cuchillas dejen de girar.
14. Retire la jarra de la licuadora dándole vuelta en dirección
contraria a las agujas del reloj para desconectarla de la base.
OPERACIÓN CON LA VARILLA DE MEZCLAR – Cuando se esté
usando y en dirección contraria a las agujas mientras la máquina
está funcionando, agite o rote la Varilla de Mezclar en dirección
contraria a las agujas del reloj de modo que la misma raspe o haga
contacto con los lados de la jarra. Esta operación de agitación
ayudará a mezclar el contenido de la jarra forzando los
ingredientes hacia las cuchillas mezcladoras.
C
ONSEJOS PRÁCTICOS
•
Siempre añada primero los ingredientes líquidos a la jarra de la licuadora y
luego añada los restantes ingredientes sólidos o congelados. Este prevendrá el
excesivo desgaste del motor y asegurará que los ingredientes sean licuados
correctamente. No llene por encima de la línea de llenado máximo, “MAX” (48
onzas/1.4 L/6 tazas).
•
Para añadir otros ingredientes cuando la licuadora esté funcionando, retire el
tapón transparente de la tapa y añada los ingredientes por la abertura. Vuelva a
colocar el tapón en la tapa y asegúrela en su sitio antes de comenzar a licuar.
•
Puede usarse la varilla de mezclar para asistir en la preparación de bebidas
congeladas o para licuar cualquier otro tipo de ingredientes. Cuando no se esté
utilizando la varilla de mezclar, asegúrese de colocar el tapón transparente
sobre el agujero en el centro de la tapa.
•
Para los mejores resultados, gire la varilla de mezclar en dirección contraria a
las agujas del reloj.
•
Al picar ingredientes secos como migas de pan, nueces, especias, etc.,
asegúrese de que la jarra de la licuadora y las cuchillas estén completamente
secas.
5
Page 22

•
La velocidad “PULSE” (pulsar) deberá hacerse funcionar en ráfagas cortas. En
la medida que se activa y libera la velocidad “PULSE” (pulsar), las cuchillas
deberían dejar de girar entre pulsos.
•
No intente mezclar o amasar masa pesada, triturar papas, batir claras de
huevo, moler carne cruda, o extraer jugos de frutas o verduras. La licuadora no
está hecha para realizar estas tareas.
•
No licue de más a los alimentos. La mayoría de los ingredientes los deberían
estar debidamente licuados o picados en segundos.
•
No haga funcionar la base del motor durante más 3 minutos a la vez; deje pasar
5 minutos antes de hacer funcionar el motor de nuevo.
•
Si el motor se parase, apague y desenchufe la unidad. Retire una parte de los
ingredientes antes de intentar seguir adelante.
•
No añada líquidos hirvientes a la jarra de la licuadora.
•
Corte todas las frutas y verduras firmes, carnes cocidas, pescados, y mariscos,
en pedazos no mayores de ¾ pulgada (1.8 cm) a 1 pulgada (2.5 cm). Corte
todos los tipos de quesos en pedazos no mayores de ¾ pulgada (1.8 cm).
•
Permita que las verduras cocidas y los caldos se enfríen antes de verterlos en
la jarra de la licuadora para procesarlos.
L
IMPIEZA DE LA LICUADORA
1. Apague la licuadora pasando el interruptor a la posición ‘OFF” y desenchufe del
tomacorriente.
2. Las partes de la licuadora son resistentes a la corrosión, higiénicas y de
limpieza fácil. Antes del usarla por primera vez y después de cada uso, separe
las partes y límpielas a fondo con agua caliente jabonosa, enjuáguelas y
séquelas bien.Al lavar y secar, tenga cuidado con las cuchillas de la licuadora.
NO LAVE NINGUNA PARTE EN EL LAVAVAJILLAS.
3. Limpie la base de licuadora, el botón de control, y el cordón eléctrico con un
paño húmedo o una esponja. Para eliminar las manchas obstinadas, use un
producto de limpieza suave, no abrasivo. Nunca sumerja la base del motor en
agua.
4. Compruebe todos los componentes antes de volver a armar la licuadora. Si las
cuchillas de procesamiento están pegadas o difíciles de darles vuelta, no USE
LA LICUADORA. Para verificarlo, use con cuidado una rasqueta o cubierta
protectora de la mano para girar las cuchillas en dirección contraria a las agujas
del reloj (los bordes opuestos son afilados). Las cuchillas deberían de girar
libremente.
5. Si la jarra está desconchada o rajada, NO USE LA LICUADORA - el uso
adicional podría causar la rotura de jarra de la licuadora. Si necesitase sacar
las cuchillas, use un paño o la cubierta protectora de la mano para retirar la
base de la cuchilla.
6
Page 23

G
ARANTÍA DEL PRODUCTO
Garantía Limitada de 1 Año del Artefacto Electrodoméstico
Focus Electrics, LLC (“Focus Electrics”) garantiza que este aparato no presentará fallas de
material ni fabricación durante un (1) año a partir de la fecha original de compra con prueba de
dicha compra, siempre y cuando el aparato sea operado y mantenido tal como se indica en el
manual de instrucciones provisto. Toda pieza del aparato que presente fallas será reparada o
reemplazada sin costo alguno a criterio de Focus Electrics. Esta garantía rige solamente para
el uso domestico dentro de la casa.
Esta garantía no cubre ningún daño, incluyendo la decoloración, de superficie anti-adherente
alguna del aparato electrodoméstico. Esta garantía es nula y sin valor, según lo determine
exclusivamente Focus Electrics si el artefacto electrodoméstico es dañado a causa de
accidente, mal uso, abuso, negligencia, rayaduras, o si el artefacto electrodoméstico es
cambiado de algún modo.
ESTA GARANTÍA REEMPLAZA A TODAS LAS DEMÁS GARANTÍAS IMPLÍCITAS,
INCLUYENDO AQUÉLLAS DE COMERCIABILIDAD, IDONEIDAD PARA UN FIN O USO EN
PARTICULAR, DESEMPEÑO, U OTROS TIPOS, LAS CUALES QUEDAN EXCLUIDAS
MEDIANTE EL PRESENTE DOCUMENTO. FOCUS ELECTRICS, LLC RECHAZA TODA
RESPONSABILIDAD POR DAÑOS, YA SEAN DIRECTOS, INDIRECTOS, INCIDENTALES,
PREVISIBLES, CONSECUENTES O ESPECIALES QUE SURJAN DE ESTE APARATO
ELECTRODOMÉSTICO O GUARDEN RELACIÓN CON EL MISMO.
Si piensa que el artefacto electrodoméstico se ha dañado o requiere de servicio dentro de su
período de garantía, por favor póngase en contacto con el Departamento de Atención al
Cliente de Focus Electrics por el (866) 290-1851 o contáctenos por correo electrónico a la
service@focuselectrics.com. Los gastos de devolución no son reembolsables. Para todas las
reclamaciones de garantía, se requerirá un recibo que demuestra la fecha de compra original,
los recibos escritos a mano no son aceptados. Focus Electrics, LLC no se hace
responsable de las devoluciones perdidas en tránsito.
Válido sólo en EE.UU. y Canadá
R
EPUESTOS
Las partes de repuestos, si están disponibles, pueden pedirse directamente en línea a Focus
Electrics en www.focuselectrics.com, o puede llamar o enviar un correo electrónico al
departamento de servicio al número telefónico o dirección de correo electrónico arriba
indicados, o escribiéndonos a:
Focus Electrics, LLC
Attn: Customer Service
P. O. Box 2780
West Bend, WI 53095
Cerciórese de incluir el número de catálogo/modelo del aparato electrodoméstico (situado en la
parte inferior/posterior de la unidad) así como la descripción y la cantidad de repuestos que
necesita. Junto con esta información, incluya su nombre, dirección postal, número de tarjeta
de crédito Visa o MasterCard, la fecha de vencimiento y el nombre tal como aparece en la
tarjeta. Los cheques pueden ser pagaderos a Focus Electrics, LLC. Llame al Departamento
de Atención al Cliente para obtener el monto de la compra. Se sumará al total el impuesto de
venta estatal que corresponda, más un cargo por despacho y procesamiento. La entrega
tarda dos (2) semanas.
Este manual contiene información importante y útil sobre el uso seguro y el cuidado de su
nuevo producto Focus Electrics. Para su propia referencia, archive aquí el recibo fechado que
sirve de comprobante de compra para la garantía, y anote la siguiente información:
Fecha en que compró o recibió la unidad como regalo: _______________________________
Dónde se efectuó la compra y el precio, si lo sabe: ___________________________________
Número y código de fecha del producto (aparece en la parte inferior/posterior de la unidad):
___________________________________
L5700A 11/09 West Bend®, une Marque de Focus Electrics, LLC. Printed in China
7
Page 24

N
OTAS
L5561
West Bend® Housewares, LLC
A Focus Products Group Company Printed in China
 Loading...