

Page 1

QUIKSERVE™ OVEN
Instruction Manual
Register this and other Focus Electrics products through our website:
www.focuselectrics.com
Important Safeguards...............................................................................................2
Operating Precautions..............................................................................................3
Control Panel ...........................................................................................................4
Using Your QuikServe
Suggested Settings and Cooking Times ..................................................................7
Cleaning Your QuikServe
Recipes....................................................................................................................9
Warranty.................................................................................................................12
SAVE THIS INSTRUCTION MANUAL FOR FUTURE REFERENCE
™
Oven..................................................................................5
™
Oven.............................................................................8
© 2008 West Bend®, a Brand of Focus Electrics, LLC.
www.focuselectrics.com
Page 2

To prevent personal injury or property damage, read and follow all instructions
and warnings.
When using electrical appliances, basic safety precautions should always be
followed including the following:
• Read all instructions, including these important safeguards and the care and use
instructions in this manual.
• Do not touch hot surfaces. Use handles or knobs.
• To protect against electric shock, do not immerse cord, plugs, or other electric
parts in water or other liquids.
• Close supervision is necessary when this appliance is used by or near children.
• Unplug from outlet when not in use and before cleaning. Allow to cool before
putting on or taking off parts.
• Do not operate this appliance with a damaged cord or plug, after the appliance
malfunctions or if the appliance is dropped or damaged in any manner. If you
experience any problems with your appliance, unplug it immediately from the
electrical outlet. For service information see warranty page.
• The use of accessory attachments not recommended by Focus Electrics may
cause injuries.
• Do not use this appliance outdoors.
• Do not let cord hang over the edge of a table or counter, or touch hot surfaces.
• Do not place on or near a hot gas or electrical burner or in a heated oven.
• Extreme caution must be used when moving an appliance containing hot oil or
other hot liquids.
• To disconnect, turn all controls to “OFF”, then remove plug from wall outlet.
• Do not use appliance for other than intended use.
• This appliance has a polarized plug (one blade is wider than the other). To
reduce the risk of electric shock, this plug is intended to fit into a polarized outlet
only one way. If the plug does not fit fully into the outlet, reverse the plug. If it
still does not fit, contact a qualified electrician. Do not attempt to modify the plug
in any way.
• Use extreme caution when removing the trays or disposing of hot grease.
• Do not clean with metal scouring pads. Pieces can break off of the pad and touch
electrical parts, creating a risk of electrical shock.
• Oversize foods or metal utensils must not be inserted in this appliance as they
may create a fire or risk of electric shock.
2
Page 3

• A fire may occur if the appliance is covered or touching flammable material
including curtains, draperies, walls and the like, when in operation. Do not store
any item on top of appliance when in operation.
• Extreme caution should be exercised when using containers constructed of other
than metal or glass. Do not store any materials, other than manufacturers
recommended accessories in this oven when not in use.
• Do not place any of the following materials in the oven: plastic, paper or
cardboard.
• Do not cover racks, trays or any parts of the oven with aluminum foil, as
overheating will occur.
• Always turn control to “OFF” and unplug the appliance from outlet when not in
use and before cleaning.
• For household use only.
To prevent personal injury or property damage, read and follow all instructions
and warnings.
OPERATING PRECAUTIONS
• This device is not intended to heat oil or other liquids.
• Do not use sharp utensils to clean oven door glass as scratching may weaken it
and cause shattering.
• Do not touch heating elements as serious burns may result.
• Set cooking containers, pans, and trays on a hot pad, trivet or other heat
protective surface. Do not set directly on the counter, table or other surface.
• Failure to clean after each use may result in fire hazard.
• Be extremely cautious of steam as you lift the cover.
• Unplug oven and close door if fire is observed.
• A short power-supply cord is provided to reduce risks resulting from becoming
entangled in or tripping over a longer cord.
• Longer, detachable power-supply cords or extension cords are available and
may be used if care is exercised in their use. While use of an extension cord is
not recommended, if you must use one, the marked electrical rating of the
detachable power-supply cord or extension cord should be at least as great as
the electrical rating of the appliance. If the appliance is of the grounded type,
the extension cord should be a grounding-type 3-wire cord. The cord should be
arranged so that it will not hang over the counter top or tabletop where it can be
pulled by children or tripped over.
• Do not attempt to repair this product yourself.
SAVE THESE INSTRUCTIONS
3
Page 4
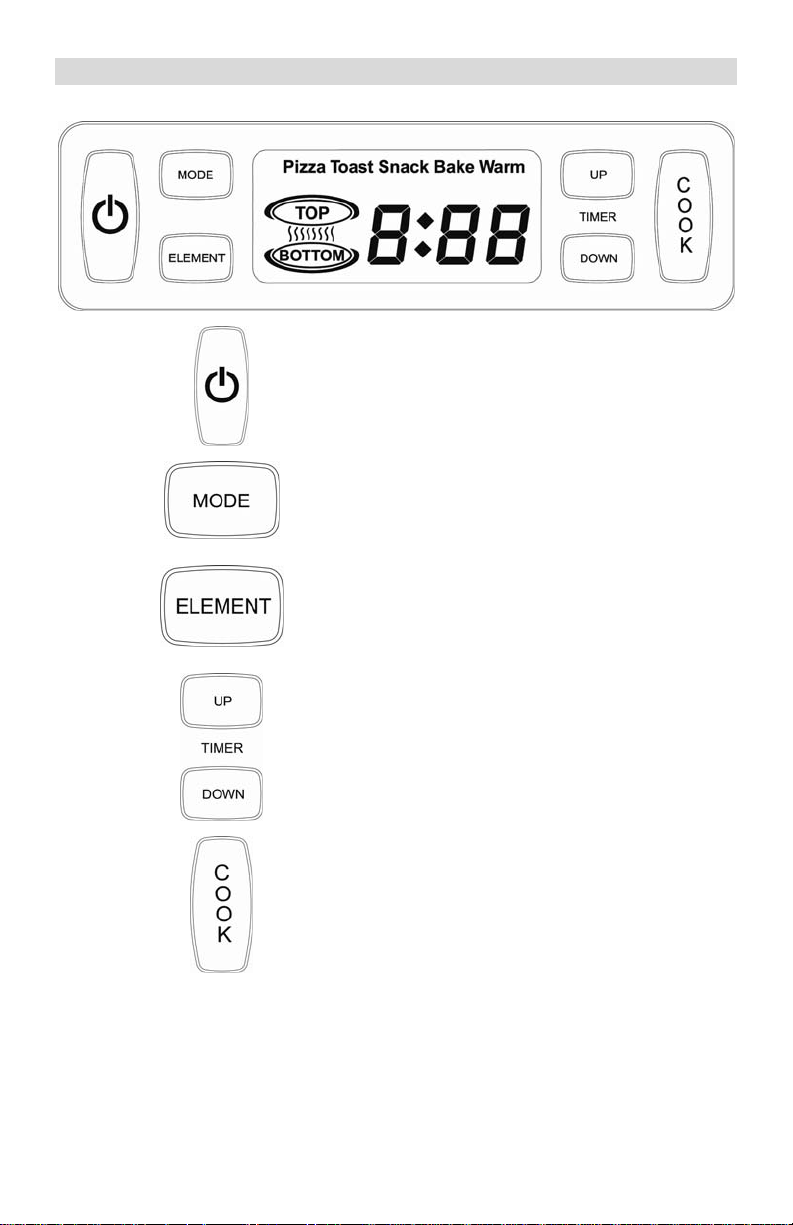
CONTROL PANEL
Power button. Turns the oven on and
off.
Selects the desired cooking mode;
Pizza, Toast, Snack, Bake, or Warm
Selects an individual heating element
setting for optimum browning; Top,
Bottom, Top and Bottom. Note:
Element selection is not available with all
cooking modes.
Programs the cooking time.
Confirms the selected settings and
begins the cooking process.
4
Page 5
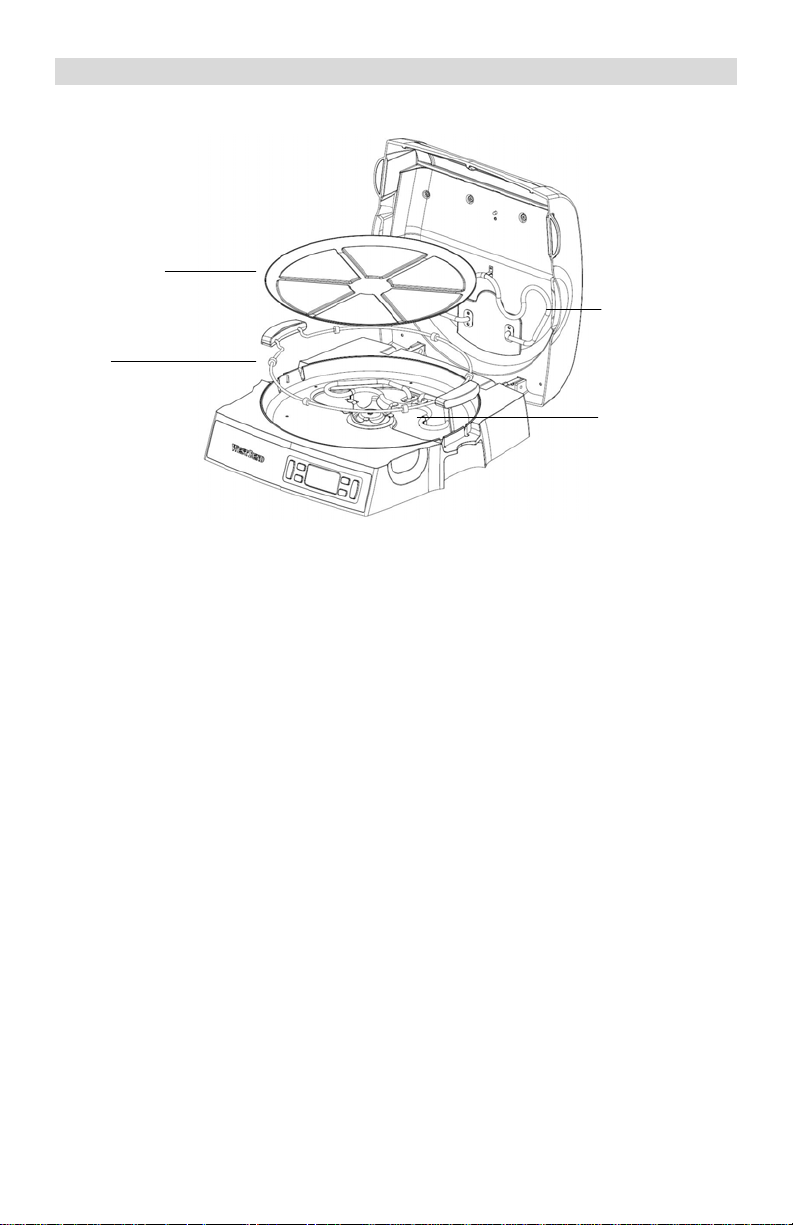
USING YOUR QUIKSERVE
™
OVEN
Baking Tray
Top Heating
Element
Trivet
Bottom
Heating
Element
Before first use: Remove any stickers or labels from heating surfaces. Make sure
the oven is free from any paper or objects not intended for use in the oven. Clean
the interior, baking tray and other accessories as described in the “Cleaning Your
QuikServe
™
Oven” section of this manual.
• A small amount of smoke and/or odor may occur upon heating due to the
release of manufacturing oils – this is normal.
• Some minor expansion/contraction sounds may occur during heating and
cooling – this is normal.
The QuikServe
™
Oven does not require preheating for most foods. For
suggested cooking times, refer to the cooking guide in this booklet rather than
the food-packaging recommendations. Most foods will cook faster in the
QuikServe
1. Place the QuikServe
™
Oven than in a conventional oven
™
Oven on a dry, level, heat-resistant surface, away from
any edge.
2. Open the cover and position the trivet with handles in to the oven. Note: The
trivet should always be in position in the oven while cooking.
3. Place the baking tray in to the oven, aligning the recessed area in the center of
the baking tray over the rotating drive in the center of the base. Do NOT
operate the oven without the baking tray properly positioned on the rotating
drive.
4. If cooking prepackaged food, remove all packaging. Place food on to the baking
tray, centering and spacing evenly for best results. The QuikServe
™
Oven does
not require preheating for most foods. CAUTION: Do not cover baking tray or
any parts of the oven with aluminum foil, as overheating will occur.
5
Page 6

5. Close the cover. Plug the cord into a 120 volt, AC electric outlet ONLY. Note:
The QuikServe
™
Oven can not be programmed or operated with the cover in the
open position.
6. Press the “POWER” button. Press the “MODE” button repeatedly to scroll to the
desired cooking mode. Some modes will allow individual heating element
settings for optimum browning. If desired, press the “ELEMENT” button to
customize for your individual tastes.
7. Press the “UP/DOWN TIMER” button to set the desired cook time. For
suggested cooking times, refer to the cooking guide in this booklet rather than
the food-packaging recommendations. Most foods will cook faster in the
QuikServe
™
Oven than in a conventional oven. CAUTION: DO NOT BLOCK
OR INSERT ANY OBJECT INTO THE VENTING HOLES AS YOU MAY CAUSE
HARM TO YOURSELF OR THE APPLIANCE.
8. Press “COOK” to confirm the settings and begin the cooking process.
Note: If the tray does not rotate, press the “POWER” button, unplug from the
electrical outlet and allow the appliance to cool completely. Using care not to
touch the heating elements, check to be sure the baking tray is positioned
correctly onto the rotating drive in the bottom of the base, food is centered on
the baking tray and does not extend beyond the baking tray area.
9. An alert will sound when the cooking time has elapsed. The baking tray will
continue to rotate to help evenly warm food. Press the “POWER” button to turn
the oven off, open the cover and check the contents. If additional cooking time
is needed, close the cover, and follow steps 6 – 8 again. Monitor the browning
progress through the viewing window. If necessary, the cover can be opened to
check the cooking results. When the cover is opened, the baking tray will stop
rotating. However, the heating elements will remain hot and foods will continue
to cook. The cover should not be left open for extended periods of time. If the
selected time has not elapsed, the baking tray will begin rotating again when the
cover is closed.
10. When the food is cooked as desired, press the “POWER” button to turn the
appliance off. Unplug the oven from the electrical outlet. Using hot pads or
oven mitts open the cover. Using a non-metal spatula or utensil, carefully
remove the food from the baking tray and place on to a serving tray, cooling
rack or cutting board. The handles on the trivet can be used to move the entire
baking tray to a heat resistant area. DO NOT CUT PIZZA OR OTHER FOODS
ON THE BAKING TRAY AS SCRATCHING MAY OCCUR.
11. Unplug the cord from the electrical outlet and clean after each use as directed in
the “CLEANING YOUR QUIKSERVE
™
OVEN” section of this manual.
CAUTION: NEVER TOUCH THE HEATING ELEMENTS DURING OR AFTER
COOKING AS SERIOUS BURNS MAY RESULT. LET THE OVEN COOL
COMPLETELY BEFORE CLEANING.
6
Page 7

SUGGESTED SETTINGS AND COOKING TIMES
FOOD
Frozen, regular crust Pizza Top/Bottom 10-12
Frozen, regular crust,
extra toppings
Frozen, self rising Pizza Bottom 20-25
Frozen, stuffed crust Pizza Bottom 15-17
Fresh/Deli Pizza Top/Bottom 9-11
Precooked Chicken
Nuggets, frozen
Pizza Rolls Snack Top/Bottom 7-9
Fish Sticks, frozen Snack Top/Bottom 6
Buffalo Wings Snack Top/Bottom 10
Hash Brown Potatoes,
patties
Garlic Bread, frozen
slices
MODE
Pizza –9-12 inch
Pizza Top/Bottom 12-15
Snack Top/Bottom 10-12
Snack Top/Bottom 10
Toast Top/Bottom 5-7
ELEMENT
SELECTION
Other Foods
APPROXIMATE
COOK TIME IN MINUTES
Cookies Bake Top/Bottom 12
All foods Warm Top/Bottom 10
Note: Cooking times and settings are suggestions only. You may find that your
personal taste requires longer or different settings. Experiment with the QuikServe™
Oven until you are satisfied with the results.
7
Page 8

COOKING TIPS
• Some foods such as self rising pizzas, pies, quiches, and pastry based foods
are prone to rising during baking or cooking. Monitor these closely to prev ent
them from contacting the upper heating element.
• Suggested cooking times and heating element selections are to be used as a
guide only. Experiment with cooking times and element selections for best
results.
™
• The QuikServe
• The QuikServe™ Oven can not be programmed or operated with the cover open.
• Some snack foods require turning for even and thorough heating. Use the
handles provided on the trivet to remove the baking tray. Turn the food and
replace the trivet and baking tray in to the oven. Continue heating.
• Pre-packaged frozen foods will require some amount of experimentation to
achieve the correct cooking times and heating element combinations.
CAUTION: Before cleaning any part of the oven, always press the “POWER” button
to turn the oven off, unplug the cord from the electrical outlet and allow the oven to
cool completely.
1. The baking tray and trivet are immersible and can be washed in warm, soapy
water, rinsed and dried thoroughly or in an automatic dishwasher. Note: Do not
use any metal or abrasive scouring pads or cleaners, or soak the baking tray for
more than one hour as damage to the finish may occur.
2. Wipe the exterior of the oven and glass viewing window with a soft, damp cloth
and dry. Note: Do not use any type of scouring pad or cleaner on the exterior
surfaces or the glass viewing window as scratching will occur. If glass is
scratched, it can weaken and shatter.
3. Wipe the interior of the oven with a damp cloth, wipe clean and dry. Be careful
when wiping around the heating elements to prevent dama ge. Note: Do not
use any metal or abrasive scouring pads, cleaners or oven cleaner on the inside
of the oven, as damage will occur.
CAUTION: Never immerse the QuikServe™ Oven or cord in water or any other
liquids.
Oven will not operate unless a time is displayed.
CLEANING YOUR QUIKSERVE
™
OVEN
• Do not remove any components from the appliance except the trivet and baking
tray.
• With extended use, some natural discoloration on the interior of the appliance
will occur.
8
Page 9

RECIPES
Note: The QuikServe™ Oven can not be programmed or operated with the cover
open.
Easy Quiche
2 tbs. Butter
½ cup Onion, minced
1 cup Chopped ham
1- 9 inch pie crust, unbaked
3 Eggs
½ tsp. Salt
¼ tsp. Black pepper
¾ cup Italian cheese blend
Blend all of the ingredients together in a small bowl and set aside. Place the
unbaked pie crust into a pie pan, if not already in one. Center the pie pan on the
baking tray and place in the oven. Close the cover. Turn the oven on, select the
“BAKE” function, use both oven elements and set the timer for 5 minutes. Press
“COOK” to confirm the settings and begin the cooking process. When the 5 minutes
has elapsed, open the cover, remove the pie crust and pour the egg mixture into the
prepared pie crust. Place the pie crust back in to the oven and close the cover.
Turn the oven on, select the “BAKE” function, and set the timer for approximately 23
minutes. Press “COOK” to confirm the settings and begin the cooking process.
Herb Focaccias
1 can Pillsbury Grands buttermilk biscuits, 8 big biscuits
8 tsp. Olive oil
4 Garlic cloves, finely chopped
8 tbs. Basil leaves, fresh or dried
8 tbs. Fresh parmesan cheese
Place four biscuits on to the baking tray, evenly spaced. Press or roll each biscuit to
approximately 4 inches round. Brush the tops of the biscuits with the olive oil.
Sprinkle with garlic, basil, and parmesan cheese. Place the baking tray in the oven
and close the cover. Turn the oven on, select the “BAKE” function, and set the timer
for 9 minutes or until the edges are golden brown. Press “COOK” to confirm the
settings and begin the cooking process.
9
Page 10

Chicken Alfredo Pizza
1 pkg. Pillsbury quick pizza crust
½ cup Alfredo sauce
½ cup Pre-cooked chicken breast, chopped
3 tbs. Onion, chopped
3 tbs. Green pepper, chopped
3 tbs. Artichoke, chopped
¼ tsp. Garlic salt
½ cup Pizza cheese, shredded
Dash Black pepper
Place one pizza crust on to the baking tray and press into place. Prick the crust in
several places to eliminate any air pockets. Place the baking tray in the oven and
close the cover. Turn the oven on, select the “PIZZA” function, set the timer for 3
minutes, and press “COOK” to confirm the settings and begin the cooking process.
Open the cover and remove the baking tray and pizza crust from the oven. Spread
the Alfredo sauce on the crust and top with the chicken, onion, peppers, and
artichoke. Sprinkle with seasonings and shredded cheese. Place the baking tra y
back in to the oven, close the cover and cook for an additional 8 to 10 minutes or
until the cheese is bubbling and the crust is golden brown.
Mexican Tortilla Appetizers
6-6” Flour tortillas
16 oz. Refried beans
½ cup Taco sauce
½ cup Green pepper, chopped
½ cup Red pepper, chopped
½ cup Green onion, chopped
2 cups Mexican blend cheese
Place three tortillas onto the baking tray. Place the baking tray in the oven and close
the cover. Turn the oven on, select the “SNACK” function, and set the timer for 3
minutes. Press “COOK” to confirm the settings and begin the cooking process.
When the alert sounds, open the cover and remove the baking tray and tortillas.
Spread refried beans evenly on each tortilla. Spread 1 tbs. of taco sauce over the
beans. Top with bell peppers and green onions. Sprinkle with cheese. Place the
baking tray back in to the oven and bake for an additional 4 to 5 minutes or until the
cheese is melted. Cut into wedges.
10
Page 11

Mini Rueben Appetizers
Loaf, rye cocktail bread
Sauerkraut, drained
Sliced dried corned beef, shredded
Thousand Island dressing
Shredded Swiss cheese
Spread one side of each slice of rye bread with approximately 1 tbs. of Thousand
Island dressing. Top each slice with the desired amount of dried corned beef,
sauerkraut, and Swiss cheese. Place the Rueben’s onto the baking tray and place in
the oven. Close the cover. Turn the oven on, select the “SNACK” function and use
both oven elements. Set the timer for 6 minutes and press “COOK” to confirm the
settings and begin the cooking process.
Chocolate Chip Cookies
1 cup Softened butter
¾ cup Granulated sugar
¾ cup Packed brown sugar
1 tsp. Vanilla extract
2 Large Eggs
2¼ cups All-purpose flour
1 tsp. Baking soda
1 tsp. Salt
2 cups Semi-sweet chocolate chips
1 cup Chopped walnuts
Cream the butter, granulated sugar, brown sugar, and vanilla extract in a large
mixing bowl until all ingredients are creamy. Add one egg at a time, beating well
after each addition. Gradually beat in flour, baking soda, and salt. Stir in chocolate
chips and nuts. Remove the baking tray from the oven, close the cover, turn the
oven on, select the “BAKE” function, set the timer for 3 minutes and press “COOK” to
preheat the oven. Drop the cookie dough by a rounded teaspoon onto the ungreased baking tray. Open the cover and place the baking tray back into the oven.
Turn the oven on, select the “BAKE” function, and set the timer for 7 to 8 minutes
and press “COOK” to confirm the settings and begin the cooking process. Cool on a
baking tray for 2 minutes.
11
Page 12

PRODUCT WARRANTY
Appliance 1 Year Limited Warranty
Focus Electrics, LLC (“Focus Electrics”) warrants this appliance from failures in the material
and workmanship for one (1) year from the date of original purchase with proof of purchase,
provided the appliance is operated and maintained in conformity with the provided Instruction
Manual. Any failed part of the appliance will be repaired or replaced without charge at Focus
Electrics’ discretion. This warranty applies to indoor household use only.
This warranty does not cover any damage, including discoloration, to any non-stick surface of
the appliance. This warranty is null and void, as determined solely by Focus Electrics if the
appliance is damaged through accident, misuse, abuse, negligence, scratching, or if the
appliance is altered in any way.
THIS WARRANTY IS IN LIEU OF ALL IMPLIED WARRANTIES, INCLUDING WARRANTIES
OF MERCHANTABILITY, FITNESS FOR A PARTICULAR PURPOSE, PERFORMANCE, OR
OTHERWISE, WHICH ARE HEREBY EXCLUDED. IN NO EVENT SHALL FOCUS
ELECTRICS BE LIABLE FOR ANY DAMAGES, WHETHER DIRECT, INDIRECT,
INCIDENTAL, FORSEEABLE, CONSEQUENTIAL, OR SPECIAL, ARISING OUT OF OR IN
CONNECTION WITH THIS APPLIANCE.
If you think the appliance has failed or requires service within its warranty period, please
contact the Focus Electrics Customer Service Department at (866) 290-1851, or e-mail us at
service@focuselectrics.com
warranty claims, hand written receipts are not accepted. You may also be required to return
the appliance for inspection and evaluation. Return shipping costs are not refundable. Focus
Electrics is not responsible for returns lost in transit.
. A receipt proving the original purchase date will be required for all
Valid only in USA and Canada
REPLACEMENT PARTS
Replacement parts, if available, may be ordered directly from Focus Electrics, LLC several
ways. Order online at www.focuselectrics.com
, e-mail service@focuselectrics.com, over the
phone by calling (866)290-1851, or by writing to:
Focus Electrics, LLC
Attn: Customer Service
P. O. Box 2780
West Bend, WI 53095
To order with a check or money order, please first contact Customer Service for an order total.
Mail your payment along with a letter stating the model or catalog number of your appliance,
which can be found on the bottom or back of the unit, a description of the part or parts you are
ordering, and the quantity you would like. Your check should be made payable to Focus
Electrics, LLC.
Your state/province’s sales tax and a shipping fee will be added to your total charge. Please
allow two weeks for processing and delivery.
This manual contains important and helpful information regarding the safe use and care of your
new Focus Electrics product. For future reference, attach dated sales receipt for warranty proof
of purchase and record the following information:
Date purchased or received as gift: _______________________________________________
Where purchased and price, if known: _____________________________________________
Item number and Date Code (shown bottom/back of product):___________________________
12
L5758 06/08 West Bend®, a Brand of Focus Electrics, LLC. Printed in China
Page 13

FOUR QUIKSERVE™
Mode d’emploi
Enregistrez ce produit et d’autres produits Focus Electrics sur notre site Web:
www.focuselectrics.com
Précautions Importantes ..........................................................................................2
Précautions d’Utilisation........................................................................................... 3
iPanneau de Commande..........................................................................................4
Utilisation de Votre Four QuikServe™.......................................................................5
Réglages et Temps de Cuisson Suggérés............................................................... 7
Nettoyage de Votre Four QuikServe
Recettes................................................................................................................... 9
Garantie .................................................................................................................12
CONSERVEZ CE MANUEL D’INSTRUCTIONS POUR RÉFÉRENCE FUTURE
© 2008 West Bend®, une Marque de Focus Electrics, LLC.
™
......................................................................8
www.focuselectrics.com
Page 14

PRECAUTIONS IMPORTANTES
Pour empêcher toute blessure physique ou tout dommage matériel, lisez et
suivez toutes les consignes et mises en garde.
Lorsque vous utilisez des appareils électriques, les précautions de sécurité
élémentaires devraient toujours être respectées, notamment les précautions cidessous :
• Lisez toutes les instructions, notamment les présentes précautions importantes, ainsi
que les consignes pour l’entretien de ce manuel.
• Ne touchez pas les surfaces chaudes. Utilisez des poignées rectangulaires ou
rondes.
• Pour vous protéger contre tout choc électrique, n’immergez pas le cordon, les fiches
ni aucune autre pièce électrique dans l’eau ni dans tout autre liquide.
• Une surveillance étroite est nécessaire lorsque vous cet appareil est utilisé par ou à
proximité d’enfants.
• Débranchez l’appareil de la prise électrique lorsqu’il n’est pas utilisé et avant de le
nettoyer. Laissez l’appareil refroidir avant la mise en place ou le retrait de pièces.
• N’utilisez pas cet appareil avec un cordon abîmé ou une fiche détériorée, si l’appareil
a connu un disfonctionnement ou si l’appareil est tombé ou a été détérioré de quelque
manière que ce soit. Si vous rencontrer un problème quel qu’il soit avec votre
appareil, débranchez-le immédiatement de la prise secteur. Pour des informations
sur les réparations, voir la page de garantie.
• L’utilisation d’accessoires non recommandés par Focus Electrics risque de causer un
incendie, une électrocution ou des blessures.
• N’utilisez pas cet appareil à l’extérieur.
• Ne laissez pas pendre le cordon du bord du plan de travail ou de la table et assurez-
vous qu'il ne touche pas de surface chaude.
• Ne placez pas cet appareil sur ou à proximité d’un brûleur à gaz ou électrique chaud
ou d’un four chaud.
• Soyez extrêmement prudent lorsque vous déplacez un appareil contenant de l’huile
chaude ou tout autre liquide chaud.
• Pour débrancher, régler l’interrupteur à « OFF » et retirer ensuite la fiche de la prise
murale.
• N’utilisez pas l’appareil pour une autre utilisation que l’utilisation indiquée.
• Cet appareil est pourvu d’une fiche polarisée (une lame est plus large que l’autre).
Pour réduire le risque d’électrocution, cette fiche est conçue pour s’encastrer dans
une prise secteur polarisée dans un sens uniquement. Si la fiche ne s’insère pas
complètement dans la prise secteur, retournez la fiche. Si elle ne s’encastre toujours
pas, contactez un électricien qualifié. Ne tentez pas de modifier la fiche de quelque
manière que ce soit.
• Utilisez la plus extrême prudence lorsque vous retirez le plateau ou jetez la graisse
chaude.
• Ne le nettoyez pas à l’aide de tampons à récurer métalliques. Des morceaux risquent
de se détacher du tampon à récurer et d’entrer en contact avec les parties
électriques, créant ainsi un risque d’électrocution.
• Aucun aliment de grande taille ni ustensile métallique ne doit être inséré dans cet
appareil car cela risque de provoquer un risque d’incendie ou d’électrocution.
2
Page 15

• Un incendie peut se produire si, en cours de fonctionnement, le appareil est couvert
ou touche des matériaux inflammables, y compris des rideaux, des doubles-rideaux,
des murs et des matières similaires.
• Une attention extrême devrait être apportée lors de l’utilisation de récipients
constitués de matières autres que le métal ou le verre. Ne ranger aucun objet, autre
que les accessoires recommandés par le fabricant, à l’intérieur de ce four lorsque
vous ne l’utilisez pas.
• Ne placez aucune des matières suivantes à l’intérieur du four : plastique, papier ou
carton.
• Ne couvrez pas les grilles, les tiroirs ni aucune autre des pièces du four de feuille
d’aluminium car cela provoquerait une surchauffe.
• Positionnez toujours le bouton sur « OFF » et débranchez l’appareil de la prise
secteur lorsque vous ne l’utilisez pas et avant de procéder au nettoyage.
• Pour une utilisation domestique uniquement.
Pour empêcher toute blessure physique ou tout dommage matériel, lisez et
suivez toutes les consignes et mises en garde.
PRECAUTIONS D’UTILISATION
• Cet appareil n’est pas conçu pour chauffer de l’huile ni tout autre liquide.
• N’utilisez pas d’ustensile tranchant pour le nettoyage de la porte vitrée du four car les
rayures risqueraient de l’affaiblir et de la faire voler en éclats.
• Ne touchez pas les éléments chauffants car des brûlures graves peuvent en résulter.
• Posez les récipients, plats, et plaque de cuisson sur une manique, une grille ou toute
autre surface résistante à la chaleur. Ne les posez pas directement sur le plan de
travail, sur la table ni sur toute autre surface.
• Le fait de ne pas nettoyer l’appareil après chaque utilisation risque de provoquer un
risque d’incendie.
• Faites extrêmement attention à la vapeur en soulevant le couvercle.
• En cas d’incendie, débranchez le four puis fermez la porte du four.
• Le cordon d’alimentation fourni est court pour réduire les risques qu’une personne se
prenne les pieds ou trébuche sur un cordon plus long.
• Des cordons d’alimentations plus longs détachables ou des cordons de rallonge sont
disponibles et peuvent être utilisés à condition de faire preuve de prudence lors de
leur utilisation. Bien que l’utilisation d’un cordon de rallonge ne soit pas
recommandée, si vous devez en utiliser un, la puissance nominale indiquée pour le
cordon d’alimentation détachable ou pour le cordon de rallonge devrait être au moins
aussi importante que la puissance nominale de l’appareil. Si l’appareil est de type
raccordé à la terre, le cordon de rallonge devrait être relié à la terre et composé de
trois fils. Le cordon devrait être disposé de manière à ne pas pendre depuis le plan
de travail d’où il risque d’être tiré par des enfants ou d’où quelqu’un pourrait s’y
prendre les pieds.
• N’essayez pas de réparer cet appareil vous-même.
CONSERVEZ CES CONSIGNES
3
Page 16
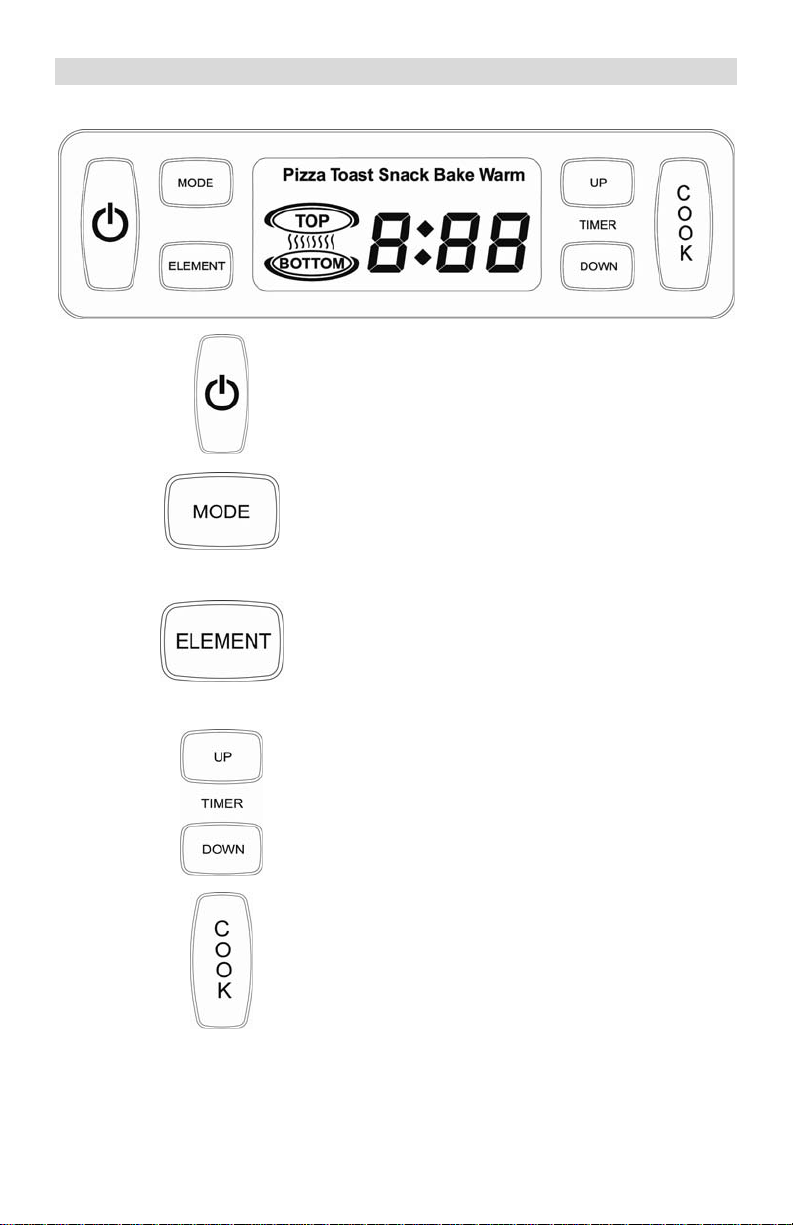
IPANNEAU DE COMMANDE
Bouton de mise en marche. Allume et
éteint le four.
Sélectionne le mode de
cuisson souhaité : Pizza, Toast, Snack,
Bake, Warm (Pizza, Rôtie, En-cas,
Cuisson ou Réchauffage).
Sélectionne le réglage d’un élément de
chauffage pour un brunissement
optimal : Top, Bottom, Top and Bottom
(Haut, Bas, Haut et Bas). Remarque :
Le contrôle séparé des éléments
chauffants n’est pas disponible pour tous
les modes de cuisson.
Programmation du temps de cuisson.
Confirme les réglages sélectionnés et
commence le processus de cuisson.
4
Page 17
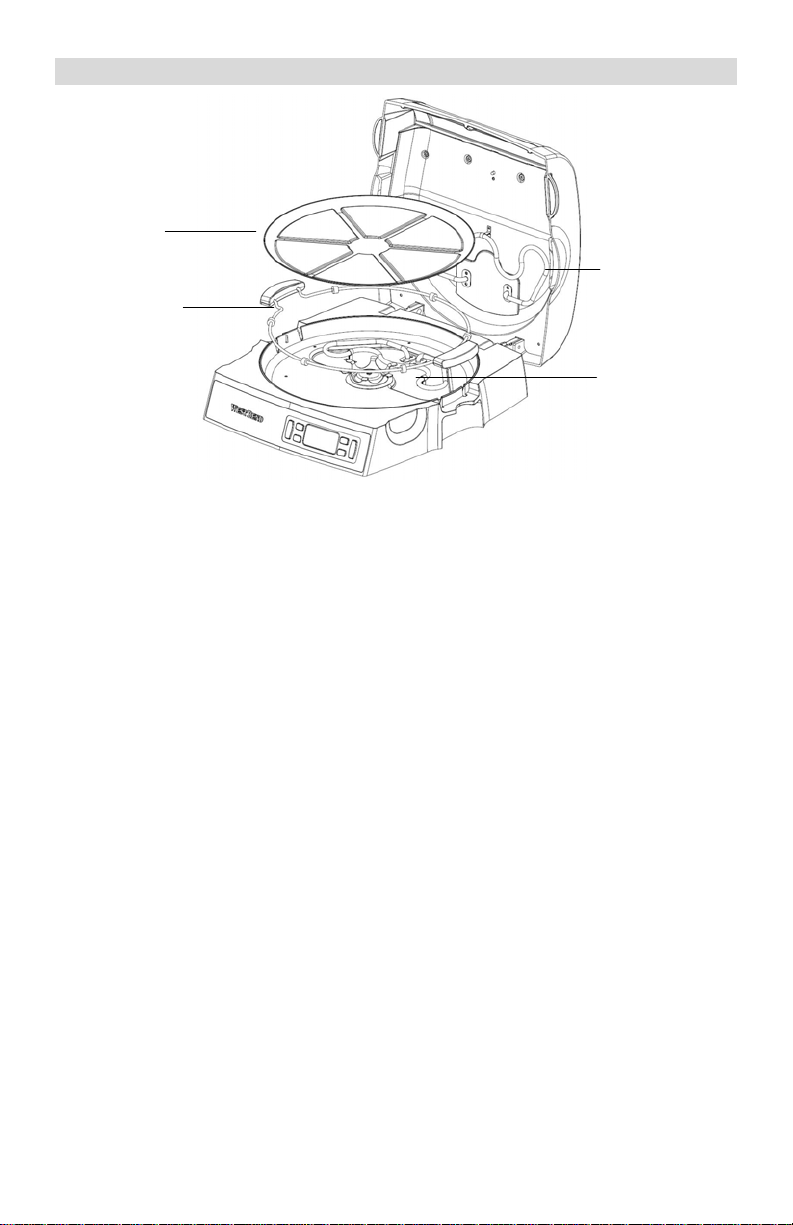
UTILISATION DE VOTRE FOUR QUIKSERVE™
Plaque de
Cuisson
Élément
Chauffant du
Haut
Sous-plaque
Élément
Chauffant du
Bas
Avant la première utilisation : Retirez les autocollants et les étiquettes des
surfaces chauffantes. Assurez-vous qu’il n'y a pas de morceaux de papier ou
d’autres objets non destinés à la cuisson dans le four. Nettoyez l’intérieur, la plaque
de cuisson et les autres accessoires comme indiqué dans la section « Nettoyage de
votre Four QuikServe
™
» de ce manuel.
• De la fumée et/ou une certaine odeur pourront se dégager lors de la chauffe
initiale en raison des huiles de fabrication – ceci est normal.
• Vous pourrez entendre des bruits d’expansion/contraction durant la chauffe et le
refroidissement initiaux – ceci est normal.
Il n'est pas nécessaire de préchauffer le Four QuikServe™ pour la plupart des
aliments. Pour les temps de cuisson suggérés, consultez le guide de cuisson
présenté ici plutôt que les recommandations indiquées sur l’emballag e d es
aliments. La plupart des aliments cuisent plus rapidement dans le Four
QuikServe
™
que dans un four conventionnel.
1. Placez le Four QuikServe™ sur une surface sèche, plane et résistante à la
chaleur, loin des bords.
2. Ouvrez le couvercle et placez la sous-plaque avec les poignées da ns le four.
Remarque : La sous-plaque doit toujours être en place dans le four pendant la
cuisson.
3. Placez la plaque de cuisson dans le four, en alignant les parties renfoncées au
centre de la plaque de cuisson sur l’entraînement rotatif au centre du socle. NE
FAITES PAS fonctionner le four sans avoir d’abord bien placé la plaque de
cuisson sur l’entraînement rotatif.
4. Retirez tout l’emballage des aliments préemballés. Placez la nourriture sur la
plaque de cuisson en la centrant et en la répartissant uniformément pour de
meilleurs résultats. Il n'est pas nécessaire de préchauffer le Four QuikServe™
pour la plupart des aliments. ATTENTION : Ne couvrez pas la plaque de
cuisson ou toute autre partie du four avec une feuille d’aluminium car cela
provoquera une surchauffe.
5
Page 18

5. Fermez le couvercle. Branchez le cordon dans une prise secteur de 120 volts
c.a. UNIQUEMENT. Remarque : Il n’est pas possible de programmer ou de
faire fonctionner le Four QuikServe
6. Appuyez sur le bouton « POWER » pour la mise en route. Appuyez à plusieurs
reprises sur le bouton « MODE » pour faire défiler les modes de cuissons.
Certains modes vous permettent de contrôler séparément les éléments
chauffants pour un brunissement optimum. Si vous le souhaitez, appuyez sur le
bouton « ELEMENT » pour personnaliser la cuisson en fonction de vos
préférences.
7. Appuyez sur les boutons du minuteur « UP/DOWN TIMER » pour sélectionner
la durée de cuisson. Pour le temps de cuisson suggéré, consultez le guide de
cuisson présenté ici plutôt que les recommandations indiquées sur l’emball age
des aliments. La plupart des aliments cuisent plus rapidement dans le Four
QuikServe
AUCUN OBJET DANS LES TROUS DE VENTILATION ET NE LES BOUCHEZ
PAS CAR CELA RISQUE D’ENDOMMAGER L’APPAREIL ET DE VOUS
BLESSER.
8. Appuyez sur « COOK » pour confirmer les réglages et commencer le processus
de cuisson.
Remarque : Si la plaque ne tourne pas, appuyez sur le bouton « POWER »,
débranchez l’appareil de la prise électrique et laissez-le complètem ent refroidir.
En veillant à ne pas toucher les éléments de chauffage, vérifiez que la plaque
de cuisson est correctement assise sur l’entraînement rotatif, que la nourriture
est bien centrée sur la plaque de cuisson et qu’elle ne déborde pas de cette
plaque.
9. Une alarme sonne quand le temps de cuisson s'est écoulé. La plaque de
cuisson continuera de tourner pour maintenir l’uniformité de la chaleur de la
nourriture. Appuyez sur le bouton « POWER » pour éteindre le four, ouvrez le
couvercle et vérifiez le contenu. S’il vous paraît nécessaire de cuire les aliments
un peu plus longtemps, refermez le couvercle et recommencez les étapes 6 à 8.
Surveillez le brunissement à travers le hublot. Si nécessaire, vous pouvez ouvrir
le couvercle pour vérifier l'état de la cuisson. Quand le couvercle est ouvert, la
plaque de cuisson cesse de tourner. En revanche, les éléments chauffants
restent chauds et la cuisson se poursuit. Il ne faut pas laisser le couvercle
ouvert pendant longtemps. Si le temps de cuisson ne s’est pas écoulé, la plaque
de cuisson se remettra à tourner une fois le couvercle fermé.
10. Lorsque la nourriture est cuite comme il faut, appuyez sur « POWER » pour
éteindre l’appareil. Débranchez le four de la prise électrique. Utilisez des
maniques ou des gants de cuisine pour ouvrir le couvercle. Avec une spatule ou
un ustensile non métallique, enlevez soigneusement la nourriture de la plaque
de cuisson et mettez-la sur un plateau, une clayette ou une planche à découper.
Vous pouvez utiliser les poignées de la sous-plaque pour transporter la plaque
de cuisson et la placer sur une surface résistante à la chaleur. NE COUPEZ
PAS DE PIZZA OU D’AUTRES ALIMENTS DIRECTEMENT SUR LA PLAQUE
DE CUISSON CAR VOUS POURRIEZ LA RAYER.
™
que dans un four conventionnel. ATTENTION : N’ENFONCEZ
™
quand le couvercle est ouvert.
6
Page 19

11. Débranchez l'appareil de la prise et nettoyez-le comme indiqué dans la section
« NETTOYAGE DE VOTRE FOUR QUIKSERVE
ATTENTION : NE TOUCHEZ JAMAIS LES ÉLÉMENTS CHAUFFANTS PENDANT
OU APRÈS LA CUISSON CAR VOUS POURRIEZ SUBIR DES BRÛLURES
GRAVES. LAISSEZ L’APPAREIL REFROIDIR COMPLÈTEMENT AVANT DE LE
NETTOYER.
™
» de ce manuel.
RÉGLAGES ET TEMPS DE CUISSON SUGGÉRÉS
NOURRITURE
Congelée, croûte
normale
Congelée, croûte
normale, beaucoup
de garniture
Congelée, auto-
levante
Congelée, croûte
fourrée
Fraîche Pizza Top/Bottom 9-11
Morceaux de poulet
précuits et congelés
Pizza-Fingers Snack Top/Bottom 7-9
Bâtonnet de poisson,
congelé
Ailes de poulet à la
Buffalo
Portions de pommes
de terre rissolées
Tranches de pain à
l’ail, congelées
Biscuits Bake Top/Bottom 12
Tout aliment Warm Top/Bottom 10
MODE
Pizza – 23 à 30 cm (9 à 12 po)
Pizza Top/Bottom 10-12
Pizza Top/Bottom 12-15
Pizza Bottom 20-25
Pizza Bottom 15-17
Autres Aliments
Snack Top/Bottom 10-12
Snack Top/Bottom 6
Snack Top/Bottom 10
Snack Top/Bottom 10
Toast Top/Bottom 5-7
SÉLECTION DE
L’ÉLÉMENT
APPROXIMATIF
TEMPS DE
CUISSON
EN MINUTES
Remarque : Les durées et les réglages indiqués ne sont que des suggestions.
Ajustez le temps de cuisson et les réglages en fonction de votre goût personnel.
Essayez différents réglages de votre Four QuikServe™ jusqu’à ce que vous obteniez
un résultat satisfaisant.
7
Page 20

CONSEILS DE CUISSON
• Certains plats, tels que pizza, tarte, quiche et d’autres plats avec de la pâte, ont
tendance à augmenter de volume pendant la cuisson. Surveillez soigneusement
la cuisson de ces plats pour qu’ils ne touchent pas l’élément chauffant du haut.
• Les temps de cuisson et les sélections d’éléments chauffants sont donnés
uniquement à titre indicatif. Expérimentez avec les durées et la sélection
d'éléments pour de meilleurs résultats.
• Le Four QuikServe™ ne fonctionnera pas si aucun temps de cuisson n’est
indiqué.
• Il n’est pas possible de programmer ou de faire fonctionner le Four QuikServe™
quand le couvercle est ouvert.
• Il faut retourner certains aliments, tels que les en-cas, pour obtenir une cuisson
uniforme et complète. Utilisez les poignées de la sous-plaque pour retirer la
plaque de cuisson. Retournez l’aliment puis remettez la sous-plaque et la
plaque de cuisson dans le four. Continuez la cuisson.
• Il faut faire différents essais avec les plats congelés préemballés pour trouver la
meilleure combinaison de sélection d’éléments chauffants et de temps de
cuisson.
NETTOYAGE DE VOTRE FOUR QUIKSERVE™
ATTENTION : Avant tout nettoyage du four, appuyez toujours sur le bouton
« POWER » pour éteindre l’appareil, débranchez-le de la prise électrique et laissezle complètement refroidir.
1. La sous-plaque et la plaque de cuisson peuvent se plo nger dans l’eau : lavezles à la main à l'eau chaude et savonneuse, puis rincez et séchez bien, ou bien
lavez-les au lave-vaisselle. Remarque : N’utilisez pas de tampons à récurer
métalliques ou abrasifs ni de détergents abrasifs et ne laissez pas tremper la
plaque de cuisson pendant plus d’une heure car cela pourrait endommager la
finition.
2. Essuyez l’extérieur du four et le hublot avec un chiffon doux humide, puis
séchez. Remarque : N’utilisez aucun type de tampon à récurer ou de nettoyant
sur la surface extérieure ou sur le hublot car cela risquerait de laisser des
rayures. Le verre rayé est affaibli et risque de voler en éclats.
3. Essuyez l’intérieur du four avec un chiffon propre humide et séchez-le. Faites
attention en essuyant près des éléments chauffants pour ne rien abîmer.
Remarque : N’utilisez aucun tampon à récurer métallique ou abrasif et aucun
détergent abrasif ou produit à nettoyer les fours sur les parties intérieures car
cela endommagera le four.
ATTENTION : Ne plongez jamais le Four QuikServe™ ou le cordon dans l’eau
ou d’autres liquides.
• Ne retirez aucune pièce de l’appareil à l’exception de la sous-plaque et de la
plaque de cuisson.
• Après une longue période d’utilisation, une certaine décoloration naturelle se
produit à l’intérieur de l’appareil.
8
Page 21

RECETTES
Remarque : Il n’est pas possible de programmer ou de faire fonctionner le Four
QuikServe
3 cl (2 c. soupe) Beurre
12 cl (1/2 tasse) Oignon, haché fin
23,5 cl (1 tasse) Jambon haché
1- Fond de tarte de 23 cm (9 po)
3 Œufs
2,5 ml (1/2 c. thé) Sel
1,25 ml (¼ c. thé) Poivre n oir
18 cl (3/4 de tasse) Mélange de fromages italiens
Mélangez tous les ingrédients dans un petit bol et mettez-le de côté. Placez la croûte
non cuite dans un moule à tarte si ce n’est déjà fait. Centrez le moule à tarte sur la
plaque de cuisson et placez le tout dans le four. Fermez le couvercle. Allumez le
four, sélectionnez la fonction « BAKE », utilisez les deux éléments chauffants et
affichez 5 minutes sur le minuteur. Appuyez sur « COOK » pour confirmer les
réglages et commencer le processus de cuisson. Au bout des 5 minutes, ouvrez le
couvercle, retirez le fond de tarte et versez-y le mélange mis de côté. Remettez le
fond de tarte avec le mélange dans le four et refermez le couvercle. Allumez le four,
sélectionnez la fonction « BAKE », et affichez environ 23 minutes sur le minuteur.
Appuyez sur « COOK » pour confirmer les réglages et commencer le processus de
cuisson.
™
quand le couvercle est ouvert.
Quiche Facile
Focaccia Aux Fines Herbes
1 boîte Biscuits chauds Pillsbury Grands, 8 grands biscuits
4 cl (8 c. thé) Huile d’olive
4 Gousses d’ail finement haché
12 cl (8 c. soupe) Feuilles de basilic, fraîches ou sèches
12 cl (8 c. soupe) Parmesan frais
Placez quatre biscuits sur la plaque de cuisson en les distribuant à intervalles
réguliers. À la main ou au rouleau, étalez chaque biscuit pour obtenir des ronds de
10 cm (4 po). Brossez le haut des biscuits à l'huile d'olive. Saupoudrez chaque
biscuit d’ail, de basilic et de parmesan. Placez la plaque dans le four et refermez le
couvercle. Allumez le four, sélectionnez la fonction « BAKE », et affichez environ 9
minutes sur le minuteur c'est-à-dire le temps nécessaire pour que les bords des
biscuits soient dorés. Appuyez sur « COOK » pour confirmer les réglages et
commencer le processus de cuisson.
9
Page 22

Pizza au Poulet Alfredo
1 paquet Croûte à pizza rapide Pillsbury
12 cl (1/2 tasse) Sauce Alfredo
12 cl (1/2 tasse) Poitrine de poulet précuite, coupée en morceaux
4,5 cl (3 c. soupe) Oigno n haché
4,5 cl (3 c. soupe) Poivron vert, haché
4,5 cl (3 c. soupe) Artichaut, coupé en morceaux
1,25 ml (¼ c. thé) Sel à l’ail
12 cl (1/2 tasse) Fromage à pizza, râpé
Pincée Poivre noir
Enfoncez un fond de pizza sur la plaque de cuisson. Piquez le fond de pizza à
plusieurs endroits pour éliminer les poches d’air. Placez la plaque dans le four et
refermez le couvercle. Allumez le four, sélectionnez la fonction « PIZZA », affichez
environ 3 minutes sur le minuteur et appuyez sur « COOK » pour confirmer les
réglages et commencer la cuisson. Soulevez le couvercle et retirez la plaque de
cuisson et le fond de pizza du four. Étalez la sauce Alfredo sur la croûte et ajoutez
les morceaux de poulet, d’oignon, de poivron vert et d’artichaut. Assaisonnez et
recouvrez avec le fromage râpé. Remettez la plaque de cuisson au four, fermez le
couvercle et faites cuire encore 8 à 10 minutes ou jusqu’à ce que le froma ge
commence à former des bulles et que la croûte est dorée.
Hors D’œuvre Aux Tortillas Mexicaines
6 de 15 cm (6 po) Tortillas à la farine
450 g Haricots frits
12 cl (1/2 tasse) Sauce à taco
12 cl (1/2 tasse) Poivron vert, haché
12 cl (1/2 tasse) Poivron rouge, haché
12 cl (1/2 tasse) Oignon vert, haché
47 cl (2 tasses) Mélange de fromages mexicains
Placez trois tortillas sur la plaque de cuisson. Placez la plaque dans le four et
refermez le couvercle. Allumez le four, sélectionnez la fonction « SNACK », et
affichez environ 3 minutes sur le minuteur. Appuyez sur « COOK » pour confirmer
les réglages et commencer le processus de cuisson. Quand l’alarme sonne, ouvrez
le couvercle et retirez la plaque de cuisson et les tortillas. Étalez de manière
uniforme les haricots frits sur chaque tortilla. Étalez 1 cuillère à soupe de sauce à
taco sur les haricots. Rajoutez poivrons et oignons. Saupoudrez de fromage.
Remettez la plaque de cuisson au four et faites cuire encore 4 à 5 minutes ou
jusqu’à ce que le fromage ait fondu. Coupez en coins.
10
Page 23

Mini Hors D’œuvre Rueben
Un pain de seigle pour cocktail
Choucroute, égouttée
Tranches de corned beef sec, râpées
Mayonnaise des Mille-îles
Gruyère râpé
Étalez environ 1 cuillère à soupe de mayonnaise des Mille-îles sur un côté de
chaque tranche de pain de seigle. Ajoutez sur chaque tranche la quantité souhaitée
de corned beef, choucroute et gruyère. Placez le Rueben sur la plaque de cuisso n et
placez le tout dans le four. Fermez le couvercle. Allumez le four, sélectionnez la
fonction « SNACK » et les deux éléments chauffants. Affichez 6 minutes sur le
minuteur et appuyez sur « COOK » pour confirmer les réglages et commencer le
processus de cuisson.
Biscuits Aux Grains de Chocolat
23,5 cl (1 tasse) Beurre ramolli
18 cl (3/4 de tasse) Sucre cristallisé
18 cl (3/4 de tasse) Sucre brun tassé
1 c. thé Extrait de vanille
2 Gros œufs
53 cl (2¼ tasses) Farine tout-usage
1 c. thé Poudre à pâte
1 c. thé Sel
47 cl (2 tasses) Grains de chocolat mi-sucré
23,5 cl (1 tasse) noix, en morceaux
Dans un grand bol, battez le beurre, le sucre cristallisé, le sucre brun et l’extrait de
vanille pour obtenir la consistance d’une crème. Ajoutez les oeufs un par un en
battant bien à chaque fois. Incorporez graduellement la farine, la poudre à pâte et le
sel, en battant. Incorporez les grains de chocolat et les noix, en mélangeant
doucement. Retirez la plaque de cuisson du four, fermez le couvercle, allumez le
four, sélectionnez la fonction « BAKE », affichez environ 3 minutes sur le minuteur et
appuyez sur « COOK » pour préchauffer le four. En utilisant une cuillère à thé bien
pleine, déposez la pâte sur la plaque de cuisson non huilée. Soulevez le couvercle
et mettez la plaque de cuisson au four. Allumez le four, sélectionnez la fonction
« BAKE », affichez environ 7 à 8 minutes sur le minuteur et appuyez sur « COOK »
pour confirmer les réglages et commencer la cuisson. Laissez refroidir sur une tôle à
biscuits pendant 2 minutes.
11
Page 24

GARANTIE DU PRODUIT
Garantie limitée d’1 an de l’appareil
Focus Electrics, LLC garantit cet appareil contre tout défaut de pièce et de main d’œuvre
pendant un (1) an à compter d el date d’achat d’origine avec un justificatif d’achat à condition
que l’appareil soit utilisé et entretenu conformément avec le Mode d’emploi de Focus Electrics.
Toute pièce défectueuse de l’appareil sera réparée ou remplacée sans frais à la discrétion de
Focus Electrics. Cette garantie s’applique en cas d’utilisation domestique en intérieur
uniquement.
La présente garantie ne couvre aucun dommage, notamment la décoloration, de toute surface
antiadhésive de l’appareil. Cette garantie est nulle et non avenue, tel que déterminé
uniquement par Focus Electrics si l’appareil est détérioré à la suite d’un accident, d’une
mauvaise utilisation, d’une utilisation abusive, d’une négligence, d’une rayure ou si l’appareil
est modifié de toute manière.
LA PRÉSENTE GARANTIE ANNULE ET REMPLACE TOUTE GARANTIE INDUITE,
NOTAMMENT LES GARANTIES DE COMMERCIALISATION, D’ADAPTATION À UN USAGE
PARTICULIER, DE PERFORMANCE, OU AUTRE QUI SONT ICI EXCLUES. EN AUCUN CAS
FOCUS ELECTRICS. NE POURRA ÊTRE TENUE POUR RESPONSABLE DE TOUT
DOMMAGE, QUE CELUI-CI SOIT DIRECT, INDIRECT, INDUIT, PRÉVISIBLE, SECONDAIRE
OU PARTICULIER, RÉSULTANT DE L’UTILISATION DE OU EN RELATION AVEC CET
APPAREIL.
Si vous pensez que cet appareil est défectueux ou nécessite des réparations pendant la durée
de sa garantie, veuillez contacter le Service clientèle de Focus Electrics au (866) 290-1851 ou
nous envoyer un e-mail à service@focuselectrics.com
d’origine sera nécessaire pour toute demande dans le cadre de la garantie, les factures
manuscrites ne sont pas acceptées. Il possible que l’on vous demande de renvoyer l’appareil
pour inspection et évaluation. Les frais de transport de retour ne sont pas remboursables.
Focus Electrics n’est pas responsable pour les retours perdus pendant le transport.
Valide uniquement aux USA et au Canada
. Une facture justifiant la date d’achat
PIECES DE RECHANGE
Les pièces de rechange, si elles sont disponibles, peuvent être commandées directement chez
Focus Electrics, LLC de plusieurs façons. Commandez en ligne à www.focuselectrics.com
courriel à service@focuselectrics.com
, par téléphone au (866)290-1851, ou en écrivant à :
Focus Electrics, LLC
Attn: Customer Service
P. O. Box 2780
West Bend, WI 53095
Pour les commandes payées par chèque ou mandat, veuillez d'abord prendre contact avec le
service à la clientèle pour obtenir le montant total de la commande. Envoyez votre paiement
avec une lettre indiquant le modèle ou le numéro de catalogue de votre appareil (ce numéro
est situé au-dessous ou au dos de l’appareil) et fournissez une description de la pièce ou des
pièces ainsi que la quantité que vous souhaitez commander. Les chèques sont à écrire à
l'ordre de Focus Electrics, LLC. Les taxes sur les ventes de votre état ou province et des frais
d’expédition seront ajoutés à votre prix
traitement et la livraison
Ce manuel contient des infor mations importantes et utiles concernant l’utilisation et l’entretien sans
danger de votre nouveau produit Focus Electrics. Pour une consultation ultérieure, fixez le ticket de
caisse daté pour avoir un justificatif d’achat pour la garantie et indiquez les informations ci-dessous:
Date d’achat ou de réception en cadeau : _____________________________________________
Lieu d’achat et prix, si connu : ______________________________________________________
Numéro de l’article et Code de date (indiqué au bas/dos du produit) : _______________________
total. Il faut compter environ deux semaines pour le
12
L5758 06/08 West Bend®, une Marque de Focus Electrics, LLC. Imprimé en Chine
, par
Page 25
HORNO QUIKSERVE™
Manual de instrucciones
Registre éste y otros productos de Focus Electrics en nuestro sitio:
www.focuselectrics.com en Internet
Precauciones Importantes........................................................................................2
Precauciones de Funcionamiento............................................................................3
Tablero de Control....................................................................................................4
Cómo Usar el Horno QuikServe
Ajustes Sugeridos y Tiempos de Cocción................................................................ 7
Limpieza del
Recetas.................................................................................................................... 9
Garantía.................................................................................................................12
CONSERVE ESTE MANUAL DE INSTRUCCIONES COMO REFERENCIA PARA
Horno QuikServe ™..............................................................................8
™
............................................................................5
EL FUTURO
© 2008 West Bend, una Marca de Focus Electrics, LLC.
www.focuselectrics.com
Page 26

PRECAUCIONES IMPORTANTES
Para evitar lesiones personales o daños materiales, lea y acate todas las
instrucciones y advertencias.
Al utilizarse artefactos eléctricos, siempre deben acatarse las precauciones básicas de
seguridad incluyendo las siguientes:
• Lea todas las instrucciones, incluyendo estas precauciones importantes, así como las
instrucciones de uso y cuidado en este manual.
• No toque las superficies calientes. Use las agarraderas o las perillas.
• Para protegerse contra descargas eléctricas no sumerja el cable, enchufes, u otras
partes eléctricas en agua u otros líquidos.
• Se requiere de supervisión adulta cuando cualquier artefacto electrodoméstico sea
usado por o cerca de niños.
• Desenchufe el aparato del tomacorriente cuando no esté en uso y antes de limpiarlo.
Deje que se enfrie antes de poner o quitar alguna parte, y antes de limpiar.
• No haga funcionar este artefacto electrodoméstico con el cordón eléctrico o el
enchufe dañado, después que el artefacto llegase a funcionar mal, o si el artefacto
se ha dejado caer o se ha dañado de alguna manera.Si usted experimenta algún
problema con su máquina, desenchúfela inmediatamente del tomacorriente. Para
información relativa al servicio de reparaciones vea la página de garantías.
• El uso de accesorios no recomendados por Focus Electrics puede causar lesiones.
• No use este aparato a la intemperie.
• No permita que el cordón eléctrico cuelgue del borde de un mostrador, mesa u otra
superficie, o que toque superficies calientes.
• No la coloque en o cerca de un quemador caliente de gas o eléctrico o en un horno
caliente.
• Se debe tener extrema precaución al mover un artefacto electrodoméstico que
contenga aceite caliente u otros líquidos calientes.
• Para desconectar apague la unidad y luego desenchufe de la pared.
• No utilice el aparato para usos distintos del indicado.
• Este artefacto tiene un enchufe polarizado (una clavija es más ancha que la otra).
Para reducir el riesgo de descarga eléctrica, este enchufe está diseñado para encajar
de una sola manera en un tomacorriente polarizado. Invierta el enchufe si éste no
encaja completamente en el tomacorriente o en el cable de extensión. Si todavía no
encaja, póngase en contacto con un electricista calificado. No trate de modificar el
enchufe de manera alguna.
• Tenga extremo cuidado al sacar la bandeja o al desechar la grasa caliente.
• No la limpie con esponjas metálicas. Pedazos pueden desprenderse de la esponja y
tocar partes eléctricas, creando un riesgo de descarga eléctrica.
• La comida demasiado grande o los utensilios metálicos no deben insertarse en este
artefacto electrodoméstico ya que pueden causar un fuego o una descarga eléctrica.
2
Page 27

• Un incendio pudiera iniciarse si al artefacto en funcionamiento lo cubriesen o tocasen
materiales inflamables, tales como cortinas, colgaduras, paredes, y similares. No
almacene ningún artículo encima del artefacto electrodoméstico mientras esté en
operación.
• Debe tenerse extremo cuidado al usar recipientes construidos de materiales que no
sean de metal o vidrio. Mientras este horno no esté en uso, no almacene en él
ningún material que no sea alguno de los accesorios recomendados por el fabricante.
• No coloque ninguno de los materiales siguientes en el horno: plástico, papel o carton.
• No cubra las rejillas, bandejas o parte alguna del horno con hojas de aluminio ya que
ocasionará sobrecalentamiento.
• Cuando el horno no se esté usando y antes de la limpiarlo, siempre gire al
temporizador de control y al selector del nivel de calor a la posición “OFF” (apagado)
y desenchúfelo del tomacorriente.
• Para uso doméstico en interiores solamente.
Para evitar lesiones personales o daños materiales, lea y acate todas las
instrucciones y advertencias.
PRECAUCIONES DE FUNCIONAMIENTO
• Este dispositivo no está diseñado para calentar aceite u otros líquidos.
• No use utensilios afilados para limpiar la puerta de vidrio del horno pues si la rayase
pudiera debilitarla y causar que se haga añicos.
• No toque los elementos calentadores pues podría sufrir quemaduras serias.
• Coloque los recipientes para cocinar, bandeja de la hornada sobre una almohadilla
térmica, un trébede u otra superficie que proteja contra el calor. No coloque el
electrodoméstico directamente sobre la encimera, mesa o cualquier otra superficie.
• El no limpiarlo tras cada uso puede resultar en un potencial peligro de incendio.
• Tenga sumo cuidado con el vapor al retirar la tapa.
• Desenchufe el horno y ciérrele la puerta si se observa fuego.
• Se suministra un cordón eléctrico corto para reducir los riesgos que resultan de
enredarse o tropezarse con un cordón eléctrico más largo.
• Hay disponibles cordones de alimentación eléctrica desmontables más largos o
extensiones eléctricas y pueden ser utilizados si se ejerce cuidado al usarlos.
Mientras el uso de una extensión eléctrica no es recomendado, si usted debe usar
una, la capacidad eléctrica nominal marcada en el cordón desmontable de
alimentación eléctrica o la extensión eléctrica deberá ser al menos la misma que la
capacidad eléctrica nominal del artefacto electrodoméstico. Si el artefacto
electrodoméstico es del tipo conectado a tierra, la extensión eléctrica deberá ser un
cordón eléctrico de 3 hilos con conexión a tierra. El cordón eléctrico debería ser
extendido de tal manera que no pase sobre encimeras o mesas donde pueda ser
tirado por niños o tropezarse con el mismo.
• No trate de reparar este artefacto electrodoméstico usted mismo.
CONSERVE ESTAS INSTRUCCIONES
3
Page 28

TABLERO DE CONTROL
Botón de encendido. Enciende y apaga
el horno.
Selecciona la modalidad de cocción
deseada: Pizza, Toast, Snack, Bake, or
Warm (Pizza, Tostar, Bocado, Hornear o
Calentar).
Selecciona un elemento calentador
individual que se ajusta para un dorado
óptimo; Superior, Inferior, Superior y
Inferior. Nota: La selección de
elementos no está disponible en todas
las modalidades de cocción.
Programa el tiempo de cocción.
Confirma los ajustes seleccionados y
comienza el proceso de cocción.
4
Page 29

CÓMO USAR EL HORNO QUIKSERVE™
Bandeja de
Hornear
Trébedes
Elemento
Calentador
Superior
Elemento
Calentador
Inferior
Antes del primer uso: Retire cualquier etiqueta adhesiva de las superficies de
calentamiento. Asegúrese de que el horno esté libre de cualquier papel u objeto
que no deba usarse en el horno. Limpie el interior, la bandeja de hornear y otros
accesorios como se describe en la sección “Limpieza del
Horno QuikServe™” de
este manual.
• Durante el primer uso, puede notarse algo de humo o un olor extraño debido a
los aceites empleados en el proceso de fabricación – esto es normal.
• Asimismo pueden notarse algunos sonidos de expansión o contracción durante
el calentamiento o enfriamiento – lo cual también es normal.
El Horno QuikServe™ no requiere precalentarse para la mayoría de los
alimentos. Para los tiempos de cocción sugeridos, refiérase más bien a la
guía de cocción en este folleto que a las recomendaciones en el empaque del
alimento. La mayoría de los alimentos se cocinarán más rápido en el Horno
QuikServe
™
que en un horno convencional
1. Coloque el Horno QuikServe™ sobre una superficie seca, nivelada y resistente
al calor, y lejos de cualquier borde.
2. Abra la tapa y coloque el trébedes con asas en el horno. Nota: El trébedes
siempre deberá estar colocado en su sitio en el horno mientras se esté
cocinando.
3. Coloque la bandeja de hornear en el horno, alineando el área rebajada en el
centro de la bandeja de hornear sobre el impulsor giratorio en el centro de la
base. NO haga funcionar el horno sin la bandeja de hornear correctamente
colocada sobre el impulsor giratorio.
4. Si se está cociendo alimentos preempacados, retire todo el empaque. Coloque
el alimento en la bandeja de hornear, centrándolo y espaciándo lo de manera
pareja para los mejores resultados. El Horno QuikServe
™
no requiere
precalentarse para la mayoría de los alimentos. PRECAUCIÓN: No cubra la
bandeja de hornear o parte alguna del horno con hojas de a luminio ya que
ocasionará sobrecalentamiento.
5
Page 30

5. Cierre la tapa. Enchufe el cordón eléctrico solamente a un tomacorriente de
corriente alterna de 120 voltios. Nota: El Horno QuikServe
programado o puesto a funcionar con la tapa en posición abierta.
6. Pulse el botón “POWER” (encendido/apagado) Pulse repetidamente el botón
"MODE" (modalidad) para avanzar a la modalidad de cocción deseada.
Algunas modalidades permitirán ajustes individuales de los elementos
calentadores para obtener un dorado óptimo. De ser deseado, pulse el botón
"ELEMENT" (elemento) para personalizar la cocción de acuerdo sus gustos
personales.
7. Apriete el botón “UP/DOWN TIMER” (temporizador: arriba/abajo) para ajustar el
tiempo de cocción deseado. Para los tiempos de cocción sugeridos, refiérase
más bien a la guía de cocción en este folleto que a las recomendaciones en el
empaque del alimento. La mayoría de los alimentos se cocinarán más rápido
en el Horno QuikServe
BLOQUEE O INSERTE NINGÚN OBJETO EN LOS AGUJEROS DE VENTEO
PUESTO QUE PUEDE CAUSARSE DAÑO A SÍ MISMO O AL ARTEFACTO
ELECTRODOMÉSTICO.
8. Presione el botón "COOK" (cocinar) para confirmar los ajustes y comenzar el
proceso de cocción.
Nota: Si la bandeja no gira, pulsa el botón "POWER" (encendido/apagado),
desenchufe del tomacorriente y permita que el artefacto electrodoméstico se
enfríe. Con cuidado de no tocar los elementos calentadores, revise para
asegurarse de que la bandeja de hornear esté colocada corr ectamente sobre el
impulsor giratorio en el fondo de la base, el alimento esté centrado sobre la
bandeja de hornear y no se extienda más allá del área de b andeja de hornear.
9. Una alarma sonará cuando el tiempo de cocción haya trans currido. La bandeja
de hornear seguirá girando para ayudar a calentar de manera pareja el
alimento. Pulse el botón "POWER" (encendido/apagado) para apagar el horno,
abra la tapa y revise el contenido. Si se requiere tiempo de cocción adicional,
cierre la tapa y siga los pasos 6 – 8 de nuevo. A través de la ventanilla de
inspección, vigile cómo progresa el dorado de los alimentos. Si fuese
necesario, la tapa puede abrirse para comprobar los resultados de la cocción.
Al abrirse la tapa, la bandeja de hornear dejará de girar. Sin embargo, los
elementos calentadores permanecerán calientes y los alimentos seguirán
cocinándose. La tapa no deberá dejarse abierta durante largos períodos de
tiempo. Si el tiempo seleccionado no ha transcurrido, la bandeja de hornear
comenzará a girar una vez que la tapa sea cerrada.
10. Cuando el alimento esté cocido al gusto, presione el botón "POWER"
(encendido/apagado) para apagar el artefacto electrodoméstico. Desenchufe el
horno del tomacorriente. Abra la tapa con almohadillas térmicas o guantes de
cocina. Usando una espátula o utensilio no metálico, con cuidado retire el
alimento de la bandeja de hornear y colóquelo en una bandeja de servir, rejilla
de enfriar o tabla de cortar. Las asas en el trébedes pueden ser usadas para
mover la bandeja de hornear entera a un punto resistente al calor. NO CORTE
LA PIZZA U OTROS ALIMENTOS EN LA BANDEJA DE HORNO PUES
PODRÍA RAYARLA.
™
que en un horno convencional PRECAUCIÓN: NO
™
no puede ser
6
Page 31

11. Después de cada uso, desenchufe el cordón eléctrico del tomacorriente y limpie
el artefacto como se indica en la sección “LIMPIEZA DEL
QUIKSERVE
PRECAUCIÓN: NUNCA TOQUE LOS ELEMENTOS CALENTADORES DURANTE
O DESPUÉS DE COCINAR PUESTO QUE PODRÍA SUFRIR QUEMADURAS
GRAVES. DEJE QUE EL HORNO SE ENFRÍE COMPLETAMENTE ANTES DE
LIMPIARLO.
™
” de este manual.
HORNO
AJUSTES SUGERIDOS Y TIEMPOS DE COCCIÓN
ALIMENTO MODALIDAD
Pizza – 9-12 pulgadas
Masa congelada regular Pizza Superior/Inferior 10-12
Masa congelada
regular, aderezos
suplementarios
Congelada, con
levadura
Masa congelada,
rellena
Fresca / Deli Pizza Superior/Inferior 9-11
Pepitas de Pollo
Precocidas, congeladas
Bolillos de Pizza Bocado Superior/Inferior 7-9
Palitos de Bacalao,
congelados
Alitas de Pollo Bocado Superior/Inferior 10
Croquetas fritas de
papa y cebollas,
empanadas
Pan de Ajo, rebanadas
congeladas
Galletas: Hornear Superior/Inferior 12
Todo alimento Calentar Superior/Inferior 10
Pizza Superior/Inferior 12-15
Pizza Inferior 20-25
Pizza Inferior 15-17
Otros Alimentos
Bocado Superior/Inferior 10-12
Bocado Superior/Inferior 6
Bocado Superior/Inferior 10
Tostar Superior/Inferior 5-7
SELECCIÓN
DE ELEMENTO
TIEMPO
APROXIMADO
DE COCCIÓN EN
MINUTOS
Nota: Los tiempos de cocción y los ajustes son sólo sugerencias. Usted pudiera
encontrar que su gusto personal requiere ajustes más largos o diferentes.
Experimente con el Horno QuikServe™ hasta quedar satisfecho con los resultados.
7
Page 32

SUGERENCIAS DE COCINA
• Algunos alimentos como las pizzas con levadura, tartas, quiches y alimentos en
base a masa tienden a crecer al hornearse o cocerse. Vigile estos de cerca
para impedir que entren en contacto con el elemento calentador superi or.
• Los tiempos de cocción y selecciones de elementos calentadores sugeridos
deben ser usados sólo como una guía. Experimente con los tiempos de
cocción y las selecciones de elementos para obtener los mejores resultados.
• El Horno QuikServe
• El Horno QuikServe™ no puede ser programado o puesto a funcionar con la
tapa abierta.
• Algunos bocados requieren que se les dé la vuelta para que queden calentados
parejamente y a fondo. Use las asas proporcionadas en el trébedes para retirar
la bandeja de hornear. Déle vuelta al alimento y retorne el trébedes y la
bandeja de hornear al horno. Siga calentando.
• Los alimentos congelados preempacados requerirán de cierta cantidad de
experimentación para conseguir las combinaciones correctas de tiempos de
cocción y elementos calentadores.
™
no funcionará a menos que un tiempo sea mostrado.
LIMPIEZA DEL HORNO QUIKSERVE ™
PRECAUCIÓN: Antes de limpiar cualquier parte del horno, siempre pulse el botón
"POWER" (apagado/encendido) para apagar el horno, desenchufe el cordón
eléctrico del tomacorriente y permita que el horno se enfríe.
1. La bandeja de hornear y el trébedes son sumergibles y pueden ser lavados en
agua caliente jabonosa, enjuagarse y secarse a fondo o en un lavavajillas
automático. Nota: No use ninguna esponja metálica o limpiador abrasivo, ni
empape la bandeja de hornear durante más de una hora puesto que pudiera
dañarse el acabado.
2. Limpie el exterior del horno y la mirilla de vidr io con un paño suave humedecido
y luego seque. Nota: No use ningún tipo de esponja o limpiador abrasivo
sobre las superficies exteriores o la mirilla de vidrio pues las rayará. Si el vidrio
se rayase, éste puede debilitarse y romperse.
3. Limpie el interior del horno con un paño húm edo y luego séquelo. Tenga
cuidado de no causar daño alguno al limpiar alrededor de los elementos
calentadores. Nota: Dentro del horno, no use esponjas metálicas, limpiadores
abrasivos o limpiadores de horno ya que podrá causar daños.
PRECAUCIÓN: Nunca sumerja el Horno QuikServe™ o el cordón eléctrico en
agua o cualquier otro líquido.
• No retire ningún componente del artefacto electrodoméstico excepto el trébedes
y la bandeja de hornear.
• Con el uso prolongado, alguna decoloración natural en el interior del artefacto
electrodoméstico ocurrirá.
8
Page 33

RECETAS
Nota: El Horno QuikServe™ no puede ser programado o puesto a funcionar con la
tapa abierta.
Quiche Fácil
2 cdas. Mantequilla
½ taza Cebolla, picada
1 taza Jamón picado
1- Masa de hojaldre de 9 pulgadas, no horneada
3 Huevos
½ cdta. Sal
¼ cdta. Pimienta negra
¾ taza Mezcla de quesos italianos
Mezcle todos los ingredientes juntos en un pequeño tazón y póngalos aparte.
Coloque la masa de hojaldre no cocida en un molde de tarta, si aún no lo ha hecho.
Centre el molde de tarta en la bandeja de hornear y coloque en el horno. Cierre l a
tapa. Encienda el horno, seleccione la función "BAKE" (hornear), use ambos
elementos del horno y ajuste el temporizador a 5 minutos. Presione el botón
"COOK" (cocinar) para confirmar los ajustes y comenzar el proceso de cocción.
Cuando hayan pasado 5 minutos, abra la tapa, retire la masa y vierta la mezcla de
huevo en la masa de hojaldre ya lista. Coloque la masa de hojaldre de vuelta en el
horno y cierre la tapa. Encienda el horno, seleccione la función "BAKE" (hornear), y
ajuste el temporizador a aproximadamente 23 minutos. Presione el botón "COOK"
(cocinar) para confirmar los ajustes y comenzar el proceso de cocción.
Focaccias de Hierbas
1 lata Galletas de suero Pillsbury Grands, 8 galletas grandes
8 cdta. Aceite de oliva
4 Dientes de ajo, finamente picados
8 cdas. Hojas de albahaca, frescas o secas
8 cdas. Queso parmesano fresco
Coloque cuatro galletas en la bandeja de hornear, parejamente espaciadas. Aplaste
o con rodillo redondee cada galleta a un tamaño de apr oximadamente 4 pulgadas
(10 cm). Cepille las partes superiores de las galletas con el aceite de oliva. Rocíe
con ajo, albahaca y queso parmesano. Coloque la bandeja de hornear en el horno y
cierre la tapa. Encienda el horno, seleccione la función "BAKE" (hornear), y ajuste
el temporizador a 9 minutos o hasta que los bordes alcancen un color marrón
dorado. Presione el botón "COOK" (cocinar) para confirmar los ajustes y comenzar
el proceso de cocción.
9
Page 34

Pizza de Pollo Alfredo
1 paquete. Masa de pizza rápida Pillsbury
½ taza Salsa Alfredo
½ taza Pechuga de pollo precocida, picada
3 cdas. Cebolla, picada
3 cdas. Pimiento verde, picado
3 cdas. Alcachofa, picada
¼ cdta. Sal de ajo
½ taza Queso de pizza, rallado grueso
Pizca Pimienta negra
Coloque una masa de pizza en la bandeja de hornear y presiónela en su lugar.
Pinche la masa en varios sitios para eliminar cualquier bolsa de aire. Coloque la
bandeja de hornear en el horno y cierre la tapa. Encienda el horno, seleccione la
función "PIZZA", ajuste el temporizador a 3 minutos, y presione "COOK" (cocinar)
para confirmar los ajustes y comenzar el proceso de cocción. Abra la tapa y retire la
bandeja de hornear y la masa de pizza del horno. Extienda la salsa de Alfredo
sobre la masa y coloque el pollo, la cebolla, los pimientos y la alcachofa por encima.
Rocíe con condimentos y queso rallado grueso. Coloque la bandeja de ho r near de
vuelta en al horno, cierre la tapa y cocine durante unos 8 a 10 minutos adicionales o
hasta que el queso burbujee y la masa esté marrón dorado.
Aperitivos de Tortilla Mexicana
6-6” Tortillas mexicanas de har ina
4 onzas Frijoles refritos
½ taza Salsa de taco
½ taza Pimiento verde, picado
½ taza Pimienta roja, picada
½ taza Cebolla verde, picada
2 tazas Mezcla de ques os mexicanos
Coloque tres tortillas mexicanas en la bandeja de hornear. Coloque la bandeja de
hornear en el horno y cierre la tapa. Encienda el horno, seleccione la función
"SNACK" (bocado), y ajuste el temporizador a 3 minutos. Presione el botón "COOK"
(cocinar) para confirmar los ajustes y comenzar el proceso de cocción. Cuando
suene la alarma, abra la tapa y retire la bandeja de hornear y las tortillas m exicanas.
Extienda los frijoles refritos de manera pareja en cada tortilla mexicana. Extienda 1
cda. de salsa de taco sobre los frijoles. Cubra con los ajíes y cebollas verdes.
Rocíe queso. Coloque la bandeja de hornear de vuelta en al hor no y hornee
durante unos 4 a 5 minutos adicionales o hasta que el queso quede derretido. Corte
en cuñas.
10
Page 35

Aperitivos Rueben Mini
Barra de pan, pan de cóctel de centeno
Chucrut, drenado
“Corned beef” (carne en conserva) seco y rebanado, rallado gruesa
Salsa Mil Islas
Queso suizo rallado grueso
Extienda en un lado de cada rebanada de pan de centeno aproximadamente 1 cda.
de salsa mil islas. Coloque encima de cada rebanada la cantidad deseada de
“corned beef" (carne en conserva) seco, chucrut, y queso suizo. Coloque el
Rueben’s en la bandeja de hornear y luego dentro del horno. Cierre la tapa.
Encienda el horno, seleccione la función "SNACK" y use ambos element os del
horno. Ajuste el temporizador a 6 minutos y presione "COOK" (cocinar) para
confirmar los ajustes y comenzar el proceso de cocción.
Galletas de Pedacitos de Chocolate
1 taza Mantequilla ablandada
¾ taza Azúcar granulado
¾ taza Azúcar moreno empacado
1 cdta. Extracto de vainilla
2 Huevos Grandes
2 ¼ tazas Harina de uso general
1 cdta. Bicarbonato de sosa
1 cdta. Sal
2 tazas Trozos de chocolate semidulce
1 taza Nueces picadas
Batir la mantequilla, el azúcar granulado, el azúcar moreno y el extracto de vainilla
en un tazón de mezcla grande hasta que todos los ingredientes queden cremosos.
Añada un huevo a la vez, batiendo hasta mucho después de cada adición.
Gradualmente incorpore en la harina el bicarbonato de sosa y la sal mientras sigue
batiendo. Agregue los trozos de chocolate y las nueces y remueva. Retire la
bandeja de hornear del horno, cierre la tapa, encienda el horno, selecc ione la
función "BAKE" (hornear), ajuste el temporizador a 3 minutos y presione "COOK"
(cocinar) para precalentar el horno. Deje caer la masa de galleta desde una
cucharadita redonda en la bandeja de hornear no engrasada. Abra la tapa y
coloque la bandeja de hornear de vuelta en el horno. Encienda el horno, seleccione
la función "BAKE" (hornear), y ajuste el temporizador a 7 a 8 minutos y presione
"COOK" (cocinar) para confirmar los ajustes y comenzar el proceso de cocción.
Deje enfriar sobre una bandeja de hornear durante 2 minutos.
11
Page 36

GARANTÍA DEL PRODUCTO
Garantía limitada de 1 año del aparato electrodoméstico
Focus Electrics, LLC (“Focus Electrics”) garantiza que este aparato no presentará fallas de
material ni fabricación durante un (1) año a partir de la fecha original de compra con prueba de
dicha compra, siempre y cuando el aparato sea operado y mantenido tal como se indica en el
manual de instrucciones provisto. Toda pieza del aparato que presente fallas será reparada o
reemplazada sin costo alguno a criterio de Focus Electrics. Esta garantía rige solamente para
el uso domestico dentro de la casa.
Esta garantía no cubre ningún daño, incluyendo la decoloración, de superficie antiadherente
alguna del aparato electrodoméstico. Esta garantía es nula y sin valor, según lo determine
exclusivamente Focus Electrics si el artefacto electrodoméstico es dañado a causa de
accidente, mal uso, abuso, negligencia, rayaduras, o si el artefacto electrodoméstico es
cambiado de algún modo.
ESTA GARANTÍA REEMPLAZA A TODAS LAS DEMÁS GARANTÍAS IMPLÍCITAS,
INCLUYENDO AQUÉLLAS DE COMERCIABILIDAD, IDONEIDAD PARA UN FIN O USO EN
PARTICULAR, DESEMPEÑO, U OTROS TIPOS, LAS CUALES QUEDAN EXCLUIDAS
MEDIANTE EL PRESENTE DOCUMENTO. FOCUS ELECTRICS RECHAZA TODA
RESPONSABILIDAD POR DAÑOS, YA SEAN DIRECTOS, INDIRECTOS, INCIDENTALES,
PREVISIBLES, CONSECUENTES O ESPECIALES QUE SURJAN DE ESTE APARATO
ELECTRODOMÉSTICO O GUARDEN RELACIÓN CON EL MISMO.
Si piensa que el artefacto electrodoméstico se ha dañado o requiere de servicio dentro de su
período de garantía, por favor póngase en contacto con el Departamento de Atención al
Cliente de Focus Electrics por el (866) 290-1851 o contáctenos por correo electrónico a la
service@focuselectrics.com
que demuestra la fecha de compra original, los recibos escritos a mano no son aceptados.
También puede requerirse que usted devuelva el aparato para su inspección y evaluación
Los gastos de devolución no son reembolsables.Focus Electrics no se hace responsable de las
devoluciones perdidas en tránsito.
. Para todas las reclamaciones de garantía, se requerirá un recibo
Válido sólo en EE.UU. y Canadá
.
REPUESTOS
Los repuestos, de estar disponibles, pueden ser pedidos directamente a Focus Electrics, LLC
de varias maneras. Ordene en línea a través de www.focuselectrics.com
electrónico a service@focuselectrics.com
escribiendo a:
Focus Electrics, LLC
Attn: Customer Service
, por teléfono llamando al (866) 290-1851, o
P. O. Box 2780
West Bend, WI 53095
Para colocar un pedido con pago mediante cheque o giro postal, póngase en contacto primero
con Atención al Cliente para que le indiquen el total de la orden. Envíe su pago junto con una
carta que indique el número de modelo o catálogo de su aparato, que puede ubicarlo en la
parte inferior o posterior de la unidad, una descripción de la parte o partes que usted solicita, y
la cantidad que desea. Su cheque deberá ser hecho a nombre de Focus Electrics, LLC.
El impuesto sobre las ventas de su estado y un recargo por gastos de envío serán añadidos al
precio total. Por favor permita un plazo de dos semanas para el procesamiento y entrega.
Este manual contiene información importante y útil sobre el uso seguro y el cuidado de su nuevo producto
Focus Electrics. Para su propia referencia, archive aquí el recibo fechado que sirve de comprobante de
compra para la garantía, y anote la siguiente información:
Fecha en que compró o recibió la unidad como regalo: __________________________________________
Dónde se efectuó la compra y el precio, si lo sabe: _____________________________________________
Número y código de fecha del producto (aparece en la parte inferior/posterior de la unidad): _____________
L5758 06/08 West Bend
®
, una Marca de Focus Electrics, LLC. Impreso en China
12
, por correo
 Loading...