

Page 1
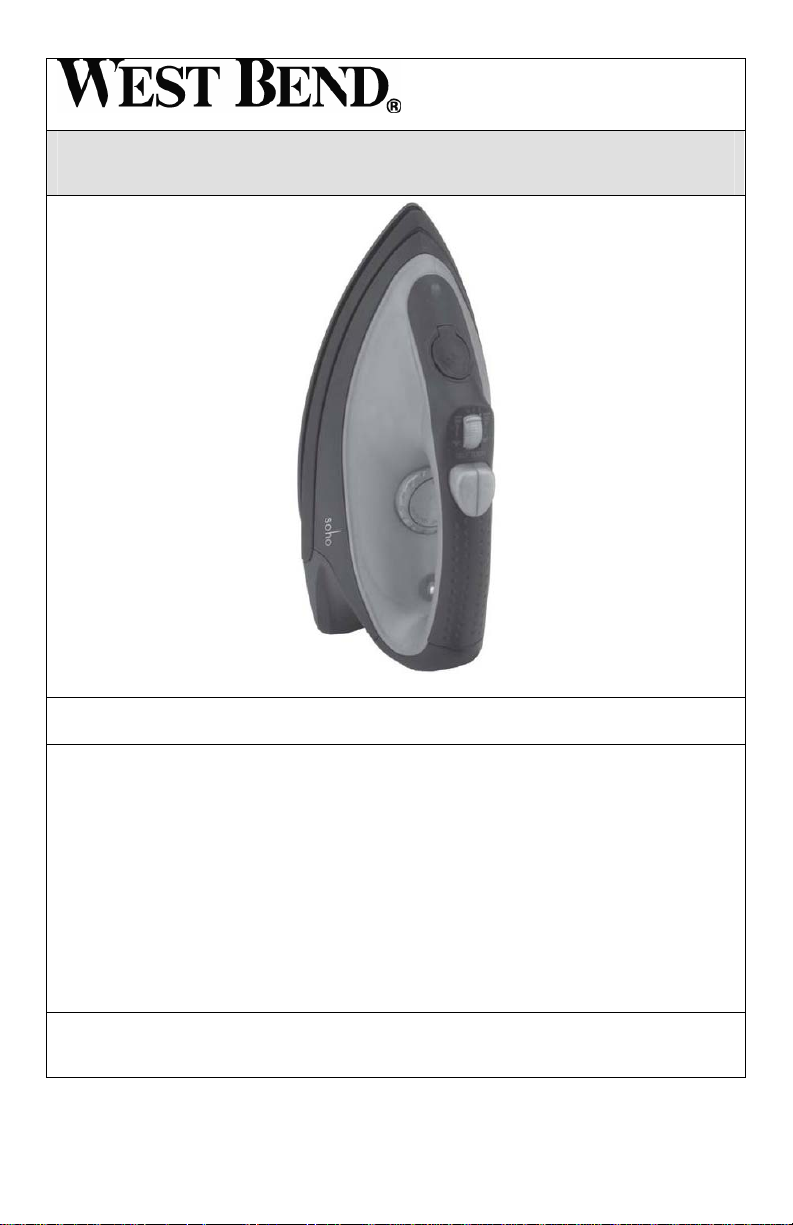
SOHO® STEAM IRON
Instruction Manual
Register this and other Focus Electrics products through our website:
www.focuselectrics.com
Important Safeguards................................................................................................ 2
Using Your Iron ......................................................................................................... 3
Ironing Tips ............................................................................................................... 5
Fabric Settings .......................................................................................................... 6
Cleaning Your Iron .................................................................................................... 6
Warranty.................................................................................................................... 7
SAVE THIS INSTRUCTION MANUAL FOR FUTURE REFERENCE
© 2008 West Bend
®
, a Brand of Focus Electrics, LLC.
www.focuselectrics.com
Page 2

IMPORTANT SAFEGUARDS
To prevent personal injury or property damage, read and follow all instructions
and warnings.
When using electrical appliances, basic safety precautions should always be
followed including the following:
• Read all instructions, including these important safeguards and the care and use
instructions in this manual.
• Use iron only for its intended use.
• To protect against electric shock, do not immerse cord, plugs, or other electric
parts in water or other liquids.
• The iron should always be turned off before plugging into or unplugging from an
outlet. Never yank cord to disconnect from outlet; instead grasp plug and pull to
disconnect.
• Do not allow the cord to touch hot surfaces. Let the iron cool completely before
putting away. Loop cord loosely around cord wrap when storing.
• Always disconnect iron from electrical outlet when filling with or emptying water,
and when not in use.
• Never operate this appliance if it has a damaged cord or plug, if it is not working
properly, if it has been dropped or damaged in any manner or dropped into
water. To avoid the risk of electric shock, do not disassemble the iron or replace
supply cord. For service information see warranty page.
• Close supervision is necessary for any appliance being used by or near
children.
• Do not leave iron unattended while plugged in or on an ironing board. Always
position iron carefully to prevent it from falling if the ironing board is accidentally
moved or the cord is pulled. Always use the heel rest.
• Burns can occur from touching hot metal parts, hot water, or steam. Use
caution when you turn a steam iron upside down or use the surge of steam –
there may be hot water in the water tank. Avoid rapid movement of the iron to
minimize hot water spillage.
• To reduce the risk of contact with hot water emitting from the steam vents,
check appliance before each use by holding it away from body and operati ng
steam button.
SPECIAL INSTRUCTIONS:
• To avoid a circuit overload, do not operate another high wattage appliance on
the same circuit.
• While use of an extension cord is not recommended, if you must use one, make
sure the cord has the same or higher wattage as the appliance (wattage is
stamped by the soleplate of the unit). Position the extension cord so that it
cannot be pulled or tripped over.
2
Page 3
SAVE THESE INSTRUCTIONS
POLARIZED PLUG – This appliance may have a polarized plug –one blade is wider
than the other. To reduce the risk of electric shock, this plug is intended to fit into a
polarized outlet only one way. If the plug does not fit fully into the outlet, reverse the
plug. If it still does not fit, contact a qualified electrician. Do not attempt to modify
the plug in any way.
1. Never pull or yank on the cord or the appliance.
2. To insert plug, grasp it firmly and guide it into outlet.
3. To disconnect the appliance, grasp plug and remove it from outlet.
4. Before each use, inspect the cord for damage. If damage is found, do not use
the appliance.
5. Let the iron cool completely before wrapping the cord. Never wrap the cord
tightly around the appliance as this could place undue stress on the cord where
it enters the appliance and cause it to fray and break.
DO NOT OPERATE THE APPLIANCE IF THE CORD SHOWS ANY DAMAGE, IF
THE APPLIANCE WORKS INTERMITTENTLY OR STOPS WORKING ENTIRELY.
SPECIAL ATTENTION: This appliance is designed with a protective coating around
the heating elements. When plugged in and operating for the first time, there may be
momentary smoking while this coating is initially heated. This presents no danger to
the user and does not indicate a defect in the unit. When using for the first time,
allow the appliance to continue heating until the smoke dissipates.
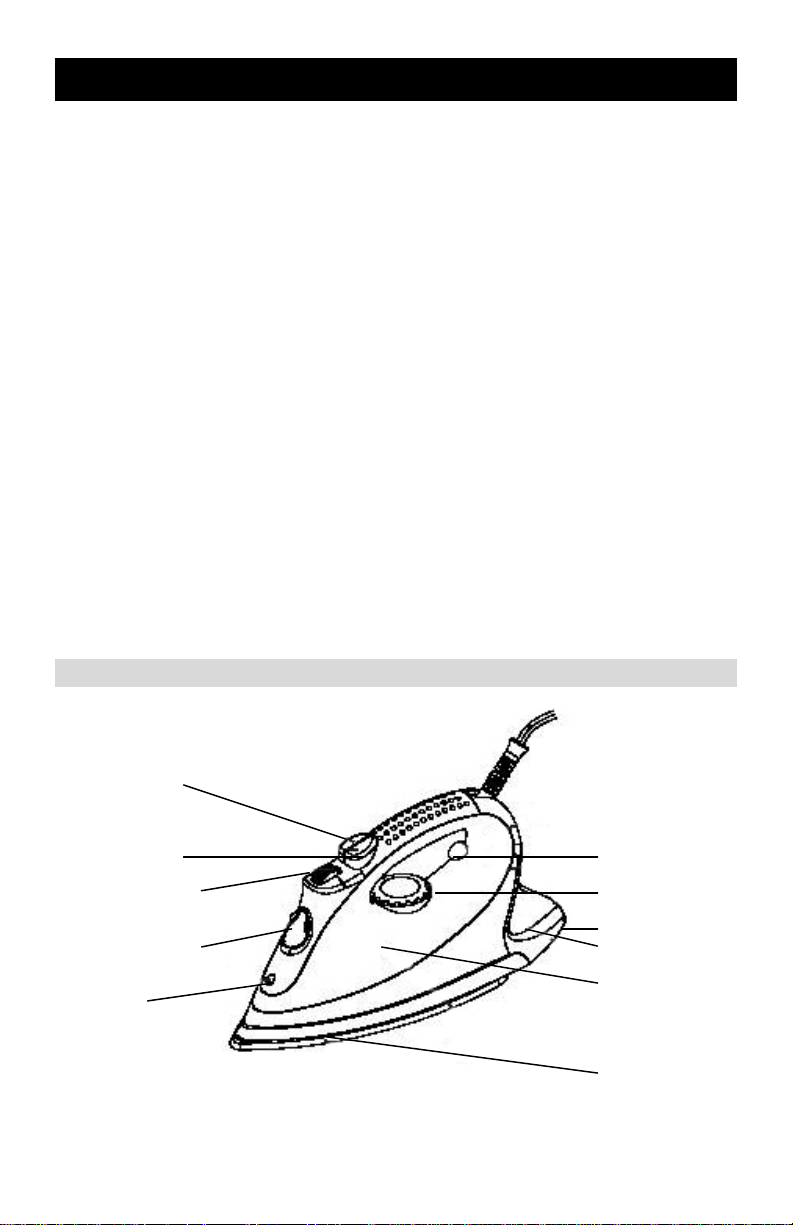
Shot of Steam
Button
Spray Button
Steam Control
Dial
Water Tank Inlet
Sprayer
USING YOUR IRON
Power
Indicator
Temperature
Dial
Heel Rest
Cord Wrap
Water Tank
Max Fill
Marking
Non-Stick
Soleplate
3
Page 4
Before first use, do the following:
• Remove any stickers or protective covers from the soleplate.
• Heat the iron to the maximum temperature and iron a piece of damp cloth for
several minutes to remove any residue on the soleplate.
• A small amount of smoke and/or odor may occur upon heating due to the
release of manufacturing oils – this is normal.
• Some minor expansion/contraction sounds may occur during heating and
cooling – this is normal.
1) Fill the water tank: Open the tank cover and hold the iron in a slightly tilted
position. Add water to the fill line. Do not exceed the “MAX” fill marking on the
side of the iron. The maximum water volume is approximately 8 ounces/1 cup.
Press the water tank cover closed.
2) Connect the cord to the power outlet. The blue light will illuminate.
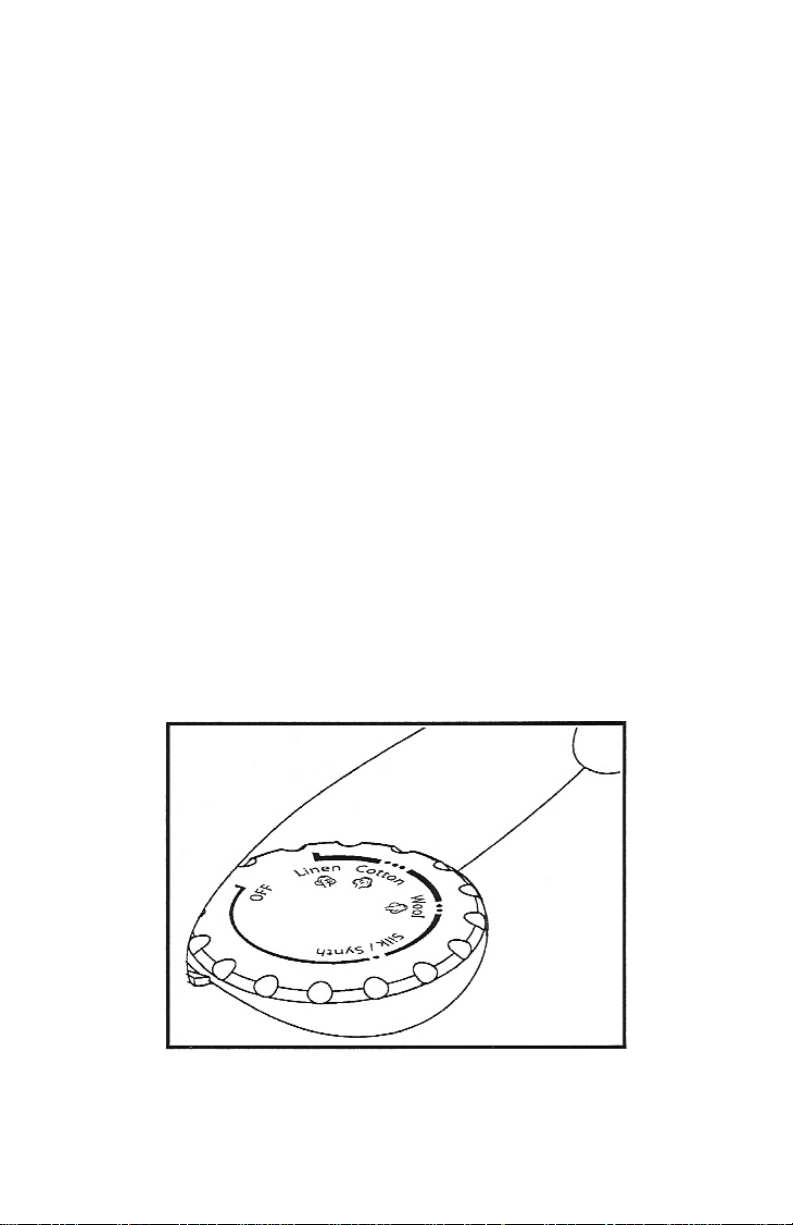
3) Select the temperature: Turn the temperature dial to the desired fabric setting.
Temperature settings are as follows:
a. •Silk/Synth: 158 - 248°F (70 - 120°C). This setting is for silks and
synthetics including nylon, polyester, acetate, acrylic, polyamide and
rayon/viscose. This position is for dry ironing only. No steam will be
produced at this setting.
b. ••Wool: 212 - 320°F (100 - 160°C). This setting is for all wool or
blended wool fabrics. It can be used with or without steam.
c. •••Cotton: 284 - 392°F (140 - 200° C). T his setting is for cotton or
cotton/linen blend fabrics. It can be used with or without steam.
d. Linen: 338 - 446°F (170 - 230°C). Use this setting for linen fabrics with
or without steam.
4
Page 5

4. Place the iron on the heel rest. Let the iron heat for a few minutes before
setting the steam level.
5. Set the steam level: Move the steam control dial to the desired steam
output level. If dry ironing is desired (always select dry setting for silks/synthetics), move the dial to the dry position mark until you hear a “click”
sound.
6. Begin ironing.
7. Spray: Press the spray button a couple of times to moisten hard-to-iron
fabrics. A fine mist will come out of the sprayer at the front of the iron.
Before spraying, make sure there is enough water in the water tank.
8. Shot of Steam: A powerful shot of steam helps remove stubborn wrinkles
or creases. Push down on the shot of steam button to activate. The shotof-steam function can only be used at the “Linen/Max” temperature setting.
9. Anti-Drip: This iron features an “Anti-Drip” steam shut-off function. The
iron automatically stops steaming at low temperatures to prevent water from
dripping out of the soleplate openings.
Ironing Tips:
• For silk, wool, and synthetic materials, iron on the reverse side of the fabric to
prevent shiny spots.
• Velvet and other textured fabrics such as corduroy that rapidly acquire shine,
crush or matte, should be ironed in one direction only (with the nap) applying
light pressure as you move the iron, Always keep the iron moving to prevent
crushing and permanent marks.
• Pure wool fabrics (100% wool) may be pressed with the iron set to a steam
position. When steam-ironing wool fabrics, shining can readily occur.
Preferably, set the steam control to the maximum position and use a dry
pressing cloth over the wool fabric. It is best to press on the reverse side if
possible.
• For blended fabrics that contain various kinds of fibers, use the lowest
temperature setting that applies to the most delicate fiber.
• To prevent staining, avoid using the spray function on silk or other delicate
fabrics.
• The iron heats up quicker than it cools down. Therefore, start ironing articles
that require the lowest temperature setting, finishing with fabrics requiring higher
settings.
• Do not let the soleplate rub against any metal materials.
• Check to see if there is a label with ironing instructions attached to the article to
be ironed. Follow these specific ironing instructions.
5
Page 6

Fabric Settings:
Fabric Type Temperature Steam Shot of
Steam
Silk and
Synthetics
Wool
Cotton
Linen Linen (Max) Yes Yes Yes
•Silk/Synth
••Wool
•••Cotton
None None Yes
Yes None Yes
Yes None Yes
Spray
CLEANING YOUR IRON
After Ironing:
1. Disconnect the power cord from the outlet. Let the iron cool completely.
2. Empty any water left in the water tank and wipe the soleplate with a damp cloth.
Please note: if using starch, it should be sprayed on the reverse side of
the fabric and the soleplate cleaned more frequently.
3. Clean the upper part of the iron with a damp cloth.
4. Wind the cord loosely around the cord wrap.
5. Store the iron horizontally on a stable surface and use a cloth to protect the
soleplate. Do not let the soleplate sit on or rub against any metal materials.
Self-cleaning Function:
1. Do this function where you have close access to a sink.
2. Fill the water tank to the Max Fill level and plug in the iron. Set the temperature
dial to the Linen/Max position. A blue light will illuminate showing the iron is
“On.” Make sure the steam control dial is in the dry position.
3. When the iron is heated, hold it over a sink and move the steam control dial
backwards to the “Self Clean” position, exerting a little force. Hold the dial in
this position during cleaning. Steam and boiling water will come out of the
soleplate flushing out impurities and flakes (if any).
4. Release the dial when all the water is completely emptied from the iron.
5. Let the iron cool then wipe the soleplate with a damp cloth and store as directed
in the “After Ironing” section above (#5).
Auto-decalcification Feature: There is a decalcification box inside this appliance
that greatly reduces the formation of calcium deposits.
6
Page 7

PRODUCT WARRANTY
Appliance 1 Year Limited Warranty
Focus Electrics, LLC (“Focus Electrics”) warrants this appliance from failures in the material
and workmanship for one (1) year from the date of original purchase with proof of purchase,
provided the appliance is operated and maintained in conformity with the provided Instruction
Manual. Any failed part of the appliance will be repaired or replaced without charge at Focus
Electrics’ discretion. This warranty applies to indoor household use only.
This warranty does not cover any damage, including discoloration, to any non-stick surface of
the appliance. This warranty is null and void, as determined solely by Focus Electrics if the
appliance is damaged through accident, misuse, abuse, negligence, scratching, or if the
appliance is altered in any way.
THIS WARRANTY IS IN LIEU OF ALL IMPLIED WARRANTIES, INCLUDING WARRANTIES
OF MERCHANTABILITY, FITNESS FOR A PARTICULAR PURPOSE, PERFORMANCE, OR
OTHERWISE, WHICH ARE HEREBY EXCLUDED. IN NO EVENT SHALL FOCUS
ELECTRICS BE LIABLE FOR ANY DAMAGES, WHETHER DIRECT, INDIRECT,
INCIDENTAL, FORSEEABLE, CONSEQUENTIAL, OR SPECIAL, ARISING OUT OF OR IN
CONNECTION WITH THIS APPLIANCE.
If you think the appliance has failed or requires service within its warranty period, please
contact the Focus Electrics Customer Service Department at (866) 290 –1851 or e-mail us at
service@focuselectrics.com
original purchase date will be required for all warranty claims. Hand-written receipts are not
accepted. Focus Electrics is not responsible for returns lost in transit.
. Return shipping fees are non-refundable. A receipt proving
Valid only in USA and Canada
REPLACEMENT PARTS
Replacement parts, if available, may be ordered directly from Focus Electrics online at
www.focuselectrics.com
address listed above, or by writing to us at:
Focus Electrics, LLC
Attn: Customer Service
P. O. Box 2780
West Bend, WI 53095
Be sure to include the catalog/model number of your appliance (located on the bottom/back of
the unit) and a description and quantity of the part you wish to order. Along with this include
your name, mailing address, Visa/MasterCard number, expiration date and the name as it
appears on the card. Checks can be made payable to Focus Electrics, LLC. Call Customer
Service to obtain purchase amount. Your state’s sales tax and a shipping/processing fee will
be added to your total charge. Please allow two (2) weeks for delivery.
This manual contains important and helpful information regarding the safe use and care of your
new Focus Electrics product. For future reference, attach dated sales receipt for warranty proof
of purchase and record the following information:
Date purchased or received as gift: _______________________________________________
Where purchased and price, if known: _____________________________________________
Item number and Date Code (shown bottom/back of product):_____________________________
, or you may call or e-mail the service department at the number/e-mail
L5742 04/08 West Bend®, a Brand of Focus Electrics, LLC. Printed in China
7
Page 8

Page 9

FER À VAPEUR SOHO®
Mode d’emploi
Enregistrez ce produit et d’autres produits Focus Electrics sur notre site Web:
www.focuselectrics.com
Précautions importantes............................................................................................ 2
Utilisation de votre fer à vapeur................................................................................. 3
Conseils pour le repassage....................................................................................... 5
Réglages de repassage ............................................................................................ 6
Nettoyage de votre fer à vapeur................................................................................ 6
Garantie .................................................................................................................... 7
CONSERVEZ CE MANUEL D’INSTRUCTIONS POUR RÉFÉRENCE FUTURE
© 2008 West Bend®, une Marque de Focus Electrics, LLC.
www.focuselectrics.com
Page 10

PRECAUTIONS IMPORTANTES
Pour empêcher toute blessure physique ou tout dommage matériel, lisez et
suivez toutes les consignes et mises en garde.
Lorsque vous utilisez des appareils électriques, les précautions de sécurité
élémentaires devraient toujours être respectées, notamment les précautions cidessous:
• Lisez toutes les instructions, notamment les présentes précautions importantes, ainsi
que les consignes pour l’entretien de ce manuel.
• Utilisez le fer uniquement pour repasser des tissus.
• Pour éviter les risques de chocs électriques et de blessures, ne plongez pas le fer
dans de l’eau ou d’autres liquides.
• Le fer doit toujours être éteint avant de le brancher ou de le débrancher au secteur.
Ne tirez jamais sur le cordon pour débrancher l’appareil mais faites-le en tirant sur la
fiche.
• Ne laissez pas le cordon toucher des surfaces chaudes. Laissez le fer refroidir
complètement avant de le ranger. Enroulez le cordon sans trop serrer pour le
rangement.
• Débranchez toujours l’appareil du secteur pour le vider ou le remplir et lorsque vous
ne l’utilisez pas.
• Ne faites jamais fonctionner cet appareil en cas de détérioration de son cordon
d’alimentation ou de sa fiche, si l’appareil ne fonctionne pas correctement, s’il est
tombé ou s’il a été endommagé d’une façon quelconque ou s’il est tombé dans l’eau.
Pour éviter les risques de chocs électriques, ne démontez pas le fer. Pour des
renseignements concernant les réparations, voir la page de garantie.
• Une surveillance étroite est nécessaire lorsqu’un appareil est utilisé à proximité
d’enfants.
• Ne laissez pas l’appareil sans surveillance lorsque celui-ci est branché au secteur ou
s’il est sur une planche à repasser. Placez toujours le fer avec précaution pour éviter
qu’il ne tombe si la planche à repasser est heurtée ou si le cordon est tiré par
accident. Utilisez toujours le talon d’appui.
• Le métal chaud, l'eau chaude et la vapeur peuvent provoquer des brûlures. Faites
attention si vous mettez le fer à vapeur à l’envers ou si vous utilisez un jet de vapeur
car il peut y avoir de l’eau chaude dans le réservoir. Évitez les mouvements rapides
avec le fer pour réduire le risque de renverser de l'eau chaude.
• Pour réduire le risque de contact avec de l'eau chaude issue des orifices de diffusion
de la vapeur, vérifiez l'appareil avant chaque utilisation en le tenant loin du corps et
en appuyant sur le bouton de vaporisation.
INSTRUCTIONS SPÉCIALES :
• Pour éviter toute surcharge du réseau électrique, n’utilisez pas d’autre appareil de
forte puissance sur le même circuit.
• L’utilisation d’un prolongateur est déconseillée mais si vous devez en utiliser un
vérifiez que le cordon du prolongateur soit prévu pour une puissance égale ou
supérieure à celle du fer (la puissance en watts est marquée sur la semelle de
l’appareil). Veiller à placer le cordon de manière à ce qu’il ne risque pas d’être
arraché ou de provoquer de trébuchement.
2
Page 11

CONSERVEZ CES CONSIGNES
FICHE POLARISÉE – Cet appareil peut être équipé d’une fiche polarisée : une lame est
plus large que l’autre. Afin de réduire tout risque de choc électrique, cette fiche est
conçue pour s’adapter à une prise secteur polarisée dans un sens uniquement. Si la fiche
ne s’enfonce pas complètement dans la prise secteur, tournez-la. Si la fiche ne s’adapte
toujours pas, contactez un électricien qualifié. N’essayez pas de modifier la fiche de
quelque manière que ce soit.
1. Ne tirez jamais sur le cordon ou l’appareil.
2. Afin d’insérer la fiche, tenez-la fermement et guidez-la dans la prise secteur.
3. Afin de débrancher l’appareil, saisissez le fiche puis retirez-la de la prise secteur.
4. Avant chaque utilisation, vérifiez le bon état du cordon. Si vous constatez un dégât,
n’utilisez pas cet appareil.
5. Laissez le fer refroidir complètement avant d’enrouler le cordon. Ne serrez pas le
cordon d’alimentation autour de l’appareil car cela pourrait surtendre le cordon à
l’endroit où il entre dans l’appareil, ce qui risquerait de provoquer son effilochement
ou sa rupture.
N’UTILISEZ PAS CET APPAREIL SI LE CORDON D’ALIMENTATION PRÉSENTE DES
SIGNES DE DÉTÉRIORATION OU SI L’APPAREIL FONCTIONNE PAR
INTERMITTENCE OU CESSE CO M P LÈTEMENT DE FONCTIONNER.
REMARQUE PARTICULIÈR E : Cet appareil est conçu avec un revêtement de protection
autour des éléments chauffants. Lorsqu’il est branché et mis en marche pour la première
fois, il est possible de voir un peu de fumée au moment de la chauffe initiale. Ce
phénomène ne présente aucun danger pour l’utilisateur et ne révèle aucun défaut de
l’appareil. Lors de la première utilisation, laissez l’appareil chauffer jusqu’à ce que la
fumée disparaisse.
Bouton d’arrêt
de la vapeur
Bouton de
pulvérisation
Molette de
contrôle de la
vapeur
Orifice du
réservoir d’eau
Pulvérisateur
UTILISATION DE VOTRE FER À VAPEUR
3 4
Puis-sance
Voyant
Commande
de la
température
Talon d'appui
Rembobineur
de cordon
Indicateur de
réservoir
plein
Semelle antiadhérente
Page 12

Avant d’utiliser le fer pour la première fois, observer les directives suivantes :
• Retirer tous les autocollants et les pellicules protectrices de la semelle.
• Préchauffer le fer à la température maximale puis repasser un chiffon humide
pendant quelques minutes pour éliminer tous les résidus qui pourraient s’être
fixés sur la semelle.
• De la fumée et/ou une certaine odeur pourront se dégager lors de la chauffe
initiale en raison des huiles de fabrication – ceci est normal.
• Vous pourrez entendre des bruits d’expansion/contraction durant la chauffe et le
refroidissement initiaux – ceci est normal.
1. Remplir le réservoir d’eau: Ouvrir le réservoir et tenir le fer légèrement
penché. Verser l’eau jusqu’à l’indicateur de réservoir plein. Ne pas dépass er
l’indicateur de réservoir plein «MAX» sur le côté du fer. Le réservoir a une
capacité maximale d’environ huit onces ou une tasse. Refermer le réservoir en
enfonçant le capuchon.
2. Brancher le cordon dans une prise électrique. Le voyant bleu s’allumera pour
indiquer que le fer est en fonction.
3. Sélectionner la temperature: Régler la commande de température sur le type
de tissu voulu. Les options de température sont les suivantes:
a. •Silk/Synth: 158 - 248°F (70 - 120°C). Utiliser ce réglage pour la soie et
les tissus synthétiques y compris le nylon, le polyester, la fibre d’acétate,
l’acrylique, le polyamide et la rayonne/viscose. Cette position est
réservée au repassage à sec. Aucune vapeur ne sera produite à ce
réglage.
b. ••Wool: 212 - 320°F (100 - 160°C). Ce réglage est réservée aux
lainages et aux tissus en laine mixte. On peut utiliser cette position avec
ou sans vapeur.
c. •••Cotton: 284 - 392°F (140 - 200° C). Ce réglage est réservé aux tissus
en coton ou aux tissus métis. On peut utiliser cette position avec ou sans
vapeur.
d. Linen: 338 - 446°F (170 - 230°C). Ce réglage est réservé aux tissus en
lin. Utiliser avec ou sans vapeur.
Page 13

4. Placer le fer sur son talon d’appui. Laisser chauffer le fer pendant quelques
minutes avant d’effectuer le réglage du niveau de vapeur.
5. Réglage du niveau de vapeur: Régler la commande du niveau de vapeur au
niveau voulu. Pour le repassage à sec (toujours sélectionner le réglage Dry
pour la soie et les tissus synthétiques), placer le cadran à la position Dry et
tourner jusqu’à entendre un « clic ».
6. Commencer le repassage.
7. Bouton de pulverization: Appuyer sur le bouton de pulvérisation à deux ou
trois reprises pour humidifier les tissus difficiles à repasser. Une fine brume
sortira du pulvérisateur à l’avant du fer. Avant d’appuyer sur le bouton,
s’assurer qu’il y a suffisamment d’eau dans le réservoir.
8. Jet de vapeur: Un puissant jet de vapeur aide à éliminer les plis tenaces.
Actionner en enfonçant le bouton de jet de vapeur. La fonction de jet de vapeur
ne peut être utilisée qu’à la position Linen/Max.
9. Dispositif antigoutte: Ce fer est doté d’une fonction d’arrêt de la vapeur de
type antigoutte. Le fer cesse automatiquement de produire de la vapeur à
basse température afin d’empêcher l’eau de s’égoutter par les orifices de la
semelle.
Conseils pour le repassage:
• Pour le repassage de la soie, de la laine et des tissus synthétiques, repasser les
tissus à l’envers pour éviter de créer des zones luisantes.
• Le velours et les autres tissus texturés comme le velours côtelé sur lesquels des
zones luisantes, écrasées ou mates peuvent apparaître rapidement doivent être
repassés dans un seul sens (sens de la couche pelucheuse) en appliq uant une
légère pression sur le fer. Toujours maintenir le fer en mouvement afin d’éviter
d’écraser le tissu ou de créer des marques permanents.
• Les tissus en laine pure (100 % laine) peuvent être repassés à la vapeur.
Pendant le repassage à la vapeur des tissus en laine, des zones luisantes
peuvent apparaître rapidement. Il est recommandé de régler la vapeur à son
niveau maximal et d’utiliser le tissu de repassage à sec sur le lainage. Il est
préférable de repasser le tissu à l’envers si cela est possible.
• Dans le cas des tissus en fibres mélangées, repasser à la température la plus
basse, soit la température recommandée pour la plupart des tissus délicats.
• Pour prévenir les taches, éviter d’utiliser la fonction de pulvérisation sur la soie
ou les tissus délicats.
• Le fer prend plus de temps à refroidir qu’à chauffer. Par conséquent,
commencer le repassage avec les articles qui requièrent des températures plus
basses en terminant avec les tissus qui exigent une température de repassage
plus élevée.
• Ne pas frotter la semelle sur des matières métalliques.
• Vérifier si l’article à repasser porte une étiquette avec instructions de repassage.
Observer ces instructions de repassage particulières.
5
Page 14

Réglages de repassage:
Type de tissu Température Vapeur Jet de vapeur Pulvérisateur
Soie et tissus
synthétiques
Laine
Coton
Lin Linen (Max) Oui Oui Oui
•Silk/Synth
••Wool
•••Cotton
Aucun Aucun Oui
Oui Aucun Oui
Oui Aucun Oui
NETTOYAGE DE VOTRE APPAREIL DE FER À VAPEUR
Après le repassage:
1. Débrancher le cordon d’alimentation de la prise. Permettre le refroidissement
complet du fer.
2. Vider le réservoir d’eau complètement et essuyer la semelle à l’aide d’un chiffon
humide. Veuillez noter que: Lorsque de l’amidon est utilisé, la
pulvérisation doit se faire à l’envers du tissu et la semelle du fer doit être
nettoyée plus fréquemment.
3. Nettoyer la partie supérieure du fer à l’aide d’un chiffon humide.
4. Enrouler le cordon de façon lâche autour du rembobineur.
5. Ranger le fer à l’horizontale sur une surface stable, la semelle reposant sur un
chiffon pour la protéger. Ne pas frotter ou déposer la semelle sur des matières
métalliques.
Fonction d’autonettoyage:
1. Exécuter cette fonction uniquement si vous disposez d’un accès immédiat à un
évier.
2. Remplir le réservoir jusqu’à l’indicateur de réservoir plein. Régler la
température à la position Linen/Max. Le voyant bleu s’allume pour indiquer que
le fer est en fonction. S’assurer que la molette de contrôle de la vapeur est à la
position Dry.
3. Pendant le réchauffement du fer, tenir l’appareil au-dessus de l’évier et
actionner la molette de contrôle de la vapeur vers l’arrière à la position « Self
Clean » en exerçant une légère pression. Tenir la molette à cette position
pendant le nettoyage. De la vapeur et de l’eau bouillante seront expulsées de la
semelle entraînant avec elles des impuretés et des éclats.
4. Relâcher la molette lorsque le fer est entièrement vide.
5. Laisser refroidir le fer et essuyer la semelle à l’aide d’un chiffon humide, puis
ranger l’appareil tel que recommandé au point 5 la secion ci-dessus, Après le
repassage.
Fonction d’autodécalcification: Cet appareil renferme une boîte de décalcification
qui réduit grandement le risque de formation de dépôts de calcium.
6
Page 15

GARANTIE DU PRODUIT
Garantie limitée d’1 an de l’appareil
Focus Electrics, LLC garantit cet appareil contre tout défaut de pièce et de main d’œuvre
pendant un (1) an à compter d el date d’achat d’origine avec un justificatif d’achat à condition
que l’appareil soit utilisé et entretenu conformément avec le Mode d’emploi de Focus Electrics.
Toute pièce défectueuse de l’appareil sera réparée ou remplacée sans frais à la discrétion de
Focus Electrics. Cette garantie s’applique en cas d’utilisation domestique en intérieur
uniquement.
La présente garantie ne couvre aucun dommage, notamment la décoloration, de toute surface
antiadhésive de l’appareil. Cette garantie est nulle et non avenue, tel que déterminé
uniquement par Focus Electrics si l’appareil est détérioré à la suite d’un accident, d’une
mauvaise utilisation, d’une utilisation abusive, d’une négligence, d’une rayure ou si l’appareil
est modifié de toute manière.
LA PRÉSENTE GARANTIE ANNULE ET REMPLACE TOUTE GARANTIE INDUITE,
NOTAMMENT LES GARANTIES DE COMMERCIALISATION, D’ADAPTATION À UN USAGE
PARTICULIER, DE PERFORMANCE, OU AUTRE QUI SONT ICI EXCLUES. EN AUCUN CAS
FOCUS ELECTRICS. NE POURRA ÊTRE TENUE POUR RESPONSABLE DE TOUT
DOMMAGE, QUE CELUI-CI SOIT DIRECT, INDIRECT, INDUIT, PRÉVISIBLE, SECONDAIRE
OU PARTICULIER, RÉSULTANT DE L’UTILISATION DE OU EN RELATION AVEC CET
APPAREIL.
Si vous pensez que cet appareil est défectueux ou nécessite des réparations pendant la durée
de sa garantie, veuillez contacter le Service clientèle de Focus Electrics au (866) 290-1851 ou
nous envoyer un e-mail à service@focuselectrics.com
pas remboursables. Une facture justifiant la date d’achat d’origine sera nécessaire pour toute
demande dans le cadre de la garantie. Les factures manuscrites ne sont pas acceptées. Focus
Electrics n’est pas responsable pour les retours perdus pendant le transport.
Valide uniquement aux USA et au Canada
. Les frais de transport de retour ne sont
PIECES DE RECHANGE
Les pièces de rechange, lorsque celles-ci sont disponibles, peuvent être commandées directement
auprès de Focus Electrics en ligne sur www.focuselectrics.com. Ou vous pouvez téléphoner ou
adresser un e-mail au service des réparations au numéro/à l’adresse e-mail ci-dessus, ou en nous
écrivant à :
Focus Electrics, LLC
Attn: Customer Service
P. O. Box 2780
West Bend, WI 53095
Assurez-vous d’indiquer le numéro de catalogue/modèle de votre appareil (situé au bas/dos de
l’appareil) et une description ainsi qu’une quantité pour la pièce que vous souhaitez commander.
Joignez à ces informations votre nom, votre adresse postale, votre numéro de carte Visa/MasterCard,
la date d’expiration et le nom du titulaire tel qu’il apparaît sur la carte. Les chèques peuvent être
libellés à l’ordre de Focus Electrics, LLC. Appelez le Service clientèle pour obtenir le montant de
l’achat. La taxe commerciale de votre état et des frais de transport/traitement seront ajoutés à votre
facturation totale. Veuillez autoriser deux (2) semaines pour la livraison.
Ce manuel contient des infor mations importantes et utiles concernant l’utilisation et l’entretien sans
danger de votre nouveau produit Focus Electrics. Pour une consultation ultérieure, fixez le ticket de
caisse daté pour avoir un justificatif d’achat pour la garantie et indiquez les informations ci-dessous:
Date d’achat ou de réception en cadeau : _____________________________________________
Lieu d’achat et prix, si connu : ______________________________________________________
Numéro de l’article et Code de date (indiqué au bas/dos du produit) : _______________________
L5742 04/08 West Bend
®
, une Marque de Focus Electrics, LLC. Imprimé en Chine
7
Page 16

Page 17

PLANCHA A VAPOR SOHO®
Manual de instrucciones
Registre éste y otros productos de Focus Electrics en nuestro sitio:
www.focuselectrics.com en Internet
Precauciones importantes......................................................................................... 2
Como usar su plancha a vapor ................................................................................. 3
Consejos de planchado............................................................................................. 5
Posiciones de temperatura........................................................................................ 6
Limpieza de su plancha a vapor................................................................................ 6
Garantía.................................................................................................................... 7
CONSERVE ESTE MANUAL DE INSTRUCCIONES COMO REFERENCIA PARA
EL FUTURO
®
© 2008 West Bend
, una Marca de Focus Electrics, LLC.
www.focuselectrics.com
Page 18

PRECAUCIONES IMPORTANTES
Para evitar lesiones personales o daños materiales, lea y acate todas las
instrucciones y advertencias.
Al utilizarse artefactos electrodomésticos, siempre deben acatarse las precauciones
básicas de seguridad incluyendo las siguientes:
• Lea todas las instrucciones, incluyendo estas precauciones importantes, así como
las instrucciones de uso y cuidado en este manual.
• Use la plancha solamente para su uso intencionado.
• Para protegerse contra descargas eléctricas, no sumerja la plancha en agua u otros
líquidos.
• La plancha deberá siempre apagarse antes de enchufarla o desenchufarla de un
tomacorriente. Nunca hale el cordón eléctrico para desconectarlo de un
tomacorriente; en vez, agarre y tire del enchufe para desconectarlo.
• No permita que el cordón eléctrico toque superficies calientes. Deje que la plancha
se enfríe antes de guardarla en su sitio. Enrolle el cordón eléctrico flojamente
alrededor de la envoltura del mismo.
• Al llenar o vaciarla de agua, siempre desconecte la plancha del tomacorriente, al
igual que cuando no esté usándola.
• Nunca opere este artefacto si tiene un cordón o enchufe eléctrico dañado, si no está
funcionando correctamente, si se ha dejado caer o ha sido dañado de cualquier
forma o ha caído al agua. Para evitar el riesgo de una descarga eléctrica, no
desarme la plancha. Para información relativa al servicio de reparaciones vea la
página de garantías.
• La supervisión cercana es necesaria en caso de que cualquier artefacto
electrodoméstico sea usado por o cerca de niños.
• No deje la plancha desatendida mientras esté enchufada o sobre una tabla de
planchar. Siempre coloque la plancha con cuidado para impedir que caiga si la tabla
de planchar es por casualidad movida o se halase del cordón eléctrico. Siempre use
el talón de apoyo.
• Pueden ocurrir quemaduras si se tocan las partes metálicas calientes, agua caliente,
o vapor. Tenga cuidado al voltear una plancha de vapor al revés o al usar el
rociador de vapor – puede haber agua caliente en el tanque de agua. Evite el
movimiento rápido de la plancha para minimizar el derramamiento de agua caliente.
• Para reducir el riesgo de contacto con la emisión de agua caliente de las aberturas
de vapor, compruebe el artefacto antes de cada uso; para ello sosténgalo alejado
del cuerpo y opere el botón de vapor.
INSTRUCCIONES ESPECIALES:
• Para evitar una sobrecarga del circuito eléctrico, no haga funcionar otro artefacto
electrodoméstico de alto vataje en el mismo circuito eléctrico.
• Aunque no se recomienda usar un cable de extensión, si debe hacerlo, cerciórese
de que el vataje del mismo sea igual o superior al del artefacto (el vataje está
estampado debajo de la placa de asiento del mismo). Coloque la extensión eléctrica
de modo que no se pueda halar de ella o tropezarse con ella.
2
Page 19

CONSERVE ESTAS INSTRUCCIONES
ENCHUFE POLARIZADO: Este artefacto tiene un enchufe polarizado, en el cual una
clavija es más grande que la otra. Para reducir el riesgo de una descarga eléctrica, este
enchufe está diseñado para encajar de una sola manera dentro del tomacorriente
polarizado. Invierta el enchufe si éste no encaja completamente en el tomacorriente. Si
aún no encaja, consulte con un electricista calificado. No trate de modificar el enchufe de
manera alguna.
1. Nunca hale o tire del cordón eléctrico o del artefacto.
2. Para insertar el enchufe, agárrelo firmemente y guíelo hacia dentro del
tomacorriente.
3. Para desconectar el artefacto, agarre el enchufe y retírelo del tomacorriente.
4. Antes de cada uso, inspeccione el cordón eléctrico de línea para asegurarse de que
no tenga daño alguno. Si se encontrase algún daño, no use el artefacto.
5. Deje que la plancha se enfríe antes de enrollar el cordón eléctrico. Nunca enrolle al
cordón eléctrico de manera apretada alrededor del artefacto ya que esto aplicará un
excesivo esfuerzo al cordón en el punto donde se introduce dentro del artefacto y
ocasionará que se deshilache y rompa.
NO HAGA FUNCIONAR EL ARTEFACTO SI EL CORDÓN ELÉCTRICO MUESTRA
CUALQUIER DAÑO O SI EL ARTEFACTO SÓLO TRABAJA INTERMITENTEMENTE
O DEJA DE FUNCIONAR POR COMPLETO.
ATENCIÓN ESPECIAL: Este artefacto está diseñado con un recubrimiento protector
alrededor de los elementos de calentamiento. Al enchufarlo y hacerlo funcionar por
primera vez, puede haber una emisión momentánea de humo mientras esta capa sea
inicialmente calentada. Esto ni representa peligro alguno para el usuario ni indica que la
unidad esté defectuosa. Al usarlo por primera vez, permita que el artefacto se siga
calentando hasta que el humo se disipe.
Botón del chorro
de vapor
Botón
vaporizador
Dial de control
del vapor
Orificio del
tanque de agua
Vaporizador
COMO USAR SU PLANCHA A VAPOR
3
Lámpara
indicadora de
energía
Dial de
temperatura
Pie de apoyo
Porta cable
Marca de
máximo nivel
del agua
Base
antiadherente
Page 20

Antes del primer uso, haga lo indicado a continuación:
• Retire toda pegatina o cubierta protectora de la base.
• Caliente la plancha a la máxima temperatura y planche sobre un trozo de paño
húmedo durante varios minutos, para retirar cualquier residuo que haya qu edado en la base.
• Durante el primer uso, puede notarse algo de humo o un olor extraño debido a
los aceites empleados en el proceso de fabricación – esto es normal.
• Asimismo, pueden notarse algunos sonidos de expansión o contracción durante
el calentamiento o enfriamiento – lo cual también es normal.
1. Llene el tanque de agua. Abra la tapa del tanque y tenga la plancha en una
posición ligeramente inclinada. Agregue agua hasta la marca de nivel. No
exceda la marca de nivel “MAX” ubicada en la parte lateral de la plancha. El
volumen máximo de agua es de aproximadamente 8 onzas/1 taza. Presione la
tapa del tanque para cerrarla.
2.
Conecte el cable al enchufe. La lámpara indicadora azul se encenderá, para
indicar que la plancha está encendida
3.
Seleccione la temperatura.Gire el dial de temperatura hasta el tipo de tela
deseado. Los niveles de temperatura son los siguientes:
•Seda/Sintético: 158° - 248°F (70° - 120°C). Esta temperatura es para
a.
sedas y sintéticos, incluyendo nylon, polyester, acetato, acrílico,
polyamida y rayón/viscosa. Esta posición es solo para planchar en
seco. No se producirá vapor en esta temperatura.
b. ••Lana: 212 - 320°F (100 - 160 °C). Esta posición es para todo tipo de
lanas y telas con mezclas de lana. Puede ser usada con o sin vapor.
c. •••Algodón: 284 - 392°F (140 - 200°C). Esta posición es para algodón
o telas con mezclas de algodón y lino. Puede ser usada con o sin
vapor.
d. Lino: 338 - 446°F (170 - 230°C). Utilice esta posición para telas de
lino, con o sin vapor.
4
Page 21

4. Coloque la plancha sobre el pie de apoyo. Deje que la plancha se caliente por
unos minutos antes de seleccionar el nivel de vapor.
5. Seleccione el vapor con el Control de vapor: Gire el Dial de control de vapor
a la posición deseada. Si desea planchar en seco (siempre seleccione la
posición Dry para Sedas/Sintéticos), gire el dial a la marca Dry hasta que oiga
un clic.
6. Comience a planchar.
7. Vaporice: Presione el Botón vaporizador un par de veces para humedecer las
telas difíciles de planchar. Una fina bruma saldrá del Vaporizador ubicado en la
parte anterior de la plancha. Antes de vaporizar, asegúrese de que haya
suficiente agua en el Tanque de agua.
8. Chorro de vapor: Un potente chorro de vapor ayuda a retirar las arrugas
difíciles o muy marcadas. Presione el Botón de chorro de vapor hacia abajo
para activarlo. La función del chorro de vapor puede usarse únicamente en la
temperatura Máxima/Lino.
9. Anti-goteo: Esta plancha está provista de una función Anti-goteo de vapor. La
plancha automáticamente detiene el vapor a bajas temperaturas para evitar que
el agua gotee por las aberturas de la base.
Consejos de Planchado:
• Para telas de seda, lana y sintéticos, planche del revés de la tela para evitar la
formación de manchas brillantes.
• El terciopelo y otras telas con textura, como el corderoy que adquiere brillo
rápidamente, se aplastan o empalidecen deben ser planchados solamente en
una dirección (la de la pelusa), y se debe aplicar una ligera presi ón al mover la
plancha. Siempre mantenga la plancha en movimiento para evitar aplastar la
pelusa y dejar marcas permanents.
• Las telas de lana pura (100% lana) se pueden planchar con la planc ha en
posición de planchado al vapor. Cuando planche telas de lana con vapor, se
pueden formar manchas brillantes rápidamente. Es preferible colocar el control
de vapor en la máxima posición y utilizar un paño seco por encima de la tela de
lana. Es mejor planchar del lado del revés, si es posible.
• Para telas con mezclas que contienen varios tipos de fibras, utilice la tem-
peratura más baja que corresponda a la fibra más delicada.
• Para evitar manchas, evite utilizar la función de vaporizador con la seda u otras
telas delicadas.
• La plancha se calienta más rápidamente de lo que se enfría. Por lo tanto,
comience por planchar las prendas que requieren la temperatura más baja y
termine con las telas que necesitan temperaturas más altas.
• No permita que la base se frote contra ningún artículo de metal.
• Verifique la presencia de una etiqueta con las instrucciones de planchado en la
prenda que va a planchar. Siga esas instrucciones de planchado específicas.
5
Page 22

Posiciones de temperatura
Tipo de tela Temperatura Vapor Chorro de
vapor
Seda y
Sintéticos
Lana
Algodón
Lino Linen (Max) Sí Sí Sí
•Silk/Synth
••Wool
•••Cotton
No No Sí
Sí None Sí
Sí None Sí
Vaporizador
LIMPIEZA DE SU PLANCHA A VAPOR
Después de Planchar:
1. Desconecte el cable del enchufe. Deje enfriar la plancha completamente.
2. Vacíe toda el agua que haya quedado en el tanque de agu a y seque la base
con un paño húmedo. Sírvase notar: Si está usando almidón, debería
vaporizarlo del lado del revés de la tela y limpiar la base más seguido.
3. Limpie la parte superior de la plancha con un paño húmedo.
4. Arrolle el cable flojamente alrededor del Porta cable.
5. Guarde la plancha en posición horizontal sobre una superficie estable, y utilice
un paño para proteger la base. No permita que la base se apoye sobre ningún
tipo de metal ni se frote con ellos.
Función de autolimpieza:
1. Utilice esta función cuando tenga acceso a una pileta ubicada cerca.
2. Llene el tanque de agua hasta el nivel máximo y enchufe la plancha. Coloqu e el
dial de temperatura en la posición Linen/Max. La lámpara indicadora azul se
encenderá indicando que la plancha está encendida. Asegúrese de que el dial
de control de vapor esté en la posición Dry.
3. Cuando la plancha esté caliente, sosténgala sobre la pileta y mueva el dial de
control de vapor hacia atrás, hasta la posición “Self Clean”, aplicando un poco
de fuerza. Mantenga el dial en esa posición mientras se está limpiando. El
vapor y el agua hirviendo saldrán por los orificios de la base y eliminarán las
impurezas y residuos (si hay alguno).
4. Suelte el dial cuando toda el agua se haya vaciado de la plancha.
5. Deje enfriar la plancha; luego seque la base con un paño húmedo y guarde la
plancha siguiendo las instrucciones de la sección “Después de Planchar”,(#5).
Característica de autodescalcificación: Hay una caja de descalcificación en el
interior de este aparato, la cual disminuye mayormente la formación de depósitos
calcáreos.
6
Page 23

GARANTÍA DEL PRODUCTO
Garantía limitada de 1 año del artefacto electrodoméstico
Focus Electrics, LLC (“Focus Electrics”) garantiza que este aparato no presentará fallas de
material ni fabricación durante un (1) año a partir de la fecha original de compra con prueba de
dicha compra, siempre y cuando el aparato sea operado y mantenido tal como se indica en el
manual de instrucciones provisto. Toda pieza del aparato que presente fallas será reparada o
reemplazada sin costo alguno a criterio de Focus Electrics. Esta garantía rige solamente para
el uso domestico dentro de la casa.
Esta garantía no cubre ningún daño, incluyendo la decoloración, de superficie antiadherente
alguna del aparato electrodoméstico. Esta garantía es nula y sin valor, según lo determine
exclusivamente Focus Electrics si el artefacto electrodoméstico es dañado a causa de
accidente, mal uso, abuso, negligencia, rayaduras, o si el artefacto electrodoméstico es
cambiado de algún modo.
ESTA GARANTÍA REEMPLAZA A TODAS LAS DEMÁS GARANTÍAS IMPLÍCITAS,
INCLUYENDO AQUÉLLAS DE COMERCIABILIDAD, IDONEIDAD PARA UN FIN O USO EN
PARTICULAR, DESEMPEÑO, U OTROS TIPOS, LAS CUALES QUEDAN EXCLUIDAS
MEDIANTE EL PRESENTE DOCUMENTO. FOCUS ELECTRICS RECHAZA TODA
RESPONSABILIDAD POR DAÑOS, YA SEAN DIRECTOS, INDIRECTOS, INCIDENTALES,
PREVISIBLES, CONSECUENTES O ESPECIALES QUE SURJAN DE ESTE APARATO
ELECTRODOMÉSTICO O GUARDEN RELACIÓN CON EL MISMO.
Si piensa que el artefacto electrodoméstico se ha dañado o requiere de servicio dentro de su
período de garantía, por favor póngase en contacto con el Departamento de Atención al
Cliente de Focus Electrics por el (866) 290-1851 o contáctenos por correo electrónico a la
service@focuselectrics.com
reclamaciones de garantía, se requerirá un recibo que demuestra la fecha de compra original.
Los recibos escritos a mano no son aceptados. Focus Electrics no se hace responsable de las
devoluciones perdidas en tránsito.
. Los gastos de devolución no son reembolsables. Para todas las
Válido sólo en EE.UU. y Canadá
REPUESTOS
Las partes de repuestos, si están disponibles, pueden pedirse directamente en línea a Focus
Electrics en www.focuselectrics.com
departamento de servicio al número telefónico o dirección de correo electrónico arriba
indicados, o escribiéndonos a:
Focus Electrics, LLC
Attn: Customer Service
P. O. Box 2780
West Bend, WI 53095
Cerciórese de incluir el número de catálogo/modelo del aparato electrodoméstico (situado en la
parte inferior/posterior de la unidad) así como la descripción y la cantidad de repuestos que
necesita. Junto con esta información, incluya su nombre, dirección postal, número de tarjeta
de crédito Visa o MasterCard, la fecha de vencimiento y el nombre tal como aparece en la
tarjeta. Los cheques pueden ser pagaderos a Focus Electrics, LLC. Llame al Departamento
de Atención al Cliente para obtener el monto de la compra. Se sumará al total el impuesto de
venta estatal que corresponda, más un cargo por despacho y procesamiento. La entrega tarda
dos (2) semanas.
Este manual contiene información importante y útil sobre el uso seguro y el cuidado de su nuevo producto
Focus Electrics. Para su propia referencia, archive aquí el recibo fechado que sirve de comprobante de
compra para la garantía, y anote la siguiente información:
Fecha en que compró o recibió la unidad como regalo: __________________________________________
Dónde se efectuó la compra y el precio, si lo sabe: _____________________________________________
Número y código de fecha del producto (aparece en la parte inferior/posterior de la unidad): _____________
, o puede llamar o enviar un correo electrónico al
L5742 04/08 West Bend®, una Marca de Focus Electrics, LLC. Impreso en China
7
Page 24

 Loading...