

Page 1
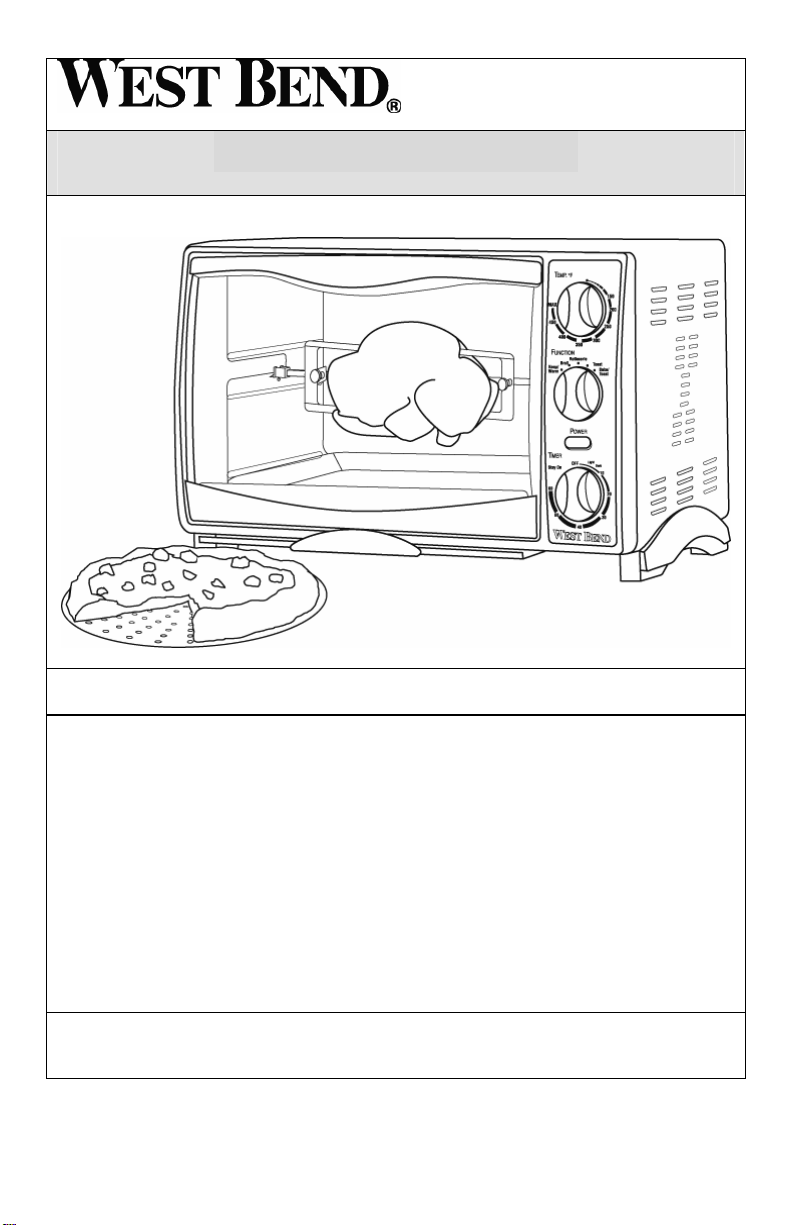
COUNTERTOP OVEN
Instruction Manual
Register this and other Focus Electrics products through our website:
www.focuselectrics.com
Important Safeguards...............................................................................................2
Operating Precautions..............................................................................................3
Accessories..............................................................................................................4
Positioning Racks..................................................................................................... 5
Using Your Countertop Oven...................................................................................5
Cleaning Your Countertop Oven ............................................................................ 11
Troubleshooting Guide........................................................................................... 12
Warranty.................................................................................................................13
SAVE THIS INSTRUCTION MANUAL FOR FUTURE REFERENCE
© 2008 West Bend®, a Brand of Focus Electrics, LLC.
www.focuselectrics.com
Page 2

IMPORTANT SAFEGUARDS
To prevent personal injury or property damage, read and follow all instructions
and warnings.
When using electrical appliances, basic safety precautions should always be
followed including the following:
• Read all instructions, including these important safeguards and the care and use
instructions in this manual.
• Do not touch hot surfaces. Use handles or knobs.
• To protect against electric shock, do not immerse cord, plugs, or other electric
parts in water or other liquids.
• Close supervision is necessary when this appliance is used by or near children.
• Unplug from outlet when not in use and before cleaning. Allow to cool before
putting on or taking off parts.
• Do not operate this appliance with a damaged cord or plug, after the appliance
malfunctions or if the appliance is dropped or damaged in any manner. If you
experience any problems with your appliance, unplug it immediately from the
electrical outlet. For service information see warranty page.
• The use of accessory attachments not recommended by Focus Electrics may
cause injuries.
• Do not use this appliance outdoors.
• Do not let cord hang over the edge of a table or counter, or touch hot surfaces.
• Do not place on or near a hot gas or electrical burner or in a heated oven.
• Extreme caution must be used when moving an appliance containing hot oil or
other hot liquids.
• To disconnect, turn all controls to “OFF”, then remove plug from wall outlet.
• Do not use appliance for other than intended use.
• This appliance has a polarized plug (one blade is wider than the other). To
reduce the risk of electric shock, this plug is intended to fit into a polarized outlet
only one way. If the plug does not fit fully into the outlet, reverse the plug. If it
still does not fit, contact a qualified electrician. Do not attempt to modify the plug
in any way.
• Use extreme caution when removing the trays or disposing of hot grease.
• Do not clean with metal scouring pads. Pieces can break off of the pad and touch
electrical parts, creating a risk of electrical shock.
• Oversize foods or metal utensils must not be inserted in this appliance as they
may create a fire or risk of electric shock.
2
Page 3
• A fire may occur if the appliance is covered or touching flammable material
including curtains, draperies, walls and the like, when in operation. Do not store
any item on top of appliance when in operation.
• Extreme caution should be exercised when using containers constructed of other
than metal or glass.
• Do not store any materials, other than manufacturers recommended accessories
in this oven when not in use.
• Do not place any of the following materials in the oven: plastic, paper or
cardboard.
• Do not cover racks, trays or any parts of the oven with aluminum foil, as
overheating will occur.
• Always turn timer control and heat selector to “OFF” and unplug the appliance
from outlet when not in use and before cleaning.
• For household use only.
To prevent personal injury or property damage, read and follow all instructions
and warnings.
OPERATING PRECAUTIONS
• This device is not intended to heat oil or other liquids.
• Do not use sharp utensils to clean oven door glass as scratching may weaken it
and cause shattering.
• Do not touch heating elements as serious burns may result.
• Set cooking containers, pans, trays and racks on a hot pad, trivet or other heat
protective surface. Do not set directly on the counter, table or other surface.
• Failure to clean after each use may result in fire hazard.
• Unplug oven and close door if fire is observed.
• A short power-supply cord is provided to reduce risks resulting from becoming
entangled in or tripping over a longer cord.
• Longer, detachable power-supply cords or extension cords are available and
may be used if care is exercised in their use. While use of an extension cord is
not recommended, if you must use one, the marked electrical rating of the
detachable power-supply cord or extension cord should be at least as great as
the electrical rating of the appliance. If the appliance is of the grounded type,
the extension cord should be a grounding-type 3-wire cord. The cord should be
arranged so that it will not hang over the counter top or tabletop where it can be
pulled by children or tripped over.
• Do not attempt to repair this product yourself.
SAVE THESE INSTRUCTIONS
3
Page 4
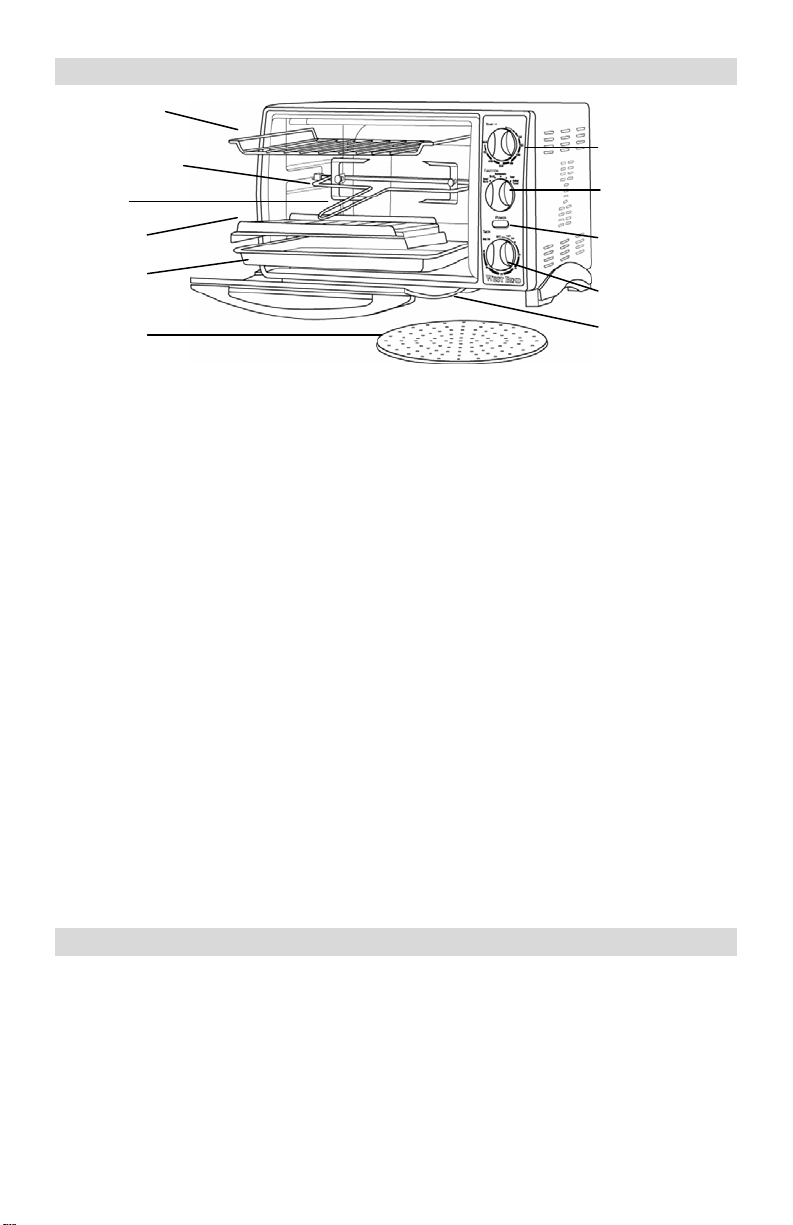
ACCESSORIES
Oven Rack
Spit, Forks &
Thumbscrew
Handle
Broil Grid
Drip Pan
Timer Control
Pizza Disc
Oven Rack: Your oven includes a chrome plated oven rack. This may be placed in
to the oven in any orientation. Turning the rack upside down will allow for more
space in relation to the heating elements allowing taller foods to fit in to the oven.
Drip Pan and Broil Grid: The broil grid allows fat to drip in to the drip pan,
channeling grease away from food, helping to prevent spattering. The broil grid is
always used with the drip pan. Never use the broil grid by itself as grease may
drip onto a heating element creating a fire hazard. The drip pan may be used by
itself for baking or reheating items.
Rotisserie, handle and forks: The rotisserie consists of a rotating rotisserie rod,
rotisserie forks, handle and thumbscrews to adjust the forks. Insert the oven rack in
the bottom position and place the drip pan on top of the oven rack to catch fat
drippings. Always tighten the thumbscrews on the forks to prevent food from
dislodging during cooking. Use the rotisserie handle provided to easily slip the rod
and food into the drive mechanism. The pointed end of the square drive rod must be
inserted into the rotating rotisserie drive inside the oven.
Pizza Disc: This oven is equipped with a 12” pizza disc to allow for even baking of pizzas. Do not bake any pizza larger than 12” in this oven.
Crumb Tray: Allows for easy disposal of crumbs.
Temperature
Control
Function
Control
Indicator
Light
Crumb Tray
CONVECTION COOKING
Convection cooking combines hot air movement by means of a fan and provides
faster cooking in many cases than regular radiant type countertop ovens. The fan
sends air to every area of the food, quickly sealing in moisture and flavor producing
more of an even temperature all around the food. If you hear a motor running
(humming) it’s the convection feature hard at work.
4
Page 5
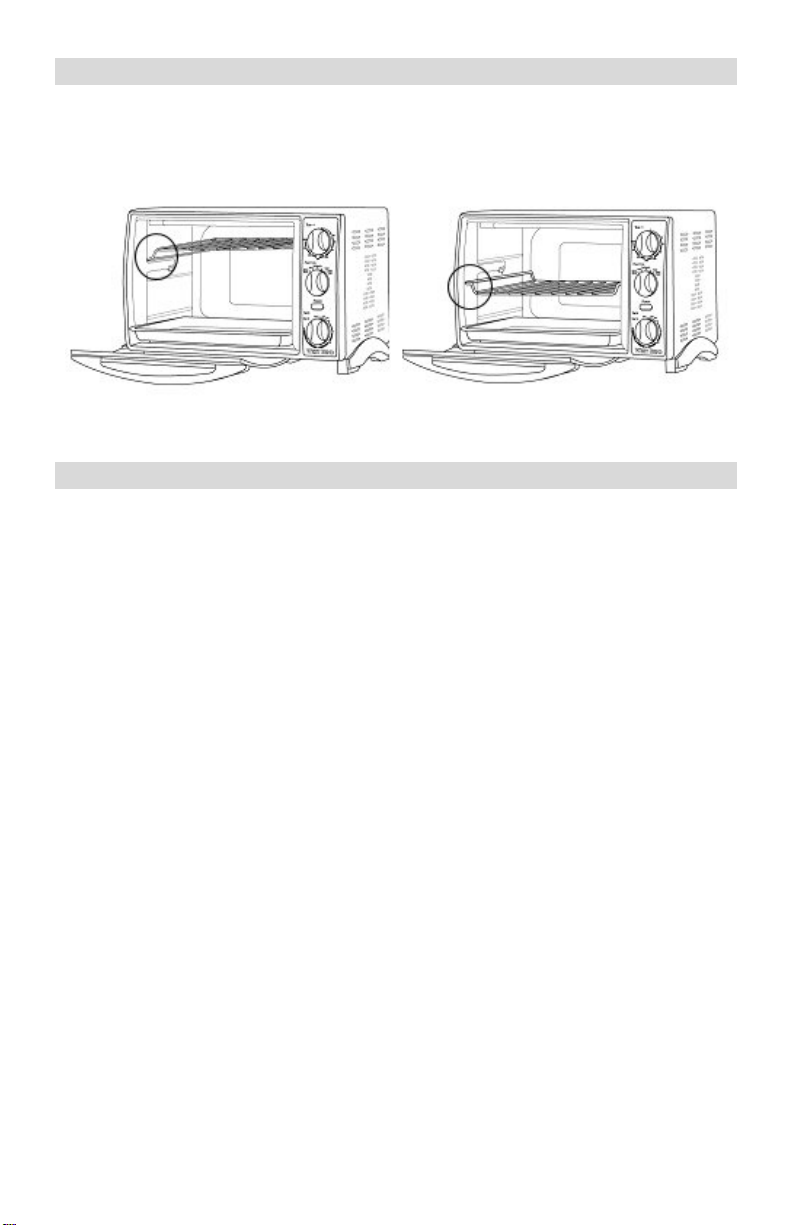
POSITIONING RACKS
To accommodate a wide variety of foods, the oven rack is reversible and has three
rack positions. The rack can be inserted in the up or down position in to any of the
rack support guides located along the oven sidewalls.
Rack in UP position Rack in DOWN position
USING YOUR COUNTERTOP OVEN
Before first use: Remove any stickers or labels from heating surfaces. Make sure
the oven is free from any paper or objects not intended for use in the oven. Clean
the interior, oven rack, pans, trays and other accessories as described in the
“Cleaning Your Countertop Oven” section of this manual.
• Some smoke and/or odor may occur upon heating due to the release of
manufacturing oils – this is normal.
• Some minor expansion/contraction sounds may occur during heating and cooling
– this is normal.
• You may hear a humming sound coming from the motor during convection
cooking – this is normal.
Recommended Pan Sizes – The following pan sizes should fit your Countertop
Oven. To be sure the pan will fit, place the pan inside the oven prior to preparing
your recipe. When baking in loaf pans, we recommend you do not fill the pan more
than half full.
• 12-cup mini muffin pan
• 6-cup muffin pan
• 8 x 4 loaf pan
• 9 x 5 loaf pan
• 8” round or square baking pan or dish
• 1-1½ quart casserole dish – most types
Note: Because your countertop oven is smaller than your regular oven, it will heat up
faster and cook in shorter periods of time. You may want to adjust the recipes
cooking time or temperature.
5
Page 6

Basic Use:
1. Plug the cord in to a 120 volt, AC electrical outlet ONLY.
2. Place the oven rack, trays and pans in to the desired position.
3. Set the function control to the desired setting.
4. Set the temperature control to the desired cooking temperature.
5. Set the timer control and allow the oven to preheat for 10 minutes. Note: When
setting the timer for less than 15 minutes, you must turn the timer past the 15
minute mark and then back to the number of minutes you wish to time. This
must be done to activate timer and turn the appliance on. Note: The “TOAST”
function requires no preheating.
6. After the oven has preheated, place the food in the proper cooking container on
to the oven rack. Note: Food should never be placed directly on the racks.
7. Set the timer control to the desired cooking time.
8. When the time has elapsed, a bell will sound and the oven will turn off
automatically. Using hot pads or oven mitts open the door and remove the
cooking container. Unplug from the electrical outlet. Allow the oven to cool
completely before cleaning.
CAUTION: Use extreme caution when opening the door and keep your hands and
face away because very hot air or steam may be released. Do not rest cooking
containers on glass door as damage could occur.
Warm Function: To be used for keeping cooked foods warm.
1. Arrange food items in proper cooking containers on to oven rack. Note: Food
should never be placed directly on to the racks.
2. Set the function control to “WARM.”
3. Set the temperature control to the desired temperature for warming. Only the
top heating elements will operate.
4. Set the timer control to the desired time setting. When the time has elapsed, a
bell will sound and the oven will turn off automatically. Use hot pads or oven
mitts, open the door and remove the cooking container. Unplug from the
electrical outlet. Allow the oven to cool completely before cleaning.
6
Page 7
Broil Function:
1. Place the broil grid in to the drip pan. Place the food item on to the broil grid (do
not allow food to hang over the grid).
2. Place the oven rack in to a rack support guide in either the up or down position.
Place the broil grid, drip pan and food on to the oven rack. Ensure there is at
least a 1” clearance between the food and the heating elements.
3. Set the function control to “BROIL.”
4. Set the temperature control to “MAX” (490°F - 254.44°C).
5. Set the timer control to the desired time. When the time has elapsed, a bell will
sound and the oven will turn off automatically. Using hot pads or oven mitts
open the door and remove the drip pan, grid and food. CAUTION: Use
extreme caution when opening the door and keep your hands and face away
because very hot air or steam may be released. Do not rest cooking containers
on the glass door because damage could occur.
Broiling Guide
Cooking results may vary; adjust these times to suit your individual requirements.
Check often during broiling to avoid overcooking. All broiling times are bas ed on
meats that are at a thawed temperature. For best results, pre-heat the countertop
oven for 15 minutes at the desired cooking temperature.
MEAT OVEN TEMP COOKING TIME
Hamburger 400°F (205°C) 15-20 min.
T-Bone Steak 400°F (205°C) 20-25 min.
Pork Chops 400°F (205°C) 20-25 min.
Lamb Chops 400°F (205°C) 20-25 min.
Chicken Legs 400°F (205°C) 30-35 min.
Fish Filets 350°F (175°C) 20-25 min.
7
Page 8
Rotisserie Function: We recommend that you do not cook anything larger than a
4lb. roast or poultry on the rotisserie. Season as desired or baste with your favorite
sauces.
1. Slide the oven rack in to the lowest rack guide position in the down position.
Place the drip pan on this rack to catch the food drippings.
2. Insert the pointed end of the spit through one of the forks, making sure the
points of the fork face in the same direction as the pointed end of the spit. Slide
the fork towards the square end of the spit and secure with the thumbscrew.
3. Place the food to be cooked onto the spit by inserting the spit (pointed a way
from you) directly through the center of the food embedding it completely.
4. Slide the second fork onto the spit at the other end of the roast or poultry.
Continue to slide the fork until it is securely embedded in the food. Secure the
fork with the thumbscrew. Ensure the food is
centered on the spit. Note: Foods may change
shape during cooking. Check to make sure there is
at least a 1” clearance between food and heating
elements at all times during the cooking cycle.
5. Insert the pointed end of the spit in to the drive socket located on the right-hand
side of the oven wall. Make sure the square end of the spit rests in the spit
support located on the left-hand side of the oven wall.
6. Set the temperature control to “MAX” (490°F - 254.44°C).
7. Set the function control to “ROTISSERIE.”
8. Turn the timer ontrol counter-clockwise to “STAY ON.” Check the meat
temperature with a reliable meat thermometer. Tip: Use an independent timer
to remind you to check the meat temperature.
9. When cooking has been completed, turn the timer control clockwise to “OFF.”
CAUTION: Use extreme caution when opening the door and keep your hands
and face away because very hot air or steam may be released. Do not rest
cooking containers on glass door as damage could occur.
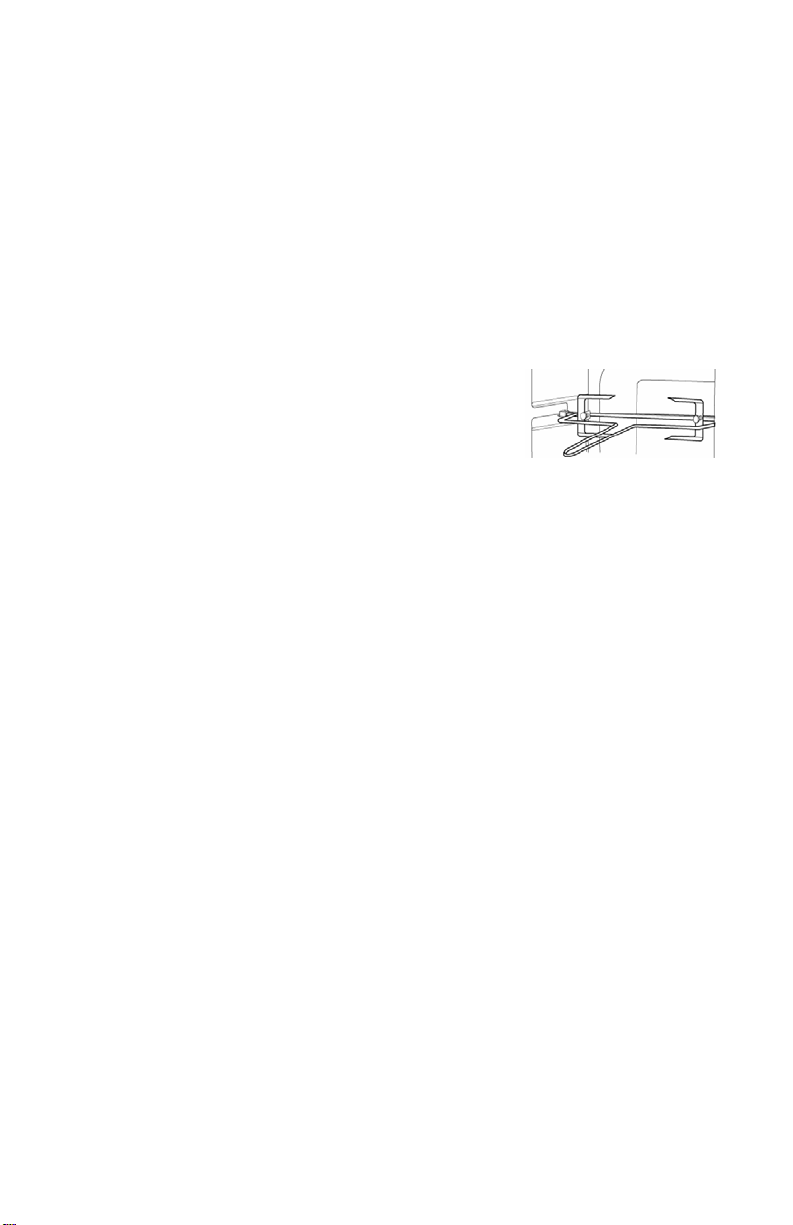
10. Using hot pads or oven mitts, open the door and remove the spit by placing the
hooks of the rotisserie handle under the grooves on either side of the spit. Lift
the left side of the spit first by lifting it up and out. Pull the spit out of the drive
socket and carefully remove the food from the oven. Unscrew the thumbscrew
from the pointed end of the spit and remove the fork. Remove the meat from
the spit and place onto a serving platter. Tip: For delicious gravy, reserve the
drippings and thicken with cornstarch or flour in a stovetop pan. DO NOT place
drip pan directly on to a stove burner.
8
Page 9

Rotisserie Cooking Guide
Cooking results may vary; adjust these times to suit your individual requirements. All
rotisserie times are based on cooking meats at a thawed temperature. For best
results, pre-heat the countertop oven for 15 minutes on the desired cooking
temperature.
MEAT OVEN TEMP TIME PER LB.
Beef Roast 300-325°F (150° -165°C) 25-30 min.
Pork Roast 325°F (165°C) 40-45 min.
Ham 300-325°F (150°-165°C) 35-40 min.
Chicken 350°F (175°C) 25-30 min.
Note: Chicken should be bound in string to prevent the chicken legs or wings from
unraveling during roasting and ensure the rotisserie assembly rotates smoothly.
Toast Function: The large capacity oven allows for toasting 4 to 6 slices of bread, 6
English muffin halves, frozen waffles or pancakes. When toasting only 1 or 2 items,
place the food in the center of the oven.
1. Ensure the crumb tray is in position.
2. Place the oven rake in to the middle rack support guide in the up position. Place
food to be toasted onto the oven rack.
3. Set the temperature control to “MAX” (490° - 254.44°C).
4. Set the function control to “TOAST” setting.
5. Set the timer control to the desired darkness (Light - Dark).
6. When toasting is complete, remove the oven rack using hot pads or oven mitts.
Tips: If toasting several batches of bread, one after the other, set the timer
control one setting lighter after the first batch as the oven will be warm and
require less toasting time.
9
Page 10
Bake/Roast Function: CAUTION: Do not use roasting bags, plastic or glass
containers in the oven as damage could occur.
1. Position the oven rack in to the bottom rack support guide.
2. Place item to be cooked (in proper cooking container) onto the oven rack.
3. Set the temperature control to the desired temperature.
4. Set the function control to “BAKE/ROAST.” Preheat the oven if necessary.
5. Turn the timer control counter-clockwise to desired time or the “STAY ON”
position. When baking is complete, turn the timer control clockwise to “OFF.”
Use hot pads or oven mitts to open the door and remove the cooking container.
CAUTION: Use extreme caution when opening the door and keep your hands
and face away because very hot air or steam may be released. Do not rest
cooking containers on glass door as damage could occur.
Baking/Roasting Guide
All roasting times are based on cooking meats at a thawed temperature. Frozen
meats may take much longer. Use of a meat thermometer is highly recommended.
Cooking results may vary; adjust these times to suit your individual requirements.
For best results, pre-heat the countertop oven for 15 minutes on the desired cooking
temperature.
MEAT OVEN TEMP TIME PER LB.
Pork Roast 325°F (165°C) 40-45 min.
Beef Roast 300-325°F (150°-165°C) 25-30 min.
Ham 300-325°F (150°-165°C) 35-40 min.
Chicken 350°F (175°C) 25-30 min.
Follow the package or recipe directions for baking times and temperatures when
baking your favorite cookies, cakes and pies. For easy cleanup, you may want to
position the drip pan in to the bottom of the oven to catch any spillover.
Baking Pizzas:
1. Place the oven rack in to the middle rack support guide.
2. Set temperature control to “MAX” (490°F - 254.44°C).
3. Set function control to “BAKE/ROAST.”
4. Preheat oven for 10 minutes. Place pizza on pizza disc and slide disc onto the
oven rack making sure it is as far back as it will go inside the oven. Bake to
desired doneness. For optimal browning performance do not insert the drip pan.
10
Page 11

Slow Cooking: Cook stews, soups, rump roast and briskets and a large variety of
other foods in your Countertop Oven by cooking 6-10 hours at the “BAKE/ROAST”
setting between 225°F (107°C) - 250°F (121°C). Use the cooking times given in
your favorite recipe.
1. Place the oven rack in to the lower or middle rack support guide.
2. Set the temperature control to 225°F (107°C).
3. Set the function control to “BAKE/ROAST.”
4. Place food to be cooked in a covered casserole dish and place on rack in oven.
5. Turn the timer control counter-clockwise to “STAY ON.” When baking is
complete, turn the timer control clockwise to “OFF.” Using hot pads or oven
mitts open the door and remove the cooking container. CAUTION: Use
extreme caution when opening the door and keep your hands and face away
because very hot air or steam may be released. Do not rest cooking containers
on glass door as damage could occur.
CLEANING YOUR COUNTERTOP OVEN
CAUTION: Before cleaning any part of the oven, always set the timer control to
“OFF,” unplug the cord from the electrical outlet and allow the oven to cool
completely.
To keep your countertop oven clean, wipe away food spills, spatters and crumbs
after each use.
1. The oven rack, drip pan, broil grid, crumb tray, rotisserie spit and forks may be
washed in warm, soapy water with a dishcloth, rinsed and dried or in an
automatic dishwasher. Do not use any metal or abrasive scouring pads or
cleaners on these parts as damage to the finish may occur.
2. Wipe the exterior of the oven and glass door with a soft, damp cloth and dry. Do
not use any type of scouring pad or cleaner on the exterior surfaces or the glass
door as scratching will occur. If glass is scratched, it can weaken and shatter.
3. Wipe the interior of the oven with a damp cloth, wipe clean and dry. Do not use
any metal or abrasive scouring pads, cleaners or oven cleaner on the inside of
oven, as damage will occur. Be careful when wiping around the heating
elements to prevent damage.
11
Page 12

TROUBLESHOOTING GUIDE
PROBLEM POTENTIAL
Overcooked/under
cooked foods
Burnt smell
Oven does not turn
on
Only one heating
element is heating
Heating element does
not stay on
Incorrect
temperature or
setting
Rack placement Racks may need to be adjusted
Food build-up
inside oven, on
heating elements
or in crumb tray.
Unit is
unplugged.
Timer is not on.
Function setting
is on “WARM”
Heating elements
will cycle on and
off to maintain the
proper
temperature.
SOLUTION
CAUSE
Adjust time or temperature.
Because your countertop oven is
smaller than your regular oven, it
will heat up faster and cook in
shorter periods of time.
to accommodate specific food
types.
Refer to “Cleaning Your Oven”
section.
Plug unit in to electrical outlet
Turn timer control to desired
setting.
Change function setting to
correct position.
12
Page 13

PRODUCT WARRANTY
Appliance 1 Year Limited Warranty
Focus Electrics, LLC (“Focus Electrics”) warrants this appliance from failures in the material
and workmanship for one (1) year from the date of original purchase with proof of purchase,
provided the appliance is operated and maintained in conformity with the provided Instruction
Manual. Any failed part of the appliance will be repaired or replaced without charge at Focus
Electrics’ discretion. This warranty applies to indoor household use only.
This warranty does not cover any damage, including discoloration, to any non-stick surface of
the appliance. This warranty is null and void, as determined solely by Focus Electrics if the
appliance is damaged through accident, misuse, abuse, negligence, scratching, or if the
appliance is altered in any way.
THIS WARRANTY IS IN LIEU OF ALL IMPLIED WARRANTIES, INCLUDING WARRANTIES
OF MERCHANTABILITY, FITNESS FOR A PARTICULAR PURPOSE, PERFORMANCE, OR
OTHERWISE, WHICH ARE HEREBY EXCLUDED. IN NO EVENT SHALL FOCUS
ELECTRICS BE LIABLE FOR ANY DAMAGES, WHETHER DIRECT, INDIRECT,
INCIDENTAL, FORSEEABLE, CONSEQUENTIAL, OR SPECIAL, ARISING OUT OF OR IN
CONNECTION WITH THIS APPLIANCE.
If you think the appliance has failed or requires service within its warranty period, please
contact the Focus Electrics Customer Service Department at (866) 290-1851, or e-mail us at
service@focuselectrics.com
warranty claims, hand written receipts are not accepted. You may also be required to return
the appliance for inspection and evaluation. Return shipping costs are not refundable. Focus
Electrics is not responsible for returns lost in transit.
. A receipt proving the original purchase date will be required for all
Valid only in USA and Canada
REPLACEMENT PARTS
Replacement parts, if available, may be ordered directly from Focus Electrics, LLC several
ways. Order online at www.focuselectrics.com
phone by calling (866)290-1851, or by writing to:
Focus Electrics, LLC
Attn: Customer Service
P. O. Box 2780
West Bend, WI 53095
To order with a check or money order, please first contact Customer Service for an order total.
Mail your payment along with a letter stating the model or catalog number of your appliance,
which can be found on the bottom or back of the unit, a description of the part or parts you are
ordering, and the quantity you would like. Your check should be made payable to Focus
Electrics, LLC.
Your state/province’s sales tax and a shipping fee will be added to your total charge. Please
allow two weeks for processing and delivery.
This manual contains important and helpful information regarding the safe use and care of your
new Focus Electrics product. For future reference, attach dated sales receipt for warranty proof
of purchase and record the following information:
Date purchased or received as gift: _______________________________________________
Where purchased and price, if known: _____________________________________________
Item number and Date Code (shown bottom/back of product):___________________________
, e-mail service@focuselectrics.com, over the
L5658B 06/08 West Bend
®
13
, a Brand of Focus Electrics, LLC. Printed in China
Page 14

FOUR A POSER SUR UN PLAN DE
TRAVAIL
Mode d’emploi
Enregistrez ce produit et d’autres produits Focus Electrics sur notre site Web:
www.focuselectrics.com
Précautions Importantes ..........................................................................................2
Précautions D’Utilisation ..........................................................................................3
Accessoires..............................................................................................................4
Positions des Grilles................................................................................................. 5
Utilisation de Votre Mini-Four...................................................................................5
Nettoyage de Votre Mini-Four................................................................................11
Guide de Dépannage.............................................................................................12
Garantie .................................................................................................................13
CONSERVEZ CE MANUEL D’INSTRUCTIONS POUR RÉFÉRENCE FUTURE
© 2008 West Bend®, une Marque de Focus Electrics, LLC.
www.focuselectrics.com
Page 15

PRECAUTIONS IMPORTANTES
Pour empêcher toute blessure physique ou tout dommage matériel, lisez et
suivez toutes les consignes et mises en garde.
Lorsque vous utilisez des appareils électriques, les précautions de sécurité
élémentaires devraient toujours être respectées, notamment les précautions cidessous :
• Lisez toutes les instructions, notamment les présentes précautions importantes, ainsi
que les consignes pour l’entretien de ce manuel.
• Ne touchez pas les surfaces chaudes. Utilisez des poignées rectangulaires ou
rondes.
• Pour vous protéger contre tout choc électrique, n’immergez pas le cordon, les fiches
ni aucune autre pièce électrique dans l’eau ni dans tout autre liquide.
• Une surveillance étroite est nécessaire lorsque vous cet appareil est utilisé par ou à
proximité d’enfants.
• Débranchez l’appareil de la prise électrique lorsqu’il n’est pas utilisé et avant de le
nettoyer. Laissez l’appareil refroidir avant la mise en place ou le retrait de pièces et
avant tout nettoyage.
• N’utilisez pas cet appareil avec un cordon abîmé ou une fiche détériorée, si l’appareil
a connu un disfonctionnement ou si l’appareil est tombé ou a été détérioré de quelque
manière que ce soit. Si vous rencontrer un problème quel qu’il soit avec votre
appareil, débranchez-le immédiatement de la prise secteur. Pour des informations
sur les réparations, voir la page de garantie.
• L’utilisation d’accessoires non recommandés par Focus Electrics risque de causer un
incendie, une électrocution ou des blessures.
• N’utilisez pas cet appareil à l’extérieur.
• Ne laissez pas pendre le cordon du bord du plan de travail ou de la table et assurez-
vous qu'il ne touche pas de surface chaude.
• Ne placez pas cet appareil sur ou à proximité d’un brûleur à gaz ou électrique chaud
ou d’un four chaud.
• Soyez extrêmement prudent lorsque vous déplacez un appareil contenant de l’huile
chaude ou tout autre liquide chaud.
• Pour débrancher, régler l’interrupteur à « OFF » et retirer ensuite la fiche de la prise
murale.
• N’utilisez pas l’appareil pour une autre utilisation que l’utilisation indiquée.
• Cet appareil est pourvu d’une fiche polarisée (une lame est plus large que l’autre).
Pour réduire le risque d’électrocution, cette fiche est conçue pour s’encastrer dans
une prise secteur polarisée dans un sens uniquement. Si la fiche ne s’insère pas
complètement dans la prise secteur, retournez la fiche. Si elle ne s’encastre toujours
pas, contactez un électricien qualifié. Ne tentez pas de modifier la fiche de quelque
manière que ce soit.
• Utilisez la plus extrême prudence lorsque vous retirez le plateau ou jetez la graisse
chaude.
• Ne le nettoyez pas à l’aide de tampons à récurer métalliques. Des morceaux risquent
de se détacher du tampon à récurer et d’entrer en contact avec les parties
électriques, créant ainsi un risque d’électrocution.
2
Page 16

• Aucun aliment de grande taille ni ustensile métallique ne doit être inséré dans cet
appareil car cela risque de provoquer un risque d’incendie ou d’électrocution.
• Un incendie risque de se produire si l’appareil est couvert d’une matière inflammable
ou entre en contact avec une telle matière, notamment les rideaux, les tentures, les
parois et des matières équivalentes, pendant son fonctionnement. Ne rangez aucun
objet au-dessus de l’appareil pendant son fonctionnement.
• Une attention extrême devrait être apportée lors de l’utilisation de récipients
constitués de matières autres que le métal ou le verre.
• Ne ranger aucun objet, autre que les accessoires recommandés par le fabricant, à
l’intérieur de ce four lorsque vous ne l’utilisez pas.
• Ne placez aucune des matières suivantes à l’intérieur du four : plastique, papier ou
carton.
• Ne couvrez pas les grilles, les tiroirs ni aucune autre des pièces du four de feuille
d’aluminium car cela provoquerait une surchauffe.
• Réglez toujours la Minuterie et le Sélecteur de source de chaleur sur « OFF » puis
débranchez l’appareil électrique de la prise secteur lorsque vous ne l’utilisez pas et
avant de le nettoyer.
• Pour une utilisation domestique uniquement.
Pour empêcher toute blessure physique ou tout dommage matériel, lisez et
suivez toutes les consignes et mises en garde.
PRECAUTIONS D’UTILISATION
• Cet appareil n’est pas conçu pour chauffer de l’huile ni tout autre liquide.
• N’utilisez pas d’ustensile tranchant pour le nettoyage de la porte vitrée du four car les
rayures risqueraient de l’affaiblir et de la faire voler en éclats.
• Ne touchez pas les éléments chauffants car des brûlures graves peuvent en résulter.
• Posez les récipients, plats, tiroirs et grilles sur une manique, une grille ou toute autre
surface résistante à la chaleur. Ne les posez pas directement sur le plan de travail,
sur la table ni sur toute autre surface.
• Le fait de ne pas nettoyer l’appareil après chaque utilisation risque de provoquer un
risque d’incendie.
• En cas d’incendie, débranchez le four puis fermez la porte du four.
• Le cordon d’alimentation fourni est court pour réduire les risques qu’une personne se
prenne les pieds ou trébuche sur un cordon plus long.
• Des cordons d’alimentations plus longs détachables ou des cordons de rallonge sont
disponibles et peuvent être utilisés à condition de faire preuve de prudence lors de
leur utilisation. Bien que l’utilisation d’un cordon de rallonge ne soit pas
recommandée, si vous devez en utiliser un, la puissance nominale indiquée pour le
cordon d’alimentation détachable ou pour le cordon de rallonge devrait être au moins
aussi importante que la puissance nominale de l’appareil. Si l’appareil est de type
raccordé à la terre, le cordon de rallonge devrait être relié à la terre et composé de
trois fils. Le cordon devrait être disposé de manière à ne pas pendre depuis le plan de
travail d’où il risque d’être tiré par des enfants ou d’où quelqu’un pourrait s’y prendre
les pieds.
• N’essayez pas de réparer cet appareil vous-même.
CONSERVEZ CES CONSIGNES
3
Page 17

ACCESSOIRES
Grille du Four
Broche,
Fourchons &
Vis à Serrage
Manuel
Poignée
Grille du Gril
Egouttoir
Disque à Pizza
Grille du Four : Votre four est livré avec une grille de four chromée. Celle-ci peut être
placée dans le four selon l’orientation de votre choix. Le fait de retourner la grille libèrera
davantage d’espace par rapport aux éléments de chauffage et permettra de placer des
aliments plus volumineux à l’intérieur du four.
Egouttoir et Grille Du Gril : La grille du gril permet à la graisse de s’écouler vers
l’égouttoir, évacuant ainsi la graisse loin des aliments afin d’éviter toute projection. La
grille du gril s’utilise toujours avec l’égouttoir. N’utilisez jamais la grille du gril seule
car la graisse risquerait de s’écouler vers un élément chauffant et de provoquer un
risque d’incendie. L’égouttoir peut être utilisé seul pour la cuisson ou le réchauffage
d’aliments.
Rôtissoire, Poignée et Fourchons : La rôtissoire est composée d’une broche de
rôtissoire pivotante, de fourchons à rôtir, d’une poignée et de vis à serrage manuel
permettant de régler les fourchons. Insérez la grille du four en position basse puis placez
l’égouttoir au-dessus de la grille du four afin de récupérer les écoulements de graisse.
Serrez toujours la vis à serrage manuel sur les fourchons afin d’empêcher les aliments de
se détacher pendant la cuisson. Utilisez la poignée de la rôtissoire fournie afin de faire
glisser facilement la broche dans le mécanisme d’entraînement. L’extrémité pointue de la
tige d’entraînement carrée doit être insérée à l’intérieur de l’entraînement de rotation de la
rôtissoire à l’intérieur du four.
Disque à Pizza : Ce four est équipé d’un disque à pizza de 12” (30 cm) pour une cuisson
homogène des pizzas. Ne cuisez aucune pizza de plus de 12” dans ce four.
Tiroir de Récupération Des Miettes : Permet de retirer facilement les miettes.
Contrôle de la
Température
Contrôle des
Fonctions
Voyant Indicateur
Contrôle de la
Minuterie
Tiroir de
Récupération des
Miettes
CUISSON PAR CONVECTION
La cuisson par convection ajoute le déplacement de l'air chaud par un ventilateur et
obtient dans la plupart des cas une cuisson plus rapide que celle qu’on obtient avec les
mini-fours à rayonnement conventionnels. Le ventilateur fait circuler l’air sur toute la
surface de l’aliment afin de conserver au plus tôt le jus et la saveur tout en équilibrant la
température autour de la nourriture. Si vous entendez tourner le moteur (ronronner) c’est
que la fonction convectrice est en train de fonctionner.
4
Page 18

POSITIONS DES GRILLES
Afin de s’adapter à une grande diversité d’aliments, la grille du four est réversible et peut
être positionnée à trois emplacements. La grille peut être insérée en position haute ou
basse dans les supports de guidage situés sur les parois latérales du four.
Grille en position HAUTE Grille en position BASSE
UTILISATION DE VOTRE MINI-FOUR
Avant la première utilisation : Retirez tout autocollant ou toute étiquette se trouvant sur
les éléments chauffants. Vérifiez que le four ne contient aucun papier ni objet non destiné
à une utilisation dans ce four. Nettoyez l’intérieur, la grille du four, les plats, les tiroirs et
les autres accessoires selon la description fournie dans la section « Nettoyage de Votre
Four/Gril » du présent manuel.
• Il est possible que de la fumée et une légère odeur se dégagent pendant le chauffage
en raison de la diffusion des huiles de fabrication : c’est tout à fait normal.
• De petits bruits d’expansion/contraction peuvent être produits pendant le chauffage et
le refroidissement : c’est tout à fait normal.
• Si vous entendez tourner le moteur (ronronner) c’est que la fonction convectrice est
en train de fonctionner : c’est tout à fait normal.
Taille recommandée pour les plats de cuisson – Les tailles suivantes devraient
convenir à votre mini-four. Pour être sûr que le plat convient, placez-le à l’intérieur du four
avant de suivre la recette. Si vous voulez cuire dans un moule à pain nous
recommandons de ne pas le remplir au-dessus de la moitié.
• Moule à 12 mini-muffins
• Moule à 6 muffins
• Moule à pain de 8 x 4 pouces
• Moule à pain de 9 x 5 pouces
• Plat de cuisson rond ou carré de 8 pouces
• Cocotte de 1-1½ quart – la plupart des modèles
Remarque : Comme votre mini-four est plus petit que votre four conventionnel, il
chauffera plus vite et les aliments seront cuits en moins de temps. Il faudra sans doute
ajuster la température ou la durée de cuisson indiquées par la recette.
5
Page 19

Utilisation de Base :
1. Branchez le cordon à une prise secteur de 120 volts CA UNIQUEMENT.
2. Placez la grille du four et les tiroirs/plats dans la position souhaitée.
3. Réglez la commande de fonction selon le réglage souhaité.
4. Réglez la commande de température selon la température de cuisson souhaitée.
5. Réglez le contrôle de la minuterie mais laissez le four en préchauffage pendant 10
minutes. Remarque :: Lorsque vous réglez la minuterie à moins de 15 minutes, vous
devez tourner au-delà du repère 15 minutes, puis revenir en arrière jusqu’au nombre
de minutes désiré. Cette opération est nécessaire pour activer la minuterie et allumer
l’appareil. Remarque : La fonction grillade légère (« Toast ») ne nécessite aucun
préchauffage.
6. Une fois le four préchauffé, placez les aliments dans un récipient adapté sur la grille
du four. Remarque : les aliments ne doivent jamais être placés directement sur les
grilles.
7. Réglez la commande de la minuterie selon le temps de cuisson souhaité.
8. Lorsque la durée est écoulée, une sonnerie retentit et le four s’éteint
automatiquement. Utilisez des gants de cuisine ou des maniques pour ouvrir la
porte puis retirez le récipient de cuisson du four. Débranchez la fiche de la prise
secteur. Laissez le four refroidir complètement avant de le nettoyer.
ATTENTION : Soyez extrêmement attentif à maintenir les mains et le visage à l’écart de
la porte lors de son ouverture car de vapeur ou de l’air chaud risquent de s’en échapper.
Ne posez pas de récipient de cuisson sur la porte vitrée car cela risque de la détériorer.
Fonction Maintien au chaud (Warm) : A utiliser pour maintenir au chaud des aliments
cuits.
1. Placez les aliments, dans des récipients adaptés, sur la grille du four. Remarque :
les aliments ne devraient jamais être placés directement sur les grilles.
2. Réglez le contrôle de fonction sur maintien au chaud « WARM ».
3. Réglez la commande de température selon la température de maintien au chaud
souhaitée. Seuls les éléments chauffants du haut fonctionneront.
4. Réglez la commande de la minuterie selon le réglage souhaité. Lorsque la durée est
écoulée, une sonnerie retentit et le four s’éteint automatiquement. Utilisez des gants
de cuisine ou des maniques pour ouvrir la porte puis retirez le récipient de cuisson
du four. Débranchez la fiche de la prise secteur. Laissez le four refroidir
complètement avant de le nettoyer.
6
Page 20

Fonction Gril :
1. Placez la grille du gril dans l’égouttoir. Placez les aliments sur la grille du gril (ne
laissez pas les aliments pendre au-delà de la grille).
2. Placez la grille du four dans les guides de support en position haute ou en position
basse. Placez la grille du gril, l’égouttoir et les aliments sur la grille du four. Vérifier
la présence d’au moins 1” (2,50 cm) d’espace dégagé entre les aliments et les
éléments de chauffage.
3. Réglez le contrôle de fonction sur grill « BROIL ».
4. Réglez le contrôle de température au « MAX » (490°F/254.44°C).
5. Positionnez la commande de la minuterie sur le réglage souhaité. Lorsque le temps
imparti est écoulé, une sonnerie retentit et le four s’éteint automatiquement. Utilisez
des gants de cuisine ou des maniques pour ouvrir la porte puis retirez l’égouttoir, la
grille et les aliments du four. ATTENTION : Soyez extrêmement attentif à maintenir
les mains et le visage à l’écart de la porte lors de son ouverture car de vapeur ou de
l’air chaud risquent de s’en échapper. Ne posez pas de récipient de cuisson sur la
porte vitrée car cela risquerait de la détériorer.
Guide Pour Les Grillades
Les résultats peuvent varier. Ajustez le temps de cuisson à votre goût. Vérifiez souvent
pendant la cuisson au grilloir pour éviter toute cuisson excessive. Tous les temps de
rôtissage sont indiqués pour des viandes non congelées. Pour un meilleur résultat,
préchauffez le mini-four pendant 15 minutes à la température de cuisson souhaitée.
VIANDE TEMP DURÉE
Hamburger 400°F (205ºC) 15-20 min.
Steak d’aloyau 400°F (205ºC) 20-25 min.
Côtelettes de porc 400°F (205ºC) 20-25 min.
Côtelettes d’agneau 400°F (205ºC) 20-25 min.
Cuisses de poulet 400°F (205ºC) 30-35 min.
Filets de poisson 350°F (175º C) 20-25 min.
7
Page 21

Fonction Rôtissoire : Nous vous recommandons de ne faire cuire dans la rôtissoire
aucune pièce de viande dont le volume serait supérieur à celui d’un rôti/d’une volaille de 4
livres. Assaisonnez selon votre convenance ou badigeonnez la viande avec vot r e sauce
préférée.
1. Faites glisser la grille du four dans les guides de l’emplacement le plus bas de la
grille. Placez l’égouttoir sur cette grille pour récupérer les écoulements de jus de
viande.
2. Insérez l’extrémité pointue de la broche à travers l’un des fourchons, en vous
assurant que les pointes du fourchon sont orientées dans la même direction que
l’extrémité de la broche. Faites glisser le fourchon vers l’extrémité de la broche puis
fixez-le à l’aide de la vis à serrage manuel.
3. Placez la viande à rôtir sur la broche en insérant la broche (orientée dans la direction
opposée par rapport à vous) directement à travers le milieu de la pièce de viande,
qui doit recouvrir entièrement la broche.
4. Faites glisser le second fourchon dans la broche à l’autre extrémité du rôti ou de la
volaille. Continuez à enfoncer le fourchon jusqu’à ce que celui-ci soit solidement
fixée au milieu du morceau de viande. Fixez le
fourchon au moyen de la vis à serrage manuel.
Vérifiez que le morceau de viande se trouve au centre
de la broche. Remarque : Les aliments peuvent
changer de forme pendant la cuisson. Vérifiez leur
forme pour vous assurer qu’il reste toujours un espace dégagé d’un minimum de 1”
(2,50 cm) entre les aliments et les éléments chauffants pendant le cycle de cuisson.
5. Insérez l’extrémité pointue de la broche dans le support d’entraînement situé du côté
droit de la paroi du four. Assurez-vous que l’extrémité carrée de la broche repose sur
le support de broche situé du côté gauche de la paroi du four.
6. Réglez le contrôle de température au « MAX » (490°F-254.44°C).
7. Réglez le contrôle de fonction sur rôtissoire « ROTISSERIE ».
8. Faites pivoter la minuterie dans le sens inverse des aiguilles d’une montre pour que
le four reste en marche « STAY ON ». Vérifiez la température de la viande à l’aide
d’un thermomètre alimentaire fiable. Astuce : Utilisez une minuterie distincte pour
vous rappeler de vérifier la température de la viande.
9. Lorsque la cuisson est terminée, tournez le bouton de la minuterie dans le sens des
aiguilles d’une montre pour l’arrêter « OFF ».
ATTENTION : Soyez extrêmement attentif à maintenir les mains et le visage à
l’écart de la porte lors de son ouverture car de vapeur ou de l’air chaud risquent de
s’en échapper. Ne posez pas de récipient de cuisson sur la porte vitrée car cela
risque de la détériorer.
10. A l’aide de gants de cuisine ou de maniques, ouvrez la porte et retirez la broche en
plaçant les crochets de la poignée de la Rôtissoire au-dessous des encoches de
chaque côté de la broche. Soulevez le côté gauche de la broche en premier en la
soulevant pour la sortir du four. Retirez la broche du support d’entraînement puis
retirez prudemment la viande du four. Dévissez la vis à serrage manuel de
l’extrémité pointue de la broche puis retirez la fourchette. Retirez la viande de la
broche puis placez-la sur un plat pour le service. Astuce : Pour une délicieuse sauce
de viande, réservez les jus de viande puis faites-les épaissir en y ajoutant de
l’amidon de maïs ou de farine, en les réchauffant dans une casserole sur votre
gazinière. Ne placez PAS l’égouttoir directement sur la gazinière.
8
Page 22

Guide Pour Rôtir
Les résultats peuvent varier. Ajustez le temps de cuisson à votre goût. Tous les temps de
rôtissage sont indiqués pour des viandes non congelées. Pour un meilleur résultat,
préchauffez le mini-four pendant 15 minutes à la température de cuisson souhaitée.
VIANDE TEMP TEMPS PAR LIVRE
Rôti de boeuf 300-325°F (150º-165ºC) 25-30 min.
Rôti de Porc 325°F (165ºC) 40-45 min.
Jambon 300-325°F (150º-165ºC) 35-40 min.
Poulet 350°F (175ºC) 25-30 min.
Remarque : Le poulet doit être ficelé pour éviter que les cuisses ou les ailes se détachent
pendant la cuisson et pour que le système de rôtisserie puisse tourner sans problème.
Fonction Grillade Légère : La grande capacité du four permet de faire dorer 4 à 6
tranches de pain, 6 demi muffins anglais, gaufres surgelées ou crêpes. Lorsque vous
faites dorer seulement 1 ou 2 tranches, placez-les au centre du four.
1. Vérifiez que le tiroir de récupération des miettes est correctement placé.
2. Placez la grille du four sur les guides de support du milieu en position haute. Placez
les aliments à dorer sur la grille du four.
3. Réglez le contrôle de température au « MAX » (490°F-254.44°C).
4. Réglez le contrôle de fonction sur grillade légère « TOAST ».
5. Réglez la commande de la minuterie selon la couleur souhaitée (Légèrement doré –
Foncé).
6. Lorsque la grillade est terminée, retirez la grille du four à l’aide de maniques ou de
gants de cuisine.
Astuces : Si vous préparez plusieurs rôties, les unes après les autres, abaissez la
minuterie d’un cran après la première fournée car le four sera déjà chaud et il faudra
donc moins de temps pour la cuisson.
9
Page 23

Fonction Cuisson/Rôtissoire : ATTENTION : N’utilisez pas de sacs à rôtir, de récipients
en plastique ou en verre à l’intérieur du four car cela risquerait de provoquer des
dégradations.
1. Placez la grille du four sur le guide de support inférieur.
2. Placez les aliments à cuire (dans un récipient de cuisson adapté) sur la grille du four.
3. Positionnez la commande de température sur le réglage de température souhaité.
4. Réglez la commande fonction sur « BAKE/ROAST » (Cuire/Rôtir). Préchauffez le
four le cas échéant.
5. Tournez le bouton de la minuterie dans le sens inverse des aiguilles d’une montre
pour obtenir le temps de cuisson souhaité ou en position de marche continue
« STAY ON ». Lorsque la cuisson est finie, tournez le bouton de la minuterie dans le
sens des aiguilles d’une montre pour obtenir la position d'arrêt « OFF ». Utilisez des
gants de cuisine ou des maniques pour ouvrir la porte puis retirez le récipient de
cuisson du four. ATTENTION : Soyez extrêmement attentif à maintenir les mains et
le visage à l’écart de la porte lors de son ouverture car de vapeur ou de l’air chaud
pourraient s’en échapper. Ne posez pas de récipient de cuisson sur la porte vitrée
car cela risque de la détériorer.
Guide de Cuisson/Rôtissage
Tous les temps de rôtissage sont indiqués pour la cuisson des viandes non congelées.
Les viandes congelées peuvent prendre bien plus de temps. Nous recommandons
vivement l’utilisation d’un thermomètre à viande. Les résultats peuvent varier. Ajustez le
temps de cuisson à votre goût. Pour un meilleur résultat, préchauffez le mini-four pendant
15 minutes à la température de cuisson souhaitée.
VIANDE TEMP TEMPS PAR LIVRE
Rôti de Porc 325°F (165ºC) 40-45 min.
Rôti de Boeuf 300-325°F (150º-165ºC) 25-30 min.
Jambon 300-325°F (150º-165ºC) 35-40 min.
Poulet 350°F (175ºC) 25-30 min.
Suivez les indications de l'emballage ou de la recette pour le temps de cuisson et la
température lorsque vous préparez vos biscuits, tartes et gâteaux favoris. Pour un
nettoyage facile, placez le ramasse-sauce en position basse afin de récupérer tout ce qui
pourrait déborder.
Cuisson des pizzas :
1.
Placez la grille du four sur les guides de support du milieu.
2. Réglez le contrôle de température au « MAX » (490°F-254.44°C).
3. Réglez la commande fonction sur « BAKE/ROAST » (Cuire/Rôtir).
4. Préchauffez le four pendant 10 minutes. Placez la pizza sur le disque à pizza puis
faites-le glisser sur la grille du four en vous assurant qu’il est le plus au fond du four
possible. Faites cuire selon votre convenance. Pour bien dorer la pizza ne mettez
pas le ramasse-sauce dans le four.
10
Page 24

Cuisson Lente Faites cuire les ragoûts, les soupes, les rôtis de croupe, les poitrines de
boeuf et une grande variété d’autres plats dans votre mini-four en cuisant pendant 6 à 10
heures sur « BAKE/ROAST » (Cuire/Rôtir) entre 225ºF et 250ºF (105 et 120ºC). Utilisez
le temps de cuisson indiqué par la recette que vous préférez.
1. Placez la grille du four sur les guides de support du bas ou du milieu.
2. Réglez le thermostat à 225ºF (105ºC).
3. Réglez la commande de fonction sur « BAKE/ROAST » (Cuire/Rôtir).
4. Placez les aliments à cuire dans une cocotte couverte que vous mettrez sur la grille
du four.
5. Faites pivoter la minuterie dans le sens inverse des aiguilles d’une montre sur
« STAY ON » pour que le four reste en marche. Lorsque la cuisson est finie, tournez
le bouton de la minuterie dans le sens des aiguilles d’une montre pour obtenir la
position « OFF » (arrêt). Utilisez des gants de cuisine ou des maniques pour ouvrir la
porte puis retirez le plat du four. ATTENTION : Soyez extrêmement attentif à
maintenir les mains et le visage à l’écart de la porte lors de son ouverture car de la
vapeur ou de l’air chaud pourraient s’en échapper. Ne posez pas de récipient de
cuisson sur la porte vitrée car cela risque de l’endommager.
NETTOYAGE DE VOTRE FOUR/GRIL
ATTENTION : Avant de nettoyer toute pièce du four, réglez toujours la minuterie sur
« OFF » (désactivée), débranchez le cordon de la prise secteur puis laissez le four
refroidir complètement.
Pour maintenir votre mini-four propre, essuyez tout aliment renversé, toute projection et
miette après chaque utilisation.
1. L’égouttoir de la grille du four, la grille du gril, le tiroir de récupération des miettes, la
broche et les fourchons de la rôtissoire peuvent être lavés à l’eau chaude
savonneuse à l’aide d’un torchon à vaisselle, rincés puis séchés ou passés au lavevaisselle automatique. N’utilisez aucun tampon à récurer métallique ou abrasif ni
aucun détergent sur ces pièces car cela risquerait de détériorer les finitions.
2. Essuyez l’extérieur du four et la porte vitrée à l’aide d’un chiffon doux et humide puis
séchez-les. N’utilisez aucun type de tampon à récurer ni de détergent sur les
surfaces extérieures ni sur la porte vitrée car cela risquerait de créer des rayures.
En cas de rayure du verre, celui-ci risque de s’affaiblir et de voler en éclats.
3. Essuyez l’intérieur du four à l’aide d’un torchon humide puis séchez-le. N’utilisez
aucun tampon à récurer métallique ou abrasif, aucun détergent ni nettoyant pour four
à l’intérieur du four car cela l’endommagerait. Soyez prudent en essuyant à
proximité des éléments de chauffage afin d’éviter toute détérioration de ceux-ci.
11
Page 25

GUIDE DE DEPANNAGE
PROBLEME CAUSE POTENTIELLE SOLUTION
Aliments
trop/pas assez
cuits
Odeur de brûlé
Le four ne se met
pas en marche
Seul un élément
de chauffage
fonctionne
L’élément de
chauffage ne
reste pas en
marche
Température ou réglage
incorrects
Position de la grille Les grilles ont parfois besoin d’être
Accumulaiton d’aliments
à l’intérieur du four, sur
les éléments de
chauffage ou dans le
tiroir de récupération des
miettes
L’appareil est débranché.
La minuterie n’est pas
activée.
La fonction paramétrée
est Maintien au chaud
« WARM »
Les éléments de
chauffage s’activent et
se désactivent par cycles
pour maintenir la
température de
chauffage qui convient.
Régler la durée ou la température .
Votre mini-four étant plus petit que
votre four ordinaire, il se réchauffe
plus rapidement et cuit pendant
des périodes plus courtes.
réglées pour s’adapter à certains
types d’aliments.
Voir la section consacrée au
« Nettoyage de Votre Four/Gril ».
Branchez l’appareil à une prise
secteur.
Réglez la minuterie sur la durée
souhaitée.
Modifiez le réglage de fonction
pour choisir un réglage adapté.
12
Page 26

GARANTIE DU PRODUIT
Garantie limitée d’1 an de l’appareil
Focus Electrics, LLC garantit cet appareil contre tout défaut de pièce et de main d’œuvre
pendant un (1) an à compter d el date d’achat d’origine avec un justificatif d’achat à condition
que l’appareil soit utilisé et entretenu conformément avec le Mode d’emploi de Focus Electrics.
Toute pièce défectueuse de l’appareil sera réparée ou remplacée sans frais à la discrétion de
Focus Electrics. Cette garantie s’applique en cas d’utilisation domestique en intérieur
uniquement.
La présente garantie ne couvre aucun dommage, notamment la décoloration, de toute surface
antiadhésive de l’appareil. Cette garantie est nulle et non avenue, tel que déterminé
uniquement par Focus Electrics si l’appareil est détérioré à la suite d’un accident, d’une
mauvaise utilisation, d’une utilisation abusive, d’une négligence, d’une rayure ou si l’appareil
est modifié de toute manière.
LA PRÉSENTE GARANTIE ANNULE ET REMPLACE TOUTE GARANTIE INDUITE,
NOTAMMENT LES GARANTIES DE COMMERCIALISATION, D’ADAPTATION À UN USAGE
PARTICULIER, DE PERFORMANCE, OU AUTRE QUI SONT ICI EXCLUES. EN AUCUN CAS
FOCUS ELECTRICS. NE POURRA ÊTRE TENUE POUR RESPONSABLE DE TOUT
DOMMAGE, QUE CELUI-CI SOIT DIRECT, INDIRECT, INDUIT, PRÉVISIBLE, SECONDAIRE
OU PARTICULIER, RÉSULTANT DE L’UTILISATION DE OU EN RELATION AVEC CET
APPAREIL.
Si vous pensez que cet appareil est défectueux ou nécessite des réparations pendant la durée
de sa garantie, veuillez contacter le Service clientèle de Focus Electrics au (866) 290-1851 ou
nous envoyer un e-mail à service@focuselectrics.com
d’origine sera nécessaire pour toute demande dans le cadre de la garantie, les factures
manuscrites ne sont pas acceptées. Il possible que l’on vous demande de renvoyer l’appareil
pour inspection et évaluation. Les frais de transport de retour ne sont pas remboursables.
Focus Electrics n’est pas responsable pour les retours perdus pendant le transport.
Valide uniquement aux USA et au Canada
. Une facture justifiant la date d’achat
PIECES DE RECHANGE
Les pièces de rechange, si elles sont disponibles, peuvent être commandées directement chez
Focus Electrics, LLC de plusieurs façons. Commandez en ligne à www.focuselectrics.com
courriel à service@focuselectrics.com
, par téléphone au (866)290-1851, ou en écrivant à :
Focus Electrics, LLC
Attn: Customer Service
P. O. Box 2780
West Bend, WI 53095
Pour les commandes payées par chèque ou mandat, veuillez d'abord prendre contact avec le
service à la clientèle pour obtenir le montant total de la commande. Envoyez votre paiement
avec une lettre indiquant le modèle ou le numéro de catalogue de votre appareil (ce numéro
est situé au-dessous ou au dos de l’appareil) et fournissez une description de la pièce ou des
pièces ainsi que la quantité que vous souhaitez commander. Les chèques sont à écrire à
l'ordre de Focus Electrics, LLC. Les taxes sur les ventes de votre état ou province et des frais
d’expédition seront ajoutés à votre prix
traitement et la livraison
Ce manuel contient des infor mations importantes et utiles concernant l’utilisation et l’entretien sans
danger de votre nouveau produit Focus Electrics. Pour une consultation ultérieure, fixez le ticket de
caisse daté pour avoir un justificatif d’achat pour la garantie et indiquez les informations ci-dessous:
Date d’achat ou de réception en cadeau : _____________________________________________
Lieu d’achat et prix, si connu : ______________________________________________________
Numéro de l’article et Code de date (indiqué au bas/dos du produit) : _______________________
total. Il faut compter environ deux semaines pour le
, par
L5658B 06/08 West Bend®, une Marque de Focus Electrics, LLC. Imprimé en Chine
13
Page 27

HORNO DE ENCIMERA
Manual de instrucciones
Registre éste y otros productos de Focus Electrics en nuestro sitio:
www.focuselectrics.com en Internet
Precauciones Importantes........................................................................................2
Precauciones de Funcionamiento............................................................................3
Accesorios................................................................................................................4
Colocación de las Rejillas ........................................................................................5
Cómo Usar su Horno de Encimera...........................................................................5
Cómo Limpiar su Horno de Encimera .................................................................... 11
Guía de Solución de Problemas.............................................................................12
Garantía.................................................................................................................13
CONSERVE ESTE MANUAL DE INSTRUCCIONES COMO REFERENCIA PARA
EL FUTURO
© 2008 West Bend, una Marca de Focus Electrics, LLC.
www.focuselectrics.com
Page 28

PRECAUCIONES IMPORTANTES
Para evitar lesiones personales o daños materiales, lea y acate todas las
instrucciones y advertencias.
Al utilizarse artefactos eléctricos, siempre deben acatarse las precauciones básicas de
seguridad incluyendo las siguientes:
• Lea todas las instrucciones, incluyendo estas precauciones importantes, así como las
instrucciones de uso y cuidado en este manual.
• No toque las superficies calientes. Use las agarraderas o las perillas.
• Para protegerse contra descargas eléctricas no sumerja el cable, enchufes, u otras
partes eléctricas en agua u otros líquidos.
• Se requiere de supervisión adulta cuando cualquier artefacto electrodoméstico sea
usado por o cerca de niños.
• Desenchufe el aparato del tomacorriente cuando no esté en uso y antes de limpiarlo.
Deje que se enfrie antes de poner o quitar alguna parte, y antes de limpiar.
• No haga funcionar este artefacto electrodoméstico con el cordón eléctrico o el
enchufe dañado, después que el artefacto llegase a funcionar mal, o si el artefacto
se ha dejado caer o se ha dañado de alguna manera.Si usted experimenta algún
problema con su máquina, desenchúfela inmediatamente del tomacorriente. Para
información relativa al servicio de reparaciones vea la página de garantías.
• El uso de accesorios no recomendados por Focus Electrics puede causar lesiones.
• No use este aparato a la intemperie.
• No permita que el cordón eléctrico cuelgue del borde de un mostrador, mesa u otra
superficie, o que toque superficies calientes.
• No la coloque en o cerca de un quemador caliente de gas o eléctrico o en un horno
caliente.
• Se debe tener extrema precaución al mover un artefacto electrodoméstico que
contenga aceite caliente u otros líquidos calientes.
• Para desconectar apague la unidad y luego desenchufe de la pared.
• No utilice el aparato para usos distintos del indicado.
• Este artefacto tiene un enchufe polarizado (una clavija es más ancha que la otra).
Para reducir el riesgo de descarga eléctrica, este enchufe está diseñado para encajar
de una sola manera en un tomacorriente polarizado. Invierta el enchufe si éste no
encaja completamente en el tomacorriente o en el cable de extensión. Si todavía no
encaja, póngase en contacto con un electricista calificado. No trate de modificar el
enchufe de manera alguna.
• Tenga extremo cuidado al sacar la bandeja o al desechar la grasa caliente.
• No la limpie con esponjas metálicas. Pedazos pueden desprenderse de la esponja y
tocar partes eléctricas, creando un riesgo de descarga eléctrica.
• La comida demasiado grande o los utensilios metálicos no deben insertarse en este
artefacto electrodoméstico ya que pueden causar un fuego o una descarga eléctrica.
2
Page 29

• Un incendio pudiera iniciarse si al artefacto en funcionamiento lo cubriesen o tocasen
materiales inflamables, tales como cortinas, colgaduras, paredes, y similares. No
almacene ningún artículo encima del artefacto electrodoméstico mientras esté en
operación.
• Debe tenerse extremo cuidado al usar recipientes construidos de materiales que no
sean de metal o vidrio.
• Mientras este horno no esté en uso, no almacene en él ningún material que no sea
alguno de los accesorios recomendados por el fabricante.
• No coloque ninguno de los materiales siguientes en el horno: plástico, papel o carton.
• No cubra las rejillas, bandejas o parte alguna del horno con hojas de aluminio ya que
ocasionará sobrecalentamiento.
• Cuando el horno no se esté usando y antes de la limpiarlo, siempre gire al
Temporizador de control y al Selector del nivel de calor a la posición “OFF” (apagado)
y desenchúfelo del tomacorriente.
• Para uso doméstico en interiores solamente.
Para evitar lesiones personales o daños materiales, lea y acate todas las
instrucciones y advertencias.
PRECAUCIONES DE FUNCIONAMIENTO
• Este dispositivo no está diseñado para calentar aceite u otros líquidos.
• No use utensilios afilados para limpiar la puerta de vidrio del horno pues si la rayase
pudiera debilitarla y causar que se haga añicos.
• No toque los elementos calentadores pues podría sufrir quemaduras serias.
• Coloque los recipientes para cocinar, bandejas y rejillas sobre una almohadilla
térmica, un trébede u otra superficie que proteja contra el calor. No coloque el
electrodoméstico directamente sobre la encimera, mesa o cualquier otra superficie.
• El no limpiarlo tras cada uso puede resultar en un potencial peligro de incendio.
• Desenchufe el horno y ciérrele la puerta si se observa fuego.
• Se suministra un cordón eléctrico corto para reducir los riesgos que resultan de
enredarse o tropezarse con un cordón eléctrico más largo.
• Hay disponibles cordones de alimentación eléctrica desmontables más largos o
extensiones eléctricas y pueden ser utilizados si se ejerce cuidado al usarlos.
Mientras el uso de una extensión eléctrica no es recomendado, si usted debe usar
una, la capacidad eléctrica nominal marcada en el cordón desmontable de
alimentación eléctrica o la extensión eléctrica deberá ser al menos la misma que la
capacidad eléctrica nominal del artefacto electrodoméstico. Si el artefacto
electrodoméstico es del tipo conectado a tierra, la extensión eléctrica deberá ser un
cordón eléctrico de 3 hilos con conexión a tierra. El cordón eléctrico debería ser
extendido de tal manera que no pase sobre encimeras o mesas donde pueda ser
tirado por niños o tropezarse con el mismo.
• No trate de reparar este artefacto electrodoméstico usted mismo.
CONSERVE ESTAS INSTRUCCIONES
3
Page 30

ACCESORIOS
Rejilla del
Horno
Asador,
Horquillas &
Tornillo
Mango
Parrilla Para
Asar
Bandeja de
Goteo
Disco Para
Pizza
Control de
Temperatura
Control de
Funciones
Temporizador de
Control
Luz Indicadora
Bandeja de
Migas
Rejilla del Horno: Su horno incluye una rejilla de horno cromada. Esta puede colocarse
en el horno en cualquier orientación. Al voltear la rejilla tendrá más espacio en relación a
los elementos calentadores lo que permite que alimentos más altos puedan caber en el
horno.
Bandeja de Goteo y Parrilla Para Asar: La parrilla para asar permite que la grasa
gotee a la bandeja de goteo y encauce la grasa lejos del alimento, lo cual ayuda a
prevenir el salpicado. La parrilla para asar siempre debe usarse conjuntamente con la
bandeja de goteo. Nunca use la parrilla para asar por sí sola ya que la grasa puede
gotear sobre un elemento calentador y crear un riesgo de incendio. La bandeja de
goteo puede ser usada por sí sola para hornear o recalentar alimentos.
Asador Giratorio, Mango y Horquillas: El asador giratorio consiste en una vara
giratoria, horquillas, un mango y tornillos de apriete manual para ajustar las horquillas.
Inserte la rejilla del horno en la posición inferior y coloque la bandeja de goteo encima de
la rejilla para recoger el pringue. Siempre apriete los tornillos de apriete manual en las
horquillas para impedir que la comida se suelte durante la cocción. Use el mango
proporcionado con el asador giratorio para meter sin mayores dificultades la vara y la
comida en el mecanismo de accionamiento. El extremo puntiagudo de la vara de
accionamiento cuadrada debe insertarse en el motor del asador giratorio dentro del
horno.
Disco Para Pizza: Este horno está equipado con un disco de 12” para pizzas para hornearlas de manera pareja. Dentro de este horno no hornee pizzas mayores de 12”.
Bandeja de Migas: Permite deshacerse fácilmente de las migas.
COCCIÓN POR CONVECCIÓN
La cocción por convección combina el movimiento de aire caliente por medio de un
ventilador y en muchos casos proporciona una cocción más rápida que los hornos de
encimera regulares de calor radiante. El ventilador envía el aire a cada área del
alimento, con lo que rápidamente sella la humedad y el sabor, y produce una temperatura
más pareja alrededor de todo el alimento. Si usted oye el ruido de un motor (zumbido),
es el elemento de convección que está funcionando.
.
4
Page 31

COLOCACIÓN DE LAS REJILLAS
Para acomodar una amplia variedad de alimentos, la rejilla del horno es reversible y se
puede colocar en tres posiciones. La rejilla puede ser insertada en posición hacia arriba
o hacia abajo en cualquiera de las guías de apoyo de rejillas localizadas en las paredes
laterales de horno.
Rejilla hacia ARRIBA Rejilla hacia ABAJO
CÓMO USAR SU HORNO DE ENCIMERA
Antes del primer uso: Retire cualquier etiqueta adhesiva de las superficies de
calentamiento. Asegúrese de que el horno esté libre de cualquier papel u objeto que no
deba usarse en el horno. Limpie el interior, la rejilla, las bandejas y demás accesorios del
horno tal como se describe en la sección “Cómo limpiar su Horno de encimera” de este
manual.
• Al calentarlo podrá emitirse una pequeña cantidad de humo y/o un leve olor a causa
de la emanación de aceites usados en la fabricación - esto es normal.
• Durante el calentamiento y enfriamiento pudieran ocurrir algunos ruidos menores de
expansión y contracción - esto es normal.
• Quizás escuche un zumbido proveniente del motor durante la cocción por convección
– este es normal.
Tamaños de Moldes Recomendados – los siguientes tamaños de moldes y fuentes de
hornear deberían caber en su Horno de Encimera. Para asegurarse de que el molde o
fuente quepa, colóquelo dentro del horno antes de preparar su receta. Al hornear en
moldes para pan, le recomendamos que no llene el molde a más de la mitad.
• Molde de 12 tazas para mini-molletes
• Molde de 6 tazas para molletes
• Molde para pan de 8 x 4
• Molde para pan de 9 x 5
• Bandeja o fuente de hornear redonda o cuadrada de 8”
• Cazuela de 1-1 ½ cuartos de galón – la mayoría de los tipos de cazuelas
Nota: Debido a que su horno de encimera es más pequeño que su horno regular, se
calentará más rápido y cocinará en períodos más cortos del tiempo. Usted quizás desee
ajustar el tiempo de cocción o la temperatura de las recetas.
5
Page 32

Uso Básico:
1. Enchufe el cordón eléctrico SOLAMENTE a un tomacorriente de corriente alterna de
120 voltios.
2. Coloque la rejilla del horno y las bandejas/moldes en la posición deseada.
3. Ajuste el control de funciones al ajuste deseado.
4. Ajuste el control de temperatura a la temperatura de cocción deseada.
5. Ajuste el Control temporizador y permita que el horno se precaliente durante 10
minutos. Nota: Cuando fije el temporizador en menos de 15 minutos, debe girarlo
más allá de la marca de 15 minutos y luego volver a la cantidad de minutos
deseados. Esto debe hacerlo para activar el temporizador y encender la unidad.
Nota: La función Tostar no requiere precalentamiento.
6. Cuando el horno se haya precalentado, coloque la comida (en un recipiente
apropiado para cocinar) sobre la rejilla del horno. Nota: Los alimentos nunca
deberán ser colocados directamente sobre las rejillas.
7. Ajuste el temporizador de control al tiempo deseado.
8. Cuando el tiempo haya pasado, sonará una campana y el horno se apagará
automáticamente. Abra la puerta y saque el recipiente para cocinar usando
almohadillas térmicas o guantes de cocina.
que el horno se enfríe por completo antes de limpiarlo.
Desenchufe del tomacorriente. Permita
PRECAUCIÓN: Tenga mucho cuidado en mantener las manos y la cara alejadas de la
puerta al abrirla ya que vapor o aire caliente puede ser liberado. No apoye los
recipientes de cocinar sobre la puerta de vidrio pues pueden dañarla.
Función Recalentar: Se usa para mantener calientes a los alimentos ya cocinados.
1. Disponga sobre la rejilla del horno a las piezas de alimentos colocadas dentro de
recipientes para cocinar apropiados. Nota: Los alimentos nunca deberán ser
colocados directamente sobre las rejillas.
2. Coloque el control de funciones en la posición “WARM” (recalentar).
3. Ajuste el control de temperatura a la temperatura deseada para el recalentamiento.
Sólo funcionarán los elementos calentadores superiores.
4. Ajuste el temporizador de control al tiempo de calentamiento deseado. Cuando el
tiempo haya pasado, sonará una campana y el horno se apagará automáticamente.
Abra la puerta y saque el recipiente para cocinar usando almohadillas térmicas o
guantes de cocina .
completo antes de limpiarlo.
Desenchufe del tomacorriente. Permita que el horno se enfríe por
6
Page 33

Función Asar a la Parrilla:
1. Coloque la parrilla para asar dentro de la bandeja de goteo. Coloque la pieza a asar
sobre la parrilla (no permita que el alimento cuelgue sobre ésta).
2. Coloque la rejilla del horno dentro de una de sus guías de soporte, bien sea en
posición hacia abajo o hacia arriba. Coloque la parrilla para asar, la bandeja de
goteo y la pieza a asar sobre la rejilla del horno. Asegure de que haya al menos un
espacio de 1” (2.5 cm) entre el alimento y los elementos calentadores.
3. Ajuste el control de función a la posición “BROIL” (asar a la parrilla).
4. Ajuste el control de temperatura a “MAX” (490°F - 254.44°C).
5. Ajuste el temporizador de control al tiempo deseado. Cuando el tiempo haya
pasado, sonará una campana y el horno se apagará automáticamente. Abra la
puerta y retire la bandeja de goteo, la parrilla y la pieza asada usando almohadillas
térmicas o guantes de cocina. PRECAUCIÓN: Tenga mucho cuidado en mantener
las manos y la cara alejadas de la puerta al abrirla ya que vapor o aire caliente
puede ser liberado. No apoye los recipientes de cocinar sobre la puerta de vidrio
pues pueden dañarla.
Guía Para Asar
La resultados de la cocción pueden variar; ajuste estos tiempos a fin de satisfacer sus
requisitos individuales. Mientras se asen, controle a menudo los alimentos para evitar
que se cocinen de más. Todos los tiempos de asado están basados en carnes a una
temperatura descongelada. Para los mejores resultados, precaliente el horno de
encimera durante 15 minutos a la temperatura de cocción deseada.
CARNE
TEMPERATURA
DEL HORNO
TIEMPO DE
COCCIÓN
Hamburguesa 400°F (204°C) 15-20 minutos.
Bistec T-bone 400°F (204°C) 20-25 minutos.
Chuletas de cerdo 400°F (204°C) 20-25 minutos.
Chuletas de cordero 400°F (204°C) 20-25 minutos.
Piernas de pollo 400°F (204°C) 30-35 minutos.
Filetes de pescado 350°F (177°C) 20-25 minutos.
7
Page 34

Función Asador Giratorio: Le recomendamos que en el asador giratorio no cocine
ningún asado o ave mayor de 4 libras. Condimente a su gusto o rocíe con sus salsas
favoritas.
1. Deslice la rejilla del horno en la posición de guía de rejilla más baja en posición
hacia abajo. Coloque la bandeja de goteo sobre esta rejilla para recolectar los
pringues que goteen del asado.
2. Inserte el extremo puntiagudo del asador a través de una de las horquillas,
asegurándose de que las puntas de la horquilla miren en la misma dirección que el
extremo puntiagudo del asador. Deslice la horquilla hacia el extremo cuadrado del
asador y asegúrelo en su sitio con el tornillo de apriete manual.
3. Coloque el alimento a cocinarse en el asador insertando éste (apuntándolo en
dirección contraria a usted) directamente a través del centro del alimento y
atravesándolo completamente.
4. Deslice la segunda horquilla sobre el asador al otro extremo del asado o ave. Siga
deslizando la horquilla hasta que quede bien empotrada dentro de la pieza a asar.
Asegure la horquilla con el tornillo de apriete manual.
Asegúrese de que la pieza esté centrada en el asador.
Nota: Los alimentos puede cambiar de forma durante
la cocción. En todo momento durante el ciclo de
cocción, asegúrese de que exista un espacio de al
menos 1” (2.5 cm) entre el alimento y los elementos calentadores.
5. Inserte el extremo puntiagudo del asador en el encaje impulsor localizado al lado
derecho de la pared del horno. Asegúrese de que el extremo cuadrado del asador
esté apoyándose sobre el soporte del asador localizado a la izquierda de la pared
del horno.
6. Ajuste el control de temperatura a “MAX” (490°F - 254.44°C).
7. Ajuste el control de funciones a la posición “ROTISSERIE” (asador giratorio).
8. Gire el temporizador de control hacia la izquierda a la posición “STAY ON”
(mantener encendido). Compruebe la temperatura de la carne con un termómetro
de carne confiable. Sugerencia: Use un temporizador independiente para
recordarle medir la temperatura de la carne.
9. Cuando se haya completado la cocción, gire el temporizador de control en la
dirección de las agujas del reloj a la posición “OFF” (apagado).
PRECAUCIÓN: Tenga mucho cuidado en mantener las manos y la cara alejadas de
la puerta al abrirla ya que vapor o aire caliente pueden ser liberados. No apoye los
recipientes de cocinar sobre la puerta de vidrio pues pueden dañarla.
10. Usando almohadillas térmicas o guantes de cocina, abra la puerta y retire el asador
colocando los ganchos del mango del asador giratorio bajo los surcos a ambos lados
del asador. Alce primero el lado izquierdo del asador levantándolo hacia arriba y
hacia afuera. Saque el asador del encaje impulsor y con cuidado retire el alimento
del horno. Desatornille el tornillo de apriete manual del extremo puntiagudo del
asador y retire la horquilla. Retire la carne del asador y colóquela sobre la fuente de
servir. Sugerencia: Para preparar una salsa deliciosa, guarde los pringues y
espéselos con maizena o harina en una cacerola. NO coloque la bandeja de goteo
directamente sobre el quemador de la estufa.
8
Page 35

Guía Para Cocinar Con el Asador Giratorio
La resultados de la cocción pueden variar; ajuste estos tiempos para satisfacer sus
requisitos individuales. Todos los tiempos de cocción con el asador giratorio están
basados en carnes a una temperatura descongelada. Para los mejores resultados,
precaliente el horno de encimera durante 15 minutos a la temperatura de cocción
deseada.
CARNE
Asado de carne de vaca 300-325°F (149-163°C) 25-30 minutos.
Asado de carne de cerdo 325°F (163° C) 40-45 minutos.
Jamón 300-325°F (149- 163°C) 35-40 minutos.
Pollo 350°F (177°C) 25-30 minutos.
TEMPERATURA DEL
HORNO
TIEMPO POR LIBRA.
Nota: El pollo deberá atarse con un cordel para prevenir que las piernas o alas se abran
durante el proceso de asado y para asegurarse de que el ensamble del asador giratorio
gire sin obstáculos.
Función Tostar: El horno de gran capacidad permite tostar 4 a 6 rebanadas de pan, 6
mitades de molletes ingleses, wafles congelados o panqueques. Al tostar sólo 1 o 2
piezas, colóquelas en el centro del horno.
1. Asegure de que la bandeja de migas está en su debida posición.
2. Coloque la rejilla del horno en la guía de soporte del medio en posición viendo hacia
arriba. Coloque las piezas a tostarse sobre la rejilla del horno.
3. Ajuste el control de temperatura a “MAX” (490° - 254.44°C).
4. Ajuste el control de funciones a la posición “TOAST” (tostar).
5. Ajuste el temporizador de control al grado de tostado deseado (Light - Dark) (ligero –
oscuro).
6. Al terminar de tostar, retire la rejilla del horno usando almohadillas térmicas o guantes de
cocina.
Sugerencias: Si está tostando varias hornadas de pan, una tras otra, después del primer
lote ajuste el temporizador de control a un punto de tostado más ligero ya que el horno
estará caliente y requerirá de menos tiempo para tostar.
9
Page 36

Función Hornear/Asar: PRECAUCIÓN: No use en el horno bolsas para as ar,
recipientes plásticos o de vidrio pues podrían causar daños.
1. Coloque la rejilla del horno dentro de la guía de soporte inferior.
2. Coloque la pieza a cocinar (dentro de un recipiente para cocinar apropiado) sobre la rejilla
del horno.
3. Ajuste el control de temperatura a la temperatura deseada.
4. Ajuste el control de funciones a “BAKE/ROAST” (hornear/asar). Precaliente el horno si
fuese necesario.
5. Gire el control temporizador en dirección contraria a las agujas del reloj al tiempo deseado
o la posición "STAY ON" (permanecer encendido). Al concluir el horneado, gire el
temporizador de control en dirección de las agujas del reloj a la posición “OFF” (apagado).
Abra la puerta y retire el recipiente para cocinar usando almohadillas térmicas o guantes
de cocina . PRECAUCIÓN: Tenga mucho cuidado en mantener las manos y la cara
alejadas de la puerta al abrirla ya que vapor o aire caliente pueden ser liberados. No
apoye los recipientes de cocinar sobre la puerta de vidrio pues pueden dañarla.
Guía Para Hornear/Asar
Todos los tiempos de asado están basados en carnes a una temperatura descongelada.
Las carnes congeladas pueden tomar mucho más tiempo. El uso de un termómetro de
carne es altamente recomendado. La resultados de la cocción pueden variar; ajuste
estos tiempos para satisfacer sus requisitos individuales. Para los mejores resultados,
precaliente el horno de encimera durante 15 minutos a la temperatura de cocción
deseada.
CARNE
TEMPERATURA DEL
HORNO
TIEMPO POR LIBRA.
Asado de Carne deCerdo 325°F (163°C) 40-45 minutos.
Asado de Carne de Vaca 300-325°F (149-163°C) 25-30 minutos.
Jamón 300-325°F (149-163°C) 35-40 minutos.
Pollo 350°F (177°C) 25-30 minutos.
Al hornear sus galletas, pasteles y tartas favoritas, siga las instrucciones del paquete o la
receta para los tiempos y temperaturas de horneado. Para una limpieza fácil, quizás
desee colocar la bandeja de goteo en el fondo del horno para atrapar cualquier derrame.
Horneado de pizzas:
1. Coloque la rejilla del horno en la guía de soporte del medio.
2. Ajuste el control de temperatura a “MAX” (490°F - 254.44°C).
3. Ajuste el control de funciones en la posición “BAKE/ROAST” (hornear/asar).
4. Precaliente el horno durante 10 minutos. Coloque la pizza sobre el disco para
pizzas y deslícelo sobre la rejilla del horno asegurándose de que entre lo más
adentro posible en el horno. Hornee hasta el grado deseado. Para un dorado
óptimo no inserte la bandeja de goteo.
10
Page 37

Cocción Lenta: Cocine en su horno de encimera estofados, sopas, asado de cadera y
pecho de res y una gran variedad de otras comidas cocinando 6-10 horas con la función
”BAKE/ROAST” (hornear/asar) ajustada una temperatura entre 225°F (107°C) y 250°F
(121°C). Use los tiempos de cocción dados en su receta favorita.
1. Coloque la rejilla del horno en la guía de soporte de abajo o en la del medio.
2. Ajuste el control de temperatura a 225°F (107°C).
3. Ajuste el control de funciones a la posición “BAKE/ROAST” (hornear/asar).
4. Coloque la comida a cocinarse en una cazuela tapada y coloque ésta última sobre la
rejilla en el horno.
5. Gire el Temporizador de control en dirección contraria a las agujas del reloj a la
posición “STAY ON” (mantener encendido). Al concluir el horneado, gire el
temporizador de control en dirección de las agujas del reloj a la posición “OFF”
(apagado). Abra la puerta y retire el recipiente para cocinar usando almohadillas
térmicas o guantes de cocina. PRECAUCIÓN: Al abrir la puerta, tenga mucho
cuidado en mantener las manos y la cara alejadas de ella ya que vapor o aire
caliente pueden ser liberados. No apoye los recipientes de cocinar sobre la puerta
de vidrio pues pueden dañarla.
LIMPIEZA DE SU HORNO DE ENCIMERA
PRECAUCIÓN: Antes de limpiar cualquier parte del horno, siempre coloque el
Temporizador de control en la posición “OFF” (apagado), desenchufe el cordón eléctrico
del tomacorriente y permita que el horno se enfríe completamente.
Para mantener su horno de encimera limpio, tras cada uso limpie con un trapo todo
derrame de alimentos, salpicaduras y migas.
1. La bandeja de goteo de la rejilla del horno, la parrilla para asar y la bandeja de
migas, el asador giratorio y las horquillas pueden lavarse con un trapo de cocina en
agua jabonosa caliente, enjuagarse y secarse; o pueden lavarse en un lavavajillas
automático. No use ninguna esponja o limpiadores metálicos o abrasivos con estas
piezas pues el acabado puede dañarse.
2. Limpie la parte exterior del horno y la puerta de vidrio con un trapo suave
humedecido y luego séquelas. No use ningún tipo de esponja o limpiador abrasivo
sobre las superficies exteriores o la puerta de vidrio pues las rayará. Si el vidrio se
rayase, éste puede debilitarse y romperse.
3. Limpie el interior del horno con un trapo húmedo, y luego séquelo. Dentro del horno,
no use esponjas metálicas, limpiadores abrasivos o limpiadores de horno ya que
podrá causar daños. Tenga cuidado de no causar daño alguno al limpiar alrededor
de los elementos calentadores.
11
Page 38

GUÍA DE SOLUCIÓN DE PROBLEMAS
PROBLEMA CAUSA POTENCIAL SOLUCIÓN
Alimentos cocidos
de más o de menos
Olor a quemado
El horno no se
enciende
Un solo elemento
calentador está
calentando
El elemento
calentador no se
mantiene
encendido
Temperatura o ajuste
incorrectos
Colocación de la rejilla Puede que sea necesario ajustar
Acumulación de
alimentos dentro del
horno, en los
elementos
calentadores o en la
bandeja de migas
La unidad está
desenchufada.
El temporizador no
está encendido.
El ajuste de función
está en “WARM”
(recalentar)
Los elementos
calentadores se
encenderán y
apagarán para
mantener la
temperatura apropiada
Ajuste el tiempo o la temperatura.
Debido a que su horno de
encimera es más pequeño que su
horno regular, se calentará más
rápido y cocinará en períodos más
cortos del tiempo.
la posición de las rejillas según los
tipos específicos de alimentos.
Refiérase a la sección de
“Limpieza de su Horno”.
Enchufe la unidad al tomacorriente
Gire el temporizador de control al
ajuste deseado.
Cambie el control de funciones a
la posición correcta.
12
Page 39

GARANTÍA DEL PRODUCTO
Garantía limitada de 1 año del artefacto electrodoméstico
Focus Electrics, LLC (“Focus Electrics”) garantiza que este aparato no presentará fallas de
material ni fabricación durante un (1) año a partir de la fecha original de compra con prueba de
dicha compra, siempre y cuando el aparato sea operado y mantenido tal como se indica en el
manual de instrucciones provisto. Toda pieza del aparato que presente fallas será reparada o
reemplazada sin costo alguno a criterio de Focus Electrics. Esta garantía rige solamente para
el uso domestico dentro de la casa.
Esta garantía no cubre ningún daño, incluyendo la decoloración, de superficie antiadherente
alguna del aparato electrodoméstico. Esta garantía es nula y sin valor, según lo determine
exclusivamente Focus Electrics si el artefacto electrodoméstico es dañado a causa de
accidente, mal uso, abuso, negligencia, rayaduras, o si el artefacto electrodoméstico es
cambiado de algún modo.
ESTA GARANTÍA REEMPLAZA A TODAS LAS DEMÁS GARANTÍAS IMPLÍCITAS,
INCLUYENDO AQUÉLLAS DE COMERCIABILIDAD, IDONEIDAD PARA UN FIN O USO EN
PARTICULAR, DESEMPEÑO, U OTROS TIPOS, LAS CUALES QUEDAN EXCLUIDAS
MEDIANTE EL PRESENTE DOCUMENTO. FOCUS ELECTRICS RECHAZA TODA
RESPONSABILIDAD POR DAÑOS, YA SEAN DIRECTOS, INDIRECTOS, INCIDENTALES,
PREVISIBLES, CONSECUENTES O ESPECIALES QUE SURJAN DE ESTE APARATO
ELECTRODOMÉSTICO O GUARDEN RELACIÓN CON EL MISMO.
Si piensa que el artefacto electrodoméstico se ha dañado o requiere de servicio dentro de su
período de garantía, por favor póngase en contacto con el Departamento de Atención al
Cliente de Focus Electrics por el (866) 290-1851 o contáctenos por correo electrónico a la
service@focuselectrics.com
que demuestra la fecha de compra original, los recibos escritos a mano no son aceptados.
También puede requerirse que usted devuelva el aparato para su inspección y evaluación
Los gastos de devolución no son reembolsables.Focus Electrics no se hace responsable de las
devoluciones perdidas en tránsito.
. Para todas las reclamaciones de garantía, se requerirá un recibo
Válido sólo en EE.UU. y Canadá
.
REPUESTOS
Los repuestos, de estar disponibles, pueden ser pedidos directamente a Focus Electrics, LLC
de varias maneras. Ordene en línea a través de www.focuselectrics.com
electrónico a service@focuselectrics.com
escribiendo a:
Focus Electrics, LLC
Attn: Customer Service
, por teléfono llamando al (866) 290-1851, o
P. O. Box 2780
West Bend, WI 53095
Para colocar un pedido con pago mediante cheque o giro postal, póngase en contacto primero
con Atención al Cliente para que le indiquen el total de la orden. Envíe su pago junto con una
carta que indique el número de modelo o catálogo de su aparato, que puede ubicarlo en la
parte inferior o posterior de la unidad, una descripción de la parte o partes que usted solicita, y
la cantidad que desea. Su cheque deberá ser hecho a nombre de Focus Electrics, LLC.
El impuesto sobre las ventas de su estado y un recargo por gastos de envío serán añadidos al
precio total. Por favor permita un plazo de dos semanas para el procesamiento y entrega.
Este manual contiene información importante y útil sobre el uso seguro y el cuidado de su nuevo producto
Focus Electrics. Para su propia referencia, archive aquí el recibo fechado que sirve de comprobante de
compra para la garantía, y anote la siguiente información:
Fecha en que compró o recibió la unidad como regalo: __________________________________________
Dónde se efectuó la compra y el precio, si lo sabe: _____________________________________________
Número y código de fecha del producto (aparece en la parte inferior/posterior de la unidad): _____________
, por correo
L5658B 06/08 West Bend®, una Marca de Focus Electrics Impreso en China
13
Page 40

 Loading...