

Page 1
4-Cup Electric Coffee Press
Instruction Manual
Register this and other West Bend® Housewares products through our website:
www.west bend .com
Important Safeguards............................................................................................... 2
Heat Precautions...................................................................................................... 2
Electricity Precautions.............................................................................................. 3
Precautions For Use Around Children...................................................................... 4
Glass Carafe Precautions ........................................................................................ 4
Using Your Coffeemaker – Preparing Coffee........................................................4-5
Cleaning Your Coffeemaker..................................................................................... 6
Decalcifying Your Coffeemaker................................................................................ 6
Tips .......................................................................................................................... 7
Warranty................................................................................................................... 8
SAVE THIS INSTRUCTION MANUAL FOR FUTURE REFERENCE
Page 2
IMPORTANT SAFEGUARDS
To prevent personal injury or property damage, read and follow all instructions
and warnings.
When using electrical appliances, basic safety precautions should always be
followed including the following:
• Read all instructions, including these important safeguards and the care and use
instructions in this manual.
• Do not use appliance for other than intended use.
• Do not place on or near a hot gas or electric burner, or a heated oven.
• The use of accessory attachments not recommended by West Bend®
Housewares may cause injuries.
• Do not operate when the appliance is not working properly or when it has been
damaged in any manner. For service information see warranty page.
• Do not attempt to repair this appliance yourself.
• For household use only.
To prevent burns, personal injury or property damage, read and follow all
instructions and warnings.
Heat Precautions
• Do not touch hot surfaces. Use handles and knobs where provided. Use hot
pads or oven mitts when handling hot surfaces.
• Do not move an appliance containing hot water, coffee or other hot liquids.
• Do not refill the water reservoir while the appliance is on. Turn the machine off
and allow to cool before refilling with water.
• Make sure glass carafe is in place when brewing coffee/tea. If the glass carafe
is not in place hot water or hot coffee will overflow.
• Do not remove any part of the coffeemaker during the brew cycle as scalding
could occur.
2
Page 3
To prevent electrical shock, personal injury or property damage, read and
follow all instructions and warnings.
Electricity Precautions
• To protect against electric shock, do not immerse cord, plugs, or other electric
parts in water or other liquids.
• Do not operate any appliance with a damaged cord or plug.
• Do not use this appliance outdoors.
• Always unplug the appliance from outlet before cleaning. Allow to cool before
putting on or taking off parts and before cleaning.
• Your Coffeemaker has a short cord as a safety precaution to avoid pulling,
tripping or entanglement. Position the cord so that it does not hang over the
edge of the counter, table or other area or touch hot surfaces.
• While use of an extension cord is not recommended, if you must use one, make
sure the cord has the same or higher wattage as the Coffeemaker (wattage is
stamped on the underside of the Coffeemaker base). To avoid pulling, tripping
or entanglement, position the extension cord so that it does not hang over the
edge of the counter, table or other area.
• Use an electrical outlet that accommodates the polarized plug on the
Coffeemaker. On a polarized plug, one blade of the plug is wider than the other.
If the plug does not fit fully into the outlet or extension cord, reverse the plug. If
the plug still does not fit fully, contact a qualified electrician. Do not alter the
plug.
• Do not use an outlet or extension cord if the plug fits loosely or if the outlet or
extension cord feels hot.
• Keep the cord away from hot parts of the appliance and hot surfaces during
operation.
3
Page 4

To prevent burns or other personal injuries to children, read and follow all
instructions and warnings.
Precautions For Use Around Children
• Always supervise children.
• Do not allow children to operate or be near the Coffeemaker, as the outside
surfaces are hot during use.
• Do not allow cord to hang over any edge where a child can reach it. Arrange
cord to avoid pulling, tripping or entanglement.
Glass Carafe Cautions
• The carafe is designed for use with this appliance only. Do not use the carafe
provided with this appliance for any other appliance or application.
• Do not place carafe on hot surface or in a heated oven.
• Do not put a hot carafe on a wet or cold surface.
• Do not use a cracked carafe or a carafe having a loose or weakened handle.
• Do not clean carafe with cleansers, steel wool pads, or other abrasive materials.
SAVE THESE INSTRUCTIONS
Using Your Coffeemaker – Preparing Coffee
Before making coffee, clean the entire unit according to the cleaning
instructions. Wash all loose parts in warm soapy water, rinse thoroughly and
dry.
• To remove any manufacturing residuals that may reside in the appliance, we
recommend making at least one full carafe of coffee with water only, no coffee
grounds.
• A small amount of smoke and/or odor may occur upon heating due to the release
of manufacturing oils – this is normal.
• Some minor expansion/contraction sounds may occur during heating and cooling
– this is normal.
4
Page 5
1. Place appliance on dry, level, heat-resistant surface, away from any edge. Plug
cord into a 120 volt AC electric outlet only.
2. Open the hinged water reservoir cover. Using the carafe, fill the water reservoir
to the desired level with clean cool water. Close the reservoir cover. Never
pour more water into the reservoir than the marked maximum level. Do
not use warm or hot water to fill reservoir.
• For optimal results we recommend rinsing the carafe in warm to hot water to
preheat the carafe. This will help promote the extraction of the coffee/tea flavors
and result in a hotter carafe of coffee/tea.
3. Remove the carafe cover and plunger/filter assembly. Add coffee/tea grounds
to the carafe. We recommend 1 tbsp. of coarsely ground coffee or 1 tsp. of tea
for each cup brewed. After using your coffeemaker a few times, you can adjust
the amount of coffee/tea to suit your own taste. NOTE: The coffee grind should
be appropriate for a “press” type coffeemaker, usually fairly coarse. Drip grind
or finer will likely be too fine and may clog the filter or allow solids past the filter.
Too coarse a grind will taste weak.
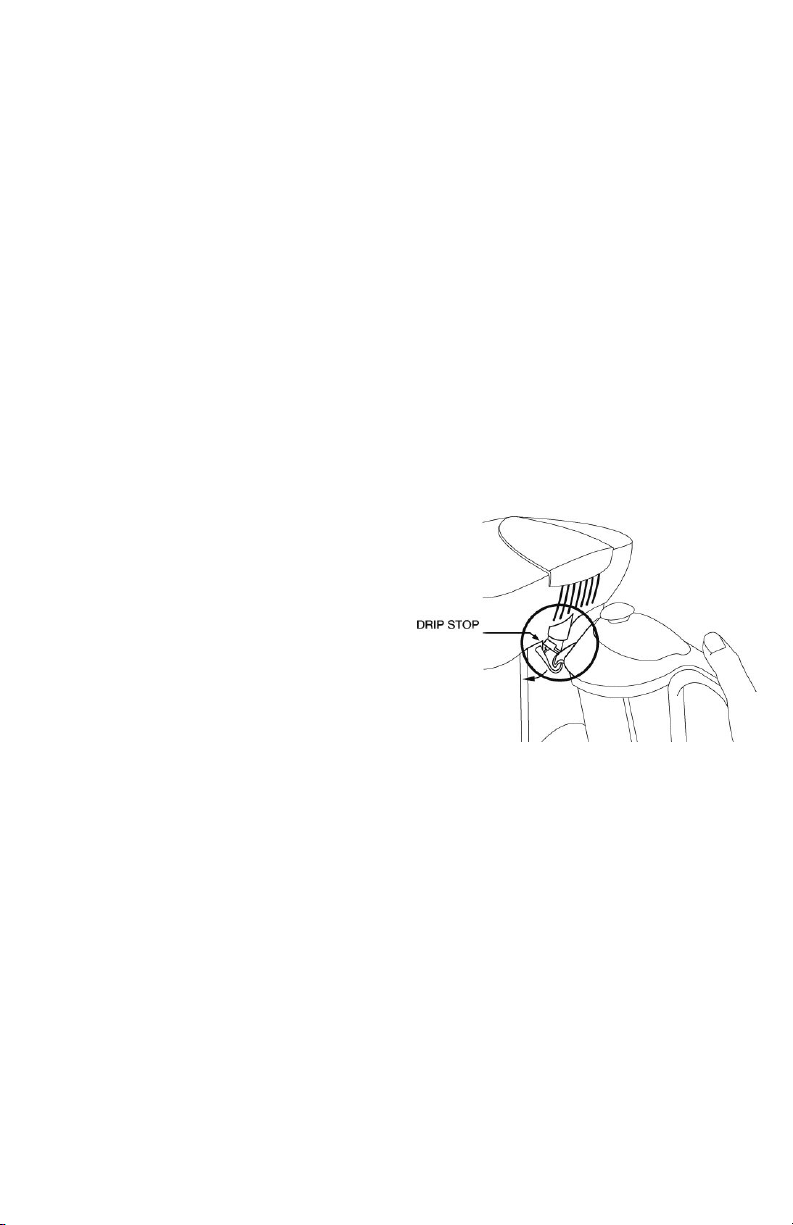
4. Replace the carafe cover and plunger/filter assembly on the carafe. The
plunger should be down and positioned towards the bottom of the carafe. Place
the carafe on the coffeemaker with the handle pointing towards the operator and
set fully within the locating ring on the coffeemaker. The pour lip of the carafe
must be positioned to push back and open the drip stop.
5. Press the Start button to begin
brewing. The amber indicator light
will illuminate indicating that the
brewing process has begun (approx.
1½ min per cup). When the water
has reached the proper temperature,
the unit will automatically begin filling
the carafe. When finished, the power
and amber light will turn off. Note:
Do not remove the carafe from the
coffeemaker until all the hot water has
stopped flowing from the reservoir.
6. When all the water has drained into the carafe remove the carafe from the
coffeemaker. Slowly press and pull the coffee plunger/filter assembly straight
up and down through the coffee/tea water mixture three times. This will act to
mix and agitate the grounds to promote maximum extraction.
7. The plunger should be pulled up and positioned towards the top of the lid. Allow
the coffee/tea to “steep” for approximately three to four minutes. Too short a
time will yield week coffee/tea and steeping too long may produce a bitter
coffee/tea. See the “TIPS” section for optimizing the flavor to your liking and
troubleshooting.
8. Do one final press, slowly pressing the plunger/filter assembly through the
coffee/tea to the bottom position. Pour and enjoy.
9. After coffee/tea has been served, follow directions in “CLEANING YOUR
COFFEEMAKER” section.
• Pause Feature: The Pause Feature (drip stop) is a feature that will stop the flow
of hot water from the reservoir if the carafe is removed too soon or not properly
positoned on the coffeemaker. This is not intended to function as a “Pause and
Serve” feature. For safety and optimum flavor, allow all of the water to finish
draining from the reservoir before removing carafe.
5
Page 6

Cleaning Your Coffeemaker
1. Unplug from electrical outlet and allow the entire unit to cool before cleaning.
2. Remove the carafe cover and plunger/filter assembly and discard used grounds
from the carafe.
3. Clean the carafe, cover and plunger/filter assembly in a solution of warm water
and mild liquid soap. Rinse thoroughly.
4. The exterior of the coffeemaker can be wiped clean with a damp cloth after it
has been unplugged and the base is cool.
• Periodically inspect the filter assembly screen for wear or damage and replace if
necessary.
• Do not clean the inside of the water reservoir with a cloth or paper toweling.
This may leave particles in the chambers that may clog small openings in your
coffeemaker. Rinse with cold water periodically.
• Decalcify the Coffeemaker periodically. See the “Decalcifying Your
Coffeemaker” section in this manual.
Decalcifying Your Coffeemaker
The coffeemaker must be decalcified periodically. Over time, mineral deposits build
up on internal parts and effect the operation of the appliance. The frequency of
decalcification depends on the hardness of your water and how often you use the
Coffeemaker. Indications that decalcifying is necessary are:
• Increased noise during production
• Excessive steaming
• Longer brewing times
If usage is regular, decalcifying should be carried out as follows:
• With soft water, decalcify every 6 months
• With medium water, decalcify every 3 months
• With hard water, decalcify every month
We recommend the use of vinegar for decalcifying.
1. Pour 16 ounces (4-cup mark on coffee carafe) of fresh, cool undiluted white
household vinegar into the reservoir. Never pour more vinegar into the
reservoir than the marked maximum level.
2. Follow steps 3-5 in “Using Your Coffeemaker – Preparing Coffee” section of this
manual except do not use any coffee or tea grounds.
3. Repeat the process above twice using clear cool water each time in place of
vinegar to rinse any remaining traces of the vinegar from the system.
6
Page 7

Tips
A coffee press, also known as a press pot or French press, provides a much richer
cup of coffee. If you are accustomed to drinking drip coffee, press pot coffee will
taste richer/stronger at first. Also, there may be a small amount of coffee sediment
in the bottom of your cup. This is normal for press pot coffee brewing.
The coffee should be served immediately after the steeping process. Do not keep
the coffee in the carafe with the grounds as continued brewing will occur and the
coffee will become too strong and bitter. If all the coffee is not going to be served at
once, pour the coffee into a thermal carafe to retain the flavor and temperature.
Coffee Tastes Weak:
The grind is too coarse. When the grind is too coarse not enough flavors are
extracted from the coffee.
Steeping time is too short. Allow regular coffee to steep at least 3 minutes and decaffeinated coffee 4 minutes. Try small amounts of additional steeping time until the
desired flavor is achieved.
Coffee Tastes Bitter:
The coffee is ground too fine. When the coffee is too fine, bitters are also extracted
during the steeping time.
Coffee Taste Too Strong:
If the coffee is too strong (not bitter), decrease the steeping time in small increments
until the desired flavor is achieved. Do not let the brewed coffee sit inside the carafe
after the steeping time as the hot water will continue extracting flavor from the coffee.
Move it from the press pot to a thermal carafe or only brew what you will drink
immediately.
Too Much Sediment or Other Solids:
A small amount of sediment at the bottom of your cup is normal. If there is too much
sediment or solids in the coffee, ensure you are pressing the filter though the coffee
straight and slowly so the grounds do not slip by the filter. Check the stainless steel
filter for damage and that it fits snug into the carafe.
Water Takes Too Long To Boil:
It is normal to take one 1 to 1-1/2 minutes per cup to heat. When the brewing time
takes noticeably longer, decalcify the coffeemaker. See the “Decalcifying Your
Coffeemaker” section in this manual.
7
Page 8

Product Warranty
Appliance 1 Year Limited Warranty
West Bend® Housewares, LLC warrants this appliance from failures in the material and
workmanship for 1 year from the date of original purchase, provided the appliance is operated
and maintained in conformity with the West Bend® Housewares, LLC Instruction Manual. Any
failed part of the appliance will be repaired or replaced without charge at West Bend®
Housewares, LLC discretion. This warranty applies to indoor household use only.
The West Bend® Housewares, LLC warranty does not cover any damage, including
discoloration, to any non-stick surface of the appliance. The West Bend® Housewares, LLC
warranty is null and void, as determined solely by West Bend® Housewares, LLC if the
appliance is damaged through accident, misuse or abuse, scratching, overheating, or if the
appliance is altered in any way or if used outside of an indoor household setting.
This warranty gives you specific legal rights. You may also have other rights, which may vary
from state to state.
THIS WARRANTY IS IN LIEU OF ALL IMPLIED WARRANTIES, INCLUDING WARRANTIES
OF MERCHANTABILITY, FITNESS FOR A PARTICULAR PURPOSE, PERFORMANCE, OR
OTHERWISE, WHICH ARE HEREBY EXCLUDED. IN NO EVENT SHALL WEST BEND®
HOUSEWARES, LLC BE LIABLE FOR ANY DAMAGES, WHETHER DIRECT, IMMEDIATE,
INCIDENTAL, FORESEEABLE, CONSEQUENTIAL, OR SPECIAL, ARISING OUT OF OR IN
CONNECTION WITH ITS APPLIANCE.
If you think the appliance has failed or requires service within its warranty period, return it to the
original place of purchase. For further details please contact our Customer Service Department
at (262) 334-6949 or e-mail us at housewares@westbend.com. Return shipping fees are nonrefundable. Hand-written receipts are not accepted. West Bend® Housewares, LLC is not
responsible for returns lost in transit.
Valid only in USA and Canada
Replacement Parts
Replacement parts may be ordered direct by ordering online at www.westbend.com:
Replacement Parts. Or you may call or e-mail the service department at the number/e-mail
address listed above, or by writing to us at:
West Bend® Housewares, LLC
Attn: Customer Service
P.O. Box 2780
West Bend, WI 53095
Be sure to include the catalog/model number of your appliance (located on the bottom/back of
the unit) and a description and quantity of the part you wish to order. Along with this include
your name, mailing address, Visa/MasterCard number, expiration date and the name as it
appears on the card. Checks can be made payable to West Bend Housewares. Call Customer
Service to obtain purchase amount. Your state’s sales tax (if applicable) and a
shipping/processing fee will be added to your total charge. Please allow two (2) weeks for
delivery.
This manual contains important and helpful information regarding the safe use and care of your new West
Bend® product. For future reference, attach dated sales receipt for warranty proof of purchase and record
the following information:
Date purchased or received as gift: _______________________________________________________
Where purchased and price, if known: ____________________________________________________
Item Number and Date Code (shown bottom/back of product): ___________________________________________
8
L5648A 07/05 West Bend Housewares A Focus Products Group Company Printed in China
Page 9

Cafetière à piston électrique 4 tasses
Mode d’emploi
Enregistrez ce produit et les autres produits West Bend® Housewares sur notre site
Internet :
www.west bend .com
Précautions importantes........................................................................................... 2
Précautions de sécurité à haute température........................................................... 2
Précautions de sécurité relative à l’électricité........................................................... 3
Précautions pour une utilisation en présence d’enfants ........................................... 4
Précautions pour l’utilisation de la carafe en verre................................................... 4
Utilisation de votre cafetière – Préparation du café...............................................4-5
Nettoyage de votre cafetière .................................................................................... 6
Détartrage de votre cafetière.................................................................................... 6
Astuces ................................................................................................................... 7
Garantie ................................................................................................................... 8
CONSERVEZ CE MODE D’EMPLOI POUR UNE CONSULTATION ULTERIEURE
Page 10

PRECAUTIONS IMPORTANTES
Pour empêcher toute blessure physique ou tout dommage matériel, lisez et
suivez toutes les consignes et mises en garde.
Lorsque vous utilisez des appareils électriques, les précautions de sécurité
élémentaires devraient toujours être respectées, notamment les précautions cidessous :
• Lisez toutes les instructions, notamment les présentes précautions importantes,
ainsi que les consignes pour l’entretien de ce manuel.
• N’utilisez pas l’appareil pour un autre usage que celui pour lequel il a été conçu.
• Ne placez pas cet appareil sur ou à proximité d’une gazinière ou d’un réchaud
électrique, ni dans un four chaud.
• L’utilisation de fixations accessoires non recommandés par West Bend®
Housewares risque de provoquer des blessures.
• N’utilisez pas le poêlon électrique s’il ne fonctionne pas correctement ou s’il a
été détérioré de quelque manière que ce soit. Pour des renseignements
concernant les réparations, voir la page de garantie.
• N’essayez pas de réparer cet appareil vous-même.
• Pour une utilisation domestique uniquement.
Pour empêcher toute brûlure, toute blessure physique ou tout dommage
matériel, lisez et suivez toutes les consignes et mises en garde.
Précautions de sécurité à haute température
• Ne touchez pas les surfaces à haute température. Utilisez les poignées
rectangulaires et rondes lorsque celles-ci sont fournies. Utilisez des maniques
ou des gants de cuisine lorsque vous manipulez des surfaces à haute
température.
• Ne déplacez pas un appareil contenant de l’eau, du café ou d’autres liquides à
haute température.
• Ne remplissez pas le réservoir d’eau lorsque l’appareil est en marche. Mettez la
machine hors tension puis laissez-la refroidir avant de la recharger en eau.
• Assurez-vous que la carafe de verre est en place lorsque vous préparez du
café/thé. Si la carafe de verre n’est pas en place, de l’eau ou du café à haute
temparature seront renversés.
• Ne retirez aucune pièce de la cafetière pendant le cycle de percolation car vous
risqueriez de vous brûler.
2
Page 11

Pour empêcher tout choc électrique, toute blessure physique ou tout
dommage matériel, lisez et suivez toutes les consignes et mises en garde.
Précautions de sécurité relative à l’électricité
• Pour vous protéger contre tout choc électrique, n’immergez pas le cordon, les
fiches ni aucune autre pièce électrique dans l’eau ni dans tout autre liquide.
• N’utilisez aucun appareil électrique dont le cordon ou la fiche est en mauvais
état.
• N’utilisez pas cet appareil en extérieur.
• Débranchez toujours l’appareil de la prise secteur avant de procéder au
nettoyage. Laissez refroidir avant de mettre en place ou de retirer des pièces
ainsi qu’avant de procéder au nettoyage.
• Le fait que votre Cafetière dispose d’un cordon court constitue une précaution
de sécurité visant à éviter que celui-ci soit tiré, que quelqu’un s’y prenne les
pieds ou que celui-ci s’emmêle. Positionnez le cordon de sorte qu’il ne pende
pas au-dessus du bord du plan de travail, de la table ou de toute autre surface
ou qu’il n’entre en contact avec aucune surface à haute température.
• Bien que l’utilisation d’un cordon de rallonge ne soit pas recommandée, si vous
devez en utiliser un, veillez à ce que ce cordon supporte le même nombre de
watts ou un nombre de watts plus élevé que la Cafetière (le nombre de watts est
inscrit au-dessous de la base de l’appareil). Positionnez le cordon de rallonge
de sorte qu’il ne pende pas au-dessus du bord du plan de travail, de la table ou
de toute autre surface.
• Utilisez une prise secteur qui accepte la fiche polarisée de la Cafetière. Sur une
fiche polarisée, une des lames de la fiche est plus large que l’autre. Si la fiche
ne s’enfonce pas complètement dans la prise secteur ou dans le cordon de
rallonge, retournez-la. Si la fiche ne s’enfonce toujours pas entièrement,
contactez un électricien qualifié. Ne modifiez pas la fiche.
• N’utilisez pas une prise secteur ou un cordon de rallonge si la fiche s’y adapte
avec un jeu ou si cette prise secteur ou ce cordon de rallonge vous semblent
chauds.
• Maintenez le cordon à l’écart des pièces de l’appareil et des surfaces à haute
température pendant l’utilisation.
3
Page 12

Pour empêcher toute brûlure ou toute autre blessure physique des enfants,
lisez et suivez toutes les consignes et mises en garde.
Précautions pour une utilisation en présence d’enfants
• Ne laissez jamais les enfants sans surveillance.
• Ne laissez pas des enfants utiliser la cafetière ni s’en approcher car la
température des surfaces extérieures est très élevée pendant l’utilisation.
• Ne laissez pas le cordon pendre au-dessus de toute extrémité où un enfant
risquerait de l’atteindre. Positionnez le cordon de façon à éviter qu’il soit tiré,
qu’on s’y prenne les pieds ou qu’il s’emmêle.
Précautions pour l’utilisation de la cafetière de verre
• Cette carafe a été conçue pour une utilisation avec cet appareil uniquement.
N’utilisez pas la carafe fournie avec cet appareil pour tout(e) autre appareil ou
application.
• Ne posez pas la carafe sur une surface à haute température, dans un four
chaud ou au four à micro-ondes.
• Ne placez pas une carafe à haute température sur une surface humide ou
froide.
• N’utilisez pas une carafe fissurée ou un thermos dont la poignée est desserrée
ou affaiblie.
• Ne nettoyez pas la carafe à l’aide de détergents, de tampons de laine d’acier ou
de toute autre matière abrasive.
CONSERVEZ CES CONSIGNES
Utilisation de votre cafetière – Préparation du café
Avant de faire du café, nettoyer totalement l’appareil conformément aux
instructions de nettoyage. Lavez toutes les pièces détachables à l’eau tiède
savonneuse, rincez-les soigneusement et séchez-les.
• Pour retirer tout résidu de la fabrication susceptible de demeurer à l’intérieur de
l’appareil, nous vous recommandons de préparer au moins une cafetière pleine
en faisant passer de l’eau uniquement, sans café moulu.
• Il est possible qu’un peu de fumée et une légère odeur se dégagent pendant le
chauffage en raison de la diffusion des huiles de fabrication : c’est tout à fait
normal.
• De petits bruits d’expansion/contraction peuvent être produits pendant le
chauffage et le refroidissement : c’est tout à fait normal.
4
Page 13

1. Placez l’appareil sur une surface sèche, plane et résistante à la chaleur, loin du bord.
Branchez le cordon dans une prise secteur de 120 volts AC uniquement.
2. Ouvrez le couvercle du réservoir d’eau à charnière. A l’aide d’une carafe d’eau
propre et fraîche, remplissez le réservoir jusqu’au niveau souhaité. Fermez le
couvercle du réservoir. Ne versez jamais plus d’eau dans le réservoir que le
niveau maximum indiqué. N’utilisez pas d’eau tiède ou chaude pour remplir le
réservoir.
• Pour de meilleurs résultats, nous vous recommandons de rincer la carafe à l’eau tiède
voire chaude pour préchauffer la carafe. Cette procédure aidera à favoriser
l’extraction des arômes du café/thé et permettra d’obtenir une carafe contenant du
café/thé plus chaud.
3. Retirez le couvercle de la carafe et l’ensemble piston/filtre. Ajoutez des grains de
café/thé dans la carafe. Nous recommandons l’utilisation de 1 cuiller à soupe de
café moulu fort ou 1 cuiller à café pour chaque tasse préparée. Après avoir utilisé
votre cafetière plusieurs fois, vous pouvez ajuster la quantité de café/thé afin de
l’adapter à votre goût. REMARQUE : Les grains de café moulus devraient être
adaptés à une utilisation dans une cafetière « à piston », habituellement relativement
fort. Un café moulu pour cafetière à percolation sera probablement trop fin et risque
de boucher le filtre ou de permettre à des éléments solides de traverser le filtre. Un
café moulu en grains trop gros aura un goût peu prononcé.
4. Remettez le couvercle et l’ensemble piston/filtre en place sur la carafe. Le piston
devrait être enfoncé et se trouver vers le bas de la carafe. Placez la carafe sur la
cafetière en orientant la poignée vers l’utilisateur et réglez-la complètement à
l’intérieur de la bague de localisation de la cafetière. Le bec verseur de la carafe doit
être mis en place pour repousser le dispositif d’arrêt des gouttes et pour l’ouvrir.
5. Appuyez sur le bouton Démarrer pour
commencer l’infusion. Le voyant
indicateur couleur ambre s’allume
indiquant que le processus d’infusion
a commencé (environ 1 ½ min par
tasse). Lorsque l’eau a atteint la
bonne température, l’appareil
commence automatiquement à rempli
la carafe. Lorsque le processus est
terminé, le voyant de mise sous
tension et le voyant de couleur ambre
s’éteignent. Remarque : Ne retirez pas la carafe de la cafetière jusqu’à ce que toute
l’eau chaude ait arrêté de couler depuis le réservoir.
6. Lorsque toute l’eau s’est écoulée dans la carafe, retirez la carafe de la cafetière.
Enfoncez doucement puis tirez sur l’ensemble piston/filtre de haut en bas selon un
mouvement droit dans le mélange d’eau du café/thé trois fois. Ceci permettra de
mélanger et d’agiter les grains et favorisera une extraction optimale.
7. Le piston devrait être tiré vers le haut et positionné vers le haut du couvercle.
Laissez le café/thé « reposer » pendant environ trois à quatre minutes. Une durée
trop courte produira un café/thé au goût peu prononcé et une durée de repos trop
longue produira un café/thé amer. Voir la section « ASTUCES » pour l’optimisation
de la saveur selon votre goût et les astuces de dépannage.
8. Pressez une dernière fois, en appuyant doucement sur l’ensemble piston/filtre pour
presser le café vers le bas. Versez et appréciez.
9. Une fois que le café/thé a été servi, suivez les instructions fournies dans la section
« NETTOYAGE DE VOTRE CAFETIERE ».
• Fonction pause : La fonction Pause (arrêt des gouttes) est une fonction qui arrête la
circulation de l’eau chaude en provenance du réservoir en cas de retrait trop rapide
de la carafe ou en cas de mauvaise disposition de celle-ci sur la cafetière. Cette
fonction n’est pas conçue pour servir de fonction « Pause pour le service ». Pour une
sécurité et une saveur optimales, laissez toute l’eau terminer de s’écouler en
provenance du réservoir avant de retirer la carafe.
5
Page 14

Nettoyage de votre Cafetière
1. Débranchez l’appareil de la prise secteur et laissez la totalité de celui-ci
refroidir avant de le nettoyer.
2. Retirez le couvercle de la carafe et l’ensemble piston/filtre et jetez le café moulu
utilisé de la carafe.
3. Nettoyez la carafe, le couvercle et l’ensemble piston/filtre dans une solution
d’eau tiède et de savon liquide de puissance moyenne. Rincez soigneusement.
4. L’extérieur de la cafetière peut être essuyé à l’aide d’un chiffon humide une fois
que la cafeière a été débranchée et que sa base ait refroidi.
• Inspectez régulièrement le filtre de l’ensemble filtre pour détecter toute usure ou
détérioration et remplacez-le si nécessaire.
• Ne nettoyez pas l’intérieur du réservoir d’eau à l’aide d’un chiffon ni d’une
serviette en papier. Cela risque de déposer des particules dans les
compartiments et cela risque d’obstruer les petites ouvertures de votre cafetière.
Rincez cette partie à l’eau froide de temps en temps.
• Détartrez régulièrement la Cafetière. Voir la section « Détartrage de votre
cafetière » de ce manuel.
Détartrage de votre cafetière
La cafetière doit être décalcifiée de temps en temps. Au fil du temps, des dépôts
minéraux s’accumulent sur les pièces internes et cela affecte le fonctionnement de
l’appareil. La fréquence du détartrage dépend de la dureté de votre eau et de la
fréquence selon laquelle vous utilisez votre cafetière. Les signes indiquant qu’un
détartrage est nécessaire sont :
• Augmentation du bruit pendant la production
• Production excessive de vapeur
• Durées de préparation plus longues
En cas d’utilisation régulière, le détartrage devrait être effectué comme suit :
• Avec de l’eau non calcaire, décalcifiez tous les 6 mois
• Avec de l’eau moyennement calcaire, décalcifiez tous les 3 mois
• Avec de l’eau calcaire, détartrez une fois par mois
Nous recommandons l’utilisation de vinaigre pour le détartrage.
1. Versez 16 onces (marque indiquant 4 tasses sur la cafetière) de vinaigre de
cuisine non dilué frais et froid à l’intérieur du réservoir. Ne versez jamais plus
de vinaigre dans le réservoir que le niveau maximum indiqué.
2. Suivez les étapes 3-5 de la section « Utilisation de votre cafetière – Préparation
du café » de ce manuel mais n’utilisez aucun café ou thé moulu.
3. Répétez la procédure ci-dessus deux fois en utilisant de l’eau claire fraîche à
chaque fois à la place du vinaigre afin de rincer toute trace de vinaigre
demeurant à l’intérieur de l’appareil.
6
Page 15

Astuces
Une cafetière à piston, également appelée, cafetière à la française, produit un café
beaucoup plus riche. Si vous êtes habitué à boire du café réalisé par percolation, le
café réalisé avec la cafetière à piston aura un arôme plus riche/long dès la première
utilisation. De plus, il peut y avoir une petite quantité de sédiment de café au bas de
votre tasse. C’est tout à fait normal lors de la préparation de café à l’aide d’une
cafetière à piston.
Le café devrait être servi immédiatement après le processus de repos. Ne
conservez pas le café dans la carafe avec les grains de café moulu car les grains
vont continuer à infuser et le café va devenir trop fort et amer. Si vous ne souhaitez
pas servir tout le café en même temps, versez-le dans un thermos pour préserver
son arôme et sa température.
Le café n’est pas assez fort :
Les grains ne sont pas assez fins. Lorsque les grains sont trop gros, l’arôme extrait
du café est insuffisant.
Le temps de repos est trop court. Laissez le café ordinaire reposer au moins 3
minutes et le café décaféiné 4 minutes. Essayez de laisser le mélange reposer plus
longtemps et progressivement, jusqu’à ce que la saveur souhaitée soit obtenue.
Le café a une saveur amère :
Le café est moulu trop fin. Lorsque le café est moulu trop fin, l’amertume est
également extraite pendant le temps où le mélange est au repos.
Le café a une saveur trop forte :
Si le café est trop fort (pas amer), diminuez progressivement la durée de repos
jusqu’à ce que vous ayez obtenu la saveur souhaitée. Ne laissez pas le café infusé
dans la carafe après le temps de repos cas l’eau chaude va continuer à extraire
l’arôme du café. Transvasez-le de la cafetière à piston vers un thermos ou ne
préparez que la quantité de boisson que vous allez boire immédiatement.
Trop de sédiments ou d’autres éléments solides :
Une petite quantité de résidus de sédimentation au bas de votre tasse est normale.
S’il y a trop de sédiments ou de solides dans le café, assurez-vous que vous
enfoncez le filtre sur le café selon un mouvement droit et lent de sorte que les grains
moulus ne glissent pas à côté du filtre. Vérifiez si le filtre en acier inoxydable est
détérioré et s’il s’adapte bien à l’intérieur de la carafe.
L’eau met trop de temps avant de bouillir :
Il est normal de chauffer l’eau pendant 1 – 1/2 minutes par tasse. Lorsque la durée
de percolation est significativement plus importante, veuillez détartrer la cafetière.
Voir la section « Détartrage de votre cafetière » de ce manuel.
7
Page 16

Garantie du produit
Garantie de l’appareil limitée à 1 an
West Bend® Housewares, LLC garantit le présent appareil contre tout défaut de pièce et de main
d’oeuvre pendant 1 an à compter de la date de l’achat initial, à condition que l’appareil soit utilisé et
entretenu conformément au mode d’emploi de West Bend® Housewares, LLC. Toute pièce
défectueuse de l’appareil sera réparée ou remplacée sans frais à la discrétion de West Bend®
Housewares, LLC. Cette garantie s’applique aux appareils ménagers d’intérieur uniquement.
La garantie de West Bend® Housewares, LLC ne couvre aucune détérioration, notamment la
décoloration, de toute surface anti-adhésive de cet appareil. La garantie de West Bend®
Housewares, LLC est nulle et non avenue, comme déterminé uniquement par West Bend®
Housewares, LLC, si l’appareil est détérioré en raison de tout accident, de toute mauvaise utilisation
ou de tout abus, de toute rayure, de toute surchauffe, ou si l’appareil est modifié de quelque manière
que ce soit ou s’il est utilisé à l’extérieur du cadre d’un intérieur domestique.
Cette garantie vous confère des droits particuliers. Il possible que vous ayez également d’autres
droits, qui sont susceptibles de varier d’un état à un autre.
CETTE GARANTIE ANNULE ET REMPLACE TOUTE GARANTIE INDUITE, NOTAMMENT LES
GARANTIES DE COMMERCIABILITÉ, D’ADAPTATION À UN USAGE PARTICULIER, DE
FONCTIONNEMENT OU AUTRE, QUI SONT PAR LA PRÉSENTE EXCLUES. EN AUCUN CAS WEST
BEND® HOUSEWARES, LLC NE POURRA ETRE CONSIDÉRÉ COMME RESPONSABLE DE TOUTE
DÉTÉRIORATION, QUE CELLE-CI SOIT DIRECTE, IMMÉDIATE, INDIRECTE, PRÉVISIBLE, UNE
CONSÉQUENCE OU PARTICULIÈRE, RÉSULTANT DE L’UTILISATION DE CET APPAREIL OU EN
RAPPORT AVEC SON UTILISATION.
Si vous pensez que cet appareil est défectueux ou a besoin d’être réparé pendant la durée de sa
garantie, rapportez-le au lieu de l’achat d’origine. Pour de plus amples renseignements, veuillez
contacter le Service client de West Bend® Housewares au (262) 334-6949 ou nous envoyer un e-mail
à housewares@westbend.com Les frais de port pour le retour ne sont pas remboursables. Les
factures manuscrites ne sont pas acceptées. West Bend Housewares, LLC n’est pas responsable des
appareils retournés qui sont perdus pendant le transport.
Valable uniquement aux USA et au Canada
Pièces de rechange
Vous pouvez commander des pièces de rechange directement auprès de West Bend® Housewares,
LLC en commandant en ligne sur le site Internet : www.westbend.com: Pièces de rechange. Vous
pouvez également appelez ou envoyer un e-mail au service des réparations au numéro/à l’adresse email indiqué(e) ci-dessus ou nous écrire à :
West Bend Housewares, LLC
Attn: Customer Service
P.O. Box 2780
West Bend, WI 53095
Veillez à inclure le numéro du modèle/catalogue de votre appareil (situé au-dessous/au dos de l’appareil) et
une description ainsi que la quantité de la pièce que vous souhaitez commander. Indiquez également votre
nom, votre adresse postale, votre numéro de carte Visa/Mastercard, la date d’expiration et le nom tel qu’il
figure sur la carte. Les chèques peuvent être rédigés à l’ordre de West Bend Housewares, LLC. Appelez le
service client pour connaître le montant de votre achat. Les taxes de votre état ainsi qu’un honoraire
d’expédition/traitement seront ajoutés à votre prix total. Vous recevrez votre envoi sous deux (2) semaines.
Ce guide contient des renseignements importants et utiles concernant l’utilisation sans danger et l’entretien de votre
nouveau produit West Bend® Housewares, LLC. Pour une consultation ultérieur, fixez le reçu de caisse daté pour la preuve
d’achat nécessaire à la garantie puis inscrivez les renseignements ci-dessous :
Date d’achat ou de réception en cadeau : _______________________________________________________
Lieu d’achat et prix, si connus : ____________________________________________________
Numéro de l’article et Code de la date (indiqués au bas/dos du produit) : ________________________________________
8
L5648A 07/05 West Bend Housewares A Focus Products Group Company Printed in China
Page 17

Cafetera de prensa eléctrica de 4 tazas
Manual de instrucciones
Registre este y otros productos West Bend® Housewares a través de nuestro sitio
web.
www.west bend .com
Precauciones importantes........................................................................................ 2
Precauciones relativas al calor................................................................................. 2
Precauciones eléctricas ........................................................................................... 3
Precauciones al usar cerca de niños........................................................................ 4
Precauciones con la jarra de vidrio .......................................................................... 4
Cómo usar su cafetera – Cómo preparar café ......................................................4-5
Cómo limpiar su cafetera ......................................................................................... 6
Cómo descalcificar su cafetera ................................................................................ 6
Sugerencias ............................................................................................................. 7
Garantía ................................................................................................................... 8
CONSERVE ESTE MANUAL DE INSTRUCCIONES PARA FUTURAS
CONSULTAS
Page 18

PRECAUCIONES IMPORTANTES
Para evitar lesiones personales o daños materiales, lea y acate todas las instrucciones
y advertencias.
Al utilizar artefactos eléctricos, siempre deben acatarse las precauciones básicas de
seguridad incluyendo las siguientes:
• Lea todas las instrucciones, incluyendo estas precauciones importantes, así como las
instrucciones de uso y cuidado en este manual.
• No utilice el artefacto para usos distintos del indicado.
• No lo coloque sobre o cerca de un calentador eléctrico a gas caliente, o en un horno
caliente.
• El uso de accesorios no recomendados por West Bend® Housewares, LLC puede
causar lesiones.
• No opere el artefacto cuando no funcione correctamente o haya sido dañado de algún
modo. Para información relativa al servicio vea la página de garantías.
• No trate de reparar este artefacto electrodoméstico usted mismo.
• Sólo para uso doméstico.
Para evitar quemaduras, lesiones personales o daños materiales, lea y acate todas las
instrucciones y advertencias.
Precauciones relativas al calor
• No toque las superficies calientes. Use las asas o perillas donde estén provistas. Use
almohadillas térmicas o guantes para horno al manipular superficies calientes.
• No mueva artefacto electrodoméstico alguno que contenga agua caliente, café u otros
líquidos calientes.
• No llene el depósito de agua mientras el artefacto esté encendido. Apague la máquina y
permita que se enfríe antes de llenarla con agua.
• Al preparar café o té, asegúrese de que la jarra de vidrio esté colocada en su sitio. Si la
jarra de vidrio no está colocada en su sitio se podrá derramar agua caliente o café
caliente.
• No retire ninguna parte de la cafetera durante el ciclo de preparación pues pudiera
causarle escaldaduras.
2
Page 19

Para evitar descargas eléctricas, lesiones personales o daños materiales, lea y
acate todas las instrucciones y advertencias.
Precauciones eléctricas
• Para protegerse contra descargas eléctricas no sumerja el cable, enchufes, u
otras partes eléctricas en agua u otros líquidos.
• No opere aparato electrodoméstico alguno con el cordón eléctrico o el enchufe
dañado.
• No use este artefacto al aire libre.
• Siempre desenchufe el artefacto del tomacorriente antes de limpiarlo. Permita
que se enfríe antes de colocarle o quitarle partes o antes de limpiarlo
• Su cafetera tiene un cordón eléctrico corto como medida de precaución para
impedir el halado, tropiezo o enredo accidental con el mismo. Coloque el
cordón eléctrico de tal manera que no cuelgue del borde de un mostrador, mesa
u otra superficie o toque áreas calientes.
• No se recomienda usar un cable de extensión, pero si debe hacerlo, cerciórese
de que el vataje del mismo sea igual o superior al de la cafetera (el vataje está
estampado debajo de la base de la misma). Coloque el cable de extensión de
tal modo que no cuelgue del borde de un mostrador, mesa u otra superficie a fin
de impedir que se hale, tropiece o enrede en el mismo.
• Use un tomacorriente apto para el enchufe polarizado de la cafetera. En un
enchufe polarizado, una hoja es más ancha que la otra. Invierta el enchufe si
éste no encaja completamente en el tomacorriente o el cable de extensión. Si
todavía no encaja, consulte con un electricista calificado. No altere el enchufe.
• No use un tomacorriente o cable de extensión en el cual el enchufe calce
flojamente, o si el tomacorriente o el cable de extensión están calientes.
• Mantenga el cordón eléctrico alejado de las partes calientes del artefacto
electrodoméstico mientras éste esté operándose.
3
Page 20

Para prevenir quemaduras u otras lesiones en los niños, lea y acate todas las
instrucciones y advertencias.
Precauciones al usar cerca de niños
• Siempre supervise de cerca cuando haya niños.
• No permita que los niños usen o estén cerca de la cafetera ya que las
superficies externas de ésta se calientan al usarse.
• No permita que el cordón eléctrico cuelgue de algún borde donde pueda ser
alcanzado por los niños. Coloque el cordón eléctrico de modo que se eviten
lesiones que resulten del halar, tropezarse o enredarse en el mismo.
Precauciones con la jarra de vidrio
• La jarra está diseñada para usarse solamente con este electrodoméstico. No la
use con otro artefacto electrodoméstico o aplicación.
• No coloque la jarra sobre una superficie caliente o en un horno caliente.
• No coloque la jarra caliente sobre una superficie mojada o fría.
• No utilice la jarra si está agrietada o tiene el asa floja o debilitada.
• No limpie la jarra con limpiadores abrasivos, esponjas de lana de acero u otros
materiales abrasivos.
CONSERVE ESTAS INSTRUCCIONES
Cómo usar su cafetera – Cómo preparar café
Antes de preparar café, limpie la unidad entera de acuerdo con las
instrucciones de limpieza. Lave todas las partes sueltas en agua jabonosa,
enjuáguelas a fondo y séquelas.
• Para eliminar cualesquier residuos de fabricación que puedan quedar en el
artefacto, recomendamos preparar por lo menos una jarra de café llena con sólo
agua, sin café molido.
• Al calentarla podrá emitirse una pequeña cantidad de humo y/o un leve olor a
causa de la emanación de los aceites usados en la fabricación de ésta - esto es
normal.
• Durante el calentamiento y enfriamiento pudieran ocurrir algunos ruidos menores
de expansión y contracción - esto es normal.
4
Page 21

1. Coloque el artefacto sobre una superficie seca, nivelada, y resistente al calor, lejos de
cualquier borde. Enchufe el cable solamente a tomacorrientes de corriente alterna de
120 voltios.
2. Abra la tapa abisagrada del depósito de agua. Usando la jarra, llene el depósito de
agua con agua fresca limpia hasta el nivel deseado. Cierre la tapa del depósito.
Nota: nunca vierta más agua en el depósito que el máximo nivel marcado. No use agua
tibia ni caliente para llenar el depósito.
• Para unos resultados óptimos, le recomendamos que enjuague la jarra en agua tibia o
caliente para precalentarla. Esto ayudará a estimular la extracción del sabor del café o té
y proporcionará una jarra de café o té más caliente.
3. Retire la tapa de la jarra y el ensamble del émbolo y filtro. Agregue el café molido o té a
la jarra. Recomendamos 1 cucharita de café molido o 1 cucharita de té por cada taza
preparada. Tras usar la cafetera unas cuantas veces, usted podrá ajustar la cantidad del
café o del té a su gusto. NOTA: La molienda del café deberá ser la apropiada para una
cafetera tipo "prensa", normalmente debe ser una molienda relativamente gruesa. Una
molienda para colar a goteo o más fina serán probablemente demasiado finas y
pudieran obstruir el filtro o permitir que sólidos pasen a través del mismo. Una molienda
demasiado gruesa producirá un café demasiado débi; y falto de sabor.
4. Vuelva a colocar la tapa y el ensamble del émbolo y filtro en la jarra. El émbolo deberá
estar bajado y posicionado hacia el fondo de la jarra. Coloque la jarra sobre la
cafetera con el asa en dirección hacia el operador y de manera que encaje
completamente dentro del anillo de fijación de la cafetera. El pico de la jarra debe
colocarse para empujar hacia atrás y abrir el obstructor del goteo.
5. Pulse el botón de Encendido ("Start") para
comenzar la preparación. La luz indicadora
ámbar se iluminará indicando que el
proceso de preparación se ha iniciado
(aproximadamente 1½ minutos por taza).
Cuando el agua llegue a la temperatura
correcta, la unidad empezará a llenar la jarra
automáticamente. Al terminar, la
electricidad y la luz ámbar se apagarán.
Nota: No retire la jarra de la cafetera hasta tanto haya parado de fluir toda el agua
caliente desde el depósito.
6. Cuando toda el agua haya drenado a la jarra retire ésta de la cafetera. Lentamente
presione y hale el ensamble del émbolo y filtro para arriba y para abajo tres veces a
través de la mezcla del agua con el café o té. Esta acción mezclará y agitará las
partículas de café o té para estimular la máxima extracción.
7. El émbolo deberá halarse hacia arriba y colocarse cerca de la tapa. Permita que el café
o té se "maceren" durante aproximadamente tres a cuatro minutos. Un tiempo
demasiado corto producirá un café o té débil; el dejar macerar por demasiado tiempo
producirá un café o té amargo. Vea la sección de "SUGERENCIAS" para cómo
optimizar el sabor a su gusto y cómo resolver problemas.
8. Realice un prensado final, prensando lentamente el ensamble del émbolo y filtro a través
del café o té hasta el fondo. Sírvalo y disfrútelo.
9. Una vez se haya servido el café o té, siga las direcciones indicadas en la sección de
"CÓMO LIMPIAR SU CAFETERA".
• La Función Pausa: La función de Pausa (obstructor del goteo) es una función
que parará el flujo de agua caliente desde el depósito si la jarra es retirada
demasiado pronto o no estuviese correctamente colocada en la cafetera. No es
la intención de que esta función funcione para "pausar y servir". Por razones de
seguridad y para obtener el sabor óptimo, permita que el agua termine de drenar del
depósito antes de retirar la jarra.
5
Page 22

Cómo limpiar su cafetera
1. Desenchúfela del tomacorriente y permita que toda la unidad se enfríe antes
de limpiarla.
2. Retire la tapa de la jarra y el ensamble del émbolo y filtro y deseche los posos
de café o té de la jarra.
3. Limpie la jarra, la tapa y el ensamble del émbolo y filtro en una solución de agua
tibia y un jabón líquido suave. Enjuáguelos a fondo.
4. La parte exterior de la cafetera puede limpiarse con un trapo húmedo una vez
se haya desenchufado y la base se haya enfriado.
• Inspeccione periódicamente la malla del ensamble del filtro para asegurarse de
que no esté desgastada o dañada y reemplácela si fuese necesario.
• No limpie la parte interna del depósito de agua con un paño o una toalla de
papel. Esto puede dejar partículas en las cámaras que pudieran obstruir las
pequeñas aberturas en su cafetera. Enjuague periódicamente con agua fría.
• Descalcifique la cafetera periódicamente. Vea la sección "Cómo descalcificar
su cafetera" en este manual.
Cómo descalcificar su cafetera
La cafetera debe descalcificarse periódicamente. Con el tiempo, depósitos
minerales se acumulan sobre las partes internas y afectan a la operación del
artefacto. La frecuencia con que habrá que descalcificar depende de la dureza de
su agua y cuán a menudo utiliza la cafetera. Se hace necesaria una
descalcificación cuando aparezcan los siguientes indicios:
• Mayor ruido al funcionar
• Excesiva generación de vapor
• Mayores tiempos de preparación del café
Si se usa con regularidad, la descalcificación se debe llevar a cabo de la siguiente
frecuencia:
• Con agua suave, descalcifique cada 6 meses
• Con agua de dureza media, descalcifique cada 3 meses
• Con agua dura, descalcifique mensualmente
Le recomendamos usar vinagre para descalcificar.
1. Vierta 16 onzas (la marca para 4 tazas en la jarra de la cafetera) de vinagre
doméstico blanco sin diluir en el depósito. Nunca vierta más vinagre en el
depósito que el máximo nivel marcado.
2. Siga los pasos 3-5 indicados en la sección "Cómo usar su cafetera – Cómo
preparar café" de este manual excepto que no use café molido o té.
3. Repita dos veces el proceso arriba indicado excepto que cada vez use agua
fresca limpia en vez de vinagre para enjuagar cualquier traza remanente de
vinagre en el sistema.
6
Page 23

Sugerencias
Una cafetera de prensa, también conocida como cafetera francesa, proporciona una
taza de café mucho más rica. Si usted está acostumbrado a tomar café de una
cafetera por goteo, el café de una cafetera de prensa le parecerá mucho más rico y
fuerte al principio. Además, pudiera quedar una pequeña cantidad de sedimento de
café en el fondo de su taza. Esto es normal al preparar café con una cafetera de
prensa.
El café debe servirse inmediatamente después del proceso de maceración. No deje
el café en la jarra junto con los posos ya que la extracción continuará y el café se
tornará demasiado fuerte y amargo. Si no se va a servir todo el café de una vez,
vierta el café en un termo para retener el sabor y la temperatura.
El café sabe demasiado débil:
La molienda es demasiado gruesa. Cuando la molienda es demasiado gruesa no se
extraen suficientes sabores del café.
El tiempo de maceración es demasiado corto. Permita que el café regular se
macere durante por lo menos 3 minutos y el descafeinado unos 4 minutos. Pruebe
pequeños tiempos adicionales de maceración hasta lograr el sabor deseado.
El café sabe amargo:
El café está molido demasiado fino. Cuando el café esta demasiado fino, sabores
amargos también son extraídos durante el tiempo de maceración.
El café sabe demasiado fuerte:
Si el café está demasiado fuerte (no amargo), disminuya el tiempo de maceración
en pequeños incrementos hasta que se obtenga el sabor deseado. No deje que el
café preparado repose dentro de la jarra después del período de maceración ya que
el agua caliente continuará extrayendo sabor del café. Páselo de la cafetera de
prensa a un termo o prepare justo lo que tomará inmediatamente.
Demasiado sedimento u otros sólidos:
Una pequeña cantidad de sedimento en el fondo de su taza es normal. Si hubiese
demasiados sedimentos o sólidos en el café, asegúrese de que usted esté
prensando el filtro recta y lentamente de manera que los posos del café no se
cuelen alrededor del filtro. Verifique que el filtro de acero inoxidable no esté dañado
y que se ajuste de manera exacta a la jarra.
El agua tarda demasiado en hervir:
Es normal que se tome de 1 a 1-1/2 minutos por taza en calentar. Cuando el tiempo
de preparación tarde notablemente más, descalcifique la cafetera. Vea la sección
"Cómo descalcificar su cafetera" en este manual.
7
Page 24

Garantía del producto
Garantía limitada de 1 año del aparato electrodoméstico
West Bend® Housewares, LLC garantiza que este aparato no presentará fallas de material ni fabricación
durante 1 año a partir de la fecha original de compra, siempre y cuando el aparato sea operado y
mantenido tal como se indica en el manual de instrucciones de West Bend® Housewares, LLC. Toda
pieza del aparato que presente fallas será reparada o reemplazada sin costo alguno a criterio de West
Bend® Housewares, LLC. Esta garantía rige solamente para el uso domestico en interiores.
La garantía de West Bend® Housewares, LLC no cubre ningún daño, incluyendo la decoloración, de
superficie antiadherente alguna del aparato electrodoméstico. La garantía de West Bend® Housewares,
LLC quedará nula e inválida, según lo determine exclusivamente West Bend® Housewares, LLC, si el
aparato electrodoméstico resultase dañado debido a accidentes, uso indebido o abuso, rayas,
sobrecalentamiento o si es alterado de algún modo o no se usa en forma doméstica y en interiores.
Esta garantía le otorga derechos legales específicos. Usted también puede tener otros derechos, los
cuales pueden variar de una jurisdicción a otra.
ESTA GARANTÍA REEMPLAZA A TODAS LAS DEMÁS GARANTÍAS IMPLÍCITAS, INCLUYENDO
AQUÉLLAS DE COMERCIABILIDAD E IDONEIDAD PARA UN FIN O USO EN PARTICULAR, LAS
CUALES QUEDAN EXCLUIDAS MEDIANTE EL PRESENTE DOCUMENTO. WEST BEND®
HOUSEWARES, LLC RECHAZA TODA RESPONSABILIDAD POR DAÑOS, YA SEAN DIRECTOS,
INMEDIATOS, INCIDENTALES, PREVISIBLES, CONSECUENTES O ESPECIALES QUE SURJAN
DEL USO DEL APARATO ELECTRODOMÉSTICO O GUARDEN RELACIÓN CON EL MISMO.
Si dentro del período de garantía usted considera que el aparato electrodoméstico presenta fallas o requiere
servicio, devuélvalo al lugar de compra original. Para obtener mayores detalles comuníquese con el
Departamento de Servicio al Cliente al (262) 334-6949 o por correo electrónico a housewares@westbend.com.
Los gastos de devolución no son reembolsables. Los recibos escritos a mano no son válidos. West Bend
Housewares, LLC no se hace responsable de las devoluciones perdidas en tránsito.
Válido sólo en EE.UU. y Canadá
Repuestos
Solicite los repuestos a West Bend® Housewares, LLC directamente en línea en
www.westbend.com, "Replacement Parts", llamando o enviando un mensaje de correo electrónico al
departamento de servicios al número/dirección antedichos o escribiendo a: West Bend Housewares,
LLC Repuestos O puede llamarnos o enviarnos un mensaje de correo electrónico al departamento
de servicios al número/dirección antedichos o escribiéndonos a:
West Bend Housewares, LLC
Attn: Customer Service
P.O. Box 2780
West Bend, WI 53095, EE.UU.
Cerciórese de incluir el número de catálogo/modelo del aparato electrodoméstico (situado en la
parte inferior/posterior de la unidad) así como la descripción y la cantidad de repuestos que necesita.
Junto con esta información, incluya su nombre, dirección postal, número de tarjeta de crédito Visa o
MasterCard, la fecha de vencimiento y el nombre tal como aparece en la tarjeta. Los cheques
deben hacerse pagaderos a West Bend Housewares, LLC. Llame a Servicio a la Clientela para que
le informen el monto de la compra. Se sumará al total el impuesto de venta estatal que corresponda,
más un cargo por despacho y procesamiento. La entrega tarda dos (2) semanas.
Este folleto contiene información importante y útil sobre el uso seguro y el cuidado de su nuevo producto
de West Bend® Housewares, LLC. Para su propia referencia, archive aquí el recibo fechado que sirve de
comprobante de compra para la garantía, y anote la siguiente información:
Fecha en que compró o recibió la unidad como regalo:
_______________________________________________________
Dónde se efectuó la compra y el precio, si lo sabe:
____________________________________________________
Número y código de fecha del producto (aparece en la parte inferior/posterior de la unidad):
___________________________________________
L5648A 07/05 West Bend Housewares A Focus Products Group Company Printed in China
8
 Loading...