

COFFEEMAKER
Instruction Manual
Register this and other West Bend® Housewares products through our website:
www.westbend.com
Important Safeguards...............................................................................................2
Heat Precautions...................................................................................................... 2
Electricity Precautions.............................................................................................. 3
Precautions For Use Around Children...................................................................... 4
Using Your Cofeemaker........................................................................................4-5
Cleaning Your Coffeemaker.....................................................................................6
Warranty...................................................................................................................7
SAVE THIS INSTRUCTION MANUAL FOR FUTURE REFERENCE
IMPORTANT SAFEGUARDS
To prevent personal injury or property damage, read and follow all instructions
and warnings.
When using electrical appliances, basic safety precautions should always be
followed including the following:
• Read all instructions, including these important safeguards and the care and use
instructions in this manual.
• Do not use appliance for other than intended use.
• Do not place on or near a hot gas or electric burner, or in a heated oven.
• Do not operate when the appliance is not working properly or when it has been
damaged in any manner. For service information see warranty page.
• The use of accessory attachments not recommended by West Bend®
Housewares may result in fire, electric shock or injury to persons.
• Do not attempt to repair this appliance yourself.
• Do not use this appliance on the stovetop, under a broiler, in the oven, or in the
refrigerator or freezer.
• For household use only.
To prevent burns, personal injury or property damage, read and follow all
instructions and warnings.
HEAT PRECAUTIONS
• Do not touch hot surfaces. Use handles and knobs where provided. Use hot pads
or oven mitts when handling hot surfaces.
• Extreme caution must be used when moving an appliance containing hot oil or
other hot liquids.
• Make sure cover, basket, stem and cord are properly attached before
coffeemaker is plugged in. No part of the coffeemaker should be removed during
the brewing cycle as scalding may occur.
2
To prevent electrical shock, personal injury or property damage, read and
follow all instructions and warnings.
ELECTRICITY PRECAUTIONS
• To protect against fire, electric shock and injury to persons do not immerse cord,
plugs, or other electric parts in water or other liquids.
• Do not operate any appliance with a damaged cord or plug.
• Do not use this appliance outdoors.
• Always attach plug to appliance first, then plug cord into the wall outlet. To
disconnect, turn any control to “off”, then remove plug from wall outlet.
• Always unplug from outlet when not in use and before cleaning and allow to cool
before putting on or taking off parts.
• Your appliance has a short cord as a safety precaution to avoid pulling, tripping
or entanglement. Position the cord so that it does not hang over the edge of the
counter, table or other area or touch hot surfaces.
• While use of an extension cord is not recommended, if you must use one, make
sure the cord has the same or higher wattage as the coffeemaker (wattage is
stamped on the underside of the base). To avoid pulling, tripping or
entanglement, position the extension cord so that it does not hang over the edge
of the counter, table or other area.
• Use an electrical outlet that accommodates the polarized plug on the appliance.
On a polarized plug, one blade of the plug is wider than the other. If the plug
does not fit fully into the outlet or extension cord, reverse the plug. If the plug still
does not fit, contact a qualified electrician. Do not attempt to modify the plug in
any way.
• Do not use an outlet or extension cord if the plug fits loosely or if the outlet or
extension cord feels hot.
• Keep the cord away from hot parts of the appliance and hot surfaces during
operation.
3
To prevent burns or other personal injuries to children, read and follow all
instructions and warnings.
PRECAUTIONS FOR USE AROUND CHILDREN
• Always supervise children.
• Do not allow children to operate or be near the appliance, as the outside surfaces
are hot during use.
• Do not allow cord to hang over any edge where a child can reach it. Arrange
cord to avoid pulling, tripping or entanglement.
SAVE THESE INSTRUCTIONS
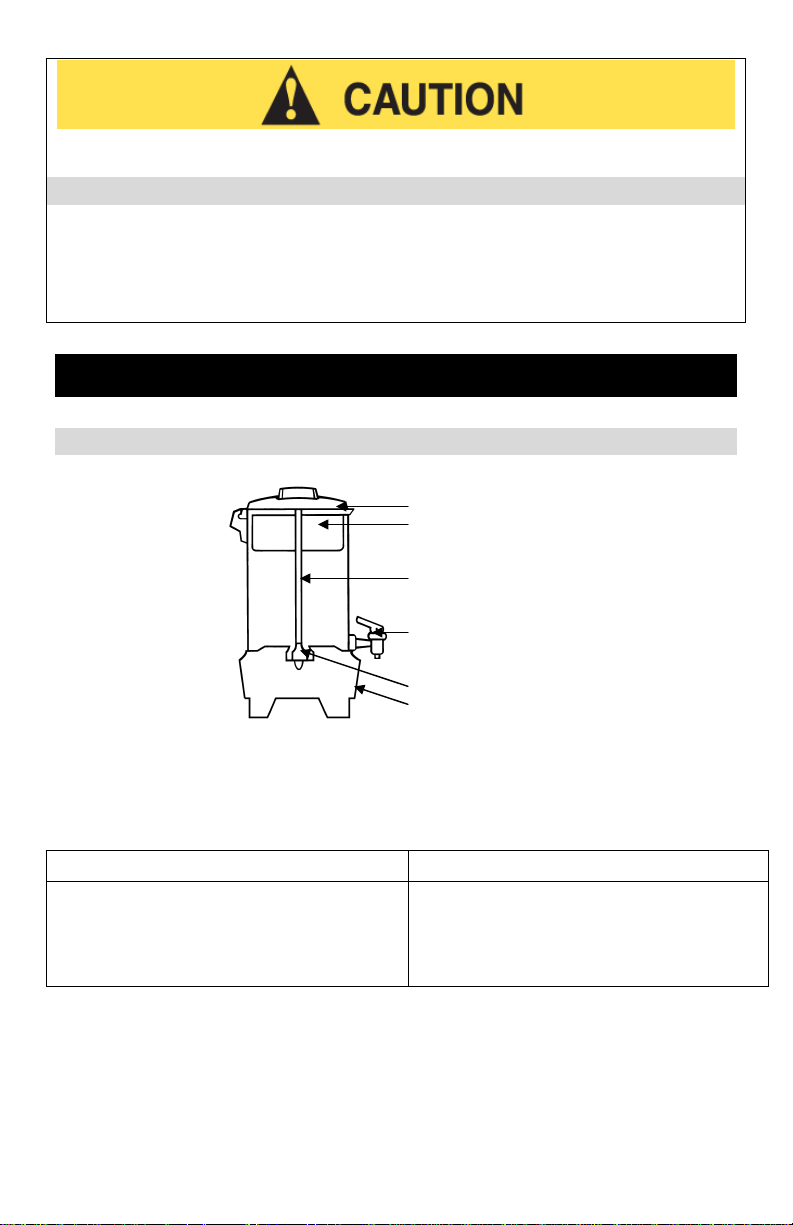
USING YOUR COFFEEMAKER
Cover
Coffee Basket
Stem
Faucet
Heating Unit Well
Serving Light
Before using the coffeemaker for the first time, clean it thoroughly. Refer to Cleaning
Your Coffeemaker section.
Water Level Amount of Ground Coffee Water Level Amount of Ground Coffee
42 Cups 2 ½ Cups
36 Cups 2 Cups
30 Cups 1 ¾ Cups
28 Cups 1 2/3 Cups
SPECIAL NOTE ON GRINDING COFFEE BEANS: If grinding your own coffee
beans, grind to medium coarseness for best results. DO NOT grind too fine (powderlike) as this can cause basket to flood. Use standard measuring cups to measure
coffee. Do not allow ground coffee to fall into stem. The amount of coffee
recommended will produce mild coffee, which most people prefer.
24 Cups 1 ½ Cups
22 Cups 1 ½ Cups
18 Cups 1 ¼ Cups
12 Cups 1 Cup
4

1. With basket and stem removed, fill coffeemaker with COLD water to desired level
using the cup markings on inside of coffeemaker as a guide. Do not make less
than 12 or more than maximum capacity of the coffeemaker at one time.
2. Place stem into heating unit in bottom of coffeemaker, then put basket on stem.
Spread the recommended amount of ground coffee evenly into the basket. See
chart. Use regular electric perk grind coffee or coffee ground for all coffeemakers.
Do not use drip or finely ground coffee as flooding of the basket can occur.
3. Turn cover in place on coffeemaker. To reduce coffee spills, especially if
coffeemaker is tipped over, make sure cover has been turned clockwise until it is
completely secured in the handle slots. (Note the arrows on the cover for correct
turning.) The cover temporarily reduces coffee spilage if coffeemaker is tipped
over, so care should be used when moving coffeemaker.
4. Place coffeemaker on a dry, level surface. Attach cord to coffeemaker and plug
into a 120 volt AC electrical outlet ONLY.
5. Coffeemaker stops perking automatically. (Each cup of coffee requires about 1
minute brewing time) Serving light will glow when coffee is ready. Before serving,
use a hot pad to remove cover, then carefully remove stem and basket from
coffeemaker as coffee and grounds are HOT. If not removed, bitter oils from the
coffee grounds will drip into coffee. Replace the cover making sure it is
completely secured into the handle slots.
6. Coffee will remain at serving temperature as long as coffeemaker is connected to
outlet. (if you have an insulated coffeemaker, the sealed-air insulation will keep
coffee hot for up to two hours without electricity.) To serve, place cup and saucer
under faucet and press down on handle. If a continuous flow is desired to fill a
carafe, lift handle straight up until it locks into open position. When approximately
one cup of coffee remains in coffeemaker, disconnect from outlet.
TO MAKE MORE COFFEE: If another pot of coffee is desired right away, partially fill
coffeemaker with cold water to reset the thermostat. Pour out water, refill with cold
water and repeat steps 1-6.
TO HEAT WATER FOR INSTANT BEVERAGES: Plain water may be heated in
your coffeemaker for use with instant beverages. Simply fill the clean coffeemaker
with cold water to the desired cup level, and then place the stem and empty coffee
basket in place. Using the stem and empty basket will heat the water more
uniformly. Secure cover in place and plug coffeemaker in. Heat water until perking
stops and serving light comes on. Unplug coffeemaker when less than 1 cup
remains. Other than making coffee or heating water, no other liquid should be
heated in coffeemaker as damage to heating unit can occur.
When coffeemaker is used to heat water only, the metal inside will discolor which is
normal and does not affect performance or the water heated in the coffeemaker.
Refer to Special Cleaning Instructions in this manual for removing discoloration as
well as mineral deposits, which form inside the coffeemaker when heating water. If
these deposits are not removed, pitting of the metal inside may occur and result in
damage to coffeemaker. Refer to the cleaning your coffeemaker section.
5

CLEANING YOUR COFFEEMAKER
Improper cleaning of the coffeemaker, especially the heating unit well will affect
performance of the coffeemaker, resulting in weak, lukewarm coffee and may even
cause the coffeemaker to stop perking. To keep your coffeemaker working properly,
it is important to follow all cleaning instructions after each use.
1. Unplug coffeemaker and allow to cool before cleaning.
2. Clean basket, stem and cover in hot soapy water with a dishcloth, rinse and dry.
Coffee stains on underside of cover or stem may be removed by scouring with a
damp cloth and a non-abrasive cleanser.
3. Clean inside of coffeemaker by filling with hot water until about one-third full. Add
small amount of liquid dishwasher detergent and wash with a dishcloth or sponge.
Then clean the heating unit well (where stem fits) with a scouring pad, to remove
coffee residue. Twist pad inside heating unit well to clean thoroughly.
IMPORTANT: If heating unit well is not kept clean, coffeemaker will not perform
properly.
4. After cleaning inside of coffeemaker, drain and rinse inside. Clean faucet by
letting clear water run through it into sink, while moving faucet handle up and
down. Drain water from inside of coffeemaker and dry.
5. Clea n outside of coffeemaker with a damp cloth and dry with a soft cloth. Do not
use abrasive metal scouring pads or cleansers on outside of coffeemaker as
scratching will occur.
DO NOT WASH COFFEEMAKER PARTS IN AN AUTOMATIC DISHWASHER.
SPECIAL CLEANING INSTRUCTIONS
To Remove Mineral Deposits: If coffeemaker is used daily, a special cleaning
every 2 weeks OR every week if used for heating water, is necessary. Fill
coffeemaker with 1 quart each of water and white distilled vinegar. (If a white
mineral buildup has formed on inside of coffeemaker, use an additional 2 cups of
vinegar.) Place stem and empty coffee basket in place, secure cover onto
coffeemaker and plug in. Allow coffeemaker to complete perking cycle, then let
stand for 10 to 15 minutes. Unplug and drain coffeemaker. Allow to cool and follow
general cleaning instructions.
To Remove Discoloration: Inside of the coffeemaker can discolor when used for
heating water, which is normal. To remove/lighten discoloration, fill coffeemaker with
water to the level of discoloration (at least to the 12 cup level, but not past maximum
cup level). Place stem and empty basket in place. For every 12 cups of water
added to coffeemaker, add 2 teaspoons cream of tartar to basket. Secure cover
onto coffeemaker, plug cord into coffemaker and then into outlet and allow
coffeemaker to complete perk cycle. Let stand for 15 to 20 minutes or until
discoloration is lightened. Unplug cord and drain coffeemaker. Allow to cool and
follow general cleaning instructions.
Do not use baking soda to clean coffeemaker, as it will discolor inside metal.
After frequent use, coffee residue may collect inside faucet. To clean, unscrew top
half of faucet. Move a small brush up and down through faucet. Insert brush
through opening inside coffeemaker to clean faucet connection. Rinse and replace
top half of faucet.
6

PRODUCT WARRANTY
Appliance 1 Year Limited Warranty
West Bend® Housewares, LLC warrants this appliance from failures in the material and
workmanship for 1 year from the date of original purchase, provided the appliance is operated
and maintained in conformity with the West Bend® Housewares, LLC Instruction Manual. Any
failed part of the appliance will be repaired or replaced without charge at West Bend®
Housewares, LLC discretion. This warranty applies to indoor household use only.
The West Bend® Housewares, LLC warranty does not cover any damage, including
discoloration, to any non-stick surface of the appliance. The West Bend® Housewares, LLC
warranty is null and void, as determined solely by West Bend® Housewares, LLC, if the
appliance is damaged through accident, misuse or abuse, scratching, overheating, or if the
appliance is altered in any way or if used outside of an indoor household setting.
This warranty gives you specific legal rights. You may also have other rights, which may vary
from state to state.
THIS WARRANTY IS IN LIEU OF ALL IMPLIED WARRANTIES, INCLUDING WARRANTIES
OF MERCHANTABILITY, FITNESS FOR A PARTICULAR PURPOSE, PERFORMANCE, OR
OTHERWISE, WHICH ARE HEREBY EXCLUDED. IN NO EVENT SHALL WEST BEND®
HOUSEWARES, LLC BE LIABLE FOR ANY DAMAGES, WHETHER DIRECT, IMMEDIATE,
INCIDENTAL, FORESEEABLE, CONSEQUENTIAL, OR SPECIAL, ARISING OUT OF OR IN
CONNECTION WITH ITS APPLIANCE.
If you think the appliance has failed or requires service within its warranty period, return it to the
original place of purchase. For further details please contact the West Bend® Housewares
Customer Service Department at (262) 334-6949 or e-mail us at housewares@westbend.com.
Return shipping fees are non-refundable. Hand-written receipts are not accepted. West Bend
Housewares, LLC is not responsible for returns lost in transit.
Valid only in USA and Canada
REPLACEMENT PARTS
Replacement parts may be ordered direct from West Bend® Housewares, LLC by ordering
online at www.westbend.com: Replacement Parts. Or you may call or e-mail the service
department at the number/e-mail address listed above, or by writing to us at:
West Bend Housewares, LLC
Attn: Customer Service
P.O. Box 2780
West Bend, WI 53095
Be sure to include the catalog/model number of your appliance (located on the bottom/back of
the unit) and a description and quantity of the part you wish to order. Along with this include
your name, mailing address, Visa/MasterCard number, expiration date and the name as it
appears on the card. Checks can be made payable to West Bend Housewares, LLC Call
Customer Service to obtain purchase amount. Your state’s sales tax and a shipping/processing
fee will be added to your total charge. Please allow two (2) weeks for delivery.
This manual contains important and helpful information regarding the safe use and care of your new West
Bend® Housewares, LLC product. For future reference, attach dated sales receipt for warranty proof of
purchase and record the following information:
Date purchased or received as gift: _______________________________________________________
Where purchased and price, if known: ____________________________________________________
Item Number and Date Code (shown bottom/back of product): ___________________________________________
L5590A 10/05 West Bend Housewares, LLC A Focus Products Group Company Printed in China
7

Notes

CAFETIERE
Mode d’emploi
Enregistrez ce produit et les autres produits West Bend® Housewares sur notre site
Internet :
www.westbend.com
Précautions importantes...........................................................................................2
Précautions de sécurité à haute température...........................................................2
Précautions de sécurité relative à l’électricité...........................................................3
Précautions pour une utilisation en présence d’enfants...........................................4
Utilisation de votre cafetière..................................................................................4-5
Nettoyage de votre cafetière....................................................................................6
Garantie ...................................................................................................................7
CONSERVEZ CE MODE D’EMPLOI POUR UNE CONSULTATION ULTERIEURE

PRECAUTIONS IMPORTANTES
Pour empêcher toute blessure physique ou tout dommage matériel, lisez et
suivez toutes les consignes et mises en garde.
Lorsque vous utilisez des appareils électriques, les précautions de sécurité
élémentaires devraient toujours être respectées, notamment les précautions cidessous :
• Lisez toutes les instructions, notamment les présentes précautions importantes,
ainsi que les consignes pour l’entretien de ce manuel.
• N’utilisez pas l’appareil pour un autre usage que celui pour lequel il a été conçu.
• Ne placez pas cet appareil sur ou à proximité d’une gazinière ou d’un réchaud
électrique, ni à l’intérieur d’un four chaud.
• N’utilisez pas cet appareil s’il ne fonctionne pas correctement ou s’il a été
détérioré de quelque manière que ce soit. Pour des renseignements concernant
les réparations, voir la page de garantie.
• L’utilisation d’accessoires non recommandés par West Bend® Housewares
risque de provoquer un incendie, un choc électrique voire des blessures.
• N’essayez pas de réparer cet appareil vous-même.
• N’utilisez pas cet appareil au-dessus du feu, sous un grill, au four, dans le
réfrigérateur ni au congélateur.
• Pour une utilisation domestique uniquement.
Pour empêcher toute brûlure, toute blessure physique ou tout dommage
matériel, lisez et suivez toutes les consignes et mises en garde.
PRECAUTIONS DE SECURITE A HAUTE TEMPERATURE
• Ne touchez pas les surfaces à haute température. Utilisez les poignées
rectangulaires et rondes lorsque celles-ci sont fournies. Utilisez des maniques
ou des gants de cuisine lorsque vous manipulez des surfaces à haute
température.
• Vous devez faire preuve d’une extrême prudence lorsque vous déplacez un
appareil contenant de l’huile ou tout autre liquide à haute température.
• Vérifiez que le couvercle, le filtre, la tige et le cordon d’alimentation sont
correctement fixés avant de brancher la cafetière. Aucune pièce de la cafetière
ne devrait être retirée pendant le cycle de préparation du café car il existe un
risque de brûlure.
2

Pour empêcher tout choc électrique, toute blessure physique ou tout
dommage matériel, lisez et suivez toutes les consignes et mises en garde.
PRECAUTIONS DE SECURITE RELATIVE A L’ELECTRICITE
• Pour vous protéger contre les incendies, les chocs électriques et les blessures,
n’immergez pas le cordon, les fiches ni toute autre pièce électrique dans l’eau ou
dans d’autres liquides.
• N’utilisez aucun appareil électrique dont le cordon ou la fiche est en mauvais
état.
• N’utilisez pas cet appareil en extérieur.
• Fixez toujours la fiche à l’appareil en premier, ensuite brancher la fiche dans la
prise secteur. Pour débrancher l’appareil, tournez toute commande sur « off »
puis retirez la fiche de la prise murale.
• Débranchez toujours de la prise secteur lorsque vous n’utilisez pas l’appareil et
avant de le nettoyer et laissez-le refroidir avant de placer ou de retirer des
pièces.
• Le fait que votre appareil dispose d’un cordon court constitue une précaution de
sécurité visant à éviter que celui-ci soit tiré, que quelqu’un s’y prenne les pieds
ou que celui-ci s’emmêle. Positionnez le cordon de sorte qu’il ne pende pas audessus du bord du plan de travail, de la table ou de toute autre surface ou qu’il
n’entre en contact avec aucune surface à haute température.
• Bien que l’utilisation d’un cordon de rallonge ne soit pas recommandée, si vous
devez en utiliser un, veillez à ce que ce cordon supporte le même nombre de
watts ou un nombre de watts plus élevé que la cafetière (le nombre de watts est
inscrit au-dessous de la tige de l’appareil). Positionnez le cordon de rallonge de
sorte qu’il ne pende pas au-dessus du bord du plan de travail, de la table ou de
toute autre surface.
• Utilisez une prise secteur qui accepte la fiche polarisée de l’appareil. Sur une
fiche polarisée, une des lames de la fiche est plus large que l’autre. Si la fiche
ne s’enfonce pas complètement dans la prise secteur ou dans le cordon de
rallonge, retournez-la. Si la fiche ne s’adapte toujours pas, contactez un
électricien qualifié. N’essayez pas de modifier la fiche de quelque manière que
ce soit.
• N’utilisez pas une prise secteur ou un cordon de rallonge si la fiche s’y adapte
avec un jeu ou si cette prise secteur ou ce cordon de rallonge vous semblent
chauds.
• Maintenez le cordon à l’écart des pièces de l’appareil et des surfaces à haute
température pendant l’utilisation.
3

Pour empêcher toute brûlure ou toute autre blessure physique des enfants,
lisez et suivez toutes les consignes et mises en garde.
PRECAUTIONS POUR UNE UTILISATION EN PRESENCE D’ENFANTS
• Ne laissez jamais les enfants sans surveillance.
• Ne laissez pas des enfants utiliser l’appareil ni s’en approcher car la température
des surfaces extérieures est très élevée pendant l’utilisation.
• Ne laissez pas le cordon pendre au-dessus de toute extrémité où un enfant
risquerait de l’atteindre. Positionnez le cordon de façon à éviter qu’il soit tiré,
qu’on s’y prenne les pieds ou qu’il s’emmêle.
CONSERVEZ CES CONSIGNES
UTILISATION DE VOTRE CAFETIERE
Couvercle
Filtre à café
Tige
Robinet
Puits de l’élément
de chauffage
Indicateur de
service
Avant d’utiliser cette cafetière pour la première fois, veuillez la nettoyer de manière
approfondie. Voir la section Nettoyage de votre cafetière.
Niveau d’eau Quantité de café moulu Niveau d’eau Quantité de café moulu
42 tasses 2 ½ mesures
36 tasses 2 mesures
30 tasses 1 ¾ mesures
28 tasses 1 2/3 mesures
REMARQUE SPECIALE SUR LA FAÇON DE MOUDRE LES GRAINS DE CAFE.
Si vous souhaitez moudre votre café vous-mêmes, faites-le avec des grains moyens
à grossiers pour obtenir de meilleurs résultats. NE PAS moudre le café trop fin
(comme de la poudre) car cela risque de provoquer le débordement du filtre. Utilisez
des mesures ordinaires pour mesurer le café. Ne laissez pas de café moulu tomber
à l’intérieur de la tige. La quantité de café recommandée produira un café de force
moyenne, ce que la plupart des gens préfère.
24 tasses 1 ½ mesures
22 tasses 1 ½ mesures
18 tasses 1 ¼ mesures
12 tasses 1 mesures
4

1. Le filtre et la tige étant retirés, remplissez la cafetière d’eau FROIDE jusqu’au niveau
souhaité en vous aidant des marques représentant des tasses à l’intérieur de la
cafetière. Ne préparez pas moins de 12 tasses ou plus de la capacité maximale de la
cafetière en une seule fois.
2. Placez la tige à l’intérieur de l’élément chauffant au bas de la cafetière puis placez le
filtre sur la tige. Etalez la quantité de café moulu recommandée uniformément dans le
filtre. Voir le tableau. Utilisez du café moulu pour percolateur électrique ou du café
moulu pour toutes les cafetières. N’utilisez pas de café liquide ou finement moulu car
cela risque de provoquer le débordement du filtre.
3. Tournez le couvercle mis en place sur la cafetière. Afin de diminuer les pertes de café,
en particulier si la cafetière est renversée, assurez-vous que le couvercle a été tourné
dans le sens des aiguilles d’une montre jusqu’à ce qu’il soit complètement bloqué dans
les fentes de la poignée. (Regardez les flèches sur le couvercle pour tourner
correctement.) Le couvercle réduit temporairement la quantité de café renversé si la
cafetière est renversée ; c’est pourquoi vous devriez faire attention en déplaçant la
cafetière.
4. Placez la cafetière sur une surface sèche et plane. Fixez le cordon d’alimentation à la
cafetière puis branchez-le dans une prise secteur de 120 volts AC UNIQUEMENT.
5. La cafetière arrête la percolation automatiquement. (Chaque tasse de café nécessite
une durée de préparation d’environ 1 minute.) L’indicateur de service s’allume lorsque
le café est prêt. Avant de servir, utilisez une manique pour retirer le couvercle puis
retirez la tige et le filtre de la cafetière avec prudence car le café et les grains sont
TRES CHAUDS. Si vous ne les retirez pas, les huiles amères du café moulu
s’écouleront dans le café. Remettez le couvercle en place en vous assurant qu’il est
complètement coincé dans les fentes de la poignée.
6. Le café reste à la température de service tant que la cafetière est raccordée à la prise
secteur. (Si votre cafetière est isolée, l’isolation par l’air maintiendra le café au chaud
pendant deux heures au maximum sans électricité.) Pour servir, placez la tasse et la
soucoupe sous le robinet puis appuyez la poignée vers le bas. Si vous souhaitez un
flux continu pour remplir une carafe, soulevez la poignée en la maintenant bien droite
jusqu’à ce qu’elle se coince en position ouverte. Lorsqu’il reste environ une tasse de
café dans la cafetière, débranchez-la de la prise secteur.
POUR PREPARER DAVANTAGE DE CAFE : Si vous souhaitez une autre cafetière tout
de suite, remplissez partiellement la cafetière d’eau pour réinitialiser le thermostat. Videz
l’eau, remplissez à nouveau la cafetière d’eau froide puis répétez les étapes 1 à 6.
POUR CHAUFFER DE L’EAU POU R DES BOISSONS INSTANTANEES : Vous pouvez
chauffer de l’eau ordinaire dans votre cafetière afin de l’utiliser avec des boissons
instantanées. Remplissez simplement la cafetière propre d’eau froide jusqu’au niveau de
tasses souhaité puis mettez en place la tige et le filtre à café vide. Le fait d’utiliser la tige
et le filtre à café chauffera l’eau de manière plus uniforme. Fixez bien le couvercle en
place puis branchez la cafetière. Chauffez l’eau jusqu’à la fin de la percolation et attendez
que le voyant de service s’allume. Débranchez la cafetière lorsqu’il reste moins d’1 tasse.
A l’exception de la préparation du café et du chauffage d’eau, aucun autre liquide
ne devrait être chauffé dans la cafetière car cela risque de détériorer l’élément de
chauffage.
Lorsque la cafetière est utilisée pour chauffer de l’eau uniquement, le métal à l’intérieur se
décolore ; c’est tout à fait normal et cela n’a aucune influence sur la performance de la
cafetière ni sur l’eau chauffée. Consultez les instructions de Nettoyage particulier de ce
manuel pour savoir comment éliminer la coloration ainsi que les dépôts de minéraux qui
se forment à l’intérieur de la cafetière lorsque vous chauffez de l’eau. Si ces dépôts ne
sont pas retirés, le métal à l’intérieur risque d’être attaqué et une détérioration de la
cafetière risque d’en résulter. Voir la section Nettoyage de votre cafetière.
5

NETTOYAGE DE VOTRE CAFETIERE
Un mauvais nettoyage de la cafetière, en particulier de l’élément de chauffage, aura des
répercussions sur la performance de la cafetière, qui produira un café au goût peu prononcé et
fade et cela risque même d’entraîner l’arrêt de la percolation par la cafetière. Afin de maintenir
votre cafetière en état de marche, il est important de suivre l’ensemble des instructions de
nettoyage après chaque utilisation.
1. Débranchez la cafetière et laissez-la refroidir avant de la nettoyer.
2. Nettoyer le filtre, la tige et le couvercle à l’eau chaude savonneuse à l’aide d’un torchon à
vaisselle, rincez puis séchez. Les taches de café au-dessous du couvercle peuvent être
éliminées en frottant à l’aide d’un chiffon humide et d’un nettoyant non-abrasif.
3. Nettoyez l’intérieur de la cafetière en la remplissant d’eau chaude jusqu’à ce que le niveau
atteigne environ un tiers. Ajoutez une petite quantité de détergent pour lave-vaisselle
liquide et nettoyez à l’aide d’un torchon à vaisselle ou d’une éponge. Ensuite, nettoyez bien
l’élément de chauffage (là où la tige s’adapte) à l’aide d’un tampon à récurer, afin de retirer
tout résidu de café. Tordez le tampon à l’intérieur de l’élément de chauffage afin de le
nettoyer méticuleusement. IMPORTANT : si l’élément de chauffage ne demeure pas
propre, la cafetière ne fonctionnera pas correctement.
4. Après le nettoyage de l’intérieur de la cafetière, égouttez puis rincez l’intérieur. Nettoyez le
robinet en faisant couler de l’eau claire dans l’évier à travers le robinet tout en déplaçant la
poignée du robinet vers le haut et vers le bas. Egouttez l’eau à l’intérieur de la cafetière puis
séchez-la.
5. Nettoyez l’extérieur de la cafetière à l’aide d’un chiffon humide puis séchez-la avec un
chiffon doux. Ne pas utiliser de tampons à récurer métalliques ni de nettoyants abrasifs sur
les surfaces extérieures de la cafetière car cela risque de la rayer.
NE LAVEZ PAS LES PIECES
DE LA CAFETIERE AU LAVE-VAISSELLE
AUTOMATIQUE.
CONSIGNES DE NETTOYAGE PARTICULIERES
Pour éliminer les dépôts minéraux : Si la cafetière est utilisée quotidiennement, un nettoyage
particulier toutes les 2 semaines OU chaque semaine si vous l’utilisez pour chauffer de l’eau,
est nécessaire. Remplissez la cafetière avec un quart d’eau et un quart de vinaigre blanc
distillé. (Si une accumulation minérale blanche s’est formée à l’intérieur de la cafetière, utilisez
2 mesures de vinaigre supplémentaires.) Mettez la tige puis le filtre à café vide en place, fixez
bien le couvercle sur la cafetière et branchez. Laissez la cafetière terminer le cycle de
percolation puis laissez reposer pendant 10 à 15 minutes. Débranchez puis égouttez la
cafetière. Laissez la cafetière refroidir puis suivez les instructions de nettoyage générales.
Pour éliminer la décoloration : L’intérieur de la cafetière risque de se décolorer lorsque celleci est utilisée pour chauffer de l’eau ; c’est tout à fait normal. Pour éliminer/adoucir la
décoloration, remplissez la cafetière d’eau jusqu’au niveau de décoloration (au moins jusqu’au
niveau de 12 tasses mais pas au dessus du niveau de tasses maximal). Mettez la tige et le
filtre vide en place. Toutes les 12 tasses d’eau, ajoutez deux cuillers à café de crème de
tartare dans le filtre. Fixez bien le couvercle sur la cafetière, branchez le cordon d’alimentation
à la cafetière puis dans la prise secteur et laissez la cafetière réaliser le cycle de percolation.
Laissez reposer pendant 15 à 20 minutes ou jusqu’à ce que la décoloration ait diminué.
Débranchez le cordon d’alimentation puis égouttez la cafetière. Laissez la cafetière refroidir
puis suivez les instructions de nettoyage générales.
N’utilisez pas de soude alimentaire pour nettoyer la cafetière car cela risque de
décolorer le métal à l’intérieur.
Après une utilisation fréquente, des résidus de café risquent de s’accumuler à l’intérieur du
robinet. Pour le nettoyer, dévissez la moitié supérieure du robinet. Déplacez une petite brosse
de haut en bas à l’intérieur du robinet. Insérez la brosse dans l’ouverture de la cafetière pour
nettoyer le raccord du robinet. Rincez puis remettez en place la partie supérieure du robinet.
6

GARANTIE DU PRODUIT
Garantie de l’appareil limitée à 1 an
West Bend® Housewares, LLC garantit le présent appareil contre tout défaut de pièce et de main
d’oeuvre pendant 1 an à compter de la date de l’achat initial, à condition que l’appareil soit utilisé et
entretenu conformément au mode d’emploi de West Bend® Housewares, LLC. Toute pièce
défectueuse de l’appareil sera réparée ou remplacée sans frais à la discrétion de West Bend®
Housewares, LLC. Cette garantie s’applique aux appareils ménagers d’intérieur uniquement.
La garantie de West Bend® Housewares, LLC ne couvre aucune détérioration, notamment la
décoloration, de toute surface anti-adhésive de cet appareil. La garantie de West Bend®
Housewares, LLC est nulle et non avenue, comme déterminé uniquement par West Bend®
Housewares, LLC, si l’appareil est détérioré en raison de tout accident, de toute mauvaise utilisation
ou de tout abus, de toute rayure, de toute surchauffe, ou si l’appareil est modifié de quelque manière
que ce soit ou s’il est utilisé à l’extérieur du cadre d’un intérieur domestique.
Cette garantie vous confère des droits particuliers. Il possible que vous ayez également d’autres
droits, qui sont susceptibles de varier d’un état à un autre.
CETTE GARANTIE ANNULE ET REMPLACE TOUTE GARANTIE INDUITE, NOTAMMENT LES
GARANTIES DE COMMERCIABILITÉ, D’ADAPTATION À UN USAGE PARTICULIER, DE
FONCTIONNEMENT OU AUTRE, QUI SONT PAR LA PRÉSENTE EXCLUES. EN AUCUN CAS
WEST BEND® HOUSEWARES, LLC NE POURRA ETRE CON SIDÉRÉ COMME RESPONSABLE
DE TOUTE DÉTÉRIORATION, QUE CELLE-CI SOIT DIRECTE, IMMÉDIATE, INDIRECTE,
PRÉVISIBLE, UNE CONSÉQUENCE OU PARTICULIÈRE, RÉSULTANT DE L’UTILISATION DE
CET APPAREIL OU EN RAPPORT AVEC SON UTILISATION.
Si vous pensez que cet appareil est défectueux ou a besoin d’être réparé pendant la durée de sa
garantie, rapportez-le au lieu de l’achat d’origine. Pour de plus amples renseignements, veuillez
contacter le Service client de West Bend® Housewares au (262) 334-6949 ou nous envoyer un e-mail
à housewares@westbend.com. Les frais de port pour le retour ne sont pas remboursables. Les
factures manuscrites ne sont pas acceptées. West Bend Housewares, LLC n’est pas responsable des
appareils retournés qui sont perdus penda nt le tr an sport.
Valable uniquement aux USA et au Canada
PIECES DE RECHANGE
Vous pouvez commander des pièces de rechange directement auprès de West Bend® Housewares,
LLC en commandant en ligne sur le site Internet : www.westbend.com: Pièces de rechange. Vous
pouvez également appelez ou envoyer un e-mail au service des réparations au numéro/à l’adresse email indiqué(e) ci-dessus ou nous écrire à :
West Bend Housewares, LLC
Attn: Customer Service
P.O. Box 2780
West Bend, WI 53095
Veillez à inclure le numéro du modèle/catalogue de votre appareil (situé au-dessous/au dos de
l’appareil) et une description ainsi que la quantité de la pièce que vous souhaitez commander.
Indiquez également votre nom, votre adresse postale, votre numéro de carte Visa/Mastercard, la date
d’expiration et le nom tel qu’il figure sur la carte. Les chèques peuvent être rédigés à l’ordre de West
Bend Housewares, LLC. Appelez le service client pour connaître le montant de votre achat. Les taxes
de votre état ainsi qu’un honoraire d’expédition/traitement seront ajoutés à votre prix total. Vous
recevrez votre envoi sous deux (2) semaines.
Ce guide contient des renseignements importants et util es co nc er nant l’utilisation sans danger et
l’entretien de votre nouveau produit West Bend® Hou sewares, LLC. Pour une consultation
ultérieur, fixez le reçu de caisse daté pour la preuve d’achat nécessaire à la garantie puis inscrivez
les renseignements ci-dessous :
Date d’achat ou de réception en cadeau : _____________________________________________
Lieu d’achat et prix, si connus : ____________________________________________________
Numéro de l’article et Code de la date (indiqués au bas/dos du produit) : ____________________
L5590A 10/05 West Bend Housewares, LLC A Focus Products Group Company Printed in China
7

Notes

CAFETERA
Manual de instrucciones
Registre este y otros productos West Bend® Hou sewares a través de nuestro sitio web.
www.westbend.com
Precauciones importantes...............................................................................................................2
Precauciones relativas al calor........................................................................................................2
Precauciones eléctricas...................................................................................................................3
Precauciones de uso cerca de niños.............................................................................................4
Cómo usar su cafetera ................................................................................................................4-5
Cómo limpiar su cafetera.................................................................................................................6
Garantía.............................................................................................................................................7
CONSERVE ESTE MANUAL DE INSTRUCCIONES PARA FUTURAS
CONSULTAS

PRECAUCIONES IMPORTANTES
Para evitar lesiones personales o daños materiales, lea y acate todas las
instrucciones y advertencias.
Al utilizar artefactos electrodomésticos, siempre deben acatarse las precauciones básicas de
seguridad incluyendo las siguientes:
• Lea todas las in strucciones, incluyendo estas precaucio nes importantes, así como las
instrucciones de uso y cuidado en este manual .
• No u tilice el apa rato para usos distinto s del indicado .
• No lo coloque sobre o cerca de un calentador eléctrico o a gas, o en un horno caliente.
• No lo opere cuando no funcione co rrectamente o hay a sido dañado de algún modo. Para
información relativa al servicio vea la página de garantías.
• El uso de accesorios no recomendados por West Bend® Housewares pudiera
causar fuegos, descargas eléctricas o lesiones a la personas.
• No trate de reparar este aparato electrodoméstico usted mismo.
• No use este aparato electrodoméstico sobre el tope de la estufa o cocina, debajo de una
parrilla, en el horno, o en el refrigerador o congelador.
• Sólo para uso doméstico.
Para evitar quemaduras, lesiones personales o daños materiales, lea y
acate todas las instrucciones y advertencias.
PRECAUCIONES RELATIVAS AL CALOR
• No toque las superficies calientes. Use las asas o perillas donde estén provistas. Use
almohadillas térmicas o guantes pa ra horno al man ipular superficies calientes.
• Debe te nerse extremo cuidado al mover cualquier a rtefacto elec trodoméstico que
contenga aceite caliente u otros líquidos calientes.
• Asegúrese de que la tapa, la ce sta, el vástago y el cordón eléctrico estén correctamen te
colocados antes de enchufar l a cafetera. No deberá sa carse parte a lguna de la cafetera
durante el ciclo de preparación del café ya que pudiera causar escaldaduras.
2

Para evitar descargas eléctricas, lesiones personales o daños materiales, lea y
acate todas las instrucciones y advertencias.
PRECAUCIONES ELÉCTRICAS
• Como protección contra fuegos, descargas eléctricas y lesiones a las personas,
nunca sumerja el cordón eléctrico, los enchufes o cualquier parte eléctrica en
agua u otros líquidos.
• No ope re aparato electrodomé stico alguno co n el cordón eléctrico o el enchufe dañado.
• No use este aparato electrodoméstico a la intemperie.
• Siempre conecte primero el enchufe al aparato electrodoméstico, y luego enchufe el
cordón eléctrico al tomacorriente. Para descone cta, coloque cualquier con trol en la
posición "OFF" (apagado), y luego desenchufe del tomacorriente.
• Siempre desenchufe el aparato cuando no esté en uso y antes de limpiarlo y permita que
se enfríe antes de colocarle o sacarle pa rtes.
• Su apara to electrodoméstico tiene un cordón eléctrico corto como medida de precaución
para impedir el halado, tro piezo o en redo accide ntal con el mismo. C oloque el co rdón
eléctrico de tal manera que no cuelgue del borde de un mostrador, mesa u otra superficie
o toque áreas calientes.
• No se re comienda usar un cable de extensión , pero si d ebe hacerlo, cerciórese de que el
vataje del mismo sea igual o superior al de la cafete ra (el va taje está e stampado d ebajo
de la base). Coloque el cable de ex tensión de tal modo que no cue lgue del borde de un
mostrador, mesa u otra superficie a fin de impedir que se hale, tropiece o enre de en el
mismo.
• Use un tomacorriente apto para el enchufe polarizado del aparato electrodoméstico. En
un enchufe polarizado, una hoja es más ancha que la otra. Invierta el enchufe si éste no
encaja completamente en el tomacorriente o el cable de extensión. Si el enchufe todavía
no encaja, consulte con un electricista calificado. No trate de modificar el enchufe de
manera alguna.
• No use un to macorriente o cable de extensión en e l cual el enchufe calza flojamente, o si
el tomacorriente o el cable de extensión se calientan.
• Mantenga e l cordón eléctrico alejado de las partes calientes del electrodomé stico
mientras éste esté operándose.
3

Para prevenir quemaduras u otras lesiones en los niños, lea y acate todas las
instrucciones y advertencias.
PRECAUCIONES DE USO CERCA DE NIÑOS
• Siempre supervise de cerca cuando haya niños.
• No permita que los niños usen o estén cerca del electrodoméstico ya que las superficies
externas de éste se calientan al usarse.
• No pe rmita que el cordón eléctri co cuelgue de algún borde d onde pueda se r alcanzado
por los niños. Coloque el cordón eléctrico de modo que se eviten lesiones que resulten
del halar, tropezarse o enredarse en el mismo.
CONSERVE ESTAS INSTRUCCIONES
CÓMO USAR SU CAFETERA
Tapa
Cesta de café
Vástago
Grifo
Pozo de la unidad
calentadora
Luz de servicio
Antes de utilizar la cafe tera por primera vez, límpiela a fondo. Refi érase a la secci ón "Cómo
limpiar su cafetera".
Nivel de agua Cantidad de café molido Nivel de agua Cantidad de café molido
42 tazas 2 ½ tazas
36 tazas 2 tazas
30 tazas 1 ¾ tazas
28 tazas 1 2/3 tazas
24 tazas 1 ½ tazas
22 tazas 1 ½ tazas
18 tazas 1 ¼ tazas
12 tazas 1 taza
NOTA ESPECIAL SOBRE LA MOLIENDA DE GRA NOS DE CA FÉ Si usted mismo
muele los granos de café, para los mejores resultados muélalos a una granulación media. NO
los muela demasiado fino (como polvo) ya que esto causa que se inunde la cesta. Use tazas
de medición estándar para medir el ca fé. No permita que el café molido caiga dentro del
vástago. La cantidad recomendada de café producirá café ligero , que es el que prefiere la
mayoría de la gente.
4

1. Con la cesta y el vástago retirados, llene la cafetera con agua FRÍA hasta el nivel deseado
usando como guía las marcas de tazas dentro de la cafetera. No prepare a la vez menos
de 12 tazas o más de la capacidad máxima de la cafetera.
2. Coloque el vástago dentro de la unidad ca lentadora en el fondo de la cafetera , y luego
coloque la cesta sobre el vástago. Esparza parejamente la cantidad re comendada de café
dentro de la cesta. Vea la tabla. Use café molido regular para cafetera eléctrica o café
molido para todo tipo de cafetera. No use café molido fino ni pa ra cafete ras por goteo ya
que la cesta puede inunda rse.
3. Gire la tapa en su sitio en la cafetera. Para reducir los derrames de café, especialmente si
la cafetera se vuelca , asegúrese de que la tapa se hay a girado en la dirección de las
agujas del reloj hasta queda r totalmente fija en las ranura s del asa. (Fíjese en las flechas
en la tapa para girarla correctamente.) Si se volcase la cafetera, la tapa reduce
temporalmente el derrame de café, p or lo que debe tenerse cuidado cuando se traslade la
cafetera.
4. Coloque la cafetera sobre una superficie seca y nivelada. Fije el cordón eléctrico a la
cafetera y ench úfelo SOLA MENTE a un tomacorriente de corriente alterna de 120 voltios.
5. La cafetera deja de elaborar café automáticamente. (C ada taza de café requiere alrededor
de 1 minuto de tiempo de p reparación.) La luz de servicio se encenderá cuand o el café
esté listo. Antes de servir, use un tomaolla para quitar la tapa, luego retire con cuidado el
vástago y la cesta de la cafetera ya que el café y el molido están CALIENTES. Si no se
quitan, dentro del café gotearán aceites ama rgos del café molido. Vuelva a colocar la tapa
asegurándose de que esté bien fija en las ranuras del asa.
6. El café se mantendrá en su temperatura de servicio mientras la cafetera esté conectada al
tomacorriente. (si tiene una cafetera aislada , el aislamien to de aire sellado mantendrá el
café caliente hasta dos horas sin electricidad.) Para se rvir, coloque la taza y el pla tillo bajo
el grifo y presione la palanca hacia abajo. Si se desea un flujo continuo para llenar una
jarra, levante la palanca derecho hacia arriba hasta que quede fija en la posición abierta.
Cuando quede aproximadamente una taza en la cafe tera, desconé ctela del tomacorriente.
PARA PREPARAR MÁS CAFÉ Si se desea otra jarra de café inmediatamente, parcialmente
llene la unidad con agua fría para rea justar el termos tato. Vierta el agua y vuelva a llenar co n
agua fría; y repita los pasos 1 -6 anteriores.
PARA CA L ENT AR AGUA PAR A B EB IDA S IN STA N TÁN EA S: Pued e calentarse ag ua
sola en la cafetera para usarse con bebidas instantáneas. Basta con llenar la cafetera limpia
con agua fría hasta el nivel deseado de tazas, y luego colocar el vástago y la cesta de café
vacía en su sitio. Con el vástago y la cesta vacía el agua se calentará más uniformemente.
Asegure la tapa en su sitio y enchu fe la ca fetera. Calien te el agua hasta que l a unidad de je de
funcionar y se encienda la lu z de servicio. Desenchufe la cafetera cuando quede menos d e 1
taza. Aparte de preparar café o calentar agua, no debe calentarse ningún otro líquido
en la cafetera ya que puede dañarse la unidad calentadora.
Cuando se usa la cafetera para calentar agua solamente, el metal del interior se decolorará,
lo cual es normal y no afecta el de sempeño ni e l agua calentada en la cafe tera. Con sulte las
"Instrucciones especiales de li mpieza" contenid as en este folleto para eliminar la de coloración
así como los depósitos minerales que se forman den tro de la cafetera al calentar agua . Si no
se eliminan estos depósitos, el metal interio r puede picarse y producir daños a la cafetera .
Consulte la sección sobre cómo limpiar su cafetera.
5

CÓMO LIMPIAR SU CAFETERA
La limpieza incorrecta de la cafetera, y en especial la del pozo de la unidad calentadora, afectará
el desempeño de la cafetera, produciendo café poco cargado y tibio, e incluso puede hacer que
la cafetera deje de funcionar. Para mantener a su cafetera funcionando correcta mente, es
importante seguir las siguientes instrucciones de limpieza tras cada uso.
1. Desenchufe la cafetera y permita que se enfríe antes de limpiarla .
2. Limpie la cesta, el vástago y la tapa en agua caliente jabonosa con un paño de cocina,
enjuáguelos y séquelos. Las manchas de café en la parte inferior de la tapa o en el vástago
pueden eliminarse fregando con un paño húmedo y un limpiador no abrasivo.
3. Limpie el interior de la cafetera llenándola con agua caliente hasta que quede
aproximadamente un tercio llena. Agregue una pequeña cantidad de detergente líquido
para lavar platos y lave con un paño de cocina o esponja. Luego limpie el po zo de la unidad
calentadora (donde se coloca el vástago) con una esponja abrasiva para eliminar el residuo
de café. Gire la esponja dentro del pozo de la unidad calentadora para limpiarlo bien
IMPORTANTE: Si no se mantiene limpio al pozo de la unidad calentadora, la cafetera no
funcionará bien.
4. Después de limpiar la cafetera por dentro, escurra el agua y enjuague el interior. Limpie el
grifo dejando correr agua a través de él al fregadero, a la vez que se mueve la palanca del
grifo hacia arriba y hacia abajo. Escurra el agua del inte rior de la cafetera y séquela.
5. Limpie el exterior de la cafetera con un paño húmedo y séquelo con un paño suave. No use
esponjas o limpiadores abrasivos sobre la parte externa de la cafetera pues la rayará.
NO LAVE LAS PIEZAS DE LA CA FETERA EN UN LAVA PLA TOS AUTOM ÁTICO .
INSTRUCCIONES ESPECIALES DE LIMPIEZA
Para eliminar depósitos minerales Si la cafetera se usa a diario , es necesario darle una
limpieza especial cada 2 semanas O BIEN cada semana si se usa para calentar agua. Llene la
cafetera con 1 cuarto de galón (0,95 l) de agua y otro de vinagre bla nco destilado. (Si se ha
formado una acumulación de mineral blanco en el interior de la cafetera, use 2 tazas adicionales
de vinagre.) Coloque el vástago y la cesta de café vacía en su sitio, asegure la tapa en la
cafetera y enchúfela. Deje que la cafetera lle ve a cabo su ciclo, y luego déjela estar 10 a 15
minutos. Desenchufe la unidad y escurra la cafete ra. Deje que se enfríe y siga las instru cciones
generales de limpieza.
Para eliminar la decoloración El interior de la cafetera puede decolorarse al utilizarse para
calentar agua, lo cual es normal. Para eliminar o aclarar la decoloración, llene la cafetera con
agua hasta el nivel de la decoloración (por lo menos hasta el nivel de 12 tazas, pero no más allá
del nivel máximo de tazas). Coloque el vástago y la cesta vacía en su sitio. Por cad a 12 tazas
de agua que se coloquen en la cafetera, añada 2 cucharaditas de crémor tártaro a la cesta.
Asegure la tapa en la cafetera, enchufe el cordón eléctri co a la cafetera y luego al tomacorrien te
y deje que la unidad complete su ciclo. Déjela estar 15 a 20 minutos o hasta que la
decoloración se borre lo más posible. Desenchufe el cordón eléctrico y escurra la cafetera. Deje
que se enfríe y siga las instrucciones generales de limpieza.
No use bicarbonato de sosa para limpiar la cafetera ya que decolorará el
metal interior.
Tras un uso frecuente, puede acumularse residuo de café dentro del gri fo. Para limpiarlo,
desatornille la mitad superior del grifo. Mueva un pequeño cepillo hacia arriba y hacia abajo a
través del grifo. Inserte el cepillo por la abertura dentro de la cafetera para limpiar la conexión al
grifo. Enjuague y vuelva a colocar la mitad superior del grifo .
6

GARANTÍA DEL PRODUCTO
Garantía limitada de 1 año del aparato electrodoméstico
West Bend® Housewares, LLC garantiza que este aparato no presentará fallas de material ni fabricación
durante 1 año a partir de la fecha original de compra, siempre y cuando el aparato sea operado y
mantenido tal como se indica en el manual de instr ucciones de West Bend® Housewares, LLC. To da
pieza del aparato que presente fallas ser á reparada o reemplazada sin costo alg uno a criterio de West
Bend® Housewares, LLC. Esta gara ntía rige solamen te para el uso domest ico en interiore s.
La garantía de West Bend® Housewares, LLC no cubre ningún daño, incluyendo la decoloración, de
superficie antiadherente alguna d el aparato electrodoméstico . La garantía de West Bend® Housewa res,
LLC quedará nula e inválida, según lo de termine exclusivamente West Bend® House wares, LLC, si el
aparato electrodoméstico resultase dañado debido a accidentes, uso indebido o abuso, rayas,
sobrecalentamiento o si es alterado de algún modo o no se usa en forma doméstica y en interiores.
Esta garantía le otorga derechos legales específic os. Usted también puede tener otros derechos, los
cuales pueden variar de una jurisdicción a otra.
ESTA GARANTÍA REEMPLAZA A TODAS LAS DEMÁS GARANTÍAS IMPLÍCITAS, INCLUYENDO
AQUÉLLAS DE COMERCIABILIDAD E IDON EIDAD PARA UN FIN O USO EN PARTICULAR, LAS
CUALES QUEDAN EXCLUIDAS MEDIANTE EL PRESENTE DOCUMENTO. WEST BEND®
HOUSEWARES, LLC RECHAZA TODA RESPONSABILIDAD POR DAÑOS, YA SEAN DIRECTOS,
INMEDIATOS, INCIDENTALES, PREVISIBLES, CONSECUENTES O ESPECIALES QUE SURJAN
DEL USO DEL APARATO ELECTRODOMÉSTICO O GUARDEN RELACIÓN CON EL MISMO.
Si dentro del período de garantía usted considera que el aparato electrodoméstico presenta fallas o requiere
servicio, devuélvalo al lugar de compra original. Para obtener mayores detalles comuníquese con el
Departamento de Servicio al Cliente al (262) 334-6949 o por correo electrónico a housewares@westbend.com.
Los gastos de devolución no son reembolsables. Los recibos escritos a mano no son válidos. West Bend
Housewares, LLC no se hace responsable de las devoluciones perdidas en tránsito.
Válido sólo en EE.UU. y Canadá
REPUESTOS
Solicite los repuestos a West Bend® Housewares, LLC directamente en línea en
www.westbend.com, "Replacement Parts", llamando o en viando un m ensaje de correo electrónico a l
departamento de servicios al número/dirección antedichos o escribiend o a: We st Bend Housewares,
LLC Repuestos O puede llamarnos o enviarnos un mensaje de correo electrónico al departamento
de servicios al número/dirección antedichos o escr ibiéndonos a :
West Bend Housewares, LLC
Attn: Customer Service
P.O. Box 2780
West Bend, WI 53095, EE.UU.
Cerciórese de incluir el número de catálogo/modelo del aparato electrodoméstico (situado en la
parte inferior/posterior de la unidad) así como la de scripció n y la ca ntid ad de rep uestos q ue necesit a.
Junto con esta información, incluya su nombre, dirección postal, número de tarjeta de crédito Visa o
MasterCard, la fecha de vencimiento y el nombre tal como aparece en la tarjeta. Los cheques
deben hacerse pagaderos a West Bend Housewares, LLC. Llame a Servicio a la Clientela para que
le informen el monto de la compra. Se sumará al to ta l el impue sto de venta e stata l qu e correspon da,
más un cargo por despacho y procesamiento. La entr ega tarda dos (2) semanas.
Este folleto contiene información importante y útil sobre el uso seguro y el cuidado de su nuevo producto
de West Bend® Housewares, LLC. Para su propia referencia, archive aquí el recibo fechado que sirve de
comprobante de compra para la garantía, y anote la siguiente información:
Fecha en que compró o recibió la unidad como regalo: ________________________________________
Dónde se efectuó la compra y el precio, si lo sabe: ___________________________________________
Número y código de fecha del producto (aparece en la parte inferior/posterior de la unidad): ____________________
L5590A 10/05 West Bend Housewares, LLC A Focus Products Group Company Printed in China
7

Notas
 Loading...