

Page 1
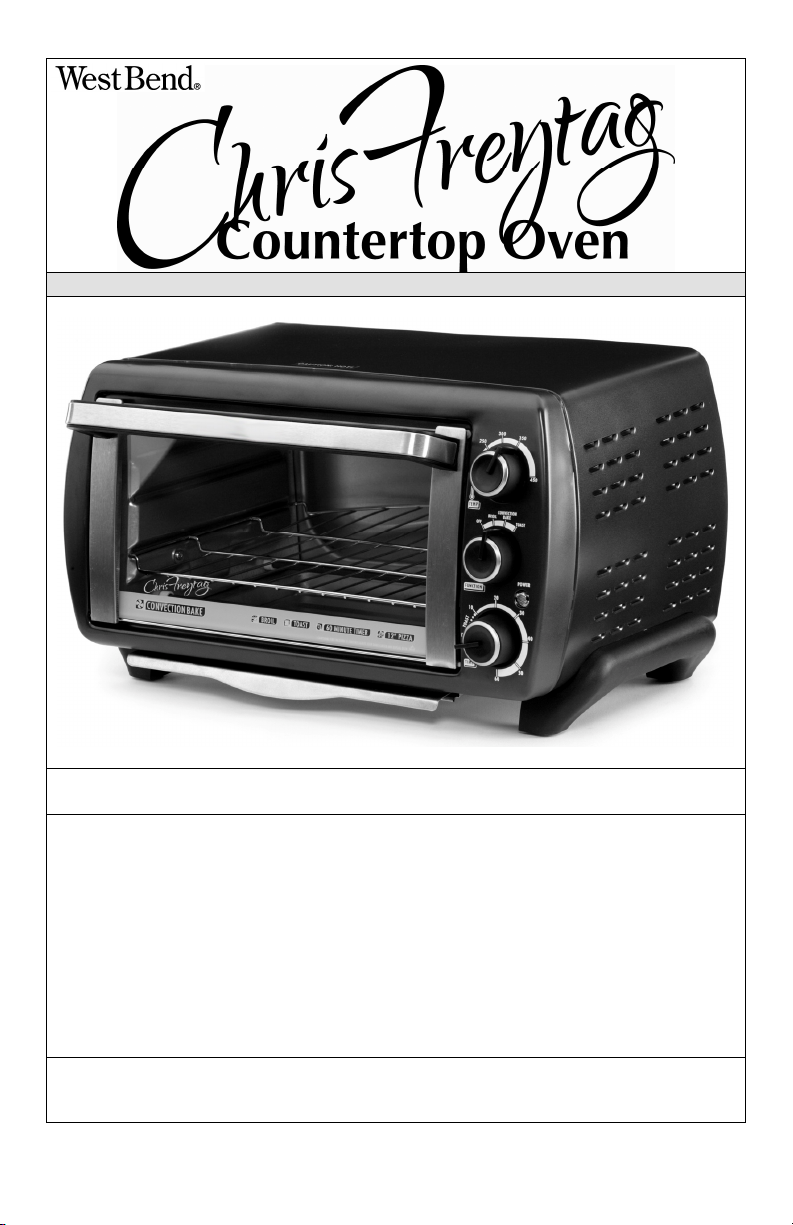
Instruction Manual
Register this and other Focus Electrics products through our website:
www.registerfocus.com
Important Safeguards ............................................................................................... 2
Before Using for the First Time ................................................................................ 4
Using Your Countertop Oven ................................................................................... 4
Helpful Hints ............................................................................................................. 7
Cleaning Your Countertop Oven .............................................................................. 7
Troubleshooting Guide ............................................................................................. 8
Warranty ................................................................................................................... 9
SAVE THIS INSTRUCTION MANUAL FOR FUTURE REFERENCE
2011 West Bend®, a Brand of Focus Electrics, LLC.
www.westbend.com
Page 2
IMPORTANT SAFEGUARDS
To prevent personal injury or property damage, read and follow all instructions
and warnings.
When using electrical appliances, basic safety precautions should always be
followed including:
• Read all instructions.
• Do not touch hot surfaces. Use handles or knobs.
• Do not touch heating elements as serious burns may result.
• A fire may occur if the appliance is covered or touching flammable material
including curtains, draperies, walls and the like, when in operation. Do not store
any item on top of appliance when in operation.
• Oversize foods or metal utensils must not be inserted in this appliance as they
may create a fire or risk of electric shock.
• Unplug oven and close door if fire is observed.
• Do not store any materials, other than manufacturers recommended
accessories in this oven when not in use.
• Do not place any of the following materials in the oven: plastic, paper, cardboard
and the like.
• Extreme caution should be exercised when using containers constructed of
other than metal or glass.
• Do not cover rack, bake/drip pan or any parts of the oven with aluminum foil, as
overheating will occur.
• Always turn timer control and heat selector to “OFF” and unplug the appliance
from outlet when not in use and before cleaning.
• Failure to clean after each use may result in fire hazard.
• Do not clean with metal scouring pads. Pieces can break off of the pad and
touch electrical parts, creating a risk of electrical shock.
• Do not use sharp utensils to clean oven door glass as scratching may weaken it
and cause shattering.
• Set cooking containers, pans, bake/drip pan and rack on a hot pad, trivet or
other heat protective surface. Do not set directly on the counter, table, or other
surface.
• Do not place on or near a hot gas or electric burner, or in a heated oven.
• This device is not intended to heat oil or other liquids.
• Extreme caution must be used when removing the bake/drip pan or disposing of
hot grease.
• To protect against fire, electric shock, and injury to persons do not immerse
cord, plugs, or other electric parts in water or other liquids.
• Close supervision is necessary when this appliance is used by or near children.
• Always plug cord into wall outlet. To disconnect, turn any control to “OFF,” then
remove plug from wall outlet.
• Always unplug from outlet when not in use and before cleaning. Allow to cool
before putting on or taking off parts and before cleaning.
• The use of accessory attachments not recommended by Focus Electrics may
cause fire, electric shock, or injury.
2
Page 3
• Do not operate any appliance with a damaged cord or plug, after the appliance
malfunctions, or has been damaged in any manner. For service information see
warranty page.
• Do not use this appliance outdoors.
• Do not let cord hang over the edge of the table or counter, or touch hot surfaces.
• Do not use appliance for other than intended use.
• A short power-supply cord is provided to reduce risks resulting from becoming
entangled in or tripping over a longer cord.
• Longer extension cords are available, but care must be exercised in their use.
While use of an extension cord is not recommended, if you must use one,
ensure that the marked electrical rating of the extension cord is equal to or
greater than that of the appliance. If the plug is of the grounded type, the
extension cord must be a grounding-type 3-wire cord. To avoid pulling, tripping
or entanglement, position the extension cord so that it does not hang over the
edge of the counter, table or other area where it can be pulled on by children or
tripped over.
• This appliance has a polarized plug (one blade is wider than the other). To
reduce the risk of electric shock, this plug is intended to fit into a polarized outlet
only one way. If the plug does not fit fully into the outlet, reverse the plug. If it
still does not fit, contact a qualified electrician. Do not attempt to modify the plug
in any way.
• Do not use an outlet or extension cord if the plug fits loosely or if the outlet or
extension cord feels hot.
• Do not attempt to repair this product yourself.
• For household use only.
SAVE THESE INSTRUCTIONS
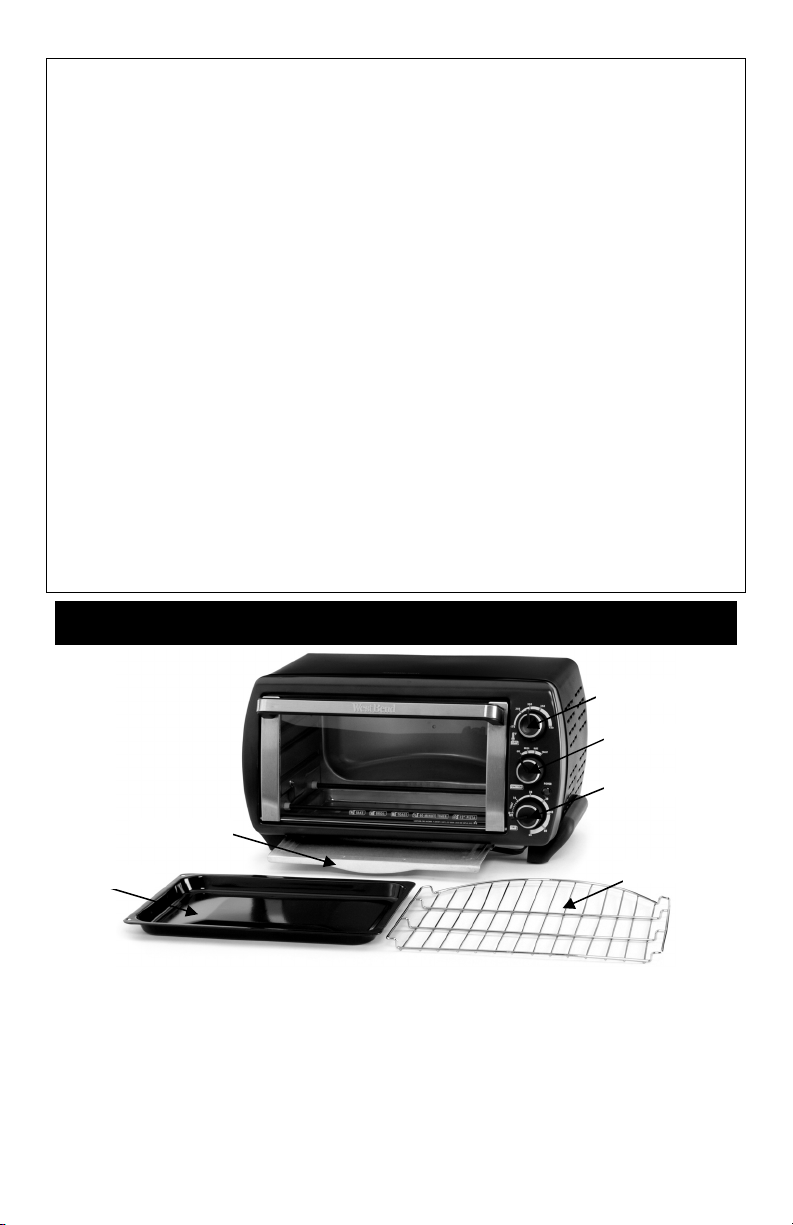
Temperature Control
Crumb Tray
Bake/Drip Pan
Oven Rack: Your oven includes a chrome plated oven rack. This must be placed in
to the oven with the rounded side towards the back of the oven. Turning the rack
upside down will allow for more space in relation to the heating elements, allowing
taller foods to fit in to the oven.
Bake/Drip Pan: The bake/drip pan may be used for baking or reheating foods or to
catch drippings.
Crumb Tray: Allows for easy disposal of crumbs.
3
Function Control
Timer Control
Oven Rack
Page 4

B
EFORE USING FOR THE FIRST TIME
Please check all packaging material carefully before discarding. Accessory
parts may be contained within the packaging material.
• Remove any stickers or labels from heating surfaces.
• Make sure the oven is free from any paper or objects not intended for use in
the oven.
• Clean the interior, oven rack, crumb tray, bake/drip pan and other
accessories as described in the “Cleaning Your Countertop Oven” section
of this manual.
• Ensure clean, dry crumb tray is in position before operating the countertop
oven.
• Select a location for your oven that is level, in an open area with at least 6”
clearance from walls, curtains, or cabinets.
• Before using for the first time, turn the temperature control to “MAX/TOAST”
and set timer control for 5 - 10 minutes or until any smoke dissipates. This
will eliminate any manufacturing oils.
U
SING YOUR COUNTERTOP OVEN
Basic Use:
1. Place countertop oven on a dry, level, heat-resistant surface, away from any
edges.
2. Plug the cord in to a 120 volt, AC electrical outlet ONLY. Ensure that the cord
is not touching any part of the oven before and during operation.
3. Insert crumb tray. Place the oven rack and/or bake/drip pan in to the desired
position.
4. Set the function control to the desired setting.
5. Set the temperature control to the desired cooking temperature.
6. Set the timer control and allow the oven to preheat for 4 - 8 minutes. Note: The
“TOAST” function requires no preheating.
7. After the oven has preheated, place the food in the oven, onto the oven rack.
Use the appropriate cooking container if required. Set the timer control to the
desired cooking time.
8. When the time has elapsed, a bell will sound and the oven will turn off
automatically. Using hot pads or oven mitts, open the door and remove the food
container. Unplug from the electrical outlet. Allow the oven to cool completely
before cleaning.
CAUTION: Use extreme caution when opening the door. Keep your hands and
face away as very hot air or steam may be released when the door is opened.
Never set anything on the glass door, as damage could occur.
NOTE: Follow the package or recipe directions for baking times and temperatures
when baking pizza, appetizers, cookies, cakes, etc. Because your countertop oven
is smaller than a conventional oven, it may heat up faster and cook in a shorter time
period. Be sure to monitor the food closely to prevent burning. Also, if making
multiple batches, you may want to reduce cook times for subsequent batches after
the initial batch is done. For easy cleanup, position the bake/drip pan in the bottom
rack support guide to catch any spillover.
4
Page 5
Bake/Convection Bake Function: (top & bottom element)
CAUTION: Do not use roasting bags, plastic or glass containers in the oven as
damage could occur.
1. Position the oven rack in to the bottom rack support guide.
2. Place item to be baked (in proper cooking container) onto the oven rack.
3. Set the temperature control to the desired temperature.
4. Set the function control to “BAKE/CONVECTION BAKE”. Preheat the oven by
setting the timer control to desired preheat time. We recommend 4 - 8 minutes.
5. Once preheated, turn the timer control clockwise to desired cook time. If baking
is complete before the timer sounds, turn the timer control counter-clockwise to
“OFF,” or manually set the function control to “OFF”. Note: If the oven is turned
off by turning the function control to “OFF,” the timer will continue to count down
to 0. Use hot pads or oven mitts to open the door and remove the cooking
container. CAUTION: Use extreme caution when opening the door. Keep your
hands and face away as very hot air or steam may be released when the door is
opened. Never set anything on the glass door, as damage could occur.
Baking/Roasting Guide
All roasting times are based on cooking meats at a thawed temperature. Frozen
meats may take much longer. Use of a meat thermometer is highly recommended.
Cooking results may vary; adjust these times to suit your individual requirements.
For best results, pre-heat the countertop oven for 4 - 8 minutes at the desired
cooking temperature.
MEAT OVEN TEMP TIME PER LB.
Pork Roast 325°F (165°C) 40-45 min.
Beef Roast 300-325°F (150°-165°C) 25-30 min.
Ham 300-325°F (150°-165°C) 35-40 min.
Chicken 350°F (175°C) 25-30 min.
Baking Pizzas: (top & bottom heating element)
1. Place the oven rack in to the middle rack support guide.
2. Set temperature control to “MAX/TOAST” (475°F - 246°C).
3. Set function control to “BAKE/CONVECTION BAKE”.
4. Preheat oven for 4 - 8 minutes. Place pizza onto the oven rack, making sure it
is as far back as it will go inside the oven. Bake to desired doneness. For
optimal browning performance do not insert the bake/drip pan.
Broil Function: (top heating element)
1. Place the food item into the bake/drip pan.
2. Place the oven rack in the appropriate rack support guide in either the up or
down position. Place the bake/drip pan with food on to the oven rack. Ensure
there is at least a 1” clearance between the food and the heating elements.
3. Set the function control to “BROIL”.
4. Set the temperature control to “MAX/TOAST” (475°F - 246°C).
5
Page 6
5. Set the timer control to the desired time. When the time has elapsed, a bell will
sound and the oven will turn off automatically. Using hot pads or oven mitts,
open the door and remove the bake/drip pan and food. CAUTION: Use extreme
caution when opening the door. Keep your hands and face away as very hot air
or steam may be released when the door is opened. Never set anything on the
glass door, as damage could occur.
Broiling Guide
Results may vary; adjust the cooking temperatures and times to suit your individual
requirements. Check often during broiling to avoid overcooking. All broiling times
are based on meats that are at a thawed temperature. For best results, pre-heat the
countertop oven for 4 - 8 minutes at the desired cooking temperature.
MEAT OVEN TEMP COOKING TIME
Hamburger 400°F (205°C) 15-20 min.
T-Bone Steak 400°F (205°C) 20-25 min.
Pork Chops 400°F (205°C) 20-25 min.
Lamb Chops 400°F (205°C) 20-25 min.
Chicken Legs 400°F (205°C) 30-35 min.
Fish Filets 350°F (175°C) 20-25 min.
Toast Function: (top & bottom heating element)
The large capacity oven allows for toasting 1 to 6 slices of bread, 6 English muffin
halves, frozen waffles, or pancakes. When toasting only 1 or 2 items, place the food
in the center of the oven.
1. Ensure the crumb tray is in position.
2. Place the oven rack in the middle rack support guide in the up position. Place
food to be toasted onto the oven rack.
3. Set the temperature control to “MAX/TOAST” (475°F - 246°C). No preheat is
required in this setting.
4. Set the function control to “TOAST” setting.
5. Set the timer control to the desired time. Longer time will produce darker toast.
6. When toasting is complete, remove the oven rack using hot pads or oven mitts.
Note: If toasting several batches of bread, one after the other, set the timer
control for less time after the first batch as the oven will be warm and require
less toasting time.
Warm Function: (top & bottom heating element)
To use the countertop oven to keep cooked food warm, follow these steps.
1. Set the function control to “BAKE/CONVECTION BAKE”.
2. Set temperature control to “WARM” (175°F - 79.4°C).
3. Set timer control to desired warming time.
4. Remove food from oven when warm time is complete, or when you are ready to
serve.
6
Page 7

H
ELPFUL HINTS
• Convection cooking uses hot air movement, by means of a fan, and provides
faster cooking in many cases than regular radiant type countertop ovens. The
fan sends hot air to every area of the food, quickly sealing in moisture and
flavor, producing more of an even temperature all around the food. The Chris
Freytag Countertop Convection oven was designed with a very quiet fan. If you
do hear a motor running (humming), it’s the convection feature hard at work.
Check to ensure that your oven is on a level surface. If the oven is not level, it
may rattle.
• To accommodate a wide variety of foods, the oven rack is reversible and has
three rack positions. The rack can be inserted in the up or down position in to
any of the rack support guides located along the oven sidewalls.
• Recommended Pan Sizes – The following pan sizes should fit your Countertop
Oven. To be sure the pan will fit, place the pan inside the oven prior to
preparing your recipe. When baking in loaf pans, we recommend you do not fill
the pan more than half full.
12-cup mini muffin pan
6-cup muffin pan
8 x 4 loaf pan
9 x 5 loaf pan
8” round or square baking pan or dish
1-1½ quart casserole dish – most types
C
LEANING YOUR COUNTERTOP OVEN
CAUTION: Before cleaning any part of the oven, always set the timer and function
controls to “OFF,” unplug the cord from the electrical outlet and allow the oven to
cool completely.
To keep your countertop oven clean, wipe away food spills, spatters, and crumbs
after each use.
1. The oven rack, bake/drip pan, and crumb tray may be washed in warm, soapy
water with a dishcloth, rinsed and dried or in an automatic dishwasher. Do not
use any metal or abrasive scouring pads or cleansers on these parts as damage
to the finish may occur.
2. Wipe the exterior of the oven and glass door with a soft, damp cloth and dry. Do
not use any type of scouring pad or cleaner on the exterior surfaces or the glass
door as scratching will occur. If glass is scratched, it can weaken and shatter.
3. Wipe the interior of the oven with a damp cloth, wipe clean and dry. Do not use
any metal or abrasive scouring pads, cleansers, or oven cleaner on the inside of
oven, as damage will occur. Be careful when wiping around the heating
elements to prevent damage.
7
Page 8

PROBLEM
POTENTIAL CAUSE
Overcooked/under
crumb tray.
cooked foods
Smoke or Odor
upon Heating
Noises
T
ROUBLESHOOTING GUIDE
SOLUTION
Incorrect temperature or
function setting
Adjust time or temperature.
Because your countertop oven
is smaller than your regular
oven, it will heat up faster and
cook in shorter periods of time.
Rack placement Rack may need to be adjusted
to accommodate specific food
types.
Manufacturing Oils Some smoke and/or odor may
occur upon initial heating due
to the release of manufacturing
oils – this is normal. Run empty
oven through heating cycle for
5-10 minutes at “MAX/TOAST”.
Expansion/Contraction
upon heating.
Convection Fan
Some minor expansion/
contraction sounds may occur
during heating and cooling –
this is normal.
If your countertop oven is the
convection model, make sure
that your oven is on a level
surface.
Burnt smell
Oven does not
turn on
Heating element
does not stay on
Food build-up inside oven,
on heating elements or in
Appliance is unplugged.
Function control set to
“OFF”.
Timer is not on.
8
Refer to “Cleaning Your Oven”
section.
Plug appliance in to electrical
outlet
Set function control to desired
setting.
Turn timer control to desired
setting.
Heating elements will cycle on
and off to maintain the proper
temperature.
Page 9

P
RODUCT WARRANTY
Appliance 1 Year Limited Warranty
Focus Electrics, LLC (“Focus Electrics”) warrants this appliance from failures in the material
and workmanship for one (1) year from the date of original purchase with proof of purchase,
provided the appliance is operated and maintained in conformity with the provided Instruction
Manual. Any failed part of the appliance will be repaired or replaced without charge at Focus
Electrics’ discretion. This warranty applies to indoor household use only.
This warranty does not cover any damage, including discoloration, to any non-stick surface of
the appliance. This warranty is null and void, as determined solely by Focus Electrics if the
appliance is damaged through accident, misuse, abuse, negligence, scratching, or if the
appliance is altered in any way.
THIS WARRANTY IS IN LIEU OF ALL IMPLIED WARRANTIES, INCLUDING WARRANTIES
OF MERCHANTABILITY, FITNESS FOR A PARTICULAR PURPOSE, PERFORMANCE, OR
OTHERWISE, WHICH ARE HEREBY EXCLUDED. IN NO EVENT SHALL FOCUS
ELECTRICS BE LIABLE FOR ANY DAMAGES, WHETHER DIRECT, INDIRECT,
INCIDENTAL, FORSEEABLE, CONSEQUENTIAL, OR SPECIAL, ARISING OUT OF OR IN
CONNECTION WITH THIS APPLIANCE.
If you think the appliance has failed or requires service within its warranty period, please
contact the Focus Electrics Customer Service Department at (866) 290-1851, or e-mail us at
service@focuselectrics.com. A receipt proving the original purchase date will be required for all
warranty claims, hand written receipts are not accepted. You may also be required to return
the appliance for inspection and evaluation. Return shipping costs are not refundable. Focus
Electrics is not responsible for returns lost in transit.
Valid only in USA and Canada
R
EPLACEMENT PARTS
Replacement parts, if available, may be ordered directly from Focus Electrics, LLC several
ways. Order online at www.focuselectrics.com, e-mail service@focuselectrics.com, over the
phone by calling (866)290-1851, or by writing to:
Focus Electrics, LLC
Attn: Customer Service
P. O. Box 2780
West Bend, WI 53095
To order with a check or money order, please first contact Customer Service for an order total.
Mail your payment along with a letter stating the model or catalog number of your appliance,
which can be found on the bottom or back of the appliance, a description of the part or parts
you are ordering, and the quantity you would like. Your check should be made payable to
Focus Electrics, LLC.
Your state/province’s sales tax and a shipping fee will be added to your total charge. Please
allow two weeks for processing and delivery.
This manual contains important and helpful information regarding the safe use and care of your
new Focus Electrics product. For future reference, attach dated sales receipt for warranty proof
of purchase and record the following information:
Date purchased or received as gift: _______________________________________________
Where purchased and price, if known: _____________________________________________
Item number and Date Code (shown bottom/back of product):___________________________
L5837 02/11 West Bend®, a Brand of Focus Electrics, LLC. Printed in China
9
Page 10

Mode d’emploi
Enregistrez cet appareil ainsi que vos autres produits Focus Electrics sur notre site
Internet: www.registerfocus.com
Précautions de Sécurité Importantes ....................................................................... 2
Avant la Première Utilisation .................................................................................... 4
Utilisation de Votre Four à Poser Sur un Plan de Travail ......................................... 4
Astuces .................................................................................................................... 7
Nettoyage de Votre Four à Poser Sur un Plan de Travail ........................................ 7
Guide de Dépannage ............................................................................................... 8
Garantie ................................................................................................................... 9
VEUILLEZ CONSERVER CE MODE D’EMPLOI AFIN DE POUVOIR LE
CONSULTER ULTÉRIEUREMENT
2011 West Bend®, une Marque de Focus Electrics, LLC.
www.westbend.com
Page 11

PRÉCAUTIONS DE SÉCURITÉ IMPORTANTES
Afin de prévenir toute blessure ou dégât matériel, veuillez lire et appliquer la totalité des
instructions et des mises en garde.
Lorsque vous utilisez des appareils électriques, les précautions de sécurité élémentaires
devraient toujours être suivies, notamment:
• Lisez la totalité des instructions.
• Ne touchez pas les surfaces à haute température. Utilisez les poignées et les boutons.
• Ne touchez pas les éléments chauffants car cela risque d’entraîner des brûlures graves.
• Un incendie peut se produire si l’appareil est couvert ou s’il est en contact avec un
matériau inflammable, notamment des rideaux, des draperies, des parois et équivalents,
pendant son fonctionnement. Ne rangez aucun élément au-dessus de l’appareil pendant
son utilisation.
• Les aliments de grande taille ou les ustensiles métalliques ne doivent pas être insérés
dans cet appareil car ils sont susceptibles de provoquer un incendie ou un risque
d’électrocution.
• Débranchez le four et fermez la porte si vous remarquez du feu.
• Ne rangez aucun matériel, à part les accessoires recommandés par le fabricant, à
l’intérieur de ce four lorsque vous ne l’utilisez pas.
• Ne placez aucun des matériaux suivants dans le four: plastique, papier, carton et autres.
• Vous devriez faire preuve d’une extrême prudence lorsque vous utilisez des récipients
fabriqués à partir de matériaux autres que du métal ou du verre.
• Ne couvrez pas la grille, le plateau à cuire/égoutter ni aucune des pièces du four à l’aide
de feuilles de papier aluminium; car cela entraînerait une surchauffe.
• Positionnez toujours la commande du minuteur ainsi que le sélecteur de température sur
“OFF » et débranchez l’appareil de la prise secteur lorsque vous ne l’utilisez pas et avant
le nettoyage.
• Le fait de ne pas nettoyer l’appareil après chaque utilisation risque de provoquer un
incendie.
• Ne nettoyez pas à l’aide de tampons à récurer métalliques. Des morceaux peuvent se
détacher du tampon et entrer en contact avec des pièces électriques, créant ainsi un
risque d’électrocution.
• N’utilisez pas d’ustensiles coupants pour nettoyer la vitre de la porte du four car les
rayures risquent de l’affaiblir et de la faire se briser.
• Posez les récipients de cuisson, les plats, les plats à cuire/égoutter ainsi que la grille sur
une manique, sur un dessous de plat ou sur toute autre surface protégeant de la chaleur.
• Ne placez pas cet appareil sur ou à proximité d’une gazinière chaude ou d’un brûleur
électrique, ou dans un four chaud.
•
Cet appareil n’est pas conçu pour faire bouillir de l’eau ou d’autres liquides.
•
Vous devez faire preuve d’une extrême prudence lorsque vous retirez le plateau de
cuisson/égouttoir ou lorsque vous jetez la graisse à haute température.
• Afin de vous protéger contre tout risque d’incendie, d’électrocution, et de blessures,
veuillez ne pas plonger le cordon, les fiches, ou toute autre pièce électrique dans de l’eau
ni dans tout autre liquide.
• Une supervision étroite est nécessaire lorsque cet appareil est utilisé par des enfants ou à
proximité de ceux-ci.
• Branchez toujours le cordon d’alimentation sur une prise secteur. Pour le débrancher,
positionnez l’une des commandes sur « OFF » (arrêt), puis retirez la fiche de la prise
secteur.
• Débranchez toujours la fiche de la prise secteur lorsque l’appareil est inutilisé et avant de
le nettoyer. Laissez l’appareil refroidir avant de remettre en place ou de retirer des pièces
et avant le nettoyage.
2
Page 12

• L’utilisation d’accessoires non recommandés par Focus Electrics risque de provoquer un
F
onctions
incendie, une électrocution voire une blessure.
• N’utilisez aucun appareil présentant un cordon ou une fiche détérioré(e), après un
disfonctionnement de l’appareil, ou si l’appareil a été détérioré de quelque manière que ce
soit. Pour des renseignements sur les réparations, voir la page de garantie.
• N’utilisez pas cet appareil en extérieur.
• Ne laissez pas le cordon d’alimentation pendre depuis l’extrémité de la table ou du plan de
travail, ou entrer en contact avec des surfaces à haute température.
•
N’utilisez pas cet appareil pour un usage autre que celui pour lequel il a été conçu.
•
Un cordon d’alimentation court est fourni afin de réduire les risques de se prendre les
pieds ou de trébucher sur un cordon plus long.
•
Des cordons de rallonge plus longs sont disponibles, mais vous devez faire preuve de
prudence dans leur utilisation. Bien que l’utilisation d’un cordon de rallonge ne soit pas
recommandée, si vous devez en utiliser un, assurez-vous que la puissance électrique
indiquée sur le cordon de rallonge est supérieure ou égale à celle de l’appareil. Si la fiche
se raccorde à la terre, le cordon de rallonge doit être un cordon de raccordement à la terre
à trois fils. Pour éviter de tirer sur le cordon, de trébucher ou de vous prendre les pieds
dedans, positionnez le cordon de rallonge de façon à ce qu’il ne pende pas depuis
l’extrémité du plan de travail, de la table ou de toute autre zone d’où il pourrait être tiré par
des enfants ou faire trébucher quelqu’un.
•
Cet appareil est pourvu d’une fiche polarisée (une lame est plus large que l’autre). Afin de
réduire le risque d’électrocution, cette fiche est conçue pour être branchée sur une prise
secteur polarisée dans un seul sens. Si la fiche ne s’encastre pas complètement dans la
prise secteur, retournez la fiche. Si elle ne rentre toujours pas, contactez un électricien
qualifié. Ne tentez pas de modifier la fiche de quelque manière que ce soit.
•
N’utilisez pas une prise secteur ou un cordon de rallonge si la fiche présente un jeu ou si
la prise secteur ou le cordon de rallonge vous semblent chauds.
•
Ne tentez pas de réparer ce produit vous-même.
•
Pour une utilisation domestique uniquement.
VEUILLEZ CONSERVER CES INSTRUCTIONS
Réglage de la
Température
Plateau de Récupération
des Miettes
Plateau à
Cuire/Égoutter
Grille du Four: Votre four comprend une grille de four chromée. Celle-ci doit être placée dans
le four avec le côté arrondi orienté vers l’arrière du four. Placer la grille à l’envers permettra
d’obtenir davantage d’espace en relation avec les éléments chauffants, permettant ainsi à des
aliments de plus grande taille de s’adapter à l’intérieur du four.
Plateau à Cuire/Égoutter: Le plateau à cuire/égoutter peut être utilisé pour cuire ou pour
réchauffer des aliments ou pour récupérer des coulures.
Plateau de Récupération des Miettes: Permet de jeter facilement les miettes.
3
Commande des
Commande du
Minuteur
Grille du Four
Page 13

A
VANT LA PREMIÈRE UTILISATION
Veuillez vérifier la totalité de l’emballage avant de le jeter. L’emballage peut contenir des
accessoires.
• Retirez tout autocollant ou étiquette se trouvant sur les surfaces chauffantes.
• Assurez-vous que le four ne contient aucun papier ou objet non conçu pour une utilisation
dans le four.
• Nettoyez l’intérieur, la grille du four, le plateau de récupération des miettes, le plateau à
cuire/égoutter et les autres accessoires tel que décrit dans la section « Nettoyage de
Votre Four à Poser Sur un Plan de Travail » de ce manuel.
• Assurez-vous qu’un plateau de récupération des miettes propre et sec est en position
avant d’utiliser le four à poser sur un plan de travail.
• Sélectionnez un emplacement pour votre four qui est à plat, dans un lieu ouvert avec un
espace dégagé d’un minimum de 6” (15.24 cm) par rapport aux murs, rideaux ou
placards.
• Avant la première utilisation, veuillez tourner le réglage de température sur
« MAX/TOAST » (max/toast) et régler la commande du minuteur sur 5 - 10 minutes ou
jusqu’à ce que la fumée se dissipe. Ceci éliminera tout résidu d’huiles de fabrication.
U
TILISATION DE VOTRE FOUR À POSER SUR UN PLAN DE TRAVAIL
Utilisation classique:
1.
Placez votre four sur une surface plane et sèche, résistante à la chaleur, loin de toute
extrémité.
2.
Branchez le cordon sur une prise secteur de 120 volts AC UNIQUEMENT. Assurez-vous
que le cordon n’est en contact avec aucune des pièces du four avant et pendant
l’utilisation.
3.
Insérez le plateau de récupération des miettes. Placez la grille du four et/ou le plateau à
cuire/égoutter dans la position souhaitée.
4.
Réglez la commande de fonction sur le paramètre souhaité.
5.
Paramétrez le réglage de la température sur la température de cuisson souhaitée.
6.
Réglez la commande du minuteur et laissez le four préchauffer pendant 4 - 8 minutes.
Remarque: La fonction « TOAST » (toast) ne nécessite aucun préchauffage.
7.
Une fois le four préchauffé, placez les aliments dans le four, sur la grille du four. Utilisez le
récipient de cuisson adapté si nécessaire. Paramétrez le réglage de la température sur la
durée de cuisson souhaitée.
8.
Une fois le temps écoulé, une sonnerie va retentir et le four va s’éteindre
automatiquement. En utilisant des maniques ou des gants de cuisine, ouvrez la porte et
sortez le récipient contenant les aliments. Débranchez le four de la prise secteur. Laissez
le four refroidir complètement avant de le nettoyer.
ATTENTION: Faites preuve d’une extrême prudence lorsque vous ouvrez la porte.
Maintenez les mains et le visage à l’écart car de l’air très chaud ou de la vapeur peuvent
s’échapper au moment de l’ouverture de la porte. Ne placez rien sur la porte vitrée, car cela
risque de la détériorer.
REMARQUE: Suivez les instructions fournies sur l’emballage ou les instructions de la recette
pour les temps de cuisson et les températures lorsque vous cuisez des pizzas, des amusebouches, des cookies, des gâteaux, etc. votre four à poser sur un plan de travail étant plus petit
qu’un four traditionnel, il peut atteindre des températures élevées plus rapidement et cuire dans
un laps de temps moins long. Assurez-vous de bien surveiller les aliments afin de ne pas les
brûler. De plus, si vous préparez plusieurs cuissons à la suite, il est possible que vous deviez
réduire les temps de cuisson pour les fournées suivantes après la première cuisson. Pour un
nettoyage facile, positionnez le plateau à cuire/égoutter dans le guide de support de la grille
inférieure afin de recueillir tout écoulement.
4
Page 14
Fonction Four/Four à Convection: (éléments de chauffage supérieur & inférieur)
ATTENTION: N’utilisez pas de sachets à rôtir, de récipients en plastique ou en verre dans le
four car cela risque d’entraîner des détériorations.
1. Positionnez la grille du four dans le guide de support de grille du bas.
2. Placez l’élément à cuire (dans un récipient de cuisson adapté) sur la grille du four.
3. Paramétrez le réglage de température sur la température souhaitée.
4. Positionnez le contrôle des fonctions sur «BAKE/CONVECTION BAKE » (four/four á
convection). Préchauffez le four en réglant la commande du minuteur sur le temps de
préchauffage souhaité. Nous recommandons 4 - 8 minutes.
5. Une fois le four préchauffé, tournez la commande du minuteur dans le sens des aiguilles
d’une montre jusqu’au temps de cuisson souhaité. Si la cuisson est terminée avant que le
minuteur ne se déclenche, tournez la commande du minuteur dans le sens inverse des
aiguilles d’une montre vers « OFF » (arrêt), ou positionnez manuellement la commande
des fonctions sur « OFF » (arrêt). Remarque: Si le four est éteint en tournant la
commande des fonctions vers « OFF » (arrêt), le minuteur va poursuivre son décompte
jusqu’à 0. Utilisez des maniques ou des gants de cuisine pour ouvrir la porte et pour sortir
le récipient de cuisson. ATTENTION: Faites preuve d’une extrême prudence au moment
où vous ouvrez la porte. Maintenez les mains et le visage éloignés car de l’air très chaud
ou de la vapeur peuvent s’échapper à l’ouverture de la porte. Ne placez rien sur la porte
en verre, cela risquerait de la détériorer.
Guide pour Cuire/Rôtir
Toutes les durées de rôtissage sont basées sur la cuisson de viandes décongelées. Les
viandes congelées peuvent nécessiter beaucoup plus de temps. L’utilisation d’un thermomètre
à viande est fortement recommandée. Les résultats de cuisson peuvent être variables; ajustez
ces durées afin de les adapter à vos besoins individuels. Pour un résultat optimal, préchauffez
le four à poser sur un plan de travail pendant 4 - 8 minutes à la température de cuisson
souhaitée.
VIANDE TEMP DU FOUR DURÉE PAR LIVRE
Rôti de Porc 325°F (165°C) 40-45 min.
Rôti de Bœuf 300-325°F (150°-165°C) 25-30 min.
Jambon 300-325°F (150°-165°C) 35-40 min.
Poulet 350°F (175°C) 25-30 min.
Cuisson des Pizzas: (éléments de chauffage supérieur & inférieur)
1. Placez la grille du four sur le guide de support du milieu.
2. Paramétrez le réglage de température sur « MAX/TOAST » (max/toast) (475°F - 246°C).
3. Positionnez la commande des fonctions sur «BAKE/CONVECTION BAKE » (four/four á
convection).
4. Préchauffez le four pendant 4 - 8 minutes. Placez la pizza sur la grille du four, en vous
assurant qu’elle est le plus au fond possible à l’intérieur du four. Cuisez jusqu’au niveau
de cuisson souhaité. Pour obtenir un doré optimal, n’insérez pas le plateau de
récupération des miettes.
Fonction Grill: (élément de chauffage supérieur)
1.
Placez les aliments sur le plateau à cuire/égoutter.
2.
Placez la grille du four dans le guide de support adapté en position haute ou basse.
Placez le plateau à cuire/égoutter avec les aliments sur la grille du four. Assurez-vous qu’il
y a un espace dégagé d’au moins 1” entre les aliments et les éléments chauffants.
3.
Réglez la commande des fonctions sur « BROIL » (grill).
4.
Paramétrez le réglage de la température sur « MAX/TOAST » (max/toast) (475°F 246°C).
5.
Réglez la commande du minuteur sur la durée souhaitée. Lorsque le temps est écoulé,
une sonnerie retentit et le four s’éteint automatiquement. À l’aide de maniques ou de
gants de cuisine, ouvrez la porte et retirez le plateau à cuire/égoutter ainsi que les
aliments. ATTENTION: Faites preuve d’une extrême prudence au moment où vous
ouvrez la porte. Maintenez les mains et le visage à l’écart car de l’air très chaud ou de la
5
Page 15
vapeur pourraient s’échapper lorsque la porte va s’ouvrir. Ne placez rien sur la porte
vitrée, car cela risque de la détériorer.
Guide d’utilisation du Grill
Les résultats de cuisson peuvent être variables; ajustez ces durées afin de les adapter à vos
besoins individuels. Vérifiez souvent pendant la cuisson au grill afin d’éviter de trop cuire.
Toutes les durées de cuisson au grill sont basées sur des viandes décongelées. Pour un
résultat optimal, préchauffez le four pendant 4 - 8 minutes à la température de cuisson
souhaitée.
VIANDE TEMP DU FOUR DURÉE DE CUISSON
Hamburger 400°F (205°C) 15-20 min.
Côte de Bœuf 400°F (205°C) 20-25 min.
Côtes de Porc 400°F (205°C) 20-25 min.
Côtes d’agneau 400°F (205°C) 20-25 min.
Cuisses de Poulet 400°F (205°C) 30-35 min.
Filets de Poisson 350°F (175°C) 20-25 min.
Fonction Toast: (élément supérieur & inférieur)
Le four grande capacité permet de toaster 1 à 6 tranches de pain, 6 demi-muffins anglais, des
gaufres surgelées, ou des crêpes. Lorsque vous toastez seulement 1 ou 2 éléments, placez les
aliments au centre du four.
1.
Assurez-vous que le plateau de récupération des miettes est en position.
2.
Placez la grille du four sur le guide de support du milieu en position haute. Placez les
aliments à toaster sur la grille du four.
3.
Paramétrez le réglage de température sur « MAX/TOAST » (max/toast) (475°F - 246°C).
Aucun préchauffage n’est nécessaire avec ce réglage.
4.
Réglez la commande des fonctions sur « TOAST » (toast).
5.
Réglez la commande du minuteur sur la durée souhaitée. Une durée plus longue produira
un toast plus grillé.
6.
Une fois les toasts prêts, retirez la grille du four en utilisant des maniques ou des gants de
cuisine. Remarque: Si vous toastez plusieurs fournées de pain, l’une après l’autre, réglez
la commande du minuteur sur une durée plus courte après la première cuisson car le four
sera déjà chaud et il aura besoin d’un temps de cuisson plus court.
Fonction de Maintien au Chaud: (éléments de chauffage supérieur & inférieur)
Pour utiliser le four à poser sur un plan de travail afin de maintenir au chaud des aliments déjà
cuits, suivez ces étapes.
1.
Positionnez la commande des fonctions sur «BAKE/CONVECTION BAKE » (four/four á
convection).
2.
Paramétrez le réglage de la température sur « WARM » (maintien au chaud) (175°F -
79.4°C).
3.
Réglez la commande du minuteur sur la durée de maintien au chaud souhaitée.
4.
Retirez les aliments du four une fois la durée de maintien au chaud écoulée, ou lorsque
vous êtes prêt à servir.
6
Page 16

A
STUCES
• La cuisson par convection utilise de l’air chaud en mouvement, au moyen d’un ventilateur,
et permet une cuisson plus rapide dans de nombreux cas par rapport à l’utilisation d’un
four à poser traditionnel à radiation. Le ventilateur envoie de l’air chaud vers chacune des
zones de l’aliment, fixant rapidement l’humidité et la saveur, et produisant une
température plus uniforme tout autour de l’aliment. La Four à convection à poser sur un
plan de travail de Chris Freytag a été conçu avec un ventilateur très silencieux. Si vous
entendez un bruit de moteur (ronronnement), c’est que la fonction de convection
fonctionne à plein régime. Vérifiez pour vous assurer que votre four est posé sur une
surface plane. Si le four n’est pas à niveau, il peut hochet.
• Pour pouvoir accueillir une grande diversité d’aliments, la grille du four est réversible et
elle peut être posée à trois hauteurs différentes. La grille peut être insérée en position
haute ou basse dans l’un des guides de support situés le long des parois du four.
• Tailles Recommandées pour les Moules – Les tailles de plats suivantes devraient
passer dans votre Four à poser sur un plan de travail. Pour vous assurer que le moule
entrera dans le four, placez le moule à l’intérieur du four avant de préparer votre recette.
Lorsque vous cuisez des pains, nous vous recommandons de ne pas remplir le moule à
plus de la moitié.
moule à mini-muffins 12 coupelles
moule à muffins 6 coupelles
moule à pain 8 x 4 (20.3 x 10.1 cm)
moule à pain 9 x 5 (22.8 x 12.7 cm)
mole ou plat à cuire rond ou carré de 8” (20.3 cm)
plat à mijoter de 1-1½ quart (3.8 - 5.7 l)
N
ETTOYAGE DE VOTRE FOUR À POSER SUR UN PLAN DE TRAVAIL
ATTENTION: Avant de nettoyer le four, réglez toujours le minuteur et les commandes de
fonctions sur « OFF » (arrêt), débranchez le cordon de la prise secteur et laissez le four
refroidir complètement.
Pour maintenir la propreté de votre four à poser, essuyez les tâches de nourriture renversée et
les miettes après chaque utilisation.
1.
La grille du four, le plateau à cuire/égoutter, et le plateau de récupération des miettes
peuvent être lavés à l’eau savonneuse chaude à l’aide d’un torchon, rincés et séchés ou
être passés au lave-vaisselle automatique. N’utilisez pas de tampon à récurer métallique
ou abrasif ou de détergents sur ces pièces car cela risque de détériorer leur finition.
2.
Essuyez l’extérieur du four ainsi que la porte vitrée à l’aide d’un chiffon doux humide puis
séchez. N’utilisez aucun type de tampon à récurer ou de détergent sur les surfaces
externes ou sur la porte vitrée car elles seraient alors rayées. Si le verre est rayé, il peut
s’affaiblir et se briser.
3.
Essuyez l’intérieur du four à l’aide d’un torchon humide, essuyez puis séchez. N’utilisez
pas de tampon à récurer métallique ou abrasif, de détergent ou de produit de nettoyage
pour four sur l’intérieur du four, car cela le détériorerait. Faites preuve de prudence en
essuyant autour des éléments de chauffage afin d’éviter toute détérioration.
– la plupart des types
7
Page 17

G
UIDE DE DÉPANNAGE
PROBLÈME CAUSE POTENTIELLE
Aliments
trop/pas assez
cuits
Fumée ou odeur
pendant le
chauffage du
four
Bruits
Odeur de brûlé
Le four ne se met
pas en marche
L’élément
chauffant ne
reste pas allumé
Température ou réglage
incorrect(e)
Placement de la grille
Huiles de fabrication
Expansion/Contraction
pendant le chauffage.
Ventilateur à convection
Accumulations d’aliments à
l’intérieur du four, sur les
éléments chauffants ou le
plateau de récupération des
miettes.
L’appareil est débranché.
Commande des fonctions
réglée sur « OFF » (arrêt).
Le minuteur n’est pas activé.
SOLUTION
Ajustez la durée ou la
température. Votre four à poser
étant plus petit que votre four
traditionnel, il va atteindre des
températures élevées plus
rapidement et cuire plus vite.
La grille peut avoir besoin d’être
ajustée pour accueillir des types
d’aliments particuliers
Il est possible que de la fumée
et/ou une odeur se diffusent lors
du chauffage initial en raison de
la diffusion d’huiles de fabrication
– c’est normal. Effectuez un
cycle de chauffe du four de 5-10
minutes à vide sur
« MAX/TOAST »
Quelques petits bruits
d’expansion/contraction seront
peut-être émis pendant le
chauffage et le refroidissement –
c’est normal.
Si votre four à poser est le
modèle à convection, assurezvous que votre four se trouve sur
une surface plane.
Voir la section « Nettoyage de
votre four ».
Branchez l’appareil à la prise
secteur
Paramétrez la commande des
fonctions sur le réglage souhaité.
Tournez la commande du
minuteur vers le réglage
souhaité.
Les éléments chauffants
s’allument et s’éteignent par
cycles afin de maintenir la
température correcte.
8
Page 18

G
ARANTIE DU PRODUIT
Garantie limitée de 1 an de l’appareil
Focus Electrics, LLC (« Focus Electrics ») garantit cet appareil contre tout défaut de pièces et
de main d’ œuvre pendant un (1) an à compter de la date d’achat d’origine avec un justificatif
d’achat, à condition que l’appareil soit utilisé et entretenu conformément aux recommandations
du Mode d’emploi fourni. Toute pièce défaillante de l’appareil sera réparée ou remplacée sans
frais à la discrétion de Focus Electrics. La présente garantie s’applique pour une utilisation
domestique à l’intérieur uniquement.
Cette garantie ne prend pas en charge les dégâts, y compris la décoloration, subis par toute
surface antiadhésive de l’appareil. Cette garantie est nulle et non avenue, tel que défini
uniquement par Focus Electrics si l’appareil est détérioré par accident, mauvaise utilisation,
utilisation abusive, négligence, rayure, ou si l’appareil est détérioré de quelque manière que ce
soit.
LA PRÉSENTE GARANTIE ANNULE ET REMPLACE TOUTES LES GARANTIES INDUITES,
NOTAMMENT LES GARANTIES DE COMMERCIALISATION, D’ADAPTATION À UN USAGE
PARTICULIER, DE PERFORMANCE, OU AUTRE, QUI SONT ICI EXCLUES. EN AUCUN
CAS FOCUS ELECTRICS NE POURRA ÊTRE TENUE POUR RESPONSABLE DE TOUT
DÉGÂT, QUE CELUI-CI SOIT DIRECT, INDIRECT, SECONDAIRE, PRÉVISIBLE, INDUIT OU
PARTICULIER, RÉSULTANT DE OU EN RAPPORT AVEC CET APPAREIL.
Si vous pensez que cet appareil est défectueux ou a besoin d’être réparé pendant la durée de
sa garantie, veuillez contacter le Service clientèle de Focus Electrics au (866) 290 –1851 ou
nous adresser un e-mail à service@focuselectrics.com
non remboursables. Un justificatif prouvant la date d’achat d’origine sera exigé pour toutes les
demandes de prise en charge dans le cadre de la garantie, les factures manuscrites ne sont
pas acceptées. Focus Electrics n’est pas responsable pour les retours perdus pendant le
transport.
Valable uniquement aux USA et au Canada
P
IÈCES DE RECHANGE
Les pièces de rechange, lorsque celles-ci sont disponibles, peuvent être commandées
directement auprès de Focus Electrics en ligne sur www.focuselectrics.com, ou vous pouvez
téléphoner ou envoyer un e-mail au service entretien au numéro/à l’adresse e-mail ci-dessus,
ou vous pouvez nous écrire à :
Focus Electrics, LLC
Attn : Service clientèle
P. O. Box 2780
West Bend, WI 53095
Assurez-vous d’inclure le numéro de catalogue/modèle de votre appareil (situé sur le
dessous/à l’arrière de l’appareil) accompagné d’une description et de la quantité de la pièce
que vous souhaitez commander. Ajoutez également votre nom, votre adresse postale, un
numéro de carte Visa/MasterCard, une date d’expiration ainsi que le nom tel qu’il apparaît sur
la carte. Vous pouvez payer par chèque à l’ordre de Focus Electrics, LLC. Appelez le Service
clientèle pour obtenir le montant de l’achat. La taxe de vente de votre état ainsi que des frais
d’expédition/de traitement seront ajoutés au total de la facture. Veuillez patienter deux (2)
semaines pour la livraison.
Ce manuel contient des informations importantes et utiles concernant l’utilisation sans danger et l’entretien
de votre nouveau produit Focus Electrics. Pour une consultation ultérieure, fixez le ticket de caisse daté pour
servir de justificatif d’achat et inscrivez les informations suivantes :
Date d’achat ou de réception en cadeau : _______________________________________________
Lieu d’achat et prix, si connus : _____________________________________________
Numéro de l’article et Code de date (dessous/arrière de l’appareil) :___________________________
. Les frais d’expédition de retour sont
L5837 02/11 West Bend®, une Marque de Focus Electrics, LLC. Imprimé en Chine
9
Page 19

Manual de Instrucciones
Registre este y otros productos Focus Electrics, LLC a través de nuestro sitio web:
www.registerfocus.com
Precauciones Importantes ........................................................................................ 2
Antes de Utilizarse por Primera Vez......................................................................... 4
Uso del Horno de Encimera ..................................................................................... 4
Consejos Prácticos................................................................................................... 8
Limpieza del Horno de Encimera ............................................................................. 8
Guía de Resolución de Problemas ........................................................................... 9
Garantía ................................................................................................................. 10
GUARDE ESTE MANUAL DE INSTRUCCIONES PARA FUTURAS CONSULTAS
2011 West Bend, una Marca de Focus Electrics, LLC.
www.westbend.com
Page 20

PRECAUCIONES IMPORTANTES
Para evitar lesiones personales o daños materiales, lea y siga todas las
instrucciones y advertencias.
Al utilizar artefactos electrodomésticos, siempre deben acatarse las precauciones
básicas de seguridad, entre ellas las siguientes:
• Lea todas las instrucciones.
• No toque las superficies calientes. Utilice las asas o perillas.
• No toque los elementos calentadores pues podría sufrir quemaduras serias.
• Un incendio podría iniciarse si al artefacto en funcionamiento lo cubriesen o
tocasen materiales inflamables, tales como cortinas, colgaduras, paredes, y
similares. No guarde ningún artículo encima del artefacto electrodoméstico
mientras esté en operación.
• La comida demasiado grande o los utensilios metálicos no deben insertarse en
este artefacto electrodoméstico ya que pueden causar un fuego o una descarga
eléctrica.
• Desenchufe el horno y ciérrele la puerta si se observa fuego.
• Mientras este horno no esté en uso, no guarde en él ningún material que no sea
alguno de los accesorios recomendados por el fabricante.
• No coloque ninguno de los materiales siguientes en el horno: plástico, papel,
carton y similares.
• Debe tenerse extremo cuidado al usar recipientes construidos de materiales
que no sean de metal o vidrio.
• No cubra la rejilla, la bandeja de hornear/de goteo o parte alguna del horno con
hojas de aluminio, ya que ocasionará un sobrecalentamiento.
• Cuando no se esté usando el horno y antes de la limpiarlo, siempre gire el
temporizador de control y el selector del nivel de calor a la posición apagada
(OFF) y desenchufe el artefacto del tomacorriente.
• El no limpiarlo tras cada uso puede resultar en un potencial peligro de incendio.
• No lo limpie con esponjas metálicas. Pedazos pueden desprenderse de la
esponja y tocar partes eléctricas, creando un riesgo de descarga eléctrica.
• No use utensilios afilados para limpiar la puerta de vidrio del horno pues si la
rayase podría debilitarla y causar que se haga añicos.
• Coloque los recipientes para cocinar, los moldes, la bandeja de hornear/de
goteo y la rejilla sobre una almohadilla térmica, un trébede u otra superficie que
proteja contra el calor. No los coloque directamente sobre la encimera, mesa o
cualquier otra superficie.
• No lo coloque sobre o cerca de un calentador eléctrico o de gas, ni dentro de un
horno caliente.
• Este dispositivo no está diseñado para calentar aceite u otros líquidos.
• Se debe tener extrema precaución al retirar la bandeja de hornear/de goteo o al
desechar grasa caliente.
• Como protección contra incendios, descargas eléctricas y lesiones, no sumerja
el cordón eléctrico, los enchufes u otras partes eléctricas en agua u otros
líquidos.
2
Page 21

• Se requiere una supervisión cercana cuando este artefacto electrodoméstico
sea usado por o cerca de niños.
• Siempre enchufe el cordón eléctrico a un tomacorriente de pared. Para
desconectar, coloque cualquier control en la posición "OFF" (apagado), y luego
desenchufe del tomacorriente de pared.
• Desenchufe siempre el artefacto del tomacorriente cuando no esté en uso y
antes de limpiarlo. Permita que se enfríe antes de colocarle o quitarle piezas o
antes de limpiarlo.
• El uso de accesorios no recomendados por Focus Electrics puede causar
incendios, descargas eléctricas o lesiones.
• No opere ningún artefacto electrodoméstico con un cordón eléctrico o enchufe
dañado o si el artefacto electrodoméstico funciona mal o ha sufrido cualquier
tipo de daño. Para información relativa al servicio de reparaciones vea la
página de garantías.
• No use este artefacto electrodoméstico al aire libre.
• No deje que el cordón eléctrico cuelgue sobre el borde de la mesa o encimera,
ni que toque superficies calientes.
• No utilice el artefacto electrodoméstico para usos distintos del indicado.
• Se suministra un cordón eléctrico corto para reducir los riesgos que resultan de
enredarse o tropezarse con un cordón eléctrico más largo.
• Hay disponibles cables de extensión más largos, pero debe tenerse cuidado al
usarlos. Aunque no se recomienda utilizar cables de extensión, si debe utilizar
uno, asegúrese de que la capacidad eléctrica indicada del cable de extensión
sea igual o mayor a la del artefacto. Si el enchufe es del tipo conectado a tierra,
el cable de extensión deberá ser un cordón eléctrico de 3 hilos con conexión a
tierra. A fin de impedir lesiones que resulten del halar, tropezarse o enredarse
en el mismo, coloque el cable de extensión de tal modo que no cuelgue del
borde de un mostrador, mesa u otra superficie donde pueda ser halado por
niños o se pueda tropezar con él.
• Este artefacto electrodoméstico tiene un enchufe polarizado (una clavija es más
ancha que la otra). Para reducir el riesgo de descargas eléctricas, este enchufe
está diseñado para encajar de una sola manera en un tomacorriente polarizado.
Invierta el enchufe si éste no encaja completamente en el tomacorriente. Si
todavía no encaja, póngase en contacto con un electricista calificado. No trate
de modificar el enchufe de manera alguna.
• No use un tomacorriente o cable de extensión en el cual el enchufe calce
flojamente, o si el tomacorriente o el cable de extensión se calientan.
• No intente reparar este artefacto usted mismo.
• Sólo para uso doméstico.
GUARDE ESTAS INSTRUCCIONES
3
Page 22

Control de
Temperatura
Control de
Temporizador de
Bandeja de
Control
Migas
Bandeja de
Rejilla del Horno
Hornear/de
Goteo
Rejilla del Horno: Su horno incluye una rejilla de horno cromada. Esta debe
colocarse en el horno con el lado redondeado de cara al fondo del horno. Al voltear
la rejilla cara abajo tendrá más espacio en relación a los elementos calentadores, lo
que permite que alimentos más altos puedan caber en el horno.
Bandeja de Hornear/de Goteo: La bandeja de hornear/de goteo puede utilizarse
para hornear o recalentar alimentos o para atrapar los jugos de cocción.
Bandeja de Migas: Permite deshacerse fácilmente de las migas.
A
NTES DE UTILIZARSE POR PRIMERA VEZ
Revise con cuidado todo el material de empaque antes de desecharlo. El
material de empaque puede contener partes accesorias.
• Retire cualquier etiqueta adhesiva de las superficies de calentamiento.
• Asegúrese de que el horno esté libre de cualquier papel u objeto que no deba
usarse en el horno.
• Limpie el interior, la rejilla del horno, la bandejas de migas, la bandeja de
hornear/de goteo y los demás accesorios del horno tal como se describe en la
sección “Limpieza del Horno de Encimera” de este manual.
• Antes de operar el horno de encimera, asegúrese de que la bandeja de migas,
seca y limpia, esté en su posición.
• Seleccione una ubicación para el horno que sea nivelada y esté en un área
abierta con una separación de las paredes, cortinas o gabinetes de por lo
menos 6 pulgadas (15 cm).
• Antes de utilizar el horno por primera vez, gire el control de temperatura a la
posición “MAX/TOAST” (máximo/tostar) y ajuste el temporizador a un tiempo de
5 - 10 minutos o hasta que el humo se disipe. Esto eliminará cualquier aceite
residual usado en su fabricación.
U
SO DEL HORNO DE ENCIMERA
Uso Básico:
1. Coloque el horno de encimera sobre una superficie seca, nivelada y resistente
al calor, y lejos de cualquier borde.
2. Enchufe el cordón eléctrico SOLAMENTE a un tomacorriente de corriente
alterna de 120 voltios. Asegúrese de que el cordón eléctrico no esté
tocando ninguna parte del horno antes de ponerlo en operación ni
mientras esté funcionando.
4
Page 23

3. Inserte la bandeja de migas. Coloque la rejilla del horno y/o la bandeja de
hornear/de goteo en la posición deseada.
4. Ajuste el control de funciones al ajuste deseado.
5. Ajuste el control de temperatura a la temperatura de cocción deseada.
6. Ajuste el temporizador y permita que el horno se precaliente durante 4 - 8
minutos. Nota: La función “TOAST” (tostar) no requiere precalentamiento.
7. Una vez que el horno se haya precalentado, coloque los alimentos dentro del
mismo, sobre la rejilla del horno. Utilice el recipiente de cocción apropiado, si se
requiere. Ajuste el temporizador al tiempo deseado.
8. Cuando el tiempo haya transcurrido, sonará una campana y el horno se
apagará automáticamente. Abra la puerta y retire el recipiente de cocción
usando almohadillas térmicas o guantes de cocina. Desenchufe del
tomacorriente. Permita que el horno se enfríe por completo antes de limpiarlo.
PRECAUCIÓN: Tenga extremo cuidado al abrir la puerta. Mantenga sus manos y
cara alejadas puesto que aire o vapor muy caliente podría liberarse al abrir la
puerta. Nunca ponga nada sobre la puerta de vidrio, pues pueden dañarla.
NOTA: Al hornear pizzas, aperitivos, galletas, pasteles, etc., siga las instrucciones
del paquete o de la receta respecto a los tiempos y temperaturas de horneado.
Debido a que el horno encimera es más pequeño que un horno convencional, podría
calentarse más rápido y cocinar en un tiempo más breve. Asegúrese de vigilar de
cerca el alimento para prevenir que se queme. Además, si está preparando tandas
múltiples, quizás necesite reducir los tiempos de cocción para las tandas
subsiguientes una vez que la tanda inicial se haya horneado. Para facilitar la
limpieza, coloque la bandeja de horneado/de goteo en la guía de soporte de la rejilla
inferior para atrapar cualquier derrame.
Función de Horneado/Horneado de Convección: (elemento superior e inferior)
PRECAUCIÓN: No use en el horno bolsas para asar ni recipientes plásticos o de
vidrio pues podrían causar daños.
1. Coloque la rejilla del horno en la guía inferior de soporte de la rejilla.
2. Coloque la pieza a hornear (dentro de un recipiente de cocción apropiado)
sobre la rejilla del horno.
3. Ajuste el control de temperatura a la temperatura deseada.
4. Ajuste el control de funciones a la posición “BAKE/CONVECTION BAKE”
(hornear/hornear con convección). Precaliente el horno ajustando el
temporizador al tiempo deseado de precalentamiento. Recomendamos 4 - 8
minutos.
5. Una vez precalentado, gire el temporizador en el sentido de las agujas del reloj
al tiempo deseado de cocción. Si el horneado se ha completado antes de que
suene el temporizador, gire el temporizador en el sentido contrario a las agujas
del reloj a la posición “OFF” (apagado), o manualmente ajuste el control de
funciones a la posición “OFF” (apagado). Nota: Si el horno es apagado girando
el control de funciones a la posición “OFF” (apagado), el temporizador
continuará contando en cuenta regresiva hasta 0. Abra la puerta y retire el
recipiente de cocción utilizando almohadillas térmicas o guantes de cocina.
PRECAUCIÓN: Tenga extremo cuidado al abrir la puerta. Mantenga sus manos
y cara alejadas puesto que aire o vapor muy caliente podría liberarse al abrir la
puerta. Nunca ponga nada sobre la puerta de vidrio, pues pueden dañarla.
5
Page 24

Guía de Horneado/Asado
Todos los tiempos de asado están basados en cocinar las carnes a una temperatura
descongelada. Las carnes congeladas podrían tardar mucho más. El uso de un
termómetro para carne es altamente recomendado. Los resultados de la cocción
podrían variar; ajuste estos tiempos para adaptarlos a su gusto personal. Para los
mejores resultados, precaliente el horno de encimera durante 4 - 8 minutos a la
temperatura de cocción deseada.
CARNE TEMPERATURA DEL HORNO TIEMPO POR LIBRA
Asado de
Puerco
Asado de Res 300-325°F (150°-165°C) 25-30 min.
Jamón 300-325°F (150°-165°C) 35-40 min.
Pollo 350°F (175°C) 25-30 min.
325°F (165°C) 40-45 min.
Horneado de Pizzas: (elementos calentadores superior e inferior)
1. Coloque la rejilla del horno en la guía de soporte de la rejilla del medio.
2. Ajuste el control de temperatura a la posición “MAX/TOAST” (máximo/tostar)
(475°F - 246°C).
3. Ajuste el control de funciones a la posición “BAKE/CONVECTION BAKE”
(hornear/hornear con convección)
4. Precaliente el horno durante 4 - 8 minutos. Coloque la pizza sobre la rejilla del
horno, asegurándose de que entre lo más adentro posible en el horno. Hornee
hasta el grado deseado. Para un dorado óptimo, no inserte la bandeja de
hornear/de goteo.
Función de Asar al Grill: (elemento calentador superior)
1. Coloque el alimento en la bandeja de hornear/de goteo.
2. Coloque la rejilla del horno en la guía de soporte de la rejilla apropiada, bien
sea en posición hacia abajo o hacia arriba. Coloque la bandeja de hornear/de
goteo con el alimento sobre la rejilla del horno. Asegure de que haya al menos
un espacio de 1” (2.5 cm) entre el alimento y los elementos calentadores.
3. Coloque el control de funciones en la posición “BROIL” (asar al grill).
4. Ajuste el control de temperatura a la posición “MAX/TOAST” (máximo/tostar)
(475°F - 246°C).
5. Ajuste el temporizador al tiempo deseado. Cuando el tiempo haya pasado,
sonará una campana y el horno se apagará automáticamente. Utilizando
almohadillas térmicas o guantes de cocina, abra la puerta y retire la bandeja de
hornear/de goteo y el alimento. PRECAUCIÓN: Tenga extremo cuidado al abrir
la puerta. Mantenga sus manos y cara alejadas puesto que aire o vapor muy
caliente podría liberarse al abrir la puerta. Nunca ponga nada sobre la puerta
de vidrio, pues pueden dañarla.
Guía de Asado al Grill
Los resultados pueden variar: ajuste las temperaturas y los tiempos de cocción para
adaptarlos a su gusto personal. Mientras asa el alimento al grill, revíselo a menudo
para evitar cocerlo de más. Todos los tiempos de asado al grill están basados en
carnes que están a una temperatura descongelada. Para los mejores resultados,
precaliente el horno de encimera durante 4 - 8 minutos a la temperatura de cocción
deseada.
6
Page 25

CARNE TEMPERATURA DEL HORNO TIEMPO DE COCCIÓN
Hamburguesa 400°F (205°C) 15-20 min.
Bistec T-bone 400°F (205°C) 20-25 min.
Chuletas de
Cerdo
Chuletas de
Cordero
Patas de Pollo 400°F (205°C) 30-35 min.
Filetes de
Pescado
400°F (205°C) 20-25 min.
400°F (205°C) 20-25 min.
350°F (175°C) 20-25 min.
Función Tostar: (elementos calentadores superior e inferior)
El horno de gran capacidad permite tostar 1 a 6 rebanadas de pan, 6 mitades de
molletes ingleses, wafles congelados o panqueques. Al tostar sólo 1 o 2 piezas,
colóquelas en el centro del horno.
1. Asegúrese de que la bandeja de migas esté en su debida posición.
2. Coloque la rejilla del horno en la guía de soporte de la rejilla del medio en la
posición más arriba. Coloque las piezas a tostarse sobre la rejilla del horno.
3. Ajuste el control de temperatura a la posición “MAX/TOAST” (máximo/tostar)
(475°F - 246°C). No se requiere precalentar con este ajuste.
4. Ajuste el control de funciones al ajuste “TOAST” (tostar).
5. Ajuste el temporizador al tiempo deseado. Un tiempo mayor producirá un
tostado más oscuro.
6. Al terminar de tostar, retire la rejilla del horno usando almohadillas térmicas o
guantes de cocina. Nota: Si está tostando varias tandas de pan, una atrás la
otra, ajuste el temporizador a un tiempo menor después de la primera tanda
puesto que el horno ya estará caliente y se requerirá menos tiempo de tostado.
Función Calentar: (elementos calentadores superior e inferior)
Para utilizar el horno de encimera para mantener los alimentos calientes, siga los
siguientes pasos.
1. Ajuste el control de funciones a la posición “BAKE/CONVECTION BAKE”
(hornear/hornear con convección).
2. Ajuste el control de temperatura a la posición “WARM” (calentar) (175°F -
79.4°C).
3. Ajuste del temporizador al tiempo de calentamiento deseado.
4. Retire el alimento del horno cuando se haya completado el tiempo de
calentamiento, o cuando se esté listo para servirlo.
7
Page 26

C
ONSEJOS PRÁCTICOS
• La cocción con convección utiliza el movimiento de aire caliente, por medio de
un ventilador, y en muchos casos proporciona una cocción más rápida que los
hornos de encimera radiantes. El ventilador envía aire caliente a todas las
zonas del alimento, lo cual sella rápidamente la humedad y el sabor, y produce
una temperatura más pareja en todo alrededor del mismo. El Horno de
Encimera de Convección de Chris Freytag ha sido diseñado con un ventilador
sumamente silencioso. Si usted escucha el motor funcionando (zumbido), esa
es la función de convección trabajando. Asegúrese de que el horno se
encuentre sobre una superficie nivelada. Si el horno no está nivelado, puede
sonajero.
• Para acomodar una amplia variedad de alimentos, la rejilla del horno es
reversible y se puede colocar a tres alturas diferentes. La rejilla puede
insertarse en posición cara arriba o cara abajo en cualquiera de las guías de
soporte de la rejilla ubicadas a lo largo de las paredes laterales del horno.
• Tamaños de Moldes Recomendados: los siguientes tamaños de moldes
deberán caber en el Horno de Encimera. Para asegurarse de que el molde
quepa, colóquelo dentro del horno antes de preparar la receta. Al hornear en
moldes de pan, recomendamos que no llene el molde más allá de la mitad.
Molde de 12 tazas para mini-molletes
Molde de 6 tazas para molletes
Molde de pan de 8 x 4 pulg. (20.3 x 10.1 cm)
Molde de pan de 9 x 5 pulg. (22.8 x 12.7 cm)
Molde o bandeja de hornear redonda o cuadrada de 8 pulg. (20.3 cm)
Cazuela de 1-1½ cuartos de galón (3.8 - 5.7 l) - la mayoría de los tipos
L
IMPIEZA DEL HORNO DE ENCIMERA
PRECAUCIÓN: Antes de limpiar cualquier parte del horno, siempre coloque el
temporizador de control y el selector de funciones en la posición “OFF” (apagado),
desenchufe el cordón eléctrico del tomacorriente y permita que el horno se enfríe.
Para mantener el horno de encimera limpio, tras cada uso limpie con un trapo todo
derrame de alimentos, salpicaduras y migas.
1. La rejilla del horno, la bandeja de hornear/de goteo, la parrilla para asar y la
bandeja de migas pueden lavarse con un paño de cocina en agua jabonosa
caliente, enjuagarse y secarse; o pueden lavarse en un lavavajillas automático.
No use ninguna esponja o limpiador metálico o abrasivo con estas piezas, pues
pueden dañar el acabado de las mismas.
2. Limpie el exterior del horno y la puerta de vidrio con un paño suave humedecido
y luego séquelos. No use ningún tipo de esponja o limpiador abrasivo sobre las
superficies exteriores o la puerta de vidrio pues las rayará. Si el vidrio se
rayase, éste puede debilitarse y romperse.
3. Limpie el interior del horno con un paño húmedo y luego séquelo. Dentro del
horno, no use esponjas metálicas, limpiadores abrasivos ni limpiadores de
horno ya que podrían dañarlo. Tenga cuidado de no causar daño alguno al
limpiar alrededor de los elementos calentadores.
8
Page 27

PROBLEMA
CAUSA POTENCIAL
Alimentos
elementos calentadores o
cocidos de más
o de menos
G
UÍA DE RESOLUCIÓN DE PROBLEMAS
Temperatura o ajuste
incorrectos
Colocación de la rejilla
Ajuste el tiempo o la
temperatura. Debido a que el
horno de encimera es más
pequeño que un horno regular,
se calentará más rápido y
cocinará en menos tiempo.
Podría ser necesario ajustar la
posición de la rejilla para dar
cabida a tipos específicos de
alimentos.
SOLUCIÓN
Humo u olor al
calentar
Ruidos
Olor a quemado
El horno no se
enciende
El elemento
calentador no
se mantiene
encendido
Aceites utilizados en la
fabricación del artefacto
Expansión/contracción al
calentarse.
Horno de convección
Acumulación de alimentos
dentro del horno, en los
El artefacto está
desenchufado.
El control de funciones
está ajustado a la posición
“OFF” (apagado).
El temporizador no está
encendido.
Al calentar por primera vez
podría emanarse algo de humo
y/o olor a causa de la
liberación de aceites usados
en la fabricación - esto es
normal. Haga funcionar el
horno vacío durante un ciclo de
5-10 minutos en la posición
“MAX/TOAST” (máximo/tostar).
Algunos sonidos menores de
expansión/contracción pueden
ocurrir durante el
calentamiento y enfriamiento –
esto es normal.
Si el horno de encimera es un
modelo de convección,
asegúrese de que el horno
esté sobre una superficie
nivelada.
Refiérase a la sección de
"Limpieza del Horno".
Enchufe el artefacto al
tomacorriente
Ajuste el control de funciones
al ajuste deseado.
Gire el temporizador de control
al ajuste deseado.
Los elementos calentadores se
encenderán y apagarán para
mantener la temperatura
apropiada.
9
Page 28

G
ARANTÍA DEL PRODUCTO
Garantía Limitada de 1 Año del Artefacto Electrodoméstico
Focus Electrics, LLC (“Focus Electrics”) garantiza que este aparato no presentará fallas de
material ni fabricación durante un (1) año a partir de la fecha original de compra con prueba de
dicha compra, siempre y cuando el aparato sea operado y mantenido tal como se indica en el
manual de instrucciones provisto. Toda pieza del aparato que presente fallas será reparada o
reemplazada sin costo alguno a criterio de Focus Electrics. Esta garantía rige solamente para
el uso domestico dentro de la casa.
Esta garantía no cubre ningún daño, incluyendo la decoloración, de superficie anti-adherente
alguna del aparato electrodoméstico. Esta garantía es nula y sin valor, según lo determine
exclusivamente Focus Electrics si el artefacto electrodoméstico es dañado a causa de
accidente, mal uso, abuso, negligencia, rayaduras, o si el artefacto electrodoméstico es
cambiado de algún modo.
ESTA GARANTÍA REEMPLAZA A TODAS LAS DEMÁS GARANTÍAS IMPLÍCITAS,
INCLUYENDO AQUÉLLAS DE COMERCIABILIDAD, IDONEIDAD PARA UN FIN O USO EN
PARTICULAR, DESEMPEÑO, U OTROS TIPOS, LAS CUALES QUEDAN EXCLUIDAS
MEDIANTE EL PRESENTE DOCUMENTO. FOCUS ELECTRICS, LLC RECHAZA TODA
RESPONSABILIDAD POR DAÑOS, YA SEAN DIRECTOS, INDIRECTOS, INCIDENTALES,
PREVISIBLES, CONSECUENTES O ESPECIALES QUE SURJAN DE ESTE APARATO
ELECTRODOMÉSTICO O GUARDEN RELACIÓN CON EL MISMO.
Si piensa que el artefacto electrodoméstico se ha dañado o requiere de servicio dentro de su
período de garantía, por favor póngase en contacto con el Departamento de Atención al
Cliente de Focus Electrics por el (866) 290-1851 o contáctenos por correo electrónico a la
service@focuselectrics.com. Los gastos de devolución no son reembolsables. Para todas las
reclamaciones de garantía, se requerirá un recibo que demuestra la fecha de compra original,
los recibos escritos a mano no son aceptados. Focus Electrics, LLC no se hace
responsable de las devoluciones perdidas en tránsito.
Válido sólo en EE.UU. y Canadá
R
EPUESTOS
Las partes de repuestos, si están disponibles, pueden pedirse directamente en línea a Focus
Electrics en www.focuselectrics.com, o puede llamar o enviar un correo electrónico al
departamento de servicio al número telefónico o dirección de correo electrónico arriba
indicados, o escribiéndonos a:
Focus Electrics, LLC
Attn: Customer Service
P. O. Box 2780
West Bend, WI 53095
Cerciórese de incluir el número de catálogo/modelo del aparato electrodoméstico (situado en la
parte inferior/posterior de la unidad) así como la descripción y la cantidad de repuestos que
necesita. Junto con esta información, incluya su nombre, dirección postal, número de tarjeta
de crédito Visa o MasterCard, la fecha de vencimiento y el nombre tal como aparece en la
tarjeta. Los cheques pueden ser pagaderos a Focus Electrics, LLC. Llame al Departamento
de Atención al Cliente para obtener el monto de la compra. Se sumará al total el impuesto de
venta estatal que corresponda, más un cargo por despacho y procesamiento. La entrega tarda
dos (2) semanas.
Este manual contiene información importante y útil sobre el uso seguro y el cuidado de su
nuevo producto Focus Electrics. Para su propia referencia, archive aquí el recibo fechado que
sirve de comprobante de compra para la garantía, y anote la siguiente información:
Fecha en que compró o recibió la unidad como regalo: _______________________________
Dónde se efectuó la compra y el precio, si lo sabe: ___________________________________
Número y código de fecha del producto (aparece en la parte inferior/posterior de la unidad):
___________________________________
L5837 02/11 West Bend®, una Marca de Focus Electrics Impreso en China
10
 Loading...