

Page 1

JUICE EXTRACTOR
(WITH OPTIONAL BLENDER ATTACHMENT)
Instruction Manual
Register this and other Focus Electrics products through our website:
Important Safeguards .............................................................................................. 2
Operating Precautions ............................................................................................. 3
Assembling Your Juice Extractor
Using Your Juice Extractor.......................................................................................8
Juicing Guidelines ................................................................................................... 9
Assembling Your Blender Attachment (if included) ............................................... 10
Using Your Blender Attachment (if included) ......................................................... 10
Cleaning Your Juice Extractor
Cleaning Your Blender Attachment (if included) ....................................................12
Troubleshooting .................................................................................................... 13
Warranty ................................................................................................................15
SAVE THIS INSTRUCTION MANUAL FOR FUTURE REFERENCE
© 2008 West Bend®, a Brand of Focus Electrics, LLC.
www.focuselectrics.com
.............................................................................4
............................................................................... 12
www.focuselectrics.com
Page 2

IMPORTANT SAFEGUARDS
To prevent personal injury or property damage, read and follow all instructions
and warnings.
When using electrical appliances, basic safety precautions should always be
followed including the following:
• Read all instructions, including these important safeguards and the care and use
instructions in this manual.
• To protect against risk of electrical shock, do not immerse cord, plugs, or other
electric parts in water or other liquids.
• Close supervision is always necessary when any appliance is used by or near
children.
• Unplug the appliance from outlet when not in use, before putting on or taking off
parts and before cleaning.
• Avoid contacting moving parts.
• Do not operate this appliance with a damaged cord or plug, after the appliance
malfunctions or if the appliance is dropped or damaged in any manner. If you
experience any problems with your appliance, unplug it immediately from the
electrical outlet. For service information see warranty page.
• The use of attachments, including canning jars, not recommended or sold by
Focus Electrics may cause fire, electric shock or injury.
• Do not use this appliance outdoors.
• Do not allow cord to hang over edge of table or counter.
• Do not let cord contact hot surface, including the stove.
• Always make sure juicer cover is clamped securely in place before motor is
turned on. Do not unfasten clamps while juicer is in operation.
• Be sure to turn switch to “OFF” position after each use of your juicer. Make sure
the motor stops completely before disassembling.
• Do not put your fingers or other objects into the juicer opening while it is in
operation. If food becomes lodged in opening, use a food pusher or another
piece of fruit or vegetable to push it down. When this method is not possible,
turn the motor off and disassemble juicer to remove the remaining food.
• Do not use the appliance if the rotating sieve is damaged.
• Keep hands and utensils out of the blending jar while blending to reduce th e risk
of severe injury to persons or damage to the blender. A scraper may be used
but must be used only when the blender is unplugged and not in operation.
• Blades are sharp; handle carefully.
• To reduce the risk of injury, never place cutting assembly blades on motor base
without blending jar properly attached.
• Always operate blender with lid in place.
2
Page 3

• When blending hot liquids, remove centerpiece of two-piece cover.
• This appliance has a polarized plug (one blade is wider than the other). To
reduce the risk of electric shock, this plug is intended to fit into a polarized outlet
only one way. If the plug does not fit fully into the outlet, reverse the plug. If it
still does not fit, contact a qualified electrician. Do not attempt to modify the plug
in any way.
• To ensure continued protection against risk of electric shock, connect to
properly grounded outlets only.
• For household use only.
To prevent personal injuries, read and follow all instructions and warnings.
OPERATING PRECAUTIONS
• All parts provided with this appliance are designed for use with this appliance
only. Do not use any parts provided for any other appliance or application.
• Do not place any parts on a hot surface or in a heated oven.
• Do not use if any part is cracked, chipped, loose, weakened, or damaged in any
manner.
• Do not clean any part with cleansers, steel wool pads, or other abrasive
materials.
• Always make sure the motor has stopped completely before disassembling.
• Always hold the blending jar while processing for stability.
• Do not leave the appliance unattended while it is operating.
• Do not disassemble or remove any parts from the base until the motor has
stopped completely.
• A short power-supply cord is provided to reduce risks resulting from becoming
entangled in or tripping over a longer cord.
• Longer, detachable power-supply cords or extension cords are available and
may be used if care is exercised in their use. While use of an extension cord is
not recommended, if you must use one, the marked electrical rating of the
detachable power-supply cord or extension cord should be at least as great as
the electrical rating of the appliance. If the appliance is of the grounded type,
the extension cord should be a grounding-type 3-wire cord. The cord should be
arranged so that it will not hang over the counter top or tabletop where it can be
pulled by children or tripped over.
• Do not use an outlet or extension cord if the plug fits loosely or if the outlet or
extension cord feels hot.
• Do not attempt to repair this appliance yourself.
• Do not use this appliance for other than intended use.
SAVE THESE INSTRUCTIONS
3
Page 4
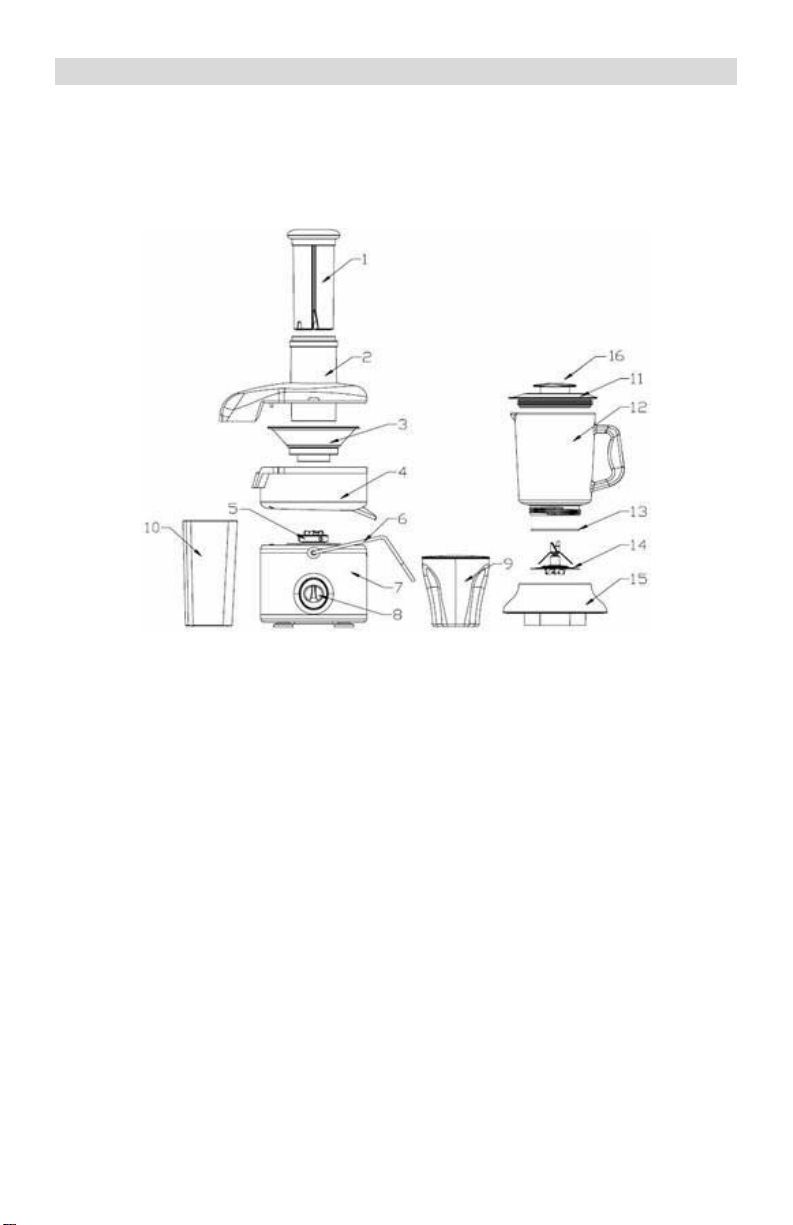
ASSEMBLING YOUR JUICE EXTRACTOR
Before assembling your juice extractor, wash all loose parts, except the motor base
in warm, soapy water, rinse thoroughly and dry. All parts except for the motor
base can be washed in the top rack of the dishwasher. The motor base can be
wiped clean with a damp cloth.
Juice Extractor Optional Blender Attachment
Note: When assembling, do not force any of the parts into place. When the parts
are properly aligned they will easily snap into place. Using excessive force could
damage the parts.
Juice Extractor Optional Blender Attachment
1 Food Pusher 11 Lid 2 Juicer Cover 12 Blending Jar 3 Juicer Blade 13 Sealing Ring 4 Filter Bowl 14 Blade Assembly 5 Motor Drive 15 Blade Base 6 Cover Locking Arm 16 Lid Cap 7 Motor Base 8 Power/Speed Switch 9 Juice Container 10 Pulp Container
4
Page 5
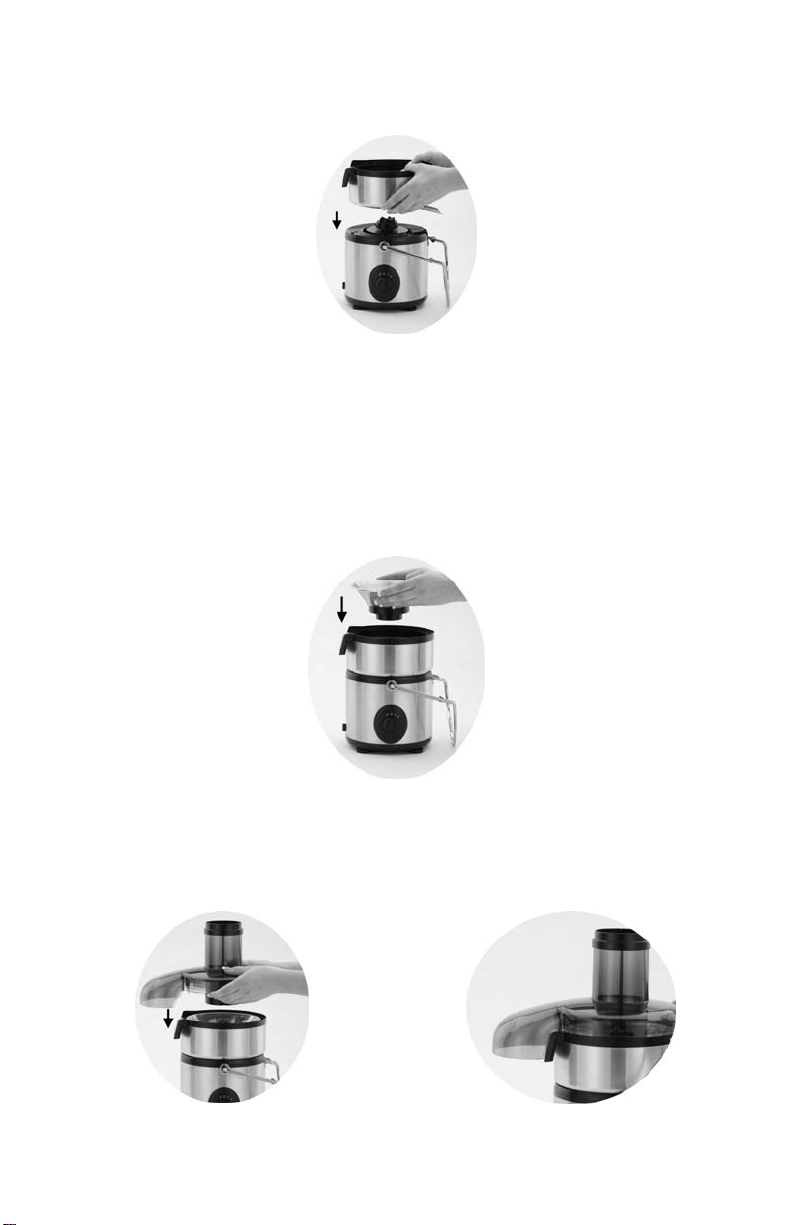
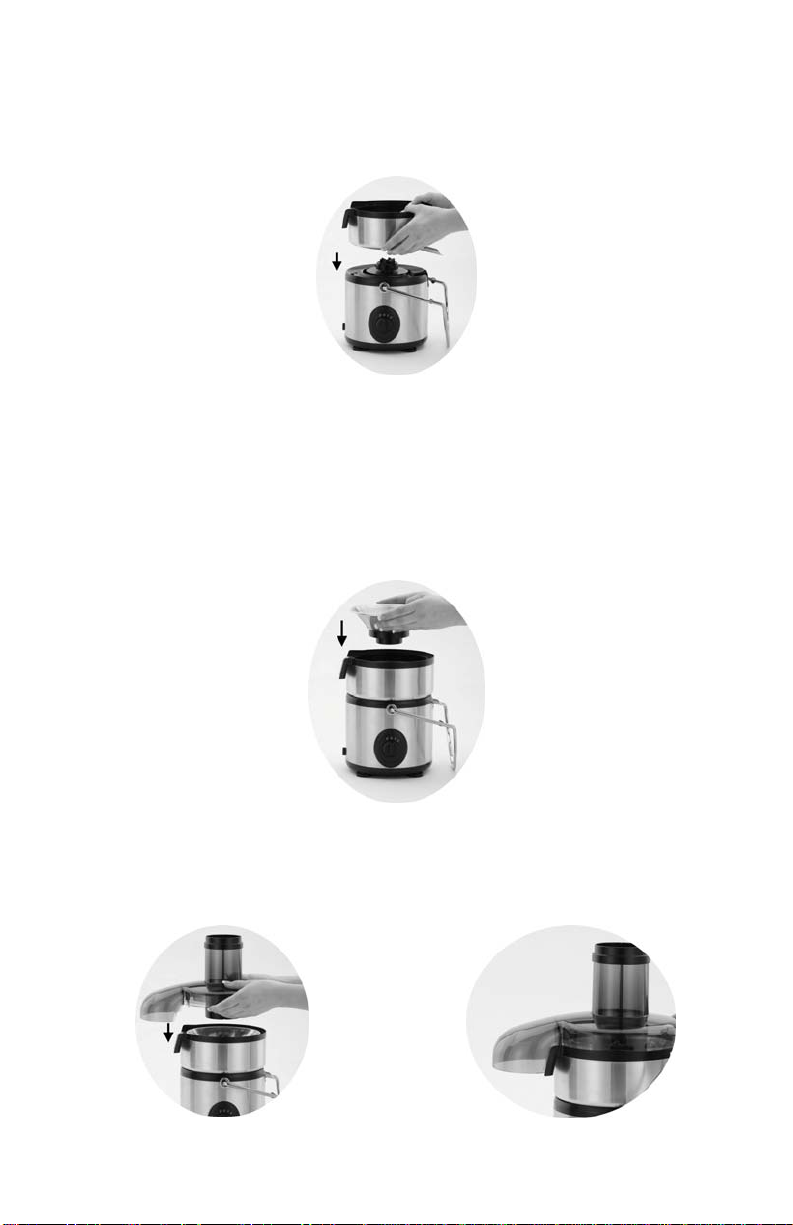
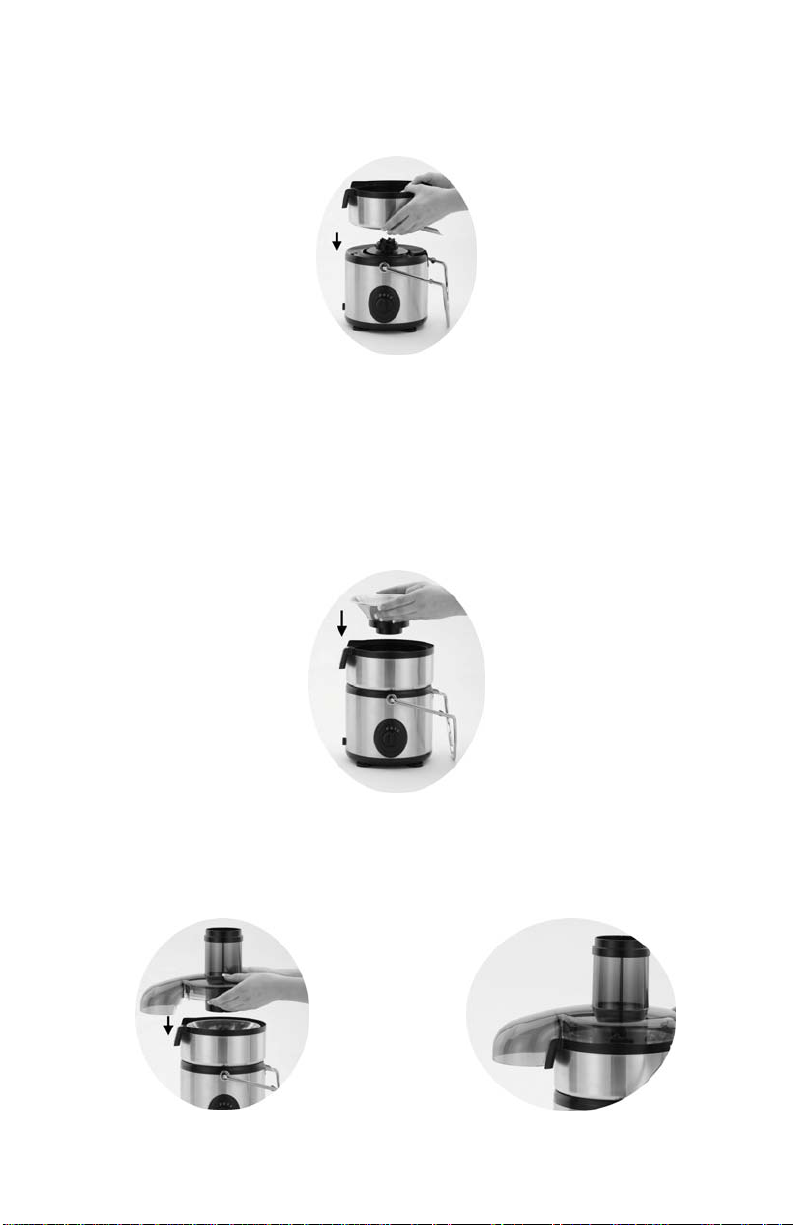
1. Place the filter bowl over the motor base aligning the juice outlet spout over the notch in the motor base. Press down with a slight twisting motion until it sits flat.
Step 1
2. Place the juicer blade into the filter bowl. Rotate if necessary to align with the
motor drive and press down firmly until the juicer blade is tight and even with the
top of the filter bowl. CAUTION: There are many small sharp blades for
processing the fruits and vegetables. Use care when handling the juicer blade
to reduce the risk of injury.
Step 2
3. Center the juicer cover over the filter bowl and carefully align the juicer cover so
the pulp outlet chute sits within the edges of the filter bowl.
Step 3 Step 3A
5
Page 6
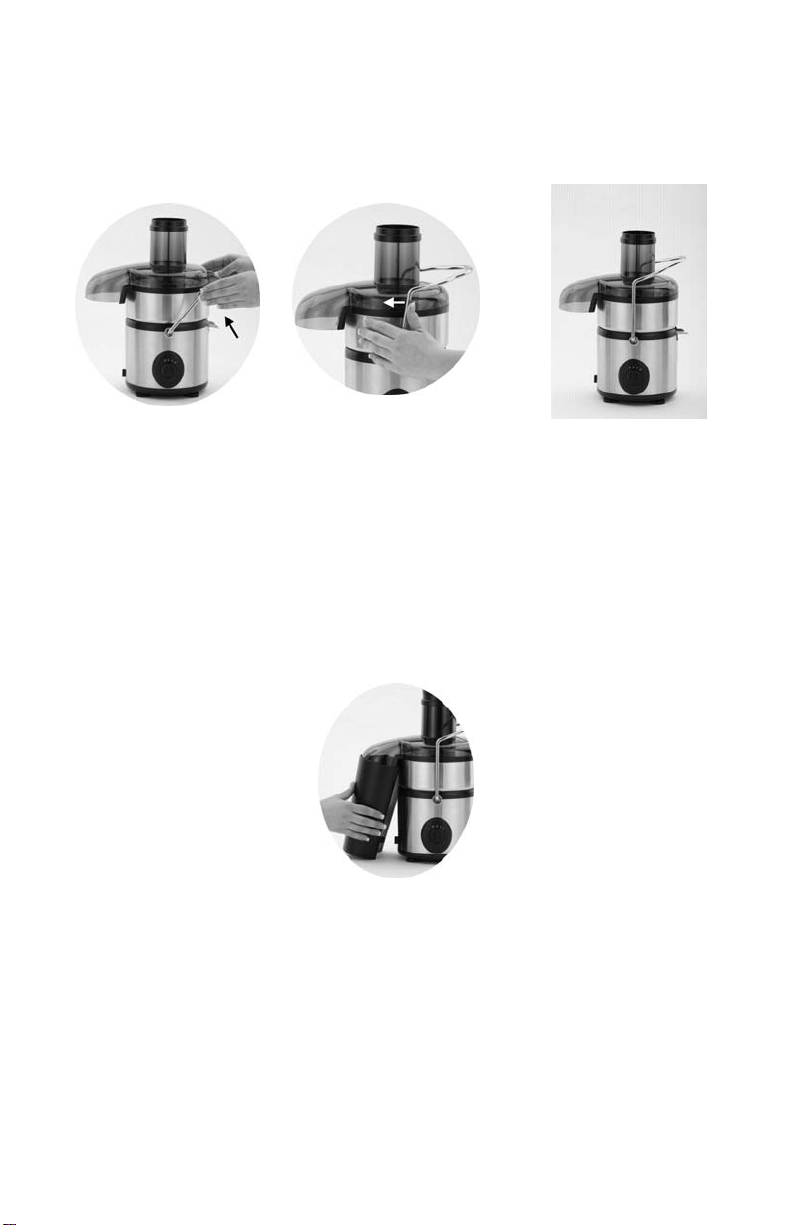
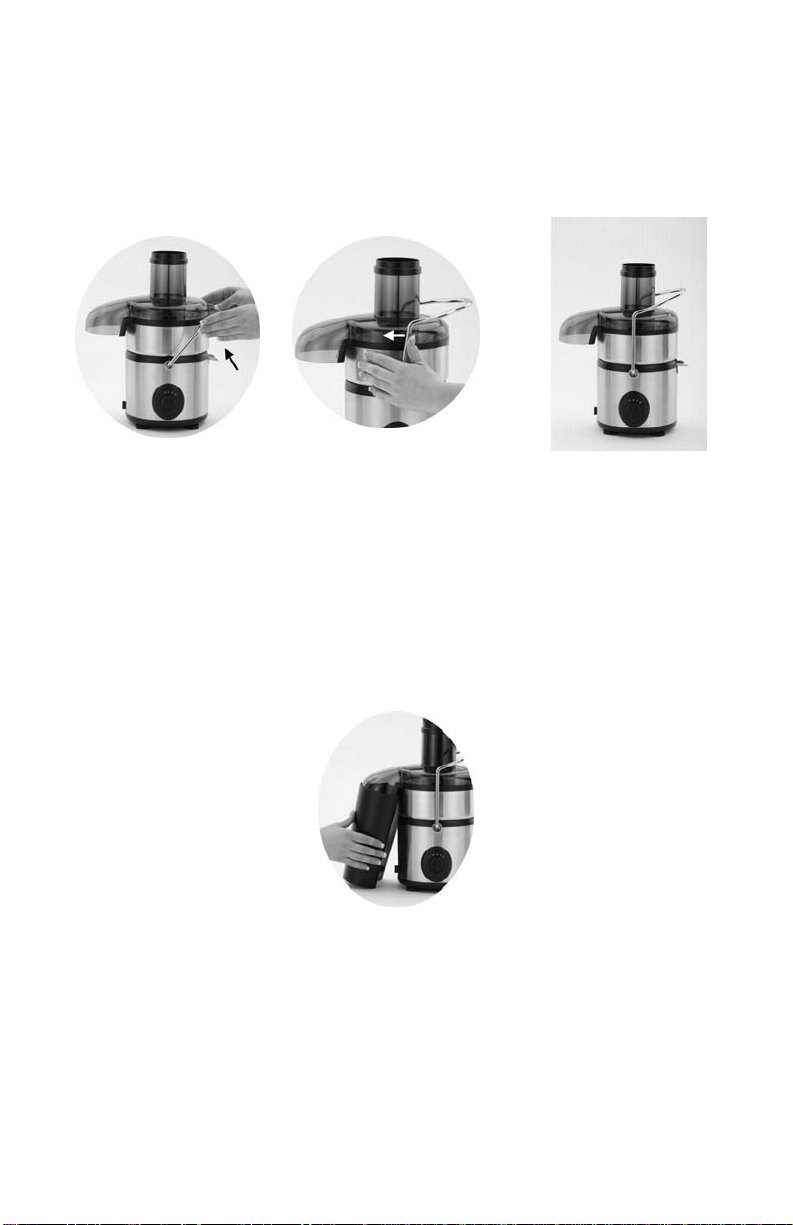
4. Swing the cover locking arm up over the juicer cover and snap into place. Make
sure the cover locking arm is locked securely into place on both sides of the
juicer.
Step 4 Step 4A Step 4B
5. Slide the pulp container into place under the pulp outlet chute of the juicer cover.
Step 5
6
Page 7
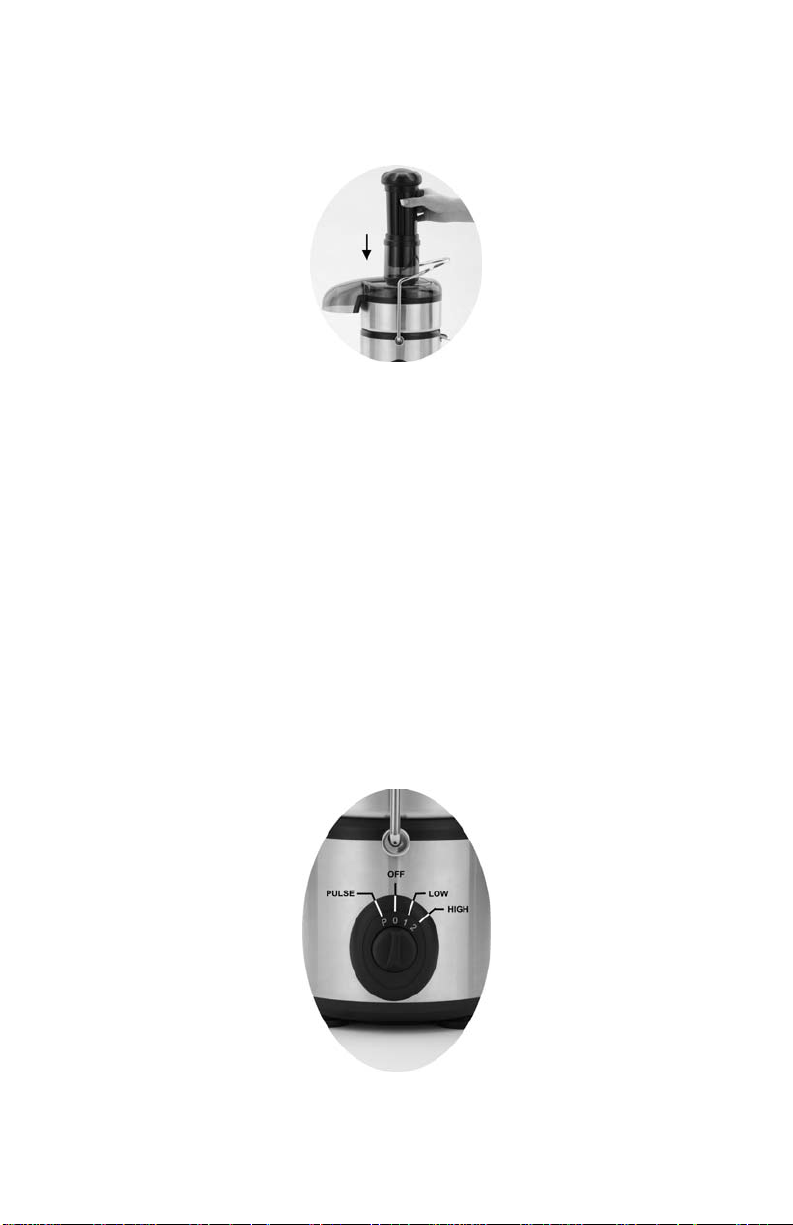
6. Align and slide the food pusher down into the juicer cover.
Step 6
7. Your juice extractor is now ready to use.
8. Place the appliance on a dry, level, heat-resistant surface, away from any edge.
9. Plug cord into a 120 volt AC electric outlet only.
10. Turn the juice extractor on for a few seconds using the pulse, “P” switch position
to ensure everything is functioning and all safety switches have been activated.
If the juicer will not turn on, unplug from electrical outlet, disassemble, and
check the alignment of all the parts to ensure they are properly positioned.
Note: Do not run the juicer dry for more than a few seconds as extended
periods of dry operation could cause damage to the juicer.
Step 10
7
Page 8
USING YOUR JUICE EXTRACTOR
1. Place the appliance on a dry, level, heat-resistant surface, away from any edge.
Note: Do not operate this appliance where dust or flour can be suctioned up into
the vent openings, as this will cause damage to the appliance.
2. Assemble the juice extractor according to the “Assembling Your Juice Extractor”
instructions.
3. Prepare your fruit and vegetables by washing, and if necessary, cutting down to
a size which will fit into the feed chute of the juicer cover.
4. Plug the cord into a 120 volt AC electric outlet only.
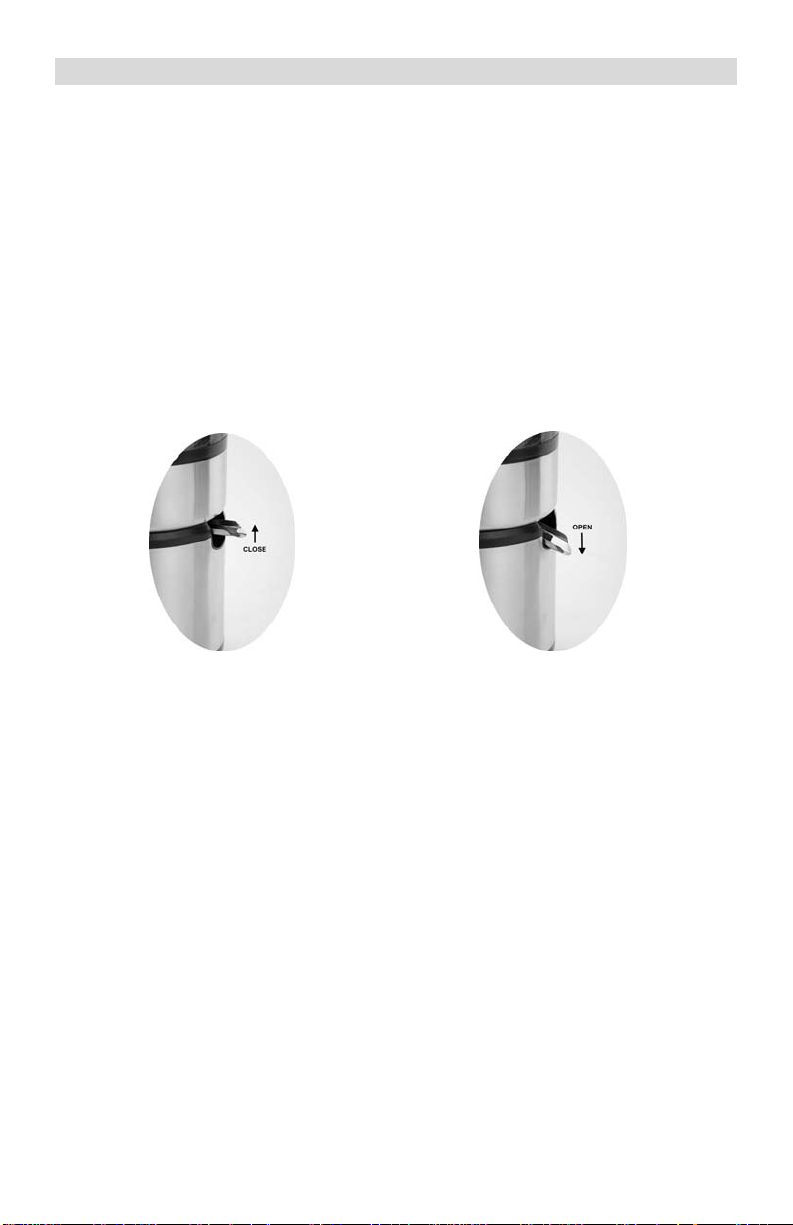
5. Place the provided juice container or another container under the juice outlet
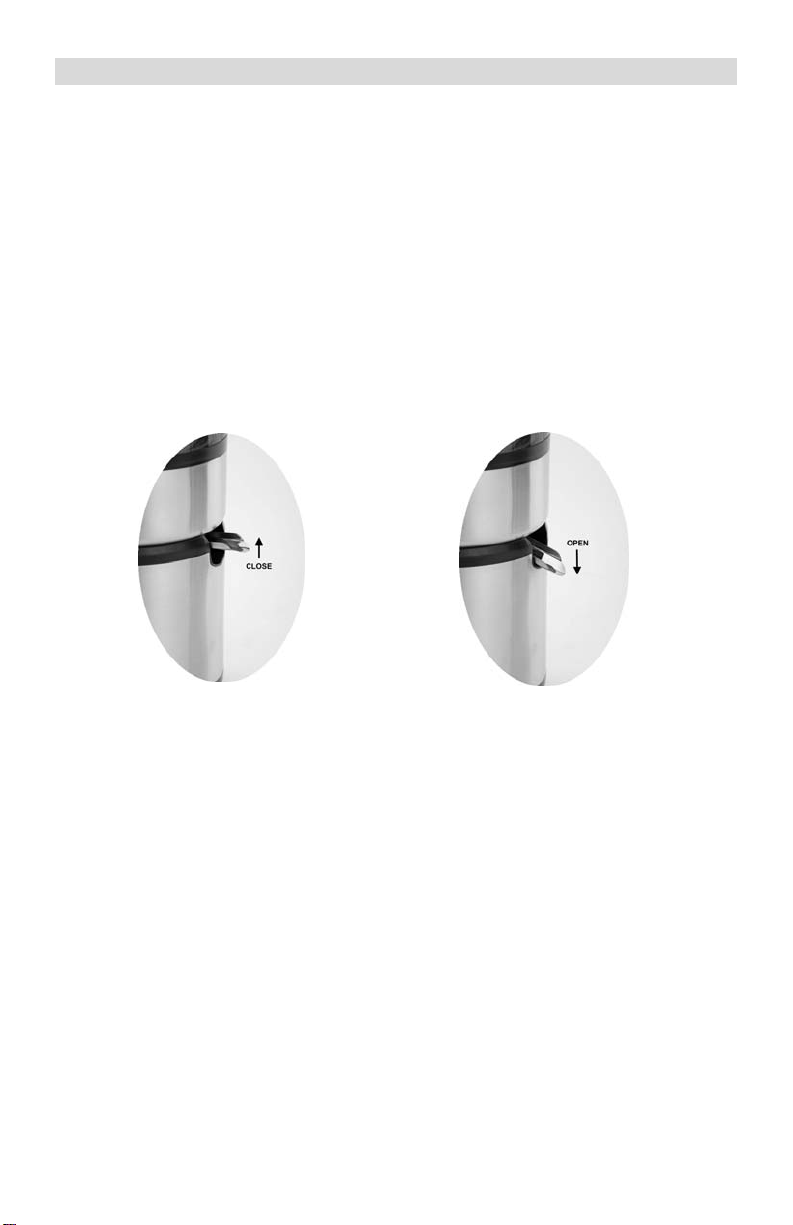
spout. Make sure the juice outlet spout is open by pushing down. Down is
open, up is closed.
Juice Outlet Spout in Closed Position Juice Outlet Spout in Open Position
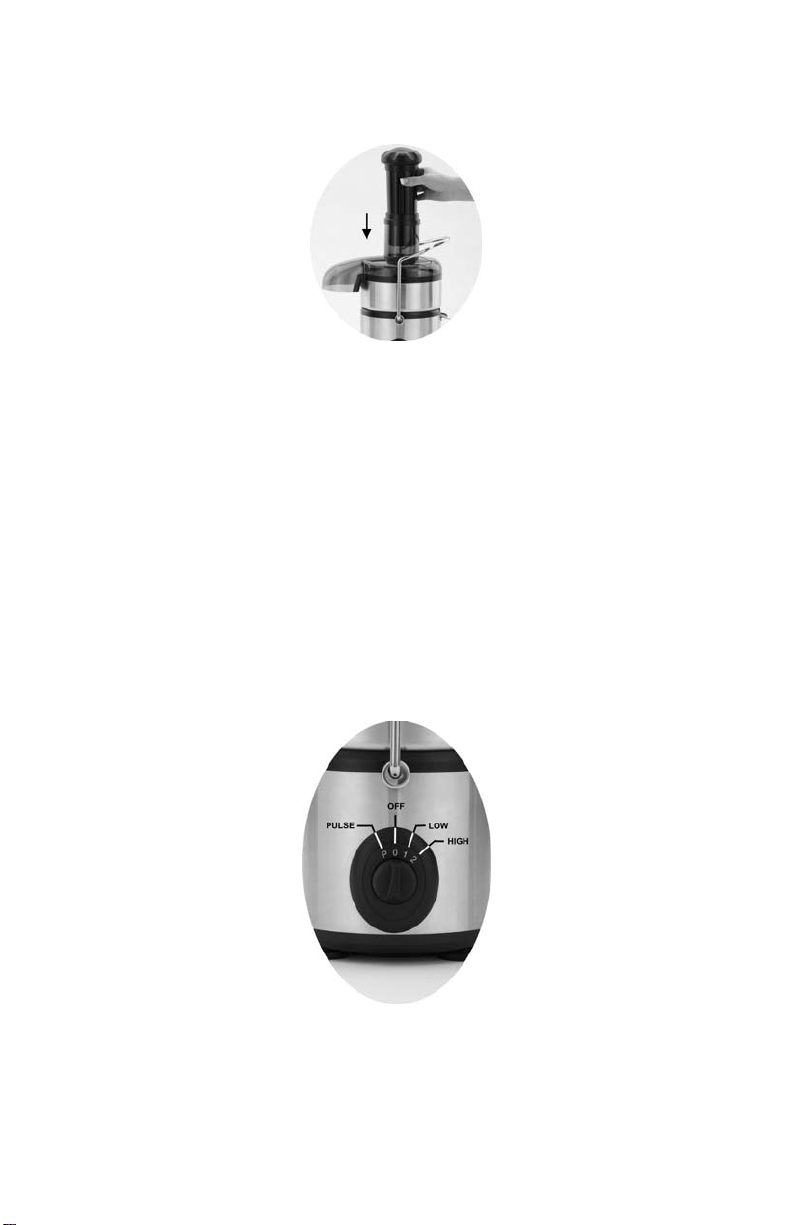
6. Turn the juicer on by selecting a speed; “1” (low) or “2” (high). Refer to the
“Juicing Guidelines” section of this manual for recommended speed selection.
7. While the motor is running, remove the food pusher and begin to place food into
the food chute. When the chute is about ¾ full, align and slide the food pusher
down into the food chute, slowly pushing the food down into the blade. Note:
For maximum extraction, use a slow, steady, downward pressure on the food
pusher. CAUTION: To reduce the risk of injury, never use your fingers or any
item other than the food pusher to push the food down into the blades.
Juice should begin to flow out of the juice outlet spout. If the juice does not start
flowing as expected, make sure the juice outlet spout is open. Note: If the
motor base appears to be laboring try one of the following:
a. Increase the motor speed.
b. Reduce the amount of pressure and speed on the food pusher.
c. Turn juicer to “0” (OFF), unpl ug and clean any obstructions.
Continue to add more food until the desired amount of juice has been extracted. more food until the desired amount of juice has been extracted.
8
Page 9

Note: The juicer should not be operated continuously for an extended per iod of
time; never more than five (5) minutes. For the best juice extraction and to help
extend the life of the juicer, turn the juicer “0” (OFF) after approximately one to
two minutes of continuous juicing. Clean the juicer cover and juicer blade and
empty the pulp container if necessary before resuming.
8. When all food in the filter bowl has been processed and juice is no longer
flowing from the juice outlet spout, turn the juicer “0” (OFF). Note: Close the
juice outlet spout for drip free removal of the juice container.
9. Add sugar, salt, or other ingredients to the juice as desired and enjoy!
10. Unplug the juicer, disassemble and clean all parts according to the instructions
provided in the “Cleaning Your Juice Extractor” section of this manual. Note:
For easier clean-up, rinse all the parts immediately after juicing to keep juice
residue from drying on parts.
JUICING GUIDELINES
• Always wash all foods, fruits, and vegetables before juicing.
• Perishable items must be refrigerated prior to juicing. Refrigeration is
recommended for other fruits and vegetables prior to juicing.
• Fresh juice is a product of fresh foods and contains no preservatives. To
maintain freshness and greatest vitamin content, consume as soon as possible
after juicing. All juice should be refrigerated immediately if not consumed.
• Certain foods should have the skin removed (peeled) before juicing if the skins
are too tough or not palatable. Examples include; citrus fruits, bananas, melons,
and pineapples.
• Always pit foods with hard seeds, pits, or stones. Examples include; cherries,
peaches, and plums.
• Soft textured foods should be juiced at the lower speed “1” and firmer foods
should be juiced at the higher speed “2”.
• Soft or over-ripe fruit can clog the juicer. If this happens, turn the motor base “0”
(OFF), unplug from electrical outlet, disassemble, and clean the parts.
• Loose or leafy vegetables should be bundled together or combined with more
substantial type food for best results.
• Running the juicer continuously for an extended period of time can cause
overheating. If this happens, the motor base will shut down automatically, reset,
and be ready to operate after approximately 10 – 15 minutes of rest.
9
Page 10

ASSEMBLING YOUR BLENDER ATTACHMENT (if included)
Before assembling your blender attachment, wash all loose parts, except the motor
base in warm, soapy water, rinse thoroughly and dry. All parts except the motor
base can be washed in the top rack of the dishwasher. The motor base can be
wiped clean with a damp cloth.
1. Place the blending jar upside down on the table or counter with the bottom
facing up. Note: Do not place the glass blending jar directly on a very hard
surface such as ceramic or granite. The glass may become chipped or
damaged.
2. Center and place the sealing ring on the rim of the blending jar.
3. Place the blade assembly on top of the sealing ring. Thread and secure the
blade base onto the bottom of the blending jar by turning clockwise.
4. Place the blending jar assembly on the motor base.
5. Place the lid on to the blending jar by pressing it in to place making sure that it is
properly lined up to cover the pour spout and seal the blending jar.
6. Place the lid cap on to the lid by lining up the flanges over the flange openings.
Make a ¼ turn clockwise to secure it in place.
USING YOUR BLENDER ATTACHMENT (if included)
1. Place appliance on a dry, level, heat-resistant surface, away from any edge.
Note: Do not operate this appliance where dust or flour can be suctioned up into
the vent openings, as this will cause damage to the appliance.
2. Place assembled blending jar on to the motor base.
3. Plug cord into a 120 volt AC electric outlet only.
4. Put liquids into the blending jar first unless the recipe calls for an alternate
processing sequence.
5. Prepare ingredients for blending by cutting all solid ingredients (fruits,
vegetables, etc.) into uniform pieces, ½ to 1-inch cubes.
6. Place the lid on the blending jar.
7. Place the lid cap into position on the lid. Note: Always place a hand on the
blending jar or lid to steady the blender while it is operating.
8. Blend foods according to the recipe or until the desired results are achieved.
Note: If scraping or stirring of contents is required, turn blender to “0” (OFF) and
unplug from electrical the outlet. Do not use metal utensils to stir as they may
scratch the blending jar.
9. The lid cap may be removed while blending to add ingredients. CAUTION: To
prevent the risk of injury, do not remove the lid while blending. Be sure the
blades have stopped rotating before removing the lid.
10
Page 11

Crushing Ice
1. Fill the blending jar with approximately 2-cups of water. Add the desired amount
of ice cubes.
2. Cover the blending jar with the lid and insert the lid cap.
3. When crushing ice, hold the blender stable with the palm of your hand over the
Lid. Turn the speed control to “P” (pulse) for 1 second and release. Pause for
approximately 2-seconds and repeat the 1 second “P” (pulse) until ice is
crushed to desired consistency.
4. Drain any excess water.
HINT: approximately 12 cubes (2-cups) of ice make for a slush consistency.
11
Page 12

CLEANING YOUR JUICE EXTRACTOR
Use caution when cleaning the filter bowl with the juicer blade assembled. W ipe
exterior with a damp cloth, and only rinse the interior. Disassemble and clean
following the instructions below.
1. Switch motor base to “0” (OFF) and unplug from the electrical outlet.
2. Disassemble the juicer. Note: The filter bowl may have liquid remaining in the
bottom. With the juicer outlet spout in the closed position, carefully remove the
filter bowl and juicer blade. Empty liquid contents and juicer blade into the sink.
CAUTION: There are many small, sharp blades on the juicer blade. To reduce
the risk of injury, use extreme care when removing and handling the juicer
blade.
3. Wash all loose parts, except the motor base in warm, soapy water, rinse
thoroughly and dry. All parts except the motor base can be washed in the top
rack of the dishwasher. The motor base can be wiped clean with a damp cloth.
CAUTION: Never put the motor base in water or other liquid as damage will
occur.
4. Pay particular attention to properly cleaning the juicer blade which is constructed
of a very fine, filter mesh that must be clean and open for proper operation and
juicing extraction. If necessary, clean the inside of the juicer blade with a nylon
brush. Do not use a metal brush. Hold the juicer blade up to the light to ensure
the mesh is clean and open. CAUTION: To reduce the risk of injury, do not use
the appliance if the juicer blade exhibits excessive wear or damage. Inspect the
juicer blade after each cleaning.
Note: Some fruits and vegetables can stain the plastic parts. To reduce the chance
of staining, rinse and clean all parts immediately after juicing. If staining occurs,
soak parts in water containing 10% lemon juice. Never soak the parts in bleach or
other harsh chemicals.
CLEANING YOUR BLENDER ATTACHMENT (if included)
1. Switch the motor base to “0” (OFF) and unplug from the electrical outlet.
2. Wipe the motor base, powers, and cord with a damp cloth or sponge. To remove
stubborn spots, use a mild, non-abrasive cleanser.
3. To clean the blending jar, disassemble all parts. Carefully wash all parts except
the motor base in warm, soapy water, rinse and dry thoroughly. All parts
except the motor base can be washed in the top rack of the dishwasher.
4. Store the blending jar with the lid off to prevent odor.
12
Page 13

TROUBLESHOOTING
MOTOR DOES NOT OPERATE WHEN SWITCHED ON:
No power:
• Check the power source.
Not assembled correctly:
• One of the parts may not be assembled (positioned, aligned or seated)
correctly and the safety switches are not activated. Make sure all the
parts are assembled correctly and the cover locking arm is locked in
place.
Motor overheated:
• Check to ensure the motor has not labored too heavily due to
excessive speed, pressure, or load during juicing or blending.
• Check to ensure the juicer blade, blender blade assembly, juicer cover,
or pulp container are not clogged.
• Running the motor base continuously for an extended time, over five
minutes, can cause overheating and the motor base will shut down
automatically. The motor base will reset and be ready to operate after
approximately 10 – 15 minutes of rest.
• Check to ensure powder, dust, or liquid has not been suctioned up into
the motor through the vents on the bottom.
MOTOR STALLS:
Too aggressive:
• Allow a few seconds for the motor to get up to full speed before adding
food.
• Reduce the pressure and speed of the food introduction.
Clogged juicer:
• Soft fruit, over-ripe fruit or leafy vegetables can clog the juicer. If this
happens, clean the juicer according to the cleaning instructions and try
blending with firmer fruit or vegetables.
• For large volumes of continuous juicing, stop after two minutes of
juicing, clean and allow the juicer to rest for 10 minutes.
Excess pulp buildup in the juicer blade and cover:
• Check to ensure the juicer blade is properly cleaned and the filter mesh
is clear of debris.
Jammed or overloaded blender:
• Try using “P” (pulse) to loosen the blockage. If this does not work, turn
“0” (OFF), unplug and remove the blockage.
• Blend smaller quantities of food at one time.
13
Page 14

PULP TOO WET OR NO JUICE OUTPUT:
Juice outlet spout is clogged:
• Check to ensure the juice outlet spout is clean and open in the down
position.
Excessive pulp buildup:
• Clean the juicer blade, juicer cover and filter bowl.
• Slow down the juicing process by putting less pressure on the food
pusher.
JUICER LEAKS:
• Check to ensure all the parts have been properly cleaned and
assembled correctly.
• Check to ensure the juice outlet spout is open and not clogged.
BLENDING JAR LEAKS:
• Check to ensure the seal ring is present, correctly assembled to the
blending jar and not damaged.
• Check the blending jar and the blade base for cracks. Do not use if the
appliance parts are damaged or missing.
14
Page 15

PRODUCT WARRANTY
Appliance 1 Year Limited Warranty
Focus Electrics, LLC (“Focus Electrics”) warrants this appliance from failures in the material
and workmanship for one (1) year from the date of original purchase with proof of purchase,
provided the appliance is operated and maintained in conformity with the provided Instruction
Manual. Any failed part of the appliance will be repaired or replaced without charge at Focus
Electrics’ discretion. This warranty applies to indoor household use only.
This warranty does not cover any damage, including discoloration, to any non-stick surface of
the appliance. This warranty is null and void, as determined solely by Focus Electrics if the
appliance is damaged through accident, misuse, abuse, negligence, scratching, or if the
appliance is altered in any way.
THIS WARRANTY IS IN LIEU OF ALL IMPLIED WARRANTIES, INCLUDING WARRANTIES
OF MERCHANTABILITY, FITNESS FOR A PARTICULAR PURPOSE, PERFORMANCE, OR
OTHERWISE, WHICH ARE HEREBY EXCLUDED. IN NO EVENT SHALL FOCUS
ELECTRICS BE LIABLE FOR ANY DAMAGES, WHETHER DIRECT, INDIRECT,
INCIDENTAL, FORSEEABLE, CONSEQUENTIAL, OR SPECIAL, ARISING OUT OF OR IN
CONNECTION WITH THIS APPLIANCE.
If you think the appliance has failed or requires service within its warranty period, please
contact the Focus Electrics Customer Service Department at (866) 290-1851, or e-mail us at
service@focuselectrics.com
warranty claims, hand written receipts are not accepted. You may also be required to return
the appliance for inspection and evaluation. Return shipping costs are not refundable. Focus
Electrics is not responsible for returns lost in transit.
. A receipt proving the original purchase date will be required for all
Valid only in USA and Canada
REPLACEMENT PARTS
Replacement parts, if available, may be ordered directly from Focus Electrics, LLC several
ways. Order online at www.focuselectrics.com
phone by calling (866)290-1851, or by writing to:
Focus Electrics, LLC
Attn: Customer Service
P. O. Box 2780
West Bend, WI 53095
To order with a check or money order, please first contact Customer Service for an order total.
Mail your payment along with a letter stating the model or catalog number of your appliance,
which can be found on the bottom or back of the unit, a description of the part or parts you are
ordering, and the quantity you would like. Your check should be made payable to Focus
Electrics, LLC.
Your state/province’s sales tax and a shipping fee will be added to your total charge. Please
allow two weeks for processing and delivery.
This manual contains important and helpful information regarding the safe use and care of your
new Focus Electrics product. For future reference, attach dated sales receipt for warranty proof
of purchase and record the following information:
Date purchased or received as gift: _______________________________________________
Where purchased and price, if known: _____________________________________________
Item number and Date Code (shown bottom/back of product):___________________________
, e-mail service@focuselectrics.com, over the
L5711A 06/08 West Bend®, a Brand of Focus Electrics, LLC. Printed in China
15
Page 16

Page 17

CENTRIFUGEUSE/EXTRACTEUR À JUS
(AVEC UN MÉLANGEUR COMME ACCESSOIRE OPTIONNEL)
Manuel d’instructions
Enregistrez ce produit et d’autres produits Focus Electrics sur notre site Web:
Mises en garde importantes..................................................................................... 2
Précautions d’utilisation............................................................................................3
Assemblage De Votre Centrifugeuse.......................................................................4
Utilisation De Votre Centrifugeuse ...........................................................................8
Directives D'Emploi De La Centrifugeuse ................................................................ 9
Montage Du Mélangeur (s’il est compris)............................................................... 10
Mode D’Emploi Du Mélangeur (s’il est compris)..................................................... 10
Nettoyage De Votre Centrifugeuse ........................................................................ 12
Nettoyage Du Mélangeur (s’il est compris).............................................................12
Vérification-Dépannage..........................................................................................13
Garantie .................................................................................................................15
CONSERVEZ CE MANUEL D’INSTRUCTIONS POUR RÉFÉRENCE FUTURE
© 2008 West Bend®, une Marque de Focus Electrics, LLC.
www.focuselectrics.com
www.focuselectrics.com
Page 18

MISES EN GARDE IMPORTANTES
Pour écarter tout risque de blessure et de dégâts matériels, lisez et suivez
toutes ces instructions et tous ces avertissements.
Lorsque vous utilisez des appareils électriques, prenez toujours les précautions de
base, notamment:
• Lisez toutes les instructions, y compris ces mises en garde importantes et le
mode d’emploi et d’entretien décrit dans ce manuel.
• Pour vous protéger contre tout choc électrique, n’immergez pas le cordon, les
fiches ni aucune autre pièce électrique dans l’eau ni dans tout autre liquide.
• Une surveillance étroite est nécessaire lorsque vous cet appareil est utilisé par
ou à proximité d’enfants.
• Débranchez l’appareil de la prise secteur lorsque vous ne l’utilisez p as, avant de
mettre en place ou de retirer des pièces et avant de le nettoyer.
• Évitez tout contact avec les pièces mobiles.
• N’utilisez pas cet appareil avec un cordon abîmé ou une fiche détériorée, si
l’appareil a connu un disfonctionnement ou si l’appareil est tombé ou a été
détérioré de quelque manière que ce soit. Si vous rencontrer un problème quel
qu’il soit avec votre appareil, débranchez-le immédiatement de la prise secteur.
Pour des informations sur les réparations, voir la page de garantie.
• L’utilisation des accessoires, notamment les pichets de conservation, non
recommandés ou vendus par Focus Electrics risque de provoquer un incendie,
une électrocution ou une blessure.
• N’utilisez pas cet appareil à l’extérieur.
• Ne laissez pas la corde pendre depuis l’extrémité d’une tabl e ou d’un plan de
travail.
• Ne laissez pas le cordon électrique entrer en contact avec une surface à haute
températue, y compris la gazinière.
• Vérifiez que le couvercle de la centrifugeuse soit bien verrouillé en place a v ant
de mettre le moteur en route. Ne déverrouillez rien pendant le fonctionnement
de l’appareil.
• Be Veillez à mettre le commutateur en position d’arrêt (OFF) après chaque
utilisation de votre centrifugeuse. Vérifiez toujours que le moteur est
complètement arrêté avant de démonter l’appareil.
• Ne mettez pas les doigts ou tout autre objet dans la centrifugeuse quand elle
fonctionne. Si de la nourriture se coince dans l’embouchure, utilisez un poussoir
ou un autre fruit ou légume pour le faire passer. Si cette méthode est
impossible, éteignez le moteur, débranchez l’appareil et démontez la
centrifugeuse pour retirer les aliments qui restent.
• N’utilisez pas l’appareil si le tamis rotatif est endommagé.
• Maintenez les mains et les ustensiles à l’extérieur du pichet à mixer pendant le
mélange pour réduire le risque de blessure grave ou de détérioration d u mixeur.
Vous pourrez utiliser une spatule uniquement avec le mixeur débranché.
• Les lames sont tranchantes ; manipulez-les avec précaution.
• Pour éviter tout risque de blessure, ne mettez jamais l’assemblage des lames
sur le socle-moteur si le gobelet mélangeur n’est pas bien fixé.
• Utilisez toujours l’appareil avec le couvercle en place.
2
Page 19

• Lorsque vous mélangez des liquides chauds, retirez la pièce centrale du couvercle à
deux pièces.
• Cet appareil est pourvu d’une fiche polarisée (une lame est plus large que l’autre).
Pour réduire le risque d’électrocution, cette fiche est conçue pour s’encastrer dans
une prise secteur polarisée dans un sens uniquement. Si la fiche ne s’insère pas
complètement dans la prise secteur, retournez la fiche. Si elle ne s’encastre toujours
pas, contactez un électricien qualifié. Ne tentez pas de modifier la fiche de quelque
manière que ce soit.
• Afin d’assurer une protection constante contre le risque d’électrocution, ne branchez
l’appareil qu’à une prise reliée à la masse correctement installée.
• Pour usage domestique uniquement.
Pour éviter les blessures, lisez et suivez toutes les instructions et
avertissements.
PRÉCAUTIONS D’UTILISATION
• Toutes les pèces fournies avec cet appareil sont uniquement destinées à cet
appareil. N'utilisez pas les pièces fournies à d'autres fins ou avec un autre appareil.
• Ne placez aucune pièce sur une surface chaude ou dans un four chaud.
• N’utilisez pas cet appareil si une pièce est fendue, écaillée, présente du jeu, est
affaiblie ou endomagée.
• Ne nettoyez aucune pièce avec des détergents, des pailles de fer ou d’autres
matériaux abrasifs.
• Vérifiez toujours que le moteur est complètement arrêté avant de le démonter.
• Gardez toujours une main sur le récipient à mélanger pendant le fonctionnement
pour plus de stabilité.
• Ne laissez pas cet appareil sans surveillance pendant son fonctionnement.
• Ne démontez pas et ne retirez aucune pièce du socle tant que le moteur n'est pas
complétement arrêté.
• Le cordon d’alimentation fourni est court pour réduire les risques qu’une personne se
prenne les pieds ou trébuche sur un cordon plus long.
• Des cordons d’alimentations plus longs détachables ou des cordons de rallonge sont
disponibles et peuvent être utilisés à condition de faire preuve de prudence lors de
leur utilisation. Bien que l’utilisation d’un cordon de rallonge ne soit pas
recommandée, si vous devez en utiliser un, la puissance nominale indiquée pour le
cordon d’alimentation détachable ou pour le cordon de rallonge devrait être au moins
aussi importante que la puissance nominale de l’appareil. Si l’appareil est de type
raccordé à la terre, le cordon de rallonge devrait être relié à la terre et composé de
trois fils. Le cordon devrait être disposé de manière à ne pas pendre depuis le plan
de travail d’où il risque d’être tiré par des enfants ou d’où quelqu’un pourrait s’y
prendre les pieds.
• N’utilisez pas une prise électrique ou une rallonge si la fiche est lâche à l’intérieur de
la prise ou si la prise ou la rallonge est chaude.
• N’essayez pas de réparer cet appareil vous-même.
• N’utilisez pas l’appareil pour une autre utilisation que l’utilisation indiquée.
CONSERVEZ CES INSTRUCTIONS
3
Page 20

ASSEMBLAGE DE VOTRE CENTRIFUGEUSE
Avant d’assembler votre centrifugeuse, lavez toutes les pièces, sauf le soclemoteur, dans de l’eau chaude savonneuse puis rincez-les et séchez-les
complètement. Toutes les pièces à l’exception du socle moteur peuvent aller au
lave-vaisselle à condition d’être placés en haut. Le bloc moteur peut s’essuyer avec
un chiffon propre et humide.
Centrifugeuse Accessoire Mélangeur En Option
Remarque : Pendant l’assemblage, ne forcez jamais pour mettre une pièce en
place. Si les pièces sont bien alignées, elles s’enclenchent facilement. L’utilisation
d’une force excessive pourrait endommager les pièces.
Centrifugeuse Mélangeur Optionnel
Poussoir 11 Couvercle
1 2 Couvercle de la centrifugeuse 12 Bocal à mélanger
3 Lame de la centrifugeuse 13 Joint d’étanchéité 4 Bol filtreur 14 Lames 5 Entraînement moteur 15 Socle à lames
Levier de verrouillage du
6
couvercle
7 Socle moteur
Commutateur de mise en
8
route et sélecteur de vitesse 9 Récepteur de jus 10 Récepteur de pulpe
16 Capuchon du couvercle
4
Page 21
1. Placez le bol filtreur sur le socle moteur en alignant la goulotte de sortie du jus sur l’encoche du socle moteur. Enfoncez-le avec une légère torsion jusqu’à ce qu’il soit bien à plat.
Étape 1
2. Placez la lame centrifugeuse dans le bol filtreur. Tournez-la un peu si
nécessaire pour l’aligner avec l’entraînement moteur et enfoncez fermement
jusqu’à ce que la lame centrifugeuse soit serrée et au même niveau que le haut
du bol filtreur. ATTENTION : Il existe de nombreuses lames coupantes pour la
transformation des fruits et légumes. Faites attention pendant le maniement de
la lame centrifugeuse pour réduire tout risque de blessure.
Étape 2
3. Centrez le couvercle de la centrifugeuse sur le bol filtreur et alignez-le
soigneusement de sorte que la sortie de pulpe soit assise à l’intérieur des bords
du bol filtreur.
Étape 3
Étape 3A
5
Page 22
4. Ramenez le levier de verrouillage au-dessus du couvercle de la centrifugeuse et
enclenchez-le en place. Assurez-vous que le levier de verrouillage est
solidement en place des deux côtés de la centrifugeuse.
Étape 4
5. Glissez le récepteur de pulpe en place sous la sortie de pulpe du couvercle de
la centrifugeuse.
Étape 5
Étape 4A Étape 4B
6
Page 23

6. Alignez et glissez le poussoir dans le couvercle de la centrifugeuse.
Étape 6
7. Votre centrifugeuse est maintenant prête à fonctionner.
8. Placez l’appareil sur une surface sèche, plane et résistante à la chaleur, loin du
bord.
9. Branchez le cordon dans une prise secteur de 120 volts CA uniquement.
10. Faites fonctionner la centrifugeuse pendant quelques secondes en mode
d’impulsion (commutateur sur « P ») pour vérifier que tout fonctionne bien et
que tous les interrupteurs de sécurité sont en position de marche. Si la
centrifugeuse ne se met pas en route, débranchez l’appareil du secteur,
démontez et vérifiez l’alignement de toutes les pièces pour vous assurer
qu’elles sont bien positionnées. Remarque : Ne faites pas tourner la
centrifugeuse à sec pendant plus de quelques secondes car le fonctionnement
à sec pendant une période prolongée pourrait endommager la centrifugeuse.
10
Étape
7
Page 24

UTILISATION DE VOTRE CENTRIFUGEUSE
1. Placez l’appareil sur une surface sèche, plane et résistante à la chaleur, loin du
bord. Remarque : Ne faites pas fonctionner l’appareil dans un emplacement ou
de la poussière ou de la farine pourrait être aspirée dans les prises d'air car cela
endommagerait l'appareil.
2. Assemblez la centrifugeuse en suivant les instructions données à la section
« Assemblage De Votre Centrifugeuse ».
3. Préparez vos fruits et légumes en les lavant et, si nécessaire, en les coupant
pour pouvoir les faire passer par l'embouchure (ou cheminée d'alimentati on)
située sur le couvercle de la centrifugeuse.
4. Branchez le cordon dans une prise secteur de 120 volts CA uniquement.
5. Placez le récepteur de jus ou un autre récipient sous la goulotte de sortie du jus.
Assurez-vous que la goulotte de sortie du jus est ouverte en la poussant vers le
bas. Elle est ouverte vers le bas, fermée vers le haut.
Goulotte De Sortie De Jus en Position
Fermée
Goulotte De Sortie De Jus en Position
Ouverte
6. Mettez la centrifugeuse en marche en sélectionnant une vitesse : « 1 » (basse)
ou « 2 » (haute). Référez-vous aux « Directives D’Emploi De La Centrifugeuse »
de ce manuel pour le choix des vitesses recommandées.
7. Pendant que le moteur tourne, retirez le poussoir et commencez à mettre la
nourriture dans l’embouchure. Quand l’embouchure est plei ne aux trois-quarts,
alignez et glissez le poussoir dans l’embouchure, en poussant lentement la
nourriture vers la lame. Remarque : Pour extraire le plus de jus possible,
exercez une pression lente et constante sur le poussoir. ATTENTION : Pour
réduire les risques de blessure, n’utilisez jamais les doigts ou tout objet autre
que le poussoir pour pousser la nourriture vers les lames.
Le jus devrait comnmencer à sortir de la goulotte. Si le jus ne commence pas à
couler, assurez-vous que la goulotte de sortie est bien ouverte. Remarque : Si
le moteur semble avoir du mal à tourner, essayez une des solutions suivantes :
a. Augmentez la vitesses du moteur.
b. Réduisez la pression exercée sur le poussoir et poussez plus
lentement.
c. Éteignez la centrifugeuse en mettant le commutateur sur « O »,
débranchez du secteur et retirez toute obstruction.
Continuez d’ajouter de la nourriture jusqu’à ce que vous ayez la quantité de jus
souhaitée.
8
Page 25

Remarque : Ne faites jamais fonctionner la centrifugeuse en continu pendant des
périodes prolongées : ne dépassez jamais cinq (5) minutes. Pour une extraction du
jus optimale et pour prolonger la vie de votre appareil, éteignez-le (commutateur sur
« O ») après environ une à deux minutes d’extraction continue. Nettoyez le
couvercle et la lame de la centrifugeuse et, si nécessaire, videz le réservoir à pulpe
avant de recommencer.
8. Quand toute la nourriture dans le bol filtreur a été transformée et que le jus ne
coule plus, éteignez la centrifugeuse (commutateur sur « O »). Remarque :
Fermez la goulotte de sortie du jus pour pouvoir retirer le récipient de jus sans
qu’il y ait de gouttes.
9. Ajoutez du sucre, du sel ou tout autre ingrédient au jus en fonction du goût et à
votre santé!
10. Débranchez la centrifugeuse, démontez-la et nettoyez toutes les pièces en
suivant les instructions de la section « Nettoyage De La Centrifigeuse »
présentées dans ce manuel. Remarque : Pour un nettoyage plus facile, rincez
immédiatement toutes les pièces après chaque extraction pour empêcher que
les résidus du processus ne sèchent sur les pièces.
DIRECTIVES D'EMPLOI DE LA CENTRIFUGEUSE
• Lavez toujours tous les aliments tels que fruits et légumes avant d’en extraire le
jus.
• Il faut garder les aliments périssables au réfrigérateur avant d’en extraire le jus.
En général, il est toujours recommandé de réfrigérer les fruits et légumes avant
d’en extraire le jus.
• Le jus de fruit frais est un produit d’aliments frais et ne contient aucun agent de
conservation. Pour garder la fraîcheur avec un maximumn de vitamines,
consommez le jus aussitôt que possible. Placez immédiatement le jus non
consommé au réfrigérateur.
• Il faut éplucher certains aliments avant de les passer à la centrifugeuse si leur
peau est trop dure ou si elle a mauvais goût. Par exemple : agrumes, bananes,
melons et ananas.
• Dénoyautez toujours les aliments à noyau ou graines dures. Par exemple :
pêches, cerises et prunes.
• Passez les aliments mous à vitesse basse « 1 », et les aliments plus solides à
vitesse haute « 2 ».
• Les fruits mous ou trop mûrs peuvent boucher la centrifugeuse. Dans ce cas,
mettez le commutateur du socle moteur sur « O » pour l’arrêter, débranchez
l’appareil de la prise secteur, démontez-le et nettoyez les pièces.
• Les légumes en vrac ou en feuilles doivent être groupés ensemble ou combinés
avec des aliments plus solides pour obtenir le meilleur résultat.
• Ne faites jamais fonctionner la centrifugeuse en continu pendant des périodes
prolongées car vous la feriez surchauffer. En cas de surchauffe, le socle moteur
s’éteint automatiquement. Il se réenclenchera et sera prêt à fonctionner de
nouveau après un délai de 10 à 15 minutes de repos.
9
Page 26

MONTAGE DU MÉLANGEUR (s’il est compris)
Avant d’assembler l’accessoire mélangeur, lavez toutes les pièces libres, sauf le
socle-moteur, dans de l’eau chaude savonneuse puis rince z -les et séchez-les
complètement. Toutes les pièces à l’exception du socle moteur peuvent aller au
lave-vaisselle à condition d’être placées en haut. Le bloc moteur peut s’essuyer avec
un chiffon propre et humide.
1. Placez le bocal à l’envers sur la table ou le comptoir, donc avec la partie
inférieure en haut. Remarque : Ne mettez pas le bocal à mélanger en verre
directement sur une surface très dure telle que de la céramique ou du granit.
Vous pourriez endommager le verre.
2. Centrez le joint d’étanchéité sur le bord du bocal à mélanger.
3. Placez la lame sur le joint d'étanchéité. Serrez le socle à lames sur le fond du
bocal à mélanger, en le vissant dans le sens des aiguilles d’une montre.
4. Mettez l’ensemble mélangeur sur le socle moteur.
5. Positionnez le couvercle du bocal à mélanger en l’enfonçant dans le bocal et en
veillant à ce qu'il soit bien aligné de façon à recouvrir le bec verseur pour rendre
le bocal étanche.
6. Placez le capuchon sur le couvercle en alignant les languettes sur les
ouvertures réceptrices. Tournez d’un quart de tour pour verrouiller l’ensemble.
MODE D’EMPLOI DU MÉLANGEUR (s’il est compris)
1. Placez l’appareil sur une surface sèche, plane et résistante à la chaleur, loin du
bord. Remarque : Ne faites pas fonctionner l’appareil dans un emplacement ou
de la poussière ou de la farine pourrait être aspirée dans les prises d'air car cela
endommagerait l'appareil.
2. Mettez l’ensemble mélangeur sur le socle moteur.
3. Branchez le cordon dans une prise secteur de 120 volts CA uniquement.
4. Mettez d’abord les liquides dans le bocal à mélanger sauf indication contraire
donnée dans la recette.
5. Préparez les ingrédients à mélanger en coupant tous les ingrédients solides
(fruits, légumes, etc.) en morceaux de même taille, environ 2 cm
6. Placez le couvercle sur le bocal à mélanger.
7. Mettez le capuchon en place sur le couvercle. Remarque : Gardez toujours une
main sur le bocal à mélanger, ou sur le couvercle, pendant le fonctionnement du
mélangeur.
8. Mélangez les aliments selon les instructions de la recette ou jusqu’à l’obtention
des résultats souhaités. Remarque : S’il est nécessaire de racler ou de touiller
le contenu, éteignez le mélangeur en mettant le commutateur sur « O » et
débranchez l’appareil de la prise secteur. N’utilisez pas d’ustensiles en métal
pour touiller car ils pourraient rayer le bocal.
9. Vous pouvez retirez le capuchon du couvercle en cours de mélange pour
ajouter des ingrédients. ATTENTION : Pour éviter les risques de blessures, ne
retirez pas le couvercle en cours de mélange. Attendez que les lames soient
totalement immobiles avant de retirer le couvercle.
3
.
10
Page 27

Broyage de la glace
1. Remplissez le bocal à mélanger d’environ 50 cl d’eau (2 tasses). Ajoutez la
quantité souhaitée de glaçons.
2. Recouvrez le bocal à mélanger du couvercle et celui-ci de son capuchon.
3. Quand vous broyez de la glace, stabilisez le mélangeur en plaçant la paum e de
la main sur le couvercle. Mettez le bouton de commande sur « P » (pulsation)
pendant 1 seconde et relâchez-le. Faites une pause d’environ 2 secondes et
recommencez le broyage par impulsion en mettant le commutateur sur « P »
jusqu’à ce que vous ayez obtenu la consistance souhaitée.
4. Videz l'eau.
ASTUCE : il faut environ 12 glaçons (2 tasses) pour obtenir la consistance d’une
barbotine.
11
Page 28

NETTOYAGE DE VOTRE CENTRIFUGEUSE
Nettoyez le bol filtreur muni de la lame centrifugeuse avec prudence. Essuyez
l’extérieur avec un chiffon humide et contentez-vous de simplement rincer l’intérieur.
Démontez et nettoyez conformément aux instructions ci-dessous :
1. Arrêtez l'appareil en mettant le commutateur sur « O » et débranchez-le.
2. Démontez la centrifugeuse. Remarque : Le bol filtreur peut encore contenir un
fond de liquide. Mettez la goulotte de sortie du jus en position fermée et retirez
soigneusement le bol filtreur et la lame de la centrifugeuse. Videz le liquide et
mettez la lame de la centrifugeuse dans l’évier. ATTENTION : Il existe de
nombreuses petites lames coupantes sur la lame de la centrifugeuse. Faites
très attention et soyez particulièrement prudent pendant le retrait et le
maniement de la lame centrifugeuse afin de réduire tout risque de blessure.
3. Lavez toutes les pièces libres, sauf le socle-moteur, dans de l’eau chaude
savonneuse puis rincez-les et séchez-les complètement. Toutes les pièces à
l’exception du socle moteur peuvent aller au lave-vaisselle à condition d’être
placées en haut. Le bloc moteur peut s’essuyer avec un chiffon propre et
humide. ATTENTION : Ne plongez jamais le socle moteur dans de l’eau ou
d’autres liquides car cela l’endommagera.
4. Faites particulièrement attention lors du nettoyage de la lame de la
centrifugeuse qui est faite d’un tamis très fin. Si nécessaire, nettoyez l’intérieur
de la lame centrifugeuse avec une brosse en nylon. N’utilisez pas de brosse
métallique. Observez la lame de la centrifugeuse à contre-jour pour voir si le
tamis est bien propre et ouvert. ATTENTION : Afin de réduire tout risque de
blessure, n’utilisez pas cet appareil si la lame centrifugeuse présente une usure
excessive ou si elle est endommagée. Inspectez la lame centrifugeuse apr ès
chaque utilisation.
Remarque : Certains fruits et légumes peuvent tacher les pièces en plastique. Pour
réduire les risques de taches, rincez et nettoyez toutes les pièces immédiatement
après l’extraction du jus. Si vous voyez des taches, trempez les pièces dans de l’eau
contenant 10% de jus de citron. Ne trempez jamais les pièces dans de l’eau de javel
ou tout autre produit chimique fort.
NETTOYAGE DU MÉLANGEUR (s’il est compris)
1. Arrêtez l'appareil en mettant le commutateur sur « O » et débranchez-le.
2. Essuyez le socle moteur, le commutateur et le cordon avec un chiffon ou une
éponge humide. Au besoin, vous pouvez utiliser un détergent doux, non abrasif.
3. Pour nettoyer le bocal à mélanger, démontez toutes les pièces. Lavez
soigneusement toutes les pièces à l’exception du socle-moteur, dans de l’eau
chaude savonneuse puis rincez-les et séchez-les complètement. Toutes les
pièces à l’exception du socle moteur peuvent aller au lave-vaisselle à
condition d’être placées en haut.
4. Rangez le bocal à mélanger sans son couvercle pour éviter les odeurs.
12
Page 29

VÉRIFICATION-DÉPANNAGE
LE MOTEUR NE SE MET PAS EN ROUTE QUAND ON ALLUME L’APPAREIL :
Pas d’alimentation :
• Vérifiez la source d'électricité.
Assemblage incorrect :
• Il est possible qu'une des pièces soit mal assemblée (position,
alignement, assise) de sorte que les interrupteurs de sécurité ne sont
pas en position de marche. Vérifiez le bon assemblage de chaque
pièce et assurez-vous que le levier de verrouillage est bien verrouillé
en place.
Surchauffe du moteur :
• Vérifiez que le moteur n’a pas produit trop d’effort à la suite d’une
vitesse, d’une pression ou d’une charge excessives pendant
l’extraction du jus ou le mélange.
• Vérifiez que la lame centrifugeuse, le socle à lames du mélangeur, le
couvercle de la centrifugeuse ou le réservoir à pulpe ne sont pas
bouchés.
• Si le moteur fonctionne continuellement pendant plus de cinq minutes,
il y a un risque de surchauffe et le socle moteur s'éteint
automatiquement. Le socle moteur se réenclenchera et sera prêt à
fonctionner de nouveau après un délai de 10 à 15 minutes de repos.
• Vérifiez qu’aucune poudre, poussière ou liquide n’a été aspirée vers le
moteur à travers les prises d’air situées sous l’appareil.
LE MOTEUR CALE :
Introduction des aliments trop dynamique :
• Atendez quelques secondes pour que le moteur puisse atteindre sa
vitesse de fonctionnement avant d’ajouter les aliments.
• Réduisez la pression exercée sur le poussoir et poussez plus
lentement.
Obstruction :
• Les fruits mous ou trop mûrs et les légumes à feuilles peuvent boucher
la centifugeuse. Dans ce cas, nettoyez la centrifugeuse en suivant les
instructions de nettoyage et essayez d'ajouter des fruits ou des
légumes dont la chair est plus ferme.
• Pour l’extraction d’une grande quantité de jus, éteignez l’appareil après
deux minutes d’extraction, nettoyez-le et laissez-le reposer pendant 10
minutes.
Trop de pulpe dans la lame centrigeuse et le couvercle :
• Vérifiez que la lame centrifugeuse est bien nettoyée et que le tamis
n’est pas recouvert de débris.
Mélangeur bloqué ou surchargé :
• Essayez d’utiliser des impulsions « P » pour débloquer les aliments. Si
cela ne résout pas le problème, arrêtez l’appareil en mettant le
commutateur sur « O » et retirez les aliments qui sont la cause du
blocage.
• Mélangez de plus petites quantités de nourriture à la fois.
13
Page 30

LA PULPE EST TROP HUMIDE OU IL N’Y A PAS DE SORTIE DE JUS :
La goulotte de sortie du jus est bouchée :
• Assurez-vous que la goulotte de sortie du jus est propre et ouverte en
position basse.
Trop de pulpe :
• Nettoyez la lame centrifugeuse, le couvercle de la centrifugeuse et le
bol filtreur.
• Ralentissez le processus d’extraction du jus en appuyant moins sur le
poussoir.
LA CENTRIFUGEUSE FUIT :
• Vérifiez que toutes les pièces sont propres et correctement installées.
• Assurez-vous que la goulotte de sortie du jus est ouverte et qu’elle
n’est pas bouchée.
LE BOCAL À MÉLANGER FUIT :
• Vérifiez que le joint d’étanchéité est bien en place, qu’il est
correctement assis et qu’il n’est pas endommagé.
• Vérifiez que le socle à lames et le bocal à mélanger ne sont pas fêlés.
N’utilisez pas l’appareil si une des pièces manque ou si elle est
endommagée.
14
Page 31

GARANTIE DU PRODUIT
Garantie de l’appareil limitée à 1 an
Focus Electrics, LLC garantit cet appareil contre tout défaut de pièce et de main d’œuvre
pendant un (1) an à compter d el date d’achat d’origine avec un justificatif d’achat à condition
que l’appareil soit utilisé et entretenu conformément avec le Mode d’emploi de Focus Electrics.
Toute pièce défectueuse de l’appareil sera réparée ou remplacée sans frais à la discrétion de
Focus Electrics. Cette garantie s’applique en cas d’utilisation domestique en intérieur
uniquement.
La présente garantie ne couvre aucun dommage, notamment la décoloration, de toute surface
antiadhésive de l’appareil. Cette garantie est nulle et non avenue, tel que déterminé
uniquement par Focus Electrics si l’appareil est détérioré à la suite d’un accident, d’une
mauvaise utilisation, d’une utilisation abusive, d’une négligence, d’une rayure ou si l’appareil
est modifié de toute manière.
LA PRÉSENTE GARANTIE ANNULE ET REMPLACE TOUTE GARANTIE INDUITE,
NOTAMMENT LES GARANTIES DE COMMERCIALISATION, D’ADAPTATION À UN USAGE
PARTICULIER, DE PERFORMANCE, OU AUTRE QUI SONT ICI EXCLUES. EN AUCUN CAS
FOCUS ELECTRICS. NE POURRA ÊTRE TENUE POUR RESPONSABLE DE TOUT
DOMMAGE, QUE CELUI-CI SOIT DIRECT, INDIRECT, INDUIT, PRÉVISIBLE, SECONDAIRE
OU PARTICULIER, RÉSULTANT DE L’UTILISATION DE OU EN RELATION AVEC CET
APPAREIL.
Si vous pensez que cet appareil est défectueux ou nécessite des réparations pendant la durée
de sa garantie, veuillez contacter le Service clientèle de Focus Electrics au (866) 290-1851 ou
nous envoyer un e-mail à service@focuselectrics.com
d’origine sera nécessaire pour toute demande dans le cadre de la garantie, les factures
manuscrites ne sont pas acceptées. Il possible que l’on vous demande de renvoyer l’appareil
pour inspection et évaluation. Les frais de transport de retour ne sont pas remboursables.
Focus Electrics n’est pas responsable pour les retours perdus pendant le transport.
Valide uniquement aux USA et au Canada
. Une facture justifiant la date d’achat
PIECES DE RECHANGE
Les pièces de rechange, si elles sont disponibles, peuvent être commandées directement chez
Focus Electrics, LLC de plusieurs façons. Commandez en ligne à www.focuselectrics.com
courriel à service@focuselectrics.com
, par téléphone au (866)290-1851, ou en écrivant à :
Focus Electrics, LLC
Attn: Customer Service
P. O. Box 2780
West Bend, WI 53095
Pour les commandes payées par chèque ou mandat, veuillez d'abord prendre contact avec le
service à la clientèle pour obtenir le montant total de la commande. Envoyez votre paiement
avec une lettre indiquant le modèle ou le numéro de catalogue de votre appareil (ce numéro
est situé au-dessous ou au dos de l’appareil) et fournissez une description de la pièce ou des
pièces ainsi que la quantité que vous souhaitez commander. Les chèques sont à écrire à
l'ordre de Focus Electrics, LLC. Les taxes sur les ventes de votre état ou province et des frais
d’expédition seront ajoutés à votre prix
traitement et la livraison
Ce manuel contient des infor mations importantes et utiles concernant l’utilisation et l’entretien sans
danger de votre nouveau produit Focus Electrics. Pour une consultation ultérieure, fixez le ticket de
caisse daté pour avoir un justificatif d’achat pour la garantie et indiquez les informations ci-dessous:
Date d’achat ou de réception en cadeau : _____________________________________________
Lieu d’achat et prix, si connu : ______________________________________________________
Numéro de l’article et Code de date (indiqué au bas/dos du produit) : _______________________
total. Il faut compter environ deux semaines pour le
, par
L5711A 06/08 West Bend®, une Marque de Focus Electrics, LLC. Imprimé en Chine
15
Page 32

Page 33

EXTRACTOR DE JUGOS
(CON ACCESORIO OPCIONAL PARA LICUAR)
Manual de instrucciones
Registre éste y otros productos de Focus Electrics en nuestro sitio:
Precauciones Importantes........................................................................................2
Precauciones De Funcionamiento ...........................................................................3
Ensambladura De Su Extractor de Jugo.................................................................. 4
Cómo Usar El Extractor de Jugos............................................................................ 8
Pautas Para Exprimir ...............................................................................................9
Ensambladura Del Accesorio Para Licuar (de ser incluido) ...................................10
Cómo Usar El Accesorio Para Licuar (de ser incluido)...........................................10
Limpieza Del Extractor De Jugos........................................................................... 12
Limpieza De Su Accesorio Para Licuar (de ser incluido)........................................12
Resolución De Problemas......................................................................................13
Garantía.................................................................................................................15
CONSERVE ESTE MANUAL DE INSTRUCCIONES COMO REFERENCIA PARA
www.focuselectrics.com en Internet
EL FUTURO
© 2008 West Bend®, una Marca de Focus Electrics, LLC.
www.focuselectrics.com
Page 34

PRECAUCIONES IMPORTANTES
Para evitar lesiones personales o daños materiales, lea y acate todas las
instrucciones y advertencias.
Al utilizar aparatos eléctricos, siempre deben acatarse las precauciones básicas de
seguridad incluyendo las siguientes:
• Lea todas las instrucciones, incluyendo estas precauciones importantes, así
como las instrucciones de uso y cuidado en este manual.
• Para protegerse contra descargas eléctricas no sumerja el cable, enchufes, u
otras partes eléctricas en agua u otros líquidos.
• Se requiere de supervisión adulta cuando cualquier artefacto electrodoméstico
sea usado por o cerca de niños.
• Desenchufe el artefacto electrodoméstico del tomacorriente cuando no esté en
uso, antes de colocarle o quitarle partes y antes de limpiarlo.
• Evite contato con piezas en movimiento.
• No haga funcionar este artefacto electrodoméstico con el cordón eléctrico o el
enchufe dañado, después que el artefacto llegase a funcionar mal, o si el
artefacto se ha dejado caer o se ha dañado de alguna manera.Si usted
experimenta algún problema con su máquina, desenchúfela inmediatamente del
tomacorriente. Para información relativa al servicio de reparaciones vea la
página de garantías.
• El uso de accesorios, incluso jarras de enlatado, no recomendados o vendidos
por Focus Electrics puede causar incendios, descargas eléctricas o lesions.
• No use este aparato a la intemperie.
• No deje colgar el cordón eléctrico sobre el borde de una mesa o encimera.
• No permita que el cordón haga contacto con la superficie caliente de la estufa.
• Vérifiez que le couvercle de la centrifugeuse soit bien verrouillé en place a v ant
de mettre le moteur en route. Ne déverrouillez rien pendant le fonctionnement
de l’appareil.
• Veillez à mettre le commutateur en position d’arrêt (OFF) après chaque
utilisation de votre centrifugeuse. Vérifiez toujours que le moteur est
complètement arrêté avant de démonter l’appareil.
• Ne mettez pas les doigts ou tout autre objet dans la centrifugeuse quand elle
fonctionne. Si de la nourriture se coince dans l’embouchure, utilisez un poussoir
ou un autre fruit ou légume pour le faire passer. Si cette méthode est
impossible, éteignez le moteur, débranchez l’appareil et démontez la
centrifugeuse pour retirer les aliments qui restent..
• N’utilisez pas l’appareil si le tamis rotatif est endommagé.
• Cuando se esté licuando, mantenga las manos y utensilios fuera de la jarra de
la licuadora para reducir el riesgo de lesiones graves a personas o daños a la
licuadora. Puede usarse un raspador, pero sólo cuando la licuadora esté
apagada y desenchufada del tomacorriente.
• Las cuchillas son afiladas; manipúlelas con cuidado.
• Para reducir el riesgo de lesiones, nunca coloque las cuchillas del ensamble del
cortador en la base sin la jarra de la licuadora correctamente colocada.
• Siempre haga funcionar el artefacto electrodoméstico con la tapa puesta.
2
Page 35

• Al mezclar líquidos calientes, retire la pieza central de la tapa de dos partes.
• Este artefacto tiene un enchufe polarizado (una clavija es más ancha que la
otra). Para reducir el riesgo de descarga eléctrica, este enchufe está diseñado
para encajar de una sola manera en un tomacorriente polarizado. Invierta el
enchufe si éste no encaja completamente en el tomacorriente o en el cable de
extensión. Si todavía no encaja, póngase en contacto con un electricista
calificado. No trate de modificar el enchufe de manera alguna.
• Para asegurar la protección permanente contra el riesgo de descargas
eléctricas, conecte solamente a enchufes debidamente conectados a tierra.
• Para uso doméstico solamente.
Para evitar lesiones personales o daños materiales, lea y acate todas las
instrucciones y advertencies.
PRECAUCIONES DE FUNCIONAMIENTO
• Todas las piezas provistas con este artefacto electrodoméstico están diseñadas
para usarse solamente con el mismo. No use ninguna pieza provista con
cualquier otro artefacto electrodoméstico o aplicación.
• No coloque ninguna pieza sobre una superficie caliente o en un horno caliente.
• No lo use si alguna pieza está rajada, desconchada, floja, debilitada o de
alguna manera dañada.
• No limpie ninguna pieza con productos de limpieza, almohadillas de virutas de
acero u otros materiales abrasivos.
• Siempre asegúrese de que el motor se haya parado completamente antes de
desmontar el artefacto.
• Siempre sostenga la jarra de licuar al procesar para darle e s tabilidad al
artefacto.
• No deje el artefacto desatendido mientras esté funcionando.
• No desarme o retire ninguna pieza de la base hasta que el motor se haya
parado completamente.
• Se suministra un cordón eléctrico corto para reducir los riesgos que resultan de
enredarse o tropezarse con un cordón eléctrico más largo.
• Hay disponibles cordones de alimentación eléctrica desmontables más largos o
extensiones eléctricas y pueden ser utilizados si se ejerce cuidado al usarlos.
Mientras el uso de una extensión eléctrica no es recomendado, si usted debe
usar una, la capacidad eléctrica nominal marcada en el cordón desmontable de
alimentación eléctrica o la extensión eléctrica deberá ser al menos la mis m a
que la capacidad eléctrica nominal del artefacto electrodoméstico. Si el
artefacto electrodoméstico es del tipo conectado a tierra, la extensión eléctrica
deberá ser un cordón eléctrico de 3 hilos con conexión a tierra. El cordón
eléctrico debería ser extendido de tal manera que no pase sobre encimeras o
mesas donde pueda ser tirado por niños o tropezarse con el mismo.
• No trate de reparar este aparato usted mismo.
• No utilice el aparato para usos distintos del indicado.
CONSERVE ESTAS INSTRUCCIONES
3
Page 36

ENSAMBLADURA DE SU EXTRACTOR DE JUGO
Antes de ensamblar el extractor de jugos, lave todas sus partes, excepto la base
del motor, en agua jabonosa tibia, enjuáguelas a fondo y séquelas. Todas las
partes excepto la base del motor pueden lavarse en la rejilla superior del
lavavajillas. La base del motor puede limpiarse con un paño húmedo.
Extractor De Jugo Accesorio Opcional Para Licuar
Nota: Al ensamblar, no fuerce ninguna de las piezas en su lugar. Cuando las
piezas están correctamente alineadas éstas encajarán fácilmente en su lugar. El
usar fuerza excesiva podría dañar las piezas.
Extractor De Jugos Accesorio Opcional Para Licuar
1 Empujador de alimentos 11 Tapa 2 Tapa del Exprimidor 12 Jarra de Licuar 3 Cuchilla del Exprimidor 13 Anillo de Sellado 4 Tazón con Filtro 14 Ensambladura de la Cuchilla 5 Motor 15 Base de l a Cuchilla
Brazo de Cierre de la
6
Tapa
7 Base del Motor
Interruptor de
8
Encendido/Velocidad 9 Recipiente de Jugo 10 Recipiente de la Pulpa
16 Tapón de la Tapa
4
Page 37
1. Coloque el tazón con filtro sobre la base del motor alineando el pico de la salida del jugo sobre la muesca en la base del motor. Haga presión con un leve movimiento de giro hasta que se asiente en su lugar.
Paso 1
2. Coloque la cuchilla del exprimidor en el tazón con filtro. Gírela si fuese
necesario para alinearla con el motor y presiónela firmemente hasta que quede
bien apretada y a ras con la parte superior del tazón con filtro. PRECAUCIÓN:
Hay muchas pequeñas cuchillas afiladas para procesar las frutas y verduras.
Tenga cuidado al manipular la cuchilla del exprimidor para reducir el riesgo de
lesionarse.
Paso 2
3. Centre la tapa del exprimidor el tazón con filtro y con cuidado alinee la misma
de manera que la tolva de salida de la pulpa quede dentro de los bordes del
tazón con filtro.
Paso 3
Paso 3A
5
Page 38

4. Gire el brazo de cierre de la tapa por encima de la tapa del exprimidor y
encájelo en su lugar. Asegúrese de que el brazo de cierre de tapa esté bien
asegurado a ambos lados del exprimidor.
Paso 4
Paso 4A Paso 4B
5. Deslice el recipiente de pulpa en su lugar debajo de la tolva de salida d e la
pulpa de la tapa de exprimidor.
Paso 5
6
Page 39
6. Alinee y deslice el empujador de alimentos hacia abajo dentro de la tapa de
exprimidor.
Paso 6
7. El extractor de jugos está ahora lista para usarse.
8. Coloque el artefacto electrodoméstico sobre una superficie seca, nivelada y
resistente al calor, y lejos de cualquier borde.
9. Enchufe el cordón eléctrico solamente a un tomacorriente de corriente alterna
de 120 voltios.
10. Encienda el extractor de jugos durante unos segundos usando la pulsación, con
el interruptor en la posición “P”, para asegurarse de que todo funciona y todos
los interruptores de seguridad han sido activados. Si el exprimidor no se
encendiese, desenchufe del tomacorriente, desármelo y compruebe la
alineación de todas las piezas para asegurarse de que están correctamente
colocados. Nota: Mientras esté seco, no opere el exprimidor por más de unos
segundos ya que períodos prolongados de operación en seco podrían ca usar
daños al exprimidor.
10
Paso
7
Page 40
CÓMO USAR EL EXTRACTOR DE JUGOS
1. Coloque el artefacto electrodoméstico sobre una superficie seca, nivelada y
resistente al calor, y lejos de cualquier borde. Nota: No haga funcionar este
artefacto electrodoméstico donde polvo o harina puedan ser succionados por
las aberturas de ventilación, puesto que esto causará daños al mismo.
2. Arme el extractor de jugo según las instrucciones de “Ensambladura Del
Extractor De Jugo.
3. Prepare las frutas y verduras lavándolas, y si fuese necesario, cortándolas a un
tamaño que quepa en la tolva de alimentación de la tapa del exprimidor.
4. Enchufe el cordón eléctrico solamente a un tomacorriente de corriente alterna
de 120 voltios.
5. Coloque el recipiente de jugo proporcionado u otro recipient e bajo el pico de
salida del jugo. Asegúrese de que el pico de salida del jugo esté abierto
apretándolo hacia abajo. Hacia abajo está abierto, hacia arriba está cerrado.
Pico De Salida Del Jugo En Posición
Cerrada
6. Encienda el exprimidor seleccionando una velocidad; “1” (baja) o “2" (alta) .
Consulte la sección "Pautas Para Exprimir” de este manual para la selección de
la velocidad recomendada.
7. Mientras funcione el motor, retire el empujador de alimentos y comience a
colocar el alimento en la tolva de alimentos. Cuando la tolva esté alrededor de
¾ llena, alinee y deslice el empujador de alimentos dentro de la tolva de
alimentos, lentamente empujando el alimento hacia la cuchilla. Nota: Para una
extracción máxima, presione el empujador de alimentos hacia abajo de fo rma
lenta y constante. PRECAUCIÓN: Para reducir el riesgo de lesión, nunca use
sus dedos o cualquier artículo diferente al empujador de alimentos para apretar
el alimento en las cuchillas.
El jugo debería comenzar a manar del pico de la salida del jugo. Si el jugo no
comienza a fluir como se espera, asegúrese de que el pico de salida del jugo
esté abierto. Nota: Si el motor pareciera estarse forzando intente uno de lo
siguientes:
Siga añadiendo más alimento hasta que la cantidad deseada de jugo haya sido
extraída.
extraída.
a. Aumente la velocidad del motor.
b. Reduzca la cantidad de presión y velocidad sobre el empujador de
c. Apague el exprimidor l levando el selector a "0", desenchúfelo y
alimentos.
limpie cualquier obstrucción.
ento hasta que la cantidad deseada de jugo haya sido
Pico de Salida Del Jugo En Posición
Cerrada
8
Page 41

Nota: El exprimidor no debería ser puesto a funcionar de manera continua
durante un período prolongado de tiempo; en ningún caso más de cinco (5)
minutos. Para la mejor extracción de jugo y para ayudar a prolongar la vida del
exprimidor, gire el exprimidor a “0” (apagado) después de aproximadamente
uno a dos minutos de exprimir de manera continua. Limpie la tapa de
exprimidor y la cuchilla del exprimidor y si fuese necesario vacíe el reci piente de
pulpa antes de reanudar.
8. Cuando todo el alimento en el tazón con filtro haya sido procesado y el jugo ya
no fluya del pico de salida del jugo, apague el exprimidor colocando el selector
en la posición “0” (apagado). Nota: Cierre el pico de salida del jugo para poder
retirar el recipiente de jugo sin que éste gotee.
9. Añada al gusto azúcar, sal, u otros ingredientes al jugo, ¡y disfrútelo!
10. Desenchufe el exprimidor, desármelo y limpie todas las partes según las
instrucciones proporcionadas en la sección “Limpieza del Extractor de Jugos”
de este manual. Nota: Para una limpieza más fácil, enjuague todas las partes
inmediatamente después de exprimir para impedir que los residuos de jugo se
sequen sobre las partes.
PAUTAS PARA EXPRIMIR
• Siempre lave todos los alimentos, frutas y verduras antes de exprimirlos.
• Los artículos perecederos deben ser refrigerados antes de exprimirlos. La
refrigeración es recomendada para otras frutas y verduras antes de exprimirlas.
• El jugo fresco es un producto de los alimentos frescos y no contiene ningún
preservativo. Para mantener la frescura y el mayor contenido de vitaminas,
consúmalos cuanto antes después exprimirlos. Todo el jugo debería ser
refrigerado inmediatamente si no es consumido.
• Ciertos alimentos debería pelarse antes de exprimirlos si su piel misma es
demasiado dura o no apetecible. Ejemplos incluyen; cítricos, plátanos, melones
y piñas.
• Siempre deshuese los alimentos con semillas duras, huesos o piedras.
Ejemplos incluyen; cerezas, melocotones y ciruelas.
• Los alimentos de textura suave deberán ser exprimidos a la velocidad más baja,
“1”, y los alimentos más firmes deberán ser exprimidos a la velocidad más alta,
“2”.
• Las frutas blandas o demasiado maduras puede atascar el exprimidor. Si esto
ocurriese, apague el motor colocando el selector de velocidades en la posición
“0” (apagado), desenchufe del tomacorriente, desarme y limpie las partes.
• Para los mejores resultados, los vegetales de hojas o sueltos deberían ser
atados en un fardo o combinados con un tipo de alimento más sustancial.
• El hacer funcionar el exprimidor continuamente durante un período prolongado
de tiempo puede causar sobrecalentamiento. Si esto sucediese, la base del
motor se apagará automáticamente, se restablecerá y estará lista para
funcionar después de aproximadamente 10 – 15 minutos de descanso.
9
Page 42

ENSAMBLADURA DEL ACCESORIO PARA LICUAR (de ser incluido)
Antes de ensamblar el extractor de jugos, lave todas sus partes, excepto la base
del motor, en agua jabonosa tibia, enjuáguelas a fondo y séquelas. Todas las
partes excepto la base del motor pueden ser lavadas en la rejilla superior del
lavavajillas. La base del motor puede limpiarse con un paño húmedo.
1. Coloque la jarra de licuar al revés sobre la mesa o encimera con el fondo hacia
arriba. Nota: No coloque la jarra de licuar de cristal directamente sobre una
superficie muy dura como la cerámica o el granito. El vidrio puede
desconcharse o dañarse.
2. Centre y coloque el anillo de sellado sobre el borde de la jarra de licuar.
3. Coloque el ensamble de la cuchilla encima del anillo de sellado. Enrosque y
asegure la base de la cuchilla en el fondo de la jarra de licuar dándole vueltas
en el sentido de las agujas del reloj.
4. Coloque la ensambladura de la jarra de licuar sobre la base del motor.
5. Coloque la tapa en la jarra de licuar presionándola en su lugar y asegurán dose
de que esté correctamente alineada de manera que cubra el pico de verter y
selle la jarra de licuar.
6. Coloque el tapón de la tapa en su sitio en la tapa alineando los rebordes sobre
las aperturas para los mismos. Déle un ¼ de vuelta en el sentido de las agujas
del reloj para asegurarlo en su lugar.
CÓMO USAR EL ACCESORIO PARA LICUAR (de ser incluido)
1. Coloque el artefacto electrodoméstico sobre una superficie seca, nivelada y
resistente al calor, y lejos de cualquier borde. Nota: No haga funcionar este
artefacto electrodoméstico donde el polvo o la harina puedan ser succionados
por las aberturas de ventilación, puesto que esto causará daños al mismo.
2. Coloque la jarra de licuar armada sobre la base del motor.
3. Enchufe el cordón eléctrico solamente a un tomacorriente de corriente alterna
de 120 voltios.
4. Primero vierta los líquidos en la jarra de licuar a menos que la receta pida una
secuencia de procesamiento alterna.
5. Prepare los ingredientes a licuar cortando todos los ingredientes sólidos (frutas,
verduras, etc.) en trozos cúbicos uniformes de ½ a 1 pulgada.
6. Coloque la tapa sobre la jarra de licuar.
7. Coloque el tapón de la tapa en su sitio en la tapa. Nota: Siempre coloque una
mano sobre la jarra de licuar o la tapa para estabilizar la licuadora mientras ésta
funciona.
8. Licue los alimentos según la receta o hasta lograr los resultados deseados.
Nota: Si se requiere raspar o remover el contenido, apague la licuadora girando
el selector a "0" (apagado) y desenchufe del tomacorriente. No use utensilios
metálicos para remover puesto que pueden rayar la jarra de licuar.
9. El tapón de la tapa puede ser retirado mientras se licua para añadir
ingredientes. PRECAUCIÓN: Para prevenir el riesgo de lesiones, no retire la
tapa mientras se esté licuando. Asegúrese de que las cuchillas han dejado de
girar antes de retirar la tapa.
10
Page 43

Trituración de Hielo
1. Llene la jarra de licuar con aproximadamente 2 tazas de agua. Añada la
cantidad deseada de cubitos de hielo.
2. Cubra la jarra de licuar con la tapa e inserte el tapón de la tapa.
3. Al triturar hielo, mantenga la licuadora estable con la palma de su mano sobre
la tapa. Gire el control de velocidad a "P" (pulsación) durante 1 segundo y
suéltelo. Pare durante aproximadamente 2 segundos y repita la pulsación (“P”)
durante 1 segundo hasta que el hielo quede triturado a la consistencia deseada.
4. Drene cualquier agua de exceso.
INDIRECTA: aproximadamente 12 cubos (2 tazas) de hielo resultan en una
consistencia de aguanieve.
11
Page 44

LIMPIEZA DEL EXTRACTOR DE JUGOS
Tenga precaución al limpiar el tazón con filtro con la cuchilla del exprimidor
ensamblada. Limpie el exterior con un paño húmedo, y sólo enjuague el interior.
Desmonte y limpie siguiendo las instrucciones abajo.
1. Apague el motor colocando el selector en la posición "0" (apagado) y
desenchufe del tomacorriente.
2. Desmonte el exprimidor. Nota: El tazón con filtro puede tener el líquido
remanente en el fondo. Con el pico de salida del exprimidor en la posición
cerrada, con cuidado retire el tazón con filtro y la cuchilla del exprimidor. Vacíe
el contenido líquido y la cuchilla del exprimidor en el fregadero. PRECAUCIÓN:
Hay muchas cuchillas pequeñas y afiladas en la cuchilla del exprimidor. Para
reducir el riesgo de lesiones, tenga extremo cuidado al retirar y manipular la
cuchilla del exprimidor.
3. Con cuidado lave todas las partes sueltas, excepto la base del motor, en agua
jabonosa tibia, enjuáguelas y séquelas a fondo. Todas las partes excepto la
base del motor pueden ser lavadas en la rejilla superior del lavavajillas. La
base del motor puede limpiarse con un paño húmedo. PRECAUCIÓN: Nunca
ponga la base del motor en agua u otro líquido puesto que la dañará.
4. Preste particular atención en limpiar correctamente la cuchilla del exprimidor, la
cual está construida con una malla filtrante muy fina que debe estar limpia y
abierta para el funcionamiento y extracción correctos. Si fuese necesario,
limpie el interior de la cuchilla del exprimidor con un cepillo de nilón. No use un
cepillo metálico. Sostenga la cuchilla del exprimidor contra la luz para
asegurarse de que la malla esté limpia y abierta. PRECAUCIÓN: Para reducir
el riesgo de lesiones, no use el artefacto electrodoméstico si la cuchilla del
exprimidor muestra un excesivo desgaste o daños. Inspeccione la cuchilla del
exprimidor después de cada limpieza.
Nota: Algunas frutas y verduras pueden manchar las partes plásticas. Para reducir
la posibilidad de manchas, enjuague y limpie todas las partes inmediatamente
después de exprimir. Si llegasen a mancharse, empape las partes en agua que
contenga 10% de jugo de limón. Nunca empape las partes en lejía u otros
productos químicos agresivos.
LIMPIEZA DE SU ACCESORIO PARA LICUAR (de ser incluido)
1. Apague el motor colocando el selector en la posición "0" (apagado) y
desenchufe del tomacorriente.
2. Limpie la base del motor y el cordón eléctrico con un paño húmedo o una
esponja. Para retirar puntos obstinados, use un producto de limpieza suave, no
abrasivo.
3. Para limpiar la jarra de licuar, desmonte todas las partes. Con cuidado lave
todas las partes excepto la base del motor en agua jabonosa tibia, enjuague y
seque a fondo. Todas las partes excepto la base del motor pueden ser
lavadas en la rejilla superior del lavavajillas.
4. Almacene la jarra de licuar sin la tapa puesta para prevenir malos olores.
12
Page 45

RESOLUCIÓN DE PROBLEMAS
EL MOTOR NO FUNCIONA CUANDO SE ENCIENDE:
No está conectado a la corriente eléctrica:
• Compruebe la fuente de alimentación eléctrica.
No está correctamente armado:
• Una de las partes pudiera no estar correctamente armada (colocada,
alineada o asentada) y los interruptores de seguridad no están
activados. Asegúrese de que todas las partes están correctamente
armadas y que el brazo de cierre de la tapa esté cerrado en su lugar.
Motor recalentado:
• Compruebe que no se haya sobreesforzado al motor a causa de
excesiva velocidad, presión o carga al exprimir o licuar.
• Compruebe que la cuchilla del exprimidor, el ensamble de la cuchilla
de licuadora, la tapa de exprimidor o el recipiente de pulpa no estén
atascados.
• El hacer funcionar la base del motor continuamente durante un tiempo
prolongando, o sea más de cinco minutos, puede causar
sobrecalentamiento y la base del motor se apagará automáticamente.
La base del motor reinicializará y estará lista para a funcionar después
de aproximadamente 10 – 15 minutos de descanso.
• Compruebe que nada de polvo, suciedad o líquido haya sid o
succionado hacia el motor a través de las aberturas en el fondo.
El MOTOR SE PARA:
Demasiado agresivo:
• Deje pasar unos segundos para que el motor pueda llegar a su
velocidad plena antes de añadir alimento.
• Reduzca la presión y velocidad de la introducción del alimento.
Exprimidor atascado:
• Las frutas blancas, las frutas demasiado maduras o los vegetales de
hojas pueden atascar el exprimidor. Si esto ocurriese, limpie el
exprimidor según las instrucciones de limpieza e intente mezclar con
frutas o verduras más firmes.
• Para exprimir grandes volúmenes de manera continua, pare después
de dos minutos de exprimir, limpie y permita que el exprimidor
descanse durante 10 minutos.
Acumulación de exceso de pulpa en la cuchilla del exprimidor y la
tapa:
• Compruebe que la cuchilla del exprimidor esté bien limpia y que la
malla filtrante esté libre de residuos.
Licuadora atestada o sobrecargada:
• Trate de usar “P” (pulsación) para aflojar el atascamiento. Si esto no
funciona, gire el selector a “0” (apagado), desenchufe y elimine el
atascamiento.
• Licue cantidades más pequeñas de alimento a la vez.
13
Page 46

PULPA DEMASIADO MOJADA O NINGUNA SALIDA DE JUGO:
El pico de salida del jugo está obstruido:
• Compruebe que el pico de salida del jugo esté limpio y abierto en la
posición de abajo.
Acumulación excesiva de pulpa:
• Limpie la cuchilla del exprimidor, la tapa de exprimidor y el tazón con
filtro.
• Exprima a menor velocidad haciendo menos presión sobr e el
empujador de alimentos.
EL EXPRIMIDOR TIENE FUGAS:
• Compruebe que todas las partes han sido bien limpiadas y armadas
correctamente.
• Compruebe que el pico de salida del jugo está abierto y no está
obstruido.
LA JARRA DE LICUAR TIENE FUGAS:
• Compruebe que el anillo de sellado esté presente, esté correctamente
colocado en la jarra de licuar y no esté dañado.
• Compruebe que la jarra de licuar y la base de la cuchilla no tengan
grietas. No use si faltan partes de artefacto electrodoméstico o están
dañadas.
14
Page 47

GARANTÍA DEL PRODUCTO
Garantía limitada de 1 año del aparato electrodoméstico
Focus Electrics, LLC (“Focus Electrics”) garantiza que este aparato no presentará fallas de
material ni fabricación durante un (1) año a partir de la fecha original de compra con prueba de
dicha compra, siempre y cuando el aparato sea operado y mantenido tal como se indica en el
manual de instrucciones provisto. Toda pieza del aparato que presente fallas será reparada o
reemplazada sin costo alguno a criterio de Focus Electrics. Esta garantía rige solamente para
el uso domestico dentro de la casa.
Esta garantía no cubre ningún daño, incluyendo la decoloración, de superficie antiadherente
alguna del aparato electrodoméstico. Esta garantía es nula y sin valor, según lo determine
exclusivamente Focus Electrics si el artefacto electrodoméstico es dañado a causa de
accidente, mal uso, abuso, negligencia, rayaduras, o si el artefacto electrodoméstico es
cambiado de algún modo.
ESTA GARANTÍA REEMPLAZA A TODAS LAS DEMÁS GARANTÍAS IMPLÍCITAS,
INCLUYENDO AQUÉLLAS DE COMERCIABILIDAD, IDONEIDAD PARA UN FIN O USO EN
PARTICULAR, DESEMPEÑO, U OTROS TIPOS, LAS CUALES QUEDAN EXCLUIDAS
MEDIANTE EL PRESENTE DOCUMENTO. FOCUS ELECTRICS RECHAZA TODA
RESPONSABILIDAD POR DAÑOS, YA SEAN DIRECTOS, INDIRECTOS, INCIDENTALES,
PREVISIBLES, CONSECUENTES O ESPECIALES QUE SURJAN DE ESTE APARATO
ELECTRODOMÉSTICO O GUARDEN RELACIÓN CON EL MISMO.
Si piensa que el artefacto electrodoméstico se ha dañado o requiere de servicio dentro de su
período de garantía, por favor póngase en contacto con el Departamento de Atención al
Cliente de Focus Electrics por el (866) 290-1851 o contáctenos por correo electrónico a la
service@focuselectrics.com
que demuestra la fecha de compra original, los recibos escritos a mano no son aceptados.
También puede requerirse que usted devuelva el aparato para su inspección y evaluación
Los gastos de devolución no son reembolsables.Focus Electrics no se hace responsable de las
devoluciones perdidas en tránsito.
. Para todas las reclamaciones de garantía, se requerirá un recibo
Válido sólo en EE.UU. y Canadá
.
REPUESTOS
Los repuestos, de estar disponibles, pueden ser pedidos directamente a Focus Electrics, LLC
de varias maneras. Ordene en línea a través de www.focuselectrics.com
electrónico a service@focuselectrics.com
escribiendo a:
Focus Electrics, LLC
Attn: Customer Service
, por teléfono llamando al (866) 290-1851, o
P. O. Box 2780
West Bend, WI 53095
Para colocar un pedido con pago mediante cheque o giro postal, póngase en contacto primero
con Atención al Cliente para que le indiquen el total de la orden. Envíe su pago junto con una
carta que indique el número de modelo o catálogo de su aparato, que puede ubicarlo en la
parte inferior o posterior de la unidad, una descripción de la parte o partes que usted solicita, y
la cantidad que desea. Su cheque deberá ser hecho a nombre de Focus Electrics, LLC.
El impuesto sobre las ventas de su estado y un recargo por gastos de envío serán añadidos al
precio total. Por favor permita un plazo de dos semanas para el procesamiento y entrega.
Este manual contiene información importante y útil sobre el uso seguro y el cuidado de su nuevo producto
Focus Electrics. Para su propia referencia, archive aquí el recibo fechado que sirve de comprobante de
compra para la garantía, y anote la siguiente información:
Fecha en que compró o recibió la unidad como regalo: __________________________________________
Dónde se efectuó la compra y el precio, si lo sabe: _____________________________________________
Número y código de fecha del producto (aparece en la parte inferior/posterior de la unidad): _____________
15
L5711A 06/08 West Bend®, una Marca de Focus Electrics, LLC. Impreso en China
, por correo
Page 48

 Loading...