

Page 1
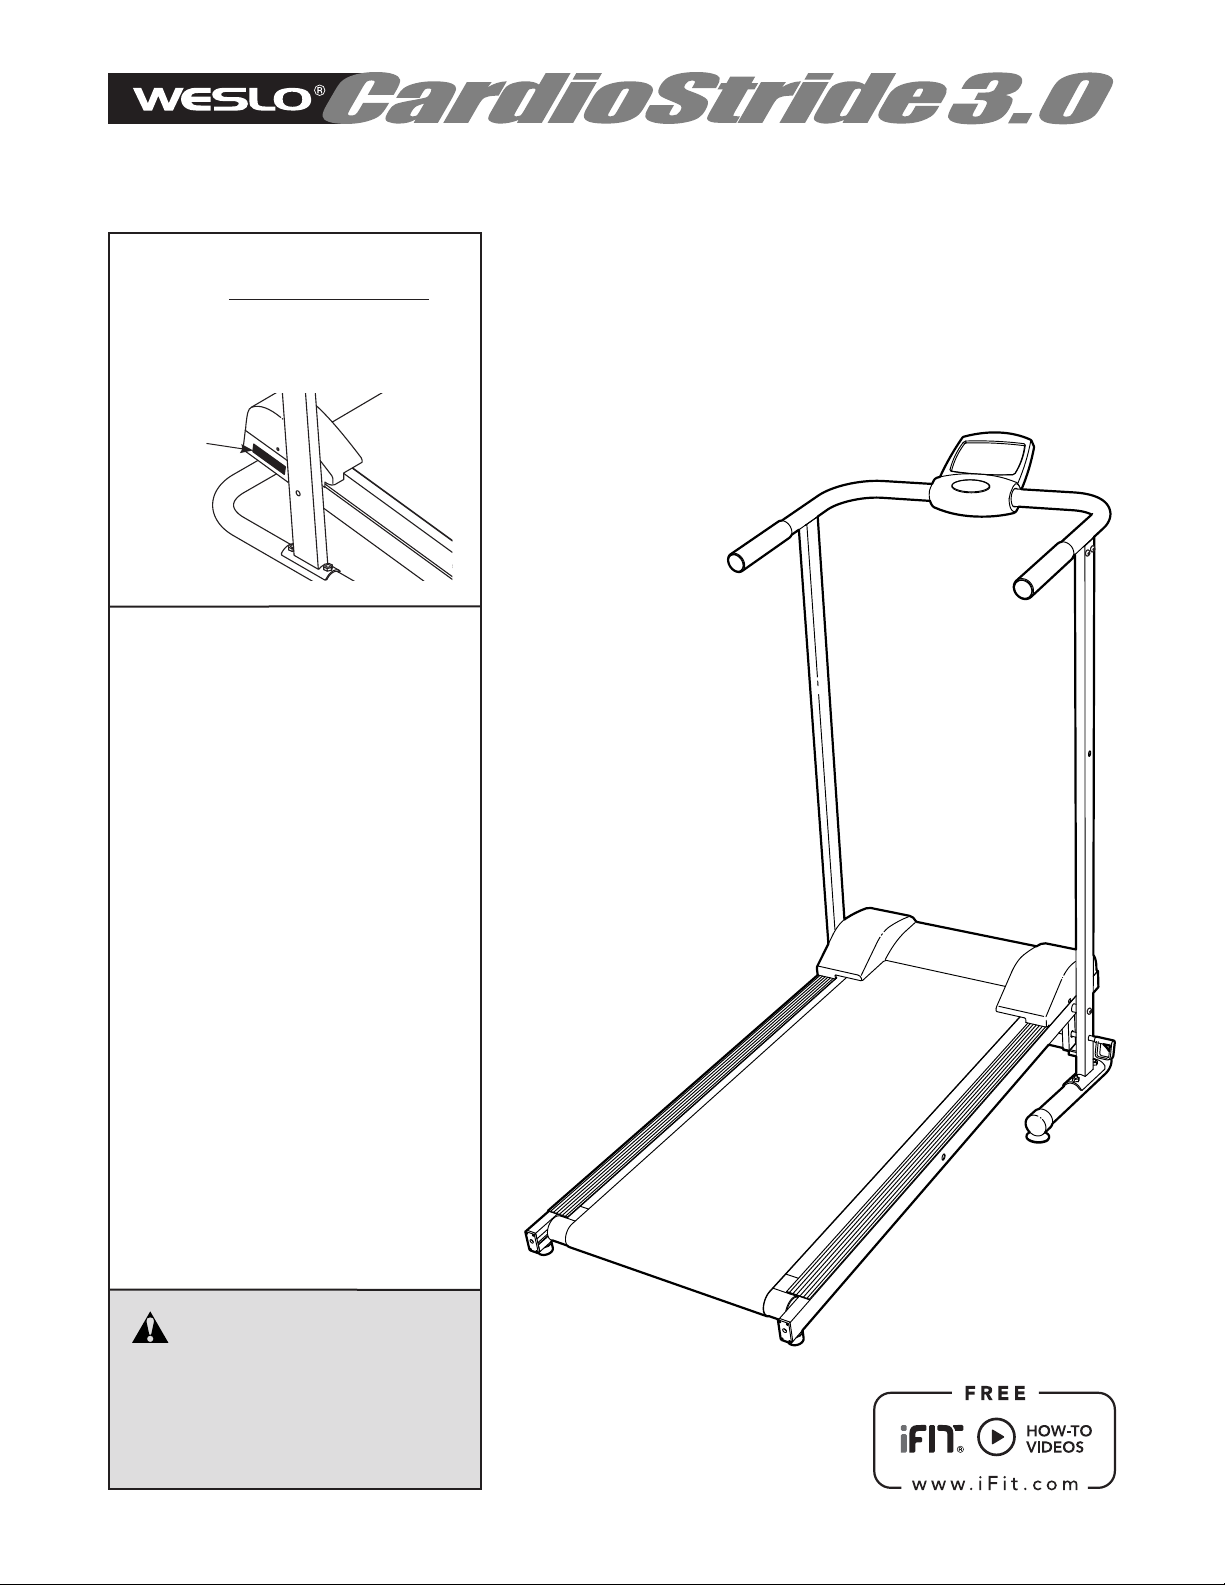
Model No. 831.21901.0
Serial No.
TREADMILL EXERCISER
Write the serial number in the space
above for future reference.
Serial
Number
Decal
• Assembly
• Operation
• Maintenance
• Part List and Drawing
User’s Manual
Sears, Roebuck and Co.
Hoffman Estates, IL 60179
CAUTION
Read all precautions and instructions in this manual before using
this equipment. Save this manual
for future reference.
Page 2
256841
TABLE OF CONTENTS
WARNING DECAL PLACEMENT . . . . . . . . . . . . . . . . . . . . . . . . . . . . . . . . . . . . . . . . . . . . . . . . . . . . . . . . . . . . . . .2
IMPORTANT PRECAUTIONS ..................................................................3
BEFORE YOU BEGIN. . . . . . . . . . . . . . . . . . . . . . . . . . . . . . . . . . . . . . . . . . . . . . . . . . . . . . . . . . . . . . . . . . . . . . . .5
PART IDENTIFICATION CHART. . . . . . . . . . . . . . . . . . . . . . . . . . . . . . . . . . . . . . . . . . . . . . . . . . . . . . . . . . . . . . . . 6
ASSEMBLY . . . . . . . . . . . . . . . . . . . . . . . . . . . . . . . . . . . . . . . . . . . . . . . . . . . . . . . . . . . . . . . . . . . . . . . . . . . . . . . .7
TREADMILL OPERATION. . . . . . . . . . . . . . . . . . . . . . . . . . . . . . . . . . . . . . . . . . . . . . . . . . . . . . . . . . . . . . . . . . . . 11
HOW TO FOLD THE TREADMILL .............................................................13
TROUBLESHOOTING ......................................................................14
EXERCISE GUIDELINES ....................................................................15
ORDERING REPLACEMENT PARTS. . . . . . . . . . . . . . . . . . . . . . . . . . . . . . . . . . . . . . . . . . . . . . . . . . . Back Cover
90-DAY FULL WARRANTY. . . . . . . . . . . . . . . . . . . . . . . . . . . . . . . . . . . . . . . . . . . . . . . . . . . . . . . . . . . Back Cover
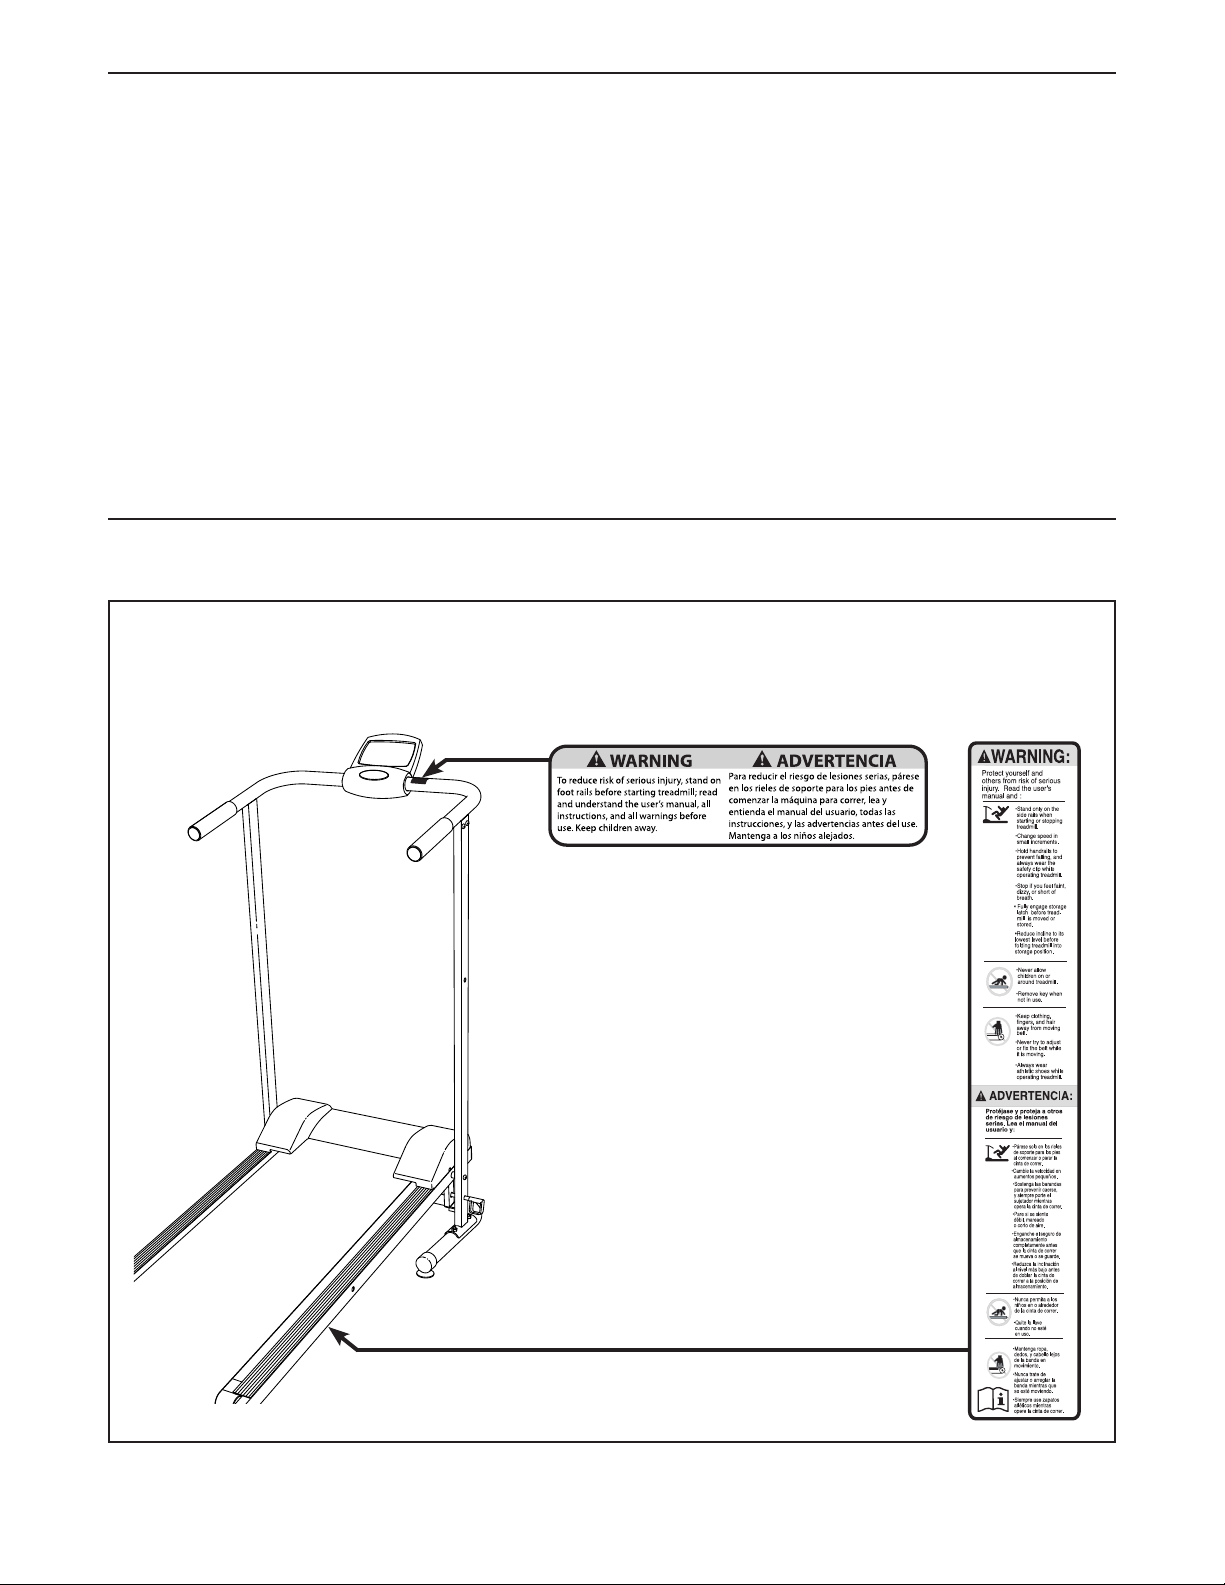
WARNING DECAL PLACEMENT
This drawing shows the location(s) of the warning decal(s). If a decal is missing or illegible, call 1-866-
699-3756 and request a free replacement decal. Apply the decal in the location shown. Note: The
decal(s) may not be shown at actual size.
WESLO is a registered trademark of ICON IP, Inc.
2
Page 3

IMPORTANT PRECAUTIONS
WARNING: To reduce the risk of serious injury, read all important precautions and
instructions in this manual and all warnings on your treadmill before using your treadmill. Sears
assumes no responsibility for personal injury or property damage sustained by or through the use of
this product.
1. It is the responsibility of the owner to ensure
that all users of this treadmill are adequately
informed of all warnings and precautions.
2. Before beginning any exercise program,
consult your physician. This is especially
important for persons over age 35 or persons
with pre-existing health problems.
3. Use the treadmill only as described in this
manual.
4. The treadmill is intended for home use only.
Do not use the treadmill in any commercial,
rental, or institutional setting.
5. Keep the treadmill indoors, away from moisture and dust. Do not put the treadmill in a
garage or covered patio, or near water.
6. Place the treadmill on a level surface, with
at least 8 ft. (2.4 m) of clearance behind it
and 2 ft. (0.6 m) on each side. Do not place
the treadmill on any surface that blocks air
openings. To protect the floor or carpet from
damage, place a mat under the treadmill.
10. Never allow more than one person on the
treadmill at a time.
11. Wear appropriate exercise clothes while
using the treadmill. Do not wear loose
clothes that could become caught in the
treadmill. Athletic support clothes are recom-
mended for both men and women. Always
wear athletic shoes. Never use the treadmill
with bare feet, wearing only stockings, or in
sandals.
12. Do not operate the treadmill if the
treadmill is not working properly. (See
TROUBLESHOOTING on page 14 if the treadmill is not working properly.)
13. Always hold the handrails while using the
treadmill.
14. Do not attempt to raise or lower the tread-
mill until it is properly assembled. (See
ASSEMBLY on page 7 and HOW TO FOLD
THE TREADMILL on page 13.) You must be
able to safely lift 25 lbs. (11 kg) to raise or
lower the treadmill.
7. Do not operate the treadmill where aerosol
products are used or where oxygen is being
administered.
8. Keep children under age 12 and pets away
from the treadmill at all times.
9. The treadmill should be used only by per-
sons weighing 250 lbs. (113 kg) or less.
15. When folding the treadmill, make sure
that the storage latch is holding the frame
securely in the storage position.
16. Do not change the incline of the treadmill by
placing objects under the treadmill.
17. Inspect and properly tighten all parts of the
treadmill regularly.
3
Page 4

18. Never drop or insert any object into any
opening on the treadmill.
21. Do not place hands or feet under the tread-
mill while it is in use.
19. Servicing other than the procedures in this
manual should be performed by an authorized service representative only.
20. Over exercising may result in serious injury
or death. If you feel faint or if you experience
pain while exercising, stop immediately and
cool down.
SAVE THESE INSTRUCTIONS
22. The roller guards must be 1/8 inch from
the rear roller (see the drawing on page 5).
Adjust the roller guards, if necessary.
4
Page 5
BEFORE YOU BEGIN
Thank you for selecting the new WESLO® CARDIO
STRIDE 3.0 treadmill. The CARDIO STRIDE 3.0
treadmill offers a selection of features designed to
make your workouts at home more effective. And
when you’re not exercising, the unique treadmill can
be folded up, requiring less than half the floor space of
other treadmills.
For your benefit, read this manual carefully before
using the treadmill. If you have questions after
Length: 4 ft. 5 in. (135 cm)
Width: 2 ft. 3 in. (69 cm)
reading this manual, please see the back cover of this
manual. To help us assist you, note the product model
number and serial number before contacting us. The
model number and the location of the serial number
decal are shown on the front cover of this manual.
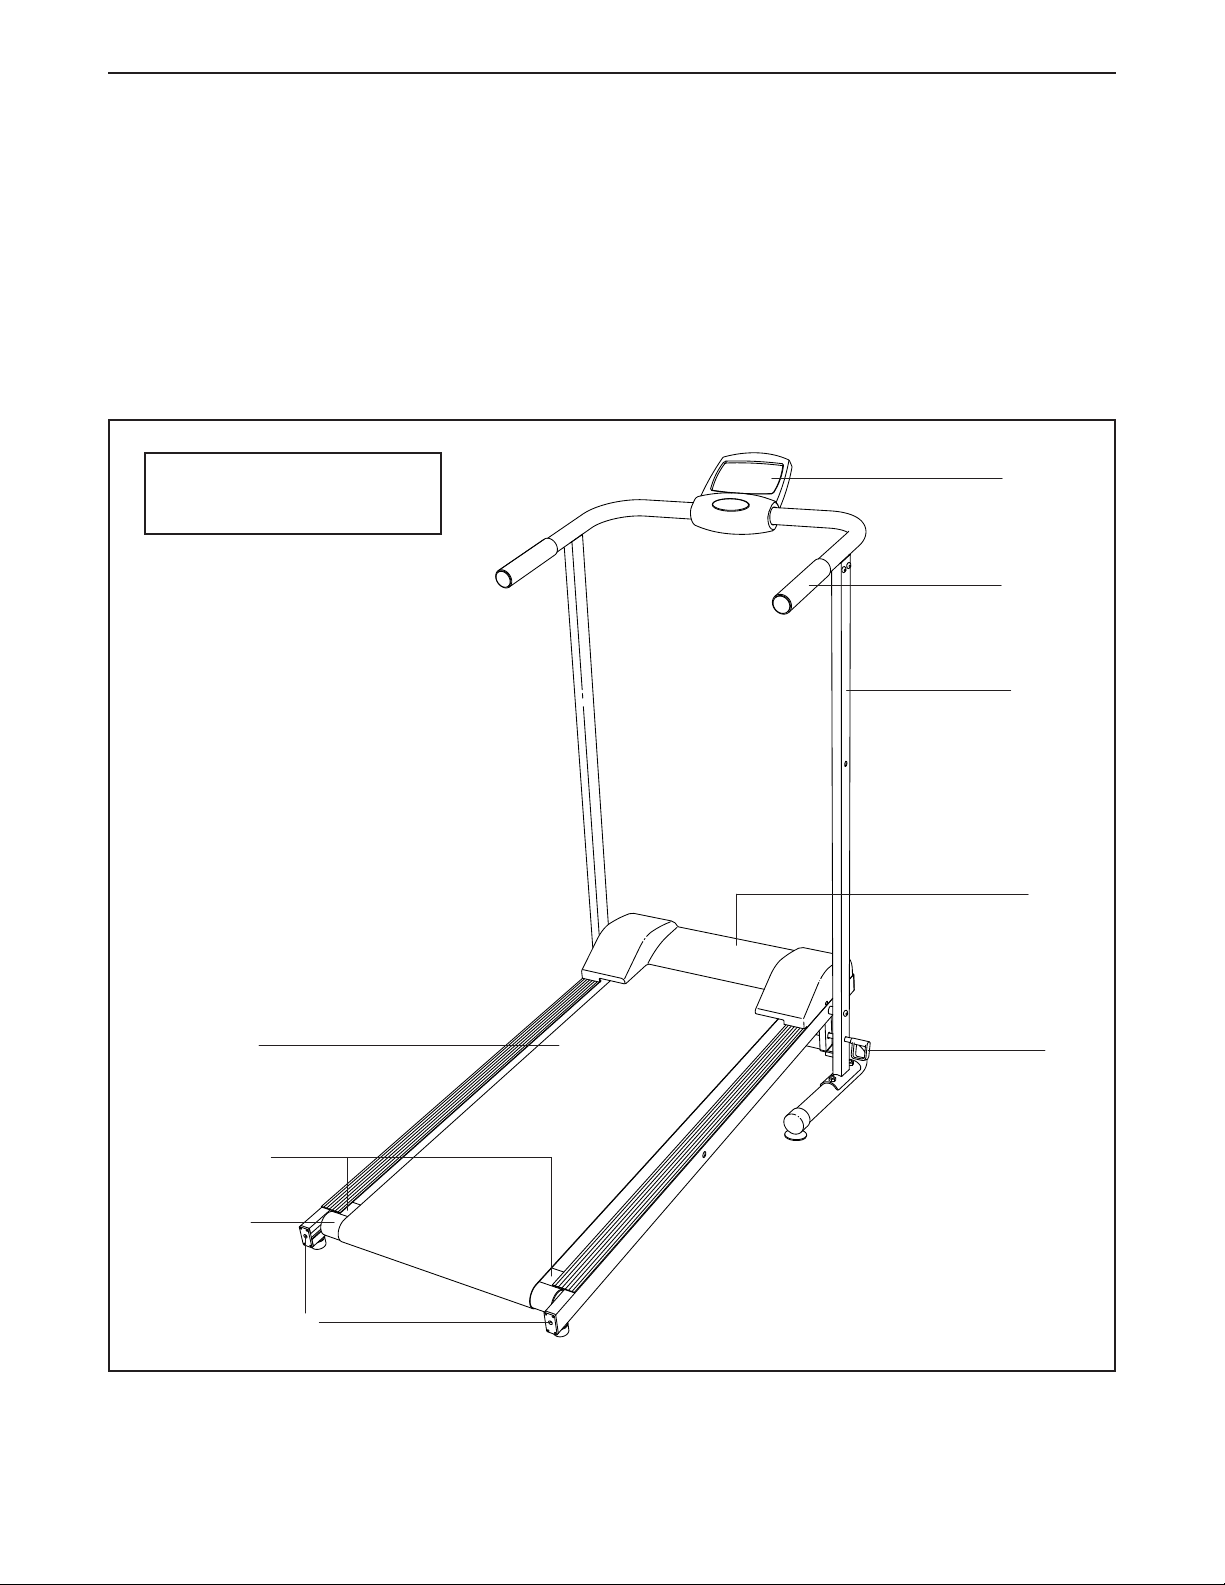
Before reading further, please familiarize yourself with
the parts that are labeled in the drawing below.
Console
Handrail
Upright
Walking Belt
Roller Guards
Rear Roller
Rear Roller
Adjustment Screws
Hood
Pin
5
Page 6
PART IDENTIFICATION CHART
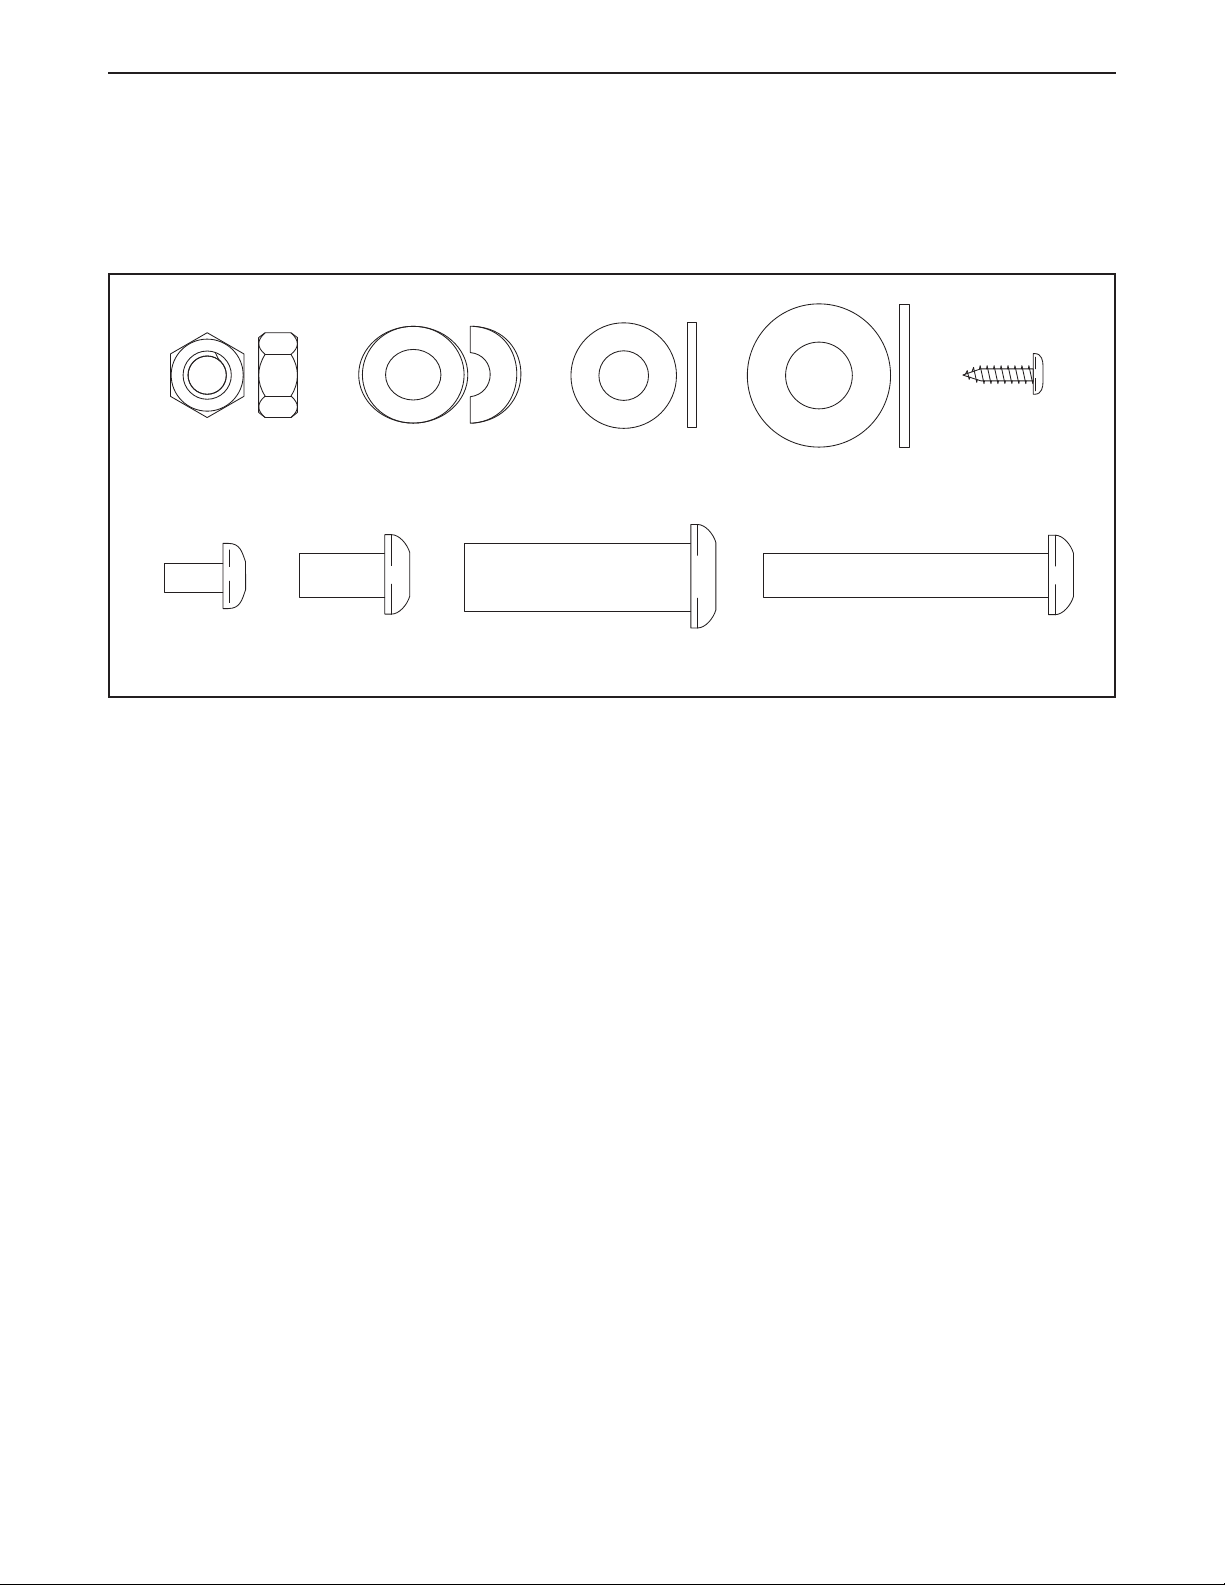
Use the drawings below to identify small parts used for assembly. The number in parentheses below each drawing is the key number of the part, from the PART LIST near the end of this manual. The number following the key
number is the quantity used for assembly. Note: If a part is not in the hardware kit, check to see if it is preat-
tached. If it is not, call 1-866-699-3756. Extra parts may be included.
M4 x 12mm
M8 Nylon
Nut (2)–4
M8 Curved
Washer (3)–4
M8 Washer
(8)–4
M12 Washer
(6)–2
Screw (9)–2
M5 x 10mm
Screw (4)–2
M8 x 15mm
Screw (7)–4
M12 x 40mm Screw
(5)–2
M8 x 50mm Bolt
(1)–4
6
Page 7
ASSEMBLY
• To watch an assembly
video, go to
http://productvideo.co/
assembly/kmart/weslo
or use your mobile
phone or smartphone to
read the QR code at the
right. A reader application such as ShopSavvy
must be installed on your mobile phone or
smartphone.
• Assembly requires two persons.
• Place all parts in a cleared area and remove the
packing materials. Do not dispose of the packing
materialsuntilyounishallassemblysteps.
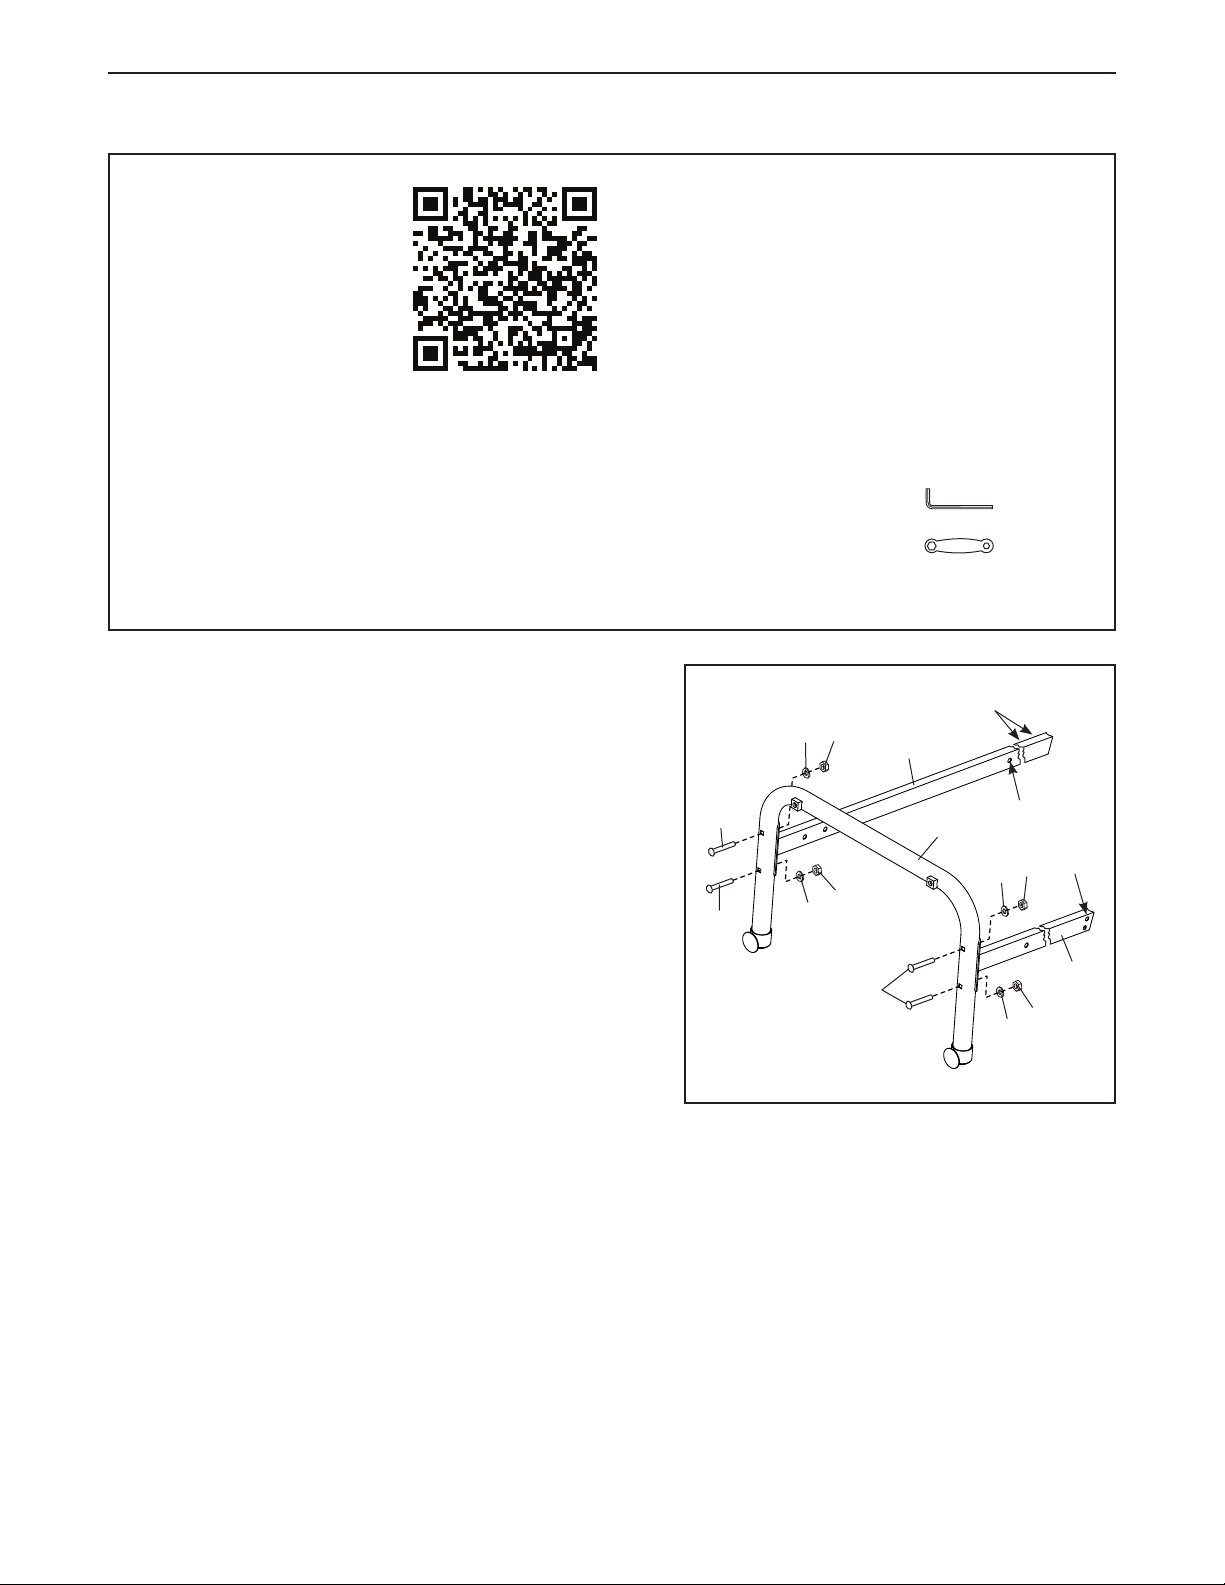
1. Identify the Right Upright (10), which has a single hole
in the indicated location. (Note: There is a wire inside of
the Left Upright [11].) Hold the Right Upright against the
Base (12) as shown, and orient the Right Upright so that
the two indicated holes are on the side shown.
• After shipping, there may be an oily substance
on the exterior of the treadmill. This is normal. If
there is an oily substance on the treadmill, wipe
it off with a soft cloth and a mild, non-abrasive
cleaner.
• Left parts are marked “L” or “Left” and right parts
are marked “R” or “Right.”
• To identify small parts, see page 6.
• Assembly requires the following tools:
the included hex key
one adjustable wrench
To avoid damaging parts, do not use power tools.
1
3
2
10
Holes
Attach the Right Upright (10) to the Base (12) with two
M8 x 50mm Bolts (1), two M8 Curved Washers (3), and
two M8 Nylon Nuts (2) as shown. Make sure that the
curved sides of the Washers are against the Base. Do
not tighten the Nylon Nuts yet.
Attach the Left Upright (11) to the Base (12) in the
same way. Make sure that the Left Upright is oriented so
that the two indicated holes are on the side shown. Do
not tighten the Nylon Nuts yet.
1
2
1
3
1
12
Hole
3
3
2
Holes
11
2
7
Page 8
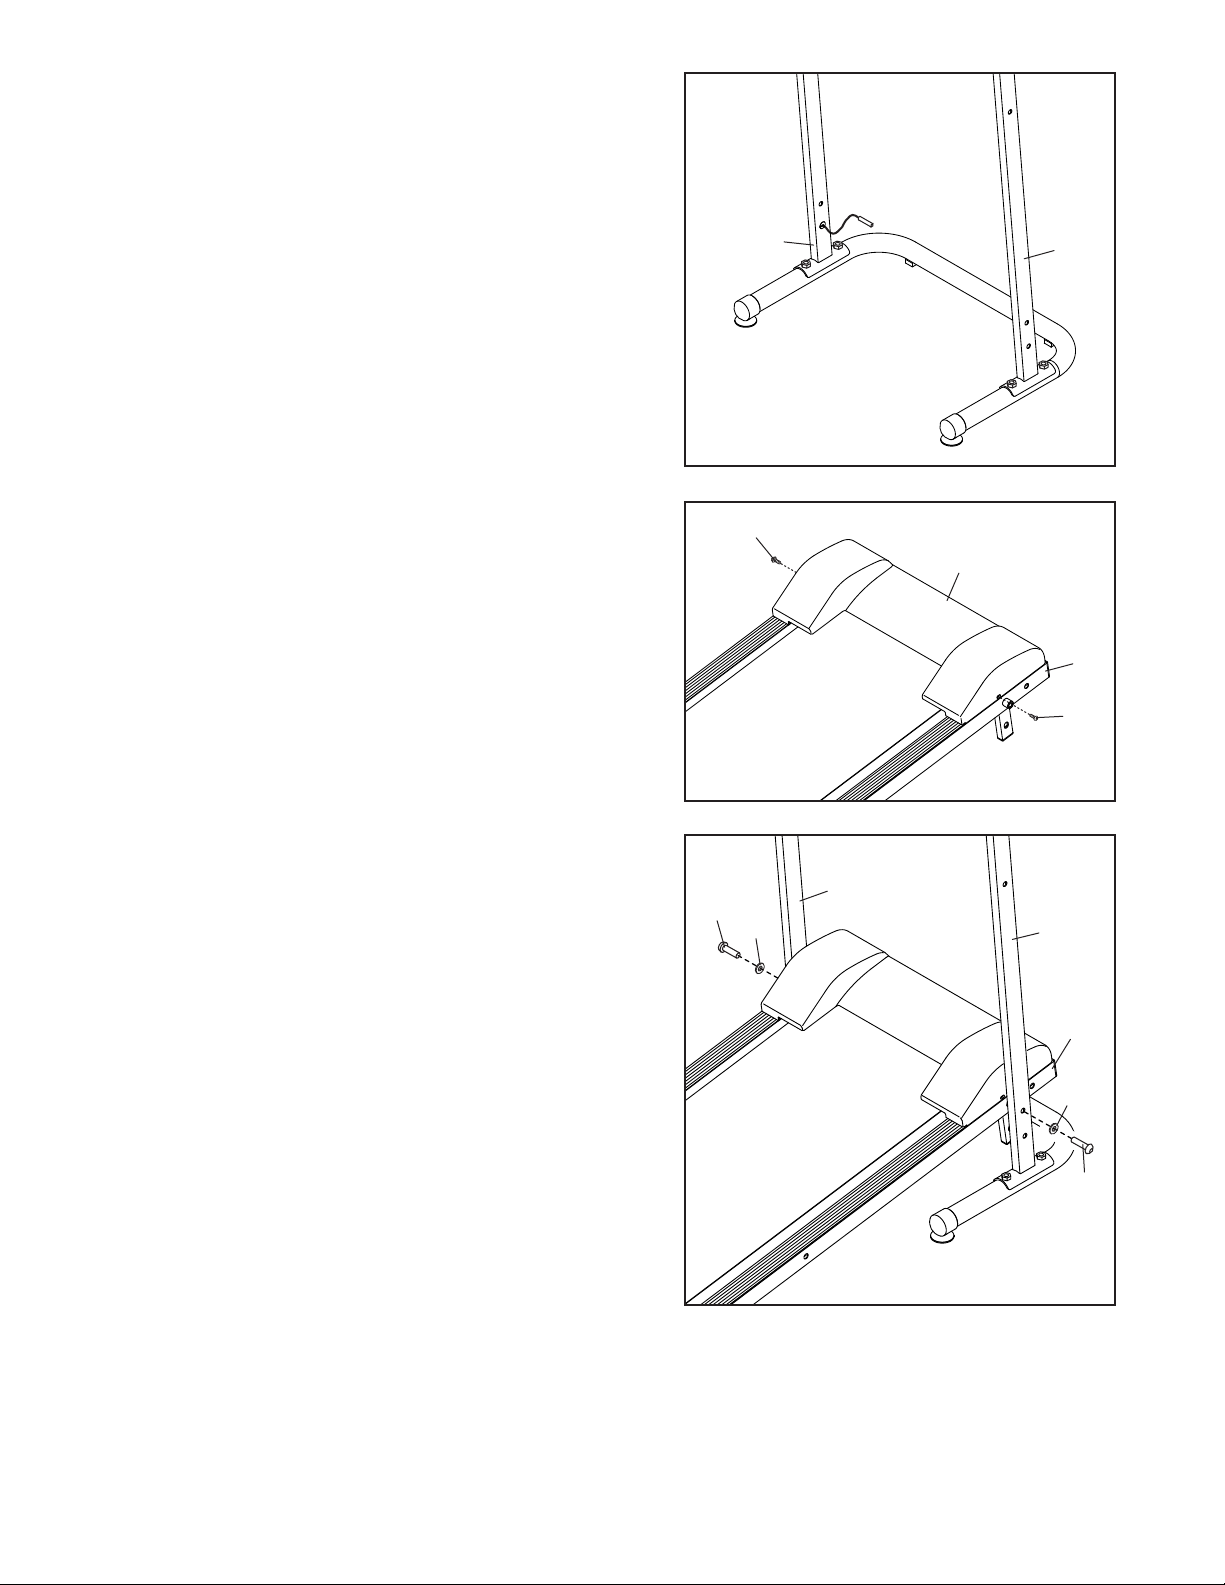
2. Raise the Left Upright (11) and the Right Upright (10) to
the position shown.
2
3. Attach the Hood (13) to the front of the Frame (14) with
two M5 x 10mm Screws (4).
11
3
4
13
10
14
4
4. Hold the front of the Frame (14) between the Left Upright
(11) and the Right Upright (10). Align the holes near the
front of the Frame with the upper holes shown in the
Uprights. Tighten an M12 x 40mm Screw (5) with an M12
Washer (6) into each Upright and into the Frame.
4a
11
5
6
10
14
6
5
8
Page 9
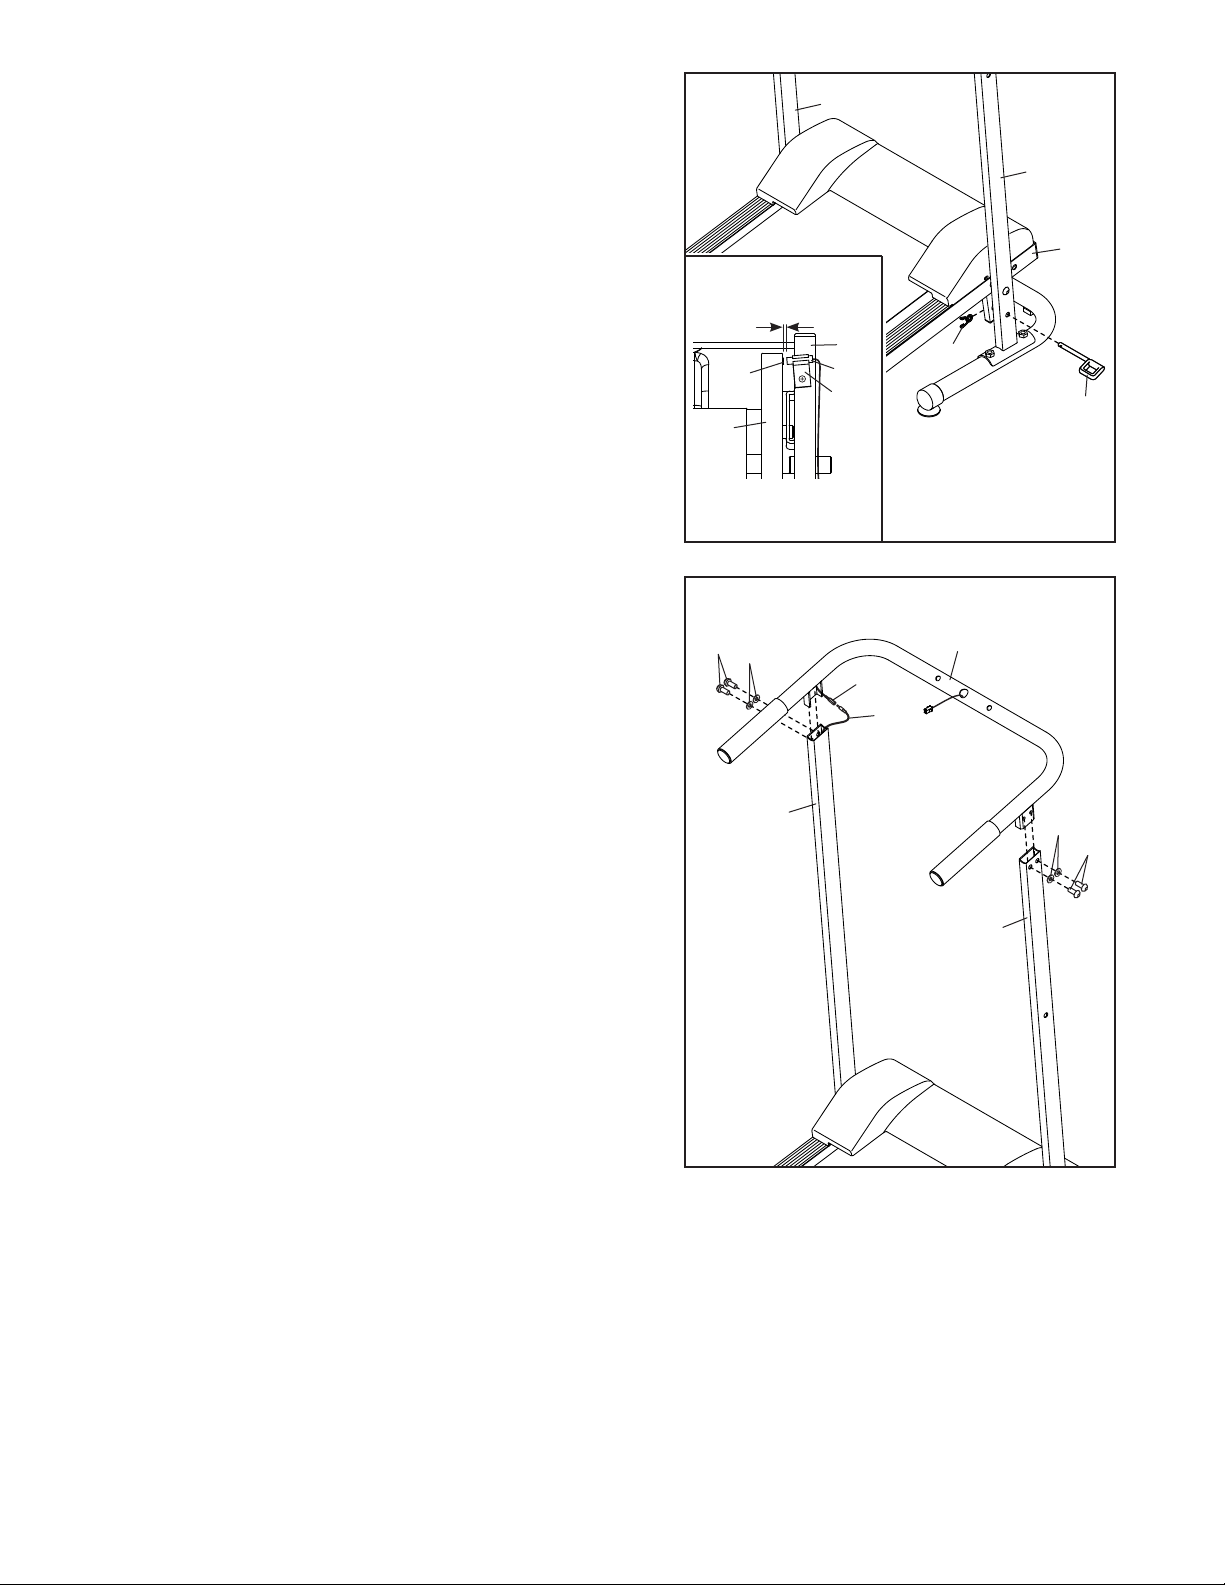
5. Align the hole on the Frame (14) with the hole in the
Right Upright (10). Insert the Pin (15) into the holes in
the Upright and the Frame. Make sure that the Pin is
fully inserted. Then, attach a Spring Clip (20) on the
end of the Pin.
Look under the Frame (14) near the Left Upright (11).
See drawing 5b. Locate the Reed Switch Clip (16)
attached to the underside of the Frame. Insert the Reed
Switch (17) into the Reed Switch Clip as shown. Next,
locate the Magnet (18) on the Flywheel (19). Turn the
Flywheel until the Magnet is aligned with the Reed
Switch. Move the Reed Switch so that there is a
1/8" (3 mm) gap between the Reed Switch and the
Magnet.
5a
5b
18
19
11
1/8 in.
View from
below
14
17
16
10
14
20
15
6. Hold the Handrail (27) near the Left and Right Uprights
(11, 10). Connect the Handrail Wire (21) to the Reed
Switch Wire (22). Insert the Wires down into the Left
Upright.
Attach the Handrail (27) to the Uprights (11, 10) with four
M8 x 15mm Screws (7) and four M8 Washers (8). Be
careful not to pinch the Wires (21, 22). Do not fully
tighten the Screws yet.
Place the treadmill in the storage position (see page 13).
Center the Frame (not shown) between the Uprights (11,
10).
See step 1. Tighten the four M8 Nylon Nuts (2). Then,
tighten the M8 x 15mm Screws (7). Lower the Frame
(see page 13).
6
7
8
21
22
11
27
8
7
10
9
Page 10
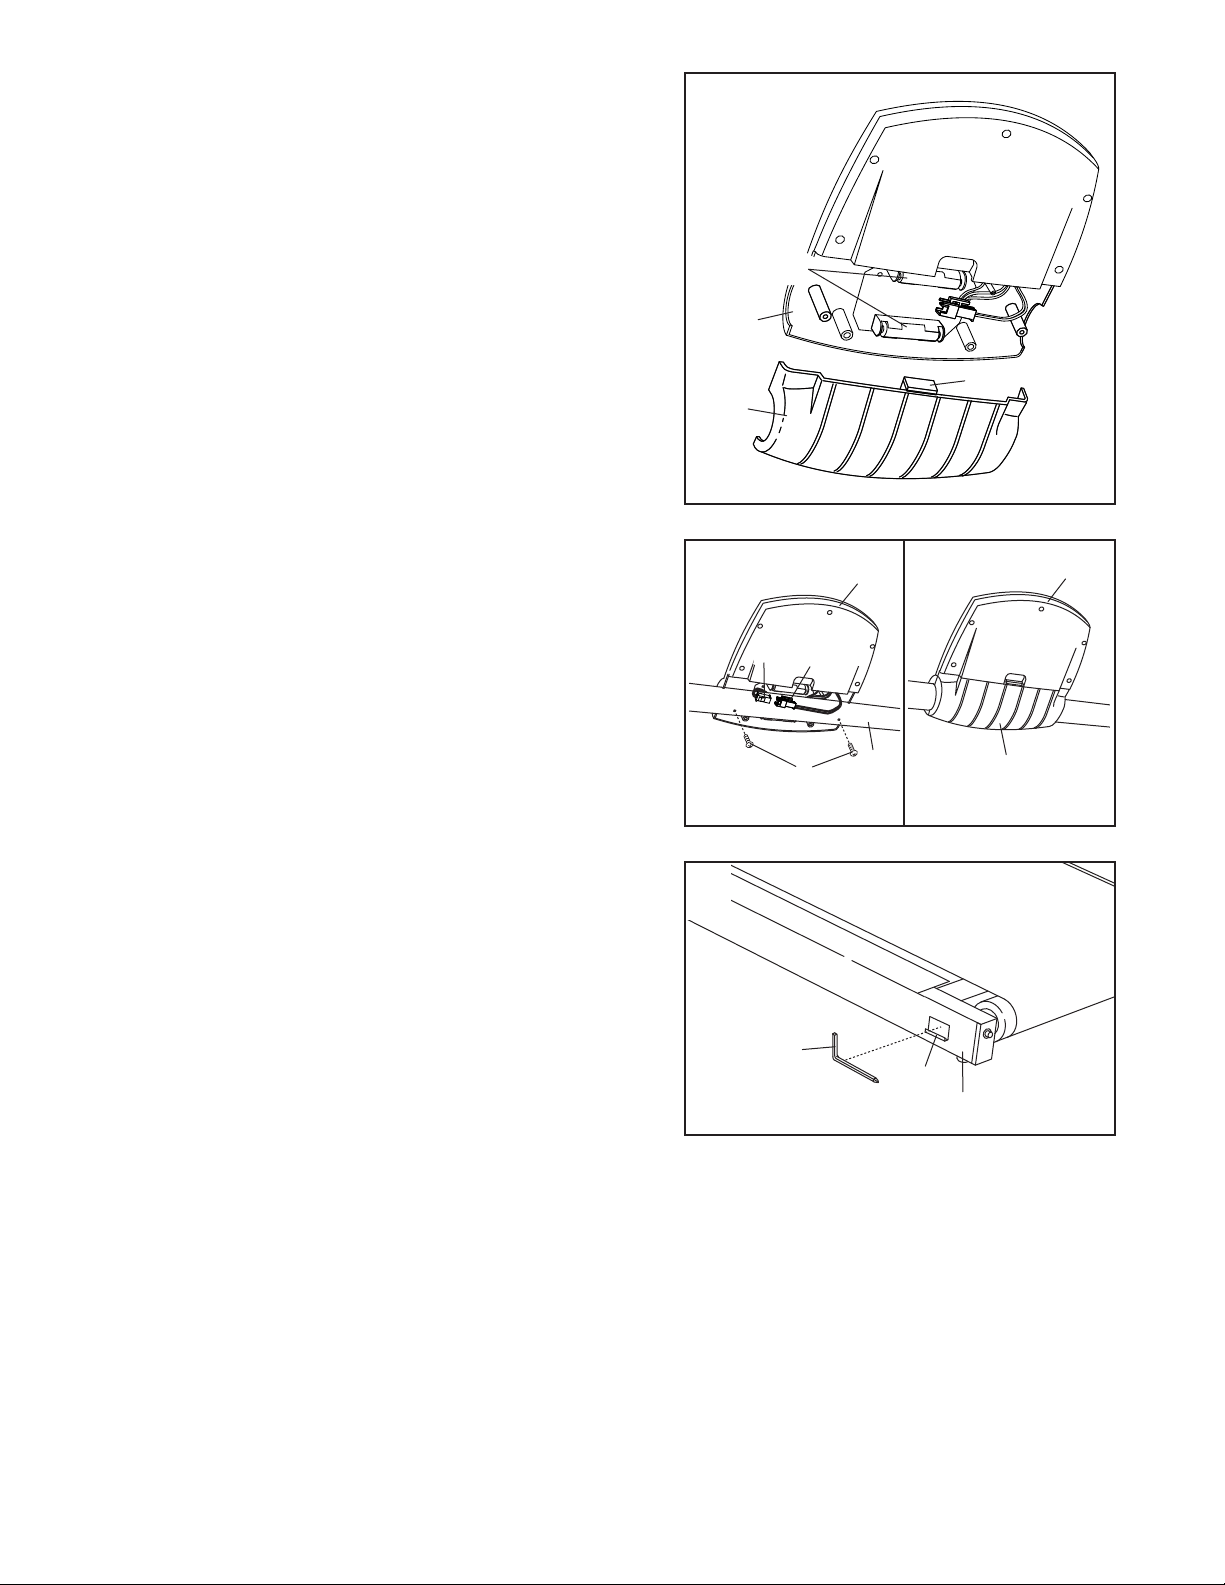
7. The Console (23) requires two “AAA” batteries. Alkaline
batteries are recommended. Do not use old and new batteries together or alkaline, standard, and rechargeable
batteries together.
Press the indicated tab on the Battery Cover (24), and
remove the Battery Cover. Insert two batteries into the
two battery clips; make sure that the negative (–) ends
of the batteries are touching the springs in the bat-
tery clips.
7
Batteries
23
Tab
24
8. See drawing 8a. Hold the Console (23) near the
Handrail (27). Connect the wire on the Console to the
Handrail Wire (21).
Attach the Console (23) to the Handrail (27) with two M4
x 12mm Screws (9). Do not overtighten the Screws.
Make sure that the wires are not pinched.
See drawing 8b. Press the Battery Cover (24) back onto
the Console (23).
9. Remove the paper backing from the Adhesive Clip (25).
Press the Adhesive Clip onto the left side of the Frame
(14) in the indicated location. Press the Hex Key (26) into
the Adhesive Clip.
Make sure that the walking belt is properly tightened (see
SYMPTOM 3 on page 14).
8a
9
21
26
Console
Wire
9
23
27
8b
25
23
24
14
10. Make sure that all parts are properly tightened before you use the treadmill. To protect the floor or car-
pet, place a mat under the treadmill.
10
Page 11
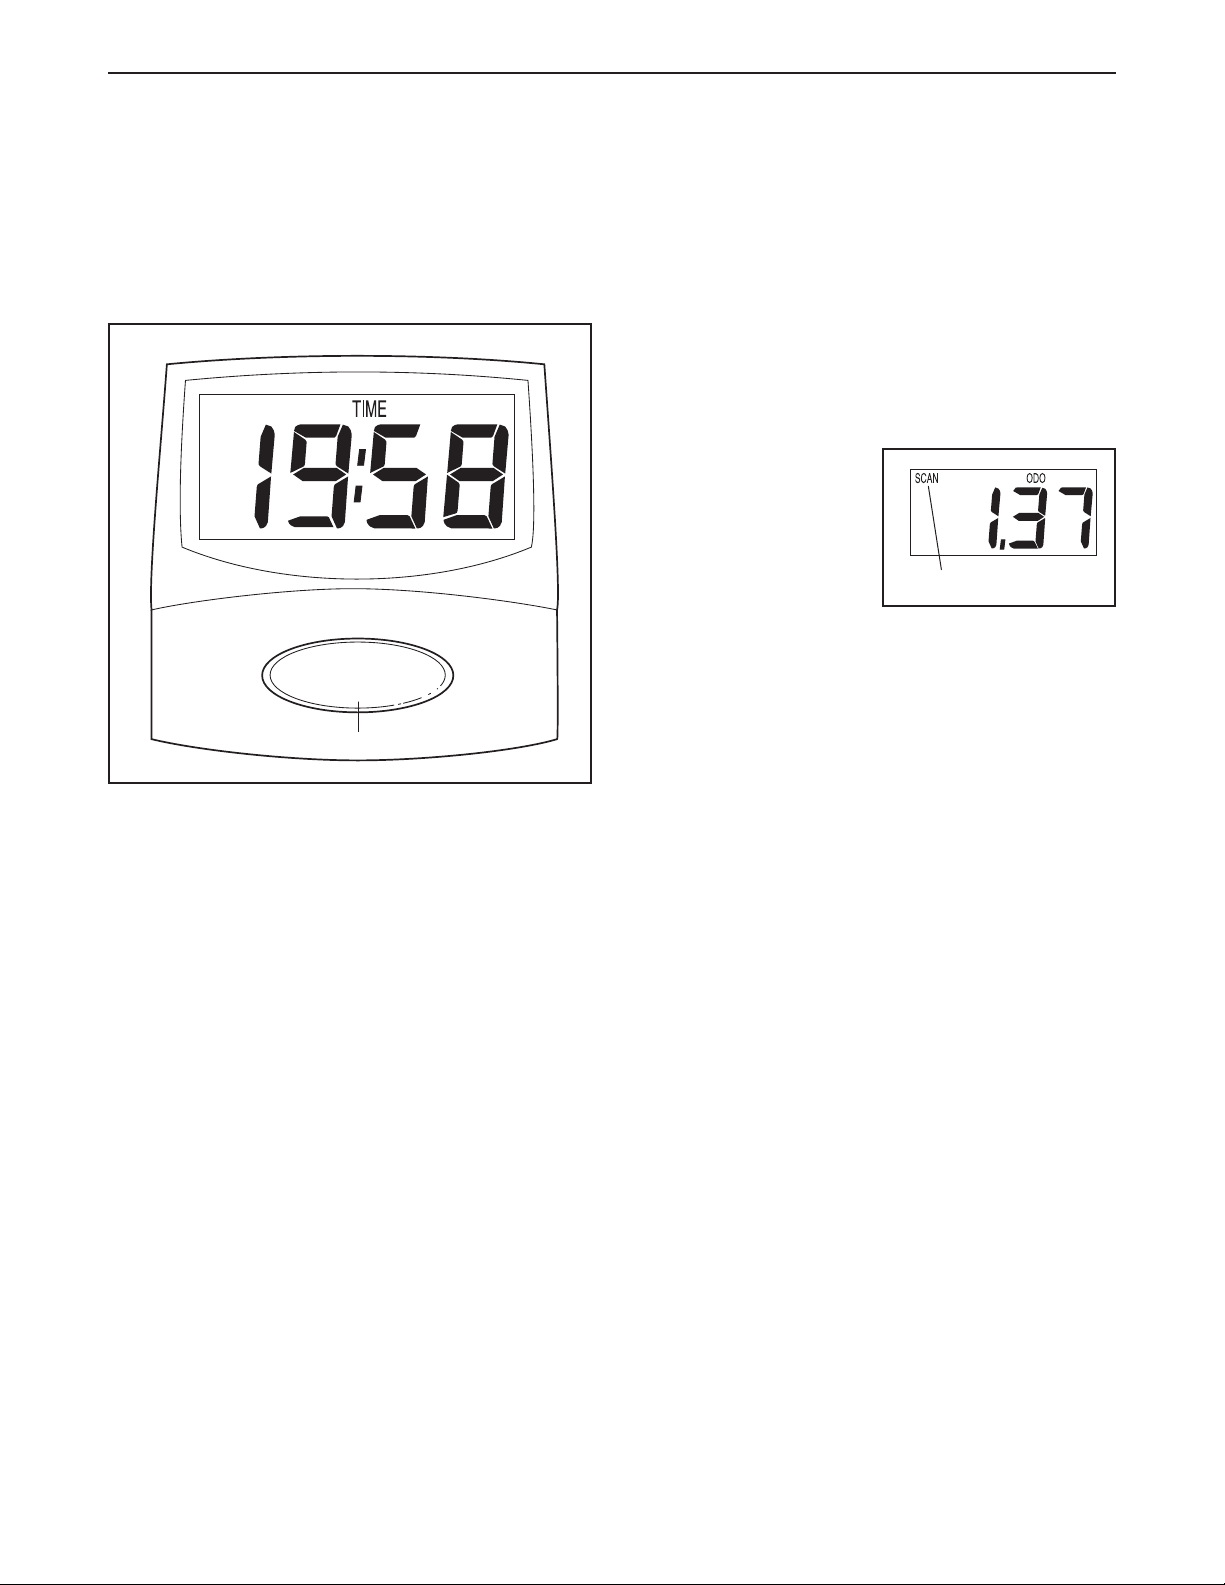
TREADMILL OPERATION
STEP-BY-STEP CONSOLE OPERATION
Before the console can be operated, batteries must
be installed (see assembly step 7 on page 10). If there
is a thin sheet of plastic on the console, remove the
plastic.
Console Button
The console features six modes:
• Speed—Thismodedisplaysyourspeedinmiles
per hour.
Follow the steps below to operate the console.
1. Turn on the power.
To turn on the power, press the console button or
begin walking. Note: If batteries were just installed,
the power will already be on. The first time you use
the treadmill, lubricate the walking platform (see
page 12).
2. Track your progress with the six modes.
When the power
is turned on, the
Scan mode will be
selected and the
SCAN indicator will
appear. The console will display the
Speed, Distance,
Time, Odometer, and Calorie modes, for about six
seconds each, in a repeating cycle.
To select only the Speed, Distance, Time,
Odometer, or Calorie mode, press the console
button until only the SPEED, DIST, TIME, ODO, or
CAL indicator appears in the display. Make sure
that the SCAN indicator does not appear.
To reset all modes (except for the odometer
mode), press the console button for about three
seconds.
SCAN Indicator
• Distance—Thismodedisplaysthenumberofmiles
you have walked.
• Time—Thismodedisplaystheelapsedtime.
• Odometer—Thismodedisplaysthedistancethat
the walking belt has moved since the batteries
were changed.
• Calorie—Thismodedisplaystheapproximate
number of calories you have burned.
• Scan—ThismodedisplaystheSpeed,Distance,
Time, Odometer, and Calorie modes in a repeating
cycle.
3. Turn off the power.
To turn off the power, simply wait for a few min-
utes. If the walking belt is not moved and the console button is not pressed for a few minutes, the
power will turn off automatically.
11
Page 12
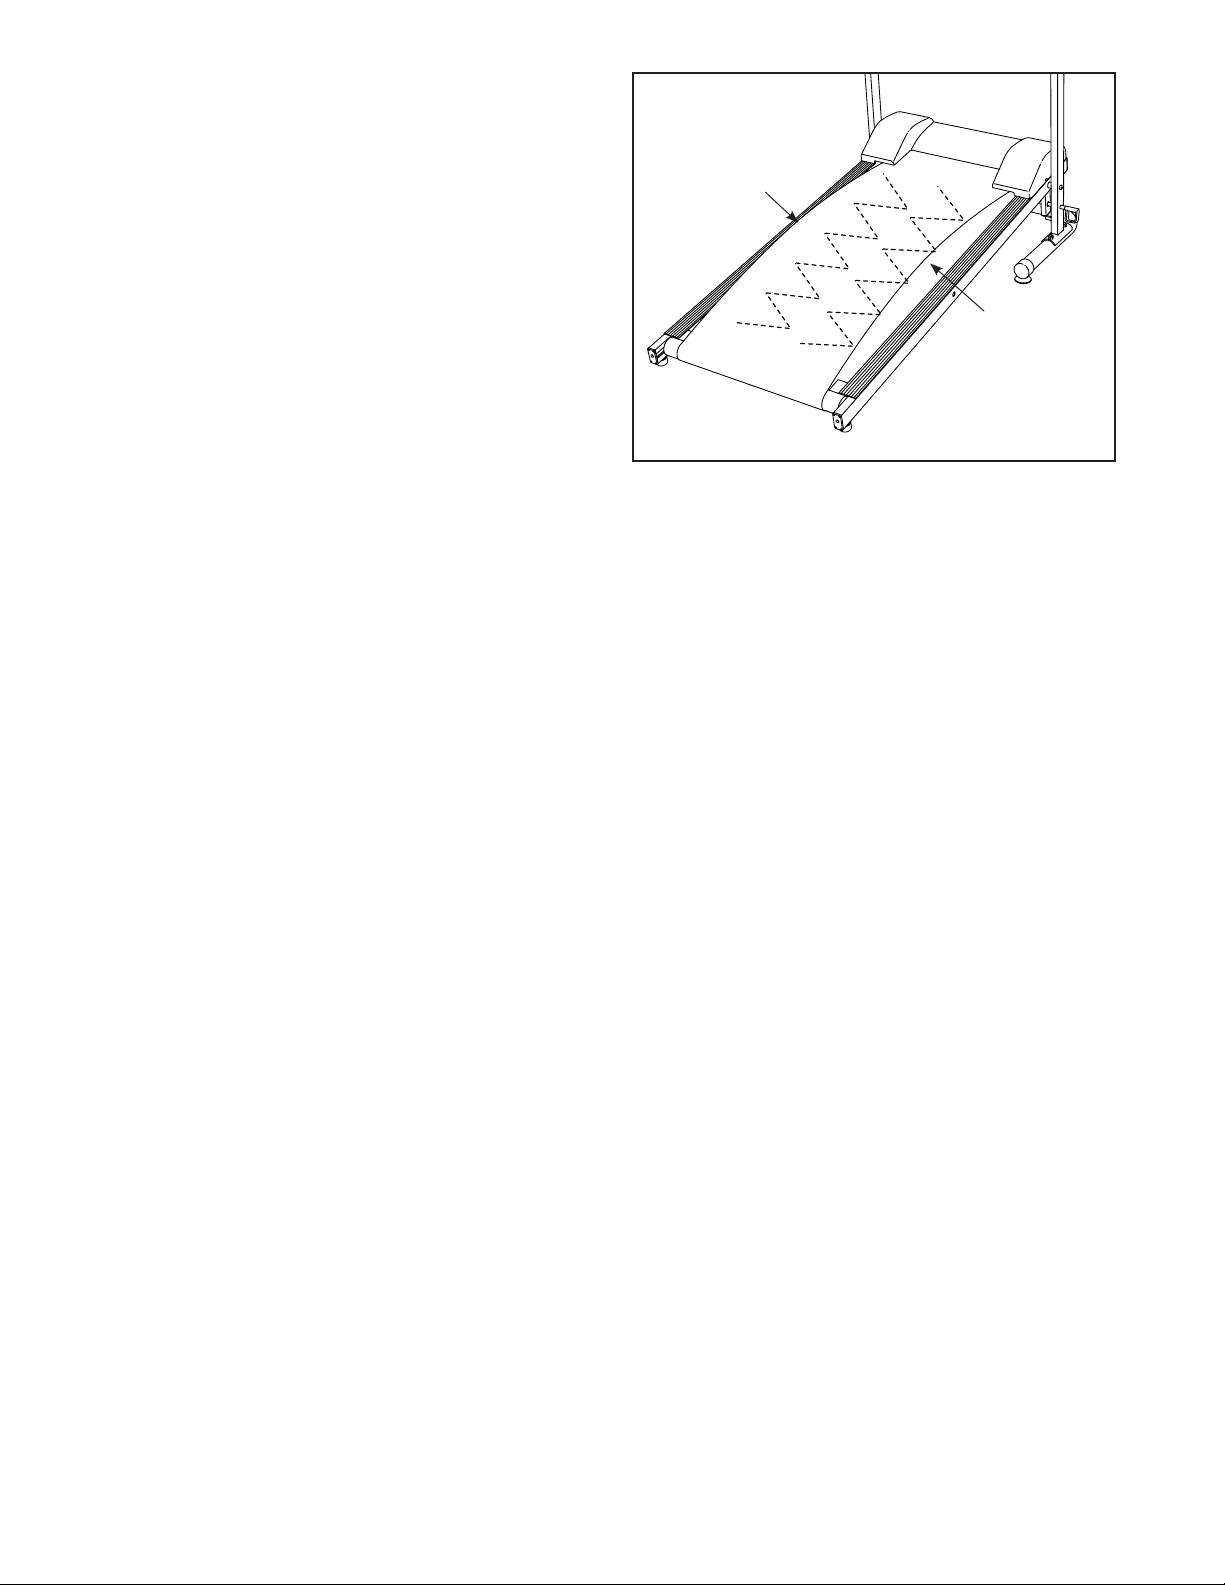
LUBRICATING THE WALKING PLATFORM
Before the treadmill is used, the walking platform
should be lubricated. Open the included lubricant
packet. Reach under one side of the walking belt as far
as you can, and apply half of the lubricant to the walking platform. Then, reach under the other side of the
walking belt and apply the remaining lubricant. After
you have applied the lubricant, walk on the treadmill for a few minutes to spread the lubricant.
Apply lubricant
here
Apply lubricant
here
12
Page 13
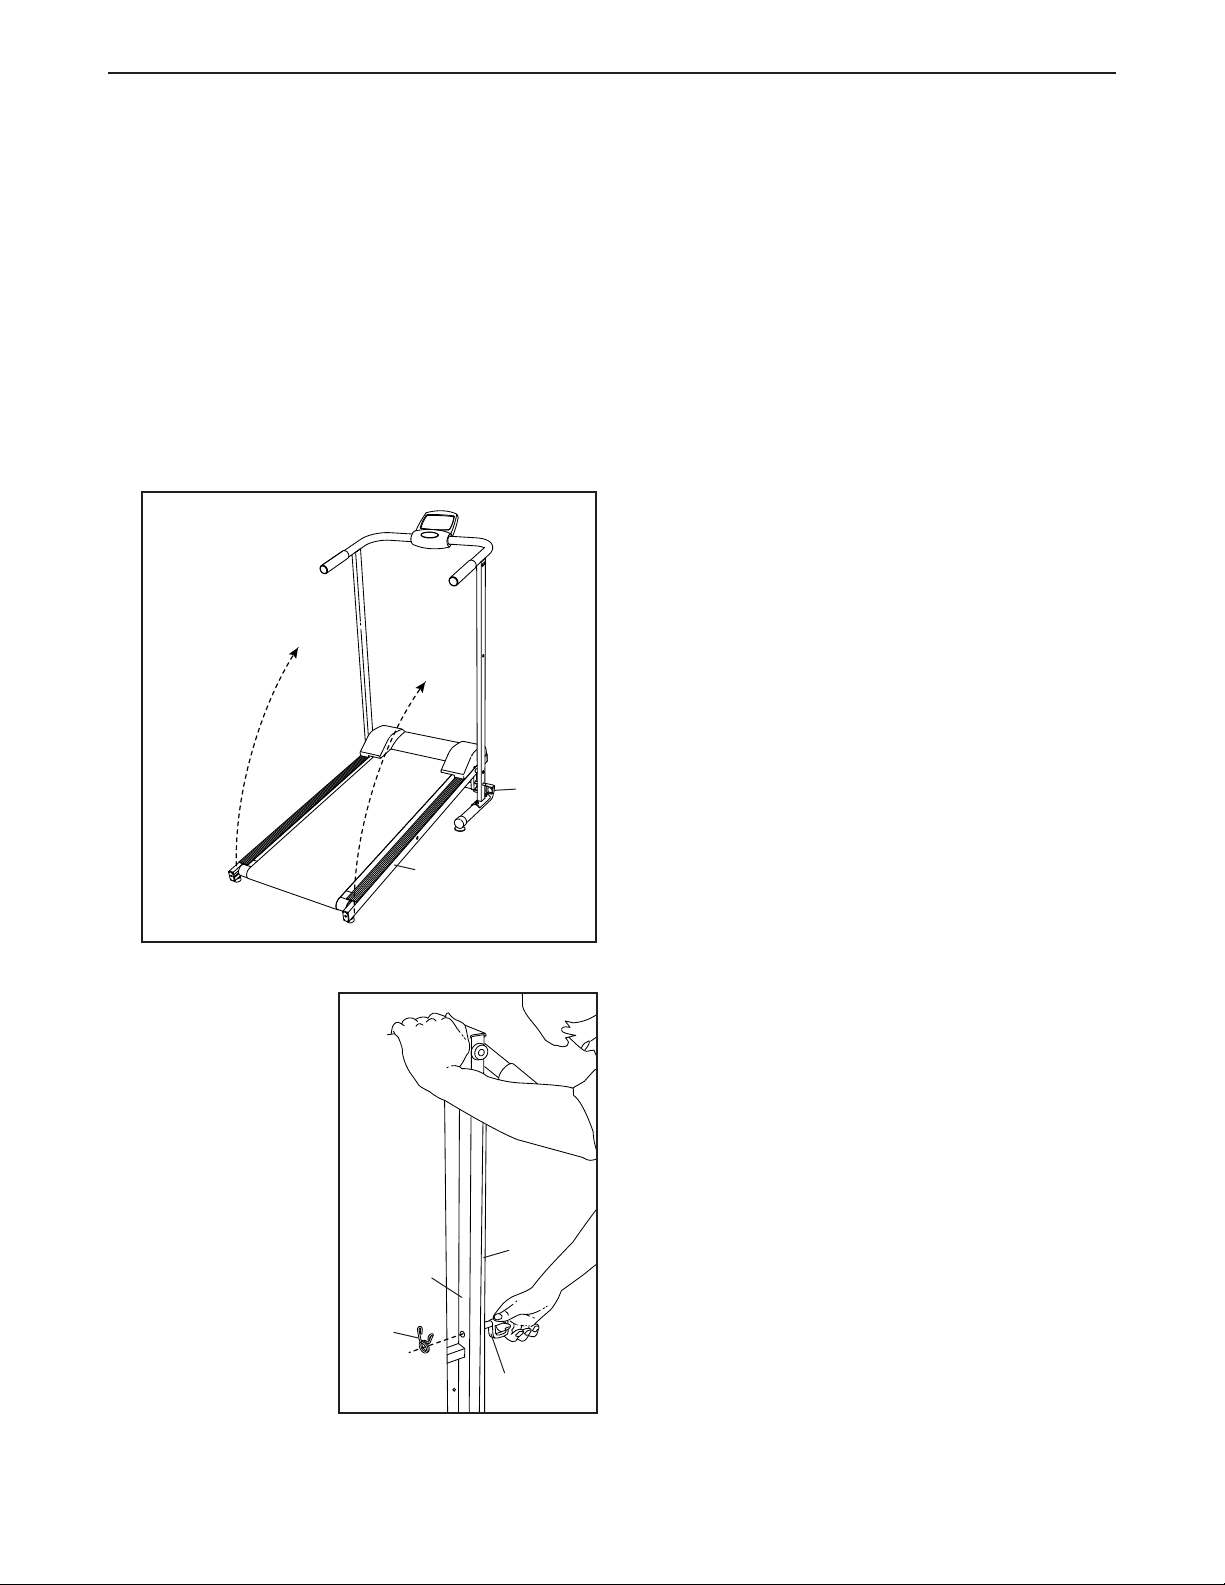
HOW TO FOLD THE TREADMILL
FOLDING THE TREADMILL FOR STORAGE
When the treadmill is not in use, it can be folded to
the compact storage position. CAUTION: You must
be able to safely lift 25 pounds (11 kg) to raise or
lower the treadmill.
1. Remove the Pin (15) from the right side of the
treadmill. Hold the end of the Frame (14) firmly with
your hands. CAUTION: Bend your legs and keep
your back straight. As you raise the Frame,
make sure to lift with your legs rather than your
back. Raise the Frame to the vertical position.
1
LOWERING THE TREADMILL FOR USE
1. Hold the treadmill securely with your left hand as
shown in drawing 2. Press the ends of the Spring
Clip (20) together and slide the Spring Clip off the
end of the Pin (15). Pull out the Pin and pivot the
treadmill downward a few inches.
2. Hold the treadmill firmly with both hands, and lower
the treadmill to the floor. CAUTION: Bend your
legs and keep your back straight. Then, reinsert
the pin and reattach the spring clip.
2. Hold the treadmill
securely with
your left hand as
shown. Insert the
Pin (15) into the
hole in the right
side of the Right
Upright (10) and
into the Frame
(14) as far as it
will go.
Press the ends
of the Spring Clip
(20) together and
slide the Spring
Clip onto the end
of the Pin (15).
15
14
2
10
14
20
15
13
Page 14
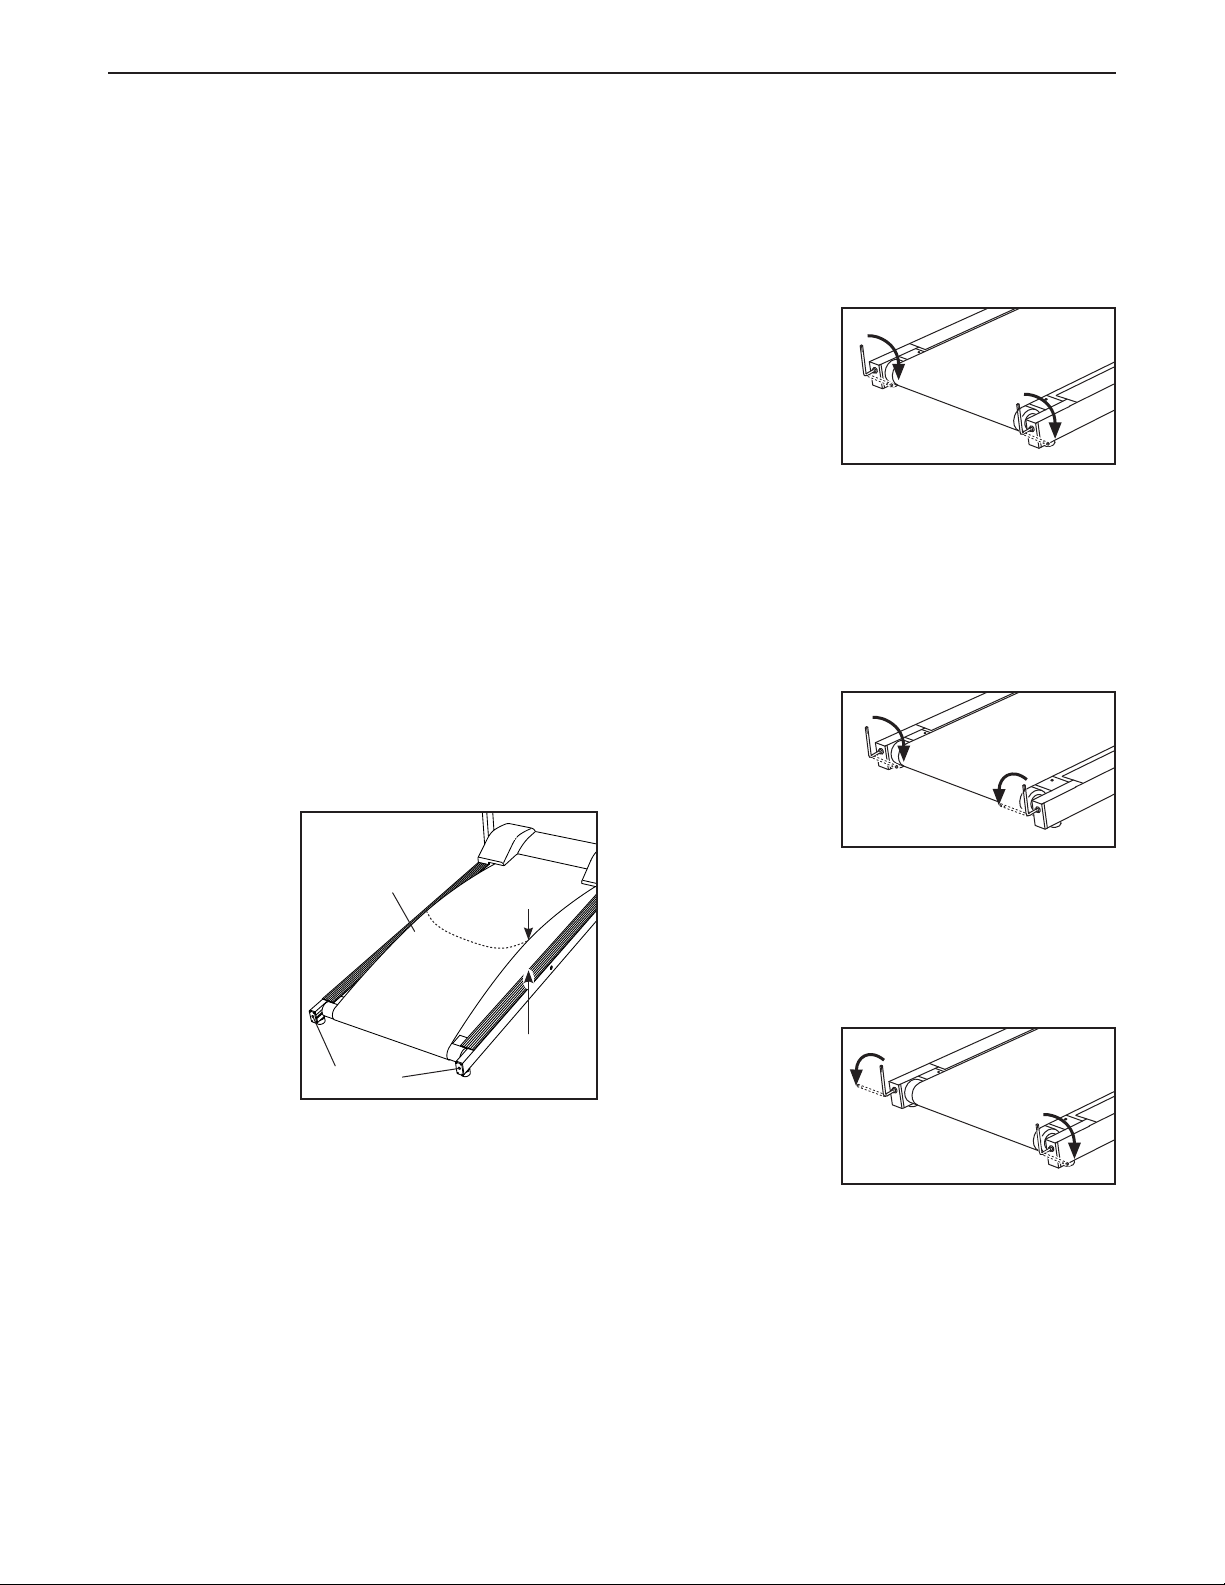
TROUBLESHOOTING
Most treadmill problems can be solved by following the steps below. Find the symptom that applies, and
follow the steps listed. If further assistance is needed, please see the back cover of this manual.
1. SYMPTOM: THE CONSOLE DOES NOT
FUNCTION PROPERLY
a. Replace the batteries in the console (see assem-
bly step 7 on page 10).
b. Make sure that the reed switch is properly
adjusted (see assembly step 5 on page 9).
c. Make sure that the handrail wire is plugged fully
into the wire on the console (see assembly step 8
on page 10).
d. The console, like most electronics, is susceptible
to static electricity build-up caused by certain
types of clothing or by the operation of the
treadmill. If the display is blank or gives incorrect
readings, apply an anti-static spray to the handrail. Anti-static spray is available where laundry
supplies are sold.
2. SYMPTOM: THE WALKING BELT DOES NOT
MOVE SMOOTHLY
a. If the walk-
ing belt
is overtightened,
performance
may be
reduced and
the walking
belt may be
permanently
damaged.
Using the
hex key,
turn both
rear roller adjustment screws counterclockwise
1/4 of a turn. When the walking belt is properly
tightened, you should be able to lift each edge
of the walking belt 2 to 3 in. (5 to 7 cm) off the
walking platform. Be careful to keep the walking belt centered. Walk on the treadmill for a few
minutes. Repeat until the walking belt is properly
tightened.
Walking Belt
2 –3 in.
Screws
3. SYMPTOM: THE WALKING BELT SLIPS OR IS
OFF-CENTER
a. If the walk-
ing belt slips
when walked
on, use the
hex key to turn
both adjustment screws
clockwise,
1/4 of a turn. When the walking belt is properly
tightened, you should be able to lift each edge of
the walking belt 2 to 3 in. (5 to 7 cm) off the walking platform. Be careful to keep the walking belt
centered. Walk on the treadmill for a few minutes.
Repeat until the walking belt is properly
tightened.
b. If the walk-
ing belt has
shifted to
the left side,
use the hex
key to turn
the left adjustment screw
clockwise, and the right adjustment screw counterclockwise, 1/4 of a turn each. Be careful not to
overtighten the walking belt. Walk on the treadmill for a few minutes. Repeat until the walking
belt is centered.
c. If the walk-
ing belt has
shifted to the
right side,
use the hex
key to turn
the left adjustment screw
counterclockwise, and the right adjustment screw
clockwise, 1/4 of a turn each. Be careful not to
overtighten the walking belt. Walk on the treadmill for a few minutes. Repeat until the walking
belt is centered.
14
Page 15
EXERCISE GUIDELINES
WARNING: Before beginning this
or any exercise program, consult your physician. This is especially important for persons
over age 35 or persons with pre-existing
health problems.
Aerobic Exercise—Ifyourgoalistostrengthenyour
cardiovascular system, you must perform aerobic
exercise, which is activity that requires large amounts
of oxygen for prolonged periods of time. For aerobic
exercise, adjust the intensity of your exercise until your
heart rate is near the highest number in your training
zone.
These guidelines will help you to plan your exercise
program. For detailed exercise information, obtain a
reputable book or consult your physician. Remember,
proper nutrition and adequate rest are essential for
successful results.
EXERCISE INTENSITY
Whether your goal is to burn fat or to strengthen your
cardiovascular system, exercising at the proper intensity is the key to achieving results. You can use your
heart rate as a guide to find the proper intensity level.
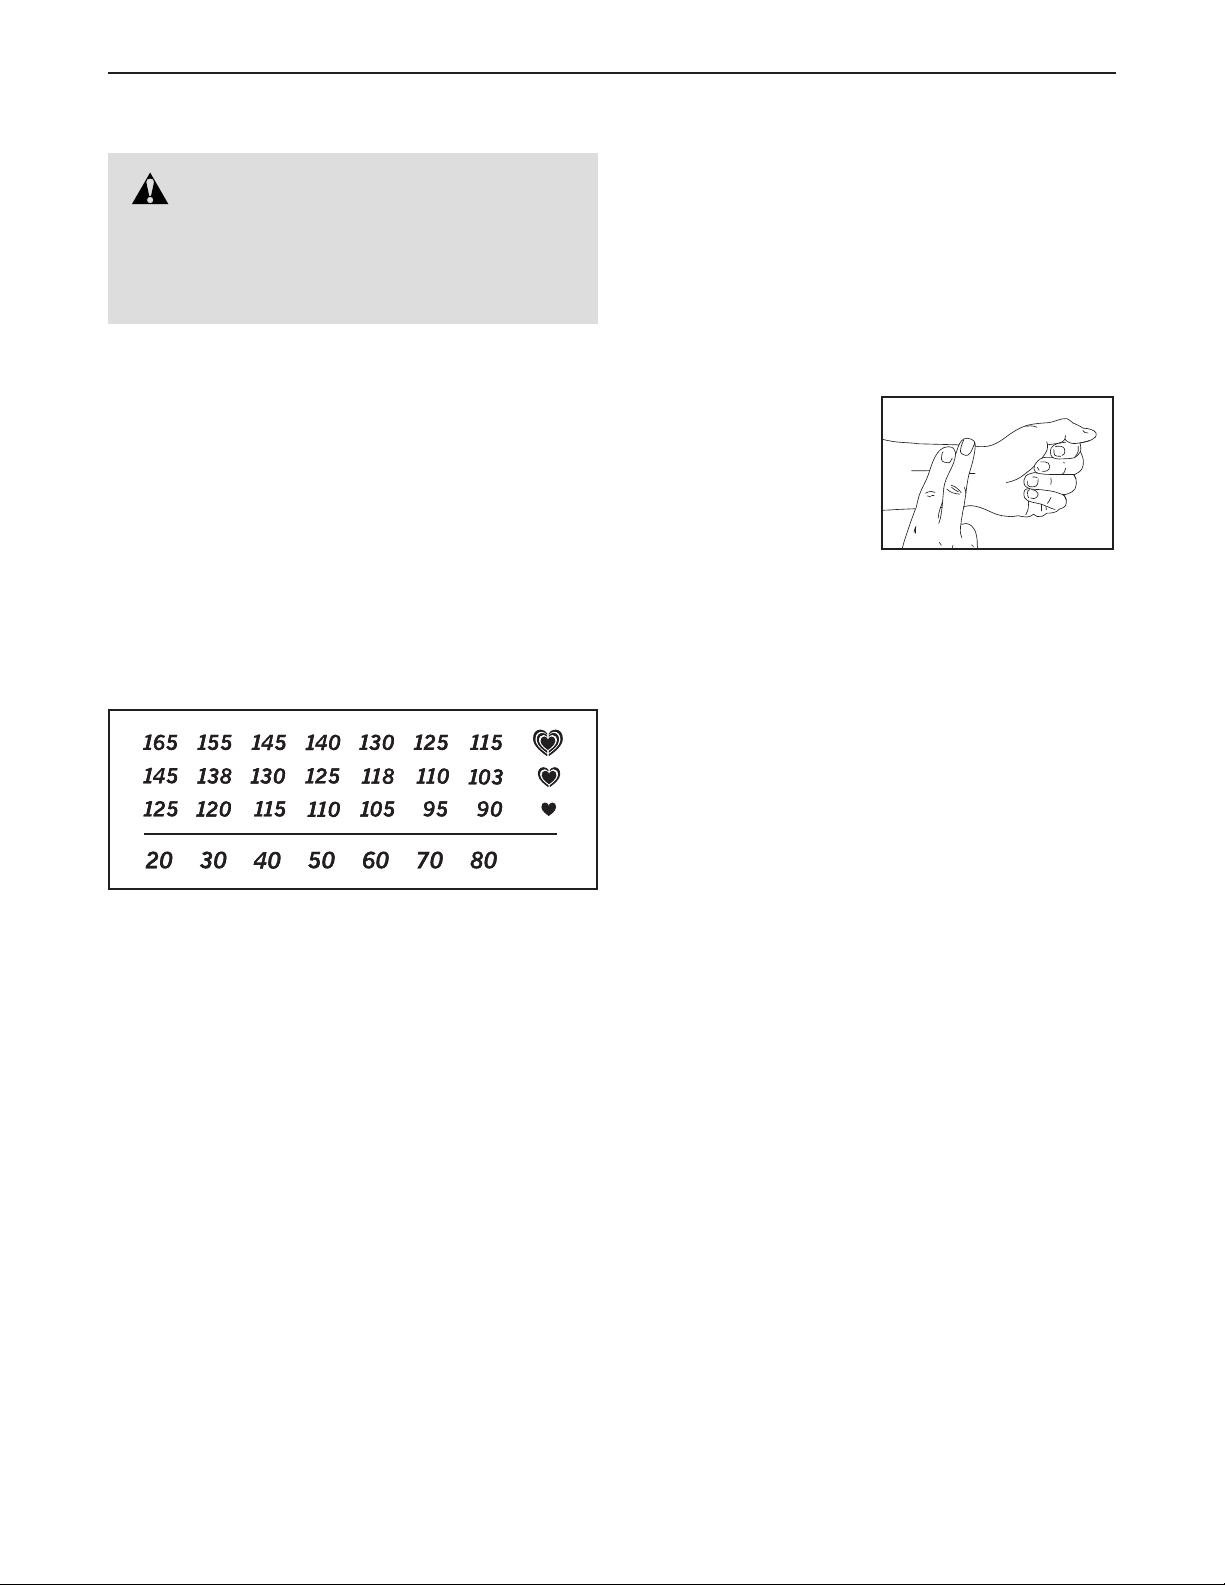
The chart below shows recommended heart rates for
fat burning and aerobic exercise.
To find the proper intensity level, find your age at the
bottom of the chart (ages are rounded off to the nearest ten years). The three numbers listed above your
age define your “training zone.” The lowest number is
the heart rate for fat burning, the middle number is the
heart rate for maximum fat burning, and the highest
number is the heart rate for aerobic exercise.
HOW TO MEASURE YOUR HEART RATE
To measure your heart
rate, exercise for at least
four minutes. Then, stop
exercising and place
two fingers on your
wrist as shown. Take
a six-second heartbeat
count, and multiply the
result by 10 to find your heart rate. For example, if your
six-second heartbeat count is 14, your heart rate is 140
beats per minute.
WORKOUT GUIDELINES
Warming Up—Startwith5to10minutesofstretch-
ing and light exercise. A warm-up increases your body
temperature, heart rate, and circulation in preparation
for exercise.
Training Zone Exercise—Exercisefor20to30min-
utes with your heart rate in your training zone. (During
the first few weeks of your exercise program, do not
keep your heart rate in your training zone for longer
than 20 minutes.) Breathe regularly and deeply as you
exercise; never hold your breath.
Cooling Down—Finishwith5to10minutesofstretch-
ing. Stretching increases the flexibility of your muscles
and helps to prevent post-exercise problems.
Burning Fat—Toburnfateffectively,youmustexer-
cise at a low intensity level for a sustained period of
time. During the first few minutes of exercise, your
body uses carbohydrate calories for energy. Only after
the first few minutes of exercise does your body begin
to use stored fat calories for energy. If your goal is to
burn fat, adjust the intensity of your exercise until your
heart rate is near the lowest number in your training
zone. For maximum fat burning, exercise with your
heart rate near the middle number in your training
zone.
EXERCISE FREQUENCY
To maintain or improve your condition, complete three
workouts each week, with at least one day of rest
between workouts. After a few months of regular exercise, you may complete up to five workouts each week,
if desired. Remember, the key to success is to make
exercise a regular and enjoyable part of your everyday
life.
15
Page 16

Get it fixed, at your home or ours!
Your Home
For repair—in your home—of all major brand appliances, lawn and garden equipment,
or heating and cooling systems, no matter who made it, no matter who sold it!
For the replacement parts, accessories, and user’s manuals that you need to do-it-yourself.
For Sears professional installation of home appliances
and items like garage door openers and water heaters.
1-800-4-MY-HOME
Call anytime, day or night (U.S.A. and Canada)
www.sears.com www.sears.ca
Our Home
For repair of carry-in items like vacuums, lawn equipment,
and electronics, call or go on-line for the location of your nearest
Sears Parts & Repair Center.
®
(1-800-469-4663)
1-800-488-1222
Call anytime, day or night (U.S.A. only)
www.sears.com
To purchase a protection agreement (U.S.A.)
or maintenance agreement (Canada) on a product serviced by Sears:
1-800-827-6655
(U.S.A.) 1-800-361-6665 (Canada)
Para pedir servicio de reparación a domicilio, y para ordenar piezas:
®
1-888-SU-HOGAR
® Registered Trademark /
® Marca Registrada /
TM
TM
Trademark /
Marca de Fábrica /
(1-888-784-6427)
SM
Service Mark of Sears Brands, LLC
SM
Marca de Servicio de Sears Brands, LLC
90-DAY FULL WARRANTY
If this Sears Treadmill Exerciser fails due to a defect in material or workmanship within 90 days of the
date of purchase, call 1-800-4-MY-HOME® (1-800-469-4663) to arrange for free repair (or replacement
if repair proves impossible). The frame and drive motor are warranted for five (5) years from the date of
purchase.
This warranty does not apply when the Treadmill Exerciser is used commercially or for rental purposes.
This warranty gives you specific legal rights, and you may also have other rights which vary from state to
state.
Sears, Roebuck and Co., Hoffman Estates, IL 60179
Part No. 340701 R1112A Printed in China © 2012 ICON IP, Inc.
 Loading...