

Page 1
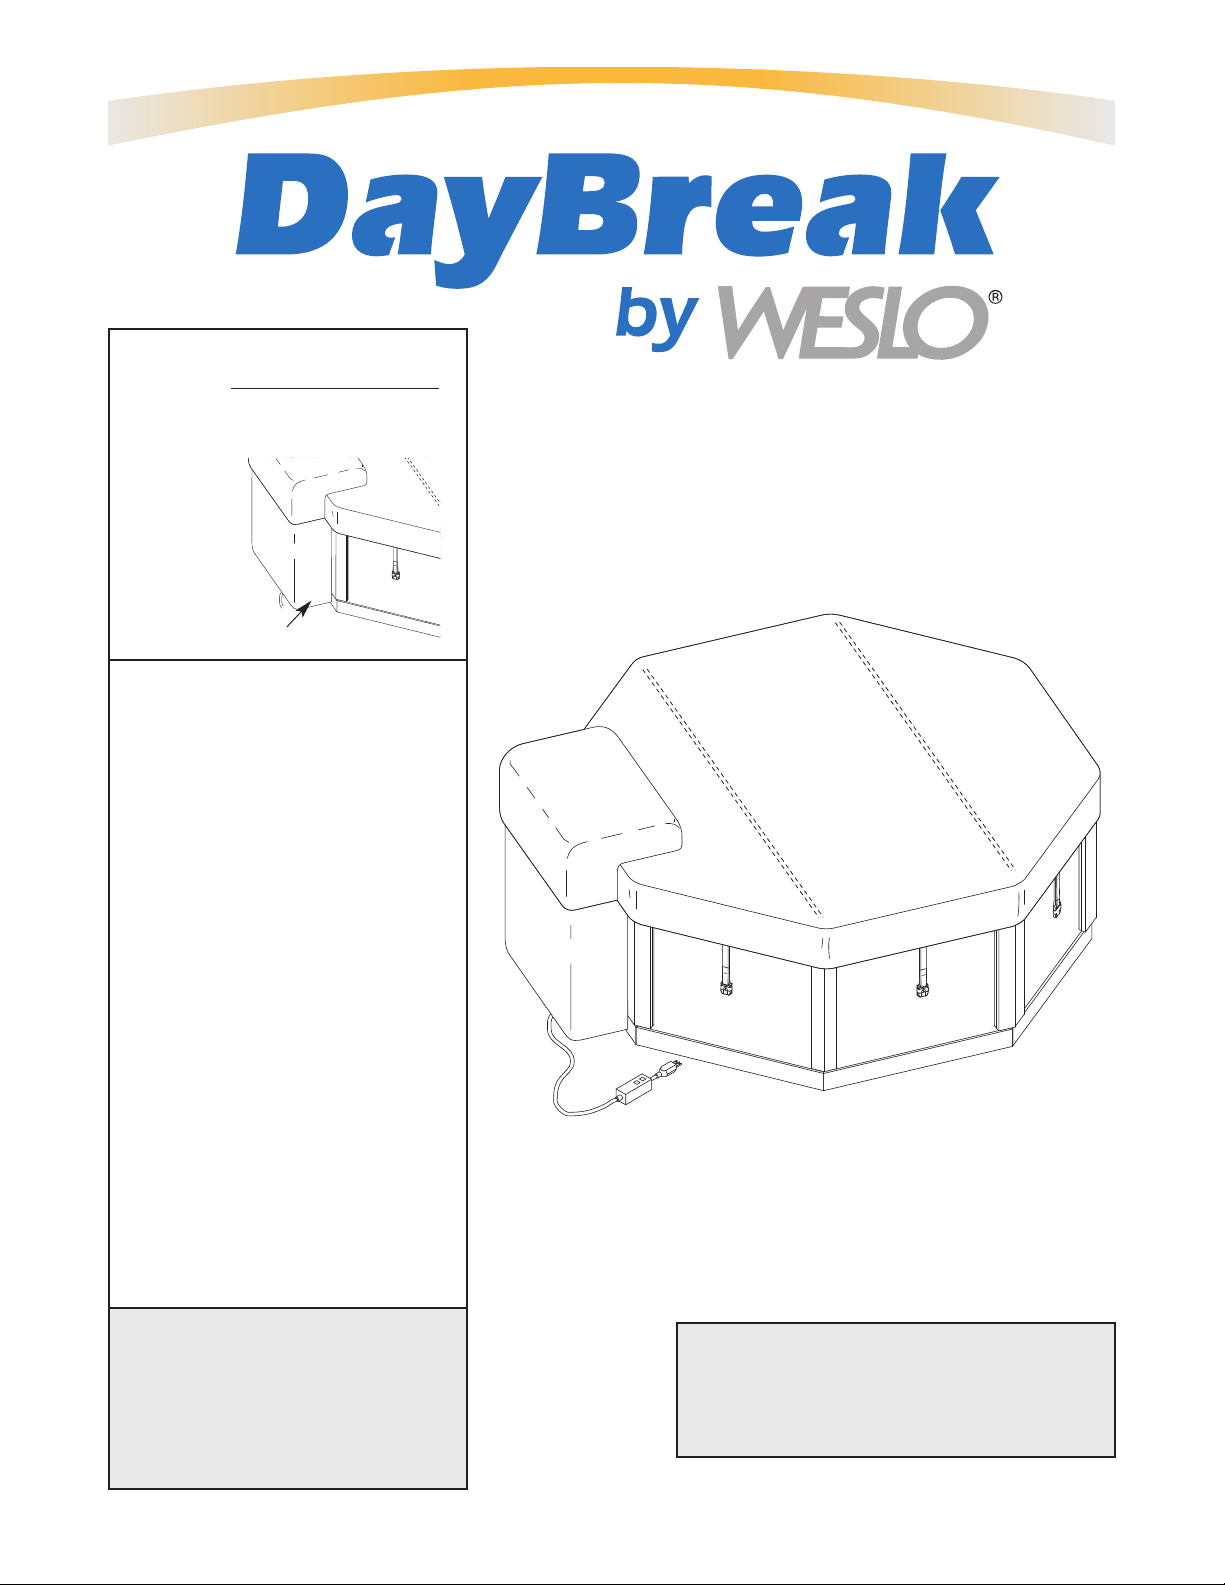
Model No. 831.100413
Serial No.
Write the serial number in the space
above for reference.
Serial Number Decal
QUESTIONS?
As a manufacturer, we are committed to providing complete
customer satisfaction. If you
have questions, or find that there
are missing or damaged parts,
we will guarantee you complete
satisfaction through direct assistance from our factory.
TO AVOID UNNECESSARY
DELAYS, PLEASE CALL DIRECT
TO OUR TOLL-FREE CUSTOMER
HOT LINE. The trained technicians on our Customer Hot Line
will provide immediate assistance, free of charge to you.
CUSTOMER HOT LINE:
1-888-936-4266
Mon.–Fri., 9 a.m.–5 p.m. EST
CAUTION
Read all precautions and instructions in this manual before using
this equipment. Save this manual
for future reference.
Patent Pending
USER'S MANUAL
A pH testing kit (not included) is required
for proper use and maintenance of the
DAYBREAK. A pH testing kit can be purchased at any spa or pool supply store.
SEARS CANADA, INC., TORONTO, ONTARIO M5B 2B8
Page 2

LIMITED FIVE YEAR MASSAGE SPA WARRANTY
ICON OF/DU CANADA INC., (ICON), warrants this product to be free from defects in workmanship and
material, under normal use and service conditions, for a period of ninety (90) days from the date of pur-
hase. ICON extends a limited five (5) year warranty on the spa shell structure. ICON also extends a lim-
c
ited two (2) year warranty on the pump and motor. This warranty extends only to the original purchaser.
ICON's obligation under this warranty is limited to replacing or repairing, at ICON's option, the product
through one of its authorized service centers. All repairs for which warranty claims are made must be preauthorized by ICON. This warranty does not extend to any product or damage to a product caused by or
attributable to freight damage, abuse, misuse, improper or abnormal usage, or repairs not provided by
ICON authorized service personnel, to products used for commercial or rental purposes, or to products
used as store display models. Specifically excluded are damages caused by or attributable to the following incidents: any damage to the wood exterior resulting from improper maintenance, or any damage to
the wood or tile exterior attributable to freight mishandling; damage resulting from improper winterization;
damage to the spa shell resulting from improper chemical treatment, damage to the spa shell resulting
from exposure to extreme temperatures, or damage to the spa shell resulting from exposure to direct sunlight and ultraviolet rays while the spa is empty; damage to the pump, motor, plumbing, and components
due to improper maintenance, chemical treatment, or exposure; damage resulting from failure to properly follow userʼs manual installation, operating, or maintenance instructions. Also excluded are consumable
components, including but not restricted to headrests, filter cartridges, and light bulbs. No other warranty
beyond that specifically set forth above is authorized by ICON.
ICON is not responsible or liable for indirect, special or consequential damages arising out of or in connection with the use or performance of the product or damages with respect to any economic loss, loss
of or damage to property including water damage, loss of revenues or profits, loss of enjoyment or use,
costs of removal, installation or other consequential damages of whatsoever nature. Some provinces do
not allow the exclusion or limitation of incidental or consequential damages. Accordingly, the above limitation may not apply to you.
The warranty extended hereunder is in lieu of any and all other warranties and any implied warranties of
merchantability or fitness for a particular purpose is limited in its scope and duration to the terms set forth
herein. Some provinces do not allow limitations on how long an implied warranty lasts. Accordingly, the
above limitation may not apply to you.
This warranty gives you specific legal rights. You may also have other rights which vary from province to
province.
ICON OF/DU CANADA, 900 de lʼIndustrie, St. Jerôme, QC J7Y 4B8
2
Page 3

TABLE OF CONTENTS
LIMITED WARRANTY . . . . . . . . . . . . . . . . . . . . . . . . . . . . . . . . . . . . . . . . . . . . . . . . . . . . . . . . . . . . . . . . . . . . . . .2
IMPORTANT SAFETY INSTRUCTIONS . . . . . . . . . . . . . . . . . . . . . . . . . . . . . . . . . . . . . . . . . . . . . . . . . . . . . . . .4
WARNING DECAL PLACEMENT . . . . . . . . . . . . . . . . . . . . . . . . . . . . . . . . . . . . . . . . . . . . . . . . . . . . . . . . . . . . . .6
EFORE YOU BEGIN . . . . . . . . . . . . . . . . . . . . . . . . . . . . . . . . . . . . . . . . . . . . . . . . . . . . . . . . . . . . . . . . . . . . . .7
B
CHOOSING A LOCATION FOR THE DAYBREAK . . . . . . . . . . . . . . . . . . . . . . . . . . . . . . . . . . . . . . . . . . . . . . . . .8
ASSEMBLY . . . . . . . . . . . . . . . . . . . . . . . . . . . . . . . . . . . . . . . . . . . . . . . . . . . . . . . . . . . . . . . . . . . . . . . . . . . . . . .9
USING THE DAYBREAK . . . . . . . . . . . . . . . . . . . . . . . . . . . . . . . . . . . . . . . . . . . . . . . . . . . . . . . . . . . . . . . . . . .13
MAINTENANCE . . . . . . . . . . . . . . . . . . . . . . . . . . . . . . . . . . . . . . . . . . . . . . . . . . . . . . . . . . . . . . . . . . . . . . . . . .16
TROUBLE-SHOOTING . . . . . . . . . . . . . . . . . . . . . . . . . . . . . . . . . . . . . . . . . . . . . . . . . . . . . . . . . . . . . . . . . . . . .17
WIRING DIAGRAM . . . . . . . . . . . . . . . . . . . . . . . . . . . . . . . . . . . . . . . . . . . . . . . . . . . . . . . . . . . . . . . . . . . . . . . .18
PART LIST . . . . . . . . . . . . . . . . . . . . . . . . . . . . . . . . . . . . . . . . . . . . . . . . . . . . . . . . . . . . . . . . . . . . . . . . . . . . . .19
EXPLODED DRAWING . . . . . . . . . . . . . . . . . . . . . . . . . . . . . . . . . . . . . . . . . . . . . . . . . . . . . . . . . . . . . . . . . . . .20
CUSTOMER RECORD . . . . . . . . . . . . . . . . . . . . . . . . . . . . . . . . . . . . . . . . . . . . . . . . . . . . . . . . . . . . . . . . . . . . .21
ORDERING REPLACEMENT PARTS . . . . . . . . . . . . . . . . . . . . . . . . . . . . . . . . . . . . . . . . . . . . . . . . . . . . . . . . .22
3
Page 4

IMPORTANT SAFETY INSTRUCTIONS
WARNING: To reduce the risk of drowning, electric shock, or serious injury, read the following
mportant precautions before using the DAYBREAK.
i
READ AND FOLLOW ALL INSTRUCTIONS
1. It is the responsibility of the owner to ensure
that all users of the DAYBREAK are adequately informed of all precautions.
2. Use the DAYBREAK only as described in this
manual.
3. The DAYBREAK is intended for home use
only. Do not use the DAYBREAK in any commercial, rental, or institutional setting.
4. Use the DAYBREAK only on a level surface.
Do not use the DAYBREAK on carpet or
other materials that could be damaged by
moisture. Do not use the DAYBREAK on
rough or sharp surfaces such as gravel or
wood chips.
5. The DAYBREAK will weigh approximately
1600 pounds when it is assembled and filled
with water. Be sure that the location you
select for the DAYBREAK will support this
weight, plus the weight of the occupants.
6. Inspect and tighten all parts regularly.
Replace any worn parts immediately.
7. DANGER—Risk of injury: Do not remove or
alter the covers on the suction fittings. Never
operate the DAYBREAK if the suction guard
is missing or broken. Keep hair and body
away from the suction guard. If you need to
replace a suction fitting, be sure that the flow
rate of the replacement is compatible.
13. Keep all chemicals away from children and
pets.
14. The pH and chemical balance of the water
must be maintained as explained in this manual (see page 16). Failure to do so may cause
injury to users or damage to the spa jet unit,
and will void the warranty.
15. The water pump in the spa jet unit must be
primed before you use the DAYBREAK the
first time. You must also prime the pump
before using the unit each time you re-fill the
spa. The spa jet unit may be seriously damaged if the pump is not properly primed (see
PRIMING THE SPA JET UNIT on page 13).
16. DANGER—When connecting the power cord
(see PLUGGING IN THE DAYBREAK on page
12), plug the power cord directly into a
grounded circuit capable of carrying 15 or
more amps. No other appliance should be on
the same circuit. Replace the power cord
immediately if damaged.
17. Do not use an extension cord with the DAYBREAK. This could damage the motor and
will void the warranty.
18. DANGER—If you will be using the DAYBREAK outside, do not bury the power cord;
you should also keep the power cord away
from lawn mowers, hedge trimmers, and
other similar equipment.
8. Do not bring any object into the DAYBREAK
that could puncture the liner.
9. Never insert any object into any opening.
10. Do not sit on the spa cover or place objects
on it. It is not designed to support weight.
11. Remove any water which may collect on the
spa cover.
12. Keep children under 12 and pets away from
the DAYBREAK when it is not in use.
19. WARNING—The power cord is equipped with
a Ground Fault Circuit Interrupter (GFCI),
located at the end of the power cord. The
GFCI must be tested before each use. To test
the GFCI, press the “test” button while the
spa jet unit is running. The spa jet unit
should shut off. Press the “reset” button.
The spa jet unit should resume normal operation. If the spa jet unit continues to run after
the “test” button is pressed, then the GFCI is
damaged. Do not use the DAYBREAK until
the GFCI has been repaired or replaced by a
qualified electrician.
4
Page 5

20. Keep all electrical appliances such as radios,
telephones, televisions, and lights at least
five feet (1.52 meters) away from the water.
21. A wire connector is provided on the pump
motor of this unit to connect a minimum No.
8 AWG (804 mm2) solid copper conductor
between this unit and any metal equipment,
electrical enclosure made of metal, metal
water pipes, or conduit within five feet
(1.52m) of the unit.
22. DANGER—Risk of electric shock: Do not set
up the DAYBREAK within five feet of any
metal objects or surfaces. As an alternative,
you may use the DAYBREAK within five feet
of metal objects if each metal object is permanently connected to the wire connector on
the pump motor of this unit by a minimum
No. 8 AWG (804 mm2) solid copper conductor
(see instruction 21).
23. DANGER—Risk of drowning: Exercise
extreme caution to prevent unauthorized and
unsupervised use of the DAYBREAK by children. Children must always be supervised.
24. DANGER—To reduce the risk of drowning:
• Never use the DAYBREAK alone;
• Children should not use the DAYBREAK
unless they are supervised by an adult;
• Keep pets away from the DAYBREAK at all
times;
• Always replace and lock the spa cover
when the DAYBREAK is not in use.
25. WARNING—To reduce the risk of injury: The
water temperature should never exceed
104°F (40°C). Temperatures between 100°F
(38°C) and 104°F (40°C) are considered to be
safe for healthy adults. However, if you plan
to remain in the DAYBREAK for more than
10 to 15 minutes, a lower temperature is recommended. Lower temperatures are also recommended for children.
26. WARNING—To reduce the risk of injury:
Always use an accurate thermometer to
determine the water temperature before
using the DAYBREAK.
27. WARNING—To reduce the risk of injury:
Pregnant women should consult with their
physician before using the DAYBREAK.
Pregnant women should not use the DAYBREAK if the water temperature is above
100°F (38°C); the unborn child could be seriously harmed.
28. DANGER—To reduce the risk of drowning:
Prolonged immersion in the DAYBREAK may
cause hyperthermia, a dangerous condition
which occurs when the internal body temperature rises several degrees above the normal
body temperature of 98.6°F. The symptoms of
hyperthermia are nausea, dizziness, drowsiness, and fainting. Effects include: a lack of
awareness, inability to perceive heat or danger, and a greater risk of drowning due to a
loss of consciousness. Special note:
Individuals suffering from hyperthermia may
be unable to realize that they must exit the
DAYBREAK, and they also may be physically
unable to do so.
29. WARNING—To reduce the risk of drowning:
Heat from the water, in conjunction with alcohol or drugs can cause unconsciousness. Do
not use the DAYBREAK if you are under the
influence of drugs or alcohol.
30. WARNING—To reduce the risk of injury or
drowning: Consult your physician about possible side-effects of any medications you
may be taking before using the DAYBREAK.
Heat from the water, in conjunction with some
medications may cause drowsiness and
increase the risk drowning. Others can effect
blood pressure, heart rate, and circulation.
31. WARNING—To reduce the risk of injury: It is
especially important for persons over the age
of 35 or persons with pre-existing health
problems, such as obesity, heart disease,
high or low blood pressure, circulatory problems, or diabetes to consult your physician
before using this product.
32. If you feel pain or dizziness at any time while
using the DAYBREAK, discontinue use and
contact a physician.
WARNING: Read all instructions before using the DAYBREAK. ICON assumes no responsibility for
personal injury or property damage sustained by or through the use of this product.
SAVE THESE INSTRUCTIONS
5
Page 6
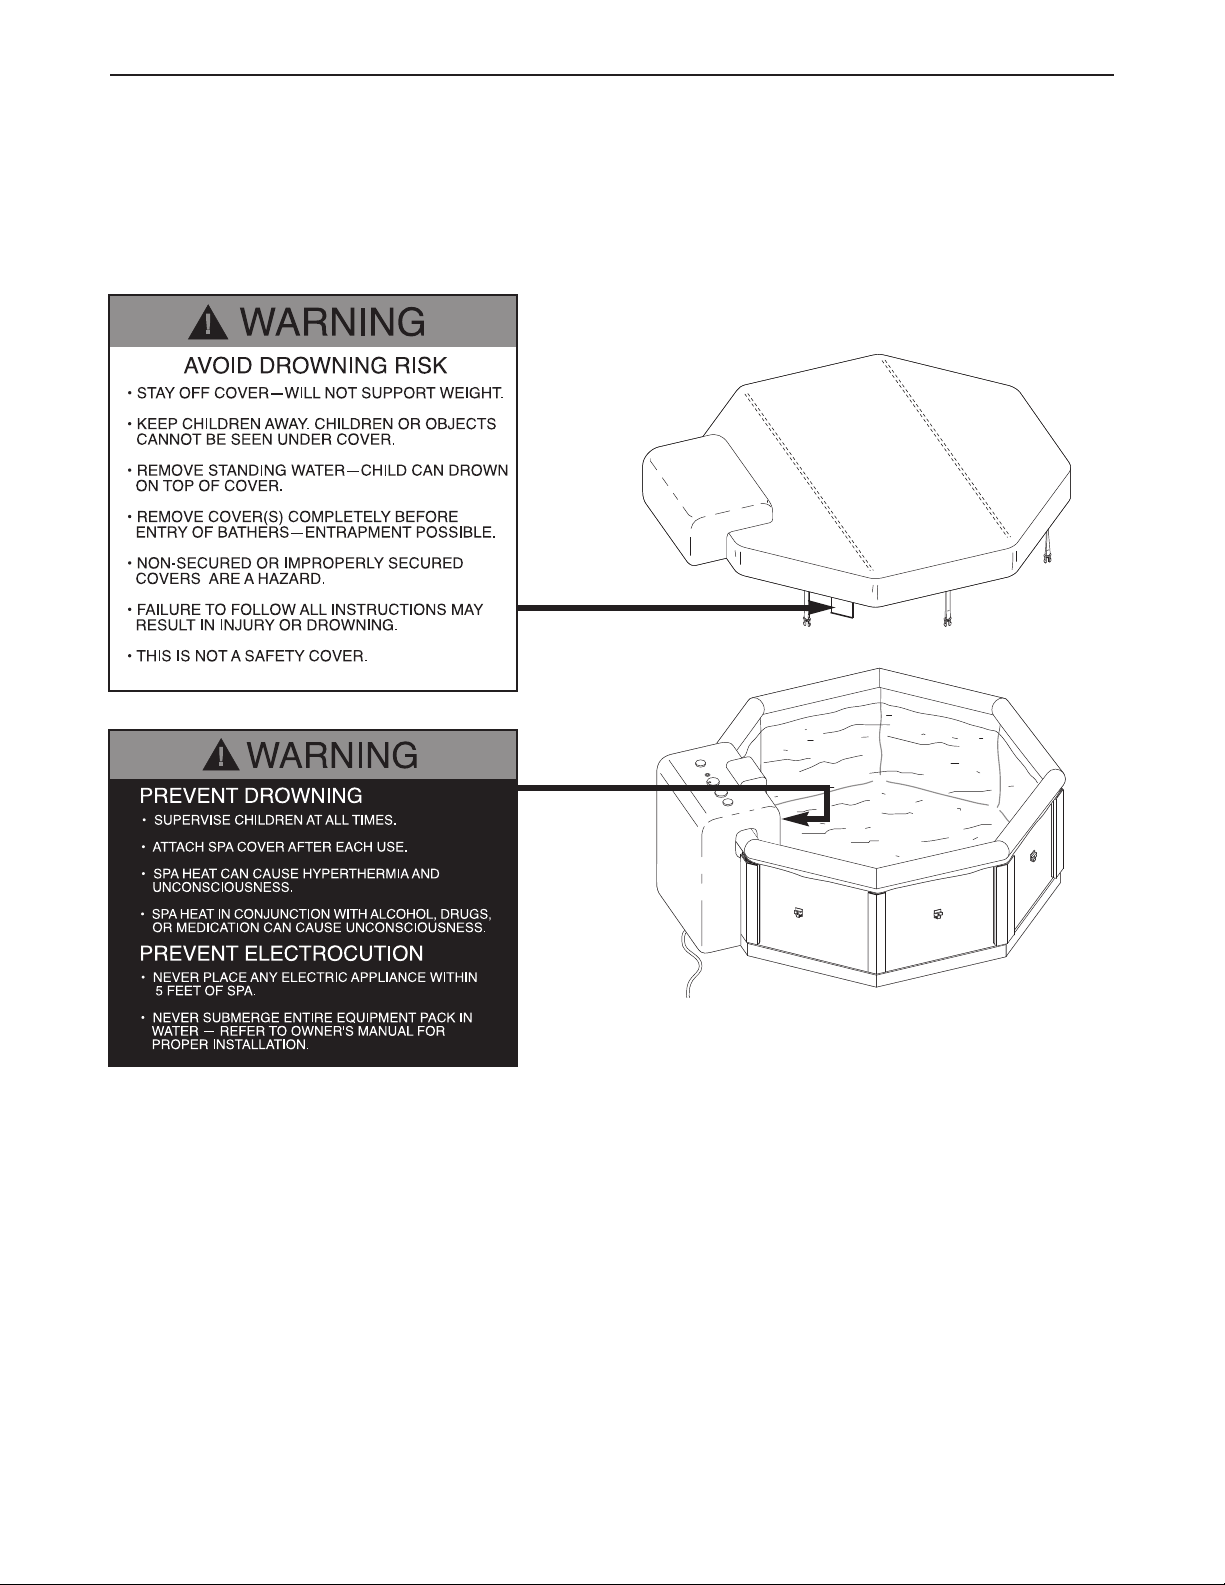
WARNING DECAL PLACEMENT
The decals shown below have been placed on the DAYBREAK. If a decal is missing, or if it is not legible,
lease call our Customer Service Department toll-free at 1-888-936-4266, Monday through Friday, 9 a.m.
p
until 5 p.m EST (excluding holidays), to order a replacement decal. Apply the decal in the location
shown.
6
Page 7
BEFORE YOU BEGIN
Thank you for selecting the DAYBREAK by WESLO®.
The innovative DAYBREAK offers the features and
quality of a traditional hot tub at an affordable price.
Best of all, the DAYBREAK is fully portable, so you
can take it wherever there is an electrical outlet. The
DAYBREAK allows you to relax and unwind in the
comfort of your own home.
For your benefit, read this manual carefully before
using the DAYBREAK by WESLO®. If you have addi-
tional questions, please call our Customer Service
Console (Under
Spa Cover)
Department toll-free at 1-888-936-4266, Monday
through Friday, 9 a.m. until 5 p.m EST (excluding holidays). To help us assist you, please note the product
model number and serial number before calling. The
model number is 831.100413. The serial number can
be found on a decal attached to spa jet unit (see the
front cover of this userʼs manual).
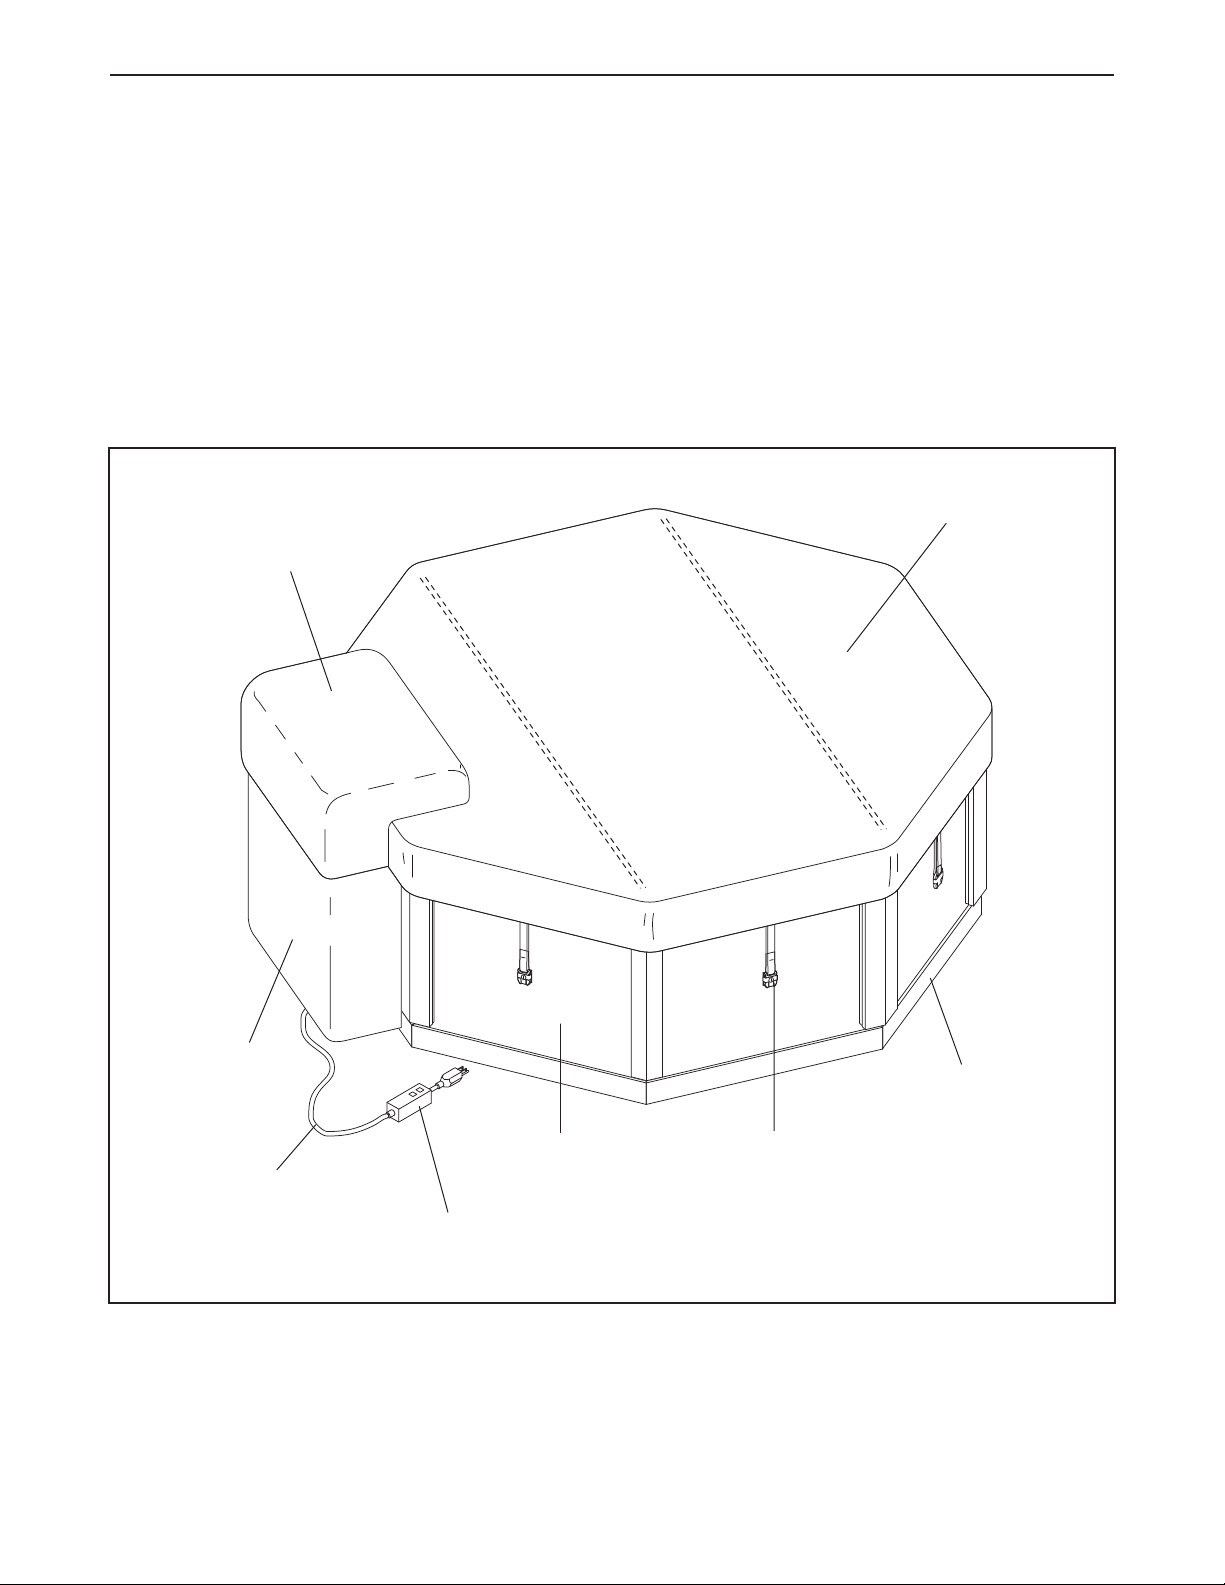
Before reading further, please familiarize yourself with
the parts that are labeled in the drawing below.
Spa Cover
Spa Jet
Unit
Power Cord
Side Panel
Ground Fault Circuit
Interrupter (GFCI)
Floor Cap
Locking
Buckle
7
Page 8

CHOOSING A LOCATION FOR THE DAYBREAK
There are many factors to consider when choosing a location to set up the DAYBREAK. These factors vary
depending on whether you use the DAYBREAK inside or outside. We have listed several factors you may wish
to consider as you decide where you want to use the DAYBREAK.
If you set up the DAYBREAK inside:
1. The DAYBREAK will increase the level of humidity
in your home. The location you choose should be
well ventilated. You may need to install a ventilation fan or use a dehumidifier.
2. The location must be close to an electrical outlet.
Do not use an extension cord with the DAYBREAK.
3. The DAYBREAK should be close to a source of
water.
4. Do not use the DAYBREAK on carpet or other
material that may be damaged by moisture. We
recommend that you place the DAYBREAK on a
water- and stain-resistant, non-slip surface with a
floor drain for any water that may splash from the
DAYBREAK.
5. Be sure that the location you choose is stable. It
must be able to support the weight of the DAYBREAK when it is filled with water, plus the weight
of the occupants. The DAYBREAK weighs approximately 1600 pounds when filled with water.
6. Do not use the DAYBREAK above a finished living
area, due to the risk of water damage.
7. Be sure that there is room around the DAYBREAK
to permit servicing of the unit. The diameter of the
tub is 60”. You should allow for this size, plus the
size of the spa jet unit, when choosing the location.
8. Be sure to note any other considerations, such as
aesthetics or privacy concerns, that may affect the
safety or enjoyment of using the DAYBREAK.
If you set up the DAYBREAK outside:
1. You should check your local building codes concerning the use of outdoor spas.
2. The location must be close to an electrical outlet.
Do not use an extension cord with the DAYBREAK.
3. The DAYBREAK should be close to a source of
water.
4. We recommend that you place the DAYBREAK on
a water- and stain-resistant, non-slip surface.
5. Be sure that the location you choose is stable. It
must be able to support the weight of the DAYBREAK when it is filled with water, plus the weight
of the occupants. The DAYBREAK weighs approximately 1600 pounds when filled with water.
6. Think about environmental factors, such as rain,
wind, shade, sunlight, and so forth.
7. You should be able to monitor the use of the DAYBREAK from your home, to prevent unauthorized
use by children.
8. Be sure that there is room around the DAYBREAK
to permit servicing of the unit. The diameter of the
tub is 60”. You should allow for this size, plus the
size of the spa jet unit, when choosing the location.
9. Be sure to note any other considerations, such as
aesthetics or privacy concerns, which may affect
the safety or enjoyment of using the DAYBREAK.
8
Page 9
ASSEMBLY
Before beginning assembly, carefully read the
following information and instructions:
• Place all parts in a cleared area and remove the
packing materials; do not dispose of the packing
materials until assembly is completed.
• Assembly requires two people.
• Tighten all parts as you assemble them, unless
instructed to do otherwise.
1. Before beginning assembly, be sure that you
have read and understand the information in the
box above and on the previous page.
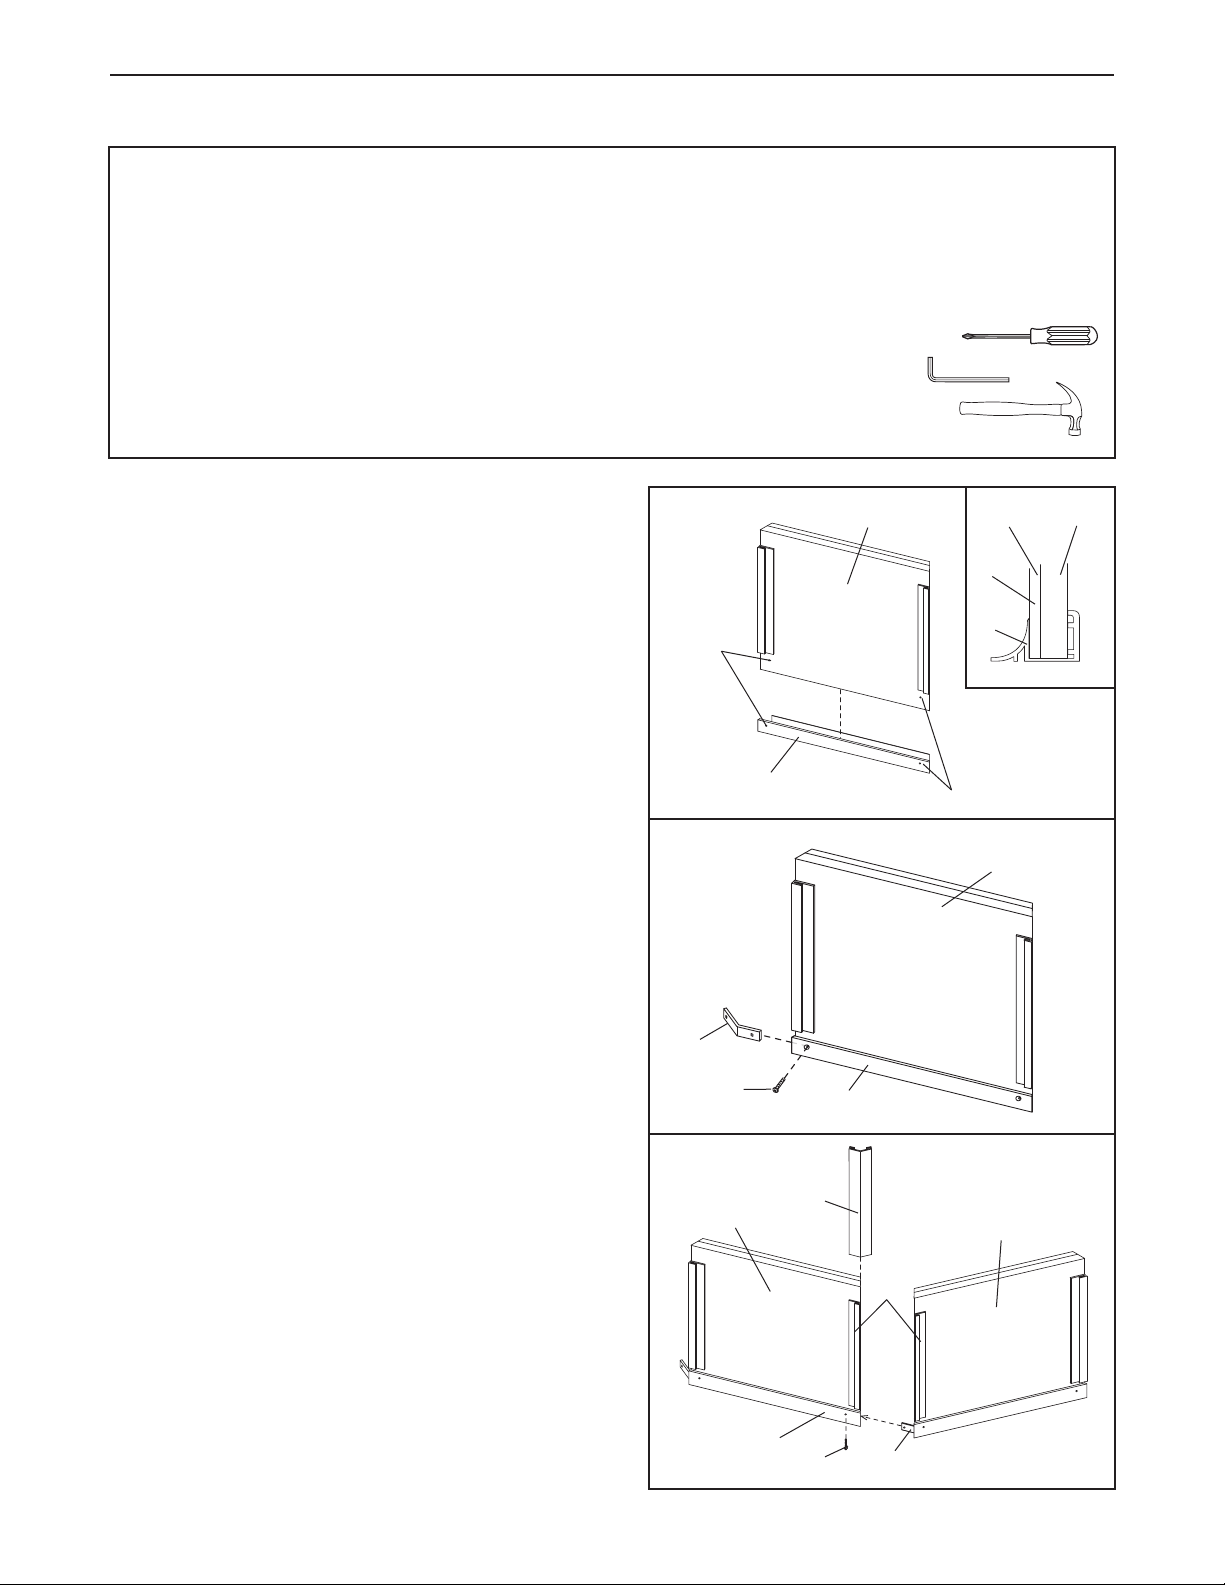
Press a Floor Cap (2) onto the bottom of each of the
eight Side Panels (1). Be sure to align the indicat-
ed holes. The Side Panels must be oriented and
fully inserted in the Floor Caps as shown in the
inset drawing.
• Read each assembly step before you begin.
• During assembly, make sure that all parts are oriented as shown in the drawings.
TOOLS REQUIRED FOR ASSEMBLY:
• Your own phillips screwdriver
• The included allen wrench
• You may also need a hammer
1
Align
these
holes
1
Foam
1
2
Wood
2. Slide an Angle Bracket (3) between one of the Side
Panels (1) and the Floor Cap (2), as shown. Attach
the Angle Bracket to the Side Panel with a Bracket
Screw (4).
Attach an Angle Bracket (3) to each of the remaining
Side Panels (1) in the same manner.
3. Slide two of the Side Panels (1) together as shown.
The indicated Angle Bracket (3) should go
between the Side Panel and the Floor Cap (2).
Slide a Connector Bracket (6) into the Side Brackets
(5). Attach the Angle Bracket to the other Side Panel
with a Bracket Screw (4).
Continue to connect the remaining Side Panels (1) in
the same manner.
2
2
3
4
3
1
2
6
5
Align these holes
1
1
2
4
3
9
Page 10
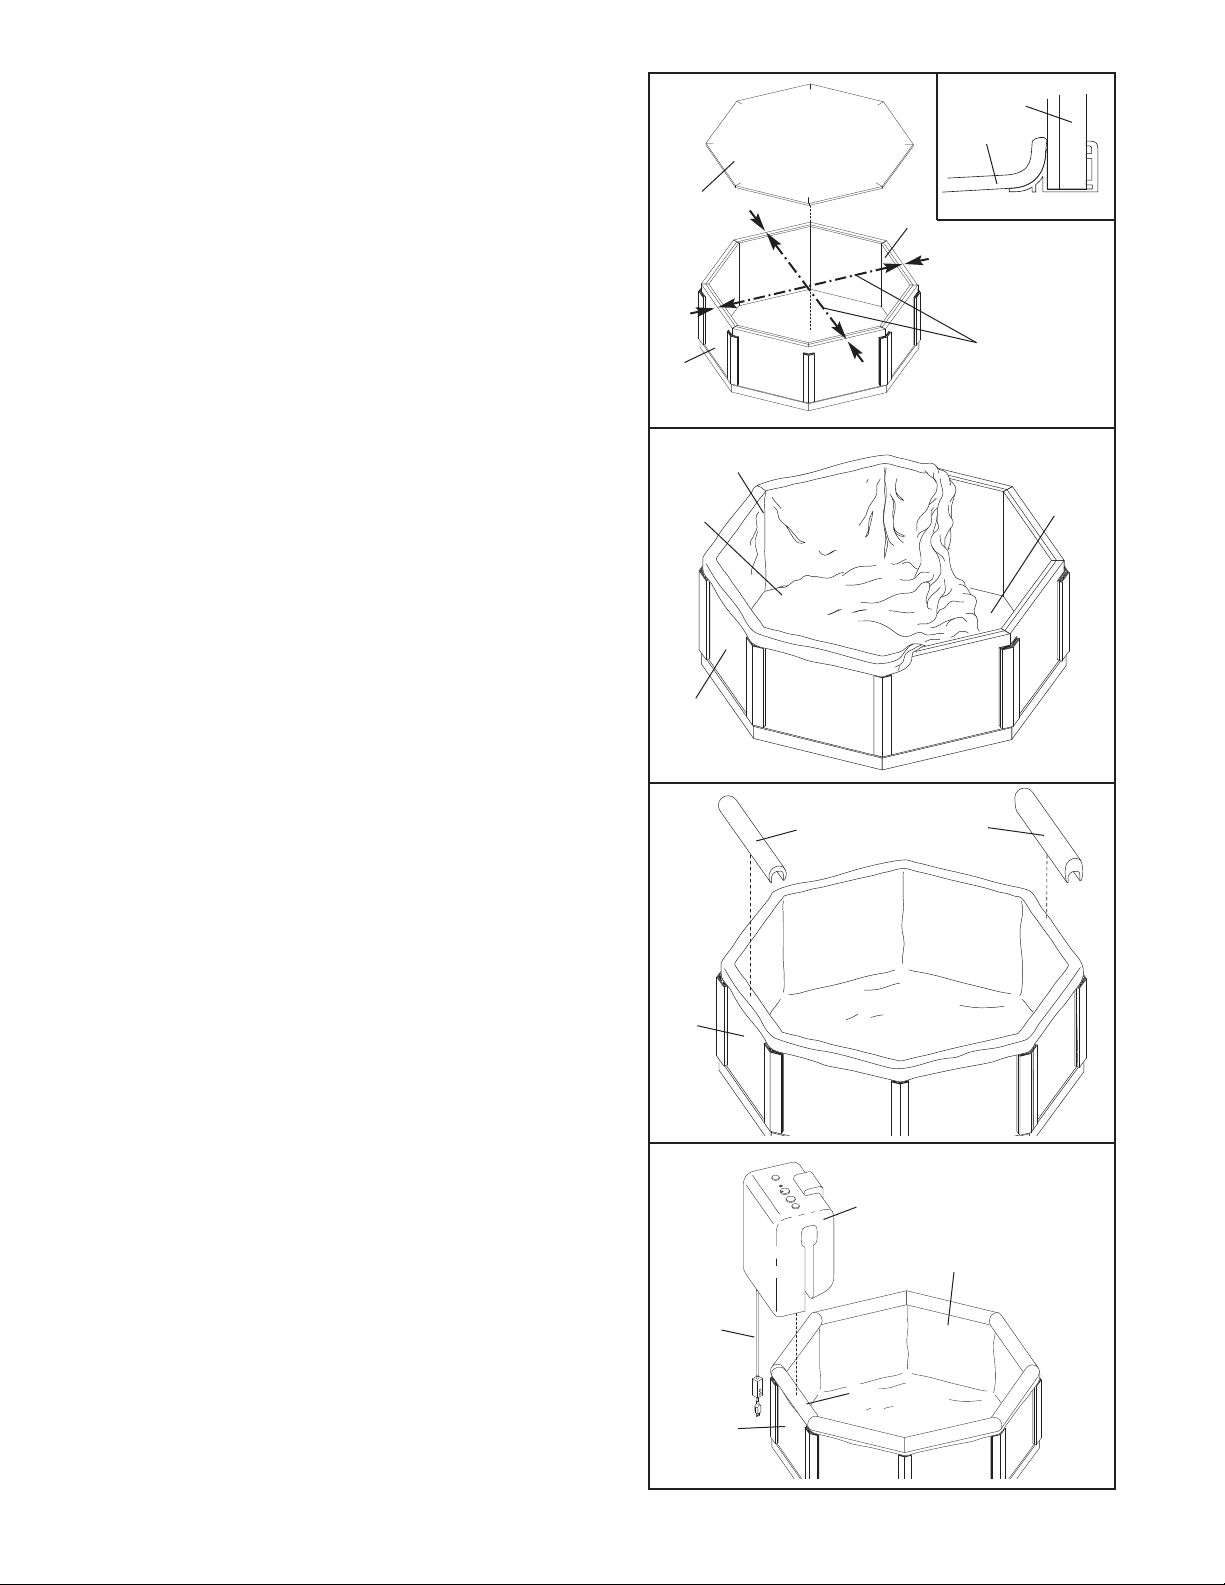
4. Place the Insulated Floor Cover (8) inside the
assembled Side Panels (1). The edge of the
Insulated Floor Cover should cover the bottom two
nches of the Side Panels (see the inset drawing).
i
4
1
8
easure the width of the DAYBREAK, from the top
M
center of one Side Panel (1) to the top center of the
Side Panel directly across from it. Take two measurements, as shown. Both measurements must
be the same. The measurement should be
between 56” and 58”. If the frame is not squared,
the Spa Cover (not shown) will not fit properly. If
necessary, adjust the positions of the Side Panels
so the frame is squared.
5. Place the Spa Liner (9) on top of the Insulated
Floor Cover (8). Smooth out the Spa Liner, working
the wrinkles to the edges. The seam in the Spa
Liner should be lined up with a joint between two of
the Side Panels (1).
Stretch the edge of the Spa Liner (9) over the top of
the Side Panels (1), working the wrinkles to the top.
The edge of the Spa Liner should hang over the
Side Panels about two inches.
8
1
Both
1
5
Seam
9
1
measurements
must be equal
8
6. Place the Small Edge Protector (14) on top of the
Side Panel (1) closest to the electrical outlet which
you will use to power the DAYBREAK. This is the
Side Panel where the Spa Jet Unit (not shown)
will be placed.
Place the seven Edge Protectors (12) around the
top of the remaining Side Panels (1).
7. Remove the power cord from the Spa Jet Unit (13).
Place the Spa Jet Unit over the Side Panel (1) with
the Small Edge Protector (14). Be extremely care-
ful not to tear the Spa Liner (9) as you slide the
Spa Jet Unit into place.
6
1
7
Power
Cord
14
12
13
9
10
14
1
Page 11
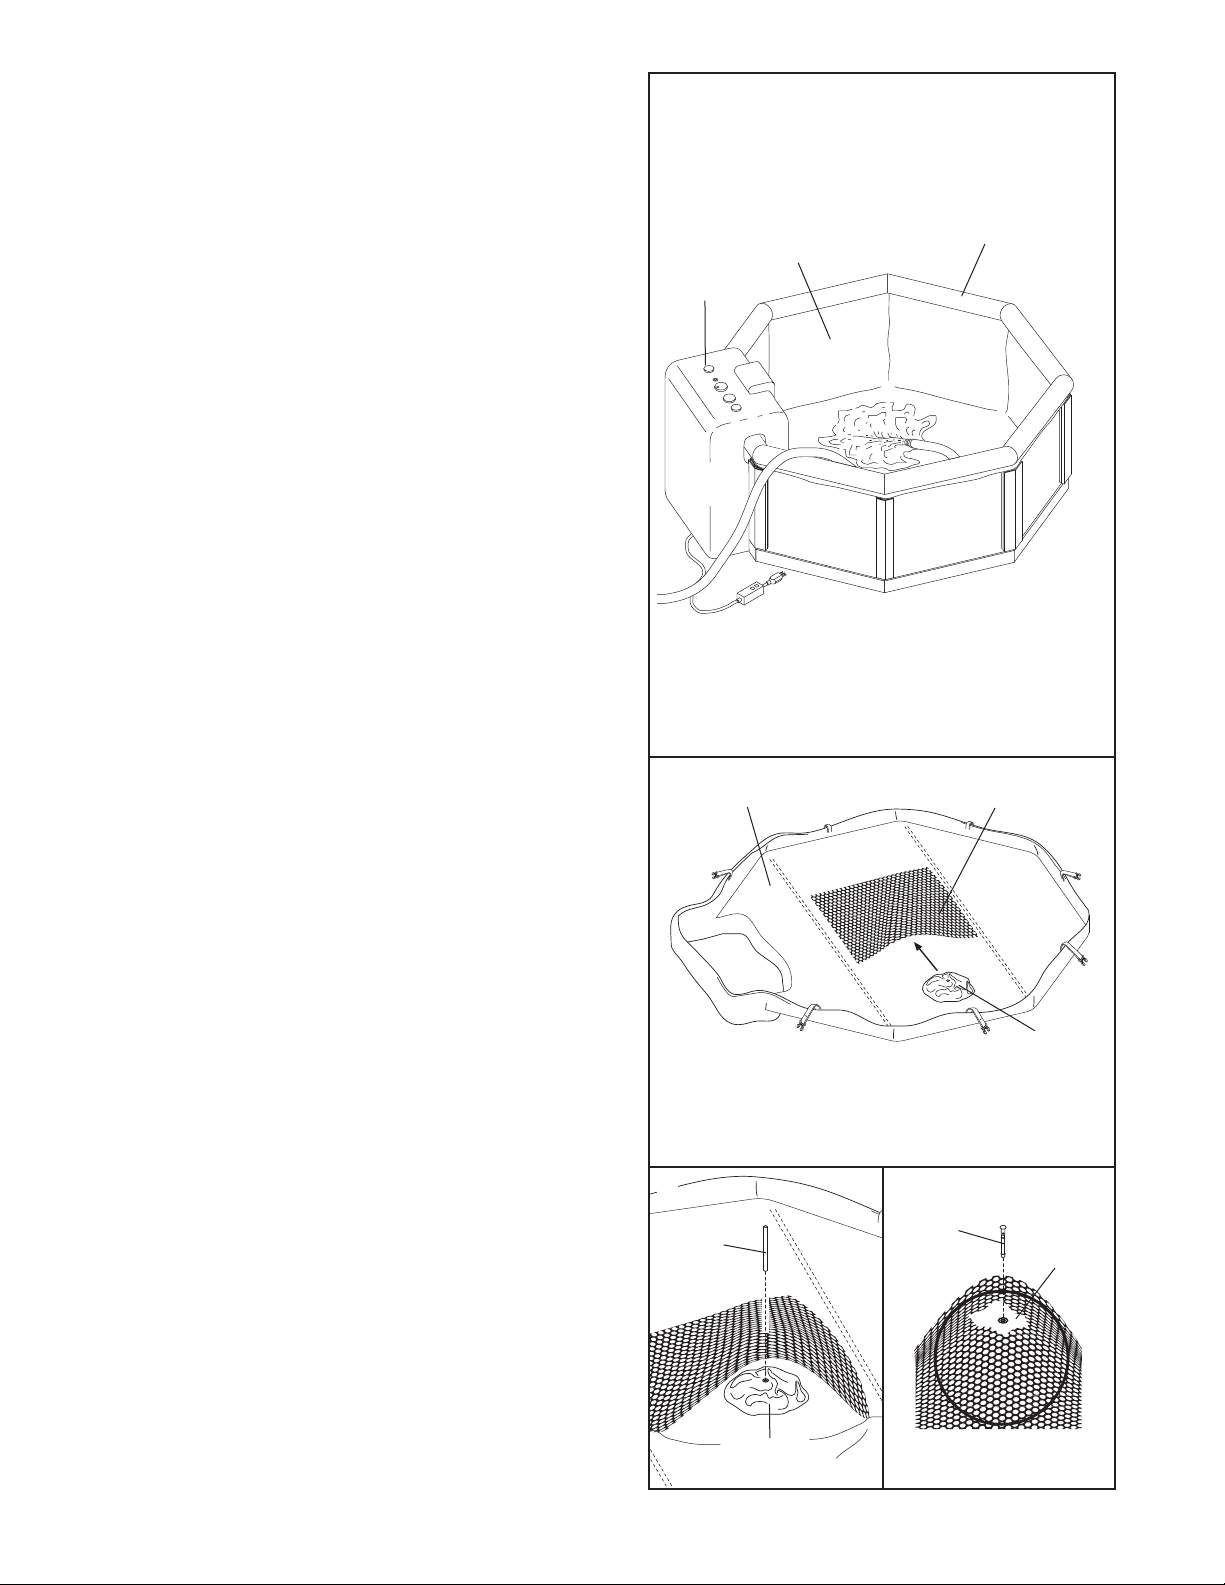
8. Before you fill the DAYBREAK, be sure that it is in
the position you want, and that it can be easily serviced, if needed. Once the DAYBREAK is filled with
ater, it will need to be drained to be moved.
w
sing a garden hose or other clean water source,
U
begin filling the DAYBREAK. Be sure to check for
wrinkles, which may form in the Spa Liner (9) as
the water begins to cover the bottom. It is very
important that you remove as many wrinkles from
the floor and sides of the DAYBREAK as possible.
To do this, you should smooth any wrinkles out
toward the sides, and then smooth the wrinkles to
the top. It is normal to have some wrinkles around
the Spa Jet Unit (13).
Continue to fill the DAYBREAK, until the jet and filter openings on the Spa Jet Unit (13) are covered
with water. Do not fill the DAYBREAK above the
bottoms of the Edge Protectors (12).
After the DAYBREAK is full, you must prime the
Spa Jet Unit (13) before using the DAYBREAK
(see PRIMING THE SPA JET UNIT on page 13).
8
2
9
13
1
9. Insert the Support Ball (15) into the mesh pocket on
the underside of the Spa Cover (11).
See inset drawing A. Insert the inflation tube into
the hole in the Support Ball (15). Inflate the Support
Ball.
See inset drawing B. When the Support Ball (15) is
inflated, remove the inflation tube from the Support
Ball and insert the ball plug through the mesh into
the Support Ball. The head of the ball plug will
hold the Support Ball in place.
Note: The Support Ball (15) is not a toy.
9
Inflation
Tube
11
Mesh Pocket
15
BA
Ball
Plug
15
11
15
Page 12
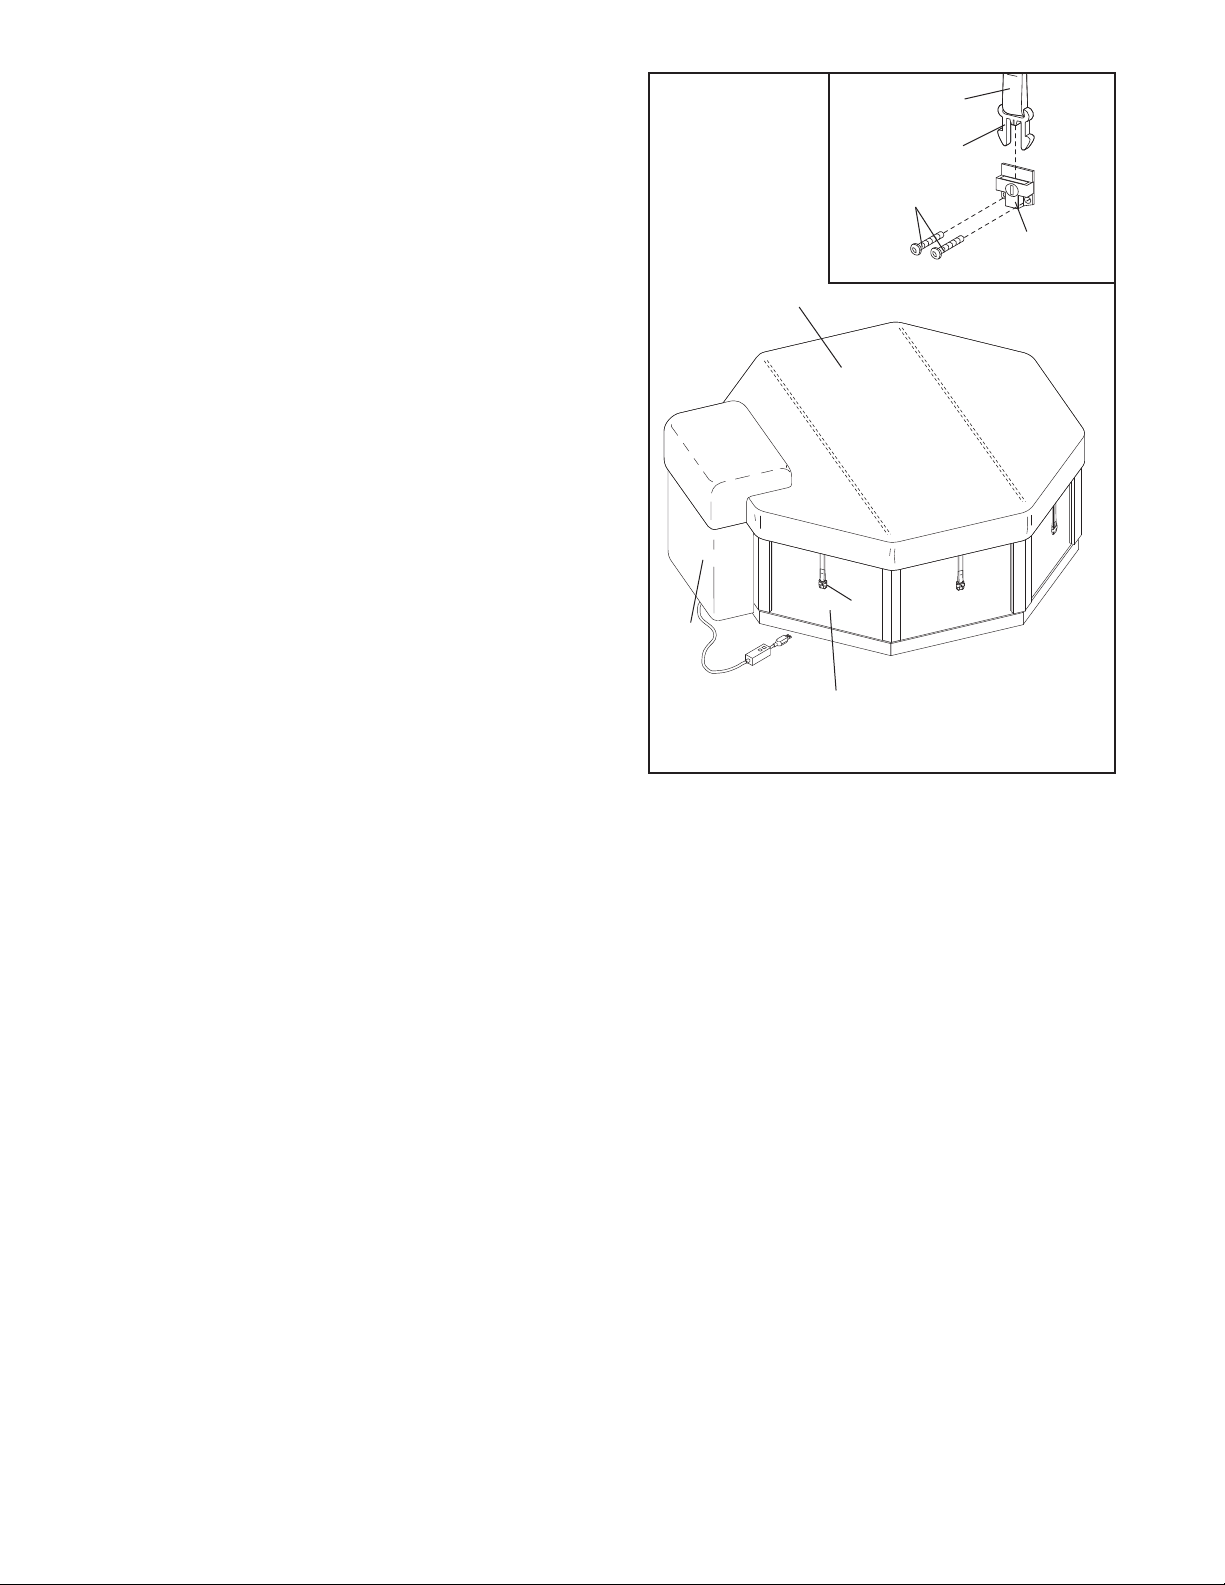
10. Place the Spa Cover (11) over the Side Panels (1)
and the Spa Jet Unit (13). Be sure that the Spa
Cover is properly centered and that the corners
f the Spa Cover line up with the corners of the
o
Side Panels (1).
Snap a Buckle (21) onto each of the seven latches
on the Spa Cover (11).
10
Strap
Latch
3
2
21
See the inset drawing. Position one of the Buckles
(21) on the Side Panel (1) and hold the Buckle in
place, so the strap on the Spa Cover (11) is tight.
(Note: It may be easier to position the Buckles if a
second person holds the strap on the opposite side
of the Spa Cover tight.) Do not place the Buckle
over one of the grooves in the Side Panel.
Remove the latch. Attach the Buckle to the Side
Panel with two Buckle Screws (23). Note: It may
be helpful to use a hammer and a nail to tap
starter holes in the Side Panels. You may also
want to apply a little soap or wax to the screw
threads.
Attach the other six Buckles (21) to the Side Panels
(1) in the same manner.
11
21
13
1
12
Page 13
USING THE DAYBREAK
The DAYBREAK is designed for up to four adults. The
six water jets can be regulated to provide a relaxing
massage to sooth away stress, and the strength of
the water massage can be adjusted by the air control.
he DAYBREAK holds 170 gallons of water and offers
T
an automatic, programmable heating (70°F to 104°F)
and filtration system.
The guidelines below explain how to properly use the
DAYBREAK. Follow these guidelines to maintain the
DAYBREAK for your long-term enjoyment.
PRIMING THE SPA JET UNIT
The water pump in the
spa jet unit must be
primed before you use
the DAYBREAK the
first time. You must
also prime the pump
before using the unit
each time you re-fill
the DAYBREAK.
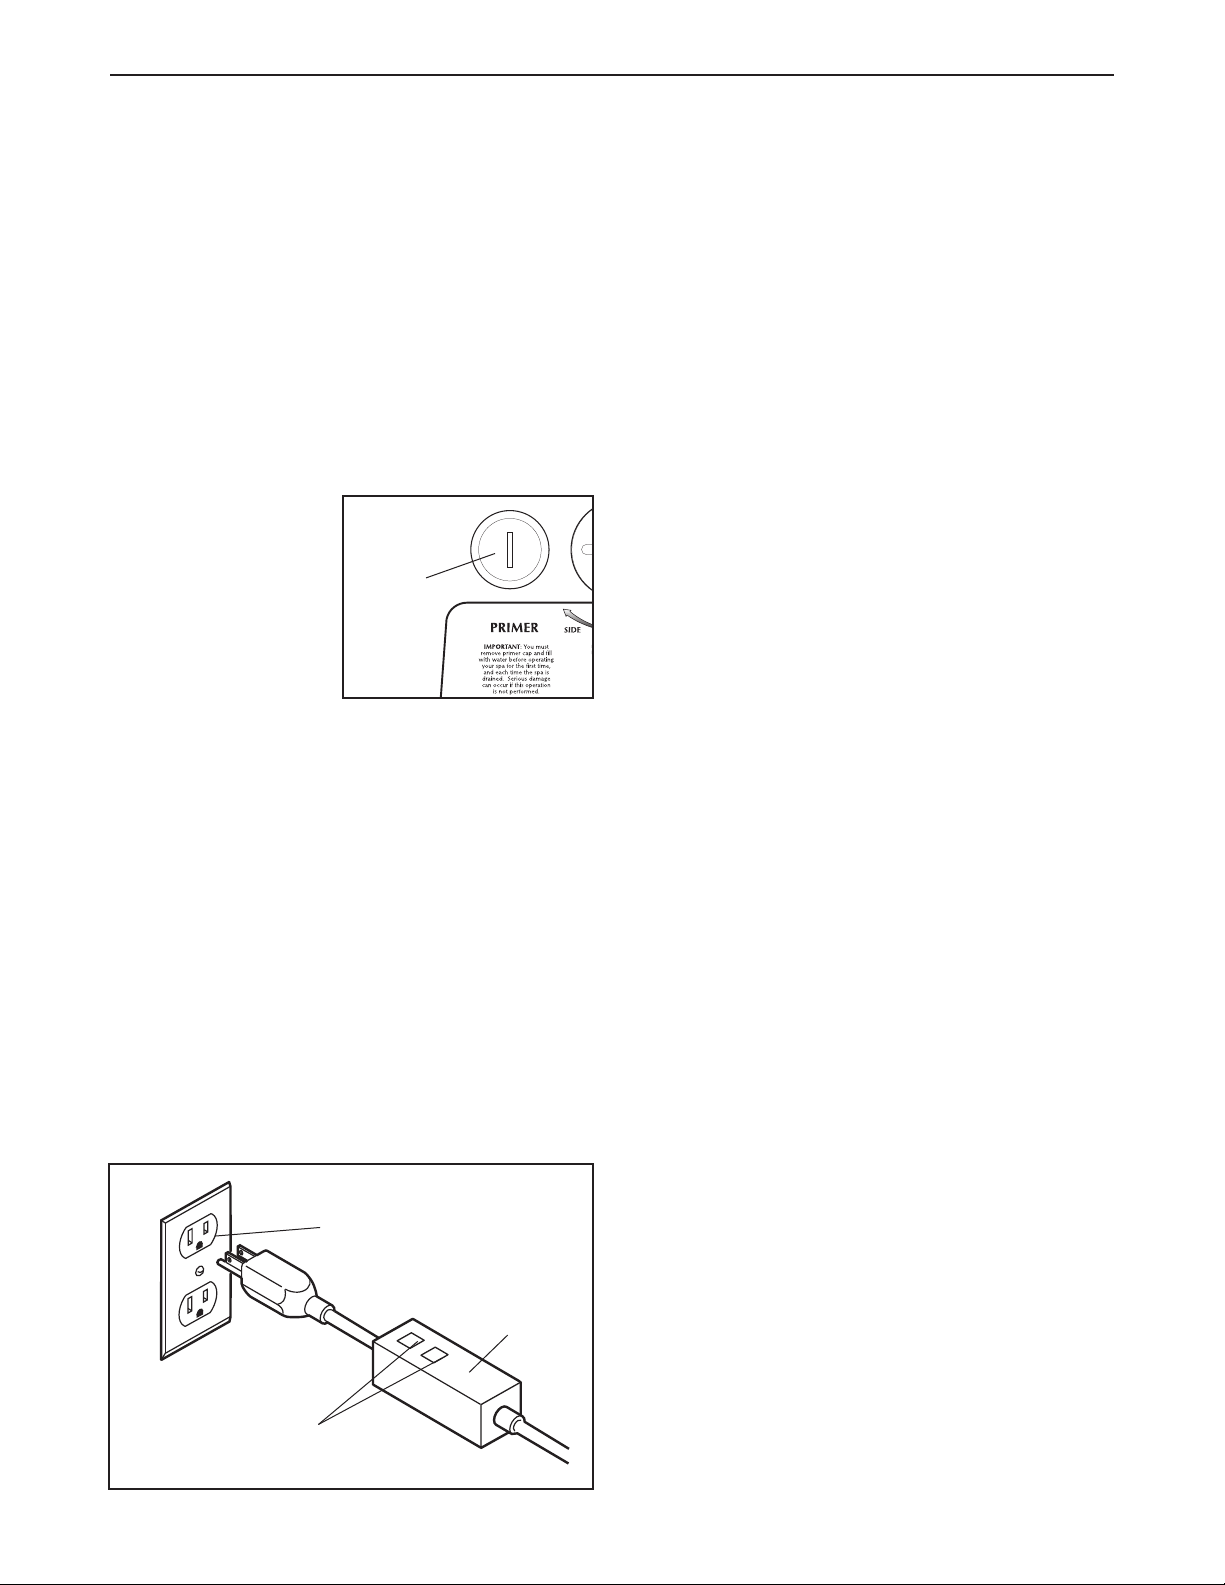
To prime the spa jet unit, remove the primer cap from
the console. Fill the spa jet unit with at least 64 oz. of
water. Replace and tighten the primer cap. IMPOR-
TANT: The spa jet unit may be seriously damaged
if the pump is not properly primed, or if the primer
cap is not replaced and fully tightened.
PLUGGING IN THE DAYBREAK
Primer
Cap
or more amps. No other appliance should be on the
same circuit. Replace the power cord immediately if it
becomes damaged.
he power cord is equipped with a Ground Fault
T
Circuit Interrupter (GFCI), located at the end of the
power cord. You should always test the GFCI before
using the DAYBREAK.
First, turn on the DAYBREAK by pressing the power
button on the console. Once the unit is running, press
the GFCI “test” button. The DAYBREAK should shut
off. Press the “reset” button. The DAYBREAK should
resume normal operation. If the DAYBREAK continues to run after the “test” button is pressed, then the
GFCI is damaged. Do not use the DAYBREAK until
the GFCI has been repaired or replaced by a qualified
electrician.
STARTING THE DAYBREAK
Once you have tested the GFCI, you should verify the
water flow from the pumping unit. Set the air control
on the console to the lowest setting (see USING THE
CONSOLE on the next page). The pumping unit will
heat the water as it pumps. Cover the DAYBREAK
with the spa cover. The spa cover must be tight.
The water will heat at about 1.5°F an hour with the
cover on. If you are using the DAYBREAK indoors,
and the room temperature is maintained at 70°F, it will
take approximately 36 to 48 hours for the water to
reach the set temperature.
Once the DAYBREAK is filled with enough water to
cover the water jets and the pump has been primed,
the power cord can be plugged in and the spa jet unit
can be turned on. Note: The first time the power cord
is plugged in, the spa jet unit will turn on automatically.
When connecting the power cord, plug the power cord
directly into a grounded circuit capable of carrying 15
Grounded circuit
capable of carrying
15 or more amps
GFCI
Test and Reset
Buttons
The temperature and water flow can be set or
changed by the controls on the console (see USING
THE CONSOLE on the next page).
TESTING AND TREATING THE WATER
The DAYBREAK comes with a starter chemical pack
for maintaining the water in the spa. Disregard the
directions on the individual packages of “QUICK pHix
It DOWN” and “QUICK pHix It UP.” However, the
directions on the bottle of “Non-chlorine Shox” and
“Bromine Base” are correct. Always keep the chemi-
cals away from children and pets.
The first time you use the spa, you should test and
treat the water. Once you have verified that the spa
jet unit is functioning properly, and have allowed the
water to circulate for a while, you should remove the
spa cover and add 1/3 of the “Bromine Base” bottle,
and 1/3 of the “Non-chlorine Shox” bottle to the water
in the spa. Allow the water to circulate for five minutes. You should now test the pH level of the water.
You will need a pH test kit (not included), which can
13
Page 14
be obtained at a pool and spa supply store. The pH
reading should be between 7.2 and 7.8.
f the level is too low, add half of one of the “QUICK
I
pHix It UP” packets to the water. Let the water circu-
ate through the spa jet unit for five minutes. Test the
l
pH level again. Repeat until the pH level is correct.
If the level is too high, add half of one of the “QUICK
pHix It DOWN” packets to the water. Let the water circulate through the spa jet unit for five minutes. Test
the pH level again. Repeat until the pH level is correct.
Replace the spa cover and allow the water to continue to heat.
See WATER CHEMISTRY on page 15 for information
concerning proper water maintenance.
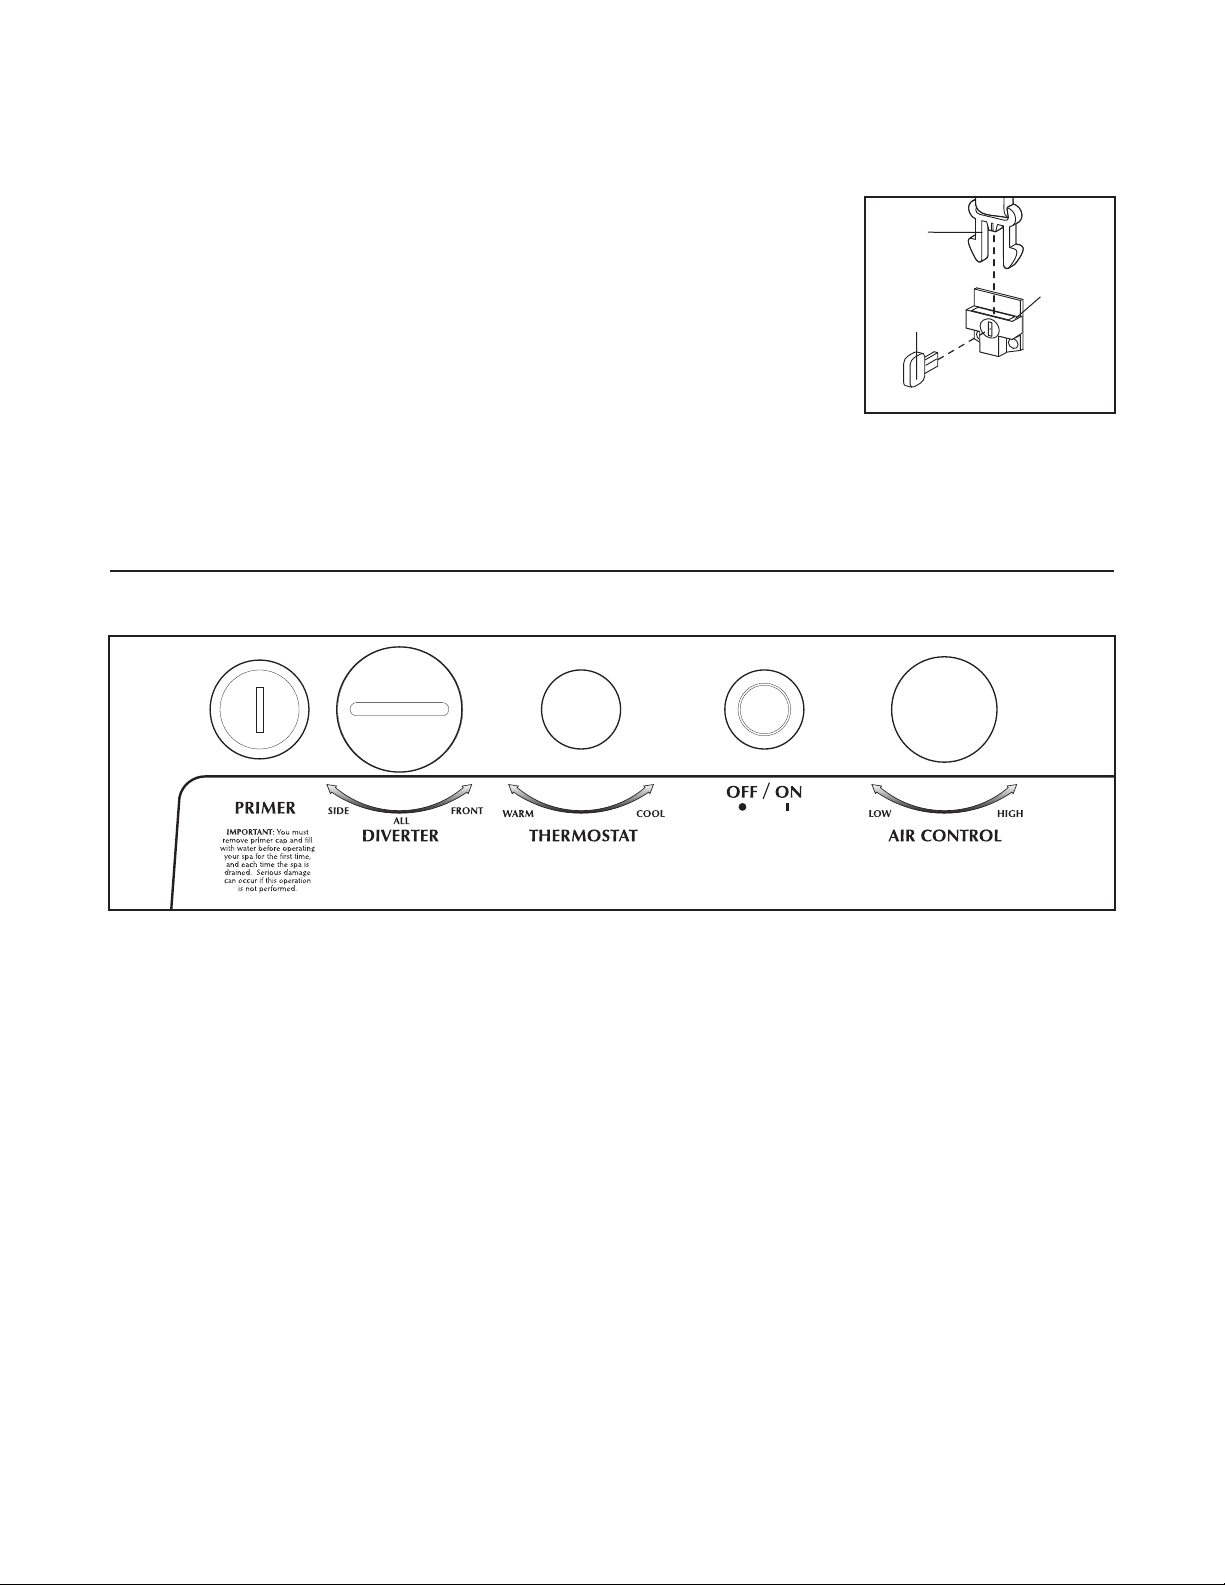
DIAGRAM OF THE CONSOLE
SECURING THE SPA COVER
The spa cover can be secured by snapping the latch-
s on the spa cover into the buckles on the side panels.
e
he buckles can be
T
locked by inserting the
key and turning it
clockwise a quarter
turn. To unlock the
buckles, insert the key
and turn it counterclockwise a quarter
turn.
Always keep the buckles locked when the spa is
not in use. Keep the keys in a safe place, out of
the reach of children.
Latch
Buckle
Key
USING THE CONSOLE
Refer to the console diagram above. The function of
each console control is explained below:
Primer: This opening allows you to prime the spa jet
unit before operation (see PRIMING THE SPA JET
UNIT on page 13).
Diverter: Controls the flow of water through the
hydro-therapy jets and the whirlpool diverter. The
direction of the flow can be adjusted by turning the
diverter control. When the control is set to “front,” the
flow will be through the hydro-therapy jets; when it is
set to “side,” the flow will be through the whirlpool
diverter; when it is set to “all,” the flow will be evenly
distributed through both the hydro-therapy jets and
the whirlpool diverter.
Thermostat: Controls the temperature of the water.
The water heats at about 1.5°F an hour with the cover
on. The thermostat can be set to heat the water from
70°F to 104°F. You should use a medical or other
accurate thermometer to check the temperature of the
water.
On/Off: Turns the spa jet unit on and off. To turn the
spa jet unit on, press the control once. To turn the spa
jet unit off, press the control twice. After you press it
once, the spa jet unit will shut off for about 30 seconds, and restart. Press the control again. The spa jet
unit will remain off for three hours, at which time it will
begin running the filter cycle. At any time after the spa
jet unit has been shut off, the pump will begin cycling
the water if the temperature falls below the minimum
setting. Note: To keep the filter and heat cycles from
running, the power cord must be unplugged.
Air Control: Determines the amount of air that is in
the spa jet system during operation. If the control is
turned to the left, the amount of air flowing through
the jets will increase. If the control is turned to the
right, the amount will decrease.
14
Page 15
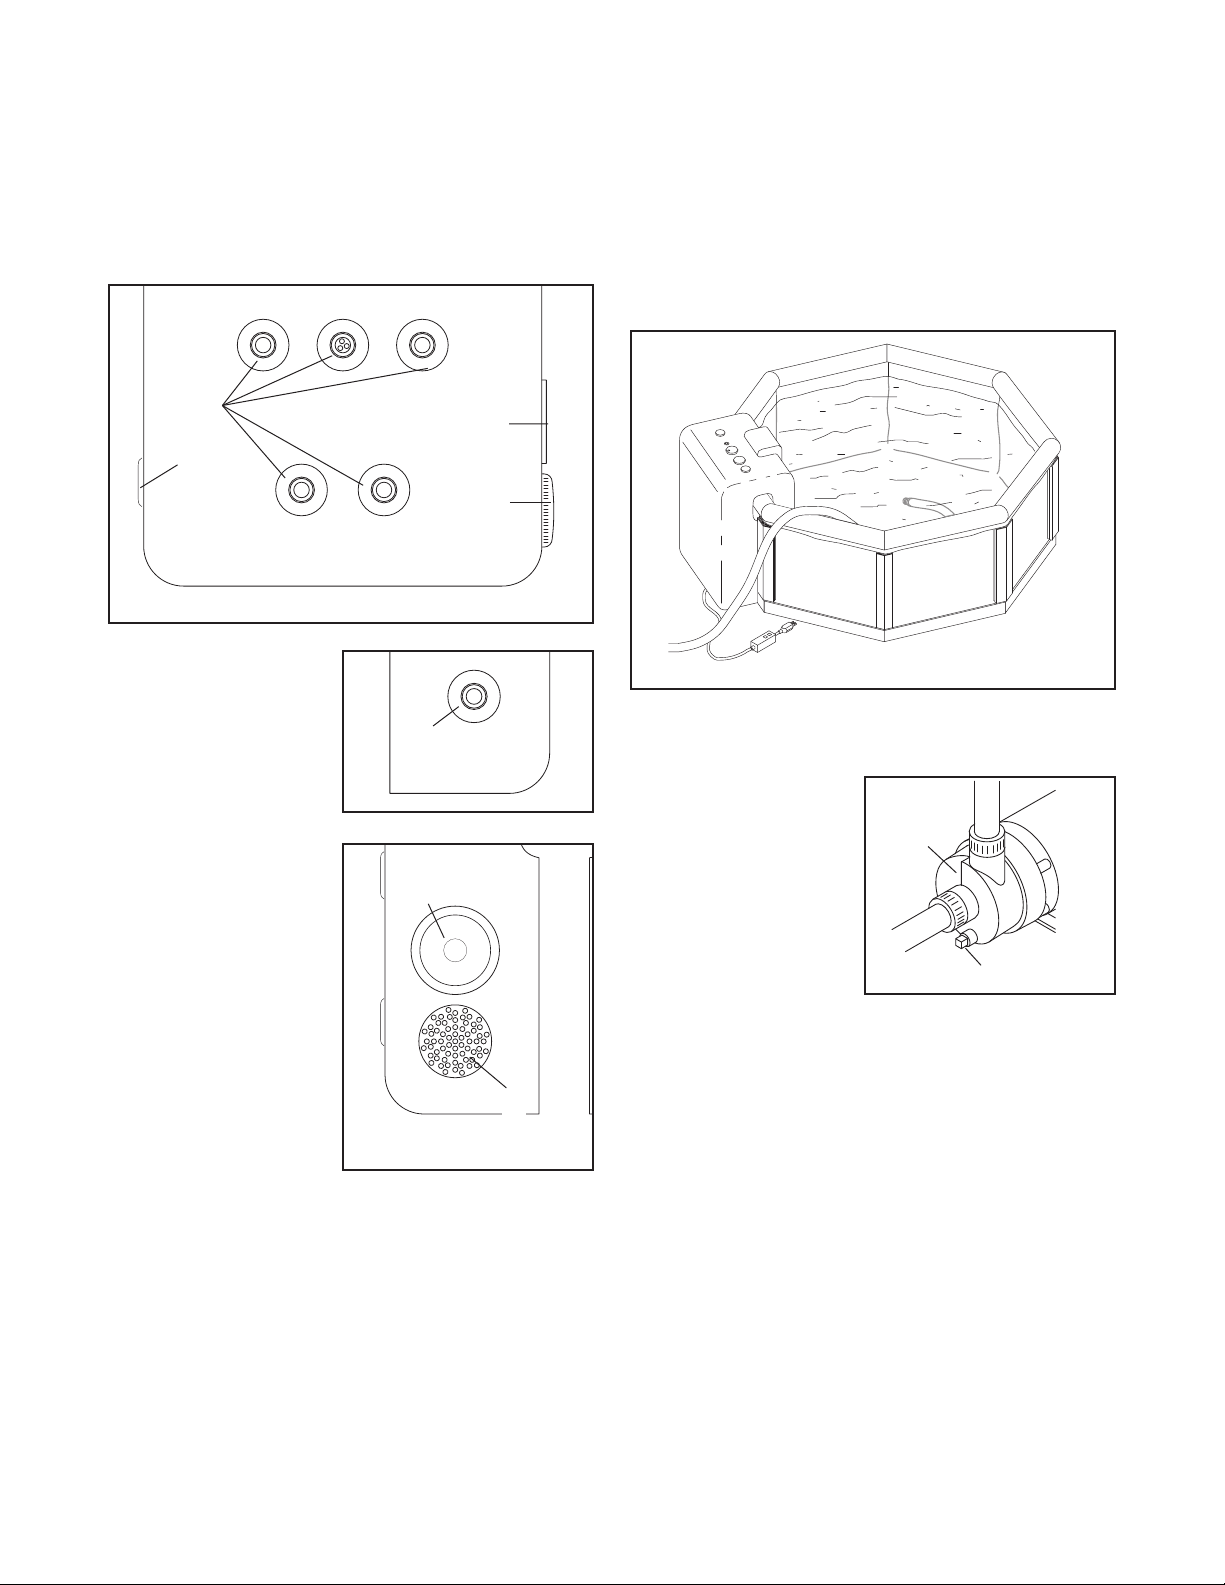
SPA JET UNIT OPERATION
DRAINING THE DAYBREAK
The spa jet unit features five hydro-therapy jets, a
hirlpool diverter, a suction vent, and a filter housing.
w
he five hydro-therapy jets (A), located on the front
T
of the spa jet unit, focus the water massage on your
neck and back.
A
B
The whirlpool divert-
er (B), located on the
left side of the spa jet
unit, directs the flow of
the water to create a
whirlpool action in the
DAYBREAK.
The suction vent (C),
located on the right
side of the spa jet
unit, pulls the water
into the spa unit, in
order to operate the
system. The suction
cover should always
be in place over the
suction vent. Never
operate the DAYBREAK without the
suction cover in
place.
The filter housing (D), also located on the right side
of the spa jet unit, and filter can be removed for
cleaning and replacement by pulling the fitting from
the spa jet unit.
B
D
D
C
C
To drain the DAYBREAK, you must use a garden
ose to siphon the water. Place one end of the hose
h
in the DAYBREAK and hold it in front of a hydro-ther-
py jet until there is a flow of water coming out of the
a
hose. Turn off the spa unit and unplug the power
cord. The unit will be damaged if it is run without
water circulating. Be sure the end of the hose in the
DAYBREAK is on the floor of the spa.
DRAINING THE PUMP
After the DAYBREAK
is drained (see
DRAINING THE DAYBREAK above), the
pump in the spa jet
unit should also be
drained if the DAYBREAK will be stored
for more than thirty
days, or if it may be
exposed to freezing temperatures.
To drain the pump, remove the spa jet unit from the
side panels. Be careful not to tear the spa liner.
Locate the pump inside the spa jet unit. Remove the
indicated bolt from the pump. Tip the spa jet unit
slightly, until all the water has drained from the pump.
Replace the drain plug.
Pump
Drain Plug
The spa jet unit features an automatic filter cycle and
freeze protection. If the spa jet unit has not been
operated for three hours, the pump will begin circulating the water for twenty minutes to filter any impurities. Also, if the water temperature falls below 40°F,
the pump will begin circulating and heating the water
to prevent the water from freezing.
15
Page 16

MAINTENANCE
LEANING THE SPA LINER
C
The liner should be cleaned with a mild soap solution.
Do not use solvents. The liner should always be clean
nd dry before being moved or stored.
a
CHECKING AND CLEANING THE FILTER
The filter should be checked periodically for build-up
of dirt and oil. If the filter needs to be cleaned, follow
the steps below:
1. Turn off the power.
2. Remove the filter from the spa jet unit by
pulling the white filter from the side of the spa
jet unit.
3. Check the filter for any dirt or debris. If the filter needs to be cleaned, rinse the filter with a
hose. If the filter still is dirty, you will need to
soak it in a cleaning solution which can be
obtained from a pool and spa supply store.
4. Inspect the filter for damage. Replace the filter if there are any signs of damage.
5. Re-insert the cleaned filter into the spa jet unit.
MAINTAINING THE SPA COVER
The spa cover should be cleaned monthly. To clean
the spa cover, hang it over a clothes line and spray it
with a hose. Leave the cover on the clothes line until
it is fully dry.
WINTER USE AND CARE
The DAYBREAK is designed for year-round use. If
you decide to store the DAYBREAK for the winter,
store it in a warm, dry location. (See DRAINING THE
DAYBREAK and DRAINING THE PUMP on page 15.)
WATER CHEMISTRY
. Keep all chemicals out of the reach of chil-
4
dren and pets.
5. Keep all containers closed tightly when
not in use.
. Never add water to the chemicals—always
6
add the chemicals to the water as directed.
7. Always store chemicals in a cool, dry place.
8. Always keep chemicals away from children and pets.
MAINTAINING THE PROPER PH BALANCE
The pH factor is a measure of relative acidity or alkalinity in the water. It is measured on a scale of 1 to 14.
Pure water has a value of 7, which is neutral. Any
value above 7 is alkaline, and any value below 7 is
acidic. You should maintain a slightly alkaline pH
level, between 7.2 and 7.8, in the DAYBREAK.
Severe problems can occur when the pH balance is
not maintained within this range. If the pH level
exceeds 7.8, dissolved minerals can build-up and clog
the plumbing in the spa jet unit. If the pH level falls
below 7.2, the acid level in the water will begin to corrode the metal parts in the spa jet unit. Also, the sanitation agents in the water will not be effective if the pH
level is not properly maintained. Damage caused by
improper pH levels is not covered under the warranty.
To maintain the proper pH level, you should test the
pH of the water regularly. You will need a pH test kit
(not included), which can be obtained at a pool and
spa supply store. The pH reading should be between
7.2 and 7.8. If the level is too low, add a pH increaser
(usually soda ash). If the level is too high, add a pH
reducer (usually sodium bisulfate). Test the water
again after five minutes. See the instructions with your
pH test kit for additional information about testing and
adjusting the pH.
The DAYBREAK comes with a starter chemical pack
for maintaining the water in the spa. (See TESTING
AND TREATING THE WATER on page 13.) Additional
chemicals can be purchased at a pool and spa supply
store.
CAUTION: The chemicals used to maintain the pH
balance of the water and to sanitize the water can
be dangerous. Always follow these basic guidelines when handling the chemicals:
1. Always read and follow the directions on
the label, unless directed otherwise.
2. Never mix different chemicals.
3. Do not exceed the recommended
amounts—follow the directions on the
label closely.
SANITIZING THE DAYBREAK
Please refer to your local pool and spa supplier for
information concerning which chemicals you should
use in your area to sanitize the spa.
The most common sanitizing agent is a solid bromine
concentrate. The amount required varies according to
several factors, such as user load, temperature, water
conditions, and so forth.
Proper water maintenance is a fairly complex process.
We recommend that you contact your local pool and
spa supplier for information on how you should best
accomplish this.
16
Page 17

TROUBLE-SHOOTING
Most problems can be solved by following the simple steps below. Find the symptom that applies, and
follow the steps listed. If further assistance is needed, call our Customer Service Department toll-free at
1-888-936-4266, Monday through Friday, 9 a.m. until 5 p.m EST (excluding holidays).
1. SYMPTOM: THE SPA WILL NOT OPERATE
a. Check the power cord. The power cord must
be plugged into a grounded outlet (see PLUGGING IN THE DAYBREAK on page 13).
b. Check to see if the GFCI breaker is tripped, or
was not turned on. Reset the GFCI breaker.
2. SYMPTOM: THE CIRCUIT BREAKER OR GFCI
BREAKER TRIPS WHILE THE SPA IS
OPERATING
a. Reset the circuit breaker. If the circuit breaker
trips again, contact a qualified electrician for
service.
3. SYMPTOM: THE PUMP HUMS
a. The filter may be dirty or damaged. Remove
the filter housing from the spa jet unit and clean
or replace the filter.
b. The pump may have a foreign object stuck in
the impeller. Contact our customer service
department or a local spa and pool service
provider.
6. SYMPTOM: THE WATER DOES NOT HEAT
a. The pump in the spa jet unit is the heater. If the
pump is operating, the water should heat.
Cover the DAYBREAK with the spa cover. The
spa cover must be tight. Set the air control to
low. The water will heat at a rate of 1.5°F an
hour. If you are using the DAYBREAK indoors,
and the room temperature is maintained at
70°F, it will take approximately 36 to 48 hours
for the water to reach the set temperature.
b. If you are using the DAYBREAK outdoors, it
may take longer for the water to heat. See the
chart below for the approximate heating time.
Air Temperature
+
70°F
50°F – 70°F 2 to 4 days
30°F – 50°F 4 to 6 days
b. If the water still has not heated after six days,
contact our customer service department or a
local spa and pool service provider.
7. SYMPTOM: THE WATER PULSATES OR
THERE IS MINIMUM WATER FLOW
Heating Time
36 to 48 hours
c. The pump may have a loose wire connection.
Contact our customer service department or a
local spa and pool service provider.
4. SYMPTOM: THE PUMP HUMS BUT DOES NOT
ROTATE
a. The pump may be jammed. Contact our cus-
tomer service department or a local spa and
pool service provider.
5. SYMPTOM: THE PUMP IS NOISY WHILE
OPERATING
a. There may be debris in the pump. Contact our
customer service department or a local spa and
pool service provider.
b. The pump may have a bad bearing. Contact
our customer service department or a local spa
and pool service provider.
a. Adjust the water level. This usually occurs only
when the water level is low. Add water until the
filter and jets are covered.
8. SYMPTOM: THE SPA JET UNIT CAVITATES
DURING USE
a. This problem is caused by excess air in the
pump circulation system. Check to see if the
primer cap is fully tightened. Prime the pump
again and fully tighten the primer cap (see
PRIMING THE SPA JET UNIT on page 13).
9. SYMPTOM: THE WATER IS NOT BEING
CLEANED BY THE FILTER
a. Check to see if the filter is in place. Clean the
filter if it is dirty.
b. Check the chemical balance of the water. If the
pH is incorrect, the sanitizing agents will not
function properly.
17
Page 18
10. SYMPTOM: THE SPA JET UNIT CONTINUES
POWER
SUPPLY
GFCI
BLACK/HOT
WHITE/NEUTRAL
GREEN/GROUND
TIMER
MOTOR
GROUNDING
CONDUCTOR/LUG
(Pressure Wire
Connector)
TO RUN AFTER IT HAS BEEN SHUT OFF
. To turn the spa jet unit on, press the ON/OFF
a
control once. To turn the spa jet unit off, press
he control twice. After you press it once, the
t
spa jet unit will shut off for about 30 seconds,
and restart. Press the control again. The spa
jet unit will remain off for three hours, at which
time it will begin running the filter cycle. At any
time after the spa jet unit has been shut off, the
pump will begin cycling the water if the temperature falls below the minimum setting.
11. SYMPTOM: THE WATER LEVEL DROPS
a. Some water loss due to evaporation is normal.
If rapid water loss occurs, or if you notice wetness on the floor around the DAYBREAK, then
the liner may have a leak. Locate the leak, and
patch it using a pool patch kit that you can purchase at any pool and spa supply store.
b. A clamp or seal inside the spa jet may be
loose. Check the floor around the spa jet unit
for excess water, and watch the spa jet unit
hile it is operating to see if water drips from
w
the spa jet unit housing. If you can identify the
ocation of the leak inside the spa jet unit, tight-
l
en the clamp or replace the damaged seal.
12. SYMPTOM: THERE ARE WRINKLES IN THE
LINER
a. Drain the water from the DAYBREAK, until the
water level is below the wrinkles. Smooth out
any wrinkles that you can see. Begin to refill
the DAYBREAK. Be sure to check for new
wrinkles that may form in the spa liner as the
water begins to cover the bottom. Smooth out
any wrinkles toward the sides, and then smooth
the wrinkles to the top. It is normal to have
some wrinkles around the spa jet unit.
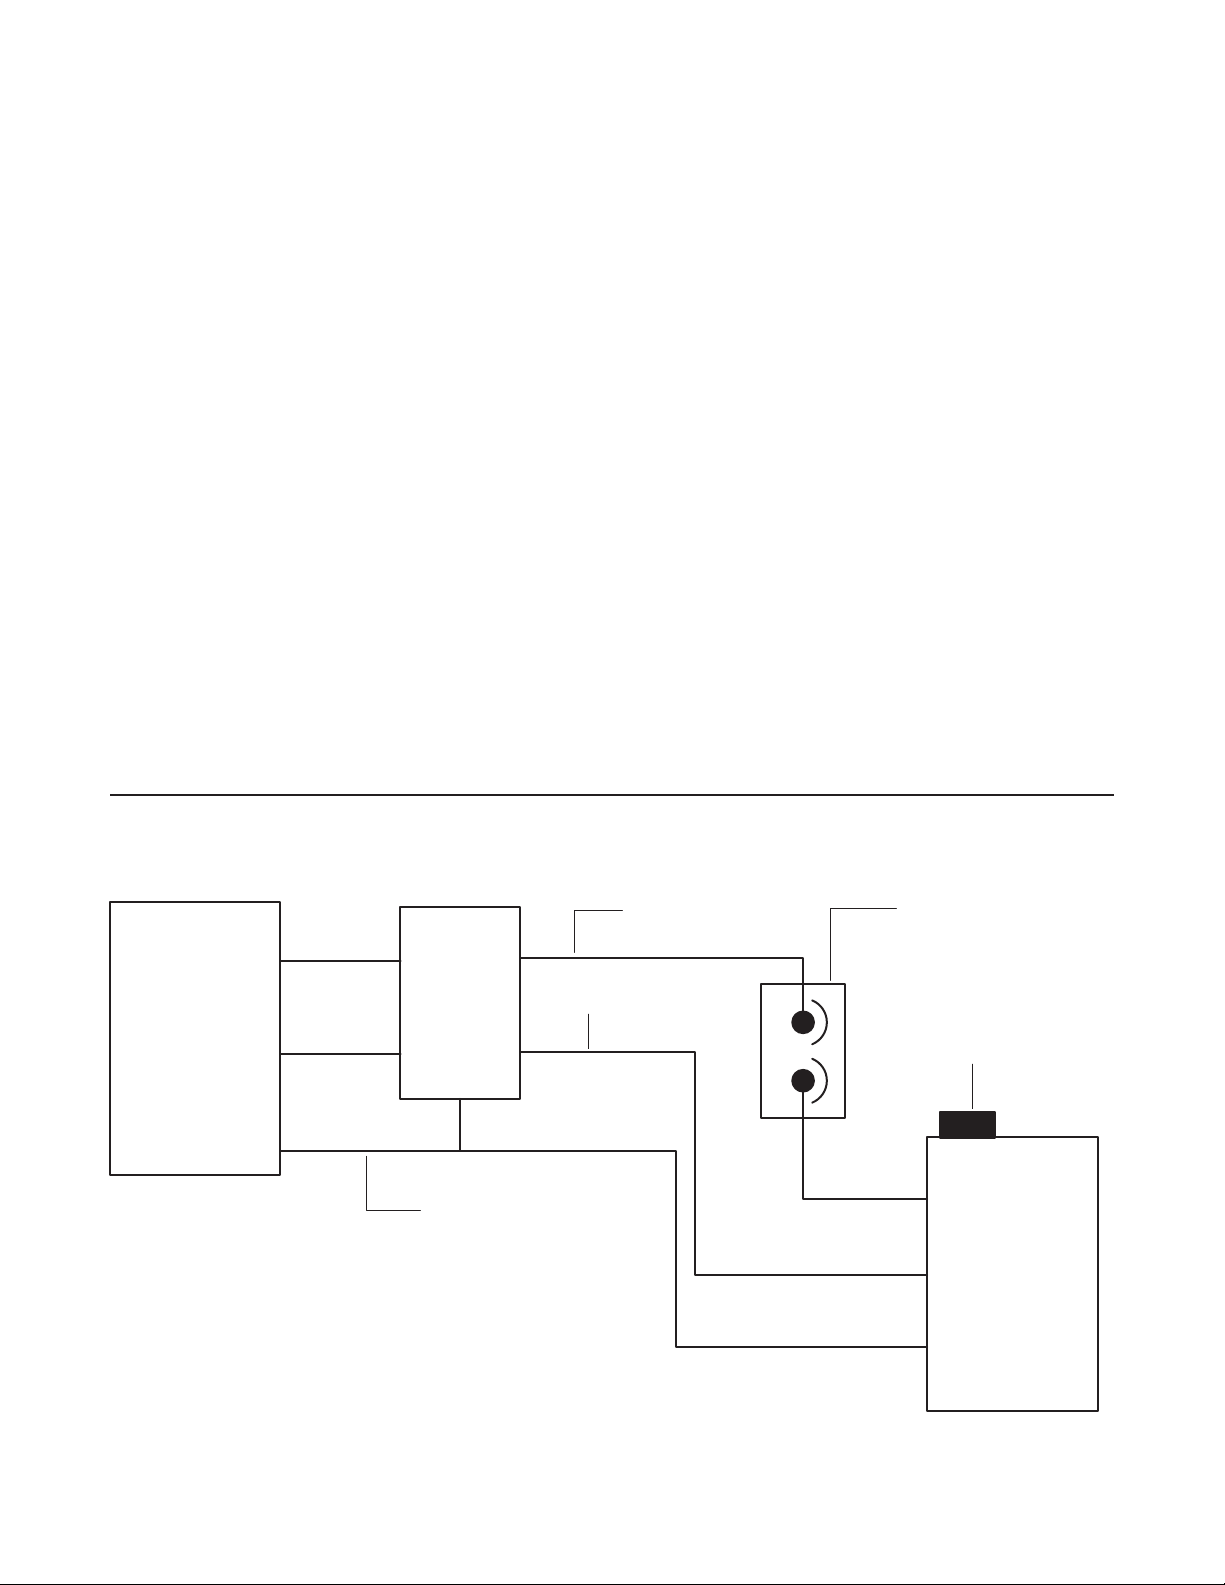
WIRING DIAGRAM
See the manufacturerʼs wiring diagram on the pump motor for more information.
18
Page 19

PART LIST—Model No. 831.100413 R
0398A
Key No. Qty. Description
18Side Panel
28Floor Cap
38Angle Bracket
4
5 16 Side Bracket
68Bracket Connector
74Bolt
81Insulated Floor Cover
91Spa Liner
10 4 Spa Jet Nozzle
11 1 Spa Cover
12 7 Edge Protector
13 1 Spa Jet Unit
14 1 Small Edge Protector
15 1 Support Ball (Set)
16 1 Filter
17 1 Cover Screw
18 1 Suction Cover
19 1 Suction Fitting
Note: “#” indicates a non-illustrated part. Specifications are subject to change without notice.
64 Bracket Screw
Key No. Qty. Description
20 1 Pump Motor
21 7 Buckle
22 1 Heat Controller
3 14 Buckle Screw
2
24 1 Heat Sensor
25 1 Electronic Control
26 1 Tri-jet Nozzle
27 1 Headrest
28 4 Nut
29 1 Trim
30 4 Rubber Insulator
31 4 Washer
32 1 Whirlpool Diverter
33 1 Rubber Damper
#2Key
#1Allen Wrench
#1Starter Chemical Pack
#1Userʼs Manual
19
Page 20
11
12
9
12
12
1
1
2
8
6
5
5
2
2
2
5
12
2
3
4
4
4
3
2
4
4
3
13
5
5
1
6
2
3
4
4
6
3
6
1
5
4
4
23
21
1
16
17
18
19
24
25
20
22
15
26
10
32
14
5
21
23
23
29
27
28
33
34
30
31
7
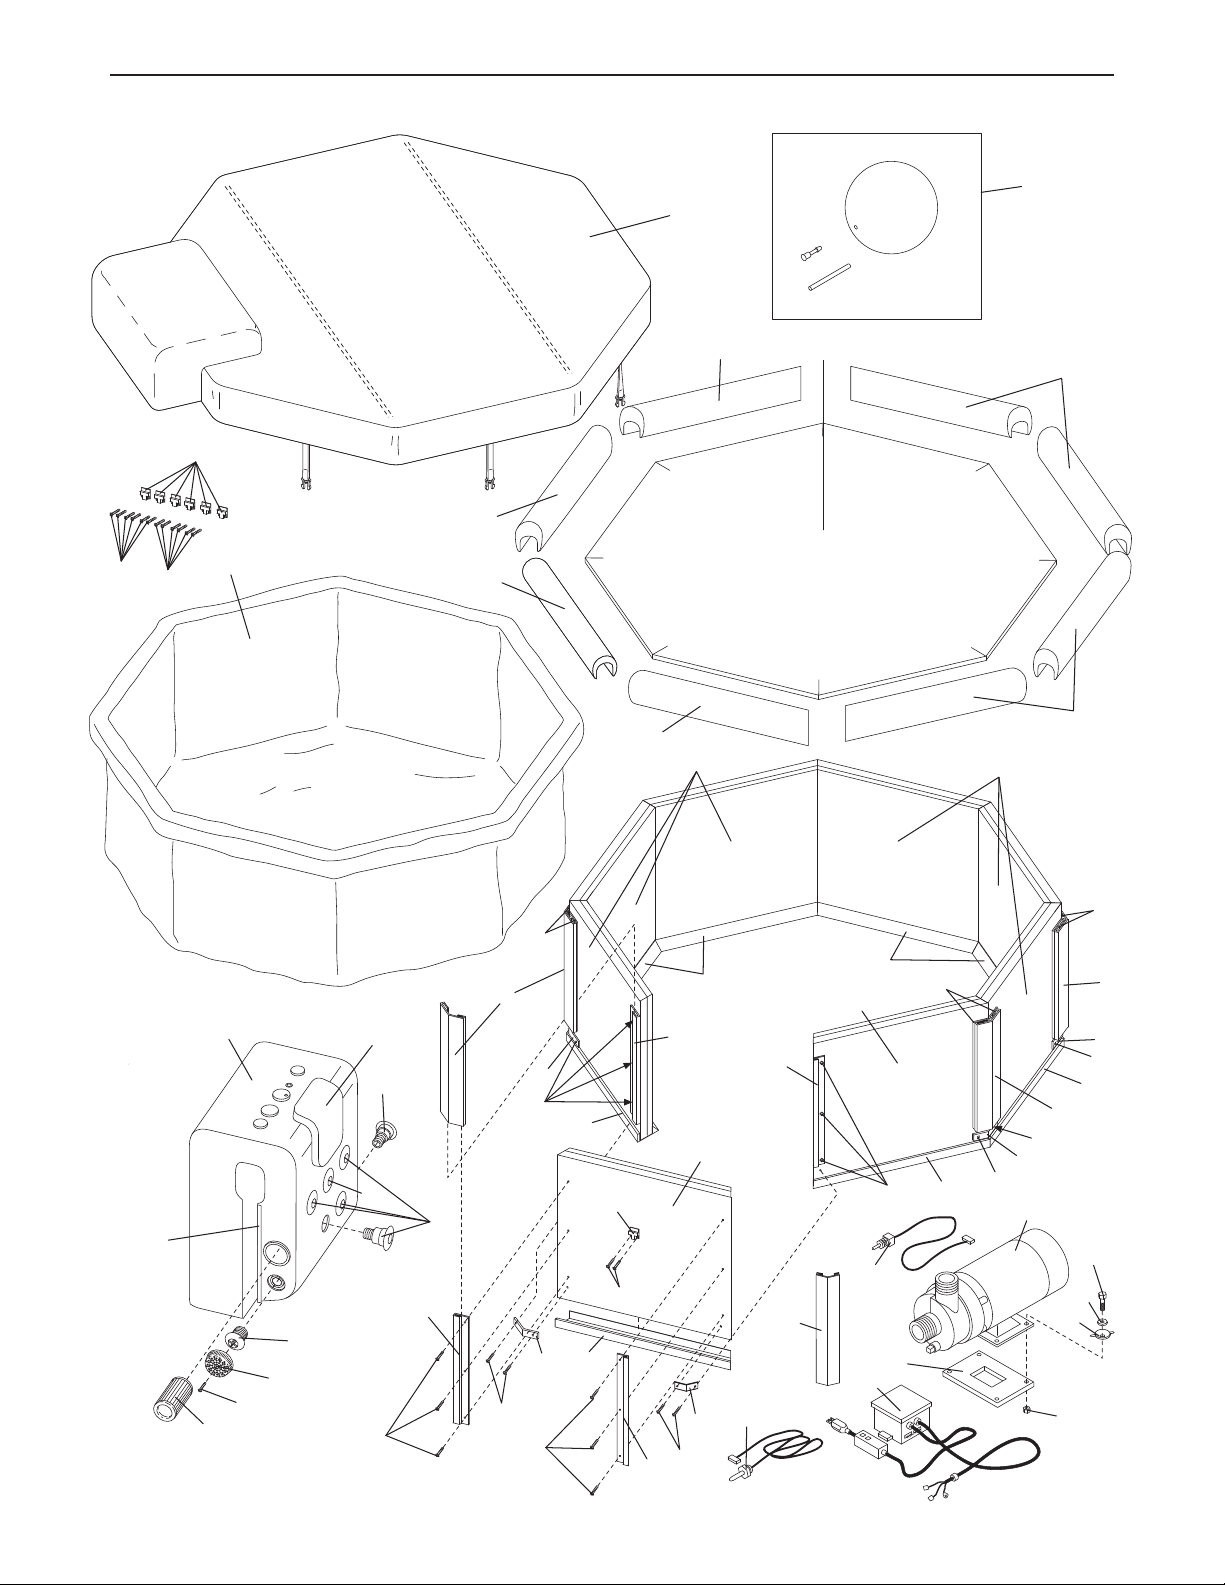
EXPLODED DRAWING—Model No. 831.100413 R
0398A
20
28
Page 21

CUSTOMER RECORD
odel No.: Serial No.:
M
Retailer Name: Purchase Date:
etailer Address:
R
ICON of Canada Inc.
900 de lʼIndustrie
St-Jérôme, Québec
Canada, J7Y 4B8
PLACE
STAMP
HERE
21
Page 22

®
of/du Canada Inc.
™
ORDERING REPLACEMENT PARTS
To order replacement parts, call our Customer Service Department toll-free at 1-888-936-4266, Monday through
riday, 9 a.m. until 5 p.m EST (excluding holidays). When ordering parts, please be prepared to give the follow-
F
ing information:
1. The MODEL NUMBER of the product (831.100413).
2. The NAME of the product (DAYBREAK by WESLO
®
).
3. The SERIAL NUMBER of the product (see the front cover of this manual).
4. The KEY NUMBER and DESCRIPTION of the desired part(s) (see the PART LIST on page 19 of this manual).
PRODUCT WARRANTY REGISTRATION
IMPORTANT: MAIL WITHIN 14 DAYS OF PURCHASE
NAME:
ADDRESS:
COUNTY:
MODEL NO.
SERIAL NO. PURCHASE DATE:
RETAILER NAME:
1) Primary user(s) of product:
Male Female Family
2) Age of primary user:
0–24 35–44 55–64
25–34 45–54 65 and over
3) Annual household income:
0–9,999 15,000–19,999
10,000–14,999 20,000+
4) How many times a week do you exercise?
Less than 3 times 3 times or more
5) Have you ever purchased an ICON product before?
Yes No
6) Where did you first see or hear about ICON products?
Magazine Friend/relative
Newspaper Ad Store
Other
7) What was the primary reason for purchasing this ICON product?
Store Employee Television Ads Colour
Electronic Features Magazine Ads Price
Product Design Product Innovation
Other Features
PHONE:
POSTCODE:
RETAILER ADDRESS:
8) Did you consider purchasing fitness equipment from another
manufacturer?
No Yes
What other Manufacturer?
9) Based on your impression of what you have purchased,
would you buy another ICON product?
Yes No No Opinion
If not, what other brand name equipment would you purchase?
10) What other type of exercise equipment do you own?
Bicycle Exercise Cycle Treadmill
Home Gym Weight Bench Stepper
Cardio Glide Other
11) Which type of magazines do you read regularly?
Sports Fitness Motoring
Business Computer General
12) Do you wish to be sent further bulletins about ICON products?
Yes No
THANK YOU FOR YOUR TIME
© 1997 ICON of Canada, Inc. Printed in USA
Part No. 141342 R0997A WESLO is a registered trademark of ICON Health & Fitness, Inc. © 1997 Printed in USA
22
 Loading...