

Page 1
WESAUDIO
1
4/9/18
_HYPERION USER MANUAL REV1
www.WesAudio.com
_HYPERION
User manual
EN
Copyright 2018 by WesAudio
Page 2

WESAUDIO
2
4/9/18
_HYPERION USER MANUAL REV1
Thank You for the purchase of _HYPERION
_ HYPERION
Fully analog parametric EQ with digital control through VST/AAX/AU plug-ins
With kind regards
Radoslaw Wesolowski and Michal Weglicki
Page 3
WESAUDIO
3
4/9/18
_HYPERION USER MANUAL REV1
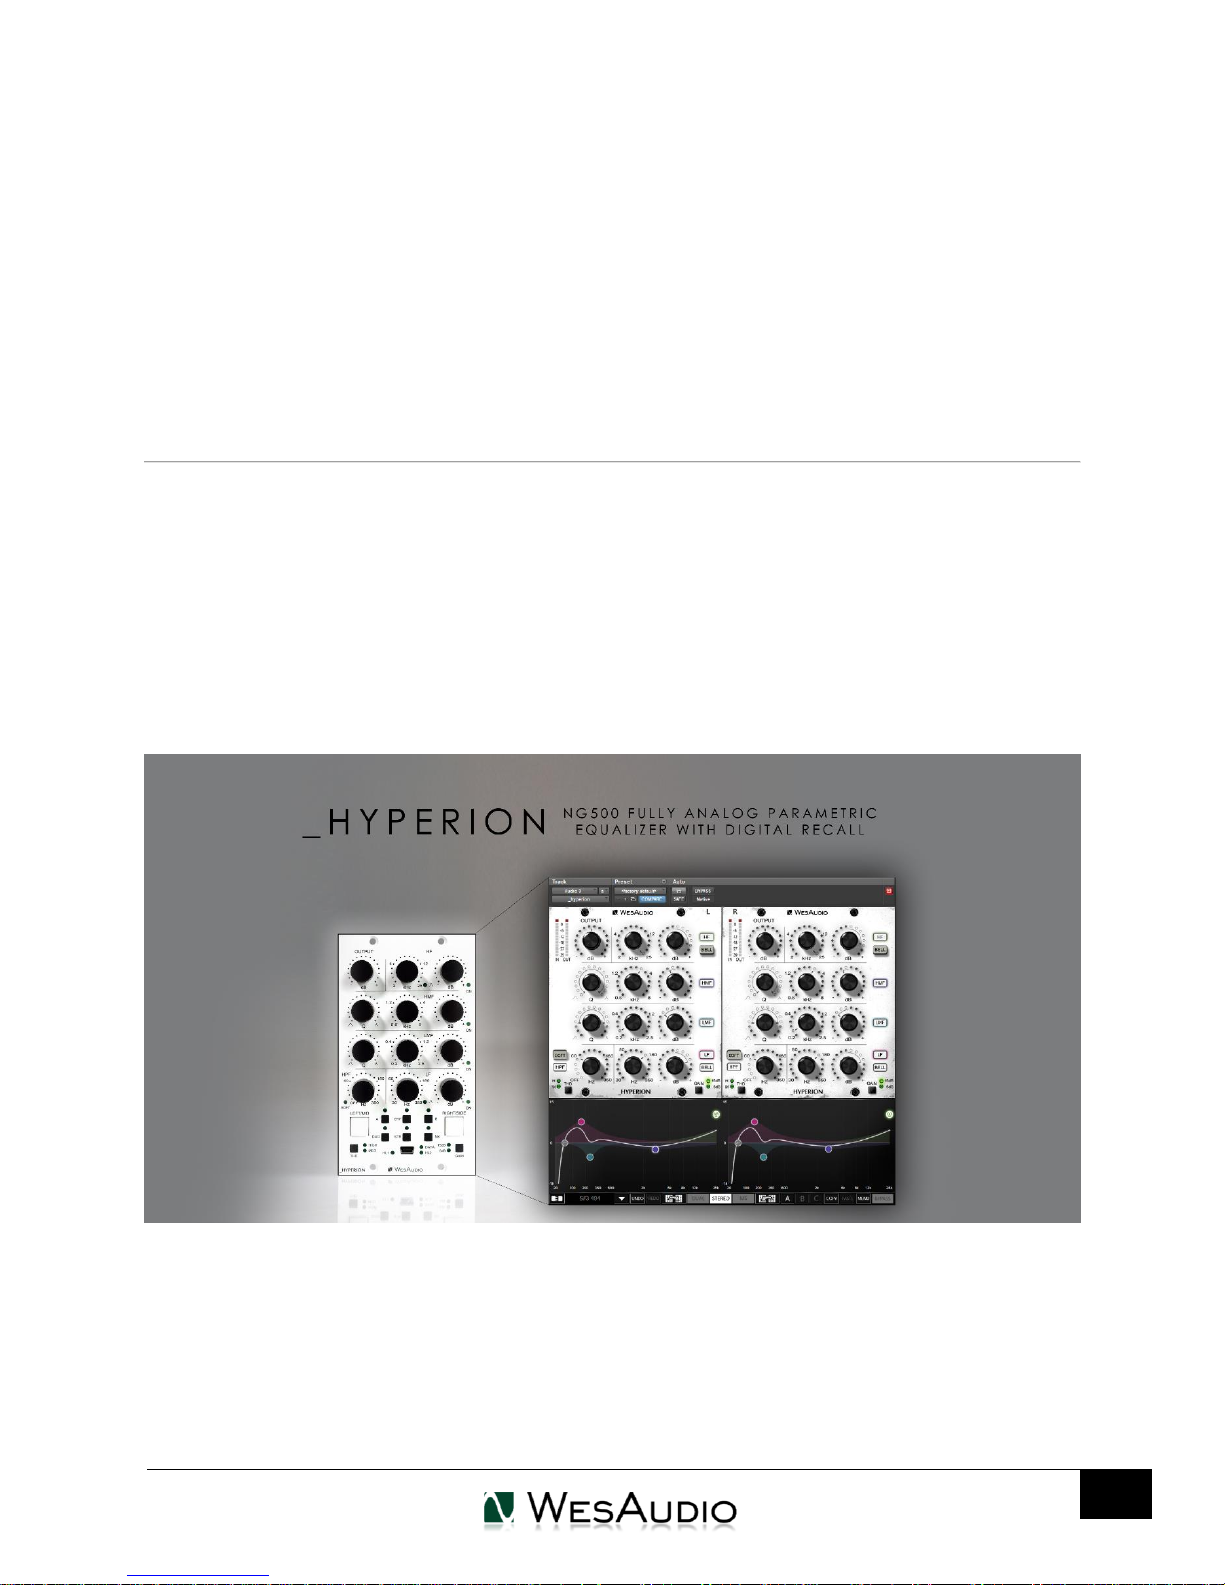
Fully analog parametric EQ with digital recall through
VST/AAX/AU plug-ins.
_HYPERION is fully analog parametric EQ with +24dBu of headroom. It features a lot of
innovative improvements that no other processor on the market provides. Its innovative design
utilizes 15 VCAs per channel to provide essentially noiseless parameter changes and very
musical nature. _HYPERION is next product in NG500 line where total recall is implemented
through front panel USB socket or _TITAN chassis.
Page 4

WESAUDIO
4
4/9/18
_HYPERION USER MANUAL REV1
Contents
1. Overview ................................................................................................................................................... 6
2. Installation and compatibility. .................................................................................................................. 7
3. Front panel .............................................................................................................................................. 10
4. Front panel – special functions ............................................................................................................... 12
4.1. Copy channels ........................................................................................................................................ 12
4.2. Copy presets (A/B) .................................................................................................................................. 12
5. Specification ............................................................................................................................................ 13
6. Curves ..................................................................................................................................................... 14
6.1. HF – high filter ........................................................................................................................................ 14
6.2. HMF & LMF – high-mid filter & low-mid filter ....................................................................................... 15
6.3. LF – low filter .......................................................................................................................................... 16
6.4. HPF – high pass filter .............................................................................................................................. 17
7. Unit modes .............................................................................................................................................. 18
7.1. Unit standalone usage ............................................................................................................................ 18
7.2. Unit with a plug-in usage ........................................................................................................................ 19
7.3. Stereo mode in standalone mode vs plug-in usage ............................................................................... 21
8. Metering ................................................................................................................................................. 23
9. Software .................................................................................................................................................. 24
9.1. Installation .............................................................................................................................................. 24
9.1.1. WINDOWS ............................................................................................................................................. 24
9.1.2. OSX ...................................................................................................................................................... 24
9.1.3. Troubleshooting .................................................................................................................................. 24
9.2. Plug-ins ................................................................................................................................................... 26
9.2.1. Dedicated plugin - _HYPERION ........................................................................................................... 26
9.2.1.1. _HYPERION – Stereo plugin structure ................................................................................... 26
9.2.1.2. _HYPERION – Mono plugin structure .................................................................................... 27
9.2.1.3. _HYPERION – plugin structure description ............................................................................ 27
9.2.2. GConBlackBox ..................................................................................................................................... 29
9.3. Setup for mixing ..................................................................................................................................... 30
Page 5

WESAUDIO
5
4/9/18
_HYPERION USER MANUAL REV1
9.3.1. HW insert/External effect ................................................................................................................... 30
9.3.2. Direct output ...................................................................................................................................... 31
9.4. Memories ............................................................................................................................................... 32
9.4.1. Synchronization upon connection ...................................................................................................... 32
9.4.2. Memory synchronization between plugin and hardware .................................................................. 32
9.4.2.1. Synchronized memory enabled ............................................................................................. 33
9.4.2.2. Synchronized memory disabled ............................................................................................ 33
9.5. Automation ............................................................................................................................................ 34
9.5.1. Automation for stereo plugin ............................................................................................................. 34
9.5.2. Automation record ............................................................................................................................. 34
9.6. Pro Tools Integration .............................................................................................................................. 35
9.7. Multi Host Support ................................................................................................................................. 35
9.8. GCon Manager ....................................................................................................................................... 36
9.8.1. How to check firmware upgrade. ....................................................................................................... 36
9.8.2. How to perform firmware upgrade. ................................................................................................... 37
10. Abbreviations and terms......................................................................................................................... 38
11. Warranty ................................................................................................................................................. 38
12. History ..................................................................................................................................................... 39
Page 6

WESAUDIO
6
4/9/18
_HYPERION USER MANUAL REV1
1. Overview
_HYPERION is fully analog unit with digital control, it means that whole audio processing is done ONLY
through analog components. Digital side is responsible to configure device accordingly, which allows to
implement digital recall and remote control of the unit.
MAIN FEATURES:
Fully ANALOG parametric EQ with digital control
+24dBu of headroom
Stereo / Dual mono / Mid/Side operation mode
4-Band EQ with switchable gain range for 5db or 15dB boost or cut per band:
High band – 2kHz to 25kHz (bell or shelf)
High-Mid band – 600Hz to 8Khz with full Q control
Low-Mid band – 200Hz to 2.5Khz with full Q control
Low band – 30 Hz to 350Hz (bell or shelf)
HPF with 12dB/Oct or 6 dB/Oct slopes
Each band features its own Bypass switch
Essentially Noiseless parameter changes
Proprietary THD implementation
Flexible DAW/Live plug-in control for instant recall
12 touch sensitive encoders allows to record automation
True bypass
In and OUT metering with clip detection
A/B compare feature
Page 7

WESAUDIO
7
_HYPERION USER MANUAL REV1
2. Installation and compatibility.
WesAudio _HYPERION equalizer module is designed to be installed into:
An API™ 500 Series compatible rack
_TITAN or any other ng500 compatible chassis,
WesAudio _ HYPERION cannot function standalone, requiring the power source supplied by the rack
system.
Two important NOTES:
Unit needs to warm up for about 5 minutes before usage as its temperature may
affect some internal variables – like frequencies of each band, and very slightly gain
and Q settings.
Unit produces fair amount of heat because of its power consumption, it is highly
recommended to leave empty space above and below chassis to allow proper air
4/9/18
circulation. Ideally 1U space above, and 1U space below.
After unpacking your _HYPERION module, please check for any visible damage that may have occurred
during transit. If there is any problem, please contact your dealer immediately!
Module installation walkthrough:
Choose the position in the rack to which you will install the module and slide it in so that the edge
connector of the module aligns with the matching connector in the rack. A gentle push and the module
should slide home into the rack connector. Attach the front panel to the front of the rack with screws
supplied by your rack manufacturer. This is important for mechanical rigidity. Do not over tighten these
screws to avoid stripping out the threads. Apply power, test that everything is working OK, and most
importantly, enjoy!
!!!Ensure the rack is completely powered down before attempting
installation to prevent damage to the module!!!
Page 8
WESAUDIO
8
4/9/18
_HYPERION USER MANUAL REV1
500 series compatibility note:
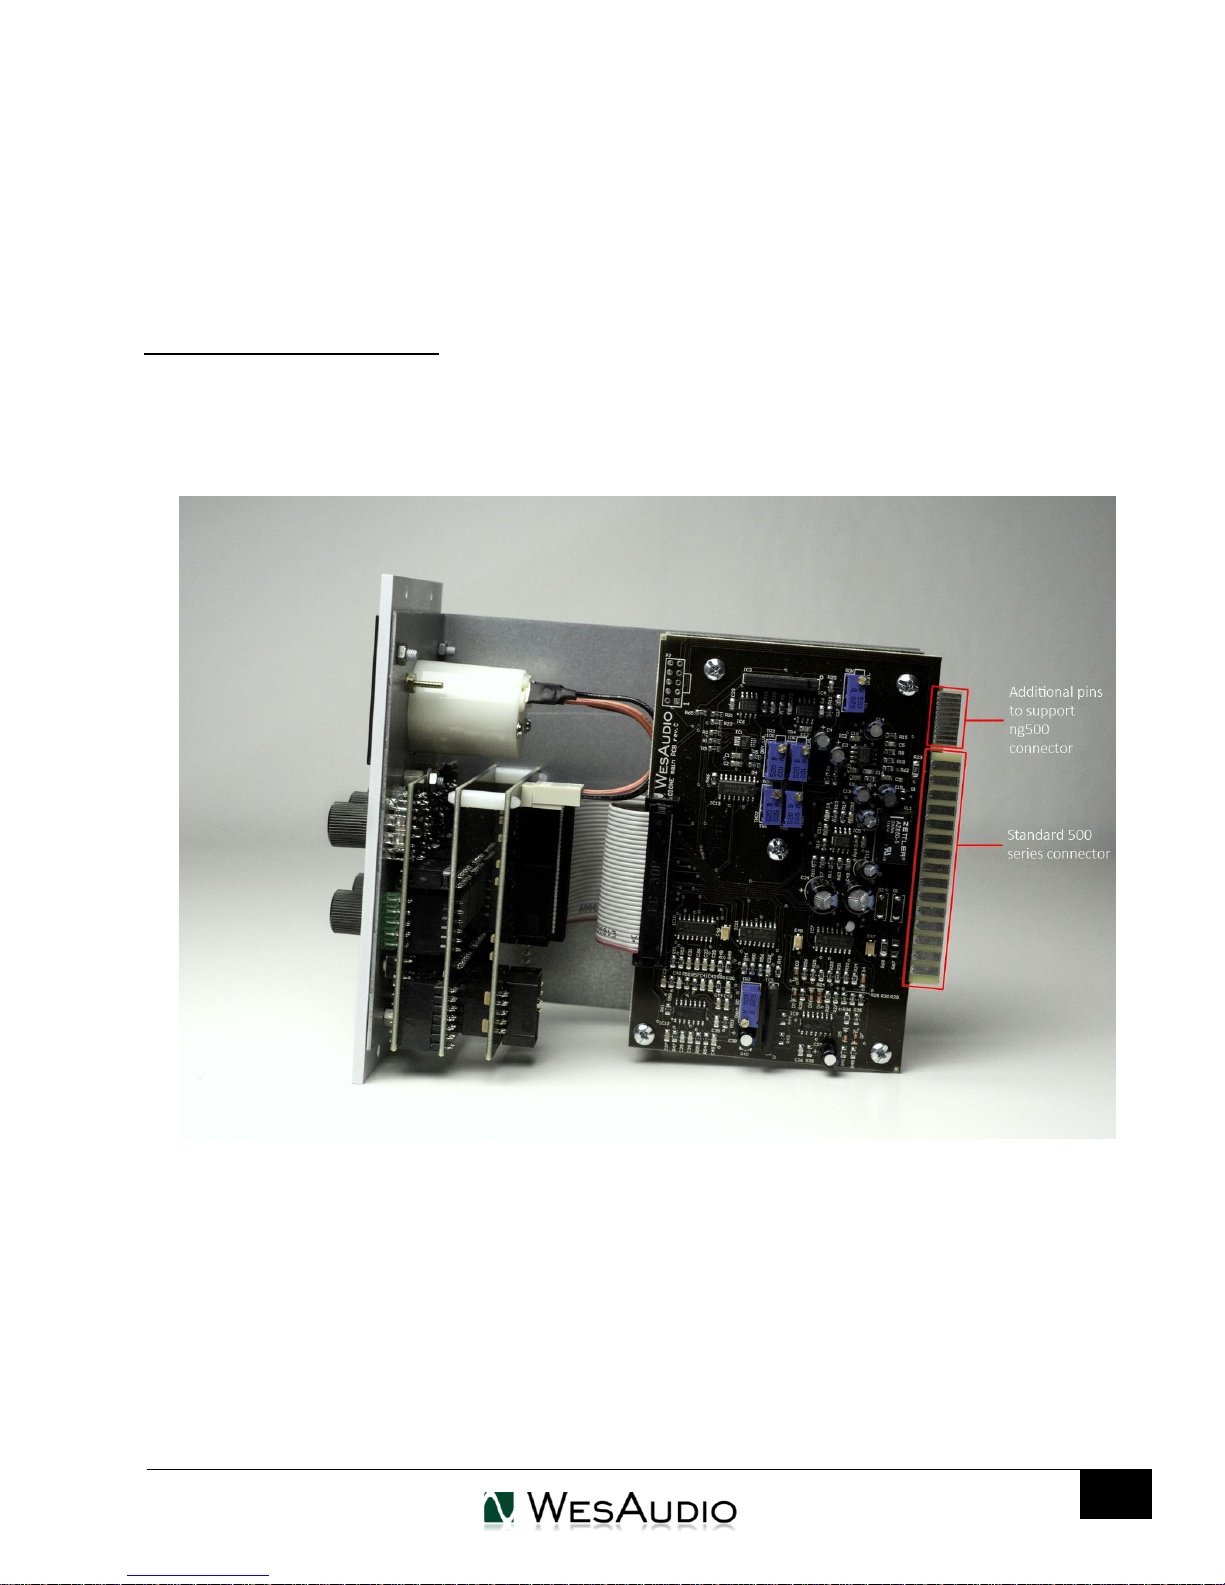
Each WesAudio device in ng500 (Next Generation 500 series) product line is equipped with special
connector. This connector is an extension to 500 series, and allows your device to be managed/recalled
through specialized GCon protocol (e.g. _Titan 500 series 10 slots frame).
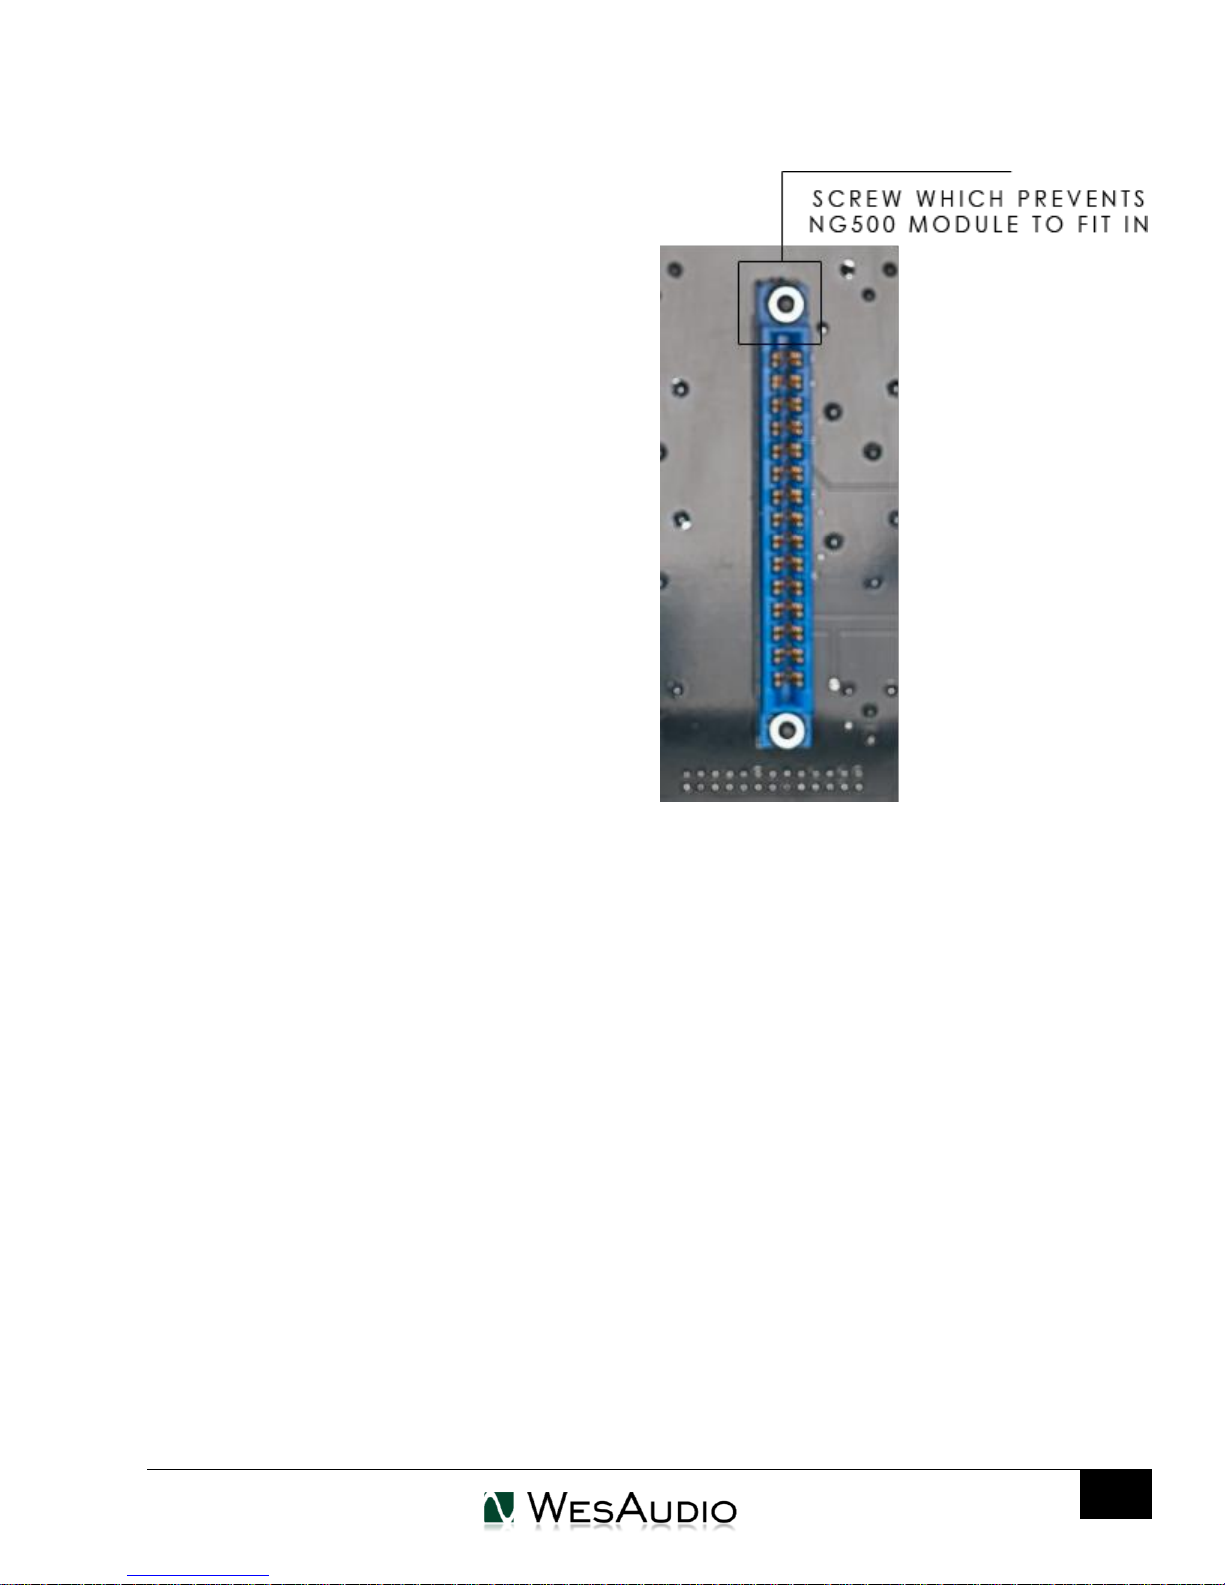
This extension is compatible with 500 series standardized plug type, however some manufacturers
apply enormous screws to the plug itself, which prevent the device to fit in. Based on official research
more than 90% of available 500 series racks will fit just fine. Currently known exceptions:
– Rupert Neve Designs 500 series Rack (confirmed),
– Aphex 500 series rack (not confirmed),
– Some older BAE racks (not produced anymore).
Page 9
_HYPERION USER MANUAL REV1
9
If you are in possession of any of those 500 series
racks, there are two options:
1) NG500 module won’t fit into this racks because
of upper screw attached to 500 series
connector. This particular screw can be
removed without any side effects in most of
listed racks. With such simple modification
your rack is ready to host any NG500 module
on this particular slot.
2) IMPORTANT ORDER NOTE: Each device can be
ordered without special 500 series connector,
however:
– The device compatibility with _titan frame is
broken, and will not work.
– The device can be managed/recalled via
direct USB connection without any problems.
WESAUDIO
4/9/18
Page 10
10
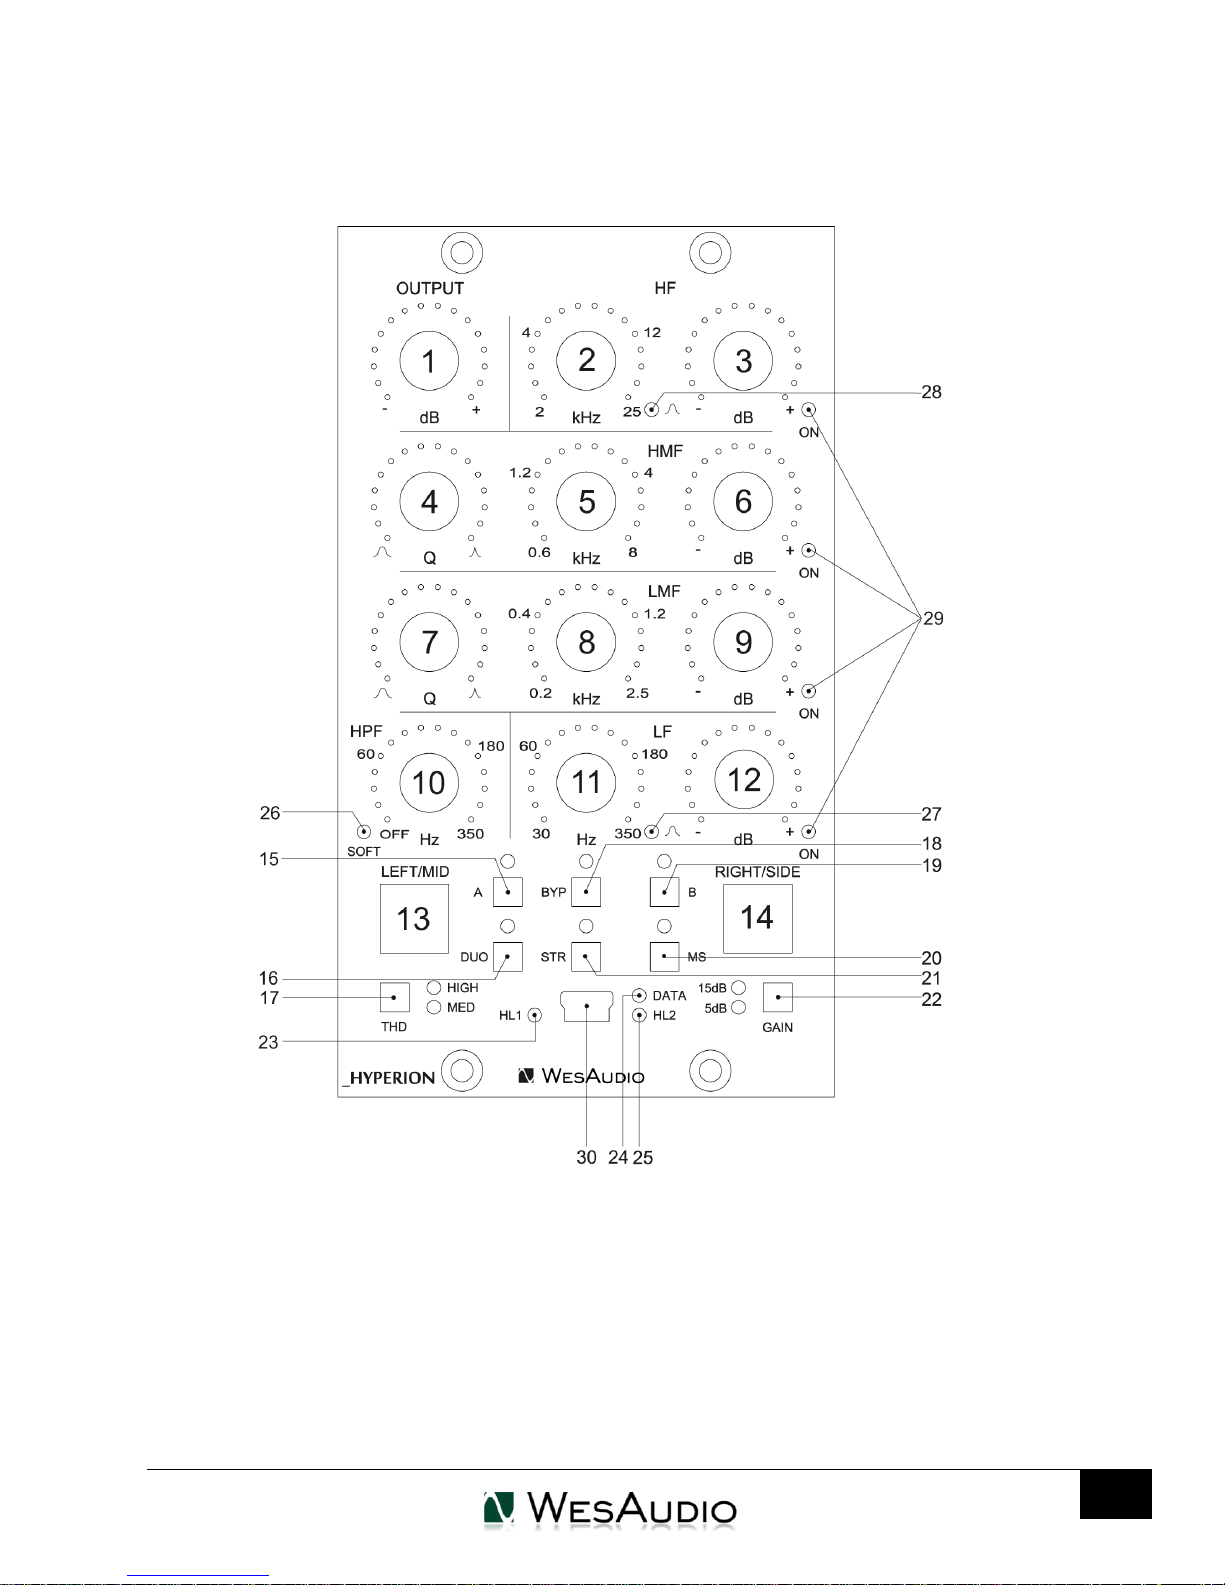
3. Front panel
WESAUDIO
4/9/18
_HYPERION USER MANUAL REV1
1) OUTPUT – output level control.
2) HF Frequency – high filter frequency control.
3) HF gain – high filter gain control.
4) HMF Q – high-mid filter bandwidth (Q) control.
5) HMF Frequency – high-mid filter frequency control.
6) HMF Gain – high-mid filter gain control.
7) LMF Q – low-mid filter bandwidth (Q) control.
Page 11

WESAUDIO
11
_HYPERION USER MANUAL REV1
8) LMF Frequency – low-mid filter frequency control.
9) LMF Gain – low-mid filter gain control.
10) HPF Frequency – high pass filter frequency control.
11) LF Frequency – low filter frequency control.
12) LF Gain – low filter gain control.
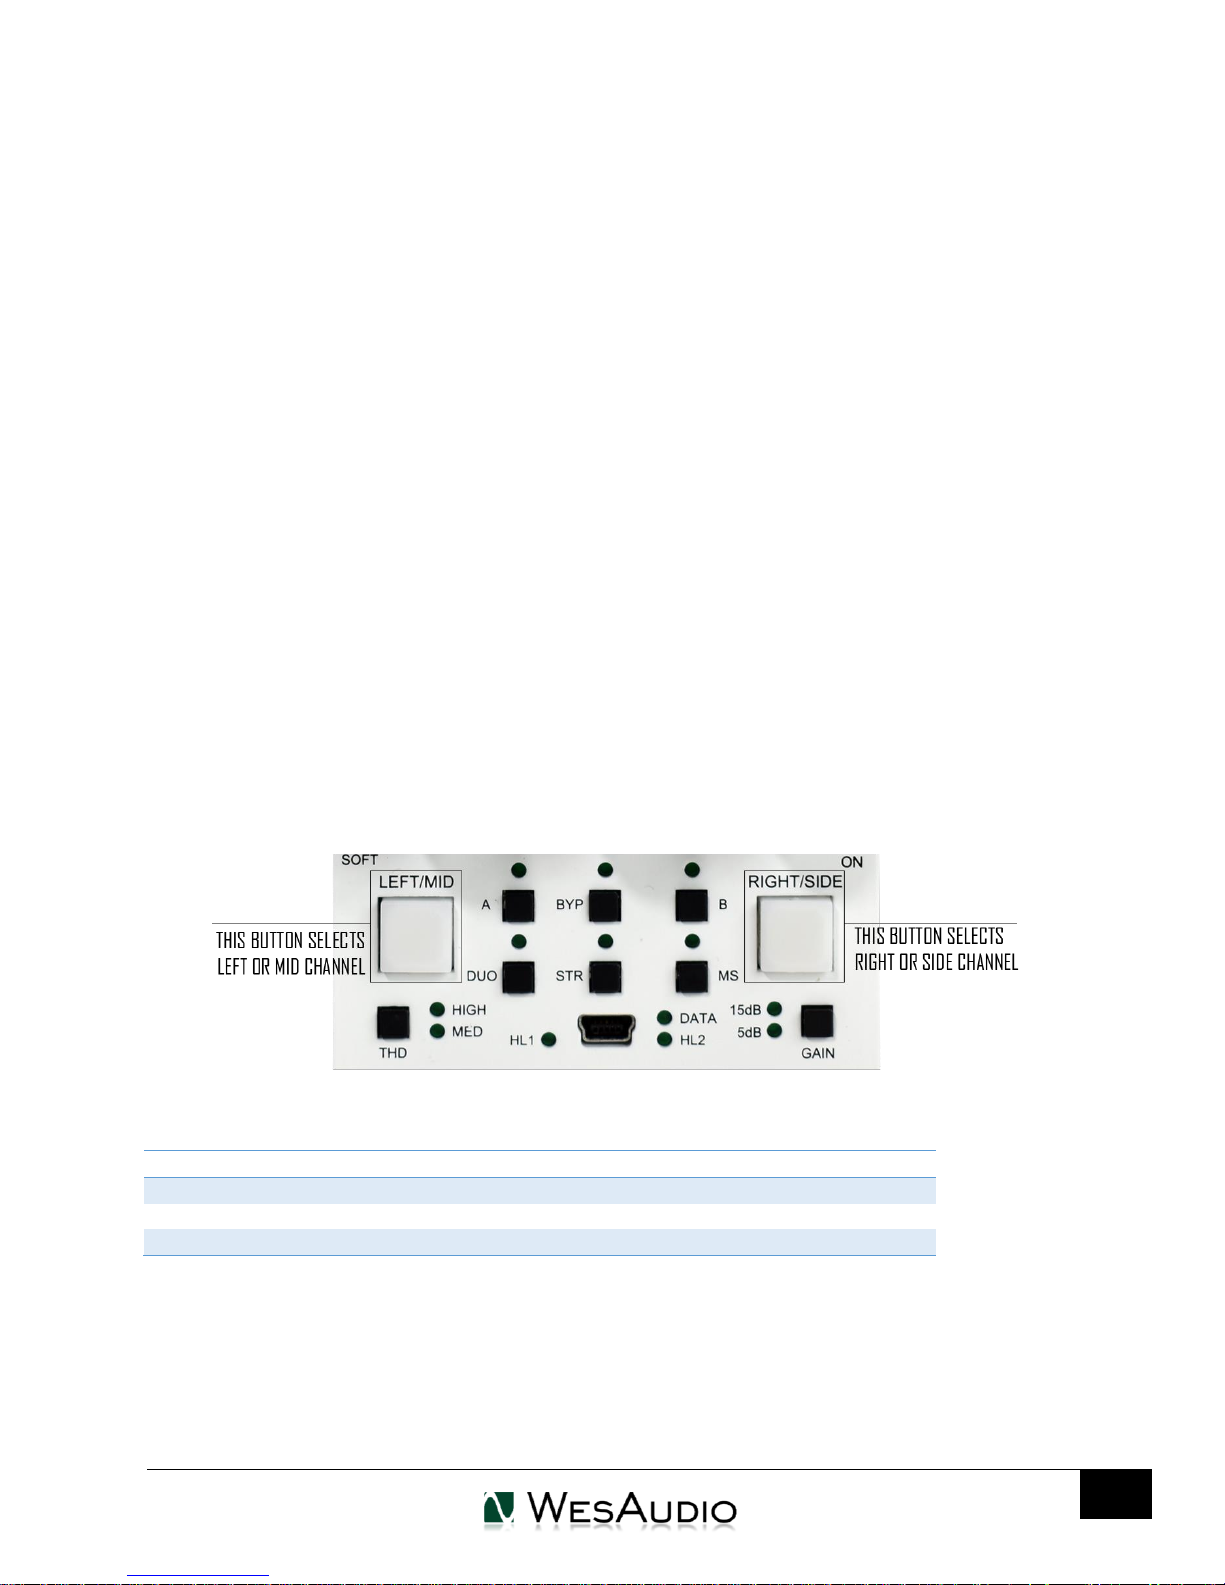
13) LEFT/MID channel button – hitting this button shows LEFT/MID channel on a front panel.
14) RIGHT/SIDE channel button – hitting this button shows RIGHT/SIDE channel on a front panel.
15) A – fast preset change – enables preset “A”.
16) DUO – enables dual mono mode.
17) THD – toggles THD level, possible steps – OFF (LEDs disabled), MED, HIGH.
18) Bypass – bypass switch.
19) B – fast preset change – enables preset “B”.
20) MS – enables mid-side mode.
21) STR – enables stereo mode.
22) GAIN mode – sets unit gain mode which affects all bands gain controls, and output controls.
Possible steps:
a. 15dB for cut and boost, with 0.25 dB change on each step,
b. 5dB for cut and boost, with 0.083 dB change on each step.
23) HL1 - indicates state of channel LEFT/MID connection to HOST – this led will be enabled if plug-in
is connected to this particular channel.
24) DATA - indicates that data is being sent from DAW to device.
25) HL2 - indicates state of channel RIGHT/SIDE connection to HOST – this led will be enabled if plug-
in is connected to this particular channel.
26) SOFT – this button enables 6dB per octave HPF mode.
27) LF BELL – indicates low filter mode, if enabled, bell mode is active, if disabled, shelf. To toggle
between modes LF frequency encoder has to be pressed (pushed).
28) HF BELL – indicates high filter mode, if enabled, bell mode is active, if disabled, shelf. To toggle
between modes HF frequency encoder has to be pressed (pushed).
29) Band bypass LEDs – each band can be independently bypassed, these LEDs indicates if particular
band is active. If LED is active, band is also active. To toggle from on to off, band gain encoder has
to be pressed (pushed).
30) USB socket - module control USB port.
4/9/18
Page 12
WESAUDIO
12
_HYPERION USER MANUAL REV1
4. Front panel – special functions
_HYPERION implements few usability features on the front panel which can help when using unit in
standalone mode (without plug-in connected).
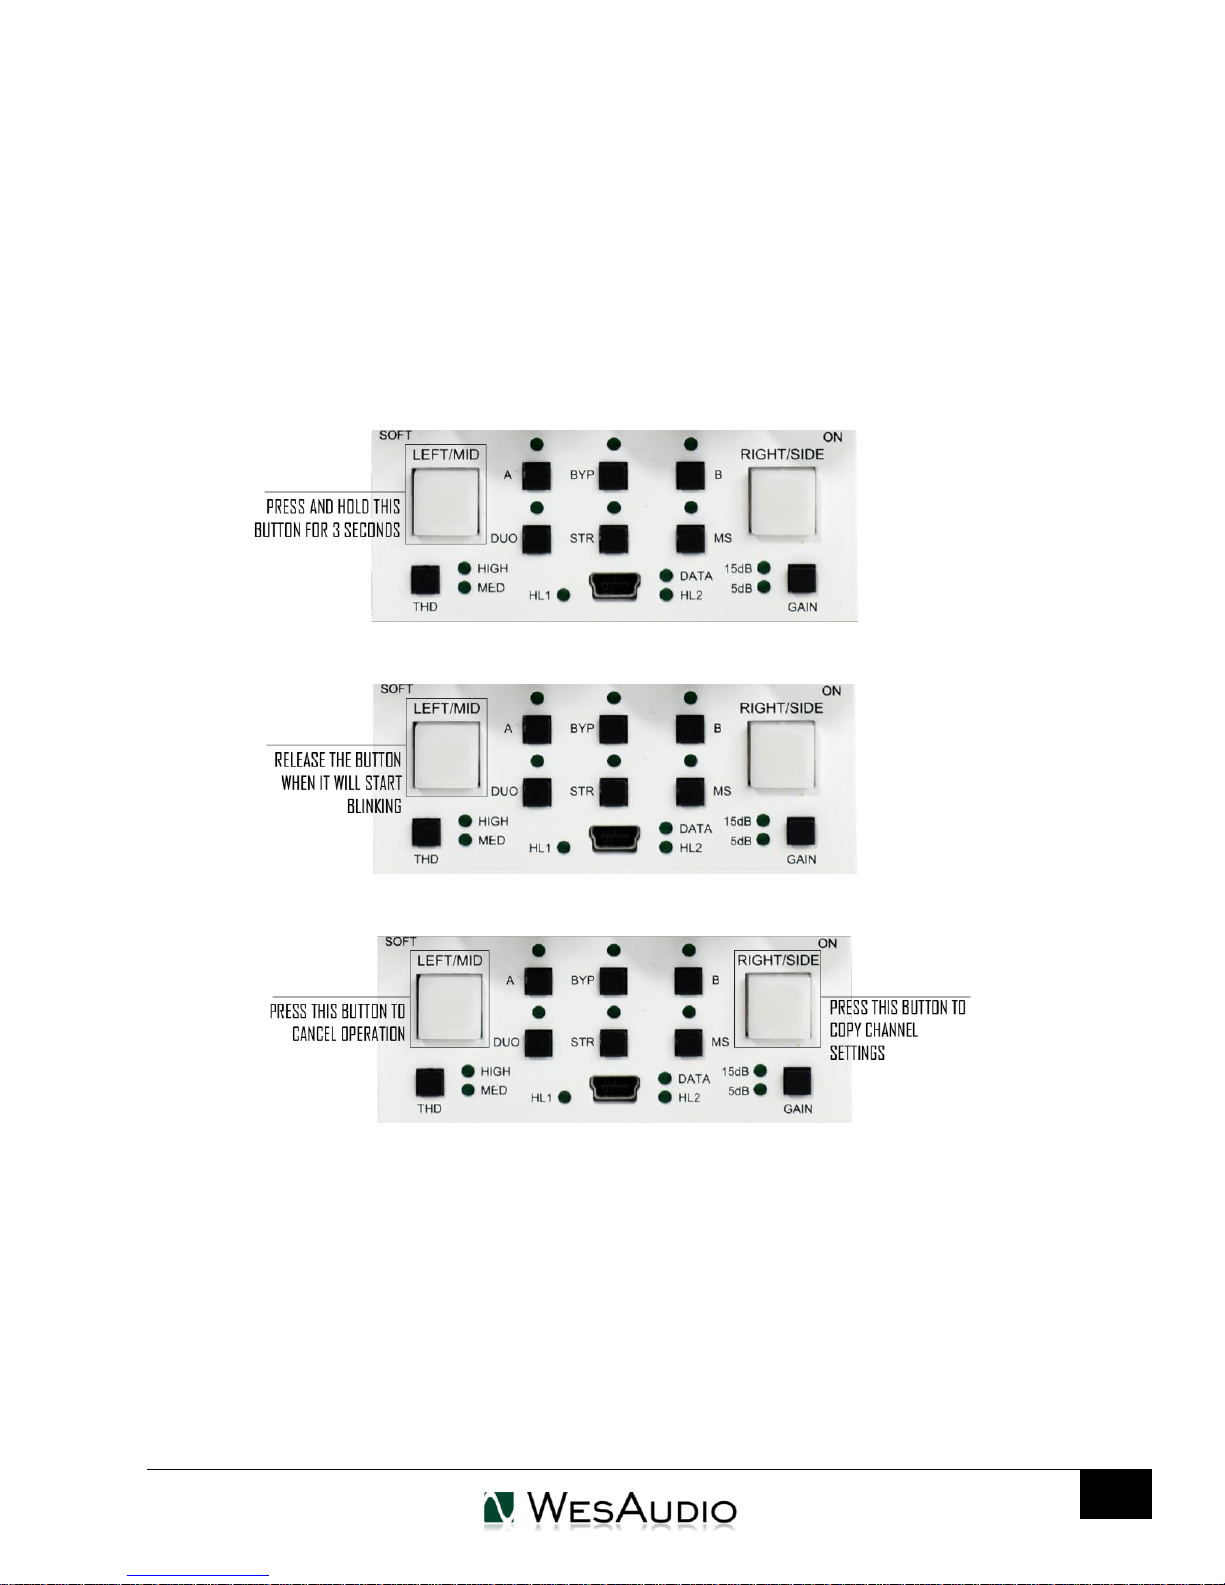
4.1. Copy channels
To copy channel settings, please refer to below steps. This example will show how to copy LEFT/MID
channel settings over to RIGHT/SIDE channel.
4/9/18
4.2. Copy presets (A/B)
To copy preset (A or B) please follow exact same approach as described in channel copy chapter above.
Page 13

_HYPERION USER MANUAL REV1
13
5. Specification
Short specification summary:
Frequency response: 10Hz-150kHz (-2dB)
THD+N all bands gain "0": 0.003% (1kHz,0dBu)
THD+N +15dB band boost: <0.15% (1kHz,0dBu)
Input impedance: 10kohm
Output impedance: <100ohm
Max signal level: +24dBu
Crosstalk:< -100dB
THD (MID switch): 1%
THD (HIGH switch): 2.5%
Power consumption: 150mA per rail
Dimensions : 76x133x158mm
WESAUDIO
4/9/18
Warranty: 2 years
Unit needs to warm up for about 5 minutes before usage as its temperature may affect some
internal variables – like frequencies of each band, and very slightly gain and Q settings.
Each band can boost or cut in configurable gain mode (It affects also OUTPUT control):
o 15dB boost or cut in 0.25 dB steps,
o 5dB boost or cut in 0.083 dB steps,
Each frequency control has predefined amount of steps in logarithmic scale:
o HF frequency – 256 steps,
o HMF frequency – 256 steps,
o LMF frequency – 256 steps,
o LF frequency – 200 steps,
o HPF frequency – 128 steps.
Page 14
_HYPERION USER MANUAL REV1
14
6. Curves
This chapter presents all basic band configurations.
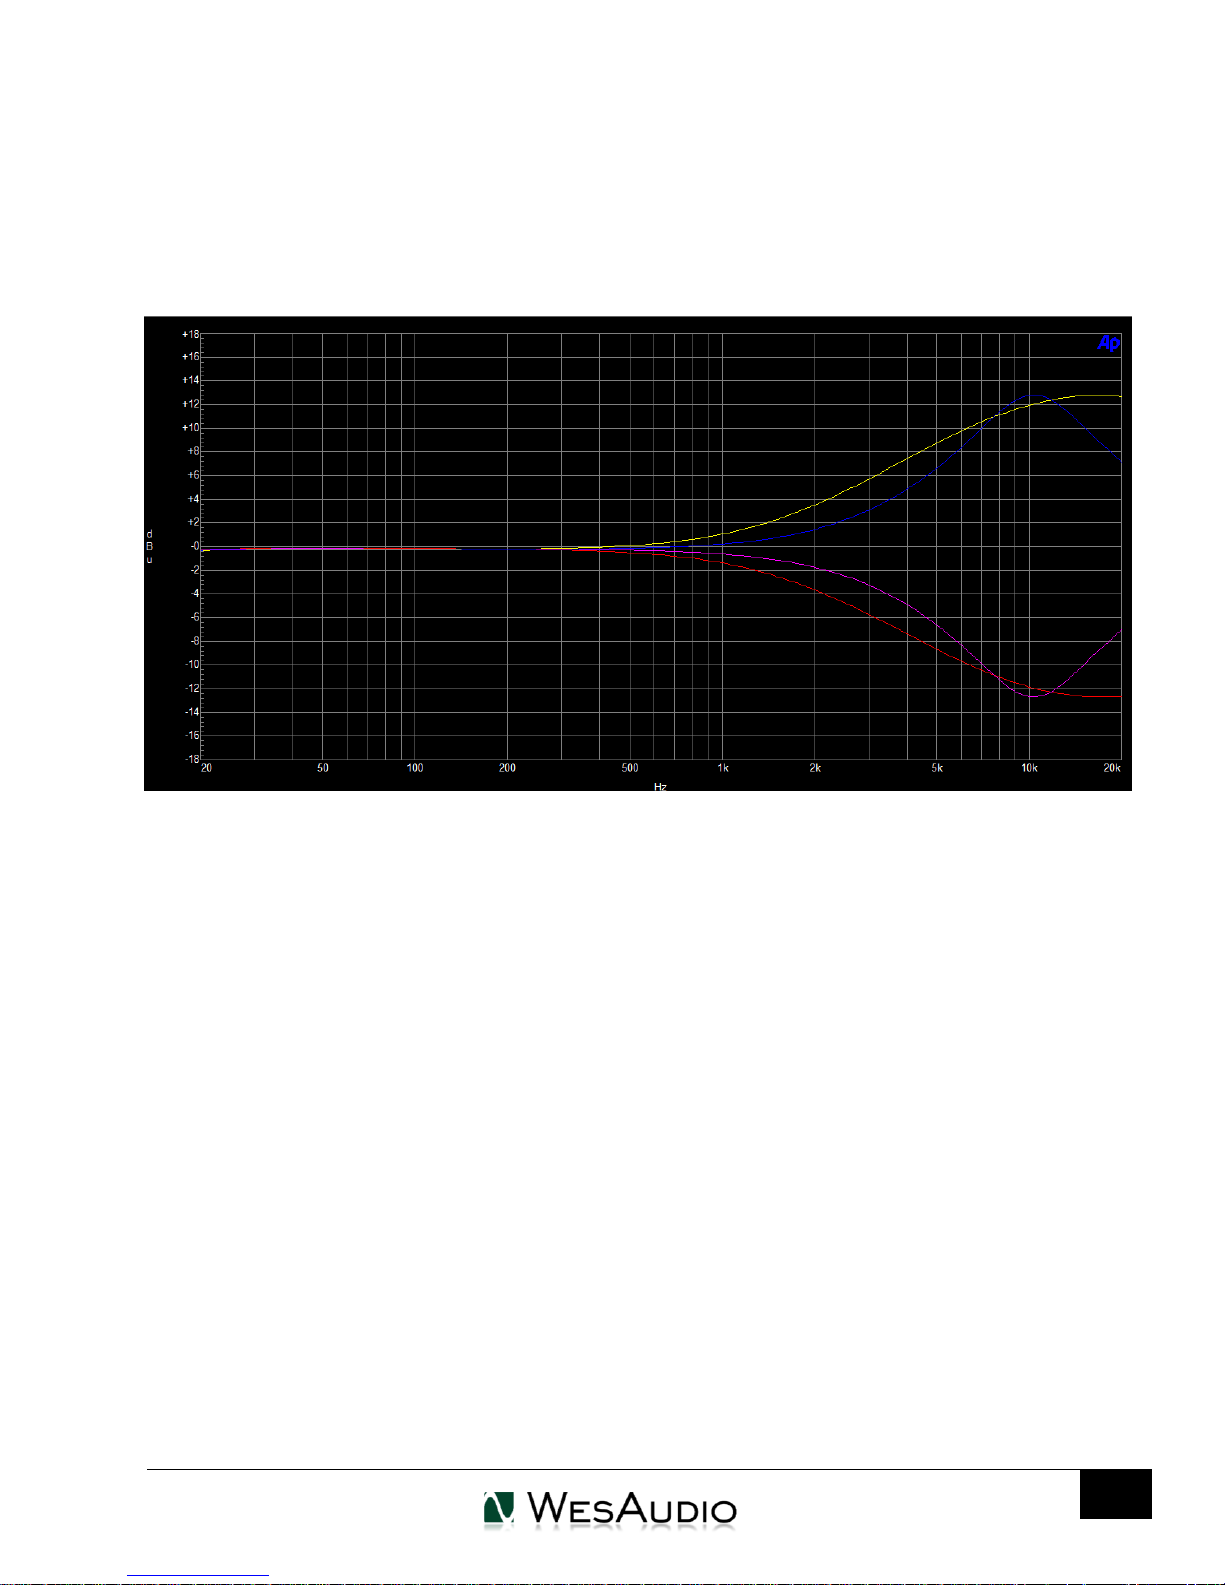
6.1. HF – high filter
WESAUDIO
4/9/18
1) YELLOW – Frequency 10kHz, +15dB boost, Shelf mode.
2) RED – Frequency 10kHz, -15dB cut, Shelf mode.
3) MAGENTA – Frequency 10kHz, -15dB cut, Bell mode.
4) BLUE – Frequency 10kHz, +15dB boost, Bell mode.
Page 15
_HYPERION USER MANUAL REV1
15
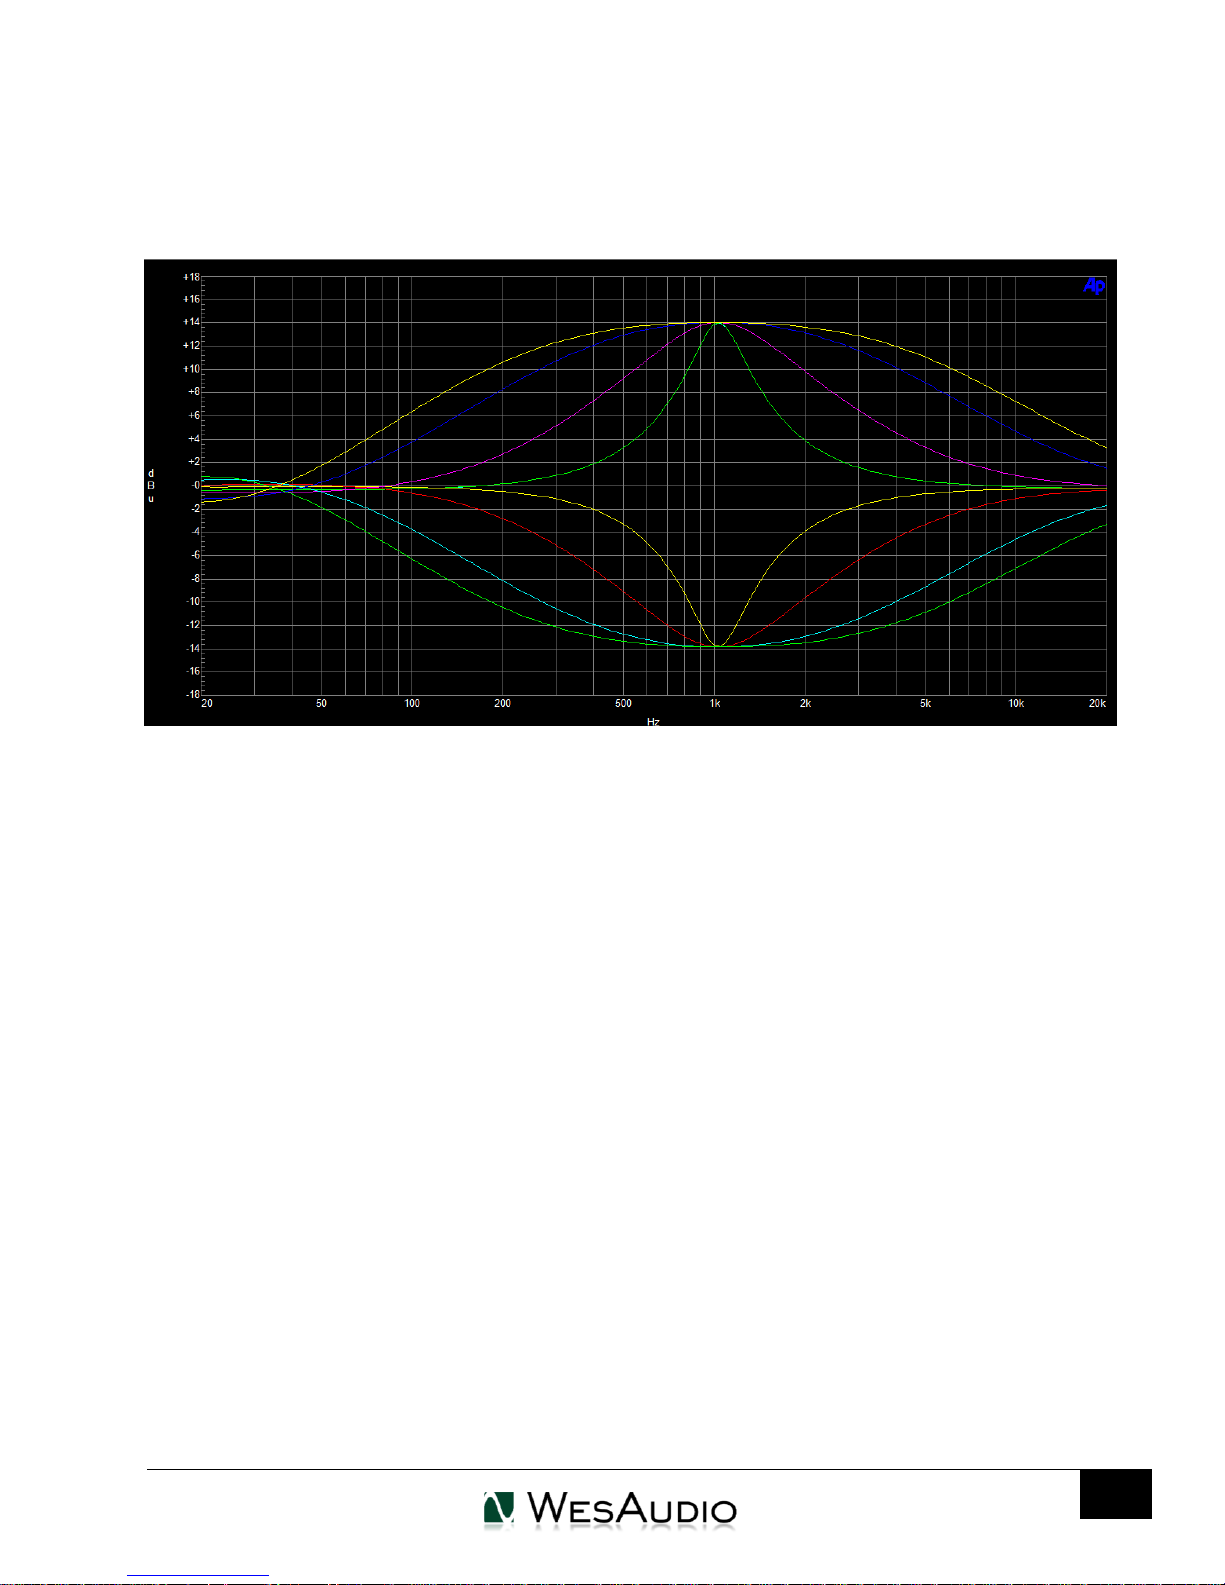
6.2. HMF & LMF – high-mid filter & low-mid filter
HMF and LMF filters are very similar, however exist in different frequency ranges.
WESAUDIO
4/9/18
This graph presents different Q values and Gain values for 1kHz frequency. Each curve is done either for
+15dB boost or -15dB cut. Widest Q value is equal 0.2 and narrowest 3.2.
Page 16
16
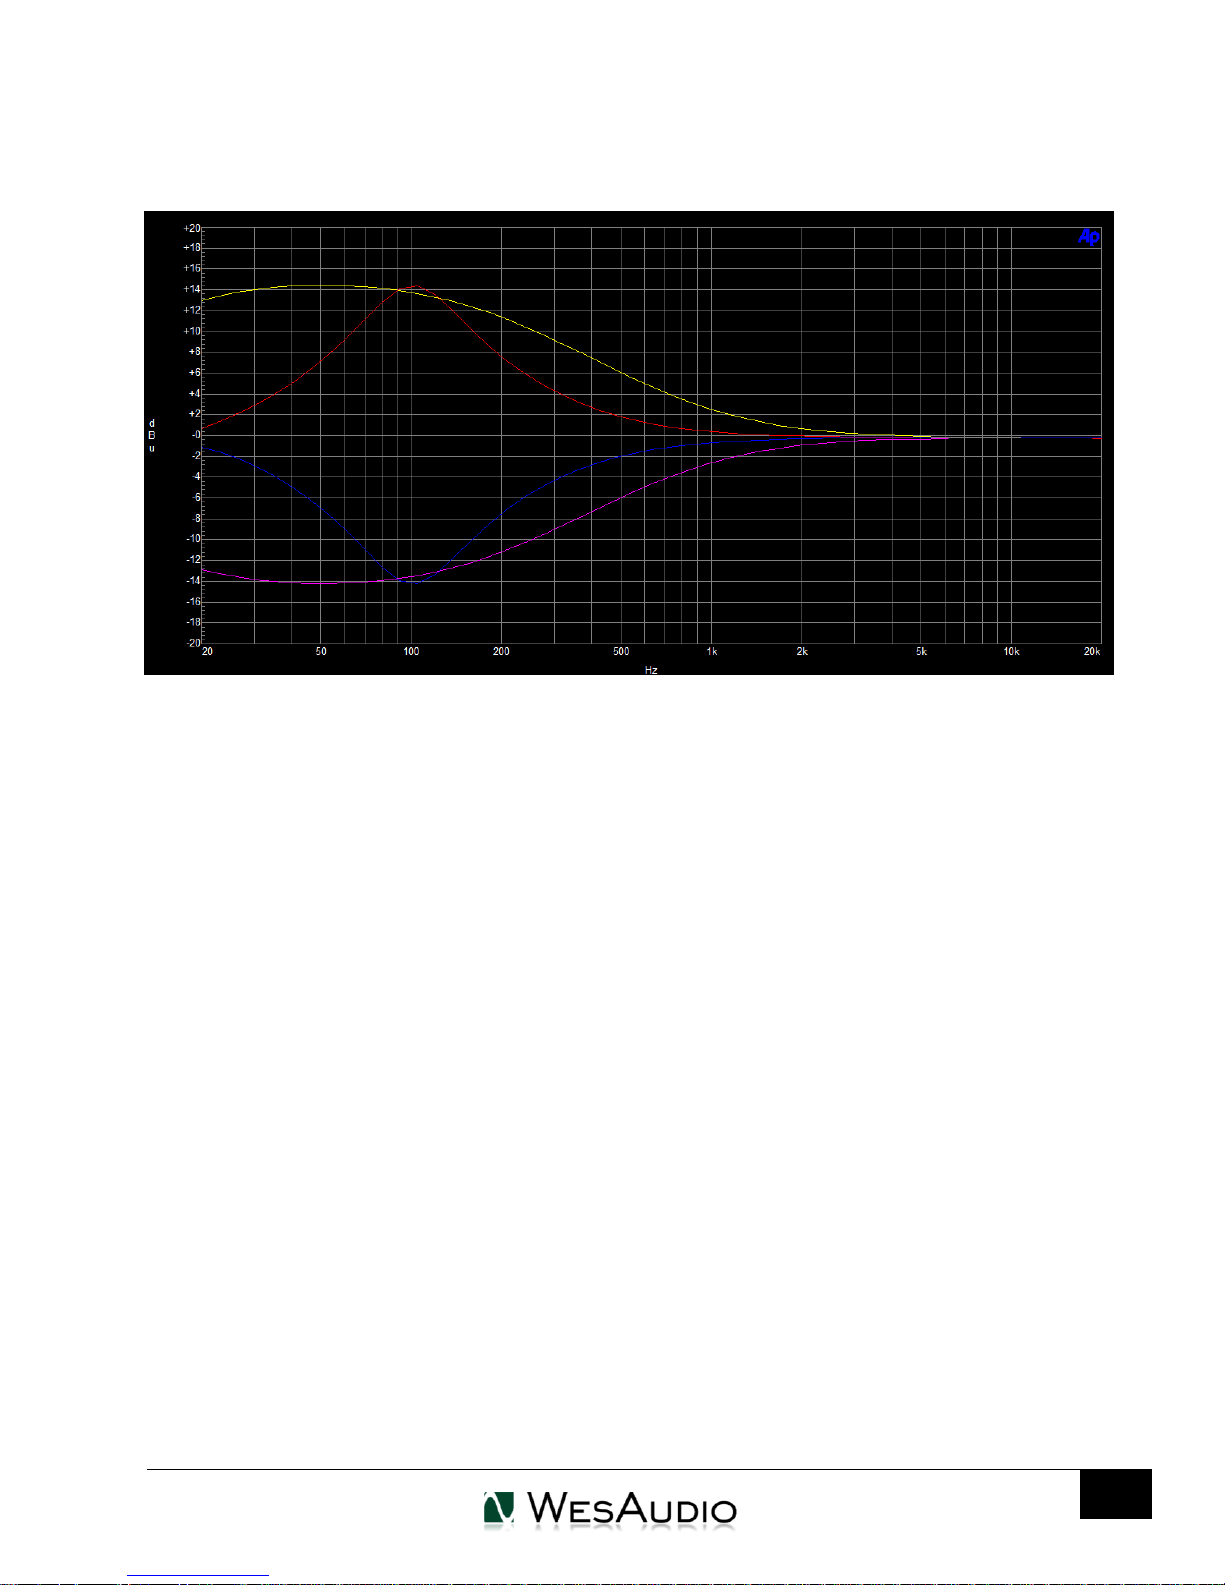
6.3. LF – low filter
WESAUDIO
4/9/18
_HYPERION USER MANUAL REV1
1) YELLOW – Frequency 100Hz, +15dB boost, Shelf mode.
2) RED – Frequency 100Hz, +15dB boost, Bell mode.
3) MAGENTA – Frequency 100Hz, -15dB cut, Shelf mode.
4) BLUE – Frequency 100Hz, -15dB cut, Bell mode.
Page 17
17
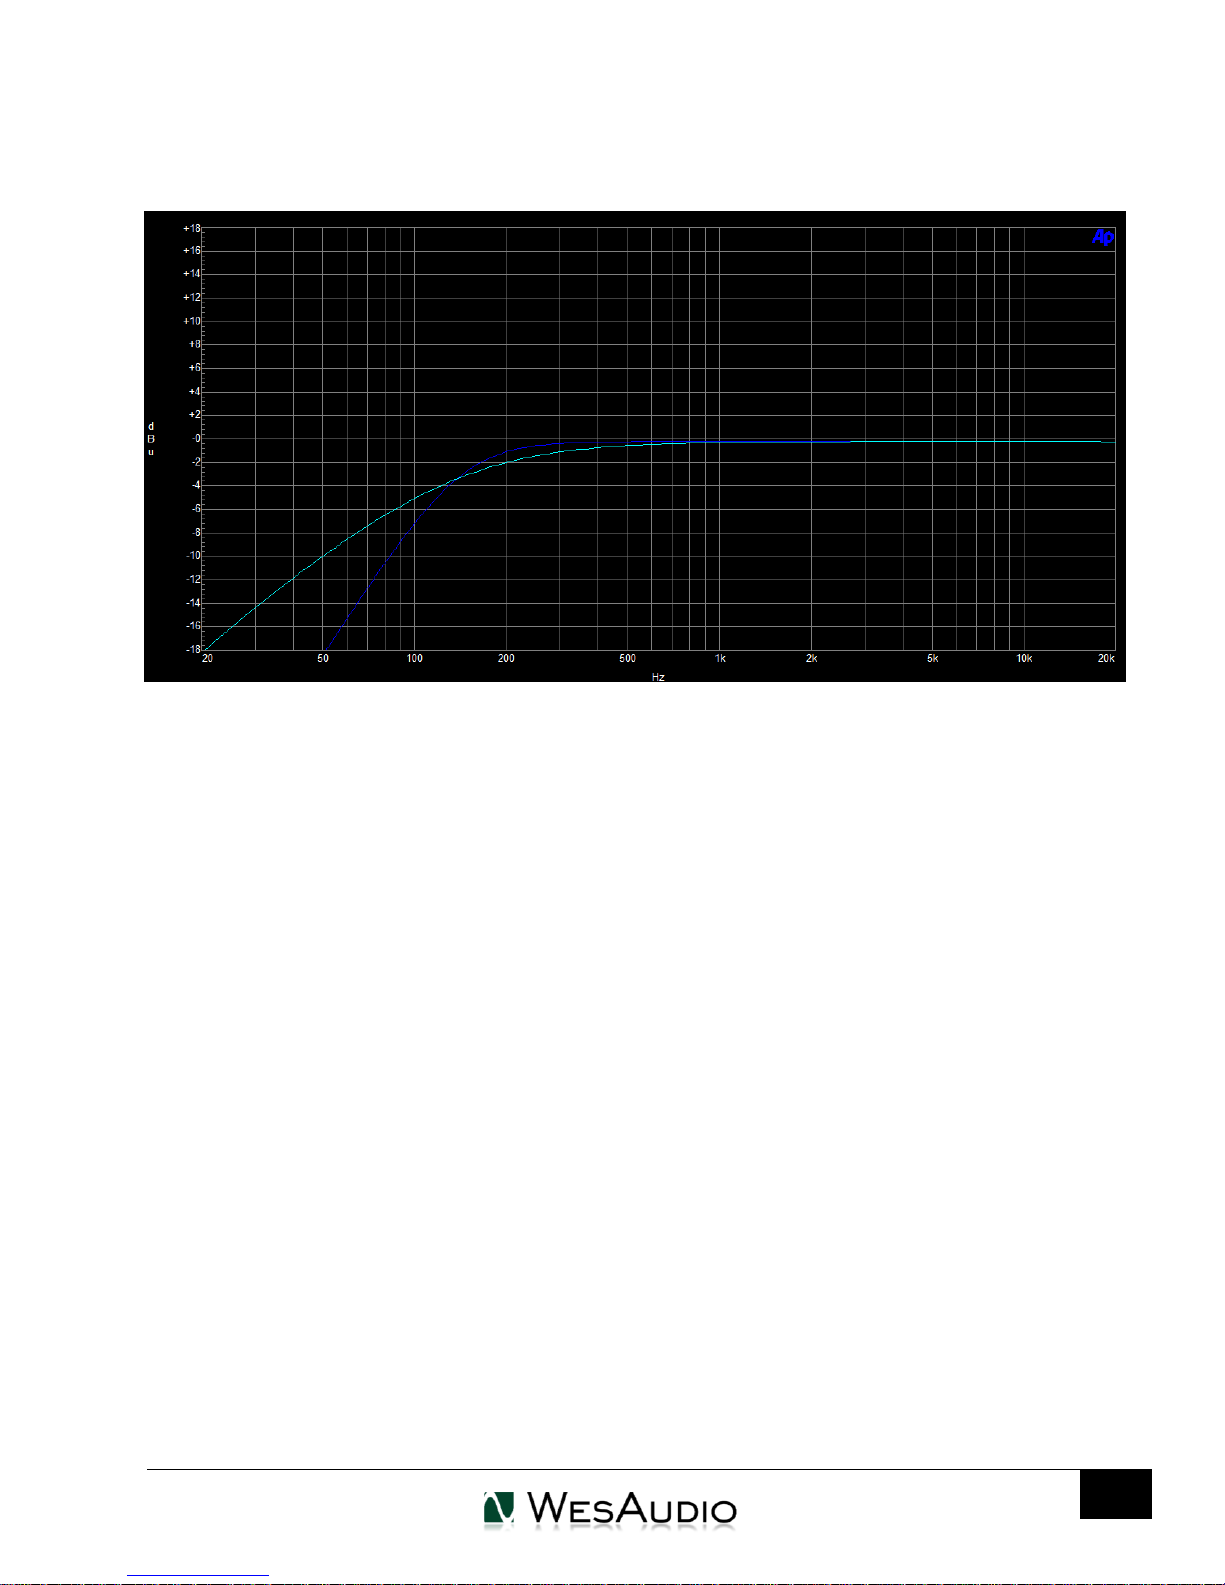
6.4. HPF – high pass filter
WESAUDIO
4/9/18
_HYPERION USER MANUAL REV1
1) BLUE – Frequency 150Hz, 12dB/Oct (Normal mode).
2) CYAN - Frequency 150Hz, 6dB/Oct (Soft mode).
Page 18
WESAUDIO
18
Mode
Management - A/B and Bypass
Channels
Dual mono
Global mode (1)
Unlinked mode (2)
Stereo
Global mode (1)
HW Linked mode (3)
Mid-Side
Global mode (1)
Unlinked mode (2)
_HYPERION USER MANUAL REV1
7. Unit modes
_HYPERION is an equalizer which can work in following modes:
DUAL MONO – each channel works as independent units – channels are unlinked.
STEREO – channels are linked together which allows processing stereo audio signal in convenient
way.
MID-SIDE – signal on the way in is encoded into MID and SIDE signal, and at the end of the circuit it is
decoded back to stereo. This allows separate control over MID and SIDE channels respectively.
Regardless above modes, _HYPERION can be used in following ways:
STANDALONE – unit is not connected through USB or _TITAN chassis with digital plug-in or any other
control application, it is used as any normal analog unit.
CONNECTED to a PLUGIN – where unit is connected to a plugin which allows total recall and remote
control.
4/9/18
7.1. Unit standalone usage
Standalone usage means that unit isn’t connected anyhow to management client – e.g.
AAX/VST/VST3/AU plug-in or any standalone application. It is used as standard analog unit using a front
panel. In this mode when channels are unlinked (please see table below), front panel buttons LEFT/MID and
RIGHT/SIDE can be used to select particular channel:
Below table describes unit behavior:
Page 19

WESAUDIO
19
Plugin type
Mode
A/B and Bypass
Channels
Stereo
Dual mono
Global mode (2)
Unlinked mode(4)
Stereo
Stereo
Global mode (2)
SW Linked mode (5)
Stereo
Mid-Side
Global mode (2)
Unlinked mode/SW Linked
mode(6)
Mono (1)
Dual mono
Split mode (3)
Unlinked mode (4)
_HYPERION USER MANUAL REV1
Management modes define how unit responds to A/B buttons and Bypass button, there are following
options:
Global Mode (1) – each time either A/B or Bypass is pressed, both channels are affected regardless
currently selected channel. Those functions works in global mode.
Channels modes description:
Unlinked mode (2) – this mode means that LEFT/MID and RIGHT/SIDE channel is completely
independent from each other, to change parameter value in this mode, it is necessary to select a
channel, and then change a parameter, and only selected channel configuration will be affected.
HW Linked mode (3) – this is special mode active only in standalone operation when stereo mode is
active. It means that currently selected channel becomes master channel and all its parameters are
applied to both analog channels (That is why both channels buttons are marked as selected). In
essence, it means that each time parameter is changed through front panel, both analog circuits (for
both channels) will be affected exactly the same way. However what is important, that only currently
selected channel memory is really affected (to prevent unwanted channel memory copy upon hitting
Stereo button). When channels will be unlinked after modifications in Stereo mode (either by
enabling Dual mono or Mid-Side modes), channel which hasn’t been currently selected, will go back
to its previous memory state. To learn how to copy channels using unit’s front panel, please refer to
chapter Front panel – special functions.
4/9/18
7.2. Unit with a plug-in usage
This chapter describes how unit behaves when it is connected to a plug-in.
(1) IMPORTANT NOTE: MONO plugin upon connection will always activate “Dual” mode. This
plugin can work only in that mode.
Management modes define how unit responds to A/B buttons and Bypass button, there are following
options:
Global Mode (2) – each time either A/B or Bypass is pressed, both channels are affected regardless
currently selected channel. Plug-in doesn’t contain separate buttons (A/B and bypass) for each
channel.
Split Mode (3) – Split mode is activated only when mono plug-in instance is connected to at least
one hardware channel. In this mode A/B and Bypass work completely independent for each channel.
Page 20
WESAUDIO
20
_HYPERION USER MANUAL REV1
This mode allows “true” dual-mono operation which is perfect for processing two mono sources (e.g.
kick and snare). In fact in this mode each channel can be treated as separate hardware unit.
Channels modes description:
Unlinked mode (4) – this mode means that LEFT/MID and RIGHT/SIDE channel is completely
independent from each other, to change parameter value in this mode:
o Using front panel - it is necessary to select a channel, and then change a parameter, and only
selected channel configuration will be affected.
o Using Stereo plugin – each channel is easily accessible.
o Using Mono plugin – Mono plugin can change only its currently connected (paired) channel.
SW Linked mode (5) – Active only for Stereo mode in Stereo plug-in - In this mode both channels are
linked relatively (please check Stereo mode chapter for more details).
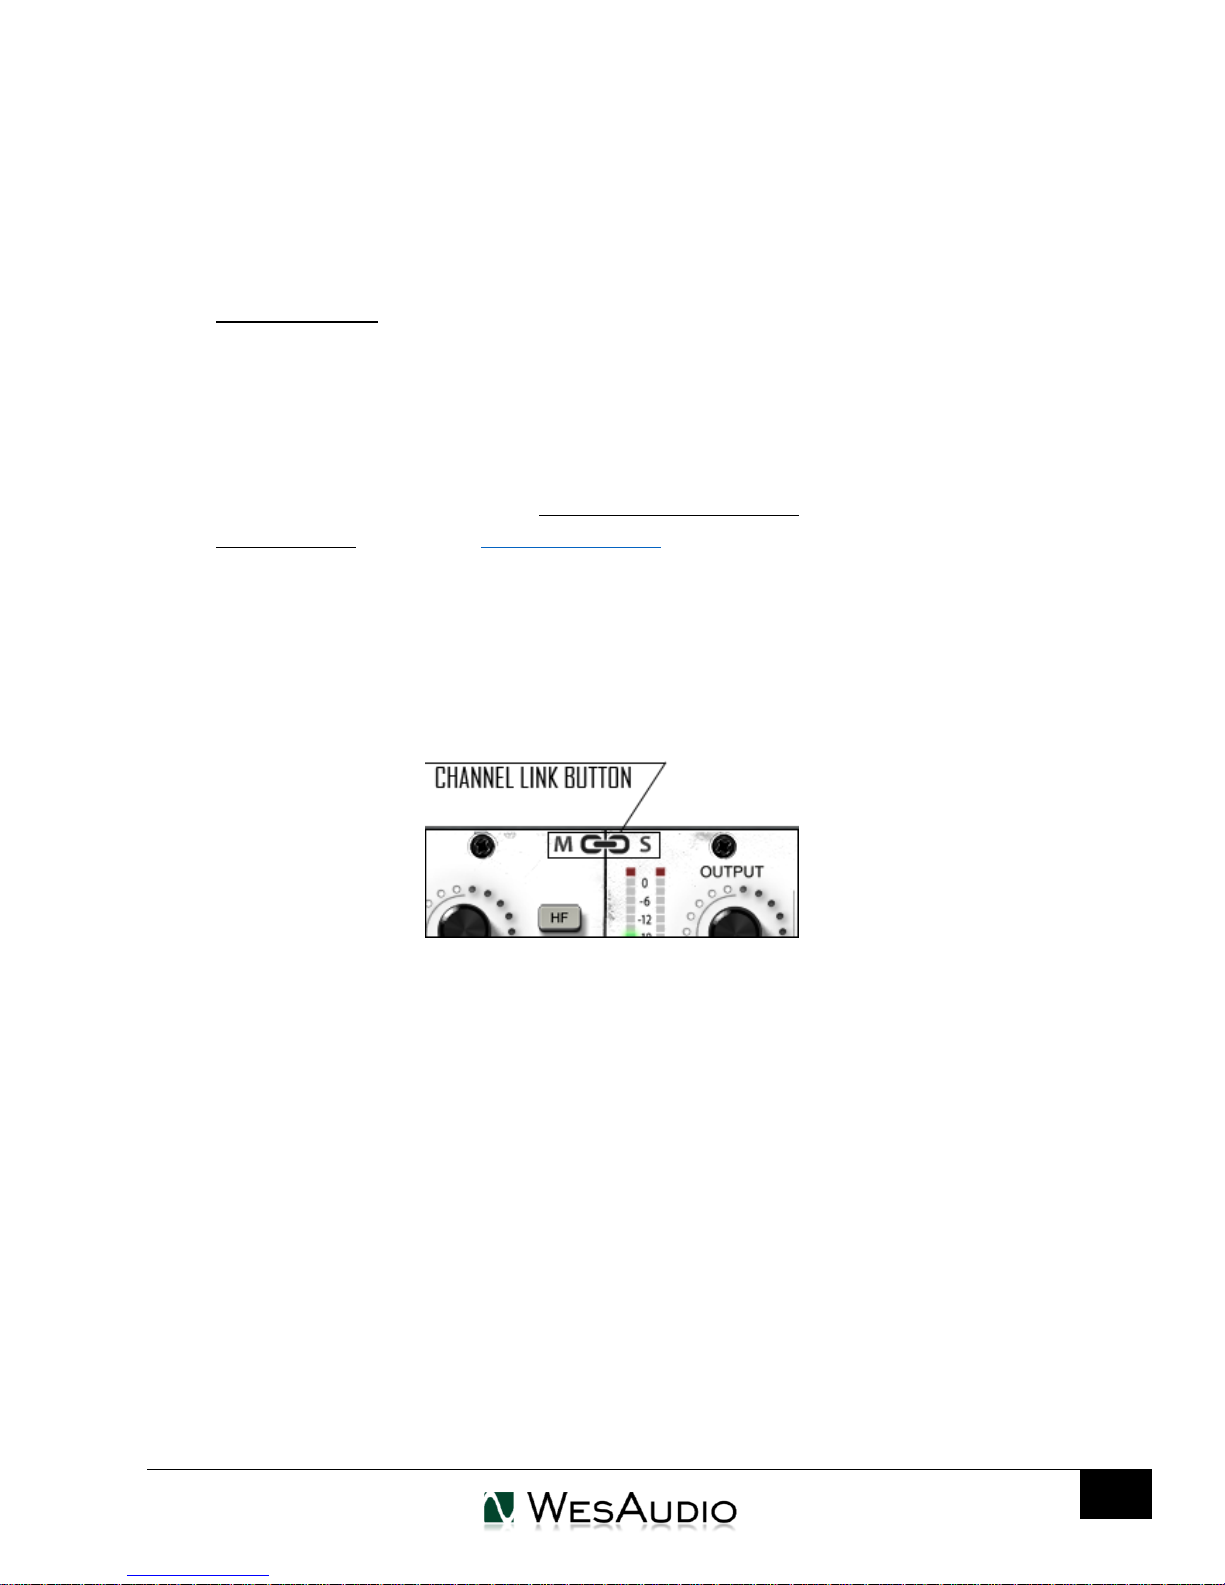
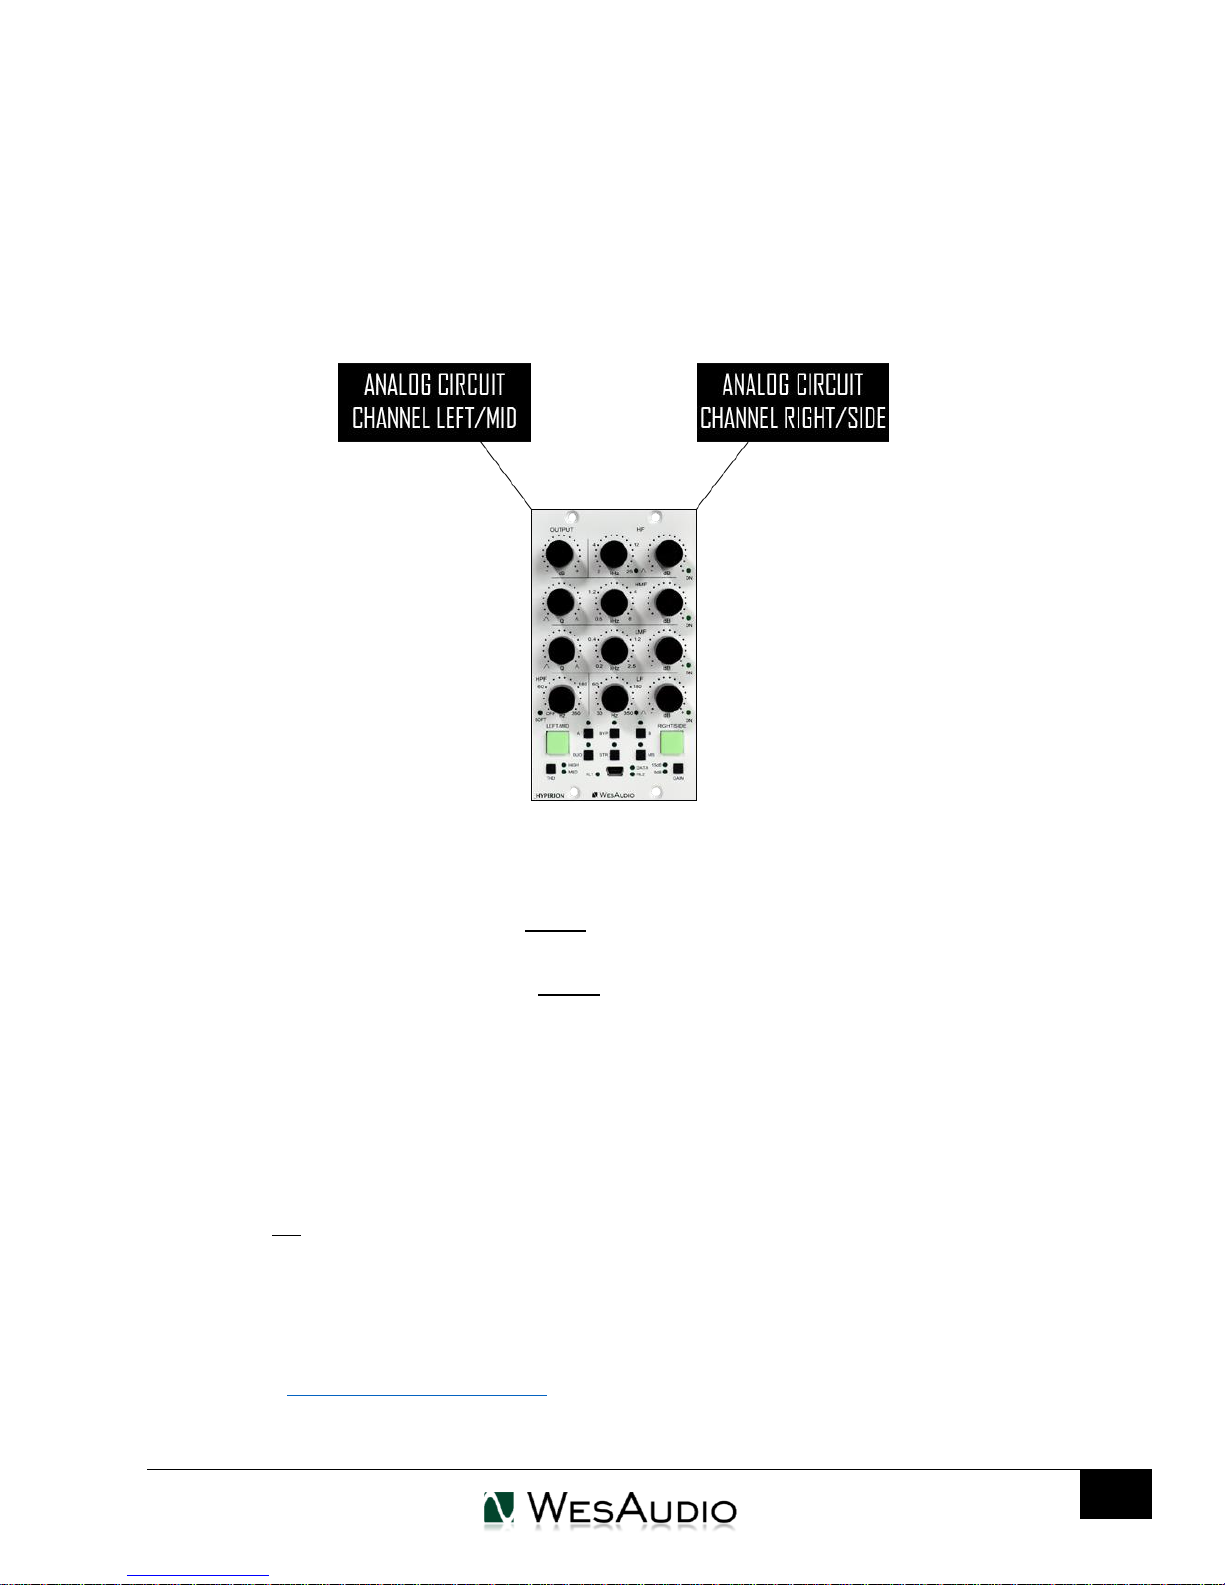
Unlinked mode/SW Linked mode (6) – This behavior is available only for Mid-Side mode – by default
by activating Mid-Side mode, both channels (MID and SIDE) are unlinked. However, we can still link
those channels anytime (relatively) by activating “Channel link button” (picture below). This might be
useful if we would like to still change some settings for both channels at the same time, or to check
our changes by toggling band bypass buttons.
4/9/18
Page 21
WESAUDIO
21
_HYPERION USER MANUAL REV1
7.3. Stereo mode in standalone mode vs plug-in usage
There is slight difference in stereo operation when unit works in standalone mode versus unit connected
to a plug-in. This has been described in pervious chapter, but to make it even more clear please follow
description below. For standalone operation, stereo mode works like this:
4/9/18
Currently visible/selected channel becomes master channel which controls both analog circuits. When stereo
mode is engaged, both channel buttons are active. However only control of analog circuit is replicated,
internal unit memory will be updated only for master channel. What does it mean? Let’s go through below
example:
1) All parameters are at default state, dual mono mode is active, LEFT/MID channel is currently
selected.
2) Stereo mode is engaged, so both channels are affected through parameter changes.
3) Some initial sound is dialed in, however we would like to start M-S mode, to add few more dB in HF
section.
4) When MS mode is engaged, LEFT/MID channel remains in current state, however RIGHT/SIDE
channel is loaded from internal memory – so it will update all parameters to its own state. In point 1)
we started from default settings, so default state will be set on the analog circuit for channel
RIGHT/SIDE).
5) We can however, very easily copy LEFT/MID channel state to RIGHT/SIDE, by following steps in
chapter Front panel – special functions.
Page 22
WESAUDIO
22
4/9/18
_HYPERION USER MANUAL REV1
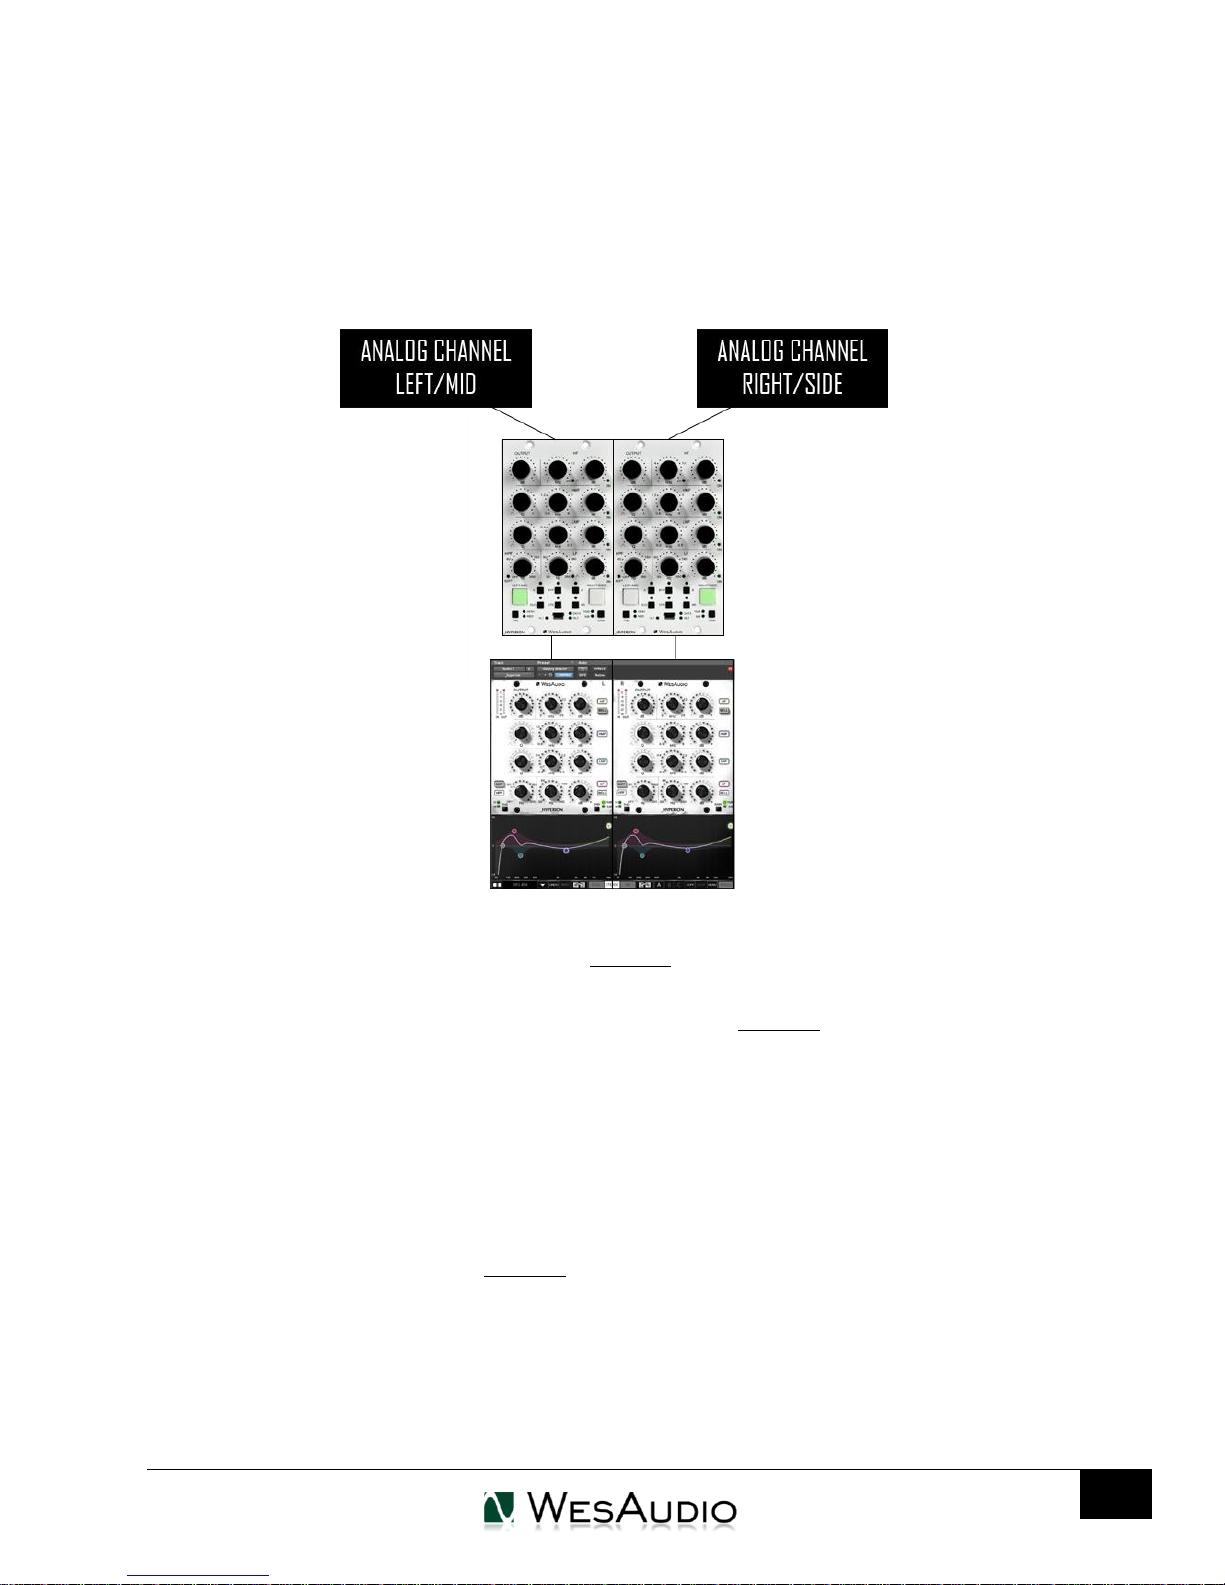
Unfortunately 500 series small footprint and many _HYPERION parameters made it impossible to fit two
channels on a front panel at a same time. Switching channels caused some usability decisions, most common
applications will be very straightforward however other cases may be little bit unintuitive at first encounter.
Below picture shows stereo operation with plugin control:
As you can see in this case both channels are totally independent, but in this particular case, when
stereo mode is active, both channels are also linked relatively. Most of the time, parameters on each side will
be exactly at the same position, however plugin control allows to unlink those channels at any time. Than
each modification of parameter in stereo mode will change each side relatively. For example:
Channel LEFT/MID HF Gain is at 0, channel RIGHT/SIDE HF Gain is at 0.
Dual mono mode is engaged.
Channel LEFT/MID HF Gain is set to 3, channel RIGHT/SIDE HF Gain is still 0 as change was done in
dual mono mode.
Stereo mode is engaged.
Changing channel LEFT/MID HF Gain back to 0, will cause channel RIGHT/SIDE HF Gain change to -3,
as those parameters are linked relatively.
To copy channels to each other, it is enough to use buttons on the bottom of plugin window.
As _HYPERION is an analog unit, in analog world nothing is perfect. This feature may become really
handy as it will be very easy to compensate any differences in our analog chain.
Page 23
WESAUDIO
23
_HYPERION USER MANUAL REV1
8. Metering
_HYPERION implements metering system in two different ways:
Clip detection on a front panel – each time clip is detected either on IN or OUT, channel button will
become red. This is momentary information, this state is kept for very short period of time.
VU on IN and OUT, and Clip detection in the plug-in. When plug-in is connected to a hardware (pair),
it will start send information about current VU levels. When clip is detected, special indicator (clip
LED) will visualize this in the plug-in separately for IN and OUT. Clip state (LED) is kept for few
seconds, however it can be canceled by clicking on it.
4/9/18
Page 24

WESAUDIO
24
4/9/18
_HYPERION USER MANUAL REV1
9. Software
Software package can be downloaded from http://www.wesaudio.com/download by anyone who
purchased related HW unit. To check currently supported plugin types and platforms, please follow above
link.
9.1. Installation
To install WesAudio software package, please visit http://www.wesaudio.com/download and
download recent version of software.
9.1.1. WINDOWS
Start the installer application, if you will encounter any system warnings about this particular installer,
please ignore them*, then select any components which you would like to install**.
If this is FIRST installation, please unplug all WesAudio devices from your workstation.
When USB driver will be installed, application will inform that all devices should be connected –
please do so.
If USB driver installation is triggered, user will be asked to restart computer. We know that this is
unwanted activity, but it is necessary step for USB driver to install with success.
If computer restart is triggered, this Installer will start again during start up. If for some reason
installer won’t be started after the restart, please start same installer manually again.
9.1.2. OSX
Because OSX architecture and USB devices handling is much simpler in concept, the only thing to
note is to have all devices connected during install procedure.
Start the installer application, if you will encounter any system warnings about this particular
installer, please ignore them * (sometimes it is necessary to open context menu with right mouse button
and trigger installation once again).
9.1.3. Troubleshooting
If anything would fail during installation procedure please contact our support at
[email protected]. We will get back to you as soon as possible.
Below you can find some symptoms and description which will help to investigate the issue:
Page 25
WESAUDIO
25
4/9/18
_HYPERION USER MANUAL REV1
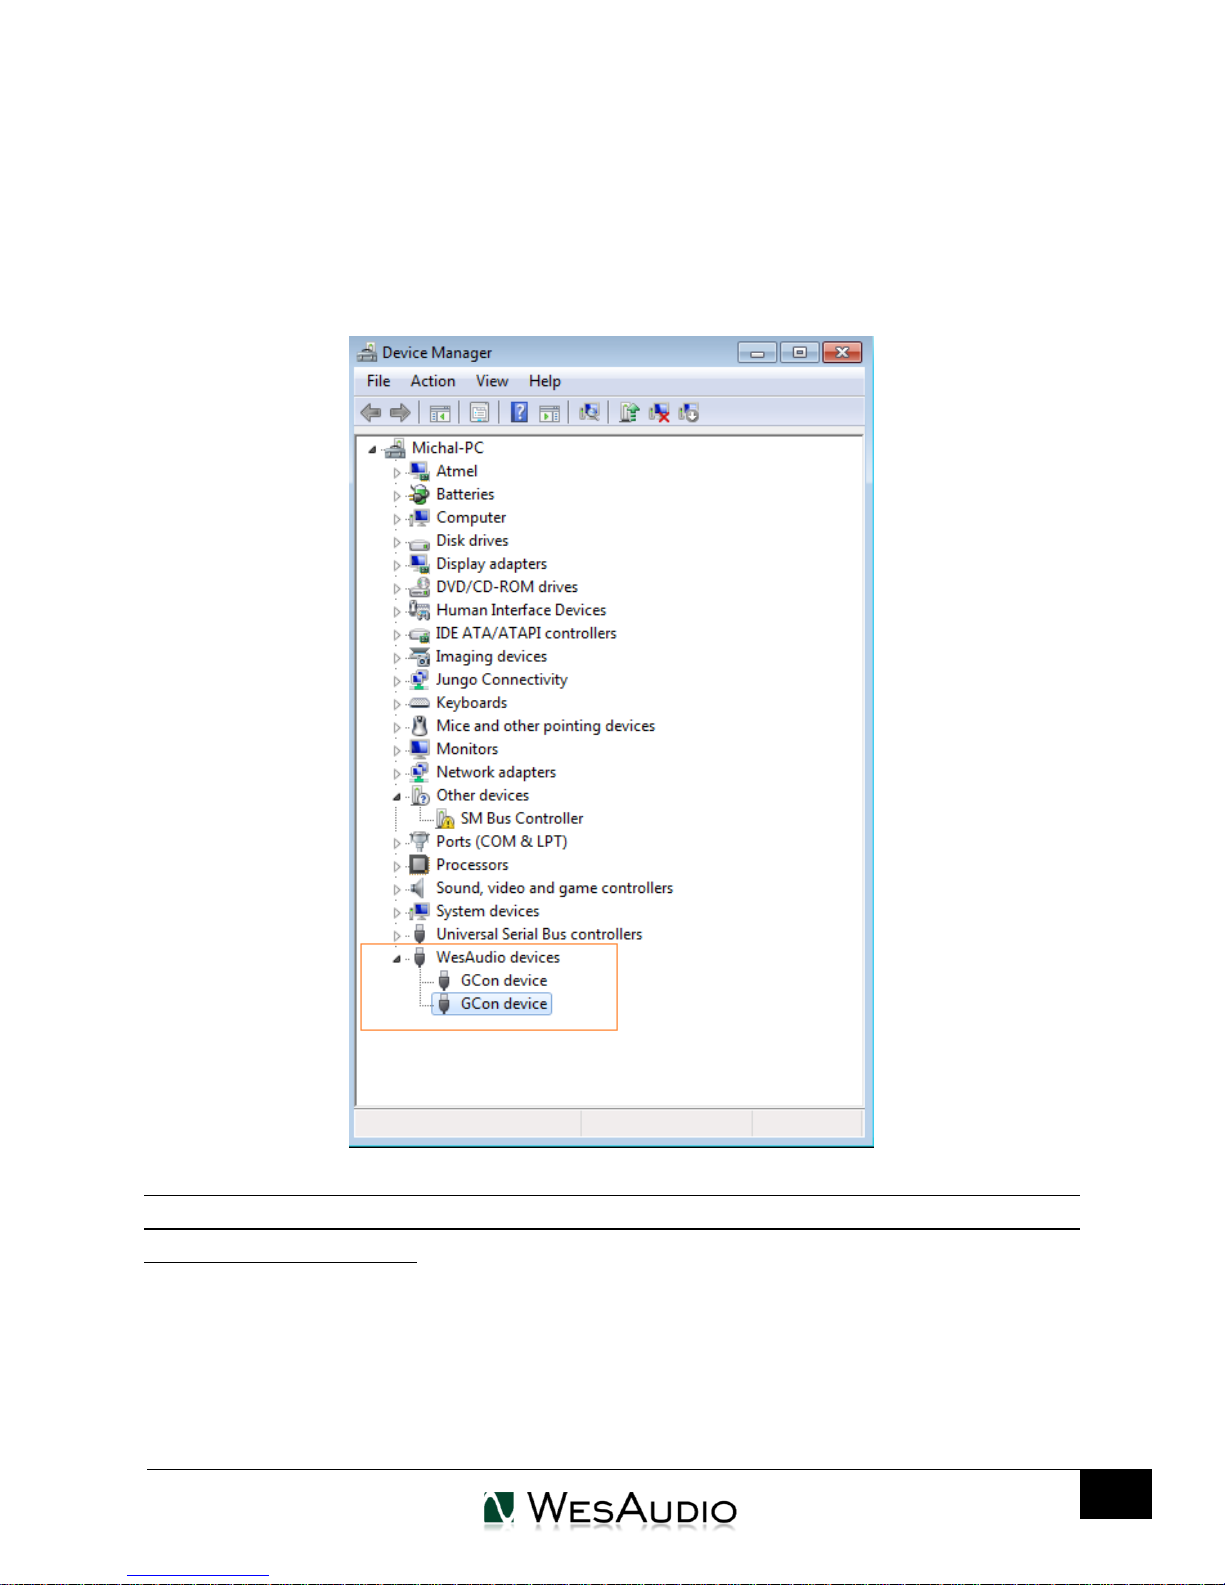
“Can’t find my device on plugin drop down menu”
Unfortunately there could be dozens of root causes. On Windows machine it is very important to check if
USB device is successfully connected on system level. That can be checked in “Control Panel->System>Device Manager”:
** Please note that for WINDOWS it is necessary to install USB driver which is critical to communicate with
HW units. It is required step only during first installation, and this option will be automatically disabled
during any software upgrades.
Page 26
_HYPERION USER MANUAL REV1
26
9.2. Plug-ins
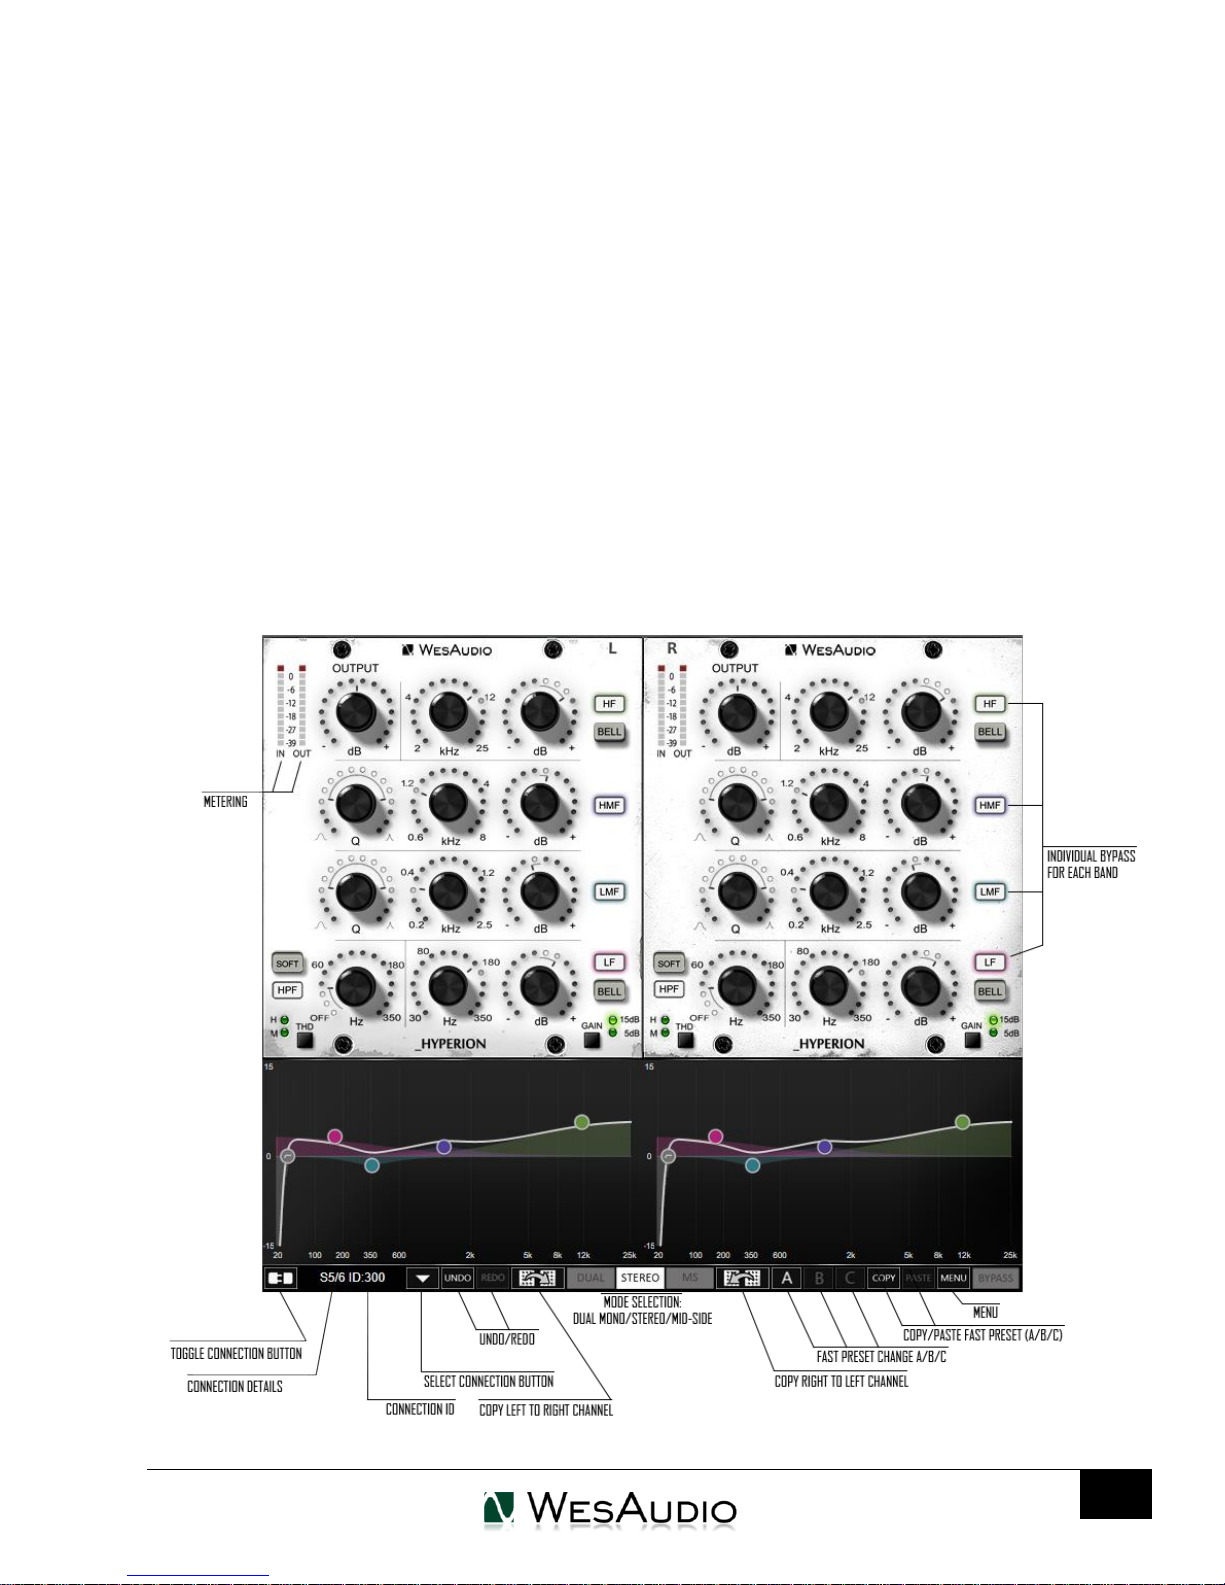
_HYPERION unit can be managed through two different plugin types: Dedicated plugin (_HYPERION)
and GConBlackBox.
9.2.1. Dedicated plugin - _HYPERION
_HYPERION comes with two plug-in types:
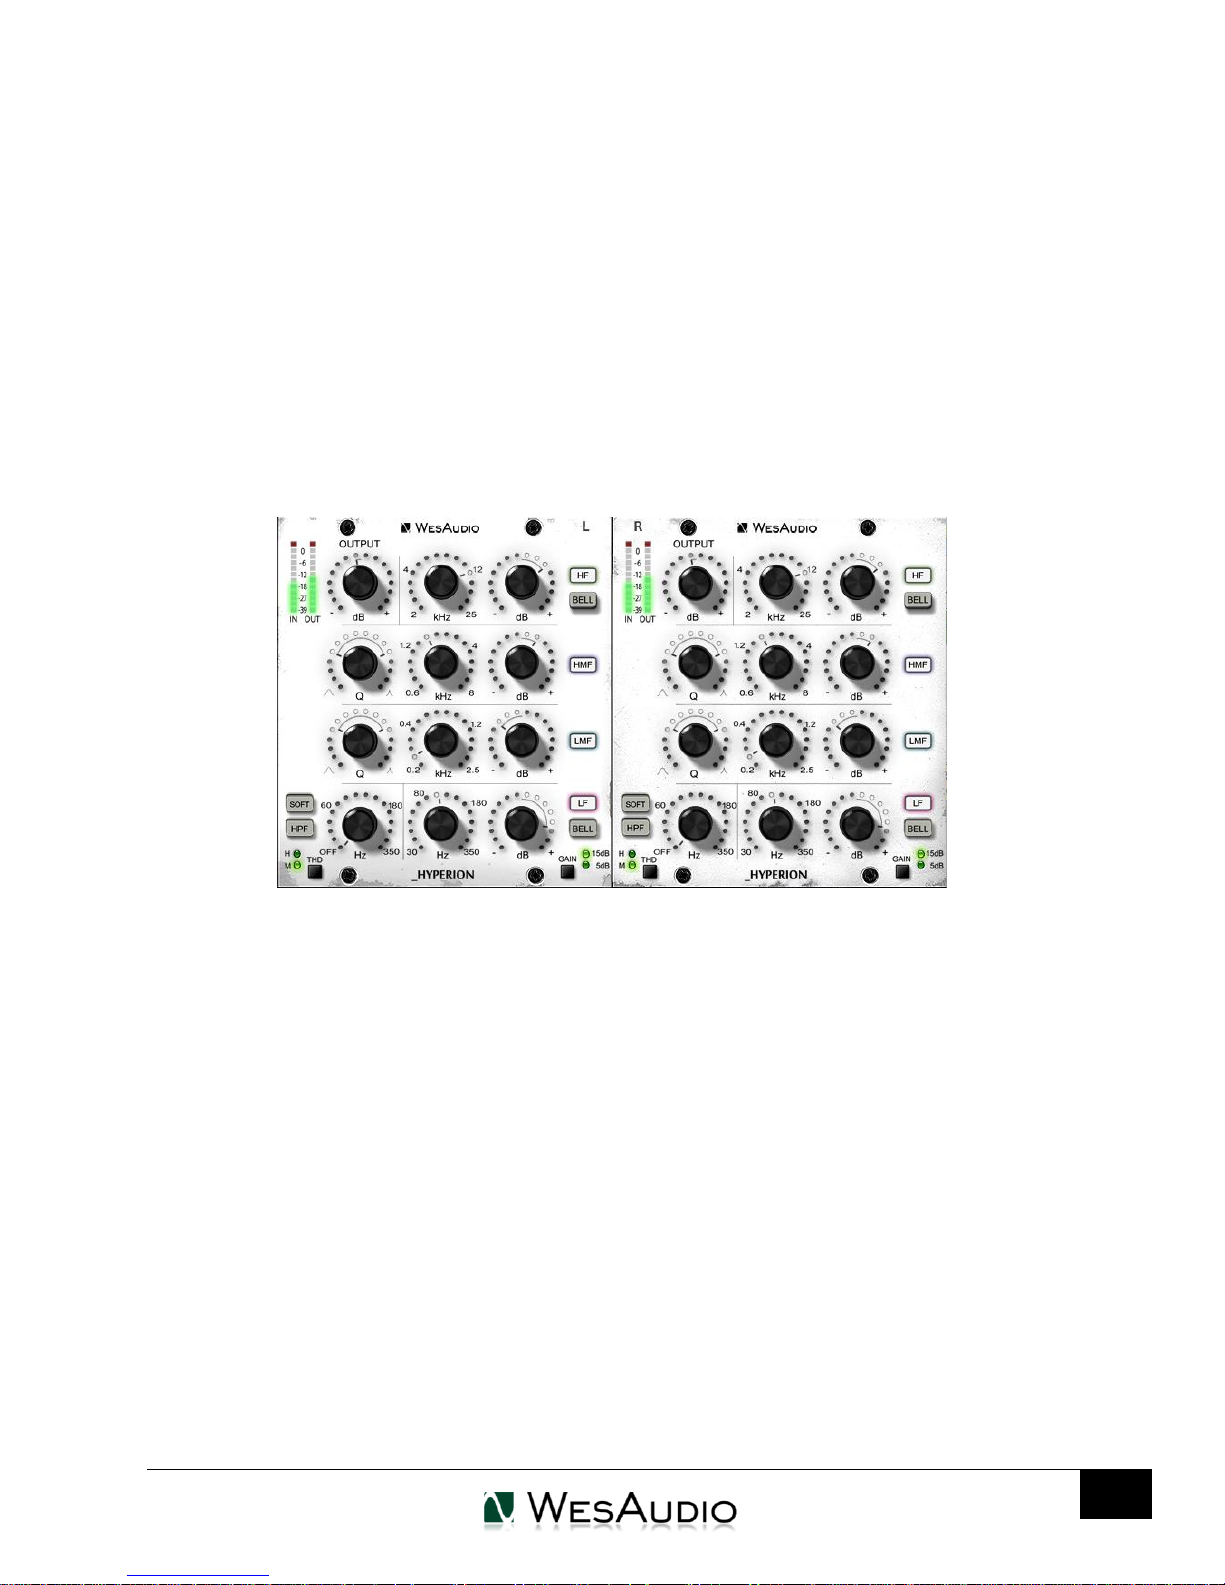
Stereo – plug-in have full control over two channels of the unit, this mode supports dual mono,
stereo and mid-side operation.
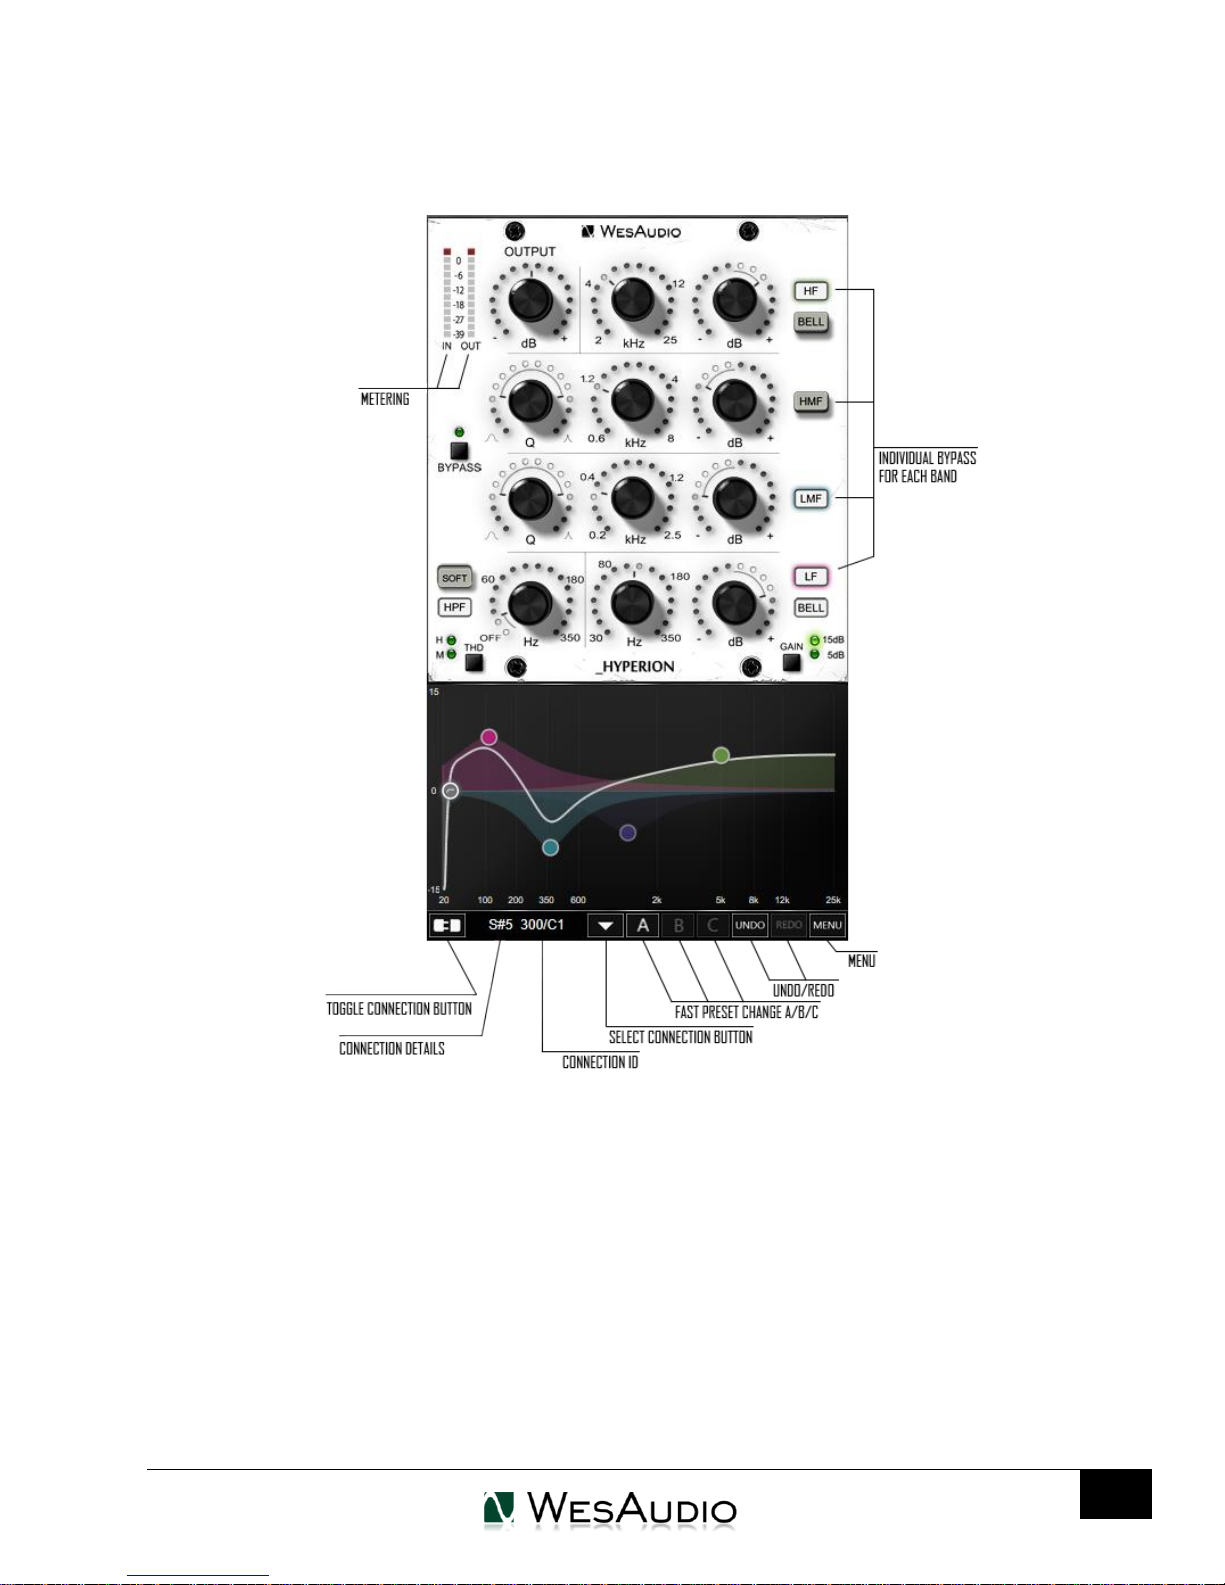
Mono – plug-in connects to just one channel (two plug-in instances can connect to one hardware
unit). This operation allows true dual mono usage, so for instance one channel can process a kick,
and second a snare – in this mode, each hardware channel acts as separate mono unit.
9.2.1.1. _HYPERION – Stereo plugin structure
WESAUDIO
4/9/18
Page 27
_HYPERION USER MANUAL REV1
27
9.2.1.2. _HYPERION – Mono plugin structure
WESAUDIO
4/9/18
9.2.1.3. _HYPERION – plugin structure description
1) Select connection button: This button shows all connected devices, if “drop-down” list with
element IDs is not visible, that means that no devices has been detected which support GCon
protocol.
2) Toggle connection button: Button toggles connection status ON/OFF. Please note that button
works only if ID has been previously selected using “Select connection button”.
3) Connection details: Additional connection information:
a. USB – module has been connected through direct USB connection in front panel.
b. S#X – Slot number which is functionality available in _Titan frame, and means that internal
connection protocol between module and Frame is engaged.
Page 28

WESAUDIO
28
4/9/18
_HYPERION USER MANUAL REV1
NOTE: This fields shows also connection status:
c. ON – Font WHITE/Style: NORMAL: Connection is established.
d. OFF – FONT GRAY/Style: NORMAL: Connection is NOT established.
e. Connecting FONT GRAY/Style: ITALIC – Connection process is ongoing. If “Connecting”
state is visible for longer period of time (more than 5 seconds), and plugin has no control
over the unit, that would mean:
i. HW unit is no longer connected to your Workstation.
ii. HW unit was disconnected or detached by operating system for some reason.
iii. Any other reason which should be consulted with [email protected].
f.
4) Connection ID: Unique Connection ID of connected HW unit.
5) Fast preset change (A/B/C): Button switches between available setups A/B/C. Please note that this
presets won’t switch any connection related parameters. That means Connection ID is shared
between all available setups (A/B/C) and won’t be changed if any of those buttons is hit.
6) Undo: Undo last parameter change (up to 20). Please note that setup change button (A/B/C) clears
current history.
7) Redo: Redo last parameter change (up to 20). Please note that setup change button (A/B/C) clears
current history.
8) Metering: Show channel current meter status on IN and OUT. Please note that in Mid-Side
metering shows status of MID and SIDE channel respectively.
9) Mode selection: Selects unit mode of operation:
a. Dual mono
b. Stereo
c. Mid-Side
10) Copy left channel to right channel: Button copies all parameters from left (MID) to right (SIDE)
channel.
11) Copy right channel to left channel: Button copies all parameters from right (SIDE) to left (MID)
channel.
12) Copy/Paste fast preset (A/B/C): Button copies currently active fast preset and store it to internal
plug-in memory, this preset can be stored, by selecting another fast preset and hit “Paste”.
13) Individual bypass for each band: Each band (HF, HMF, LMF, LF, HPF) can be independently
bypassed using dedicated switches.
14) Menu:
a. Reset parameters to default – sets all plug-in parameters to default.
Page 29
_HYPERION USER MANUAL REV1
29
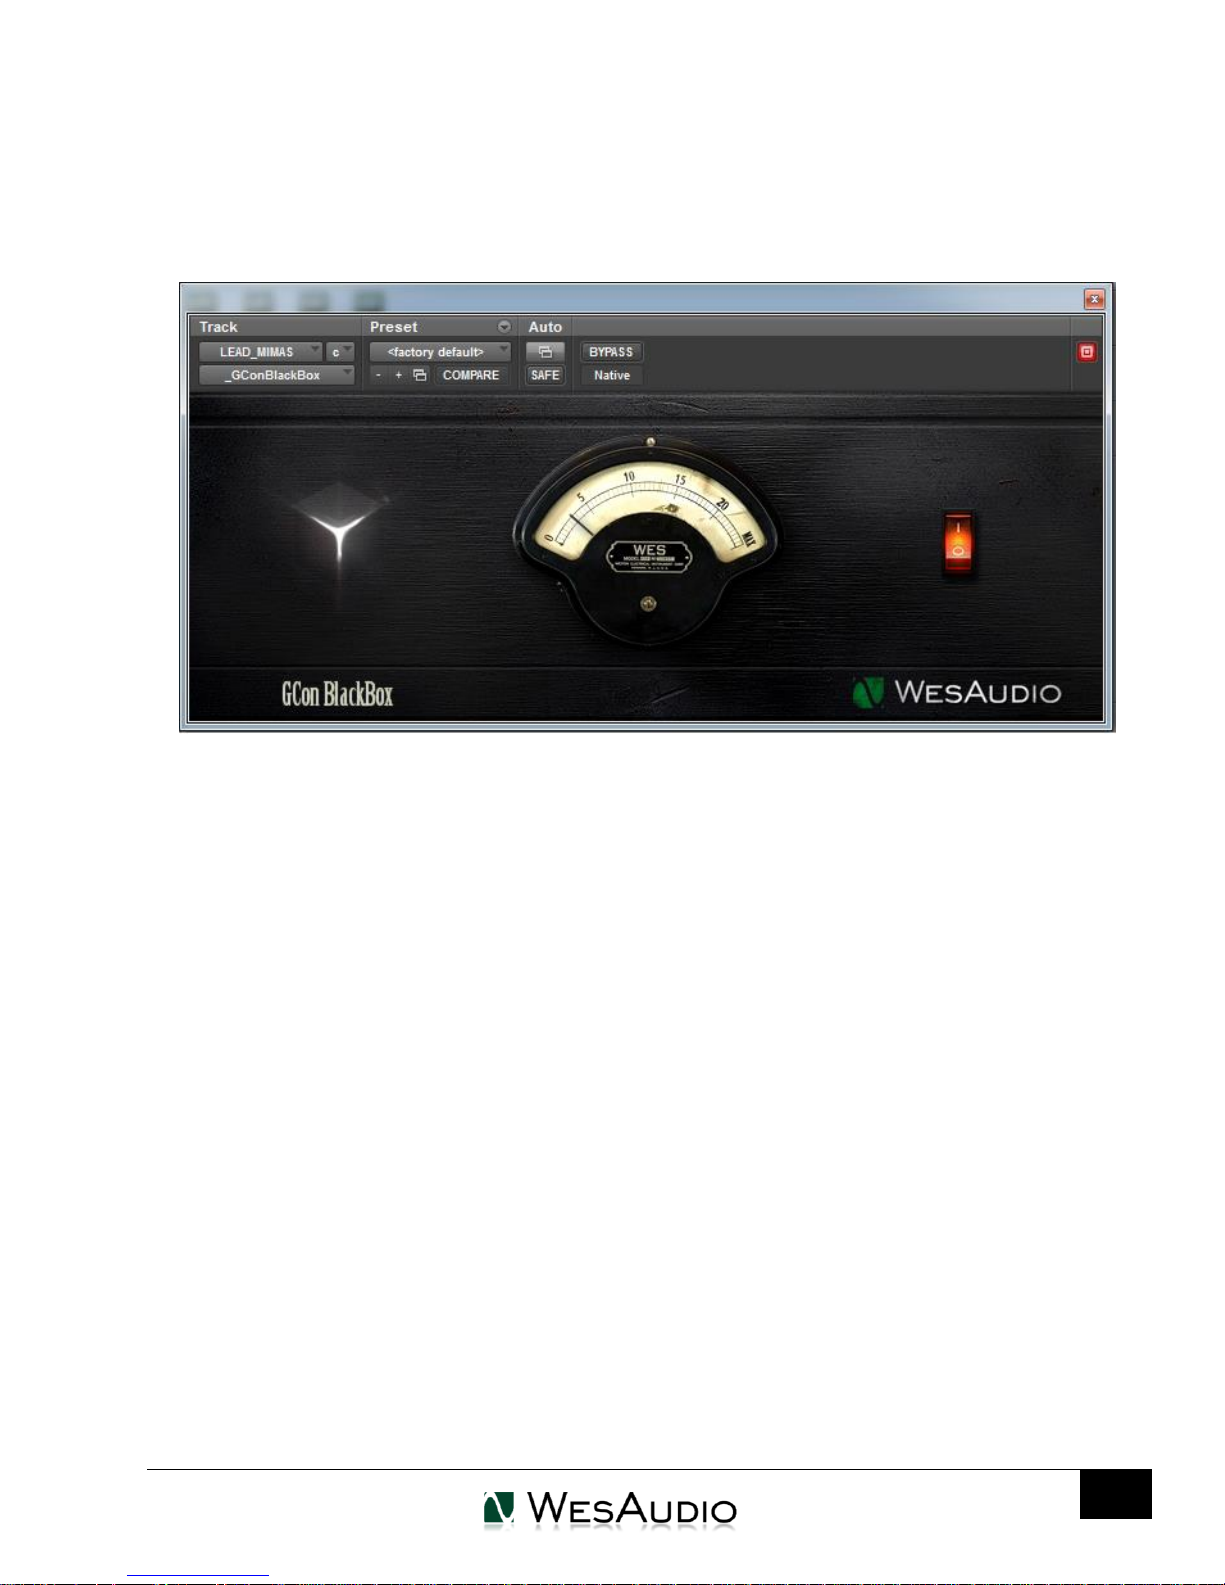
9.2.2. GConBlackBox
GConBlackBox plugin is generic recall plugin. It doesn’t implement any controls, it was created to
easily recall large amount of units.
WESAUDIO
4/9/18
How does it work?
Just start your session and create one instance of GConBlackBox plugin on any track/aux. It will
automatically connect to any GCon hardware currently available and synchronize its parameters. From
now on, any change of parameter through a hardware front panel will be notified to GConBlackBox
plugin. There are many possible use cases, please go through few examples:
When fast session preparation is a requirement – just load the session and create one instance
of GConBlackBox to have total recall of all your units.
During recording session, when plugin control is not really necessary (GConBlackBox can be
inactivated after recording is over – it can be re-activated if necessary in the future)
To recall large amount of units – when during such session there is a need for some automation
moves, dedicated plugin can still be started on top of GConBlackBox (its state will be
synchronized with GConBlackBox upon connection with a hardware).
Page 30
_HYPERION USER MANUAL REV1
30
Audio signal
HW
I
N
DAW
WesAudio
AAX/VST3
USB cable
O
U
T
Audio signal
Audio Interface
OUT
Audio Interface
IN
9.3. Setup for mixing
The configuration of devices is plain & simple, and its management side follows Plug&Play
principles, so besides physical connection to your machine there are no other steps required.
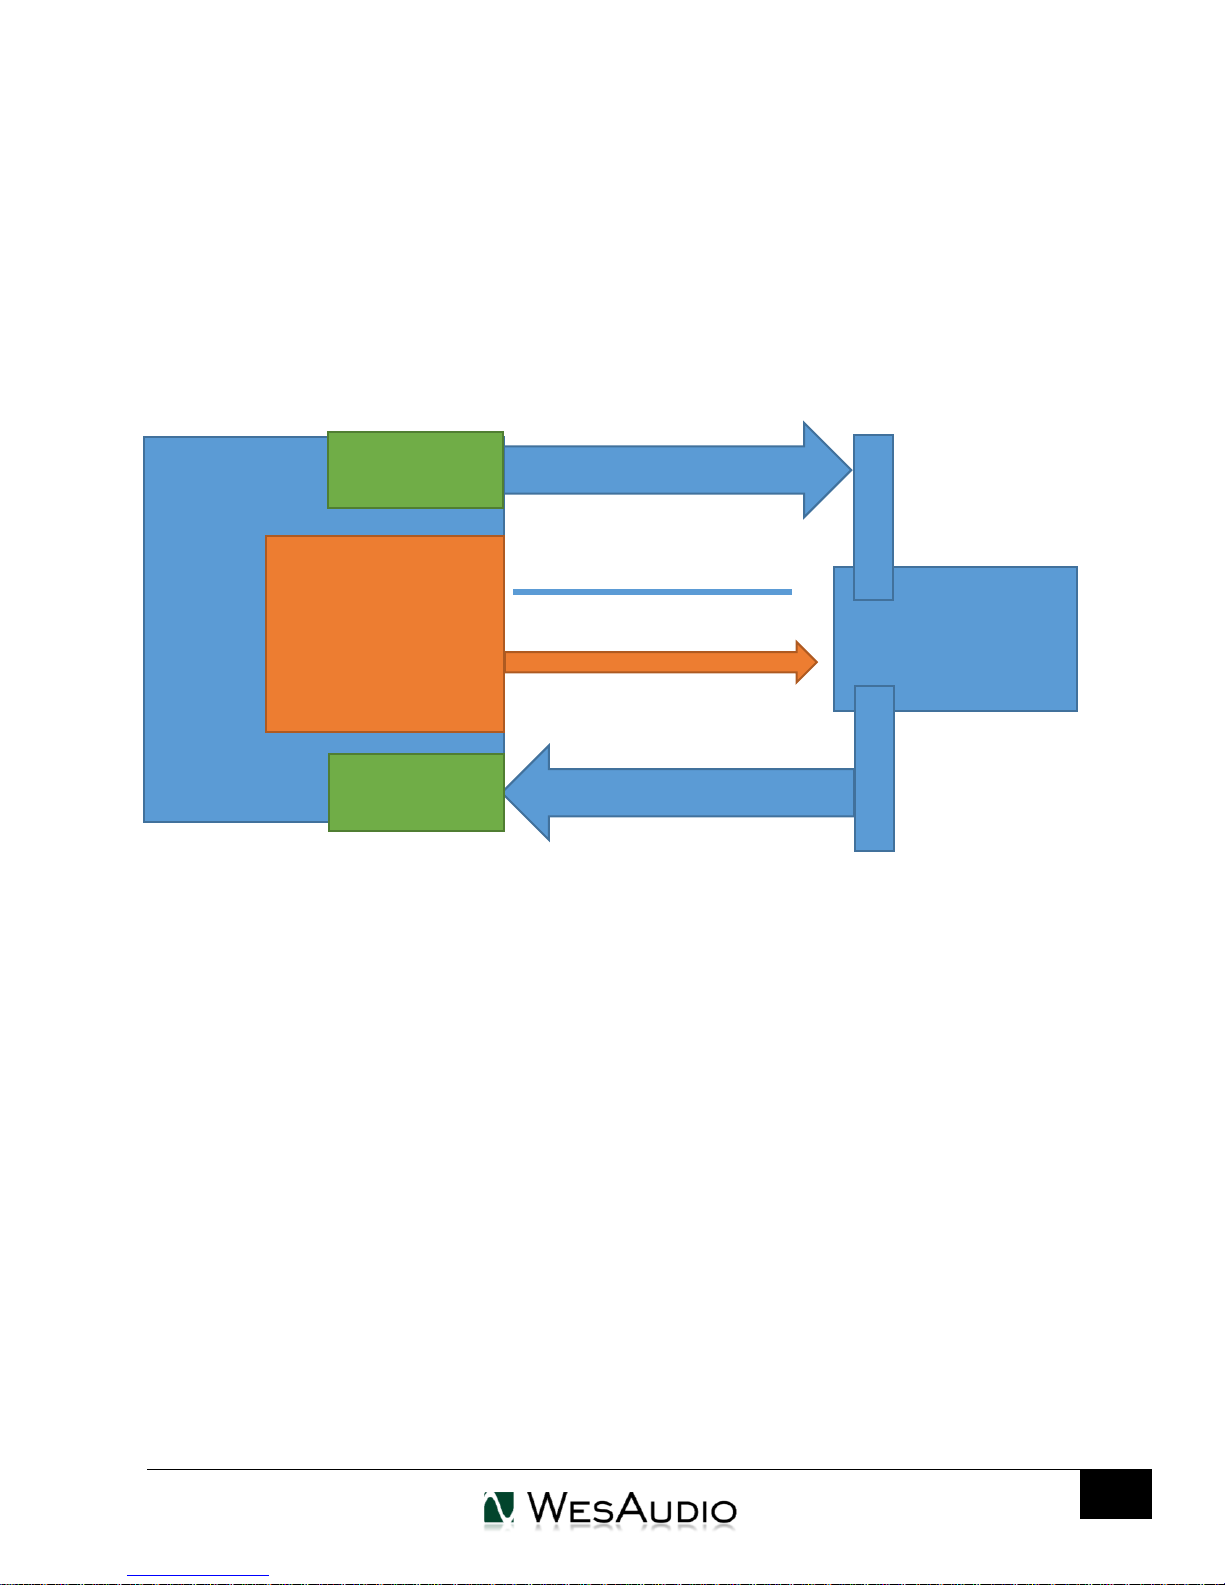
9.3.1. HW insert/External effect
If you would like to work with WesAudio devices inside your DAW, audio signal has to be sent to &
received from the HW unit. Below you can find steps which describe that process in details.
WESAUDIO
4/9/18
To set up you environment two steps are necessary:
1) Device Control Setup:
a. Connect your workstation through USB cable and USB 2.0+ port (**) with your
hardware unit or _Titan rack frame.
b. Insert on your track WesAudio plugin which matches with your hardware and select
your device from drop down list.
c. After connection state “ON” is light up, your device is ready to use, and saving your
session activity will store all the settings as they are.
2) Device Audio Setup:
a. Create any type of external effect which is supported in you DAW (e.g. “External effect”
in Cubase/Nuendo, “Hardware Insert” in Pro Tools).
b. Configure “Send” to WesAudio HW unit IN.
c. Configure “Return” to WesAudio HW unit OUT.
d. Connect all the wires from you audio interface, to the unit IN/OUT.
e. Insert this effect after* WesAudio plugin in insert chain.
Now you are ready to work in the Box with external audio units with all digital usability features
provided by your DAW.
Page 31

WESAUDIO
31
4/9/18
_HYPERION USER MANUAL REV1
9.3.2. Direct output
WesAudio devices and plugin management functionalities are perfect solution for hybrid mixing,
when on some stage signal is sent to the analog world and summed outside DAW. In that approach:
3) Connect your HW with your machine using USB cable and USB 2.0+ port in your workstation
(**) or _Titan rack frame.
4) Insert on your track WesAudio plugin which matches with your HW and select your device from
drop down list.
5) Set up track/aux output to audio interface output which routes signal to the WesAudio device.
From now on you can use automation and recall features in analog domain!
** PLEASE NOTE: Officially supported interface is USB 2.0 – please check your USB HUB to be
compatible with this particular USB revision.
Page 32
WESAUDIO
32
4/9/18
_HYPERION USER MANUAL REV1
9.4. Memories
Parameter storage could be summarized like this:
- _HYPERION unit has TWO separate fast presets which can be triggered via A/B buttons.
- _HYPERION plugin can store UNLIMITED number of configurations, when each preset can
contain THREE instant configuration changes (A/B/C – fast presets).
9.4.1. Synchronization upon connection
When new plugin instance is loaded into DAW, its state is unmodified, that means that no
parameters are yet modified. When user will initiate connection to hardware unit by setting Connection
ID, Plugin will download current state of parameters from the unit including any available fast
configuration presets. So for instance, if connection between _HYPERION plugin and _HYPERION
hardware will be triggered, and plugin will be in unmodified state, all parameters states will be
downloaded to the plugin, including _PRESET_A and _PRESET_B states.
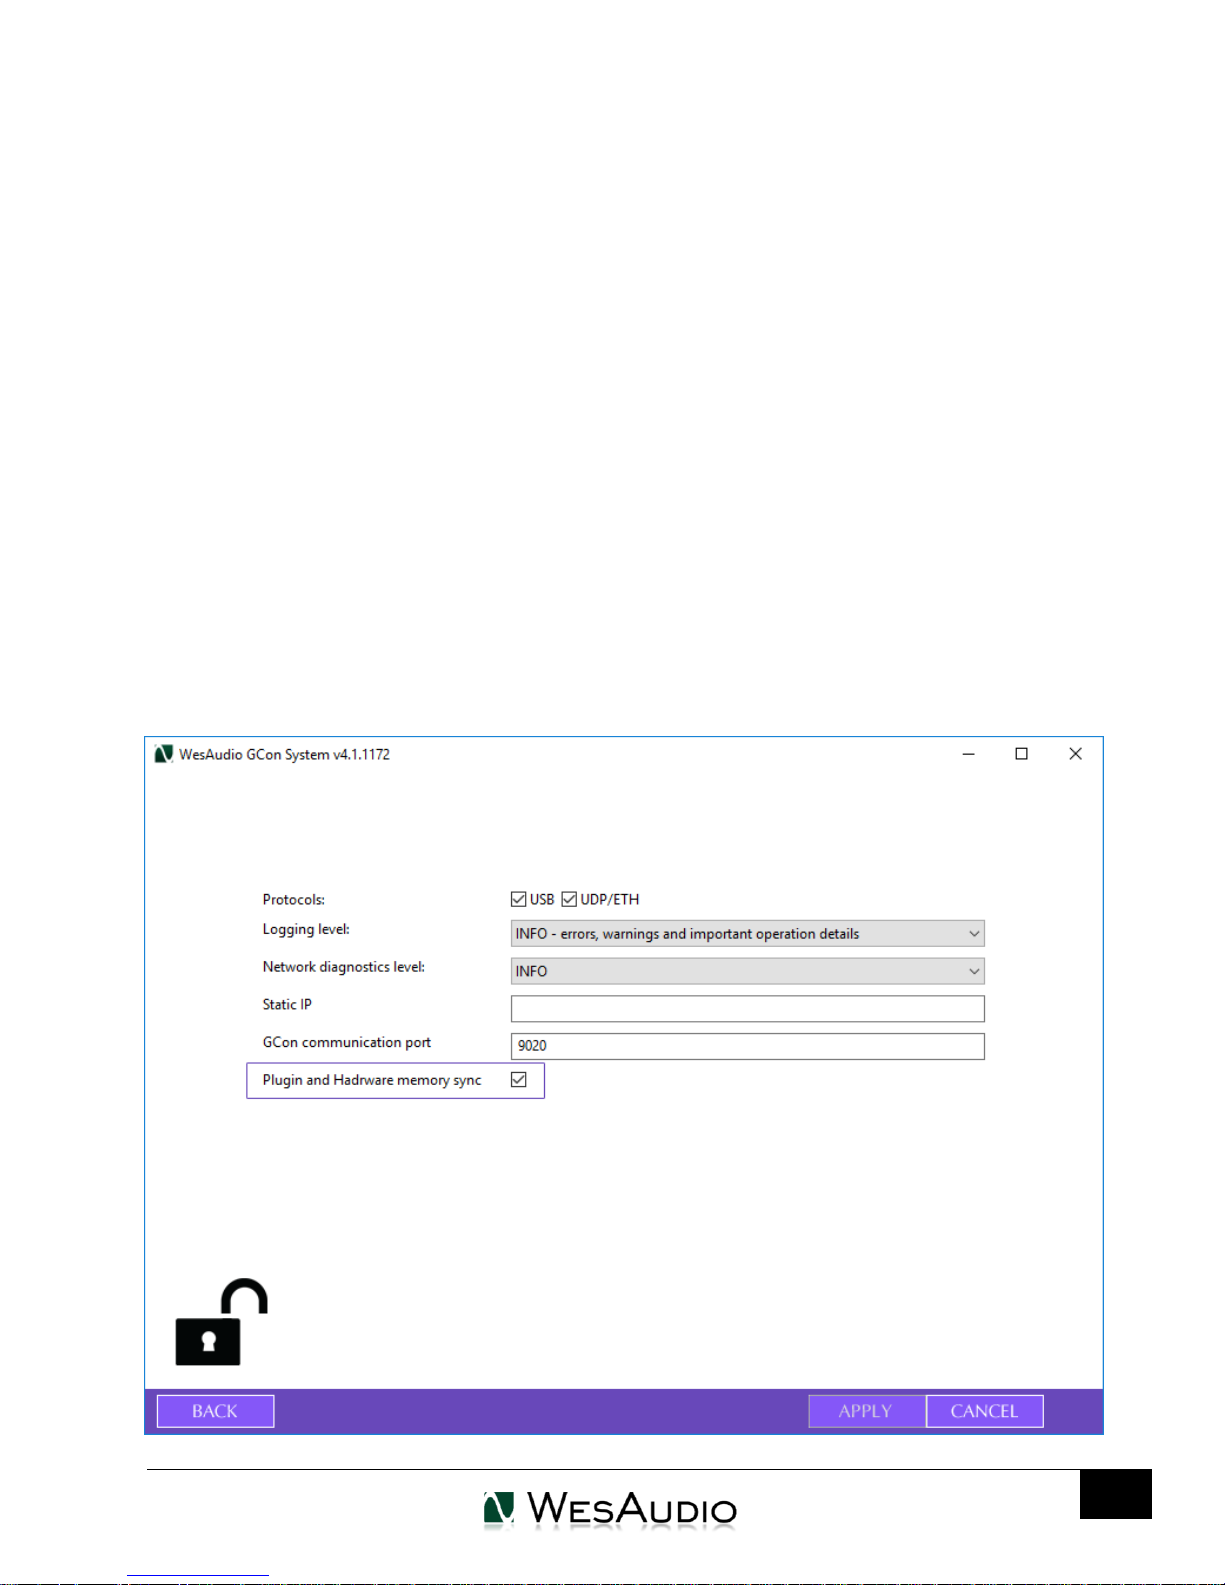
9.4.2. Memory synchronization between plugin and hardware
In general there two modes of operation which can be modified through
GConManager/_SETTINGS application: synchronization enabled, and synchronization disabled.
Page 33

WESAUDIO
33
4/9/18
_HYPERION USER MANUAL REV1
9.4.2.1. Synchronized memory enabled
This is default setting enabled through “Plugin and Hardware memory sync” option, and it
causes direct link between unit and plugin memory. In this case, when plugin is connected with a
hardware, all parameters including number of fast presets which unit can store (e.g. A/B) will be
synchronized. So when plugin will be disconnected (through manual toggle button hit, DAW session
close, etc.) all hardware configuration will remain unchanged.
9.4.2.2. Synchronized memory disabled
In this case, plugin works as separate form of persistence implementation. That means if HW
unit is connected to work with the Plugin, all settings from Plugin are applied to the device (or from the
hardware to the plugin), however unit configuration will get back to previous state when Plugin will
initiate disconnection (through connection toggle button, session close etc.) . So in practice HW unit
internal memory isn’t affected by the software at all. This functionality can be useful if user needs to
switch often between different modes, for example session needs to be recalled, but unit is used during
production activities without any session loaded (then unit can be easily recalled through session load,
and when session is closed, unit will go back to the state before the recall had happened).
Page 34

WESAUDIO
34
4/9/18
_HYPERION USER MANUAL REV1
9.5. Automation
WesAudio devices are capable to follow any automation triggered from your DAW. Our devices
were tested against high performance peaks.
9.5.1. Automation for stereo plugin
Please note that when channels are linked together using Stereo plugin (either STEREO mode, or
MID-SIDE where channels are linked (OPTIONAL)), only one channel needs to be automated and second one
will follow accordingly. If both channels will be automated, each channel will try to update the other one,
which will definitely lead to unexpected and unwanted results.
9.5.2. Automation record
Besides normal automation feature all knobs are touch sensitive, and this brings possibility to
record automation using Hardware unit itself. Just enable automation record in your DAW and start
moving HW knobs! Just please note that when channels are linked, only one channel automation needs
to be recorded.
Page 35

_HYPERION USER MANUAL REV1
35
9.6. Pro Tools Integration
Starting from software release 2.1 WesAudio plugins integrates with Pro Tools using all powerful
features:
PT10+ engaging bypass mode from mixer or edit view will now enable hardware bypass on the
unit,
Making plugin instance “inactive” will force the plugin to unload, and because of that it will also
disconnect from the hardware. It means that new plugin instance can be used to connect to the
same hardware unit where all previous settings are stored through inactivated plugin – very
useful to work with one unit on multiple sources keeping all the settings recallable with one
mouse click,
PT12+ - Commit Functionality – new Pro Tools commit functionality can be used also to print
hardware inserts and it is 100% compatible with WesAudio plugins. When commit is triggered
for HW Insert and WesAudio plugin, plugin will disconnect from its source and save all the
settings. As a result You will get:
o printed track through analogue processor,
o hardware settings stored on inactivated track through plugin instance,
o new plugin instance can be used to connect to the same hardware on different tracks,
o inactive track can be re-enabled any time, and WesAudio plugin will reconnect to
hardware automatically restoring all the settings (please remember that one instance of
the plugin can be connected to the hardware at the same time).
WESAUDIO
4/9/18
9.7. Multi Host Support
Devices connected through direct (front panel) USB cable will be detected in one HOST
application at the same time. First HOST application which will start any WesAudio plugin will enable
GCon communication engine, and from now on it will serve as a master. Master application opens all
available WesAudio units and keeps all device handles for communication purposes. That activity will
prevent other HOST applications started at the same time to communicate with WesAudio units using
direct USB connection. Such situation may happen in practice when two different hosts are started at
the same time and connected through ReWire interface, in that approach only one host can serve as
plugin host for WesAudio products.
Page 36
WESAUDIO
36
4/9/18
_HYPERION USER MANUAL REV1
9.8. GCon Manager
GCon Manager is generic application which implements configuration management over compatible
units. It can be found in Application folder data:
- For OSX: “/Applications/WesAudio/GConManager”
- For WINDOWS: folder specified during installation phase, by default in: “c:/Program Files
x86/WesAudio/GConManager.exe”.
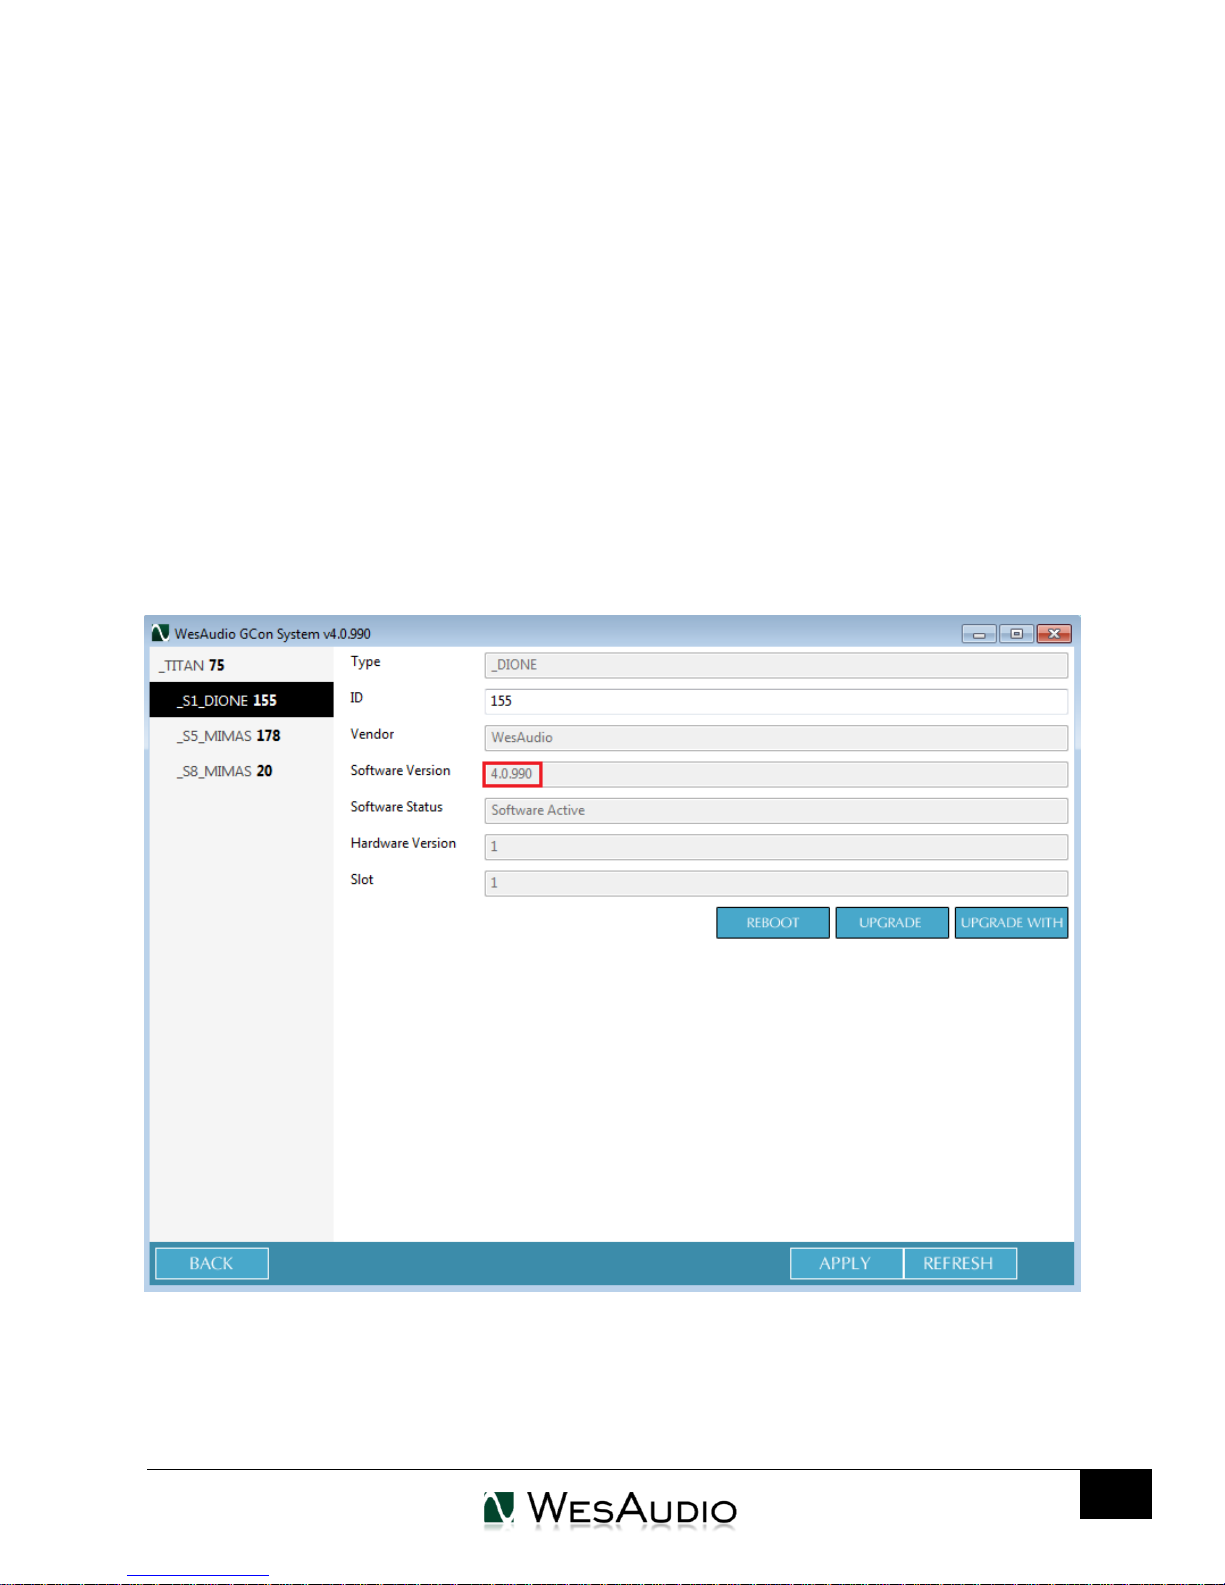
9.8.1. How to check firmware upgrade.
Each device reports to your workstation with particular version, which indicates compatibility
between your host application, and remote module. To check firmware upgrade please to GCon
Manager CONFIG application:
Page 37
_HYPERION USER MANUAL REV1
37
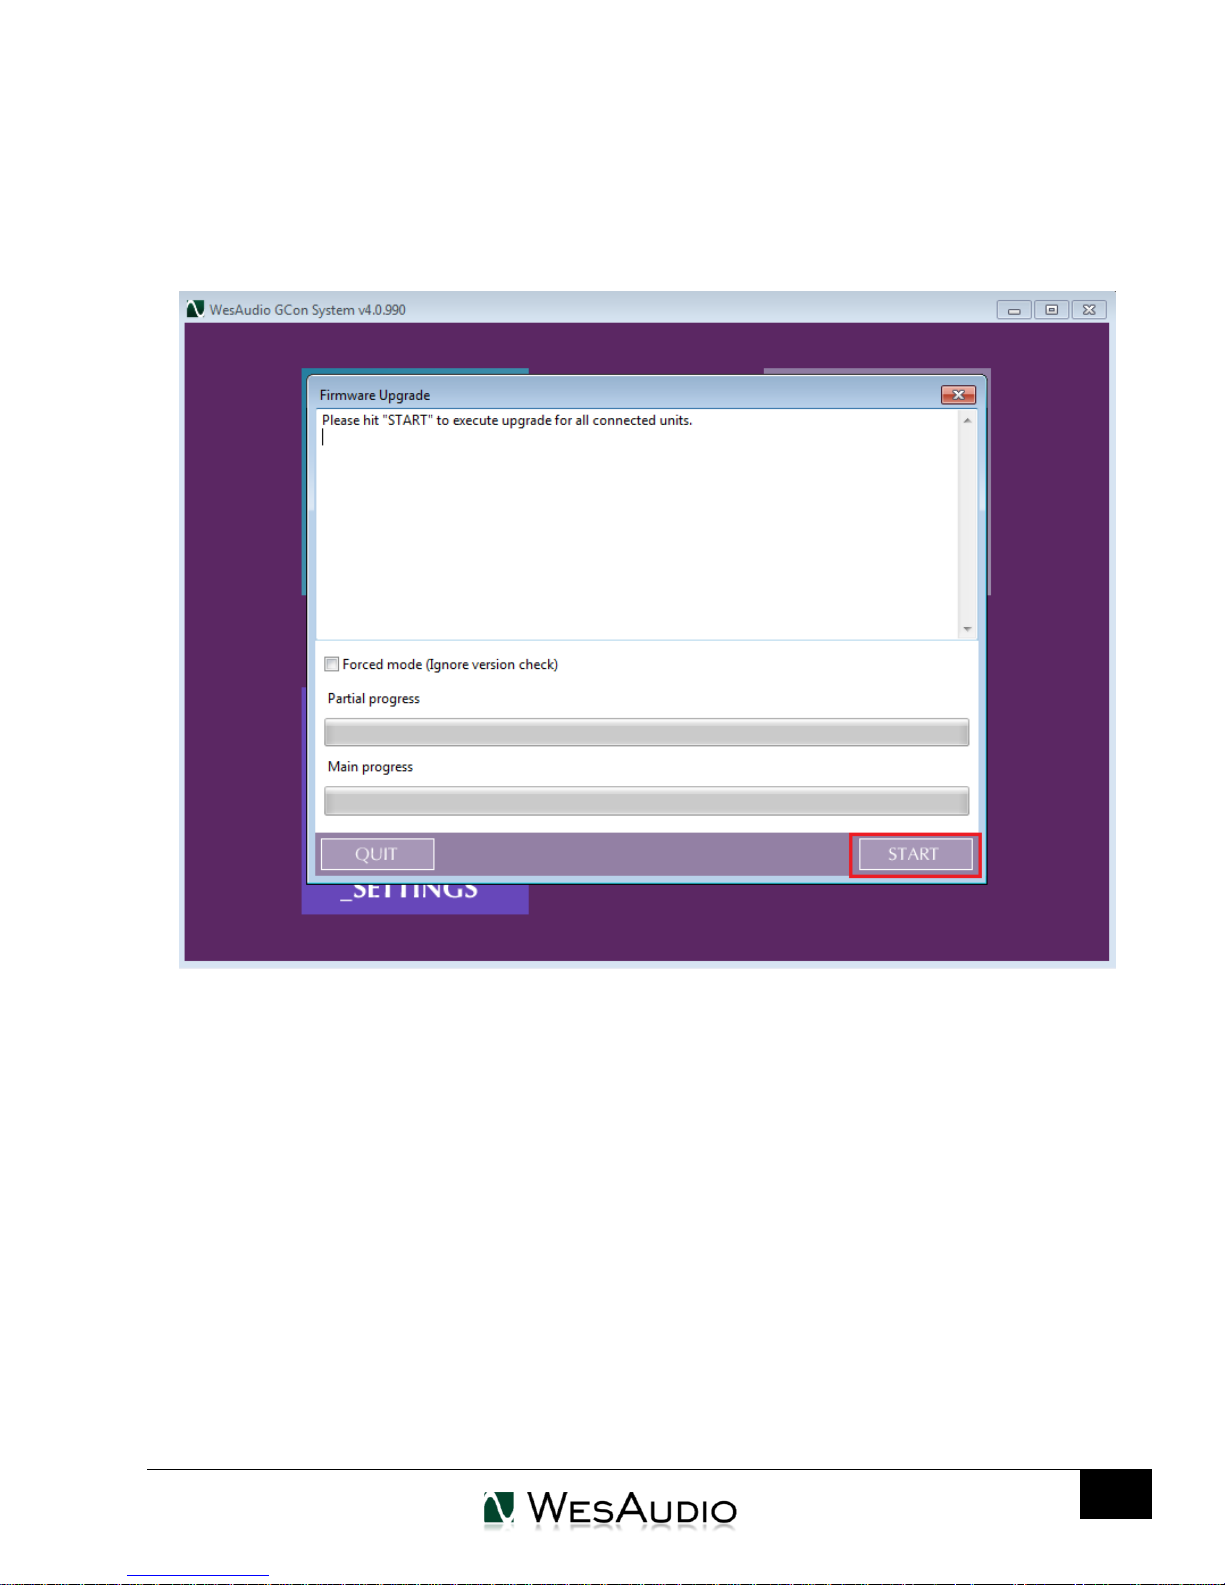
9.8.2. How to perform firmware upgrade.
To perform firmware upgrade go to GConManager upgrade and hit “Start” button. This will trigger
upgrade operation for all modules which are not up to date with your host software.
WESAUDIO
4/9/18
Page 38

WESAUDIO
38
4/9/18
_HYPERION USER MANUAL REV1
10. Abbreviations and terms
GCon – high speed communication protocol which allows full management and recall of analog devices.
Please note that this is just management protocol, audio signal transfer is not in scope of its capabilities.
NG500 – Next generation 500 series.
NG500 connector – special connector which extends standardized 500 series connector with additional pins.
11. Warranty
All WesAudio products are built to the highest standards and should provide reliable performance
for many years, subject to reasonable care, use, transportation and storage.
WesAudio warrants all of our products to be free of defective parts and workmanship for a period of
two years.
This warranty period begins at the original date of purchase and is transferable to any person
who may subsequently purchase the product during this time. This warranty excludes the following
conditions: normal wear and tear, misuse, customer negligence, accidental damage, unauthorized repair
or modification, cosmetic damage and damage incurred during shipment. During the time of this
warranty, WesAudio will repair or replace, at its option, any defective parts or repair defective
workmanship without charge, provided the customer has appropriate proof of purchase and that the
product has its original factory serial number. In all warranty claims the customer is responsible for
shipping costs to the WesAudio facility, and WesAudio pays for return ground shipping.
Page 39

39
Editor
Version
Date
Description
Michal
Weglicki
V1
09.04.2018
Document created.
12. History
WESAUDIO
4/9/18
_HYPERION USER MANUAL REV1
 Loading...