


!!
!
!
!
!
!
!
!
!
!
!
!
!
OPERATOR’S)MANUAL!
!
! ! ! ! ! ! ! ! ! ! ! !!!!!! ! ! ! ! !!!!"#"$%!&"!
! ! ! ! ! ! ! ! ! ! ! ! ! ! ! '()(**(*!&"!
!!!!!!!!!!!!!!!!!!!!!!!!!!!!!!!!!!!!!!!!!!!!!!!!!!!!!!!!!!!!!!!!!!!!!!!!!!!!!!!!!!!!!!
!!
!
!
!
!
!
!
!
!
!
!
!
!
!
!
!
!
!
!
!
!
!
!
!
WerkMaster Grinders and Sanders Inc.
6932 Greenwood Street, Burnaby, BC V5A 1X8
tel: 604.629.8700 | toll free: 1.866.373.WERK | fax: 604.444.4231
www.werkmaster.com | email: info@werkmaster.com!

!!
LIABILITY LIMITATIONS
The remedies of the user set forth under provisions of warranty outlined at the
end of this manual are the exclusive and total liability of WerkMaster Grinders &
Sanders Inc. with the respect to their sale or the equipment and service furnished
hereunder, in connection with the performance or breach thereof, or from the
sale, delivery, installation, repair or technical direction covered by or furnished
under the sale, whether based on contract, warranty, negligence, indemnity, strict
liability, or otherwise shall not exceed the purchase price of the unit of equipment
upon which such liability is based.
WerkMaster will not in any event be liable to the user, any successors in interest
or any beneficiary or assignee relating to this sale for any consequential,
incidental, indirect, special or punitive damages arising out of this sale or any
breach thereof, or any defects on, or failure of, or malfunction of the equipment
under this sale based upon loss of use, lost profits or revenue, interest, lost
goodwill, work stoppage, impairment of other goods, loss by reason of shutdown
or non-operation, increased expenses of operation of the equipment, cost of
purchase or replacement power of claims of users or customers of the user for
service interruption whether or not such loss or damage is based on contract,
warranty, negligence, indemnity, strict liability, or otherwise.
WerkMaster reserves the right to modify, alter and improve any part or parts
without incurring any obligation to replace any part or parts previously sold
without such modified, altered or improved part or parts.
No person is authorized to give any other warranty or to assume any additional
obligation on WerkMaster’s behalf unless made in writing and signed by an
officer of WerkMaster.
USE ONLY GENUINE WERKMASTER PARTS AND ACCESSORIES FOR
YOUR OWN SAFETY, THE SAFETY OF OTHERS AND THE LIFE OF YOUR
MACHINE.

OPERATOR’S!MANUAL!!
+,-.!/!!
CONTENTS
Introduction!.....................................................................................................! 2!
Machine!Descriptions!........................................................................................!2!
Specifications!....................................................................................................!3!
Safety!Precautions!............................................................................................!4!
+.0123,4!+025.6578.!9:;7<=.35!>>>>>>>>>>>>>>>>>>>>>>>>>>>>>>>>>>>>>>>>>>>>>>>>>>>>>>>>>>>>>>>>>>>>>>>>>>>>>>>>!?!
+@A176,4!,3B!C.35,4!D753.11!>>>>>>>>>>>>>>>>>>>>>>>>>>>>>>>>>>>>>>>>>>>>>>>>>>>>>>>>>>>>>>>>>>>>>>>>>>>>>>>>>>>>>>!?!
*,E.!(<.0,573-!F715,36.!>>>>>>>>>>>>>>>>>>>>>>>>>>>>>>>>>>>>>>>>>>>>>>>>>>>>>>>>>>>>>>>>>>>>>>>>>>>>>>>>>>>>>>>>>>>!?!
+2G.0!>>>>>>>>>>>>>>>>>>>>>>>>>>>>>>>>>>>>>>>>>>>>>>>>>>>>>>>>>>>>>>>>>>>>>>>>>>>>>>>>>>>>>>>>>>>>>>>>>>>>>>>>>>>>>>>>>>>>>>>!?!
*,E.!(<.0,573-!'23B757231!>>>>>>>>>>>>>>>>>>>>>>>>>>>>>>>>>>>>>>>>>>>>>>>>>>>>>>>>>>>>>>>>>>>>>>>>>>>>>>>>>>>>>>>!?!
C2B7E76,57231!>>>>>>>>>>>>>>>>>>>>>>>>>>>>>>>>>>>>>>>>>>>>>>>>>>>>>>>>>>>>>>>>>>>>>>>>>>>>>>>>>>>>>>>>>>>>>>>>>>>>>>>>>>>!H!
Power!and!Connectivity!......................................................................................!5!
I.3.0,4!'233.657231!>>>>>>>>>>>>>>>>>>>>>>>>>>>>>>>>>>>>>>>>>>>>>>>>>>>>>>>>>>>>>>>>>>>>>>>>>>>>>>>>>>>>>>>>>>>>>>>>!H!
*73-4.J+@,1.!52!"@0..J+@,1.!$B,<5.0!'20B!>>>>>>>>>>>>>>>>>>>>>>>>>>>>>>>>>>>>>>>>>>>>>>>>>>>>>>>>>>>>>>!K!
+7-5,741!>>>>>>>>>>>>>>>>>>>>>>>>>>>>>>>>>>>>>>>>>>>>>>>>>>>>>>>>>>>>>>>>>>>>>>>>>>>>>>>>>>>>>>>>>>>>>>>>>>>>>>>>>>>>>>>>>>>>>!K!
*528.!,3B!F0A.0!$B,<5.0!+4;-1!>>>>>>>>>>>>>>>>>>>>>>>>>>>>>>>>>>>>>>>>>>>>>>>>>>>>>>>>>>>>>>>>>>>>>>>>>>>>>>>>>!K!
+2G.0!'20B!C737=;=!L.:;70.=.351!>>>>>>>>>>>>>>>>>>>>>>>>>>>>>>>>>>>>>>>>>>>>>>>>>>>>>>>>>>>>>>>>>>>>>>>>!K!
I.3.0,520!C737=;=!L.:;70.=.351!>>>>>>>>>>>>>>>>>>>>>>>>>>>>>>>>>>>>>>>>>>>>>>>>>>>>>>>>>>>>>>>>>>>>>>>>>>!K!
Introduction!to!the!Controls!................................................................................!7!
C,6@73.!'2350241!>>>>>>>>>>>>>>>>>>>>>>>>>>>>>>>>>>>>>>>>>>>>>>>>>>>>>>>>>>>>>>>>>>>>>>>>>>>>>>>>>>>>>>>>>>>>>>>>>>>>>>!M!
NDF!'2350241!>>>>>>>>>>>>>>>>>>>>>>>>>>>>>>>>>>>>>>>>>>>>>>>>>>>>>>>>>>>>>>>>>>>>>>>>>>>>>>>>>>>>>>>>>>>>>>>>>>>>>>>>>>>>>!M!
Machine!Operation!...........................................................................................!8!
'@,3-73-!"2241OOOOOOOOOOOOOOOOOOOOOOOOOOOOOOOOOOO P!
9Q!R,S!5745!(<.0,5723!>>>>>>>>>>>>>>>>>>>>>>>>>>>>>>>>>>>>>>>>>>>>>>>>>>>>>>>>>>>>>>>>>>>>>>>>>>>>>>>>>>>>>>>>>>>!O>>T!
$BU;1573-!5@.!F;15!*S705!>>>>>>>>>>>>>>>>>>>>>>>>>>>>>>>>>>>>>>>>>>>>>>>>>>>>>>>>>>>>>>>>>>>>>>>>>>>>>>>>>>>>>>>>>>>>!T!
$BU;1573-!5@.!V,3B4.!>>>>>>>>>>>>>>>>>>>>>>>>>>>>>>>>>>>>>>>>>>>>>>>>>>>>>>>>>>>>>>>>>>>>>>>>>>>>>>>>>>>>>>>>>>>>>>>!/W!
#3757,4!*5,05!*.:;.36.!>>>>>>>>>>>>>>>>>>>>>>>>>>>>>>>>>>>>>>>>>>>>>>>>>>>>>>>>>>>>>>>>>>>>>>>>>>>>>>>>>>>>>>>>>>>>>>!/W!!
*.4.6573-!5@.!*5,0573-!*<..BOOOOOOOOOOOOOOOOOOOOOOOOOOO!>>//!
*5,0573-!5@.!C,6@73.OOOOOOOOOOOOOOOOOOOOOOOOOOOOOOO>>//!
$BU;1573-!5@.!*<..B!>>>>>>>>>>>>>>>>>>>>>>>>>>>>>>>>>>>>>>>>>>>>>>>>>>>>>>>>>>>>>>>>>>>>>>>>>>>>>>>>>>>>>>>>>>>>>>>>!/X!
*52<<73-!5@.!C,6@73.!>>>>>>>>>>>>>>>>>>>>>>>>>>>>>>>>>>>>>>>>>>>>>>>>>>>>>>>>>>>>>>>>>>>>>>>>>>>>>>>>>>>>>>>>>>>>>!/X!
#315,4473-!,3B!L.=2873-!5@.!+,B!F078.0!!>>>>>>>>>>>>>>>>>>>>>>>>>>>>>>>>>>>>>>>>>>>>>>>>>>>>>>>>>>>>>>>>>>!/X!
L25,5723!+,55.03!2E!"22473-!+4,5.1!!>>>>>>>>>>>>>>>>>>>>>>>>>>>>>>>>>>>>>>>>>>>>>>>>>>>>>>>>>>>>>>>>>>>>>>>>>>!/X!
Checking!Usage!Time!.......................................................................................!13!
935.073-!5@.!+02-0,==73-!C.3;!>>>>>>>>>>>>>>>>>>>>>>>>>>>>>>>>>>>>>>>>>>>>>>>>>>>>>>>>>>>>>!OOOOO/Y!!
RA<,1173-!5@.!$66.11!'2B.!>>>>>>>>>>>>>>>>>>>>>>>>>>>>>>>>>>>>>>>>>>>>>>>>>>>>>>>>>>>>>>>>>>>>>>>>>>>>>>>>>>>>>>!/Y!
N7.G73-!5@.!"25,4!"7=.!93.0-7Z.B!>>>>>>>>>>>>>>>>>>>>>>>>>>>>>>>>>>>>>>>>>>>>>>>>>>>>>>>>>>>>>>>>>>>>>>>>>>>!/?!
N7.G73-!5@.!"25,4!L;3!"7=.!>>>>>>>>>>>>>>>>>>>>>>>>>>>>>>>>>>>>>>>>>>>>>>>>>>>>>>>>>>>>>>>>>>>>>>>>>>>>>>>>>>>>>!/?!
9[75!5@.!+02-0,==73-!C.3;!>>>>>>>>>>>>>>>>>>>>>>>>>>>>>>>>>>>>>>>>>>>>>>>>>>>>>>>>>>>>>>>>>>>>>>>>>>>>>>>>>>>>!/H!
Vacuum!or!Water!Feature!.................................................................................!15!
Maintenance!....................................................................................................!16!
Troubleshooting!..............................................................................................!17!
VFD!Error!Screens!and!Codes!............................................................................!19!
Exploded!View!and!Parts!List!............................................................................!24!
"75,3!&"!>>>>>>>>>>>>>>>>>>>>>>>>>>>>>>>>>>>>>>>>>>>>>>>>>>>>>>>>>>>>>>>>>>>>>>>>>>>>>>>>>>>>>>>>>>>>>>>>>>>>>>>>>>>>>>>>>>!X?!
'2421121!&"!>>>>>>>>>>>>>>>>>>>>>>>>>>>>>>>>>>>>>>>>>>>>>>>>>>>>>>>>>>>>>>>>>>>>>>>>>>>>>>>>>>>>>>>>>>>>>>>>>>>>>>>>>>>>>!XM!
Glossary!..........................................................................................................!30!
Warranty!Information!......................................................................................!31!
Operation!and!Safety!Guide!..............................................................................!33!
!

OPERATOR’S!MANUAL!!
+,-.!X!!
INTRODUCTION
Congratulations on your purchase of a WerkMaster machine. WerkMaster
machines allow professional surface prep, polishing, grinding, edging, buffing
and restoration of virtually any surface material, including concrete, terrazzo,
stone, and hardwood. This manual is provided to assist you in the operation and
maintenance of your WerkMaster machine.
!
!
!
MACHINE DESCRIPTIONS
WerkMaster machines include the Scarab, Termite, Viper XT, Raptor XT, TITAN
XT, COLOSSOS XT models. To see the complete family of WerkMaster
machines visit our website at www.werkmaster.com.
TITAN XT (230V / 380V / 460V)
• Most aggressive surface prep machine in its class, designed to exceed the
needs of the professional commercial, residential, and maintenance
contractor
• 7 Machines in 1 – grinds, sands, strips, polishes, buffs, burnishes, and edges
• Removes thinset, epoxy, glue, paint, mastic, and micro toppings; works on
spalled or rained out concrete
• Allows you to easily flatten a floor or follow a wavy floor with the same tool so
you can polish from cream to exposed aggregate
• Delivers deep, crisp, clear mirror finishes on concrete, marble, stone, granite
and terrazzo
• Runs wet or dry on concrete, stone, and terrazzo
• Features WerkMaster Octi-DiscTM Technology with 8 counter rotating heads
and the versatility of using our 6 ¾” (171 mm) ULTRA-FLEX Plug ‘N Go
tooling system
• Edges to within 1/8” (3 mm) of the wall
• Easy to use and operator friendly, the TITAN XT weighs only 600 lbs (273
kg), has a 20” (51 cm) footprint with a disc rotation speed range of 450 –
1800 RPM
• Runs on both single-phase 220V or three-phase 230V
• 380V / 460V runs in three-phase only in 380V or 460V mode
• The dual action wet/dry vacuum port allows for dry, dust-free pick up and can
be used with our optional water feature
• Has EZ Bak tilt and an adjustable, foldable handle for easy transport
!
!
!
!
!
!
!
!

OPERATOR’S!MANUAL!!
+,-.!Y!!
COLOSSOS XT (230V / 460V)
!
• Largest model in the WerkMaster family of machines, designed to exceed the
needs of the professional commercial, residential, and maintenance
contractors
• Available in 230V, 380V/460V and 460V models
• 7 Machines in 1 – grinds, sands, strips, polishes, buffs, burnishes, and edges
• Removes thinset, epoxy, glue, paint, mastic, and micro toppings; works on
spalled or rained out concrete.
• Allows you to easily flatten a floor or follow a wavy floor with the same tool, so
you can polish from cream to exposed aggregate
• Delivers deep, crisp, clear mirror finishes on concrete and terrazzo
• Runs wet or dry on concrete, stone and terrazzo
• Features WerkMaster Octi-DiscTM Technology with 8 counter rotating heads
and the versatility of using our 8” (203 mm) ULTRA-FLEX Plug ‘N Go tooling
system
• Edges to within 1/8” (3 mm) of the wall.
• Easy to use and operator friendly, the COLOSSOS XT weighs only 800 lbs
(364 kg), has a 24” (61 cm) footprint has an auto sensing dual voltage (230V
and 460V) 3 phase variable frequency drive with a disc rotation speed range
of 450 –1800 RPM. 380V models are NOT dual voltage
• The dual action wet/dry vacuum port allows for dry, dust-free pick up and can
be used with our optional water feature.
• Has EZ Bak tilt and an adjustable, foldable handle for easy transport.
SPECIFICATIONS
!
!
MODEL!
TITAN!XT!
COLOSSOS!XT!
F7=.317231!!!!!!!!!!!\4![!G!!73]!
!!!!!!!!!!!!!!!!!!!!!!!!!!!!!!!\4![!G!!6=]!
XW![!XW!
H/![!H/!
X?![!X?!
K/![!K/!
^.7-@5!!!!!!!!!!!!!!!!!!!\!4_1!`!S-]!
KWW!`!XMY!
PWW!`!YK?!
V201.<2G.0!!!!!!!!!!!!!!!!!\V+]!
+@,1.!
/W!
/a!`!Ya!
XW!
Ya!
D0.:;.36A!!!!!!!!!!!!!!!!!!!!!\VZ]!
HW!`!KW!
HW!`!KW!
N245,-.!!!!!!!!!!!!!!!!!!!!!!!!!!!!!\N]!
XYWNb!XWWJXYW!
?KWNb!YPWJ?KW!
XYWNb!XWWJXYW!
?KWNb!YPWJ?KW!
R0.,S.0!*7Z.!
XYWNb!HW!`!?KWNb!YW!
HW!
!
!

OPERATOR’S!MANUAL!!
+,-.!?!!
SAFETY PRECAUTIONS
!
!
Read this manual and all the safety precautions before attempting to
operate WerkMaster machines. Failure to follow the safety precautions may
result in severe personal injury or death. This machine is intended for
commercial use.
!
• Wear eye and ear protection at all times when operating WerkMaster
machines. Use only ANSI/OSHA-approved safety glasses to help prevent
eye injury.
• Wear appropriate clothing and footwear when operating WerkMaster
machines. Do not wear loose clothing or jewelry that may become entangled
in moving parts.
• Crystalline silica from bricks and concrete and other masonry products may
cause health problems. Risk of exposure varies depending on how often you
do this type of work. To reduce your risk, work in a well-ventilated area, use
a dust control system such as an industrial-style vacuum, and wear
approved personal safety equipment, such as a dust or particle respirator
designed to filter out microscopic particles.
• NEVER operate WerkMaster machines under the influence of drugs or
alcohol, when taking medications that impair the senses or reactions, or
when excessively tired or under stress.
• Only operate and maintain WerkMaster machines if you are in good physical
condition and mental health. You must be physically able to handle their
bulk, weight and power.
• WerkMaster machines are designed to be operated by one person at a time.
Maintain a safe operating distance to other personnel. Keep bystanders a
safe distance away during operation by blocking off the work area in all
directions with roping, safety netting, or other material. Failure to do so may
result in someone being injured by flying debris or being exposed to harmful
dust and noise.
• Maintain a safe operating distance from flammable materials. Sparks from the
cutting action of WerkMaster machines may ignite flammable materials or
vapors.
• Unplug the WerkMaster’s power cord when not in use and before servicing or
changing discs.
• Turn the WerkMaster off before disconnecting power.
• DO NOT disconnect power by pulling the cord. To disconnect power, grasp the
plug, not the cord. To remove twist-lock plugs, push in and turn clockwise to
engage, and turn counter-clockwise and pull to remove.
• DO NOT turn on the WerkMaster while it is tilted back. Any tooling fastened to
the WerkMaster may eject and become a lethal projectile.
• Be sure all safety decals on the machine can be clearly read and understood.
Replace damaged or missing decals immediately.
• Maintain WerkMaster machines in safe operating condition with all guards in
place and secure, all mechanical fasteners tight, all controls in working order,
and the grinder configured for the job application, whether concrete, natural
stone, wood or other surfaces.
Personal Protective
Equipment
Physical and
Mental Fitness
Safe Operating Distance
Power
Safe Operating
Conditions
! ! ! !!!!!!!!!!!!!!!!!!!!!!!!!!!!!!!! !WARNING!

OPERATOR’S!MANUAL!!
+,-.!H!!
• To prevent damage to the grinder or severe personal injury, avoid protruding
slab inserts, nails, screws, Hilti anchors, rebar, embedded bolts or any other
debris, pipe extensions, machinery bases, or any objects that transmit
sudden shock to the grinding assembly.
• Inspect the tooling plates carefully before installing. Do not use any tooling
plates that exhibit signs of damage, as severe personal injury or damage to
the equipment could result.
• NEVER leave WerkMaster machines running unattended>!!
!
• Risk of Explosion: Floor sanding can result in an explosive mixture of fine dust
and air. Use floor-sanding machine only in well-ventilated area free from any
flame or match.
!
!
• DO NOT modify WerkMaster machines. Modifications will void the warranty
and may result in injury to persons and damage to the machine.
POWER AND CONNECTIVITY
All WerkMaster machines are outfitted with an X4 variable frequency drive (VFD)
that allows the desired grinding speed to be selected. Along with controlling the
speed of the machine, X4 VFD features include the following:
• Undervoltage protection (damages most single-phase motors)
• Overcurrent protection (prevents nuisance breaker tripping)
• 60 Hz and 50 Hz capability (international)
• Wide voltage range (200–230V +/- 15% for 230V models;
380–460V +/- 15% for 460V models)
• Soft start (smaller generator requirements)
• Monitor pad speed display
• Load display
!
!
WerkMaster machines come with a variety of different plug configurations. The
following table lists the plugs that are typically used.
!
!
MODEL!
!!!!!!!!!TITAN!XT!
230V!!!!!!!!!!!!!!!380V/!!460V!
!!!!COLOSSOS!XT!
!!!230V!!!!!!!!!!!!!380V/!460V!
N245,-.!
XYW!!!!!!!!!!!!!!!!!!!!!!!!!!!!?PW!
XYW!!!!!!!!!!!!!!!!!!!!!!!!!!!!!!?PW!
R0.,S.0!F0,G!
YW!!!!!!!!!!!!!!!!!!!!!!!!!!!!!!YW!
HW!!!!!!!!!!!!!!!!!!!!!!!!!!!!!!!!YW!
+@,1.!'23E7-;0,5723!
/!<@,1.!!!!!!!!!!!!!!!!!!!Y!<@,1.!
Y!<@,1.!!!!!!!!!!!!!!!!!!!!!!Y!<@,1.!
'20B!93B!
?!<24.!Y!G70.!!!!!!!!?!<24.!Y!G70.!
5G715!426S!!!!!!!!!!!!!!5G715!426S!
?!<24.!Y!G70.!!!!!!!!!!!!?!<24.!Y!G70.!
5G715!426S!!!!!!!!!!!!!!!!!!5G715!426S!
!
!
!
!
!
!
!
!
!
Modifications
General Connections

OPERATOR’S!MANUAL!!
+,-.!K!!
WerkMaster machines come in a variety of voltage and phase configurations.
The TITAN XT is typically configured to operate on 208–230V three-phase
power. The TITAN XT is capable of operating on single-phase 208–230V power
with the use of the included adapter cord.
COLOSSOS XT is capable of operating with 230V three-phase to 460V threephase power with the use of the adapter cord. Runs on 230V or 460V auto
synching.
!
!
Pigtails are plug ends with unfinished bare wire on one end for hooking up to
panels. Pigtails are used when connectivity is unknown, when connecting to the
power grid of an unfinished building that has no power receptacles, or when
operating certain generators. Many pigtails are available or can be made up by
an electrician.
!
When using the TITAN XT in a residential environment, source power may be
hard to find. The use of stove and dryer adapter cords make it easier to connect
to single-phase source power. The adapter cords are outfitted with a 30 A 250 V
single-phase twist-lock cord end for dryers and 40A 250V single-phase twist-lock
cord end for stoves. The single-phase to three-phase adapter is used to connect
the stove or dryer adapter cord to the TITAN XT only.
!
The following table lists the minimum requirements for power cords.
!
!
MODEL
DISTANCE
MINIMUM REQUIREMENT
TITAN XT
Up to 300 ft
Over 300 ft
Single-phase minimum gauge of 10/3
Three-phase minimum gauge of 10/4
Single-phase minimum gauge of 8/3
Three-phase minimum gauge of 8/4
COLOSSOS XT
230V
Up to 100 ft
Over 100 ft
Three-phase minimum gauge of 8/4
Three-phase minimum gauge of 8/4
COLOSSOS XT
380V/460V
Up to 300 ft
Over 300 ft
Three-phase minimum gauge of 10/4
Three-phase minimum gauge of 8/4
!
"@.!E2442G73-!5,_4.!47151!5@.!=737=;=!0.:;70.=.351!E20!-.3.0,5201>!
!
!
MODEL
MINIMUM REQUIREMENT (KW)
TITAN XT
11
COLOSSOS XT
25
!
!
!
!
!
Exercise extreme caution at all times when working with electrical power.
WerkMaster strongly recommends that only certified electricians be permitted to
work with electrical power sources within customers’ facility or on their job site.
!
!
!
!
!
Single-Phase to
Three-Phase Adapter Cord
Pigtails
Stove and Dryer
Adapter Plugs
Power Cord
Minimum Requirements
Generator
Minimum Requirements
! ! ! !!!!!!!!!!!!!!!!!!!!!!!!!!!!!!!! !WARNING!

OPERATOR’S!MANUAL!!
+,-.!M!!
INTRODUCTION!TO!THE!CONTROLS!!
Starting the machine and changing the speed can only be done with the controls
on the handle.
USE THIS...
TO DO THIS...
Green Start
button
Start the machine.
Red Stop button
Stop the machine.
Speed control
knob
Control the speed of the pad drivers. You can set the speed
before the machine is turned on or adjust it while the machine is
running or unplugged. The speed control knob is analog and has
end points.
!
!
The TITAN XT and the COLOSSOS XT use a Vacon X4 Variable Frequency
Drive. The TITAN XT VFD allows the TITAN XT to be operated on either singlephase or three-phase power. To operate on single-phase power, a single-phase
to three-phase adapter is required. The machine can operate on either 50 Hz or
60 Hz frequencies. The VFD will automatically adjust for phase or frequency
input.
The COLOSSOS XT 230/460 Dual Volt VFD allows the COLOSSOS to run on
either 230V or 460V auto-sensing between 230 and 460V. The machine to be
operated on 230V, 380V or 460V except on 230V only or 460V only models.
An adapter (not included) is required to convert to 460V. The machine can
operate in 50 Hz or 60 Hz frequencies. The VFD will automatically adjust for
phase or frequency input.
!
!
!
!
NEVER!open!the!VFD!panel!while!plugged!in!or!immediately!after!unplugging!the!
power!cord.!Severe!injury!or!death!may!occur.!
!
!
"@.!"#"$%!&"!,3B!5@.!'()( * * (*!&"!=2B.41!7364;B.!NDF!62350241!4715.B!_.42G>!"@.!
E2442G73-!_;55231!,0.!426S.B!2;5!,1!5@.A!,0.!325!0.:;70.B!52!;1.!5@.1.!=,6@73.1b!
• D20G,0B!_;5523!\D^F]!
• L.8.01.!_;5523!\L9N]!
• c2-!_;5523!\c(I]!
• )26,4!`!0.=25.!_;5523!\)('`L9C]!
!
Machine Controls
VFD Controls
! ! ! !!!!!!!!!!!!!!!!!!!!!!!!!!!!!!!! !DANGER!

OPERATOR’S!MANUAL!!
+,-.!P!!
!
USE THIS...
TO DO THIS...
Stop button
(STOP)
Stop the machine. The machine will not perform any function
from the keypad other than stopping the machine.
The machine can be stopped with this stop button on the VFD
or with the stop button on the handle. The stop button on the
VFD cannot be locked out as it is a secondary safety stop. If
the stop button on the handle fails, the stop button on the VFD
can be used instead.
Program button
(PROG)
Enter level 1 programming. All programming parameters are
locked out by means of an access code. This is done to
prevent accidental parameter changes that can cause
machine malfunction or damage.
Shift button
(SHIFT)
Use with the program button to enter level 2 programming.
Also use to change parameter settings.
!
!
!
MACHINE OPERATION
!
!
!
Always turn off and disconnect power from the machine when performing any
operations to the bottom of the machine.
!
! ! ! ! ! ! ! $! ! ! ! ! ! !!!!!$! ! ! ! R! ! !
!
!
!
!
!
!
!
!
!!!!!!!!!!
! ! !!!!!!!!!!"75,3!&"! ! ! ! ! ! !!!!'2421121!&"! ! ! ! ! ! !!!!
! ! ! ! ! ! ! ! !!!!D7-!/!! ! ! ! ! ! ! ! ! !!!!D7-!X!
!
! ! !
Changing Tools
! ! ! !!!!!!!!!!!!!!!!!!!!!!!!!!!!!!!! !WARNING!

OPERATOR’S!MANUAL!!
+,-.!T!!
To change tooling:
1. Unplug the power cord from the twist lock inlet (A). Ensure the handle is in its
full upright position (Fig 1). Tilt the machine back (Fig 2). Choose the
appropriate tooling holder attachment – magnetic Plug ‘N Go plate (B) for
Metal Bond tools or Foam/Velcro Adapter plate for polishing resins. Insert
the two (2) shear pins into the rubber grommets. Attach the corresponding
tooling to the plate.
X> Return the machine to the upright position.!
!
For the TITAN XT:
!
! ! ! ! ! ! ! ! ! ! $! ! ! ! ! ! ! ! ! ! ! !!!!R!
! ! ! ! ! ! ! ! ! ! ! ! ! ! ! ! ! ! ! ! ! ! ! ! !
! ! ! ! ! ! ! ! ! ! ! ! ! ! ! ! ! ! !
!
!
!
! ! ! ! ! !!!!Fig 1
1. Unplug the power cord from the twist lock plug (A). Ensure the handle is in its
full upright position (Fig 1). Tilt the equipment back by removing the pull pin,
releasing and stepping on the step down plate (B) and pulling down on the
handle.
2. Slowly lift the equipment back to the upright position by using the step down
plate (B) to prevent the TITAN XT from hitting the floor.
3. Fold up and secure the step down plate (B); replace the pull pin.
For the COLOSSOS XT:!
! ! ! ! ! ! ! ! ! ! $! ! ! ! ! ! ! ! ! ! !!!!!!!!!!R!
!
!
!
!
!
!
! ! ! ! ! ! Fig 1
1. Unplug the power cord from the twist lock plug (A). Ensure the handle is in its
full upright position (Fig 1). Tilt the equipment back by releasing and
unfolding the step down plate (B). While stepping on the step down plate,
pull down on the handle.
2. Slowly lift the equipment back to the upright position by using the step down
plate (B) to prevent the COLOSSOS XT from hitting the floor.
3. Fold up and secure the step down plate (B); replace the pin.
!
!
The dust skirt serves as a seal for the bottom of the machine to act as a vacuum
chamber helping the dust stay contained under the machine. If the skirt is too far
from the ground, the dust containment is reduced.
EZ Bak Tilt Operation
Adjusting the Dust Skirt
OPERATOR’S!MANUAL!!
+,-.!/W!!
To adjust the dust skirt:
1. Pull one end of the skirt off of the machine until you reach the middle of the
skirt.
2. Position the skirt until it is barely touching the ground and repeat with the other
end.
Avoid positioning the dust skirt too low as it will drag against the ground, wearing
the skirt out prematurely and possibly preventing smooth machine movement.
!
To adjust the handle:
3. The handle on the TITAN XT is spring-loaded, pop the pin and adjust the
handle to the desired operating position.
4. On the COLOSSOS XT, pull the pin and adjust the handle to the desired
operating position.
!!
!
!
Failure to check the handle is fully engaged could result in damage to the
machine or personal injury as the handle could release unexpectedly when the
machine is being operated or tilted back.
!
!
!
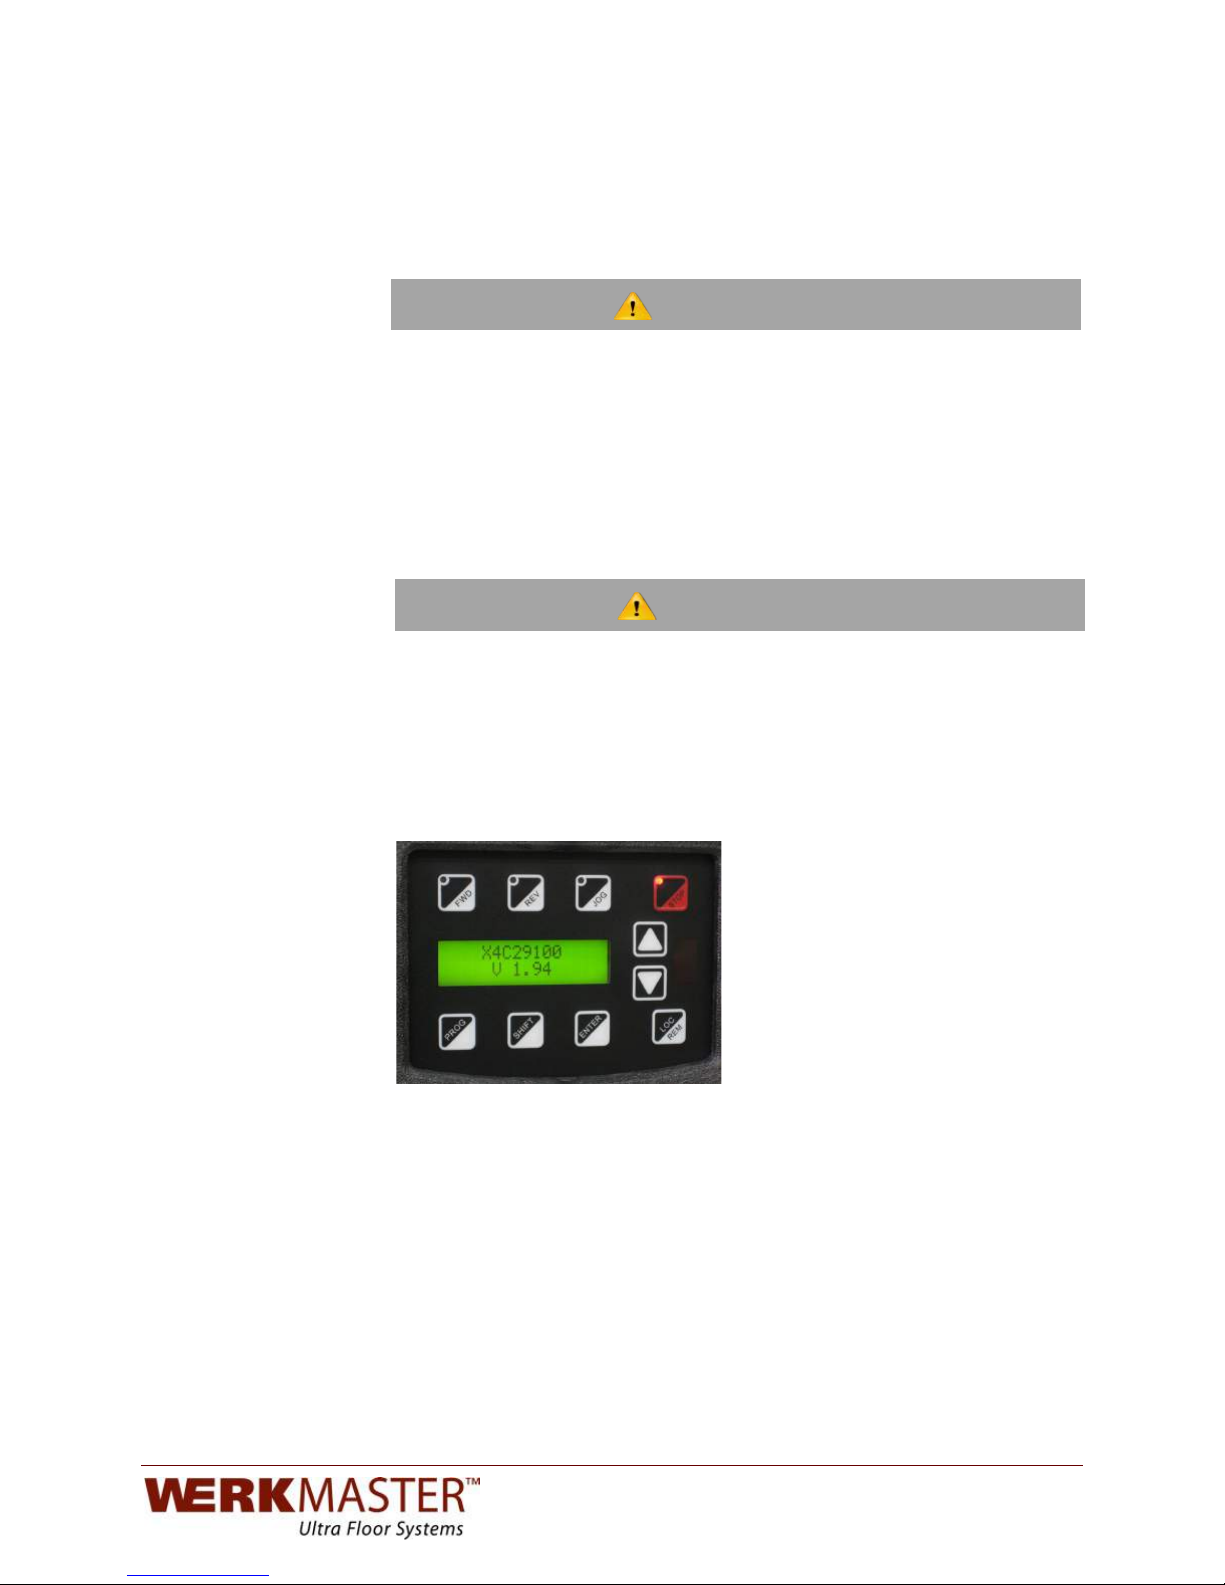
When the machine is first plugged in, the following start-up screen will appear
showing the model of the VFD and the software version.
!
!
!
After the machine runs through its initial start-up sequence, the screen will show
the VFD status, pad driver speed in revolutions per minute (RPM), and percent of
motor load.
!
Adjusting the Handle
Initial Start Sequence
! ! ! !!!!!!!!!!!!!!!!!!!!!!!!!!!!!!!! !WARNING!
! ! ! !!!!!!!!!!!!!!!!!!!!!!!!!!!!!!!! !WARNING!

OPERATOR’S!MANUAL!!
+,-.!//!!
!
!
!
!
!
!
!
!
!
!
!
Using the speed control knob on the handle, turn the speed all the way down to
450 RPM.
!
!
!
!
!
!
!
!
!
!
!
!
Selecting the Starting Speed
! ! ! !!!!!!!!!!!!!!!!!!!!!!!!!!!!!!!! !WARNING!

OPERATOR’S!MANUAL!!
+,-.!/X!!
Do not lift the machine off the ground while starting it. Doing so could cause
the diamonds to release from the machine, resulting in damage to the floor or
personal injury.
To start the machine:
1. Apply downward pressure on the handle to alleviate some pressure off the
diamonds; press the green start button.
2. The status on the screen will change from stopped to forward acceleration.
The load will increase as indicated by the percentage at the bottom right.
3. Once the machine starts, gently release the downward pressure and start
grinding.
4. Use the Speed Control Knob to select desired speed.
5. Once the machine reaches the desired speed, the following screen will
appear. The speed will remain constant as long as the load applied remains
below 100%. If the machine is running at speed and the load begins to
exceed 100%, the machine will reduce its speed as a protective measure to
try and alleviate the outstanding load. This happens under demanding
conditions and is normal.
!
!
!
The speed of the machine can be adjusted when the machine is running or
stopped. To adjust the speed, rotate the speed control knob on the handle
counterclockwise to slow it down or clockwise to speed it up.
!
!
To stop the machine, push the stop button on the handle or the STOP button on
the VFD.
!
!
!
NEVER open the VFD panel while plugged in or immediately after unplugging
the power cord. Severe injury or death may occur.!
!
To install and remove the pad driver on the bottom of the machine, you will need
a 9/16” (14 mm) socket wrench, a soft face mallet, and some medium-strength
thread locker (blue Loctite 243 or equivalent).
To remove the pad driver:
1. Slip the 9/16”(14 mm) socket wrench over the pad driver bolt and strike the
wrench with the soft face mallet in a counter-clockwise direction.
2. When installing a new pad driver or re-installing an existing one, apply a
generous amount of thread locker compound to the end of the bolt and fit it
through the hole in the pad driver. Reapply thread locking compound every
time a pad driver is removed.
3. Line up the bolt to the threaded end of the shaft and start the first couple of
threads.
4. Once the bolt is engaged, make sure that the drive shaft tongue is properly
seated within the pad driver’s slot before tightening the bolt all the way.
!
!
Starting the Machine
Adjusting the Speed
Stopping the Machine
Installing and Removing
the Pad Driver
! ! ! !!!!!!!!!!!!!!!!!!!!!!!!!!!!!!!! !DANGER!
! ! ! !!!!!!!!!!!!!!!!!!!!!!!!!!!!!!!! !CAUTION!

OPERATOR’S!MANUAL!!
+,-.!/Y!!
Failure to seat the pad driver could result in the pad driver slot being stripped out,
the threads in the shaft being stripped, the machine leaving heavy tool marks,
and the tooling overheating.
!
!
!
!
!
!
!
!
!
!
!
!
!
!
!
!
!
!
!
!
Bottom!of!WerkMaster!with!numbered!discs!and!clockwise!and!counter\clockwise!labeling!
CHECKING(USAGE(TIME!
The X4 VFD has some options you can select to determine the total time the
machine has been energized or the total run time, or view various other
parameters. To view these screens, enter the programming menu by pressing
and holding the SHIFT button and pressing the program (PROG) button once.
!
!
!
!
The machine is set with an access code to prevent accidental parameter
changes that could cause the machine to behave unpredictably, run less
efficiently, or cause irreparable damage. The following screen will appear.
For your protection and to protect the machines, the access code is not provided.
There is no reason to change the programming of the machine as the machine is
optimized from the factory to provide maximum performance.
Rotation Pattern of
Tooling Plates
Entering the
Programming Menu
Bypassing the Access
Code
! ! ! !!!!!!!!!!!!!!!!!!!!!!!!!!!!!!!! !!!!NOTE!
OPERATOR’S!MANUAL!!
+,-.!/?!!
!
!
!
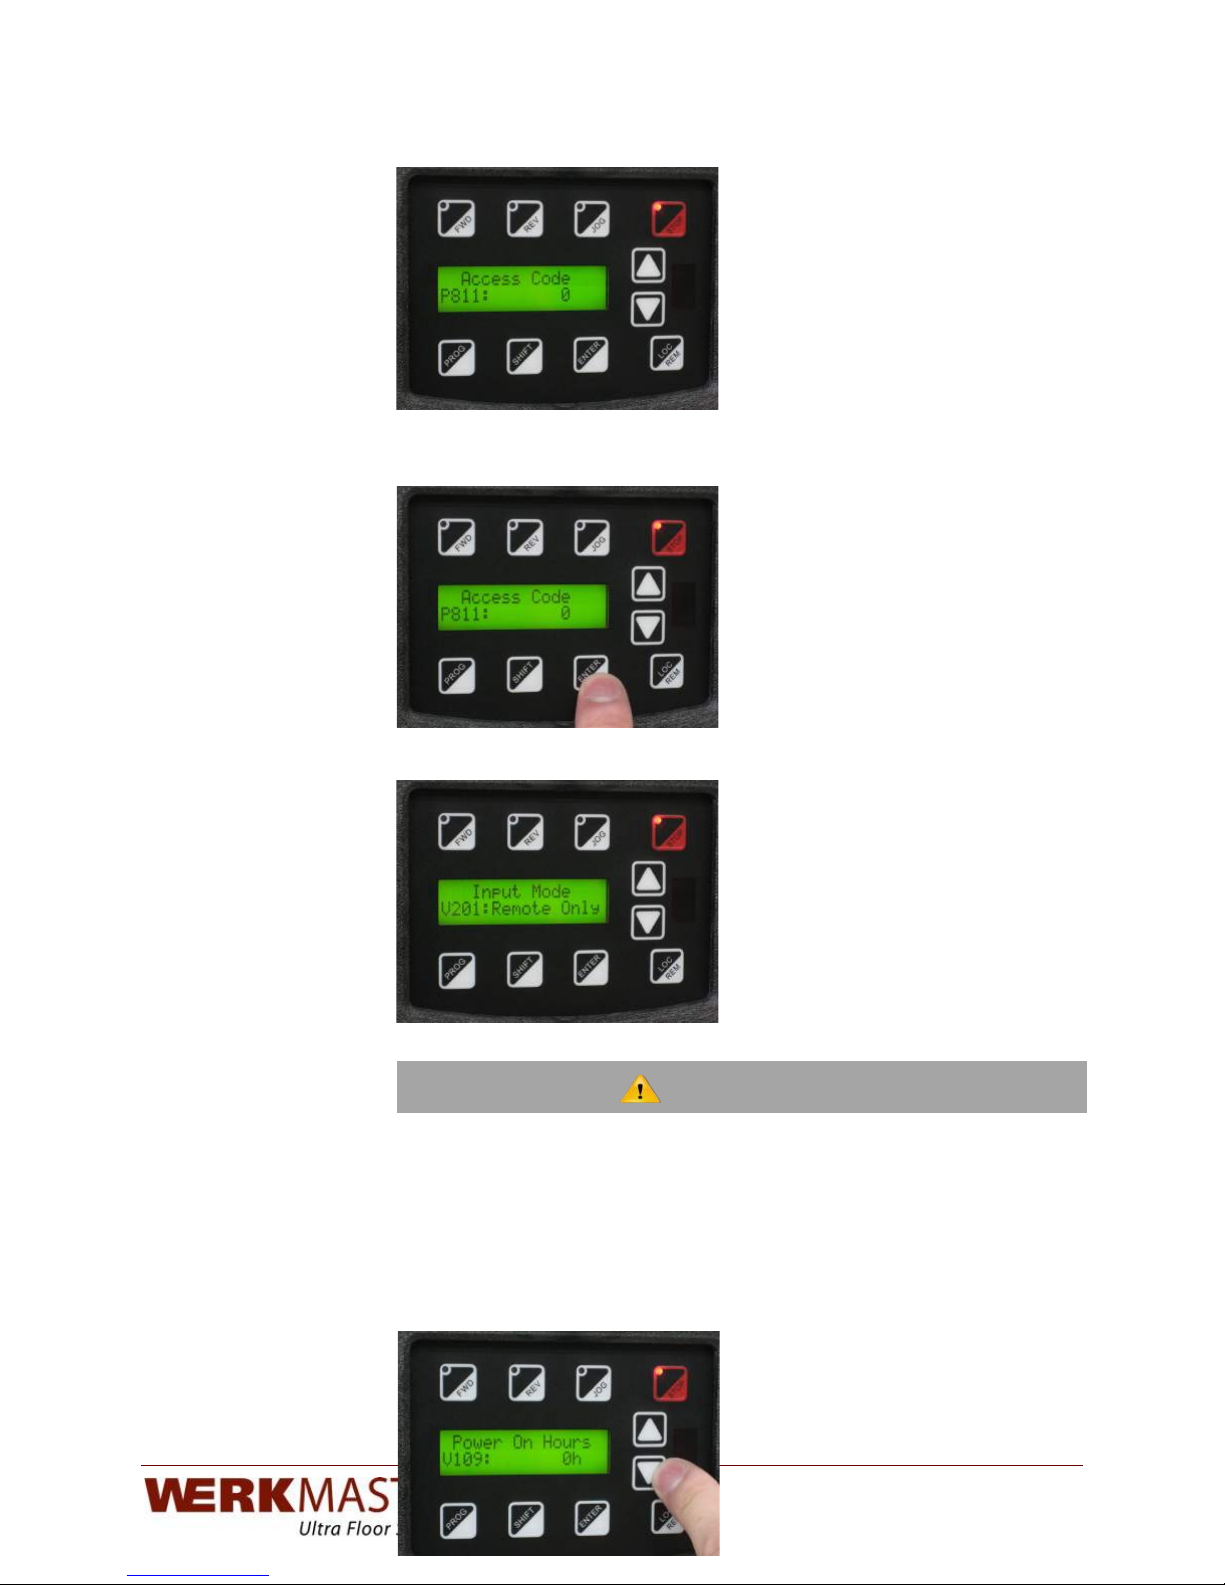
To bypass the access code screen and enter the programming menu, press the
ENTER button. Any attempt to enter an access code will be ignored by the VFD
!
!
!
!
!
!
!
!
!
!
!
After the access code screen, the following screen will appear>!!
!
!
!
!
!
!
The number 201 has a “V” before it. All parameter numbers that have a V before
them can only be viewed. Any number with a “P” before it can be changed. If you
notice a parameter with a P before it, contact customer service as this is a fault
that may cause problems.
Using the arrow button, scroll down until you reach parameter 109. This
parameter displays the total time the machine has been in plugged in. You
cannot reset this parameter.
!
!
!
!
!
!
Viewing the Total Time
Energized
! ! ! !!!!!!!!!!!!!!!!!!!!!!!!!!!!!!!! !!!!NOTE!

OPERATOR’S!MANUAL!!
+,-.!/H!!
!
!
!
!
!
!
!
!
Using the arrow button, scroll down to parameter 108. This parameter displays
the total time that the machine has actually been running. This is useful if you
want to compare the total run time to the total plugged in time. This parameter is
also used for assessing warranty information.
!
!
!
!
!
!
!
!
!
!
!
!
!
To exit the programming menu, press the program (PROG) button. The main
operation screen will appear.
!
!
!
!
!
!
!
!
!
!
!
!
!
When you unplug the machine, the screen will stay lit for a few seconds. As the
VFD drains the power from its internal capacitors, it will display “Low Voltage”
until it turns off. This is normal.
!
!
!
!
!
!
!
!
!
!
!
!
Viewing the Total Run
Time
Exiting the
Programming Menu

OPERATOR’S!MANUAL!!
+,-.!/K!!
VACUUM OR WATER FEATURE
1. Use a 2” vacuum hose between the vacuum port to fit a standard 2” vacuum
hose.
2. Run the vacuum only while dry grinding.
3. Always refer to vacuum manual.
1. Insert water feature plug into the vacuum port.
2. Ensure the blue flow control valve is in the OFF position.
3. Attach a ¾” male (standard garden hose) to the ¾” female end of water
feature. Secure tightly with a new washer to prevent leaks.
4. Turn on water supply. Adjust the blue flow control valve as wet grinding
process requires.
!
!
!
ALWAYS refer to the variable speed grinder/polisher manual prior to using the
water feature.
!
MAINTENANCE
!
!
!
Disconnect power before performing any maintenance, cleaning, or repairs to
your machine.
!
• Wipe down the machine after every job.
• Check grommets and pad drivers for wear.
• Check pins for wear.
• Vacuum, wash and thoroughly dry the underside of the machine.
• Inspect the plug ends for signs of carbon deposits and arcing.
• Check all fasteners and tighten if necessary.
!
• Inspect the handle wires for damage.
• Blow off the VFD heat sink with compressed air.
• Blow out the VFD cooling fin fans with low-pressure compressed air (30 psi or
less). Cleaning the fan prevents fan failure and potential VFD overheating.
• Blow off the motor fan with compressed air.
• Re-install the pad drivers using blue thread locking compound.
• Using a soft scrub pad, remove any excess dirt build-up from the bottom plate
and back side of the pad drivers.
!
!
DO NOT over-speed the fans with compressed air.
Vacuum
Water Feature
Daily
Weekly
! ! ! !!!!!!!!!!!!!!!!!!!!!!!!!!!!!!!! !WARNING!
! ! ! !!!!!!!!!!!!!!!!!!!!!!!!!!!!!!!! !WARNING!
! ! ! !!!!!!!!!!!!!!!!!!!!!!!!!!!!!!!! !CAUTION!

OPERATOR’S!MANUAL!!
+,-.!/M!!
After wet operation, wash bottom of machine thoroughly, failure to do so may
result in damaged bearing seals.!
DO NOT use any sharp object or abrasive pad to clean the bearing shields. This
can compromise the bearing seal.
!
!
• Check all strain reliefs and make sure they are tight. (Strain reliefs are the
plastic nuts that secure the wires that come out of the handle and VFD.)
• Remove the pad drivers and inspect the threads to make sure there are no
signs of cross-threading or stripping. Remove excess thread locking
compound from bolts using a wire brush or by washing the bolts in a solvent.
• Clean and lubricate wheels.
• Using an extremely light abrasive pad, remove any topical rust from the shafts.
TROUBLESHOOTING
!
ISSUE
TEST
SOLUTIONS
Machine will not turn on.
Check all power connections. Make sure
the source power meets the machine’s
minimum power requirements (see
Power Cord Minimum Requirements
p. 5).
• Plug in the machine.
• Check to see if any breakers or fuses are tripped or blown.
• Check to see the handle activation lever is not depressed.
• Have a qualified electrician test the source power to see if it meets
the machine’s minimum power requirements.
Machine turns on but will not
start.
Check the VFD display for error codes
(see Appendix p. p.19).
• If no error code is displayed, check if the handle wire is plugged
into the machine.
• If the VFD error code is “voltage range,” have a qualified
electrician test the source power and make the necessary
adjustments to the wiring to supply the machine with its required
input power.
Machine runs for a short time
and then shuts down.
Check the circuit breaker to see if it is
tripped or the fuse if it is blown.
• Check to make sure that the power source has the appropriately
sized breaker or fuse to meet the machine’s minimum power
requirements.
• Make sure the generator meets the machine’s minimum power
requirements.
• Have an electrician perform a voltage test while the machine is
under load to see if the voltage drops below the machine’s
minimum power requirements.
Pad drivers are not turning or
only one pad driver is
turning.
Disconnect the power and tilt the
machine back. Spin one pad by hand.
• If the pad turns independently, replace the secondary belt. Go to
www.werkmaster.com/support.
• If all pad drivers turn but the motor fan does not turn, replace the
primary belt. Contact technical support: 866.373.9375.
Not all discs are grinding the
floor.
Disconnect the power and tilt the
machine back. Visually inspect each pad
driver height against the adjacent pad
driver.
• Make sure all pad drivers are seated properly on the shafts.
• Make sure grinding / polishing / sanding media is seated properly
on the pad drivers.
• Make sure grinding / polishing / sanding media is worn evenly and
change out any media if uneven.
Monthly

OPERATOR’S!MANUAL!!
+,-.!/P!!
ISSUE
TEST
SOLUTIONS
Excessive noise or vibration
is felt or heard while running
the machine.
Disconnect the power and tilt the
machine back. Spin one pad by hand.
Listen for a clicking sound or grit-like
feeling.
• Check that all tooling is in the correct pin holes on the pad drivers.
• Replace the bearings. Contact technical support: 866.373.9375 for
instructions.
Tooling becomes dislodged
from the machine while
operating.
Disconnect the power and tilt the
machine back. Remove and inspect all
tooling. This includes the pins, tooling
plates, and pad drivers.
• If the pin holes are excessively damaged, replace the pad drivers.
• If the grommets/bumpers on the pad drivers are damaged, replace
the damaged parts.
• If the pins on the diamonds or tooling plates are damaged or
missing, replace the pins.
The machine handle
malfunctions.
Check the handle plug to see if it has
come loose.
• Secure the handle plug. If the handle controls are still
malfunctioning, contact customer service for instructions.
VFD makes popping noise
and starts to smoke.
***Disconnect power
immediately!***
Wait for 1–2 hours, then remove the
VFD cover and check electronic
components for discoloration, scorching,
or swelling.
• Contact a dealer or technical support: 866.373.9375.
VFD screen displays error
message or unusual screen
display.
Look up the message in the Appendix.
• Contact technical support: 866.373.9375.
!
!
!
!
!
!
!
!
!
!
!
!
!
!
!
!
!
!
!
!
!
!
!
!
!
!
!
!
!
!
OPERATOR’S!MANUAL!!
+,-.!/T!!
VFD ERROR SCREENS AND CODES
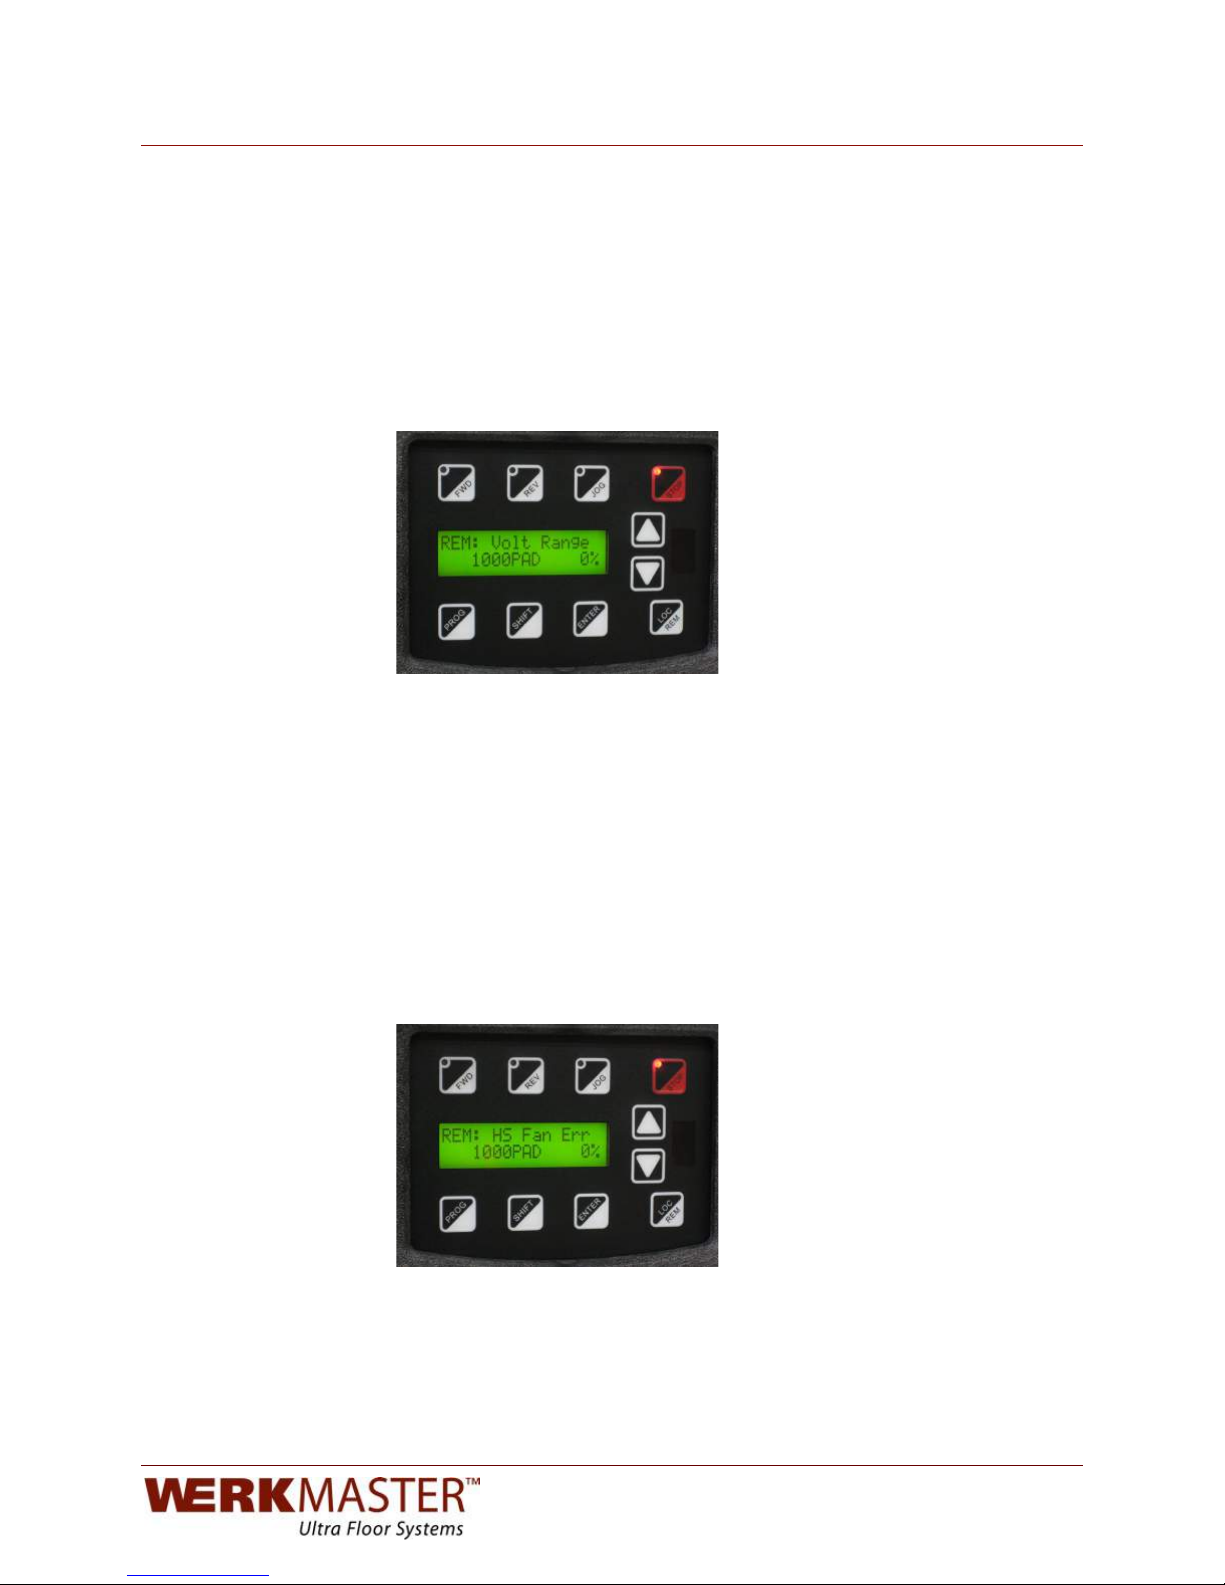
Voltage!Range!Error!
"@.!NDF!71!6,<,_4.!2E!@,3B473-!,!G7B.!0,3-.!2E!73<;5!<2G.0>!"@.!8245,-.!0,3-.!71b!
• XYWN!=2B.41b!XWWdXYWN!e`J/Wf!\/PWdXHYN]!!
• ?KWN!=2B.41b!YPWd?KWN!e`J/Wf!\Y?XdHWKN]!
!
#E!73<;5!12;06.!<2G.0!71!2;517B.!2E!5@.1.!0,3-.1g!5@.!.0020!23!5@.!E2442G73-!160..3!G744!
,<<.,0>!"@.!NDF!71!<025.65.B!E02=!8245,-.!E4;65;,57231!G75@73!5@.!1<.67E7.B!8245,-.!
0,3-.>!
!
!
!
#E!,!=,6@73.!71!<4;--.B!7352 !, !< 2 G.0!12;06.!5@,5!71!,_28.!5@ . !=,6@73.h1!=,[7=;=!
8245,-.!6,<,_7475A!\E20!.[,=<4.g!XYWN!=2B.4!<4;--.B!7352!,!?KWN!-.3.0,520]g!5@71!G744!
B,=,-.!5@.!NDF!,3B!827B!5@.!G,00,35A>!!!
!
!
Cooling!Fan!Error!
"@.!&?!NDF1!,0.!.:;7<<.B!G75@!23.!20!5G2!.4.65076!E,31!=2;35.B!23!5@.!_,6S!2E!5@.!
NDFh1!622473-!E731!\@.,5!173S!d!V*]>!^@.3!5@.!NDF!71!<4;--.B!73g!75!G744!0;3!,!1.4EJ
B7,-321576!52!=,S.!1;0.!,44!735.03,4!62=<23.351!,0.!2<.0,5723,4!,3B!52!6@.6S!5@.!
622473-!E,31>!#E!5@.!E,31!E,74!52!1<73g!5@.!.0020!23!5@.!E2442G73-!160..3!G744!,<<.,0>!"@71!
62;4B!@,<<.3!_.6,;1.!2E!B._071!U,==73-!5@.!E,3!_4,B.1g!@.,8A!6235,=73,5723g!20!G,5.0!
73@7_7573-!5@.!<2G.0!5@,5!5@.!E,3!3..B1!52!0;3>!#3!5@.!.8.35!2 E!,!622 473- !E, 3!. 0020g!
;3<4;-!5@.!=,6@73.!,3B!731<.65g!64.,3g!,3B!6@.6S!E20!E0..!=28.=.35!2E!5@.!E,3!_4,B.>!!
!
!
!
VFD Error Screens

OPERATOR’S!MANUAL!!
+,-.!XW!!
"@.!E2442G73-!5,_4.!1@2G1!5@.!E,;45!62B.1!5@,5!=,A!_.!B71<4,A.B!B;073-!&?!$'!B078.!
2<.0,5723g!,423-!G75@!1;--.157231!E20!0.628.073-!E02=!5@.!E,;45!623B75723>!!
!
!
!
*@,B.B!E,;451!,0.!,;52J0.1.55,_4.g!.[6.<5!G@.0.!325.B>!!
!
CODE!
FAULT!
DISPLAY!
DESCRIPTION!
ADV.!FAULT!
CODE!
EXPLANATION!
SUGGESTIONS!FOR!RECOVERY!
/!
*A15.=!!
*A15.=!E,;45!!
Wg/gX!
#35.03,4!=7602<026.1120!<02_4.=>!!
'231;45!5@.!E,6520A!E20!0.<,70!20!
0.<4,6.=.35>!!
Y!
"@.0=71520!<02E74.!71!736200.65>!!
'231;45!5@.!E,6520A!E20!0.<,70!20!
0.<4,6.=.35>!!
W!
C.=20A!<02_4.=!G@.3!0.E4,1@73-!5@.!
B078.h1!=.=20A>!!
L.1.5!5@.!B078.!52!E,6520A!1.5573-1>!
'231;45!5@.!E,6520A>!!
/gXgY!
'23E4765!73!5@.!B078.h1!=.=20A>!!
L.1.5!5@.!B078.!52!E,6520A!1.5573-1>!
'231;45!5@.!E,6520A>!!
X!
99!'@.6S1;=!!
'@.6S1;=!.0020!!
?!
i3,_4.!52!G075.!,3!99!<,0,=.5.0!,E5.0!,!
<,0,=.5.0!@,1!_..3!6@,3-.B!5@02;-@!
5@.!S.A<,B!20!*#(>!!
L.1.5!5@.!B078.!52!E,6520A!1.5573-1>!
'231;45!5@.!E,6520A>!!
H!
"@.!B078.!71!0.6.7873-!99!G075.!0.:;.151!
E,15.0!5@,3!5@.A!6,3!_.!<026.11.B>!"@71!
G2;4B!5A<76,44A!_.!6,;1.B!_A!G07573-!
<,0,=.5.01!522!E0.:;.354A!5@02;-@!
C2B_;1>!!
*42G!B2G3!5@.!E0.:;.36A!2E!5@.!C2B_;1!
G075.1>!!
Y!
';00!',47_0!
';00.35!
6,47_0,5723!E,;45!
W!
';00.35!6,47_0,5723!E,;45!23!<@,1.!"/`i>!
'@.6S!5@.!=2520!6233.657231!52!5@.!
5.0=73,4!1507<!2E!5@.!B078.!,3B!,5!5@.!
=2520>!V,8.!=2520!6@.6S.B>!'231;45!5@.!
E,6520A!E20!0.<,70!20!0.<4,6.=.35!2E!
B078.>!
/!
';00.35!6,47_0,5723!E,;45!23!<@,1.!"X`N>!
X!
';00.35!6,47_0,5723!E,;45!23!<@,1.!
"Y`^>!
?!
+2G.0!*;<<!!
+2G.0!1;<<4A!
E,;45!!
W!
H!N!1;<<4A!71!_.42G!?!NF'!E20!=20.!
5@,3!/WW!=1>!!
#360.,1.!0.1715,36.!_.5G..3!L9D!,3B!
,3,42-!73<;51>!'@.6S!5@.!G7073-!52!L9D!
5.0=73,41>!'231;45!5@.!E,6520A>!!
K!
#('!"07<!!
#315,35,3.2;1!
28.06;00.35!507<!!
W!
*@205!6706;75!G,1!B.5.65.B!23!<2G.0J
;<>!!
L.=28.!5@.!1@205!E02=!5@.!<2G.0!G7073-!!
'@.6S!E20!,!1@205.B!=2520>!'231;45!5@.!
E,6520A>!!
/!
*@205!6706;75!G,1!B.5.65.B!B;073-!
2<.0,5723>!!
M!
C()!!
C()!6235,65!
E,;45!!
W!
C()!B7-75,4!73<;5!G,1!,6578,5.Bg!
B.<.3B73-!23!<;44J;<!20!<;44JB2G3!
42-76!623E7-;0,5723>!
L.1.5!5@.!C()!6235,65!20!0.=28.!5@.!
623B75723!6,;173-!5@.!C()!6235,65!
,6578,5723>!
P!
C2B.4!#F!!
#F!j!2;5!2E!
0,3-.!!
Wg/gX!
'235024!_2,0B!71!325!0.,B73-!5@.!B078.!
#F!<02<.04A>!!
'231;45!5@.!E,6520A!E20!0.<,70!20!
0.<4,6.=.35>!!
/W!
L.1!)26S2;5!!
L.15,05!426S2;5!!
W!
"@.!3;=_.0!2E!E,;45!0.15,051!71!-0.,5.0!
5@,3!5@.!47=75!B.E73.B!73!5@.!6;152=.0!
<,0,=.5.0>!
'@.6S!5@.!,65;,4!E,;45!73!5@.!E,;45!42-!,3B!
;1.!5@.!,<<02<07,5.!0.=.BA>!
//!
I02;3B!!
I02;3B!E,;45!!
W!
"@.!B078.!B.5.65.B!,!6;00.35!7=_,4,36.!
_.5G..3!2;5<;5!<@,1.1>!#=_,4,36.!
B.5.0=73.B!52!_.!6;00.35!E42G!52!
-02;3B>!!
'@.6S!E20!;3_,4,36.B!6;00.351>!'@.6S!
E20!-02;3B.B!=2520!4.,B1!20!=2520>!
'231;45!5@.!E,6520A>!!
/X!
N,6!#=_436.!!
#3<;5!8245,-.!
7=_,4,36.!!
W!
"@.!B078.!B.5.65.B!,!173-4.J<@,1.!
623B75723!20!,!8245,-.!7=_,4,36.!
2;517B.!5@.!B078.h1!0,573-!G@74.!0;3373-!
,!42,B!5@,5!62;4B!_.!B,=,-73-!52!5@.!
B078.>!!
'@.6S!73<;5!8245,-.!,3B!6;00.35!E20!
7=_,4,36.g!,3B!6200.65>!!
VFD Error Codes
! ! ! !!!!!!!!!!!!!!!!!!!!!!!!!!!!!!!! !!!!!NOTE!

OPERATOR’S!MANUAL!!
+,-.!X/!!
CODE!
FAULT!
DISPLAY!
DESCRIPTION!
ADV.!FAULT!
CODE!
EXPLANATION!
SUGGESTIONS!FOR!RECOVERY!
/Y!
(8.0N245,-.!
(8.08245,-.!
623B75723!
W!
"@.!B078.!B.5.65.B!,3!28.08245,-.!
623B75723!B;073-!<2G.0J;<!!"#$%&'$#(
)*+*$$&,-*.>!
N.07EA!5@,5!7362=73-!473.!<2G.0!71!G75@73!
5@.!B078.h1!1<.67E76,57231>!$BB!,!0.,6520!
20!50,31E20=.0!52!6200.65>!
/gY!
"@.!B078.!B.5.65.B!,3!28.08245,-.!
623B75723!B;073-!,!0;3373-!623B75723>!!
N.07EA!7362=73-!473.!<2G.0!,3B!6@.6S!E20!
0.-.3.0,578.!42,B>!L.B;6.!L.-.3!42,B!20!
,BB!BA3,=76!_0,S73-!0.1715201>!L.-.3!
';00.35!)7=75!=,A!@.4<k!6231;45!5@.!
E,6520A>!!
X!
"@.!B078.!B.5.65.B!,3!28.08245,-.!
623B75723!23!<2G.0J;<!23!5@.!42,B!17B.>!
N.07EA!5@,5!7362=73-!473.!<2G.0!71!G75@73!
5@.!B078.h1!1<.67E76,57231>!$BB!,!0.,6520!
20!50,31E20=.0!52!6200.65>!
/H!
FA3!R0,S.!
FA3,=76!_0,S.!
28.042,B!
W!
FR!6706;75!71!,6578.!23!<2G.0J;<!!"#$%
&'$#()*+*$$&,-*.%!
'@.6S!E20!,!E,74.B!_0,S73-!50,3171520>!
'231;45!5@.!E,6520A>!!
/!
FR!6706;75!71!_.73-!,6578,5.B!E20!522!
423-g!<2117_4A!6,;173-!5@.!0.171520!52!
28.0@.,5!20!E,74>!!
L.B;6.!5@.!_0,S73-!6A64.!20!7360.,1.!
6,<,675A>!$6578,5.!5@.!6;00.35!47=75k!
6231;45!5@.!E,6520A>!!
X!
FR!6706;75!71!28.042,B.B!_.6,;1.!2E!522!
4,0-.!,!0.-.3.0,578.!42,B>!
L.B;6.!5@.!_0,S73-!6A64.!20!7360.,1.!
6,<,675A>!$6578,5.!5@.!6;00.35!47=75k!
6231;45!5@.!E,6520A>!
Yg?gH!
FR!6706;75!71!E,;45A!23!<2G.0J;<!!"#$%
&'$#()*+*$$&,-*./%!
!
/P!
(8.0';00.35!
(8.06;00.35!
623B75723!
W!
"@.!B078.!B.5.65.B!,3!28.06;00.35!
623B75723!23!<2G.0J;<!!"#$%&'$#(
)*+*$$&,-*.>!!
'@.6S!E20!,!E,74.B!2;5<;5!<2G.0!B.876.!20!
1@205.B!=2520>!!
/!
"@.!B078.!B.5.65.B!,3!28.06;00.35!
623B75723!B;073-!2<.0,5723>!"@.!6;00.35!
@,1!.[6..B.B!5@.!1,E.!2<.0,5723!<2735!
2E!<2G.0!B.876.1>!!
L.B;6.!5@.!42,B!23!5@.!=2520>!N.07EA!
5@,5!C2520!D)$!71!<02-0,==.B!
6200.654A>!'@.6S!E20!=.6@,376,4!_73B73-!
,3B!1@26S!42,B73->!!
/T!
(8.0!".=<!
(8.0J!
5.=<.0,5;0.!
623B75723!
W!
"@.!5.=<.0,5;0.!2E!5@.!@.,5!173S!
.[6..B.B!,!5.=<.0,5;0.!47=75>!!
'@.6S!5@,5!,=_7.35!5.=<.0,5;0.!B2.1!
325!.[6..B!5@.!B078.h1!0,573->!'@.6S!E,3!
2<.0,5723!\7E!5@.!B078.!@,1!E,31!7315,44.B]>!!
/!
"@.!5.=<.0,5;0.!2E!5@.!6235024!_2,0B!
.[6..B.B!,!5.=<.0,5;0.!47=75>!!
'@.6S!5@,5!,=_7.35!5.=<.0,5;0.!B2.1!
325!.[6..B!5@.!B078.h1!0,573->!'@.6S!E,3!
2<.0,5723!\7E!5@.!B078.!@,1!E,31!7315,44.B]>!!
X!
"@.!B078.!B.5.65.B!5@,5!5@.!@.,5!173S!
5@.0=71520!1.3120!71!E,;45A!20!325!
6233.65.B!<02<.04A>!!
'@.6S!5@.!5@.0=71520!6233.657231!20!
0.<4,6.>!'231;45!5@.!E,6520A>!!
Y!
"@.!B078.!B.5.65.B!5@,5!5@.!6235024!
_2,0B!5@.0=71520!1.3120!71!E,;45A!20!325!
6233.65.B!<02<.04A>!
'@.6S!5@.!5@.0=71520!6233.657231!20!
0.<4,6.>!'231;45!5@.!E,6520A>!!
XW!
C2520!"()!!
C2520!57=.B!
28.042,B!507<!!
W!
"@.!B078.!B.5.65.B!,3!28.042,B!5@,5!
.[6..B1!5@.!6;152=.0h1!B.E73.B!
28.042,B!1.5573->!!
'@.6S!42,B!6;00.35!B.=,3B>!N.07EA!5@,5!
C2520!D)$!71!<02-0,==.B!52!5@.!6200.65!
8,4;.>!N.07EA!5@,5!"()!6@,0,65.071576!71!
6200.65!E20!5@.!,<<476,5723>!!
X/!
)2G!".=<!!
)2G!
5.=<.0,5;0.!!
W!
"@.!5.=<.0,5;0.!2E!5@.!@.,5!173S!E.44!
_.42G!J/Wl!'>!!
N.07EA!5@,5!,=_7.35!5.=<.0,5;0.!71!
G75@73!5@.!B078.h1!1<.67E76,57231k!7360.,1.!
5@.!,=_7.35!5.=<.0,5;0.!7E!3.6.11,0A>!!
XX!
L.E!)211!!
*<..B!0.E.0.36.!
4211!!
W!
"@.!B078.!B.5.65.B!5@,5!5@.!,3,42-!
73<;5!G,1!623E7-;0.B!52!E,;45!7E!5@.!
73<;5!6;00.35!G.35!_.42G!5@.!4.8.4!
1<.67E7.B!_A!6;152=.0!<,0,=.5.01>!!
'@.6S!5@.!<@A176,4!6233.657231!E20!,!
0.E.0.36.!17-3,4>!'@.6S!5@,5!5@.!
<02-0,==73-!E20!,!?dXW!=$!17-3,4!71!
6200.65>!N.07EA!5@,5!5@.!17-3,4!52!5@.!B078.!
71!6200.65>!!

OPERATOR’S!MANUAL!!
+,-.!XX!!
CODE!
FAULT!
DISPLAY!
DESCRIPTION!
ADV.!FAULT!
CODE!
EXPLANATION!
SUGGESTIONS!FOR!RECOVERY!
XY!
R0S!^70.!!
R02S.3!G70.!
B.5.65723!!
W!
"@.!B078.!B.5.65.B!5@,5!5@.!
<25.3572=.5.0!6706;75!G7073-!2<.3.B!
,3B!-.3.0,5.B!,!E,;45>!!
'@.6S!5@.!G7073-!E20!4211!2E!6233.65723!
52!6235024!5.0=73,41>!'@.6S!5@,5!,!
<25.3572=.5.0!2E!5@.!<02<.0!8,4;.!71!
7315,44.B>!!
X?!
m.A<,B!)211!
m.A<,B!4211!
W!
+02_4.=!G75@!5@.!S.A<,B!20!,!S.A<,B!
6233.65723>!"@.!B078.!B.5.65.B!5@,5!75!
62;4B!325!0.,B!,3A!S.A!<0.11.1>!
'@.6S!5@.!6233.65723!E02=!5@.!S.A<,B!
52!5@.!6235024!_2,0B>!%25.!5@,5!5@.!
S.A<,B!71!325!B.17-3.B!E20!0.=25.!
=2;3573->!!
/!
+02_4.=!G75@!5@.!S.A<,B!20!,!S.A<,B!
6233.65723g!20!G023-!S.A<,B!G,1!;1.B>!
m.A<,B!#F!E20!,3!&?!62;4B!325!_.!0.,B>!!
X!
+02_4.=!G75@!5@.!S.A<,B!20!,!S.A<,B!
6233.65723>!"@.!B078.!B.5.65.B!5@,5!75!
62;4B!325!G075.!52!5@.!)'F>!
XH!
'2==!)211!!
'2==;376,5723!
4211!!
W!
"@.!B078.!71!73!,!1.07,4!473S!6235024!<,5@!
,3B!5@.!,=2;35!2E!57=.!1736.!5@.!4,15!
C2B_;1!62==>!.[6..B.B!5@.!57=.!1.5!
73!<,0,=.5.0!TWY!\*#(!"7=.0]>!!
'@.6S!5@.!6233.657231!52!5@.!C2B_;1!
<205>!$BU;15!5@.!8,4;.!2E!<,0,=.5.0!TWY!
\*#(!"7=.0]!,1!3..B.B>!!
XK!
L.-.3!"7=.!!
L.-.3!57=.2;5!!
W!
"@.!B078.!522S!=20.!57=.!52!B.6.4.0,5.!
52!,!152<!5@,3!71!,442G.B>!"@.!57=.2;5!
71!B.5.0=73.B!_A!5@.!423-.15!
B.6.4.0,5723!0,=<!57=.!\F.6.4/!20!
F.6.4X]!<4;1!5@.!L.-.3!57=.2;5!
<,0,=.5.0>!
L.B;6.!5@.!,=2;35!2E!0.-.3.0,578.!
.3.0-A!20!7360.,1.!5@.!L.-.3!57=.2;5!
<,0,=.5.0>!!
XM!
+G0!R07B-.!!
+2G.0!_07B-.!
E,;45!!
Wg/gX!
"@.!B078.!B.5.65.B!,!E,74;0.!73!5@.!
2;5<;5!<2G.0!B.876.1>!!
'@.6S!E20!,!E,74.B!73<;5!<2G.0!B.876.>!!
XP!
F078.!"()!!
F078.!57=.B!
28.042,B!!
W!
"@.!B078.!B.5.65.B!,3!28.042,B!5@,5!
.[6..B.B!5@.!B078.!0,573->!!
'@.6S!5@,5!42,B!623B757231!B2!325!
.[6..B!5@.!B078.h1!0,573-!\/XWf!E20!
KW!1.623B1!E02=!3,=.<4,5.!6;00.35!
0,573-!E20!320=,4!B;5A!,3B!/HWf!20!0,5.B!
6;00.35!E20!KW!1.623B1!@.,8A!B;5A]>!
XT!
*5;6S!m.A!!
*5;6S!S.A!.0020!!
W!
m.A!<0.11!G,1!B.5.65.B!;<23!<2G.0J
;<>!"@71!G2;4B!266;0!_.6,;1.!2E!,!
B.E.6578.!S.A<,B!20!_.6,;1.!12=.23.!
G,1!@24B73-!B2G3!,!S.A!G@.3!
<2G.073-!;<!5@.!B078.>!!
'@.6S!E20!,!15;6S!S.A<,B!,3B!0.<,70!20!
0.<4,6.>!'231;45!5@.!E,6520A>!!
YW!
+,0,=!L,3-.!!
+,0,=.5.0!2;5!
2E!0,3-.!!
W!
(3.!2E!5@.!6;152=.0!<,0,=.5.01!71!2;5!
2E!0,3-.>!!
'@.6S!E20!,!<,0,=.5.0!8,4;.!1,8.B!2;5!2E!
5@.!15,3B,0B!0,3-.>!L.1.5!<,0,=.5.01!52!
5@.!E,6520A!B.E,;45>!'231;45!5@.!E,6520A>!!
Y/!
+G0!^7073-!
+2G.0!G7073-!
.0020!
W!
+02_4.=!G75@!5@.!B078.!G7073->!!
'@.6S!5@,5!73<;5!<2G.0!G7073-!71!325!
6233.65.B!52!42,B!<2G.0!5.0=73,41>!
'231;45!5@.!E,6520A>!
/!
#('!E,;45!G,1!B.5.65.B!B;073-!5@.!
<2G.0!G7073-!5.15>!
YX!
)2G!N245,-.!!
)2G!8245,-.!507<!!
W!
+2G.0!B7<!266;00.B!G@.3!5@.!B078.!G,1!
2<.0,573-g!,3B!5@.!B078.!G,1!325!,_4.!52!
07B.!5@02;-@!5@.!<2G.0!B7<!_.E20.!
1@;5573-!2EE!2;5<;51>!!
N.07EA!5@,5!73<;5!473.!<2G.0!71!G75@73!5@.!
B078.h1!1<.67E76,57231>!$BB!,!50,31E20=.0!
20!0.B;6.!B.=,3B1!52!5@.!<2G.0!E..B>!
'231;45!5@.!E,6520A>!!
YY!
/+@!(8.042,B!!
/+@!28.042,B!!
W!
R;1!8245,-.!07<<4.!G,1!2;517B.!5@.!47=75!
2E!5@.!B078.!\G@.3!<,0,=.5.0!H/M!
*73-4.J+@,1.!71!623E7-;0.B!E20!173-4.J
<@,1.!2<.0,5723]>!!
'@.6S!5@,5!73<;5!<2G.0!B.=,3B!B2.1!
325!.[6..B!5@.!B078.h1!6,<,675A!E20!
173-4.J<@,1.!2<.0,5723>!'231;45!5@.!
E,6520A>!!
Y?!
L*!C.,1>!D,74!!
*5,520!
0.1715,36.!
=.,1;0.=.35!
E,74.B!!
W!
"@.!B078.!62;4B!325!=.,1;0.!5@.!15,520!
0.1715,36.!<02<.04A>!!
"0A!5@.!02;573.!,-,73!,3B!7E!5@.!E,;45!
266;01!5G76.g!6231;45!5@.!E,6520A>!!

OPERATOR’S!MANUAL!!
+,-.!XY!!
CODE!
FAULT!
DISPLAY!
DESCRIPTION!
ADV.!FAULT!
CODE!
EXPLANATION!
SUGGESTIONS!FOR!RECOVERY!
YH!
D,3!)211!
)211!2E!E,3!
6235024!20!
2<.0,5723!
W!
+02_4.=!G75@!5@.!@.,5!173S!E,3>!!
'231;45!5@.!E,6520A>!!
/!
+02_4.=!G75@!5@.!735.03,4!E,3>!"@71!
266;01!234A!23!*7Z.!?!,3B!H!=2B.41>!$44!
25@.0!=2B.41!B71<4,A!,!E,3!.0020!
G,0373->!%25.!5@,5!5@71!71!4,6S!2E!E,3!
6235024g!12!5@.!E,3!6,3!_.!1<73373-!,3B!
5@71!E,;45!G744!15744!266;0>!"@71!6,3!
@,<<.3!7E!5@.!E,3!71!23!,3B!1@2;4B!325!
_.g!20!7E!5@.!E,3!E..B_,6S!17-3,41!,0.!
2_150;65.B!E02=!-.5573-!52!5@.!6235024!
_2,0B>!!
!
!
!
!
!
!
!
!
!
!
!
!
!
!
!
!
!
!
!
!
!
!
!
!
!
!
!
!
!
!
!
!
!
!
!
!
!
!
!
!
!

OPERATOR’S!MANUAL!!
+,-.!X?!!
EXPLODED VIEW AND PARTS LIST – TITAN XT
!
!
!
!
!
!
!
!
!
!
!
!
!
!
!
!
!
!
!
!
!
!
!
!
!
!
!
!
!
!
!
!
!
!
!
!
!
!
!
!
!
!
!
!
!
!
!
!
!
!
!
!
!

OPERATOR’S!MANUAL!!
+,-.!XH!!
!
!
!
!
!
!
!
!
!
!
!
!
!
!
!
!
!
!
!
!
!
!
!
!
!
!
!
!
!
!
!
!
!
!
!
!
!
!
!
!
!
!
!
!
!
!
!
!
!
!
!
!
!
!
!
ITEM
QTY
PART NUMBER
DESCRIPTION TITAN XT
!!!
!
1 1 110-0088-00
Vacuum Tube Assembly
2 1 100-0631-00
Cover 3 1
100-0625-00
Drive Train, Lower Plate
4
17
500-0013-00
Bearing
5 8 550-0022-00
Key 6 8
500-0254-00
Sprocket
7 8 500-0255-00
Bushing
8 7 100-0578-01
Drive, Short Shaft
9 1 550-0007-00
Key Stock
10 1 500-0248-00
Bushing
11 1 500-0252-00
Sprocket
12 1 100-0577-03
Drive, Long Shaft
13 1 500-0256-00
Sprocket
14 2 500-0006-00
Bearing
15 1 100-0628-00
Idler Shaft Spacer
16 1 100-0627-00
Offset Idler Shaft
17 1 520-0041-00
Belt
18 1 100-0626-00
Drive Train, Upper Plate
19 1 100-0585-01
Bearing Plate
20 8 100-0629-00
Drive Train Spacer
21 8 590-0120-00
Fastener
22 1 100-0651-00
Idler Wrench
23 1 590-0245-00
Fastener
24 3 590-0169-00
Fastener
25 1 008-0343-00
Weather Strip
26 1 590-0260-00
Fastener
27 1 590-0261-00
Lock Nut
28 9 590-0142-00
Lock Washer
29 1 100-0635-00
Belt Check Mounting Plate
30 9 590-0114-00
Fastener
31 8 590-0124-00
Fastener
32 4 540-0151-00
Vibration Dampener
33 1 540-0133-00
VFD
34 2 540-0156-00
Strain Relief
35 1 540-0072-00
Strain Relief
36 2 590-0047-00
Washers
37 1 540-0073-00
Strain Relief
38 1 540-0002-00
Mating Receptacle
39 1 540-0068-00
Strain Relief
40 1 540-0069-00
Strain Relief
41 1 540-0218-00
Conduit
42 1 540-0008-00
Cable
43 1 540-0268-00
Cable Retainer
44 1 540-0060-00
Plug
45 1 520-0042-00
Belt
46 1 530-0005-00
Motor
47 1 550-0021-00
Key Stock
48 1 500-0066-00
Bushing
49 1 500-0253-00
Sprocket
50 1 120-0002-02
Motor Shroud Assembly
51 7 590-0115-00
Fastener
52 1 130-0091-00
Handle
53 1 130-0093-00
Handle Assembly
54 1 540-0005-00
Start Button
55 1 540-0006-00
Stop Button
56 4 540-0179-00
Threaded Bumper
57 1 540-0117-00
Potentiometer
58 1 540-0116-00
Potentiometer
59 2 580-0122-00
Handle Grip
60 1 580-0089-00
T-Handle Assembly

OPERATOR’S!MANUAL!!
+,-.!XK!!
!
ITEM
QTY
PART NUMBER
DESCRPTION TITAN XT
61 1 540-0003-00
Cords
62 1 100-0188-01
Handle Junction Box
63 1 540-0144-00
Strain Relief
64 2 590-0232-00
Washer
65 1 590-0237-00
Fastener
66 1 130-0094-00
Handle Assembly
67 2 540-0240-00
Bumper
68 1 100-0650-00
Handle Protection Plate
69 1 580-0070-00
Quick Release Pin
70 2 580-0095-00
Wheel
71 2 590-0234-00
Washer
72 2 590-0263-00
Fastener
73 2 590-0192-00
Fastener
74 2 590-0159-00
Fastener
75 1 100-0454-01
Motor Mounting Plate
76 4 590-0134-00
Fastener
77
16
008-0208-00
Bumper
78 2 008-0154-00
Bumper
79
16
008-0189-00
Shear Pin Grommet
80
12
590-0128-00
Fastener
81 8 008-0363-01
Pad Driver
82 1 008-0357-00
Velcro Loop
83 1 008-0358-00
Dust Skirt
84 4 590-0009-00
Fastener
85 4 590-0063-00
Washer
86
48
580-0033-00
Magnet
87
48
590-0182-00
Fastener
88 8 008-0362-00
Plate
89
16
008-0142-03
Shear Pins
90
16
590-0019-00
Fastener
91 1 580-0104-00
Chain
92 8 008-0354-01
Pad Driver Plate Assembly
93 8 008-0361-00
Plate Assembly
!
!
!
!
!
!
!
!
!
!
!
!
!
!
!
!
!
!
!
!
!

OPERATOR’S!MANUAL!!
+,-.!XM!!
EXPLODED VIEW AND PARTS LIST – COLOSSOS XT
!
!
!
!
!
!
!
!
!
!
!
!
!
!
!
!
!
!
!
!
!
SCALE 0.06/1
1
2
COLOSSOS XT
(001-0068-00)
19
21
57
17
15
16
56
20
21
27
100
101
48
98
68
38
67
36
33
37
64
52
28
21
58
59
63
4
29
9
18
55
51
2
62
61
39
10
8
30
5
6
94
92
82
91
8
86
11
73571
70
77
72
76
33
50
87
96
75
77
89
88
95
69 81 74 808283
78
79
54
53
9
4
31
12
13
33534
17
45
41
44
22
49
47
93
97
8 10
46
84
85
99
43
102
60 25 26
103 8
6566
23
42
24
14
32
5
6
40
90

OPERATOR’S!MANUAL!!
+,-.!XP!!
ITEM
QTY
PART NUMBER
DESCRIPTION COLOSSOS XT
!!!
!
1 1 530-0007-01
Motor
2 1 500-0079-00
Bushing
3 1 540-0078-00
VFD
4 5 590-0144-00
Lock Washer
5
12
590-0142-00
Lock Washer
6 8 590-0124-00
Fastener
7 1 120-0003-02
Motor Shroud Assembly
8
10
590-0114-00
Fastener
9 8 590-0159-00
Fastener
10
13
590-0140-00
Fastener
11 2 590-0166-00
Fastener
12 4 590-0050-00
Lock Washer
13 4 590-0217-00
Fastener
14 8 100-0176-00
Drive Spacer
15 2 500-0197-00
Bearing
16 1 500-0247-00
Idler Sprocket
17 1 100-0609-02
Offset Idler Shaft
18 8 590-0120-00
Fastener
19 1 500-0267-00
Sprocket
20 7 500-0266-00
Sprocket
21
17
500-0013-00
Bearing
22 1 540-0069-00
Strain Relief
23 1 540-0073-00
Strain Relief
24 1 100-0120-01
Drive, Idler Shaft Spacer
25 1 500-0248-00
Bushing
26 1 550-0007-00
Key Stock
27 1 100-0573-01
Drive Train, Lower Plate
28 1 100-0572-01
Drive Train, Upper Plate
29 1 110-0072-01
Cover Assembly
30 1 100-0115-01
Belt Check Plate Cover
31 1 100-0137-03
Motor Mounting Plate
32 1 100-0216-03
Lifting Lug, Motor Mounting Plate
33
12
590-0128-00
Fastener
34 8 540-0152-00
Vibration Dampener
35 8 590-0133-00
Fastener
36
24
008-0154-00
Bumper
37
16
008-0143-03
Shear Pins
38
16
008-0189-00
Shear Pin Grommet
39 2 110-0073-00
Vacuum Tube Assembly
40 2 540-0156-00
Strain Relief
41 1 540-0002-00
Mating Receptacle
42 1 540-0072-00
Strain Relief
43 2 590-0047-00
Reducing Washer
44 1 540-0268-00
Strain Relief
45 1 540-0319-00
Cable
46 2 540-0268-00
Cable Retainer
47 1 540-0066-00
Plug
48 1 008-0319-00
Weather Strip
49 1 540-0266-00
Conduit
50 8 590-0115-00
Fastener
51 1 550-0009-00
Key Stock
52
16
590-0055-00
Fastener
53 1 008-0309-01
Dust Skirt
54 1 008-0320-00
Velcro Loop
55 1 590-0244-00
Fastener
56 1 100-0611-00
Idler Wrench
57 1 590-0193-00
Fastener
58 1 100-0585-01
Bearing Plate
59 3 590-0169-00
Fastener
60 1 500-0252-00
Sprocket
61 1 520-0042-00
Belt
!
!

OPERATOR’S!MANUAL!!
+,-.!XT!!
!
62 1 500-0253-00
Sprocket COLOSSOS XT
63 8 590-0258-00
Fastener
64 8 008-0360-00
Plate, Plug ‘N Go
65
48
580-0033-00
Magnet
66
48
590-0182-00
Fastener
67
16
008-0208-00
Bumper
68 8 008-0359-02
Pad Driver
69 1 580-0070-00
Quick Release Pin
70 2 580-0095-00
Wheel
71 2 500-0198-00
Bearing
72 2 590-0132-00
Fastener
73 4 590-0135-00
Fastener
74 2 590-0230-00
Flat Washer
75 1 590-0237-00
Fastener
76 2 590-0000-00
Flat Washer
77 4 590-0232-00
Washer
78 1 130-0071-02
Handle, Main Frame
79 2 130-0073-02
Handle, Extender Assembly
80 2 100-0555-01
Hitch
81 2 580-0098-00
Retaining Ring
82 4 540-0179-00
Threaded Bumper
83 2 590-0147-00
Flat Washer
84 2 540-0240-00
Bumper
85 2 130-0076-02
Handle Assembly
86 1 100-0226-02
Handle, Wheel Axle
87 1 100-0558-01
Protection Plate
88 1 540-0116-00
Potentiometer
89 1 540-0117-00
Potentiometer Knob
90 1 100-0215-01
Handle Cover Plate
91 1 540-0006-00
Stop Button, Red
92 1 540-0005-00
Start Button, Green
93 2 540-0003-00
Cord
94 2 580-0122-00
Handle Grip
95 1 540-0144-00
Strain Relief
96 2 590-0192-00
Fastener
97 1 580-0190-00
Quick Release Pin
98 1 520-0041-00
Belt
99 1 580-0104-00
Chain
100 8 008-0368-00
Plate Assembly
101 8 008-0367-00
Pad Driver Plate Assembly
102 8 008-0310-01
Compression Foam
103 1 540-0308-00
Grounding Wire Assembly
!
!
!
!
!
!
!
!
!
!
!
!
!
!
!
!
!
!
!

OPERATOR’S!MANUAL!!
+,-.!YW!!
!
GLOSSARY
!
This is the voltage of a power source when it has no load applied to it. It can also be called
“nominal voltage” as the voltage expressed is usually a guideline voltage.
This is the voltage of a power source when a load has been applied to it. As a load is applied to the
power source, the resistance of the line is easier to examine. When a voltage-measuring device
such as a multimeter is used during operation of the machine, you can clearly see that the voltage
drops as soon as a load is applied and rises back when the load is taken off.
Pigtails are plug ends with unfinished bare wire on one end used for hooking up to panels. Pigtails
are used when the source power is unknown, when connecting to the power grid of an unfinished
building that has no power receptacles, and when running certain generators. Many pigtails are
available or can be made up by an electrician.
Rear pivoting assembly.
Vinyl composition tile.
A variable frequency drive (VFD) is a system for controlling the rotational speed of an alternating
current electric motor by controlling the frequency of the electrical power supplied to the motor. A
variable frequency drive is a specific type of adjustable-speed drive. Variable frequency drives are
also known as adjustable-frequency drives (AFD), variable-speed drives (VSD), AC drives,
microdrives, or inverter drives. Because the voltage is varied along with frequency, these are
sometimes also called variable voltage variable frequency (VVVF) drives.
!
Line Voltage
Load Voltage
Pigtail
RPA
VCT
VFD

OPERATOR’S!MANUAL!!
+,-.!Y/!!
WARRANTY!INFORMATION!!
!
WerkMaster Grinders & Sanders Inc.,herein referred to as WerkMaster, warrants
that each new machine, manufactured by WerkMaster to be free from defects in
material and workmanship in normal use and service for a period of three (3)
years from date of shipment to the original Purchaser or Distributor.
WerkMaster will, at its option, repair or replace, at the WerkMaster factory or at a
point designated by WerkMaster, any part which shall appear to the satisfaction
of WerkMaster inspection to have been defective in material or workmanship.
WerkMaster reserves the right to modify, alter and improve any part or parts
without incurring any obligation to replace any part or parts previously sold
without such modified, altered or improved part or parts.
This warranty is in lieu of and excludes all other warranties, expressed, implied,
statutory, or otherwise created under applicable law including, but not limited to
the warranty of merchantability and the warranty of fitness for a particular
purpose. In no event shall the Seller or the Manufacturer of the product be liable
for special, incidental, or consequential damages, including loss of profits,
whether or not caused by or resulting from the negligence of Seller and/or the
Manufacturer of the product unless specifically provided herein.
In addition, this warranty shall not apply to any products or portions thereof
which, at WerkMaster’s discretion, have been subjected to abuse, misuse,
improper installation, maintenance, or operation, electrical failure or abnormal
conditions, and to products which have been tampered with, altered, modified,
repaired, reworked by anyone not approved by the Seller, or used in any manner
inconsistent with the provisions of the above or any instructions or specifications
provided with or for the product.
Except for conditions or warranties which may not be excluded by law, the Seller
makes no warranty of its own on any item warranted by WerkMaster, and makes
no warranty on other items unless it delivers to the Purchaser a separate written
warranty document specifically warranting the item. The Seller has no authority
to make any representation or promise on behalf of WerkMaster or to modify the
terms or limitations of this warranty in any way.
Seller shall use reasonable efforts to attempt to cause the Products to be
delivered as provided for in these Terms & Conditions. Delivery to the initial
common carrier shall constitute the delivery to the Purchaser. Seller’s
responsibility, in so far as transportation risks are concerned, ceases upon the
delivery of the Products in good condition to such carrier at the F.O.B. point and
all the Products shall be shipped at the Purchaser’s risk. Seller shall not be
responsible or liable for any loss of income and/or profits, or incidental, special,
consequential damages resulting from Seller’s delayed performance in shipment
and delivery.
Defective or failed material shall be held at the Purchaser’s premises until
authorization has been granted by Seller to return or dispose of Products.
Products that are to be returned for final inspection must be returned Freight
Prepaid in the most economical way. Credit will be issued for material found to
be defective upon Seller’s inspection based on prices at time of purchase.
Delivery, Damages,
Shortages
Return of Defective
Products
Terms & Conditions

OPERATOR’S!MANUAL!!
+,-.!YX!!
WARRANTY continued
!
!
Seller’s obligation hereunder are subject to, and Seller shall not be held
responsible for, any delay or failure to make delivery of all or any part of the
Product due to labor difficulties, fires, casualties, accidents, acts of the elements,
acts of God, transportation difficulties, delays by a common carrier, inability to
obtain Product, materials or components or qualified labor sufficient to timely
perform part of or all of the obligations contained in these terms and conditions,
governmental regulations or actions, strikes, damage to or destruction in whole
or part of manufacturing plant, riots, terrorist attacks or incidents, civil
commotions, warlike conditions, flood, tidal waves, typhoon, hurricane,
earthquake, lightning, explosion or any other causes, contingencies or
circumstances within CANADA not subject to the Seller’s control which prevent
or hinder the manufacture or delivery of the Products or make the fulfillment of
these terms and conditions impracticable. In the event of the occurrence of any
of the foregoing, at the option of Seller, Seller shall be excused from the
performance under these Terms and Conditions, or the performance of the Seller
shall be correspondingly extended. This document sets forth the terms and
conditions pursuant to which the purchaser(“Purchaser”) will purchase and
WerkMaster (“Seller”) will sell the products, accessories, attachments
(collectively “the Products”) ordered by the Purchaser. These terms and
conditions shall govern and apply to the sale of Seller’s Products to Purchaser,
regardless of any terms and conditions appearing on any purchase order or other
forms submitted by Purchaser to Seller, or the inconsistency of any terms therein
and herein.
!
!
!
!
!
To get the best protection from your WerkMaster Warranty be sure to register
your product(s) online at www.werkmaster.com/warranty.
!
!
!
! !
!
!
!
!
!
!
!
!
!
!
!
WerkMaster Grinders and Sanders Inc.
6932 Greenwood Street, Burnaby, BC V5A 1X8
tel: 604.629.8700 | toll free: 1.866.373.WERK | fax: 604.444.4231
www.werkmaster.com | email: info@werkmaster.com
! ! ! ! ! ! ! ! ! ! ! ! ! ! ! ! ! ! ! 1G=`WP`/M!
FORCE MAJEURE

OPERATOR’S!MANUAL!!
+,-.!YY!!
!
!
!
!
!
!
!
!
!
!
!
!
!
!
!
!
!
!
!
!
!
!
!
!
!
!
!
!
!
!
!
!
!
!
!
!
!
!
!
!
!
!
!
!
!
!
!
!
!
!
!
!
!
!
!
Operation and Safety Guide
TITAN XT TM
Vendor Website: www.werkmaster.com Technical Support: 866.373.9375
!
Tool Application: The TITAN XT
TM
can be used to grind and/or polish
various floor surfaces.
Fig 1 Fig 2 Fig 3
Tool Operation:
Step!
Action!
1!
Unplug the power cord from the twist lock plug (A). Ensure the handle
is in its full upright position (Fig 1). Tilt the machine back (Fig 3) by
releasing and stepping on the step down plate (J) and pulling down on
the handle. Choose the appropriate tooling holder attachment – 6 3/4”
magnetic Plug ‘N Go plate (B) for Metal Bond tools or 6 3/4”
Foam/Velcro Adapter plate for polishing resins. Insert the 2 shear pins
into the rubber grommets. Attach the corresponding tooling to the
plates.
2!
Slowly lift the equipment back to the upright position using the step
down plate (J) to prevent the TITAN XT from hitting the floor. Loosen
and lower the dust skirts (C) so that it is just above the working
surface. Ensure the 8 pin connector cord (K) is securely fastened to
the mating receptacle (L).
3!
Adjust the handle to a comfortable operating position by pulling and
releasing the pop pin at the swivel joint (E). Connect the vacuum
hose(s) to the vacuum pipes (G) located on either side. Plug the power
cord into the twist lock plug (A). The display/keypad (H) will light up.
Turn the speed control knob (D) till the display/keypad reads 450 RPM.
4!
Grasp the handle bars. To start the equipment press the green START
button (I). Adjust the speed (D) as required. To stop the equipment
press the red STOP button (F).
5!
When the equipment is in operation it should move smoothly and
without chattering. If chattering or excessive vibration occurs stop the
machine equipment, unplug the power cord, tilt the machine back and
check at all the Plug ‘N Go/Adapter plates are installed correctly and
the tooling is seated properly.
!
6!
Move the equipment continuously in any direction using a circular
motion. Be sure keep it moving at all times to prevent unwanted marks.
View training videos at
www.werkmaster.com.
SAFETY TOPICS:
Read the Operator’s Manual or the
Operation and Safety Guide and all
safety precautions before attempting to
operate WerkMaster machines. Failure
to follow the safety precautions could
result in severe personal injury or
death.
SAFETY CHECKLIST:
WARNING: ALWAYS turn off the
equipment and unplug the power cord
when changing discs/tooling, before
servicing, and when not in use.
1. Before connecting the equipment to a
power source make sure that it is the
correct voltage.
2. Ensure all cords on the equipment
are securely fastened and in good
repair.
3. Ensure all extension cords and power
outlets are rated for the intended use,
are in good repair, and are properly
grounded (3 prong configuration).
4. Never operate the equipment under
the influence of drugs or alcohol or
when extremely fatigued.
5. If the equipment doesn’t start or stops
unexpectedly, first check power
source and all electrical connections
then go to
www.werkmaster.com,
or
call Technical Support:
866.373.9375.
WARNING: Never turn on the
equipment while it is tilted back.
Discs/tooling attached to the bottom
could eject and become a lethal
projectile.
Wear appropriate personal safety
equipment such as hearing and eye
protection and a dust mask or respirator.
R!
$!
V!
)!
#!
D!
F!
m!
c!
I!
'!
9!

OPERATOR’S!MANUAL!!
+,-.!Y?!!
!
!
!
!
!
! ! ! ! ! !
!
!
!
!
!
% % % % % %
SAFETY TOPICS:
Read the Operator’s Manual or the
Operation and Safety Guide and all
safety precautions before attempting to
operate WerkMaster machines. Failure
to follow the safety precautions could
result in severe personal injury or
death.
SAFETY CHECKLIST:
WARNING: ALWAYS turn off the
equipment and unplug the power cord
when changing discs/tooling, before
servicing, and when not in use.
1. Before connecting the equipment to a
power source make sure that it is the
correct voltage.
2. Ensure all cords on the equipment
are securely fastened and in good
repair.
3. Ensure all extension cords and power
outlets are rated for the intended use,
are in good repair, and are properly
grounded (3 prong configuration).
4. Never operate the equipment under
the influence of drugs or alcohol or
when extremely fatigued.
5. If the equipment doesn’t start or stops
unexpectedly, first check power
source and all electrical connections
then go to
www.werkmaster.com,
or
call Technical Support:
866.373.9375.
WARNING: Never turn on the
equipment while it is tilted back.
Discs/tooling attached to the bottom
could eject and become a lethal
projectile.
Wear appropriate personal safety
equipment such as hearing and eye
protection and a dust mask or respirator.
Operation and Safety Guide
COLOSSOS XT TM
!
Vendor Website: www.werkmaster.com Technical Support: 866.373.9375
Tool Application:
The COLOSSOS XT TM can be used to grind and/or polish
various floor surfaces.
Fig 1 Fig 2 Fig 3
Tool Operation:
Step!
Action!
1!
Unplug the power cord from the twist lock plug (A). Ensure the
handle is in its full upright position (Fig.1). Tilt the equipment back
(Fig.3) by releasing and unfolding the step down plate (J). While
stepping on the step down plate pull down on the handle. Choose
the appropriate tooling holder attachment – 8” magnetic Plug ‘N Go
plate (B) for Metal bond tools or 8” Foam/Velcro Adapter plate for
polishing resins. Insert the 2 shear pins into the rubber grommets.
Then attach the corresponding tooling to the plates.
2!
Slowly lift the equipment back to the upright position using the step
down plate (J) to prevent the COLOSSOS XT from hitting the floor.
Loosen and lower the dust skirts (C) so that it is just above the
working surface. Ensure that the 8 pin connector cord (K) is
securely fastened to the mating receptacle (L).
3!
Adjust the handle to a comfortable operating position by pulling out
and re-inserting the release pin at the swivel joint (E). Connect the
vacuum hose(s) to the vacuum pipes (G) located on either side.
Plug the power cord into the twist lock plug (A). The display/keypad
(H) will light up. Turn the speed control knob (D) till the
display/keypad reads 450 RPM.
4!
Grasp the handle bars. To start the equipment press the green
start button (I). Adjust the speed (D) as required. To stop the
equipment press the red stop button (F)
5!
When the equipment is in operation it should move smoothly and
without chattering. If chattering or excessive vibration occurs stop
the machine, unplug the power cord, tilt the machine back and
verify that all the Plug ‘N Go/Adaptor plates are installed correctly
and the tooling is seated properly.
!
6!
Move the equipment continuously in any direction using a circular
motion. Be sure keep it moving at all times to prevent unwanted
marks. View training videos at
www.werkmaster.com.
9!
c!
I!
'!
D!
F!
V!
#!
m
$!
)!
R!
 Loading...