

Page 1
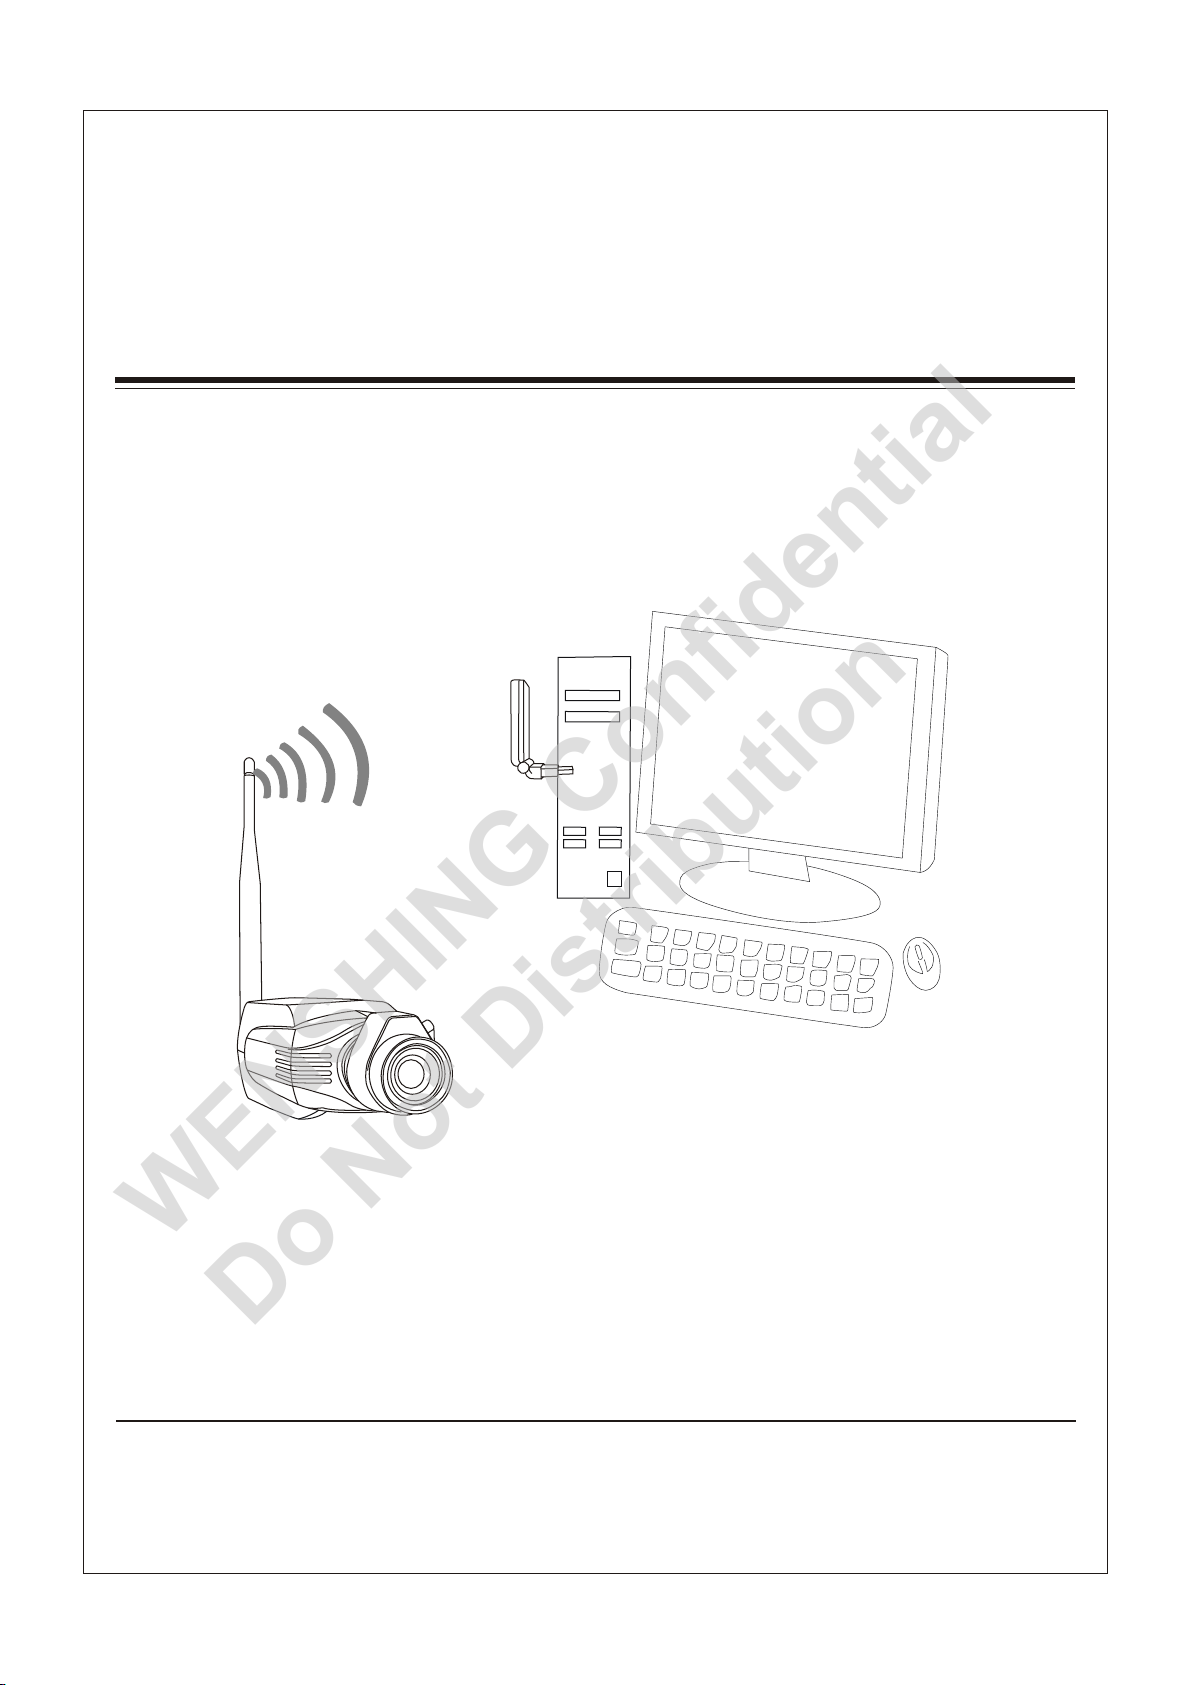
Wireless Digital CCD CameraWireless Digital CCD Camera
WENSHING Confidential
Do Not Distribution
Wireless Digital USB ReceiverWireless Digital USB Receiver
2.4GHz GFSK Hopping
Model:WS-CQE-CCD(Wireless Digital CCD Camera)
Model:WS-VIDEO-USB(Wireless Digital USB Receiver)
Page 2
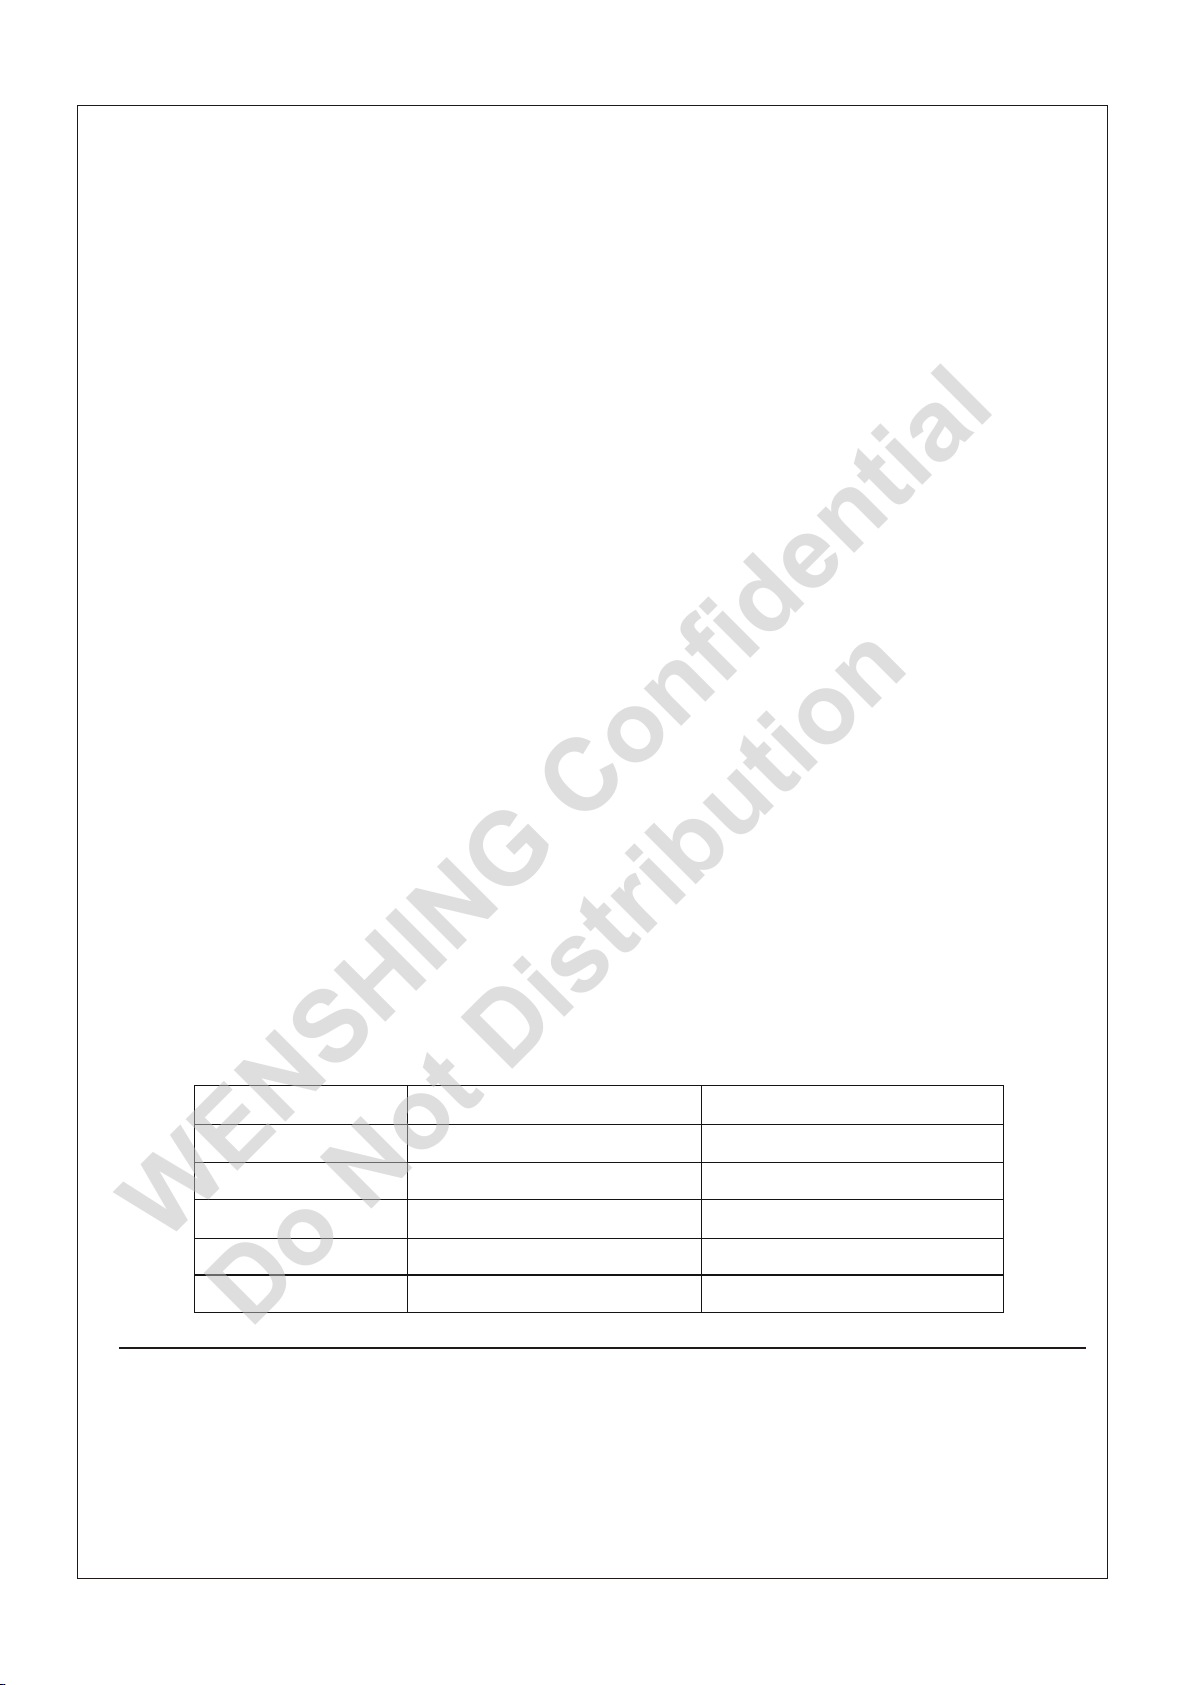
Vision HistoryVision History
WENSHING Confidential
Do Not Distribution
VersionVersion
V1.01
V1.01
V1.01
V1.01
V2.01
DateDate ChangesChanges
Nov.01,2010
Dec.15,2010
Jan.17,2011
Feb.11,2011
Aug.17,2011
1 Edition
2 Edition
3 Edition
4 Edition
5 Edition
st
st
st
st
st
Page 3
ContentContent
WENSHING Confidential
Do Not Distribution
Important Event
Important Event
Declaration
Warranty
Definition of Parts
Definition of Parts
Wireless Digital CCD Camera
Wireless Digital USB Receiver
Specification
Specification
Wireless Digital CCD Camera
Wireless Digital USB Receiver
RF Spec
Operating Environment
Dimension Diagram
Dimension Diagram
Wireless Digital CCD Camera
Wireless Digital USB Receiver
Manipulating the Wireless Digital CCD Camera
Manipulating the Wireless Digital CCD Camera
1
1
2
2
3
3
3
3
4
5
Turn On
Pair
Recharge
Wireless Digital CCD Camera and Wireless Digital USB Receiver
Wireless Digital CCD Camera and Wireless Digital USB Receiver
Install
Setup
Pair
Application
Internet Surveillance
Abnormal Test
FCC Consistent Declaration(U.S.A. Only)
FCC Consistent Declaration(U.S.A. Only)
Administrative Regulations on Low Power Radio Waves Radiated Devices
Administrative Regulations on Low Power Radio Waves Radiated Devices
6
6
6
7
9
19
21
25
26
28
28
Page 4
Important EventImportant Event
WENSHING Confidential
Do Not Distribution
1、This product is in general use for the equipment on the premise of the development, design,
manufacture. Do not use that require high security purposes, such as machinery or medical, aviation
equipment, machinery and transport-related deaths are directly or indirectly related to the system.
2、This product should be in this brochure by the instructions of the types and rated voltage power
under the current proper use. If violation of this statement by the safety records of the supply
operation, I am afraid our company cannot afford any of the responsibility.
3、Do not self-decomposition, alteration, repair of the products also will cause fire, electric shock, fault,
and dangerous. In addition, their decomposition, alteration, repair the product, failure is not within the
scope of warranty.
4、The products are not waterproof, so please do not use and touch water. Take off and on also please
note. Rain, spray, drinks, steam, sweat may be a failure.
5、Use of this product, please be sure to use according to the statement recorded by the use of methods
to operate. Please do not violate particular attention to the matter reminded to use.
6、Please res pect this statement recor ded by the note. When cons umers in contravention of t his
statemen t recorded note of the operat ion, I am afraid our compa ny could not shoulder any
responsi bility.
P.1
7、Products a re defective, the Company w ill be responsible for f ree to amend the flaws, or to the
same flawl ess product or its equiv alent products in exchang e. However, the Company d oes not
assume bas ed on the requirements o f the flaw and loss responsib ility.
8、The Compan y reserves the right to retai n without notice to user s of the cases, the product of
hardware / s oftware (version upg rade) is with the right to edit .
Declaration This product provides different frequency for user selection to meet different
Declaration
telecommunication regulation and FCC/NCC on different countries.
Warranty The warranty time is within one year from purchased date. The warranty scope are used in
Warranty
normal situation and none vandalism. (Some function harmful out of warranty scope and
Vandalism are Un-warranty).
Un-warra nty Scope Descriptio n
Un-warra nty Scope Descriptio n
1、Because the natural disaster, accident or human factor to cause the bad damage.
2、Violate the product instruction manual to cause the damage of the products.
3、The improper assemble causes damage.
4、The products used the unsanctioned accessory to cause damaged.
5、Overstep the allowed used environment to cause the products damaged.
Contact Us
Contact Us
WENSHING ELECTRONICS CO., LTD.
No.82, Chong De St. 11054 Shin Yi Dist., Taipei, Taiwan
Tel: +886-2-27353055
Fax: +886-2-27328813
Page 5
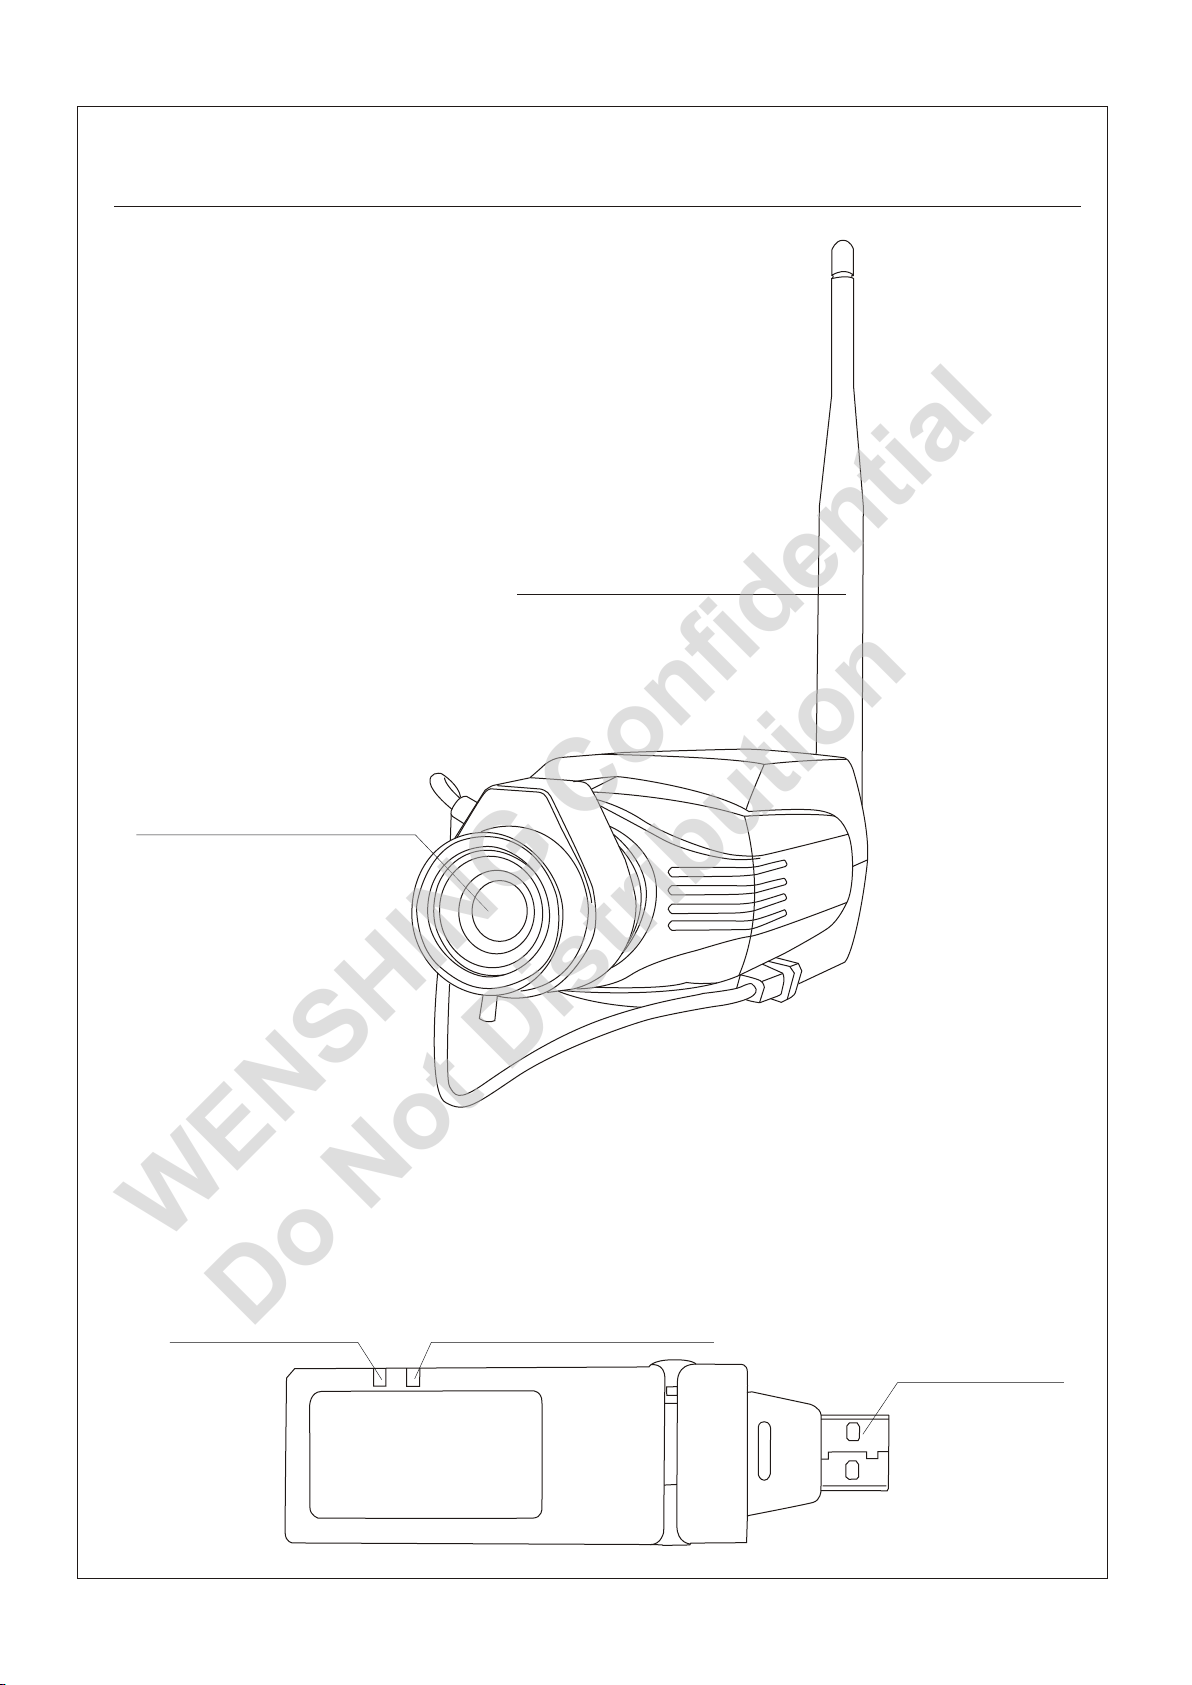
Definition of PartsDefinition of Parts
WENSHING Confidential
Do Not Distribution
●Wireless Digital CCD Camera●Wireless Digital CCD Camera
Wireless Antenna
P.2
Lens & Focus Ring
●Wireless Digital USB Receiver●Wireless Digital USB Receiver
Power Indicator
Connecting Indicator
Interface
Page 6
SpecificationSpecification
WENSHING Confidential
Do Not Distribution
●Wireless Digital CCD Camera●Wireless Digital CCD Camera
Dimension: 140mm(L) * 68mm(W) * 60mm(H)
Weight: 520g(Lens/Battery/Antenna included)
Sensor:1/3”CCD sensor
Lens: Manual DC 3.5~8mm Varifocal Auto Iris Lens, F1.4
Omni directional Microphone
Battery: Built in 3000mA Li-ion battery
Operation period: 1 hour
Power supply: B Type Mini USB DV 5V/1A
●Wireless Digital USB Receiver●Wireless Digital USB Receiver
P.3
Dimensions: 106mm(L) * 28.1mm(W) * 10.9mm(H)
Weight: 22.6g
Support system: Microsoft Windows 2000/XP/Vista/WIN7
Resolution:
4-split screen: 5~8 frames at 320x240(QVGA)
Single screen: 10~16 frames at 640x480(VGA)
●RF Spec●RF Spec
Frequency:ISM 2400~2483MHz hopping
Transmission Power:100mW (20dBm)
Modulation Mode:GFSK
●Operating Environment●Operating Environment
Operating Temperature:0℃~+50℃
Memorizing Temperature:-10℃~+60℃
●Certification●Certification
FCC Wireless Digital USB Receiver:OYQWSVIDEOUSB
NCC Wireless Digital USB Receiver:CCAB10LP5660T5
Page 7
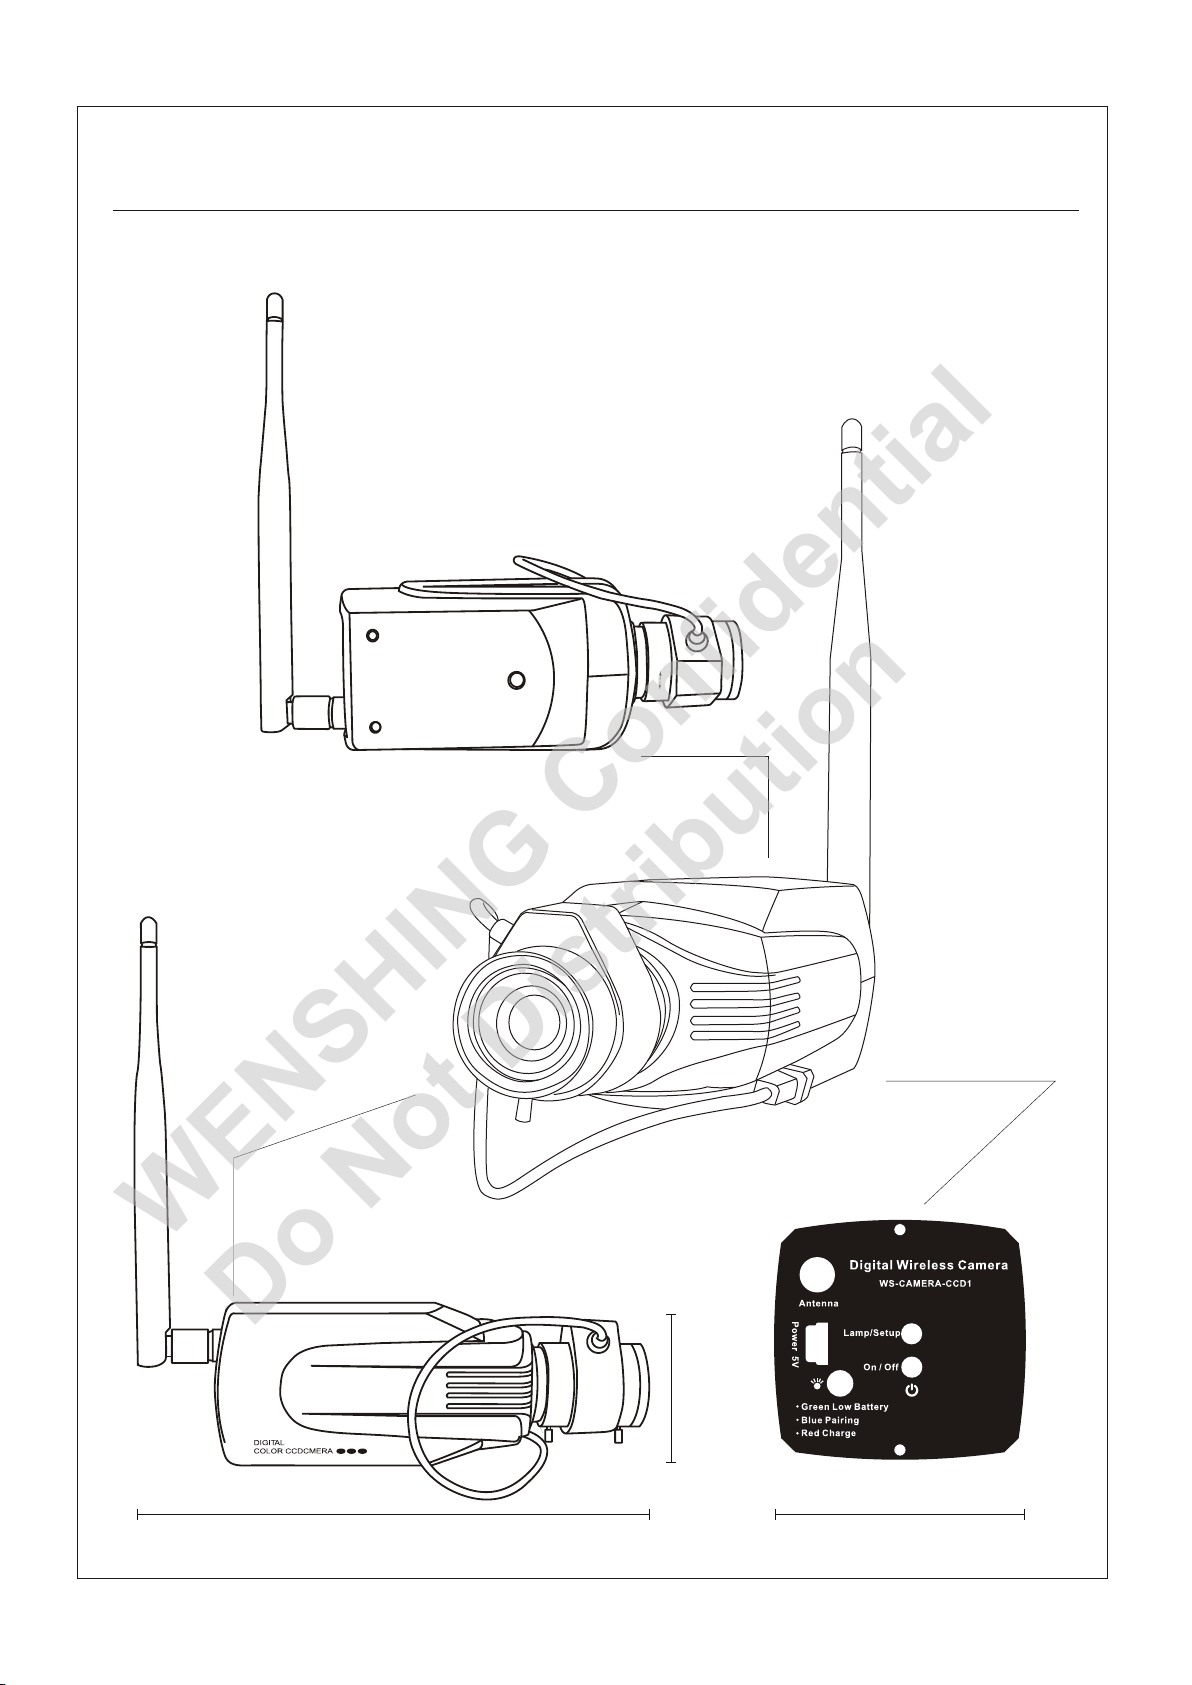
Dimension DiagramDimension Diagram
WENSHING Confidential
Do Not Distribution
●Wireless Digital CCD Camera●Wireless Digital CCD Camera
P.4
W
T
Top View
Bottom View
Side View
60mm
140mm
68mm
Page 8
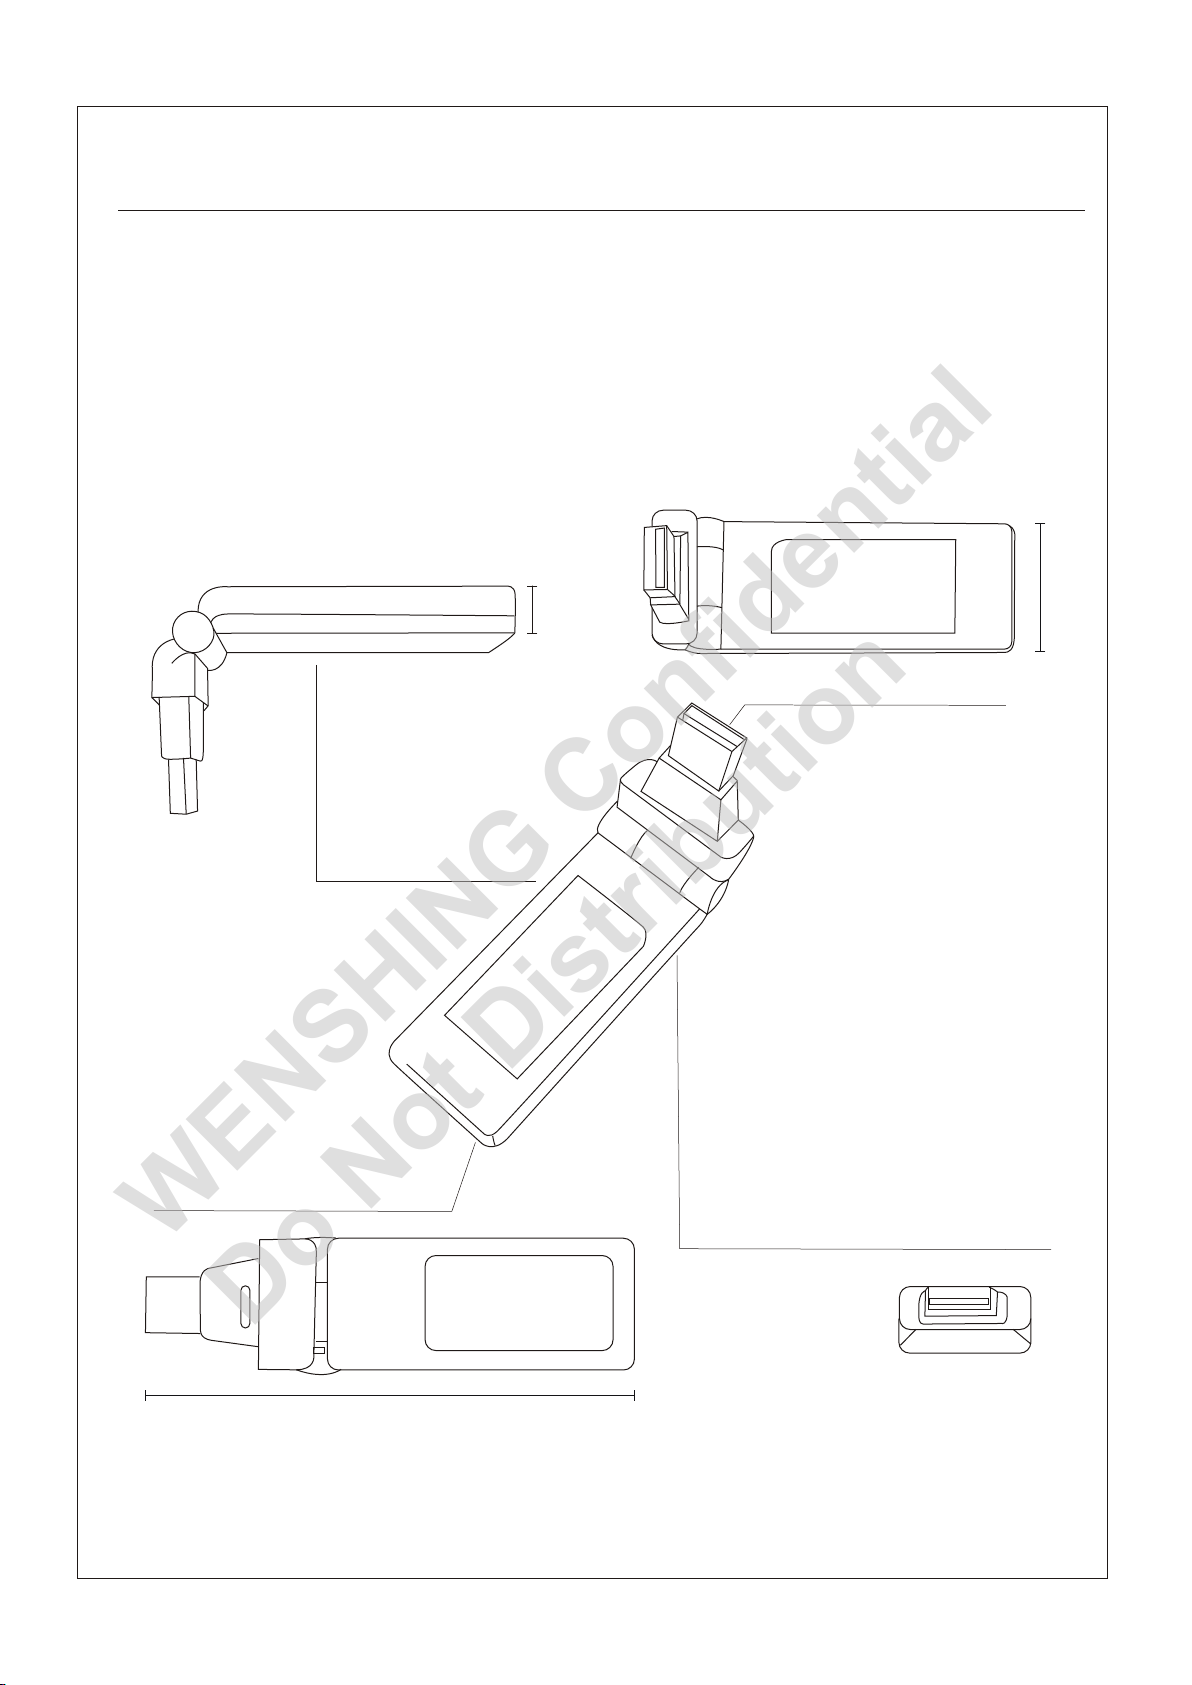
Dimension DiagramDimension Diagram
WENSHING Confidential
Do Not Distribution
●Wireless Digital USB Receiver●Wireless Digital USB Receiver
P.5
28.1mm
10.9mm
BOTTOM VIEW
SIDE VIEW
TOP VIEW
SIDE VIEW
106mm
Page 9
Manipulating the Wireless Digital CCD CameraManipulating the Wireless Digital CCD Camera
WENSHING Confidential
Do Not Distribution
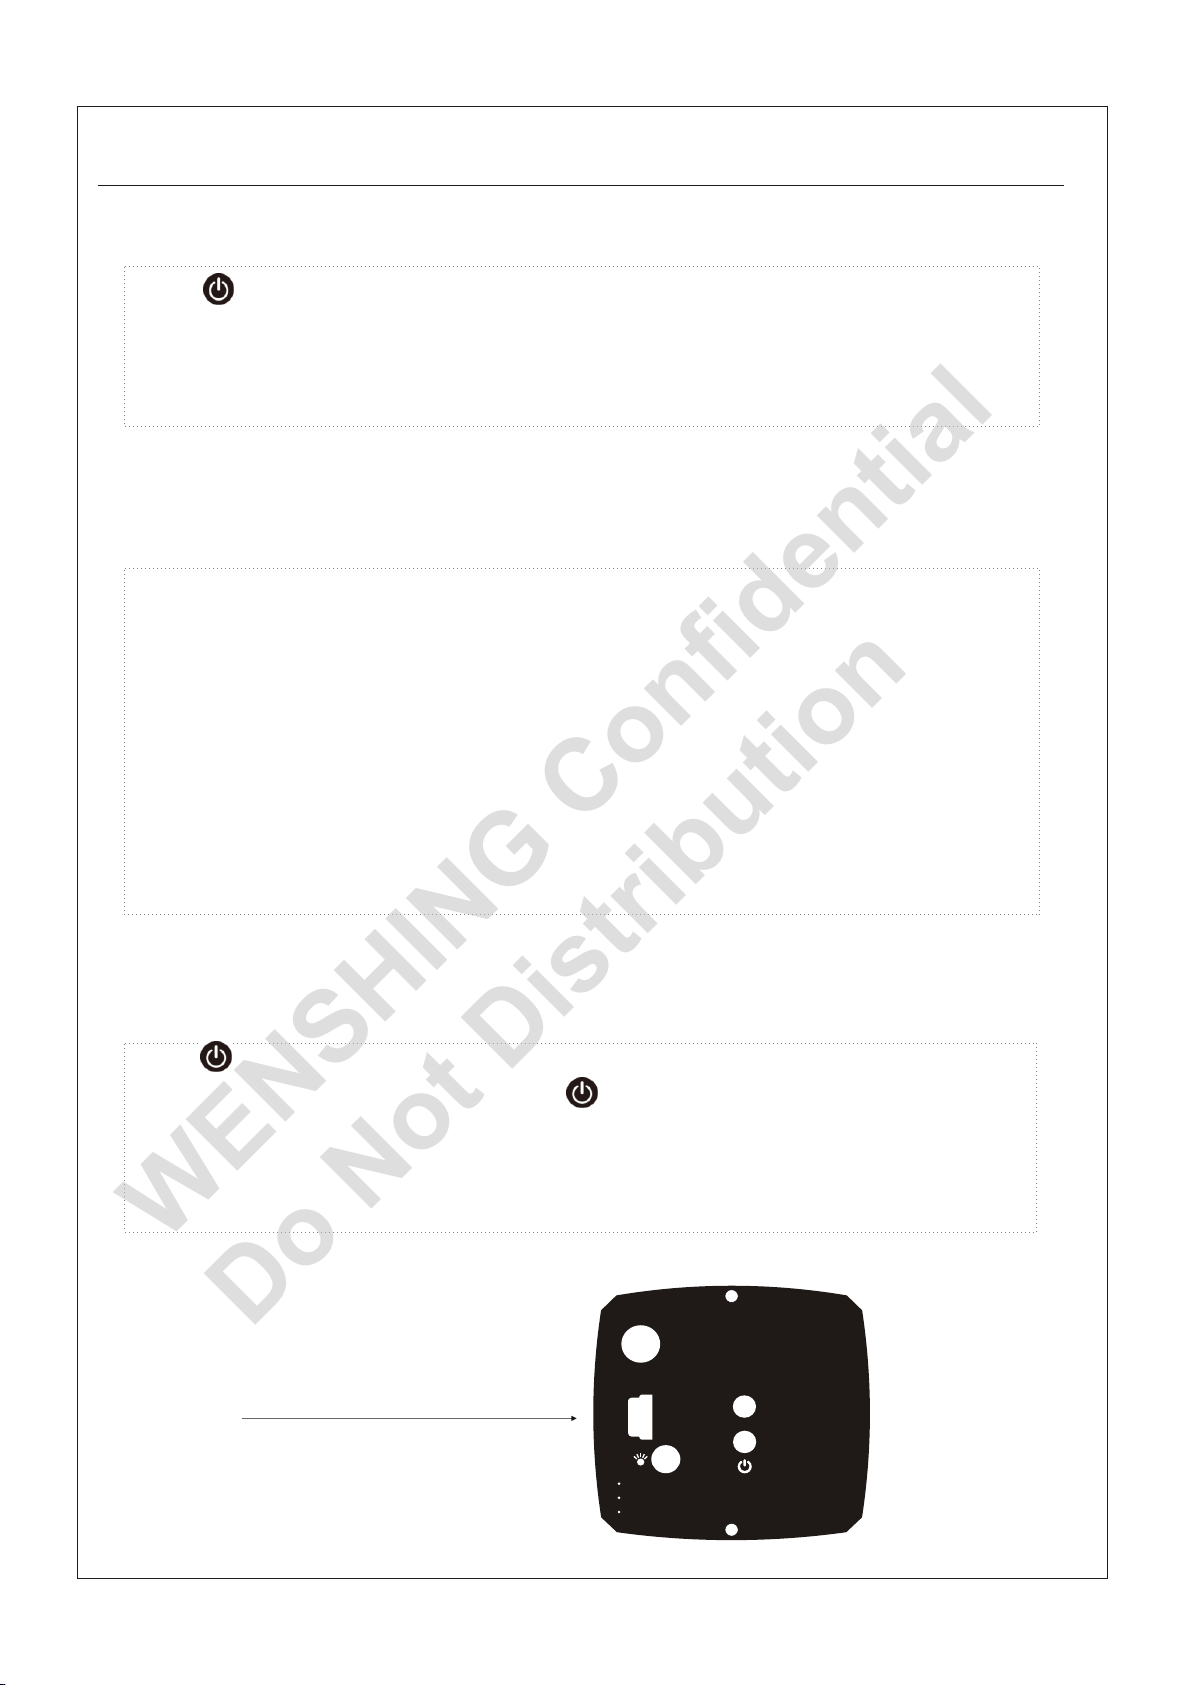
●Turn On●Turn On
Press to turn on the device, after successfully connected with the “Wireless
Digital USB Receiver” (Hereinafter called USB Receiver), Lamp/Setup will then
turn into blue. Once failed to connect or beyond the received range, Lamp/Setup
flashes once 2 seconds. As below fig (Fig 1)
●Pair●Pair
While the “Wireless Digital Security Camera” (Hereinafter called Camera) is
under the standby mode, press Lamp/Setup and last for 4 seconds, Lamp/Setup
will then continuously flash in blue. Meanwhile, click the pairing button on the PC
screen to process pairing. After Camera was successfully paired with USB
Receiver, Lamp/Setup will steadily keep in blue, and images from that camera
will be displayed simultaneously on the pc screen. Once Camera was failed to be
paired with USB Receiver, Lamp/Setup flashes once 2 seconds. Users may
follow the described steps to make pairs again. As below fig (Fig 1)
P.6
●Recharge●Recharge
While turns into yellow, it means the Camera is running out of battery. Users
may now plug in the USB charger, and will turn into red during recharging.
The Camera should be recharged for 3 hours before first-time used, and should
be recharged for 1 hour when the battery is low.
Digital W ir el es s Ca mera
WS- CAMER A-CCD 1
Ant enna
Plug in the USB charger here.
Pow er 5V
Lam p/Set up
Gre en Low Ba ttery
Blu e Pairi ng
Red C harge
On / Of f
Page 10
Pairing/Operation Method of Wireless Digital CCD Camera and Wireless Digital
WENSHING Confidential
Do Not Distribution
Pairing/Operation Method of Wireless Digital CCD Camera and Wireless Digital
USB Receiver
USB Receiver
●Install●Install
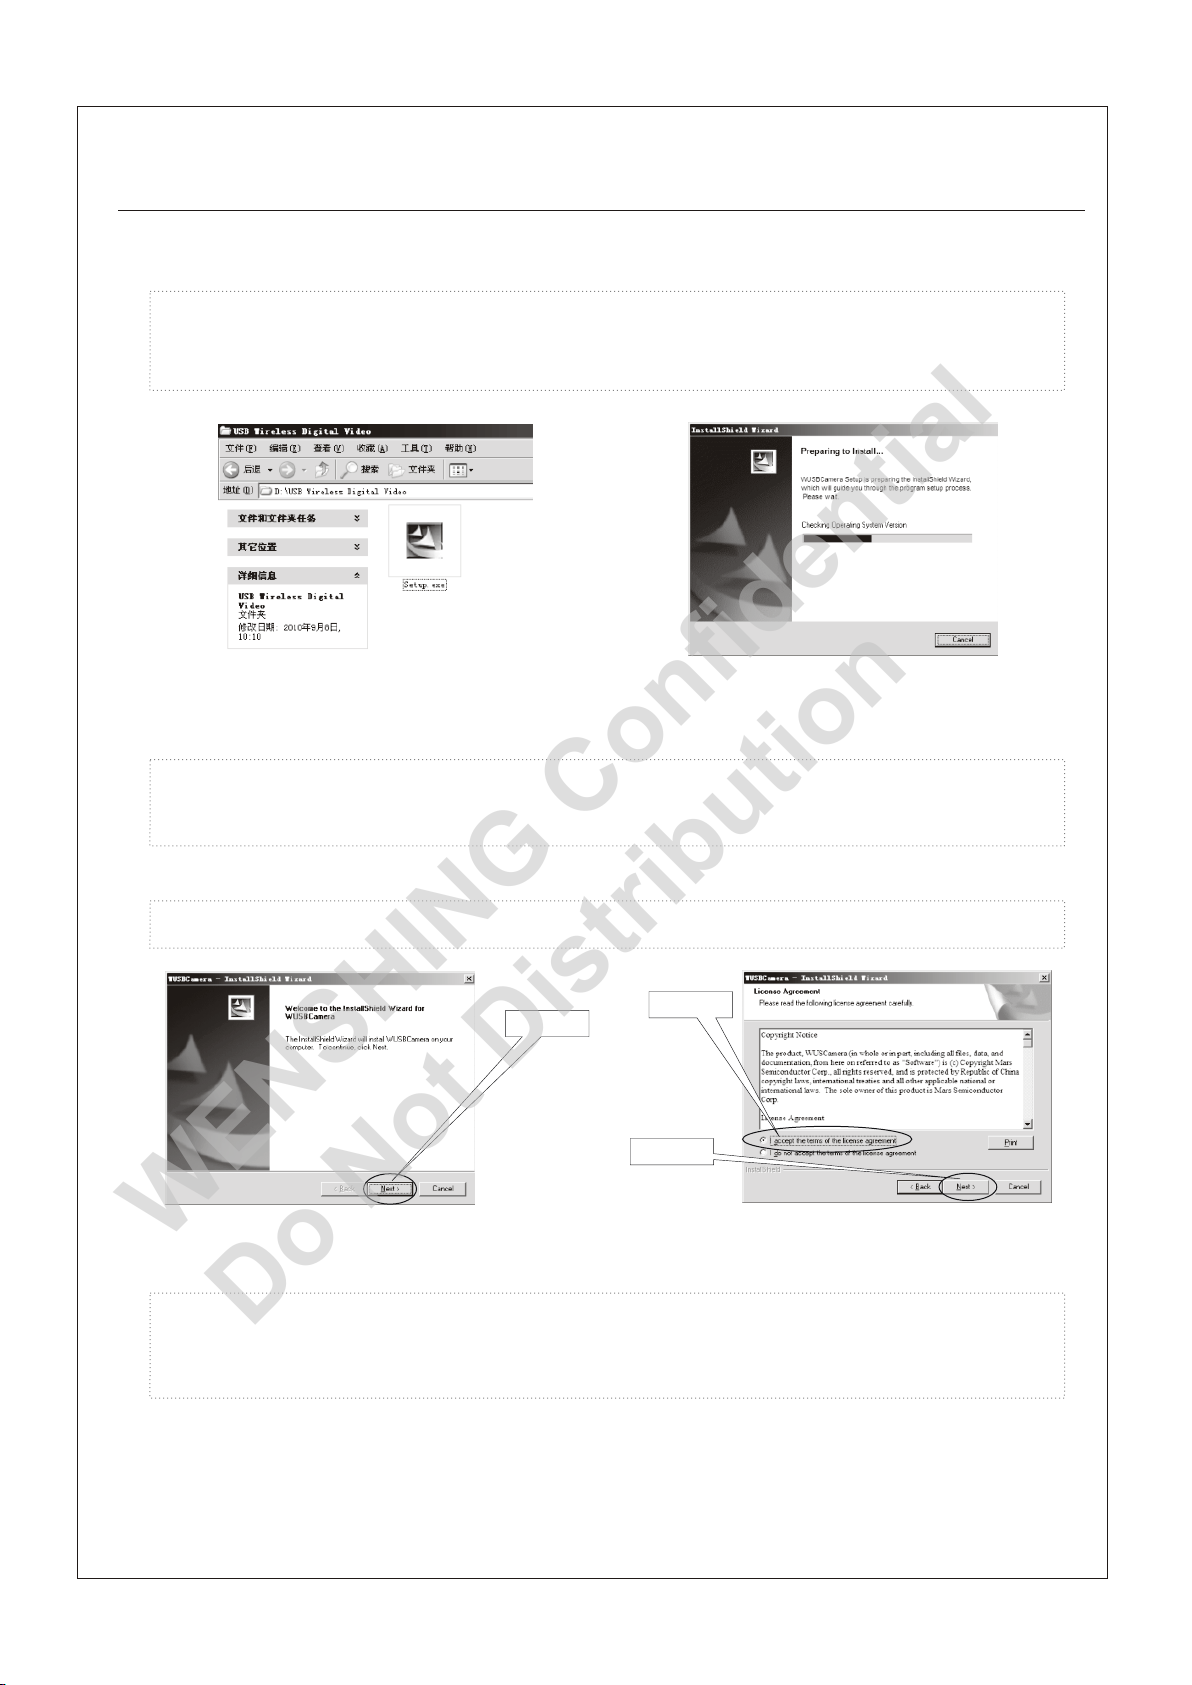
1.1 Open the “USB Wireless Digital Video” folder. As below fig (Fig 1.1)
P.7
(Fig 1.1)
1.2 Click Setup.exe to process installing procedure. As above (fig. 1.2).
1.3 Click “Next”. As below fig (Fig 1.3)
Select
Next
Next
(Fig 1.3)
(Fig 1.2)
(Fig 1.4)
1.4 Choose “I accept the terms of the license agreement”, and click “Next”. As
above fig (Fig 1.4)
Page 11
Pairing/Operation Method of Wireless Digital CCD Camera and Wireless Digital
WENSHING Confidential
Do Not Distribution
Pairing/Operation Method of Wireless Digital CCD Camera and Wireless Digital
USB Receiver
USB Receiver
P.8
Next
(Fig 1.5) (Fig 1.6)
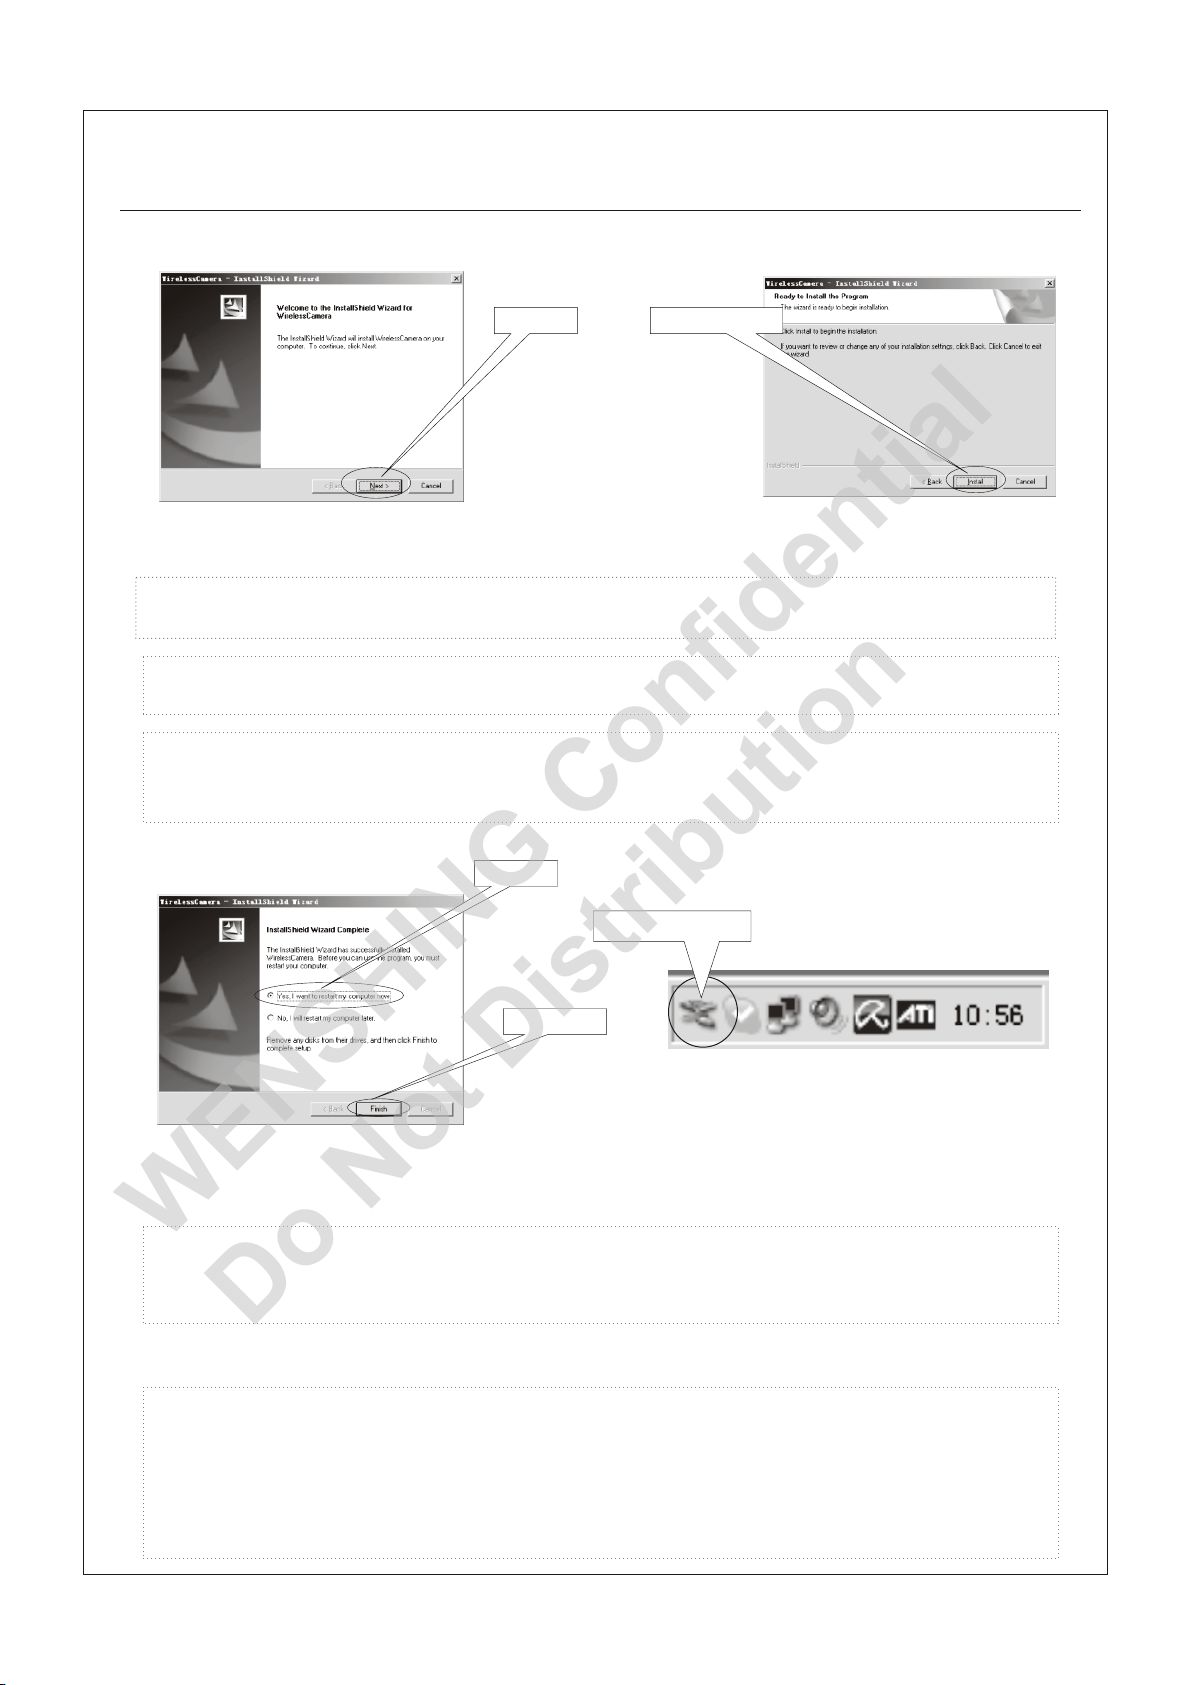
1.5 Click “Next”. As above fig (Fig 1.5)
1.6 Click “Install”. As above fig (Fig 1.6)
1.7 Choose “Yes, I want to restart my computer now.” click “Finish”, and restart
the computer. As below fig (Fig 1.7)
Select
Install
USB Receiver
Finish
(Fig 1.7)
1.8 Plug in “USB Receiver”, the icon, which is circled, will appear on the lower
right side of the desktop. As above fig (Fig 1.8)
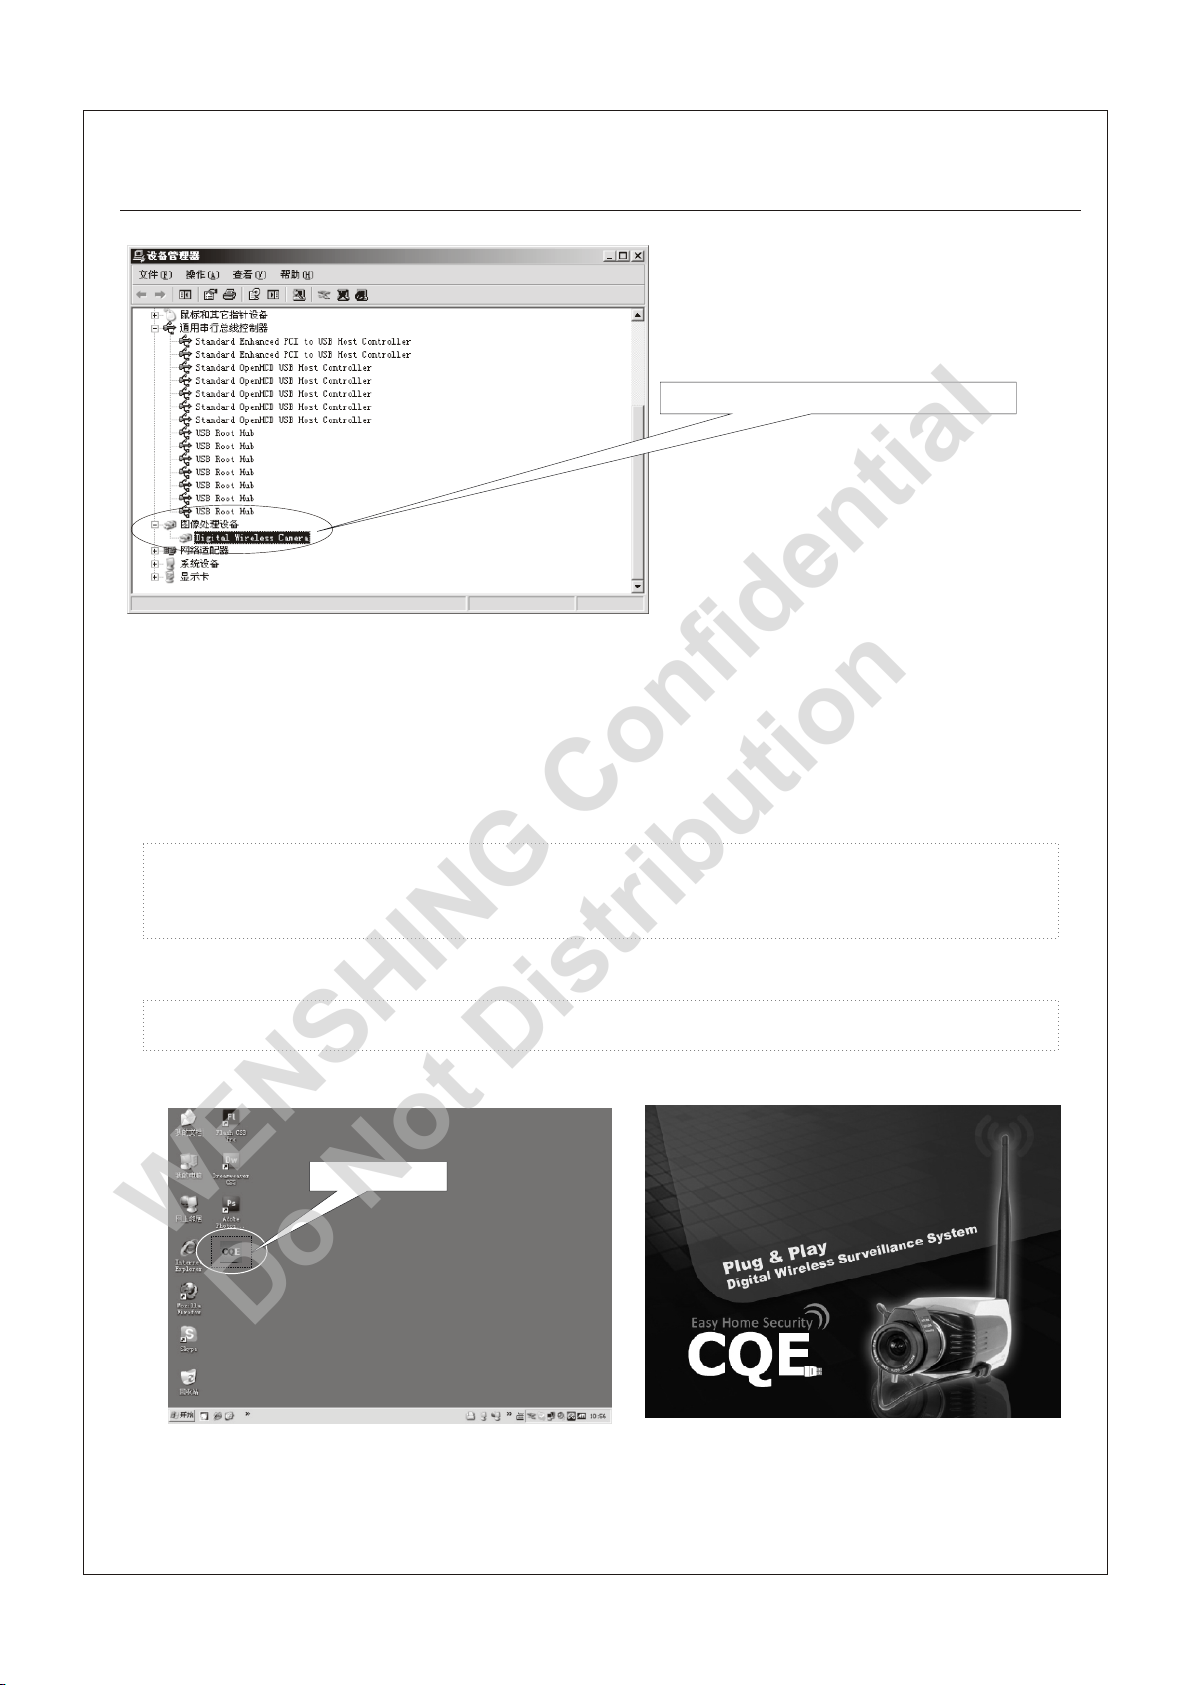
1.9 Open up the Task Manager, as long as the “Digital Wireless Camera” as
circled shows up, it means this “Wireless Digital USB Receiver” has
successfully connected to the computer. As below fig (Fig 1.9)
(Fig 1.8)
Page 12
Pairing/Operation Method of Wireless Digital CCD Camera and Wireless Digital
WENSHING Confidential
Do Not Distribution
Pairing/Operation Method of Wireless Digital CCD Camera and Wireless Digital
USB Receiver
USB Receiver
Digital Wireless Camera
(Fig 1.9)
P.9
●Set up●Set up
2.1 Click the “CQE” shortcut to start up the software. As below fig (Fig 2.1)
2.2 Download the program. As below fig (Fig 2.2)
CQE
(Fig 2.1)
(Fig 2.2)
Page 13
Pairing/Operation Method of Wireless Digital CCD Camera and Wireless Digital
WENSHING Confidential
Do Not Distribution
Pairing/Operation Method of Wireless Digital CCD Camera and Wireless Digital
USB Receiver
USB Receiver
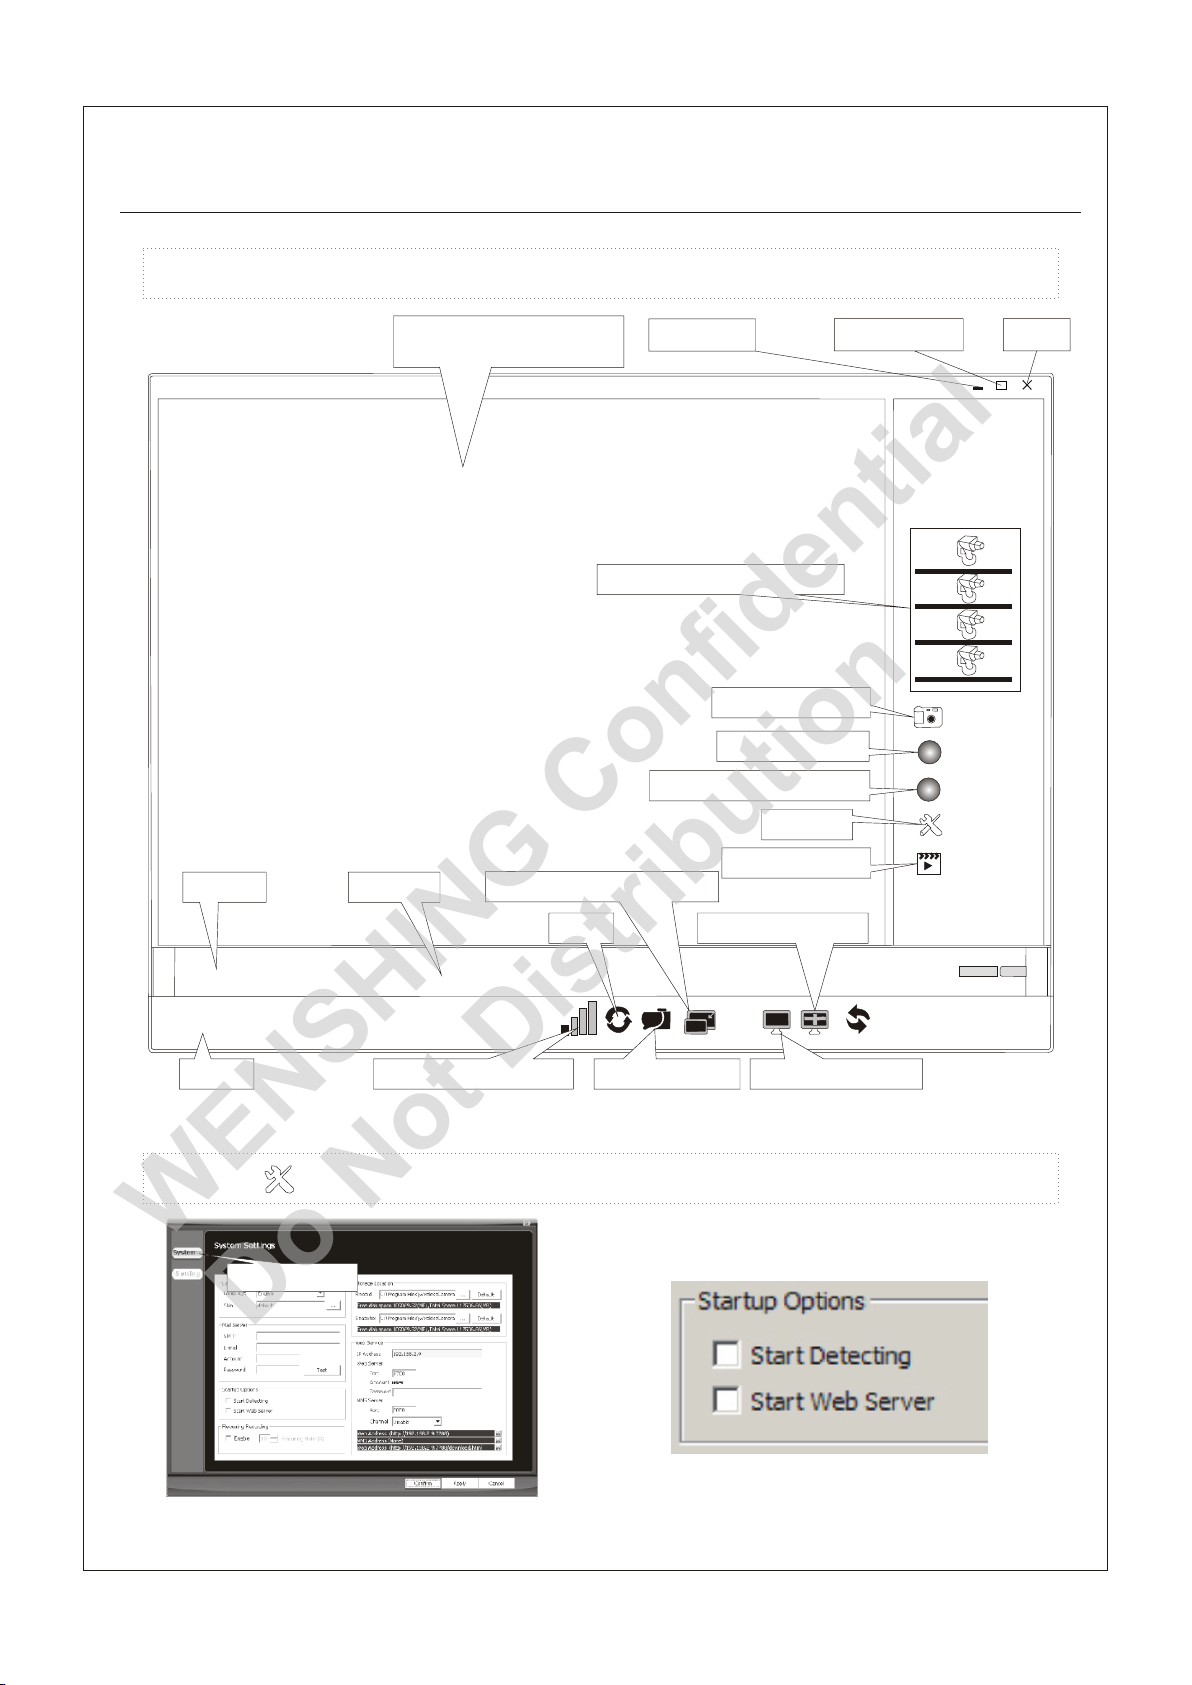
2.3 Enter into the surveillance system. As below fig (Fig 2.3)
P.10
Date
Image Display
Time
Minimized
Camera 1~4 switch
Web server
Image size switch
Snapshot
Detect
Setup
Playback
Adjustment
1
2
3
4
Close
Snap sh ot
Dete ct
Web Server
Setu p
Play ba ck
2011-01 -05
Stamd by
192.1 68 .2.9
IP
16:35:21
Signal Intensity
Pair
Open Folders
4-split screen
Full screen
(Fig 2.3)
2.4 Click to enter into System Settings. As below fig (Fig 2.4)
Setup
System
(Fig 2.4)
(Fig 2.5)
Page 14
Pairing/Operation Method of Wireless Digital CCD Camera and Wireless Digital
WENSHING Confidential
Do Not Distribution
Pairing/Operation Method of Wireless Digital CCD Camera and Wireless Digital
USB Receiver
USB Receiver
2.5 Start up Options. As above fig (Fig 2.5)
Check “Start Detecting” to start up the detecting function.
Check “Start Web Server” to start up the Web server function.
When the “Detect” and “Web Server” on step 2.3 were been chosen,
“Setup” is not able to be clicked and modify its content. “Setup” will be
able to be
Clicked until “Detect” and “Web Server” were not been chosen.
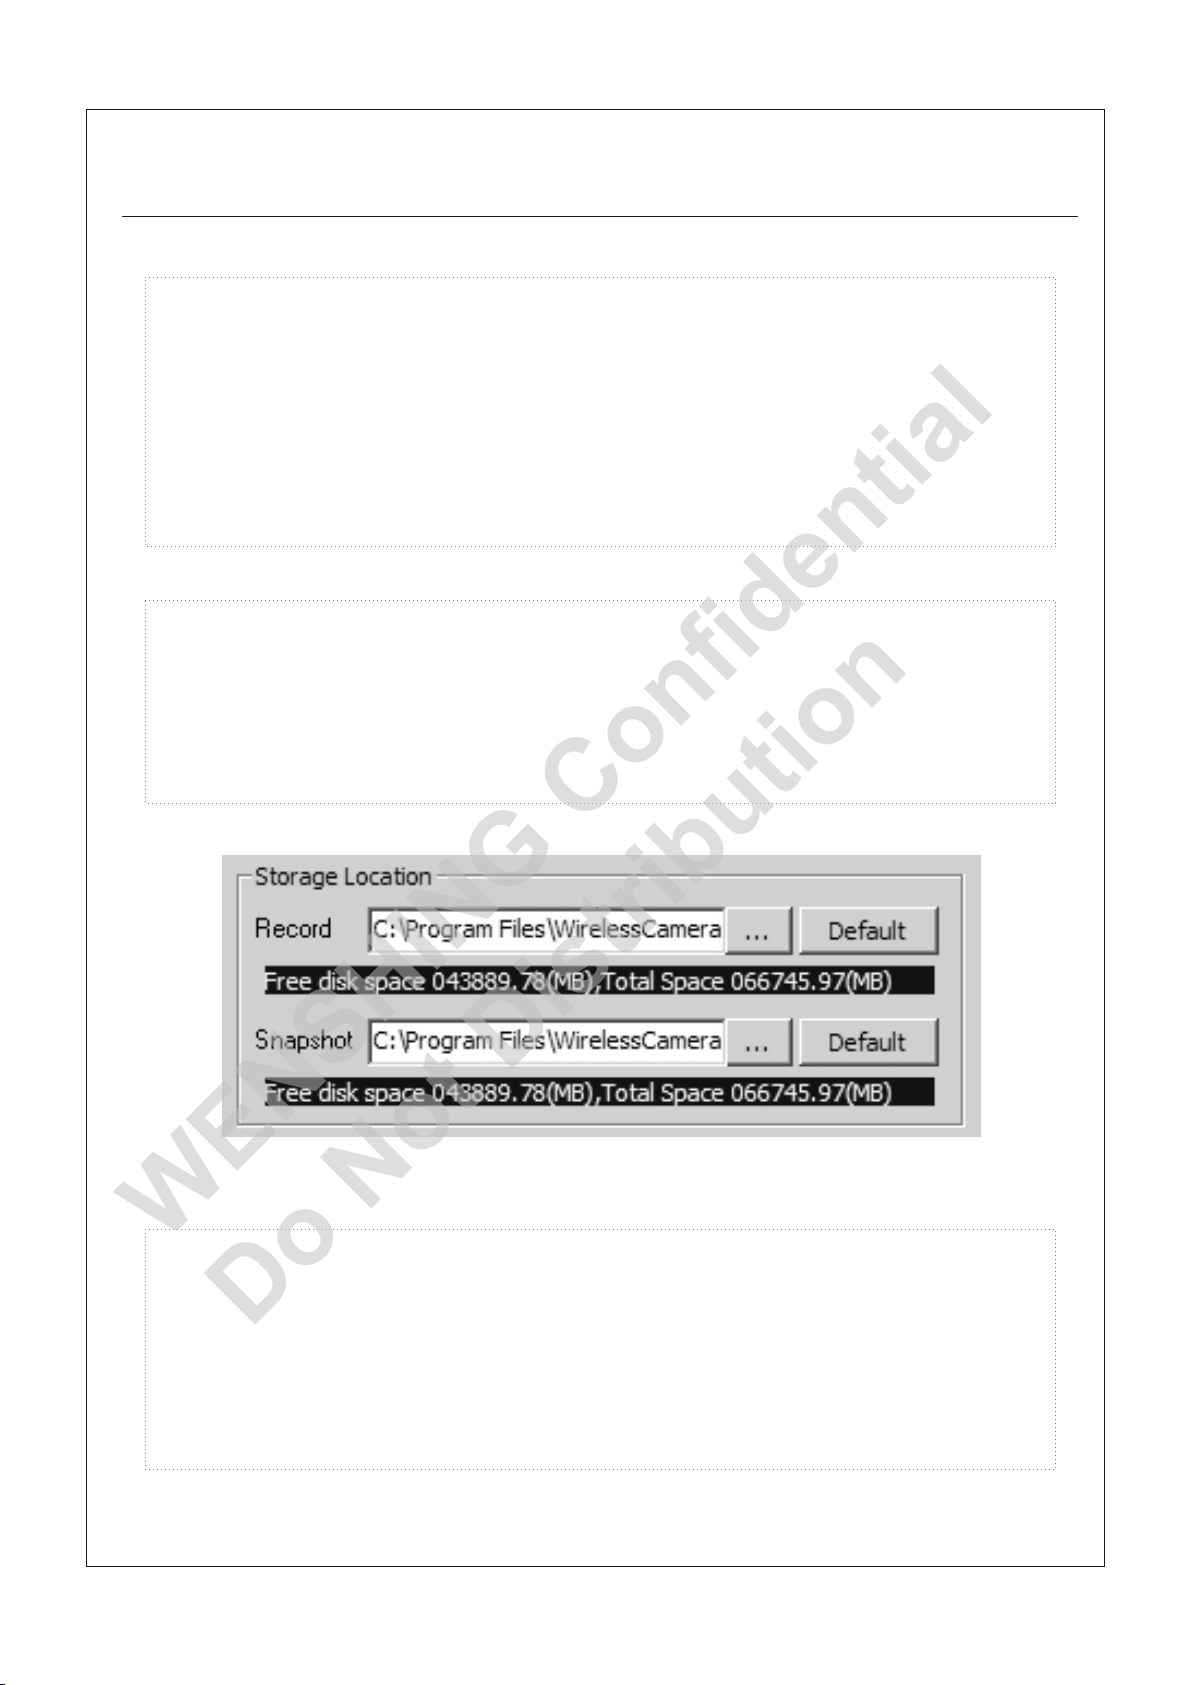
2.6 Storage Location. As below fig (Fig 2.6)
Record: choose location to store videos
Snapshot: choose location to store pictures
Click “…” to set up a new file.
Click “Default” to store files in default folder.
P.11
(Fig 2.6)
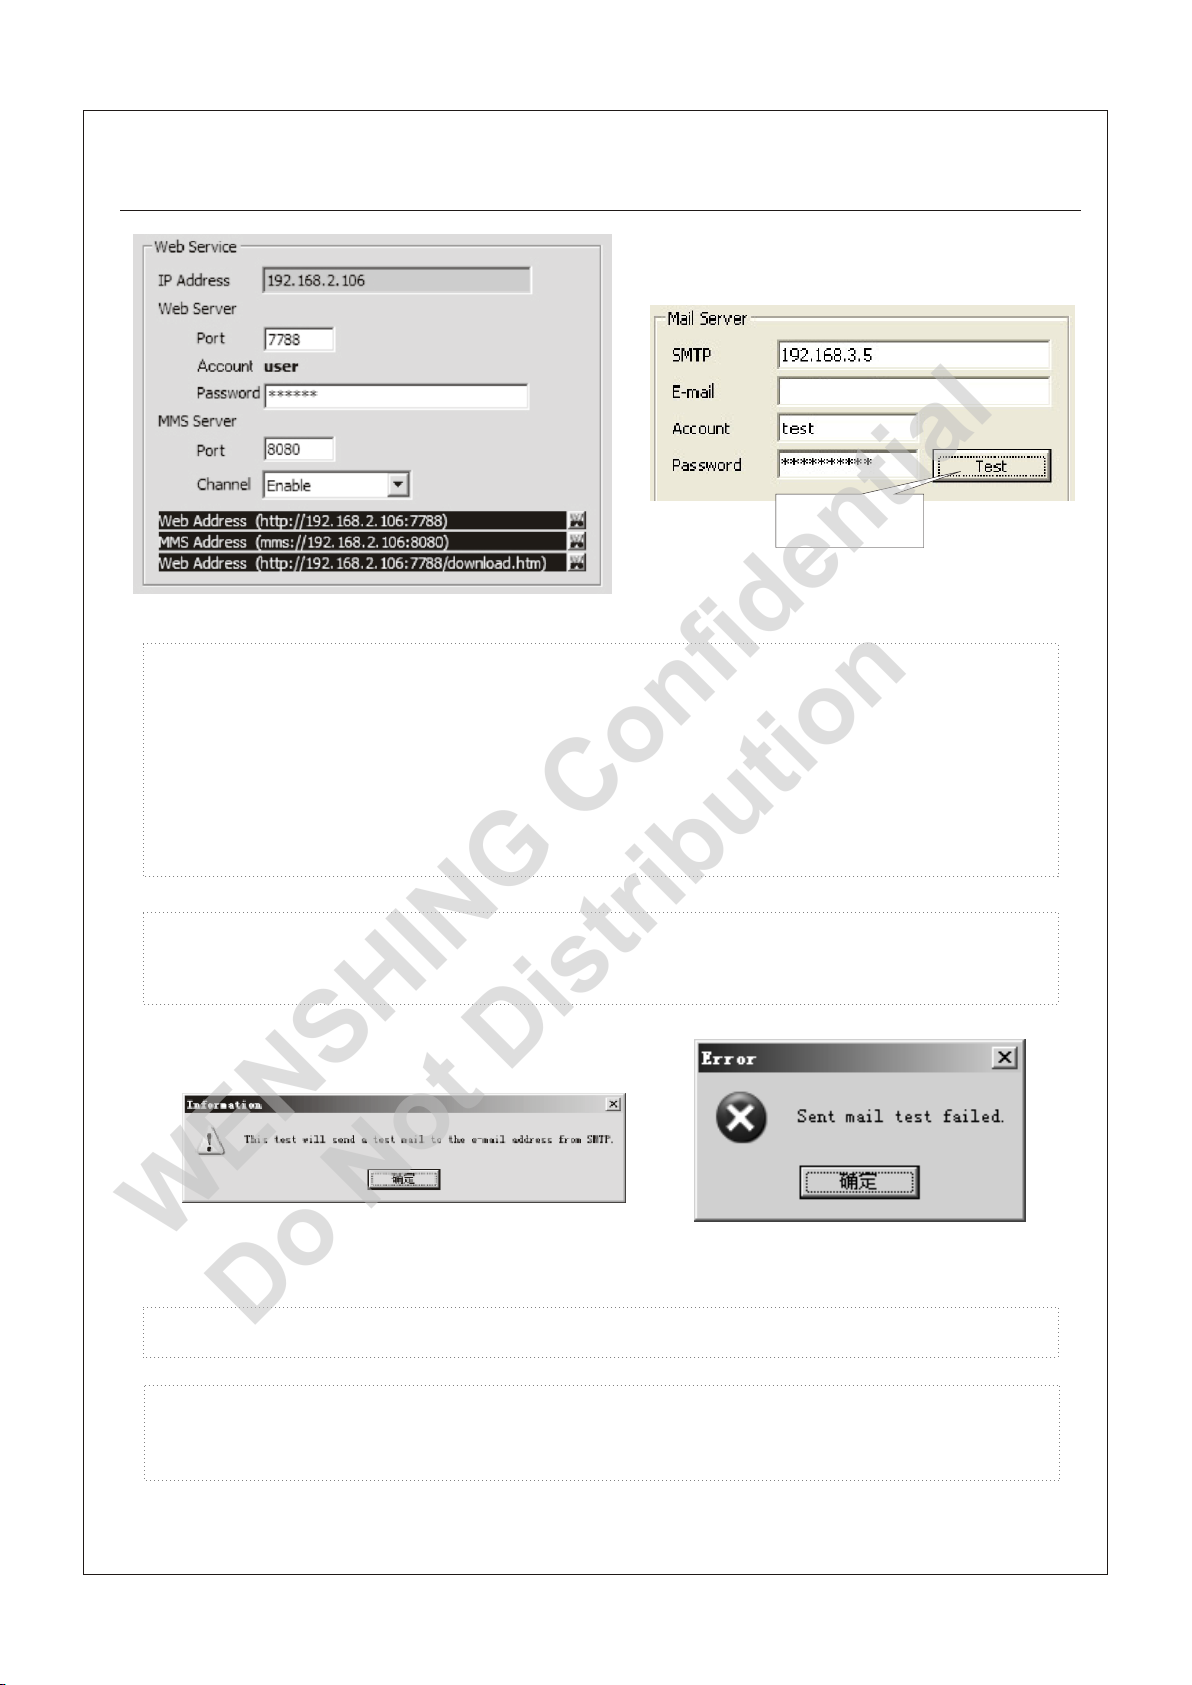
2.7 Web Server. As below fig (Fig 2.7)
IP Address: The PC searches user's IP automatically
Port: Default7788
Account: Account name was been set automatically
MMS Server: Port Default 8080
Channel: choose Enable to work the MMS Server.
Page 15
Pairing/Operation Method of Wireless Digital CCD Camera and Wireless Digital
WENSHING Confidential
Do Not Distribution
Pairing/Operation Method of Wireless Digital CCD Camera and Wireless Digital
USB Receiver
USB Receiver
Test@we nshin g.com.tw
Test
P.12
(Fig 2.7)
2.8 Mail Server (Users may key in information based on reality) . As above fig
(Fig 2.8)
SMTP: set by user
E-mail: set by user
Account: set by user
Password: set by user
2.9 After the setting, click “Test”, then the Information pops out. as shown below
(Fig. 2.9).
(Fig 2.8)
(Fig 2.9)
2.10 Click “Confirm” to enter into a testing mail.
2.11 The followed information pops out after few seconds, it means the
testing mail was failed to be sent seconds. As above fig (Fig 2.11)
(Fig 2.11)
Page 16
Pairing/Operation Method of Wireless Digital CCD Camera and Wireless Digital
WENSHING Confidential
Do Not Distribution
Pairing/Operation Method of Wireless Digital CCD Camera and Wireless Digital
USB Receiver
USB Receiver
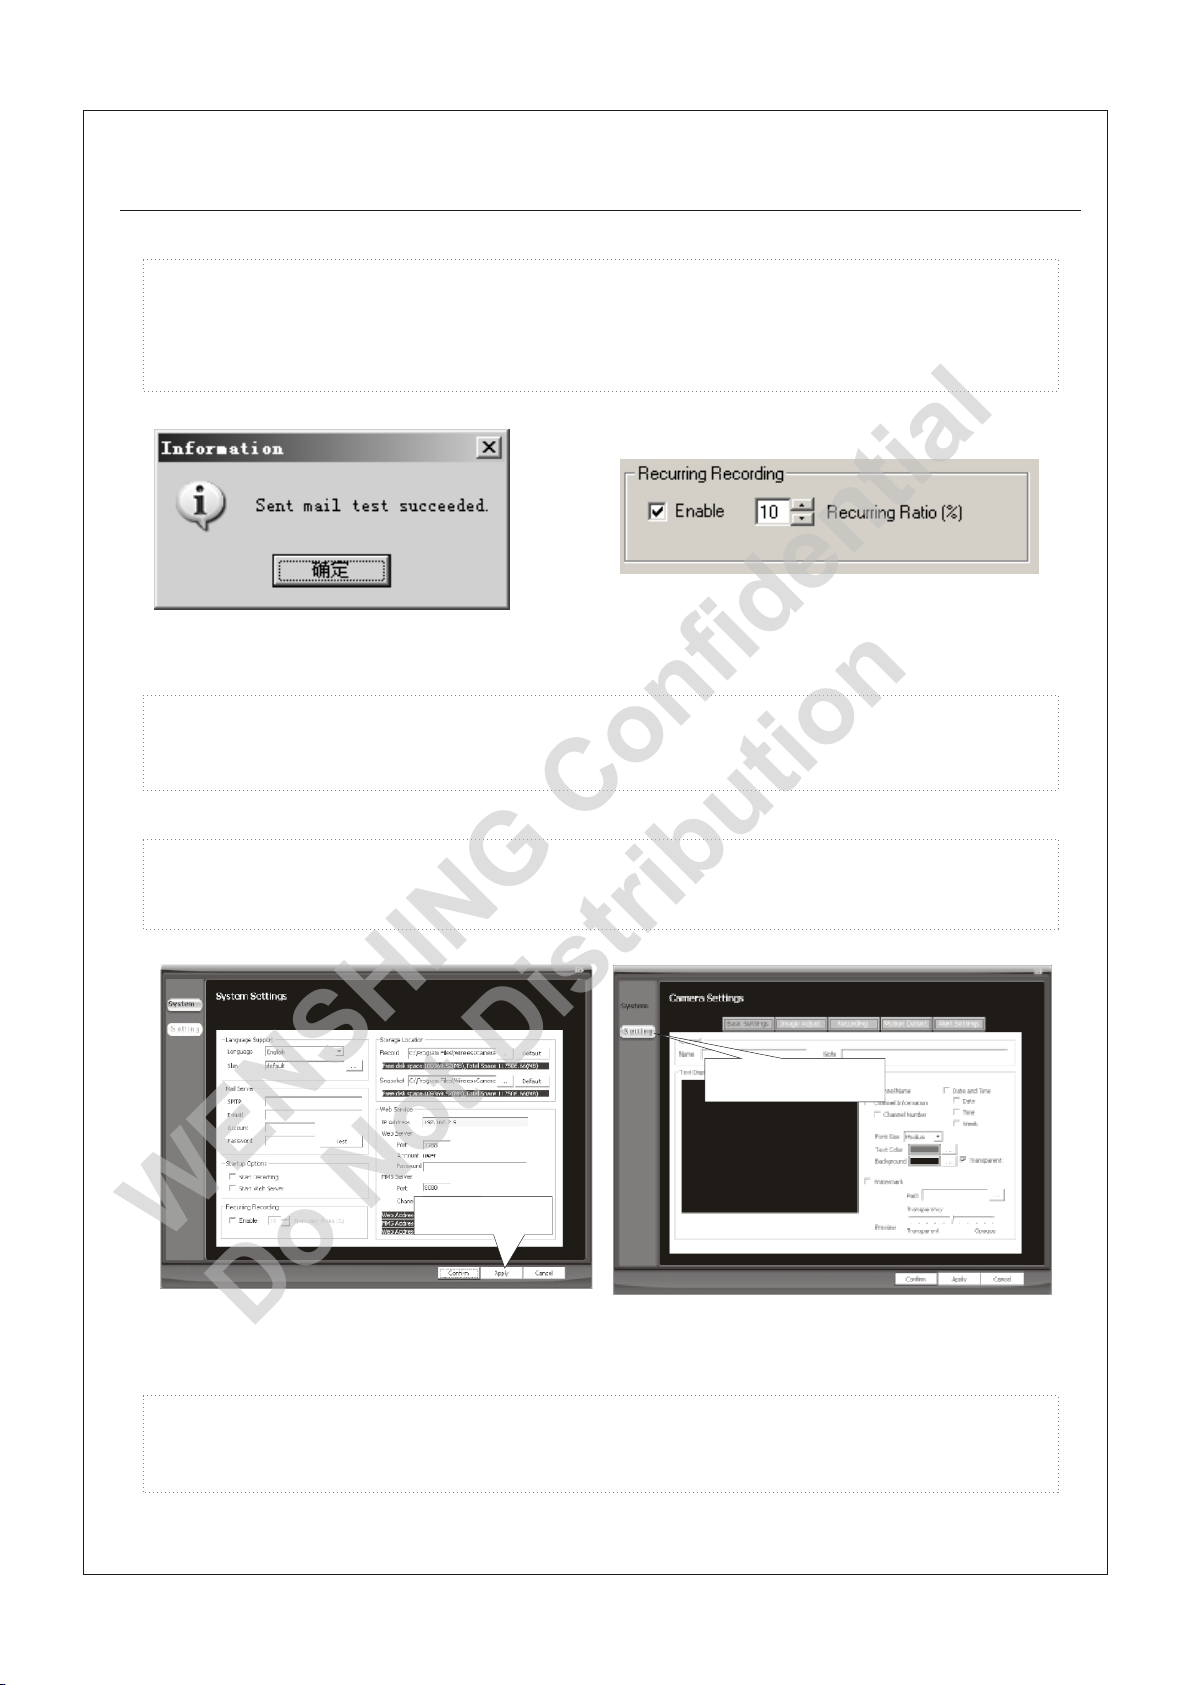
2.12 Keep clicking “Test” until the followed information pops out to inform the
testing mail has been sent successfully. As below fig (Fig 2.12)
P.13
(Fig 2.12)
2.13 Check “Enable” in the Recurring Recording section, and set the
Recurring Ratio to“10”. As above fig (Fig 2.13)
2.14 After the setting, click “Apply” to save the memory. As below fig (Fig 2.14)
Apply
(Fig 2.13)
Setting
(Fig 2.14)
2.15 Click “Setting”, and enter into the Camera Settings part. As above fig (Fig
2.15)
(Fig 2.15)
Page 17
Pairing/Operation Method of Wireless Digital CCD Camera and Wireless Digital
WENSHING Confidential
Do Not Distribution
Pairing/Operation Method of Wireless Digital CCD Camera and Wireless Digital
USB Receiver
USB Receiver
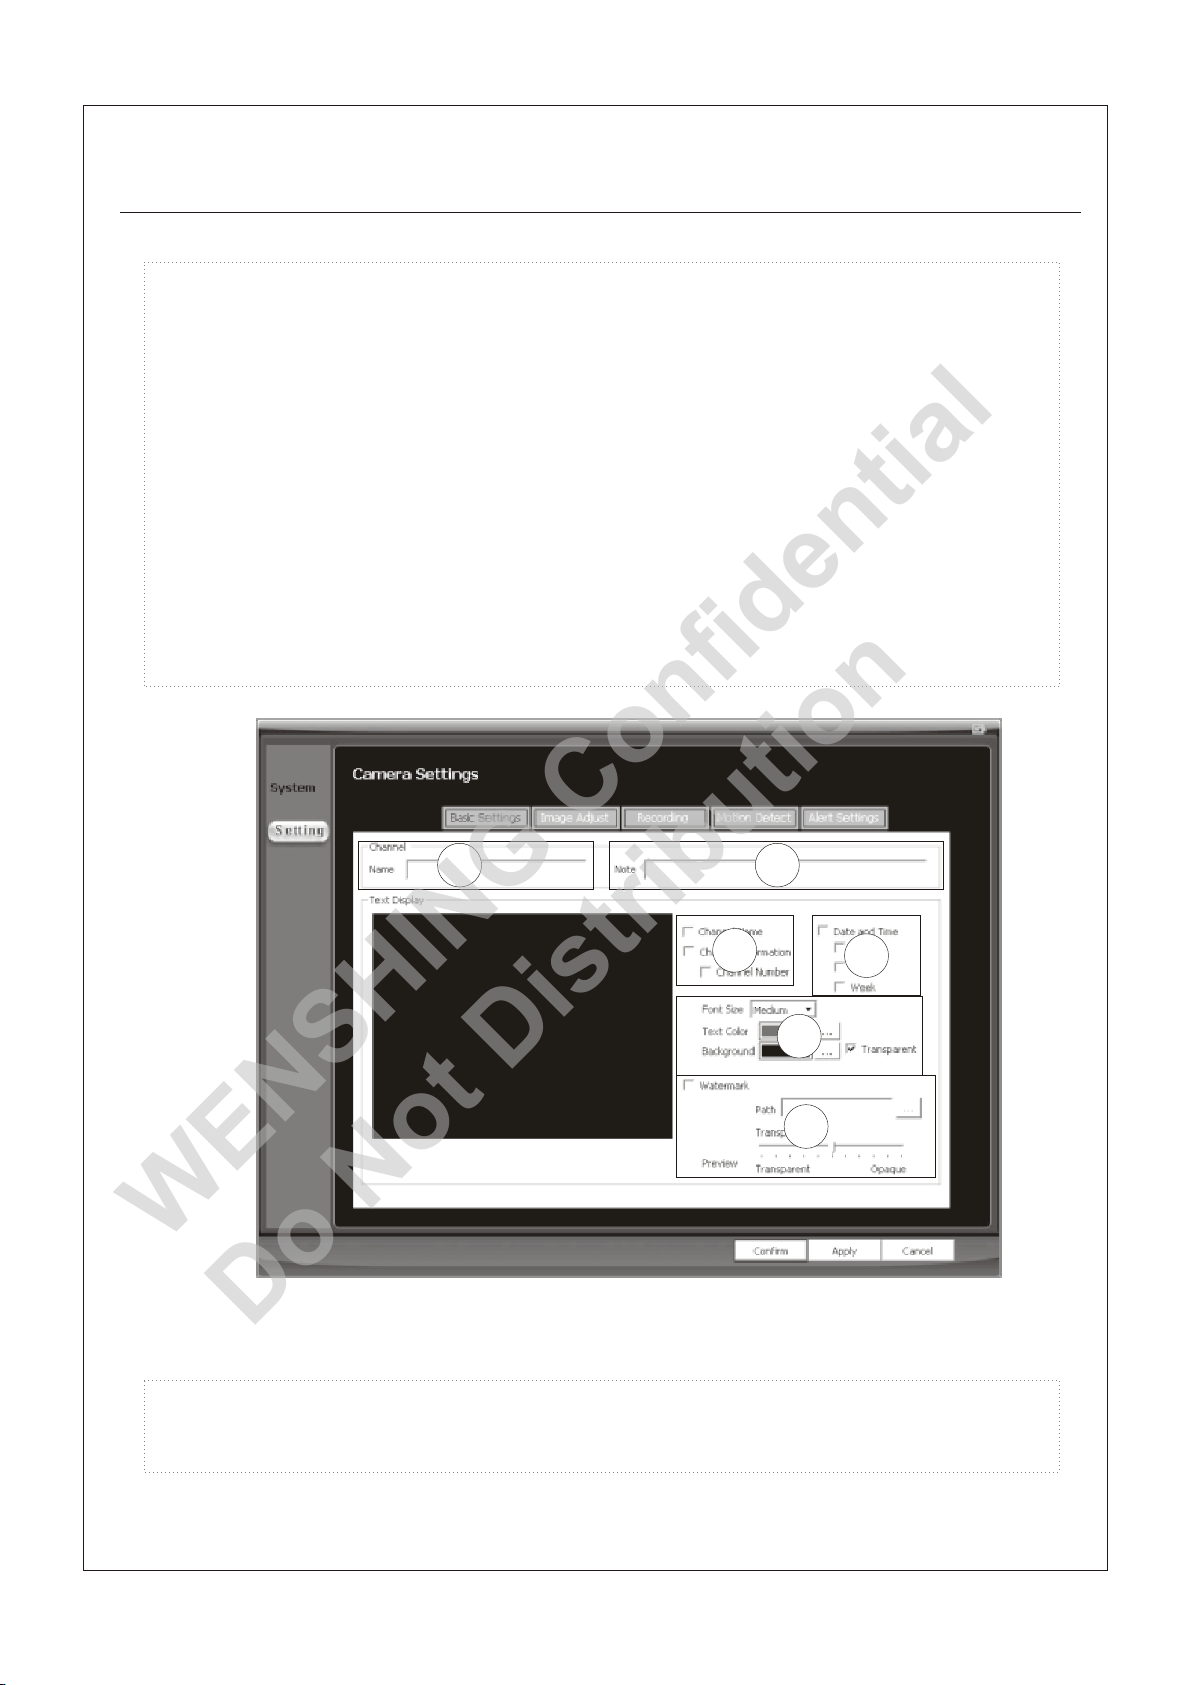
2.16 Enter the screen shown above (fig. 2.15) to reconfigure “Basic Settings”,
as shown below (fig. 2.16).
①Name: set to be "myCh01"
②Note:set to be “abc”
③ Select “Channel Name” to show“myCh01” on the screen. (users may
change the definition)
④ Check “Date and Time”, and select Date” / Time” / Week” as needed to
display on the screen.
⑤ Set up the size and color of fonts, and color of background.
⑥Check “Watermark” to add the watermark. Click“…”to choose from user's
documents, and adjust the
P.14
1 2
3
4
5
6
(Fig 2.16)
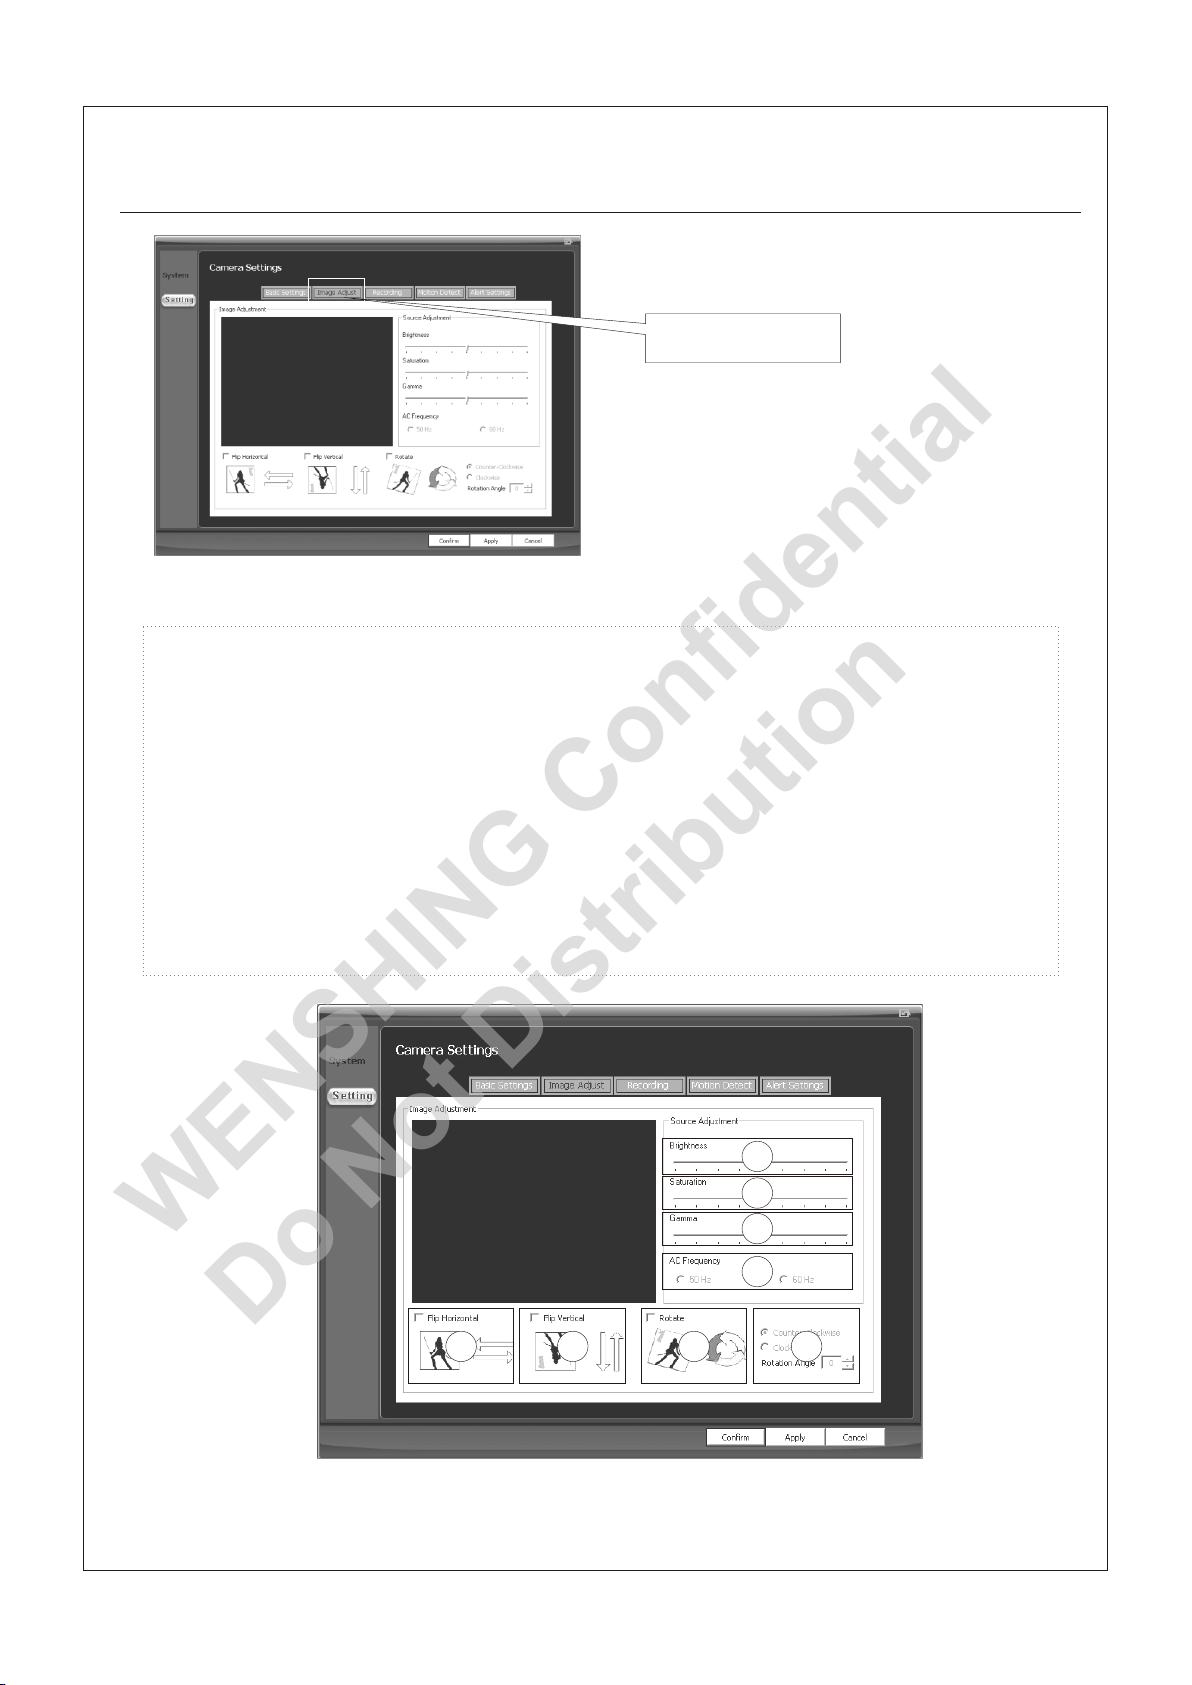
2.17 Click “Image Adjust” to enter into the image Adjust section. As below fig
(Fig 2.17)
Page 18
Pairing/Operation Method of Wireless Digital CCD Camera and Wireless
WENSHING Confidential
Do Not Distribution
Pairing/Operation Method of Wireless Digital CCD Camera and Wireless
Digital USB Receiver
Digital USB Receiver
Image Adjust
(Fig 2.17)
2.18 Set up parameters
①Brightness
P.15
②Saturation
③Gamma
④AC Frequency
⑤Flip horizontal
⑥Flip Vertical
⑦Rotate
⑧Rotation Angle
1
2
3
4
5
6
(Fig 2.18)
7
8
Page 19
Pairing/Operation Method of Wireless Digital CCD Camera and Wireless Digital
WENSHING Confidential
Do Not Distribution
Pairing/Operation Method of Wireless Digital CCD Camera and Wireless Digital
USB Receiver
USB Receiver
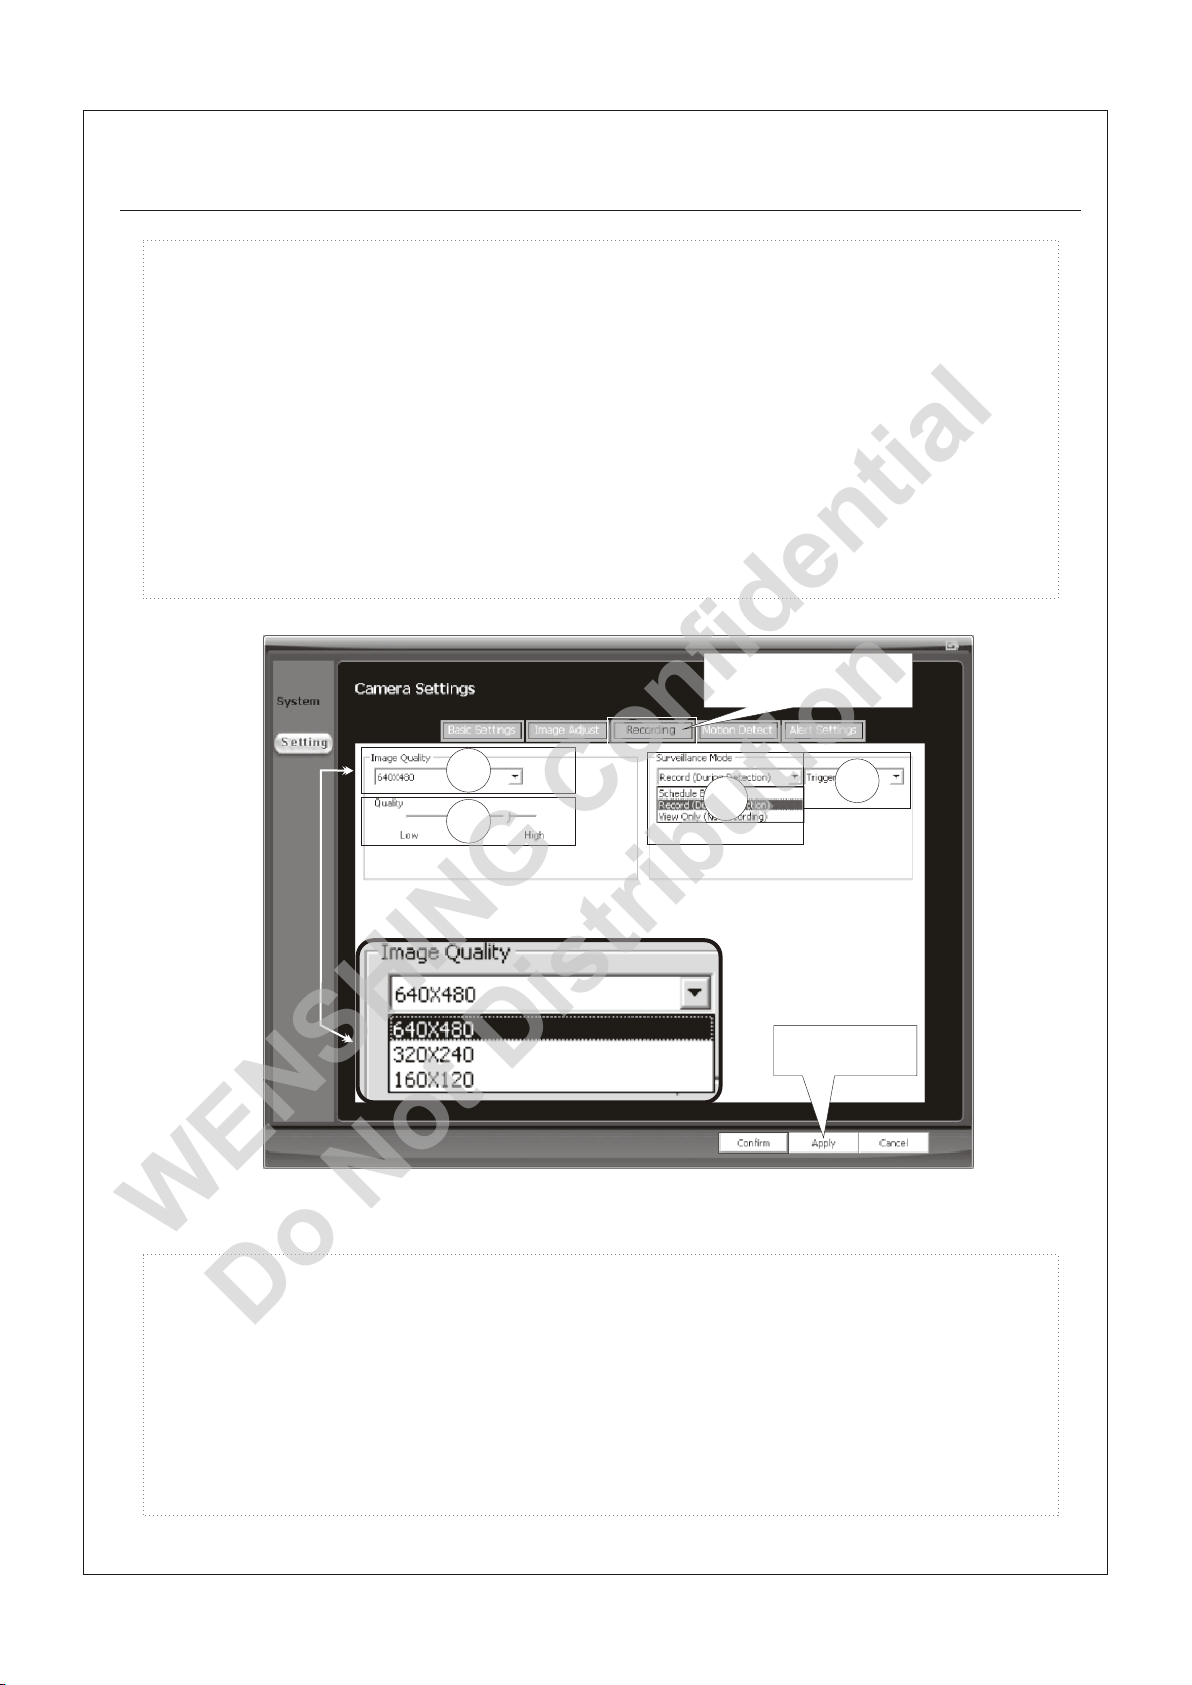
2.19 Full-time/Triggered mode recording: Click “Recording” and follow the
set-up instruction below. As below fig (F ig 2.19)
①Set the dimension: 640x480. There are 320x240 or 160x120 two options
in addition.
②Adjust the Quality.
③ Select “Record (During Detection)” in the Surveillance Mode, which
means surveillance and recording function exist simultaneously.
④ Select Triggered. (the other option “Full-time” means recording
continuously)
Recording
P.16
1
4
3
2
Apply
(Fig 2.19)
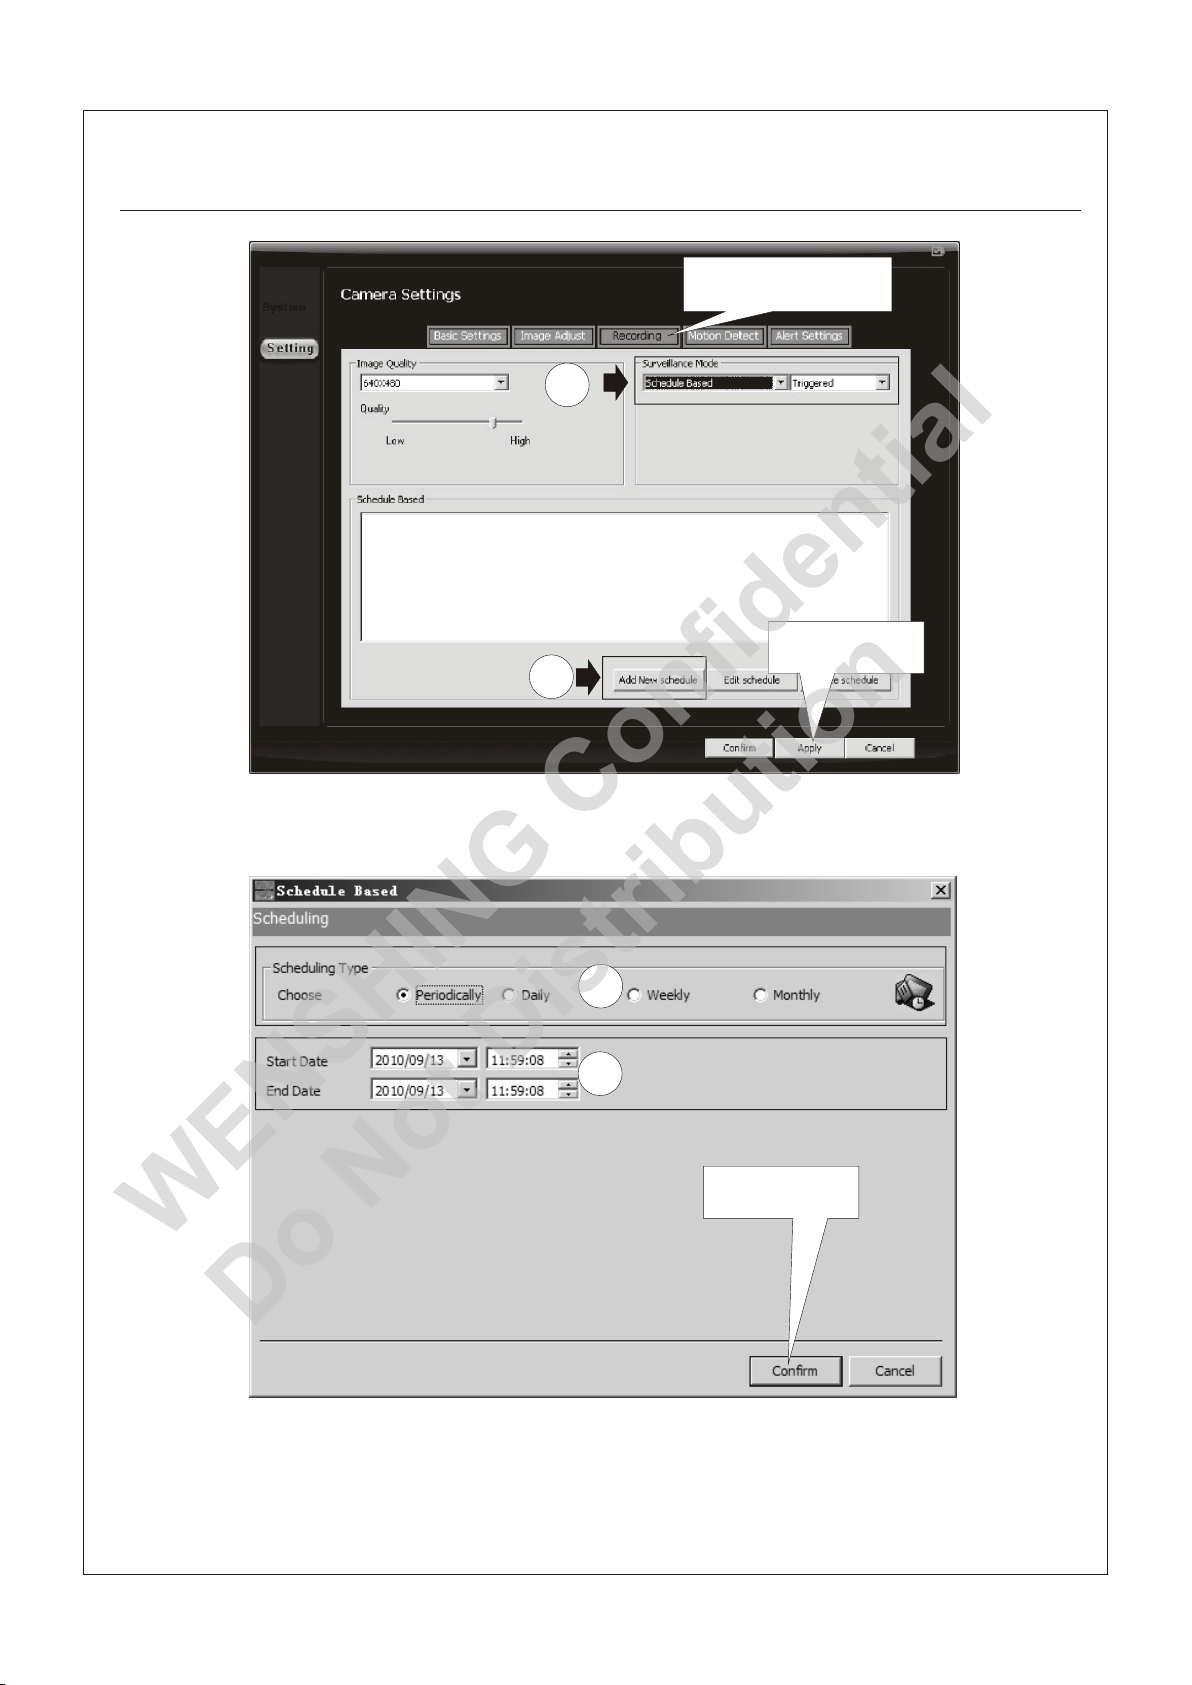
2.20 Schedule Record: Click on “Recording”, and follow hint 1 and 2 which
choose “Schedule Based” and then “Triggered” in the surveillance Mode.
After that, click “Add New schedule”. When the page on the lower side
appears, choose “Scheduling Type” in circle 3, and set up “Start Date” and
“End Date” in circle 4. Click “Apply” and “Confirm” to memorize the setting.
Page 20
Pairing/Operation Method of Wireless Digital CCD Camera and Wireless Digital
WENSHING Confidential
Do Not Distribution
Pairing/Operation Method of Wireless Digital CCD Camera and Wireless Digital
USB Receiver
USB Receiver
Recording
1
Apply
2
P.17
(Fig 2.20)
3
4
Confirm
(Fig 2.20-1)
Page 21
Pairing/Operation Method of Wireless Digital CCD Camera and Wireless Digital
WENSHING Confidential
Do Not Distribution
Pairing/Operation Method of Wireless Digital CCD Camera and Wireless Digital
USB Receiver
USB Receiver
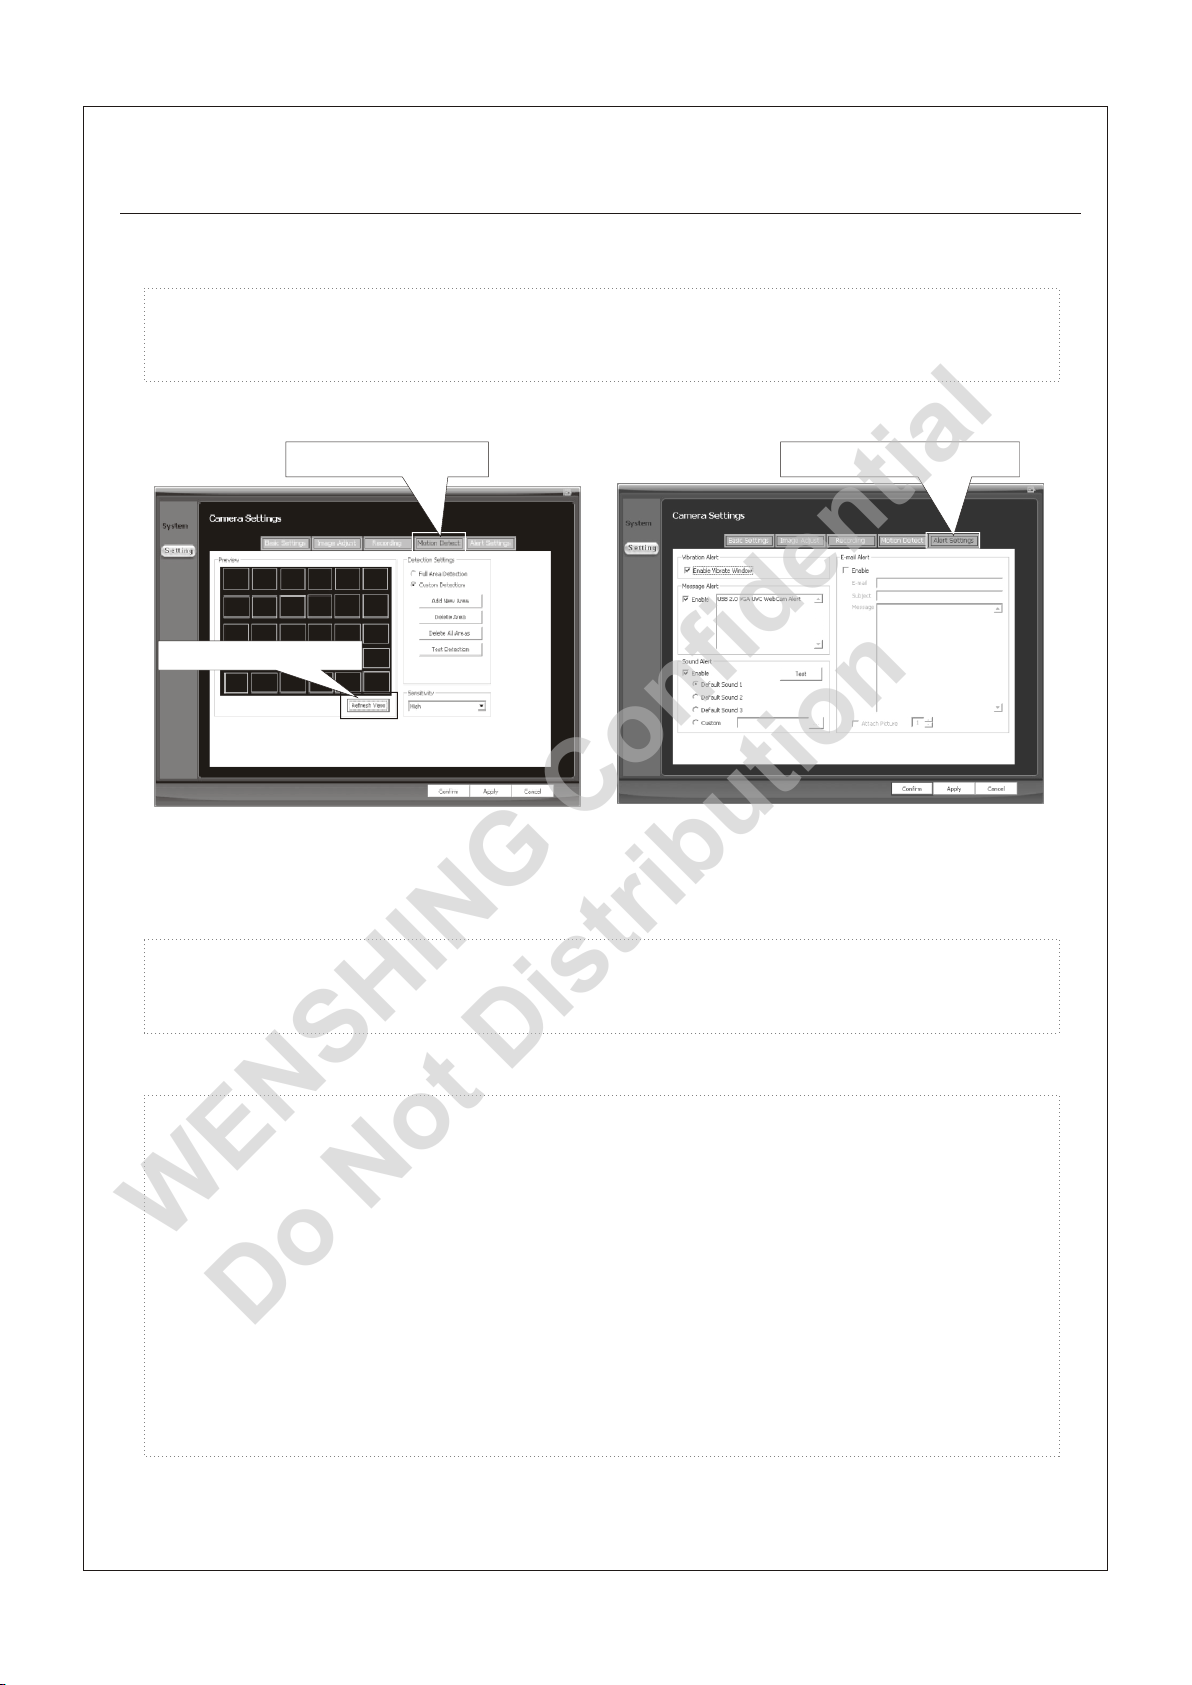
2.21 Click on “Motion Detect” to enter and configure, and click on “Refresh
View” to preview, as shown below (Fig. 2.21).
P.18
Motion Detect
Refresh View
(Fig 2.21)
2.22 Click “Alert Setting” to enter into the section. As above fig (Fig 2.22)
Alert Settings
(Fig 2.22)
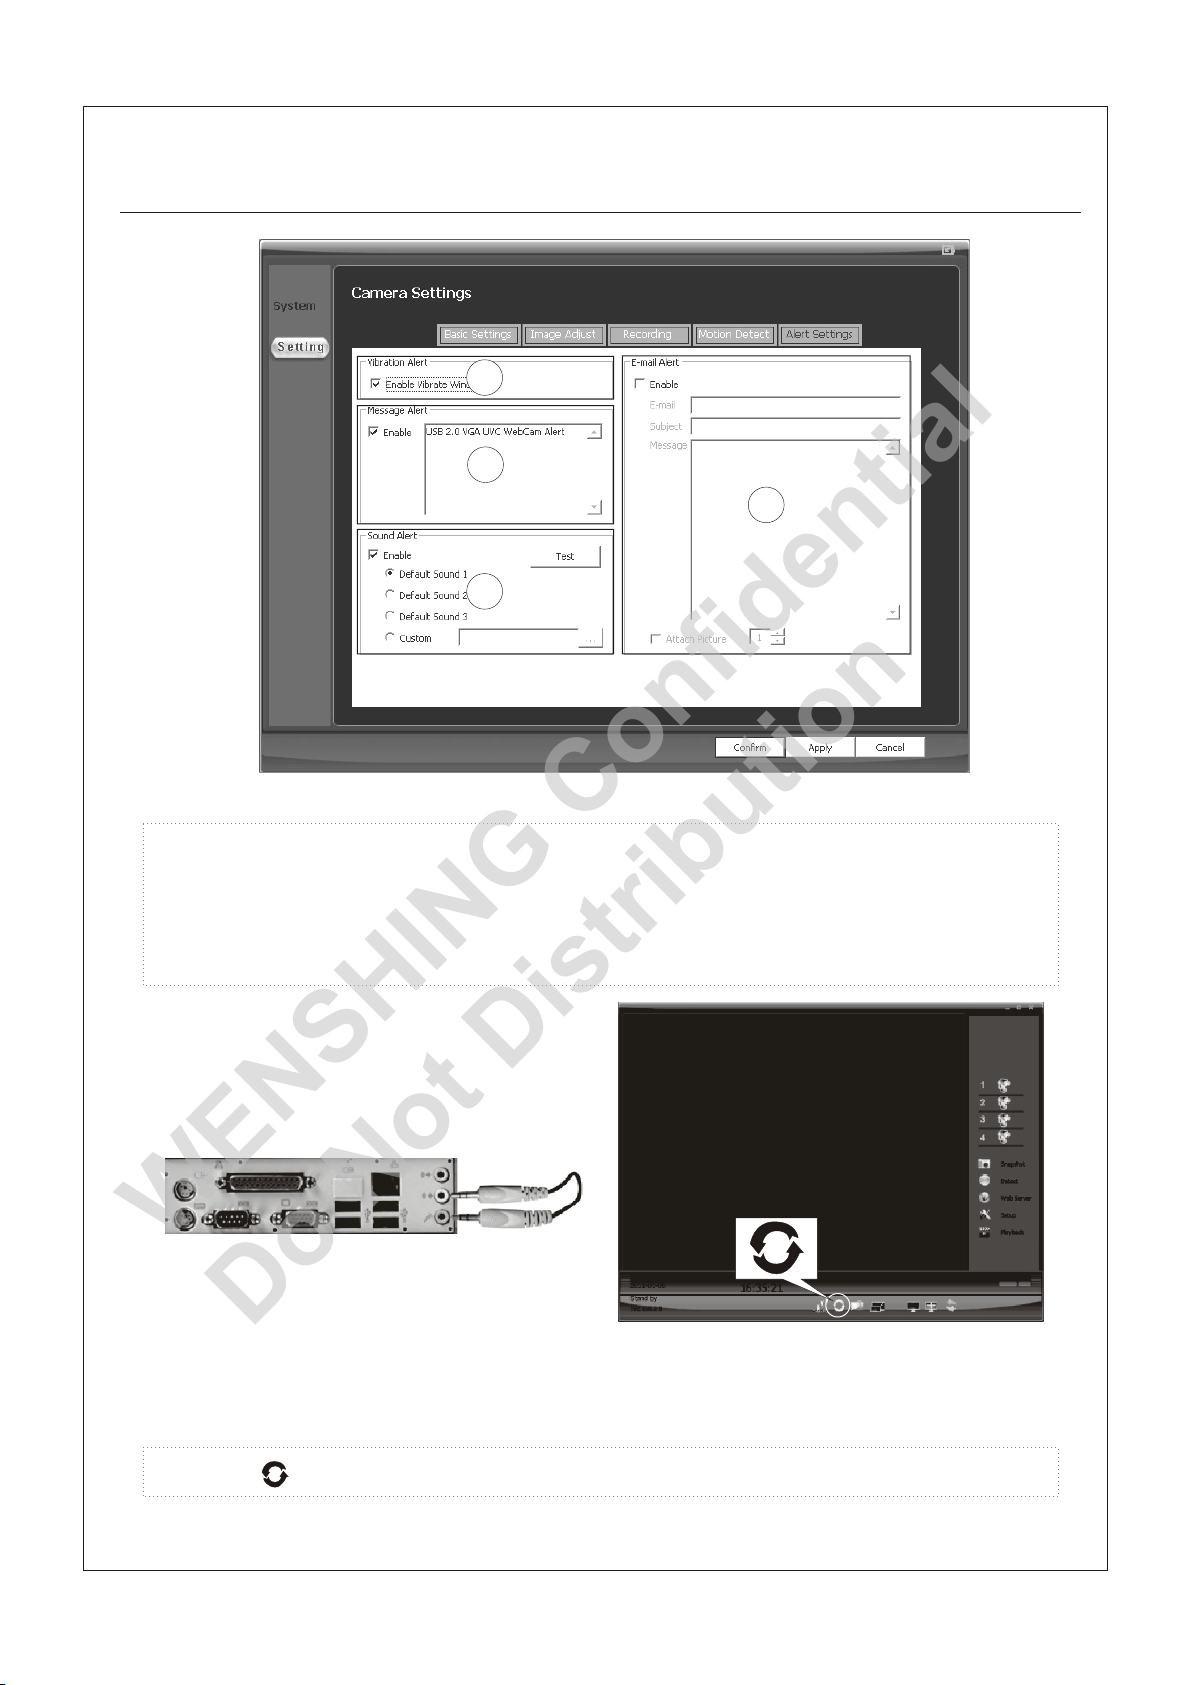
2.23 Click “confirm” after setting the parameters, and exit from the section. As
below fig (Fig 2.23)
① Check “Enable Vibrate Window” to turn on the vibration alarm.
② Check “Enable” to turn on the Message Alert.
③ Check “ Enable” to turn on voice alarm, then choose from Default
Sound1~3, or “Custom” to attach document from users files by clicked on
“…”. Click “Test” to test the result.
④ Check “Enable” to turn on E-mail Alert, the parameters can be set
based on reality.
Page 22
Pairing/Operation Method of Wireless Digital CCD Camera and Wireless Digital
WENSHING Confidential
Do Not Distribution
Pairing/Operation Method of Wireless Digital CCD Camera and Wireless Digital
USB Receiver
USB Receiver
1
2
4
3
P.19
(Fig 2.23)
2.24 Due to some PC driver do not support, in order to record voice as well,
Audio In and Audio out wires are needed to be connected to PC ( or plugging
in both microphone and speaker to PC). As below fig (Fig 2.24)
(Fig 2.24)
(Fig 3.1)
●Pair●Pair
3.1 Click to process paring. As above fig (Fig 3.1)
Page 23
Pairing/Operation Method of Wireless Digital CCD Camera and Wireless Digital USB
WENSHING Confidential
Do Not Distribution
Pairing/Operation Method of Wireless Digital CCD Camera and Wireless Digital USB
Receiver
Receiver
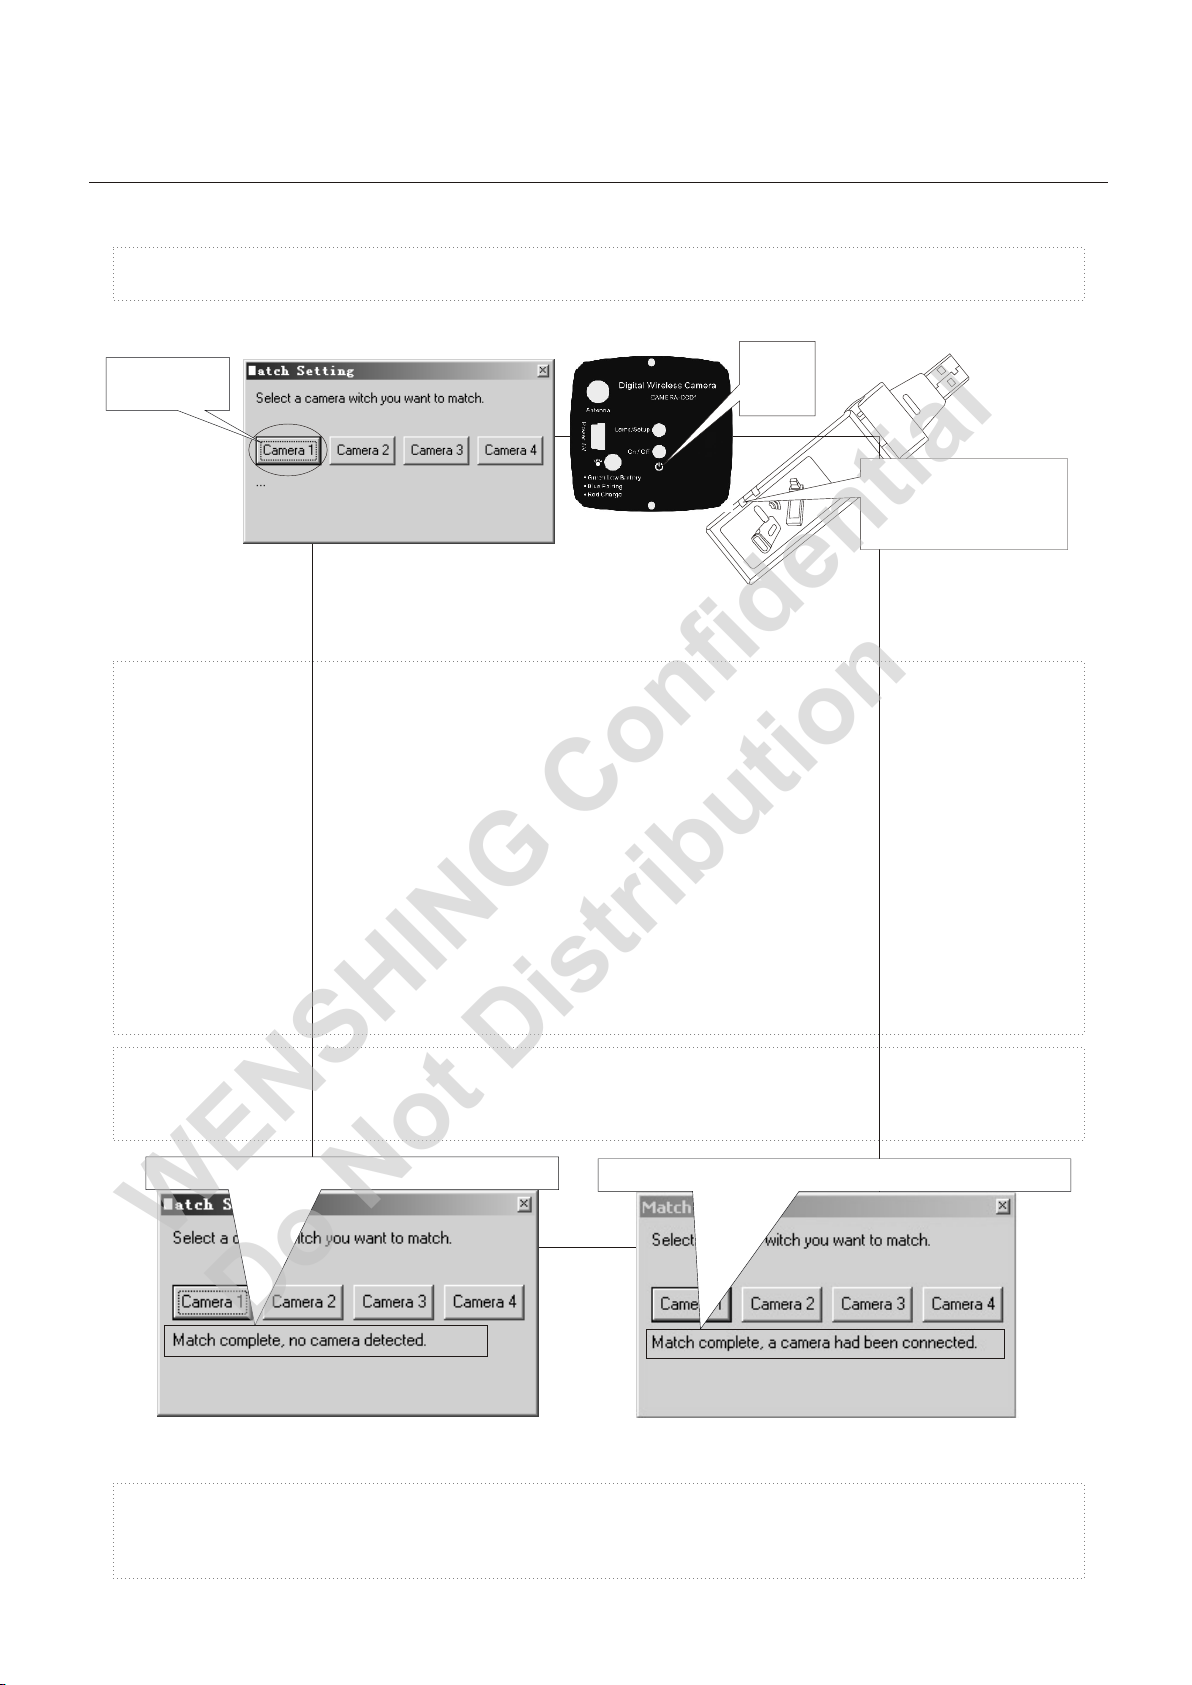
3.2 Click Camera 1 to process searching. As below fig (Fig 3.2)
P.20
Camera1
(Fig 3.2)
Lamp
ER
.24G
CAM A
WS-
Wiel ss igtal Camerr e D i a
(Fig 3.3)
It fl as he s wit h bl ue af te r pai ri ng
has suc ce ede d.
2.4G
WS-CAMERA
Wiel ss igtal Camerr e D i a
3.3 While the Camera is under the standby mode, press Lamp/Setup and last 4
seconds, Lamp/Setup will then continuously flash in blue. Meanwhile, click the
pairing button on the PC screen to process pairing. After Camera was
successfully paired with USB Receiver, Lamp/Setup will keep in blue, and
images from that camera display simultaneously on the pc screen. Once failed to
pair with USB Receiver, Lamp/Setup flashes once 2 seconds. User may follow
the above steps to make pairs again. As above fig (Fig 3.3)
3.4 If search failed, users will be informed by the notification “Match complete, no
camera detected” . As below fig (Fig 3.4)
Match complete, no camera detected.
(Fig 3.4)
Match complete, a camera had been connected.
(Fig 3.5)
3.5 Once pairing has succeeded, “Match complete, a camera had been connected”
shows up. As above fig (Fig 3.5)
Page 24
Pairing/Operation Method of Wireless Digital CCD Camera and Wireless Digital
WENSHING Confidential
Do Not Distribution
Pairing/Operation Method of Wireless Digital CCD Camera and Wireless Digital
USB Receiver
USB Receiver
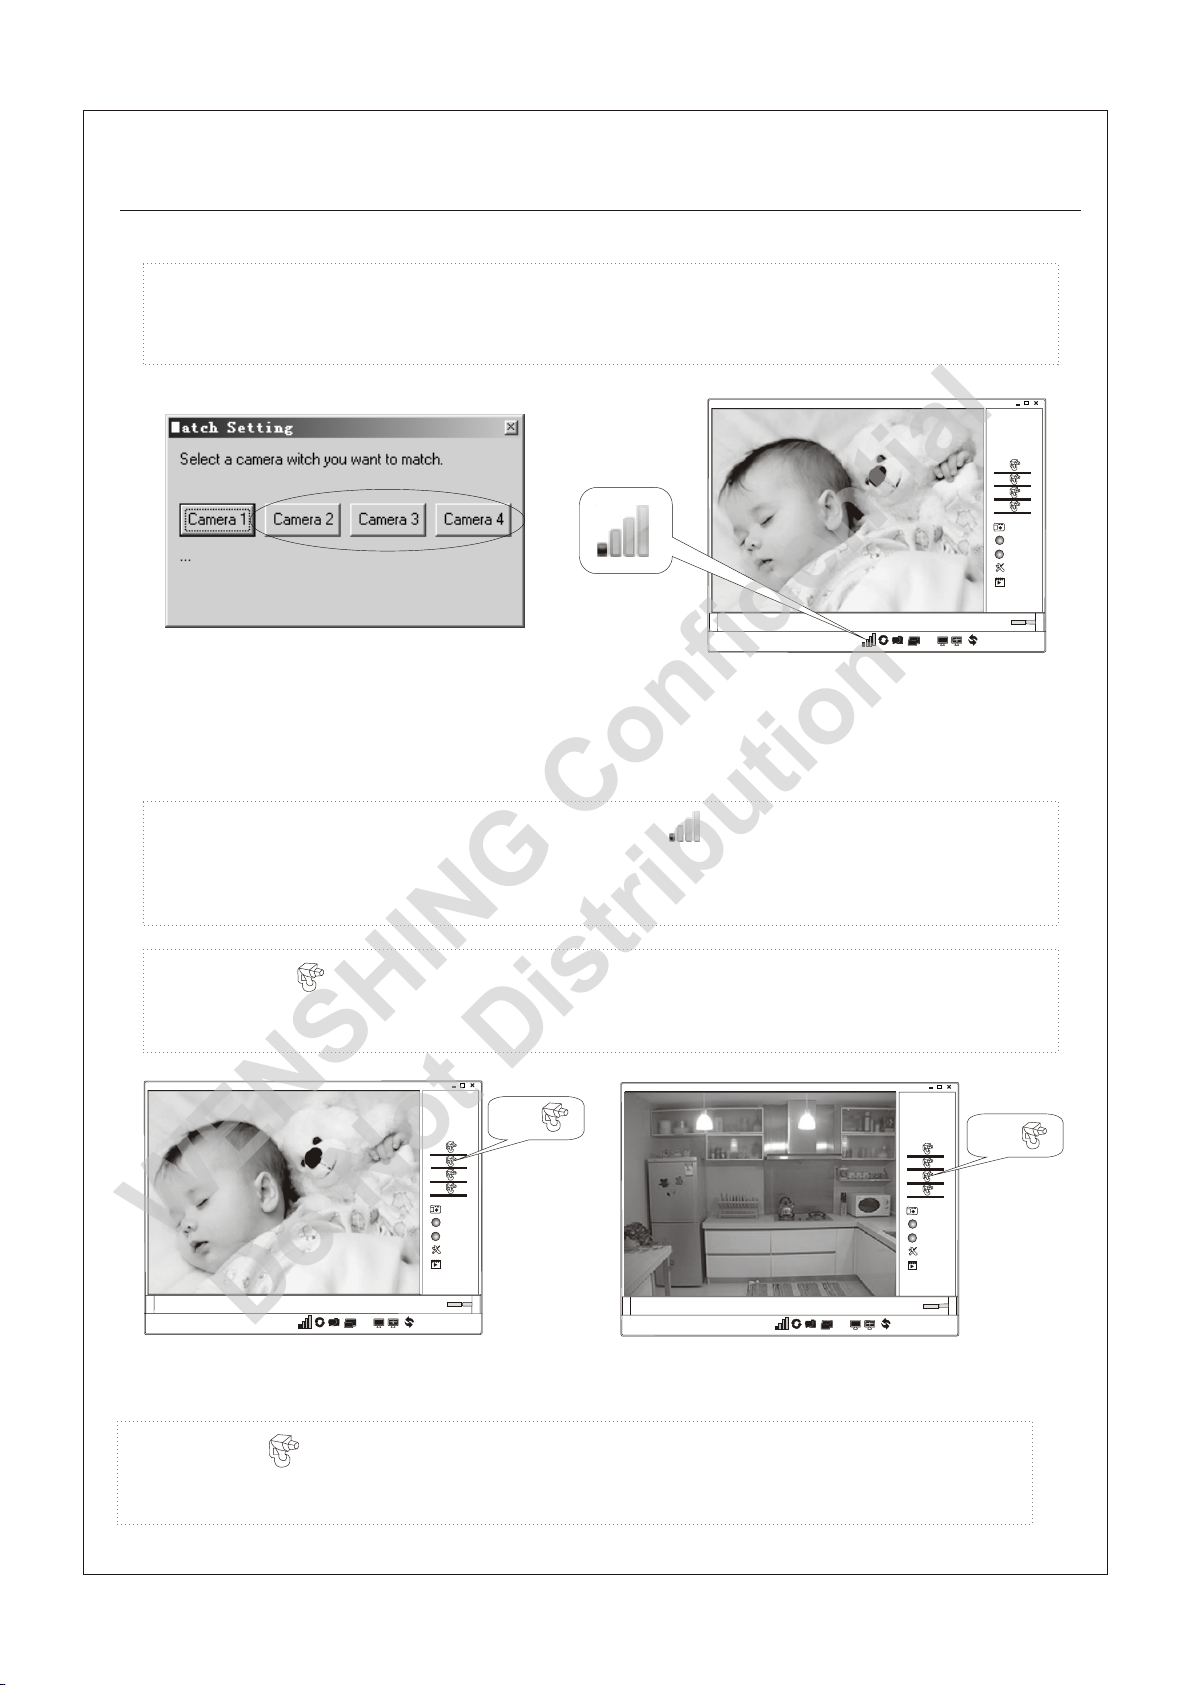
3.6 Click Camera 2 / Camera 3 /Camera 4 to process searching and repeat step
3.1. As shown below (Fig. 3.6)
1
2
3
4
Snaps hot
Detec t
Web Ser ver
Setup
Playb ack
P.21
(Fig 3.6)
2011-01-0 5
Stamd b y
192.16 8.2.9
16:35:2 1
(Fig 4.1)
●Application●Application
4.1 After pairing succeeded, signal intensity shows up in the lower side of
the screen. Images captured from Camera 1 then appear on the Image
Display area. As above fig (Fig 4.1)
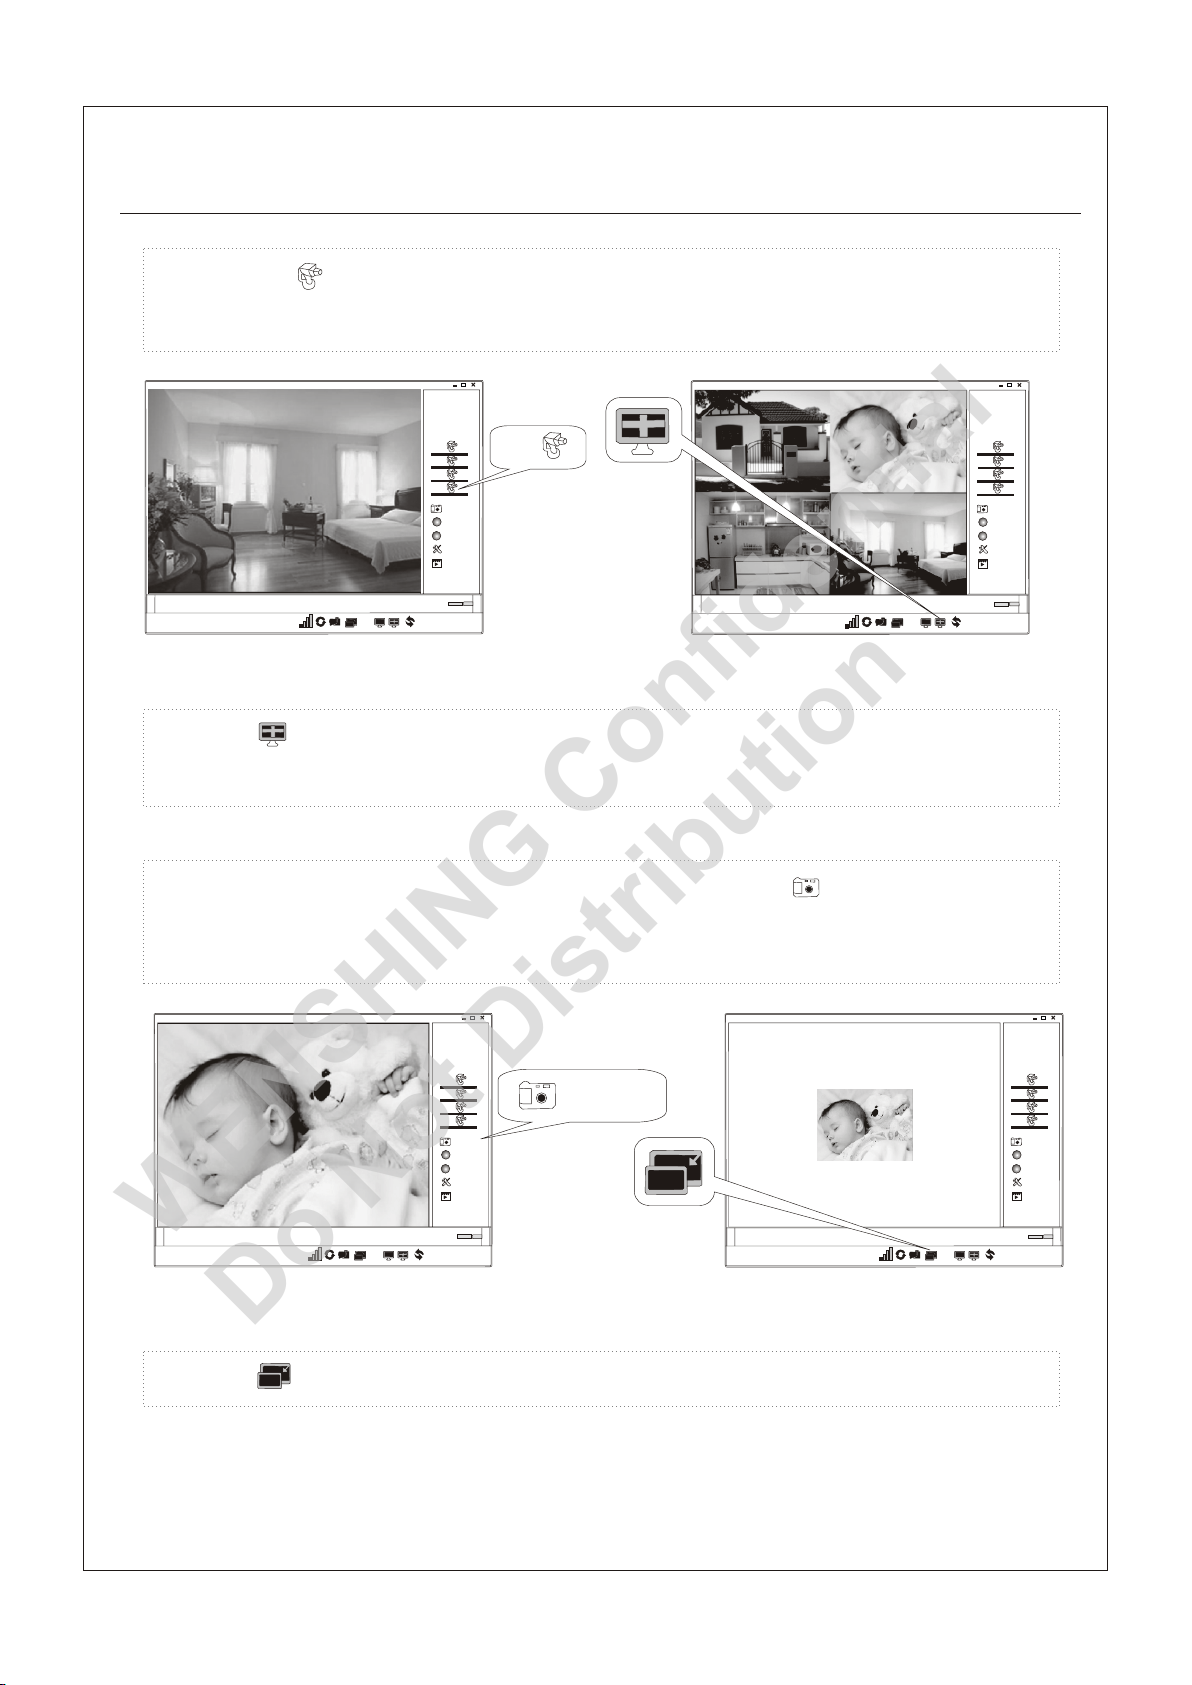
4.2 Click to switch to images from camera 2. As shown below (Fig. 4.2)
2
2
1
2
3
4
Snaps hot
Detec t
Web Ser ver
Setup
Playb ack
1
2
3
4
Snaps hot
Detec t
Web Ser ver
Setup
Playb ack
3
2011-01-0 5
Stamd b y
192.16 8.2.9
16:35:2 1
(Fig 4.2)
4.3 Click to switch to images from camera 3. As shown above (Fig. 4.2)
3
2011-01-0 5
Stamd b y
192.16 8.2.9
16:35:2 1
(Fig 4.3)
Page 25
Pairing/Operation Method of Wireless Digital CCD Camera and Wireless Digital
WENSHING Confidential
Do Not Distribution
Pairing/Operation Method of Wireless Digital CCD Camera and Wireless Digital
USB Receiver
USB Receiver
P.22
4.4 Click to switch to images from Camera 4. As shown below (Fig. 4.4)
2011-01-0 5
Stamd b y
192.16 8.2.9
4
16:35:2 1
(Fig 4.4)
1
2
3
4
Snaps hot
Detec t
Web Ser ver
Setup
Playb ack
4
2011-01-0 5
Stamd b y
192.16 8.2.9
16:35:2 1
1
2
3
4
Snaps hot
Detec t
Web Ser ver
Setup
Playb ack
(Fig 4.5)
4.5 Click to switch to the 4-split screen, which means display images from the
4 cameras simultaneously. As above fig (Fig 4.5)
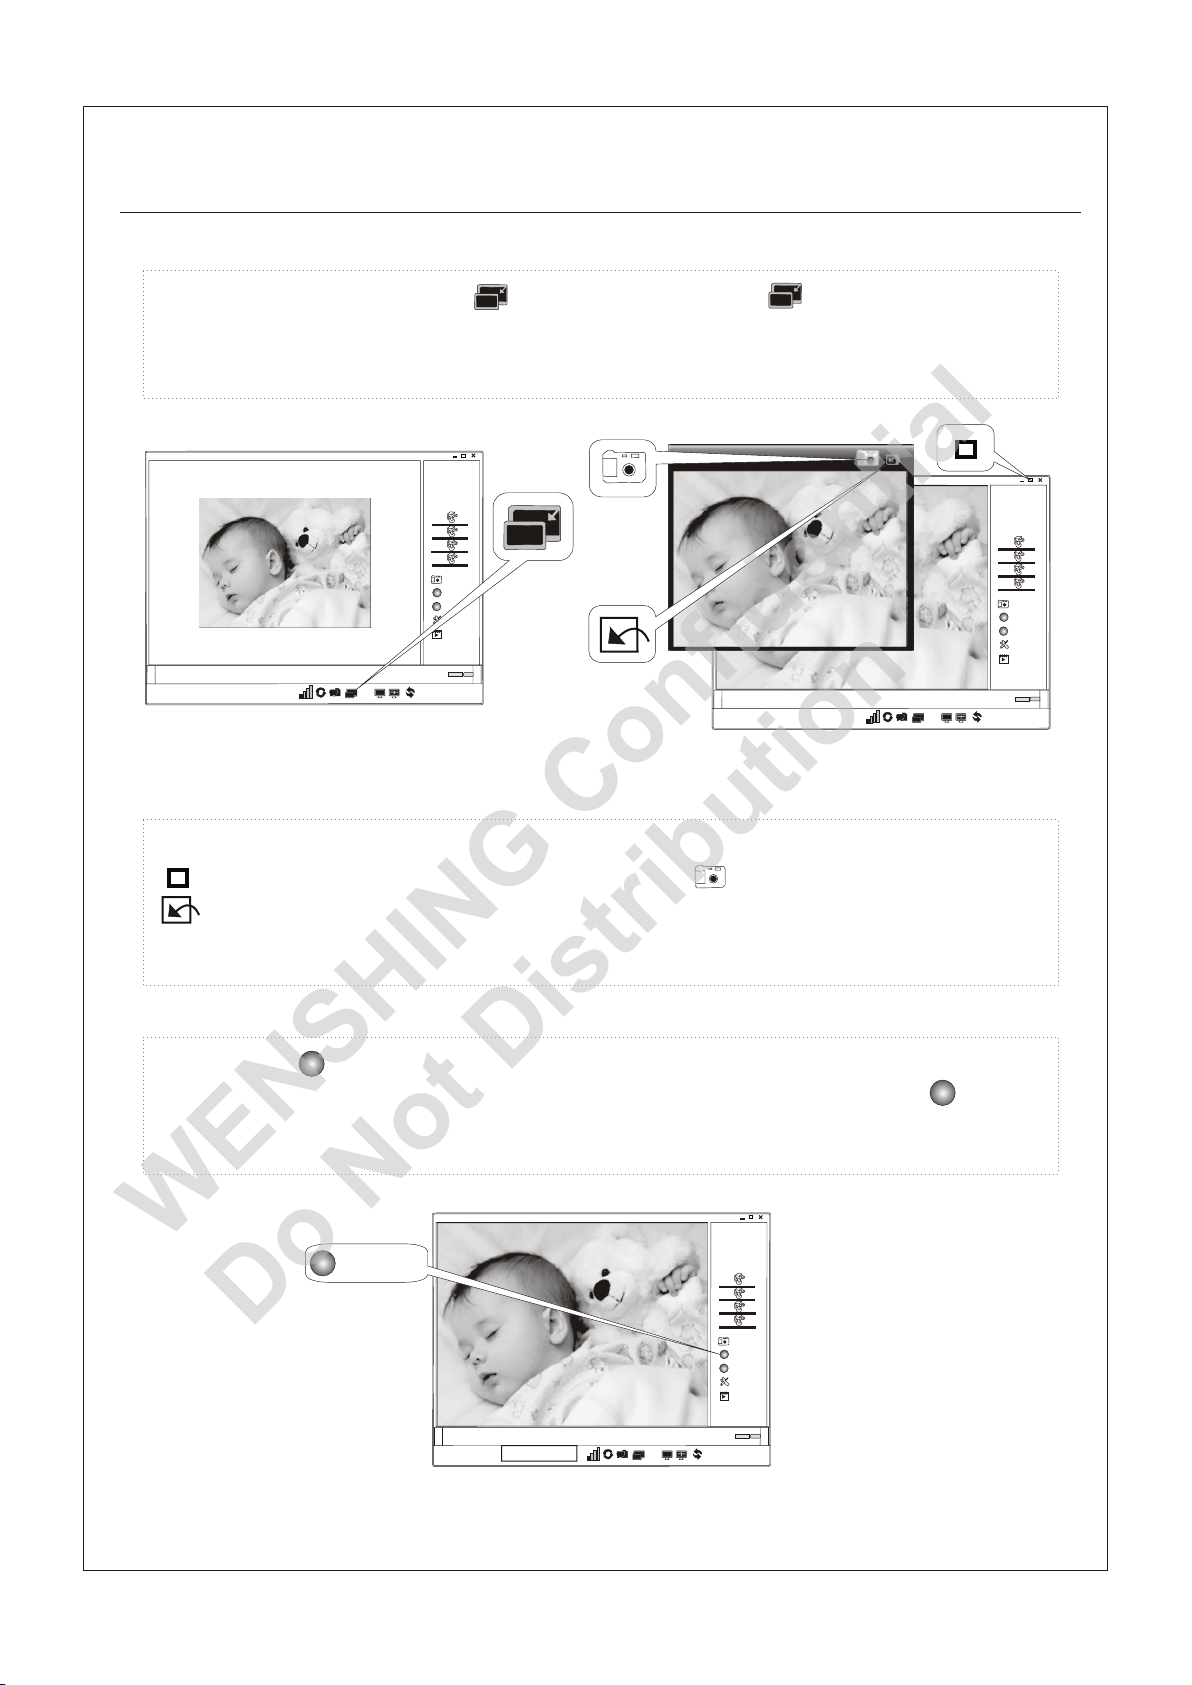
4.6 While the display area belongs to single camera, click to take
Snapshot
a snapshot, and save the document to pre-set file under the name of date.
As below fig (Fig 4.6)
1
2011-01-0 5
Stamd b y
192.16 8.2.9
16:35:2 1
(Fig 4.6)
2
3
4
Snaps hot
Detec t
Web Ser ver
Setup
Playb ack
Snapshot
2011-01-0 5
Stamd b y
192.16 8.2.9
16:35:2 1
(Fig 4.7)
4.7 Click to narrow down the image. As above fig (Fig 4.7)
1
2
3
4
Snaps hot
Detec t
Web Ser ver
Setup
Playb ack
Page 26
Pairing/Operation Method of Wireless Digital CCD Camera and Wireless Digital
WENSHING Confidential
Do Not Distribution
Pairing/Operation Method of Wireless Digital CCD Camera and Wireless Digital
USB Receiver
USB Receiver
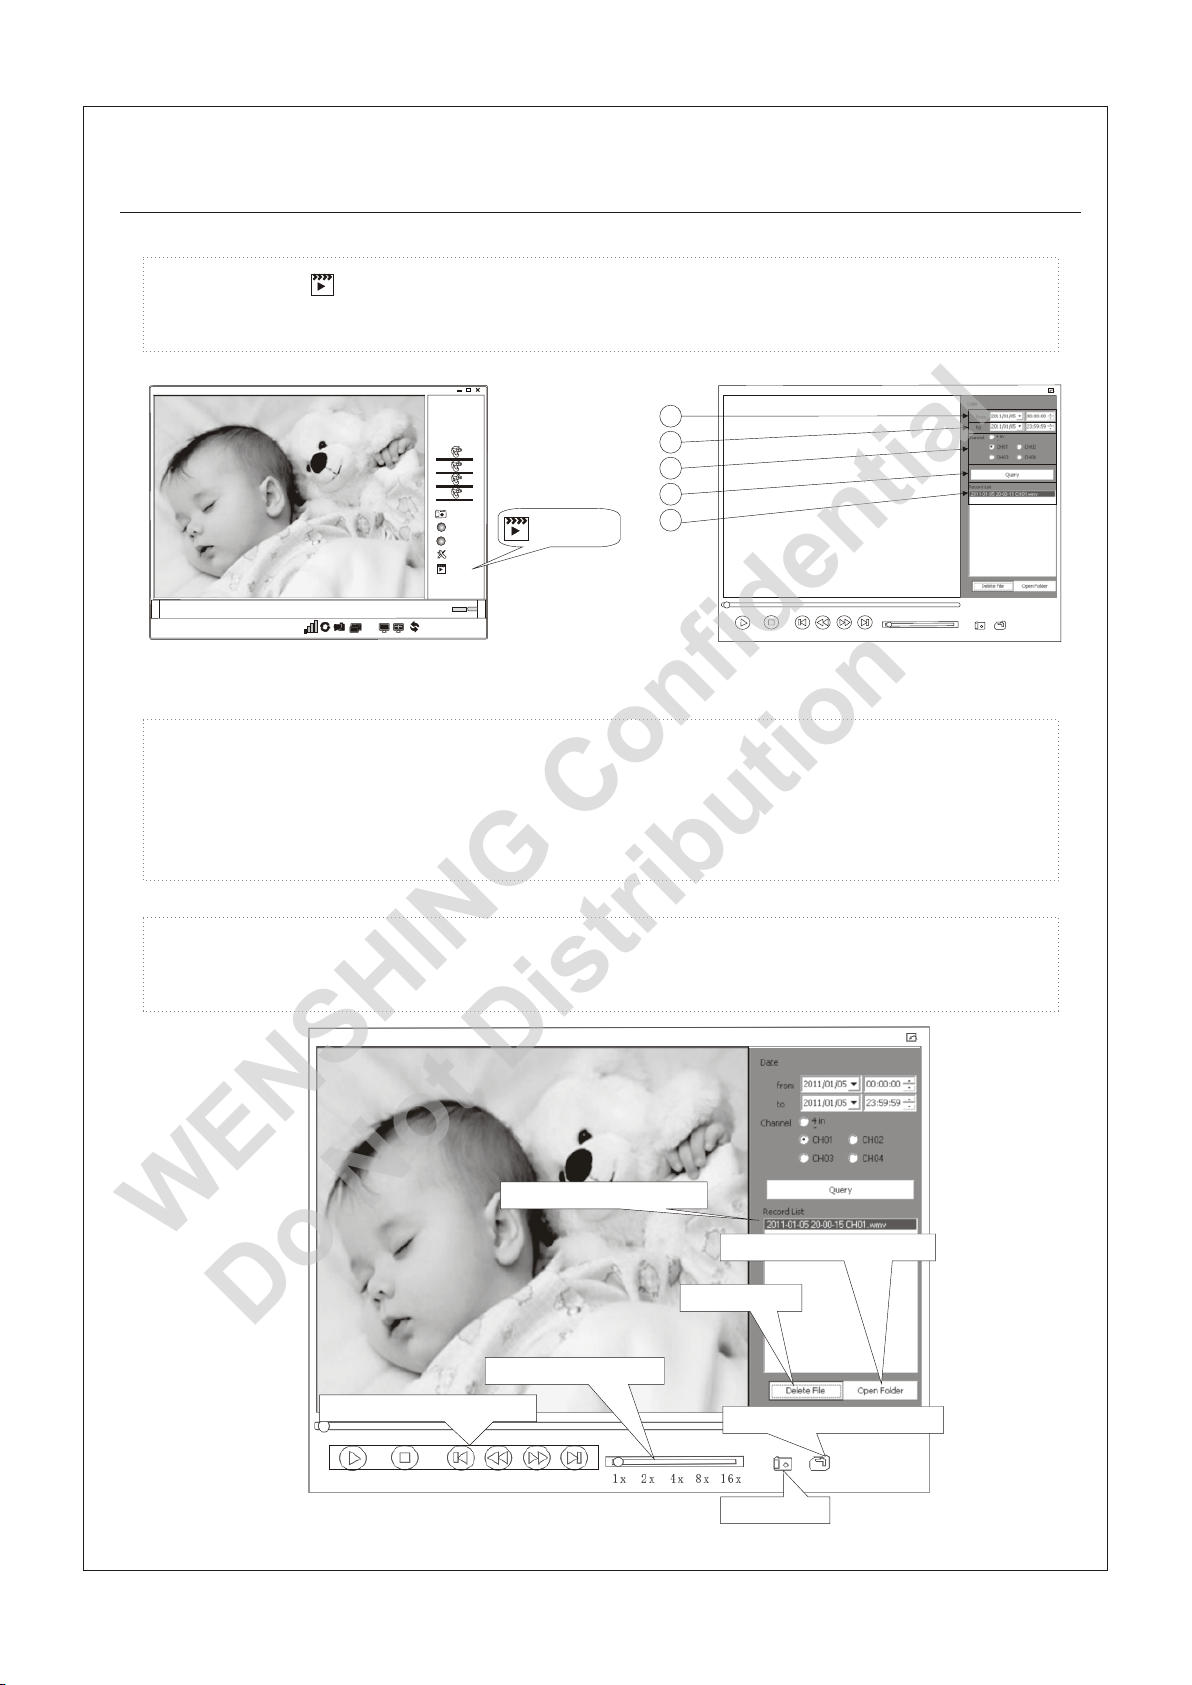
4.8 Users may keep clicking to the minimized, then click again to
enlarge back gradually to the original size . As above fig (Fig 4.7)
1
2
3
4
Snaps hot
Detec t
Web Ser ver
Setup
Playb ack
2011-01-0 5
Stamd b y
192.16 8.2.9
16:35:2 1
2011-01-0 5
Stamd b y
192.16 8.2.9
16:35:2 1
P.23
1
2
3
4
Snaps hot
Detec t
Web Ser ver
Setup
Playb ack
(Fig 4.8)
(Fig 4.9)
4.9 While the display area belongs to one single camera (as picture 4.8), click
to switch to mini screen, and users may click to take snapshot, then click
to return to original screen size. As shown above fig (Fig. 4.9)
4.10 Click to start recording, and the free disk space and Total
space will be shown on the lower side of the status bar then. Click
Detect
Dele ct
Detect
Dele ct
--
again to stop recording. As below fig (Fig 4.10)
Dele ct
Detect
1
2
3
4
Snaps hot
Detec t
Web Ser ver
Setup
Playb ack
2011-01-0 5
Stamd b y
192.16 8.2.9
16:35:2 1
Free dis k 01094 33.54 (MB)
Total Spac e 0117506 .66(M B)
(Fig 4.10)
Page 27
Pairing/Operation Method of Wireless Digital CCD Camera and Wireless Digital
WENSHING Confidential
Do Not Distribution
Pairing/Operation Method of Wireless Digital CCD Camera and Wireless Digital
USB Receiver
USB Receiver
Wireless Digital Camera and USB ReceiverWireless Digital Camera and USB Receiver
P.21
P.24
4.8 Click to enter into Record List. As below fig (Fig 4.8)
4.11 Click to enter into Record List. As below fig (Fig 4.11)
2011-01-0 5
2011-01-0 5
Stamd b y
Stamd b y
192.16 8.2.9
192.16 8.2.9
4.9 Users may choose one channel and set up the date and time when to start and end the recording, and click “Query”, the
4.12 Users may choose one channel and set up the date and time when to
16:35:2 1
16:35:2 1
(Fig 4.8)
(Fig 4.11)
date appointed record file will then show up on the Record List. As above fig (Fig 4.9)
Playba ck
Playback
1
1
2
1
1
2
2
3
3
4
4
Snaps hot
Snaps hot
Delec t
Detec t
Web Ser ver
Web Ser ver
Setup
Setup
Playb ack
Playb ack
Play ba ck
Playback
2
3
3
4
4
5
5
1x 2x 4x 8x 16x
1x 2x 4x 8x 16x
(Fig 4.9)
(Fig 4.12)
start and end the recording, and click “Query”, the date appointed record file
will then show up on the Record List. As above fig (Fig 4.9)
4.10 Double click on “Record List” to get ready for playback, and click on the play button to play or drag the scroll bar to set
4.13 Click the file on the “Record List” to start the display. Users may use the
progress.
control buttons or speed control bar. As below fig(Fig 4.13)
Record List
Record List
Open Video Folderr
Open Video Folder
Delete File
Delete File
speed control
speed control
Play control buttons
Play control buttons
(Fig 4.10)
(Fig 4.13)
Open Picture Folde
Open Picture Folder
Snapshot
Snapshot
Page 28
Pairing/Operation Method of Wireless Digital CCD Camera and Wireless Digital
WENSHING Confidential
Do Not Distribution
Pairing/Operation Method of Wireless Digital CCD Camera and Wireless Digital
USB Receiver
USB Receiver
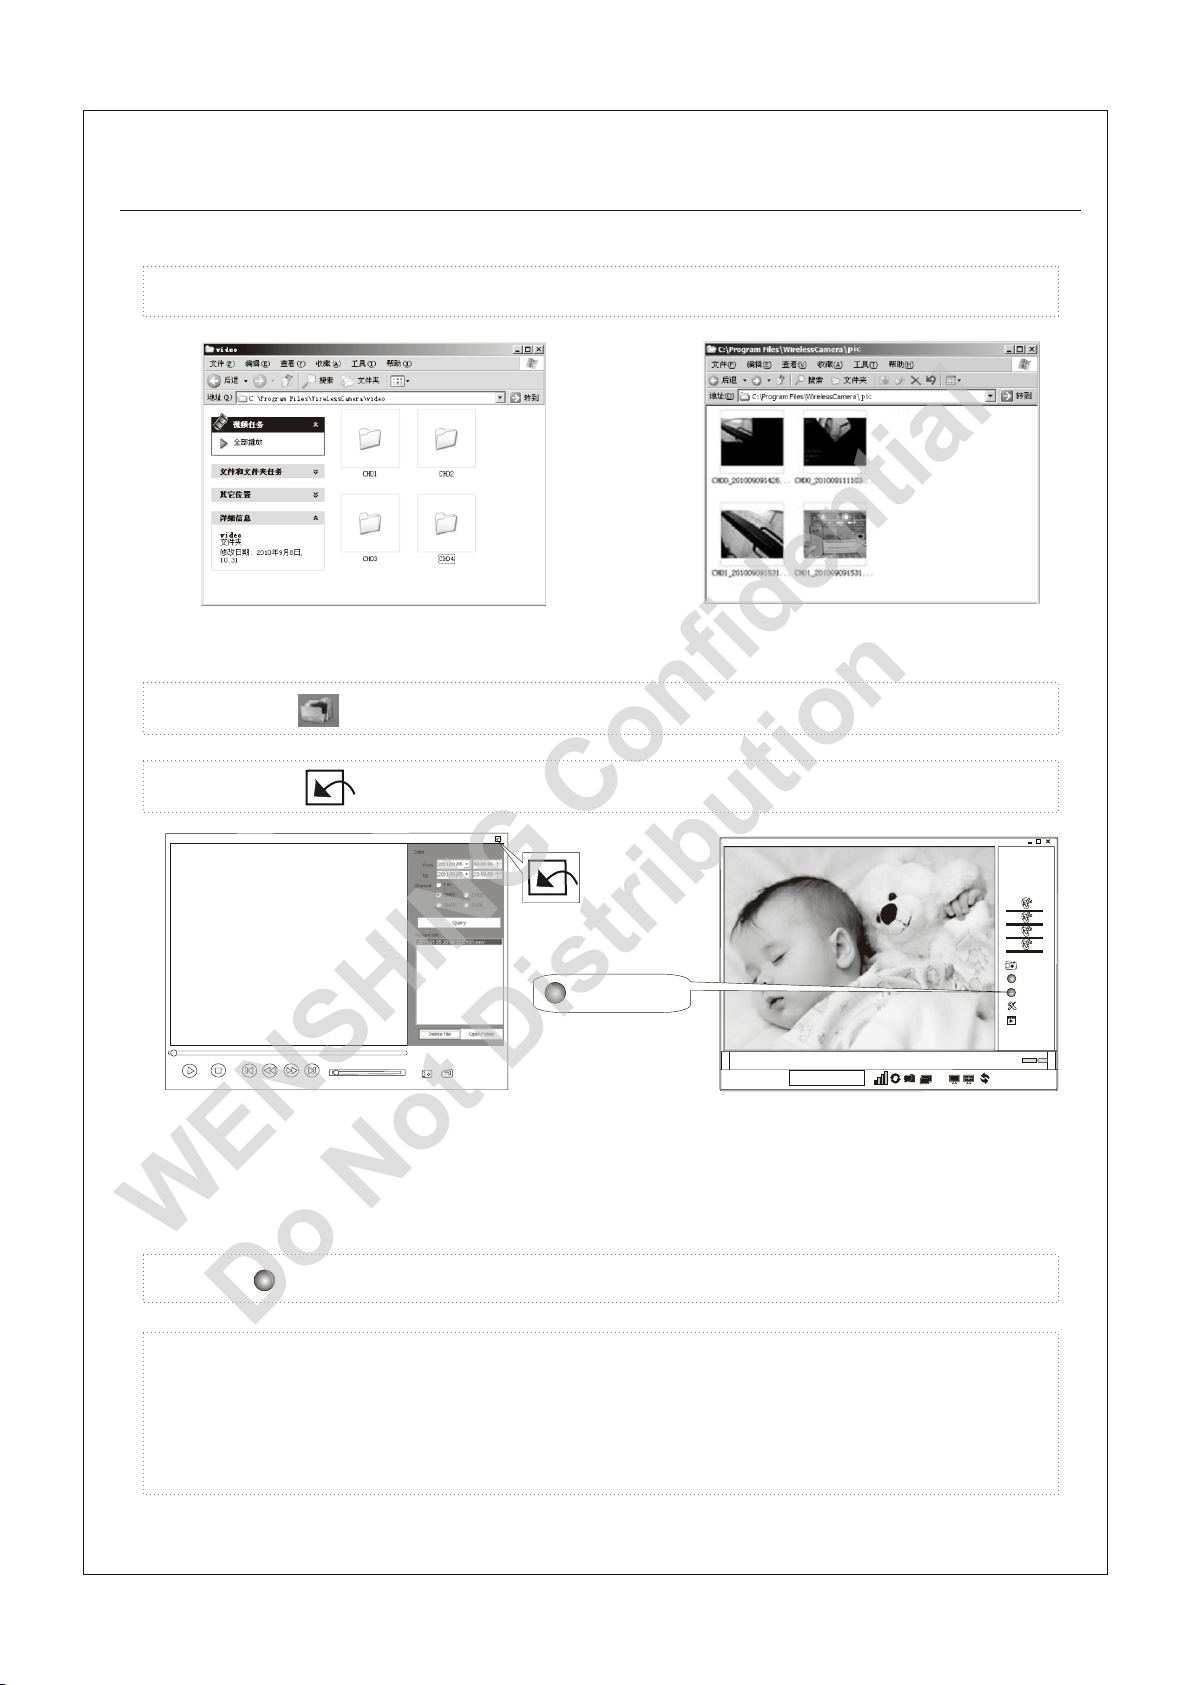
4.14 Click “Open Folder” to open video folders. As below fig (Fig 4.14)
P.25
(Fig 4.14)
(Fig 4.15)
4.15 Click to unfold pic folder. As above fig (Fig 4.15)
4.16 Click to return to surveillance mode. As below fig (Fig 4.16)
Web Server
1x 2x 4x 8x 16x
(Fig 4.16)
●Internet Surveillance●Internet Surveillance
2011-01-0 5
Stamd b y
192.16 8.2.9
16:35:2 1
Free dis k 01094 33.54 (MB)
Total Spac e 0117506 .66(M B)
(Fig 5.1)
1
2
3
4
Snaps hot
Detec t
Web Ser ver
Setup
Playb ack
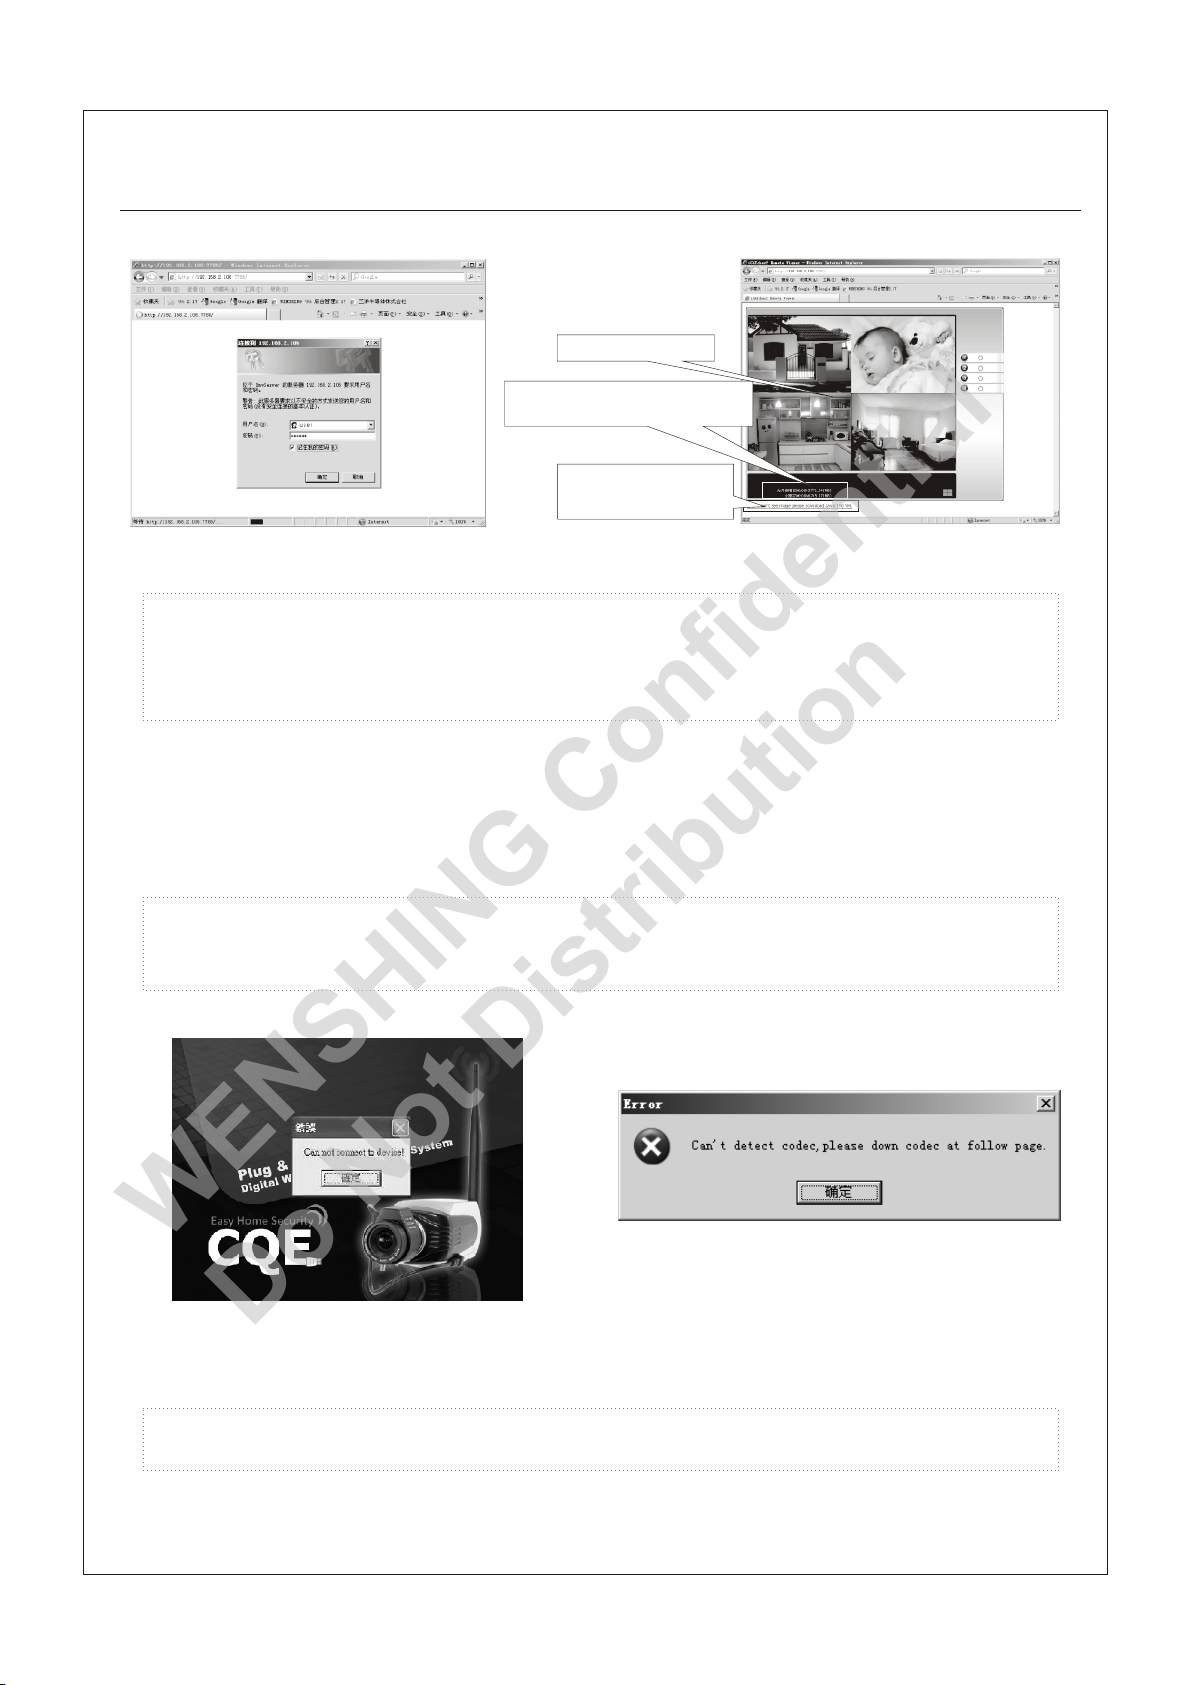
5.1 Click to turn on the Web server. As above fig (Fig 5.1)
Web Server
5.2 Key in http://IP: Port Number (Your computer IP and Port Number) as
website address, and press “Enter”, then type user name and pass
word“123456”. The message box will not appear if users did not set the pass
word. As below fig (Fig 5.2)
Page 29
Pairing/Operation Method of Wireless Digital CCD Camera and Wireless Digital
WENSHING Confidential
Do Not Distribution
Pairing/Operation Method of Wireless Digital CCD Camera and Wireless Digital
USB Receiver
USB Receiver
Image display
Total and remain space of us er's ha rd
drive
Download JAVA package
P.26
(Fig 5.2)
5.3 After the setting, users will enter into the internet surveillance page, if not,
please go to http://www.java.com/en/ and download the Java package. As
above fig (Fig 5.3)
●Abnormal Test●Abnormal Test
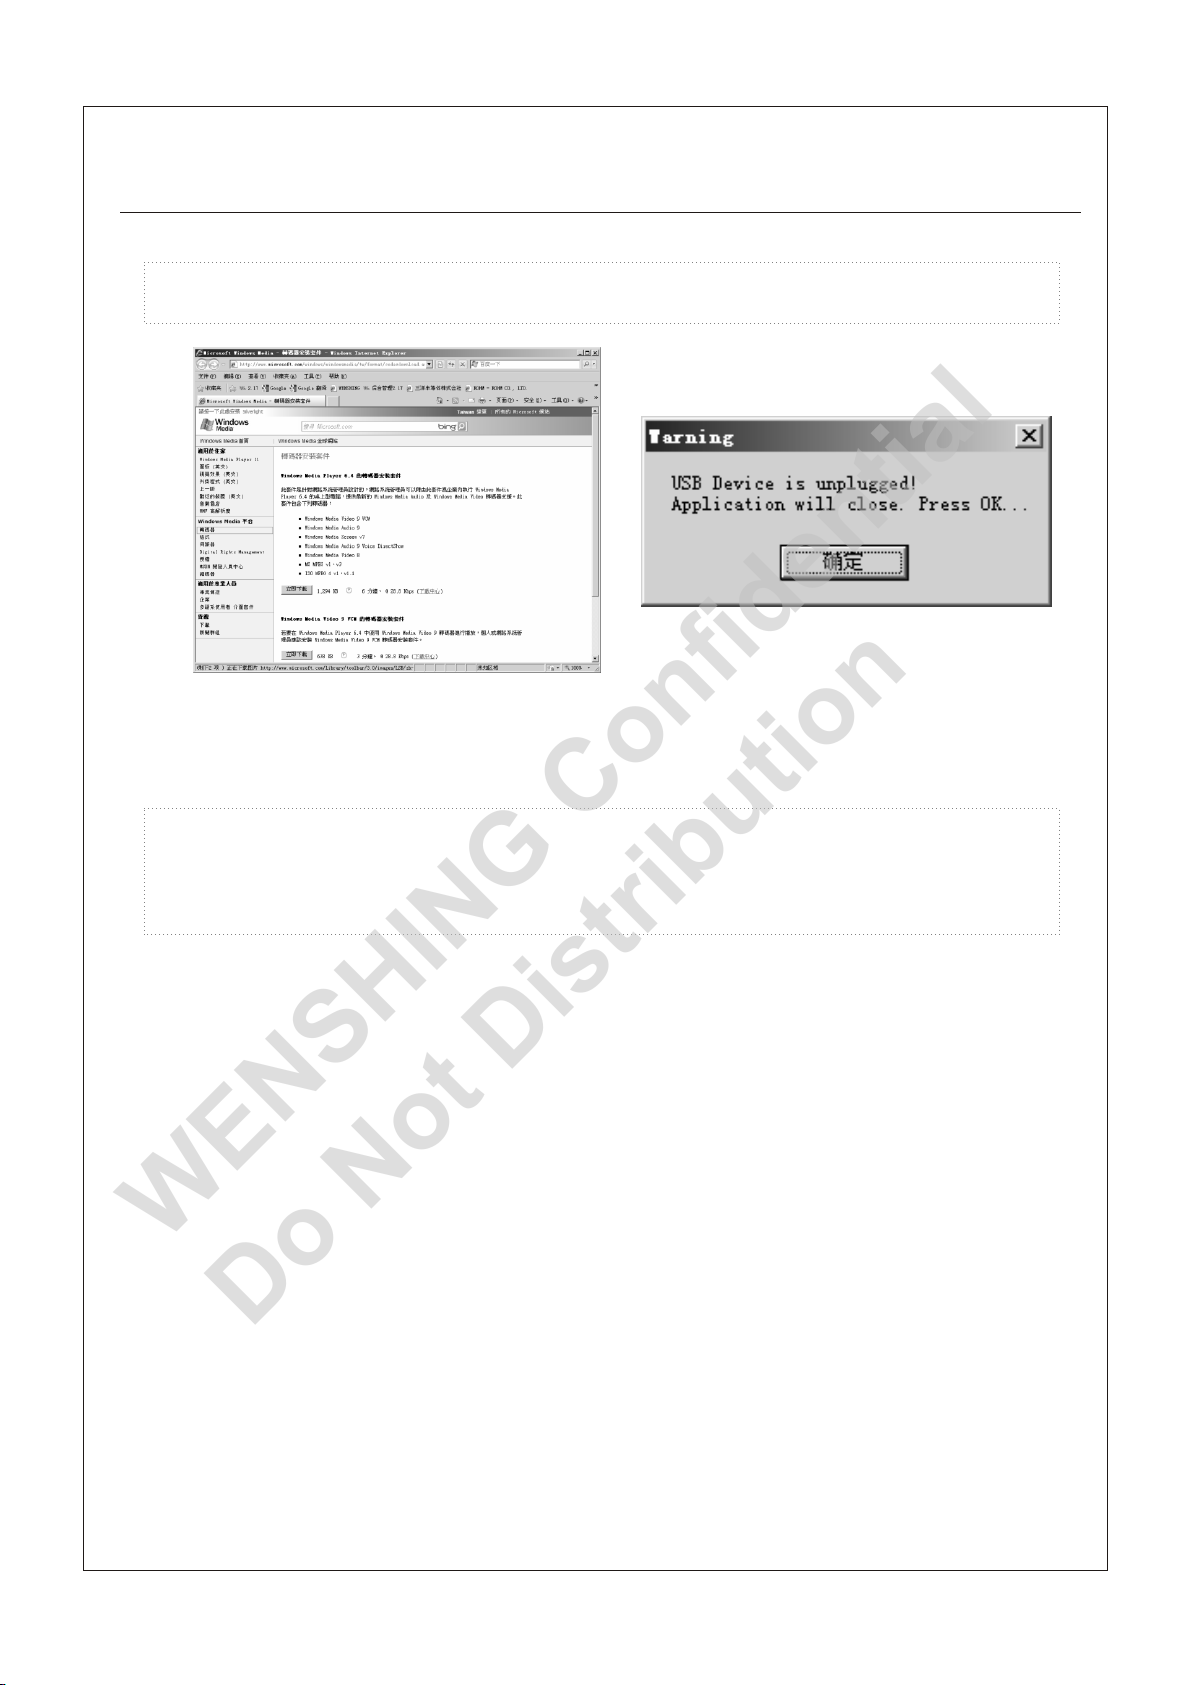
6.1 If the “Wireless Digital USB Receiver” is not plugged in to the computer, it
will display an error. As below fig (Fig 6.1)
(Fig 5.3)
(Fig 6.1)
6.2 Click “Confirm” to check the hint. As above fig (Fig. 6.2)
(Fig 6.2)
Page 30
Pairing/Operation Method of Wireless Digital CCD Camera and Wireless Digital
WENSHING Confidential
Do Not Distribution
Pairing/Operation Method of Wireless Digital CCD Camera and Wireless Digital
USB Receiver
USB Receiver
6.3 Click “Confirm” to enter into the page below. As below fig (Fig 6.3)
P.27
(Fig 6.3)
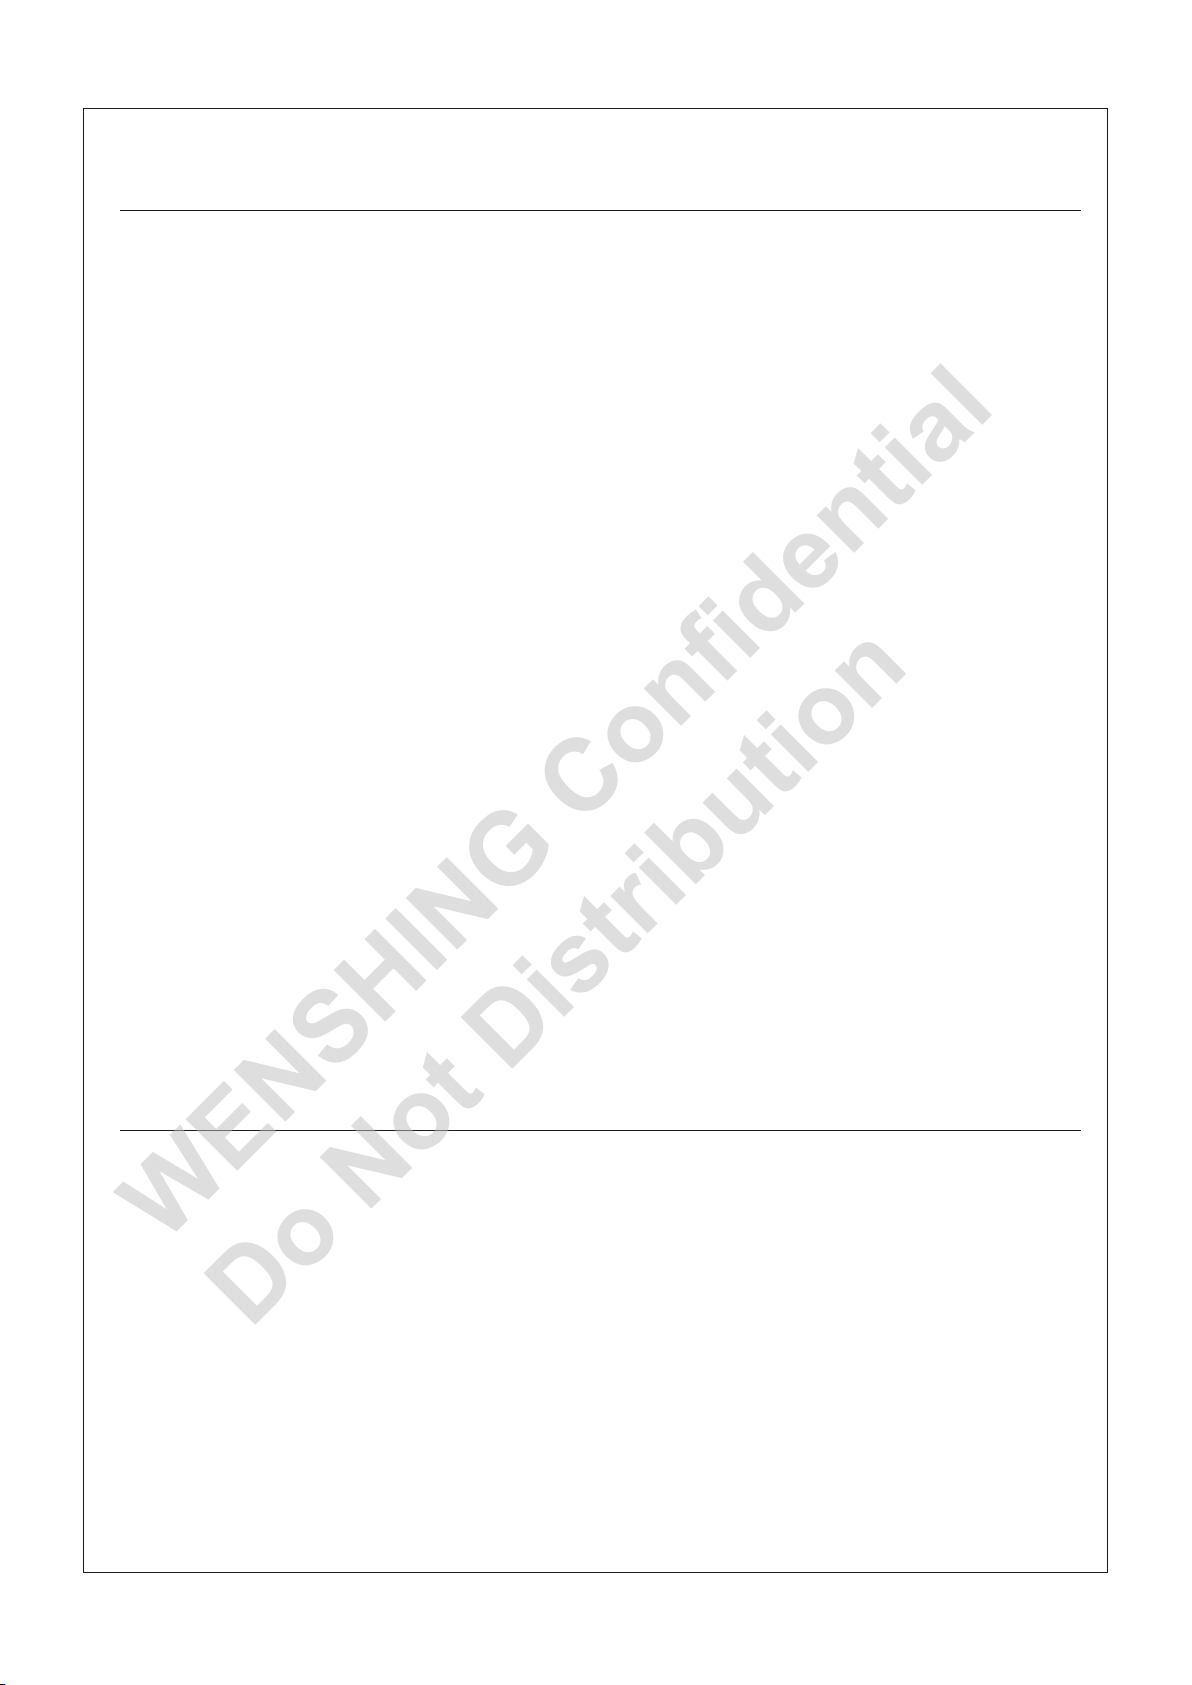
6.4 If the “wireless digital audio video USB controller” was plugged out while
running a normality test, a reminder screen will pop up as shown above
(Fig. 6.4)
(Fig 6.4)
Page 31
FCC Consistent Declaration (U.S.A. Only)FCC Consistent Declaration (U.S.A. Only)
WENSHING Confidential
Do Not Distribution
Attention: FCC rule regulation, modified and changed must allowed by WENSHING
Electronics company, otherwise that would make you operate this apparatus invalid.
This apparatus adopted test, according to chapter 15 that FCC regulation, accord with
Class B digital restrictions of device. These limits are designed to provide reasonable
protection, avoid to having harmful interference at home's environment.
This device may have radiated wireless frequency energy. If don't allow the instruction
manual, then may will interfere wireless communication. However, there is no any way
to guarantee, it will not be interfered in particular installed. If this device really causes
harmful interference, (It could be confirmed by turning on or off this device.) Advise
you to try to use the following ways modifying the interference situation.
!Relocation receiving antenna or altering its direction.
!Increase the distance between device and receiver.
!Please connect this device to the outlet in the circuit different from the receiver.
!The following manuals is published by Federal Communications Commission, they
must be helpful to all users.
!How to Identify and Resolve Radio-TV Interference Problems. (This manual can be
obtained by relevant departments of publication of the U.S. government.)
P.28
!Government Printing Office, Washington D.C., 20402. Stock No. 004-00398-5
Notice: The changes or modifications not expressly approved by the party responsible
for compliance could void the user's authority to operate the equipment.
IMPORTANT NOTE: To comply with the FCC RF exposure compliance requirements,
no change to the antenna or the device is permitted. Any change to the antenna or the
device could result in the device exceeding the RF exposure requirements and void
user's authority to operate the device.
Administrative Regulations on Low Power Radio Waves Radiated DevicesAdministrative Regulations on Low Power Radio Waves Radiated Devices
Article 12
Article 12
Without permission granted by the DGT, any company, enterprise, or user is not
allowed to change frequency, enhance transmitting power or alter original
characteristic as well as performance to a approved low power radio-frequency
devices.
Article 14
Article 14
The low power radio-frequency devices shall not influence aircraft security and
interfere legal communications; If found, the user shall cease operating immediately
until no interference is achieved.
The said legal communications means radio communications is operated in
compliance with the Telecommunications Act.
The low power radio-frequency devices must be susceptible with the interference
 Loading...