

Page 1

User's Guide
Lexicon® technoLogy
Page 2
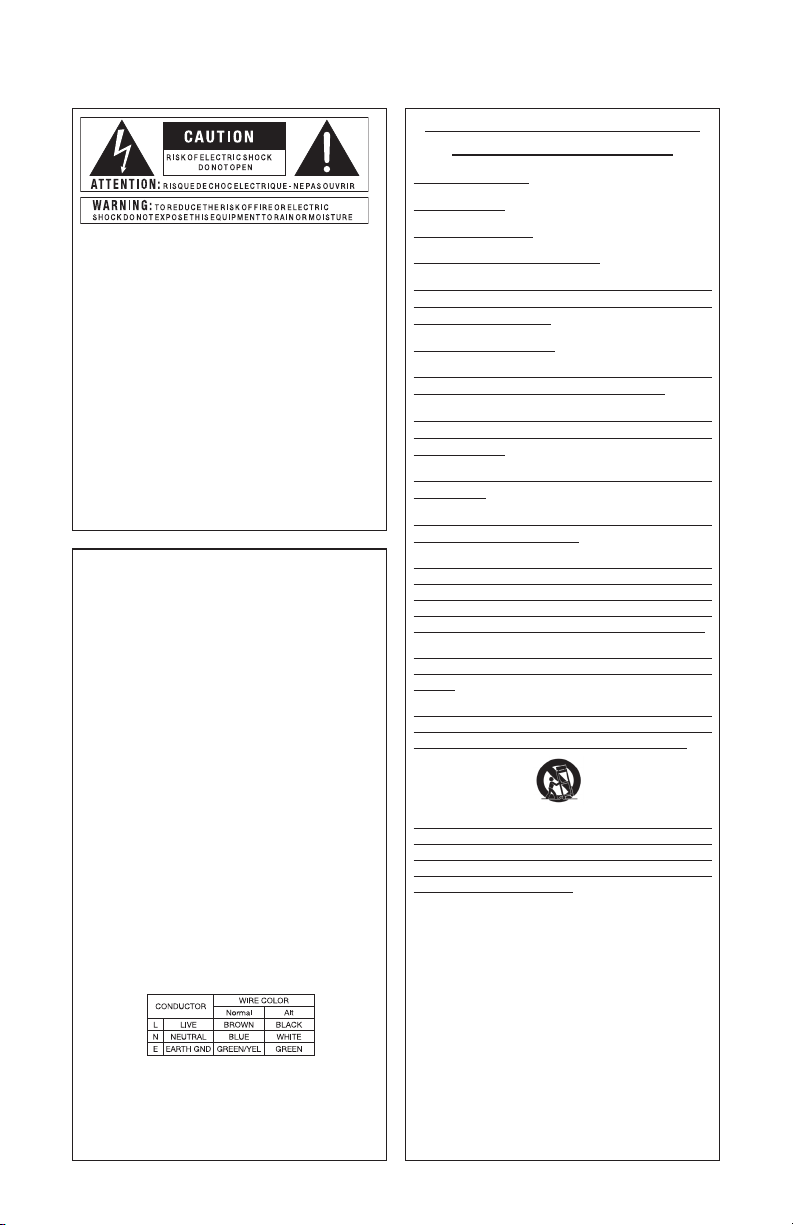
IMPORTANT SAFETY INSTRUCTIONS
WARNING FOR YOUR PROTECTION
READ THESE INSTRUCTIONS:
KEEP THESE INSTRUCTIONS
HEED ALL WARNINGS
FOLLOW ALL INSTRUCTIONS
The symbols shown above are internationally accepted symbols
that warn of potential hazards with electrical products. The
lightning flash with arrowpoint in an equilateral triangle means
that there are dangerous voltages present within the unit. The
exclamation point in an equilateral triangle indicates that it is
necessary for the user to refer to the owner’s manual.
These symbols warn that there are no user serviceable parts
inside the unit. Do not open the unit. Do not attempt to service
the unit yourself. Refer all servicing to qualified personnel.
Opening the chassis for any reason will void the manufacturer’s
warranty. Do not get the unit wet. If liquid is spilled on the
unit, shut it off immediately and take it to a dealer for service.
Disconnect the unit during storms to prevent damage.
SAFETY INSTRUCTIONS
NOTICE FOR CUSTOMERS IF YOUR UNIT IS EQUIPPED WITH A POWER CORD.
WARNING: THIS APPLIANCE MUST BE EARTHED. CONNECT ONLY TO A
MAINS SOCKET OUTLET WITH PROTECTIVE EARTHING CONNECTION.
The cores in the mains lead are coloured in accordance with the following code:
GREEN and YELLOW - Earth BLUE - Neutral BROWN - Live
As colours of the cores in the mains lead of this appliance may not
correspond with the coloured markings identifying the terminals in your
plug, proceed as follows:
•
The core which is coloured green and yellow must be connected to the
terminal in the plug marked with the letter E, or with the earth symbol,
or coloured green, or green and yellow.
•
The core which is coloured blue must be connected to the terminal
marked N or coloured black.
•
The core which is coloured brown must be connected to the terminal
marked L or coloured red.
This equipment may require the use of a different line cord, attachment
plug, or both, depending on the available power source at installation.
If the attachment plug needs to be changed, refer servicing to qualified
service personnel who should refer to the table below. The green/yellow
wire shall be connected directly to the units chassis.
WARNING: If the ground is defeated, certain fault conditions in
the unit or in the system to which it is connected can result in full
line voltage between chassis and earth ground. Severe injury or
death can then result if the chassis and earth ground are touched
simultaneously.
DO NOT USE THIS APPARATUS NEAR WATER
THE APPARATUS SHALL NOT BE EXPOSED TO DRIPPING OR SPLASHING
LIQUID AND NO OBJECT FILLED WITH LIQUID, SUCH AS VASES, SHALL
BE PLACED ON THE APPARATUS.
CLEAN ONLY WITH A DRY CLOTH.
DO NOT BLOCK ANY OF THE VENTILATION OPENINGS. INSTALL IN
ACCORDANCE WITH THE MANUFACTURER’S INSTRUCTIONS.
DO NOT INSTALL NEAR ANY HEAT SOURCES SUCH AS RADIATORS, HEAT
REGISTERS, STOVES, OR OTHER APPARATUS (INCLUDING AMPLIFIERS)
THAT PRODUCE HEAT.
ONLY USE ATTACHMENTS/ACCESSORIES SPECIFIED BY THE
MANUFACTURER.
UNPLUG THIS APPARATUS DURING LIGHTNING STORMS OR WHEN
UNUSED FOR LONG PERIODS OF TIME.
Do not defeat the safety purpose of the polarized or grounding-type plug. A
polarized plug has two blades with one wider than the other. A grounding
type plug has two blades and a third grounding prong. The wide blade or
third prong are provided for your safety. If the provided plug does not fit
your outlet, consult an electrician for replacement of the obsolete outlet.
Protect the power cord from being walked on or pinched particularly at
plugs, convenience receptacles, and the point where they exit from the
apparatus.
Use only with the cart stand, tripod bracket, or table specified by the manufacturer, or sold with the apparatus. When a cart is used, use caution when
moving the cart/apparatus combination to avoid injury from tip-over.
Refer all servicing to qualified service personnel. Servicing is required when
the apparatus has been damaged in any way, such as power-supply cord
or plug is damaged, liquid has been spilled or objects have fallen into the
apparatus, the apparatus has been exposed to rain or moisture, does not
operate normally, or has been dropped.
POWER ON/OFF SWITCH: For products provided with a power switch, the
power switch DOES NOT break the connection from the mains.
MAINS DISCONNECT: The plug shall remain readily operable. For rackmount or installation where plug is not accessible, an all-pole mains
switch with a contact separation of at least 3 mm in each pole shall be
incorporated into the electrical installation of the rack or building.
FOR UNITS EQUIPPED WITH EXTERNALLY ACCESSIBLE FUSE RECEPTACLE:
Replace fuse with same type and rating only.
MULTIPLE-INPUT VOLTAGE:
different line cord, attachment plug, or both, depending on the available
power source at installation. Connect this equipment only to the power
source indicated on the equipment rear panel. To reduce the risk of fire or
electric shock, refer servicing to qualified service personnel or equivalent.
This Equipment is intended for rack mount use only.
This equipment may require the use of a
Page 3
IMPORTANT SAFETY INSTRUCTIONS
Section Title
Rack Spacing Requirement
ELECTROMAGNETIC
COMPATIBILITY
This unit conforms to the Product
Specifications noted on the Declaration
of Conformity. Operation is subject
to the following two conditions:
•
this device may not cause harmful
interference, and
•
this device must accept any interference
received, including interference that may
cause undesired operation.
Operation of this unit within significant
electromagnetic fields should be avoided.
•
use only shielded interconnecting cables.
The model LHD240 VAE main unit must be mounted
with a minimum of 1.5 inches (1U rack space) of
space above and below it for proper air ventilation.
U.K. MAINS PLUG WARNING
A molded mains plug that has been cut off
from the cord is unsafe. Discard the mains
plug at a suitable disposal facility.
NEVER UNDER ANY
CIRCUMSTANCES SHOULD YOU
INSERT A DAMAGED OR CUT
MAINS PLUG INTO A 13 AMP
POWER SOCKET.
Do not use the mains plug without the fuse
cover in place. Replacement fuse covers
can be obtained from your local retailer.
Replacement fuses are 13 amps and MUST
be ASTA approved to BS1362.
Page 4
Service Info/Warranty
SERvICE INFO
If you require technical support, contact Wenger Corp. Customer Service at
1-800-887-7145.
WARRANTY
This warranty is valid only for the original purchaser.
1. Wenger Corp. warrants this product to be free from defects in materials and work
manship under normal use and service.
3. Wenger Corp.'s liability under this warranty is limited to repairing or, at our dis
cretion, replacing defective materials that show evidence of defect. All parts and
labor will be covered up to a period of 5 years.
4. Wenger Corp. reserves the right to make changes in design or make additions to
or improvements upon this product without incurring any obligation to install the
same additions or improvements on products previously manufactured.
5. The foregoing is in lieu of all other warranties, expressed or implied, and Wenger
Corp. neither assumes nor authorizes any person to assume on its behalf any
obligation or liability in connection with the sale of this product. In no event shall
Wenger Corp. be liable for special or consequential damages or from any delay in
the performance of this warranty due to causes beyond its control.
-
-
4
Page 5
TAblE OF CONTENTS
Service Info . . . . . . . . . . . . . . . . . . . . . . . . . . . . . . . . . . . . . . . . . . . . . . . . . . . . . . . . . . . . 4
Introduction . . . . . . . . . . . . . . . . . . . . . . . . . . . . . . . . . . . . . . . . . . . . . . . . . . . . . . . . . . . 6
Welcome
Features - Acoustic Environments
Features - Recording/Playback
The Keypad . . . . . . . . . . . . . . . . . . . . . . . . . . . . . . . . . . . . . . . . . . . . . . . . . . . . . . . . . . . . 8
Diagram
User Connections . . . . . . . . . . . . . . . . . . . . . . . . . . . . . . . . . . . . . . . . . . . . . . . . . . . . . . 10
Using the VAE . . . . . . . . . . . . . . . . . . . . . . . . . . . . . . . . . . . . . . . . . . . . . . . . . . . . . . . . . 11
Selecting a Room
Adjusting Volume
Mute
Selecting a Session
Recording
Playback
External Connections . . . . . . . . . . . . . . . . . . . . . . . . . . . . . . . . . . . . . . . . . . . . . . . . . . . 14
USB
Record Output
Footswitch
Specifications . . . . . . . . . . . . . . . . . . . . . . . . . . . . . . . . . . . . . . . . . . . . . . . . . . . . . . . . . 15
Declaration of Conformity . . . . . . . . . . . . . . . . . . . . . . . . . . . . . . . . . . . . . . . . . . . . . . . 16
. . . . . . . . . . . . . . . . . . . . . . . . . . . . . . . . . . . . . . . . . . . . . . . . . . . . . . . . . . 6
. . . . . . . . . . . . . . . . . . . . . . . . . . . . . . . . . . . . . . 6
. . . . . . . . . . . . . . . . . . . . . . . . . . . . . . . . . . . . . . . . 7
. . . . . . . . . . . . . . . . . . . . . . . . . . . . . . . . . . . . . . . . . . . . . . . . . . . . . . . . . . 8
. . . . . . . . . . . . . . . . . . . . . . . . . . . . . . . . . . . . . . . . . . . . . . . . . . 11
. . . . . . . . . . . . . . . . . . . . . . . . . . . . . . . . . . . . . . . . . . . . . . . . . . 12
. . . . . . . . . . . . . . . . . . . . . . . . . . . . . . . . . . . . . . . . . . . . . . . . . . . . . . . . . . . . . 12
. . . . . . . . . . . . . . . . . . . . . . . . . . . . . . . . . . . . . . . . . . . . . . . . . 13
. . . . . . . . . . . . . . . . . . . . . . . . . . . . . . . . . . . . . . . . . . . . . . . . . . . . . . . . 13
. . . . . . . . . . . . . . . . . . . . . . . . . . . . . . . . . . . . . . . . . . . . . . . . . . . . . . . . . 13
. . . . . . . . . . . . . . . . . . . . . . . . . . . . . . . . . . . . . . . . . . . . . . . . . . . . . . . . . . . . . 14
. . . . . . . . . . . . . . . . . . . . . . . . . . . . . . . . . . . . . . . . . . . . . . . . . . . . . 14
. . . . . . . . . . . . . . . . . . . . . . . . . . . . . . . . . . . . . . . . . . . . . . . . . . . . . . . . 14
Table of Contents
5
Page 6

Introduction
INTROdUCTION
WELCOME
Congratulations on your selection of the Virtual Acoustic Environments (VAE) system
and welcome to a world of possibilities and inspiration. With this equipment you have
enabled your music practice room to become the ultimate in rehearsal rooms. From a
small recital room to a large auditorium or even a spacious cathedral, you can practice
your musical talents in a wide variety of virtual performance spaces. With the push of
a button, the VAE allows you to change your practice space into a wide variety of “live”
performance spaces. The VAE system also allows you to capture and record your practice sessions giving you instant feedback on your performance.
Musicians know that the acoustic space you play in affects the feel of a performance
and that musical cues from the sound of their instrument in that space are an important part of optimizing the timing and feel of a performance. With the VAE Virtual
Practice Room system you have full control of the acoustic space giving you the ability
to match the sound of the space to your acoustic needs. This flexibility and the excitement it generates leads to motivation and inspiration in any musician.
It has been said that “each musician is their own worst critic”. The ability to instantly
hear back your practice session or performance is an important self-motivating tool
for any musician to improve their capabilities. The session recording capabilities of the
VAE system give you an easy way to record and play back your practice sessions. With
the capability to record up to nine sessions and a simple user control interface that
includes Record, Stop, Play, Fast Forward, and Rewind and a display showing the current session number and playback time, you have a complete self-critiquing solution
at your fingertips.
After you have captured your performance you may download a copy of the sound file
to your own personal computer through the USB port.
There is truly nothing like the VAE system in creating the optimal practice environment
for musicians and giving them the tools they need to get the most from their practice
sessions.
FEATURES - ACOUSTIC ENvIRONMENTS
• Accurately emulates nine common performance spaces
including:
• Rooms (practice, Baroque)
• Recital Halls (medium and large)
• Auditoriums (large, medium, and small)
• Special Spaces (Cathedral, Arena)
• Patented LEXICON © Virtual Environment technology
6
Page 7

FEATURES - RECORDING/PLAYBACK
• Ability to Record and Playback Nine Sessions
• Playback of Prerecorded Sessions
• Intuitive Wall-Mounted Keypad Interface
• Bright LED Display Shows:
• Current Session Number
• Record/Playback Time (Minutes and Seconds)
• Nine-Button Listening Environment Select with LED Indicators
• Adjustable Volume
• Single-Button Mute with LED Indicator
• Dedicated Recording Buttons Including:
• Record Button with integrated Red LED indicator
• Play Button with integrated Green LED indicator
• Stop Button (Session Erase when button is held down)
• Fast Forward and Rewind Buttons
Introduction
• Session Select Button
• USB Connection for Retrieving Recorded Sessions
• Remote Footswitch Connection for Remote Control:
• Optional 3-Button Footswitch
• Hands-Free Operation of Recording and Playback
• Record, Play, Stop, Erase, and Restart Functions
• Record-Out Jack for External Recording Equipment
7
Page 8

The Keypad
ThE KEYPAd
DIAGRAM
SESSION INDICATOR
This two-digit display shows which of the 9 possible session tracks is selected. This session will play or be recorded when the appropriate key is pressed.
TIME INDICATOR
The four-digit display shows the elapsed time in seconds for playback or record files. If
the selected session track is empty this display will show --:--.If the session is playing or
recording, this display will show the elapsed time in minutes and seconds.
STOP
This button stops playback or record. In playback mode the session is stopped and
may be started again at the same place. If playback is stopped and the STOP button
is pressed again the session will rewind to the start. If the STOP button is pressed and
held for two seconds, the current session is erased and the display will read --:--.
RECORD
This button starts recording of the selected session. Recording can only be initiated
if the current session track is empty and the display reads --:--. Recording cannot be
done while a USB connection is active.
8
Page 9

PLAY
This button will start play back of the selected session. The green LED on the button
indicates that playback is active. Playback cannot be run while a USB connection is
active.
REW
Pressing this button while playing a session will cause the playback to skip backwards
10 seconds at a time. Pressing this button while playback is stopped will rewind the
session start time in 10-second steps to any desired location.
FWD
Pressing this button while playing a session will cause the playback to skip forward 10
seconds at a time. Pressing this button while stopped will change the session start time
in 10-second steps.
CLEAR
Pressing the REW and FWD buttons simultaneously (when not playing or recording)
will clear the contents of the current session and the display will read --:--.
SELECT
This button will change the session number. Each time it is pressed the session number on the display increments. The time indicator will show the length of that session
for about two seconds after the SELECT button is pressed and then reset to “00:00”
awaiting commands to play or record from the beginning of the session.
The Keypad
PERFORMANCE SPACE SELECTION BUTTONS
Pressing any one of these mutually exclusive buttons will change the Active Acoustics
settings to the indicated performance space and light the corresponding LED.
vOLUME UP
This button will incrementally raise the system volume for Active Acoustics and playback.
9
Page 10

User Connections
vOLUME DOWN
This button will incrementally lower the system volume for Active Acoustics and playback.
MUTE
This button will mute the Active Acoustics coming from the system. Playback sound is
not muted but can be stopped with the STOP button.
USER CONNECTIONS
THE USB CONNECTION
This Type B connection is for output of the prerecorded files from the VAE memory to
a PC. Connect a USB cable from a laptop computer to this jack and a removable disk
will automatically be activated on the computer system. Any of the session files saved
in the VAE memory can be copied onto the laptop. This function requires Windows®
98 second edition or higher along with the appropriate drivers.
THE RECORD OUTPUT
This 1/8” stereo jack is a 2-channel audio output of the sound in the room which can
be used for external recording or headphones.
THE FOOTSWITCH CONNECTION
This 1/4” TRS jack is a 3-wire connection to an optional Wenger footswitch. If the
footswitch is connected then the STOP, RECORD and PLAY functions can be initiated
from either the footswitch or the keypad.
10
Page 11

USINg ThE vAE
SELECTING A ROOM
You have instant control over the type of room that you practice in. Feel free to try
each of the nine virtual performance spaces to experience how they sound. They are
arranged basically in order of room size, but the type of room makes a difference in the
sound as well. Once a room type is selected, that selection will remain until another
one is chosen. The room selection defaults to PRACTICE ROOM at power on. A complete description of each room type is given below.
PRACTICE ROOM
Modeled after the acoustics of a typical 8’ x 10’ music practice room with minimal
acoustic treatment on the walls.
BAROQUE ROOM
A room with seating for up to 125, similar to the spaces in which music composed
during the Baroque period was performed. This room is modeled after a typical
ornate room of that era with hard walls, floors and high ceiling, giving it a characteristic brightness and envelopment. Since these rooms were quite reflective, they
were also quite “loud” in comparison to larger spaces meant for greater numbers of
performers. The live feel of this space is ideally suited for smaller arrangements as
well as oratorios and instrumental concertos.
MEDIUM RECITAL HALL
A modest-size recital hall with seating from 100 to 200 seats, providing an intimate
performance space. These types of rooms are typically found in schools of music
on college campuses with active music programs. This room is modeled after typical recital halls constructed of hard walls and ceilings with angled wood panels
along the sidewalls and in the rear of the room providing diffusion to the space.
Characteristics of these rooms are good clarity and warmth with smooth decay provided by nice, even diffusion of sound within the hall.
Using the VAE
LARGE RECITAL HALL
A larger recital hall, ranging from 350 to 500 seats. Halls like these are typically
found on college campuses and intended for performances of larger groups. The
hall is modeled after spaces with hard walls and high ceilings with the addition of
diffusing wood panels along the side and back walls. In the ceiling area are reflective clouds to provide enhanced early reflections. Characteristics of this space are a
bright sound with a smooth, longer decay of sound.
SMALL AUDITORIUM
A small auditorium space with seating for 500. Spaces like this are often found on
college campuses, churches, and some civic facilities. Because many groups share
them, these auditoriums are not necessarily dedicated for music performance. The
space is modeled after typical construction of hard walls and ceilings with some
absorption in the back of the room to prevent strong reflections back to the stage.
The room has a small stage without a proscenium. Characteristics of these spaces
include strong early reflections due to the smaller size, a bright sound and a relatively short decay to the sound.
11
Page 12

Using the VAE
MEDIUM AUDITORIUM
A modest-size auditorium with 750 to 900 seats. These types of auditoriums are
found in high schools, college campuses, churches, and as civic facilities in many
communities. The medium auditorium is modeled after a space with hard walls
and ceilings with absorption on the back wall to prevent strong reflections back
to the stage. The room has a small proscenium stage with additional reflective
surfaces located on the sidewalls in the ceiling area near the stage to improve early
reflections and diffusion. The sound character of this space is a bright clear sound
with a modest decay in the sound.
LARGE AUDITORIUM
A large space with 1,200 to 1,500 seats. These types of auditoriums are common
in larger high schools, college schools of music, larger churches, performing arts
centers, and civic facilities. It’s modeled with hard walls and ceilings, carpeted aisle
ways, padded seating, and absorption on the back wall to prevent strong reflections
back to the stage. The room has a large proscenium stage with sidewalls containing wood diffusing surfaces and additional reflective surfaces in the ceiling area
near the stage. Characteristics of this space include a warm, enveloping sound yet
still maintaining good clarity to the sound. There is a noticeably longer decay of
sound.
CATHEDRAL
Large, rectangular stone cathedral with highly reflective stone walls along the
sides providing early reflections. High ceilings and a long sanctuary contribute to
a quick buildup of sound with a long decay. Choral, organ and soloists playing
instruments with smooth attacks are highlighted in this room.
ARENA
Very large space with seating for 10,000. The space is modeled after typical indoor
sports facilities found on larger college campuses and in larger cities. The characteristic sound of these spaces is dominated by hard surfaces with little absorption.
Sidewalls are located some distance away, creating early reflections that are noticeably delayed. Sound decays very slowly in these types of spaces due to the size and
larger area of hard reflecting surfaces.
ADjUSTING vOLUME
Press the Volume UP/DOWN buttons to adjust the volume as desired. This is normally
only necessary for playback of your sessions as the volume level is preset for each performance space. There may be some cases when practicing with loud instruments that
you may want to turn the volume down. These buttons only affect the volume level of
playback if pressed during playback. If pressed when playback is stopped, they change
the volume of the Active Acoustics.
MUTE
Press the MUTE button to toggle on or off the Active Acoustics of the system. The corresponding LED shows if the sound of the Active Acoustics is off. When playback is
started, the Active Acoustics is automatically muted to avoid double reverberation, but
can be un-muted manually if desired.
12
Page 13

SELECTING A SESSION
Each time you record in the Virtual Practice Room it is saved as a session. There are
9 possible sessions that you can record to. To change the session, so that you do not
record over a previously recorded session, use the SELECT button. Pressing the button
will increment the session number as shown on the session display. It wraps around
from 9 back to 1. As you change to a new session the time display will show the length
of the session for two seconds and then it will show 00:00.
If you wish to erase a previously recorded session, press the SELECT button until the
correct session number is displayed and then press the REW and FWD (CLEAR) buttons
simultaneously until the time display shows --:--. Pressing and holding the STOP button for two seconds will also clear the memory in the current session.
RECORDING
A very useful feature of the VAE is its digital recording capability. To record your session just choose a session number with the SELECT button and then press RECORD.
Pressing the SELECT button will change the selected session number to the next higher
number. The SELECT button will change the session display up to 9 and then wrap
back to session 1. There is enough memory to record one hour of total session time.
The total record time can be divided up in any way amongst sessions 1 thru 9. The
display will show “FULL” if you try to record when there is no more memory. In this
case, select a session you don't want to keep and simply erase it.
While recording, the red LED on the “RECORD” button is illuminated and the TIME
display will show the elapsed time from the start of recording. To stop recording, press
the STOP button. The recorded session will remain in internal memory, even after
power off, until cleared.
Using the VAE
Recording can also be done from the record output to any external record device. See
the section on “RECORD OUTPUT” below.
PLAYBACK
After a session is recorded you can play it back at anytime. If you have just recorded a
session, simply press PLAY and it will start playing from the beginning. You can select
any of the 9 sessions to play by first pressing the SELECT button until the correct session number is shown on the display and then pressing PLAY.
During playback the green LED on the button will illuminate and the elapsed time
from the beginning of the session is continually updated. It will only playback what
was previously recorded. Pressing PLAY while it is already playing causes no disruption
of the PLAY mode. You can fast forward or fast rewind through a session by pressing
the FWD or REW buttons. If the FWD or REW buttons are individually pressed and
held, multiple 10-second intervals will pass without the need to repeatedly press the
button. These buttons will skip through the session in 10-second steps. Note that when
playback is started the active acoustics are automatically muted, but can be manually
13
Page 14

External Connections
un-muted, if desired. Volume in playback mode can be adjusted as desired with the
Volume UP/DOWN buttons.
Pressing STOP when playing back a session will stop the session. If you press PLAY
again the session will continue playing from that point. If you press STOP twice in
succession the session will be rewound to the beginning.
ExTERNAl CONNECTIONS
USB
After one or more sessions are recorded you can download them to an external personal computer. Simply plug a USB cable from the laptop to the USB connection on
the keypad. The VAE will show up as an external drive. The filenames shown on the
VAE correspond to the session numbers. Copy the files from the VAE to the desired location on your computer. This functionality requires Windows® 98 (Second Edition)
or higher to operate correctly. These files are standard stereo .WAV files recorded at
44.1 kHz 16-bit resolution. The files are in a folder called Wenger and are named
SESSION1.WAV, SESSION2.WAV … through SESSION9.WAV.
RECORD OUTPUT
The "Record Out” connection provides a line level output that can be connected to any
external record device (such as an MP3 recorder or Apple® iPodTM). You will need
a cable with a stereo mini plug (3.5mm) on one end and with a plug that fits your
record device on the other end. The record device must provide its own level control for
proper recording.
FOOTSWITCH (OPTIONAL)
If you are recording a lot and don’t want to keep walking to the wall to start and stop
the recorder you can get a footswitch to operate this feature from your chair. A 1/4”
jack provides the connection to a Wenger footswitch. Simply plug in the foot pedal,
place it on the floor where you will be sitting and press the buttons with your foot to
start RECORD, start PLAY, STOP or erase the current session by holding down the STOP
button for at least two seconds.
NOTE: To avoid damage to the VAE do not connect any other devices to this jack.
14
Page 15

SPECIFICATIONS
Microphone Inputs: 2 Female XLR, Pin 2 Hot
Input Impedance: 3000 Ohms Balanced
Phantom Power: +24 Volt
Gain: 38 dB
EIN: -95 dB A-weighted @ 45 dB gain and 600 Ohm
source impedance
Maximum Input level: -15 dBu before limiting
Frequency Response: 20 to 20 kHz within 1dB
THD+N: 0.007%
Sample Rate: 44.1 kHz
Dynamic Range: A/D > 100 dB, 24 Bit resolution
D/A > 100 dB, 24 Bit resolution
Record Output: 1/8” TRS jack
Level: 0 dBu
Impedance: 330 Ohms
Power Outputs: Four 1/4” TRS and two 4-pin EURO (5.08mm pitch)
Output Impedance: 4/8/16 Ohm loads, safety shutdown
Frequency Response: 20 Hz to 20 kHz within 1 dB
Power into 8 Ohms: 25 watts RMS @ 1% THD
Power into 4 Ohms: 35 watts RMS @ 1% THD
S/N: 106 dB unweighted
THD: 0.001% 20 Hz to 400 Hz increasing to 0.1% at 20 kHz
(Measured at half power)
IMD: Less than 0.01%
Specifications
Remote control
connector: 10-pin Molex type 42404
USB type B socket: For downloading recorded files
Compact Flash socket: For storing recorded sessions
Internal 15-band 2/3 octave Equalizer
Internal pink noise generator and real time analyzer
Power Requirements: 100-120 Volts~ or 220-240 Volts~ 50/60 Hz
160 Watts typical
Temperature: 0 to 40 degrees C
Humidity: 95% max non-condensing
Dimensions:
Main Unit: 17.4”W x 3.5“H x 11.5“D (Rack mount face is 19.0”
Wide)
Remote: 5.1”W x 8.2”H x 2.375” D
Weight:
Main Unit: 17.5 lbs.
Remote: .75 lbs
15
Page 16

Declaration of Conformity
If you require technical support, contact Wenger Corp. Customer Service at
1-800-887-7145.
dEClARATION OF CONFORMITY
Manufacturer’s Name: Lexicon Professional
Manufacturer’s Address: 8760 S. Sandy Pkwy., Sandy, UT 84070, USA
Declares that the product:
Product name: Lexicon LHD240
Note: Product name may be suffixed by the letters-EU.
Product option: LHD240
Conforms to the following Product Specifications:
Safety: IEC 60065 (2002)
EMC: EN 55013 (2001+A1), EN 55020 (1998)
Supplementary Information: The product herewith complies with the requirements of
the Low Voltage Directive 73/23/EEC and the EMC Directive 89/336/EEC as amended
by Directive 93/68/EEC.
Vice-President of Engineering, 8760 S. Sandy Parkway, Sandy, Utah 84070, USA
Date: August 05, 2005
European Contact: Your local Lexicon Professional Sales and Service Office or Harman
Music Group, 8760 S. Sandy Pkwy., Sandy, UT 84070 USA Ph: (801) 566-8800
Fax: (801) 568-7583
161718
Page 17

Page 18

Page 19

19
Page 20

555 Park Drive | Owatonna, MN 55060 U.S.A.
Model LHD240
Phone: 1-800-887-7145 Fax: 507-455-4258
Questions or comments?
Visit our World Wide Web home page at: www.wengercorp.com
Copyright 2006 Lexicon Professional
®
18-0360-B
Part Number: 216H010 Rev. 2
 Loading...