

Page 1
Legacy® Classic Acoustical Shell
Contents
Important User Information . . . . . . . . . . . . . . . . . . . . . . . . . . .2
General ......................................2
Manufacturer ..................................2
Intended Use ..................................2
Warranty .....................................2
Safety Precautions . . . . . . . . . . . . . . . . . . . . . . . . . . . . . . . . .3
General ......................................3
Set Up and Usage ..............................3
Product Terminology . . . . . . . . . . . . . . . . . . . . . . . . . . . . . . . .4
Required Tools. . . . . . . . . . . . . . . . . . . . . . . . . . . . . . . . . . . . .5
Storing the Shells . . . . . . . . . . . . . . . . . . . . . . . . . . . . . . . . . .5
Moving the Shells . . . . . . . . . . . . . . . . . . . . . . . . . . . . . . . . . . 6
Arranging the Shells . . . . . . . . . . . . . . . . . . . . . . . . . . . . . . . . 7
Raising the Shell . . . . . . . . . . . . . . . . . . . . . . . . . . . . . . . . . . .8
Lowering the Shell . . . . . . . . . . . . . . . . . . . . . . . . . . . . . . . . . .11
Replacement Parts List . . . . . . . . . . . . . . . . . . . . . . . . . . . . . .14
Maintenance . . . . . . . . . . . . . . . . . . . . . . . . . . . . . . . . . . . . . .16
Cleaning .....................................16
Mechanical Check ..............................16
Panel Repair ..................................16
Owner’s Manual
Visit the Legacy Classic web page at www.wengercorp.com for more details.
Note: Please read and understand the instructions before operating the Acoustical Shell.
Note: If you need additional information, contact Wenger Corporation using the information below.
©Wenger Corporation 2017 Printed in USA 06/17 Part #186G186-05
Wenger Corporation, 555 Park Drive, P.O. Box 448, Owatonna, Minnesota 55060-0448
Questions? Call.....USA: 800-4WENGER (493-6437) • Worldwide: 1-507-455-4100 • www.wengercorp.com
Page 2

Important User Information
General
Copyright © 2017 by Wenger Corporation
All rights reserved. No part of the contents of this manual may be reproduced, copied, or transmitted
in any form or by any means including graphic, electronic, or mechanical methods or photocopying,
recording, or information storage and retrieval systems without the written permission of the publisher,
unless it is for the purchaser’s personal use.
Printed and bound in the United States of America.
The information in this manual is subject to change without notice and does not represent a commitment
on the part of Wenger Corporation. Wenger Corporation does not assume any responsibility for any
errors that may appear in this manual.
In no event will Wenger Corporation be liable for technical or editorial omissions made herein, nor for
direct, indirect, special, incidental, or consequential damages resulting from the use or defect of this
manual.
The information in this document is not intended to cover all possible conditions and situations that might
occur. The end user must exercise caution and common sense when assembling or installing Wenger
Corporation products. If any questions or problems arise, call Wenger Corporation at 1-800-887-7145.
Manufacturer
The Legacy® Classic Acoustical Shell is manufactured by:
Wenger Corporation
555 Park Drive, Owatonna, MN 55060
800-4WENGER (493-6437) • 1-507-455-4100 www.wengercorp.com
Intended Use
• This product is designed to be an acoustical reector for vocal or instrumental groups.
Towers may also be used as a backdrop or as a screen for other functions such as speeches
and ceremonies.
• This product is intended for indoor use in normal ambient temperature and humidity conditions —
it must not be exposed to outside weather conditions.
• This product is intended to be assembled only as described in these instructions.
Warranty
This product is guaranteed free of defects in materials and workmanship for ve full years from date of
shipment. A full warranty statement is available upon request.
2
Page 3
Safety Precautions
General
Throughout this manual you will nd CAUTIONS and WARNINGS which are dened as follows.
• WARNING means that failure to follow the instruction may result in serious injury or death.
• CAUTION means that failure to follow the instruction may result in serious injury or damage to
property.
Read all of these safety instructions before setting up the Legacy Classic Acoustical Shell components.
Set Up and Usage
!
CAUTION
Make sure that anyone operating
the Legacy Classic Acoustical
Shell has read and understands
this manual.
!
CAUTION
Never use the Legacy Classic
Acoustical Shell to support
scenery, signs, lighting, etc.
!
CAUTION
Never use the Legacy Classic
Acoustical Shell outdoors.
!
CAUTION
To prevent damage, fold the
crank handle in before storing
or transporting shells.
!
CAUTION
Always observe and comply
with the Warnings and
Cautions posted on the system
equipment.
!
CAUTION
Never move the Legacy
Classic Acoustical Shell more
than a few feet when it is in
the Performance Position.
!
CAUTION
Do not force the crank handle
or the crank mechanism
could be damaged.
!
CAUTION
To prevent damage, transport
shells individually and never
nested in a group.
!
CAUTION
Failure to comply with
Warnings and Cautions in this
document can result in damage
to property or serious injury.
!
CAUTION
Always have the Legacy
Classic Acoustical Shell in
the Storage Position when
moving to dierent locations.
!
CAUTION
Do not move the shell if the
Canopy panel is raised and
unlocked.
!
CAUTION
Do not use a powered device
such as a fork lift to transport
the shells.
3
Page 4
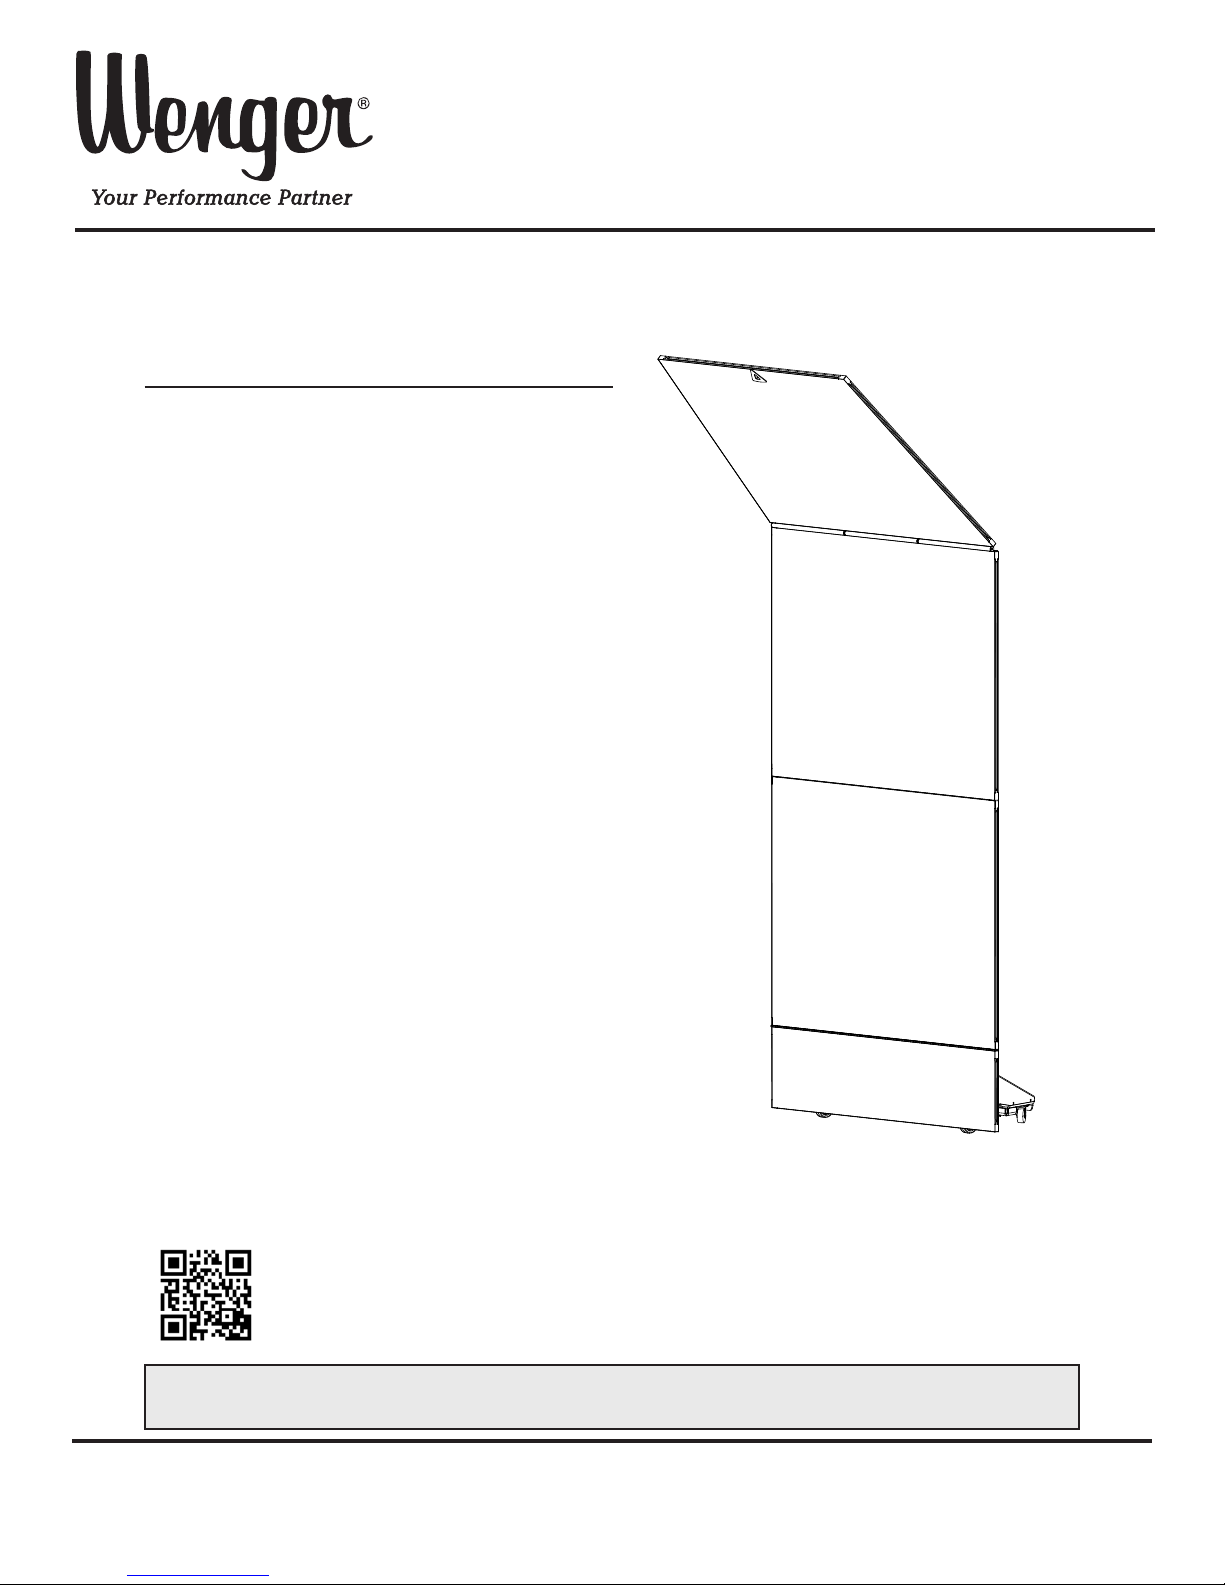
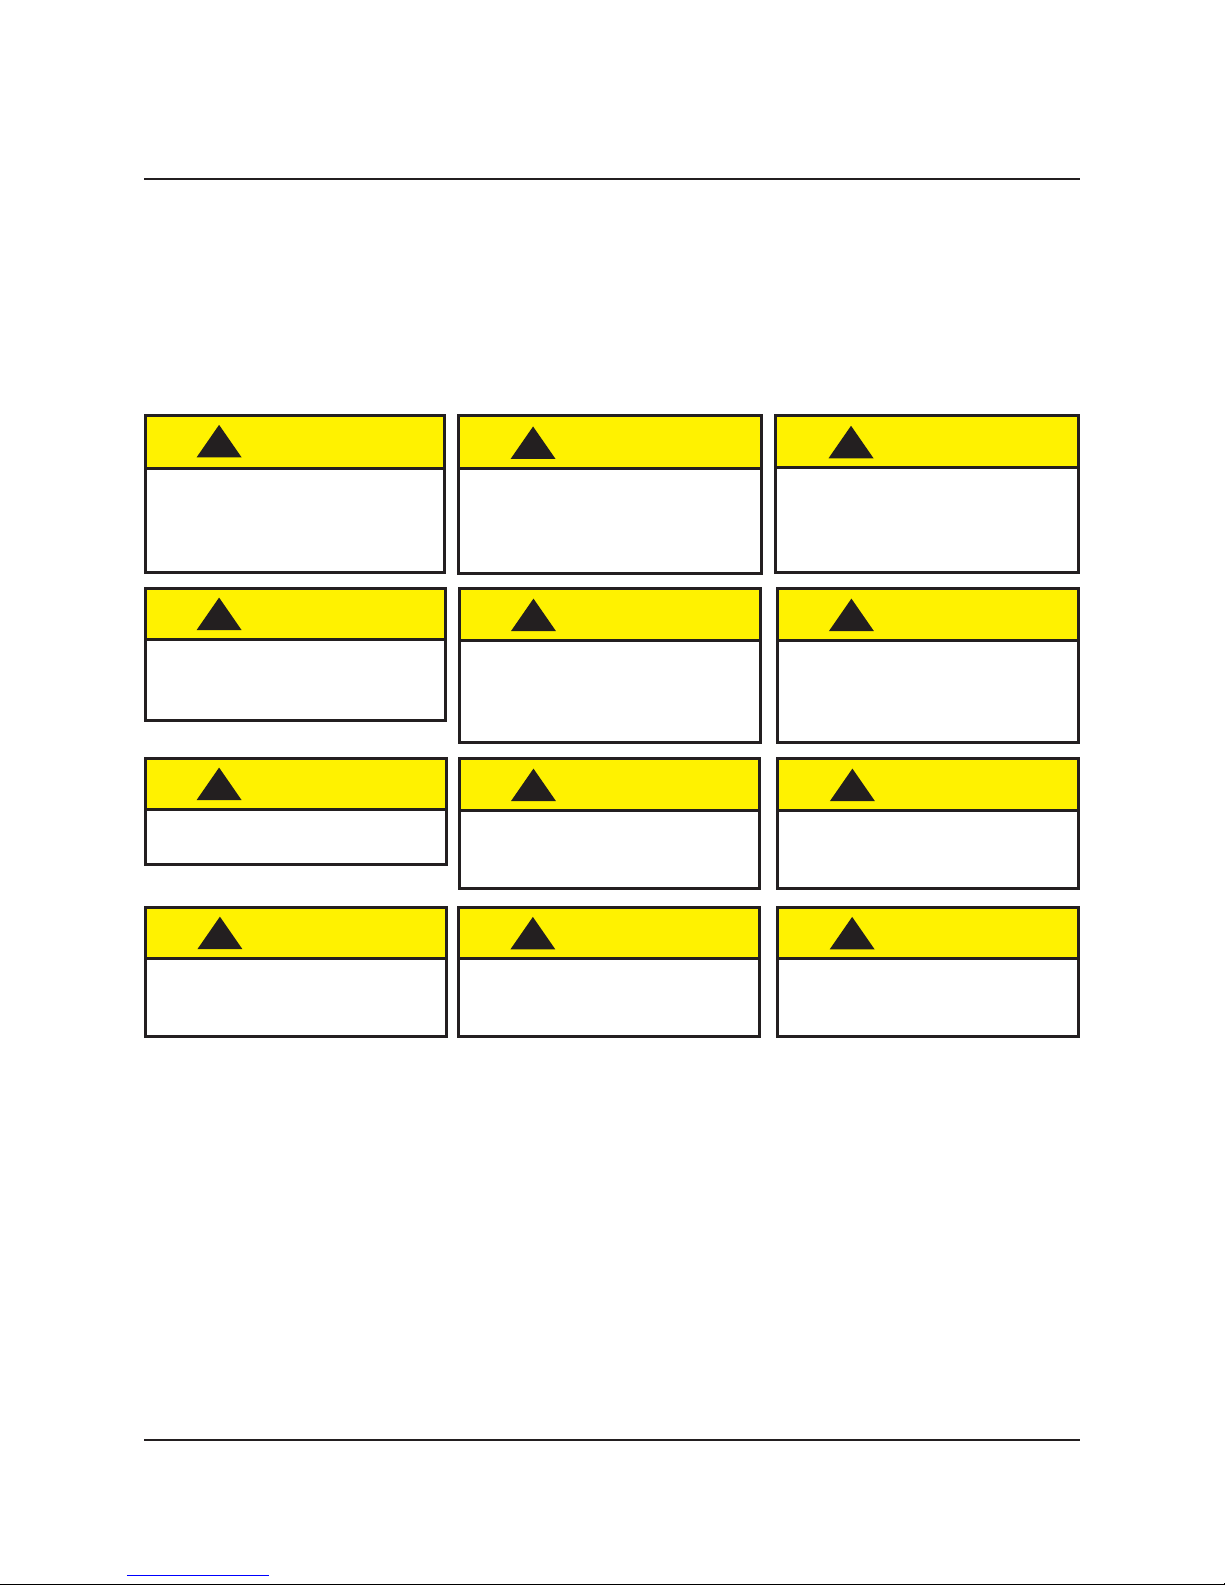
Product Terminology
A Legacy Classic Acoustical Shell includes a counter-weighted base on casters,
a support frame, and four acoustical reector panels.
The following terms are used throughout these instructions:
Shell - One complete unit.
Base - The assembly that supports the frame and panels.
Canopy Panel - The highest panel. Can be either tapered or
rectangular shaped.
Upper Panel - The higher of the two middle panels.
Lower Panel - The lower of the two middle panels.
Filler Panel - The panel closest to the ground.
Raising - Setting up a shell.
Lowering - Taking down a shell.
Storage Position - When a shell is folded down.
Performance Position - When a shell is fully raised.
Canopy
Panel
Upper
Panel
Lower
Panel
Base
Storage Position
Filler
Panel
Shell
Performance Position
4
Page 5
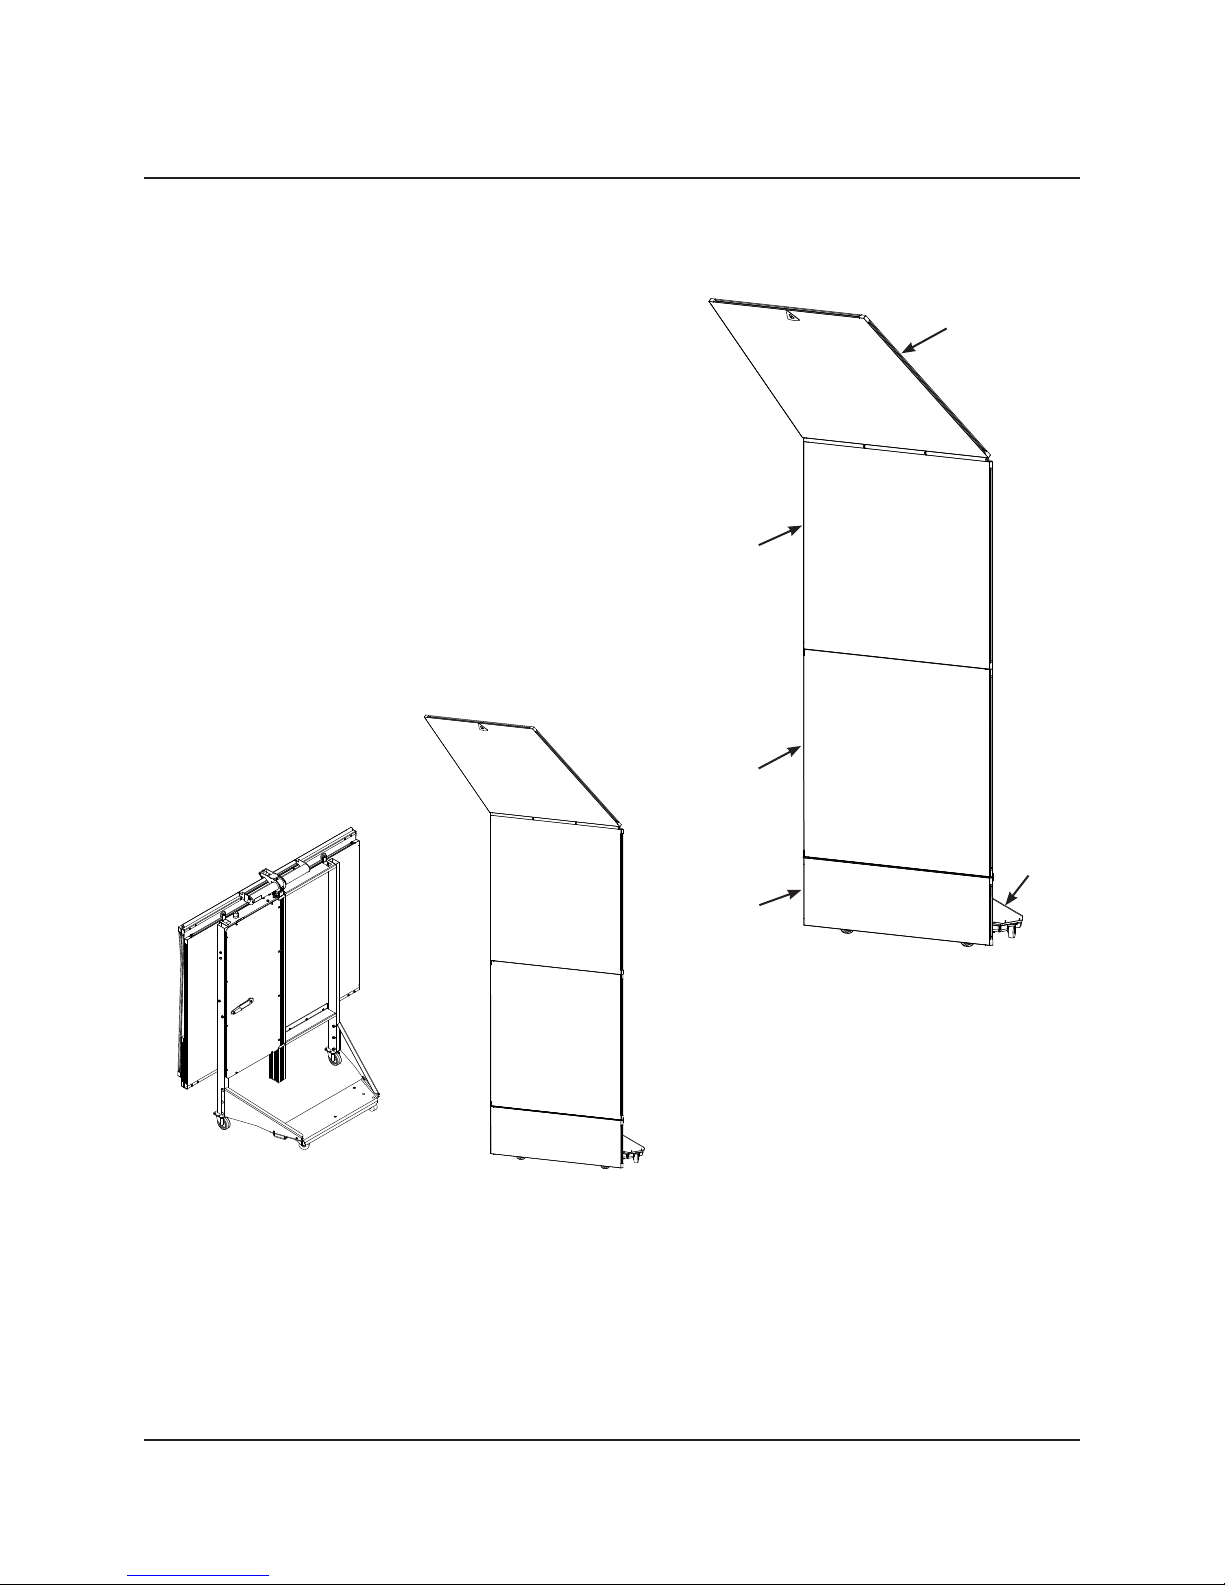
Required Tools
A pliers may be required to adjust the Legacy Classic Acoustical Shell.
Pliers
Storing the Shells
In their Storage Position, the shells can pass through a 35” x 79” opening (a typical 36” door).
A single shell unit is 72” wide x 78½” high x 34½” deep (183 x 199 x 88 cm).
Each additional shell will “nest” with the others as shown, requiring an additional 10⅝” (27 cm)
of depth per unit.
Store the shells in a space that is clean and dry. Avoid spaces with high heat, extreme cold,
or very humid conditions.
Never leave a shell in the Performance Position for more than a week at a time. Always lower
the shells to their Storage Position between events and rehearsals.
!
CAUTION
To prevent damage, fold the
crank handle in before storing
or transporting shells.
!
CAUTION
To prevent damage, transport
shells individually and never
nested in a group.
!
CAUTION
Do not use a powered device
such as a fork lift to transport
the shells.
10⅝”
(27 cm)
5
Page 6

Moving the Shells
!
CAUTION
Never move the Legacy
Classic Acoustical Shell more
than a few feet when it is in
the Performance Position.
One person can move and steer a single shell. All four wheels are swivel casters, so steering the shell
requires special attention.
If a shell is nested with other shells, prevent damage by having two people move the shell away from
the other shells and through any door openings.
If a shell must be moved more than a few feet to the performance space, carefully roll it sideways at a
slow pace. Slow down for corners and when moving through doorways.
The swivel casters are heavy-duty, but moving the shells over thresholds should be done carefully and
at a slow speed. Use a ramp to move the shells over curbs or steps. Always move the shells sideways
when going up or down a ramp.
To avoid ngerprints on the panels, have clean hands or wear clean gloves.
Always have the Legacy
Classic Acoustical Shell in
the Storage Position when
moving to dierent locations.
!
CAUTION
!
CAUTION
Do not move the shell if the
Canopy panel is raised and
unlocked.
6
Page 7

Arranging the Shells
Each shell is 72” (183 cm) wide. The canopy panels on the shell can be tapered to provide a “tight”
enclosure when the shell is set up on a 19 foot radius and the canopy is set at a 45° angle — the
most common arrangement for choral groups. Shells with rectangular canopies can be used for other
arrangements to accomplish desired effects.
While they are still in the Storage Position, arrange the shells as desired, in a row or arc.
Check for overhead clearance and for t with risers and other equipment in the performance space.
Roll the shells about 6” (15 cm) apart, to allow clearance for raising them to the Performance Position.
Arc Conguration
Tapered Canopy Panels
Row Conguration
Rectangular Canopy Panels
7
Page 8

Raising the Shell
Raise the shells to the Performance Position in a well-lit area.
Raise the shells to the Performance Position one at a time.
It is recommended that one person stand behind the shell to serve as a spotter, to prevent raising the
shell into an obstacle or another shell.
!
CAUTION
Make sure that anyone
operating the Legacy Classic
Acoustical Shell has read and
understands this manual.
1. Roll the shell as close to the nal Performance Position as possible.
2. Pull out on the bottom of the Upper Panel and unfold the Filler Panel.
!
CAUTION
Never move the Legacy
Classic Acoustical Shell
more than a few feet when
it is in the Performance
Position.
Upper
Panel
!
CAUTION
Always have the Legacy
Classic Acoustical Shell
in the Storage Position
when moving to dierent
locations.
2. Move the Canopy Lock Knob to the “RAISE” position.
Filler
Panel
Canopy
Lock Knob
8
Page 9

Raising the Shell (continued)
3. Lift the Canopy Panel and use the Canopy Tool
to raise it to one of the four set position angles.
The tool ts into the triangular hole in the
top edge of the Canopy Panel.
There will be a slight “click” sound as the
Canopy Panel reaches each of the set
positions.
NOTE: One Canopy Tool is supplied with each
Legacy Classic Acoustical Shell set.
It may be stored on the frame of any shell.
4. Pull out and unfold the Crank Handle located
on the back side of the shell.
PULL
HANDLE
OUT AND
FOLD IN
FOR STORAGE
RAISE
Crank
Handle
LOWER
Canopy
Panel
75°=14” (36 cm) Deep
60°=27” (69 cm) Deep
45°=38.5” (98 cm) Deep
Canopy
Tool
90°=0” (0 cm) Deep
IIII
III
II
I
5. Turn the Crank Handle clockwise slowly to raise the panels.
The Crank will stop when the panels reach the shell’s
maximum height.
!
CAUTION
Do not force the crank handle
or the crank mechanism
could be damaged.
9
Page 10

Raising the Shell (continued)
6. Push the Upper Panel against the magnets.
Turn the Crank Handle counter-clockwise to lower the Upper Panel
until it rests on the Lower Panel in the Performance Position.
NOTE: This is the shell’s normal performance height.
If the shell is used at less than the maximum
height, it cannot be guaranteed that the
Upper and Canopy Panels will stop and
precisely remain at any other specic height.
Some amount of drift downward may occur
when the upper hinged panel is fully raised.
This is normal and is due to variables in the
weight and internal spring tension, especially
in units with the rectangular canopy.
Magnet
Upper
Panel
Magnet
7. To make minor adjustments in the Canopy Panel angle (to align the canopies on
adjacent shells), turn the Adjustment Rod with a pliers.
Upper
Panel
Down
Up
10
Page 11

Lowering the Shell
1. Turn the Crank Handle ¼ turn Clockwise to slightly raise the Upper Panel.
2. Push out on the bottom of the Middle Panel to separate it from the magnets.
!
CAUTION
The Middle Panel must be
disengaged before the shell
can be lowered.
Magnet
3. Turn the Crank Handle counter-clockwise until the
shell is completely lowered.
!
CAUTION
Do not force the crank handle
or the crank mechanism
could be damaged.
Upper
Panel
Crank
Handle
Magnet
11
Page 12

Lowering the Shell (continued)
PULL
HANDLE
OUT AND
FOLD IN
FOR STORAGE
RAISE
LOWER
4. Pull out and fold in the Crank Handle located on the back side of the shell.
5. Move the Canopy Lock Knob to the “LOWER” position.
Canopy
Lock Knob
6. With the Canopy Tool, raise the Canopy Panel
slightly (A) to release it, then lower it (B) to the
Storage Position. There will be a slight “click”
sound as the Canopy Panel is released.
NOTE: One Canopy Panel is fully vertical,
it may have to be pushed back slightly
to release it and then pulled forward
gently to start the forward rotation.
!
CAUTION
Shell could tip if a locked
Canopy Panel is pulled on.
!
CAUTION
Always allow the Canopy
Panel to lower under it’s own
weight.
Canopy
Panel
A
Canopy
Tool
B
12
Page 13

Lowering the Shell (continued)
7. Pull out the bottom of the Upper Panel and fold the Filler Panel up to its Storage Position
(between the Upper and Lower Panels).
Upper
Panel
Filler
Panel
13
Page 14

Replacement Parts List
Item Description Qty. Item Description Qty.
1 COVER/BASE, COUNTERWEIGHT SET 1 23 WASHER, LOCK, 5/16, ZP, HELICAL 1
2 NUT,LOCK,NY.IN,FULL,ZP,5/16-18 12 24 NUT, LOCK, NY .IN, FULL, ZP, 1/4-20 1
3 CASTER,PLATE,SWIV,3 D,250 CAP 2 25 ROD,PAWL RELEASE 1
4 BOLT,CARR,5/16-18X3/4,ZP 12 26 KNOB,BLK. 1”DIA,1/4-20 1
5 COVER,LIFT MECHANISM 1 27
6 SCREW,SM,PTH,#8 X 5/8,BLK.ZN 12 28 PIN, MAIN 2
7 SCREW,SELF DRILLNG,NO.10-16,.75 6 29 PIVOT BEARING,PANEL 6
8 HINGE, LOWER PANEL 1 MIDDLE PANEL,CARRIER ASSY 1
9 HANDLE,FOLD,PLASTIC,2.91 1 31 LEGACY CANOPY TOOL 1
10 CAPSCREW,GD2,ZP,1/4-20X1 1/4 1 32 PANEL ASSY,MIDDLE 1
11 HANDLE,CRANK 1 33 MAIN FRAME,PAINTED 1
12 COG,ALIGNMENT 2 34 BOLT, CARRIAGE, 3/8-16X2 1/4, ZP 6
13 PIVOT WLDMT, MID PANEL 1 35 NUT,LOCK,NY.IN,FULL,ZP,3/8-16 10
14 SCREW,SELF TAP, HWH, 1/4-20X3/4 4 36 PANEL ASSY,LOWER 1
15 ROD END, CANOPY, LOWER 1 37 CASTER,PLATE,SWIVEL,4D,250 CAP 2
16 CANOPY ROD 1 38 BOLT, CARRIAGE, 3/8-16X1, ZP 4
17 ROD END,CANOPY,UPPER 1 39 FRAME, LEFT HAND SIDE BASE 1
18 BRACKET, ROD END 1 40 FRAME, RIGHT HAND SIDE BASE 1
19 RECEIVER WLDMT 1 41 MAGNET, CERAMIC CUP 2
20 RATCHET WLDMT 1 42 SCREW, MACHINE, TH, #8-32X 3/4, ZP 2
21 RING, CATCHPLATE 2 43 O-RING, .449 OD X .171 ID 2
22 RIVET,BLIND,3/16,GRIP.251/.375 4 44 NUT, LOCK, NYLON INSERT, #8-32 2
TAPERED CANOPY PANEL,CARRIER ASSY or
RECTANGULAR CANOPY PANEL,CARRIER ASSY
45 CAP, SHAFT 1
1
14
Page 15

18
14
7
19
27
12
15
17
16
26
14
20
13
14
7
45
30
28
21
22
24
25
29
44
43
5
31
42
41
34
32
33
35
8
36
4
37
2
11
9
10
23
39
1
4
3
2
6
40
35
38
15
Page 16

Maintenance
Cleaning
Use a soft, damp cloth to clean all surfaces. Never hose down the shells or soak any components.
For smudges or ngerprints, dampen a cloth with any standard non-abrasive household cleaner
and wipe clean.
Mechanical Check
Periodically (every three or four uses) check for loose or damaged parts and for loose fasteners.
Replace or repair damaged parts promptly. Refer to the Replacement Parts List.
!
CAUTION
Do not make adjustments
to the lift mechanism.
Contact Wenger Customer
Service for repair options.
Panel Repair
Panels are of lightweight composite construction and made of durable materials. If accidentally
damaged, repairs can be made with common llers and paint.
!
CAUTION
Do not remove the canopy
or middle panels.
Contact Wenger Customer
Service for repair options.
16
 Loading...