

Page 1

Instructions’ Booklet
Page 2

2
TABLE OF CONTENS
Wenger Watch Components 4
General Features and Components 5
Operating Instructions
Standard Three-Hand Watches 6
Chronograph Watches 8
12-hour chronograph with Slide Rule Function (SR) 12
Pilot Series 18
Recalibrating the Timer Hands 22
Traveler Series GMT 25
The 24 Time Zones 30
30-Day Calendar Watches 32
Power Reserve Series 36
Page 3

3
2nd Time Zone Dual Subdial Watches 40
Day, Date, Month Subdial Watches 42
Swing-Out Compass Watches 44
Dual Time Zone Features 46
Watches with Alarm 47
Additional Features 48
Features on Watch Bracelets 49
Translations of this booklet in
• Français
• Deutsch
• Español
to be found on www.wenger.ch/service/booklets
Page 4

4
WENGER WATCH COMPONENTS
Movements – Swiss quartz movements.
Case Body – All stainless steel or titanium for quality and durability.
Water-Resistant – To 30m (99’), 50m (165’) or 100m (330’) for standard
watches. To 200m (660’) or 1000m (3300’) for dive watches.
Straps/Bracelets – Stainless steel and titanium bracelets feature dive
buckles or deployant jewelry buckles. Straps are offered in genuine calfskin
leather, specially treated rubberized leather, water-resistant rubber or nylon,
or other high-quality materials.
Luminous Markers – Hands, markers, and numerals may be overlaid with
Super Luminova
®
which recharges in seconds when exposed to direct sunlight
for extended nighttime visibility.
Page 5
5
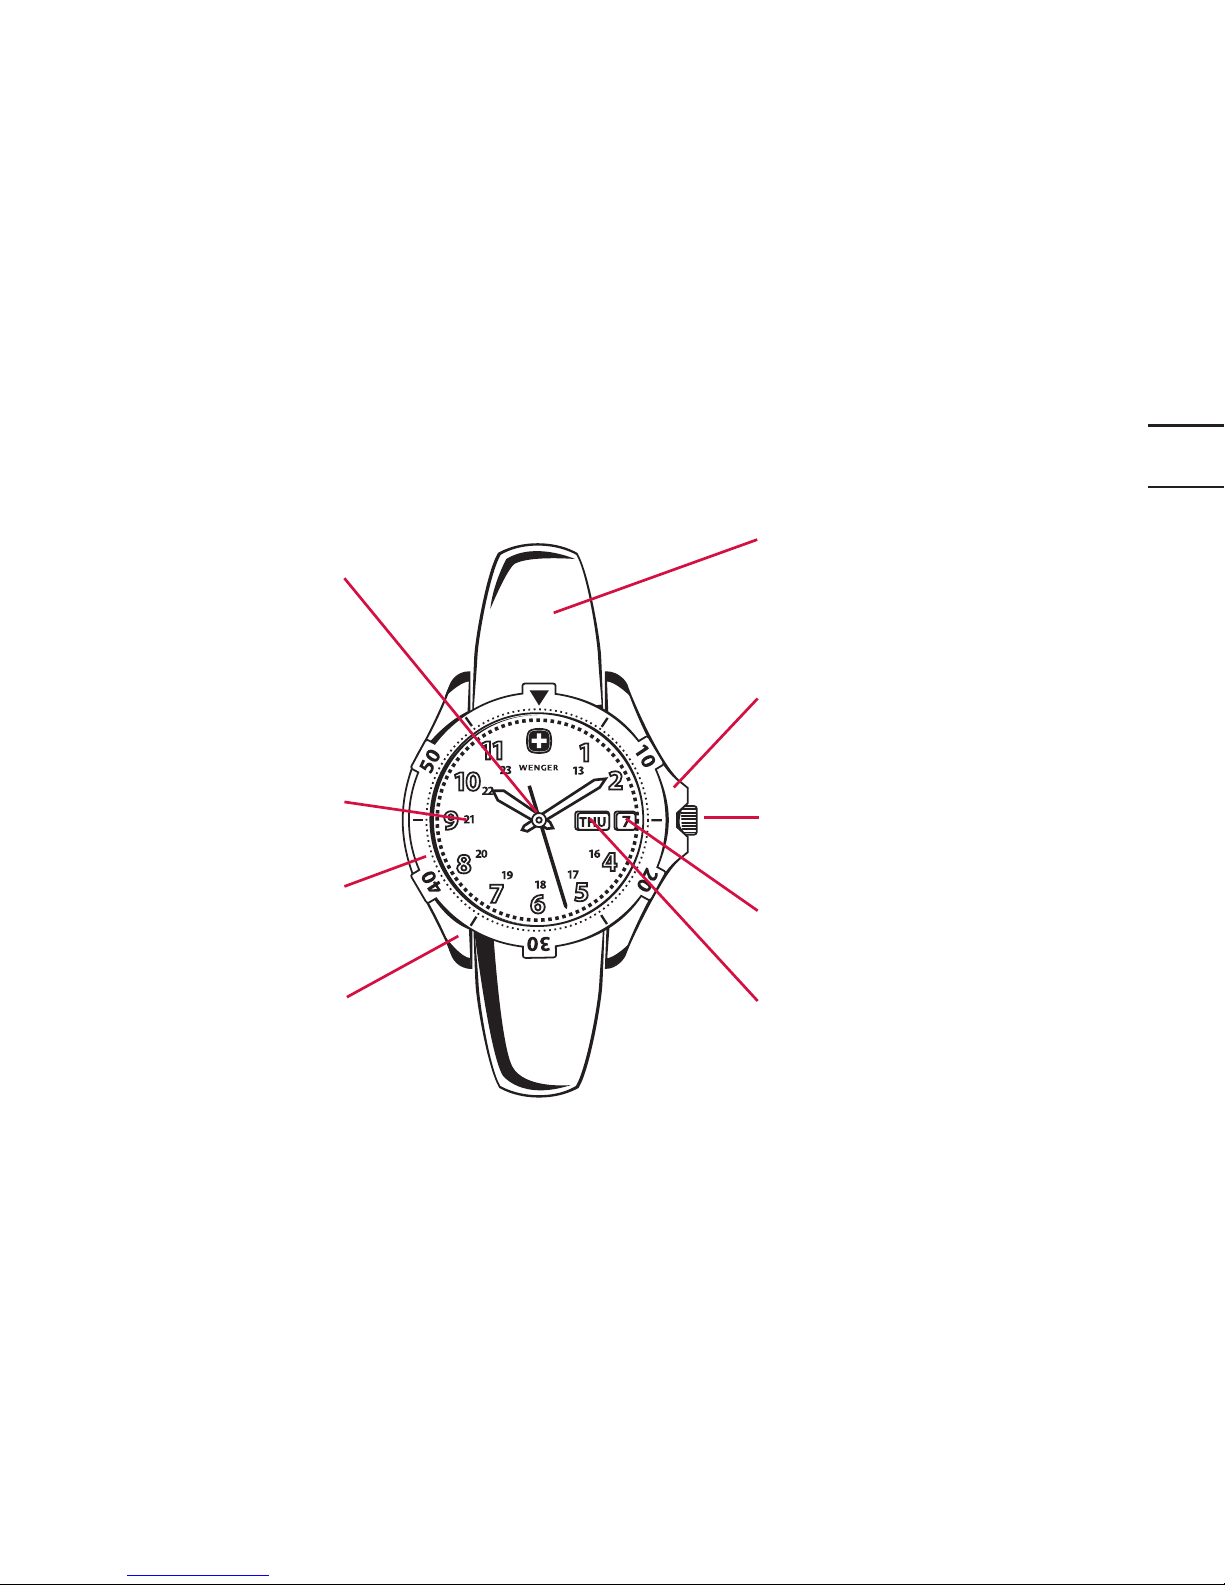
GENERAL FEATURES AND COMPONENTS
Hour, minute and
second hands
Military time
Bezelring
Case
Bracelet or strap
Crown protoctor
Crown (used to set date
and time)
Date
Day
Page 6
6
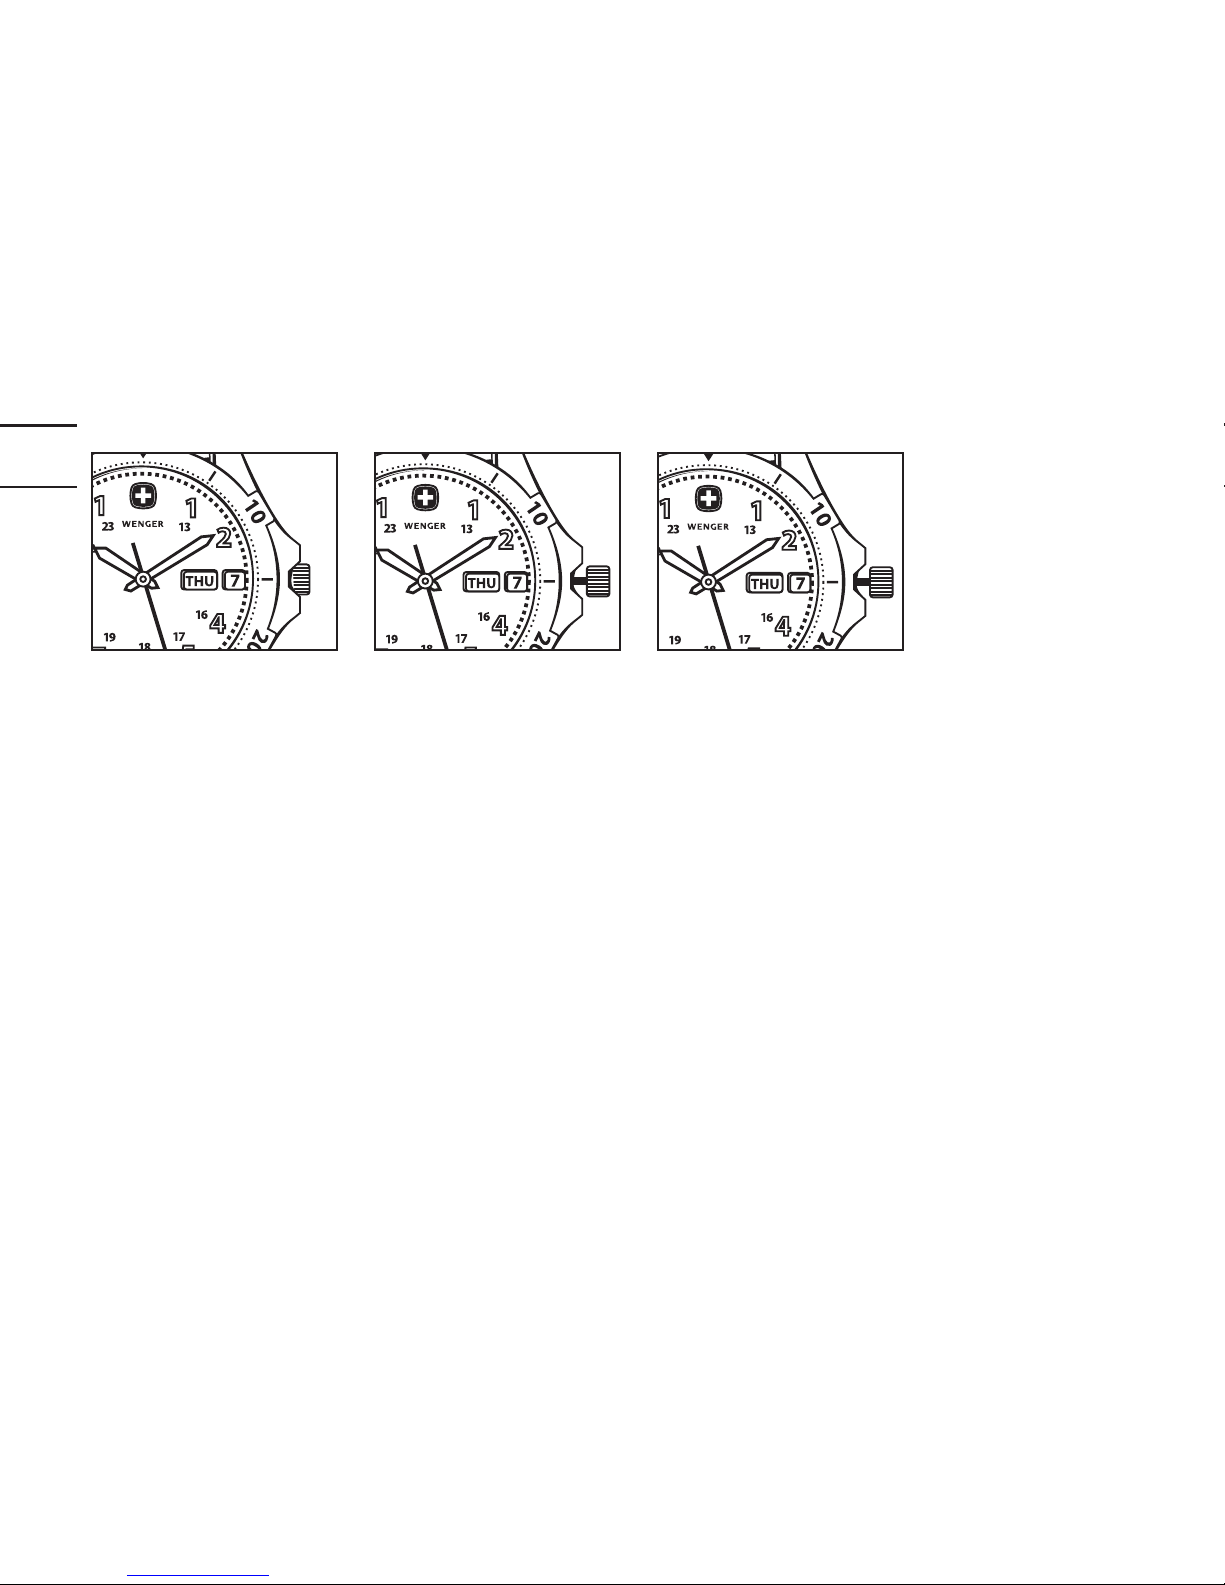
Position 1
Position 2
Position 3
SETTING TIME, DAY AND DATE ON STANDARD
WATCHES
(see Table of Contents on p. 2-3 for other watches)
Important note to assure waterresistance: If the crown of your watch
does not pull directly out or if your watch is water-resistant to 200m or more,
then you may have a watch with a screw-down crown. Rotate the crown counterclockwise until the crown moves away from the watch. This will set the
crown in Position 1.
Always screw down the crown after making any adjustments. This is very
important as the screw-down crown assures water resistance.
Page 7

7
1. Pull out the crown to Position 2 (one «click» out). Rotate crown counter-
clockwise until the date shows one day earlier than the date you want to set.
2. Pull out the crown to Position 3 (two «clicks» out). Rotate crown so the
watch hands move clockwise until the current date shows. Then set the watch
hands to the correct time. Turn the watch hands past 12 once if you’re setting
the watch for a P.M. time. Push the crown back to Position 1.
3. For a watch with day and date display, pull out the crown of the watch to Po-
sition 2, turn it clockwise to change the day and counterclockwise to change
the date.
4. Return the crown to the fully depressed Position 1, assuring the crown has
been further screwed down on all diver watches.
For Watches Without a Date Display
1. To set the time for watch without date display, pull out the crown to Position
2. Turn the crown either clockwise or counterclockwise to set the correct
time.
2. Return the crown to the fully depressed Position 1, assuring the crown has
been screwed down on all diver watches.
Page 8
8
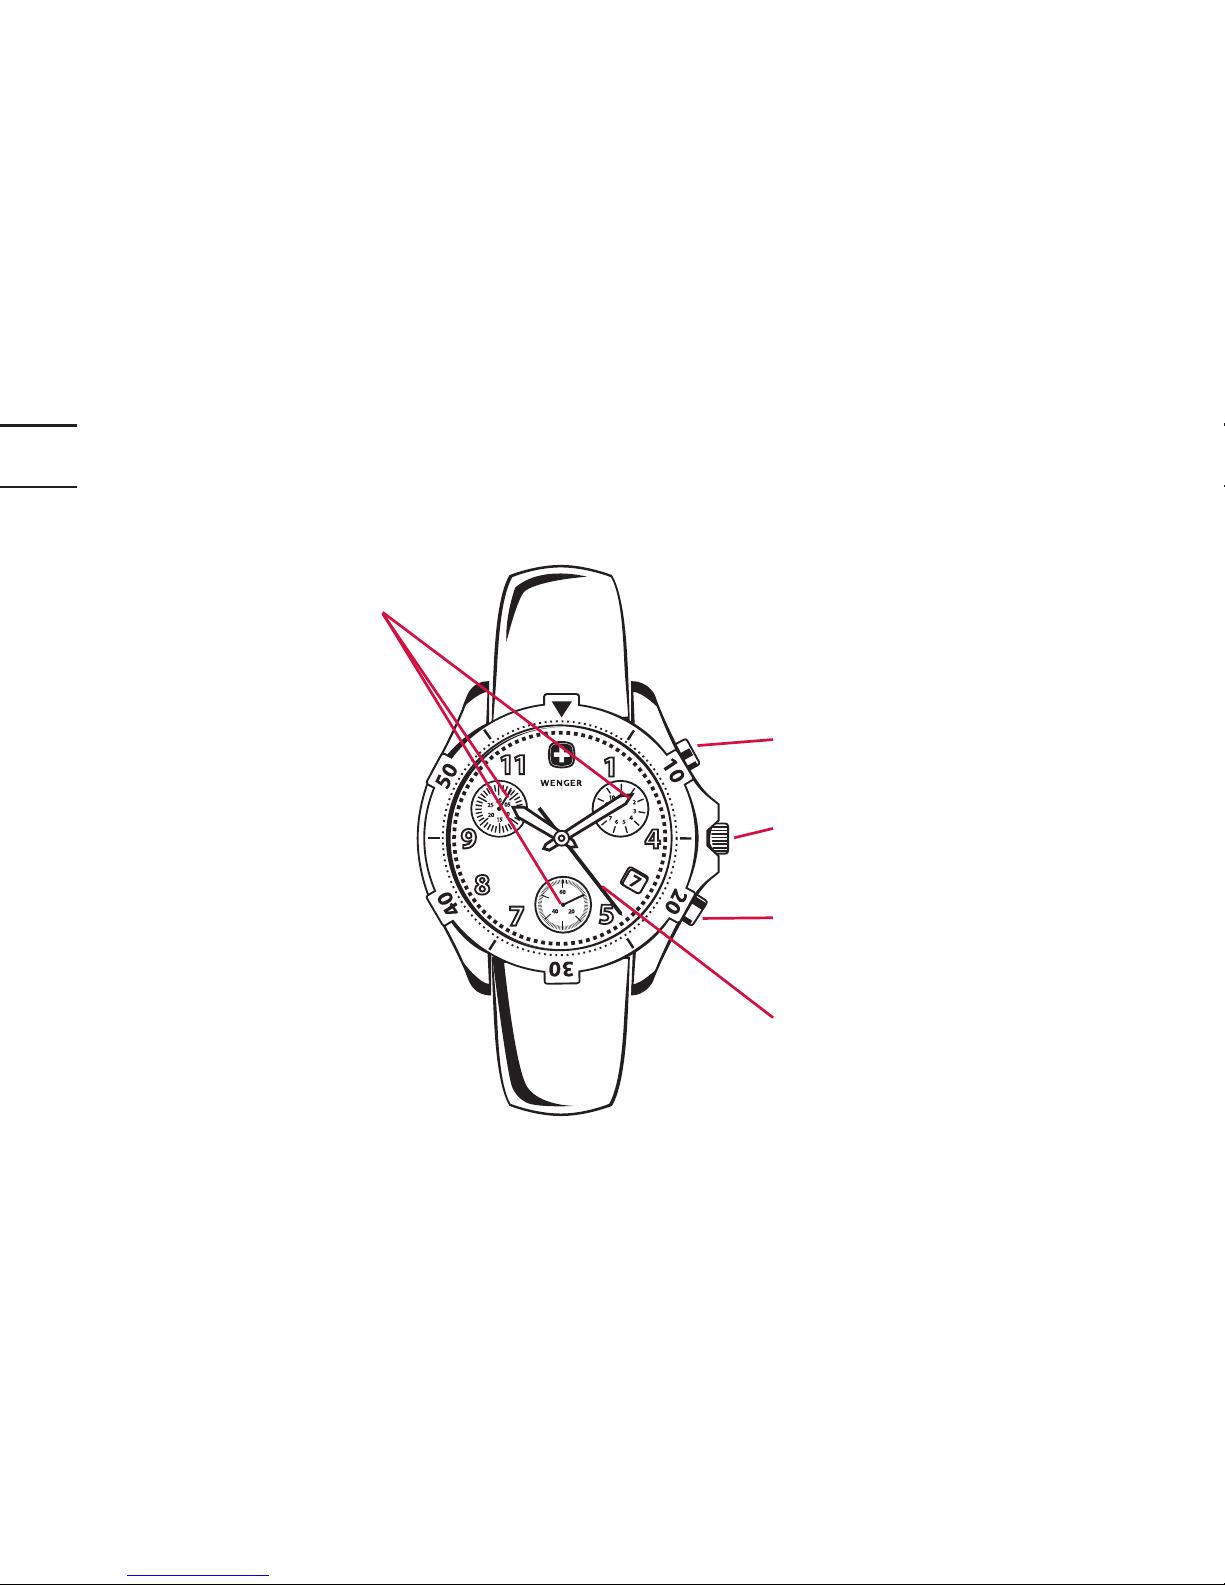
FEATURES OF CHRONOGRAPH (STOPWATCH)
Subdials
(two or three)
Top pusher
Crown
Bottom pusher
Chronograph seconds
hand
Page 9

9
Position 1
Position 2
Position 3
SETTING THE TIME AND DATE
(For Chronos and Pilot Series only)
1. Pull out the crown to Position 2 (one «click» out). Rotate crown counter-
clockwise until the date shows one day earlier than the date you want to set.
2. Pull out the crown to Position 3 (two «clicks» out). Rotate crown so the
watch hands move clockwise until the current date shows. Then set the
watch hands to the correct time. Turn the watch hands past 12 once if
you’re setting the watch for a P.M. time.
3. Return the crown to the fully depressed Position 1, assuring the crown has
been further screwed down on all 200m watches.
Page 10

10
30-Minute Chronograph (Stopwatch)
The chronograph feature is a stopwatch which measures minutes, seconds,
and 1/10 of a second. It is also capable of measuring split-timed events (timing a continuous event and sub-events simultaneously; e.g., timing an individual lap and an entire race). Note: the 1/10-second timer (right subdial)
will not move until the stop button is pushed. It will then record the elapsed
1/10-seconds.
12-Hour Chronograph (Stopwatch)
The chronograph feature is a stopwatch which measures hours, minutes, and
seconds. It is also capable of measuring split-timed events (timing a continuous event and sub-events simultaneously; e.g., timing an individual lap and
an entire race).
Stopwatch (30-Minute or 12-Hour)
1. To start the stopwatch, push the top pusher.
2. To stop it, push the top pusher again.
Page 11

11
3. Read the seconds, minutes, and hours on the appropriate dials (see the sec-
tion of this manual that corresponds to your watch for dial identification).
4. To reset the stopwatch to zero, push the bottom pusher.
Note: The clock function will continue to operate while using the stopwatch.
Using the Split-Timing Function
1. Press the top pusher to start the stopwatch.
2. To read a lap or other intermediate segment of time, push the bottom push-
er. The watch hands will stop, but the watch will continue to time the total
event internally.
3. To resume timing the total event, push the bottom pusher again.
4. You may repeat this as often as you like. The internal clock will continue to
time the total event each time you repeat the process.
5. To stop timing the total event, push the top pusher.
6. Reset the stopwatch to zero by pushing the bottom pusher.
Page 12
12
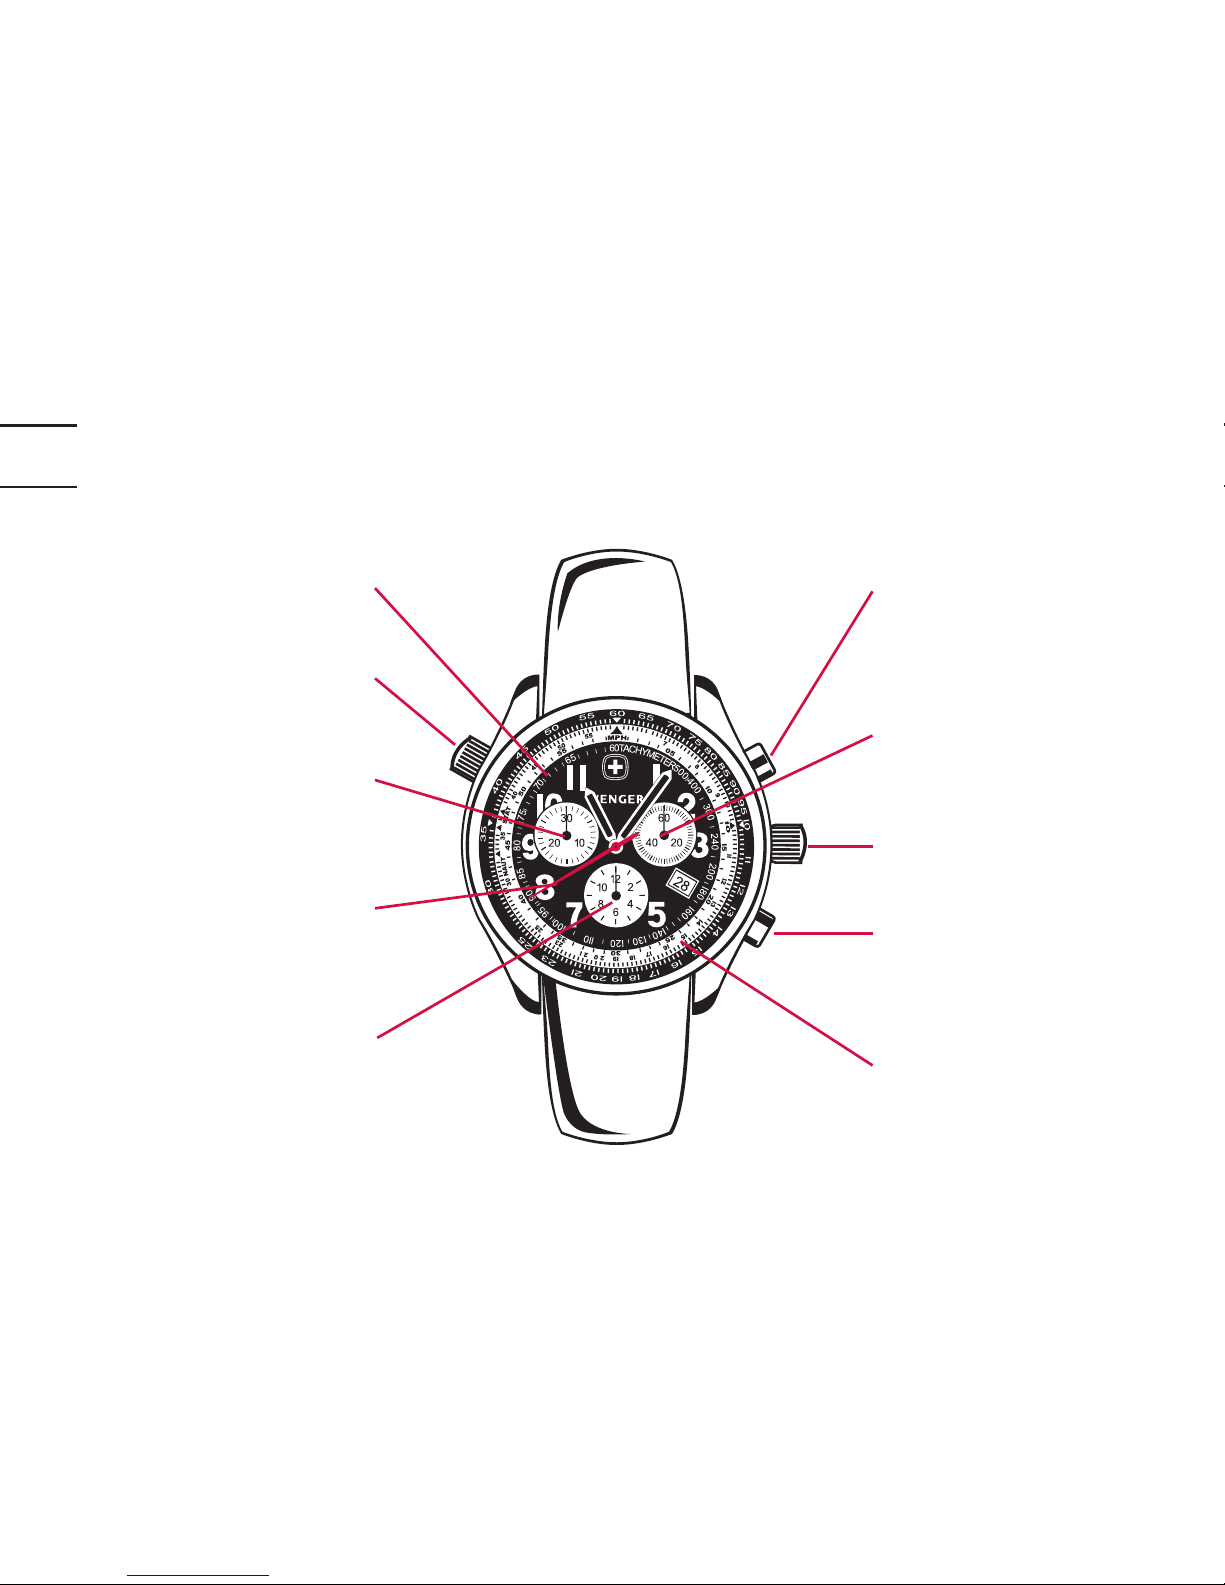
12-HOUR CHRONOGRAPH
WITH SLIDE RULE FUNCTION (SR)
Inner scale Top pusher
10:00 Crown
Seconds hand
subdial
30-Minute counter
subdial
3:00 Crown
Chronograph
seconds hand
Bottom pusher
12-Hour counter
subdial
Outer scale
Page 13

13
USING THE 12-HOUR CHRONOGRAPH WITH SLIDE
RULE FUNCTION (SR)
This SR can perform a variety of calculations from currency conversions to
multiplication and division problems with 94% accuracy. With the circular
slide, you can calculate any conversion of a linear nature with a constant ratio
such as ounces to grams, kilograms to pounds, miles to kilometers, etc.
Important note: The 10:00 crown features a screw-down mechanism to
protect against accidental adjustments. Rotate the crown counterclockwise
to move the crown away from the watch. Always screw down the crown after making adjustments. This is vital for protecting your watch against water
intrusion.
1. Rotate the 10:00 crown counterclockwise until it moves away from the
watch. This will set the crown in Position 2.
Page 14

14
2. Rotate crown until the large arrow on the inner scale is aligned with the
number «60» on the outer scale. Notice that all the numbers in the inner
and outer scale match up.
3. Decimal points. Depending on the context of your problem, you will decide
whether to read the number “10” on the inner scale as 1, 10, 100 or 1,000.
The markers between numbers indicate the calibration. (e.g., the calibration between 10 and 11 are each 0.1 so, 2 calibrations above the 10 will
read at 10.2. The calibration between 15 and 16 are each 0.2 so 2 calibrations above the 15 will read as 15.4)
Multiplication
1. Set the large 10 with the arrow on the inner scale over the number you want
to multiply on the outer scale. (e.g., for 32 x 7 = 224, set the (10/arrow)
number opposite the 32 on the outer scale.)
2. Read the result on the outer scale opposite the number you are multiplying
by on the inner scale. (e.g., for 32 x 7, read the number on the outer scale
opposite 7 on the inner scale).
Page 15

15
Division
1. Set the number you are dividing by on the inner scale over the number you
are dividing on the outer scale. (e.g., for 540 ÷ 12 = 45, set the 12 on the
inner scale over 54 on the outer scale.)
2. Read the result on the outer scale opposite the (10/arrow) number on the
inner scale.
Ratios and Conversions
When the numbers on the outer scale and the inner scale match, the ratio
between the two scales is 1:1. When you rotate the inner scale so that the
number (10/arrow) is opposite the 20 on the outer scale, the ratio between
the two scales is 2:1. This feature is useful to convert any linear conversion
like currencies or weight/length from standard to metric. Simply find how
many units of one measurement equals one unit of the other and match up
that number with the number (10/arrow).
Page 16

16
For example, 1 oz = 28.35 grams, rotate the inner scale until the (10/arrow)
number is below the 28.35 on the outer scale. Now all the numbers on the
outer scale become grams and all the numbers on the inner scale become
ounces. As an example, look at 85 on the outer scale. It is pointing to 30 on
the inner scale. Making a decimal point adjustment to 3.0 you now know that
3 oz. are almost 85 grams.
Currency Conversion
Suppose the currency rate for the Swiss Franc is SFR 1.30 to $1.00 USD.
Rotate the inner scale to set (10/arrow) number opposite the 13 on the outer
scale. The outer scale becomes Swiss Francs and the inner scale reflects the
USD equivalent (e.g., to convert SFR 4.00 to USD, look at the number on the
inner scale opposite the 40 on the outer scale and you will see the number 31.
Therefore, SFR 4.00 = $3.10 USD).
Page 17

17
Miles and Kilometers
You can convert miles to kilometers or the reverse and subsequently miles/
hour to kilometers/hour and the reverse.
1. Rotate the inner scale until the «STAT» arrow is set opposite the number of
miles you want to convert to km on the outer scale.
2. Read the corresponding km value on the outer scale that is set opposite the
«MPH/KM» arrow on the inner scale. (e.g., to convert 25 mph to kilometers per hour, set the STAT arrow opposite 25 on the outer dial. The MPH/
KM arrow is pointing to 40 which indicates 25 MPH = 40 K/H.)
3. To convert from miles to km, do the reverse.
Page 18

18
PILOT SERIES
12-Hour Subdial 2nd Time zone
Minute Subdial
Top pusher
9:00 Crown
Seconds timer
Internal rotating
bezel
3:00 Crown
Chronograph
seconds hand
Bottom pusher
Page 19

19
USING THE INTERNAL ROTATING BEZEL
1. Elapsed Time
a. Rotate the 9:00 crown counterclockwise until the zero mark (triangle
with orange dot) is at the minute hand.
b. The position of the minute hand in relation to the zero mark on the bezel
will indicate the total number of minutes elapsed.
2. Dual Time Zone
a. Rotate the 9:00 crown until the hour hand points to the 2nd time zone
time shown on black bezel ring. (eg., local time is 1:00 and second time
zone time is 7:00; rotate black bezel ring until «7» lines up with «1» on
the dial).
b. The time in the 2nd time zone can be read by looking at the numerals in
the black ring.
Page 20

20
3. Countdown Timer
a. Using the minute hand as a starting point, rotate the 9:00 crown to posi-
tion the triangle with orange dot at the desired finish point.
b. The minute hand will indicate how many minutes are remaining on the
internal rotating bezel.
USING THE TACHYMETER
The Tachymeter is the miles or kilometer per hour indicator along the outer
edge of the watch face. It is meant to be used in conjunction with the chronograph feature to measure speed over a distance of one mile or one kilometer.
1. Begin with timer hands at zero.
2. Start the chronograph when the object in motion moves from the starting
point.
3. Stop the chronograph when the object in motion has traveled one mile or
one kilometer.
Page 21

21
4. The seconds hand chronograph timer (the large seconds hand) will have ad-
vanced to a point on the Tachymeter. The corresponding number indicated
by the Tachymeter is the average speed (in MPH or KMH) the object has
traveled over the mile or kilometer distance.
Note: The object must have traveled exactly one mile or one kilometer for the
tachymeter to be accurate.
USING THE TELEMETER
The Telemeter (distance in kilometers indicator along the outer edge of the
watch dial is used for measuring distances with the help of sound.
Example in the situation of a thunderstorm:
1. Begin with Chronograph hands (stop watch) at zero.
2. Start the Chronograph hand when observing a flash of lightning.
Page 22

22
3. Stop the Chronograph hand when hearing the thunder.
4. The Chronograph hand will point to a numeral on the telemeter scale, in-
dicating the approximate distance (in km) between the observer and the
position of the lightning (current location of thunderstorm).
RECALIBRATING THE TIMER HANDS
The timer hands are preset to begin at zero. It is possible that over time the
hands will not begin at zero. If this happens you will need to recalibrate the
hands. You may also set them to begin at a different point (see below).
For Pilot Series
1. Pull out the crown to Position 3.
2. Hold both pushers down simultaneously for 2 seconds; the chronograph
seconds hand will rotate to indicate that the corrective mode is activated.
Release the pushers.
Page 23

23
3. Adjusting the seconds hand: Hold or tap the top pusher until the desired
time is reached.
4. Adjusting the minute/hour counters: Tap the bottom pusher to switch to
the minute/hour adjusting mode. Then hold or tap the top pusher until the
desired time is reached.
5. Return the crown to the fully depressed Position 1.
For 30-Minute Chronographs
1. To recalibrate the 30-minute timer, pull the crown out to Position 3. Press
the top pusher repeatedly until seconds hand is in desired starting position.
2. To recalibrate the seconds hand timer, pull the crown out to Position 2.
Press the top pusher repeatedly until seconds hand is in desired starting
position.
3. To recalibrate the 1/10-second timer, pull the crown out to Position 2.
Press the top pusher repeatedly until 1/10-seconds hand is in desired starting position.
Page 24

24
4. Return crown to Position 1 when finished.
For 12-hour chronograph with Slide Rule Function (SR)
1. Pull the 3:00 crown out to Position 3.
2. Hold both pushers down simultaneously for 2 seconds; the chronograph
seconds hand will rotate to indicate that the corrective mode is activated.
Release the pushers.
3. Adjusting the seconds hand: Hold or tap the top pusher until the desired
time is reached.
4. Adjusting the hour counter: Tap the bottom pusher to switch to the hour
adjusting mode. Then hold or tap the top pusher until the desired time is
reached.
5. Adjusting the minute counter: Tap the bottom pusher to switch to the min-
ute adjusting mode. Then hold or tap the top pusher until the desired time
is reached.
6. Return the crown to the fully depressed Position 1.
Page 25

25
TRAVELER SERIES GMT
Hour hand
Inner bezel
Second hand
Minute hand
2:00 Crown
(screw-down)
4:00
Crown
Second time
zone hand
Page 26

26
Position 1
Position 2
Position 3
SETTING THE TIME AND DATE ON GMT-WATCHES
1. Pull out the 4:00 crown to Position 2 (one «click» out). Rotate crown
clockwise until the date shows one day earlier than the date you want to set.
2. Pull out the 4:00 crown to Position 3 (two «clicks» out). Rotate crown so
the watch hands move clockwise until the current date shows. Then set
the watch hands to the correct time. Turn the watch hands past 12 once if
you’re setting the watch for a P.M. time.
3. Return the crown to the fully depressed position.
Page 27

27
SETTING THE 2ND TIME ZONE
Important note: The 2:00 crown features a screw-down mechanism to pro-
tect against accidental adjustments. Rotate the crown counterclockwise to
move the crown away from the watch. Always screw down the crown after
making adjustments. This is vital for protecting your watch against water
intrusion.
1. Rotate the 2:00 crown counterclockwise until the crown moves away from
the watch. This will set the crown in Position 2.
2. Rotate the 2:00 crown (be patient, it’s not as easy to rotate as the 4:00
crown) clockwise until a city in the same time zone as your local time zone
appears (e.g., Central Europe = Paris).
3. Pull out the 4:00 crown to Position 2 (one «click» out). Rotate the 4:00
crown counterclockwise to set the hour hand to the local time on the 24hour inner bezel.
Page 28

28
Note: The inner bezel has a 24-hour display. Therefore, when setting the
local time, make sure that 8 a.m. is set as 08.00 and 8 p.m. is set as 20.00.
4. Rotate the 2:00 crown once more until a city in the desired time zone ap-
pears in the cut-out at the 9 o’clock position of the dial.
5. The second time zone hand will now indicate the time for this time zone.
This hand rotates once every 24 hours and indicates the time on the 24hour display of the outer bezel.
Page 29

29
Position 1
Position 2
Inner bezel
Checking Additional Time Zones
Once the watch has been set as described, you can check other time zones at
any time by rotating the 2:00 crown.
Note: Certain time zones do not recognize daylight saving time (DST). You
must take this difference of +/- one hour into account when reading the second time zone or whenever you set the second time zone (see table on pages
30-31).
Page 30

30
THE 24 TIME ZONES
City Time zone DST (daylight saving time)
London
= Greenwich Mean Time (GMT)
yes
Paris + 1h yes
Cairo + 1h yes
Moscow + 2h yes
Abu Dhabi + 4h no
Karachi +5h no
Dhaka +6h no
Bangkok +7h no
Hong Kong +8h no
Tokyo +9h no
Sydney +10h yes
Noumea +11h no
Page 31

31
City Time zone DST (daylight saving time)
Auckland +12h yes
Samoa -11h no
Honolulu -10h no
Anchorage -9h yes
Los Angeles -8h yes
Denver -7h yes
Chicago -6h yes
New York -5h yes
Caracas -4h yes
Rio -3h yes
Azores -1 yes
Reykjavik -0h no
Page 32

32
30-DAY CALENDAR SERIES
Hour hand Minute hand
Inner rotating bezel
(calendar date)
2:00 Crown
(screw-down)
Seconds hand
4:00 Crown
Outer bezel
(day of the week)
Second time zone
hand
24-Hour second
time zone inner dial
Strap or bracelet
Page 33

33
Position 1
Position
2
SETTING THE TIME AND DATE
Follow instructions on p.6ff.
SETTING THE SECOND TIME ZONE
1. Pull out the 4:00 crown to Position 2 (one «click» out). Rotate crown coun-
terclockwise to set the second time zone hand to the local time on the 24hour second time zone inner dial.
2. Return the crown to the fully depressed position.
Note: The inner dial has a 24-hour/
military time display.
Therefore, when setting the local time,
using the inner 24h dial zone, make sure
that, as an example, 8 a.m. is set as
08.00 and 8 p.m. is set as 20.00.
Page 34

34
Position 1 Position 2
SETTING THE DAY AND DATE ON THE INNER
ROTATING BEZEL
Important note: The 2:00 crown screws down to prevent accidental reset.
Rotate the crown counterclockwise until the crown moves away from the
watch. Always screw down the crown after making any adjustments. This is
very important as the screw-down crown assures water resistance.
1. Rotate the 2:00 crown counterclockwise until it moves away from the
watch. This will set the crown to Position 2.
Page 35

35
2. Using the 2:00 crown, rotate the inner bezel to set the calendar posi-
tion «1» opposite the corresponding day of the week on the outer bezel.
(e.g. if December 1st is a Monday, rotate the inner bezel to set the calendar
position «1» opposite «MO» on the outer bezel. Now it’s easy to see, as
an example, that December 25th lands on a Thursday and the 31st is on a
Wednesday.)
3. Return the crown to the fully depressed Position 1, assuring the crown has
been screwed down.
Page 36

36
POWER RESERVE SERIES
Top
pusher
Power Reserve/
alarm indicator
Seconds hand
subdial
2nd Time zone hand
(thin arrow)
Crown
Day subdial
Bottom pusher
Alarm hand
(broad arrow)
Page 37

37
Position 1
Position 2
Position 3
SETTING THE DAY OF THE WEEK, TIME AND DATE
1. Pull out the crown all the way out to Position 3. Rotate crown counterclock-
wise, advancing the watch hands until the current day shows (in the subdial
over the 6 o’clock position). Continue to rotate the crown counterclockwise
until the correct time is displayed. Turn the watch hands past 12 once if
you’re setting the watch for a P.M. time. Push the crown back to the fully
depressed Position 1.
2. Pull out the crown to Position 3, then push in the crown one «click» to Posi-
tion 2. Rotate crown clockwise and the date will change in the date window.
Return the crown to the fully depressed Position 1.
Page 38

38
SETTING THE ALARM, ACTIVATING IT AND
CHECKING THE POWER RESERVE
The Alarm indicator hand is the hand with the larger of the two arrows.
This hand indicates the time at which the alarm would sound once activated.
1. Pull out the crown to Position 3, then push in the crown one «click» to
Position 2. Turn the crown counterclockwise. The alarm indicator hand will
rotate. You will note 15-minute increments on the dial (15, 30, 45) to help
you set a precise time for the alarm to activate between the hour markings.
2. Push the top pusher. The small indicator hand in the left subdial will indi-
cate the battery strength for the alarm and movement. It will then move
automatically to the «ON» position. The alarm will now activate at the time
set.
3. Return the crown to position 1.
4. When the alarm sounds, push the top pusher to turn it off.
Note: The Alarm can be turned off or deactivated at any time by pushing the
top pusher until the left subdial’s indicator hand moves to the «OFF» position.
Page 39

39
SETTING THE 2ND TIME ZONE INDICATOR
The outermost area of the dial has hour markings 1 thru 24. This is for the
second time zone which is indicated by the hand with the thinner of the two
arrows.
1. Push the bottom pusher and hold it for a few seconds. You will hear a brief
signal. Release the pusher.
2. Push the bottom pusher and hold it again. The arrow indicator will revolve
around the dial. By releasing the button and then pushing it in again momentarily, small forward adjustments can be made. If you hold the pusher
down, adjustments can be made more quickly. Once released and after a
few seconds, you will hear the brief signal again indicating that the 2nd
time zone indicator is now set.
Page 40

40
2ND TIME ZONE DUAL SUBDIAL WATCHES
Minute hand
Hour hand
2
nd
Time zone
hour hand
2
nd
Time zone
minute hand
Crown
Date
Second hand
2nd Time zone
pusher
Page 41

41
SETTING THE 2ND TIME ZONE
1. Depress the 2nd time zone pusher for at least 2 seconds and release. The
minute hand will automatically advance one minute.
2. Depress the pusher again and hold it down to advance the minute and hour
hands. The longer the pusher is depressed, the faster the time will advance.
3. If you do not depress the pusher for 10 seconds your watch will automati-
cally exit the setting mode.
Page 42

42
DAY, DATE, MONTH SUBDIAL WATCHES
Minute handHour hand
Date sub-dial
1 2 3
Month sub-dial
Day of week
sub-dial
Second hand
Crown,
crown positions
Page 43

43
SETTING THE TIME, DAY AND DATE
1. Pull out crown to position 2 and rotate crown clockwise. You will notice
that every time the date sub-dial hand passes 31, the month sub-dial hand
moves forward once. Repeat this action until the current month is set.
2. Rotate crown clockwise for the date and counter-clockwise for the day
until the date shows one day earlier than the date you want to set.
3. Pull out crown to position 3. Rotate crown so the watch hands move clock-
wise until the current date shows. Then set the watch hand to the correct
time. Turn the watch hands past 12 once if you’re setting the watch for a
P.M. time.
4. Return crown to position 1.
Page 44

44
Position 1
Position 2
Position 3
SWING-OUT COMPASS WATCHES
Setting the Date
1. Pull out the crown to Position 2 (one «click» out). Rotate crown counter-
clockwise until the date shows one day earlier than the date you want to set.
2. Pull out the crown to Position 3 (two «clicks» out). Rotate crown so the
watch hands move clockwise until the current date shows. Then set the
watch hands to the correct time. Turn the watch hands past 12 once if
you’re setting the watch for a P.M. time.
3. Return the crown to the fully depressed Position 1.
Page 45

45
Operating the Compass
1. Swing-out side of case to reveal compass.
2. Lay the compass on a flat surface for best results.
3. Your compass will adjust to accurately reflect orientation within 30 sec-
onds, the arrow may undergo some movement during this period. Once still,
the red arrow will be pointing North.
4. Your compass now accurately reflects your orientation.
1 2, 3, 4
Page 46

46
DUAL TIME ZONE FEATURES
(for 2nd Time Zone Dual Subdial, see p. 40)
Note: The second time zone is read in military
time (1:00 p.m. = «13», 2:00 p.m. = «14», etc.).
The military time hours appear either on the dial,
or on some models, on the bezel of the watch.
1. Begin by setting the regular time by following
the instructions on pages 6ff.
2. To set the second time zone, pull out the crown to Position 2 (one «click»
out) and set the second time zone hand (indicated above in red) by turning
the crown clockwise.
3. Return the crown to the fully depressed Position 1, assuring the crown has
been screwed down on all diver watches.
Page 47

47
WATCHES WITH ALARM
1. Begin by setting the regular time by following
the instructions on pages 6ff.
2. Pull crown out to Position 2.
3. Rotate crown clockwise to set alarm hand (indi-
cated in red) at desired alarm time.
4. Pull out alarm button (located at either 2 o’clock or 11 o’clock) to set
alarm. You will hear a brief signal acknowledging that the alarm is set.
5. Return crown (not the alarm button) to Position 1. Alarm will sound when
hour hand passes alarm hand.
Note: Do not expose watch to moisture when alarm button is pulled out. Push
in alarm button to stop alarm at any time. If alarm button is not pushed in,
alarm will sound once, pause and then sound ten times and stop. Push alarm
button in to stop or alarm will sound again in 12 hours.
Page 48

48
ADDITIONAL FEATURES
(All features may not be available on all models)
Rotating Bezel
This feature enables you to track elapsed time.
1. Turn the bezel counterclockwise until the zero indicator (60) is at the min-
ute hand.
2. The position of the minute hand in relation to the zero indicator on the
bezel will indicate the total number of minutes elapsed.
Unidirectional rotating Bezel (Diver watches)
For security reasons, the bezel ring moves in one direction, only.
Page 49

49
FEATURES ON WATCH BRACELETS
(All features may not be available on all models)
Deployant (Jewelry) Clasp
Deployant closures are used to assure a secure fit of your watch and easy
opening and closing. Deployant closures on straps allow for a one-time fitting
instead of refitting each time the watch is worn.
Deployant Buckles on Bracelets
Deployant buckles on bracelets are generally double
deployant, or two-sided to hide the buckle and give the bracelet a seamless
appearance.
1. Have the watch fitted by a professional jeweler and the appropriate links
removed.
2. Gently pull on either side of the clasp to open, or press down to close.
Page 50

50
Page 51

51
ref. 99600.E
The symbol with the crossed out disposal bin indicates
that this watch shall not be treated as household waste.
Please hand over your old or unused watch to the applicable collection point for the recycling of electrical and
electronic equipment or bring your old watch to your
retailer for appropriate disposal.
printed in Switzerland 09/2009
Page 52

Wenger Watch S.A.
Oberer Quai 51
CH-2502 Biel/Bienne
Switzerland
Tel: +41 (0)32 344 04 60
Fax: +41 (0)32 344 04 69
watch@wenger.ch
www.wenger.ch
Cert no. SQS-COC-100061
 Loading...