

Page 1
1
Page 2

2
Page 3

TABLE OF CONTENTS
SPECIFICATIONS…………………………………………….. 3
RULES FOR SAFE OPERATION…………………………….. 4
IMPORTANT SAFETY INSTRUCTIONS…………………… 5
UNPACKING………………………………………………….. 7
ASSEMBLY…………………………………………………… 8
OPERATION………………………………………………….. 9
LUBRICATING THE SNOW SHOVEL……………………… 12
EXPLODED VIEW…………………….……………………… 13
PARTS LIST…………………………………………………… 14
WARRANTY STATEMENT…………………………………. 15
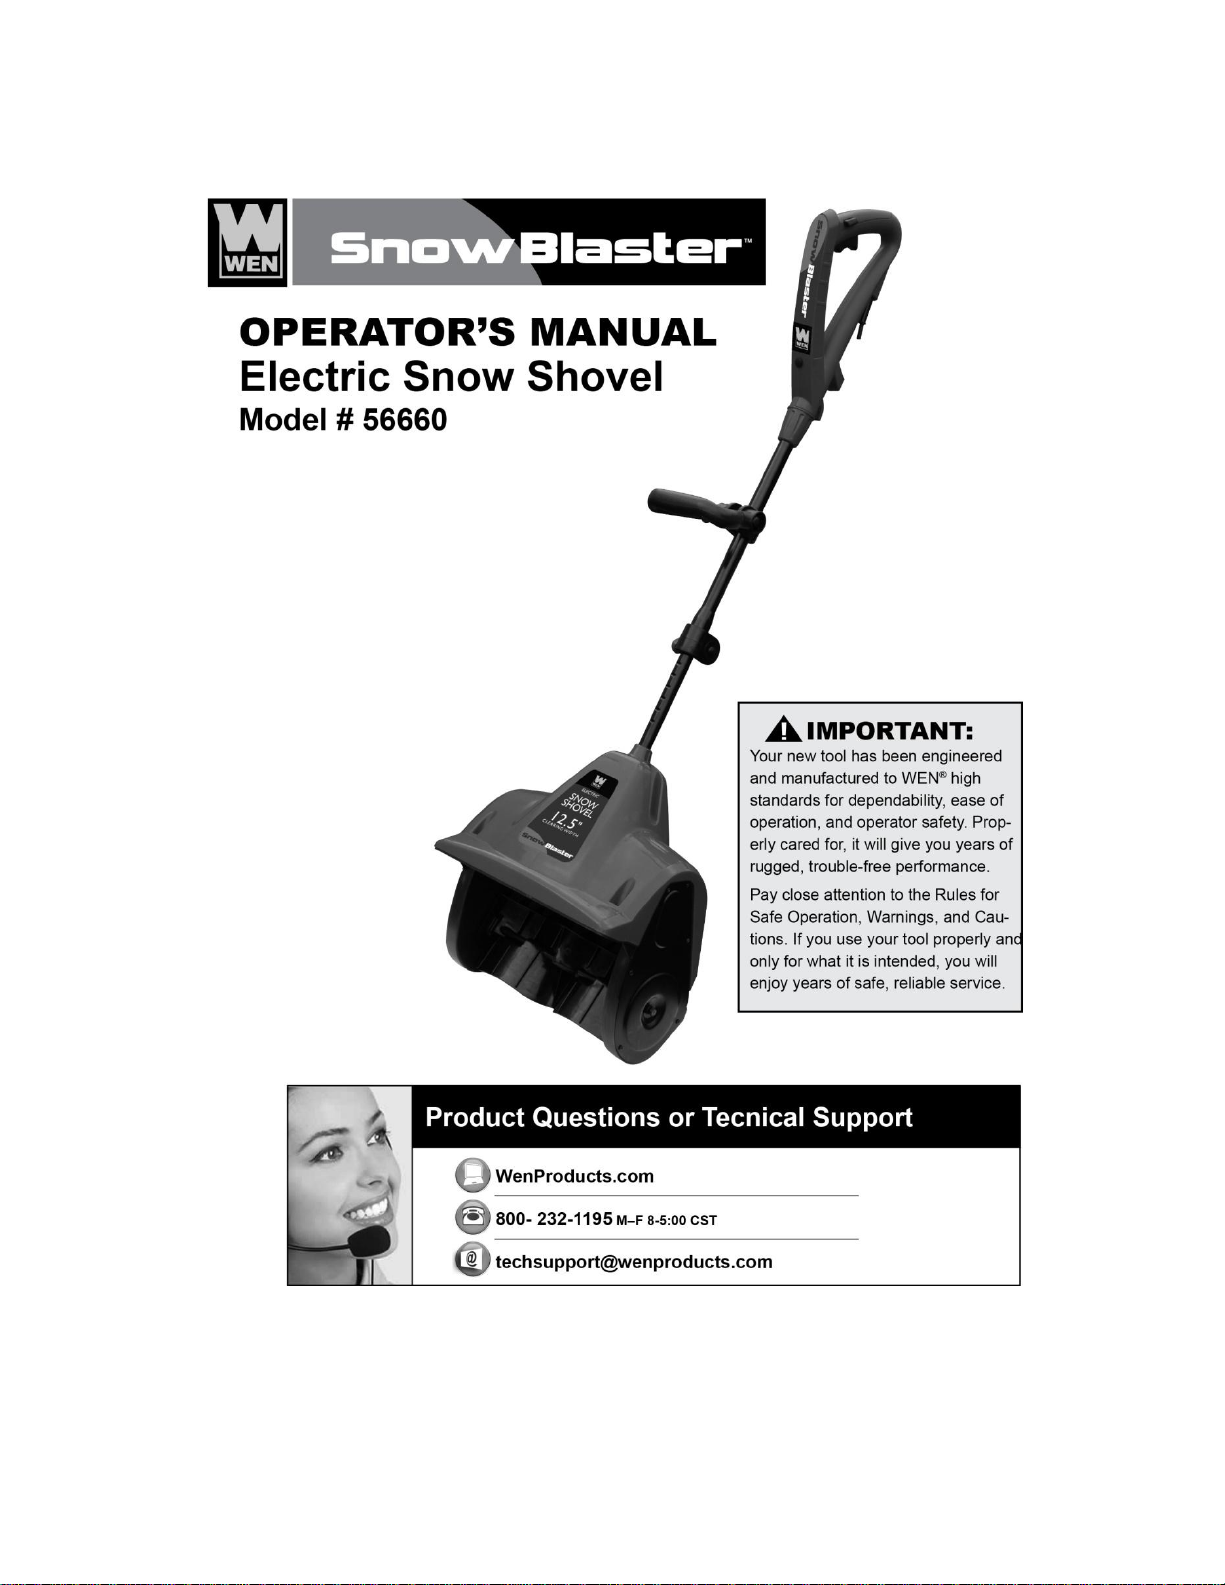
SPECIFICATIONS
Model: 56660
Motor: 120V, 60Hz, 9A
Speed: 2100rpm (no load)
Clearing width: 12.5”
Clearing height: 6”
Weight: 15 lbs
3
Page 4
RULES FOR SAFE OPERATION
The purpose of safety symbols is to attract your attention to possible dangers. The safety
symbols, and the explanations with them, deserve your careful attention and understanding. The
safety warnings do not by themselves eliminate any danger. The instructions or warnings they
give are not substitutes for proper accident prevention measures.
Symbol Meaning
Safety Alert Symbol:
Indicated danger, warning, or caution, may be used in conjunction with other symbols
or pictographs. Always follow the safety precautions to reduce the risk of fire, electric
shock and personal injury.
NOTE: Advising you of information or instructions is vital to the operation or maintenance of
the equipment.
IMPORTANT
Servicing requires extreme care and knowledge and should be performed only by a qualified
service technician. For service, we suggest you return the tool to SNOW BLASTER a division
of Great Lakes Technologies, LLC for repair. When servicing, use only identical SNOW
BLASTER replacement parts.
WARNING- Do not attempt to operate this tool until you have read thoroughly and
understand completely all instructions, safety rules, etc… contained in this manual. Failure to
comply can result in accidents involving fire, electric shock, or serious personal injury. Save
this operator’s manual and review frequently for continuing safe operation and instructing
others who may use this tool.
Safe operation of this power tool requires that you read and understand this operator’s manual
and all labels affixed to the tool. Safety is a combination of common sense, staying alert, and
knowing how your tool works.
4
Page 5
IMPORTANT SAFETY INSTRUCTIONS
When using an electrical appliance, basic precautions should always be followed, including the
following:
READ ALL INSTRUCTIONS BEFORE USING YOUR SNOW SHOVEL
WARNING- To reduce the risk of fire, electric shock, or injury, follow these safety
instructions.
Read, understand, and follow all instructions on the machine and in the manual(s) before
operating this unit. Be thoroughly familiar with the controls and the proper use of the
equipment. Know how to stop the unit and disengage the controls quickly.
Never allow children to operate the equipment. Never allow adults to operate the equipment
without proper instruction.
Keep the area of operation clear of all persons, particularly small children.
Exercise caution to avoid slipping or falling.
Replacement parts -When servicing use only identical replacement parts. Replace or repair
damaged cords.
Do not use on graveled surface unless the snow shovel is adjusted for such a surface in
accordance with the operator’s manual.
Keep children and bystanders away -All visitors should be kept at a distance from the work area.
Dress properly -Do not wear loose clothing or jewelry. They can be caught in moving parts.
Wear rubber boots when operating the snow shovel.
Operation of the snow shovel in the hand -held position is unsafe, except in accordance with the
special instructions for such use provided in the operator’s manual.
Warning -To prevent electric shock, use only with an extension cord suitable for outdoor use.
Avoid accidental starting –Don’t carry the snow shovel with your finger on the switch. Be sure
switch is off when plugging in. If cord is damaged in any manner while plugged in, pull
extension cord from wall receptacle.
5
Page 6

Ampere Rating
Total Length of Cord in feet
More Than
Not More Than
25
50
100
150 0 6
18
16
16
14 6 10
18
16
14
12
10
12
16
16
14
12
12
16
14
12
Not Recommended
Don’t abuse cord -Never carry snow shovel by cord or yank it to disconnect from receptacle.
Keep cord from heat, oil, and sharp edges.
Keep hands away from moving parts.
Keep guards in place and in working order.
Don’t force snow shovel -It will perform better and safer at the rate for which it was designed.
Do not overreach -Keep proper footing and balance at all times.
If the snow shovel strikes a foreign object, follow these steps:
Stop the snow shovel.
Inspect for damage.
Repair any damage before restarting and operating the snow shovel.
Disconnect snow shovel -Disconnect the snow shovel from the power supply when not in use,
before servicing, when changing accessories, and the like.
Store idle snow shovel indoors -When not in use, snow shovel should be stored indoors in dry,
locked place -out of reach of children.
Extension cord
WARNING: This tool is intended for outdoor, residential use only. Do not use it indoor or for
commercial or industrial purposes.
Make sure your extension cord is in good condition. When using an extension cord, be sure to
use one heavy enough to carry the current your product will draw. An undersized cord will
cause a drop in line voltage resulting in loss of power and overheating. The table below shows
the correct size to be used according to cord length and nameplate ampere rating. If in doubt,
use the next heavier gauge. The smaller the gauge number, the heavier the cord.
Minimum gauge for Extension Cords (AWG)
(When using 120V only)
The snow shovel has a polarized male plug, with one prong in the switch housing socket
slightly longer and wider than the other. The extension cord female end should be likewise
polarized, so that the extension cord fits snugly into the switch housing socket.
6
Page 7

UNPACKING
WARNING - To prevent accidental starting that could cause possible serious
personal injury; assemble all parts to your saw before connecting it to power supply.
Snow shovel should never be connected to power supply when you are assembling
parts, making adjustments, installing or removing blades, or when not in use.
WARNING - If any parts are missing, do not operate this tool until the missing parts
are replaced. Failure to do so could result in possible serious personal injury.
Do not discard the packing materials until you have carefully inspected the saw, identified all
parts, and satisfactorily operated your new snow shovel.
NOTE: if any parts are damaged or missing, do not attempt to plug in the power cord and turn
the switch on until the damaged or missing parts are obtained and are installed correctly.
7
Page 8

ASSEMBLY
Upper handle assembly
1. Firmly insert the Pipe into the Handle (Figure 1); making sure tab is inserted into locking
hole. (Figure 2)
2. Pipe is fully inserted and ready to be tightened using the Handle Knob fastener. (Figure 3)
3. Insert the Handle Knob fastener and tighten by turning
clockwise. (Figure 4)
Lower handle assembly (Figure 5, 6 & 7)
1. Put Pipe Bushing onto the Pipe (Figure 5).
2. Locate the tube notch track and align it with the notch
slot at the opening of the main thrower unit (Figure 6).
Insert pole into the opening.
3. Secure the tube to the main thrower unit using 2 bolts and nuts (Figure 7).
Positioning the assist handle (Figure 8)
1. Move and rotate the assist handle to a position that is comfortable for
you.
2. Tighten the knob.
Adjusting the snow shovel height (Figure 9)
1. Loose the knob.
2. Set the tube to a height that is comfortable for you by sliding the upper
handle to your desired height.
3. Tighten the knob.
8
Page 9

OPERATION
Note: This Snow Shovel is intended for outdoor, residential use only. Do not use it indoors or
for commercial or industrial purposes.
Safety precautions
1. Thoroughly inspect the area where the equipment is to be used and remove all doormats,
sleds, boards, wires, and other foreign objects.
2. Do not operate the equipment without wearing adequate winter garments. Avoid loose
fitting clothing that can get caught in moving parts. Wear footwear that will improve
footing on slippery surfaces.
3. Do not attempt to clear snow from a gravel or crushed rock surface. This product is
intended for use only on paved surfaces.
4. Never attempt to make any adjustments while the motor is running (except when
specifically recommended by manufacturer).
5. Always wear safety glasses or eye shields during operation or while performing an
adjustment or repair to protect eyes from foreign objects that may be thrown from the
machine.
6. Do not put hands or feet near or under rotating parts. Keep clear of the discharge opening at
all times.
7. Exercise extreme caution when operating on or crossing gravel drives, walks, or roads. Stay
alert for hidden hazards or traffic.
8. After striking a foreign object, stop the motor, thoroughly inspect the snow shovel for any
damage, and repair the damage before restarting and operating the snow shovel.
9. If the unit should start to vibrate abnormally, stop the motor and check immediately for the
cause. Vibration is generally a warning of trouble.
10. Stop the motor whenever you leave the operating position, before unclogging the rotor
blade housing or discharge chute, and when making any repairs, adjustments or inspections.
11. When cleaning, repairing, or inspecting the snow shovel, stop the motor and make certain
that the rotor blades and all moving parts have stopped.
12. Exercise extreme caution when operating on slopes.
9
Page 10

13. Never operate the snow shovel without proper guards and other safety protective devices in
place and working.
14. Never direct the discharge toward people or areas where property damage can occur. Keep
children and others away.
15. Do not overload the machine capacity by attempting to clear snow at too fast a rate.
16. Look behind and use care when backing up with the snow shovel.
17. Disengage power to the rotor blades when snow shovel is transported or not in use.
18. Never operate the snow shovel without good visibility or light. Always be sure of your
footing, and keep a firm hold on the handles. Walk; never run.
Connecting to a power source
To reduce the risk of electric shock, this appliance has a polarized plug (i.e., one blade is wider
than the other). Use only a polarized plug, UL-listed (CSA certified in Canada) extension cord
recommended for outdoor use. A polarized plug will fit in a polarized cord only one way. If the
plug does not fit fully in the cord, reverse the cord. If it still does not fit, purchase a polarized
extension cord. If you have a polarized extension cord and the extension cord plug does not fit
fully into the wall receptacle, reverse the plug. If it still does not fit, contact a qualified
electrician to install the proper outlet. Do not change the appliance or extension cord plug in
any way. Use only an extension cord recommended for outdoor use.
WARNING—Contact with water while operating the product could cause
electric shock, causing injury or death.
Don’t handle the plug or the appliance with wet hands or while standing in water.
Use only an extension cord recommended for outdoor cold-weather use.
Note: Do not use an extension cord over 150 feet.
Note: Check the extension cord frequently during use for holes or cracks in the insulation. Do
not use a damaged cord. Do not run the cord through standing water or wet grass.
1. Make a loop in the extension cord.
10
Page 11

2. Insert the loop through the hole in the back of the upper handle, securing the loop around
the hook.
Note: This helps to prevent you from accidently disconnecting the extension cord from the
appliance during operation.
3. Connect the extension cord to the appliance electrical cord.
4. Plug the extension cord into a wall outlet.
5. Keep the area to be cleared free of stones, toys, or other foreign objects which the rotor
blades may pick up and throw. Such items could be covered by snowfall and remain
unnoticed.
Starting and stopping
To start the Snow Shovel, push the button on the side of the handle grip and squeeze the trigger.
To stop the product, release the trigger.
11
Page 12

Operating Tips
Start the Snow Shovel and tilt it forward until the scraper blade contacts the ground. Push
the Snow Shovel forward at a comfortable rate of speed, slow enough to clear the path
completely. The width and depth of the snow determines your forward speed.
Direct the snow to the right or to the left by holding the Snow Shovel at a slight angle.
For the most efficient snow removal, throw the snow downwind.
If you need to clear snow from crushed rock or gravel, push down on the handle to raise the
scraper clear of loose material that the rotor blades could throw.
The Snow Shovel can remove snow up to 6 in. (15 cm) deep in one pass. When clearing
deeper drifts, hold the Snow Shovel by the upper and lower handles and use a swinging or
sweeping motion. Remove a maximum of 6 inches (15 cm) with each pass and repeat as
many times as required.
Keep the cord clear of obstructions, sharp objects, and rotor. Do not pull sharply on the cord
or abuse it in any manner. Frequently inspect the cord for damage. If it is damaged, replace
the cord.
Disconnect the extension cord after using the Snow Shovel. Hang the extension cord with
the Snow Shovel so it will not be misplaced or damaged.
LUBRICATING THE SNOW SHOVEL
The Snow Shovel does not need lubrication; all bearings are lubricated at the factory for the life
of the product. SNOW BLASTER has designed this product to give you years of trouble free
use.
Preparing the Snow Shovel for Storage
Examine the Snow Shovel thoroughly for worn, loose, or damaged parts.
Examine the extension cord thoroughly for signs of excess wear or damage. If it is worn or
damaged, replace it.
Disconnect the extension cord from the Snow Shovel before storing.
Store the Snow Shovel in a clean, dry, locked-up place out of the reach of children and cover it
to provide protection.
Store the product and extension cord indoors, in a cool dry location, out of reach of children
and animals.
12
Page 13

EXPLODED VIEW
13
Page 14

PARTS LIST
Item
Stock #
Description
Qty
Item
Stock #
Description
Qty
1
56660-001
Screw 1 48
56660-048
Tapping Screw
4 2 56660-002
Rubber Plug
1
49
56660-049
Tapping Screw
2 3 56660-003
Screw 8 50
56660-050
Protector
1 4 56660-004
Right Handle
1
51
56660-051
Brush Holder
2 5 56660-005
Switch Trigger
1
52
56660-052
Spring Washer
2 6 56660-006
Switch Trigger Spring
1
53
56660-053
Bearing 608zz
1 7 56660-007
Switch 1 54
56660-054
Stator Assembly
1 8 56660-008
Self-lock Button Spring
1
55
56660-055
Motor Holder
1 9 56660-009
Self-lock Button
1
56
56660-056
Rotor Assembly
1
10
56660-010
Screw 2 57
56660-057
Bearing 6001ZZ
1
11
56660-011
Cable Clip
2
58
56660-058
Middle Cover
1
12
56660-012
Left Handle
1
59
56660-059
oil-bearing
1
13
56660-013
Cable Sheath
1
60
56660-060
Big Gear
1
14
56660-014
Power Cord
1
61
56660-061
Shaft 1 15
56660-015
Cable Plate
1
62
56660-062
End Cover
1
16
56660-016
Screw 2 63
56660-063
Spring Washer
4
17
56660-017
Handle Knob
1
64
56660-064
Small Pulley
1
18
56660-018
Pipe Plug
1
65
56660-065
Locknut
1
19
56660-019
Connect Cable
1
66
56660-066
Flat Washer
1
20
56660-020
Locknut
3
67
56660-067
Screw 6 21
56660-021
Knob 2 68
56660-068
Left Cover
1
22
56660-022
Flat Washer
2
69
56660-069
Baffle
1
23
56660-023
Adjustable Handle
1
70
56660-070
Bearing 6000z
1
24
56660-024
Step Bolt
1
71
56660-071
Belt 1 25
56660-025
Step Bolt
1
72
56660-072
Roller Shaft
1
26
56660-026
Handle
1
73
56660-073
Bearing 6000z
1
27
56660-027
Handle Pipe
1
74
56660-074
Tapping Screw
1
28
56660-028
Step Bolt
1
75
56660-075
Baffle 1 29
56660-029
Screw 2 76
56660-076
Fixed Plate
2
30
56660-030
Plastic Pipe
2
77
56660-077
Bearing 6202z
1
31
56660-031
Pipe Bushing
1
78
56660-078
Holder 1 32
56660-032
Screw 7 79
56660-079
Spring
1
33
56660-033
Housing
1
80
56660-080
Base
1
34
56660-034
Pipe Plug
1
81
56660-081
Baffle
1
35
56660-035
Spring Connect Cable
1
82
56660-082
Right Cover
1
36
56660-036
Screw 4 83
56660-083
Screw 4 37
56660-037
Flat Washer
4
84
56660-084
Locknut
1
38
56660-038
Bearing 6001ZZ
1
85
56660-085
Flat Washer
1
39
56660-039
Woodruff Key
1
86
56660-086
Snow Wheel
2
40
56660-040
Circlip 1 87
56660-087
Flat Washer
4
41
56660-041
Screw 4 88
56660-088
Nut 3 42
56660-042
Motor Plate
1
89
56660-089
Spacer Bush
1
43
56660-043
Screw 2 90
56660-090
Shovel 1 44
56660-044
Motor Holder
1
91
56660-091
Screw
12
45
56660-045
Flat Washer
2
92
56660-092
Screw
12
46
56660-046
Screw 2 93
56660-093
Big Pulley
1
47
56660-047
Carbon Brush
2
94
56660-094
Screw
1
14
Page 15

WARRANTY STATEMENT
Limited One Year Warranty
WEN Products is committed to build tools that are dependable for years. Our warranties are consistent with this
commitment and our dedication to quality
LIMITED WARRANTY OF WEN CONSUMER POWER TOOLS PRODUCTS FOR HOME USE
GREAT LAKES TECHNOLOGIES, LLC ("Seller") warrants to the original purchaser only, that all WEN consumer
power tools will be free from defects in material or workmanship for a period of one (1) year from date of purchase.
Ninety days for all WEN products, if the tool is used for professional use.
SELLER'S SOLE OBLIGATION AND YOUR EXCLUSIVE REMEDY under this Limited Warranty and, to the extent
permitted by law, any warranty or condition implied by law, shall be the repair or replacement of parts, without
charge, which are defective in material or workmanship and which have not been misused, carelessly handled, or
misrepaired by persons other than Seller or Authorized Service Center. To make a claim under this Limited
Warranty, please contact us at 1-800-232-1195 or write to us at WEN Products, 501 Davis Road, Elgin, IL 60123.
To acquire service, you will have to provide proof of purchase and may be asked to ship the tool back to us freight
prepaid.
THIS LIMITED WARRANTY DOES NOT APPLY TO ACCESSORY ITEMS SUCH AS CIRCULAR SAW BLADES,
DRILL BITS, ROUTER BITS, JIGSAW BLADES, SANDING BELTS, GRINDING WHEELS AND OTHER RELATED
ITEMS.
ANY IMPLIED WARRANTIES SHALL BE LIMITED IN DURATION TO ONE (1) YEAR FROM DATE OF
PURCHASE. SOME STATES IN THE U.S., SOME CANADIAN PROVINCES DO NOT ALLOW LIMITATIONS ON
HOW LONG AN IMPLIED WARRANTY LASTS, SO THE ABOVE LIMITATION MAY NOT APPLY TO YOU.
IN NO EVENT SHALL SELLER BE LIABLE FOR ANY INCIDENTAL OR CONSEQUENTIAL DAMAGES
(INCLUDING BUT NOT LIMITED TO LIABILITY FOR LOSS OF PROFITS) ARISING FROM THE SALE OR USE
OF THIS PRODUCT. SOME STATES IN THE U.S. AND SOME CANADIAN PROVINCES DO NOT ALLOW THE
EXCLUSION OR LIMITATION OF INCIDENTAL OR CONSEQUENTIAL DAMAGES, SO THE ABOVE LIMITATION
OR EXCLUSION MAY NOT APPLY TO YOU.
THIS LIMITED WARRANTY GIVES YOU SPECIFIC LEGAL RIGHTS, AND YOU MAY ALSO HAVE OTHER
RIGHTS WHICH VARY FROM STATE TO STATE IN THE U.S., PROVINCE TO PROVINCE IN CANADA AND
FROM COUNTRY TO COUNTRY.
THIS LIMITED WARRANTY APPLIES ONLY TO PORTABLE ELECTRIC TOOLS, BENCH POWER TOOLS,
OUTDOOR POWER EQUIPMENT AND PNUMATIC TOOLS SOLD WITHIN THE UNITED STATES OF AMERICA,
CANADA AND THE COMMONWEALTH OF PUERTO RICO. FOR WARRANTY COVERAGE WITHIN OTHER
COUNTRIES, CONTACT THE WEN CUSTOMER SUPPORT.
15
 Loading...