


30-TON GAS
LOG SPLITTER
Model # 56230
bit.ly/WENvideo
IMPORTANT:
Your new tool has been engineered and manufactured to WEN’s highest standards for dependability,
ease of operation, and operator safety. When properly cared for, this product will supply you years
of rugged, trouble-free performance. Pay close attention to the rules for safe operation, warnings,
and cautions. If you use your tool properly and for intended purpose, you will enjoy years of safe,
reliable service.
NEED HELP? CONTACT US!
Have product questions? Need technical support?
Please feel free to contact us at:
800-232-1195
(M-F 8AM-5PM CST)
techsupport@wenproducts.com
WENPRODUCTS.COM

TABLE OF CONTENTS
Log Splitter Identification
Service Record
Introduction
Safety Information
General Safety Procedures
Important Safety Instructions
Log Splitter Components
Assembly
Log Splitter Preparation
Starting the Log Splitter
Stopping the Log Splitter
Subsequent Starting of the Log Splitter
Using the Log Splitter
Maintenance & Care
Storage & Transport
Specifications
Engine Exploded View and Parts List
Log Splitter Exploded View and Parts List
Warranty Statement
2
2
3
3
4
5
7
8
13
15
17
17
19
22
26
27
28
35
39
LOG SPLITTER IDENTIFICATION
If assistance for information or service is required, please contact the Customer Service Help Line by calling
800-232-1195; customer will be asked to provide log splitter information when calling. Keep a copy of your receipt
for any future warranty service.
DATE OF PURCHASE: ______________________________________________
PURCHASED FROM: ______________________________________________
LOG SPLITTER MODEL NUMBER: ____________________________________
SERIAL NUMBER: _________________________________________
SERVICE RECORD
Record Service Dates:
Date Date Date Date Date Date
Change Oil
Change Spark Plug
Clean Fuel Tank
Clean Air Cleaner
2

INTRODUCTION
Thank You for Purchasing a WEN® Product. This manual provides information regarding the safe operation
and maintenance of this product. Every effort has been made to ensure the accuracy of the information in this
manual. WEN® reserves the right to change this product and specifications at any time without prior notice.
Please keep this manual available to all users during the entire life of the log splitter.
This manual contains special messages to bring attention to potential safety concerns, log
splitter damage as well as helpful operating and servicing information. Please read all the
information carefully to avoid injury and machine damage.
QUESTIONS? PROBLEMS?
In order to answer questions and solve problems in the most efficient and speedy manner, contact Customer
Service at (800) 232-1195, M-F 8-5 CST
NOTICE REGARDING EMISSIONS
Engines that are certified to comply with U.S. CARB emission regulations for SORE (Small Off Road
Equipment), are certified to operate on regular unleaded gasoline, and may include the following emission control
systems: (EM) Engine Modifications and (TWC) Three-Way Catalyst (if so equipped).
SAFETY INFORMATION
Before operating this log splitter read and observe all warnings, cautions, and instructions in this Owner’s Manual.
NOTE: The following safety information is not meant to cover all possible conditions and situations that may occur. Read the entire Owner’s Manual for safety and operating instructions. Failure to follow instructions and safety
information could result in serious injury or death.
This safety alert symbol is used to identify safety information about hazards that can result in personal injury.
A signal word (DANGER, WARNING, or CAUTION) is used with the alert symbol to indicate the
likelihood and the potential severity of injury. In addition, a hazard symbol may be used to represent
the type of hazard.
DANGER indicates a hazard, which, if not avoided, will result in death or serious injury.
WARNING indicates a hazard, which, if not avoided, could result in death or serious injury.
CAUTION indicates a hazard, which, if not avoided, might result in minor or moderate injury.
CAUTION when used without the alert symbol, indicates a situation that could result in damage to the engine.
3

GENERAL SAFETY PROCEDURES
For any questions regarding the hazard and safety notices listed in this manual or on the product, please call (800)
232-1195 M-F 8-5 CST before using the log splitter.
DANGER: CARBON MONOXIDE
Using a engine indoors CAN KILL YOU IN MINUTES. Engine exhaust contains carbon monoxide (CO). This is
a poison gas you cannot see or smell. If you can smell the engine exhaust, you are breathing CO. But even if you
cannot smell the exhaust, you could be breathing CO.
NEVER use a engine inside homes, garages, crawl spaces, or other partly enclosed areas. Deadly levels of carbon
monoxide can build up in these areas. Using a fan or opening windows and doors does NOT supply enough fresh
air. ONLY use a engine outside and far away from windows, doors, and vents. These openings can pull in engine
exhaust.
Even if you use a engine correctly, CO may leak into the home. ALWAYS use a battery-powered or battery-backup
CO alarm in the home. If you start to feel sick, dizzy, or weak after the engine has been running, move to fresh air
RIGHT AWAY. See a doctor. You may have carbon monoxide poisoning.
WARNING: The exhaust from this product contains chemicals known to the State of California to cause
cancer, birth defects, or other reproductive harm.
WARNING: This engine may emit highly flammable and explosive gasoline vapors, which can cause
severe burns or even death if ignited. A nearby open flame can lead to explosion even if it isn’t directly in
contact with gasoline.
• Do not operate near open flame.
• Do not smoke near engine.
• Always operate on a firm, level surface.
• Always turn engine off before refueling. Allow engine to cool for at least 2 minutes before removing
fuel cap. Loosen cap slowly to relieve pressure in tank.
• Do not overfill fuel tank. Gasoline may expand during operation. Do not fill to the top of the tank. Allow
for expansion.
• Always check for spilled fuel before operating.
• Empty fuel tank before storing or transporting the log splitter.
WARNING: Do not use the log splitter for any purpose other than other than splitting wood. Any other
use is unauthorized and may result in serious injury or death.
PERSONAL PROTECTIVE EQUIPMENT
When operating this log splitter, it is essential that you wear safety gear including goggles or safety glasses, steel-toed
shoes and tight-fitting gloves (no loose cuffs or draw strings). Always wear ear plugs or sound deafening headphones
to protect against hearing loss when operating this log splitter.
4

GENERAL SAFETY PROCEDURES
WARNING: The engine produces heat when running. Temperatures near exhaust can exceed 1500 F
(650 C).
Do not touch hot surfaces. Allow engine to cool down after use before touching any areas of the log splitter that
become hot during use (such as the engine).
CAUTION: Misuse of this log splitter can damage it or shorten its life.
Only use log splitter for its intended purposes. Operate only on level surfaces. Allow engine to run for several
minutes before using the log splitter. Turn the engine switch to the “OFF” position when the engine is not running.
IMPORTANT SAFETY INSTRUCTIONS
SAFETY WHILE MOVING:
Horizontal position. Make sure the log splitter is secured in the horizontal position before moving the log
splitter. DO NOT move the log splitter when it is in the vertical position because it will be unstable and could tip.
Turn engine o. Never move the log splitter with its engine running.
SAFETY DURING TOWING:
1. Securely attach the log splitter to the towing vehicle before towing.
2. Be sure the tires are fully inated and in good condition before towing the log splitter. When adding air
to the tires, do not over-inflate, as this could result in serious injury if the tire explodes.
3. Never tow this log splitter over 45 mph. Faster speeds may result in loss of control.
4. Rough terrain: be extra cautious and drive slowly when traveling over rough terrain.
5. Stay sober: never tow this splitter while under the influence of alcohol, drugs, or medication.
6. If towing on a public road, make sure to comply with all local, state, and federal towing requirements. It
is the sole responsibility of the purchaser to obtain licensing, trailer lights, safety chains, signage, or any other legal
requirements needed in the area of towing.
7. Turn o the towing vehicle before leaving the splitter unattended.
8. Disconnect before operating. Do not use the log splitter while it is connected to the towing vehicle.
SAFETY DURING USE
1. Always block the wheels to prevent unintended movement of the log splitter.
2. Safety equipment/controls: always operate the log splitter with all safety equipment in place and in good
working order, and all controls properly adjusted for safe operation.
3. Know how to stop: be thoroughly familiar with all controls and with the proper use of the equipment. Know
how to stop the log splitter and relieve system pressures quickly if needed.
4. Daylight only: Only use the log splitter in daylight so you can see what you are doing.
5. Smoking/sparks: never smoke while operating the log splitter, and never operate near sources of sparks or
flames.
6. Hot muer: if you are starting a warm engine, stay clear of muffler. It may still be hot enough to burn you.
7. Never leave the machine unattended while the engine is running.
8. Stay sober: never operate the log splitter while under the influence of alcohol, drugs, or medication.
9. Other exhaust dangers. Engine exhaust, some of its constituents, and certain vehicle components contain
or emit chemicals known to the State of California to cause cancer, birth defects, or other reproductive harm.
Avoid excess inhalation of exhaust.
5

IMPORTANT SAFETY INSTRUCTIONS
10. Only uses square log ends: logs that are not cut square can slide out while splitting and become a safety
hazard or cause excessive force to log splitter components. Use a chain saw to cut logs square on each end before
attempting to split them.
11. Single log: never attempt to split more than one log at a time. Pieces of log can unexpectedly be thrown
from the machine causing serious injury.
12. Split along grain: do not use the log splitter to split logs across the grain. Doing so will damage the log
splitter and can also cause pieces of log to be thrown, injuring the operator or bystanders.
13. Keep hands clear: ALWAYS keep hands and feet away from the end plate, wedge, and partially split logs
while loading, operating and unloading the log splitter.
14. Operator position: ALWAYS operate the log splitter from the operation zone as shown below. Other
positions are unsafe because they can increase the risk of injury from crushing, cutting, flying objects, or burns.
OPERATION ZONE
15. Never straddle, reach across or step over the beam while the engine is running and the log splitter is
in the horizontal position. You could trip, actuate the controls, and get seriously injured.
16. Avoid using a second person during operation: many accidents occur when there is more than one
person involved in loading and operating the log splitter. Only one person should operate the controls. If a second
person is assisting in loading logs, the operator must NEVER actuate the Split Control Lever until the assistant
and all bystanders are at least 10 feet away. NEVER allow an assistant to hold the log in place while the operator
actuates the Split Control Lever.
17. NEVER load or unload logs while the wedge is moving.
18. Keep hands clear: remove both hands from log before activating Split Control Lever.
19. Only use your hands to operate the Split Control Lever. Never use any other body part, a rope, cable,
or other remote device to actuate the control.
20. Returning wedge: once the control valve is actuated in the return direction, the wedge is designed to keep
returning by itself completely and then stop automatically. Stay clear while the wedge is returning. It is still powerful enough on the return stroke to cause serious injury.
21. For stuck logs: if a log does not split completely and becomes stuck on the wedge, follow the instructions
below to remove the log. A log can become stuck to the wedge if the wedge becomes embedded in the log and the
log doesn’t split and separate. This can happen if the log is too stringy or tough to split completely. A stuck log will
move back with the wedge on the initial attempt to retract the wedge. If this happens, retract the wedge completely
to allow the splitter to strip the log from the wedge. Keep hands clear of log and wedge while wedge is retracting.
6

LOG SPLITTER COMPONENTS
Use the illustrations below to become familiar with the locations and functions of the various components and
controls of this log splitter.
1
2
12
3
1113
4
10
5
6
1 End Plate
7
9
2 Wedge
3 Control Valve
4 Split Control Lever
5 Cylinder
8
6 Manual Tube
7 2” Ball Coupler
8 Safety Chain
9 Support Leg
10 Horizontal Lock
11 Pump
12 Return Line Filter
13 Tire
14 Engine
15 Engine ON/OFF Switch
16 Hydraulic Dipstick
17 Hydraulic Tank
18 Vertical Lock
14
15
Closely inspect all log splitter components
If you have missing or damaged components, please contact WEN Customer Service at 1-800-232-1195.
16 17
18
7

1A
1B
234
ASSEMBLY
STEP 1 - ATTACHING THE TIRES TO THE
5
1A - Bearing
1B - Bearing
2 - Washer
3 - Castle Nut
4 - Cotter Pin
5 - Hub Cap
Figure 1
1. Slide a bearing (1A) and the tire onto axle with the
valve stem (valve for inflation) facing out (Figure 1A)
(bearings 1A and 1B may already be mounted on the
tire).
2. Slide the other bearing (1B), a washer (2) and the
slotted castle nut (3) onto the axle. Using a wrench,
tighten the nut. Turn hub to ensure the bearings are
seated properly. Make sure the tire spins freely (Figure 1B)
3. Insert cotter pin (4) through the hole in the slotted
castle nut (3) and axle. Bend and spread prongs in
opposite directions so the axle nut will not come off
(Figure 1C).
4. Install the hub cap (4). Gently tap on the hub cap
with a hammer to drive the hub cap into place (Figure
1C).
HYDRAULIC TANK (FIGURE 1)
Figure 1A
Caution: Heavy lifting required.
Some of the components in these
assembly instructions are heavy
and cannot be safely lifted by one
person. Please plan on assembling
this product when another person
can be available to help out.
5. Repeat these steps to install the other tire.
Figure 1B Figure 1C
8

ASSEMBLY
3
STEP 2 - ATTACHING THE TOW BAR TO
THE HYDRAULIC TANK (FIGURE 2)
1. Lock the support leg (4) in its downward position before starting.
2. Slide the tow bar (1) into the pivot mount (3). Fasten
it in place using the included bolts (2) and nuts (5) as
shown in Figures 2A and 2B.
1
Figure 2
2
5
4
1. Tow Bar
2. Bolts
3. Pivot Mount
4. Support Leg
5. Nuts
Figure 2BFigure 2A
STEP 3 - ATTACHING THE ENGINE TO
THE HYDRAULIC TANK (FIGURE 3)
1. Place the engine (1) as shown in position on top of the
engine mount plate (5).
2. Install the engine to the engine mount plate using bolts,
washers and nuts. Make sure to insert the bolt from the
bottom side of the engine mount plate as shown in Figure 3.
1. Engine
2. Nuts (4)
3. Spring Washers (4)
4. Top Washers (4)
5. Engine Mount Plate
6. Bolts (4)
1
5
6
2
3
4
Figure 3
Figure 3A
Figure 3B
9
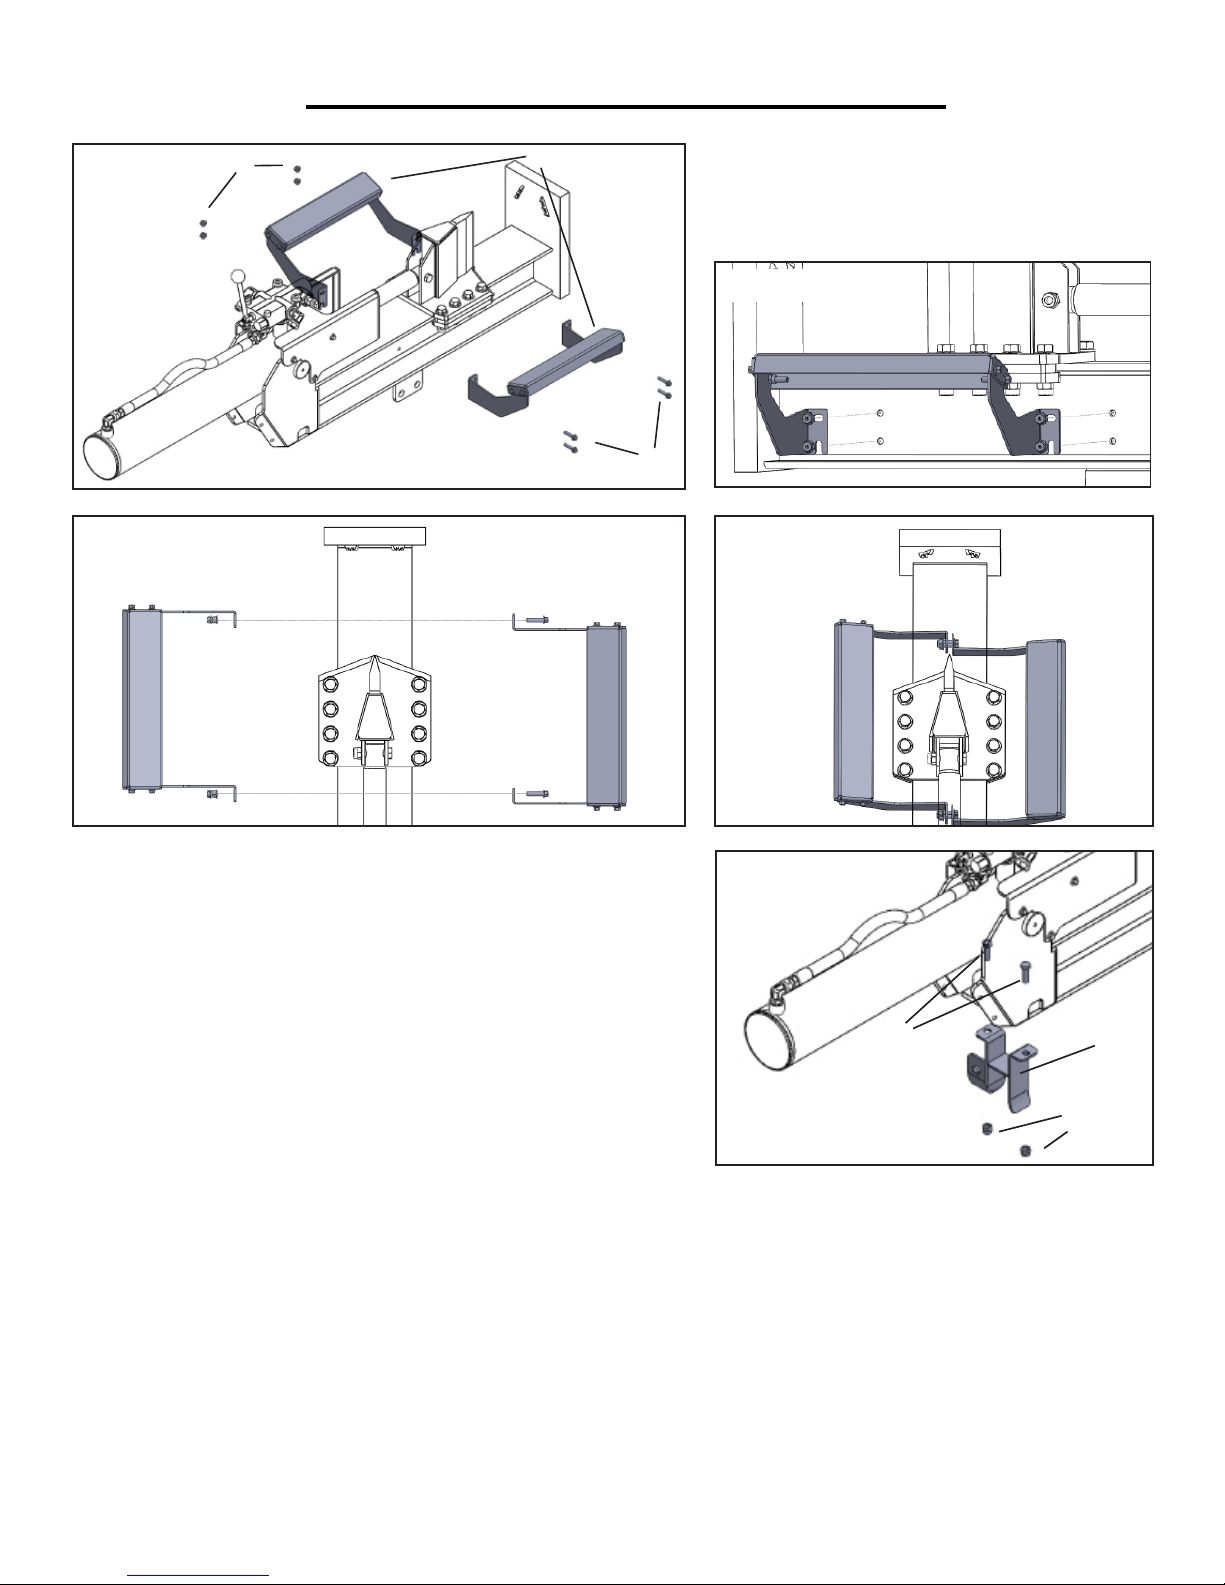
ASSEMBLY
STEP 4 - ASSEMBLING THE LOG
CRADLES (FIGURE 4)
Figure 4
1
2
Attach the two log cradles (2) to beam using
four bolts (3) and four locknuts (1).
1. Nuts (4)
2. Log Cradles (2)
3. Bolts (4)
3
Figure 4A
Figure 4B Figure 4C
STEP 5 - ASSEMBLE THE BEAM LOCK BRACKET
Figure 5
(FIGURE 5)
1. Run the two hoses emerging from either side of the control
valve to the underside of the log splitter as shown in Figure 5A
(next page).
1
2
2. Fasten the beam lock bracket using the included bolts and nuts.
Make sure that the bracket encloses the two hoses as shown in
Figure 5B (next page).
1. Bolts (2)
2. Beam Lock Bracket
3. Nuts (2)
3
STEP 6 - ATTACHING THE ASSEMBLED BEAM TO THE HYDRAULIC TANK (FIGURE 6)
1. Stand the assembled beam (4) onto its end plate in the vertical position with the pivot bracket (5) facing the
pivot mount (1) (Figure 6, next page). Make sure an associate helps hold the beam assembly in place to prevent it
from tipping over and inflicting injury.
2. Align the beam pivot bracket (5) with the pivot mount (1). Insert the pivot pin (2) (Figure 6A & 6B, next page).
3. Insert the cotter pin (3) through the hole in the beam pivot pin (4). Spread and bend the prongs of the cotter
pin in opposite directions to secure it in place. Once the pin is secure, lower the assembly beam into the horizontal position with the help of your associate (final horizontal position should look similar to Figure 7C).
10

ASSEMBLY
Figure 5B
1. Pivot Mount
2. Beam Pivot Pin
3. Cotter Pin
4. Beam Assembly
5. Beam Pivot Bracket
4
Figure 6A
Figure 6B
3
2
Figure 5A
1
5
Figure 6
Figure 6C
11

ASSEMBLY
STEP 7 - CONNECTING THE HOSES
WARNING: Be extremely careful when connecting the hoses. Connecting the hose to the wrong
port could quickly ruin your log splitter and also runs the risk of inflicting an unwanted injury. Double
check that the hoses are running to the correct inlets and outlets before starting the log splitter.
1. Connect one end of the suction hose (2) to the tank suction port (1) and the other end to the pump inlet (3) as
shown in Figure 7A. Tighten the supplied hose clamps on both sides (torque to 75 in.-lb.) (Figure 7A)
1
Figure 7A
2
2. Grab the low pressure return hose (4) emerging from the side of the control valve (5) opposite of the engine.
Attach the free end to the return line filter fitting (6). Torque to 75 in.-lb. (Figure 7C and 7D).
For Figures 7A to 7F
1. Tank Suction Port
2. Suction Hose
3. Pump Inlet Fitting
4. Low Pressure Return Hose
5. Control Valve
6. Return Line Filter Fitting
7. High Pressure Hose
8. Pump Outlet Fitting
Figure 7C
3. Route the high pressure hose (7) emerging from the engine-side of the control valve (5) down to the pump’s
outlet fitting (8). Wrench tighten three to five turns past hand tight.
3
Figure 7B
5
4
6
Figure 7D
4
5
Figure 7E
12
7
8 7
Figure 7F
 Loading...