

Page 1
212cc Horizontal Engine
Item # 56212
Owner’s Manual
Manual del Propietario
Questions? Problems?
Please call our customer help line:
(800) 232-1195 M-F 8-5 CST
FEATURES
• Low Oil Automatic Shutoff
• Circuit Breaker for Overload Protection
• 0.9 Gallon Fuel Tank Capacity
• Meets EPA Phase III Emission Standards and CARB Emission Standards
www.wenproducts.com
2013
Page 2
ENGINE IDENTIFICATION
For information and questions, please contact the Customer Service Help Line by calling 800-232-
1195. Certain information will be requested by the Customer Service Representative and to facilitate
that, please fill in the information below.
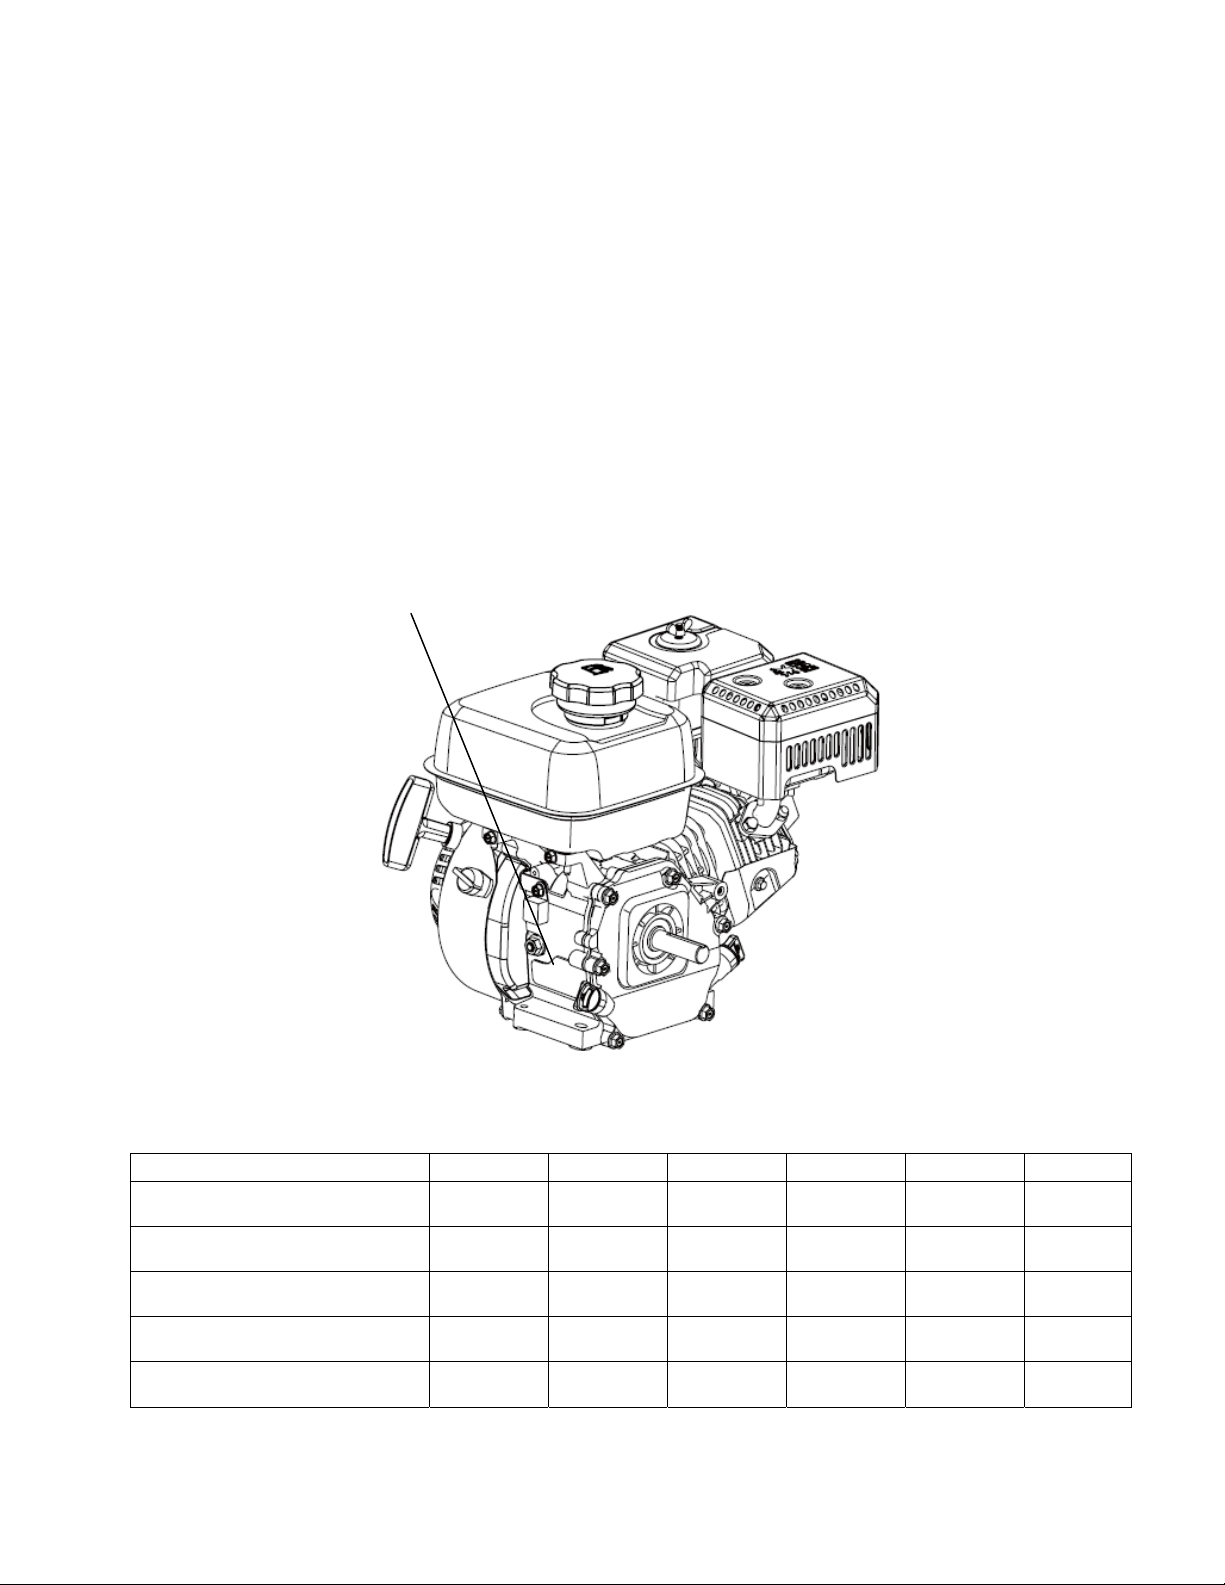
Refer to the illustration below for the location of Serial Number. Record engine information in the
spaces provided below.
DATE OF PURCHASE: ______________________________________________
PURCHASED FROM: ______________________________________________
ITEM NUMBER: ____________________________________________________
ENGINE SERIAL NUMBER: _________________________________________
ENGINE SERIAL NUMBER
SERVICE RECORD
Record Service Dates:
Date Date Date Date Date Date
Oil Change
Change spark plug
Clean Fuel Tank
Clean Air Cleaner
i
Page 3

TABLE OF CONTENTS
ENGINE IDENTIFICATION .......................................................................................................... i
SERVICE RECORD ......................................................................................................................... i
INTRODUCTION ............................................................................................................................ 1
SAFETY INFORMATION .............................................................................................................. 2
GENERAL SAFETY PROCEDURES ........................................................................................... 3
IMPORTANT SAFETY INSTRUCTIONS ................................................................................... 4
ENGINE COMPONENTS ............................................................................................................... 4
ENGINE PREPARATION .............................................................................................................. 6
Using the Engine for the First Time ............................................................................................... 6
Step 1 - Fill Oil ........................................................................................................................... 6
Step 2- Add Gasoline .................................................................................................................. 7
STARTING THE ENGINE ............................................................................................................. 8
SUBSEQUENT STARTING OF THE ENGINE ........................................................................... 9
Step 1- Check the Oil.................................................................................................................. 9
Step 2 – Check the Fuel Level .................................................................................................... 9
STOPPING THE ENGINE ........................................................................................................... 11
MAINTENANCE / CARE ............................................................................................................. 11
Cleaning the Engine ...................................................................................................................... 12
Checking the Oil ........................................................................................................................... 12
Changing/ Adding Oil .................................................................................................................. 12
Air Cleaner Maintenance .............................................................................................................. 13
Spark Plug Maintenance ............................................................................................................... 13
Draining the Fuel Tank ................................................................................................................. 14
STORAGE / TRANSPORT PROCEDURES .............................................................................. 15
SPECIFICATIONS ........................................................................................................................ 16
TROUBLESHOOTING ................................................................................................................. 18
EXPLODED VIEW AND PARTS LIST ...................................................................................... 21
WARRANTY STATEMENT ........................................................................................................ 24
ii
Page 4

INTRODUCTION
Thank You for Purchasing a WEN Power TM Product.
.
This manual provides information regarding the safe operation and maintenance of this product.
Every effort has been made to ensure the accuracy of the information in this manual.
WEN Power
prior notice.
Please keep this manual available to all users during the entire life of the product.
TM
reserves the right to change this product and specifications at any time without
Special Messages
This manual contains special messages to bring attention to potential safety concerns, engine
damage as well as helpful operating and servicing information. Please read all the information
carefully to avoid injury and machine damage.
Questions? Problems?
In order to answer questions and solve problems in the most efficient and speedy manner,
contact Customer Service at:
(800) 232-1195 M-F 8-5 CST
NOTICE REGARDING EMISSIONS
Engines that are certified to comply with U.S. EPA emission regulations for SORE (Small Off
Road Equipment), are certified to operate on regular unleaded gasoline, and may include the
following emission control systems: (EM) Engine Modifications and (TWC) Three-Way Catalyst
(if so equipped).
1
Page 5
SAFETY INFORMATION
Before operating this engine read and observe all warnings, cautions, and instructions on this
sheet, on the engine, and in the Owner’s Manual.
NOTE: The following safety information is not meant to cover all possible conditions and
situations that may occur. Read the entire Owner’s Manual for safety and operating
instructions. Failure to follow instructions and safety information could result in serious
injury or death.
This safety alert symbol is used to identify safety information about hazards that can result in
personal injury.
A signal word (DANGER, WARNING, or CAUTION) is used with
the alert symbol to indicate the likelihood and the potential severity of injury. In
addition, a hazard symbol may be used to represent the type of hazard.
DANGER indicates a hazard, which, if not avoided, will result in death or serious
injury.
WARNING indicates a hazard, which, if not avoided, could result in death or
serious injury.
CAUTION indicates a hazard, which, if not avoided, might result in minor or
moderate injury.
CAUTION, when used without the alert symbol, indicates a situation that could
result in damage to the engine or engine.
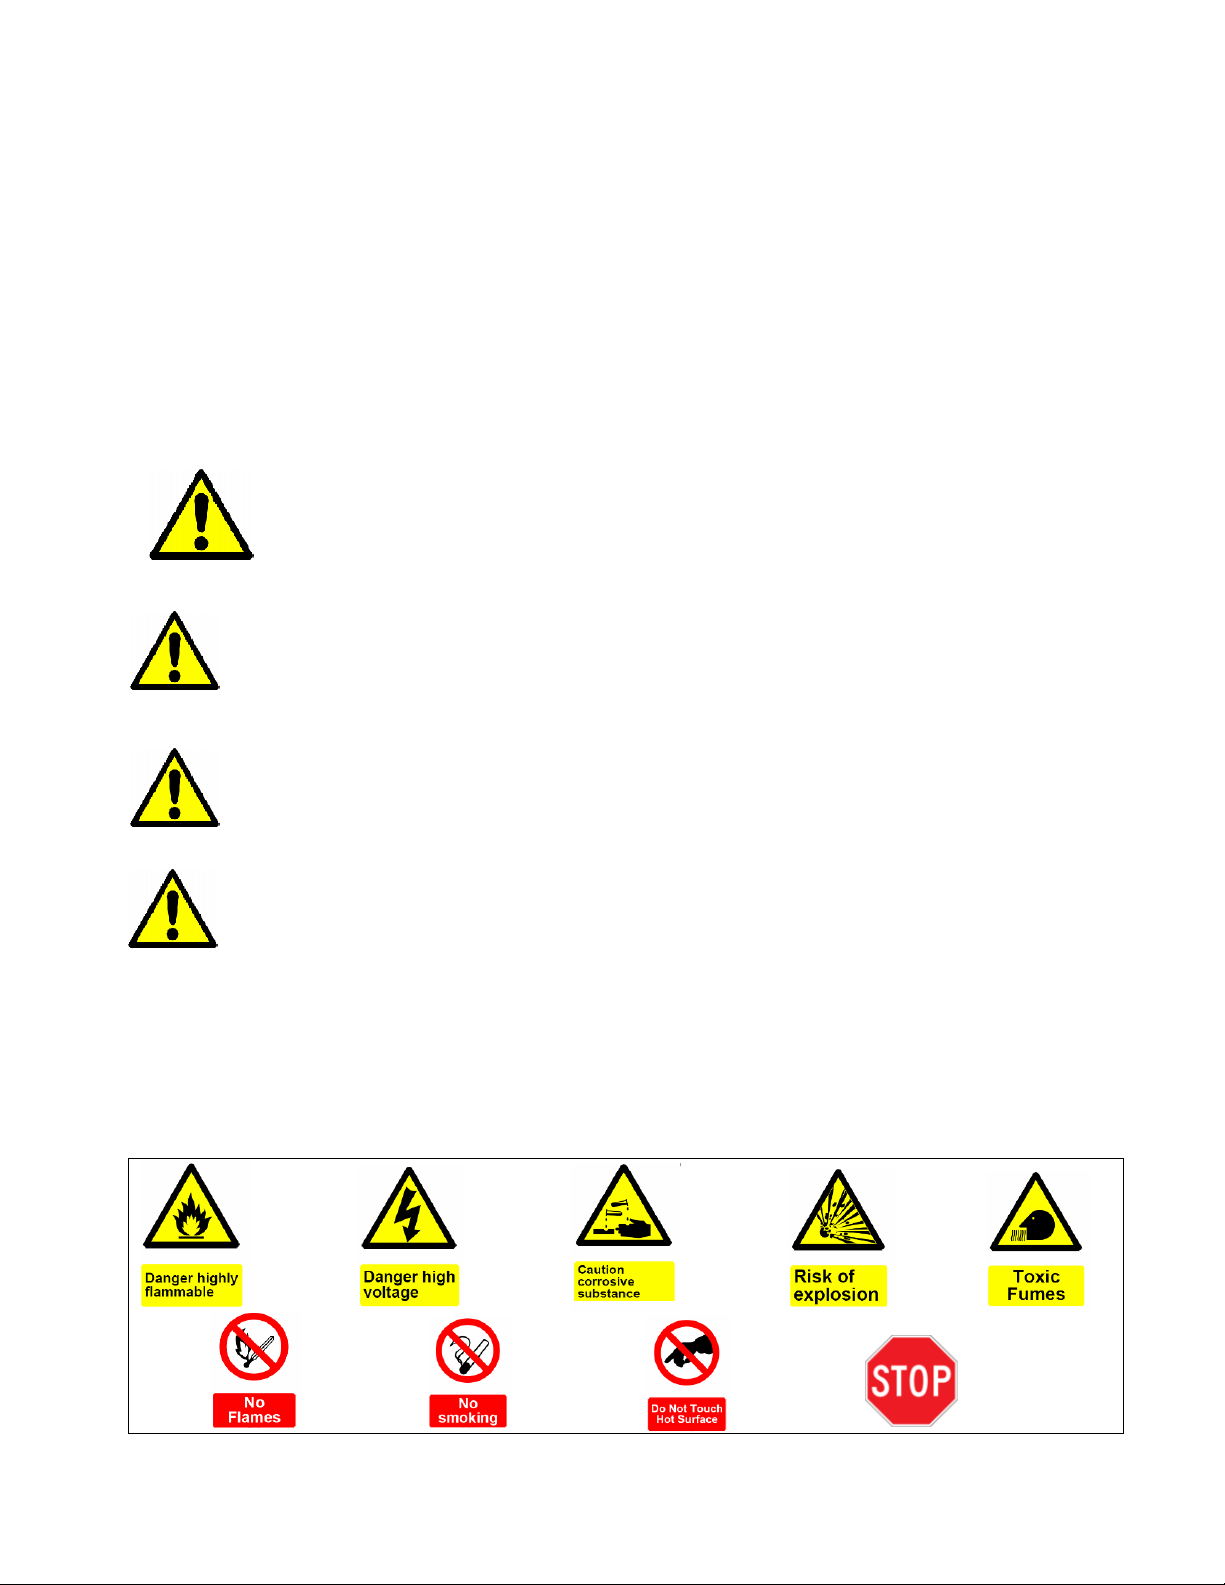
SAFETY SYMBOLS AND MEANINGS
2
Page 6
GENERAL SAFETY PROCEDURES
For any questions regarding the hazard and safety notices listed in this manual or on the
product, please call (800) 232-1195 M-F 8-5 CST before using the engine.
DANGER: CARBON MONOXIDE. Using an engine indoors CAN KILL
YOU IN MINUTES.
Engine exhaust contains carbon monoxide (CO). This is a poison gas you cannot
see or smell. If you can smell the engine exhaust, you are breathing CO. But even
if you cannot smell the exhaust, you could be breathing CO.
• NEVER use an engine inside homes, garages, crawlspaces, or other partly enclosed
areas. Deadly levels of carbon monoxide can build up in these areas. Using a fan or
opening windows and doors does NOT supply enough fresh air.
• ONLY use an engine outside and far away from windows, doors, and vents. These
openings can pull in engine exhaust.
Even if you use an engine correctly, CO may leak into the home. ALWAYS use a batterypowered or battery-backup CO alarm in the home.
If you start to feel sick, dizzy, or weak after the engine has been running, move to fresh air
RIGHT AWAY. See a doctor. You may have carbon monoxide poisoning.
WARNING: The exhaust from this product contains chemicals known to the
State of California to cause cancer, birth defects, or other reproductive harm.
WARNING: This engine may emit highly
flammable and explosive gasoline vapors, which can
cause severe burns or even death, if ignited. A nearby open flame can lead to
explosion even if not directly in contact with gasoline.
• Do not operate near open flame.
• Do not smoke near engine.
• Always operate on a firm, level surface.
• Always turn engine off before refueling. Allow engine to cool for at least 2 minutes
before removing fuel cap. Loosen cap slowly to relieve pressure in tank.
• Do not overfill fuel tank. Gasoline may expand during operation. Do not fill to the
top of the tank. Allow for expansion.
• Always check for spilled fuel before operating.
• Empty fuel tank before storing or transporting the engine.
• Before transporting, turn fuel valve to off and disconnect spark plug wire.
3
Page 7

WARNING: This engine produces heat when running. Temperatures near
exhaust can exceed 150º F (65º C).
• Do not touch hot surfaces. Pay attention to warning labels on the engine identifying hot
parts of the machine.
• Allow engine to cool down after use before touching engine or areas of the engine that
become hot during use.
CAUTION: Misuse of this engine can damage it or shorten its life.
• Use engine only for its intended purposes.
• Operate only on dry, level surfaces.
• Turn engine switch to “off” position when the engine is not running.
IMPORTANT SAFETY INSTRUCTIONS
• SAVE THESE INSTRUCTIONS – This manual contains important instructions for WEN
engine that should be followed during installation and maintenance of the engine.
• Engines vibrate in normal use. Have damaged items repaired or replaced as necessary.
In addition to the previous safety notices, please become familiar with the safety and hazard
markings on the engine.
4
Page 8
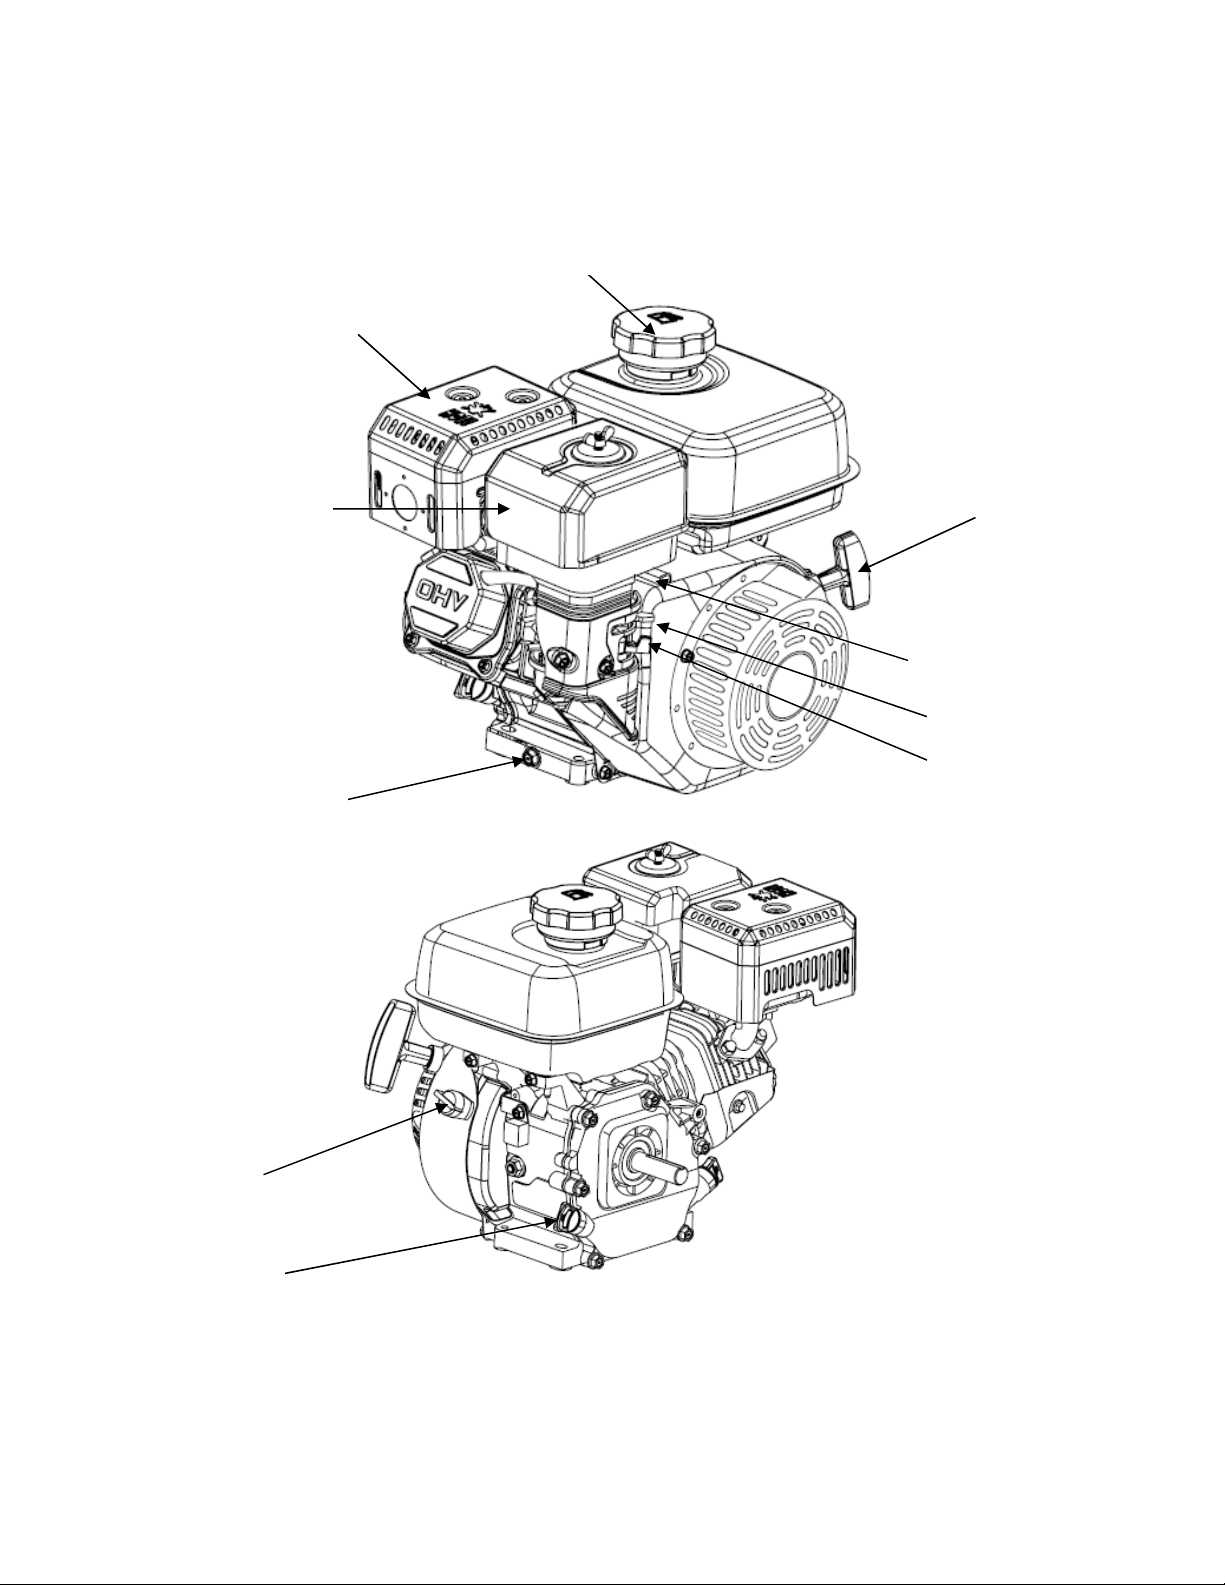
ENGINE COMPONENTS
Please familiarize yourself with the locations and functions of the various components and controls
of your engine.
Muffler
Fuel Cap
Air Cleaner
Drain Plug
Starter Handle
Throttle
Choke
Fuel Valve
Engine Switch
Dipstick
5
Page 9
ENGINE PREPARATION
Using the Engine for the First Time
The following section describes steps necessary to prepare the engine for use. If after
reading this section, you are unsure about how to perform any of the steps please call (800)
232-1195 M-F 8-5 CST
damage the engine or shorten its life.
for customer service. Failure to perform these steps properly can
Step 1 - Fill Oil
The engine is shipped without oil. User must add the proper amount of oil before operating the
engine for the first time. The oil capacity of the engine crankcase is 0.5 quart.
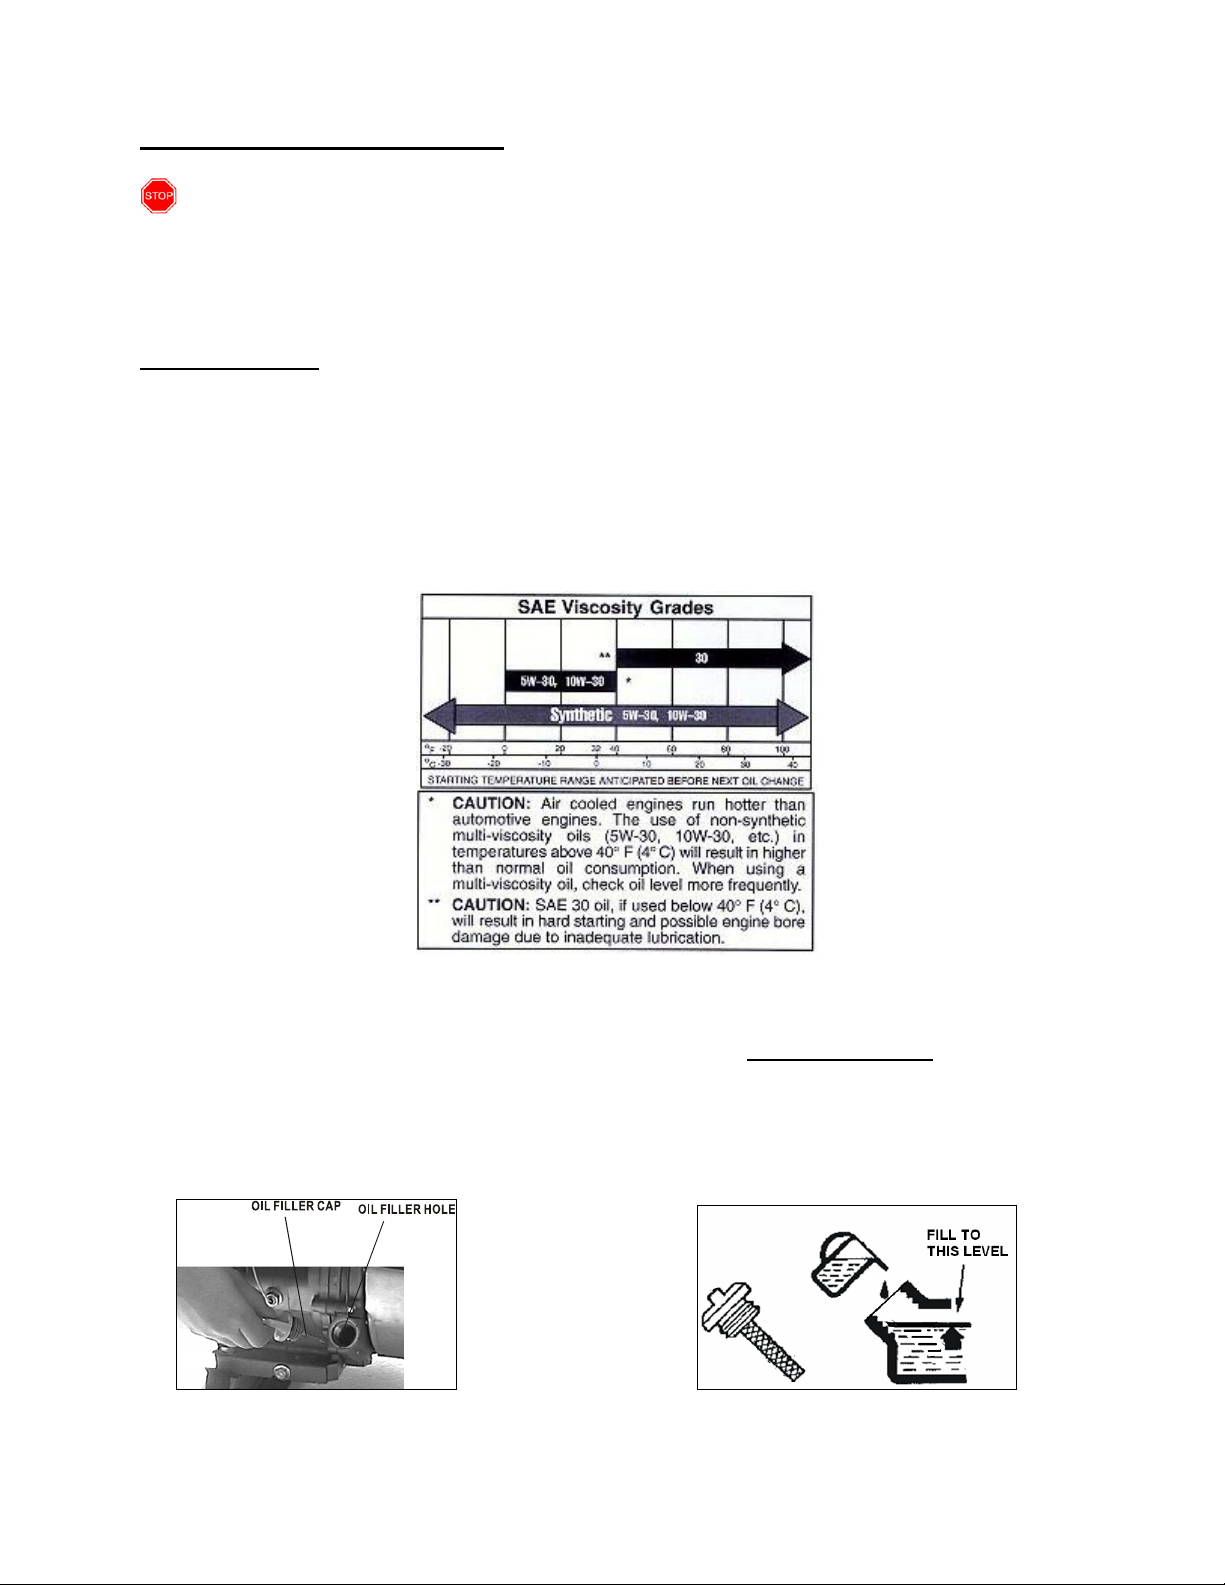
Select good quality detergent oil bearing the American Petroleum Institute (API) service
classifications SJ, SL, or SM. (Synthetic oils may be used.) Use the SAE viscosity grade
of oil from the following chart that matches the starting temperature anticipated before
the next oil changes.
Figure1- Engine oil recommendations
To fill oil to the crankcase, follow these steps:
1. Make sure the engine is on a level surface. Tilting the engine to assist in filling will cause
oil to flow into engine areas and will cause damage. Keep engine level!
2. Remove the oil filler/dipstick cap from the engine as shown in figure 2.
3. Using a funnel, add the appropriate type and amount of oil into the crankcase. The
crankcase is full when the oil level has reached the second thread from the lip of the
opening (see figure 3).
4. Check for oil leaks. Reinstall oil filler cap before starting engine.
Figure 2- Unscrewing the oil cap Figure 3- filling oil
6
Page 10

Step 2- Add Gasoline
WARNING: This engine may emit highly
flammable and explosive gasoline vapors, which can
cause severe burns or even death if ignited. A nearby
open flame can lead to explosion even if not directly in contact with gasoline.
• Do not operate near open flame.
• Do not smoke near engine.
• Always operate on a firm, level surface.
• Always turn engine off before refueling. Allow engine to cool for at least 2 minutes
before removing fuel cap. Loosen cap slowly to relieve pressure in tank.
• Do not overfill fuel tank. Gasoline may expand during operation. Do not fill to the
top of the tank. Allow for expansion.
• Always check for spilled fuel before operating. Clean up any spilled fuel before
starting.
• Empty fuel tank before storing or transporting the engine.
• Before transporting, turn fuel valve to off position and disconnect spark plug wire.
Use fresh (within 30 days from purchase), unleaded gasoline with a minimum 87 octane rating. Do
not use gasoline which contains Methanol. Do not mix oil with gasoline.
To add gasoline, follow these steps:
1. Make sure the engine is on a level surface.
2. Unscrew fuel cap and set aside (NOTE: the fuel cap may be tight and hard to unscrew).
3. Slowly add unleaded gasoline to the fuel tank. Be careful not to overfill. The fuel tank
capacity is 0.9 gallon. NOTE: Do not fill the fuel tank to the very top. (See Figure 4).
Gasoline will expand and spill over during use even with the fuel cap in place.
4. Reinstall fuel cap and wipe off any spilled gasoline with a dry cloth.
Figure 4
IMPORTANT:
• Never use an oil/gasoline mixture.
• Never use old gasoline.
• Avoid letting dirt or water into the fuel tank.
• Gasoline can age in the tank and make it hard to start up the engine in the future. Never
store engine for extended periods of time with fuel in the tank.
7
Page 11

STARTING THE ENGINE
Before starting the engine, make sure you have read and performed the steps in the
“Engine Preparation” section of this manual. If you are unsure about how to perform any of
the steps in this manual please call (800) 232-1195 M-F 8-5 CST for customer service.
DANGER: CARBON MONOXIDE. Using an engine indoors CAN KILL YOU
IN MINUTES.
Engine exhaust contains carbon monoxide (CO). This is a poison gas you cannot
see or smell. If you can smell the engine exhaust, you are breathing CO. But even
if you cannot smell the exhaust, you could be breathing CO.
• NEVER use an engine inside homes, garages, crawlspaces, or other partly enclosed
areas. Deadly levels of carbon monoxide can build up in these areas. Using a fan or
opening windows and doors does NOT supply enough fresh air.
• ONLY use an engine outside and far away from windows, doors, and vents. These
openings can pull in engine exhaust.
Even if you use an engine correctly, CO may leak into the home. ALWAYS use a batterypowered or battery-backup CO alarm in the home.
If you start to feel sick, dizzy, or weak after the engine has been running, move to fresh air
RIGHT AWAY. See a doctor. You may have carbon monoxide poisoning.
To start your engine, perform the following steps:
1. Follow the Set Up Instructions in the equipment manual to
prepare the equipment.
2. Inspect the equipment and engine.
3. Check the oil and fuel levels.
4. Read the Equipment Operation section in the equipment
manual.
5. Turn the fuel valve to the “ON” position (see figure 5).
6. Move the choke lever to the “CHOKE” position (see figure 6).
7. Set the engine switch to the “on” position.
8. Slide the Throttle or Speed Control Lever to 1/3 away from the
SLOW position (the “turtle”).
9. Pull on the recoil starter handle slowly until a slight resistance
is felt. Then pull quickly to start the engine. Return cord gently
into the machine. Never allow the cord to snap back.
10. If engine fails to start, repeat step 9. NOTE: After repeated
failed attempts to start the engine, please consult the
troubleshooting guide before attempting again. If problems
persist please call (800) 232-1195 M-F 8-5 CST.
11. Once the engine has started, slowly return the choke lever all
the way to the “RUN” position.
12. Allow the engine to run for several minutes at no load. This allows the engine to stabilize
its speed and temperature.
13. Adjust the Throttle as needed.
Figure 5
8
Page 12

SUBSEQUENT STARTING OF THE ENGINE
If this is not the first time using the engine, user should take the following steps to prepare it for
operation.
IMPORTANT: At this point the user should be familiar with the procedures described in the
section titled “Using the Engine for the First Time.” If the user has not yet read this section,
go back and read it now.
Step 1- Check the Oil
Oil consumption is normal during engine usage. The engine is equipped with a low-oil shutoff to
protect it from damage. The oil level in the engine should be checked before each use to ensure
that the engine crankcase contains sufficient lubricant.
To check or add oil, follow these steps:
1. Make sure the engine is on a level surface. Clean around oil fill.
2. Remove the oil filler/dipstick cap and check oil level.
3. If oil level is below the second thread from the lip of the oil fill opening, slowly add oil
until the engine crankcase is filled.
4. Reinstall and tighten oil filler cap before starting the engine. .
Step 2 – Check the Fuel Level
Before starting the engine, check to see that there is sufficient gasoline in the fuel tank. The fuel
gauge on top of the engine will indicate the fuel level in the tank. Add gasoline if necessary but
leave sufficient room in tank for expansion.
WARNING: This engine may emit highly
flammable and explosive gasoline vapors, which can
cause severe burns or even death if ignited. A nearby
open flame can lead to explosion even if not directly in contact with fuel.
• Do not operate near open flame.
• Do not smoke near engine.
• Always operate on a firm, level surface.
• Always turn engine off before refueling. Allow engine to cool for at least 2 minutes
before removing fuel cap. Loosen cap slowly to relieve pressure in tank.
• Do not overfill fuel tank. Gasoline may expand during operation. Do not fill to the
top of the tank. Allow for expansion.
• Always check for spilled fuel before operating. Clean up any spilled fuel before
starting.
• Empty fuel tank before storing or transporting the engine.
• Before transporting, turn fuel valve to off and disconnect spark plug wire.
IMPORTANT:
• Use only UNLEADED gasoline with an octane rating of 87 or higher.
• Do not use old gasoline.
• Never use an oil/gasoline mixture.
• Avoid letting dirt or water into the fuel tank.
9
Page 13

HIGH ALTITUDE OPERATION ABOVE 3000 FEET
The fuel system on this engine may be influenced by operation at higher altitudes. Proper
operation can be ensured by installing an altitude kit at altitudes higher than 3000 feet above sea
level. At elevations above 8000 feet, the engine may experience decrease performance, even with
the proper main jet. Operating this engine without the proper altitude kit installed may increase the
engine’s emissions and decrease fuel economy and performance. The kit should be installed by a
qualified mechanic.
WARNING! TO prevent serious injury from fire: Follow kit procedures in a well-
ventilated area away from ignition sources. If the engine is hot from use, shut the engine
off and wait for it to cool before proceeding. Do not smoke.
Notice: Warranty Void if necessary adjustments are not made for high altitude use.
High Altitude Kit Installation Instructions
1. Turn off the engine.
2. Close the fuel valve.
3. Place a bowl under the fuel cup to catch any spilled
fuel.
4. Unthread the bolt holding the fuel cup.
Caution! Carburetor bowl may have gas in it which will
leak upon removing the bolt.
5. Remove the bolt, bolt seal, fuel cup, fuel cup seal and main jet from the body of the carburetor
assembly.
6. Replace the main jet with the replacement jet needed for your altitude range.
Note: the Fuel cup seal and bolt seal may be damaged during removal and should be replaced with
the new ones from the kit.
7. Replace the fuel cup seal, fuel cup, bolt seal and bolt. Tighten in place.
8. Wipe up any spilled fuel and allow excess to evaporate before starting engine. To prevent
FIRE, do not start the engine while the smell of fuel hangs in the air.
part # Description Qty
P54173-5 Main Jet 3000-6000 feet 1
P54173-6 Main Jet 6000-8000 feet 1
P54173-7 Bolt Seal 1
P54173-1 Fuel Cup Seal 1
10
Page 14

STOPPING THE ENGINE
To stop the engine:
1. Turn the engine switch to the “OFF” position.
2. Turn the fuel valve to the “OFF” position.
WARNING: Allow the engine to cool for several minutes before touching
areas that become hot during use.
CAUTION: Allowing gasoline to sit in the engine tank for long periods of time without use
can make it difficult to start the engine in the future. Never store engine for extended periods
of time with fuel in the tank.
MAINTENANCE / CARE
Proper routine maintenance of your engine will help prolong the life of your machine. Please
perform maintenance checks and operations according the schedule in figure 7.
If you have questions about any of the maintenance procedures listed in this manual, please
call (800) 232-1195 M-F 8-5 CST.
CAUTION: Never perform maintenance operations while the engine is running.
Recommended Maintenance Schedule
Engine oil
Air cleaner
fuel filter
cup
spark plug
fuel tank
check level x
replace x x
check x
clean x
clean x
check/ clean x
check fuel level x
clean x
each use
Figure 7- Recommended maintenance schedule
first month
then every
20 hrs
every 3
months or
50 hrs
every 6
months or
100 hrs
every year
or 300 hrs
11
Page 15

Cleaning the Engine
Never clean the engine when it is running! Never clean with a bucket of water or a hose. Water
can get inside the working parts of the engine and cause a short circuit or corrosion.
Always try to use the engine in a cool, dry place. If the engine becomes dirty, clean the exterior
with a damp cloth, a soft brush, vacuum or pressurized air.
Checking the Oil
Check the oil level of the engine according to the Recommended Maintenance Schedule in Figure
7. The engine is equipped with an automatic shutoff to protect it from running with low oil
pressure. The engine should be checked before each use for proper oil level. This is a critical step
for proper engine starting.
To check or add oil, follow these steps:
1. Make sure the engine is on a level surface. Clean around oil fill.
2. Remove the oil filler/dipstick cap and check oil level.
3. If oil level is below the second thread from the lip of the oil fill opening, slowly add oil
until the engine crankcase is filled.
4. Reinstall and tighten oil filler cap before starting the engine.
Figure 8- Checking the oil
Changing/ Adding Oil
Change the oil according to the maintenance schedule in figure 19. Change the oil when the
engine is warm. This will allow for complete drainage. Change oil more often if operating under
heavy load or high ambient temperatures. It is also necessary to drain the oil from the crankcase if
it has become contaminated with water or dirt.
The oil capacity of the engine in this engine is 0.5 quart. Add oil when the oil level is low.
Drain the oil from the engine according to the following steps:
1. Place a container underneath the engine to catch oil as it drains.
2. Using a 10 mm hex wrench, unscrew the oil drain plug (see figure 9). Allow all the oil to
drain from the engine.
3. Reinstall the oil drain plug and tighten with a 10 mm hex wrench.
To fill the crankcase with oil, follow these steps:
12
Page 16

1. Make sure the engine is on a level surface. Tilting the engine to assist in filling will cause
oil to flow into engine areas and will cause damage. Keep engine level!
2. Remove the oil filler/dipstick cap from the engine as shown in figure 8 above.
3. Using a funnel, add the appropriate type and amount of oil into the crankcase. The
crankcase is full when the oil level has reached the second thread from the lip of the
opening (see figure 10).
4. Check for oil leaks. Reinstall oil filler cap before starting engine.
Figure 9- Draining oil Figure 10- Adding oil
NOTE: Never dispose of used motor oil in the trash or down a drain. Please call your local
recycling center or auto garage to arrange oil disposal.
Air Cleaner Maintenance
Routine maintenance of the air cleaner helps maintain proper air flow to the carburetor. Check that
the air cleaner is free of excessive dirt.
1. Remove the air cleaner cover and the air cleaner elements and check for dirt. Clean or replace
if necessary.
2. Wipe the dirt from inside the empty air cleaner casing.
3. Wash the sponge-like element in household detergent and warm water. Allow to dry.
4. Reinstall the sponge-like element in the air cleaner casing and reinstall the cover.
Spark Plug Maintenance
The spark plug is important for proper engine operation. A good spark plug should be intact, free
of deposits, and properly gapped. To inspect the spark plug:
1. Pull on the spark plug cap to remove it.
2. Unscrew the spark plug from the engine using the spark plug wrench included with this
product.
3. Visually inspect the spark plug. If it is cracked or chipped, discard and replace with a new
spark plug.
4. Measure the plug gap with a gauge (see figure 11). The gap should be 0.7-0.8mm (0.028-
0.031in).
5. If you are re-using the spark plug, use a wire brush to clean any dirt from around the spark
plug base and then re-gap the spark plug.
6. Screw the spark plug back into its place on the engine using the spark plug wrench. Do not
over-tighten spark plug. Recommended tightening of spark plug is ½ to ¾ of a turn after
spark plug gasket contacts spark plug hole. Reinstall the spark plug cap.
13
Page 17

0.7-0.8 mm
(0.028-0.031 in)
Figure 11- Measuring the spark plug gap
Recommended Spark Plug: NGK- BP7ES, Torch- F6TC
Draining the Fuel Tank
Clean fuel tank each year or before storing the engine for extended periods of time. To drain the
fuel tank and carburetor:
1. Turn the fuel valve to the “OFF” position. Move the engine in a well-ventilated area away
from ignition sources.
2. Place a funnel leading to a proper gasoline container below the carburetor.
3. Remove the drain bolt from the bottom of the carburetor bowl and allow the fuel to drain.
4. Open the fuel valve. After all fuel has drained, reinstall the drain bolt. Tighten securely.
5. Store the emptied gasoline in a suitable place.
Figure 12 Carburetor Drain Bolt
CAUTION: Do not store fuel for more than 3 months.
14
Page 18

STORAGE / TRANSPORT PROCEDURES
CAUTION: Never place any type of storage cover on the engine
while it is still hot.
If the engine is being stored for short periods of time (30 – 60 days), add stabilized fuel to the fuel
tank until full. NOTE: Filling the tank reduces the amount of air in the tank and helps reduce
deterioration of fuel. Run the engine for 2 – 3 minutes allowing stabilized fuel mixture to
circulate through the carburetor.
When transporting or storing the engine for extended periods of time:
• Drain the fuel tank (see “Draining the Fuel Tank” in the “Maintenance” section).
• Disconnect the spark plug cap from the spark plug.
• Do not obstruct any ventilation openings.
• Keep the engine in a cool dry area.
15
Page 19

SPECIFICATIONS
Displacement 212cc
Max. Output 4.2 KW/3600RPM
Max. Torque 12 N·m/2500RPM
Engine Type
Cooling System Forced air cooled
Fuel
Engine Oil
Lubrication System
Run Time @ 50% Load
with full tank
Sound Level at 22 feet 104 dB
Bore x Stroke 70 mm x 55 mm
Compression Ratio 8.5:1
Rotation viewed from PTO
(power takeoff - the output
shaft)
Shaft
Spark Plug
Valve
Clearance
Idle Speed 1,800 ± 50 RPM
Type 87+ octane unleaded gasoline
Capacity 0.9 Gallon
Type SAE 10W-30 above 32° F
Capacity 0.5 Quart
Shaft 3/4″ x 2.43″
Keyway 3/16″ (4.76 mm)
End
Tapped
Type NGK: BP-6ES, Torch: F6TC
Gap 0.7-0.8 mm
Intake 0.10-0.15 mm
Exhaust 0.15-0.20 mm
Horizontal Single Cylinder 4 stroke OHV
Meets EPA phase III and CARB compliant
5W-30 at 32° F or below
Forced Splash
3 hours
Counterclockwise
5/16″ - 24 UNF
Dimensions 17.9x15x16.5 inches
Weight 35.2 lbs
16
Page 20

MOUNTING HOLE DIAGRAM
POWER TAKE-OFF DIAGRAM
17
Page 21

TROUBLESHOOTING
IMPORTANT: If trouble persists please call our customer help line at (800) 232-1195 M-F 8-5
Central Time.
Problem Cause Solution
Engine will not
start
Fuel Related: Fuel Related:
No fuel in tank or fuel valve closed. Fill fuel tank and open fuel valve.
Choke not in CHOKE position, cold
engine.
Move Choke to CHOKE position.
Gasoline with more than 10%
ethanol used. (E15, E20, E85, etc.)
Low quality or deteriorated, old
gasoline.
Carburetor not primed. Pull on Starter Handle to prime.
Dirty fuel passageways. Clean out passageways using fuel
Carburetor needle stuck. Fuel can be
smelled in the air.
Too much fuel in chamber. This can
be caused by the carburetor needle
sticking.
Clean out ethanol rich gasoline
from fuel system. Replace
components damaged by ethanol.
Use fresh 87+ octane unleaded
gasoline only.Do not use gasoline
with more than 10% ethanol (E15,
E20, E85, etc.).
Use fresh 87+ octane unleaded
gasoline only.Do not use gasoline
with more than 10% ethanol (E15,
E20, E85, etc.).
additive. Heavy deposits may
require further cleaning.
Gently tap side of carburetor float
chamber with screwdriver handle.
Turn Choke to RUN position.
Remove spark plug and pull the
start handle several times to air out
the chamber. Reinstall spark plug
and set Choke to CHOKE position.
Clogged Fuel Filter. Replace Fuel Filter.
IGNITION (SPARK) RELATED: IGNITION (SPARK) RELATED:
Spark plug cap not connected
securely.
Spark plug electrode wet or dirty. Clean spark plug.
Incorrect spark plug gap. Correct spark plug gap.
Spark plug cap broken. Replace spark plug cap.
Incorrect spark timing or faulty
ignition system.
Connect spark plug cap properly.
Have qualified technician
diagnose/repair ignition system.
18
Page 22

Problem Cause Solution
Engine will not
start
COMPRESSION RELATED: COMPRESSION RELATED:
Cylinder not lubricated.
Problem after long storage
periods.
Pour tablespoon of oil into spark plug
hole. Crank engine a few times and try to
start again.
Loose or broken spark plug.
(Hissing noise will occur when
trying to start.)
Loose cylinder head or
damaged head gasket. (Hissing
noise will occur when trying to
start.)
Engine valves or tappets
misadjusted or stuck.
Engine misfires Spark plug cap loose. Check wire connections.
Incorrect spark plug gap or
damaged spark plug.
Defective spark plug cap. Replace spark plug cap.
Old or low quality gasoline. Use only fresh 87+ octane
Incorrect compression. Diagnose and repair compression.
Tighten spark plug. If that does not work,
replace spark plug. If problem persists,
may have head gasket problem.
Tighten head. If that does not remedy
problem, replace head gasket.
Have qualified technician diagnose/repair
ignition system.
Re-gap or replace spark plug.
unleaded gasoline.
(Use Engine will not start:
COMPRESSION RELATED section.)
Engine stops
suddenly
Low oil shutdown. Fill engine oil to proper level. Check
engine oil before EVERY use.
Fuel tank empty or full of
impure or low quality gasoline.
Defective fuel tank cap creating
vacuum, preventing proper
fuel flow.
Faulty magneto. Have qualified technician
Disconnected or improperly
connected spark plug cap.
Fill fuel tank with fresh 87+ octane
unleaded gasoline.
Test/replace fuel tank cap.
service magneto.
Secure spark plug cap.
19
Page 23

Problem Cause Solution
Engine stops
when under
heavy load
Engine knocks Old or low quality gasoline. Fill fuel tank with fresh 87+ octane
Dirty air filter Clean or replace element.
Engine running cold. Allow engine to warm up prior to
operating equipment.
unleaded gasoline.
Engine overloaded. Do not exceed equipment’s load rating.
Incorrect spark timing, deposit
buildup, worn engine, or other
mechanical problems.
Engine backfires Impure or low quality gasoline. Fill fuel tank with fresh 87+ octane
Engine too cold. Use cold weather fuel and oil additives to
Intake valve stuck or
overheated engine.
Incorrect timing. Check engine timing.
Have qualified technician diagnose and
service engine.
unleaded gasoline.
prevent backfiring.
Have qualified technician diagnose and
service engine.
Follow all safety precautions whenever diagnosing or servicing the equipment
or engine.
20
Page 24

EXPLODED VIEW AND PARTS LIST
21
Page 25

Part # Stock # Description Part # Stock # Description
1 56212-001 CYLINDER HEAD GASKET 51 56212-051 VALVE ROCKER
2 56212-002 CYLINDER HEAD COVER 52 56212-052 VALVE ADJUSTING NUT
3 56212-003 HEAD COVER GASKET 53 56212-053 VALVE LOCK NUT
4 56212-004 BREATHER TUBE 54 56212-054 VALVE SPRING
5 56212-005 BOLT 55 56212-055 RECOIL STARTER ASSEMBLY
6 56212-006 STUD 56 56212-056 BOLT
7 56212-007 GOVERNOR SUPPORT 57 56212-057 SHROUD
8 56212-008 STUD 58 56212-058 CYLINDER BODY SHROUD
9 56212-009 PIN 59 56212-059 LOWER SHIELD
10 56212-010 CYLINDER HEAD BOLT 60 56212-060 OIL PROTECTOR
11 56212-011 SPARK PLUG 61 56212-061 ENGINE SWITCH
12 56212-012 CYLINDER HEAD 62 56212-062 BOLT
13 56212-013 CRANKCASE 63 56212-063 BOLT
14 56212-014 OIL SENSOR 64 56212-064 COLLAR
15 56212-015 GOVERNOR GEAR ASSEMBLY 65 56212-065 BOLT
16 56212-016 GOVERNOR ARM 66 56212-066 BOLT
17 56212-017 DRAIN PLUG 67 56212-067 CARBURETOR ASSEMBLY
18 56212-018 WASHER 68 56212-068 AIR CLEANER GASKET
19 56212-019 BEARING 69 56212-069 CARBURETOR GASKET
20 56212-020 OIL SEAL 70 56212-070 CARBURETOR INSULATOR PLATE
21 56212-021 WASHER 71 56212-071 CARBURETOR INSULATOR GASKET
22 56212-022 PIN 72 56212-072 NUT
23 56212-023 BOLT 73 56212-073 AIR CLEANER
24 56212-024 CRANKCASE COVER 74 56212-074 RUBBER JACKET
25 56212-025 BEARING 75 56212-075 EXHAUST OUTLET GASKET
26 56212-026 OIL SEAL 76 56212-076 NUT
27 56212-027 CRANKCASE GASKET 77 56212-077 MUFFLER ASSY
28 56212-028 PIN 78 56212-078 FUEL TANK
29 56212-029 OIL DIPSTICK 79 56212-079 FUEL STRAINER
30 56212-030 ENGINE OIL PLUG 80 56212-080 FUEL TANK CAP
31 56212-031 BOLT 81 56212-081 FUEL TANK FUEL LINE
32 56212-032 CRANKSHAFT ASSEMBLY 82 56212-082 CLAMP
33 56212-033 PISTON PIN CLIP 83 56212-083 TUBE, FUEL
34 56212-034 PISTON 84 56212-084 BOLT
35 56212-035 PISTON PIN 85 56212-085 NUT
36 56212-036 CONNECTING ROD 86 56212-086 FLYWHEEL NUT
37 56212-037 THE FIRST RING 87 56212-087 STARTER PULLEY
38 56212-038 THE SECOND RING 88 56212-088 IMPELLER
39 56212-039 OIL RING SET 89 56212-089 FLYWHEEL
40 56212-040 CAMSHAFT ASSEMBLY 90 56212-090 BOLT
41 56212-041 EXHAUST VALVE 91 56212-091 IGNITION COIL
42 56212-042 INTAKE VALVE 92 56212-092 THROTTLE CONTROL
43 56212-043 VALVE SPRING SEAT 93 56212-093 BOLT
44 56212-044 EXHAUST VALVE RETAINER 94 56212-094 GOVERNOR SPRING
45 56212-045 VALVE ROTATOR 95 56212-095 GOVERNEOR ROD
46 56212-046 SEAL GUIDE 96 56212-096 RETURNING SPRING
47 56212-047 VALVE TAPPET 97 56212-097 SUPPORT BOLT
48 56212-048 VALVE LIFTER 98 56212-098 NUT
49 56212-049 LIFTER STOPPER PLATE
50 56212-050 VALVE ADJUSTING BOLT
22
Page 26

NOTES:
23
Page 27

WARRANTY STATEMENT FOR WEN®ENGINES
®
WEN
engines are warranted (to the original purchaser) to be free from defects in materials
and workmanship for a period of two (2) years from the date of original purchase. Engines
used for commercial or for rental have a warranty period of 90 days from date of original
purchase. Please fill out and mail the enclosed warranty card and mail it to Power Pro
Technology along with a copy of the receipt. The information is required to process
warranty claims.
WEN® will repair or replace, at its discretion, any part that is proven to be defective in
materials or workmanship under normal use during the two (2) year warranty period.
Warranty repairs or replacements will be made without charge for parts or labor. Parts
replaced during warranty repairs will be considered as part of the original product and will
have the same warranty period as the original product.
TO EXERCISE WARRANTY COVERAGE:
Do not return to retailer!
For warranty and technical support call the toll-free
Customer Service Number: (800) 232-1195 and you will be informed of the nearest
authorized service center. We will prearrange the repair with the center.
WARRANTY COVERAGE:
This warranty is conveyed to the original purchaser and is not transferable.
Engines contain parts that will wear out with usage and parts that need maintenance. The
warranty does not cover wear or maintenance parts. Specifically, the warranty does not
cover replacement of air filter, spark plug, brush and recoil starter rope.
Warranty does not extend to engines damaged or affected by accidents, neglect, misuse,
contaminated fuel, unauthorized alterations, use in applications beyond product design and
any other modification or abuse.
WEN® is not liable for any indirect, incidental or consequential damages from the sale or
use of this product. Any implied warranties are limited to two (2) years as stated in this
written limited warranty. Some states do not allow limitation on the length of an implied
warranty. Some states do not allow the exclusion or limitation of incidental or
consequential damages. This warranty gives you the specific legal right, and you may have
other rights that vary by state.
Wen
®
. Elgin, IL 60123. www.wenproducts.com.
24
 Loading...