

Page 1
Welltec-UM-Bedal_171206_EN_Rev.07
User Manual
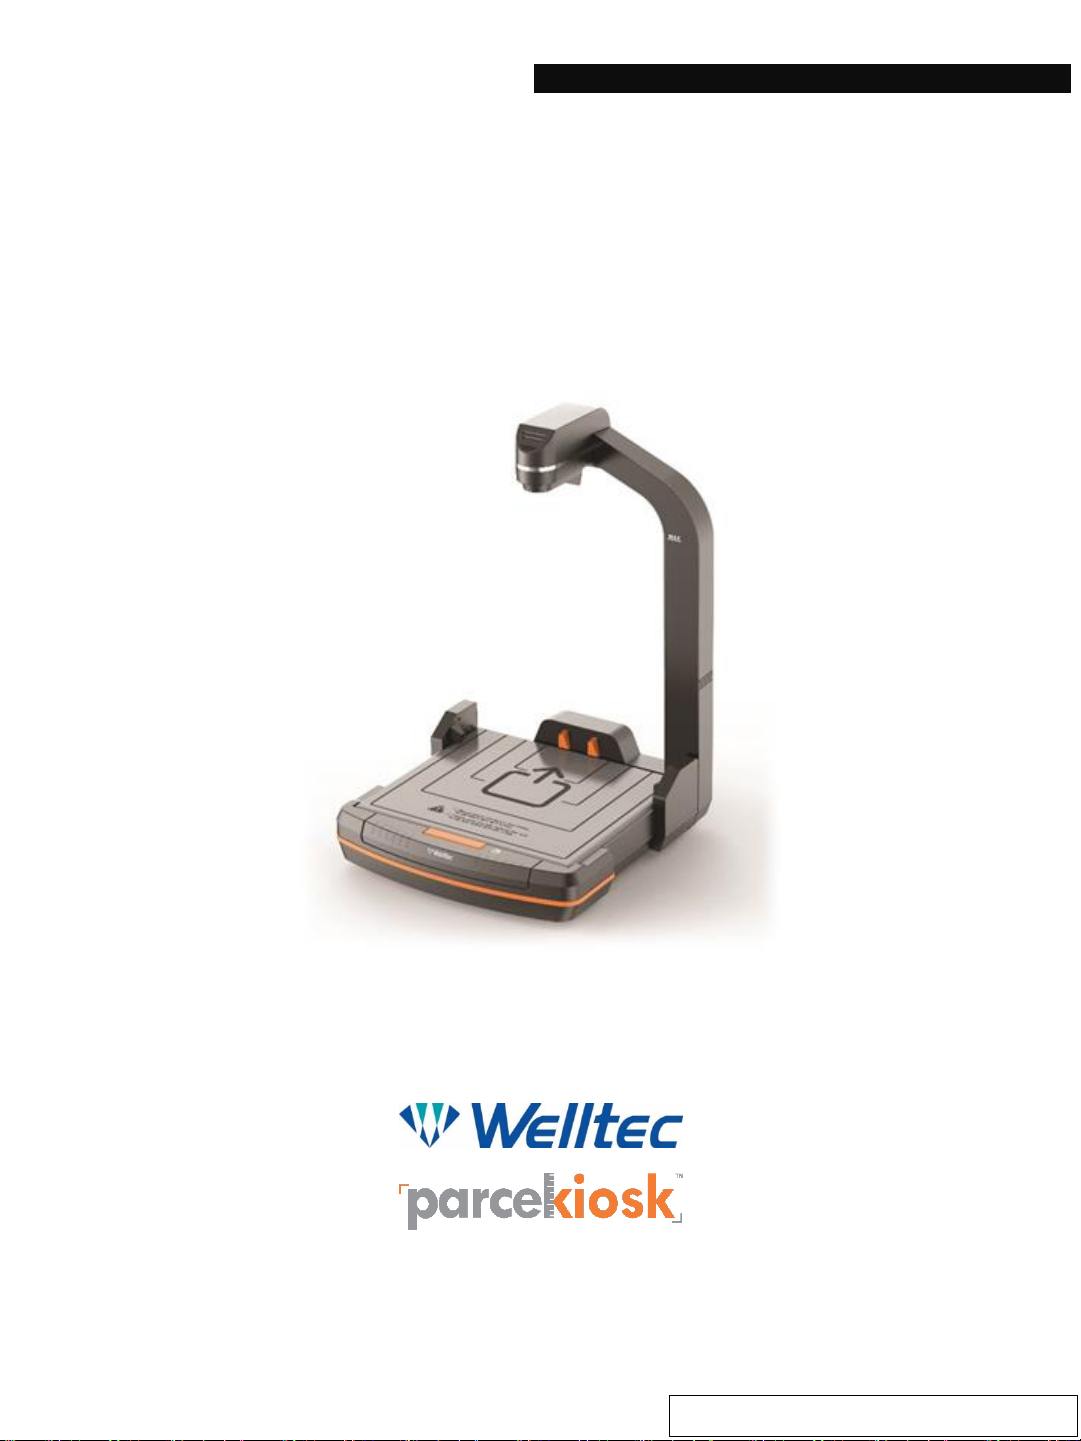
Bedal 3S
Page 2

Ver. 07
User Manual Bedal 3S
Introduction
Installation
1
Operation
Introduction 2
Operating Condition 3
Contents
Enclosed Parts 8
About Bedal 4
Measuring Dimension & Weight 19
Specifications 5
Precautions
Error Code 22
Description of Units 6
H/W Installation 9
S/W Installation 17
Interface Flow 18
Measurable / Non-Measurable Items 26
Warranty 27
Operational Precautions 23
Page 3

Ver. 07
User Manual Bedal 3S
2
Welcome!
Thank you for selecting Bedal 3S.
This manual is prepared to provide you with guidelines on how to properly operate and
Maintain Bedal 3S. Please read this user manual before operating in order to prevent
unexpected malfunction or damage. Please refer to the manual carefully and follow the
instruction.
Copyright
Any of the contents should not be copied, re-printed or translated into other languages
without Welltec’s approval.
Introduction
Introduction
Page 4
Ver. 07
User Manual Bedal 3S
Operating Condition
3
Caution: Serious bodily injury or mechanical damage may result from
insufficient attention to or incorrect compliance with warning
messages with this symbol.
● Do not attempt to disassemble or reassemble the machine. It may cause an electric
shock or mechanical problem.
● Disconnect the power immediately if liquid or a foreign object enter the inside of the
machine.
● Do not input metal or inflammable material into the inlet.
● Remove the power cable while moving the machine.
● Where the wind is directly blowing to the machine(air conditioner, fan, etc), it may
cause weighing error and extra time for measurement(need to secure stability).
● Be careful not to place object that exceeds the allowable load of Bedal 3S, as this will
cause the malfunction. (Even if no power is applied, overload might cause permanent
damage)
● Be careful not to place the machine where the rear cover is in contact with wall.
(Measurement error or unstable might occur due to vibration)
● Please avoid to install at places like below :
- Near window or places exposed to direct sunlight.
- Where vibration is detected or unstable place (causing measurement errors)
- Where temperature changes suddenly or poorly ventilated.
- Places exposed to hot or cold air directly. (not office circumstance)
- Not solid enough or weak floor.
- Near excessive electromagnetic waves are generated (causing measurement errors)
- Where strong winds blow (measurement time may be increased)
● Temperature: -10℃ ~ 40℃
● Humidity: 10~85%RH, Non-Condensing.
Introduction
Page 5
Ver. 07
User Manual Bedal 3S
About Bedal
4
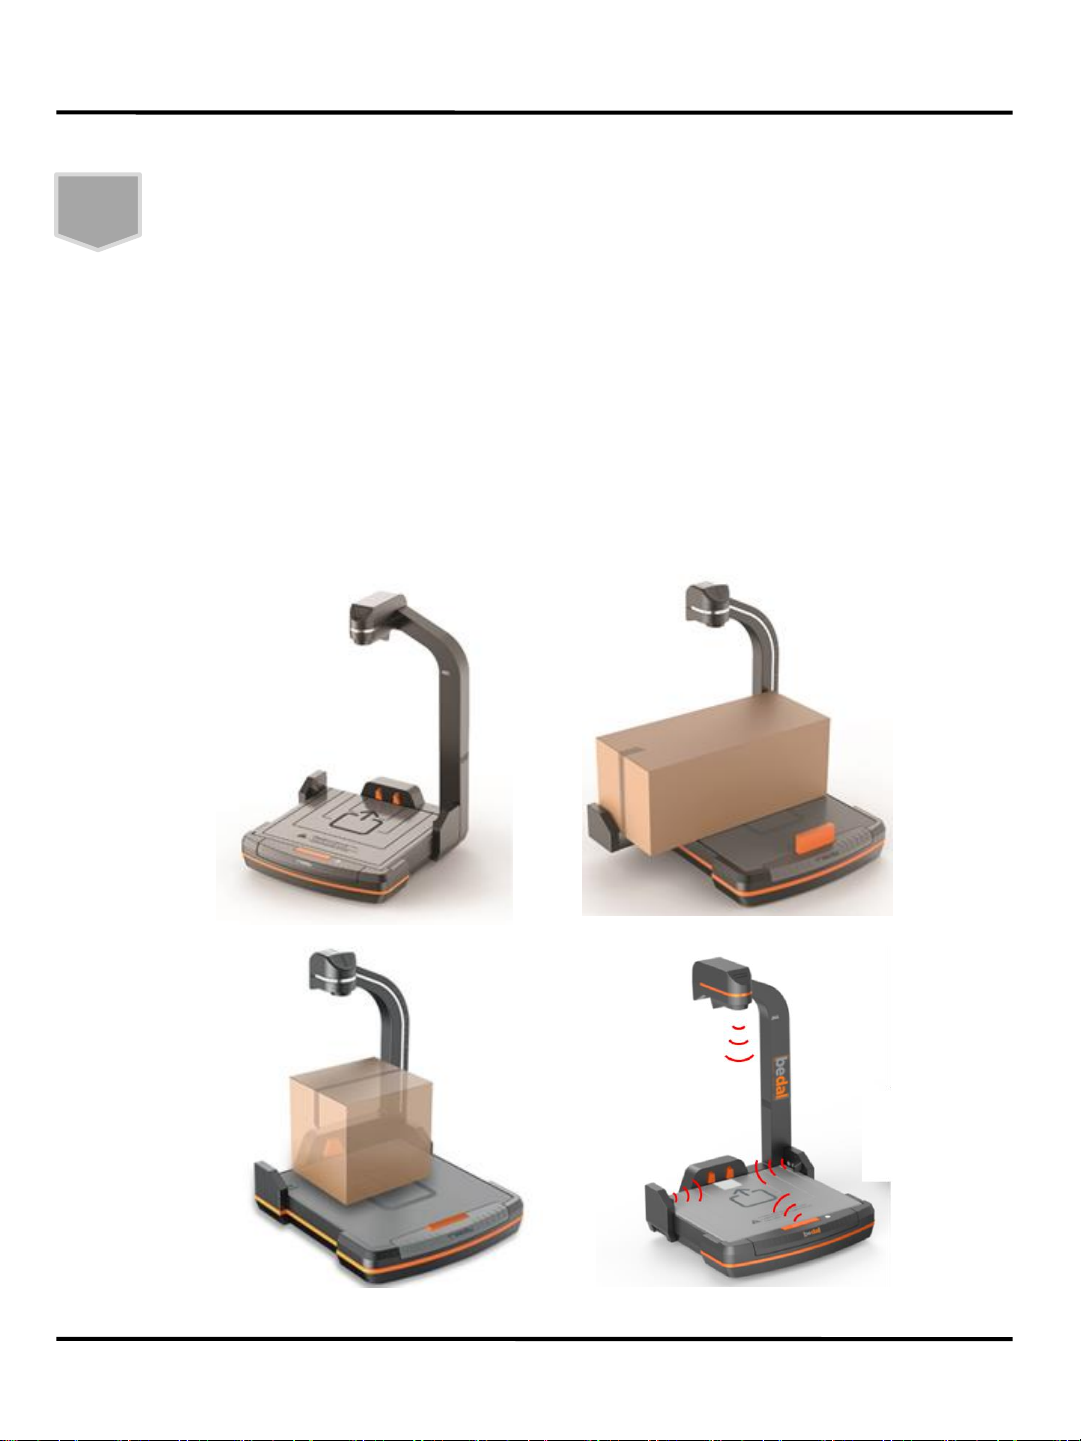
Bedal 3S is an electronic Dimensional Scanner that automatically measures the
weight and dimension of parcels. It transmits captured dimension, weight,
image and other data to the host like Windows based PC, Tablet or TCP/IP linked
server. Not working as a standalone, Bedal 3S is an Input Device required to be
linked to your computer. Bedal 3S will pay for itself, enjoy automatic measuring and
experience your time with saving cost!
Introduction
Page 6

Ver. 07
User Manual Bedal 3S
Specifications
5
* Specification is subject to be revised without notice.
Introduction
No
Criteria Specification (Module)
1
Installation Type
Stand Alone
Desktop type
2
Display
Dimensions
6 Digit FND x
3
Weighing
6 Digit FND x
1
3
Regular Shape
Dimension
Min & Max
Width
10 cm ~ 410 cm
Length
10 cm ~ 43 cm
extendable 43 cm to 75 cm
Height
4 cm ~ 48 cm
Division
Width
0.5 cm
Length
Height
Tolerance
Width
±
0.5 cm
Length
±
1 cm
Height
±
0.5 cm
4
Weighing
Min & Max
0.25 kg ~ 32
kg
Division
0.05kg
Tolerance
Under 25 kg
±
0.05 kg
Over 25 kg
±
0.1 kg
5
Light Signal
LED
Green light
On
Green light
Blinking
Red light
On
Red light
Blinking
Ready
Processing
Error
Not Ready
6
Sound
Buzzer
Beep Sound (built
-in on board)
7
Measuring Time
Regular
Max
3 seconds
8
Camera
Web Cam
1M Pixel (TBD)
9
Ethernet
LAN
IEEE 802.3 10/100Mbps Ethernet port (RJ
-45), 1ea
10
Interface
USB Hub Port
USB 2.0 (A type) x
4ea
USB 2.0 (B type) x
1ea
RS-232C
D
-SUB 9Pin (male) x 1ea
D
-SUB 9Pin (female) x 1ea
11
Size
Standard
558mm(L) X 567mm(W) X 847mm(H)
Side Extendable
874mm(L) X 567mm(W) X 847mm(H)
12
Operating Condition
Indoor Temperature
15℃
~ 40℃
Humidity
10~85%RH Non
-condensing
13
Input Power
AC Adapter
100
-240 VAC ~ 50/60Hz 1.5A
14
Power Consumption
17 W max
15
Acoustic Sound Level
48 dB(A) max (Beep sound excluded)
16
Weight
Without Packing
23kg (28kg/With Packing)
17
Compliance
International
CE
Korea
KC / Scale Certification
Page 7
Ver. 07
User Manual Bedal 3S
Description of Units
6
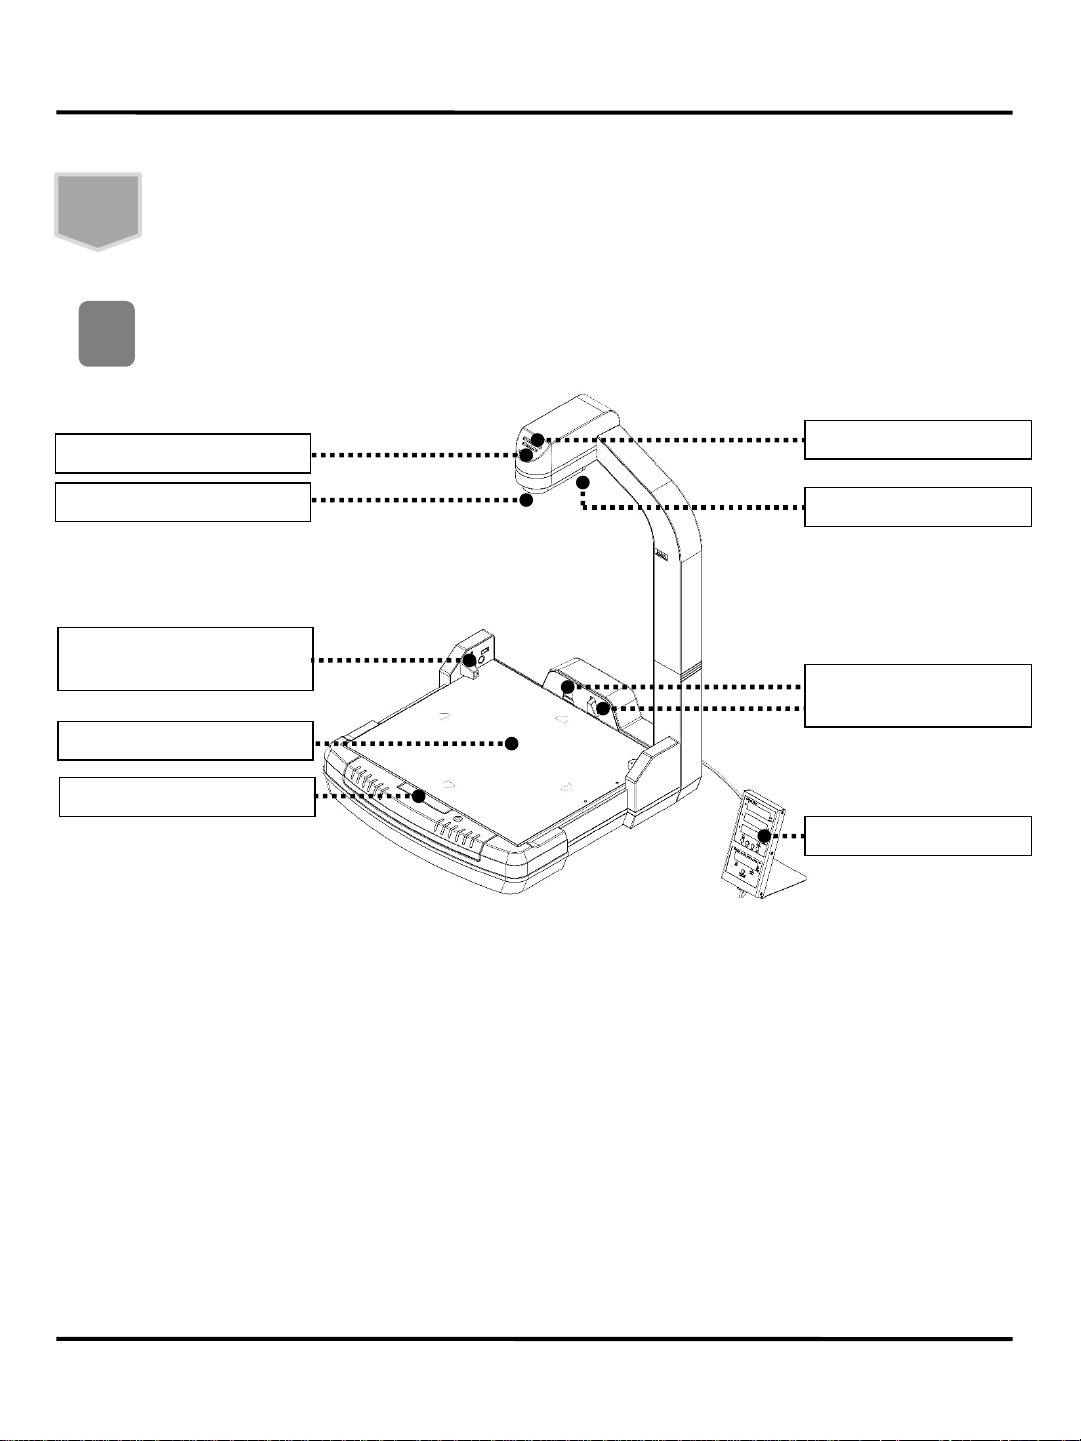
· LED: Green and red LED lights for operation status.
· Speaker: Voice instruction of operation.
· Object Detect Sensor : Start measuring the weight and dimension of the object by sensing the
object placed on the Weight Measurement.
· Sensor (Height Measure): Measure the height of object.
· Sensor (Length Measure): Measure the length of object. (1 side extendable)
· Sensor (Width Measure): Measure the width of object.
· Weight Measurement: Measure the weight of object.
· Camera : To capture the object image
· Indicator : Display measured dimension and weight information.
Front
1
Introduction
Speaker
Camera
Object Detect Sensor
Indicator
Sensor (Length Measure)
*Extendable
Weight Measurement
Sensor (Width Measure)
LED
Sensor (Height Measure)
Page 8
Ver. 07
User Manual Bedal 3S
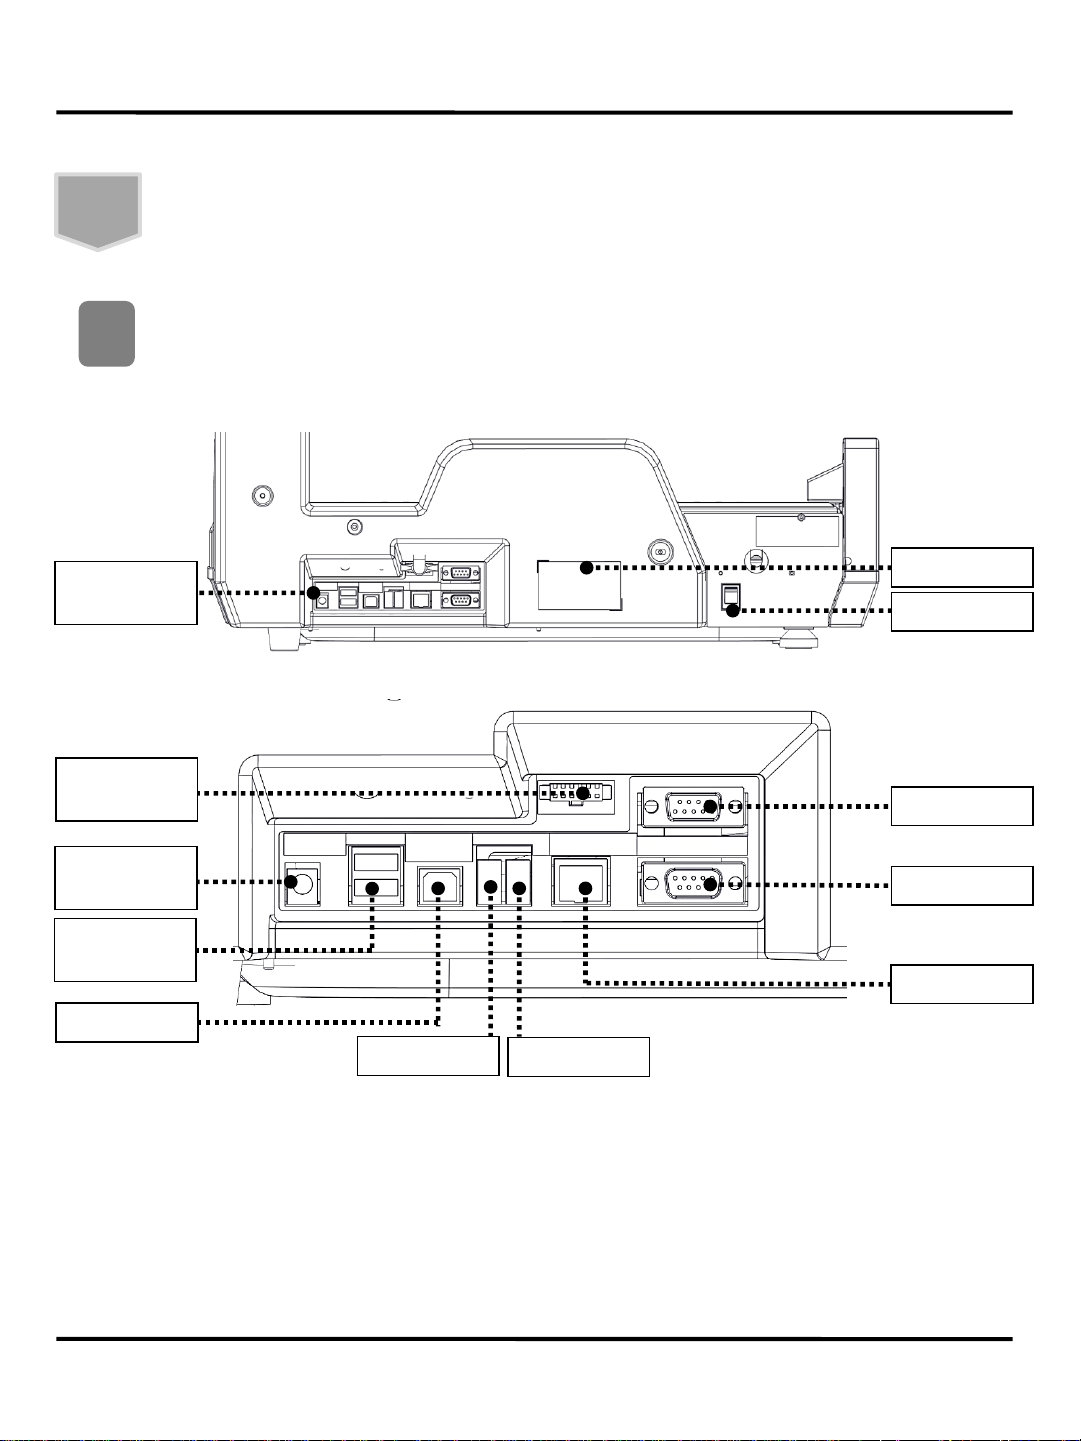
7
Rear
2
I/O
Interface
Power S/W
Serial Label
DC Power
Jack
USB 2.0
A Type
USB B Type
RS-232C (M)
RS-232C (F)
LAN (RJ45)
USB 2.0
USB 2.0
* Printer will use the power source separately.
* PC will use PC LAN Port for internet connection, Tablet PC need Wi-Fi (customer installation).
* PC (control) or server need to be able to download operation program.
* D-Sub (M/F) is for Firmware Update.
* Display Port is for exterior display unit. (optional)
* USB 3.0 (Host Port) is used as printer port when Bedal 3S is the host of the configuration.
Indicator
Port
Description of Units
Introduction
Page 9
Ver. 07
User Manual Bedal 3S
8
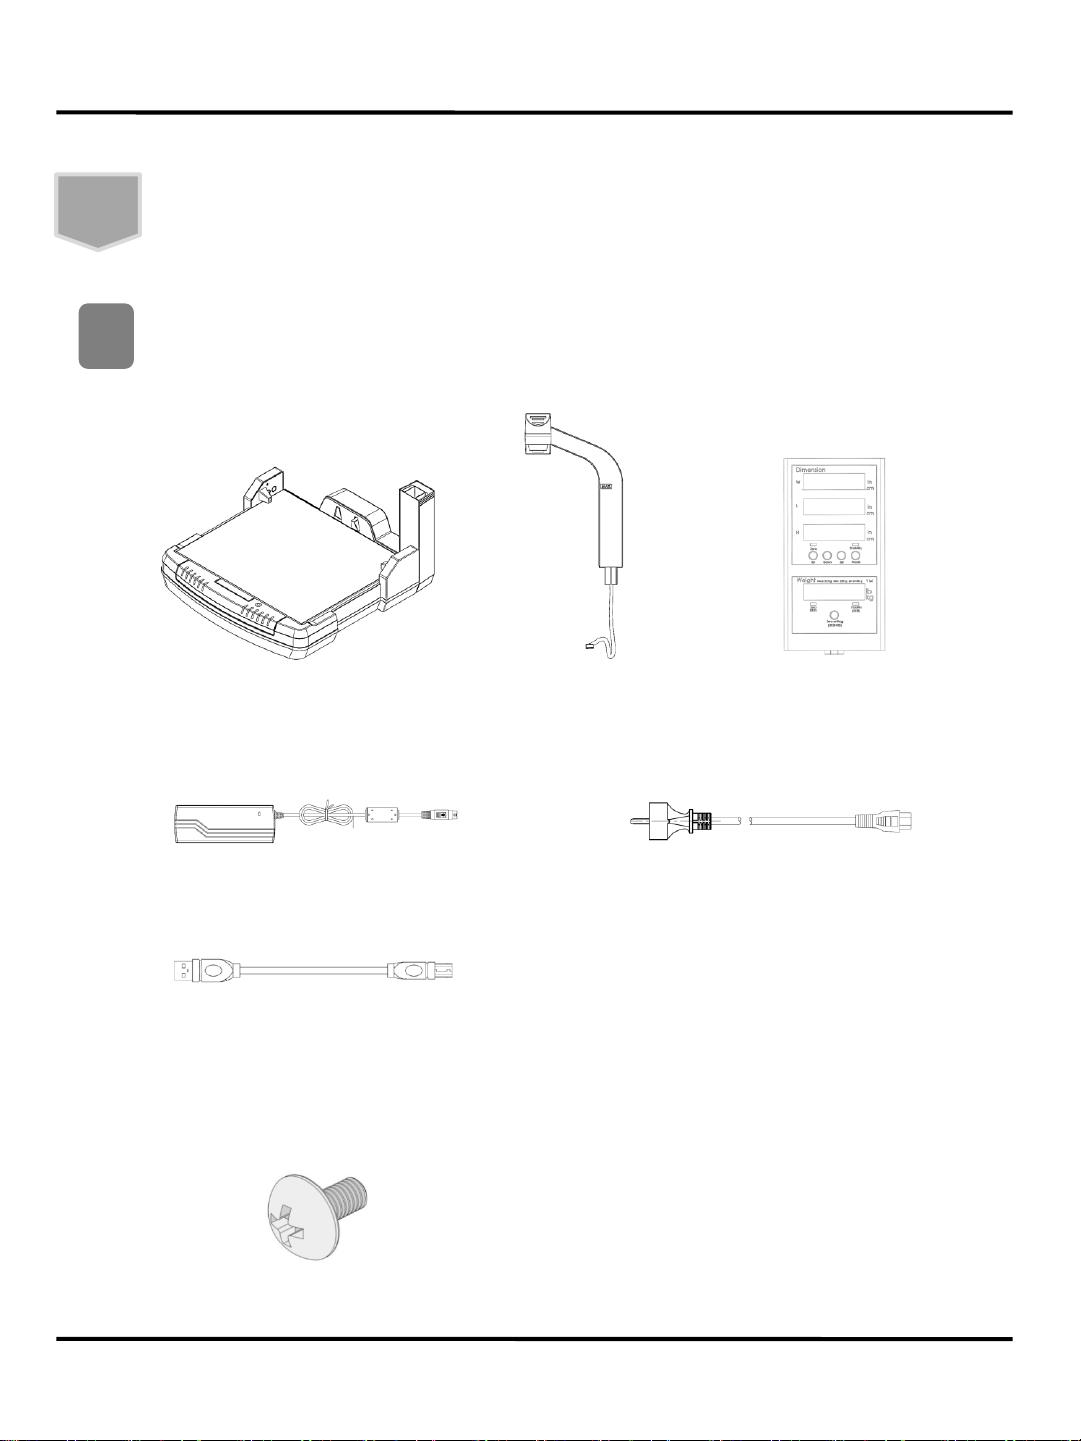
Check all parts are included after unpacking.
1
Enclosed Parts
Installation
① Main Body
● Main Units
● Adaptor & Cable
① DC Adaptor
② Power Cable
● Screws
① Truss M4X10L * 6pcs
③ USB Cable (A-B)
② Upper Unit
③ Indicator
Page 10
Ver. 07
User Manual Bedal 3S
9
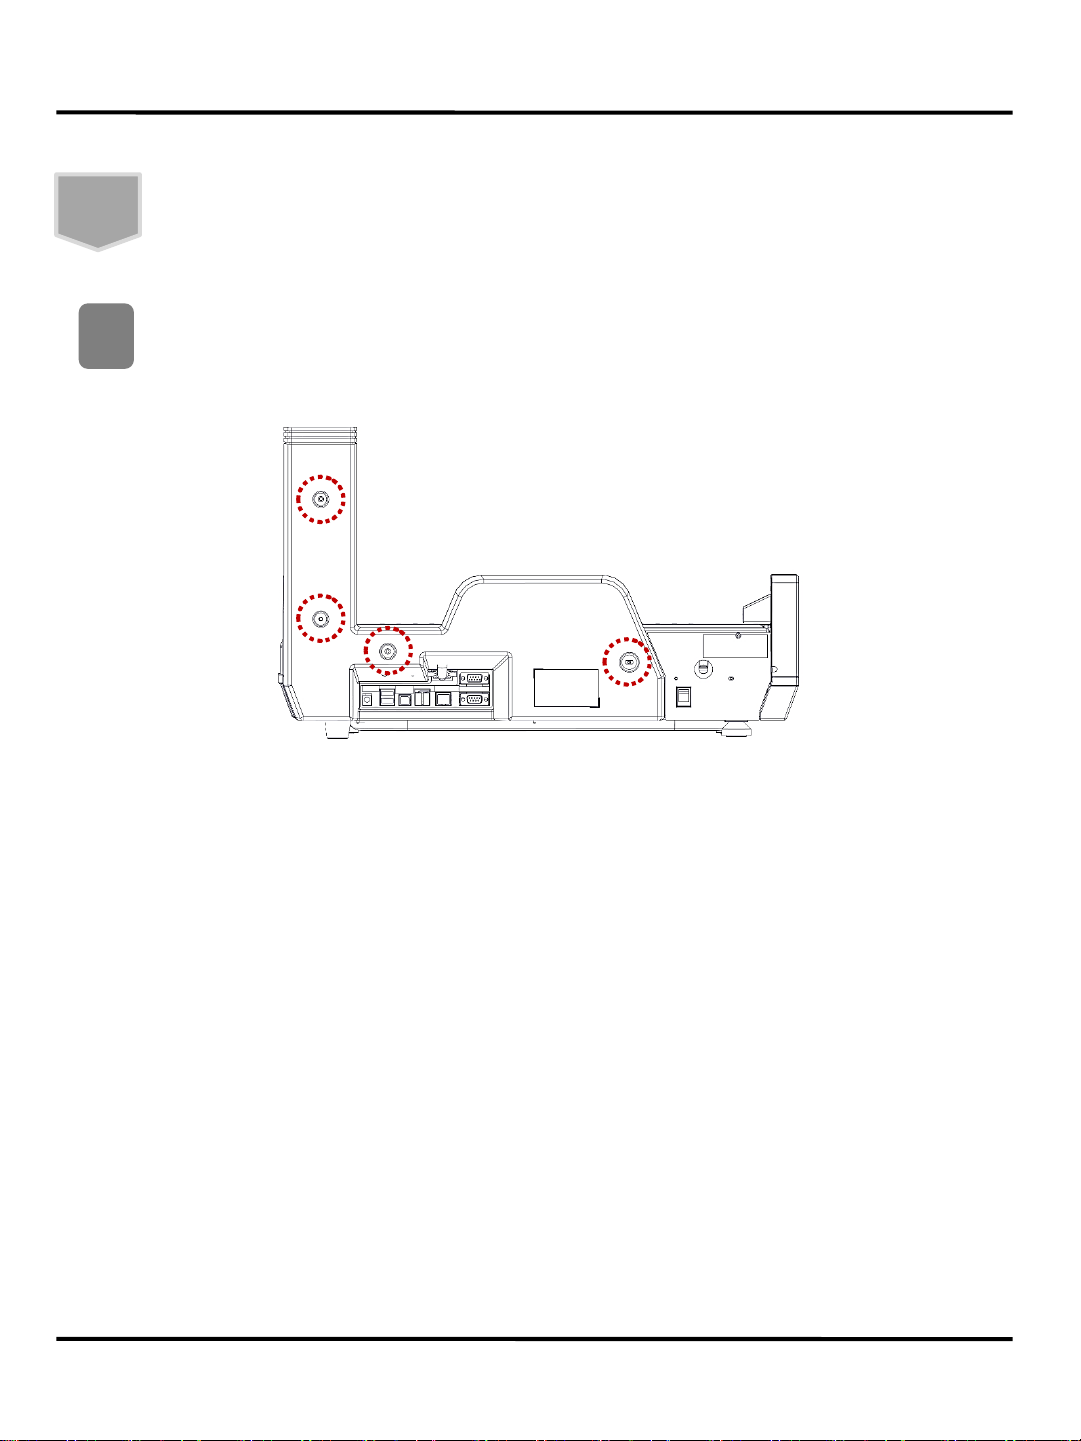
After unpacking, remove 4 screws marked as circle on the below picture &
remove the rear cover. (keep the screws)
1
H/W Installation
Installation
Page 11
Ver. 07
User Manual Bedal 3S
10
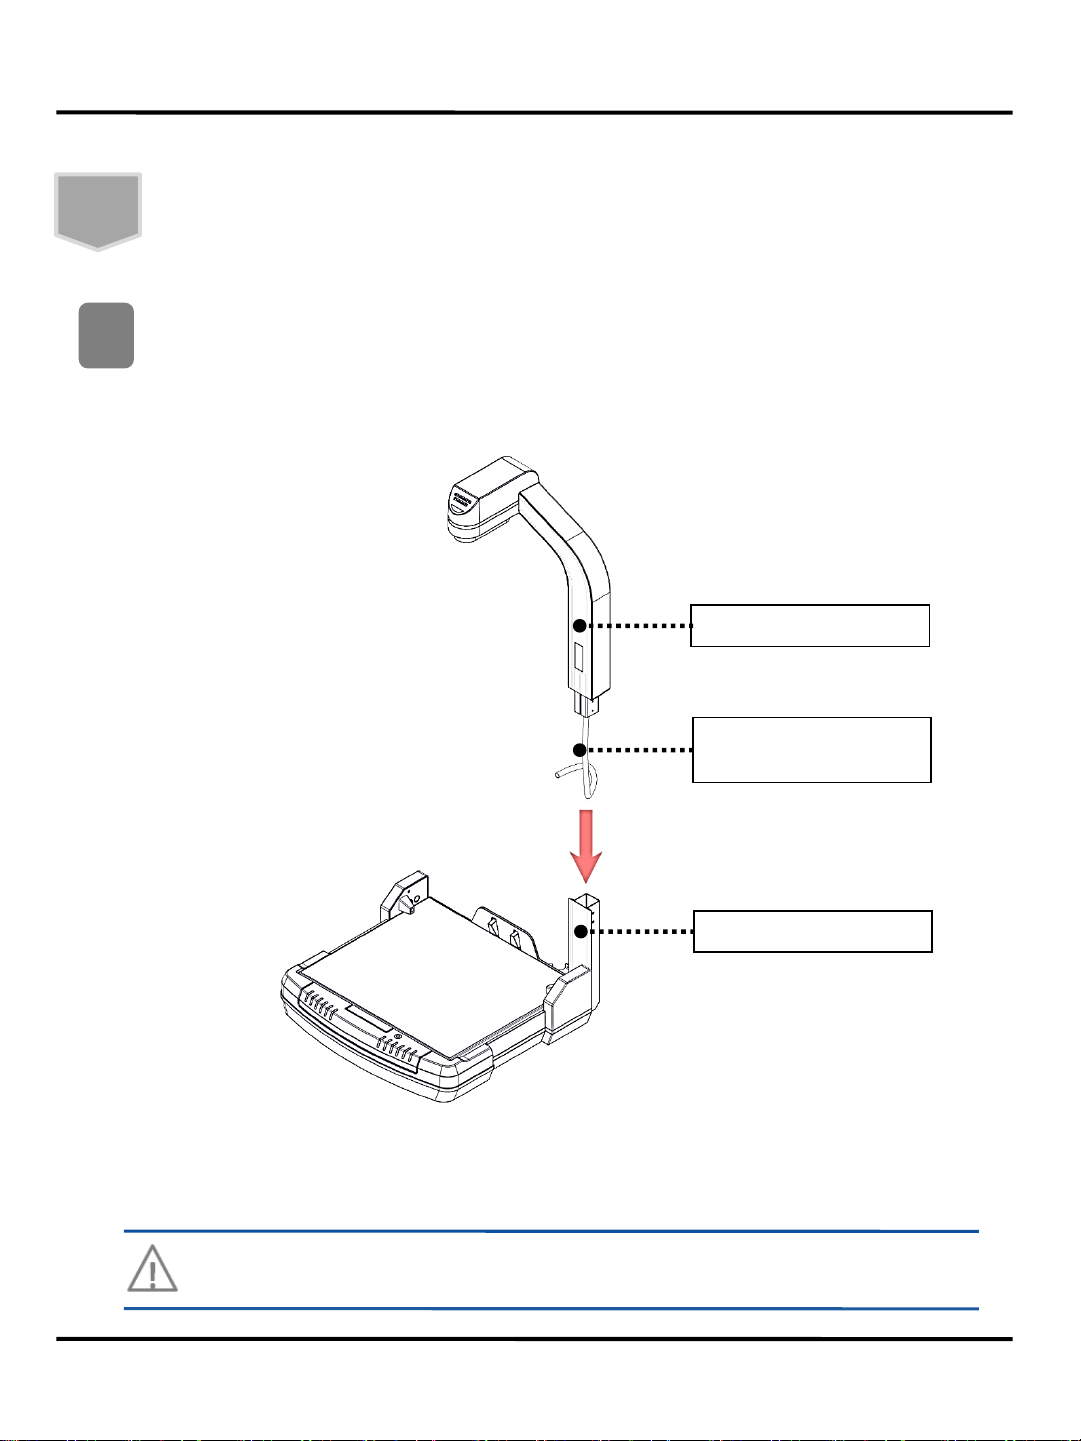
Assemble the Upper Unit to Post (Main Body) as below picture. Harness & USB
connector must go through the Post.
2
Upper Unit
Harness /
USB Connector
Post (Main Body)
Be careful your hands not to be caught in while assembling Upper Unit
to the Post.
H/W Installation
Installation
Page 12
Ver. 07
User Manual Bedal 3S
11
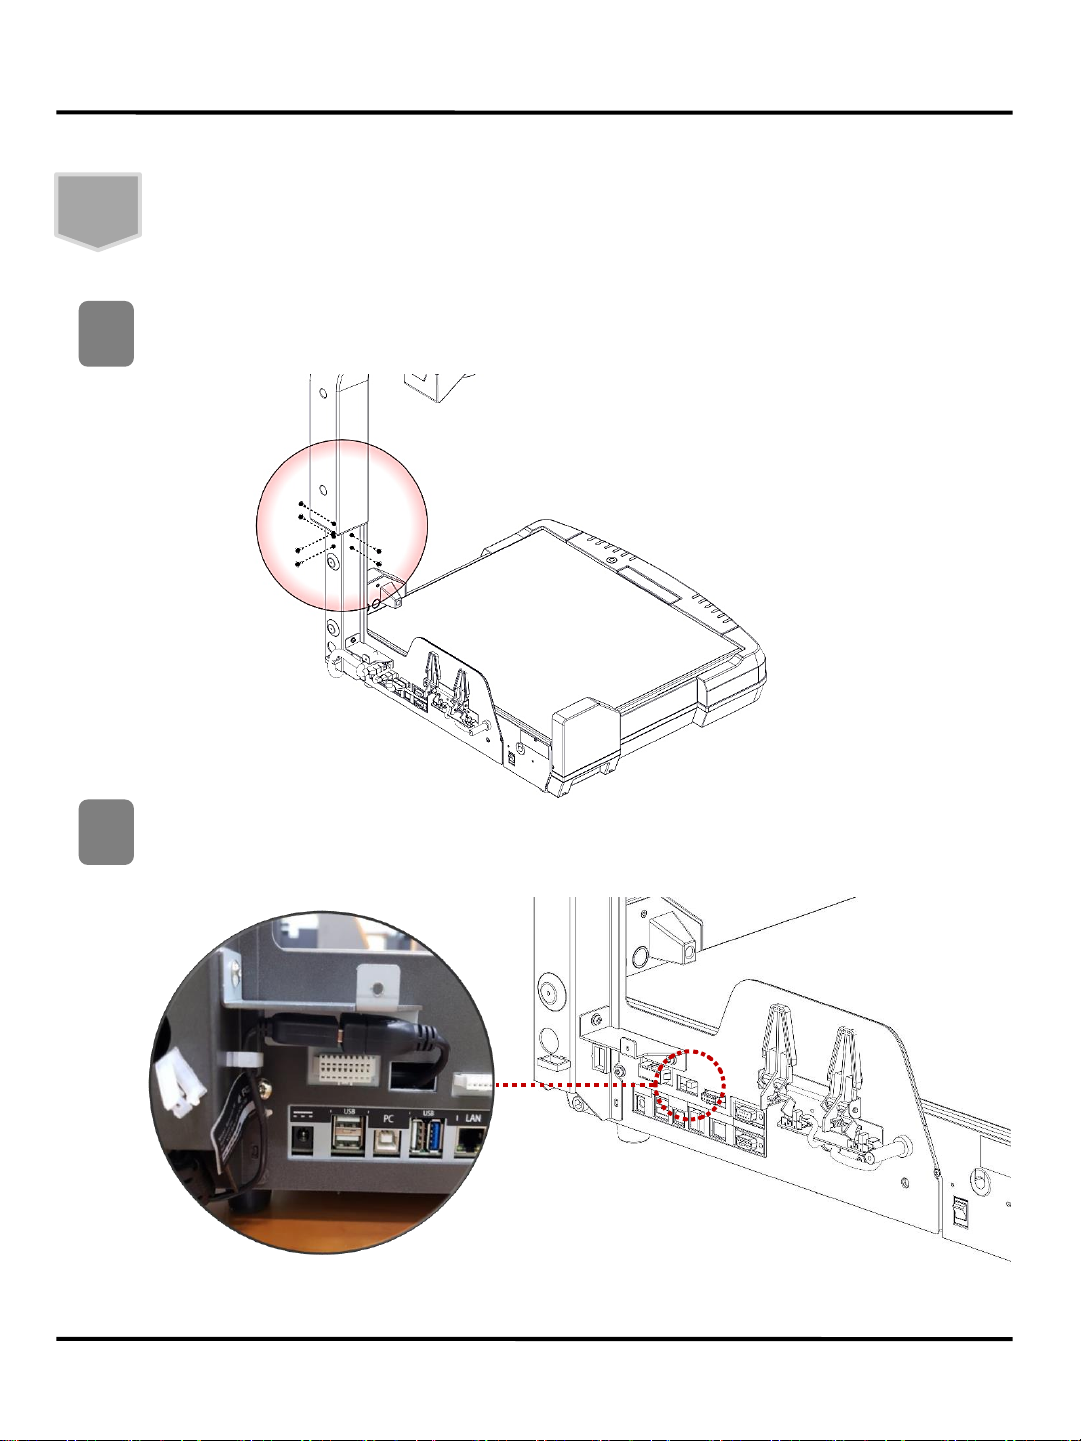
Fix the Upper Unit & the Post with Truss M4X10L * 6pcs. (included)
3
Connect the USB connector (Upper Unit - Main Body) as below picture.
4
H/W Installation
Installation
Page 13
Ver. 07
User Manual Bedal 3S
12
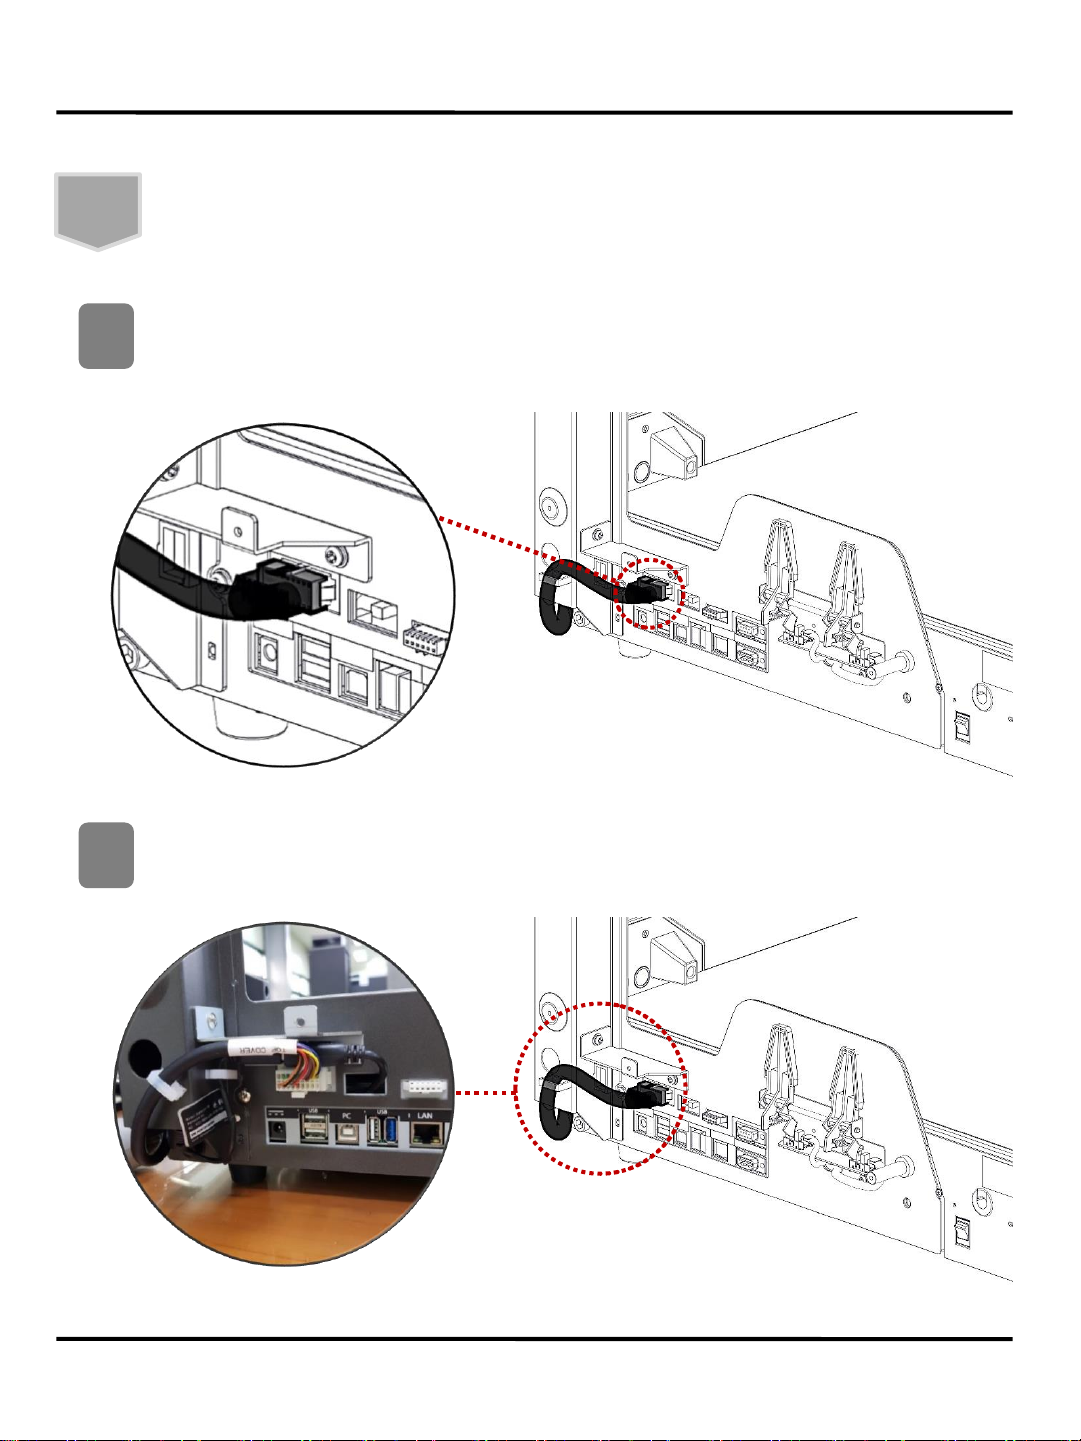
Connect Harness (Upper Unit) to the Port as below picture.
5
Arrange Harness and USB connector using the clamp as below picture.
6
H/W Installation
Installation
Page 14
Ver. 07
User Manual Bedal 3S
13
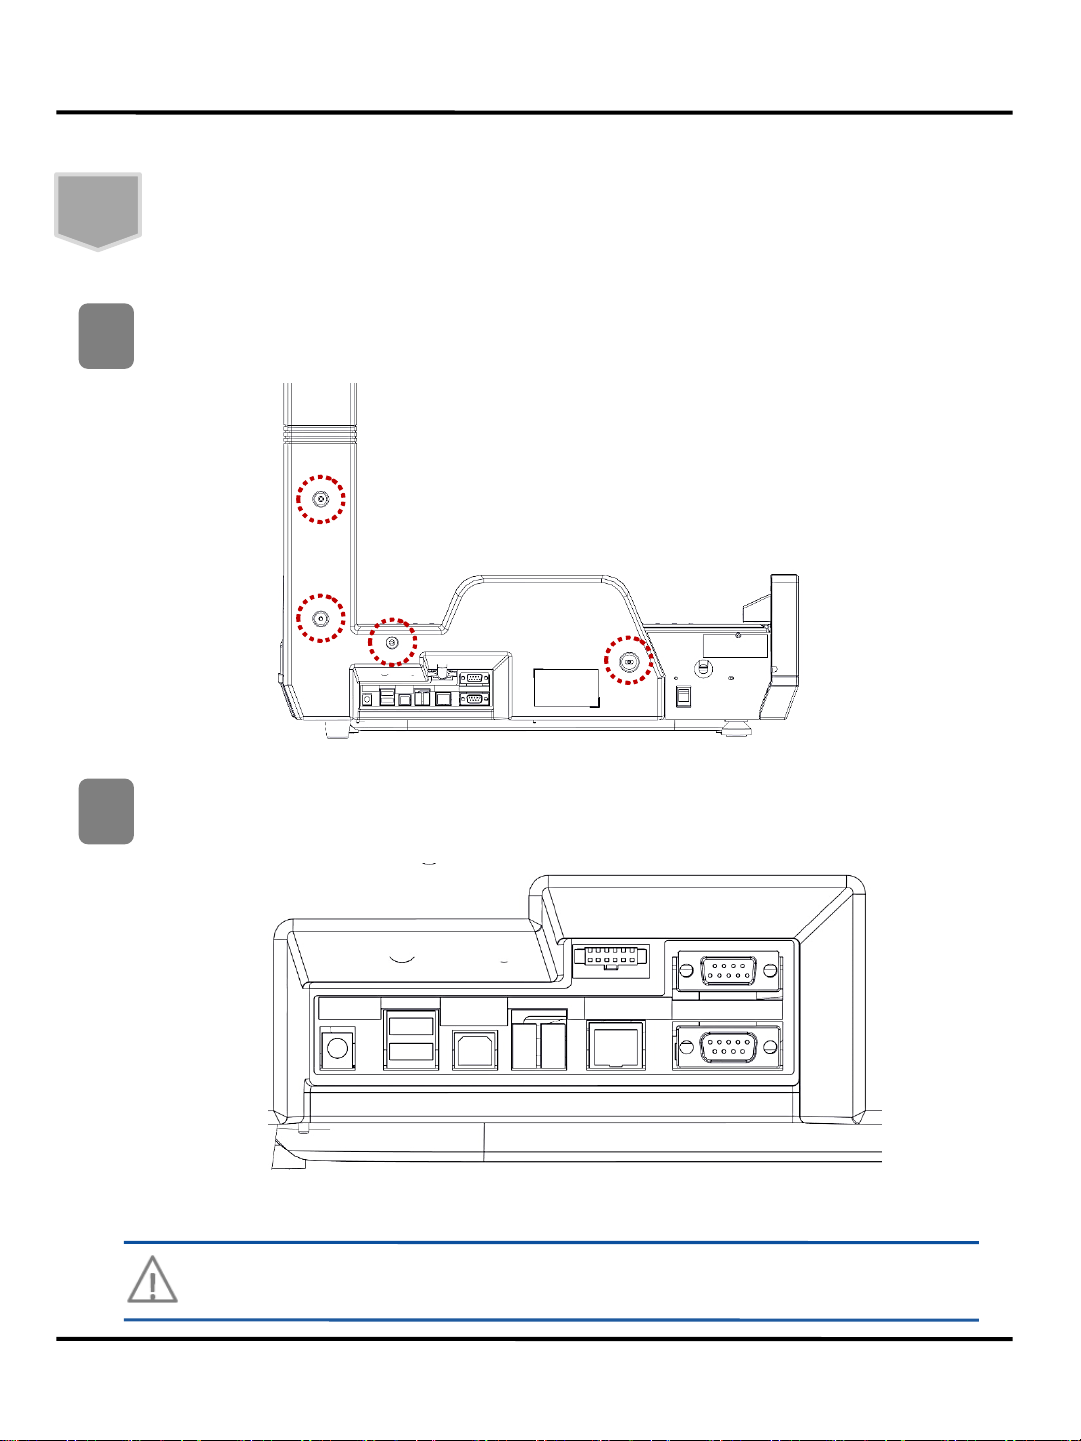
Re-assemble the rear cover, screw 4 points marked as circle on the below
picture with 4 screws (unscrewed on page 10)
7
Connect PC / tablet PC / printer / Indicator & other components to the
I/O interface.
8
* Refer to Page 7 - Description of Units (Rear)
H/W Installation
Installation
Prohibit connection of charging cable for mobile phones, tablets, etc.
Page 15
Ver. 07
User Manual Bedal 3S
14
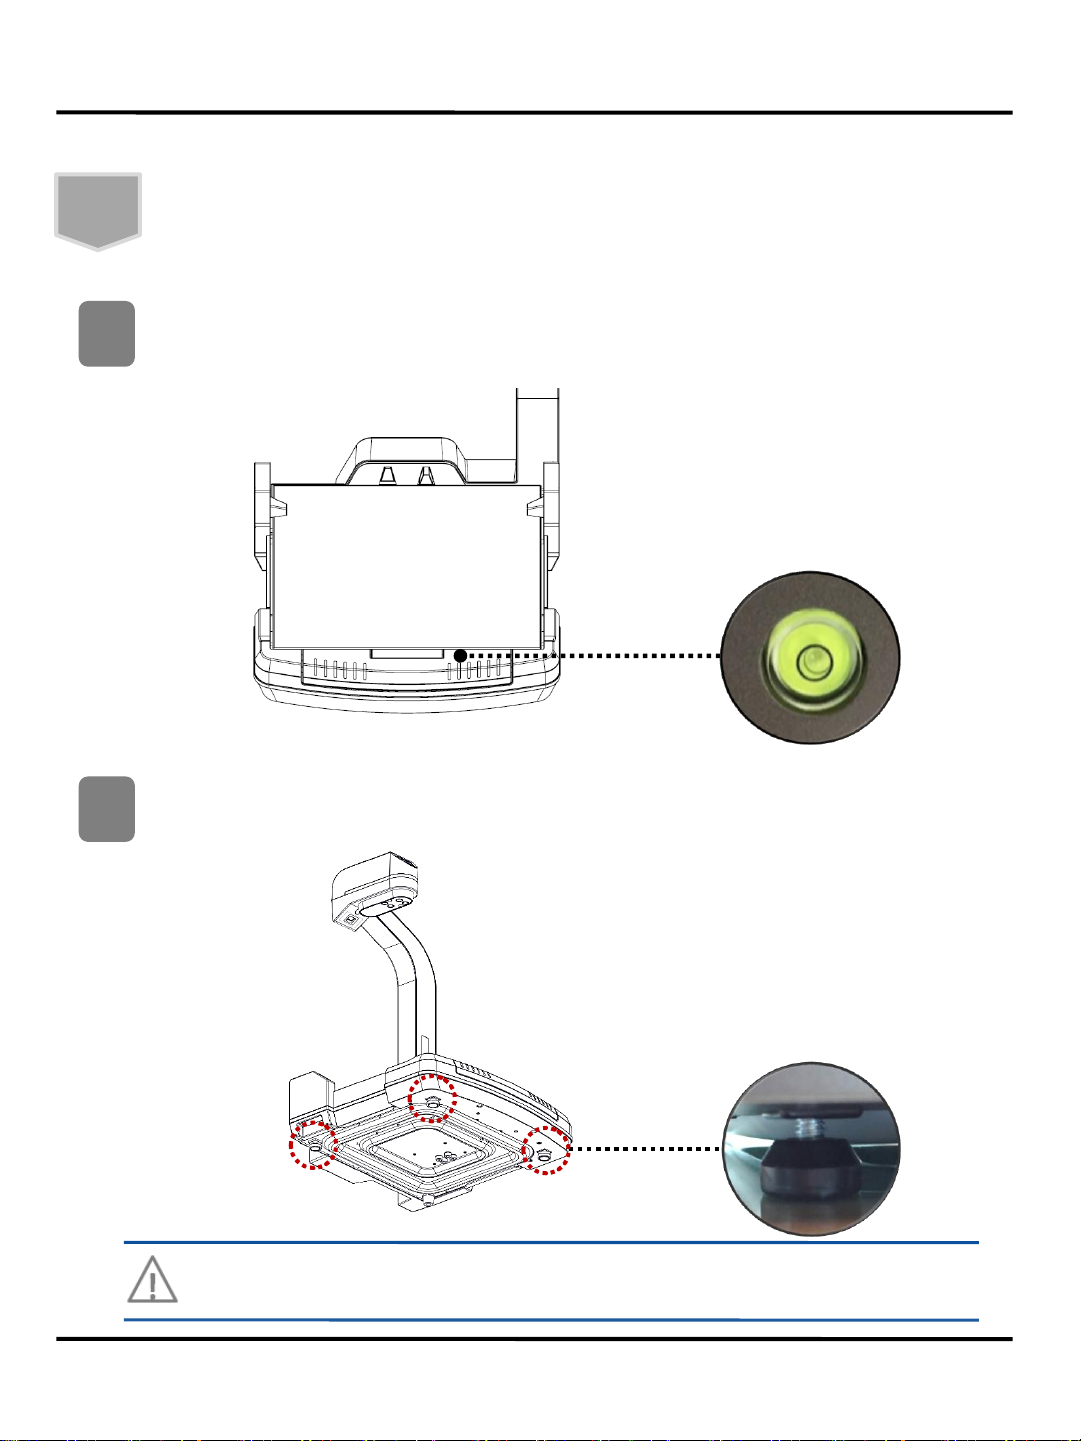
Please check the horizontal position of the installation site by using the level
indicator.
If the Bedal 3S is not leveled, use the leveling foot on the bottom of the unit to
level it. (total 3 points)
If the product is not leveled, errors may occur when measuring the
weight and dimension of the object.
9
10
H/W Installation
Installation
Page 16
Ver. 07
User Manual Bedal 3S
15
H/W Installation
Installation
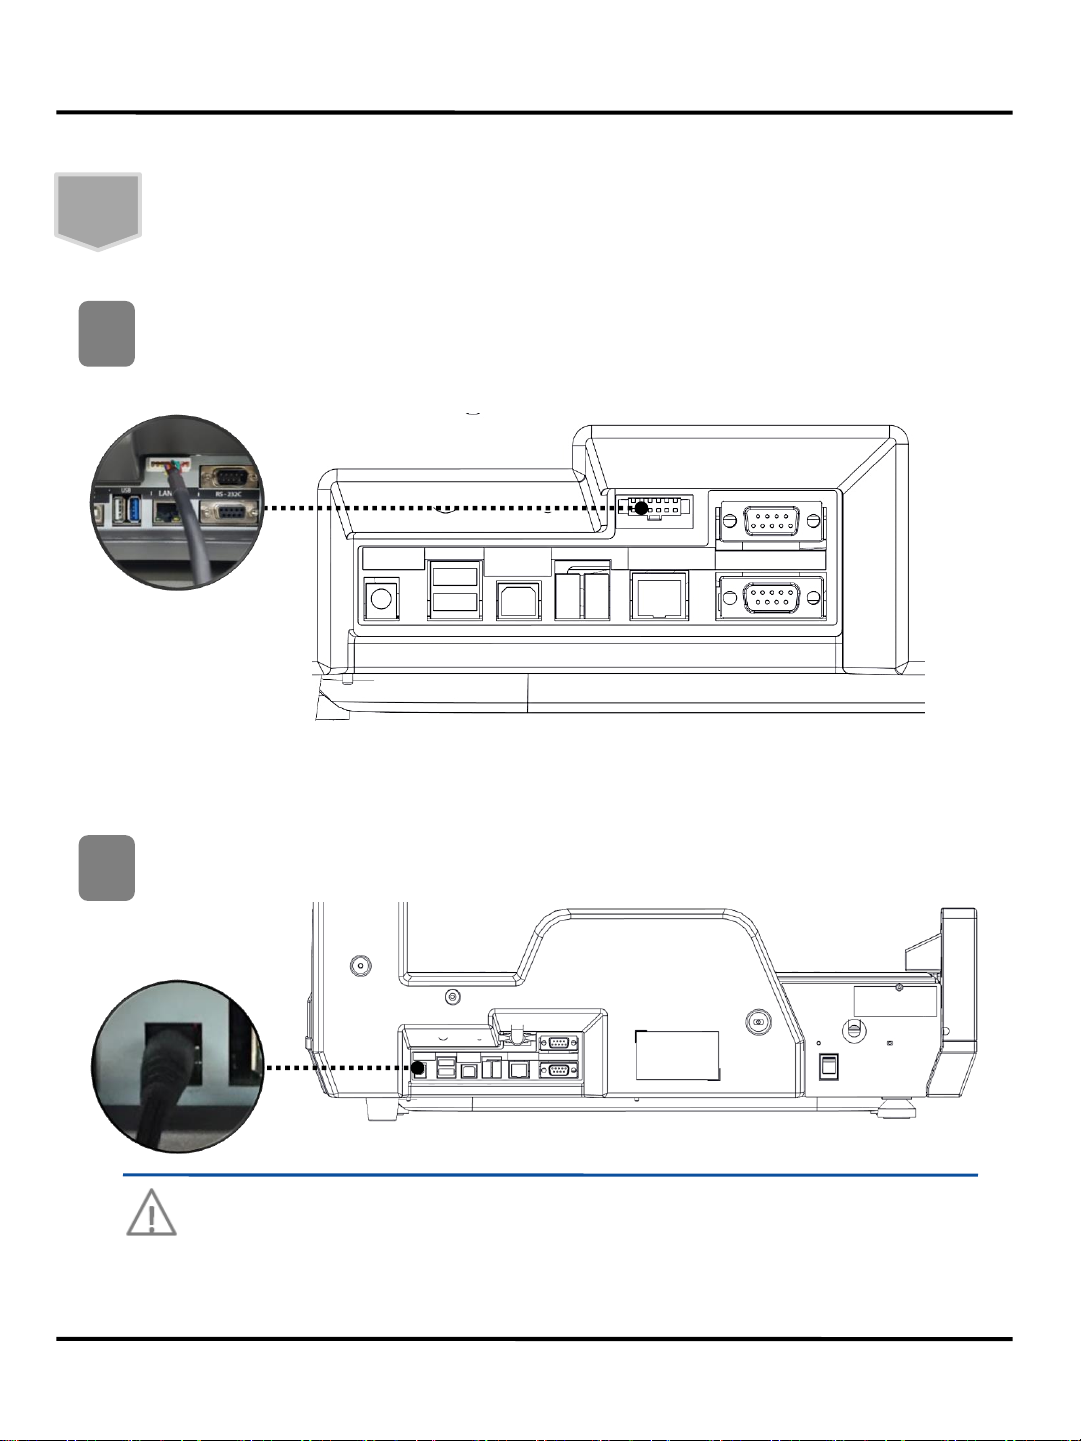
Connect Power Cable to the DC Power Jack.
12
Please make sure to use only provided adapter. Using other adapter
may cause malfunction.
Connect Display to the Display Port.
11
Page 17
Ver. 07
User Manual Bedal 3S
16
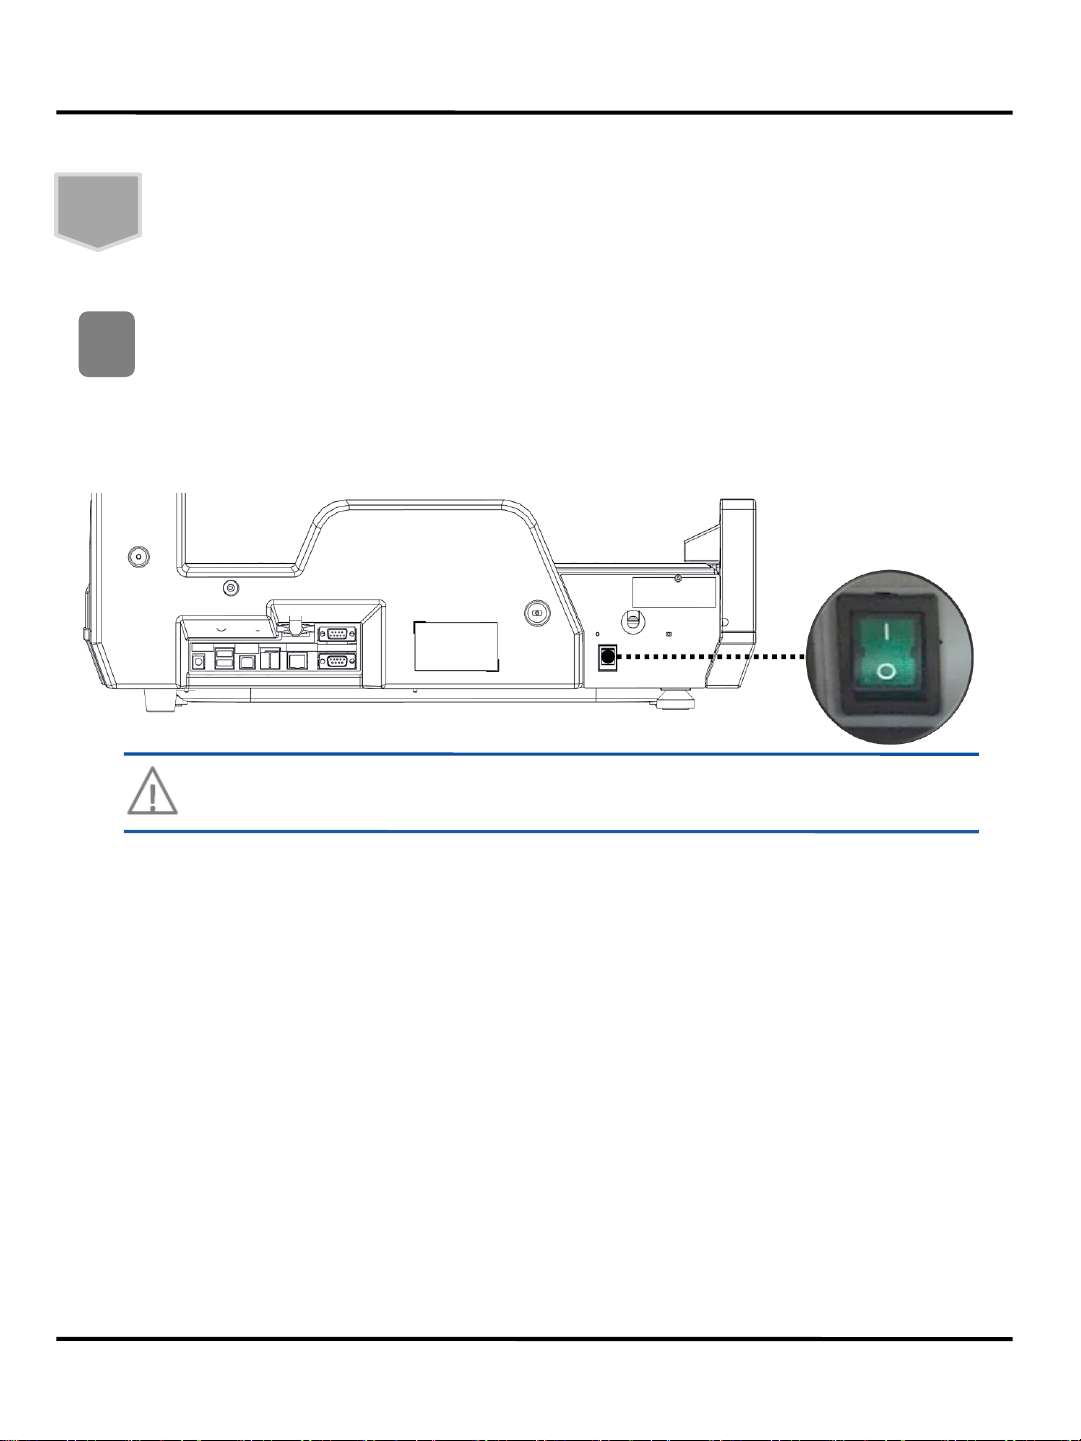
After connecting the power, turn on the power switch.
Please be sure to turn off the power after completing the acceptance.
If turning off the power during operation, it causes unexpected errors.
13
When Bedal 3S is turned on, initialization will be started. After initialization, the green
light on LED (Upper Unit) turns on and ready for measurement (takes 4~5 seconds)
H/W Installation
Installation
Page 18

Ver. 07
User Manual Bedal 3S
17
S/W Installation
Installation
www.bedalsmart.com
Please visit the below website “Bedal Smart Link” to download Bedal Smart
Connect Software & User Manual.
1
1) Bedal SmartConnect Software Download.
2) Bedal SmartConnect Software Manual.
3) Hardware / Software FAQ & Customer Support
and more information about Bedal 3S & Bedal SmartConnect will be updated on the website.
Install the Software following the S/W Manual
2
Page 19
Ver. 07
User Manual Bedal 3S
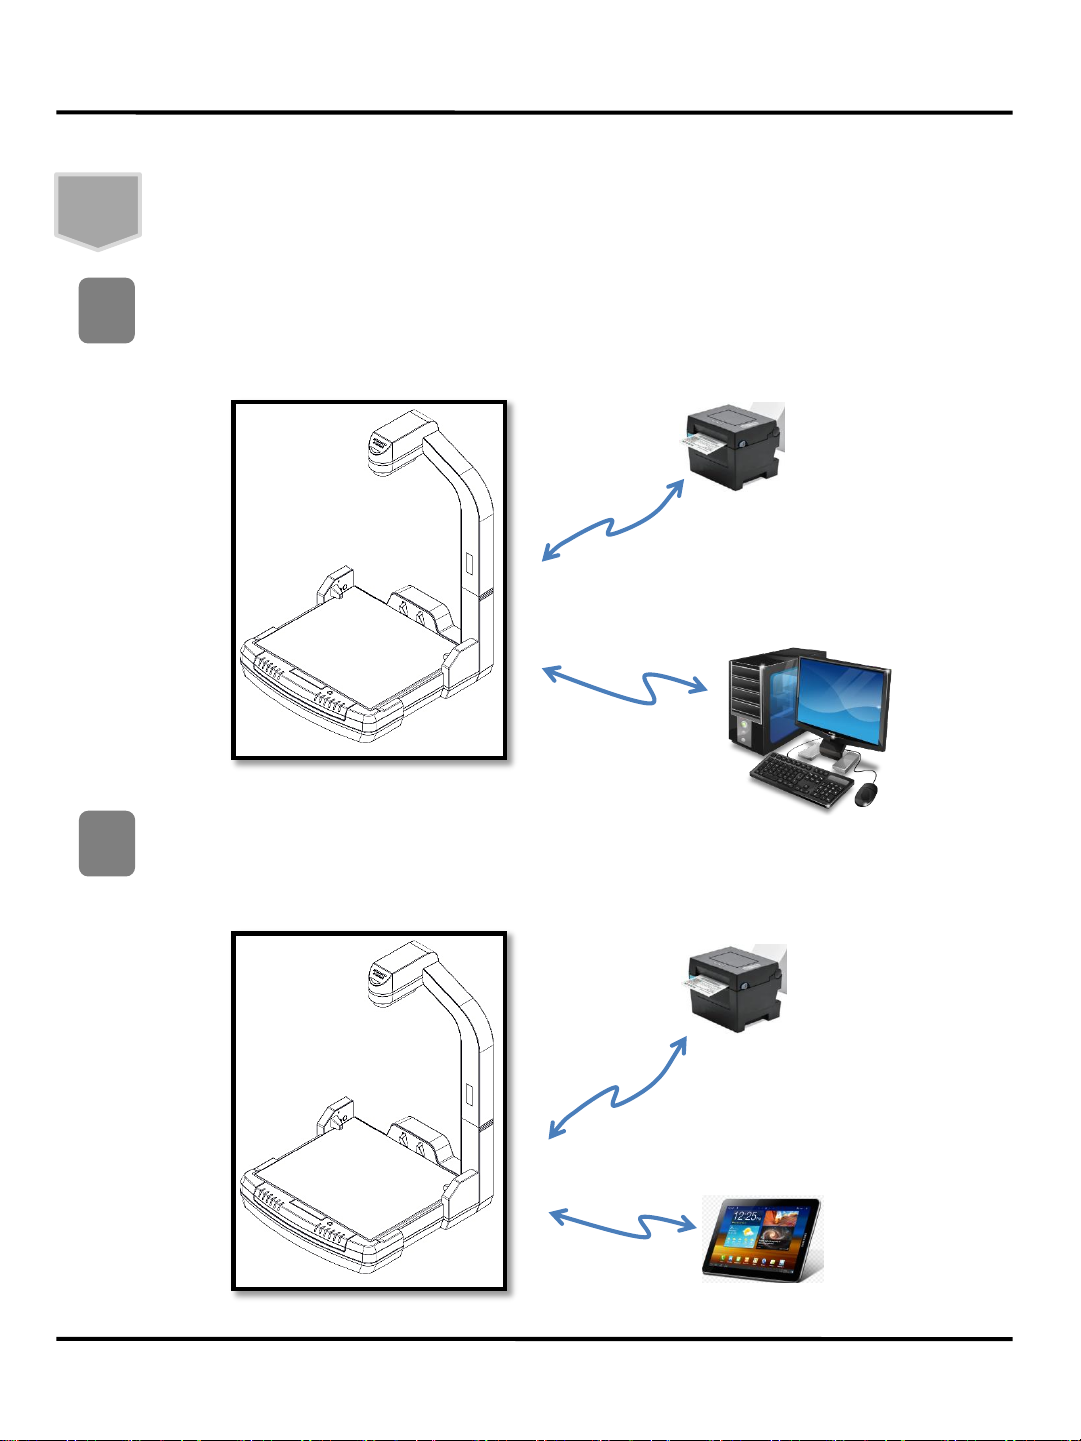
Interface flow
18
PC
1
Tablet PC
2
USB
USB (Virtual Serial)
USB
Installation
USB (Virtual Serial)
Page 20
Ver. 07
User Manual Bedal 3S
Measuring Dimension & Weight
19
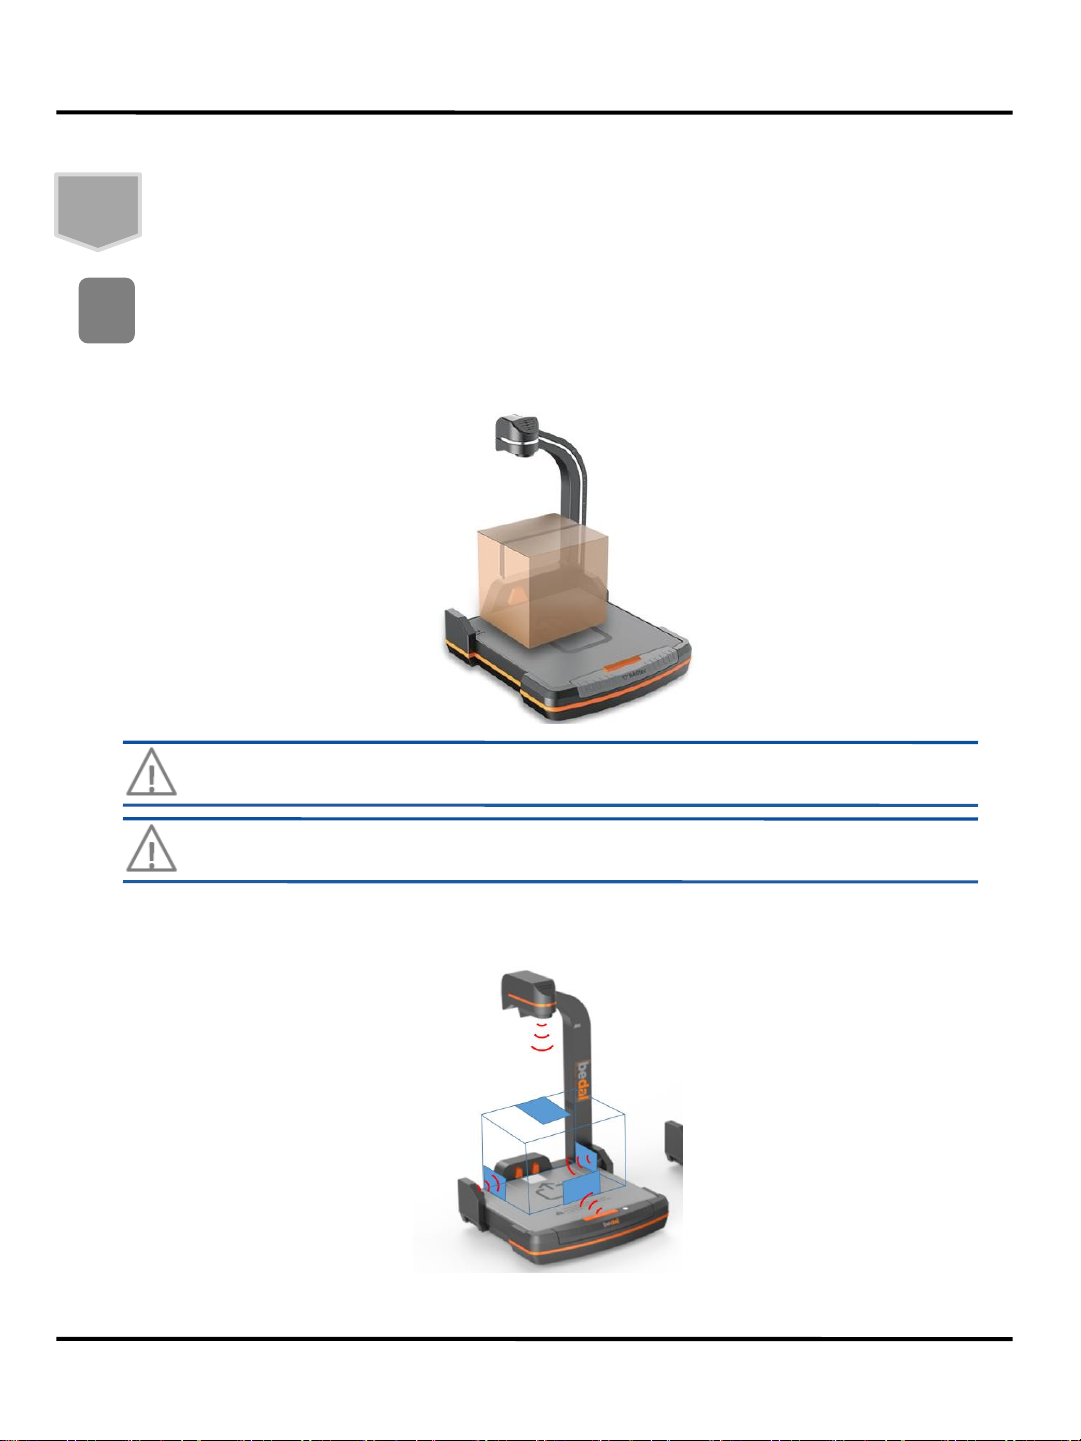
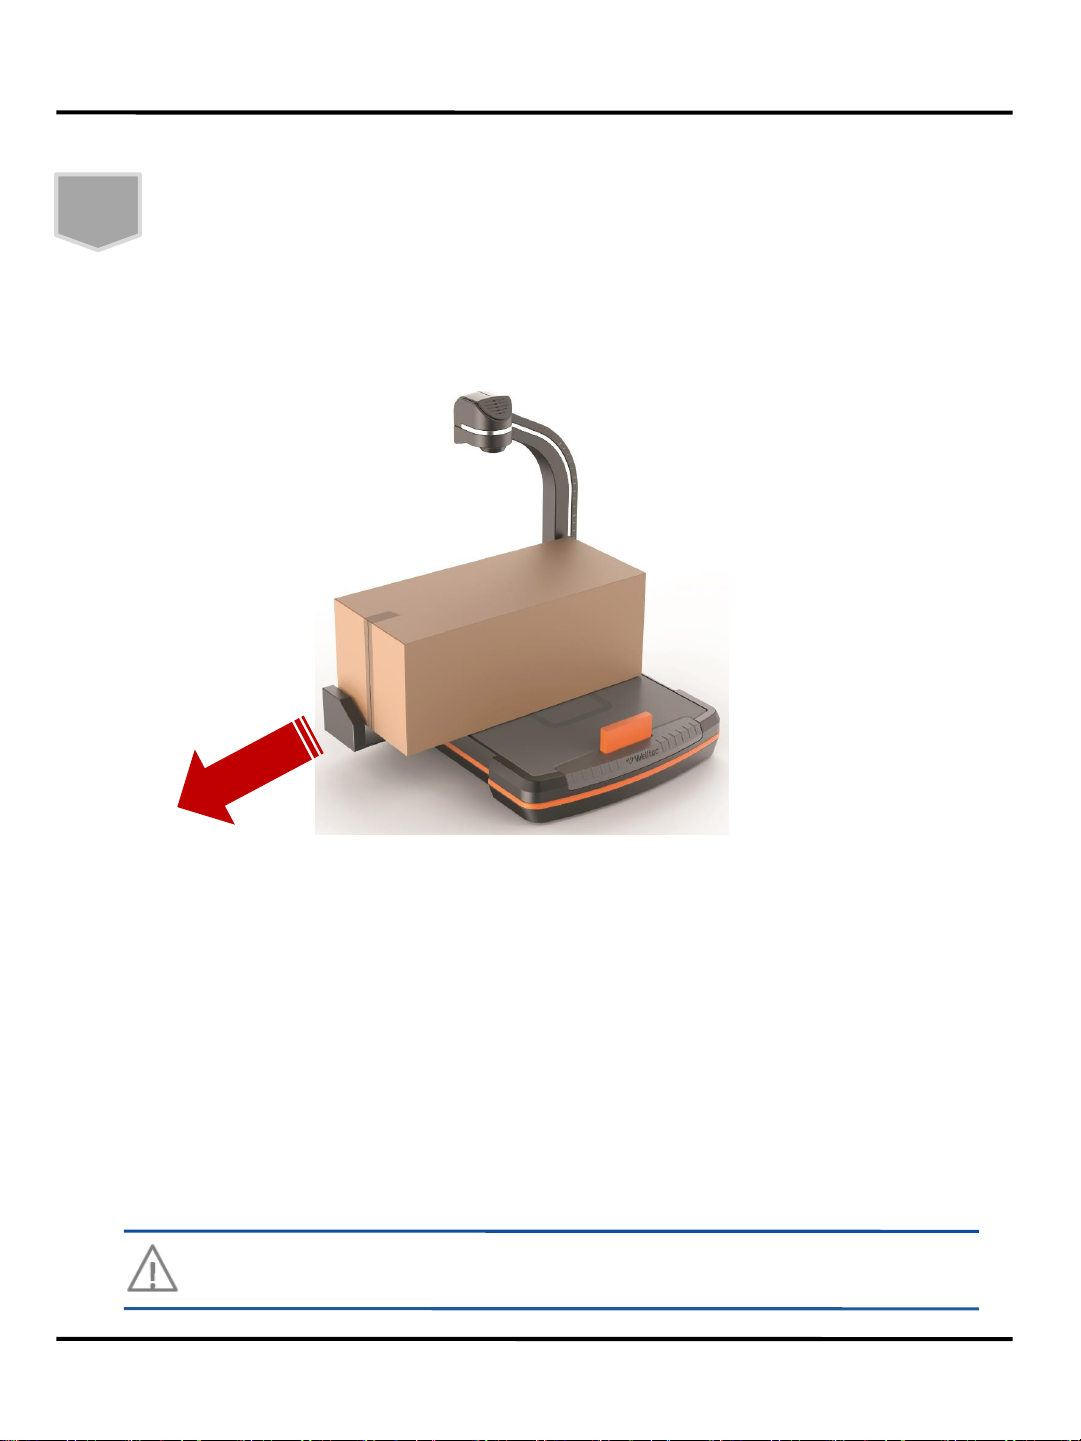
Measure the object as below picture.
1
① Put the object on the Bedal 3S. Push to the Object Detect Sensor to measure.
② Bedal 3S automatically measures the dimension and weight of the object.
Operation
* Green light flashes during measurement then two short beep sounds when complete.
If the object is placed in tripped, measurement error may occur.
Place the object where does not cover the Width Measure Sensor
(orange bar).
Page 21
Ver. 07
User Manual Bedal 3S
20
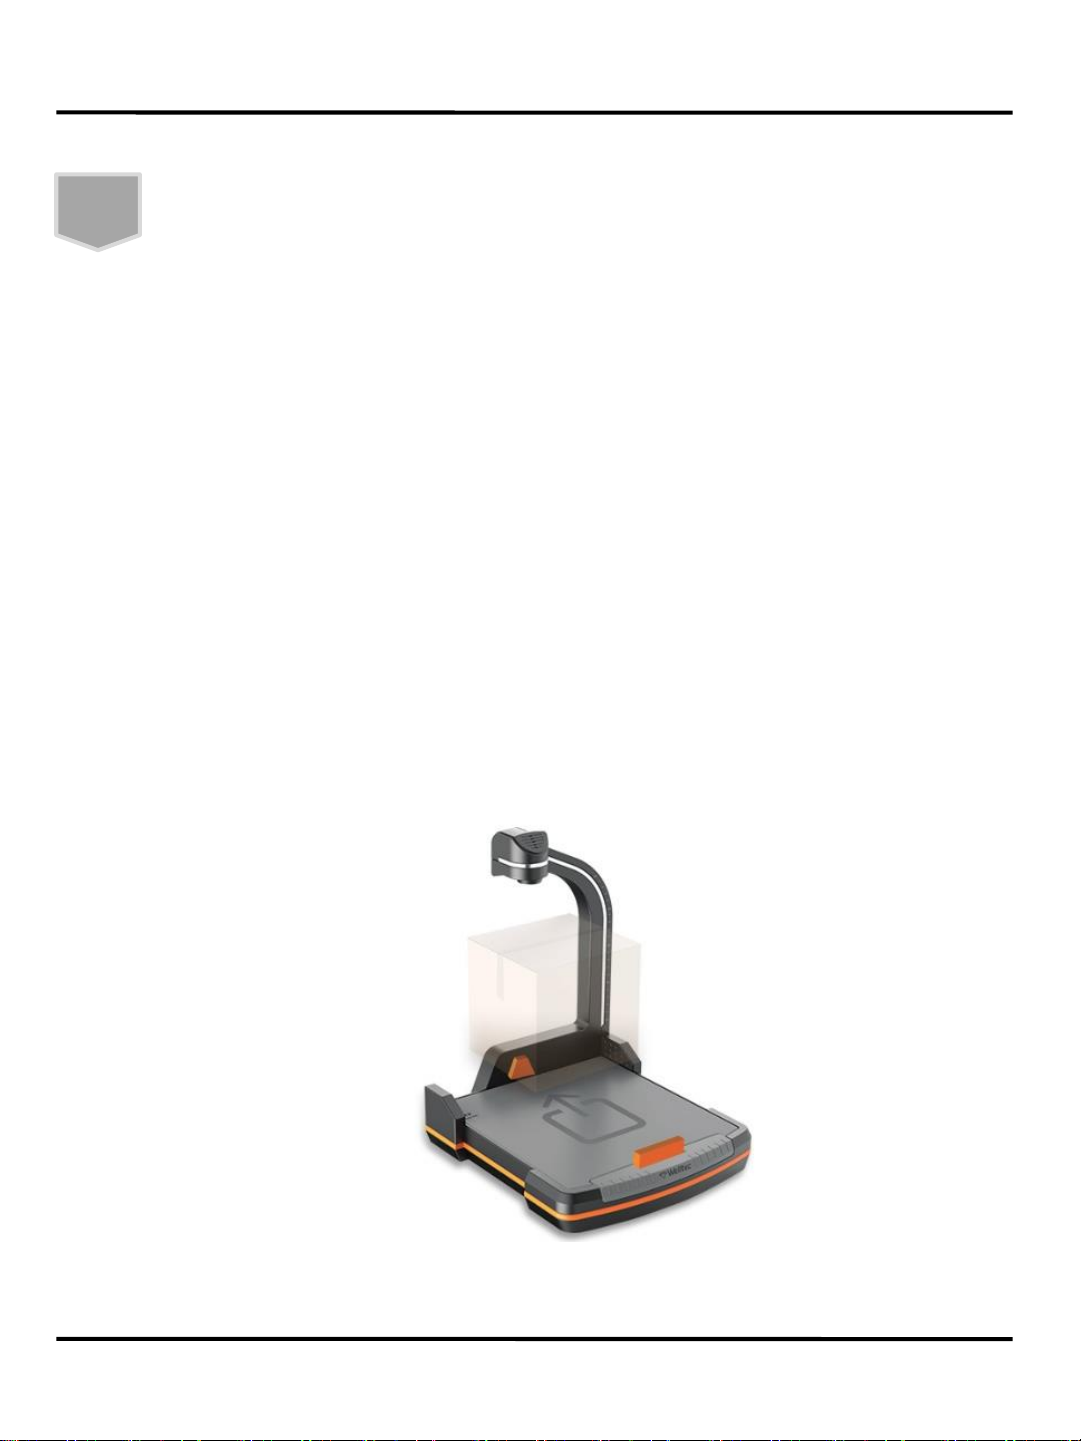
③ Extend the Length Measurement Unit for large object as below picture.
(extendable to 75cm max)
After using the Length Measurement Unit extension, please place the
Length Measurement Unit back to its original position.
* Extend the Length Measurement Unit to the end. If not, Bedal 3S doesn’t detect the object &
beep sounds.
* Place the object to cover the sensors while Length Measurement Unit is extended.
* Bedal 3S is not able to detect small object when Length Measurement Unit is extended.
Measuring Dimension & Weight
Operation
Page 22
Ver. 07
User Manual Bedal 3S
21
④ Follow the instruction guide of the PC / Tablet PC for acceptance. (connected to the Bedal 3S)
※ The Operating Instruction and User Interface is different depending on the service provider.
Please contact your service provider for the solution.
⑤ Remove the object from Bedal 3S after acceptance.
Measuring Dimension & Weight
Operation
Page 23
Ver. 07
User Manual Bedal 3S
22
Precautions
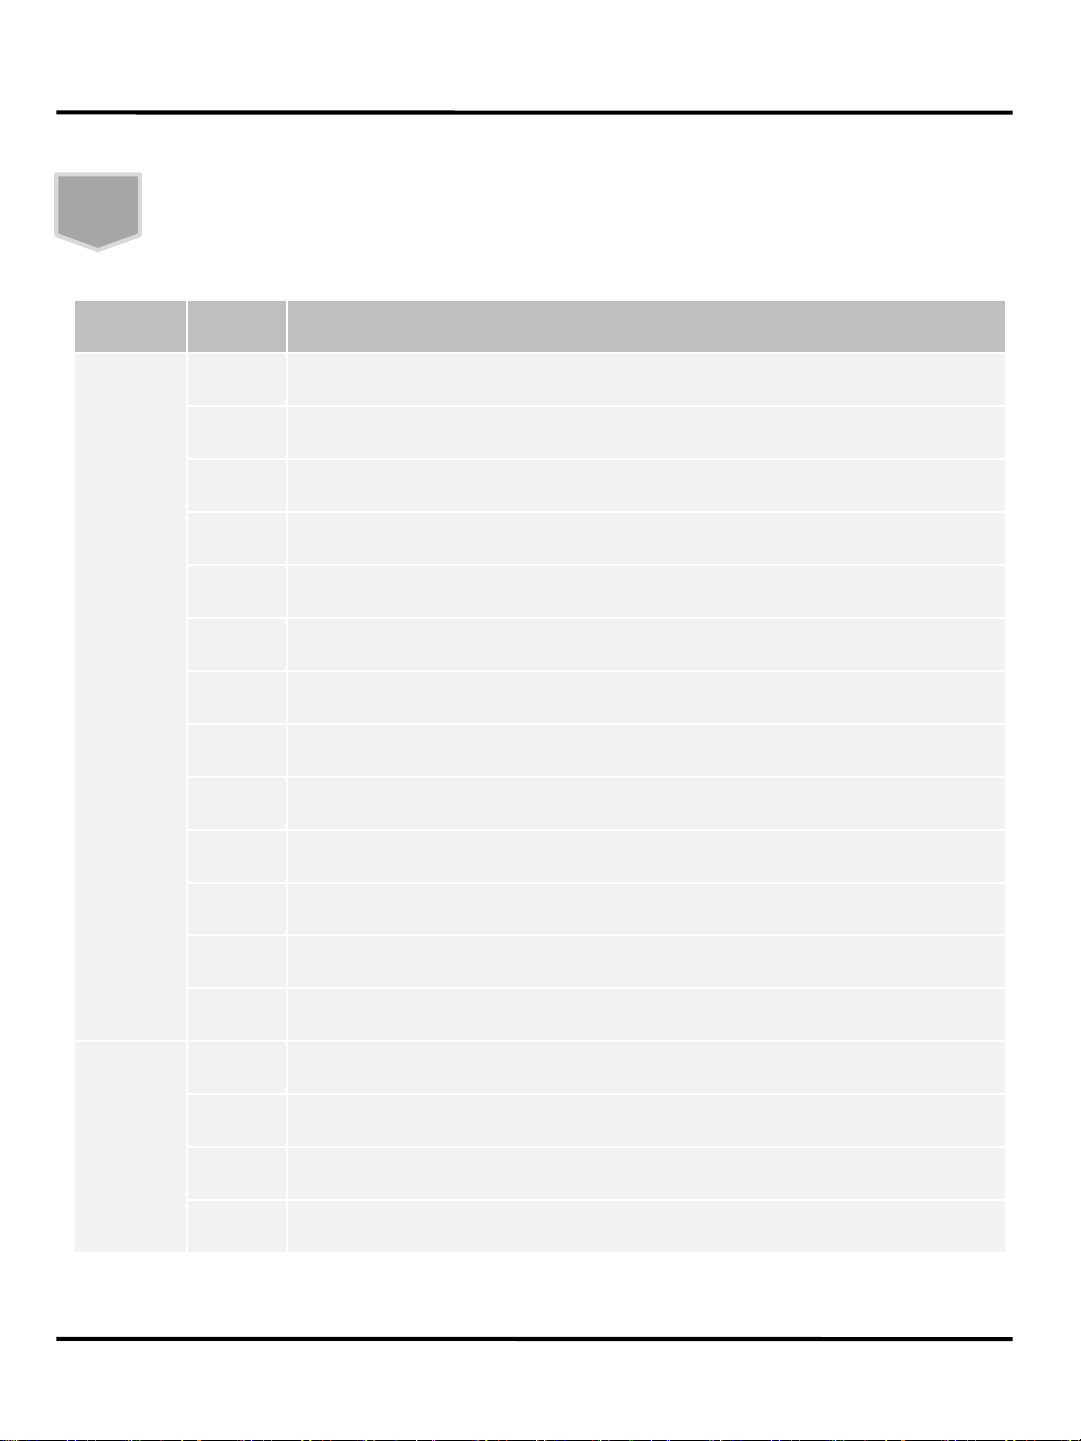
Error Code
Measuring
Error Code
Description
Dimension
E D601
SS Ultrasonic 1 detection error: If the receiver does not detect the sound wave
E D602
SS Ultrasonic 2 detection error: If the receiver does not detect the sound wave
E D603
SS Ultrasonic 3 detection error: If the receiver does not detect the sound wave
E D604
SS Ultrasonic 4 detection error: If the receiver does not detect the sound wave
E D605
SS Ultrasonic 5 detection error: If the receiver does not detect the sound wave
E D606
SS Ultrasonic 6 detection error: If the receiver does not detect the sound wave
E D607
SS Ultrasonic 7 detection error: If the receiver does not detect the sound wave
E D700
SS Ultrasonic 8 detection error: If the receiver does not detect the sound wave
E D701
M1 Open
error
E D702
M1 Close
error
E D703
Main F/W Checksum
error
E D710
Extension bar position error
E D711
Trigger detection error
Weighing
E D704
Weighing
F/W Checksum Error
E D801
Zero Setting Error: Overload more than 10% of maximum
limit while turning on
E D803
Exceed maximum load (32kg)
E D806
Exceed 2% of maximum load on the machine while manual zero
setting
Page 24
Ver. 07
User Manual Bedal 3S
23
Precautions
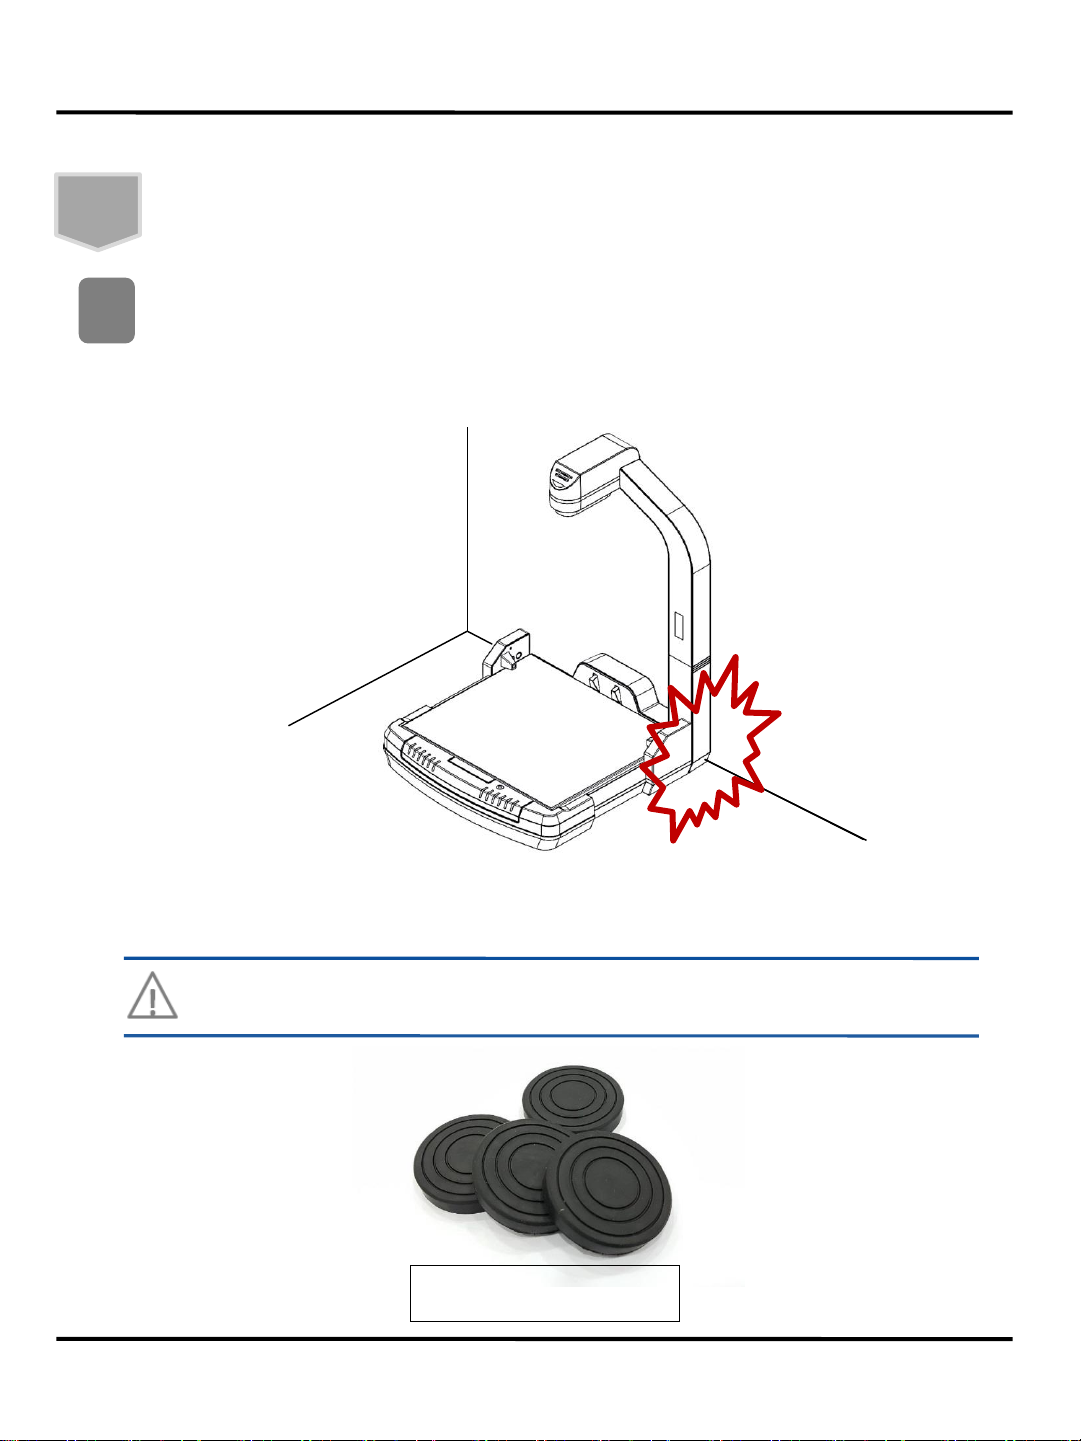
Be careful not to place the machine where the rear cover is in contact with wall.
It may cause an unpredictable error.
1
If the machine is moving during usage, purchase an anti-skid rubber
pad (optional).
Rubber Pad (Optional)
Operational Precautions
Page 25
Ver. 07
User Manual Bedal 3S
24
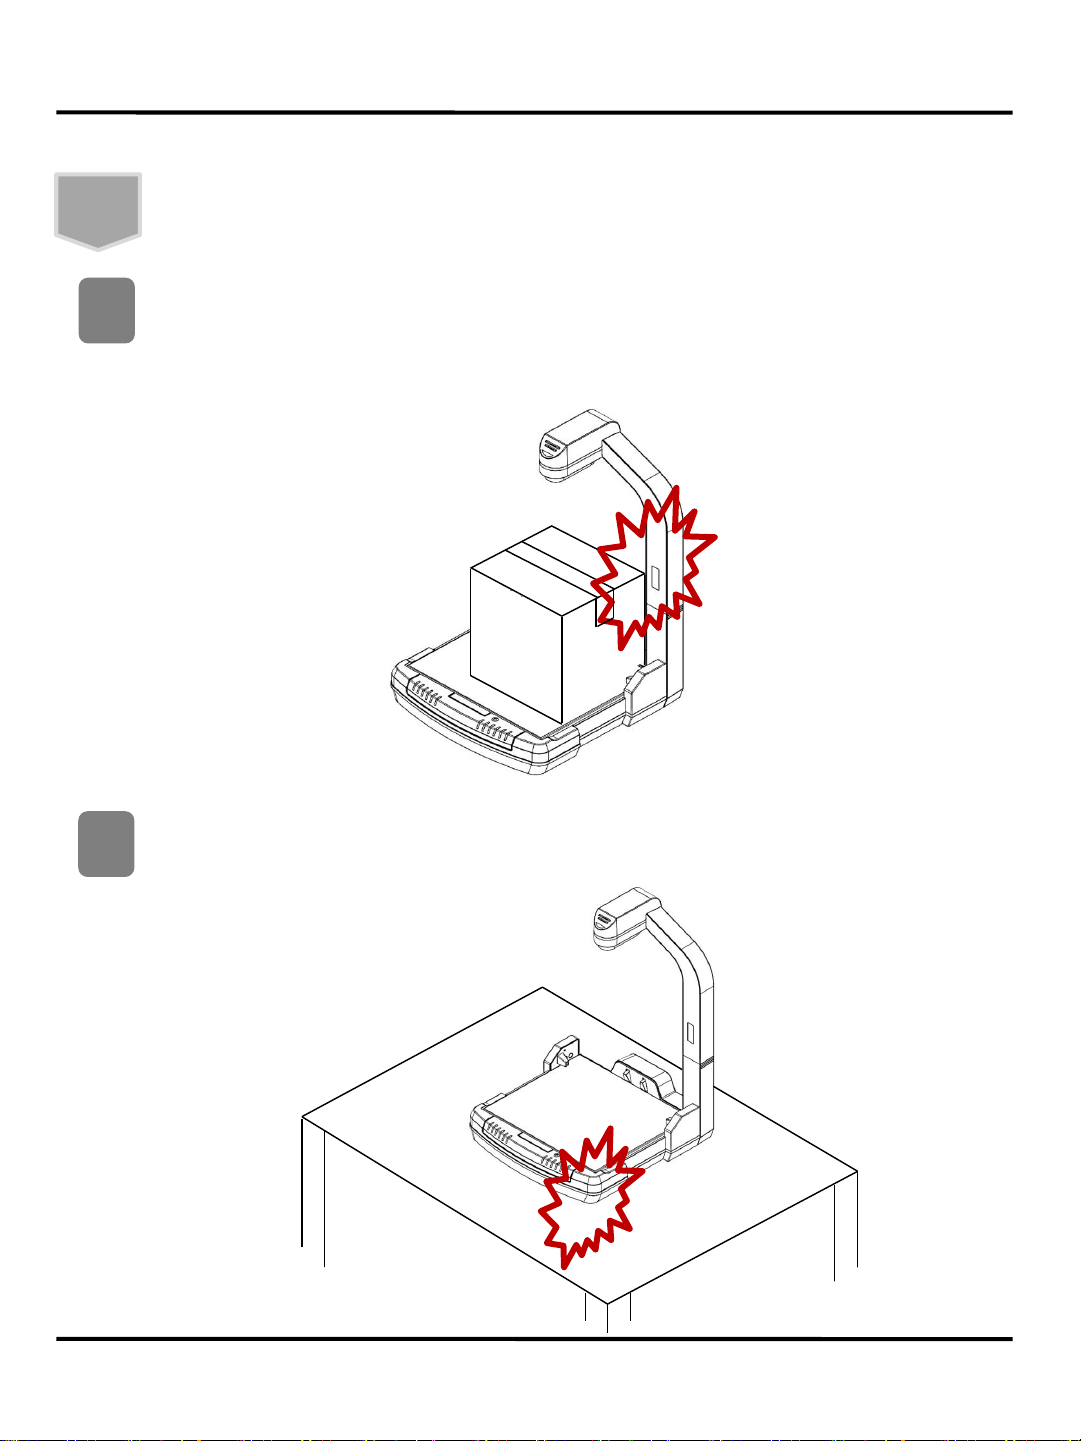
If the object is touching the upper unit, It may cause an error. Be careful not to
make contact with the upper unit when measuring.
2
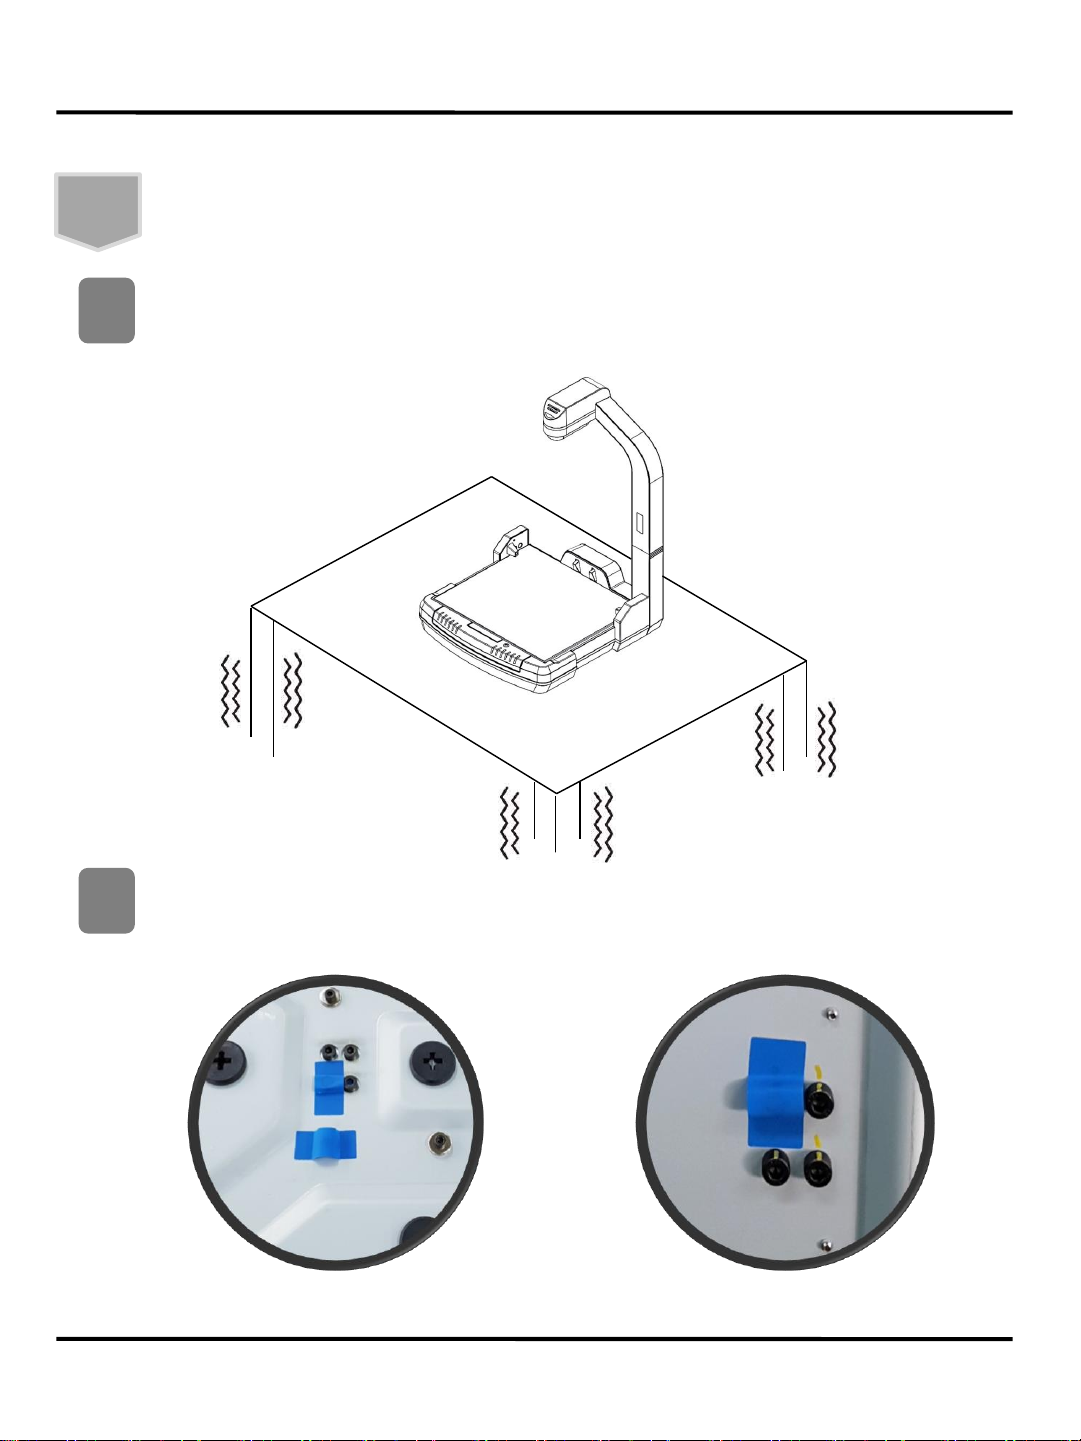
If the machine is not leveled & is shaken. Adjust the leveling screw on the
bottom of machine.
3
Precautions
Operational Precautions
Page 26
Ver. 07
User Manual Bedal 3S
25
Do not remove the blue seal attached to the machine. Removing the seal will
leave traces, which will limit product repairs and technical support.
5
Precautions
Operational Precautions
Do not install the machine on the location which is not stable. It may cause a
measurement error.
4
Page 27
Ver. 07
User Manual Bedal 3S
26
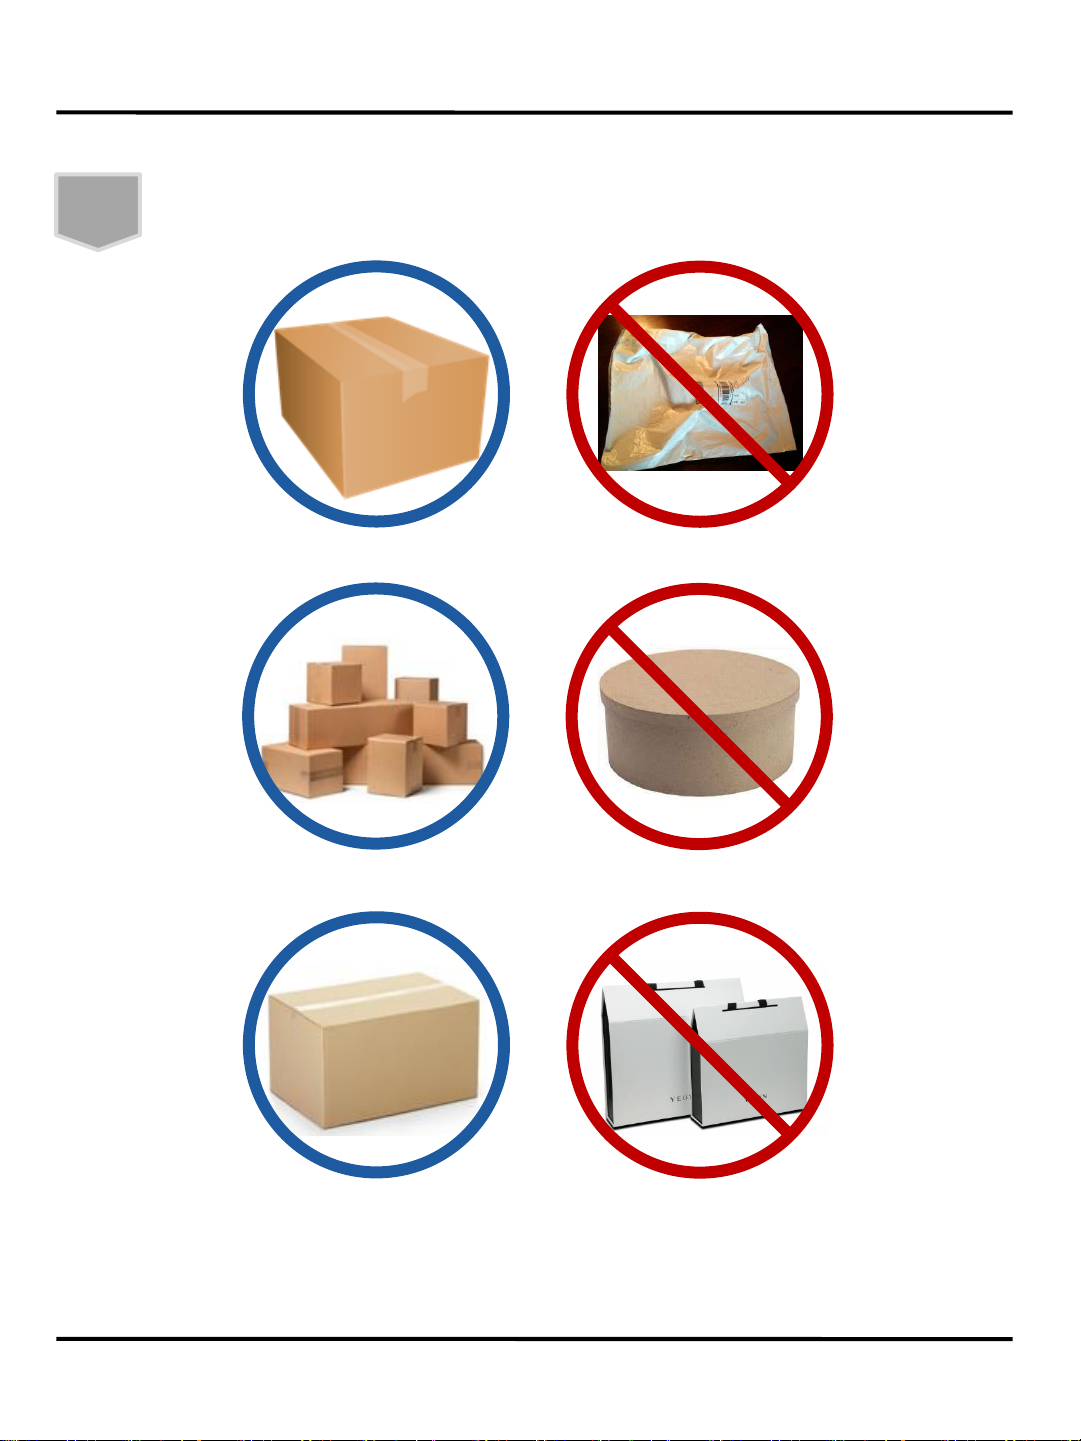
Packed in a box
Unpacked
Square box
Round box
Regular box
Irregular box
Measurable / Non-Measurable Items
* Error will be occurred in the dimension measuring with non-cube objects.
Precautions
* If the boxes are protruded due to poor packaging, it may cause an measurement errors.
Page 28

Ver. 07
User Manual Bedal 3S
27
Warranty
1. Liquid inflow and flooding due to consumer error.
2. Deformation or breakage due to external force exceeding allowable limit.
3. Damage of scale due to overloading or external force.
4. Malfunction of power supply caused by using other adaptor.
5. Malfunction due to improper usage such as intentional handling, negligence or breakage.
6. Breakdown due to natural disasters. (fire, lightning, earthquake, wind, water, gas, etc.)
7. Failure due to power supply abnormality or faulty connecting device.
8. Failure caused by repair or modification by undesignated engineers or third parties.
9. Seal breakage / removal marks on the machine.
10. Errors (malfunctions) caused by out of range of guaranteed operating environment.
11. Serial number of the product, component or accessory has been arbitrarily changed or removed.
12. Damage to the product caused by improper installation or connection to an external port.
13. Damage caused by third party software or viruses.
14. Damage or Breakage of parts caused by not using proper tools.
15. Problems with purchasing used product or unofficial channels.
16. The labels on the top plate are subject to wear and scratches as the usage increases. This is not
included in the warranty.
Policy
1
Limited Warranty
2
※ The warranty does not cover any failure or damage caused by improper use, negligence,
normal wear and tear even if the product is under warranty period.
1. Warrant that the quality of the product according to the contents of warranty & period as
enclosed Warranty Card. (or warranty policy)
2. Quality, Performance, or Functional defects during installation and proper use of the
equipment under the warranty period, the manufacturer or supplier warrant free repair.
3. Provide Warranty Card (or substitute) to manufacturer or supplier in order to confirm
warranty period and device information.
Precautions
Page 29

Ver. 07
User Manual Bedal 3S
28
Memo
Page 30

Ver. 07
User Manual Bedal 3S
29
Memo
Page 31

Ver. 07
User Manual Bedal 3S
30
Memo
Page 32

Ver. 07
User Manual Bedal 3S
Welltec Headquarter & Manufacturing
91-1, Donyu 2-ro, Munsan-eup,
Paju-si, Gyeonggi-do, Korea
Tel: +82-31-954-4711 Fax: +82-31-954-2712
Welltec & Parcalkiosk All Rights Reserved.
Parcel Kiosk Limited
Orion House, Bessemer Road
Welwyn Garden City
Hertfordshire
AL7 1HH
 Loading...