

Wellsino Electric ZH 16002, ZH 16002R User Manual

2017 QVC
Slim Frasier Fir Tree Instruction Sheet - 8 Function Remote (English)
Date: 3/7/17
Item # RL50066S-RP79QV (5ft)
RL65066S-RP79QV (6.5ft)
RL75066S-RP79QV (7.5ft)
PRE-LIT & PRE-SHAPED CHRISTMAS TREE
Thank you for your purchase of this pre-lit & pre-shaped
Christmas tree.
With proper use and care, this tree will provide years of
trouble-free enjoyment.
Please follow the instructions below in order to effectively
assemble and disassemble your tree.
In the event that you should encounter any issues during the
assembly of your tree; please refer to the “Troubleshooting”
portion of this manual or call our toll free customer service
number at 1-888-831-6656, and a trained representative will
assist you.
Customer service hours of operation:
Monday-Friday: 8:00am – 4:30pm CST.
Holiday weekends:
Last weekend in November: 8:00am – 4:30pm CST.
First weekend in December: 8:00am – 4:30pm CST.
Visit us on the web at www.santasbest.com
ASSEMBLY INSTRUCTIONS
(We recommend wearing proper clothing in order to prevent
scratches that may occur during the assembly process.)
Carefully unpack the contents from the tree’s carton (Fig 1);
including the contents of the poly-bag that is adhered to the
interior flap of the tree’s carton.
Contained in the poly-bag is the remote control which
operates your tree's 8 function lighting capability.
Your tree should include the following components:
A folding metal tree stand with (3) eyebolts.
An on/off push button foot pedal with cord and plug (Fig 6);
which is pre-attached at the lowest section of your tree (Fig 5).
The 5’ tree will have (2) tree sections. The 6.5’ and 7.5’ trees will
have (3) tree sections; (“A”, “B” and “C”; as shown in Fig 5).
The 9’ tree will have (4) tree sections “A”, “B”, “C” and “D”.
CCT17
4. Carefully cut the nylon strapping bounding the branches
upright.
CAUTION: Be extremely careful not to cut any of the exposed
light set wires.
5. Now gently guide the branches downward into place.
6. Beneath the canopy of section “A”, contains an on/off push
button foot pedal with cord and plug (Fig 6).
Remove the twist-tie binding the cord together and insert the
plug into a working electrical outlet.
7. On/off push button foot pedal operation:
The on/off push button foot pedal is intended to provide basic
manual on/off operation only; and therefore cannot provide
the remote control 8 function lighting capability.
NOTE: If the tree is powered off by the use of the push
button foot pedal, remote control or by unplugging it from
the electrical outlet; when powered back on the tree will
resume the memory of the last lighting function selected
with the remote control.
EZ-POWER™ TECHNOLOGY
NOTE: Your tree has been designed with EZ-Power™
technology; allowing for each of the tree’s remaining sections
to light up automatically, upon a firm insertion of each
lettered section (Fig 5).
8. Locate the next section of the tree which is identified by a
label on the outer branches marked “B” (Fig 5).
9. Remove the protective plastic cap from the end of the pole
on section “B”; insert that end onto the top of the pole of
section “A” (Fig 4).
Fig 4
18”
RL90066S-RP79QV (9ft)
Fig 6
FPOFPO
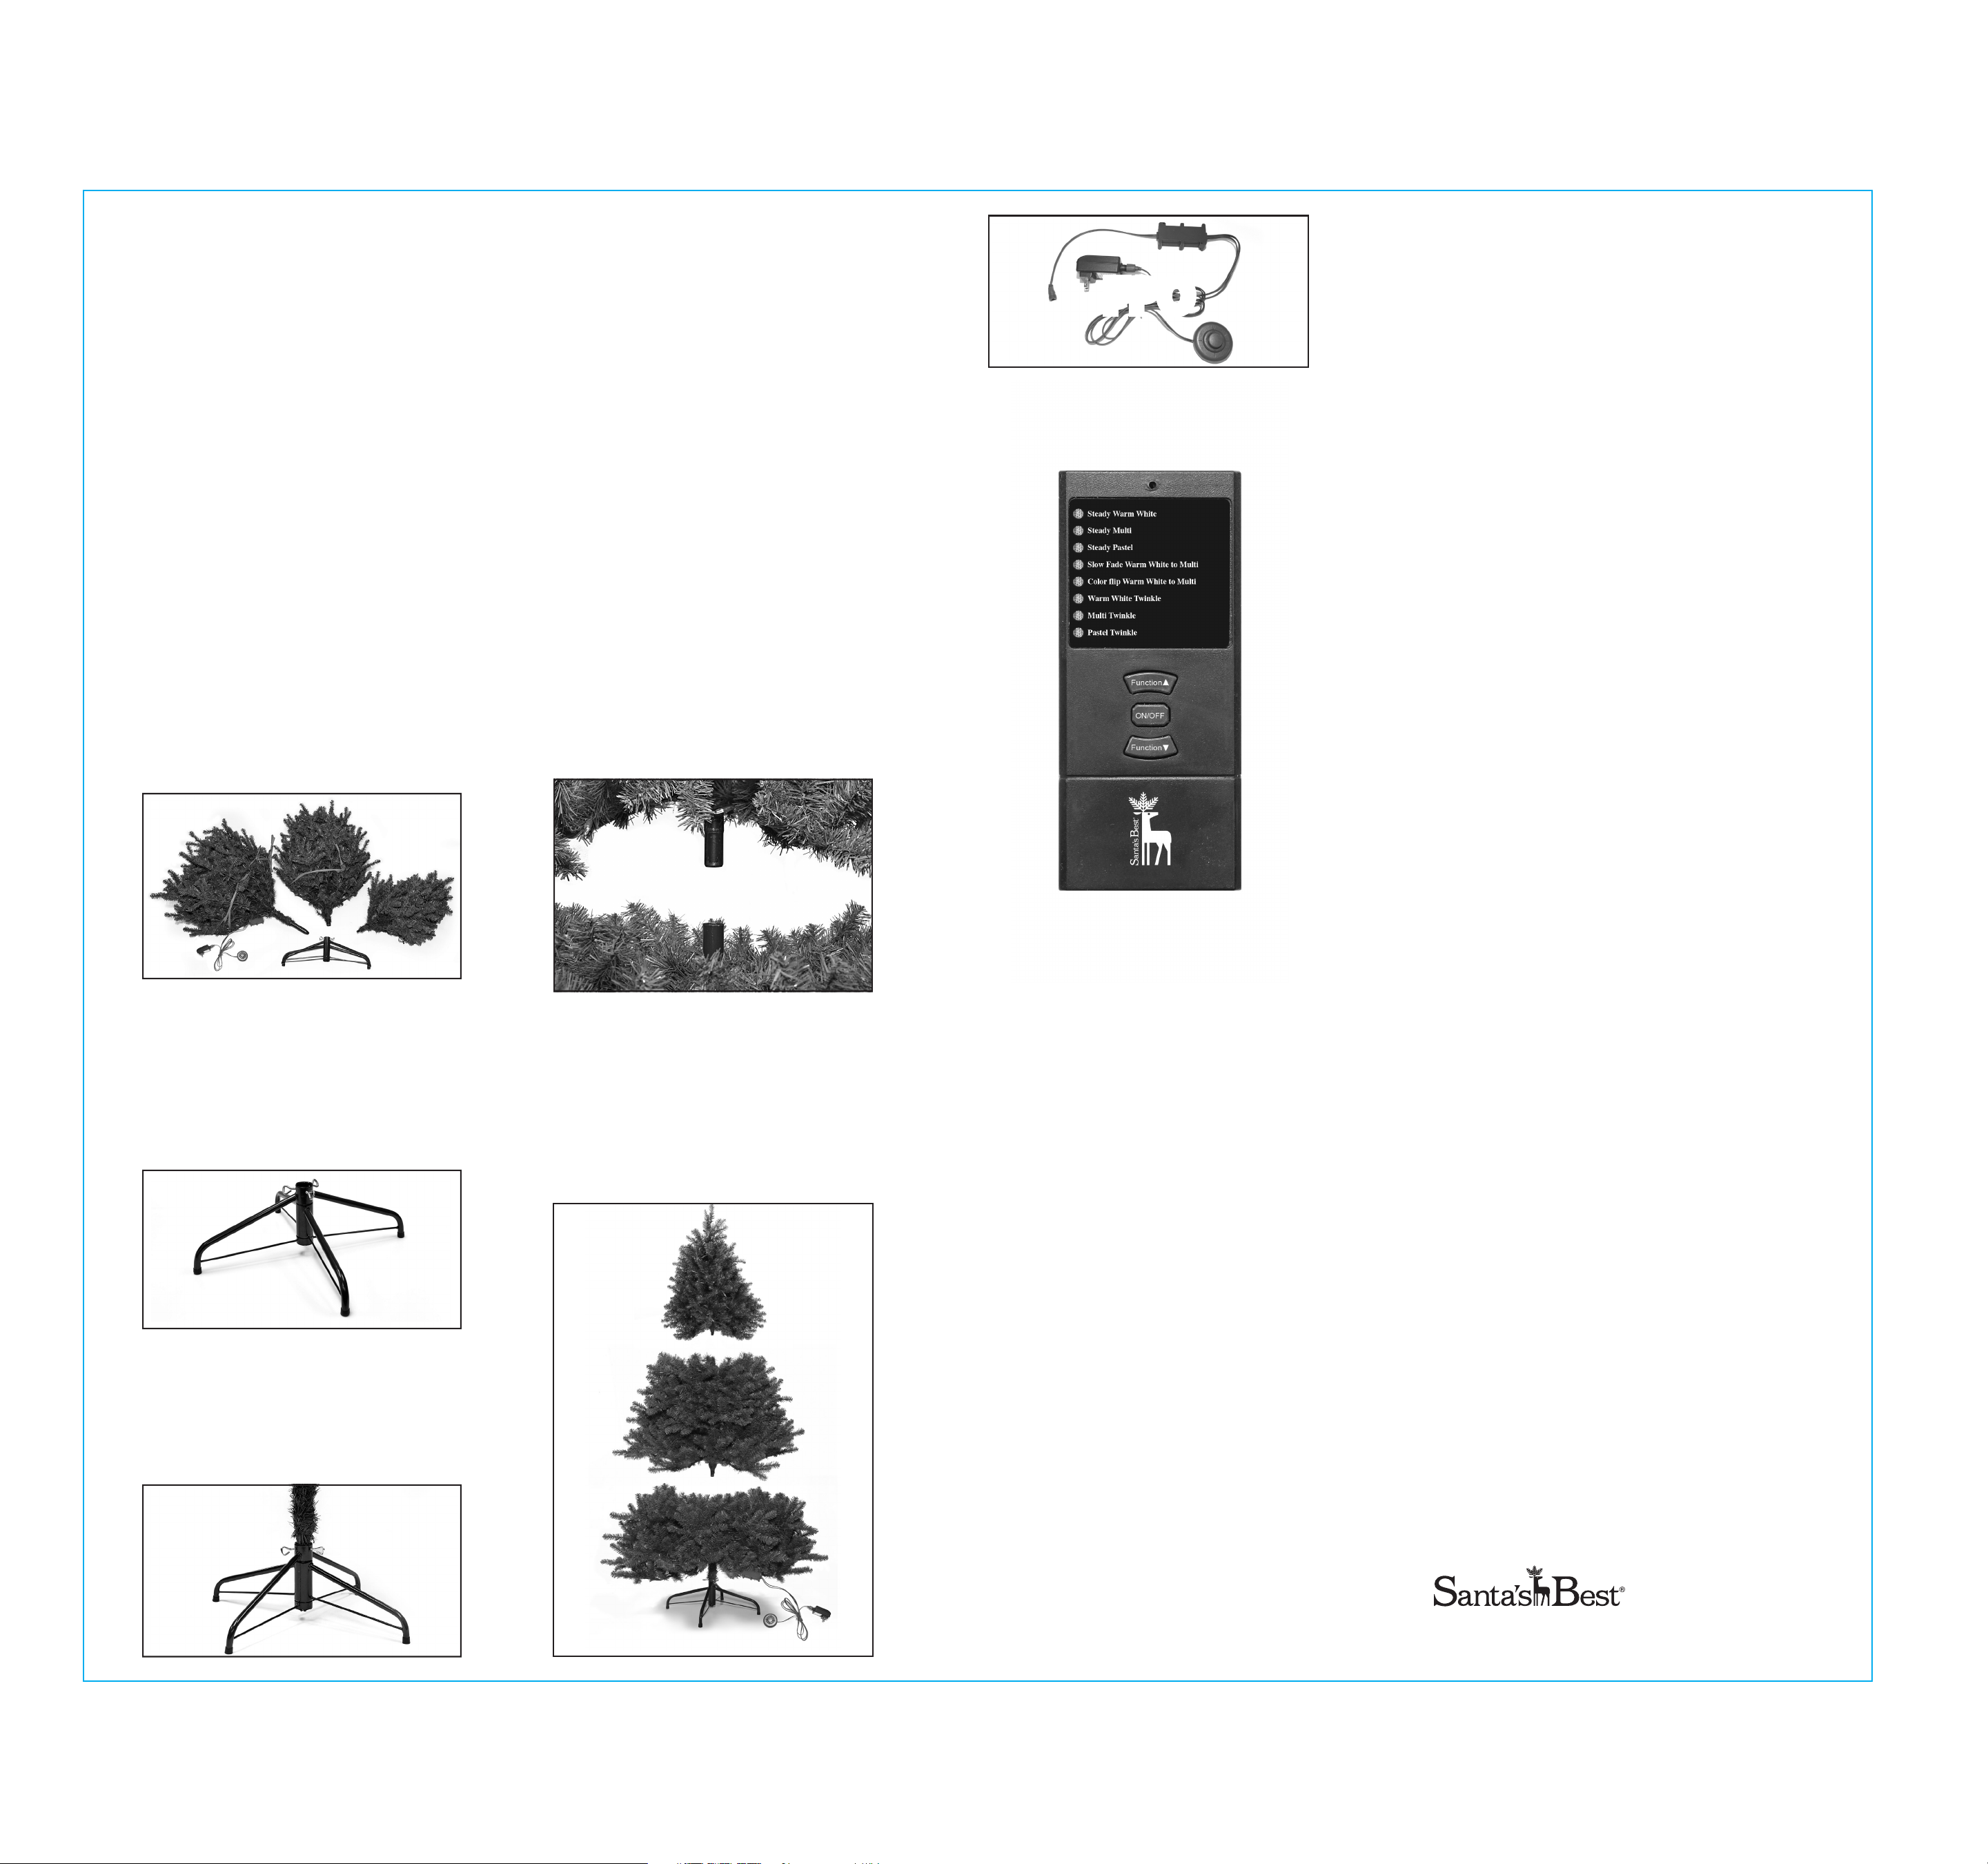
REMOTE CONTROL OPERATION
Included is the remote control that operates the color and
function of your LED pre-lit and pre-shaped Christmas tree (Fig 7).
NOTE: A SPECIALTY NON-REPLACEABLE LED HAS BEEN
APPLIED TO YOUR PRE-LIT TREE; IN THE CASE THAT A
INDIVIDUAL LED BULB BURNS OUT, THE REMAINING LED
BULBS WILL CONTINUE TO STAY LIT.
DISASSEMBLY & STORAGE
1. Gently remove the plug from its electrical outlet, and carefully bind
the cord which contains the on/off push button foot pedal and plug.
2. Beginning with the tree’s top section; lift each section straight up
from the section below, and continue working downward.
NOTE: You may have to slightly wiggle each section as you lift each
section upward.
3. To remove the bottom and final section; loosen the eyebolts by
turning in a counter-clockwise direction and lift section “A” from the
support collar of the tree stand.
4. Gently fold the branches of each section upward, towards the
center, and position in the storage container.
NOTE: With the exception of the tree’s “top” section; by holding
each section upside down; the branches will collapse downward,
due to the hinging, aiding in the packing of each section into the
storage container.
5. Fully unthread the eyebolts from the tree’s stand and fold together;
placing in the storage container.
6. It is recommended to always store the tree in a cool, dry location
protected from excessive exposure to heat or sunlight.
NOTE: Store your remote control in a SAFE & DRY location and
remove the battery from remote control before storage.
NOTE: ALTHOUGH THE LED/RGB LIGHT STRINGS ON THE TREE
ARE RATED FOR INDOOR OR OUTDOOR USE; THE COMBINATION
OF THE TREE WITH THE LED/RGB LIGHTS IS FOR INDOOR USE ONLY.
Fig 1
ASSEMBLY OF THE TREE STAND
1. Remove the tree stand from the plastic bag, loosen the eye
bolt and open the tree stand to form an “X”.
2. Align the holes for the insertion of the remaining (2) eyebolts.
3. Insert each eyebolt and begin threading in a clockwise
direction for a couple of rotations only; leaving enough room
for the tree’s pole from section “A” to be inserted into the
assembled stand (Fig 2).
4. Place the tree stand in its desired location; as once the tree is
fully assembled, it may be too difficult to move and relocate.
Fig 2
10. Once section “B” is fully inserted downward into section “A”;
both section “A” and section “B” will now be lit.
11. Again, carefully cut the nylon strapping bounding the
branches upright; being extremely careful not to cut any of
the exposed light set wires.
12. Now gently guide the branches of section “B” downward into
place.
13. Depending on the height of the tree you have purchased,
you will continue to build your tree upwards, section by
section, following the above steps until the tree is completely
assembled. Each section of the tree is labeled in alphabetical
order beginning from the bottom to the top.
Fig 5
C
Fig 7
15”
Before operation; three (3) standard AAA batteries (R03 or LR03)
must be installed into the remote control; by simply removing
the slide plate located on the back of the remote control.
The LED pre-lit and pre-shaped Christmas tree’s 8 lighting
function capability is controlled solely by the use of the remote
control provided.
NOTE: By reducing the distance from your tree; you may achieve
better remote control reception.
By pressing the Function or ON/OFF button on the remote
control; indicator lights will keep you on track as to the exact
color and function that you are currently on.
By pressing your function buttons up or down on your remote
you can choose between the following 8 Functions:
Steady Warm White
Steady Multi
Steady Pastel
Slow Fade Warm White to Multi
Color Flip Warm White to Multi
Warm White Twinkle
Multi Twinkle
Pastel Twinkle
ASSEMBLY OF THE TREE
1. Locate the bottom section of the tree which is identified by
a label on the outer branches marked “A” (Fig 5).
2. Remove the protective plastic cap from the end of the pole,
(that is pinched to a point), and place that end into the tree
stand. Be sure that the pointed end of the pole extends to
the bottom of the stand.
3. Now tighten the eyebolts evenly on the tree stand; being
careful not to over-tighten (Fig 3).
Fig 3
B
A
Foot Pedal
TROUBLESHOOTING
1. If the tree does not illuminate press the on/off button on your
remote control. If failure to light persists, the battery may need to
be replaced. Insert three (3) standard AAA batteries (R03 or LR03);
aligning the appropriate ( +/- ) markings accordingly.
NOTE: The tree’s 8 function lighting capability is controlled solely
by the use of the remote control provided.
If the tree fails to light due to a damaged or defective remote
control; please resort to manual on/off push button foot pedal
operation until a new remote control can be provided through our
customer service center.
2. If failure to light persists, press the on/off push button foot pedal;
as it may be in the “Off” mode.
3. If the top of the tree or another individual lettered section does
not illuminate, remove each section and then reinsert as
instructed, to ensure the electrical connection is made.
NOTE: The tree’s top is designed specifically for a secure and firm
connection point. Downward force will be needed to ensure that
the electrical connection occurs.
Patents pending.
Made in China Printed in China
This is not a toy, for decorative use only.
Riverwoods, IL 60015 USA
www.santasbest.com
2017 QVC
Slim Frasier Fir Tree Instruction Sheet - 8 Function Remote (Spanish)
Date: 3/3/17
Item # RL50066S-RP79QV (5ft)
RL65066S-RP79QV (6.5ft)
RL75066S-RP79QV (7.5ft)
ÁRBOL DE NAVIDAD PREFORMADO
Y PREILUMINADO
Le agradecemos por su compra de este árbol de Navidad preformado y preiluminado.
Con buen uso y mantenimiento, este árbol le proporcionará
muchos años de placer sin problemas.
Por favor siga las siguientes instrucciones para montar y
desmontar su árbol de manera eficiente.
En caso de que tenga problemas durante el montaje de su árbol;
por favor consulte la sección de “Troubleshooting” de este manual
o llame al número gratis de nuestro centro de servicio al cliente al
1-888-831-6656, y un representante entrenado le asistirá.
Horas de operación del centro de servicio al cliente:
De lunes a viernes: de 8:00 a.m. a 4:30 p.m. CST
Fines de semana vocacionales:
El último fin de semana de noviembre: de 8:00 a.m. a 4:30 p.m. CST
El primer fin de semana de diciembre: de 8:00 a.m. a 4:30 p.m. CST
Le invitamos a visitar nuestro sitio Web a: www.santasbest.com
INSTRUCCIONES PARA EL ENSAMBLAJE:
(Recomendamos llevar ropa apropiada para evitar rasguños
que pueden ocurrir durante el proceso de ensamblaje.)
Desembale cuidadosamente todos los componentes de la caja del
árbol (Fig 1); incluso los componentes de la bolsa de polietileno
que está sujetada a la solapa interior de la caja del árbol.
Spanish translation xxxxxxxxxxxxxxxxxxxxxxxxxxxxxxxxxxxxxx
xxxxxxxxxxxxxxxxxxxxxxxxxxxxxxxxxxxxxxxxxxxxxxxxxxxxx.
Su árbol debe incluir los siguientes componentes:
1 Soporte metálico plegable para árbol con 3 pernos de anilla.
Un interruptor de pie on/off con cable y enchufe (Fig 6); el cual
está sujetado a las sección inferior del árbol (Fig 5).
El árbol de 5’ tendrá (2) secciones de árbol. Los arboles de 6.5’ y
7.5’ tendrán (3) secciones de árbol. (“A”, “B” y “C”, como se
muestra en Fig 5).
El árbol de 9’ tendrá (4) secciones de árbol “A”, “B”, “C” y “D”.
Fig 1
CCT17
4. Corte cuidadosamente la cinta de nilón que mantiene las ramas
juntas y derechas.
ATENCIÓN: Tenga mucho cuidado de no cortar ningún cable de
luz expuesto.
5. Ahora, dirija suavemente cada una de las ramas hacia abajo en
su lugar.
6. Debajo de la fronda de la sección “A” se ubica un interruptor de
pie on/off con cable y enchufe (Fig 6).
Retire el fijador que ata el cable e introduzca el enchufe en un
tomacorriente operativo.
7. Funcionamiento del interruptor de pie on/off:
El interruptor de pie on/off está diseñado sólo para el
funcionamiento manual básico de on/off; y por consiguiente no
tiene capacidad de hacer funcionar las 8 funciones de
iluminación como hace el control remoto. Al oprimir el
interruptor de pie, se reanuda la última función seleccionada
por el control remoto provisto. La próxima presión del
interruptor de pie dejará el árbol en modo “off”.
NOTA: Cuando el árbol se apague utilizando el interruptor de
pie, el control remoto o desenchufándolo del tomacorriente;
cuando se vuelva a encender el árbol se reanuda la memoria de
la última función de iluminación seleccionada el control remoto.
T ecnología del conector de alimentación EZ-POWER™
NOTA: Su árbol ha sido diseñado con la tecnología del conector
de alimentación EZ-Power™; permitiendo que cada sección del
árbol que queda se ilumine automáticamente, cuando se inserte
cada sección marcada con letra firmemente (Fig 5).
8. Localice la sección siguiente del árbol, identificada con una
etiqueta que se encuentra sobre las ramas exteriores marcadas
con la “B” (Fig 5).
9. Retire el capuchón protector de plástico del extremo del eje de
la sección “B”; coloque este extremo sobre la parte superior del
eje de la sección “A” (Fig 4).
Fig 4
18”
RL90066S-RP79QV (9ft)
Fig 6
FPOFPO
FUNCIONAMIENTO DEL CONTROL REMOTO
Se incluye el control remoto que hace funcionar el color y la función de
su árbol de Navidad LED pre-iluminado y pre-formado (Fig 7).
NOTA: SPANISH TRANSLATION XXXXXXXXXXXXXXXXXXXXX
XXXXXXXXXXXXXXXXXXXXXXXXXXXXXXXXXXXXXXXXXXX
XXXXXXXXXXXXXXXXXXXXXXXXXXXXXXXXXXXXXXXXXXX
XXXXXXXXXXXXXXXXXXXXXXXXXXXXXXXXXXXXXXX
DESMONT AJE Y ALMA CENAMIENT O
1. Retire suavemente el enchufe del tomacorriente, y ate con cuidado el
cordón que contiene el interruptor de pie on/off y el enchufe.
2. Comenzando con la sección superior del árbol, levante cada una de
las secciones directamente hacia arriba y quitándolas de la sección
de abajo y continúe trabajando hacia abajo.
NOTA: Es posible que necesite mover cada sección ligeramente
mientras levantándola hacia arriba.
3. Para quitar la sección inferior y última, afloje Los pernos de anilla
girándolos hacia la izquierda y hale la sección “A” hacia arriba del
soporte para el árbol.
4. Pliegue suavemente las ramas de cada una de las secciones hacia
arriba y hacia el centro y colóquelas en la caja de almacenamiento.
NOTA: Con la excepción de la sección superior del árbol, si sostiene
cada sección boca abajo, las ramas se plegarán hacia abajo debido a
las bisagras. Esta característica le ayudará a colocar cada sección en
la caja de almacenamiento.
5. Desenrosque completamente los pernos de anilla en el soporte para
el árbol y pliéguelo; colocándolo en la caja de almacenamiento.
6. Siempre recomendamos guardar el árbol en un lugar fresco, seco y
protegido contra una exposición excesiva del calor o de la luz del sol.
NOTA: Guarde su control remoto en un lugar seguro y seco y retire la
batería antes de guardarlo.
NOTA: AUNQUE LOS ENSAMBLES DE LUCES LED DEL ÁRBOL
ESTÁN CLASIFICADOS PARA SER UTILIZADOS EN INTERIORES
O EXTERIORES; LA COMBINACIÓN DEL ÁRBOL Y LUCES LED
SE UTILIZAR SOLAMENTE EN INTERIORES.
ENSAMBLAJE DEL SOPORTE PARA EL ÁRBOL
1. Retire la base del árbol de la bolsa de plástico, afloje el perno de
argolla y abra la base del árbol para formar un “X”.
2. Alinee los agujeros para insertar los (2) pernos de argolla
restantes.
3. Inserte cada uno de los pernos de anilla y enhébrelos solamente
con algunas vueltas en el sentido del reloj. Deje un espacio
suficiente para insertar el eje del árbol dentro del soporte (Fig 2).
4. Coloque el soporte para el árbol en el lugar deseado, ya que
después del ensamblaje completo del árbol, puede ser difícil
desplazarlo a un lugar diferente.
Fig 2
10. Una vez que la sección “B” está insertada completamente hacia
abajo, dentro de la sección “A”, ambas secciones “A” y “B” estarán
ahora iluminadas.
11. Otra vez, corte cuidadosamente la cinta de nilón que mantiene
las ramas juntas y derechas; teniendo mucho cuidado de no
cortar ningún cable de luz expuesto.
12. Ahora, dirija suavemente cada una de las ramas de la sección “B”
hacia abajo en su lugar.
13. Según la altura del árbol que compró, continuará armando su
árbol hacia arriba (sección por sección) de la misma manera.
Siga los pasos de arriba, hasta que esté completado. Cada una
de las secciones del árbol tiene una etiqueta en orden
alfabético, desde la parte inferior hacia la parte superior (Fig 5).
Fig 5
C
Fig 7
Spanish translation xxxxxxxxxxxxxxxxxxxxxxxxxxxxxxxxxxxxxxxx
xxxxxxxxxxxxxxxxxxxxxxxxxxxxxxxxxxxxxxxxxxxxx; simplemente
retire la placa lateral ubicada en la parte posterior del control
remoto.
La capacidad de 8 funciones del árbol de navidad LED
pre-iluminado y pre-formado se controla sólo mediante el
control remoto provisto.
NOTA: Reduciendo su distancia del juego de luces; es posible
lograr mejor recepción.
Con tan solo pulsar el botón de Función o Encender / Apagar del
control remoto; luces indicadoras indicarán el color y la función
exactos que están funcionando.
Spanish translation xxxxxxxxxxxxxxxxxxxxxxxxxxxxxxxxxxxxxxxx
xxxxxxxxxxxxxxxxxxxxxxxxxxxxxxxxxxxxxxxx:
Spanish translation xxxxxxx
Spanish translation xxxxxxx
Spanish translation xxxxxxx
Spanish translation xxxxxxx
Spanish translation xxxxxxx
Spanish translation xxxxxxx
Spanish translation xxxxxxx
Spanish translation xxxxxxx
15”
ENSAMBLAJE DEL ÁRBOL
1. Identifique la sección inferior del árbol que tiene una etiqueta
sobre las ramas exteriores y marcada con una “A” (Fig 5).
2. Quite el capuchón protector de plástico del extremo del eje, (en
forma de punta) y coloque este extremo dentro del soporte
para el árbol. Asegúrese de que el extremo puntiagudo del eje
alcance la parte inferior del soporte.
3. Ahora apriete los pernos de argolla de manera uniforme en la
base del árbol; cuidado de no apretarlos de forma excesiva (Fig 3).
Fig 3
B
A
Pedal
PROBLEMAS / SOLUCIONES
1. Spanish translation xxxxxxxxxxxxxxxxxxxxxxxxxxxxxxxxxxxxxxxxxxx
xxxxxxxxxxxxxxxxxxxxxxxxxxxxxxxxxxxxxxxxxxxxxxxxxxxxxxxxxxxxx
xxxxxxxxxxxxxxxxxxxxxxxxxxxxxxxxxxxxxxxxxxxxxxxxxxxxxxxxxxxxx
(R03 or LR03), haciendo coincidir correctamente las marcas de
polaridad (+ / -) correspondientes.
NOTA: a capacidad de 8 funciones de iluminación del árbol se
controla solamente utilizando el control remoto provisto.
Si el árbol no se ilumina debido a un control remoto dañado o
defectuoso; por favor utilice el interruptor de pie manual hasta que
nuestro centro de servicio al cliente pueda proporcionarle un
control remoto nuevo.
2. Si la luz todavía no se enciende, oprima el interruptor de pie on/off;
como puede que esté en modo “Off”.
3. Si la parte superior del árbol u otra sección marcada con letra no se
enciende, retire cada sección y vuelva a colocarla como se indica,
para asegurarse de que la conexión eléctrica se establezca.
NOTA: La parte superior del árbol está diseñado específicamente para
ser un punto de conexión seguro y firme. Se necesita aplicar fuerza hacia
abajo para asegurarse de que se establezca la conexión eléctrica.
Patentes pendientes.
Hecho en China Impreso en China
No es un juguete – solamente para uso decorativo.
Riverwoods, IL 60015 USA
www.santasbest.com
 Loading...