

Page 1
MOD100E
WELLS MANUFACTURING
265 Hobson Street, Smithville, Tennessee 37166
telephone: 314-678-6314
fax: 314-781-2714
www.wells-mfg.com
OWNERS MANUAL
BUILT-IN
SINGLE WELL
MODULAR
WARMERS
with
THERMOSTAT & DIGITAL
ELECTRONIC CONTROL
MODELS
MOD100T, TD, TDWA
MOD100E, ED, HE
MOD100HT, HTD
MOD127TD, TDWA
011C
Includes
INSTALLATION
USE & CARE
EXPLODED VIEW
PARTS LIST
WIRING DIAGRAM
MOD100T
IMPORTANT: DO NOT DISCARD THIS MANUAL
This manual is considered to be part of the appliance and is to be given to the OWNER or
MANAGER of the restaurant, or to the person responsible for TRAINING OPERATORS of
this appliance. Additional manuals are available from your WELLS DEALER.
THIS MANUAL MUST BE READ AND UNDERSTOOD BY ALL PERSONS USING OR
INST ALLING THIS APPLIANCE. Contact your WELLS DEALER if you have any
questions concerning installation, operation or maintenance of this equipment.
2M-308017 Rev. C
03/18
Page 2
LIMITED EQUIPMENT WARRANTY
Wells Manufacturing warranties new products to be free from defects
in material and/or workmanship for a period of one [1] year from the
date of original installation, except as noted below. Defects that occur
as a result of normal use, within the time period and limitations defined
in this warranty, will at Wells’ discretion have the parts replaced or
repaired by Wells or a Wells-authorized service agency.
THIS WARRANTY IS SUBJECT TO ALL LISTED CONDITIONS.
Repairs performed under this warranty are to be performed by a Wellsauthorized service agency. Wells will not be responsible for charges
incurred or service performed by non-authorized repair agencies.
In all cases, the nearest Wells-authorized service agency must be used.
Wells will be responsible for normal labor charges incurred in the repair
or replacement of a warrantied product within 50 miles (80.5 km) of
an authorized service agency. Time and expense charges for anything
beyond that distance will be the responsibility of the owner. All labor
will need to be performed during regular service hours. Any overtime
premium will be charged to the owner. For all shipments outside the
U.S.A. and Canada, please see the International Warranty for specific
details.
It is the responsibility of the owner to inspect and report any shipping
damage claims, hidden or otherwise, promptly following delivery.
No mileage or travel charges will be honored on any equipment that is
deemed portable. In general, equipment with a cord and plug weighing
less than 50 lb. (22.7 kg) is considered portable and should be taken or
shipped to the closest authorized service agency, transportation prepaid .
CO NTAC T
Should you require any assistance regarding the operation or
maintenance of any Wells equipment; write, phone, fax or email
our service department. In all correspondence mention the
model number and the serial number of your unit, as well as
the voltage or type of gas you are using.
Business hours are 8:00 a.m. to 4:30 p.m. Central Standard Time
Telephone 314.678.6314
Fax 314.781.2714
Email [email protected]
www.wells-mfg.com
ANTY EXCLUSIONS
WARR
THE FOLLOWING WILL NOT BE COVERED UNDER WARRANTY.
• Any product which has not been installed, cleaned, maintained, or
used in accordance with the directions published in the appropriate
installation sheet and/or owner’s manual as well as national and local
codes, including incorrect gas or electrical connection. Wells is not liable
for any unit which has been mishandled, abused, misapplied, subjected
to chlorides, harsh chemicals, or caustic cleaners, damaged from
exposure to hard water, modified by unauthorized personnel, damaged
by flood, fire, or other acts of nature [or God], or which have an altered
or missing serial number.
• Installation, labor, and job checkouts, calibration of heat controls,
air and gas burner/bypass/pilot adjustments, gas or electrical
system checks, voltage and phase conversions, cleaning
of equipment, or seasoning of griddle surface.
• Replacement of fuses or resetting of circuit breakers, safety
controls, or reset buttons.
• Replacement of broken or damaged glass components, quartz heating
elements, and light bulbs.
• Labor charges for all removable parts in gas charbroilers and
hotplates, including but not limited to burners, grates, and
radiants.
• Any labor charges incurred by delays, waiting time, or operating
restrictions that hinder a service technician’s ability to perform service.
• Parts that fail or are damaged due to normal wear or labor for
replacement of Items that can easily be replaced during a daily
cleaning routine. such as but not limited to silicone belts, PTFE nonstick sheets, knobs, control labels, bulbs, fuses, quartz heating
elements, baskets, racks, and grease drawers.
• Components that should be replaced when damaged or worn, but have
been field-repaired instead [eg. field-welded fry pots].
• Any loss of business or profits.
ADDITIONAL WARRANTIES
Specialty/chain specific versions may also have additional and/or
extended warranties.
PRODUCTS PARTS LABOR
universal ventless hoods 2 years 1 year
canopy hoods 2 years 1 year
“Cook’n Hold” equipment [HW10,
HWSMP, LLSC7, LLSC7WA, LLSC11,
2 years 1 year
an d LLSC 1 1WA]
cast iron grates, burners, and burner
shields
original Wells parts sold to repair
Wells equipment
1 year
90 days
Service First 1 year
The fore going warrant y is in lieu of any and a ll other warranti es expresse d or implied and c onstitutes the e ntire warranty. 2M-Z22393 • Rev A • 02.2018
Page 3
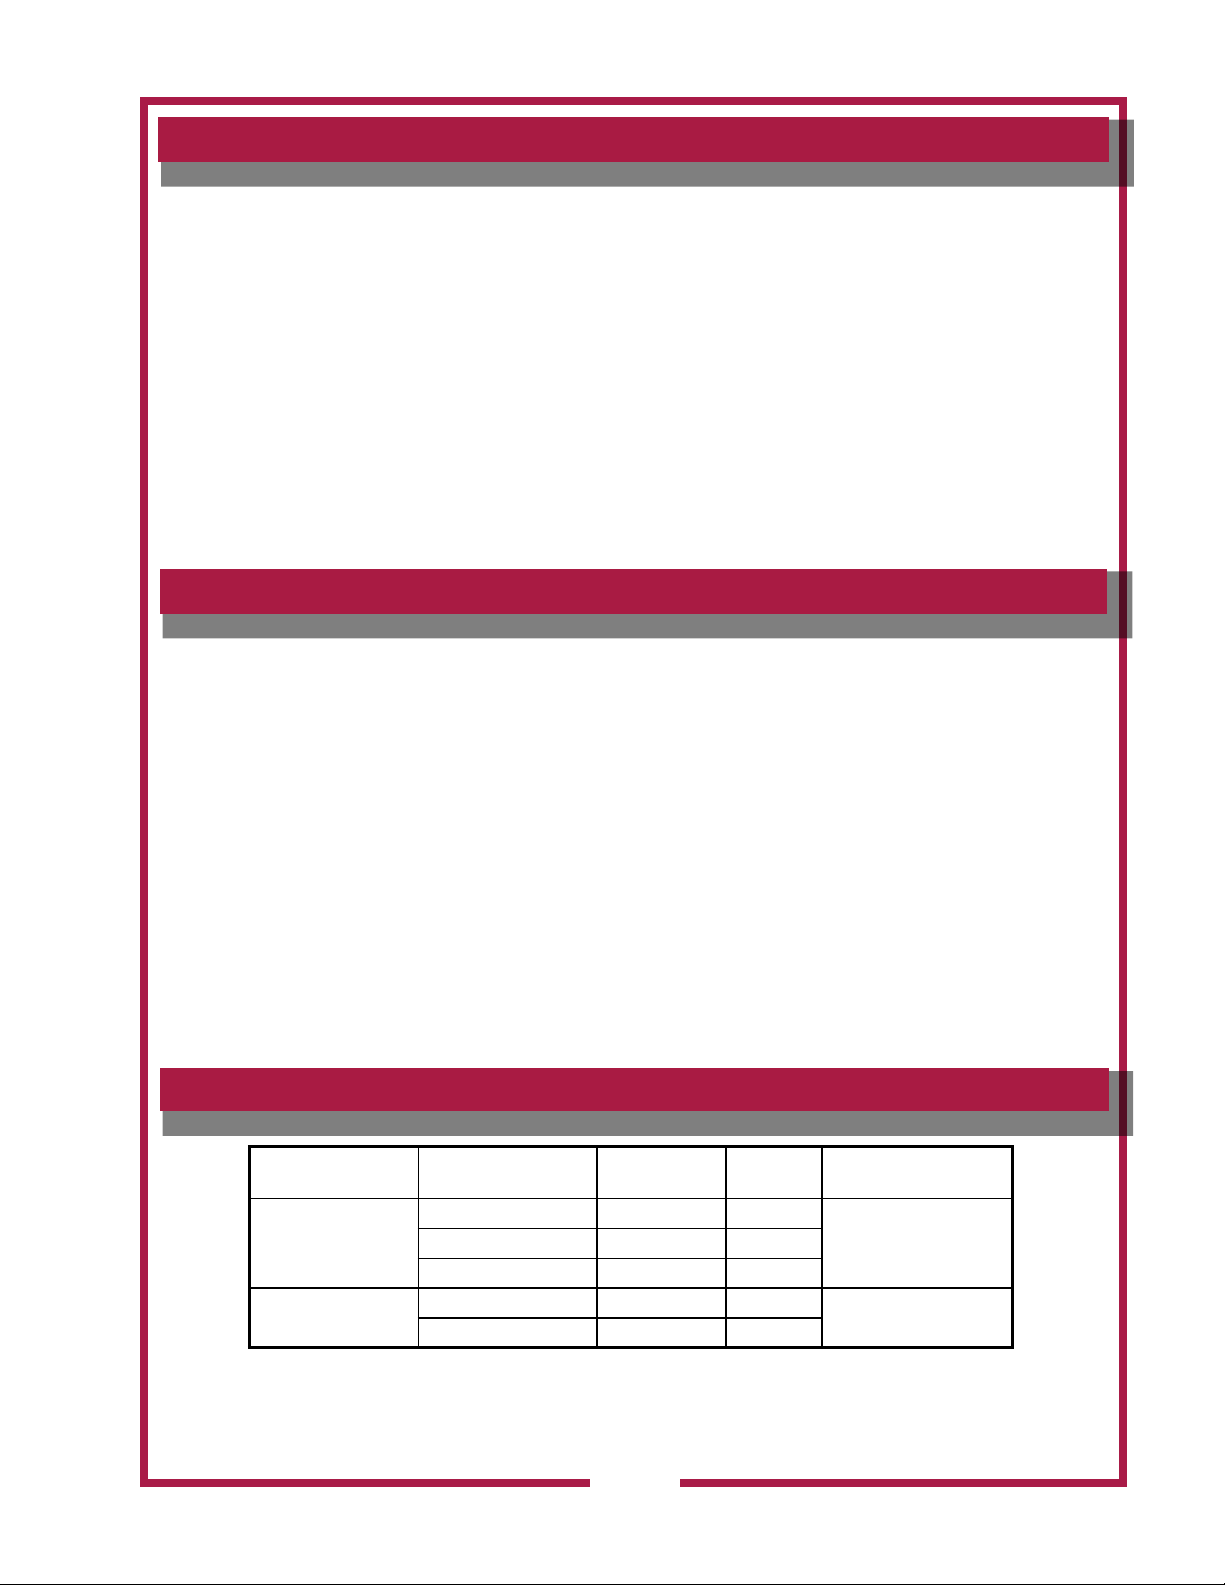
TABLE OF CONTENTS
WARRANTY
FEATURES & OPERATING CONTROLS 2
PRECAUTIONS & GENERAL INFORMATION 3
AGENCY LISTING INFORMATION 3
INSTALLATION 4
OPERATION 6
MAINTENANCE INSTRUCTIONS 7
CLEANING INSTRUCTIONS 8
TROUBLESHOOTING SUGGESTIONS 10
EXPLODED VIEW & PARTS LIST 12-16
WIRING DIAGRAM 17
PARTS & SERVICE 20
CUSTOMER SERVICE DATA 21
INTRODUCTION
Thank You for purchasing this Wells Manufacturing appliance.
Proper installation, professional operation and consistent maintenance of this appliance will ensure that it
gives you the very best performance and a long, economical service life.
This manual contains the information needed to properly install this appliance, and to use and care for the
appliance in a manner which will ensure its optimum performance.
SPECIFICATIONS
2M-308017-011C Built-In Single Well Modular Warmer w/T-Stat Control
MODEL VOLTS AMPS WATTS
MOD100T,
MOD100TD
MOD127TD
120 VAC 1ø 13.8A 1600W
240 VAC 1ø 6.9A 1600W
208 VAC 1ø 6.0A 1240W
240 VAC 1ø 6.9A 1600W
1
POWER SUPPLY
CORD
NOT SUPPLIED208 VAC 1ø 6.0A 1240W
NOT SUPPLIED
Page 4
FEATURES & OPERATING CONTROLS
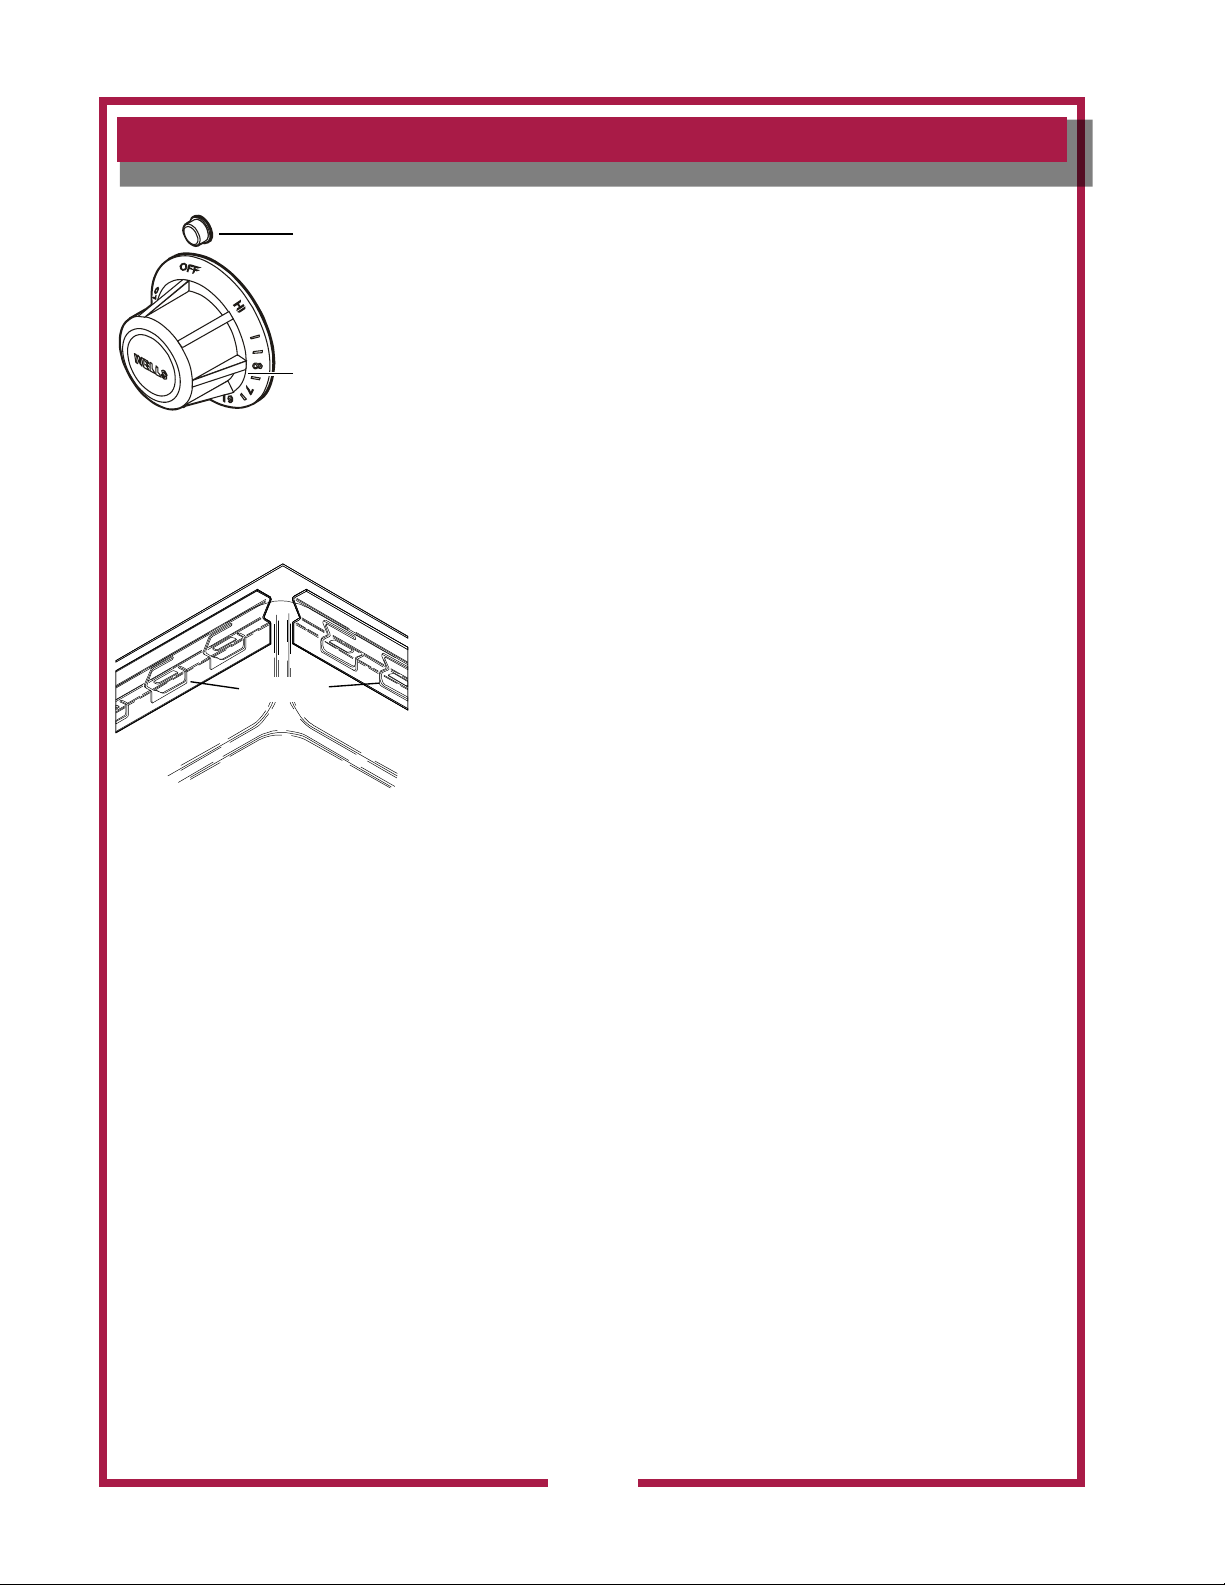
A. THERMOSTAT
INDICATOR
LIGHT
TEMPERATURE
CONTROL
KNOB
WELLSLOKS
IL2468
1. On thermostatically controlled warmers, power is applied to the
heating element according to the control knob position and the
actual temperature at the temperature sensing thermobulb.
2. The desired temperature is controlled by rotating the temperature
control knob. The knob has a numeric scale, where higher
numbers correspond to higher temperature.
3. On warmers equipped with an indicator light, the light will glow
when the thermostat is calling for heat (i.e. the element is
energized).
4. The TEMPERATURE CONTROL KNOB will rotate approximately
300º, and will reach a “stop” at both ends.
The OFF position is marked.
NOTE: The dial position is an indication of the temperature setting.
Actual temperature will vary depending upon the type of product
and food consistency.
B. MOUNTING
1. MOD-series built-in warmers may are equipped with wellsloks,
uniquely designed turnout tabs which help secure the warmer top
ange to the countertop.
2. See the Installation Instructions, supplied with the particular
appliance, for details.
IL2469
C. DRAINS
1. Sufx “D” units (e.g. MOD-300TD) have drains for each pan,
with each pan having an individual drain valve.
2M-308017-011C Built-In Single Well Modular Warmer w/T-Stat Control
2
Page 5
PRECAUTIONS AND GENERAL INFORMATION
This appliance is intended for use in commercial establishments only.
This appliance is intended to hold pre-heated food for human
consumption. No other use is recommended or authorized by the
manufacturer or its agents.
Operators of this appliance must be familiar with the appliance use,
limitations and associated restrictions. Operating instructions must be
read and understood by all persons using or installing this appliance.
Cleanliness of this appliance is essential to good sanitation. Read and
follow all included cleaning instructions and schedules to ensure the
safety of the food product.
Disconnect this appliance from electrical power before performing any
maintenance or servicing.
This appliance is not jet stream approved. Do not direct water jet or
steam jet at this appliance, or at any control panel or wiring.
Do not splash or pour water on, in or over any controls, control panel or
wiring.
Exposed surfaces of this appliance can be hot to the touch and may
cause burns.
Do not operate this appliance if the control panel is damaged. Call
your Authorized Wells Service Agent for service.
The technical content of this manual, including any wiring diagrams,
schematics, parts breakdown illustrations and/or adjustment
procedures, is intended for use by qualied technical personnel.
Any procedure which requires the use of tools must be performed by a
qualied technician.
This manual is considered to be a permanent part of the appliance.
This manual and all supplied instructions, diagrams, schematics,
parts breakdown illustrations, notices and labels must remain with the
appliance if it is sold or moved to another location.
This appliance is made in the USA. Unless otherwise noted, this
appliance has American sizes on all hardware.
WARNING:
SHOCK HAZARD
All servicing requiring
access to non-insulated
electrical components must
be performed by a factory
authorized technician.
DO NOT open any access
panel which requires the use
of tools. Failure to follow this
warning can result in severe
electrical shock.
CAUTION:
RISK OF
DAMAGE
DO NOT connect or energize
this appliance until all
installation instructions are
read and followed. Damage
to the appliance may result
if these instructions are not
followed.
CAUTION:
HOT SURFACE
Exposed surfaces can be hot
to the touch and may cause
burns.
AGENCY LISTING INFORMATION
Refer to the product nameplate for the specic appliance for agency
listings. In general:
2M-308017-011C Built-In Single Well Modular Warmer w/T-Stat Control
This appliance conforms to NSF Standard 4 for sanitation only if
installed in accordance with the supplied Installation Instructions.
UL Listed warmers are
U Listed under UL File E6070.
3
STD 4
E6070
UL Listed Warmers
Page 6
INSTALLATION
NOTE: DO NOT discard
the carton or other packing
materials until you have
inspected the appliance for
hidden damage and tested it
for proper operation.
Refer to SHIPPING DAMAGE
CLAIM PROCEDURE on
the inside front cover of this
manual.
WARNING:
RISK OF INJURY
Installation procedures must
be performed by a qualied
technician with full knowledge
of all applicable electrical and
plumbing codes. Failure can
result in personal injury and
property damage.
CAUTION
FIRE HAZARD
Avoid storing ammable or
combustible materials in, on
or near the appliance.
IMPORTANT: For warmers
installed in plastic counter
tops, the counter material
must be protected from the
heat of the warmer in order to
prevent discoloration and/or
deterioration. Wellsloks are
not suitable for this purpose.
The installer should contact
the manufacturer or distributor
of the countertop material for
specic instructions.
IMPORTANT: Wellslok
Extension Kits must be used
ONLY with UL Listed warmers
approved for installation in
wood counter tops. Refer to
the Installation Instructions
provided with the warmer.
UNPACKING & INSPECTION
Carefully remove the appliance from the carton. Remove all protective
plastic lm, packing materials and accessories from the Appliance
before connecting electrical power or otherwise performing any
installation procedure.
Carefully read all instructions in this manual and the Installation
Instruction Sheet packed with the appliance before starting any
installation.
Read and understand all labels and diagrams attached to the
appliance.
Carefully account for all components and accessories before discarding
packing materials. Store all accessories in a convenient place for later
use.
INSTALLATION NOTES
1. Installation and start up of built-in warmers MUST be performed
by an authorized installation company.
2. It is the responsibility of the installer to verify that this warmer
installation is in compliance with the specications listed in this
manual and on the specication sheet provided.
3. It is the RESPONSIBILITY OF THE INSTALLER to check with the
authority having jurisdiction, in order to verify that this warmer
installation is in compliance with local code requirements.
4. Water supply and drain installation must meet all applicable local,
state and federal plumbing codes and ordinances.
5. Refer to Installation Instructions included with the warmer for
Underwriters Laboratories conditions of acceptability, electrical
requirements and other installation concerns.
BUILT-IN WARMERS
1. This is a GENERAL GUIDE. For specic cutout dimensions
and other installation details, refer to the Installation Instructions
supplied with the warmer.
2. Cutout dimensions for warmer units and control panels are listed
on the Installation Instructions provided with the warmer.
NOTE: Verify the dimensions are correct for the installation before
making the cutout.
2M-308017-011C Built-In Single Well Modular Warmer w/T-Stat Control
4
Page 7
INSTALLATION
3. For “top-mounted” warmers (i.e. warmers mounted from above
the counter top):
a. Verify that provided sealants are applied to the underside
of the warmer top ange prior to setting the unit into the cutout.
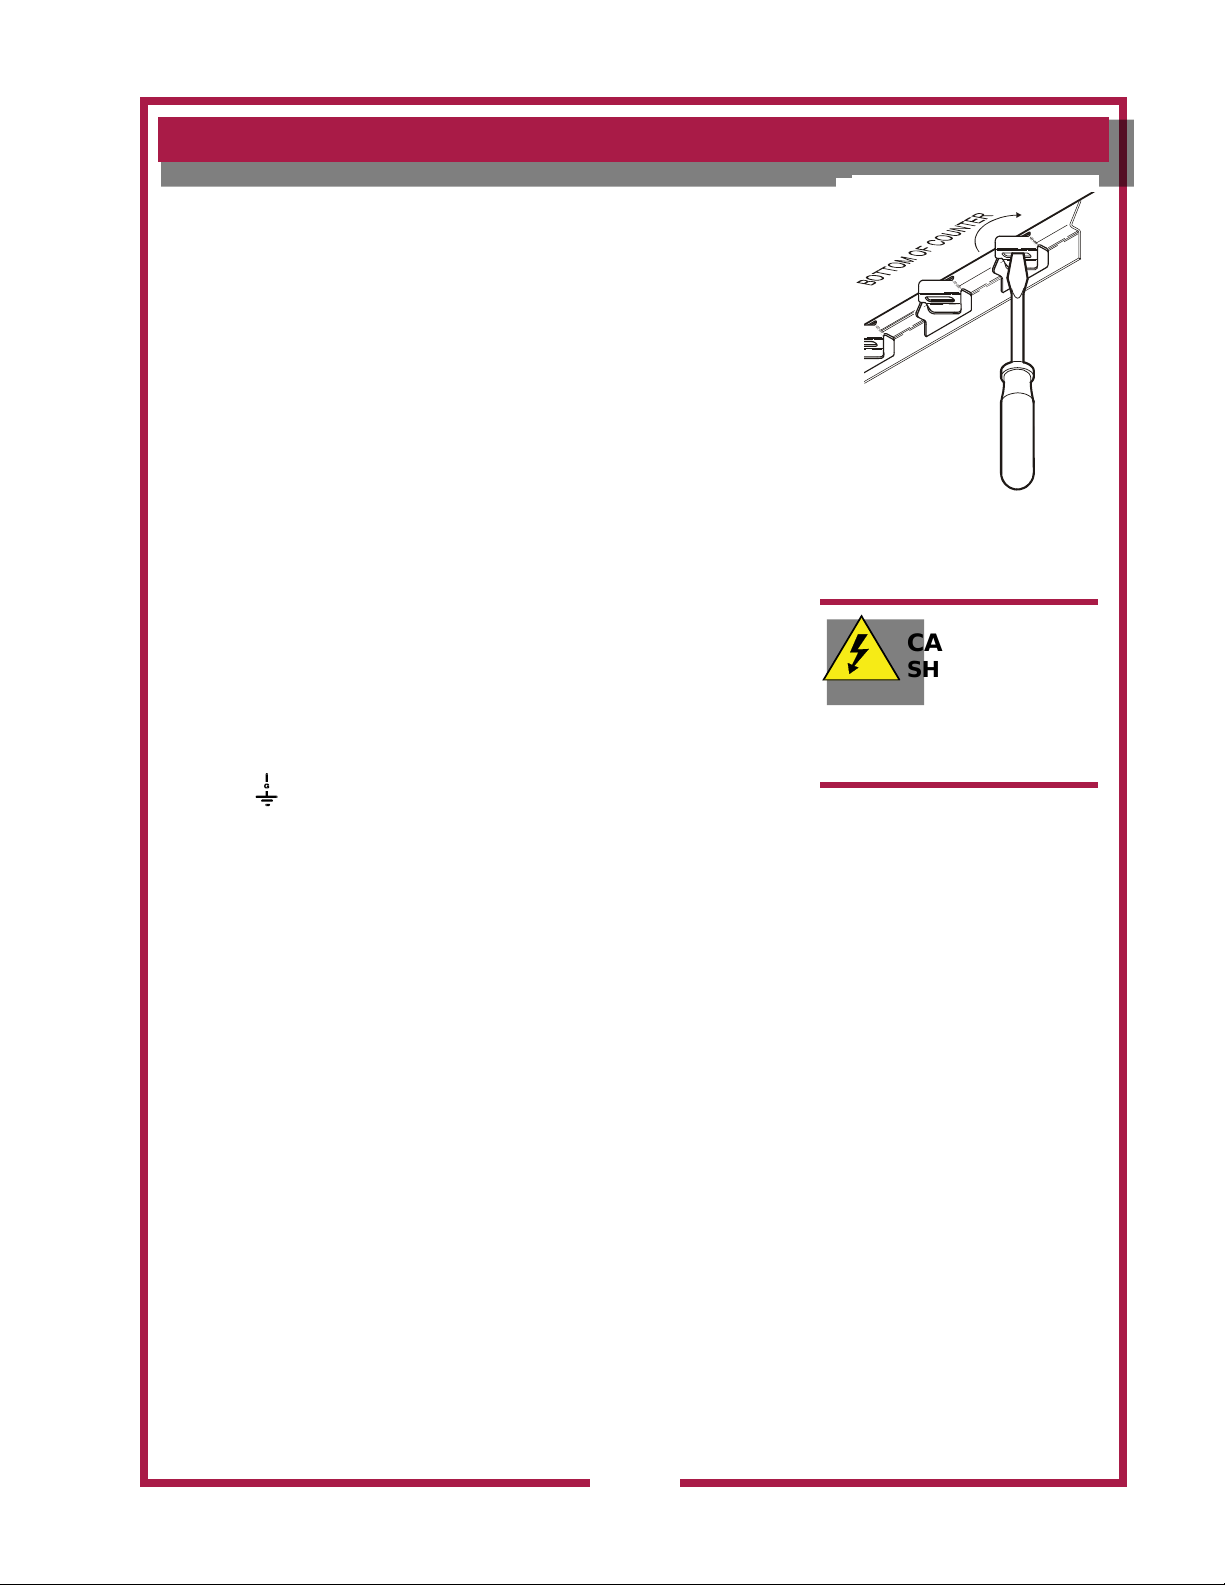
b. After installation, verify that the tabs on the Wellsloks are turned
out to lock the warmer into the counter
c. Apply a thin bead of food-grade silicone sealant around the ange
to seal it to the counter.
d. Wellslok extension kits are available for installing warmers in
counter tops where the standard Wellslok would not normally
reach. The extension kit will adapt to counter tops up to 1¾” thick.
ELECTRICAL INSTALLATION
1. Refer to the product nameplate. Verify the electrical service
power. Voltage and phase must match the nameplate
specications. Wiring the warmer to the wrong voltage can
severely damage the unit or cause noticeably decreased
performance.
2. Available electrical service amperage must meet or exceed the
specications listed on the specication sheet provided with the
warmer.
3. Warmer and control unit must be connected to an appropriate
building ground. Ground connection will be marked “GND” or
” “ .
NOTE: Wire gauge, insulation type and temperature rating , as
well as type, size and construction of conduit, must meet or exceed
applicable specications of local codes and of the National
Electrical Code.
PLUMBING INSTALLATION
For use in the State of Massachusetts, this appliance must be
installed in compliance with Massachusetts Fuel Gas and
Plumbing Code CMR 248.
1. IMPORTANT: All plumbing installations must be performed by
a qualied plumber.
2. For units equipped with a DRAIN LINE: Some jurisdictions may
require an approved air gap or other back-ow prevention device
in the drain. It is the responsibility of the plumber to determine
2M-308017-011C Built-In Single Well Modular Warmer w/T-Stat Control
such requirement, to provide and properly install the required
device.
NOTE: Damage caused
by leaks due to improper
installation is NOT covered by
warranty.
CAUTION:
SHOCK HAZARD
The ground lug of this
appliance must be connected
to a suitable building ground.
IMPORTANT:
Contact a licensed electrician
to install and connect electrical
power to the appliance.
IMPORTANT:
Damage due to being
connected to the wrong
voltage or phase is NOT
covered by warranty.
IMPORTANT: Electrical
installation other than as
specied on the specication
sheet will void the UL listing,
and may void the warranty.
NOTE: Plumb connections
must be made in compliance
with all Federal, State and
Local Plumbing Codes and
Ordinances.
5
Page 8
OPERATION
CAUTION:
HOT SURFACE
Exposed surfaces can be hot
to the touch and may cause
burns.
CAUTION:
SHOCK HAZARD
DO NOT splash or pour water
onto control panel or wiring.
Always use an inset.
DO NOT place food directly
into the warmer.
Always pour hot water into the
warmer before it is preheated.
DO NOT pour water into a
dry, heated warmer. This may
damage the unit.
DO NOT put ice into a
warmer pan. This will cause
condensation on the inside of
the warmer. Damage caused
by condensation is NOT
covered by warranty.
Stir thick food items frequently
to keep food heated uniformly.
WET OR DRY OPERATION for WARMERS
1. Carefully read the description of the warmer operation on the
specication sheet.
2. a. Most warmers are designed for WET OR DRY operation.
b. Warmers may be used wet, or may be used dry. However
warmers may NOT be used wet-to-dry or dry-to-wet unless they
have been allowed to cool to room temperature between the
change in wet or dry operation.
c. Wells Manufacturing recommends operating WET for consistent
food heating.
d. If your wet-operation warmer is allowed to run dry, turn it OFF and
allow to cool to room temperature before adding water.
3. If the warmer is to be used for WET operation, add approximately
1” of hot tap water before turning the warmer ON. Use of hot water
will allow a faster preheat.
a. Check the water level frequently and add hot water as necessary
to prevent the warmer from running dry. Do not add water to the
warmer if it has run dry.
b. If your wet-operation warmer is allowed to run dry, turn it
OFF and allow to cool to room temperature before adding water.
4. Damage caused by allowing a wet-operation warmer to run dry,
is NOT covered by warranty. Damage caused by adding water
to a dry warmer when hot is NOT covered by warranty.
PRE-HEATING THE WARMER
1. Place desired pan(s) or inset(s) with appropriate adapter top on
warmer.
a. Insets are available as accessories in 2½ qt., 4qt., 7 qt., and 11 qt.
sizes with lids and adapter tops.
b. For dry operation, a 6” deep pan or inset is recommended.
2. Turn temperature control to HI or highest temperature setting.
3. Allow warmer to preheat for approximately 30 minutes, then set
the control for the desired temperature. Be sure to keep the warmer
covered during preheat and operation.
Keep insets covered to
maintain food quality and
temperature.
2M-308017-011C Built-In Single Well Modular Warmer w/T-Stat Control
6
Page 9
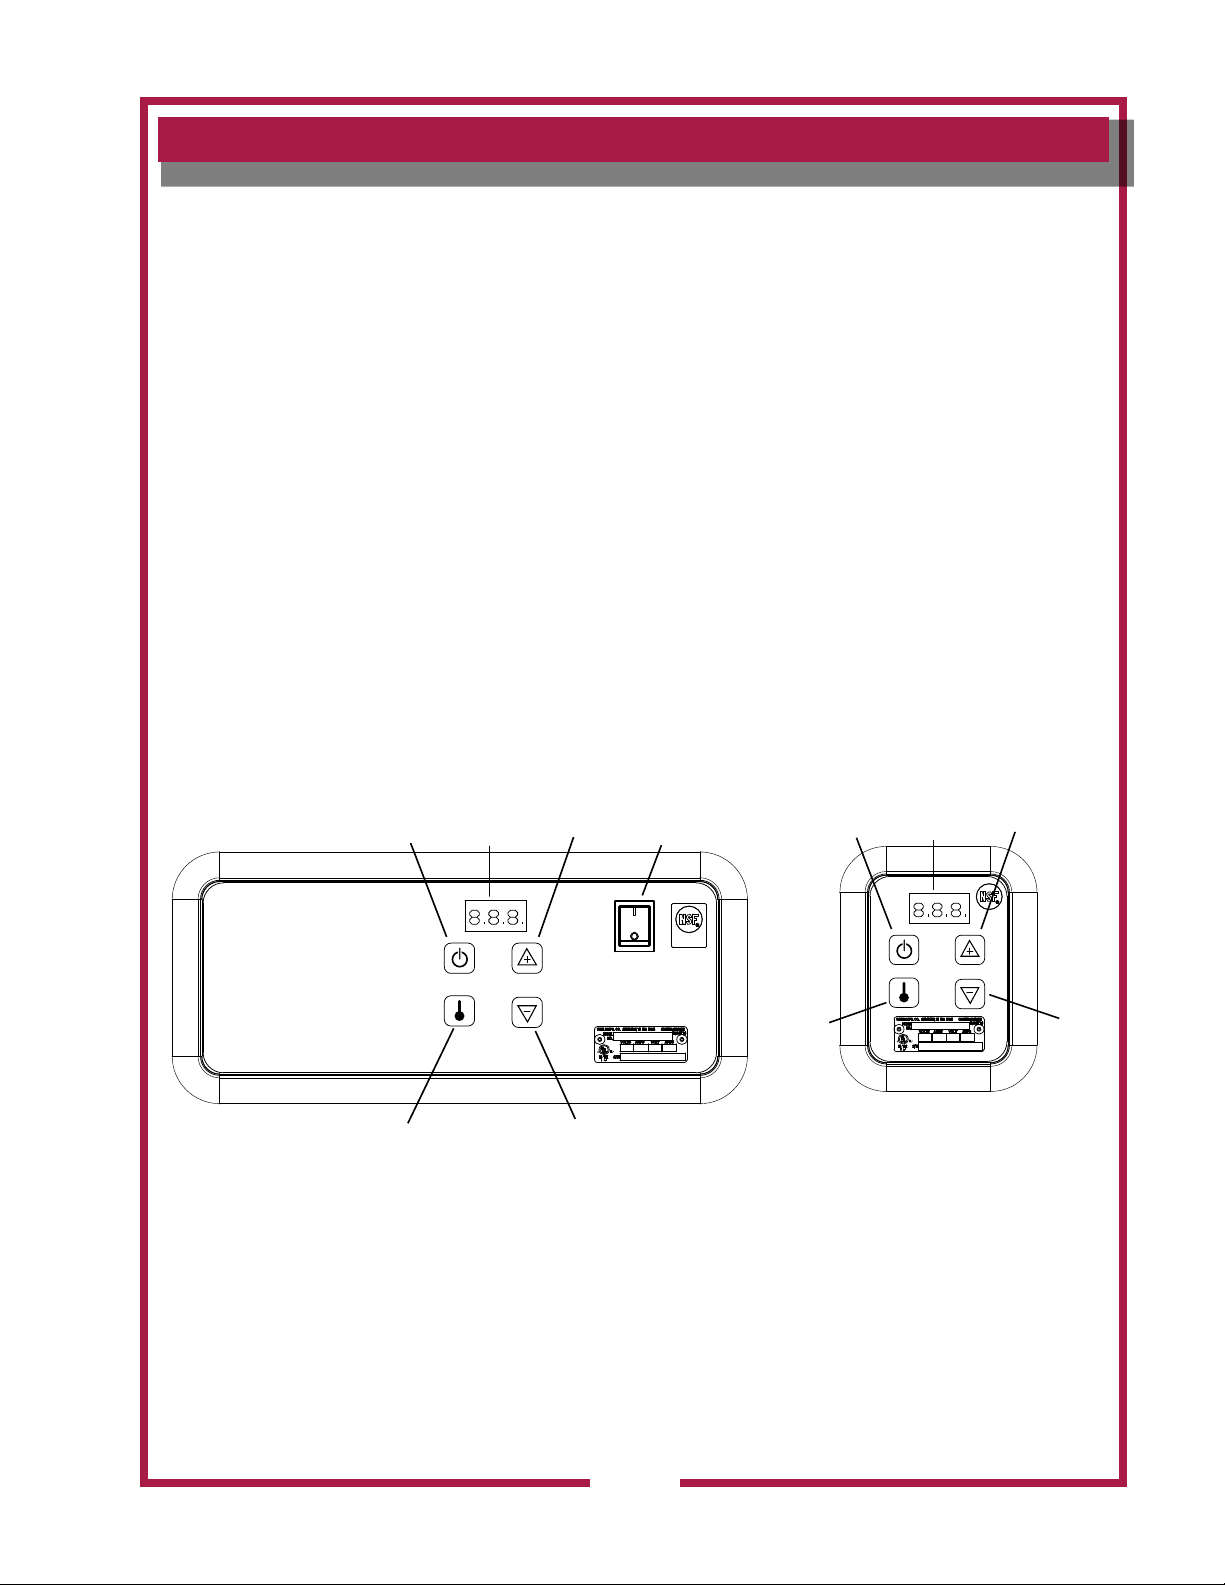
OPERATION
On/Off
Temp
OPERATION
1. Always use an inset. DO NOT place food directly into the warmer.
2. Check water level in wet-operation warmer frequently during use.
Running warmers dry will lower the temperature of the food in the insert
pan, and may damage the warmer.
3. Alternating between wet and dry operation in any individual warmer is
not recommended.
4. DO NOT use metal tools, steel wool, or caustic or abrasive cleanser to
clean warmer pan.
E-MOD Control Operation
This control will provide close regulation of the temperature in the basin
and give an indication of the air temperature surrounding the food
container. The temperature is adjustable from 100° to 200°F. Pressing
the ON/OFF button of the temperature control activates the heating
circuit. The setpoint is displayed by pressing and holding the TEMP
button. Adjust the regulated temperature by pressing the + or – buttons
while holding the TEMP button down. The actual basin temperature is
displayed when no buttons are pressed and the control is in the ON
mode. The dot in the lower corner of the display indicates when the
control is calling for heat.
When provided the master power switch controls the heating circuit
and the automatic water ll control. Turn “OFF” the power switch when
draining or cleaning the unit.
Food temperature will vary from
the control set temperature
based on the moisture content
and consistency of the food
product.
2M-308017-011C Built-In Single Well Modular Warmer w/T-Stat Control
On/Off
Button
Temp
Left: Typical Electronic Autoll Controls Unit
Temp
Display
Right: Typical Electonic Controls Unit
Up
Down
Power
Switch
IL2512
Temp
Button
Display
Up
Down
IL2512a
7
Page 10

MAINTENANCE INSTRUCTIONS
CARE OF STAINLESS STEEL
Stainless steel is a marvelous material: strong, lustrous and low maintenance. With
a minimum of care, it will normally retain its beauty and durability for the life of the
equipment. In some applications, however, special care is required in order to maintain
stainless steel’s special properties.
External components, such as cabinets and control panels, are nished with a grain
pattern. This pleasing nish is best maintained by cleaning with a non-abrasive
cleanser applied with a soft cloth. Rub only in the direction of the grain. In the absence
of visible grain, rub only along the longest axis of the appliance.
Restore stainless steel’s luster by applying a polish specically made for stainless steel.
Spray on, wipe off with a soft cloth, rubbing in the direction of the grain.
Never use metal implements, wire brushes, abrasive scratch pads or steel wool
to clean stainless steel.
Warmer pans, insets and other vessels are subject to a harsher environment. Wells
Manufacturing uses an very high quality stainless steel (#304DDQ) for our food warmer
pans. Even the highest quality stainless steel, however, is mostly iron, and will rust, pit
and corrode under the following conditions:
• Poor Water Quality: Hard water (water with a high content of dissolved minerals)
will leave mineral deposits when allowed to dry. Calcium (lime) can buildup on
heated surfaces, even under water. If left unattended, hard water spots and lime
buildup can lead to rusting, corrosion and pitting.
• Contact with Chlorides: Chlorides (specic compounds of chlorine) are found in
food, table salt and many cleansers. Chlorides can attack the surface of stainless
steel, resulting in corrosion and pitting.
Keep your stainless steel warmers clean and free from calcium buildup.
Use alkaline, alkaline chlorinated or non-chloride cleanser.
Use citric acid-based cleaners to remove calcium deposits.
For additional information, please read the NAFEM Stainless Steel Equipment and
Cleaning Guide. Contact NAFEM at :
North American Association of Food Equipment Manufacturers
401 N. Michigan Avenue
Chicago, Illinois 60611-4267
(312) 644-6610
2M-308017-011C Built-In Single Well Modular Warmer w/T-Stat Control
8
Page 11
CLEANING INSTRUCTIONS
DAILY CLEANING INSTRUCTIONS
PREPARATIONS: Turn control knob(s) to OFF. Allow warmer to cool
before proceeding.
Remove any insets, pans and/or adapter tops.
Drain or remove water from well if used for
wet operation.
FREQUENCY: Minimum - daily.
TOOLS: Mild Detergent
Solution: 10 Parts Warm Water to 4 Parts Vinegar
Plastic Scouring Pad
Clean Cloth or Sponge
Food-Grade Silicone Sealant
1. Wipe entire unit down using a clean cloth or sponge and mild
detergent.
2. Use a plastic scouring pad to remove any hardened food particles
or mineral deposits.
IMPORTANT: Do NOT use steel wool for cleaning.
3. Rinse warmer thoroughly with a vinegar and water solution to
neutralize all detergent cleanser residue.
4. Inspect warmer ange-to-counter seal. Reseal with food-grade
silicone sealant if necessary. Failure to do so may allow grease and
water to leak into insulation and heating element, causing a potential
re and/or electric shock hazard.
5. Inspect warmer tank for damage. Damage to the outer body may
allow grease and water to leak into insulation and heating element,
causing a potential re and/or electric shock hazard. Contact your
Authorized Wells Service Agency to inspect warmer if water or grease
contamination is suspected.
6. Close drain valve. Add proper amount of warm water. Turn control
knob(s) ON and check for proper operation.
CAUTION:
SHOCK HAZARD
Do NOT splash or pour water
into or over any control panel
or wiring.
CAUTION:
SHOCK HAZARD
Disconnect warmer from
electric power before cleaning
CAUTION:
BURN HAZARD
Allow warmer to cool
completely before cleaning.
2M-308017-011C Built-In Single Well Modular Warmer w/T-Stat Control
9
Page 12

CLEANING INSTRUCTIONS
CAUTION:
CHEMICAL BURN
HAZARD
Deilimng chemicals may be
caustic. Wear appropriate
personal protective equipment.
Follow cleaner manufacturer’s
instructions for safest use.
WEEKLY CLEANING INSTRUCTIONS
PREPARATIONS: Remove any insets, pans and/or adapter tops.
Drain or remove water from well if used for wet
operation.
FREQUENCY: Weekly, or whenever lime or scale is seen
accumulating on the sides of the warmer pans.
TOOLS: Commercial Delime Cleaner
Plastic Scouring Pad
Clean Cloth or Sponge
1. Add water to pans until water is at normal operating level
(1” - 1 1/2” deep) or covers accumulated scale.
2. Heat water to maximum temperature (190ºF or higher).
3. Pour contents of one package of commercial delime cleaner into
each warmer pan. Stir to dissolve cleaner. Turn heat control OFF.
Cover pans.
4. Allow solution to soak at least one hour, or overnight for heavy
scale buildup.
5. Drain hot water from pans. Scrub with a plastic scouring pad.
Rinse thoroughly with hot water, then dry.
6. Rell pans with hot tap water and resume operation.
7. Heavy scale buildup may require additional treatments.
10
2M-308017-011C Built-In Single Well Modular Warmer w/T-Stat Control
Page 13
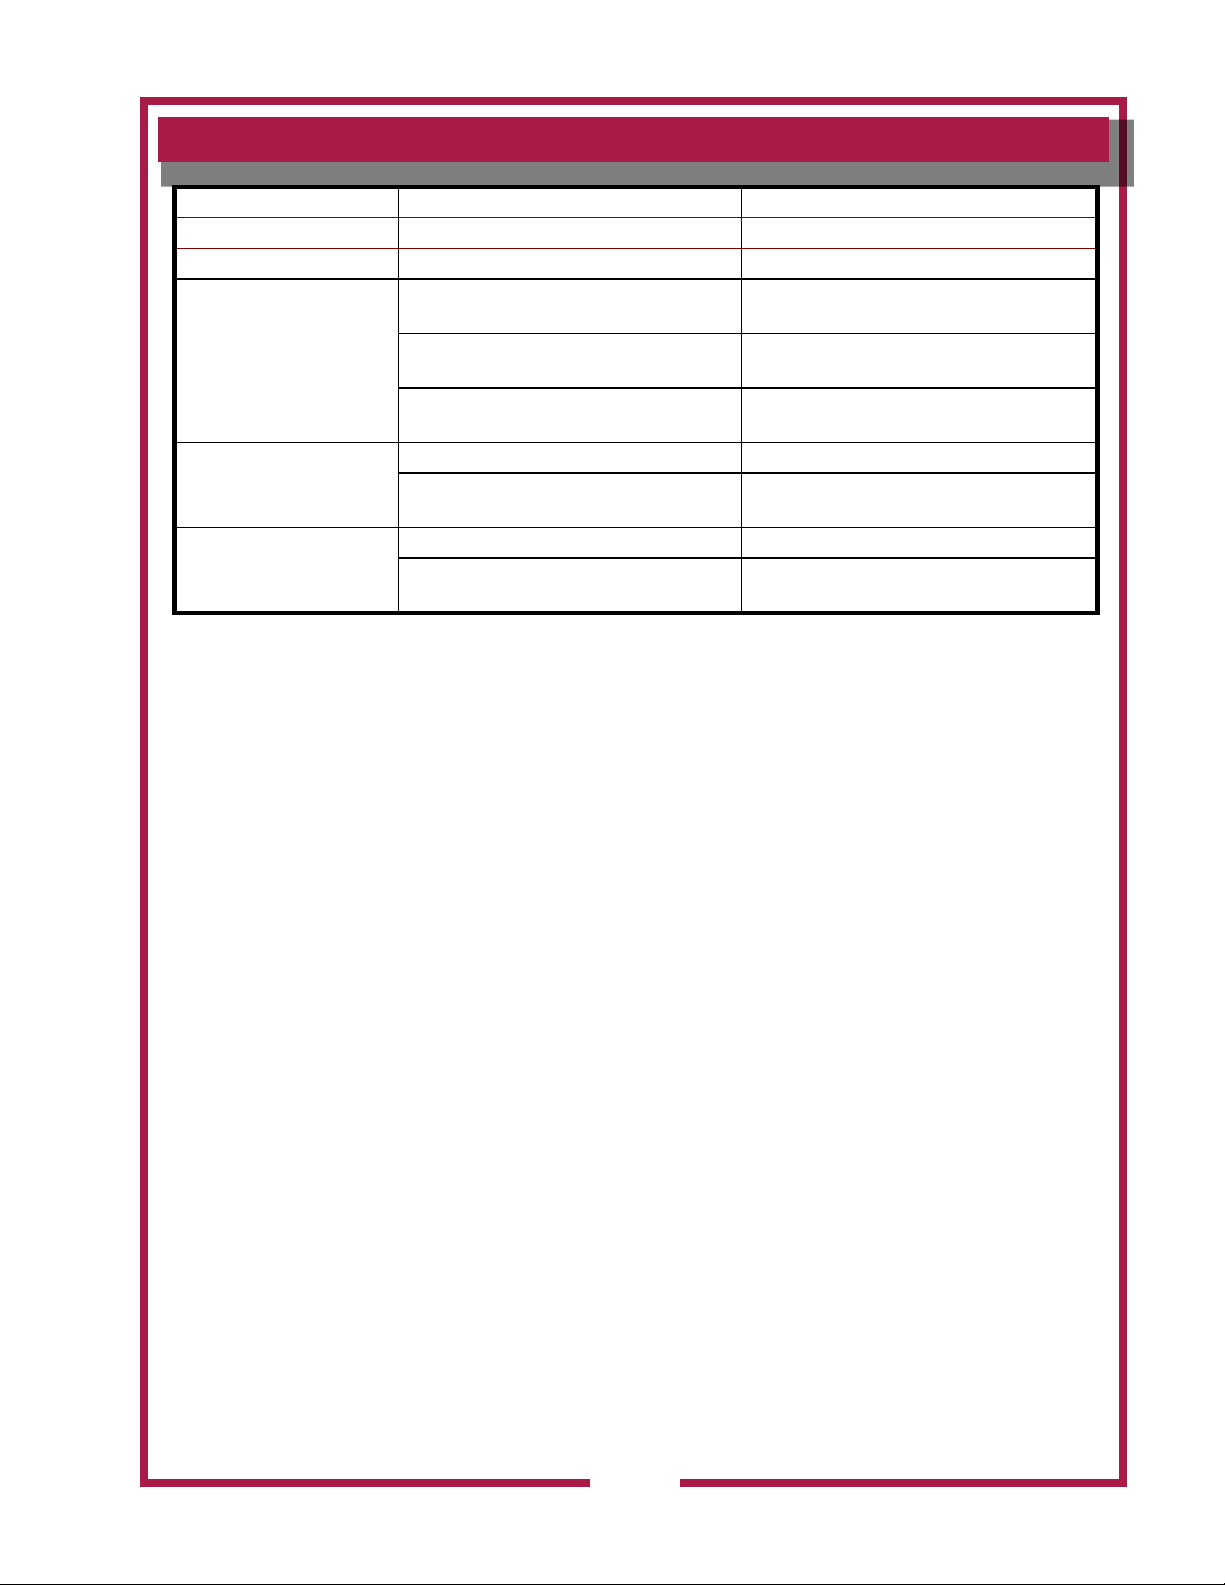
TROUBLESHOOTING SUGGESTIONS
SYMPTOM POSSIBLE CAUSE SUGGESTED REMEDY
No power to warmer Circuit breaker off or tripped Reset circuit breaker
Warmer will not heat Temperature control not set Set control to desired temperature
Wet insulation
Warmer trips circuit breaker
Pan leaking or other internal damage
Internal damage
Mineral deposits on pan acting as a insulator Clean pan(s) with delime cleaner
Warmer slow to heat
Drain-equipped unit will not
hold water
Wired to wrong voltage
Drain valve not fully closed Check drain valve for debris and close fully
Drain valve damaged or pan(s) leaking
There are no user-serviceable components in this appliance.
In all instances of damage or malfunction, contact your Authorized Wells Service Agency for repairs.
Verify ange-to counter seal is sound, or
reseal with food-grade silicone sealant
Contact your Authorized Wells Service Agency
for repairs
Contact your Authorized Wells Service Agency
for repairs
Verify supply voltage - must match voltage on
warmer nameplate
Contact your Authorized Wells Service Agency
for repairs
2M-308017-011C Built-In Single Well Modular Warmer w/T-Stat Control
11
Page 14
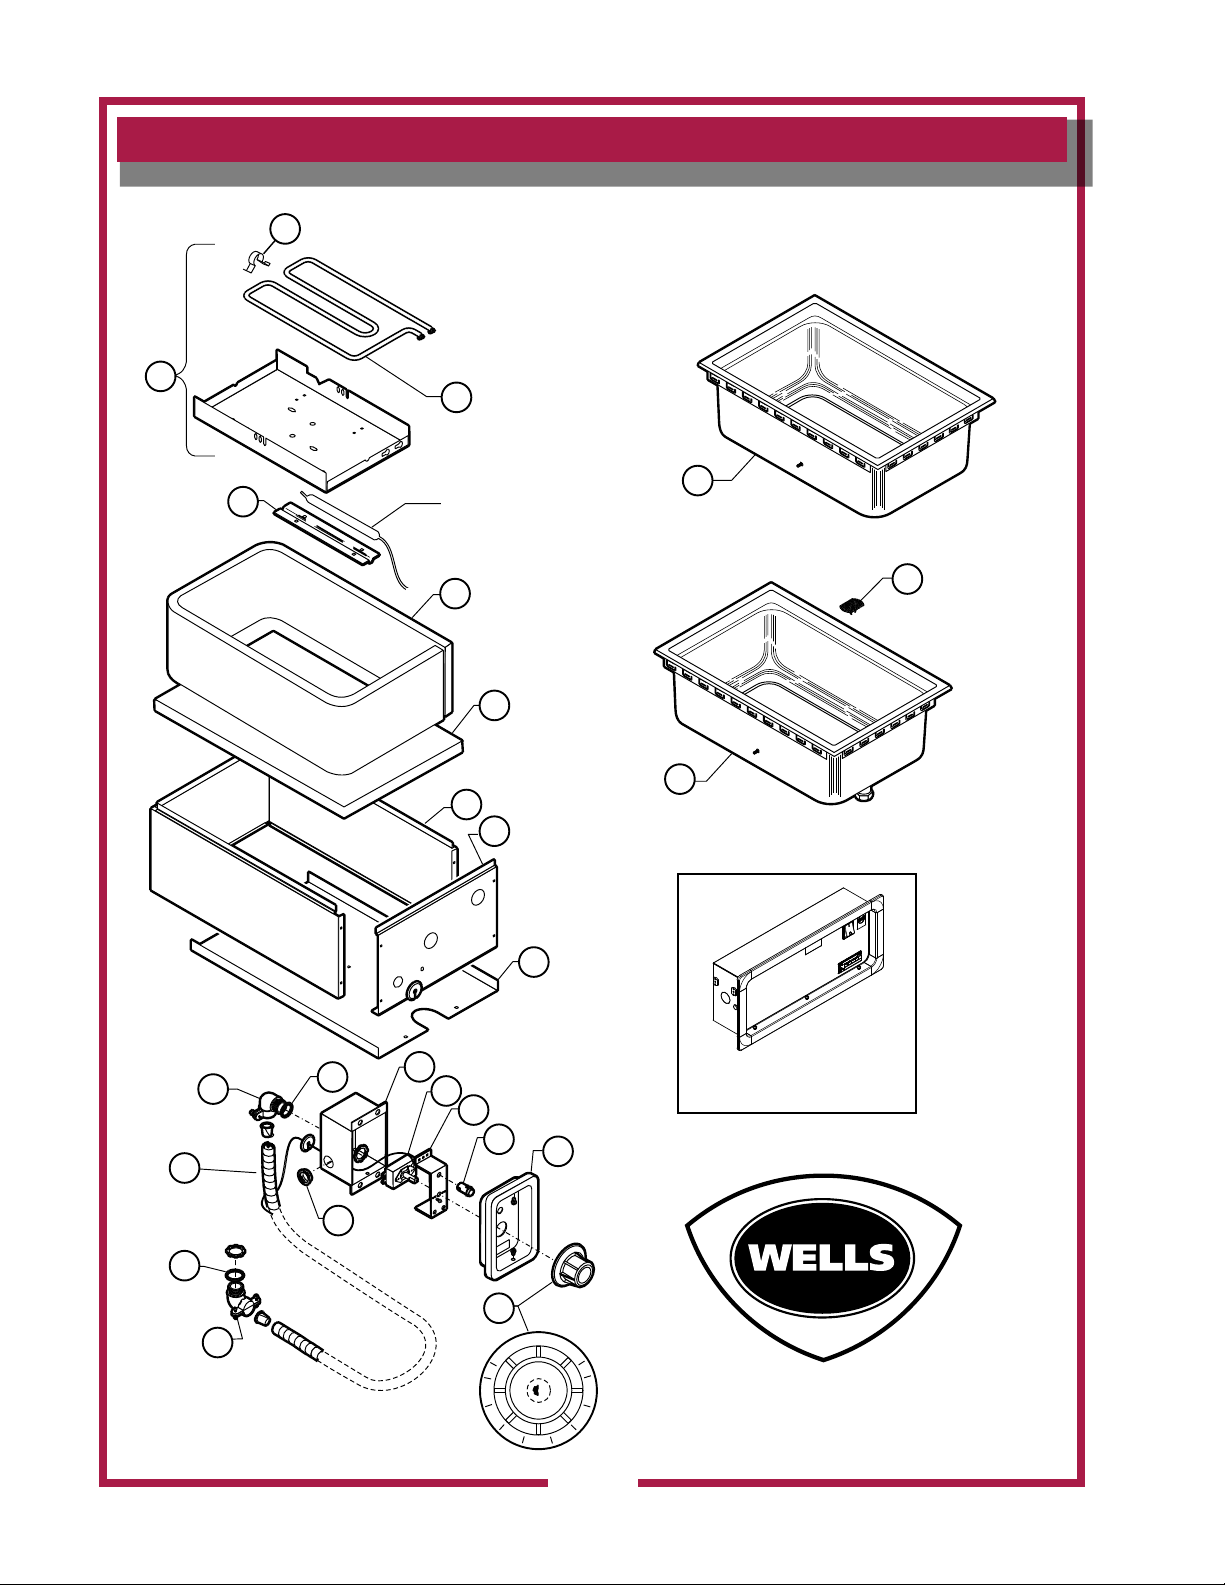
EXPLODED VIEW
IL1905, Rev C
MODEL: MOD100T, MOD100HT
1
THERMOBULB
5
21
6
7
8
9
EMOD;
Electronic Control
See Detail A
11
11
10
18
19
17
16
15
14
13
20
12
13
22
12
3
2
M100T, M100TD, M100HT, M100HTD, & EMOD UNITS
2M-308017-011C Built-In Single Well Modular Warmer w/T-Stat Control
12
Page 15
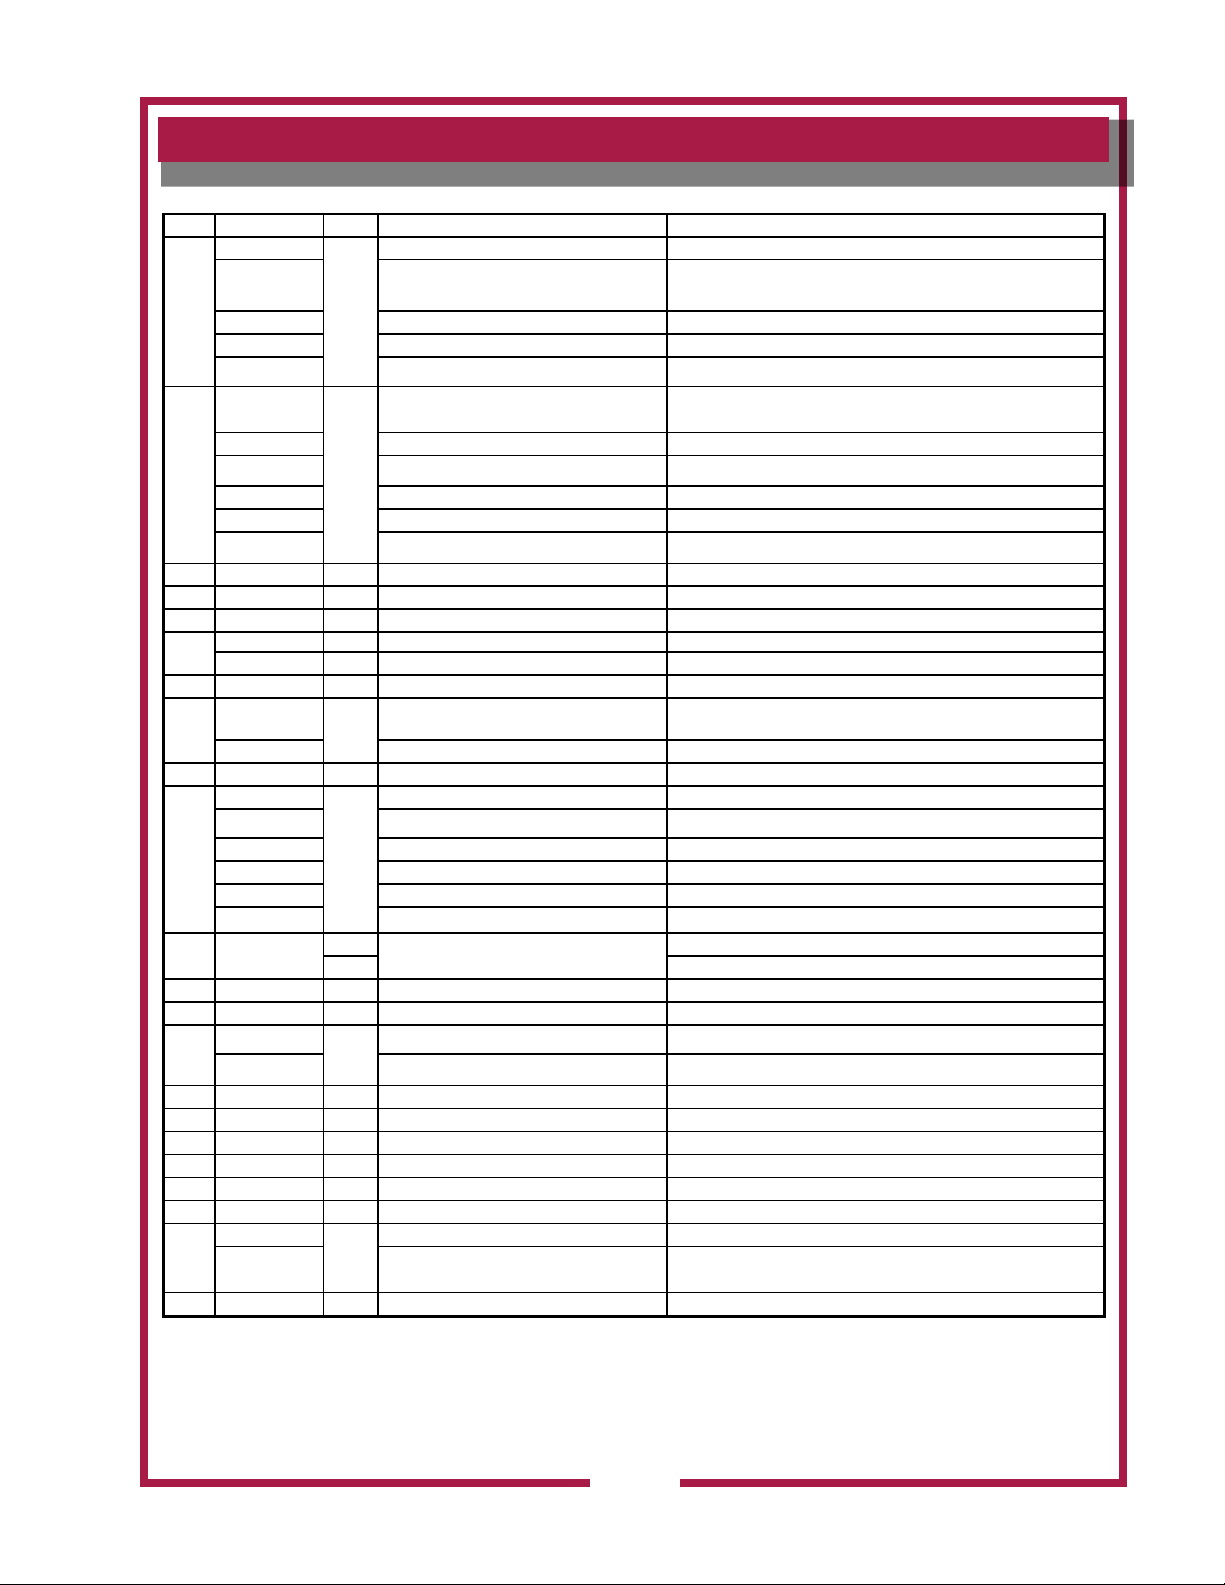
PARTS LIST
MOD-100T, MOD-100TD, MOD100HT, MOD100HTD, M100TDWA
Fig No Part No Qty Description Application
2N-300166UL
2N-303375UL
1
2N-46131UL ELEM 120V 1200W M100THTDM-120
2N-46660UL ELEM 240V 1200W LLW-1220 MOD100HTD
2N-46681UL ELEM 120V 1650W SMPT MOD100T-120V, MOD100T6-120V, MOD100TD-120, MOD100TD6120
P2-WL0071
P2-WL0076 PAN ELEM ASSY MOD100HTD MOD100HTD208
P2-WL0077 PAN ELEM ASSY MOD100HT MOD100HT, MOD100HT6, MOD100HTW
2
P2-WL0772 ELMNT PAN ASSY 1.2K 120V M100HDTM-120
P2-WL0079 PAN ELEM ASSY MOD100HTD MOD100HTD
P2-WL0080 PAN ELEM ASSY MOD100T120V MOD100T-120, MOD100T6-120, MOD100TD-120, MOD100TD6120
3 D8-303352 1 BRKT THERMO BULB ALL
5 2H-36196 4.25 INSUL FG .6 MICRO 1X 45 ALL
6 2H-36050 1.75 INSUL FG .6 MICRO 1X36 ALL
P2-40628 2 SHROUD SIDE MOD100DT MOD100HTM MOD100HT6, MOD100HTD, MOD100HTD208
7
P2-45066 1 SHROUD WRAP MOD 100 ROHS MOD100T
8 P2-45067 1 SHROUD FR MOD 100 ROHS MOD100T
P2-40629
9
P2-45186 SHROUD BOT MOD 100 ROHS
10 5P-21709 1 SCREEN DRAIN WARMERS ALL
P2-30401
P2-30402 PAN W/ DRAIN MOD100TD, MOD100TD-120, MOD100TD6, MOD100TD6120
P2-44564 PAN ASSY SMP TMP MOD100H MOD100HT, MOD100HT6
11
P2-WL0056 PAN ASSY W/DRAIN MOD100HTD MOD100HTD, MOD100HTD208
P2-Z15007 PAN ASSY M100/127E M100E, M100CE, M100E6
P2-Z15011 PAN ASSY M100/127ED M100ED, M100ED6, M100CED, M100CED6
12 2K-33996X
13 2I-Z12311 2 GASKET-FIBER WASHER MOD100T
14 P2-Z16805 1 BOX, CONTROL ALL
2T-38968
15
2T-46551 THERMO CTRL 96IN CAP RO MOD100T6, MOD100T6-120V, MOD100TD6120, MOD100HT6
16 P2-40843 1 BRKT MTG THERMO INFINITE MOD100T
17 2J-35687 1 LIGHT SIGNAL GLO DOT W#8 ALL
18 I7-Z12221 1 PANEL, FRONT MOD100T
19 2R-40498 1 KNOB ASSY MOD 100DT MOD100T, MOD100T-120V
20 2K-31040 1 BUSHING HEYCO 7/8 O.D. ALL
2M-308017-011C Built-In Single Well Modular Warmer w/T-Stat Control
21 2C-30397 4 CLIP ELEM M P ALL
P2-45183
22
P2-Z18128 CONDUIT FLEX 3/8 X 10” MOD100TD-MOE, M100HTDM-120
ELEM 208V 1650W MODS MOD100HTD208
ELEM HEATING 208/240V 1650W
(Dual Voltage)
1
PAN ELEM ASSY MOD100T 208
1
SHROUD BOT MOD100HT
1
PAN W/O DRAIN MOD100T
1
2
FTG FLEX CONDUIT 90X3/8
3 MOD100T-120V
THERMO K TYPE SS206ET R MOD100T, MOD100TD, MOD100HT, MOD100HTD, MOD100HTW
1
CONDUIT FLEX 3/8 X 28”
1
MOD100T, MOD100TD, MOD100T6, MOD100TD6, MOD100HT
MOD100T, MOD100T-230, MOD100T6, MOD100TD,
MOD100TD-230, MOD100TD6 , MOD100TDAF
MOD100HT, MOD100HT6, MOD100HTD, MOD100HT208,
MOD100HTW
ALL (EXCEPT MOES)
23 WS-20176 1 ADAPT TOP 2 7QT STD 12X20 M100TDWA
13
Page 16
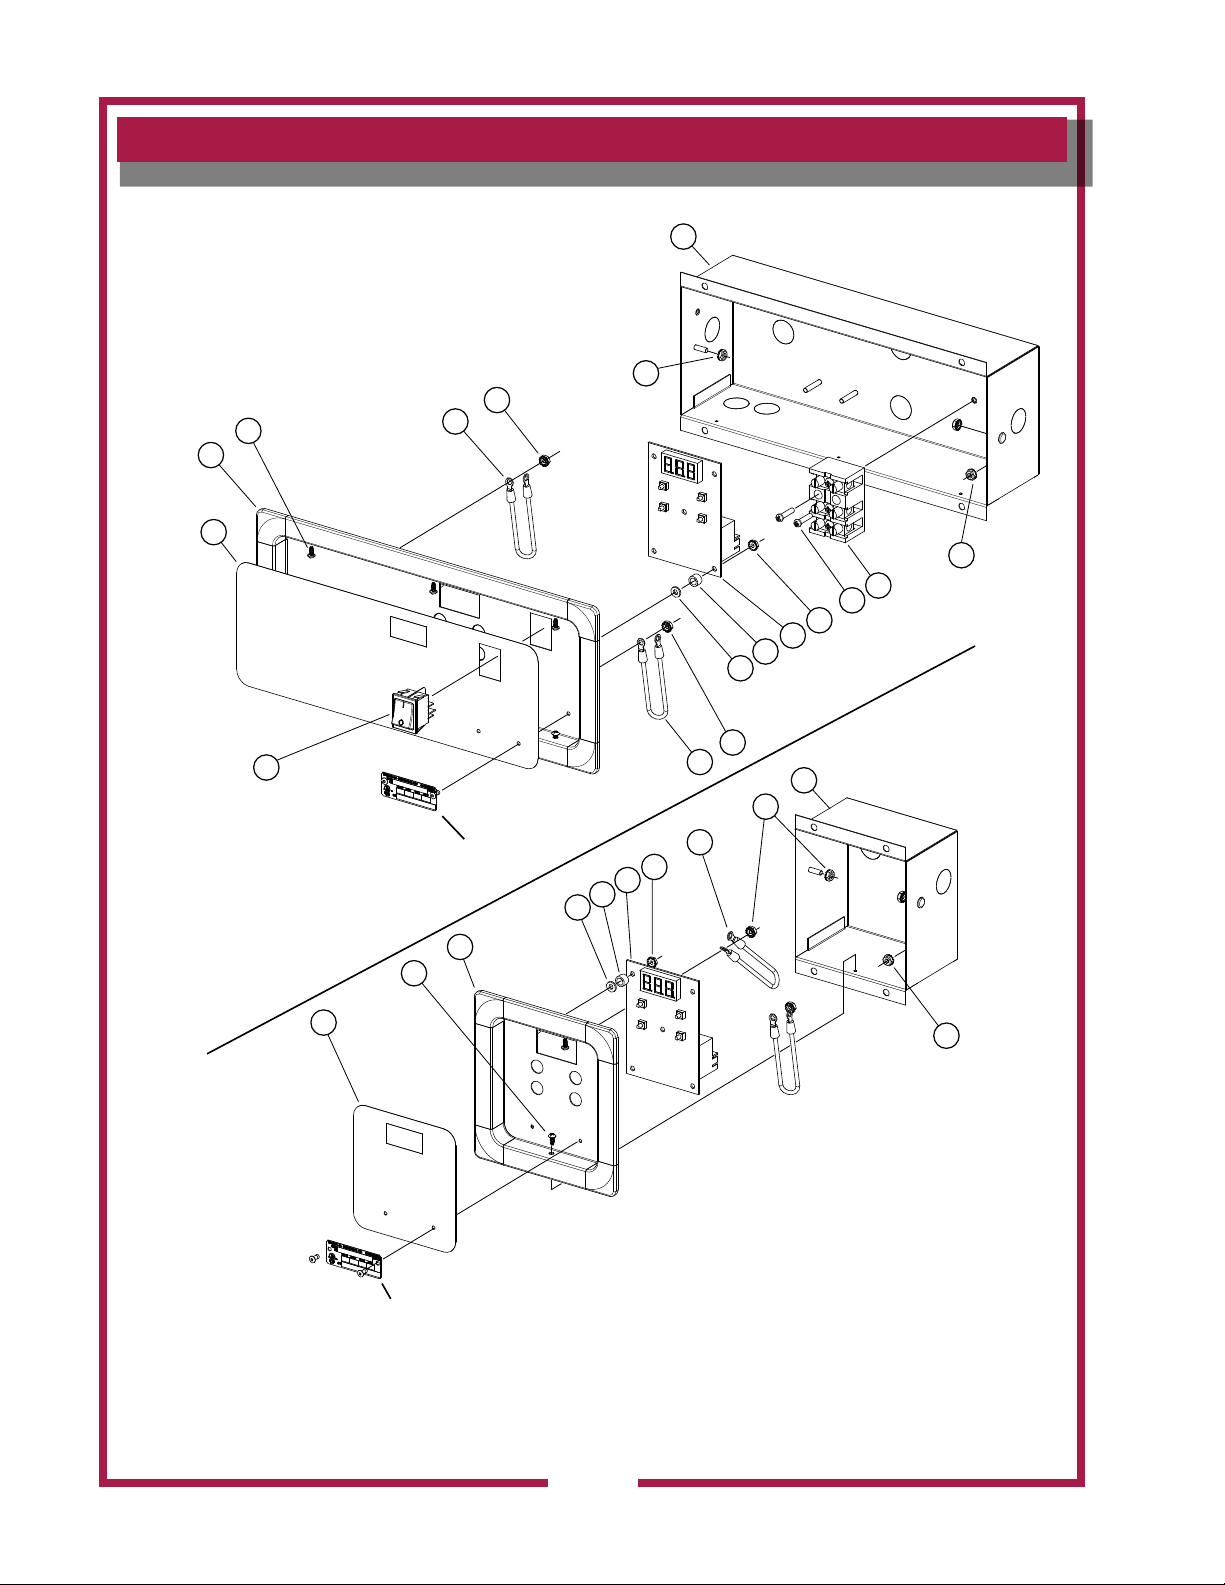
EXPLODED VIEW: Detail A
M100HE, M100HCE, M100HE6, M100HCE6, M100HED, M100HCED, M100HEAF
1
2
2
14
13
12
10
6
7
8
9
3
4
5
11
MOD100HE
Electronic Control Fab Warmer
14
17
Nameplate
Nameplate
16
2
10
10
6
7
8
9
15
2
3
2M-308017-011C Built-In Single Well Modular Warmer w/T-Stat Control
MOD100E Small Profile
Electronic Control Fab Warmer
IL2513, Rev. -, 8/1/12
14
Page 17
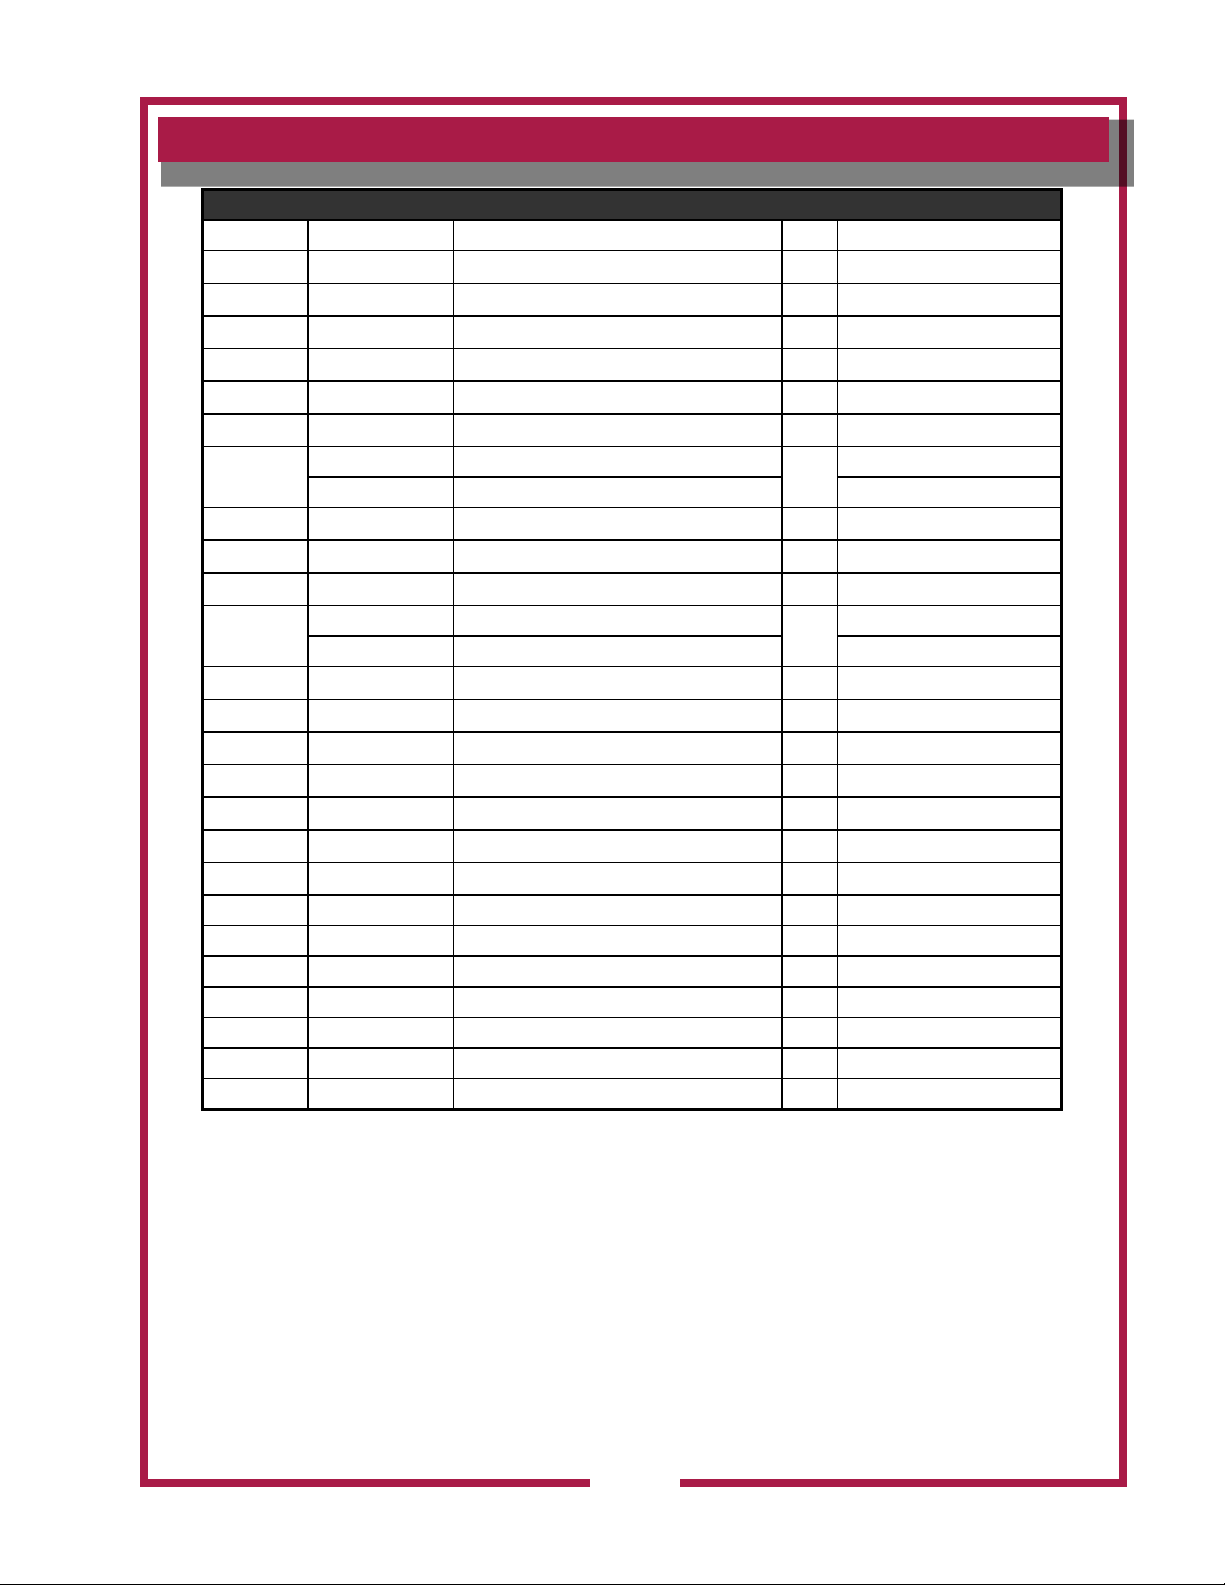
PARTS LIST: Detail A
Fig No Part No Description Qty Application
1 P2-Z14490 CONTROL BOX WELD - SMALL 1
2 2C-31053 NUT 8-32 KEPS MS NICKEL 4
3 2C-35736 NUT 8-32 HEX KEPS MS GREE 1
4 2E-37465 TERM BLOCK 3POLE 85AMP 1
5 2C-1496 SCREW 8-32X3/4 RHP STL NP 2
6 2C-Z2594 NUT 6-32 HEX W STL NP 4
7
8 2K-Z1971 SPACER .257X.75X.25 NYLON 4
9 2C-200110 WASHER, #8 FLAT 18-8 SS 4
10 2E-130601 WIRE ASSY 14GA GREEN 8” 2
11
12 2M-Z14491 GRAPHIC M100/127E 1
13 P2-Z14489 CONTROL PANEL M100/127E 1
13 P2-Z15013 CONT PANEL M100/127E 1
14 2C-33935 SCREW 6ABX5/16 PH PAN SMS 6
15 P2-Z15012 CONTROL BOX M100/127E 1
16 P2-Z15013 CONT PANEL M100/127E 1
17 2M-Z15026 GRAPHIC M100/127 E/ED 1
NI 2E-306865 CONTROL LIQ LEVEL 208/240 1 Auto-Fill
NI 2E-46529 SOLENOID VALVE 1/4NPT 240 1 Auto-Fill
NI 2E-200372 CORD SET, 12/3 CORD 6-20 1 208/240V
NI C3-G1204 CORD SET ASSEMBLY 1 120V
NI 2E-31200-01 BOX CONNECTOR 3/8 1 M100HCE
NI 2E-Z14534-1 THERMISTOR 90” RING TERM 1 STANDARD MODELS
NI 2E-Z14534-2 THERMISTOR 120” RING TERM 1 6’ CONDUIT MODELS
2E-Z14534 CONTROLLER, TEMP 208/240V
2E-Z14528 CONTROLLER, TEMP 120V 120V
2E-Z1858 SWITCH-LIGHTED
2E-Z3156 SW DPST 20A/125V ORG LGHT M100ED-230CE
Detail A: EMOD Control Box Assy
208/230/240V
1
120/208/240V
1
2M-308017-011C Built-In Single Well Modular Warmer w/T-Stat Control
15
Page 18
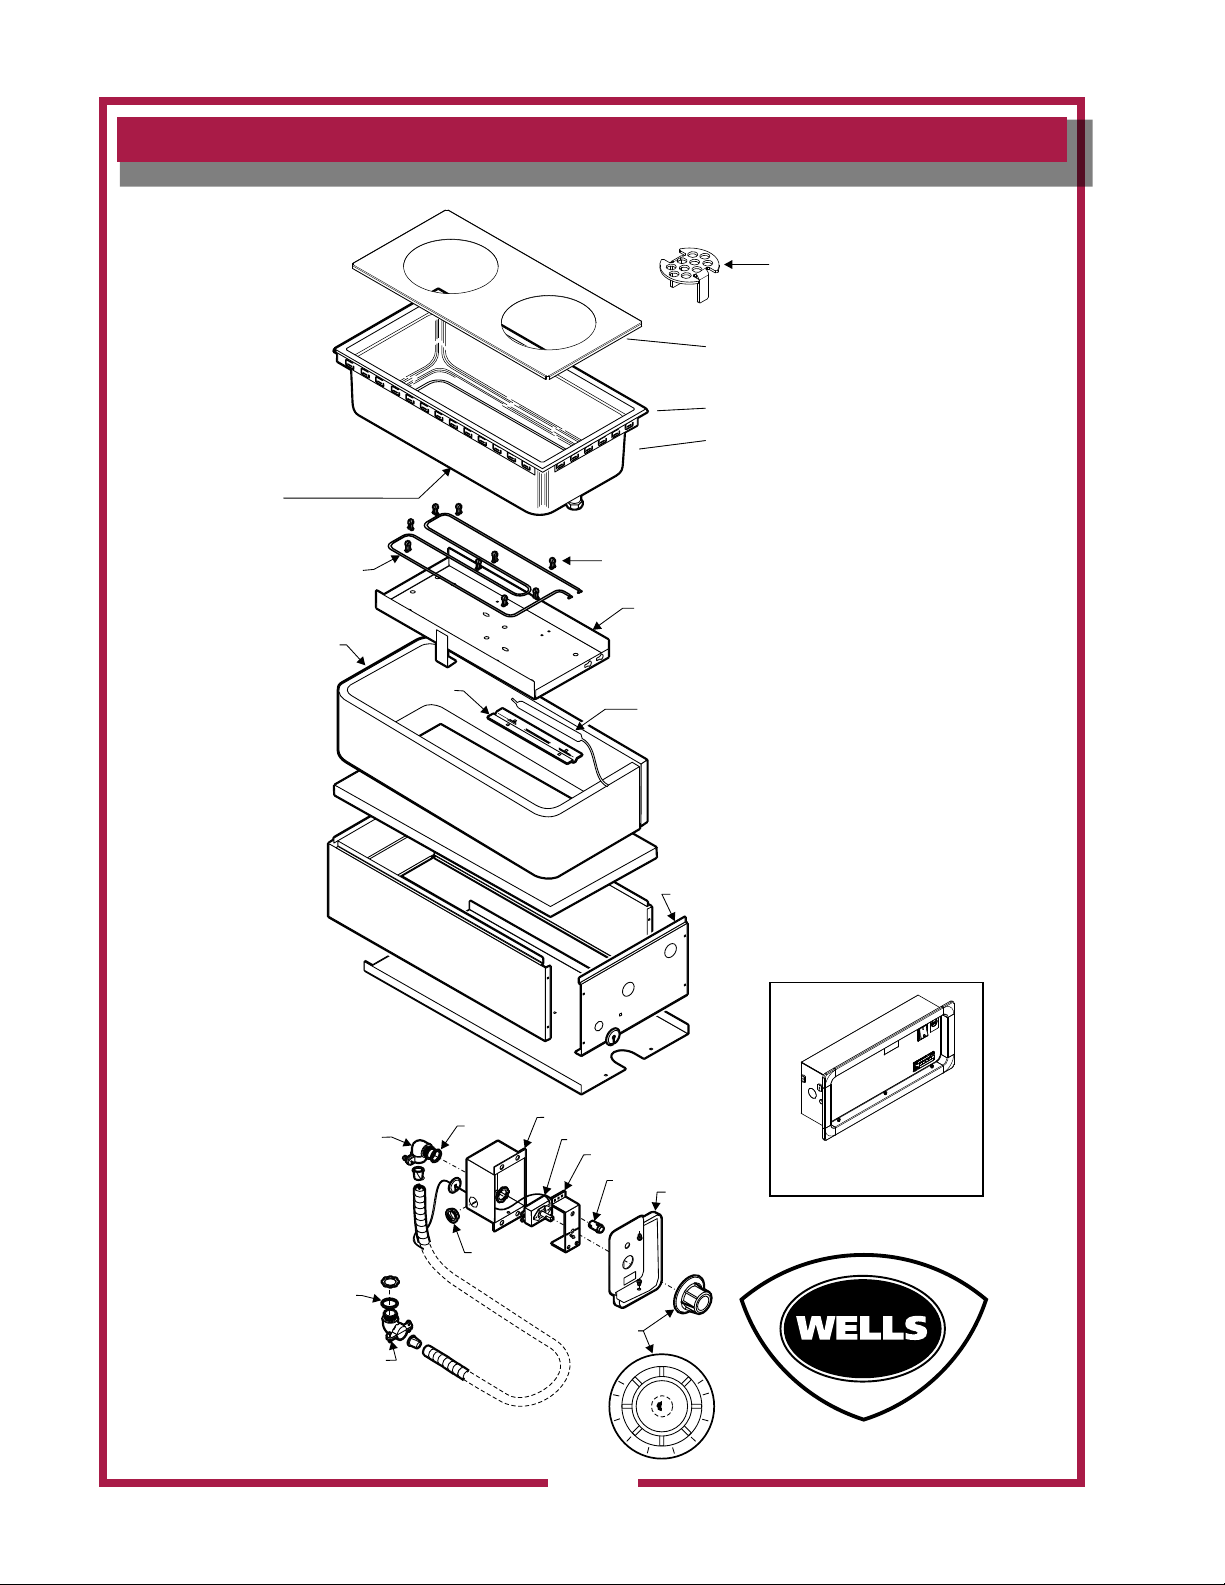
EXPLODED VIEW & PARTS LIST
2K-33996X
2K-33996X
2I-Z12311
2I-Z12311
2K--31040
2H-36196
(Sold by the foot)
P2-45067
D8-303352
THERMOBULB
(ref.)
P2-300702
2C-30397
2N-300706UL
2V-Z17446
MOD-127TD ONLY
(not to scale)
WS-505836
MOD127TD (ONLY)
WS-305826 (Top Only)
MOD127TD (ONLY)
WS-WL0061 (Pan Only)
MOD127TD (ONLY)
P2-Z14667
M127CED, ED
P2-Z14668
M127CE, E
P2-Z14666
M127CEAF, EAF
OFF
0
LO
HI
WELLS
WELLS
2
3
4
5
6
7
8
I7-Z12221
2J-35687
2R-40498
P2-40843
2T-38968
P2-Z16805
IL2472, Rev. D, 7/15/14
EMOD;
Electronic Control
See Detail A
WS-23115 (Top Only)
MOD127TDWA (ONLY)
MOD-127TD, M127E, M127CE, M127CEAF, M127EAF
2M-308017-011C Built-In Single Well Modular Warmer w/T-Stat Control
16
Page 19

WIRING DIAGRAM
2M-308017-011C Built-In Single Well Modular Warmer w/T-Stat Control
17
Page 20
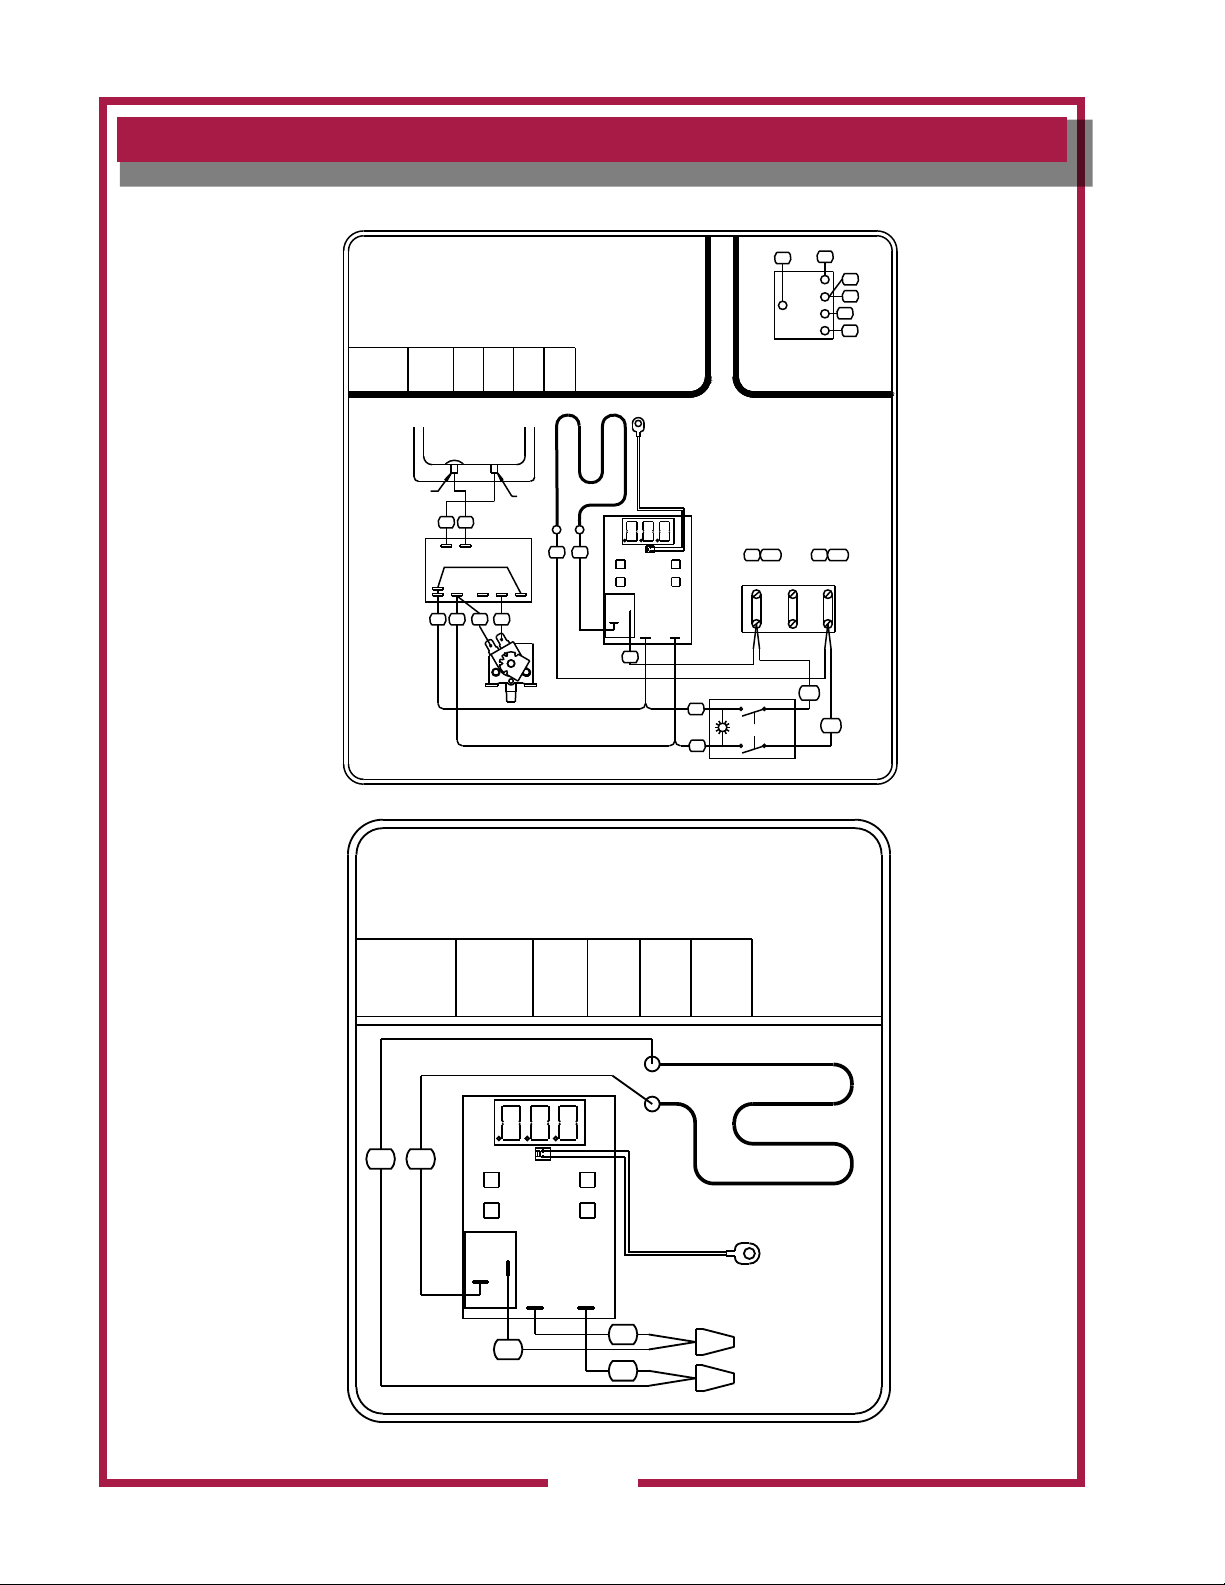
WIRING DIAGRAM
NOTES: WIRING DIAGRAM MOD100E
1) GROUND TO EARTH USING SUPPLIED STUD
IN CONTROL BOX.
2) OPTIONAL WATER LEVEL CONTROL: WIRES
19 & 35 SHOULD BE CAPPED IF NOT USED.
120
208
220
NO
363738
1386
6.3
GRN
COM
WATER FILL
VALVE
240
1650
6.9
HEATING ELEMENT
3
2
TEMP CONTROL
(BACK VIEW)
RELAY
1
MODEL
MOD100E
50/60HZ
2M-Z14564 rev~
VOLTS
WATTS
AMPS
PROBE
COMMON
35
1650
1240
13.8
6.0
WATER PAN
34
MAX
LOW WATER CONTROL
NC
INPUT
19
SENSOR
PROBE
INPUT
37
34
19
4
38
3
PROBE
35
2
COM
1
36
ALTERNATE WATER
LEVEL CONTROL
101 3 102
1
L1=
22
21
L1 L2
SINGLE PHASE
POWER INPUT
4
S1
25
L2=
L3
101
102
1
NOTES: WIRING DIAGRAM MOD100E
1) GROUND TO EARTH USING SUPPLIED STUD
IN CONTROL BOX.
120
208
220
1386
6.3
240
1650
6.9
SENSOR
PROBE
HEATING ELEMENT
2M-Z15015rev~
MODEL
MOD100E
50/60HZ
3
2
VOLTS
WATTS
AMPS
TEMP CONTROL
(BACK VIEW)
RELAY
1
1650
13.8
INPUT
1240
6.0
USE WIRE NUTS FOR CORD ATTACHMENT
OR FIELD INSTALLED WIRING.
101
102
2M-308017-011C Built-In Single Well Modular Warmer w/T-Stat Control
18
Page 21

NOTES
2M-308017-011C Built-In Single Well Modular Warmer w/T-Stat Control
19
Page 22

PARTS & SERVICE
Always use an inset.
DO NOT place food directly
into the warmer pan.
DESCRIPTION PART NO.
ADAPTERS & INSETS
ADAPTER TOP, convert 12” x 20” warmer to
hold two 7 qt. insets WS-21502
ADAPTER TOP, convert 12” x 20” warmer to
hold two 4 qt. and two 2½ qt DD-21503
ADAPTER TOP, convert 12” x 20” warmer to
hold three 4 qt. insets DD-21616
ADAPTER TOP, convert 12” x 20” warmer to
hold one 7qt. and one 4 qt. DD-21618
ADAPTER TOP, convert 12” x 20” warmer to
hold four 2½ qt. insets WS-21623
ADAPTER TOP, convert 12” x 27” SMPT-27
to hold three 7 qt. insets DD-21503
4 QT. ROUND INSET w/ lid WS-20774
7 QT. ROUND INSET w/ lid WS-20587
11 QT. ROUND INSET w/ lid WS-20908
11 QT. ROUND INSET w/ hinged lid WS-21057
2M-308017-011C Built-In Single Well Modular Warmer w/T-Stat Control
20
20
Page 23
PARTS & SERVICE
DESCRIPTION PART NO.
ACCESSORIES
WELLSLOK EXTENSION KIT, for UL LISTED
circular warmers only, adapt to wood counter
up to 1¾” thick WS-22592*
WELLSLOK EXTENSION KIT, for UL LISTED
12” x 20” warmers only, adapt to wood counter
up to 1¾” thick 5P-22593*
* Wellslok Extension Kits for UL Listed units approved for
installation in wood counter tops
One well units require one kit / Two and three well units require
two kits / four and ve well units require three kits
DRAIN VALVE EXTENSION KIT, extension from
drain to counter front with remote handle, for use with “D” models
only, excluding “DM” models WS-20385
DRAIN SCREEN P2-31869
OPTIONAL 72” WIRING, thermostatically controlled warmers **
** contact factory customer service for availability
IMPORTANT: Use only
factory authorized service parts
and replacement lters.
For factory authorized service,
or to order factory authorized
replacement parts, contact
your Wells authorized service
agency, or call:
Wells Manufacturing
265 Hobson Street,
Smithville, TN 37166 U.S.A.
Service Dept.
phone: (314) 678-6314
fax: (314) 781-2714
Service Parts Department
can supply you with the name
and telephone number of
the WELLS AUTHORIZED
SERVICE AGENCY
nearest you.
CUSTOMER SERVICE DATA
please have this information available if calling for service
RESTAURANT _____________________________ LOCATION _____________
INSTALLATION DATE ________________________ TECHNICIAN ___________
SERVICE COMPANY ________________________________________________
ADDRESS ___________________________ STATE ______ ZIP__________
TELEPHONE NUMBER (_____)_____-_________
2M-308017-011C Built-In Single Well Modular Warmer w/T-Stat Control
EQUIPMENT MODEL NO. _______________
EQUIPMENT SERIAL NO. _______________
VOLTAGE: (check one) 120 208 240
21
21
Page 24
WELLS MANUFACTURING
265 Hobson Street, Smithville, Tennessee 37166
telephone: 314-678-6314
fax: 314-781-2714
www.wells-mfg.com
 Loading...