

Page 1
WELLS MANUFACTURING COMPANY
2 ERIK C IRCLE, P. O. Box 280
Customer Ser vice (775) 345 -0444 Ext.502
Verdi, NV 89439
fax: (775) 345-0569
www.wellsbloomfield.com
F-58DJ NIWA-SHOJI
OPERATOR
INSTRUCTIONS
300
DANGER:
Contact with hot oil may cause
severe burns.
Always wear protective clothing
and heat resistant gloves when
operating the fryer or filtering the
oil.
BURN HAZARD
AUTO-LIFT FRYER
TABLE OF CONTENTS
FEATURES & OPERATING CONTROLS 2
SPECIFICATIONS 2
PRECAUTIONS & GENERAL INFORMATION 3
INSTALLATION 4
OPERATION
Normal Operation 5
Programming Instructions 6
CLEANING INSTRUCTIONS 7
DISPOSAL OF USED OIL 8
WIRING DIAGRAM 9
IMPORTANT: DO NOT DISCARD THESE INSTRUCTIONS
This document is considered to be part of the appliance and is to be given to the OWNER
or MANAGER of the restaurant, or to the person responsible for TRAINING OPERATORS
of this appliance. Additional copies are available from your WELLS DEALER.
THIS OPERATOR INSTRUCTION MUST BE READ AND UNDERSTOOD BY ALL
PERSONS USING OR INSTALLING THIS APPLIANCE. Contact your WELLS DEALER
if you have any questions concerning installation, operation
or maintenance of this equipment.
p/n 304353 Rev. (-) M300 120401 cps
page 1 of 10
Page 2
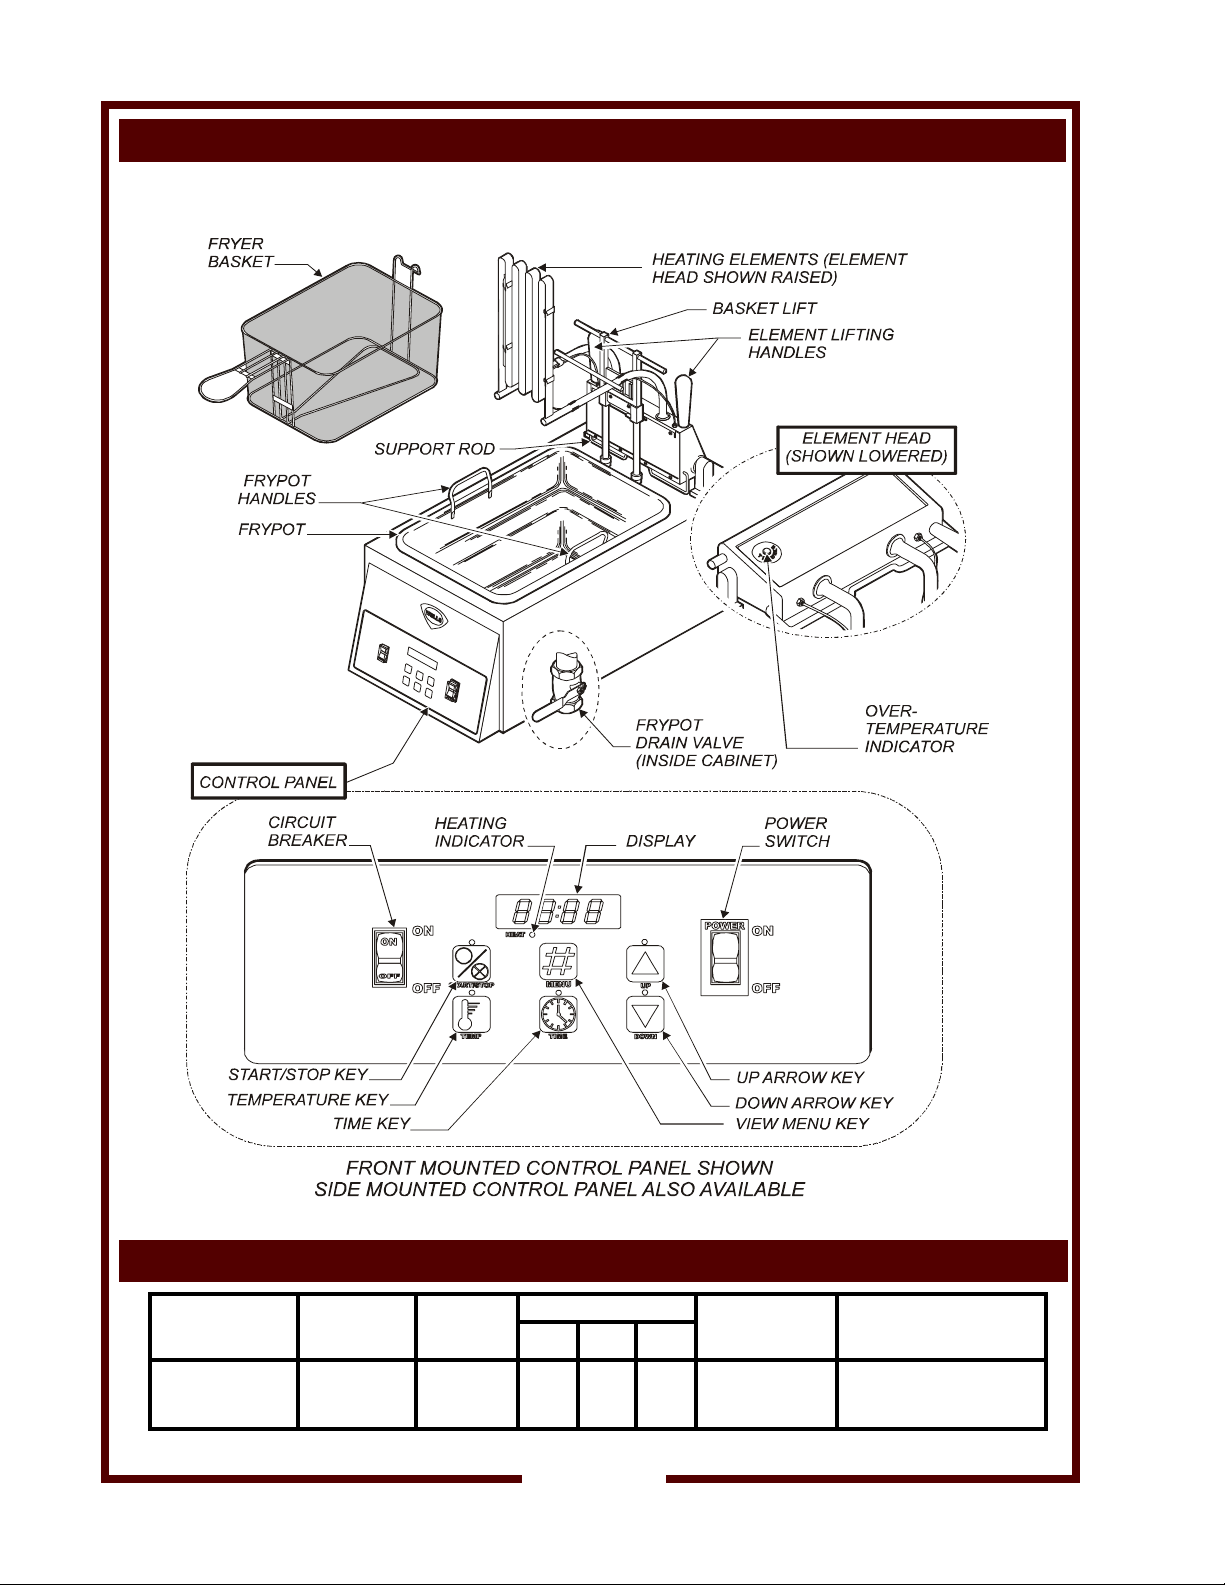
FEATURES & OPERATING CONTROLS
SPECIFICATIONS
MODEL VOLTS PHASE AMPS
L1 L2 L3
F-58DJ
200 VAC 3ø 9.3A 9.3A 9.3A 3200W Not provided
page 2 of 10
WATTS POWER CORD
Page 3
PRECAUTIONS AND GENERAL INFORMATION
DANGER:BURN HAZARD
Contact with hot oil will cause severe burns. Always wear protective clothing and heat
resistant gloves when operating the fryer or filtering the oil.
WARNING: ELECTRIC SHOCK HAZARD
All servicing requiring access to non-insulated components must be performed by
qualified service personnel. DO NOT open any access panel that requires the use of
tools. Failure to heed this warning may result in severe electric shock.
CAUTION: BURN HAZARD
Contact with hot oil may cause burns.
For disposal of oil use only a container specifically designed for the disposal of hot oil.
DO NOT fill hot oil disposal container beyond MAX OIL line.
DO NOT
fill fryer beyond
MAX OIL
line on frypot.
This appliance is intended for use in commercial establishments
only.
This appliance is intended
No other use is
agents.
Operators of this appliance must be familiar with the appliance use,
limitations and associated restrictions. Operating instructions must be
read and understood by all persons using or installing this appliance.
Cleanliness of this appliance is essential to good sanitation. Read and
follow all included cleaning instructions and schedules to ensure the
safety of the food product.
Disconnect this appliance from electrical power before performing any
maintenance or servicing.
DO NOT submerge this appliance in water. This appliance is not jet
stream approved. Do not direct water jet or steam jet at this appliance,
or at any control panel or wiring. Do not splash or pour water on, in or
over any controls, control panel or wiring. Do not wash floor around
this appliance with water or steam jet.
Exposed surfaces of this appliance can be hot to the touch and may
cause burns.
Do not operate this appliance if the control panel is damaged. Do not
operate this appliance if the keypad section of the control panel is torn
or broken. Call your Authorized Wells Service Agent for service.
The technical content of this manual, including any wiring diagrams,
schematics, parts breakdown illustrations and/or adjustment
procedures, is intended for use by qualified technical personnel.
Any procedure which requires the use of tools must be performed by a
qualified technician.
This manual is considered to be a permanent part of the appliance.
This manual and all supplied instructions, diagrams, schematics, parts
breakdown illustrations, notices and labels must remain with the
appliance if it is sold or moved to another location.
This appliance is made in the USA. Unless otherwise noted, this
appliance has American sizes on all hardware.
recommended or authorized by the manufacturer or its
to prepare food for human consumption.
CAUTION:
Risk of
Damage
DO NOT connect or
energize this appliance
until all installation
instructions are read and
followed. Damage to the
appliance can result if
these instructions are not
followed.
CAUTION:
Hot Surface
Exposed surfaces can be hot
to the touch and may cause
burns.
page 3 of 10
Page 4
INSTALLATION (continued)
WARNING: Electric Shock Hazard
All servicing requiring access to non-insulated electrical components must be performed
DO NOT open any access panel which requires the use of tools. Failure to follow this warning
can result in severe electrical shock
by a factory authorized technician.
CAUTION:
Risk of
DO NOT connect or energize
this appliance until all
installation instructions are
read and followed. Damage
to the appliance can result if
these instructions are not
followed.
Damage
CAUTION:
Electrical Shock
The ground lug of this
appliance must be connected
to a suitable building ground.
NOTE: DO NOT discard
the carton or other packing
materials until you have
inspected the appliance for
hidden damage and tested it
for proper operation.
IMPORTANT: Oil must be
drained into a container
approved for the disposal of
hot oil.
IMPORTANT:
Contact a licensed electrician
to install and connect
electrical power to the
appliance.
IMPORTANT:
Damage due to being
connected to the wrong
voltage or phase is NOT
covered by warranty.
Hazard
UNPACKING & INSPECTION
Carefully remove the fryer from the carton. Remove all protective
plastic film, packing materials and accessories from the fryer before
connecting electrical power or otherwise performing any installation
procedure.
Carefully read all instructions in this manual and the Installation
Instruction Sheet packed with the fryer before starting any installation.
Read and understand all labels and diagrams attached to the fryer.
Carefully account for all components and accessories before
discarding packing materials. Store all accessories in a convenient
place for later use.
COMPONENTS
1 ea. Frypot 1 ea. Drain Extension
1 ea Frypot Drain Valve 1 ea. Drain Coupling
1 ea. Fryer Basket
INSTALLATION SETUP IN SPECIALLY PREPARED COUNTER
Be sure the fryer is firmly secured to the countertop.
IMPORTANT: DO NOT block the ventillation holes in the bottom of the
control section. Blocking these holes will lead to failure of electrical
and electronic components.
IMPORTANT: If the fryer is not installed in a specifically designed
countertop, it must be mounted on metal legs and adjusted to be level,
both side-to-side and front-to-rear.
(p/n 20563: legs, metal adjustable, set of 4)
Apply teflon tape or high-temp sealant to the threaded portion of the
drain fitting on the bottom of the fryer, and to the threaded portion of
the drain extension and coupling. Screw the frypot drain valve onto the
fitting on the bottom of the frypot, and assemble the drain extension
and coupling to the drain valve.
Set the frypot into the fryer. Be sure the valve is closed (valve handle
horizontal).
Refer to the Installation Instruction Sheet for required clearances.
Maintain required clearances between the appliance and adjacent
combustible surfaces.
Contact a licensed electrician to install an appropriate electric circuit
and connect electrical power to the appliance.
Avoid storing flammable or combustible materials in, on or near the
appliance.
page 4 of 10
Page 5
OPERATION
NORMAL OPERATION
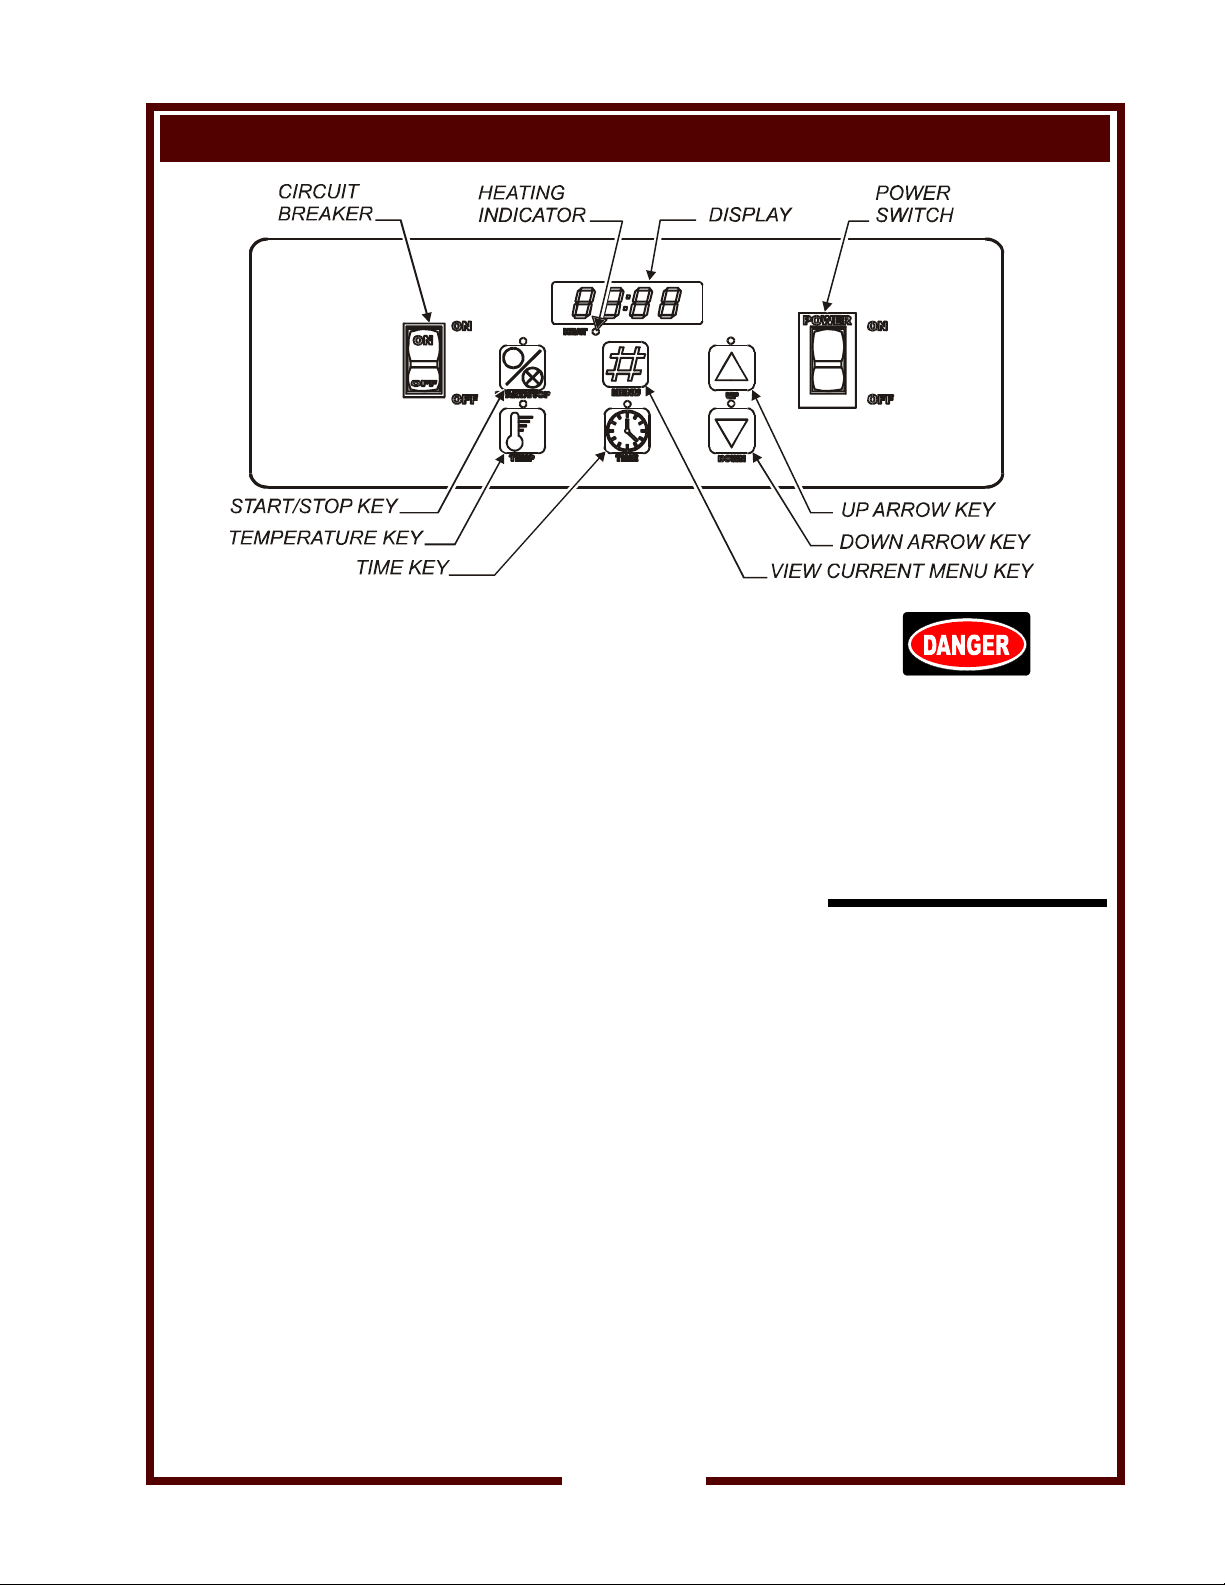
1. a. Lower the ELEMENT HEAD into the frypot by pushing back on
the ELEMENT LIFTING HANDLE, raising the SUPPORT ROD,
then carefully lowering the elements.
b. Be sure FRYPOT DRAIN VALVE is closed (drain valve handle
horizontal).
c. Fill the FRYPOT with commercial-grade liquid shortening to the
desired level. Minimum and maximum levels are marked on the
inside of the frypot.
2. Press CIRCUIT BREAKER to ON. Press POWER SWITCH to ON.
The unit will start preheating to the last menu item programmed.
The HEAT indicator will glow any time the heating elements are
energized.
3. Select a menu item by pressing the UP ARROW or DOWN ARROW
key until the desired menu number is displayed.
4. Load product into the FRYER BASKET and hang the basket on the
BASKET LIFT.
5. Press the START/STOP key to begin a cooking cycle. The basket
will lower and the controller will begin counting down the cycle time.
Note: You may press the START/STOP key while the unit is in
“preheat”. The basket will automatically lower and begin the
cooking cycle once the oil has reached the desired temperature.
6. When the cycle is complete the basket will raise and the display will
show a menu number, such as "- -1 - -” indicating the ready state.
7. To cancel the cook cycle press the START/STOP key. The cooking
cycle will be cancelled and the basket will rise. The fryer will return
to the ready state.
DANGER:
BURN HAZARD
Contact with hot oil will cause
severe burns.
Always wear protective
clothing and heat resistant
gloves when operating the
fryer.
NOTE:
No alarm will sound at the
end of the cycle.
NOTE:
Only the programmed menu
items can be displayed.
page 5 of 10
Page 6
Enter Program Mode
OPERATION (continued)
PROGRAMMING INSTRUCTIONS
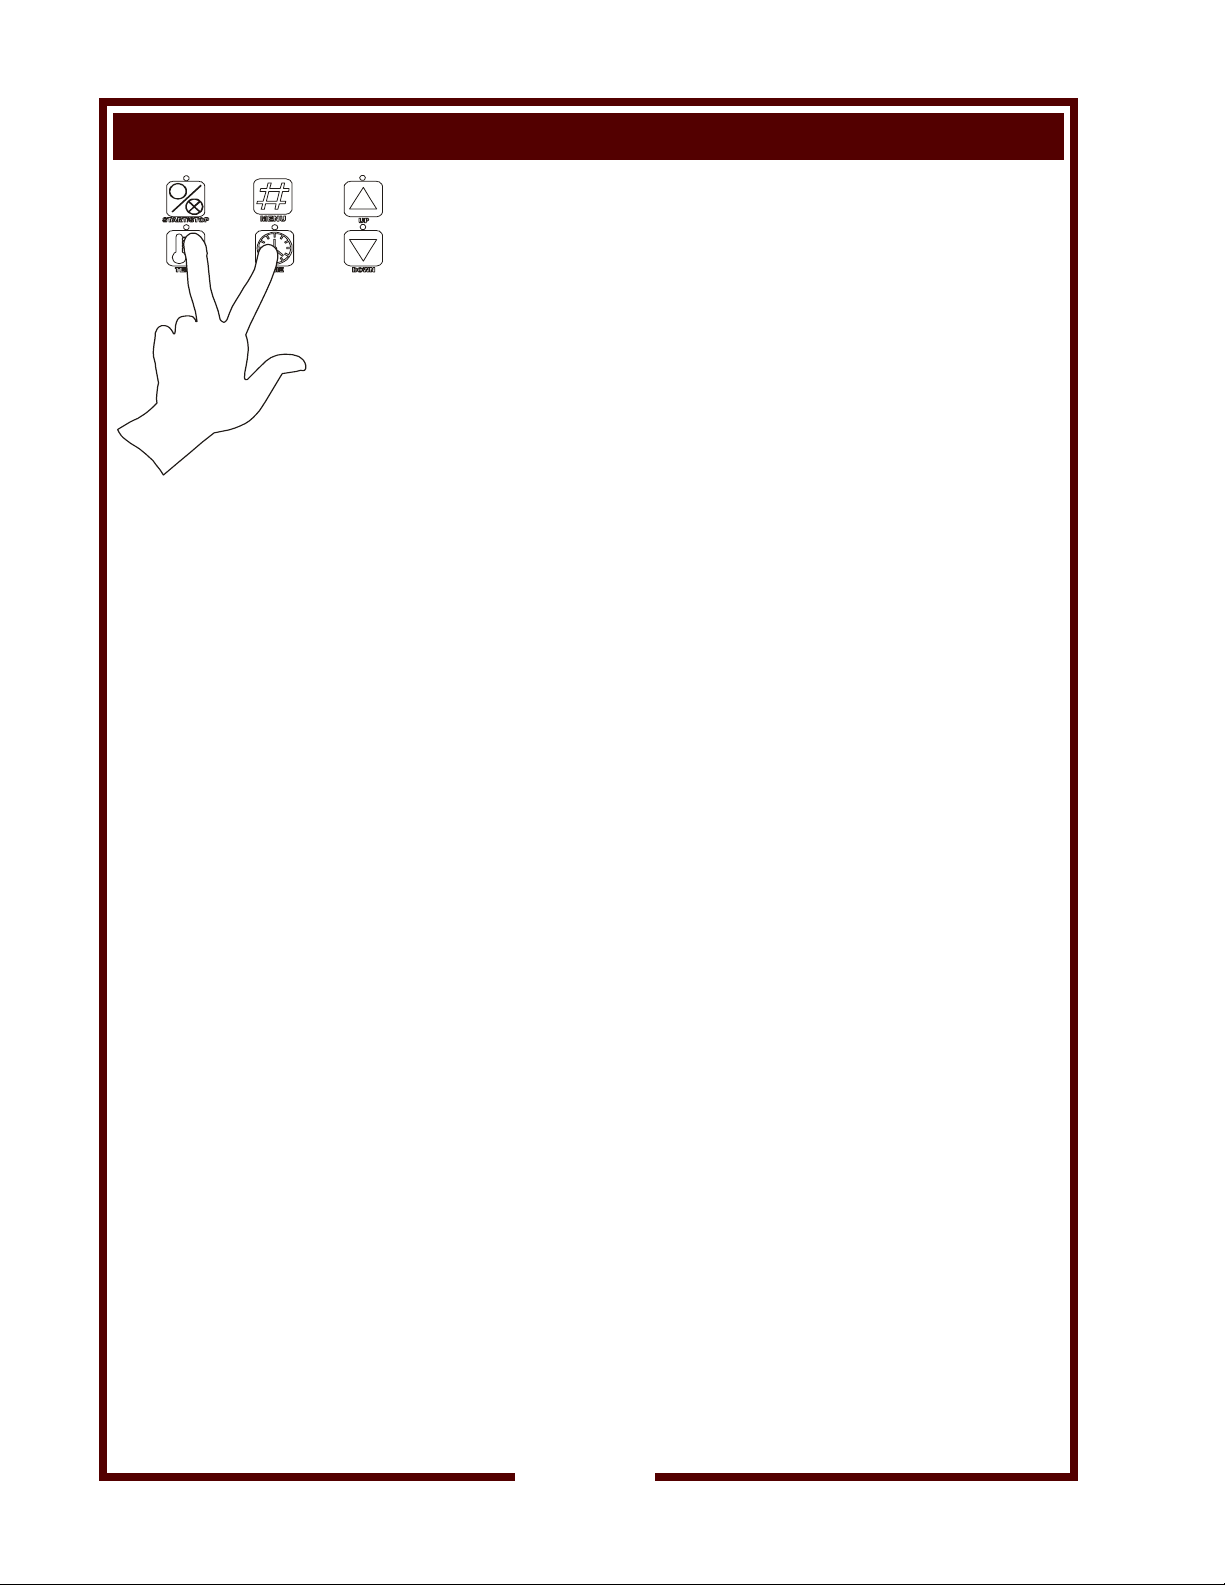
1. Press TEMP and TIME keys together for 3 seconds to enter the
programming mode.
2. "PrOg" is displayed - Scroll "Up" or "Down" using the UP ARROW
key or DOWN ARROW key to the desired menu number
"Pr- ##" is displayed. For example "PrOl " is program #1.
3. Press TEMP key - The "temp" value is displayed.
4. Use the UP ARROW key or DOWN ARROW key to change the
temperature value being displayed.
5. Press TEMP key again to save this new value:
NOTE: a (1) second beep acknowledges the change and "Pr - ##"
is displayed.
6. Press "Time" button - The "time" value is displayed.
7. Use the UP ARROW key or DOWN ARROW key to change the
time value being displayed.
8. Press the TIME key again to save this new value.
9. Repeat steps 2 - 8 to program up to a maximum of 40 menus; or,
Press START/STOP key to exit the programming mode and start
preheating to cook temperature setpoint of the last menu number
that was programmed.
TEMPERATURE
To view the actual oil temperature press the TEMP key once.
To view the programmed oil temperature press the TEMP key twice.
TIME
To view the programmed time press the TIME key once.
CANCEL A COOKING CYCLE
To cancel a cook cycle press the START/STOP key. The cooking cycle
will be cancelled and the basket will rise. The unit will return to the
ready state.
PAUSE (Manually Lifting the Basket During a Cooking Cycle)
To pause the cooking timer to check the product, press the UP ARROW
key momentarily. The display will read "PAUSE", and the cooking timer
is paused. Manually lift the basket to check product.
To resume cooking, press the DOWN ARROW key. The cooking timer
will finish counting down.
page 6 of 10
Page 7
CLEANING INSTRUCTIONS
DANGER: BURN HAZARD
Contact with hot oil will cause severe burns. Allow the fryer to cool before cleaning.
Always wear protective clothing and heat resistant gloves when cleaning the fryer.
PREPARATION Turn temperature control to OFF
Allow fryer to cool completely before cleaning
Disconnect from electric power before cleaning
FREQUENCY Daily, or as needed
TOOLS Mild Detergent, Non-abrasive cleanser
Soft Cloth or Sponge, Plastic Scouring Pad
Container for disposal of used oil.
CLEANING
1. Turn temperature control to OFF. Disconnect the fryer.
2. Remove fry baskets, then swing the element head up and out of
the frypot.
NOTE: The element support rod is spring-loaded. When the
element head is raised, the support rod will automatically swing
into position to keep the element head raised.
3. Allow the oil to cool to a safe temperature. Drain the oil into a
suitable container. Wearing heat-resistant gloves, carefullylift the
frypot by the handles and remove from fryer.
4. Frypot and baskets may be washed in a dishwasher, or with warm
water and mild detergent. Rinse thoroughly and dry completely.
5. Wipe/brush all crumbs, breading and cooking debris from
elements. Pay particular attention to the area between the element
and the thermobulbs. Be careful that the capillary tubes of the
thermobulbs are not damaged during cleaning.
6. Keep all exterior surfaces free from splashed grease by wiping with
a clean cloth dampened with warm water and mild detergent. A
non-abrasive detergent and plastic scouring pad may be used for
stubborn deposits.
IMPORTANT: DO NOT use steel wool or abrasive cleansers
as these will damage the surface finish.
IMPORTANT: DO NOT submerge fryer in water. DO NOT spill or
pour water into controls, control panel or wiring. Damage to
internal components will occur.
7. Be certain frypot is completely dry, then reinstall in fryer.
a. Be sure the TEMPERATURE CONTROL KNOB is turned to
OFF, then plug unit into receptacle.
b. Lower the ELEMENT HEAD into the frypot by pushing back on
the ELEMENT LIFTING HANDLE, raising the SUPPORT ROD,
then carefully lowering the elements.
c. Be sure drain valve handle is horizontal, then add new or
filtered oil to the MIN OIL line in frypot.
Procedure is complete.
CAUTION:
Electric Shock
Hazard
Disconnect fryer from electric
power before cleaning.
CAUTION:
Burn Hazard
Allow fryer to cool completely
before cleaning.
CAUTION:
Electric Shock
Hazard
Do not submerge fryer in
water.
IMPORTANT: DO NOT spill
or pour water into controls,
control panel or wiring.
DO NOT submerge fryer in
water. Damage to internal
components will occur.
Damage to internal
components from water
damage is not covered by
warranty.
IMPORTANT: DO NOT use
steel wool or abrasive
cleansers for cleaning the
fryer cabinet or frypot.
page 7 of 10
Page 8
DISPOSAL OF USED OIL
DANGER: BURN HAZARD
Contact with hot oil will cause severe burns. Allow the fryer to cool before cleaning.
Always wear protective clothing and heat resistant gloves when handling hot oil.
PREPARATION Turn temperature control to OFF
Allow fryer to cool completely before draining
FREQUENCY Daily, or as needed
TOOLS Container for disposal of used oil.
OIL DISPOSAL
1. Turn temperature control to OFF.
2. Allow the oil to cool to a safe temperature (below 50ºC).
Place a suitable hot oil disposal container under the drain valve.
3. Open the drain valve by turning the handle to the vertical position.
DO NOT fill the disposal container more than one-half full. Turn
the drain valve handle to the horizontal position to shut off the drain
valve.
4. Dispose of the used oil in an approved oil disposal receptacle, or
filter the oil for reuse.
5. Repeat steps 3 and 4 until the frypot is empty.
6. Turn the drain valve handle to the horizontal position to shut off the
drain valve. Add new or filtered oil to the MIN OIL line in frypot.
Procedure is complete.
CAUTION:
Burn Hazard
Allow fryer to cool completely
before draining.
CAUTION:
Slip and Fall
Hazard
Clean up oil spills
immediately. Slipping in oil
can cause injury.
CAUTION:
Health Hazard
Clean up oil spills
immediately. Oil provides an
environment for the growth of
bacteria, which presents a
health hazard.
page 8 of 10
Page 9
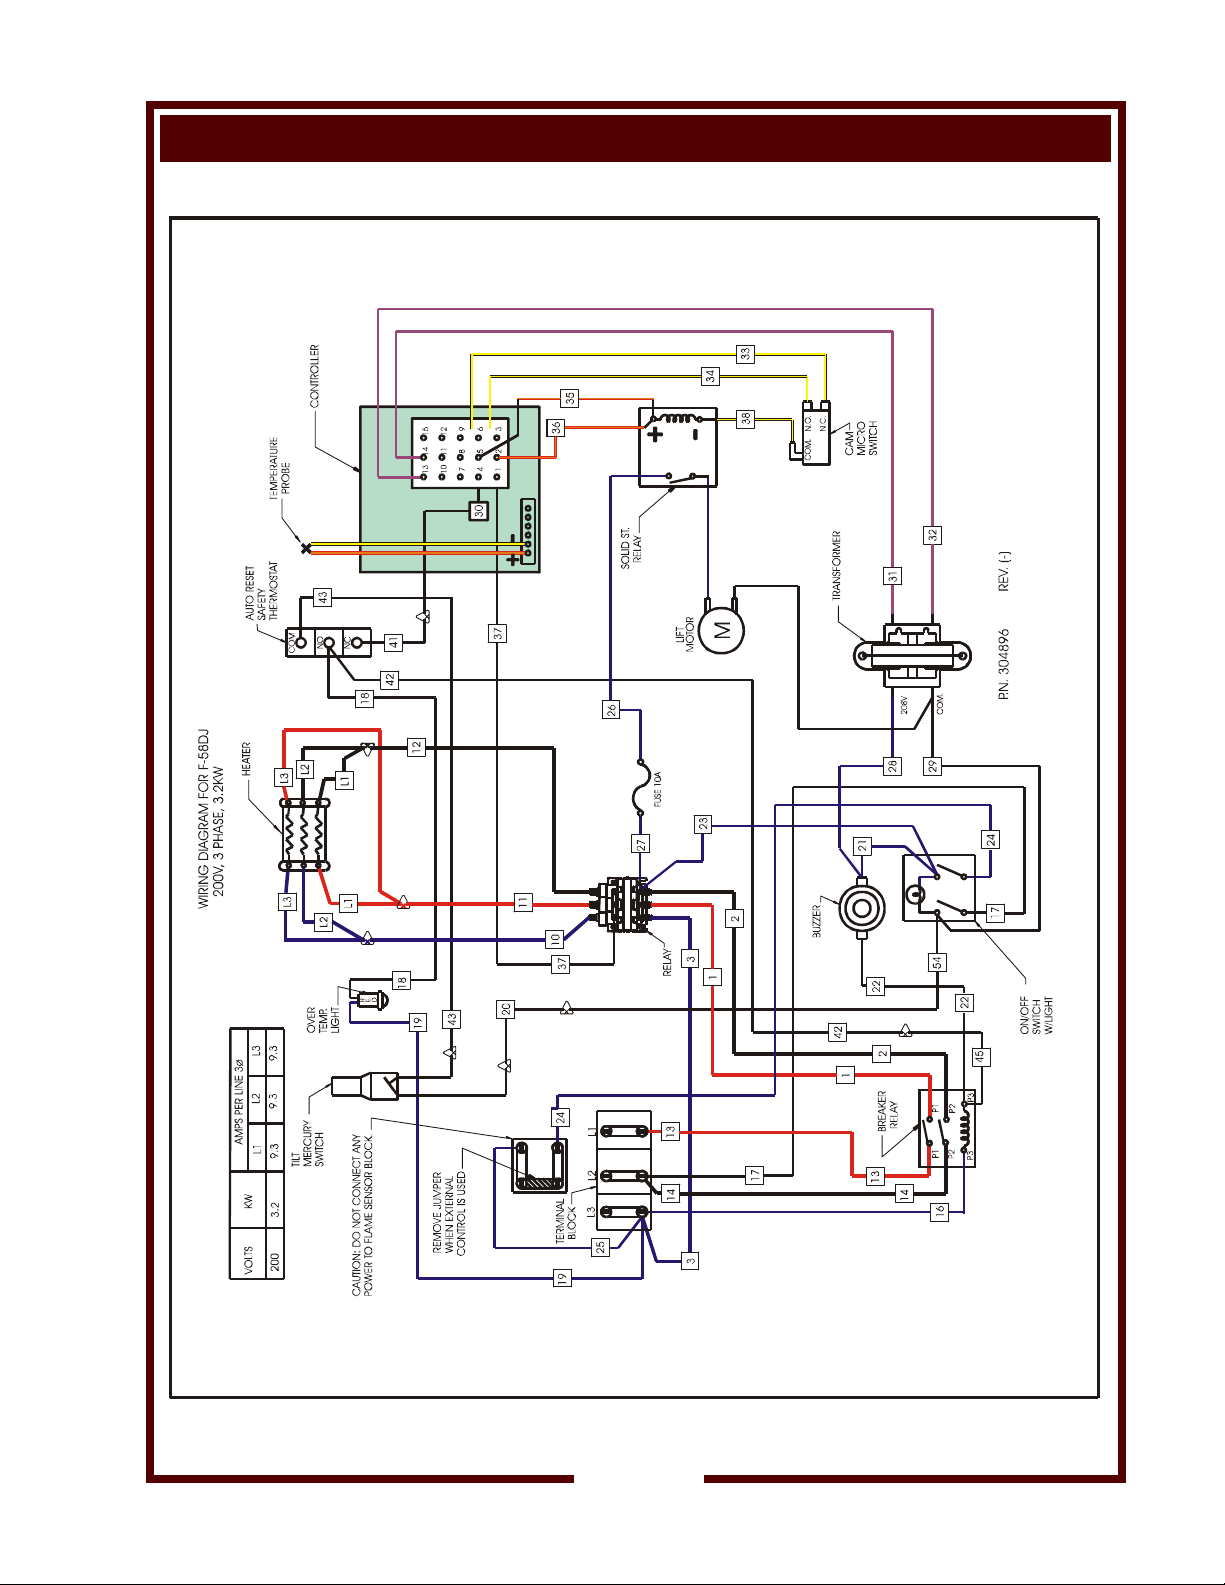
WIRING DIAGRAM
page 9 of 10
Page 10
 Loading...