

Page 1
1 of 8 Wellness Supply Group V001
Active Passive Trainer
RX AP Start
!
!
!
!
!
!
Wellness Supply Group, LLC
1685 Woodland Avenue,
Columbus, OH 43219
Tel: 800-653-8037
Fax: 614-474-1483
E-mail: [email protected]!
!
Page 2

2 of 8 Wellness Supply Group V001
Table of Contents
1. Important Safety Information …………………………………………………… 3
i. Before You Begin
ii. Warning
2. Assembly Instructions …………………………………………………… 4
3. Adjusting your Rx AP Start …………………………………………………… 5
4. Wheelchair Use …………………………………………………… 5
5. Computer Console Instructions …………………………………………………… 6
i. Main Display
ii. Functions
iii. Additional Notes
6. Maintenance …………………………………………………… 8
7. Storage and Moving …………………………………………………… 8
8. Product Warranty …………………………………………………… 8
9. Product Specifications …………………………………………………… 8
Page 3

3 of 8 Wellness Supply Group V001
1. Important Safety Information
i) Before You Begin
Please read this manual carefully from beginning to end before using the equipment for the first
time.
This exercise equipment is designed and built for optimum safety. However, certain precautions
are applied whenever you operate a set of exercise equipment. Make sure to read the entire
manual before assembling and operating this machine. Also, please note the following safety
precautions:
1. Read the following instructions carefully before using the machine.
2. Consult your physician or other health care professional, before beginning this or any other
exercise program.
3. Always wear proper exercise apparel when using the machine.
4. If at any time you feel faint, light-headed or dizzy while operating the machine, stop
exercise immediately. You should also stop exercising if you are experiencing pain or
pressure.
5. Keep children and pets away from the machine while in use.
6. Only one person can use the machine at a time.
7. Make sure your machine is correctly assembled before you use it. Make sure all screws,
nuts, and bolts are tightened prior to using the machine.
8. Do not operate this or any exercise equipment if it is damaged.
9. Watch your body: come up slowly; dizziness after a session means you came up too fast.
10. Wait a while after eating before using this machine. If you get nauseous, stop exercising
immediately.
11. Keep hands and feet away from any moving parts. Do not insert any objects into any
openings.
12. Keep clothes, jewelry or loose items away from moving parts.
ii) Warning
Before beginning any exercise program, consult your physician. This is especially important for
individuals over the age of 35 or persons with pre-existing health problems. Read all instructions
before using any fitness equipment. We assume no responsibility for personal injury or property
damage sustained by or through the use of this product.
Page 4
4 of 8 Wellness Supply Group V001
2. Assembly Instructions
Unpack the carton and check all parts. Verify that all components are present. Do not dispose of
carton or packing material until assembly has been completed and the equipment fully tested.
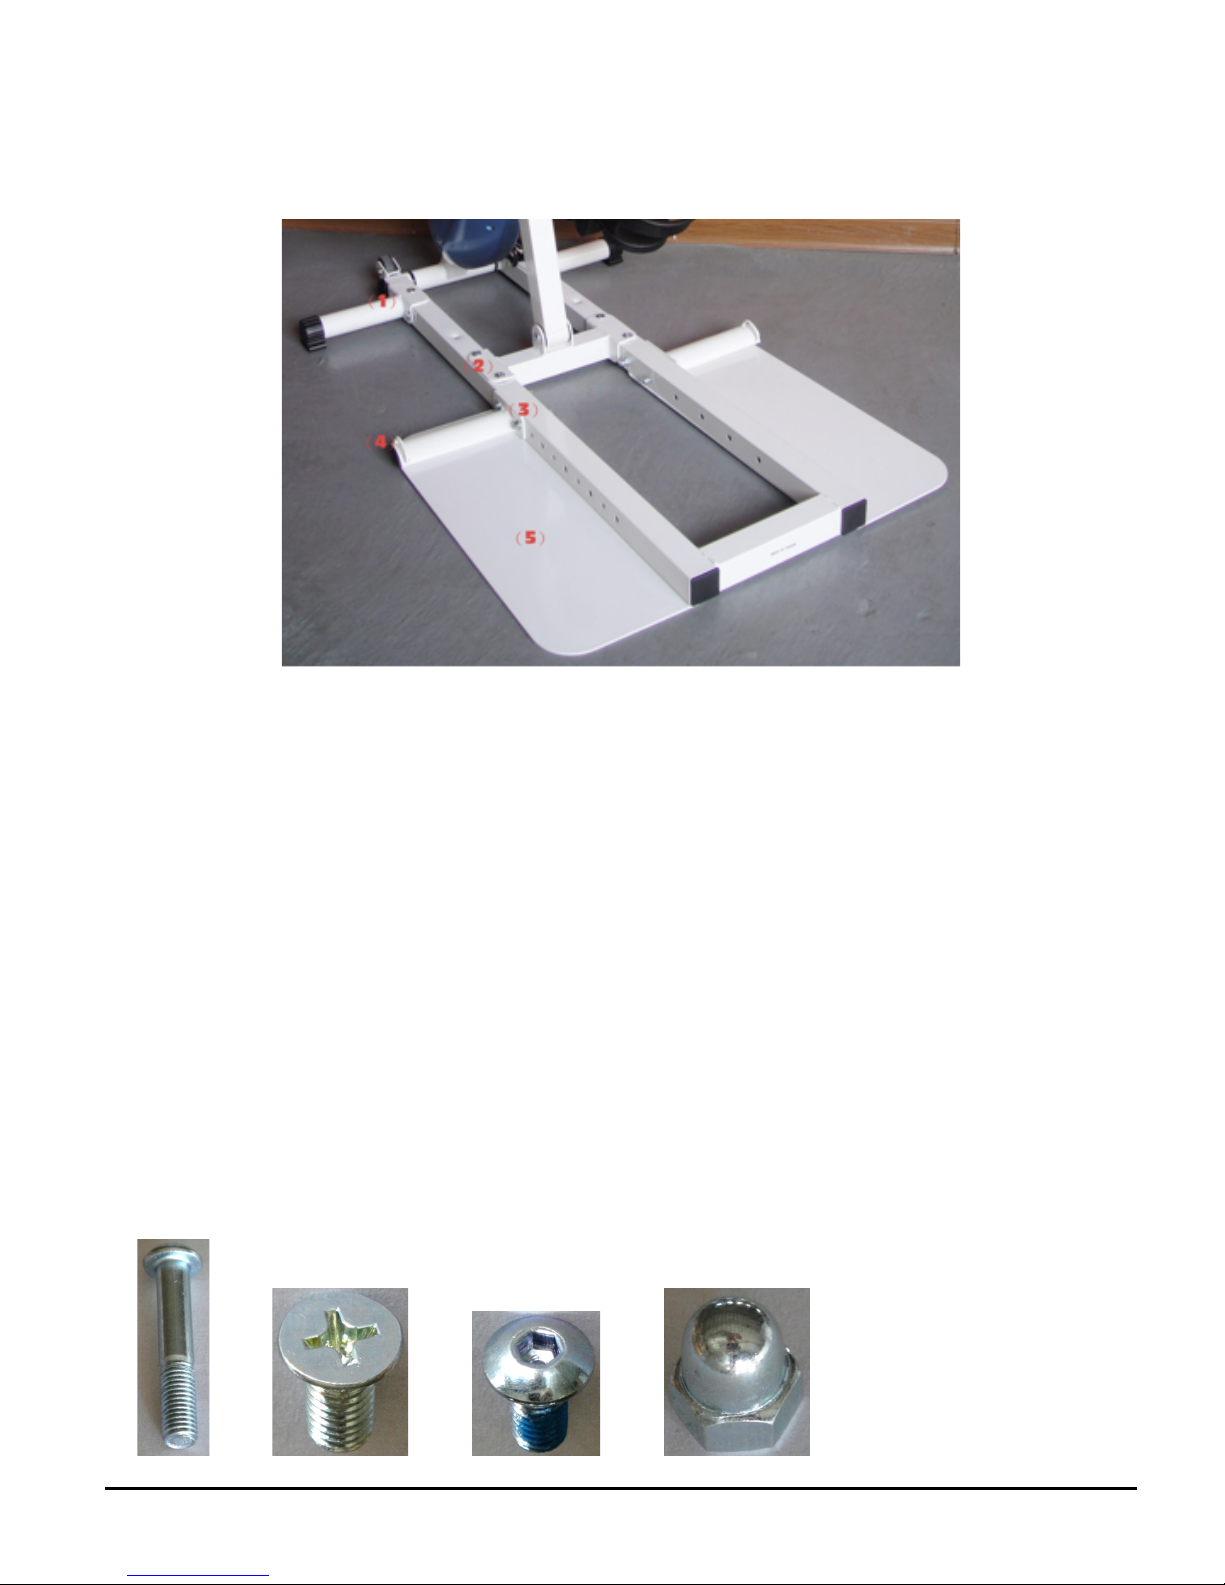
The Rx AP Start comes with four parts (seven pieces):
1. Front Extended Post
2. T Shape Tube
3. Ramp Tube
4. Steel Plate
To install the Front Extended Posts (1), line up the hole of the Post itself, to the hole on the main
frame as shown. Then use the Round Head Screw (C) and tighten. Repeat for other side.
To install the T Shape Tube (2), line up the 2 holes of the T Shape Tube to 2 out of 3 holes on
the main frame. Then use the Round Head Screw (C) and tighten.
To install the Ramp Tube (3), line up 2 holes on the Ramp Tube to 2 out of 10 holes on the side
of frame as shown on the photo. Use the Round Head Shoulder Screws (A) and Nuts (D) to
tighten the Ramp.
To install the Steel Plate, line up the 2 holes on the Plate to 2 out of 3 holes on the bottom. Use
the Flat Head Screws (B) and tighten.
A B C D
Page 5
5 of 8 Wellness Supply Group V001
3. Adjusting your Rx AP Start
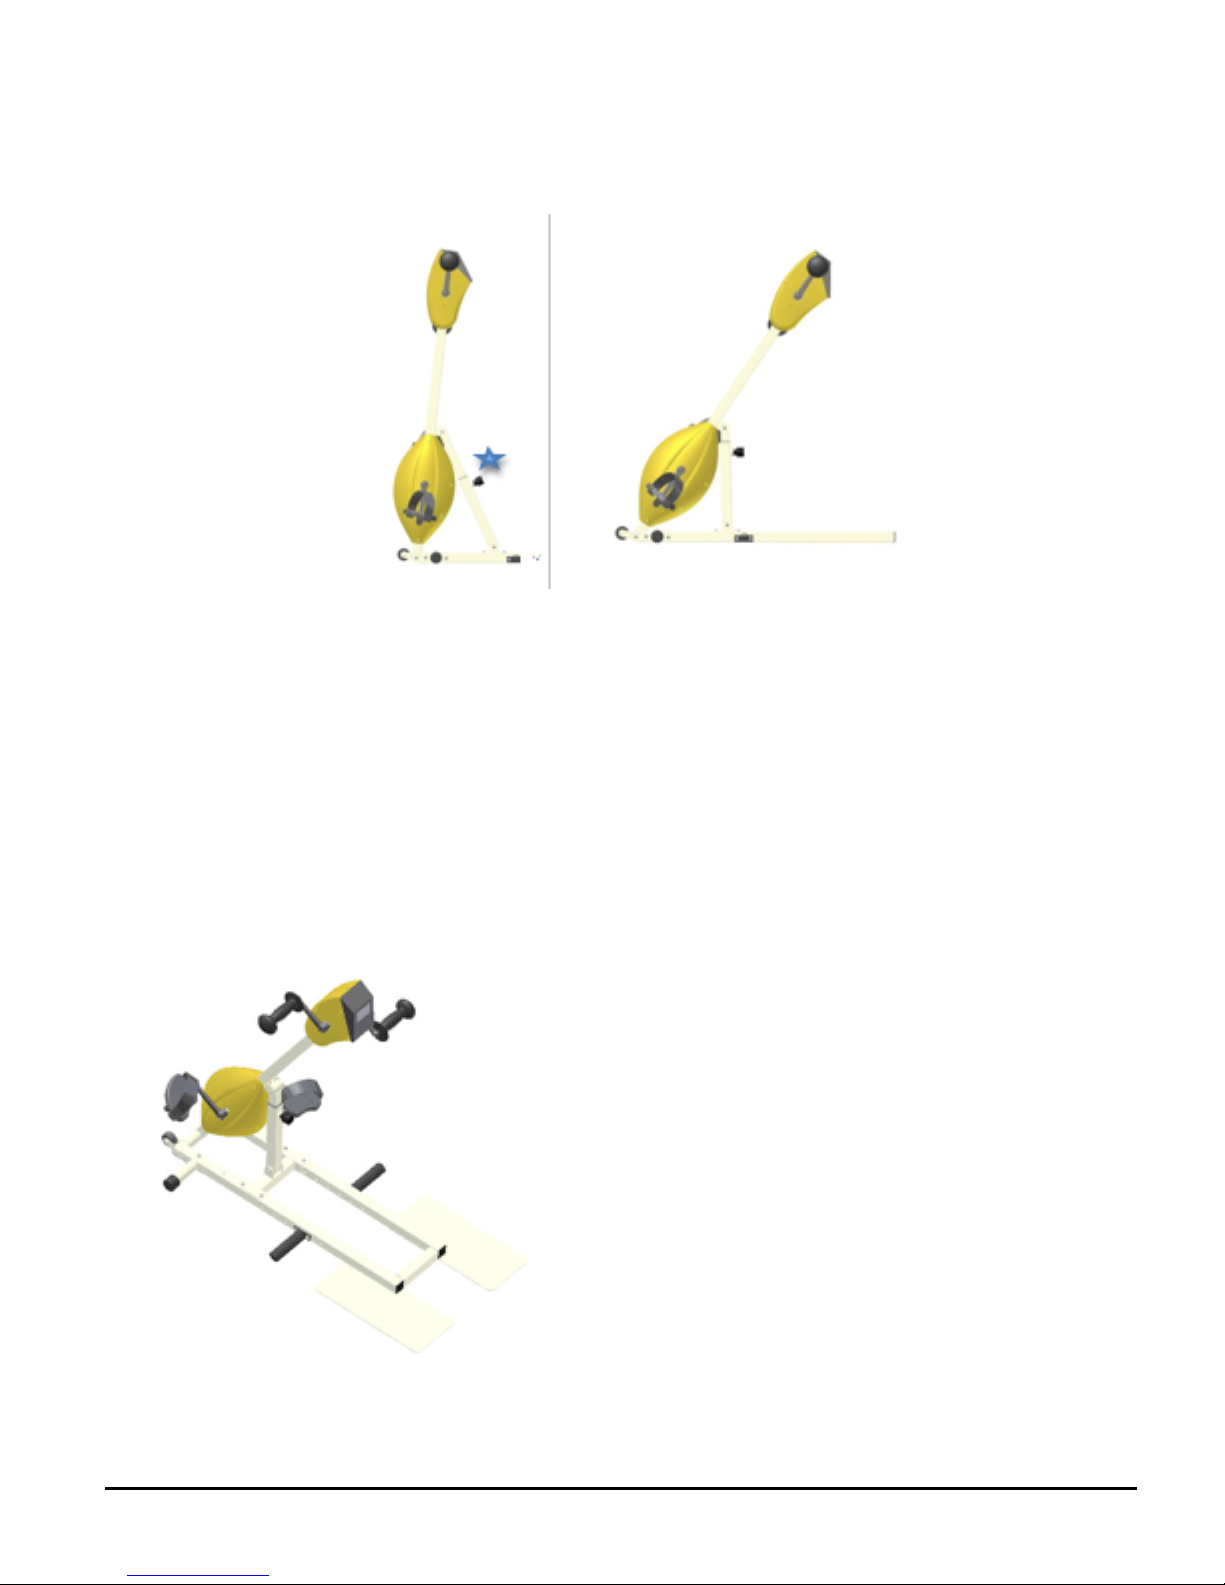
The angle of the Rx AP Start can easily be adjusted from 45 to 85 degrees in order to suite the
requirements of each user.
To adjust the angle:
1. Turn the knob anti-clockwise for 2 turns and pull it out.
2. Whilst holding the knob, adjust to the desired angle.
3. Release the knob and it will lock into the hole.
4. Turn the knob clockwise in order to tighten.
4. Wheelchair Use
The Rx AP Start has been specifically designed for wheelchair users.
To ensure optimum safety, each
wheel must be placed centrally on
the plate with the wheelchair
castor positioned in front of the
ramp bar.
Page 6
6 of 8 Wellness Supply Group V001
5. Computer Console Instructions
Please familiarize yourself with the workings of this computer console to maximize your
exercise/therapy session.
i) Main Display
!!!!!!
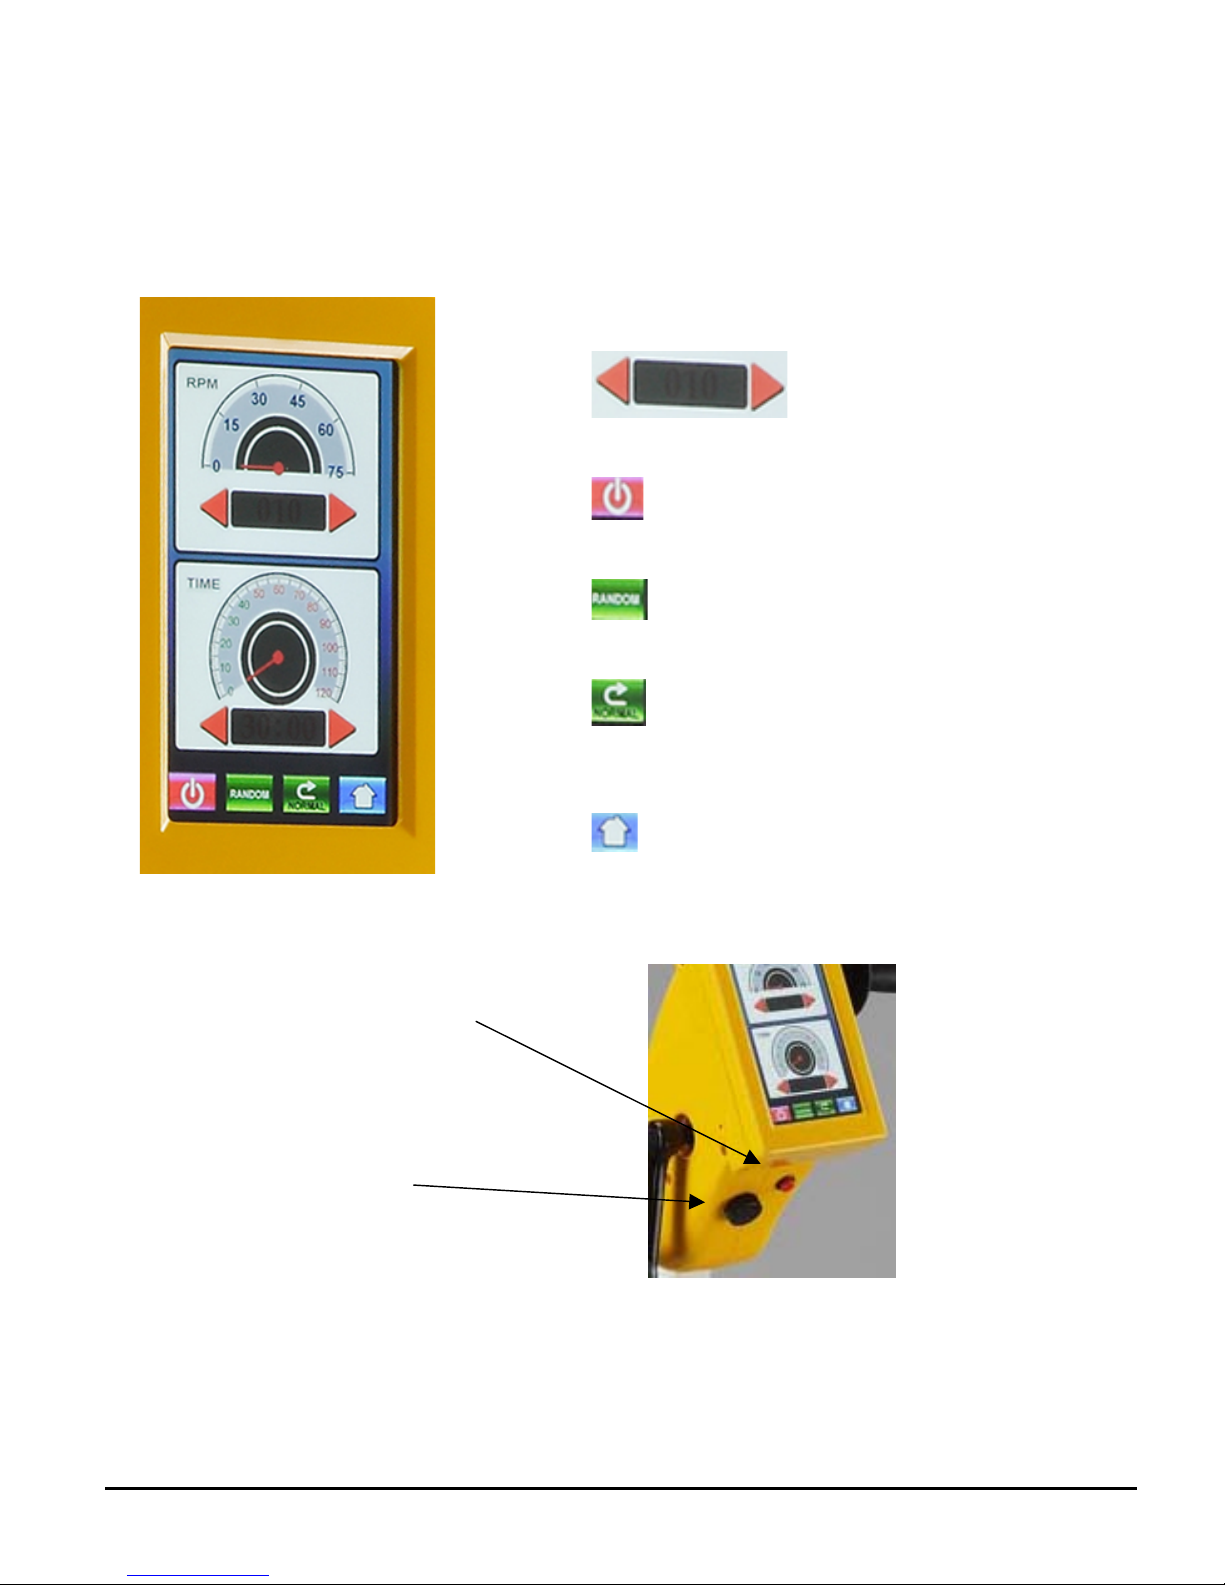
On the Home page, the Active Key is for the Active Mode exercise and the Passive Key
is for the Passive Mode exercise.
To start the unit, press the “SAFETY KEY”.
Up and Down Keys.
The Start / Stop Key.
Key to change speed randomly.
Reverse Key: press to change between
forward and reverse.
Home Page Key.
!
Knob to adjust
the level of
resistance in
Active Exercise
Mode.
The Emergency
Stop Key.
!
Page 7
7 of 8 Wellness Supply Group V001
ii) Functions
The Rx AP Start is equipped with two functions: Passive Exercise Mode and Active Exercise
Mode.
Passive Exercise Mode is built for users who have limited strength or no strength at all. The
powered assistance will help users who need rehabilitation exercise.
Active Exercise Mode is built for users who would benefit from increased strength. The active
exercise is self-movement by the thus improving their overall strength.
a) Passive Exercise Mode
From the Home Page, select Passive Key. This will take you to the Passive Panel where you
can choose one of two Passive Exercise Modes: Pre-set Program and Manual Setting.
Pre-set Program: This is the simplest way to use the Rx AP Start as all the user needs to do is
press the Start / Stop Key and a 30-minute exercise program will commence. The user can
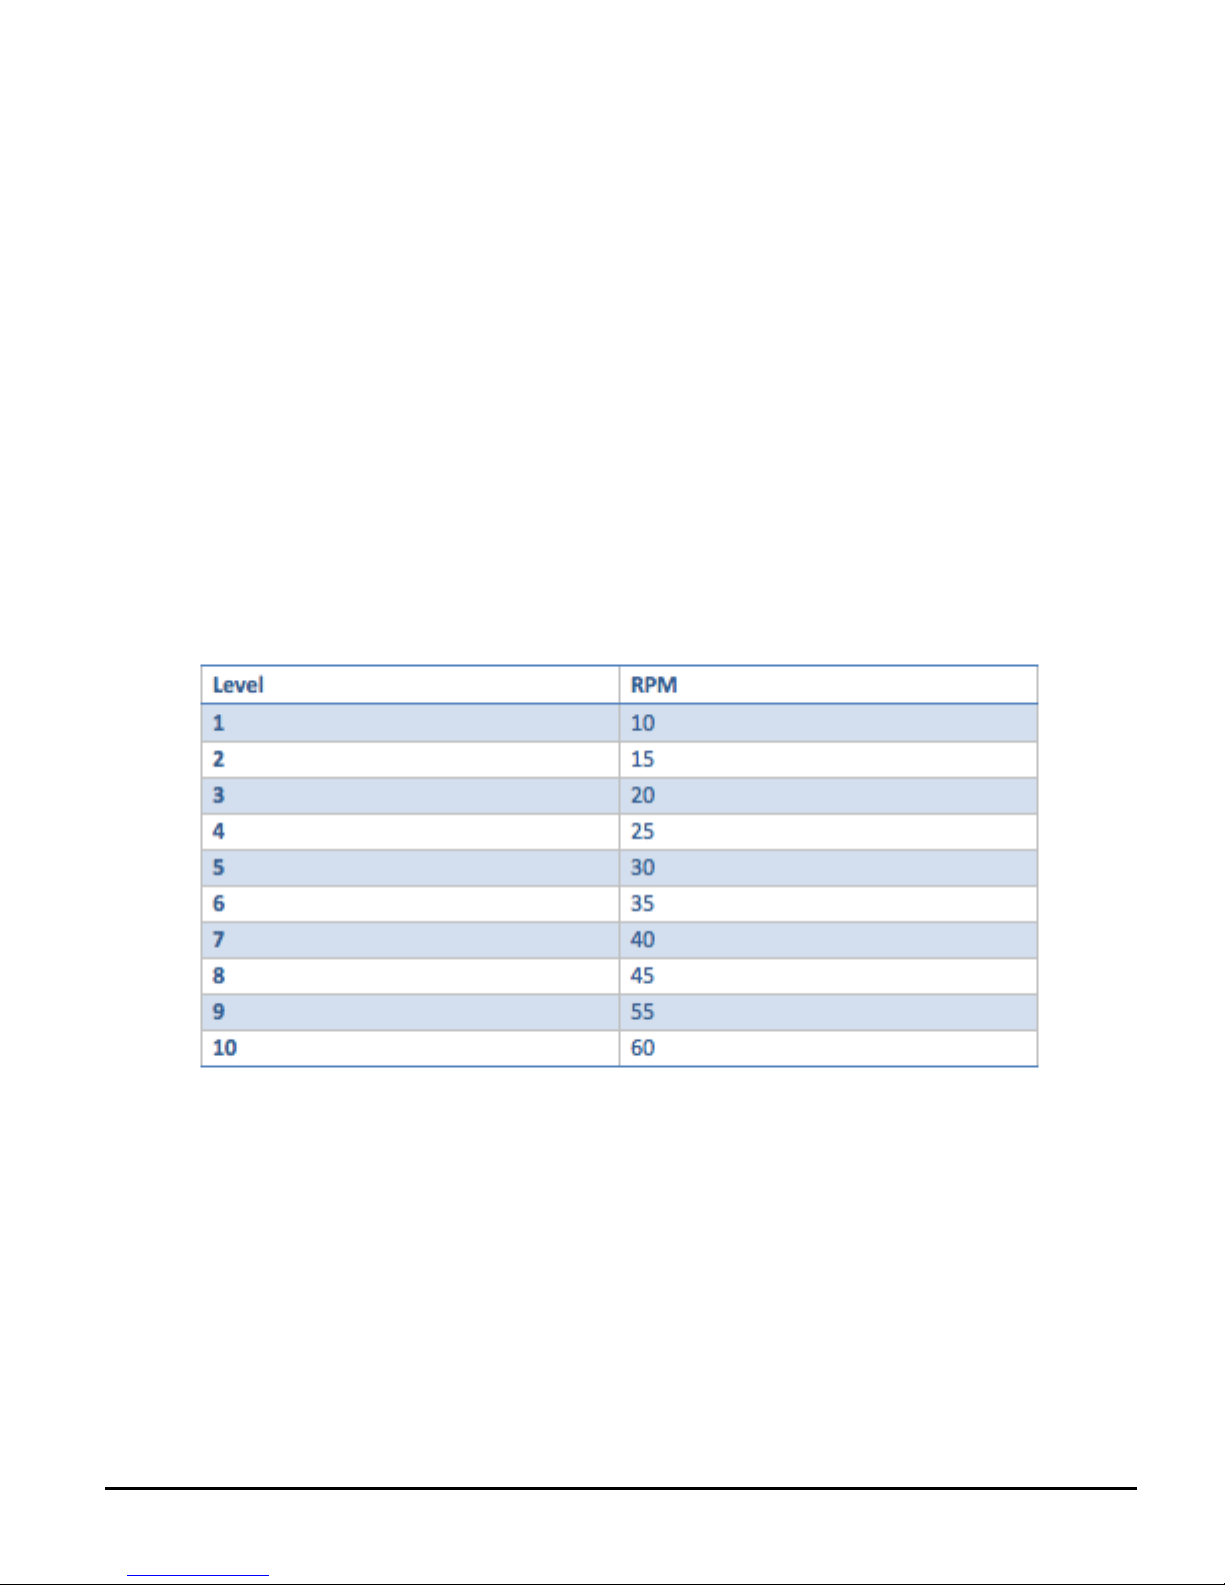
easily change the RPM during exercise by pressing the Up Key to increase the Level/RPM or
the Down Key to decrease the level/RPM.
The following shows Level against RPM:
The exercises can be done in forward or reverse. This bi-directional motion is available while in
Active or Passive Mode. To reverse direction, press the REVERSE Key, the unit will slow down
gradually, stop and then start to move in the opposite direction increasing to the previously set
speed.
Manual Setting: To choose this setting, before pressing the Start / Stop Key, the user can set
the:
• exercise workout time by pressing the Up or Down Keys until the desired time is displayed.
The time range is from 5 to 60 minutes and increases/decreases in 5-minute intervals.
• RPM by pressing the Up or Down Keys in the RPM panel until the desired RPM is showing.
The RPM range is from 10 to 60 and increases/decreases in increments of 5 RPM.
The user can easily change the RPM during exercise by pressing the Up Key to increase the
Page 8

8 of 8 Wellness Supply Group V001
Level/RPM or the Down Key to decrease the level/RPM.
b) Active Exercise Mode
From the Home Page, select Active Key. This will take you to the Active Panel where you can
set your own exercise time and RPM (as above). You can also change the level of resistance by
simply turning the knob (see diagram on p.6) clockwise for more resistance and anti-clockwise
for less resistance. There are 6 resistance levels in total.
iii) Additional Notes
a) The Rx AP Start has anti-spasm. As such, it will stop or turn off automatically when the
resistance from users has caused the crank to not rotate for 5 seconds or more.
b) It will also turn off automatically if the RPM goes over 80.
c) The Emergency Stop Key can also be used to stop the unit immediately during exercise.
6. Maintenance
i) Keep the product clean and free from dust, dirt and foreign substances.
ii) Inspect regularly for any damage and general ware and tear.
iii) Replace worn or damaged parts immediately.
iv) Repair of product should be carried out by a certified technician or manufacturing
company.
v) Do not repair the device outside of manufacturers recommendations.
7. Storage and Moving
i) Keep product in a clean, dry environment.
ii) Should be kept on a flat surface.
iii) Never drop or roughly handle the product.
8. Product Warranty
i) 1 year, limited warranty.
ii) Product warranty does not cover damage or equipment failure resulting from mis-use,
abuse, or external impact.
iii) Product warranty will not apply if there is any modification to the product outside the
manufacturers recommendations.
9. Product Specifications
Dimensions: 48” L x 24” W x 40” – 48” H
Unit Weight: 65lbs.
Power: 110V AC
 Loading...