

Page 1
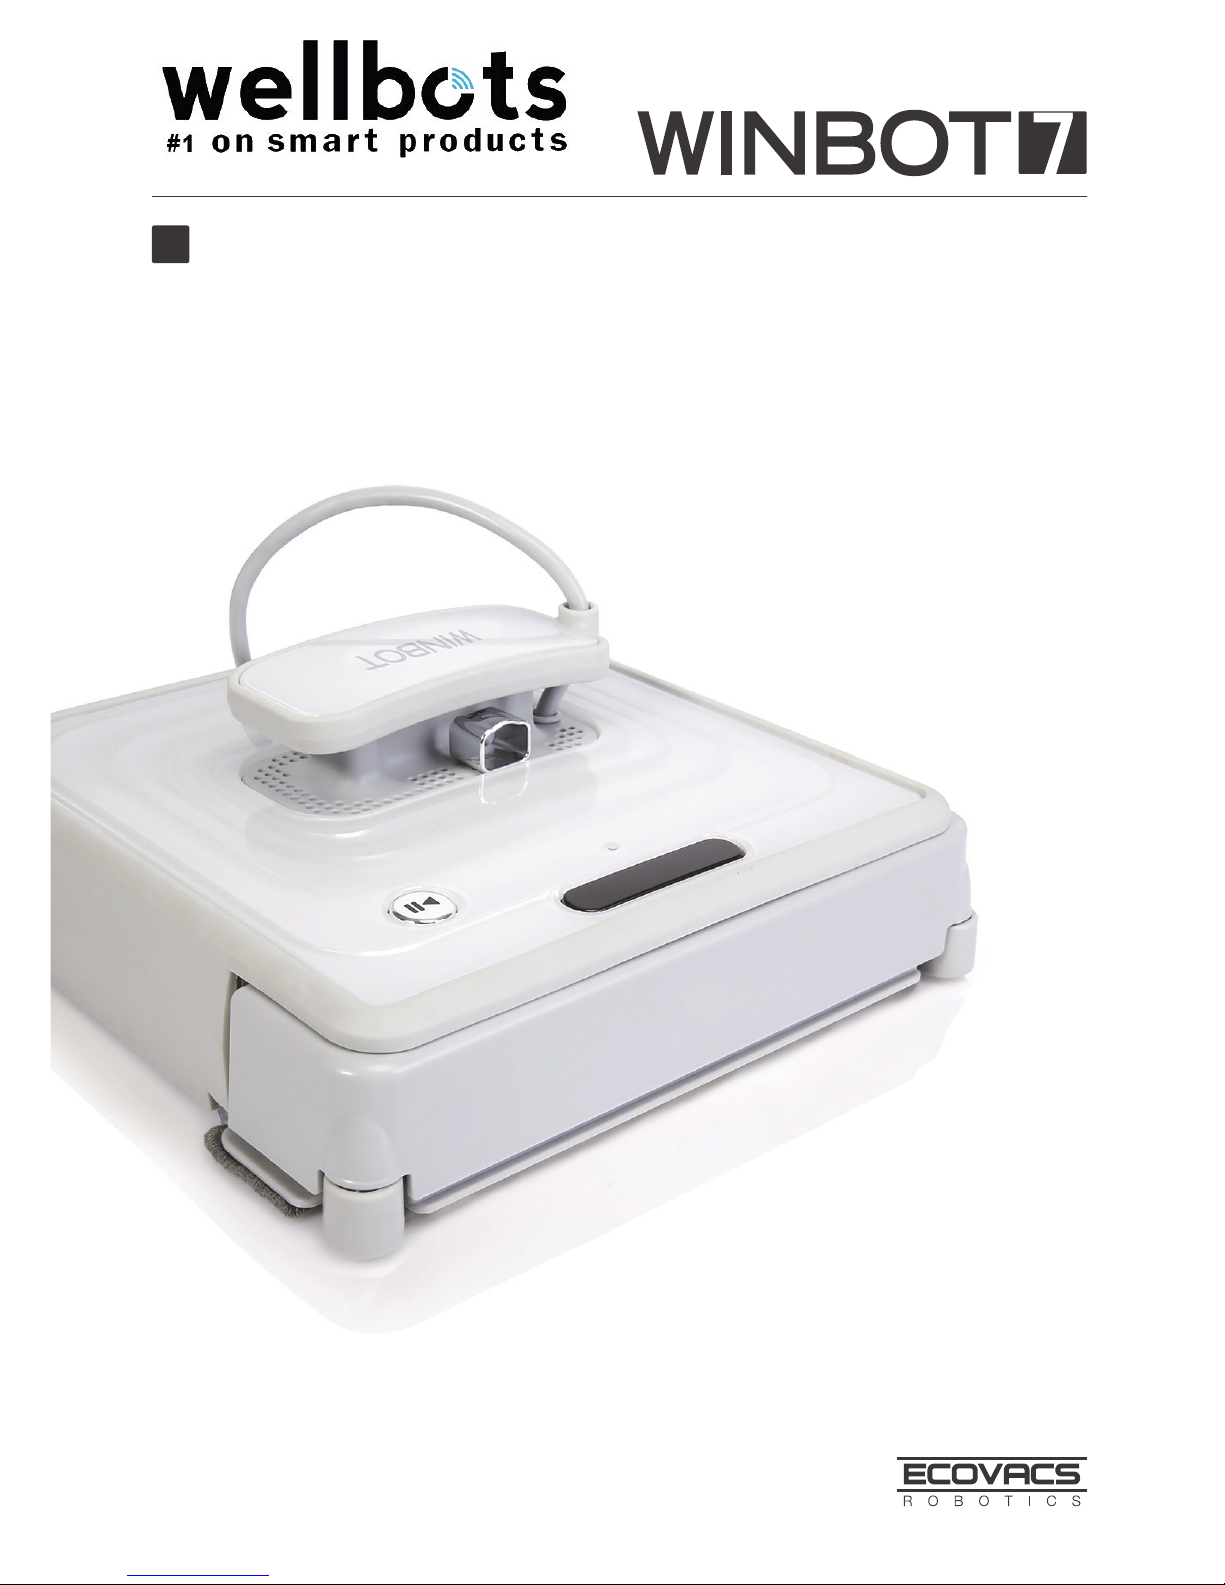
Instruction Manual
EN
Page 2

Live Smart. Enjoy Life.
Congratulations on the purchase of your Ecovacs Robotics WINBOT!
We hope it brings you many years of satisfaction. We trust the purchase of your
new robot will help keep your home clean and provide you with more quality time
to do other things.
Before you go any further, please register your product on the Ecovacs website
at www.ecovacsrobotics.com/registration/. We also suggest you record your
model number, serial number, date of purchase and attach your receipt to this
page for safekeeping.
MODEL # __________________________
SERIAL # __________________________
DATE OF PURCHASE ____ /____ /_______
Should you have any problems programming the robot or getting your robot to
function properly, please call us before contacting or returning it to the place of
purchase. For more information, assistance or Warranty information, please
visit the Ecovacs Robotics website at www.ecovacsrobotics.com or call
1-844-ECOVACS (1-844-326-8227).
Thank you for choosing WINBOT!
Page 3
Contents
1. Important Safety Instructions ...................................................................... 2
...................................... 4
2.1 Package Contents ....................................................................................4
2.2 ........................................................................................... 4
2.3 Product Diagram ......................................................................................5
3. Operating the Robot .....................................................................................6
3.1 Notes Before Cleaning ............................................................................. 6
3.2 Attach the Cleaning Pad ........................................................................... 7
3.3 Assemble the Power Adapter ................................................................... 7
3.4 Install the Safety Tether ...........................................................................7
3.5 Place the Safety Pod ................................................................................ 9
3.6 Spray Cleaning Solution ........................................................................... 9
3.7 Start ........................................................................................................10
3.8 Pause ..................................................................................................... 11
3.9 Stop ........................................................................................................ 11
4. Maintenance ................................................................................................12
4.1 Cleaning Pads ........................................................................................12
4.2 Cupule, Side Rollers and Sensors .........................................................12
4.3 Driving Treads ........................................................................................13
5. Status Indicator Light and Sounds ...........................................................14
6. Troubleshooting .........................................................................................15
Page 4

EN
2
1. Important Safety Instructions
When using an electrical appliance, basic precautions should always be followed, including
the following:
READ ALL INSTRUCTIONS BEFORE USING THIS APPLIANCE.
SAVE THESE INSTRUCTIONS
1. This Appliance is not intended to be used by children under 8 or anyone lacking knowledge
on proper use. Supervision may be necessary. Do not allow children to play with the
Appliance.
2. Do not use the Appliance in extremely hot or cold environments (below 0˚C/32˚F or above
40˚C/104˚F). The Appliance can be used to clean outside windows if it is properly tethered
to the Safety Pod, winds are calm, and it is not raining or snowing.
3. Please ensure the Appliance is plugged in while it is cleaning. The Appliance has a Back-Up
Battery that charges during use. The Back-Up Battery powers the Appliance if it becomes
unplugged or the electricity fails.
4. Do not leave the Appliance unattended when it is plugged in.
5. For household use ONLY. Do not use the Appliance in commercial or industrial environments.
6. Do not use the Appliance on cracked glass.
7. Only use accessories recommended or supplied by the manufacturer. Only use the Power
Adapter supplied by the manufacturer.
8. Please make sure your power supply voltage matches the power voltage marked on the
Power Adapter.
9. Do not use the Appliance on a framed window with a frame smaller than 5mm (0.2 inches).
10. Do not use the Appliance on wet or greasy windows.
11. Store the Appliance away from heat and
materials.
12. Do not use the Appliance if it does not
attach to the glass or has visible signs of damage.
13. To reduce the risk of electrical shock, do not put the Appliance in water or other liquid. Do
not place or store Appliance where it can fall or be pulled into a tub or sink.
14. Do not touch power plug or the Appliance with wet hands.
15. Do not charge the Appliance in extremely hot or cold environments, or it may affect battery
life span.
16. When charging the Appliance, do not place it on other electrical appliances and keep it
away from
and liquid.
17. Take care not to damage the power cord. Do not pull on or carry the Appliance by the power
cord, use the power cord as a handle, close a window on the power cord, or put heavy
weights on the power cord. Keep power cord away from hot surfaces.
18. Do not use with a damaged power cord or receptacle. Do not use the Appliance if it is not
working properly, has been dropped, damaged, or come in contact with water. It must be
repaired by the manufacturer or its service agent in order to avoid a hazard.
19. If the supply cord is damaged, it must be replaced by the manufacturer or its service agent
in order to avoid a hazard.
20. The plug must be removed from the receptacle before cleaning or maintaining the Appliance.
Do not unplug the Power Adapter by pulling on the power cord.
Page 5

EN
3
1. Important Safety Instructions
21. The Back-Up Battery must be replaced by the manufacturer or its service agent in order
to avoid a hazard.
22. The Back-Up Battery must be removed and discarded according to local laws and regulations
before disposal of the Appliance.
23. The Appliance must be disconnected from the receptacle before removing the battery for
disposal of the Appliance.
24. Please dispose of used batteries according to local laws and regulations.
25. Do not incinerate the Appliance even if it is severely damaged. The battery can explode in
a
26. The Appliance must be used in accordance with the directions in this Instruction Manual.
The company cannot be held liable or responsible for any damages or injuries caused by
improper use.
Correct Disposal of this product
This marking indicates that this product should not be disposed of with other household
waste throughout the EU. To prevent possible harm to the environment or human health
from uncontrolled waste disposal, recycle it responsibly to promote the sustainable reuse of
material resources. To recycle your used device, please use the return and collection systems
or contact the retailer where the product was purchased. They can safely recycle this product.
For EU Countries
Page 6
EN
4
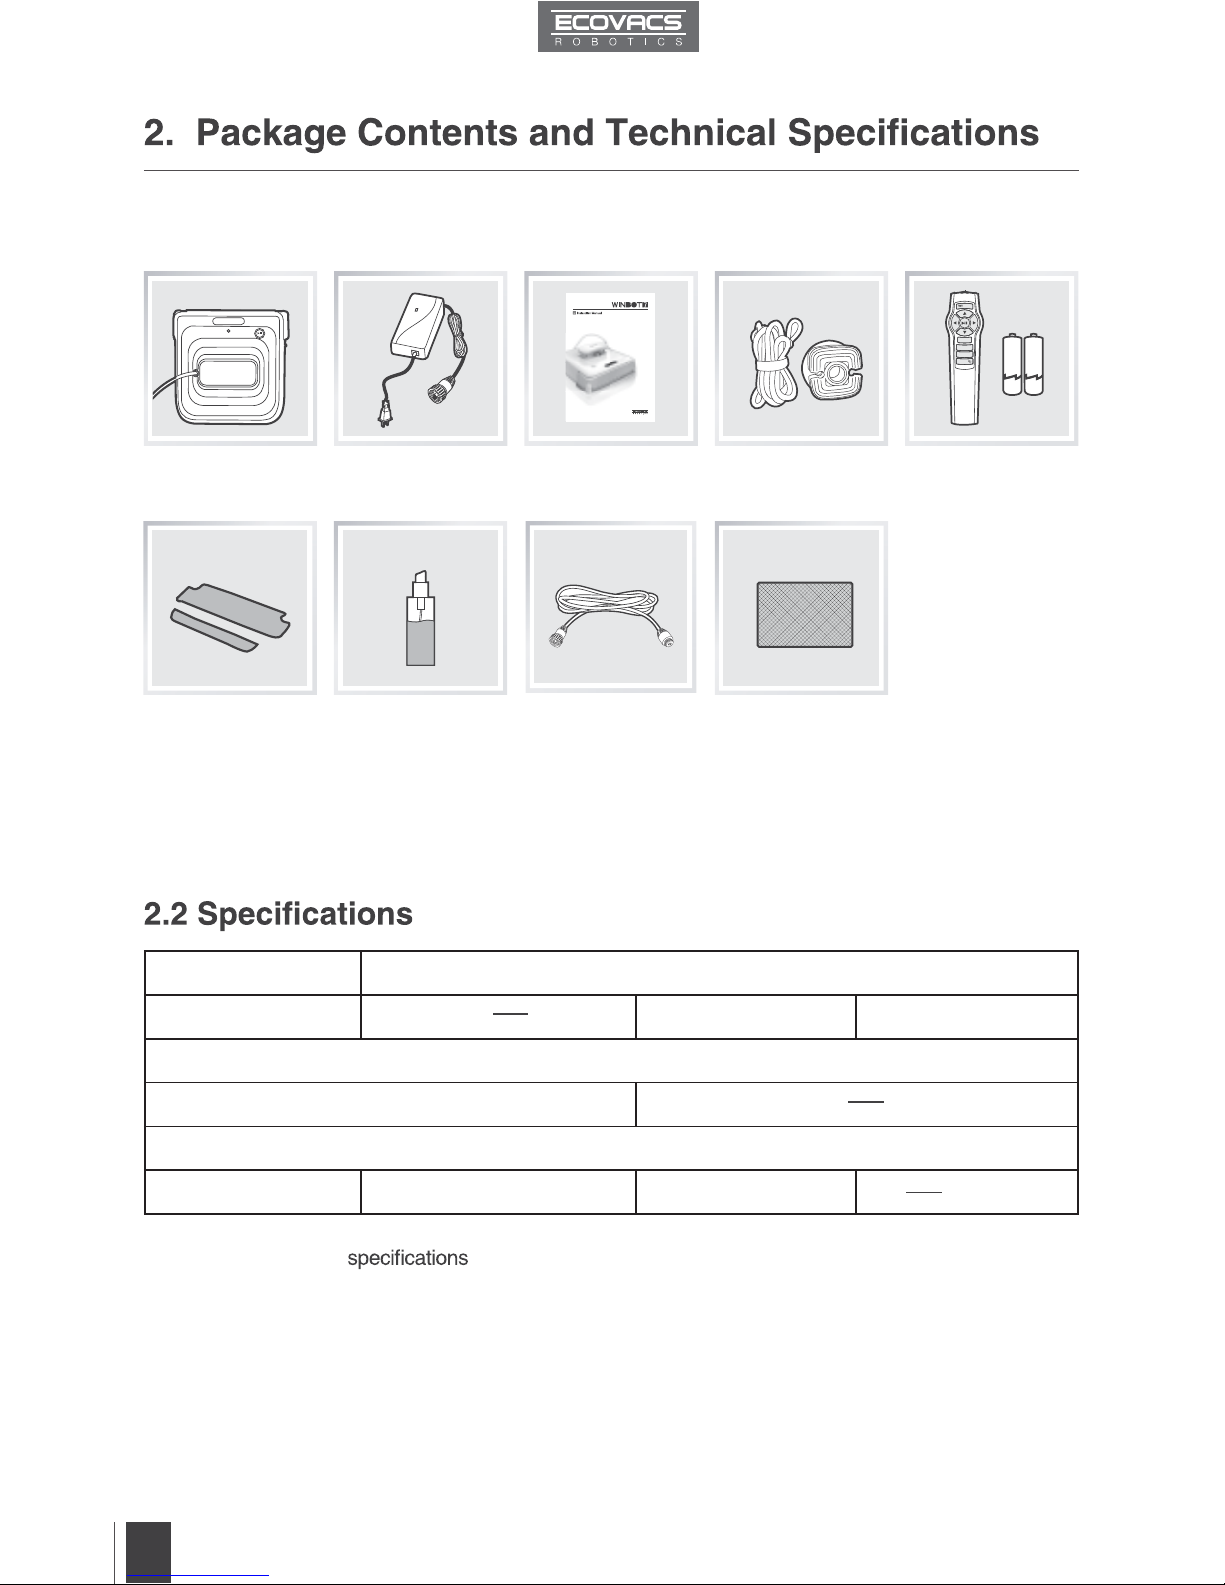
2.1 Package Contents
Model W730/W710
Working Voltage (V) 15
===
Rated Power (W) 35
Remote Control
Input Voltage(V) 3
===
Power Adapter: WT1503000
Input 100-240V~ 50/60Hz 1.6A Output 15V=== 3.0A
*Technical and design may be changed in the course of continuous product improvement.
Finishing Cloth
Safety Pod and Tether
Power Adapter Remote Control
with Batteries
Robot
(3) Sets of
Cleaning Pads
Instruction Manual
WINBOT
Cleaning Solution
(1) WINBOT
Extension Cord
(1.5m/4’11”)
Page 7
EN
5
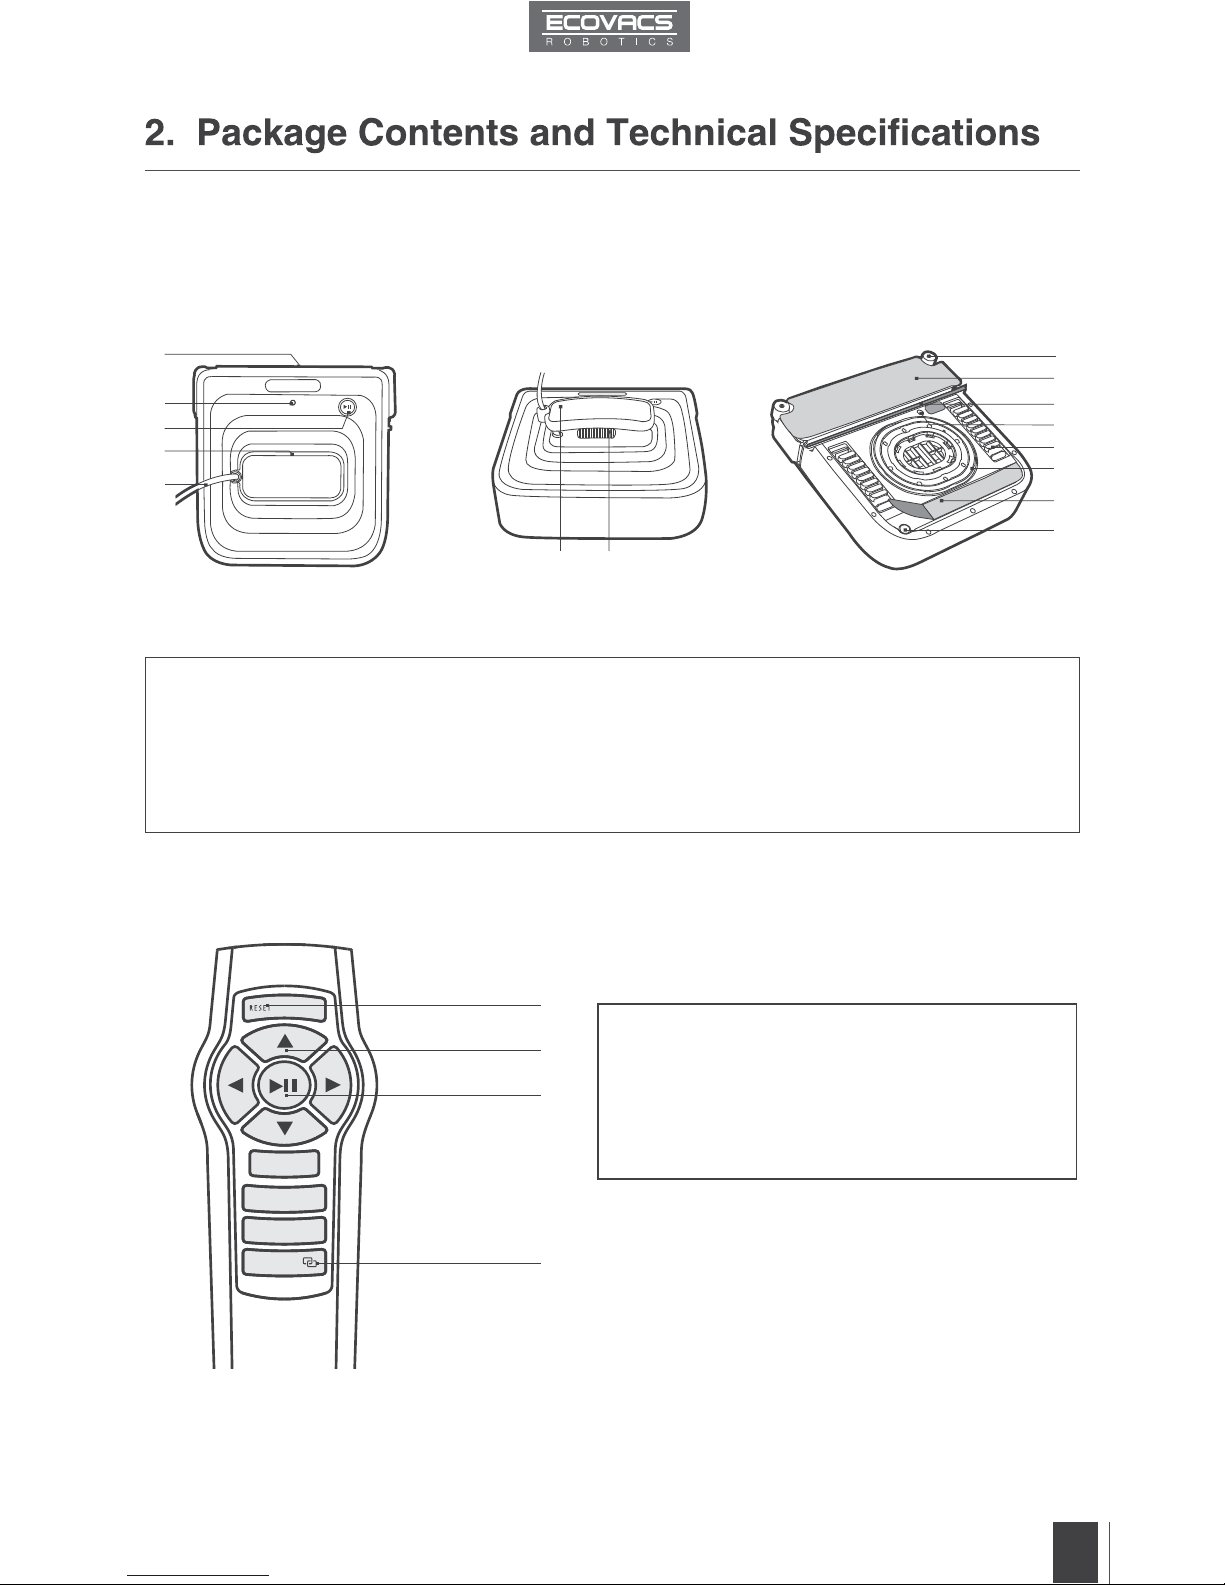
2.3 Product Diagram
Robot
Remote Control
1. Bumper
2. Status Indicator Light
3. START/PAUSE Button
4. Air Release Trigger
5. Power Cord
6. Handle
7. Power Switch
8. Side Rollers
9. Front Cleaning Pad
10. Squeegee
11. Driving Treads
12. Cupule
13. Bottom Status Indicator Light
14. Rear Cleaning Pad
15. Edge Detection Sensors (W730 ONLY)
1
10
11
12
14
13
15
2
3
4
5
6 7
9
8
1
2
3
4
1. RESET Button
2. Direction Control Buttons
3. START/PAUSE Button
4. Remote Control Pairing Button
Page 8
EN
6
3. Operating the Robot
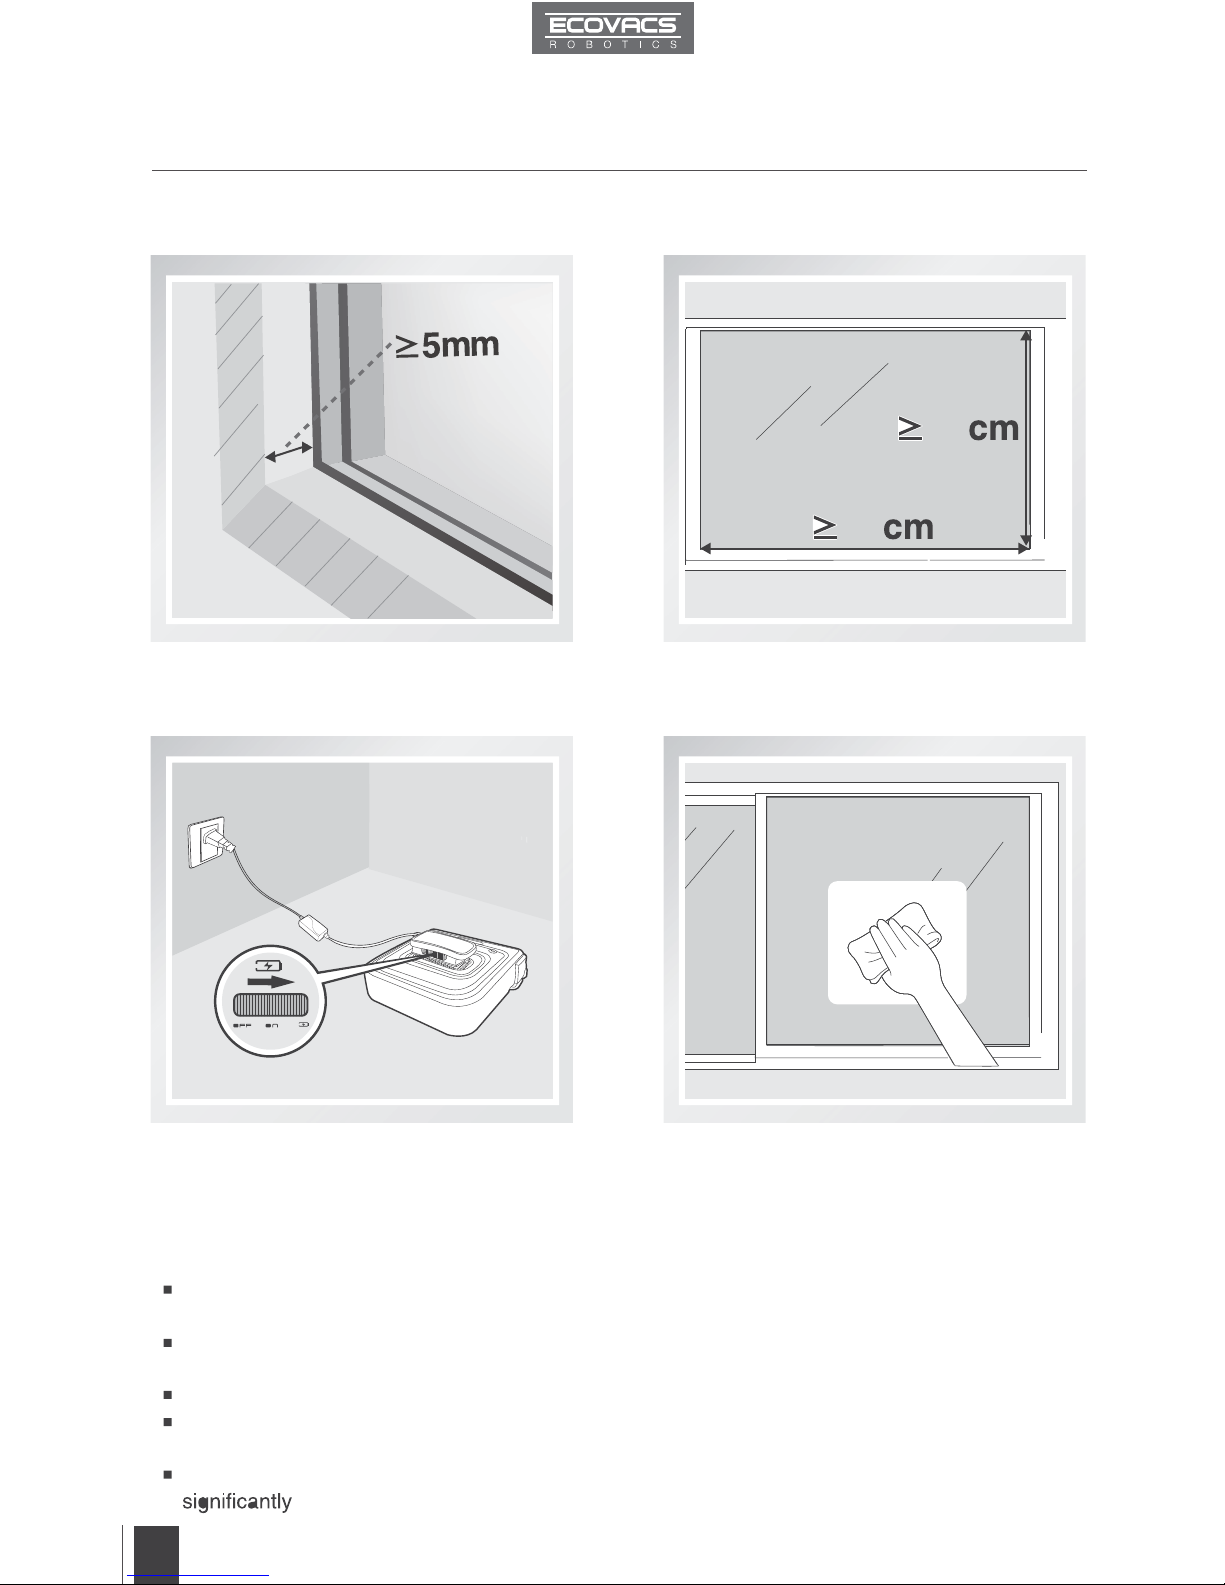
3.1 Notes Before Cleaning
Do not use WINBOT 7 on a framed window with
a frame smaller than 5mm (0.2").
WINBOT 7 can be used on framed or
frameless* windows larger than 45cm x 60cm
(17.7’’ x 23.6’’). (*W730 only)
If the window is covered with dirt, clean a
small area on the glass before use and place
WINBOT 7 there.
WINBOT 7’s Back-Up Battery must be fully
charged before use. Plug WINBOT 7 in,
move the Power Switch to the CHARGE
position, and charge until the Status Indicator
Light glows a continuous GREEN.
Please ensure there is a 15cm (5.9”) clearance between the glass and obstacles in the room
like curtains or furniture.
WINBOT 7 can clean horizontally mounted glass, or glass mounted at an angle, using the
Direction Control Buttons on the Remote Control.
Do not use WINBOT 7 upside down.
Do not use WINBOT 7 on windows with an uneven surface, such as decaled, frosted, textured,
patterned, or coated glass.
WINBOT 7 should only be used with WINBOT Cleaning Solution. Using other cleaners
reduces WINBOT’s performance and can damage the robot.
60
45
Page 9
EN
7
3. Operating the Robot
3.2 Attach the Cleaning Pads 3.3 Assemble the Power Adapter
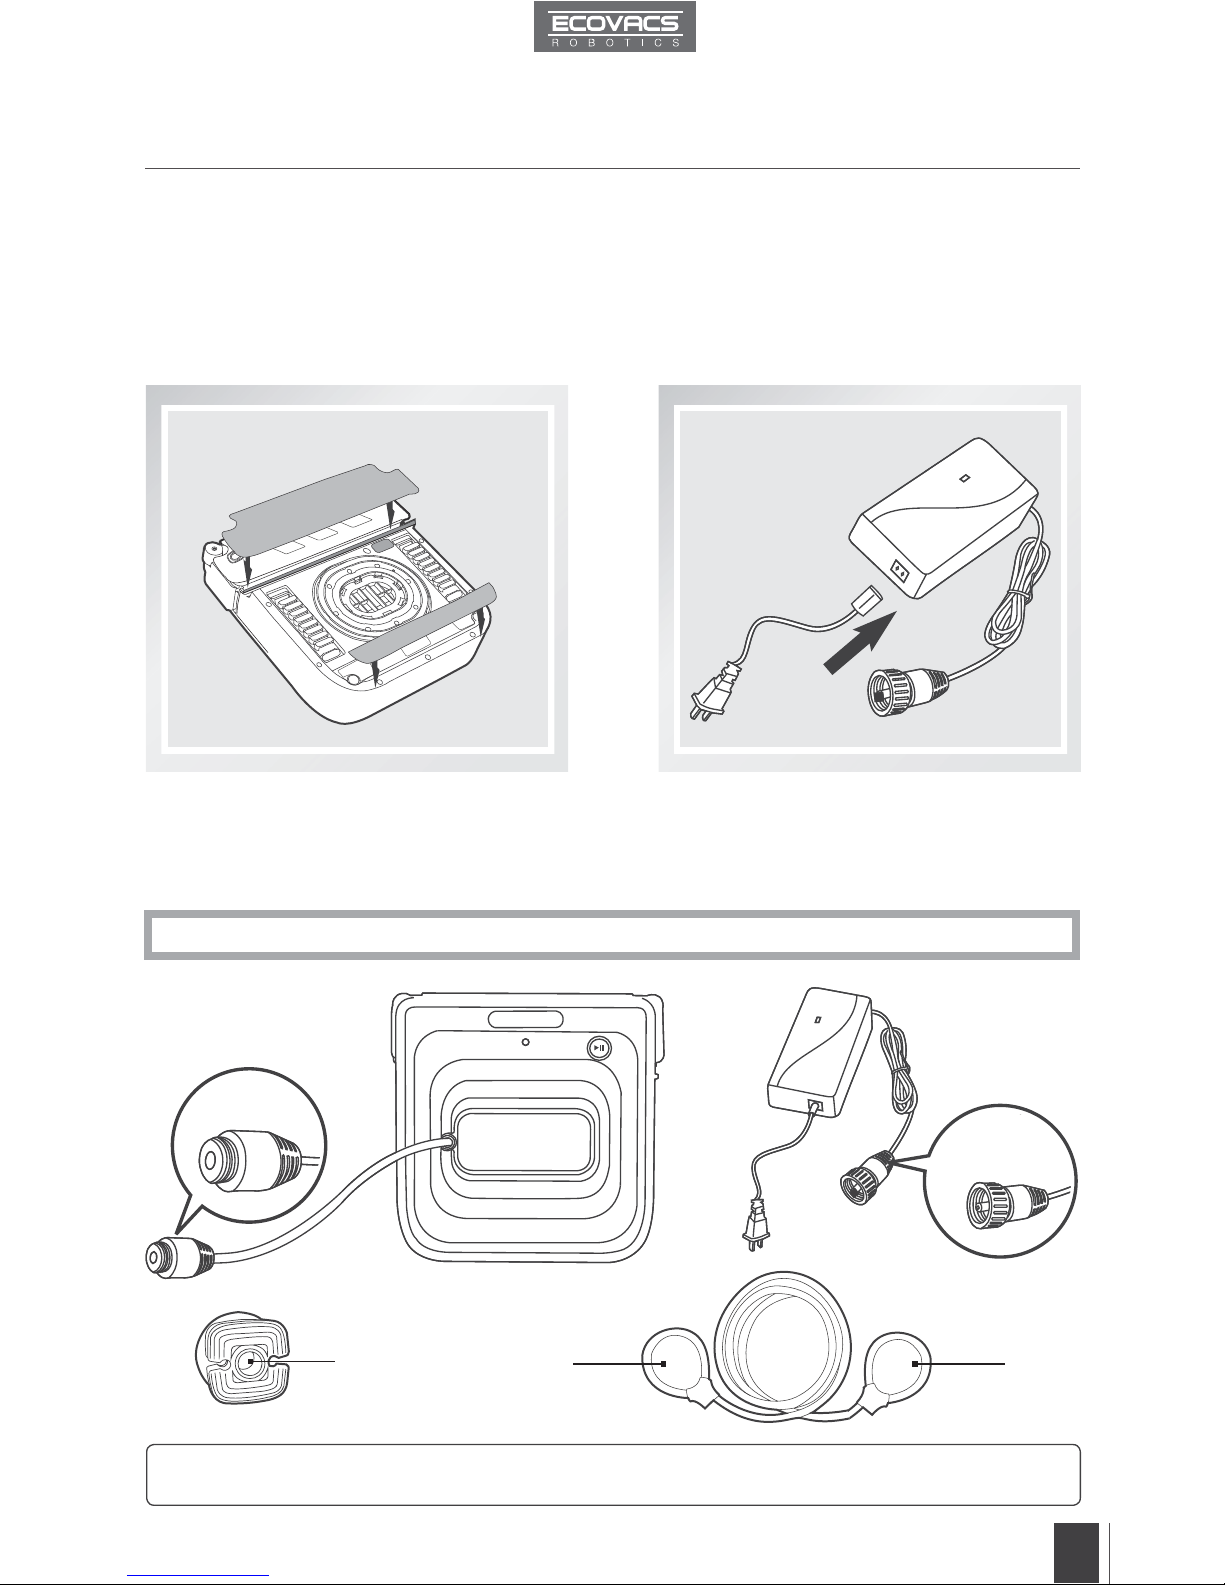
Turn WINBOT 7 over and attach the Cleaning
Pads to their Velcro areas smoothly. Make
sure the Rear Cleaning Pad is placed exactly
within its Velcro area and does not contact or
cover the Cupule (suction ring).
If WINBOT 7 is used to clean an outside window, the Safety Pod and Tether
MUST be used.
B
C
DD
A
*
If WINBOT 7 is being used to clean an inside window, please skip to step 3.6.
3.4 Install the Safety Tether
End A: Robot Power Cord End B: Power Adapter Power Cord
End C: Safety Pod End D: Safety Tether
Page 10
EN
8
3. Operating the Robot
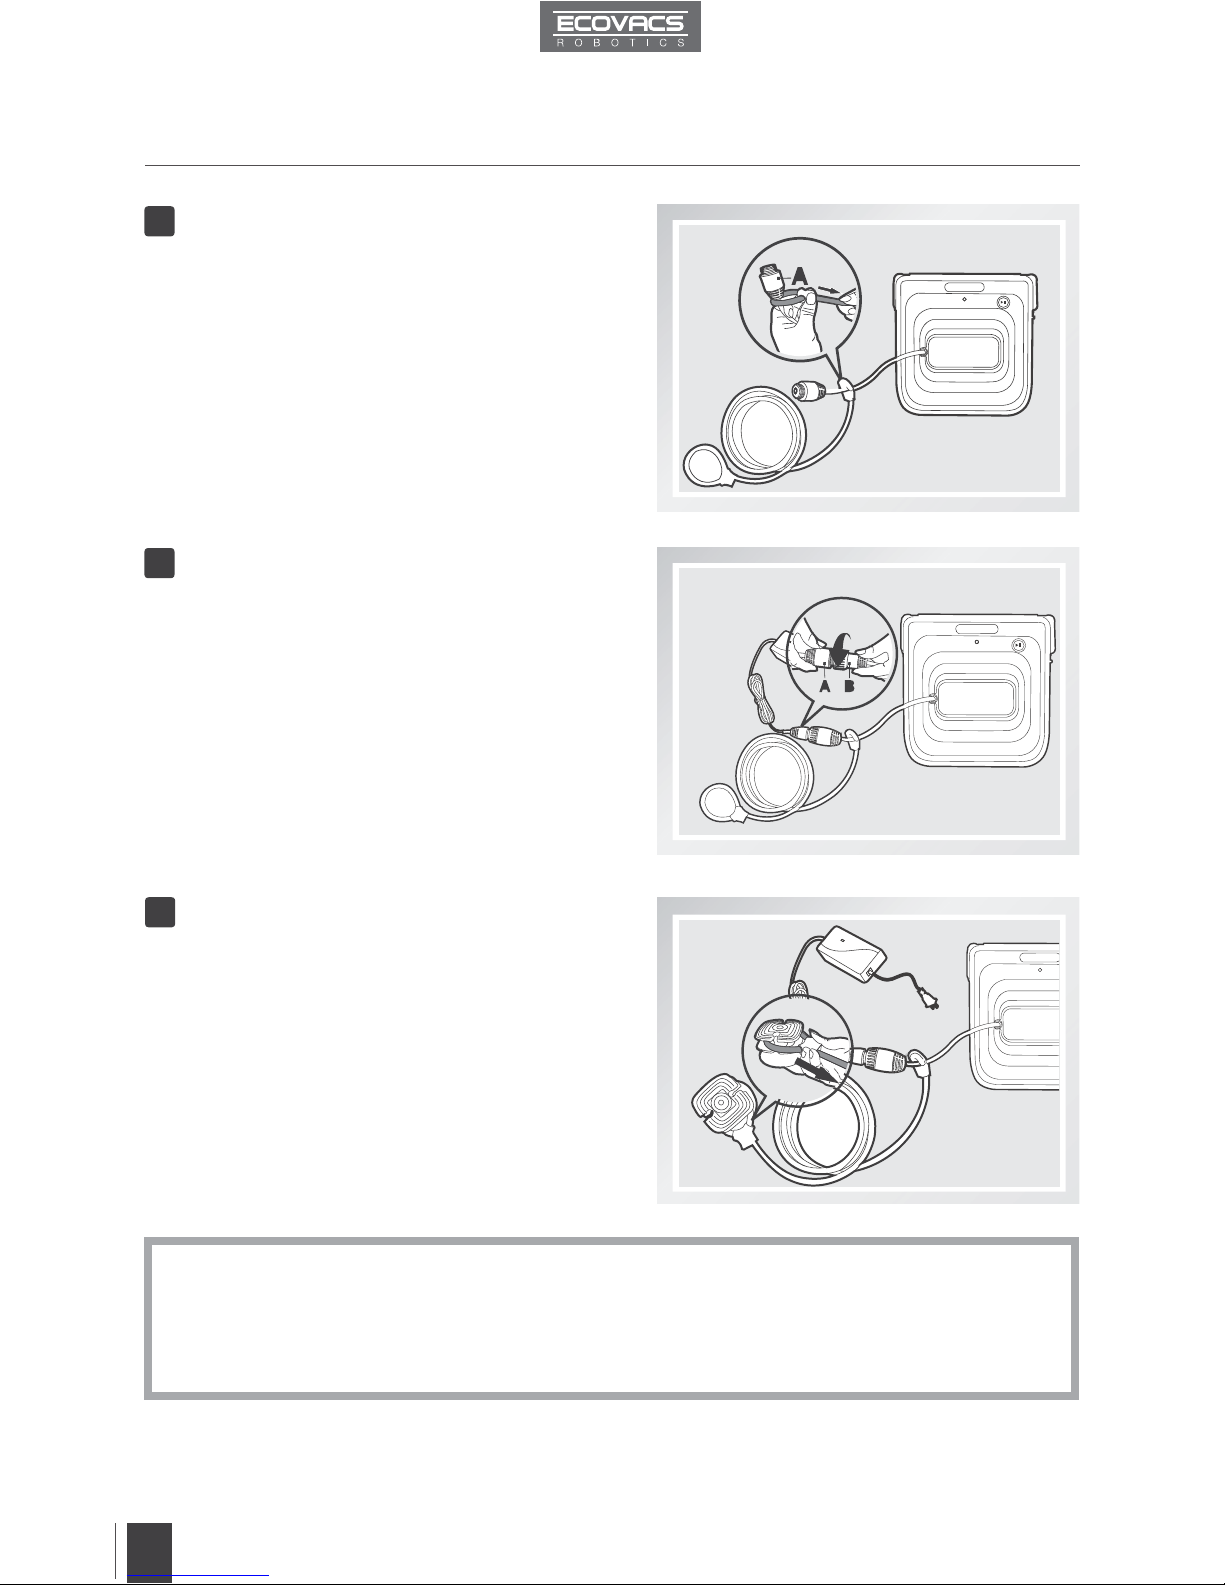
If the length of power cord restricts WINBOT 7’s movement, a WINBOT Extension Cord can
be used. Disconnect End A and End B, and connect them with both ends of the Extension
Cord respectively and tighten.
Only one Extension Cord can be used when WINBOT 7 is cleaning an outside window.
Loop one end of the Safety Tether to End A
on the Robot Power Cord and tighten.
Connect End A and End B and tighten.
Loop the other end of the Safety Tether around
the Safety Pod’s channel and pull it tight.
1
2
3
*
*
Page 11
EN
9
3. Operating the Robot
3.5 Place the Safety Pod
3.6 Spray Cleaning Solution
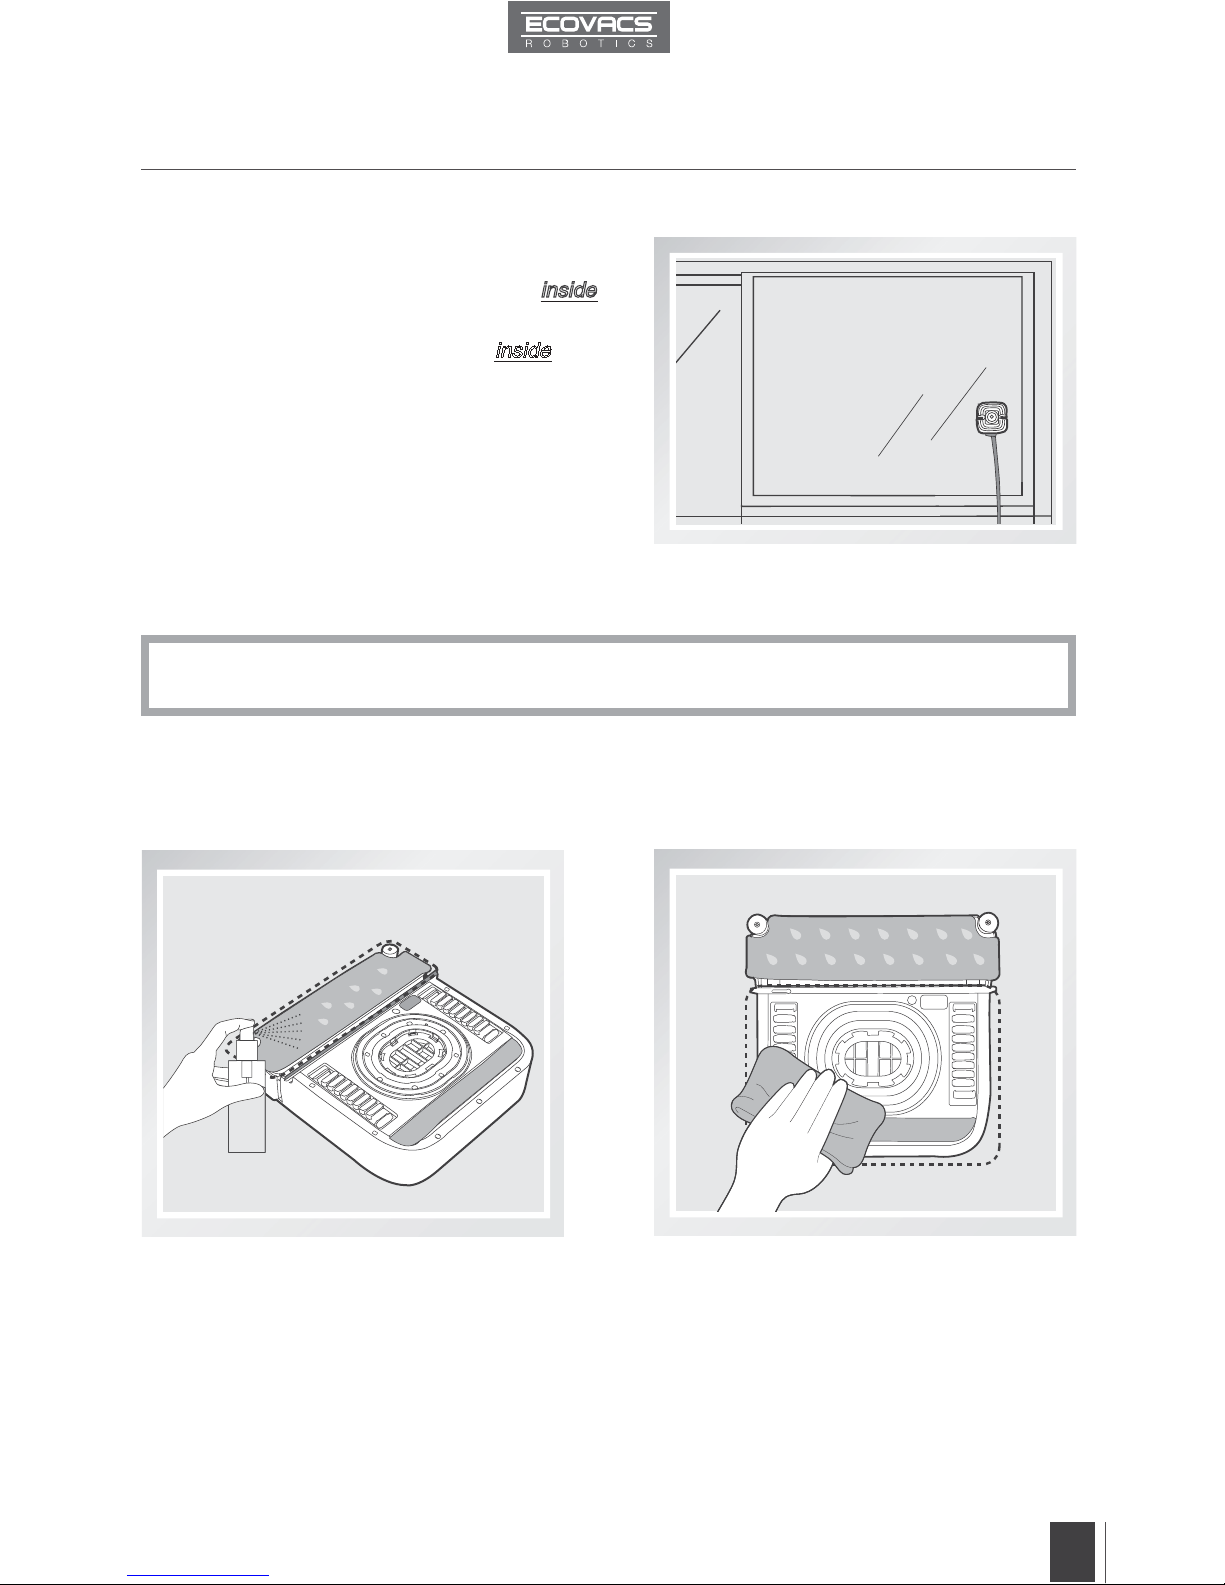
The Safety Pod MUST be placed on the inside
of the window.
Press the Safety Pod FIRMLY on the
inside of the
window being cleaned. Make sure the Safety Pod is
attached securely in place.
Spray the Front Cleaning Pad with the provided
WINBOT Cleaning Solution 3 times. The Front
Cleaning Pad should be damp, not wet.
After spraying, wipe the bottom of WINBOT 7
with the provided Finishing Cloth.
WINBOT 7 should only be used with WINBOT Cleaning Solution. Using other cleaners
significantly reduces WINBOT’s performance and can damage the robot.
*
Page 12
EN
10
3. Operating the Robot
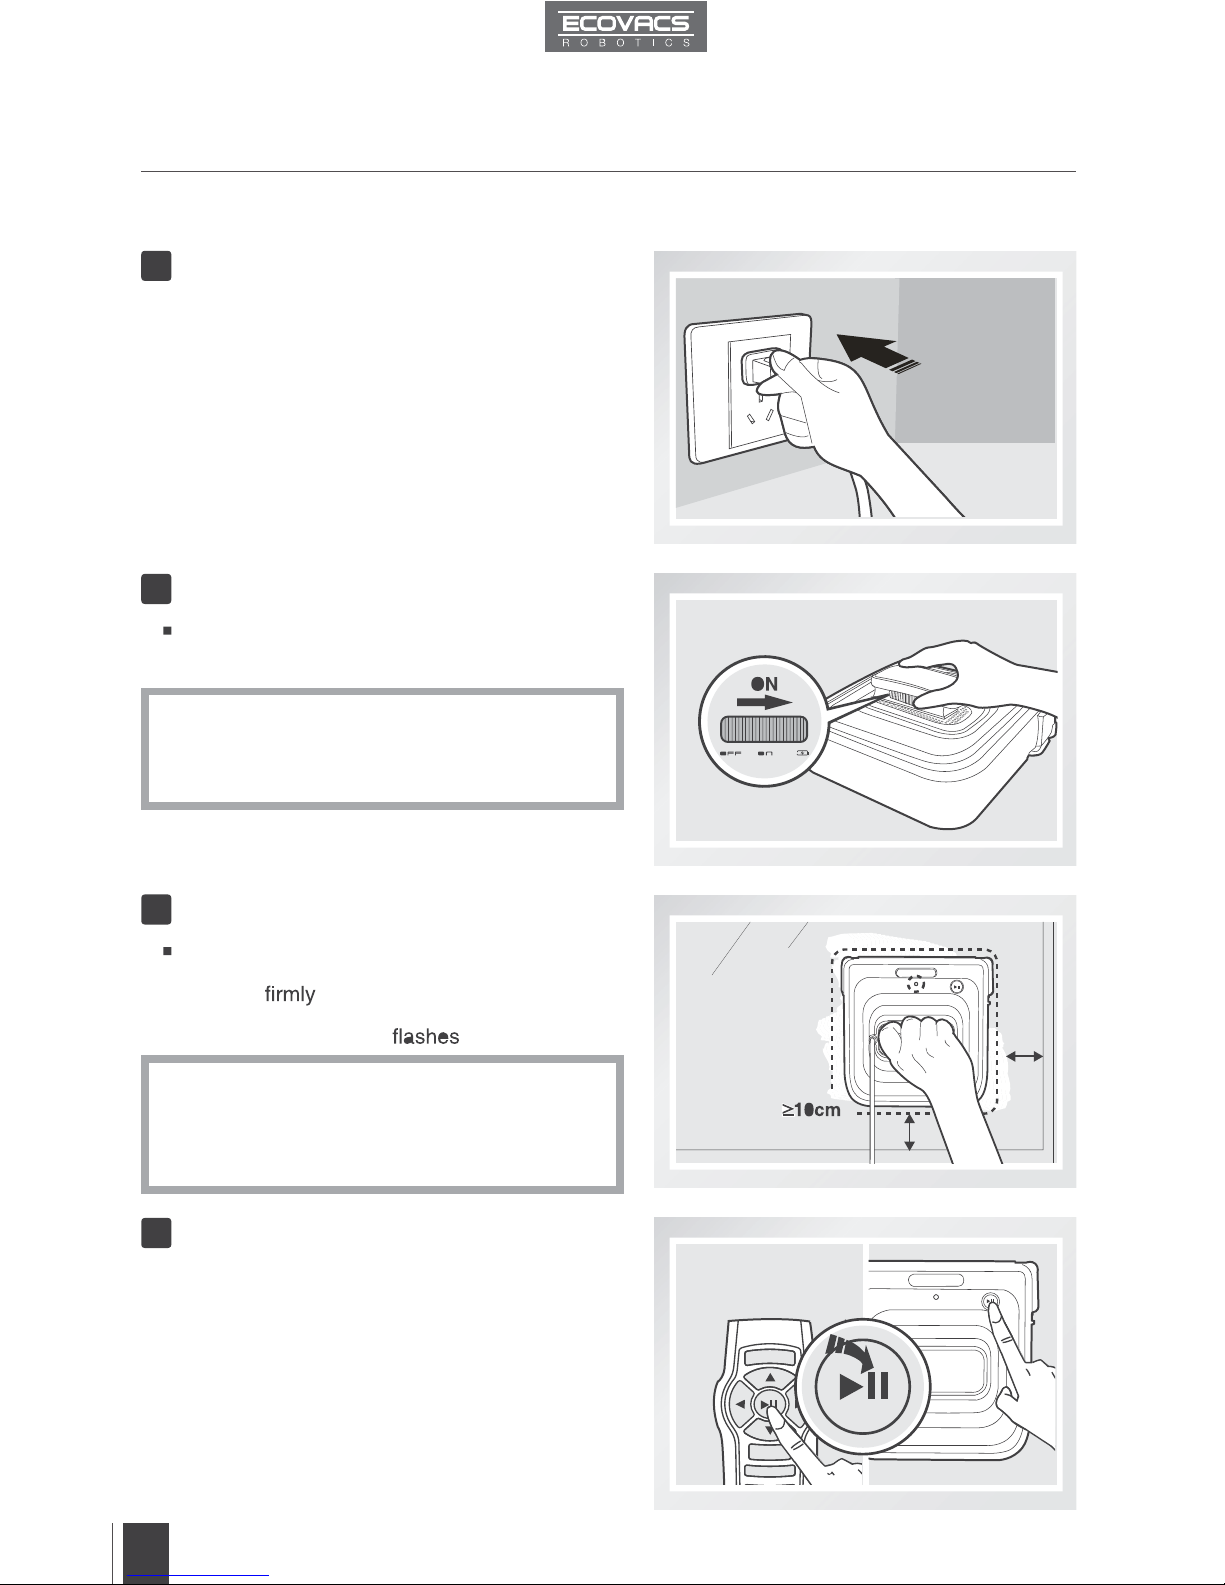
Press the START/PAUSE Button on WINBOT 7
or on the Remote Control to begin cleaning.
Place WINBOT 7 on the window at least 10cm
(4’’) from the corners and other obstacles and
press it
on the window. WINBOT 7 has
successfully attached to the window when the
Status Indicator Light BLUE.
WINBOT 7’s Back-Up Battery must be fully charged
before use. Plug WINBOT 7 in, move the Power
Switch to the CHARGE position until the Status
Indicator Light glows a continuous GREEN.
Please be careful not to pull the Air Release
Trigger.
Please ensure there is a 15cm (5.9”) clearance
between the glass and obstacles in the room like
curtains or furniture.
Move the Power Switch to the “ON” position.
WINBOT 7 is powered ON when it generates
suction.
1
3.7 Start
3
4
Plug in WINBOT 7
Power ON
Place on the Glass
Start
2
*
*
*
Page 13
EN
11
3. Operating the Robot
1
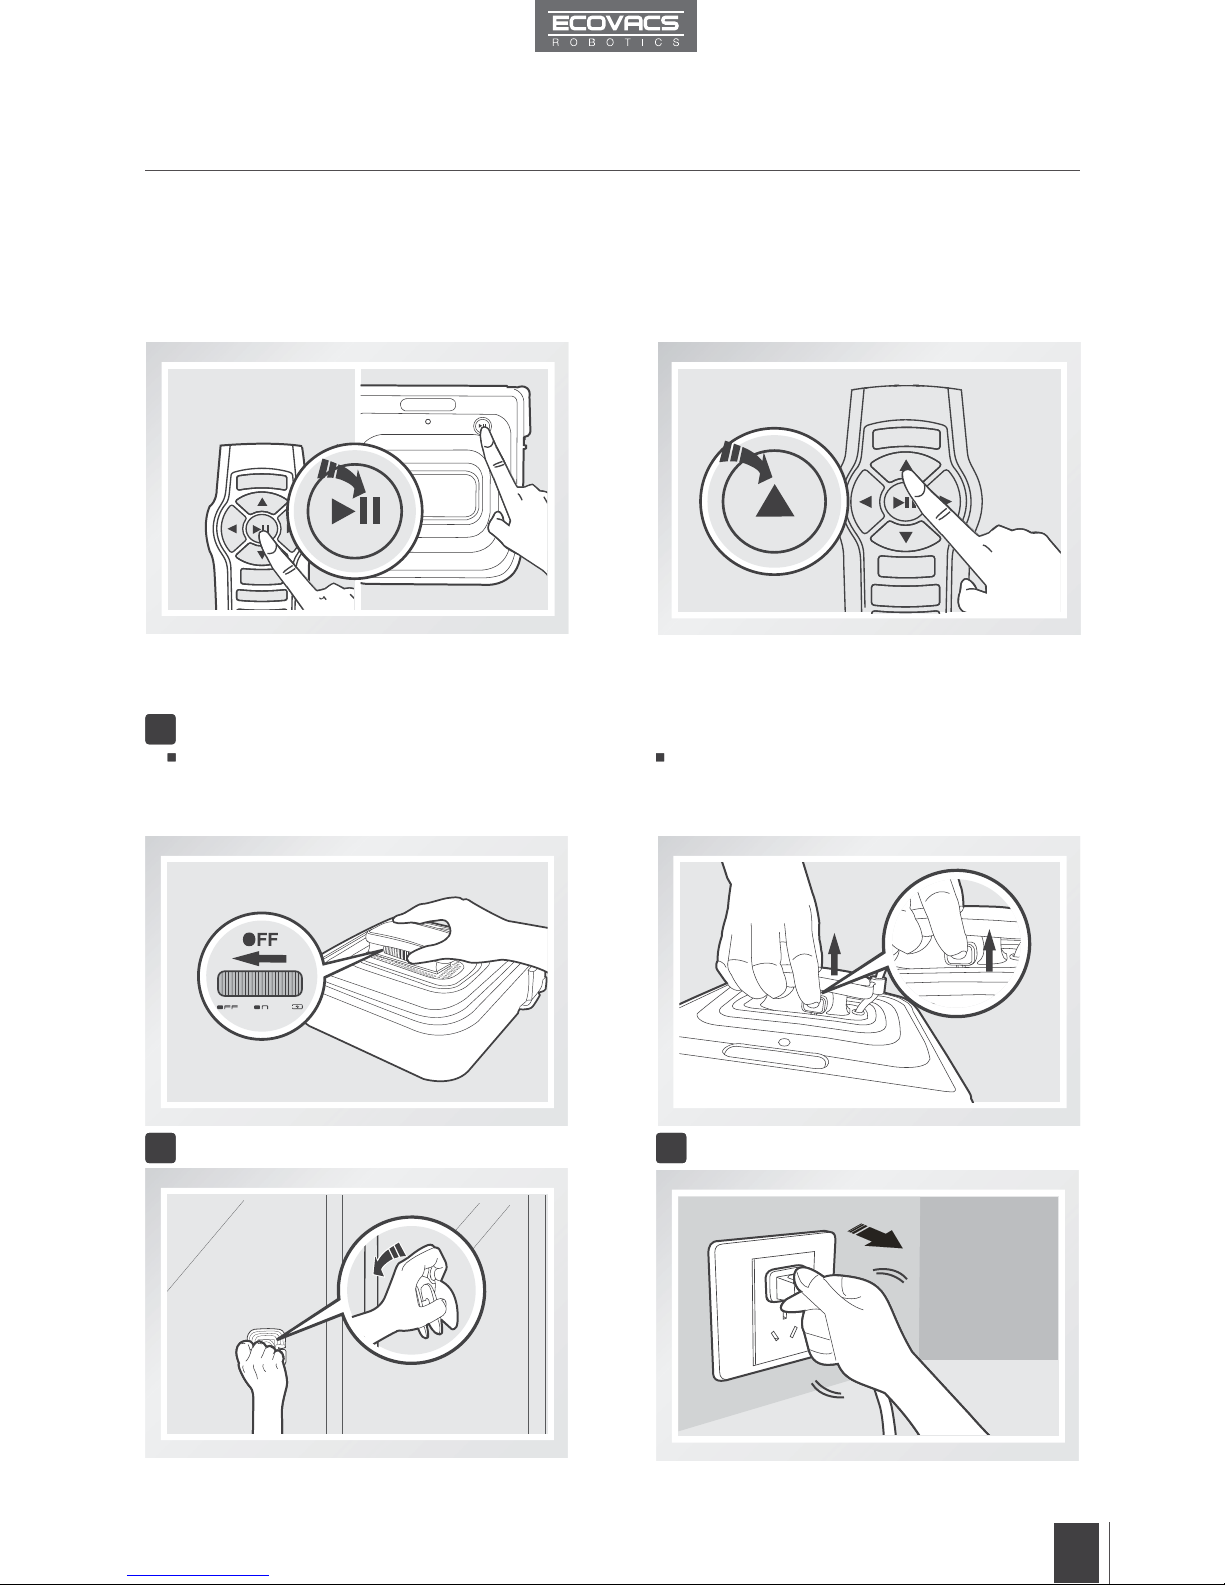
3.8 Pause
3.9 Stop
Pause WINBOT 7 during cleaning b y
pressing the START/PAUSE button on the
robot or on the Remote control.
WINBOT 7 can be directed to move forward,
backward, left and right using the Direction
Control Buttons on the Remote Control when
Paused. WINBOT 7 will clean when Direction
Control Buttons are used.
When WINBOT 7 completes its cleaning cycle, it returns to the place it started and beeps.
If WINBOT 7 has a problem and the Indicator Light glows RED, it can be reset by pressing the Reset
Button on the Remote Control.
Remove WINBOT 7
Unplug WINBOT 7
3
Remove the Safety Pod, if used
2
Pull the Air Release Trigger and remove
WINBOT 7 from the window. Polish away
any marks left on the glass from WINBOT 7’s
removal with the provided Finishing Cloth.
Grasp WINBOT 7’s handle. Move the Power
Switch to “OFF” position.
*
EN
11
3. Operating the Robot
1
3.8 Pause
3.9 Stop
Pause WINBOT 7 during cleaning b y
pressing the START/PAUSE button on the
robot or on the Remote control.
WINBOT 7 can be directed to move forward,
backward, left and right using the Direction
Control Buttons on the Remote Control when
Paused. WINBOT 7 will clean when Direction
Control Buttons are used.
When WINBOT 7 completes its cleaning cycle, it returns to the place it started and beeps.
If WINBOT 7 has a problem and the Indicator Light glows RED, it can be reset by pressing the Reset
Button on the Remote Control.
Remove WINBOT 7
Unplug WINBOT 7
3
Remove the Safety Pod, if used
2
Pull the Air Release Trigger and remove
WINBOT 7 from the window. Polish away
any marks left on the glass from WINBOT 7’s
removal with the provided Finishing Cloth.
Grasp WINBOT 7’s handle. Move the Power
Switch to “OFF” position.
*
Page 14
EN
12
4. Maintenance
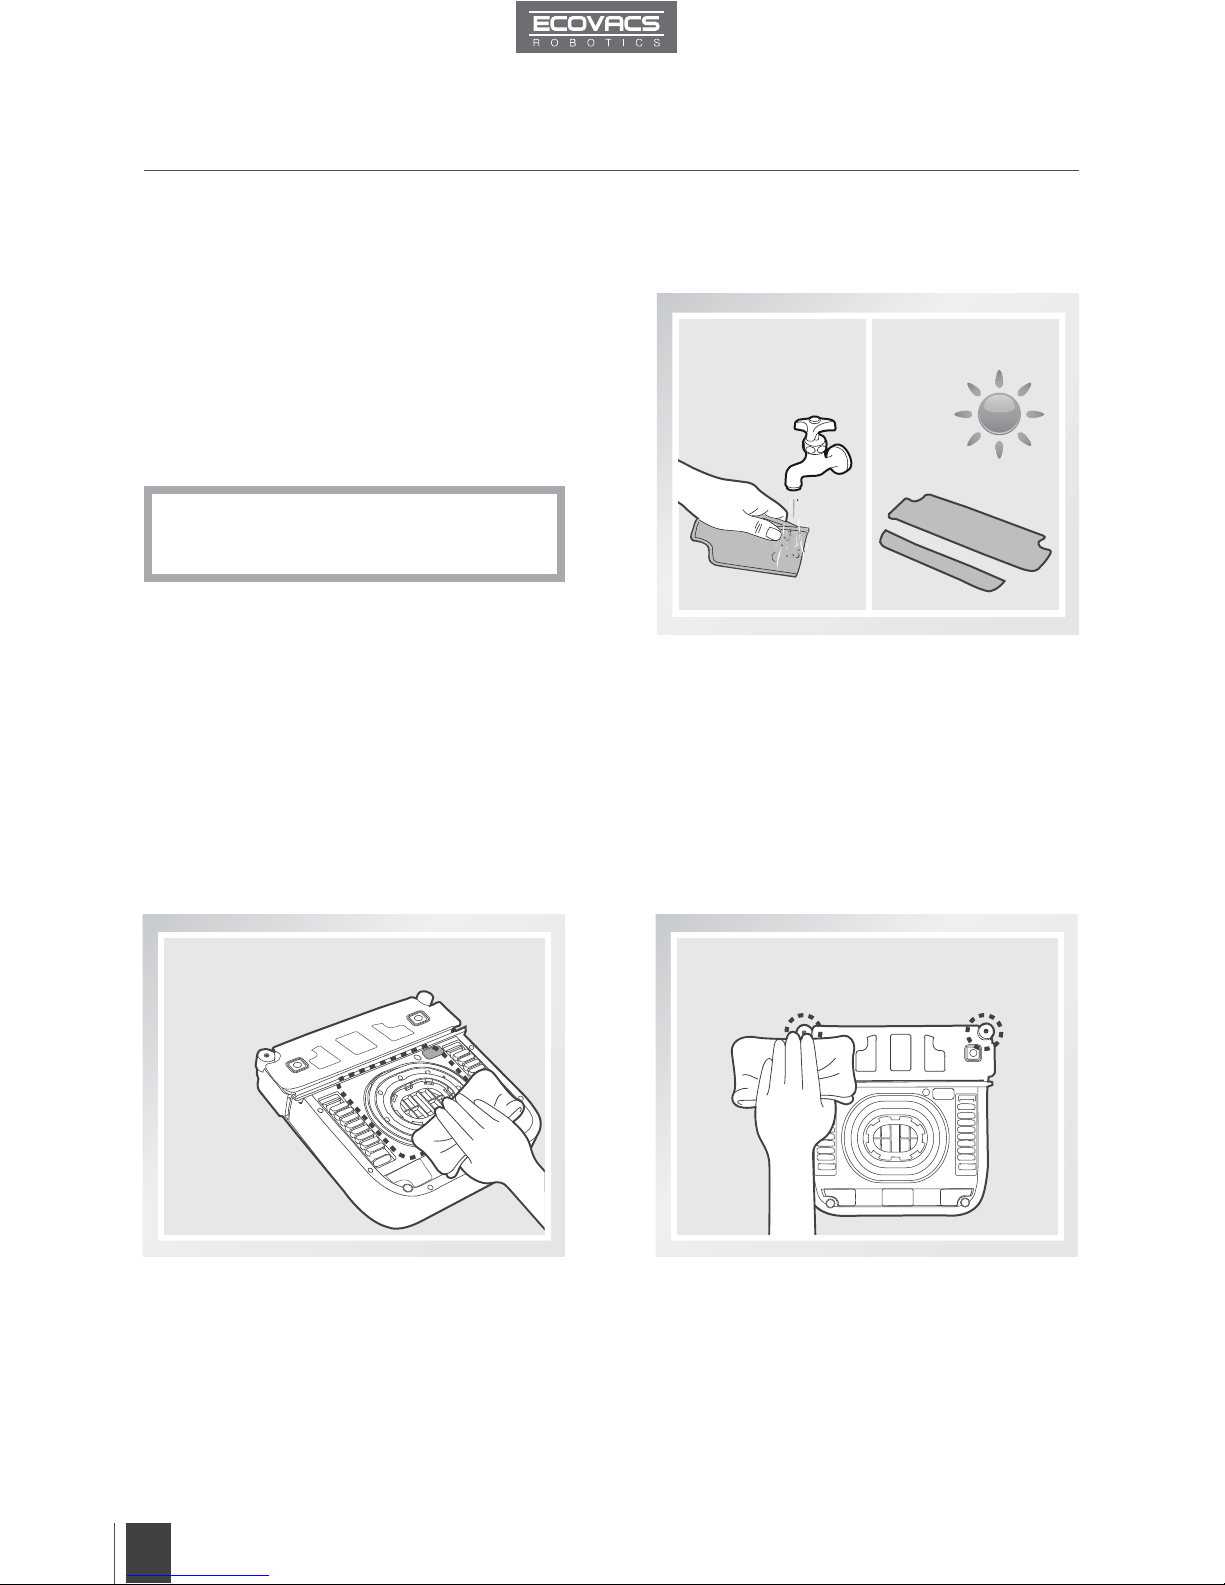
Turn the robot over and remove the Cleaning
Pads. Rinse the Cleaning Pads and allow
them to dry completely before re-attaching it
to the robot.
Turn the robot over and wipe any debris
from the Cupule with the provided Finishing
Cloth to maintain suction.
4.2 Cupule, Side Rollers and Sensors
4.1 Cleaning Pads
Do NOT use wet Cleaning Pads on
WINBOT 7, or it may slip on the window.
*
Cupule
Turn the robot over and wipe the Side
Rollers clean with the provided Finishing
Cloth to maintain their effectiveness.
Side Rollers
Before performing cleaning and maintenance on WINBOT 7, move the Power Switch to the
“OFF” position and unplug it from the receptacle.
Page 15
EN
13
4. Maintenance
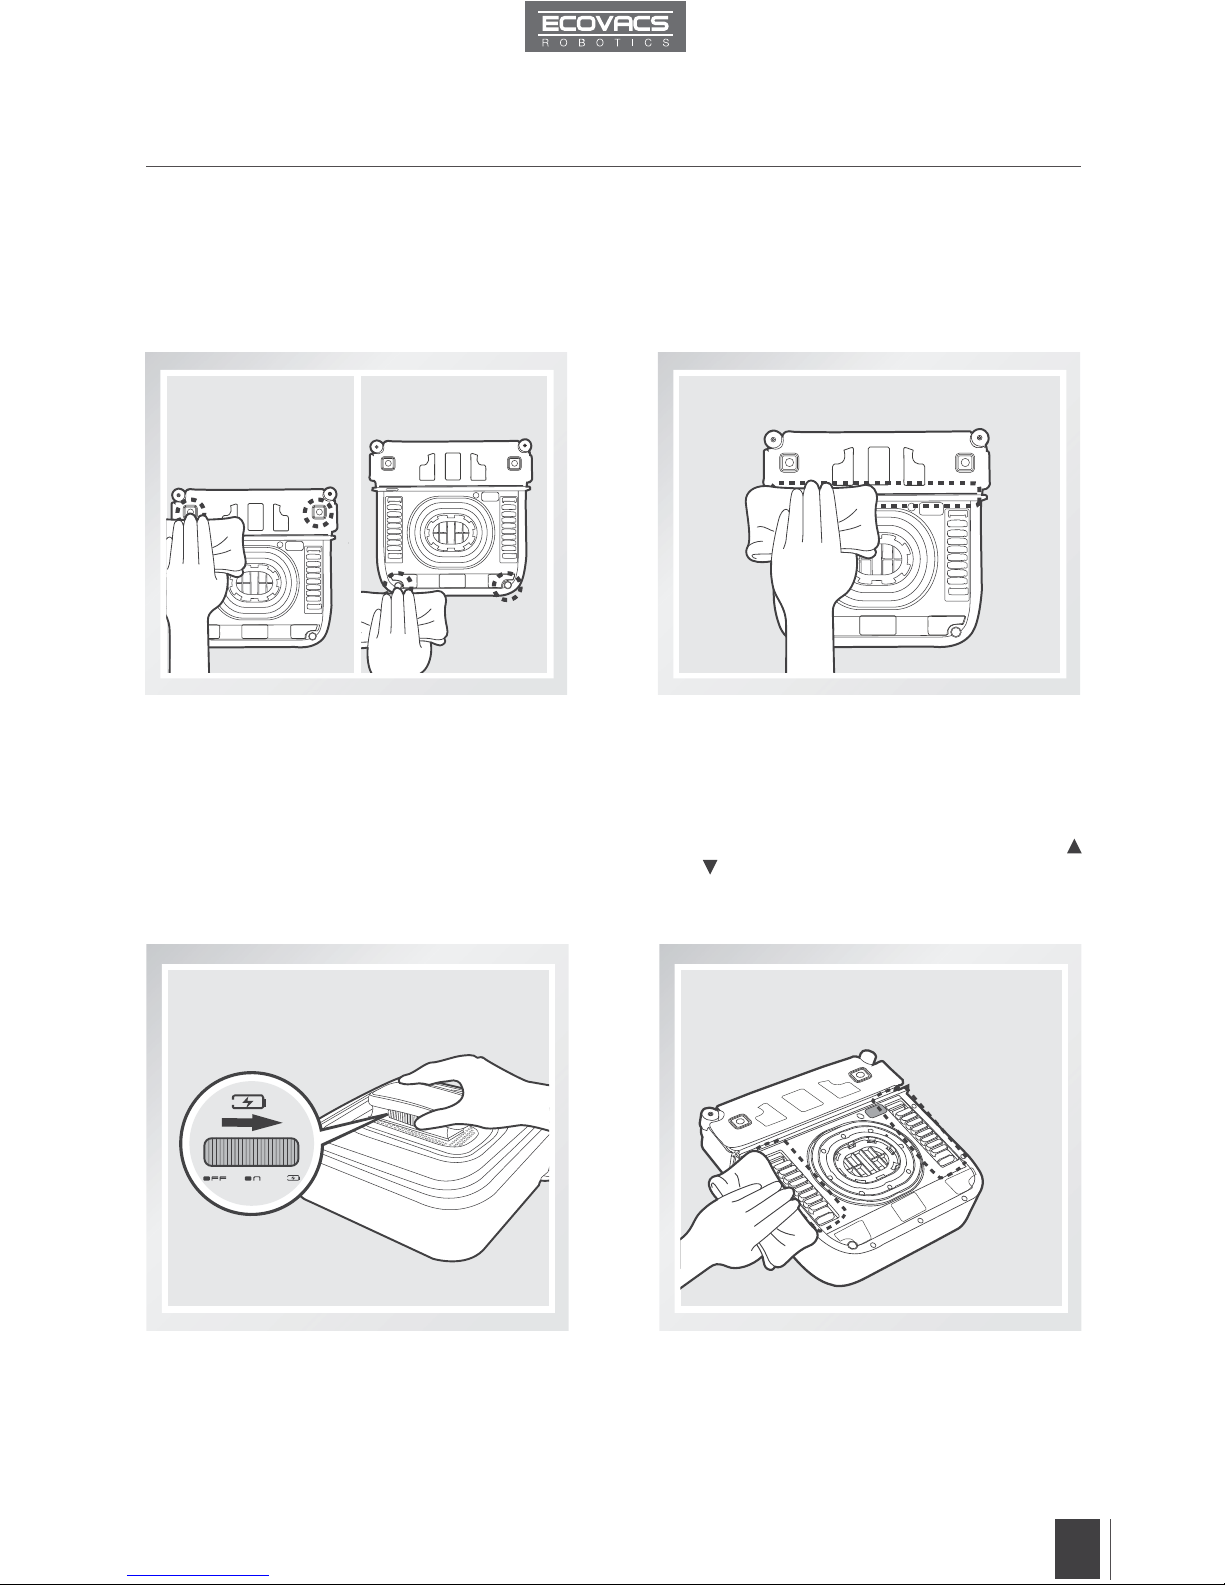
Turn the robot over and remove the Cleaning
Pads. Wipe the Edge Detection Sensors
clean with the provided Finishing Cloth to
maintain their effectiveness. (W730 ONLY)
Turn the robot over and wipe the Squeegee
clean with the provided Finishing Cloth to
maintain its effectiveness.
4.3 Driving Treads
Move the Power Switch on WINBOT 7 to the
CHARGE position.
Inspect the entire Driving Treads by using
and buttons on the Remote Control. Stop
the Driving Treads and clean any dirt on
them with the provided Finishing Cloth.
Edge Detection Sensors
Squeegee
Page 16
14
EN
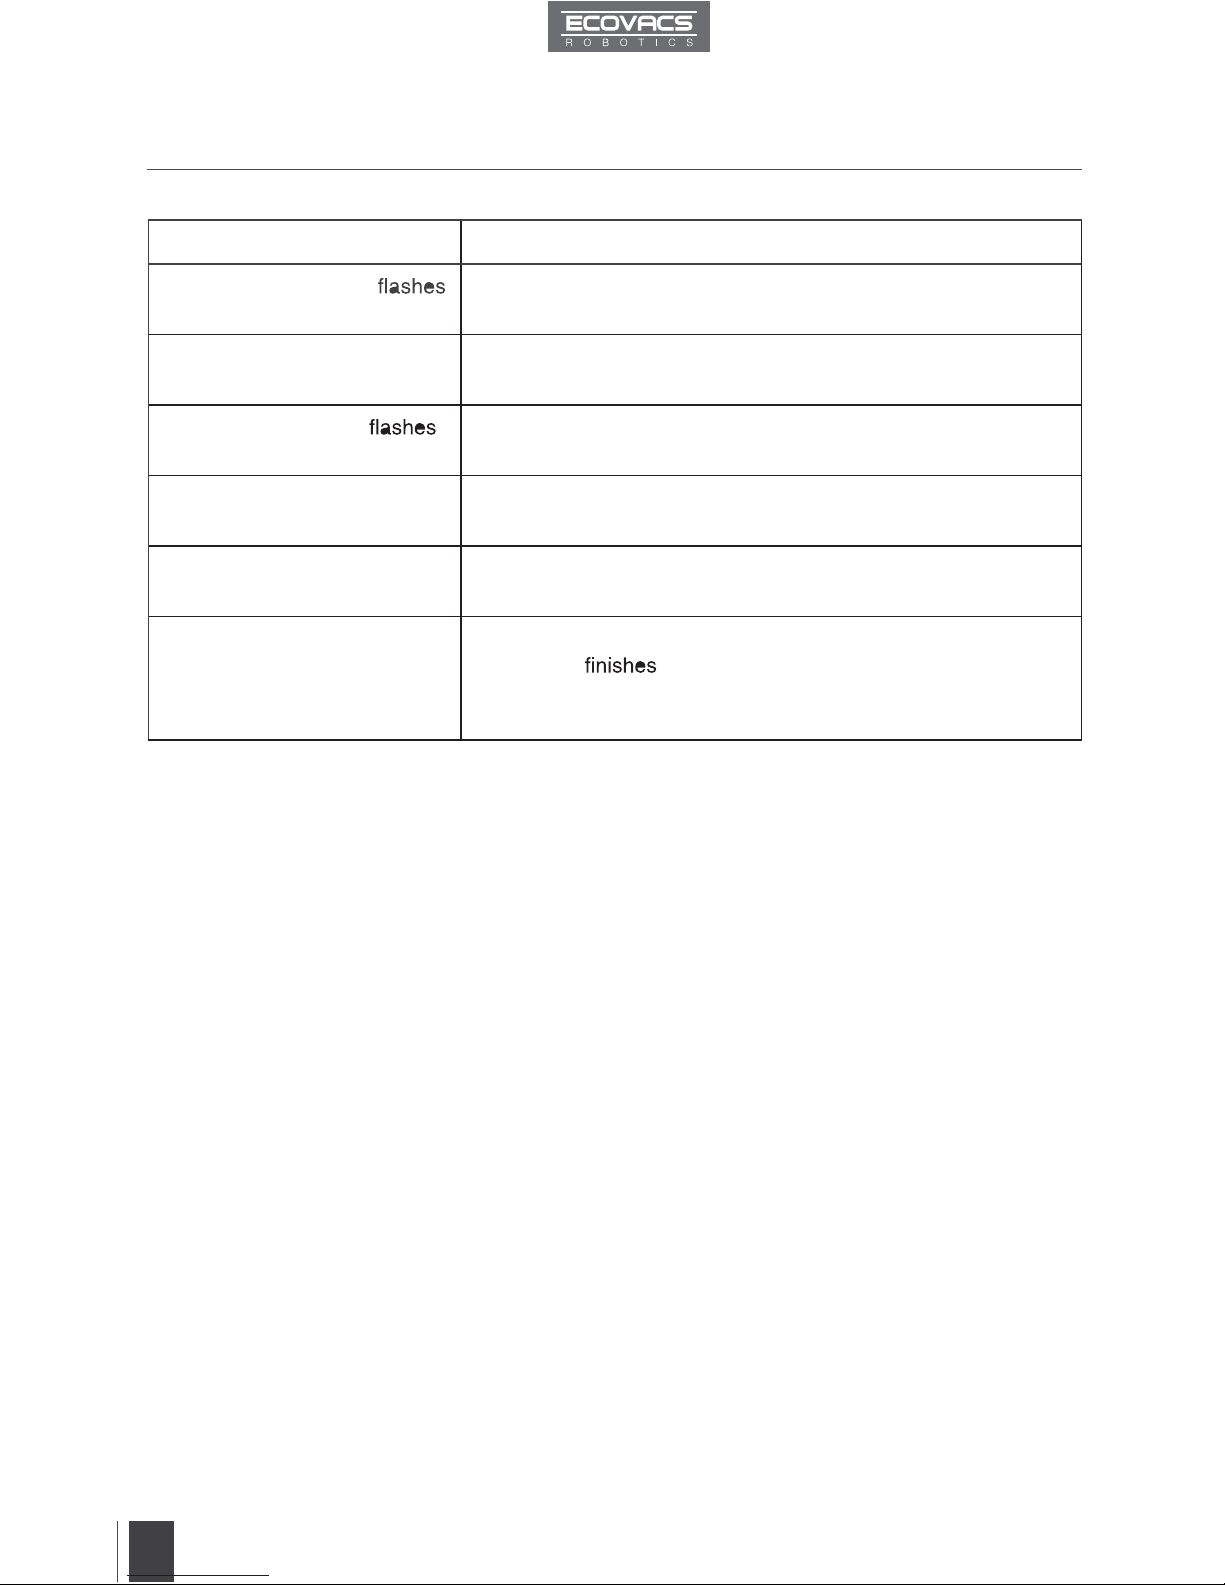
5. Status Indicator Light and Sounds
Indicator Description
Status Indicator Light
GREEN
Back-Up Battery is low and is charging.
Status Indicator Light glows a
continuous GREEN
Back-Up Battery is fully charged and WINBOT 7 is ready to use.
Status Indicator Light
BLUE
WINBOT 7 has successfully attached itself to the glass and is
ready to clean.
Status Indicator Light glows a
continuous BLUE
WINBOT 7 is cleaning the window.
Status Light Indicator glows
RED
WINBOT 7 has a problem. Please refer to Section 6,
Troubleshooting, for details.
WINBOT emits beeps
WINBOT 7 beeps in following situations:
WINBOT 7
cleaning.
WINBOT 7 is successfully paired with its Remote Control.
WINBOT 7 has a problem.
Page 17
15
EN
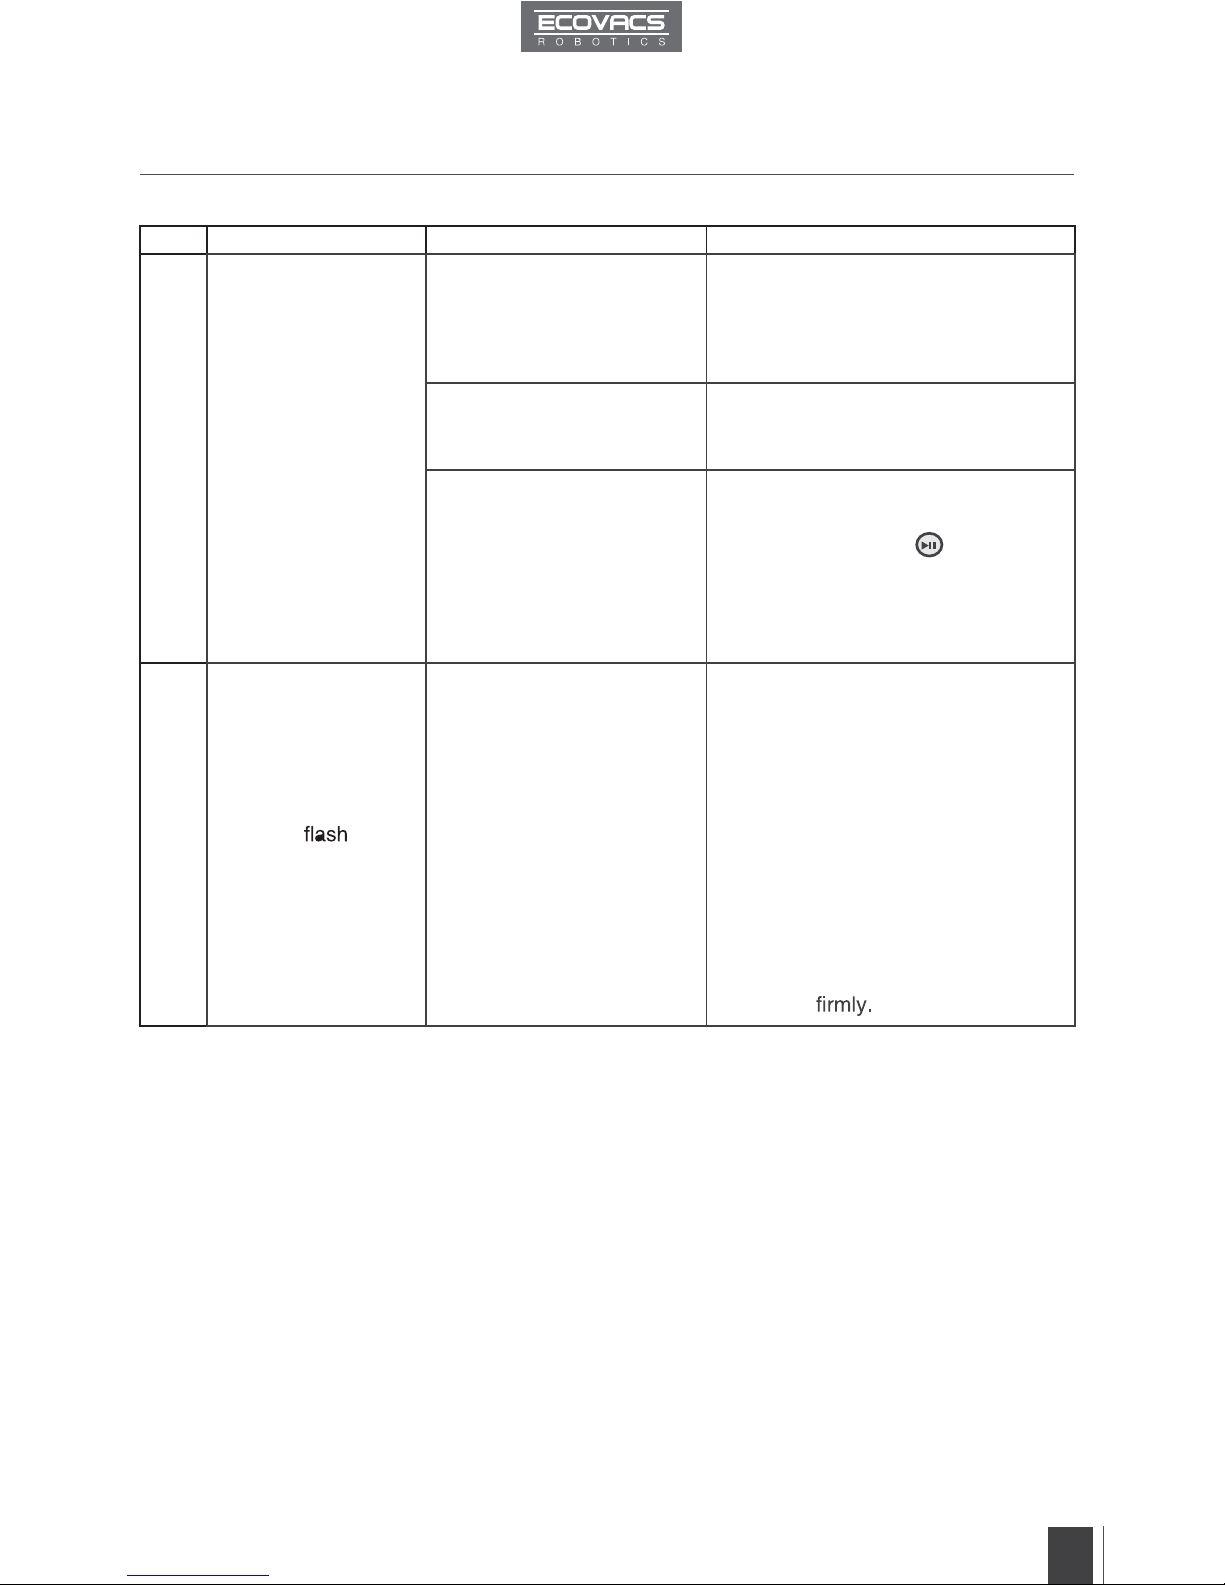
No. Malfunction Possible Causes Solutions
1
Remote Control
does not work.
WINBOT 7 is cleaning.
When WINBOT 7 is
cleaning, only the START/
PAUSE Button works on
the Remote Control.
Pause WINBOT 7 by pressing
the START/PAUSE Button on the
robot or the Remote Control. Other
buttons on the Remote Control will
function when WINBOT 7 is paused.
The batteries in the Remote
Control are not installed or
need to be replaced.
Install batteries or replace with new
batteries.
The Remote Control is not
paired with WINBOT 7.
WINBOT 7 arrives from
the factory paired with
its Remote Control. If the
Remote Control becomes
un-paired or is replaced, it
can be re-paired.
Power ON WINBOT 7. At the same
time, press and hold
button on
WINBOT 7 and the Pairing Button
on the Remote Control. Paring is
complete when WINBOT 7 beeps.
2
Status Indicator Light
does not
BLUE
after WINBOT 7 is
placed on the glass.
There is not enough suction
to attach WINBOT 7 to the
glass.
A.Check Cleaning Pads to ensure
proper placement. Remove the
Cleaning Pads and re-attach them
making sure they are placed exactly
within their Velcro areas on WINBOT 7.
B.Check for debris on the Cupule.
Clean the surface of the Cupule
with the provided Finishing Cloth as
described in section 4.
C.Check for accumulated dust or
debris on the glass where WINBOT 7
is placed. Clean a small area on the
glass before use and place WINBOT 7
there.
D.Press WINBOT 7 on the window a
little more
6. Troubleshooting
Page 18
16
EN
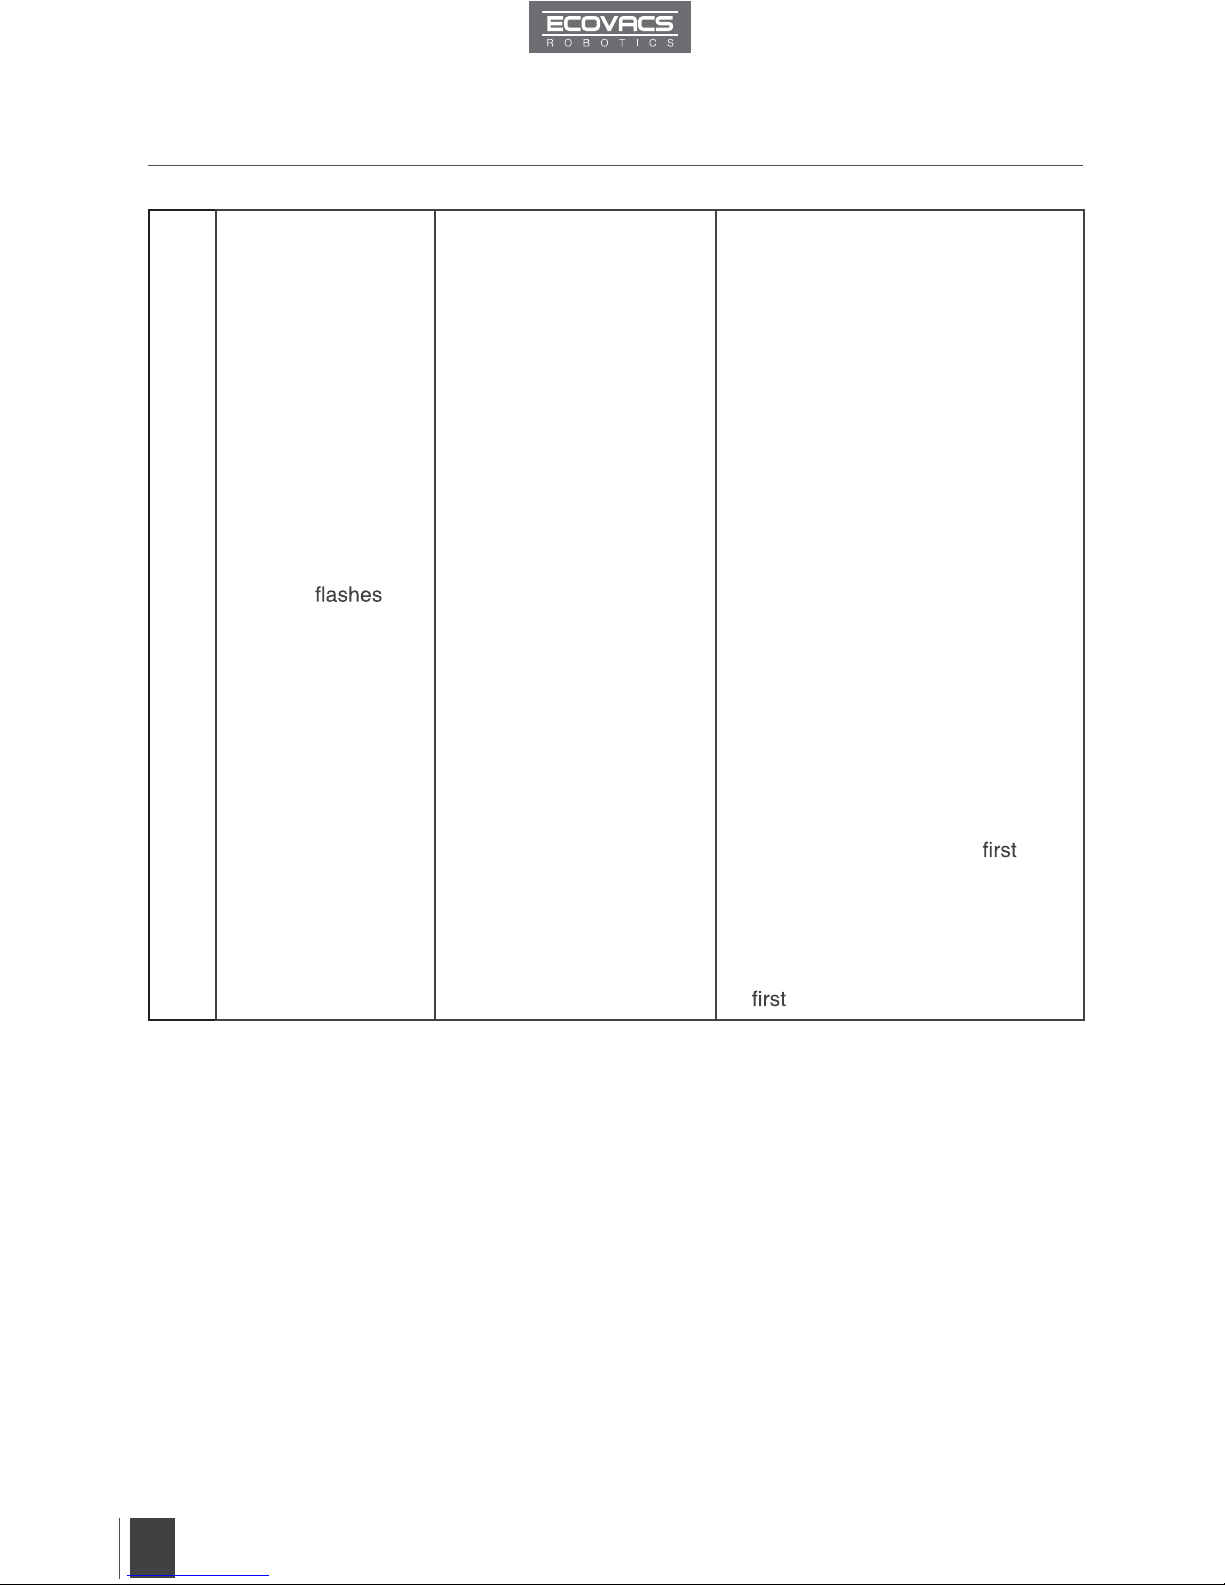
3
Status Light
Indicator
RED after it is
powered ON,
or during cleaning.
WINBOT 7 has
encountered a problem.
A. Power OFF WINBOT 7 and
unplug it. Then plug in again and
power ON.
B. Reset WINBOT 7 by pressing
the RESET Button on the Remote
Control.
C. Check for stubborn stains on the
window. Clean the stains before
using WINBOT 7.
D. Check the Cupule for dirt or
damage. Clean the Cupule as
described in section 4. If Cupule is
scratched or damaged, replace it
with a new one.
E. Check the Cleaning Pads.
Replace Cleaning Pads if they are
dirty or too wet.
F. Check the Driving Treads for dirt
or grease. Clean the Driving Treads
as described in section 4.
G. Check WINBOT 7’s Bumper.
Gently pat on the Bumper to restore
it to its normal position.
H. Check the window for uneven
surface. Do not use WINBOT 7 on
windows with an uneven surface,
such as decaled, frosted, textured,
patterned, or coated glass.
I. Check the window for thick dirt.
Clean the window by hand and
use WINBOT 7 for regular cleaning
after that.
*WINBOT 7 is intended to be
used for maintenance cleaning on
common windows. The product is
NOT designed to replace heavy duty
or time cleaning.
6. Troubleshooting
Page 19

WINBOT 7-000IM2014R00
 Loading...