

Page 1
Instruction Manual
EN
Note:This Instruction Manual applies to units purchased in North America only.
Page 2

FR-CA
EN
Congratulations on the purchase of your ECOVACS ROBOTICS DEEBOT!
We hope it brings you many years of satisfaction. We trust the purchase of your
new robot will help keep your home clean and provide you with more quality time
to do other things.
Before you go any further, please register your product on the ECOVACS ROBOTICS
website at www.ecovacsrobotics.com/registration/. We also suggest you record
your model number, serial number, date of purchase and attach your receipt
to this page for safekeeping.
MODEL # _________________
SERIAL # _________________
DATE OF PURCHASE _____/___/___
Should you have any problems programming the robot or getting your robot
to function properly, please call us before contacting or returning it to the
place of purchase. Call toll free number 1-844-ECOVACS (1-844-326-8227)
or 1-330-994-1760 from outside the United States of America and Canada for
assistance.
Thank you for choosing DEEBOT!
Page 3

FR-CA
EN
1. Important Safety Instructions .......................................................................................................2
2. Package Contents and Technical Specications .....................................................................4
2.1 Package Contents .......................................................................................................................4
2.2 Specications ................................................................................................................................4
2.3 Product Diagram .........................................................................................................................5
3. Operating and Programming ........................................................................................................7
3.1 Notes Before Cleaning ...............................................................................................................7
3.2 Quick Start .....................................................................................................................................8
3.3 Cleaning Pattern and Cleaning Mode Selection ........................................................... 11
3.4 Programming the Robot ........................................................................................................ 15
3.5 Choosing a Suction Option .................................................................................................. 16
3.6 Optional Advanced Wet/Dry Mopping System ............................................................. 17
3.7 Alarm Indicator Light and Sounds ..................................................................................... 20
4. Maintenance ..................................................................................................................................... 21
4.1 Dust Bin and Filters .................................................................................................................. 21
4.2 Advanced Wet/Dry Cleaning Cloth, Advanced Wet/Dry Reservoir ........................ 22
4.3 Main Brush, Direct Suction Option and Side Brushes ................................................. 23
4.4 Other Components .................................................................................................................. 24
5. Troubleshooting .............................................................................................................................. 25
Contents
Page 4

FR-CA
2
EN
When using an electrical appliance, basic precautions should always be followed, including
the following:
READ ALL INSTRUCTIONS BEFORE USING THIS APPLIANCE.
SAVE THESE INSTRUCTIONS
1. This Appliance is not intended to be used by children under 8 or anyone lacking knowledge
on proper use. Supervision may be necessary. Do not allow children to sit on or play with
the Appliance.
2. Clear the area to be cleaned. Remove power cords and small objects from the floor that could
entangle the Appliance. Tuck rug fringe under the rug base, and lift items such as curtains and
tablecloths o the oor.
3. If there is a drop off in the cleaning area due to a step or stairs, you should operate the
Appliance to ensure that it can detect the step without falling over the edge. It may become
necessary to place a physical barrier at the edge to keep the unit from falling. Make sure
the physical barrier is not a trip hazard.
4. Only use as described in this manual. Only use attachments recommended or sold by the
manufacturer.
5. Please make sure your power supply voltage matches the power voltage marked on the
Charging Dock.
6. For INDOOR household use ONLY. Do not use the Appliance in outdoor, commercial or
industrial environments.
7. Use only the original rechargeable battery and Charging Dock provided with the Appliance
from the manufacturer. Non-rechargeable batteries are prohibited. For battery information,
please refer to Specications section.
8. Do not use without dust bin and/or lters in place.
9. Do not operate the Appliance in an area where there are lit candles or fragile objects.
10. Do not use in extremely hot or cold environments (below -5˚C/23˚F or above 40˚C/104˚F).
11.
Keep hair, loose clothing, ngers, and all parts of body away from any openings and moving parts.
12. Do not operate the Appliance in a room where an infant or child is sleeping.
13. Do not use Appliance on wet surfaces or surfaces with standing water.
14. Do not allow the Appliance to pick up large objects like stones, large pieces of paper or any
item that may clog the Appliance.
15. Do not use Appliance to pick up flammable or combustible materials such as gasoline, printer
or copier toner, or use in areas where they may be present.
16. Do not use Appliance to pick up anything that is burning or smoking, such as cigarettes,
matches, hot ashes, or anything that could cause a re.
17.
Do not put objects into the suction intake. Do not use if the suction intake is blocked. Keep the
intake clear of dust, lint, hair, or anything that may reduce air ow.
18.
Take care not to damage the power cord. Do not pull on or carry the Appliance or Charging
Dock by the power cord, use the power cord as a handle, close a door on the power cord, or
pull power cord around sharp edges or corners. Do not run Appliance over the power cord.
Keep power cord away from hot surfaces.
19. If the power cord is damaged, it must be replaced by the manufacturer or its service agent
in order to avoid a hazard.
20. Do not use the Charging Dock if it is damaged.
21.
Do not use with a damaged power cord or receptacle. Do not use the Appliance or Charging
Dock if it is not working properly, has been dropped, damaged, left outdoors, or come in
contact with water. It must be repaired by the manufacturer or its service agent in order to
avoid a hazard.
1. Important Safety Instructions
Page 5

FR-CA
3
EN
22. Turn OFF the power switch before cleaning or maintaining the Appliance.
23. The plug must be removed from the receptacle before cleaning or maintaining the Charging
Dock.
24.
Remove the Appliance from the Charging Dock, and turn OFF the power switch to the Appliance
before removing the battery for disposal of the Appliance.
25.
The battery must be removed and discarded according to local laws and regulations before
disposal of the Appliance.
26. Please dispose of used batteries according to local laws and regulations.
27. Do not incinerate the Appliance even if it is severely damaged. The batteries can explode
in a re.
28. When not using the Charging Dock for a long period of time, please unplug it.
29. The Appliance must be used in accordance with the directions in this Instruction Manual.
ECOVACS ROBOTICS cannot be held liable or responsible for any damages or injuries
caused by improper use.
Changes or modifications not expressly approved by the party responsible for compliance
could void the user's authority to operate the equipment.
This equipment has been tested and found to comply with the limits for a Class B digital
device, pursuant to part 15 of the FCC Rules. These limits are designed to provide
reasonable protection against harmful interference in a residential installation. This equipment
generates uses and can radiate radio frequency energy and, if not installed and used in
accordance with the instructions, may cause harmful interference to radio communications.
However, there is no guarantee that interference will not occur in a particular installation. If
this equipment does cause harmful interference to radio or television reception, which can be
determined by turning the equipment off and on, the user is encouraged to try to correct the
interference by one or more of the following measures:
— Reorient or relocate the receiving antenna.
— Increase the separation between the equipment and receiver.
— Connect the equipment into an outlet on a circuit dierent from that to which the receiver is
connected.
— Consult the dealer or an experienced radio/TV technician for help.
To satisfy FCC / IC RF exposure requirements, a separation distance of 20 cm or more
should be maintained between the antenna of this device and persons during device
operation.
To ensure compliance, operations at closer than this distance is not recommended.
1. Important Safety Instructions
Page 6
FR-CA
4
EN
2. Package Contents and Technical Specications
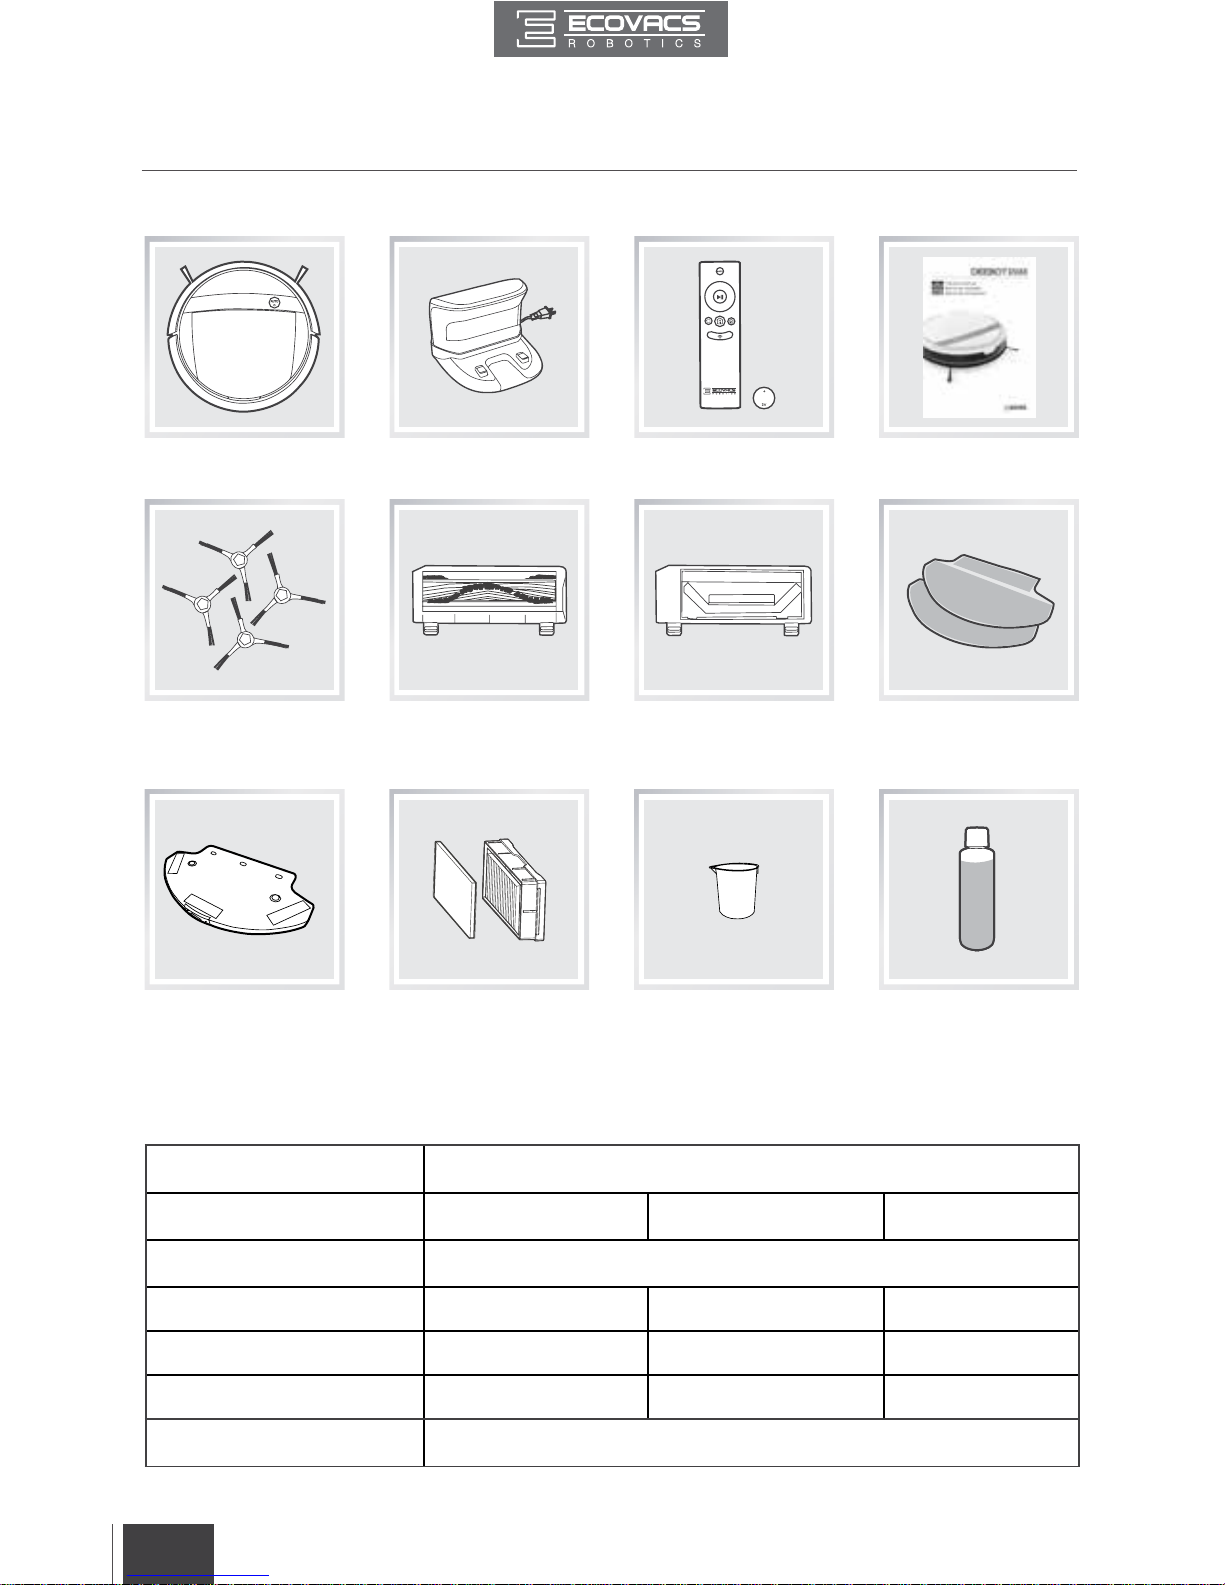
2.1 Package Contents
Robot
(4) Side Brushes
Advanced Wet/Dry
Reservoir
Main Brush Option
(pre-installed)
Direct Suction Option
(2) Advanced Wet/Dry
Cleaning Cloths
Charging Dock Remote Control with
Button Cell Battery
Instruction Manual
Model DM88
Working Voltage 12V DC
Rated Power
30W
Charging Dock Model CH1465A
Rated Input Voltage 100-240V AC Rated Output Voltage
20V DC
Rated Output Current 1A Rated Power 25W
Remote Control Model RC1521 Input Voltage 3V DC
Battery Ni-MH SC 3000mAh
2.2 Specications
*
Technical and design specications may be changed in the course of continuous product improvement.
Replacement High
Eciency Filter+
Sponge Filter
Measuring Cup Reservoir Cleaning
Solution
Page 7
FR-CA
5
EN
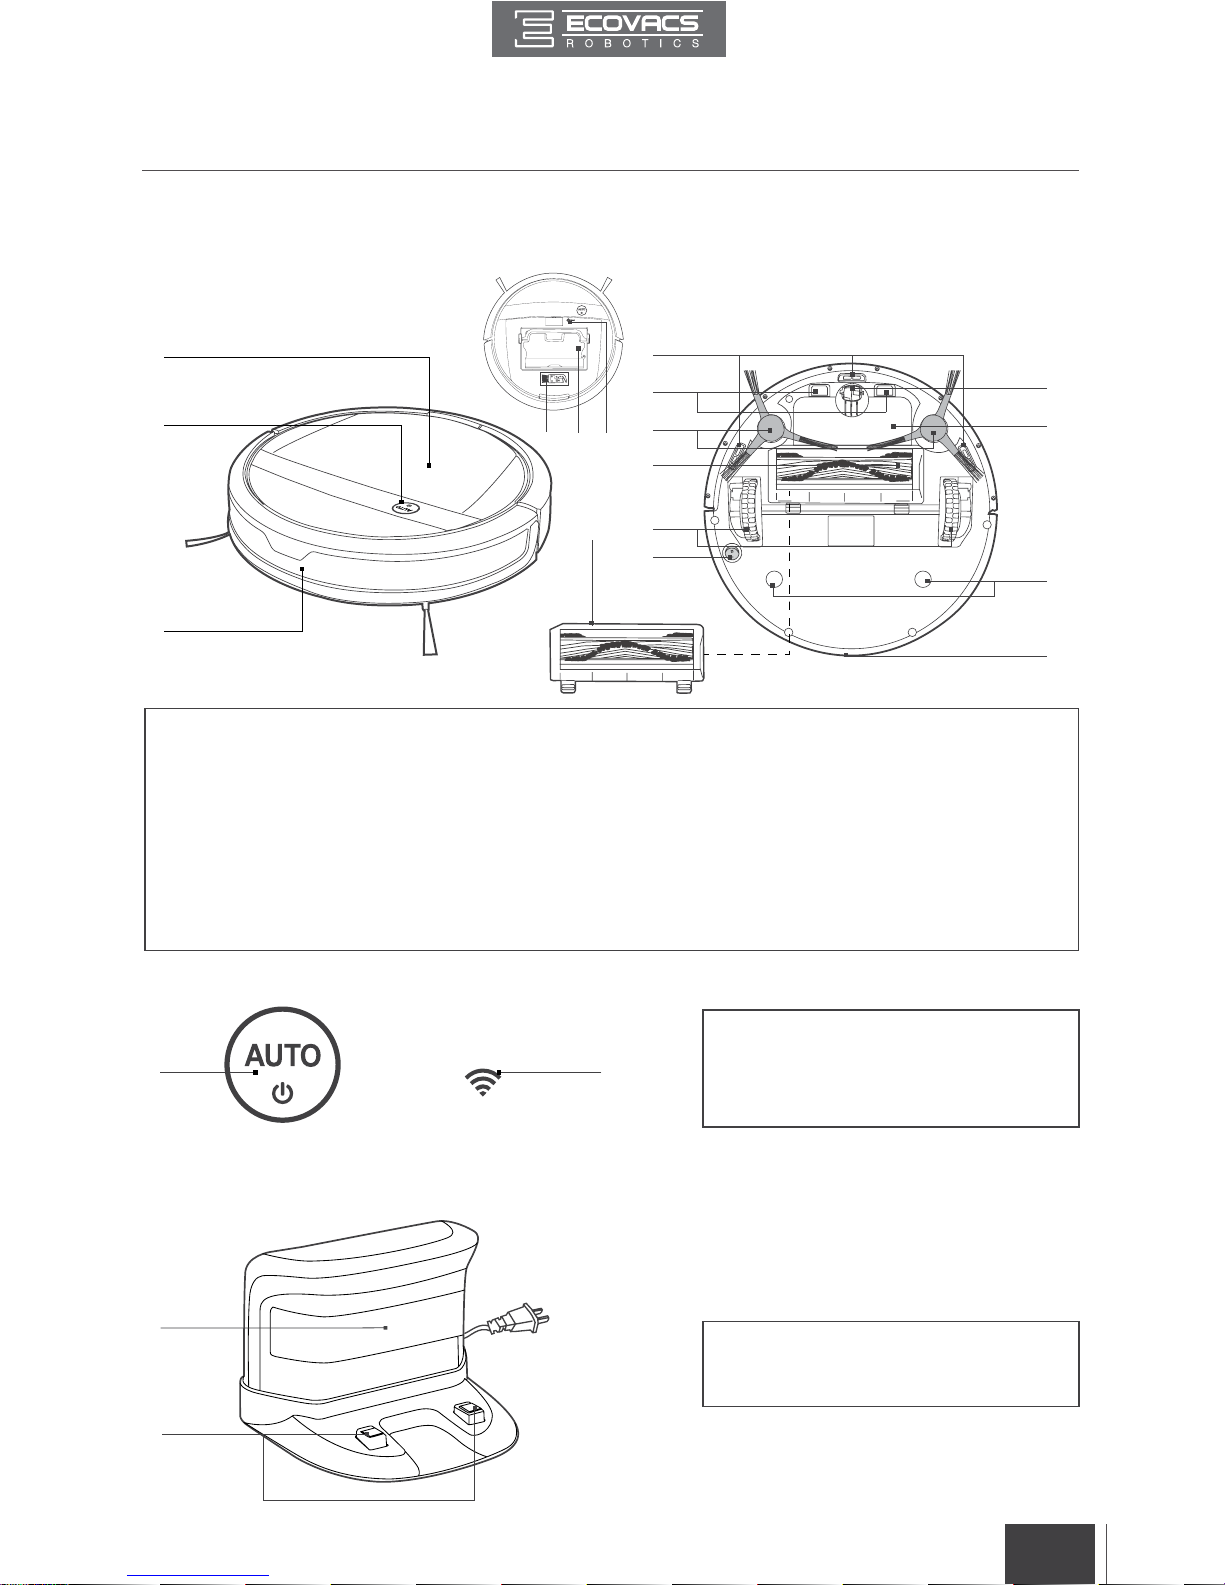
2.3 Product Diagram
Robot
1. Top Cover
2. Control Panel
3. Anti-Collision Sensors
4. Anti-Drop Sensors
5. Charging Contacts
6. Side Brushes
7. Main Brush Option
8. Driving Wheels
9. Bottom Power Switch
10. Universal Wheel
11. Battery Cover
12.
Advanced Wet/Dry Reservoir Slots
13. Infrared Receiver for Remote
Control
14. Reset Button
(For Customer Service Only)
15. Dust Bin
16. Main Brush Cover
17. Multi-Function Cleaning Tool
2. Package Contents and Technical Specications
Charging Dock
1 2
1. Infrared Signal Generator
2. Charging Dock Pins
1. AUTO Mode Button
(One-touch START/PAUSE)
2. Wi-Fi Indicator Light
Control Panel
1
2
1
2
3
4
5
6
7
8
9
10
11
12
13
14
16
1517
Page 8
FR-CA
6
EN
2. Package Contents and Technical Specications
8
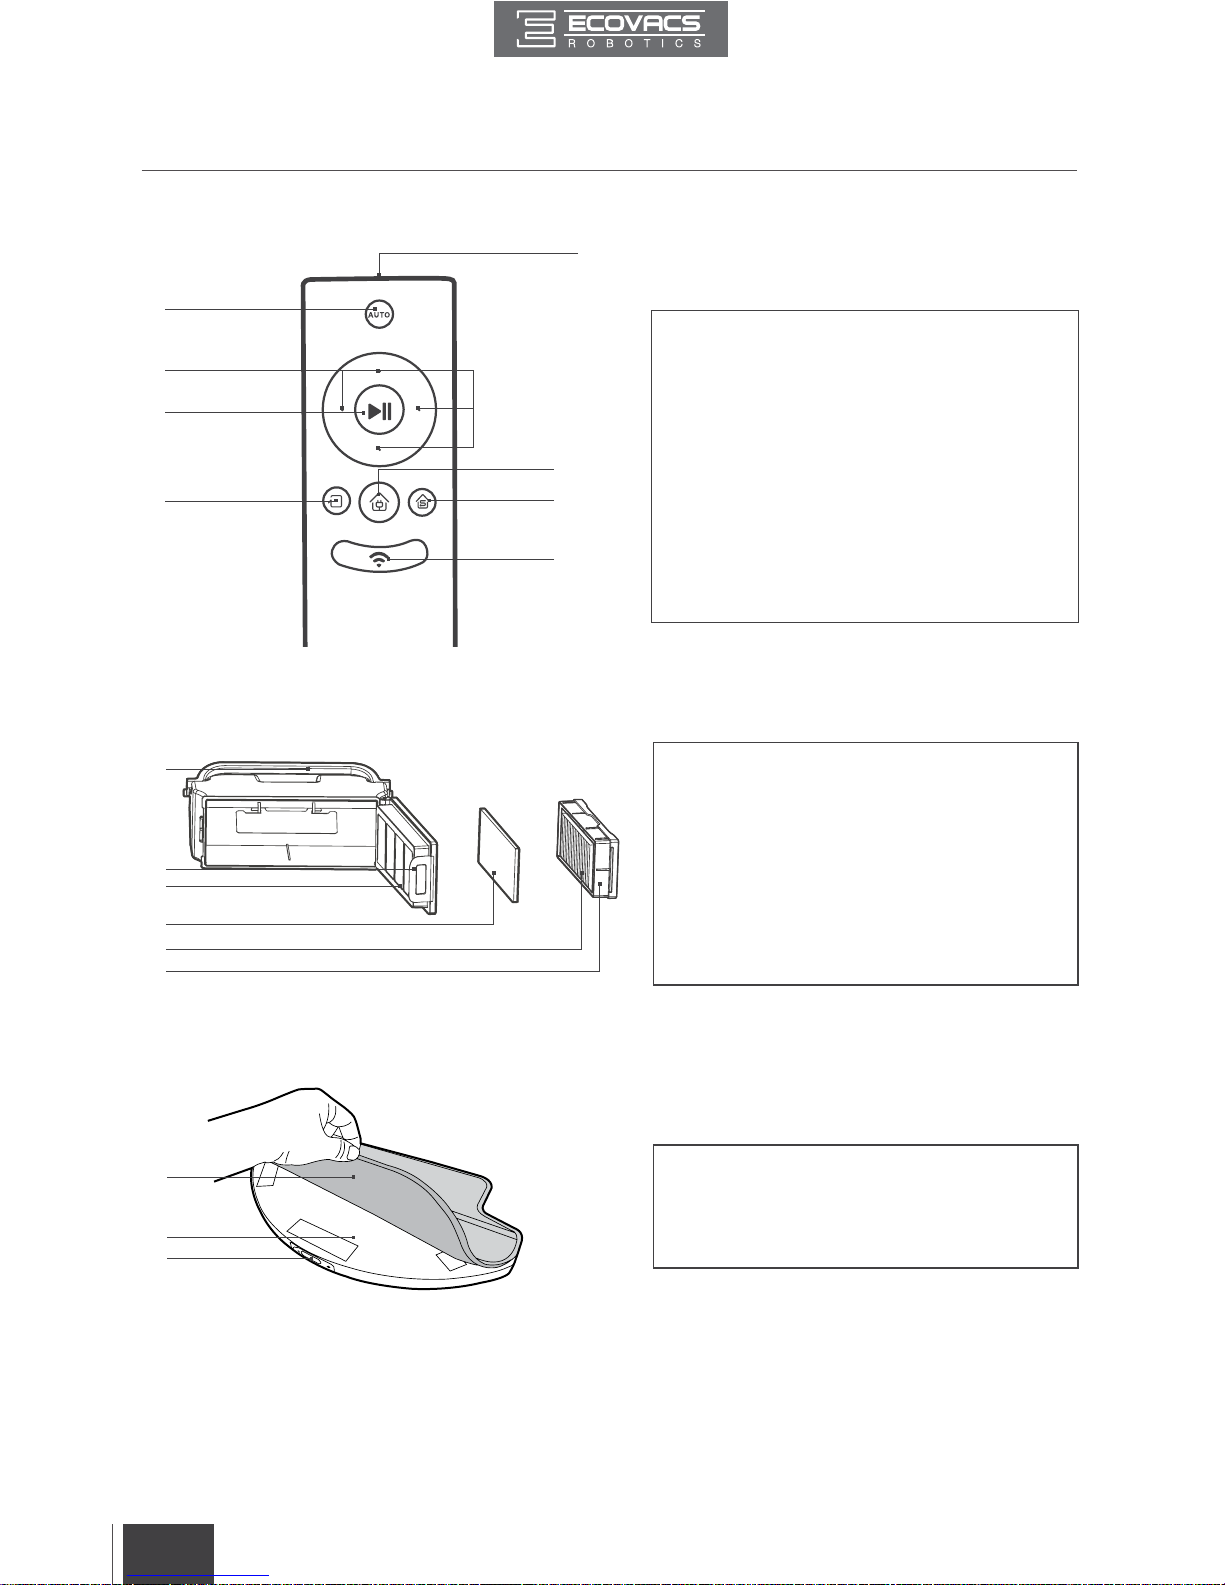
Remote Control
1. AUTO Mode Button
2. Direction Control Buttons
3. START/PAUSE Button
4. Return to Charger Mode Button
5. Single Room Mode Button
6. Edge Cleaning Mode Button
7. Network Setup Button
8. Infrared Emitter
Dust Bin
Advanced Wet/Dry Reservoir
1. Dust Bin Handle
2. Dust Bin Lock
3. Filter Net
4. Sponge Filter
5. High Eciency Filter
6. Dust Bin Cover
1. Advanced Wet/Dry Cleaning Cloth
2. Advanced Wet/Dry Reservoir
3. Water Inlet
4
5
6
1
2
3
1
2
3
6
4
5
7
1
2
3
Page 9
FR-CA
7
EN
3.1 Notes Before Cleaning
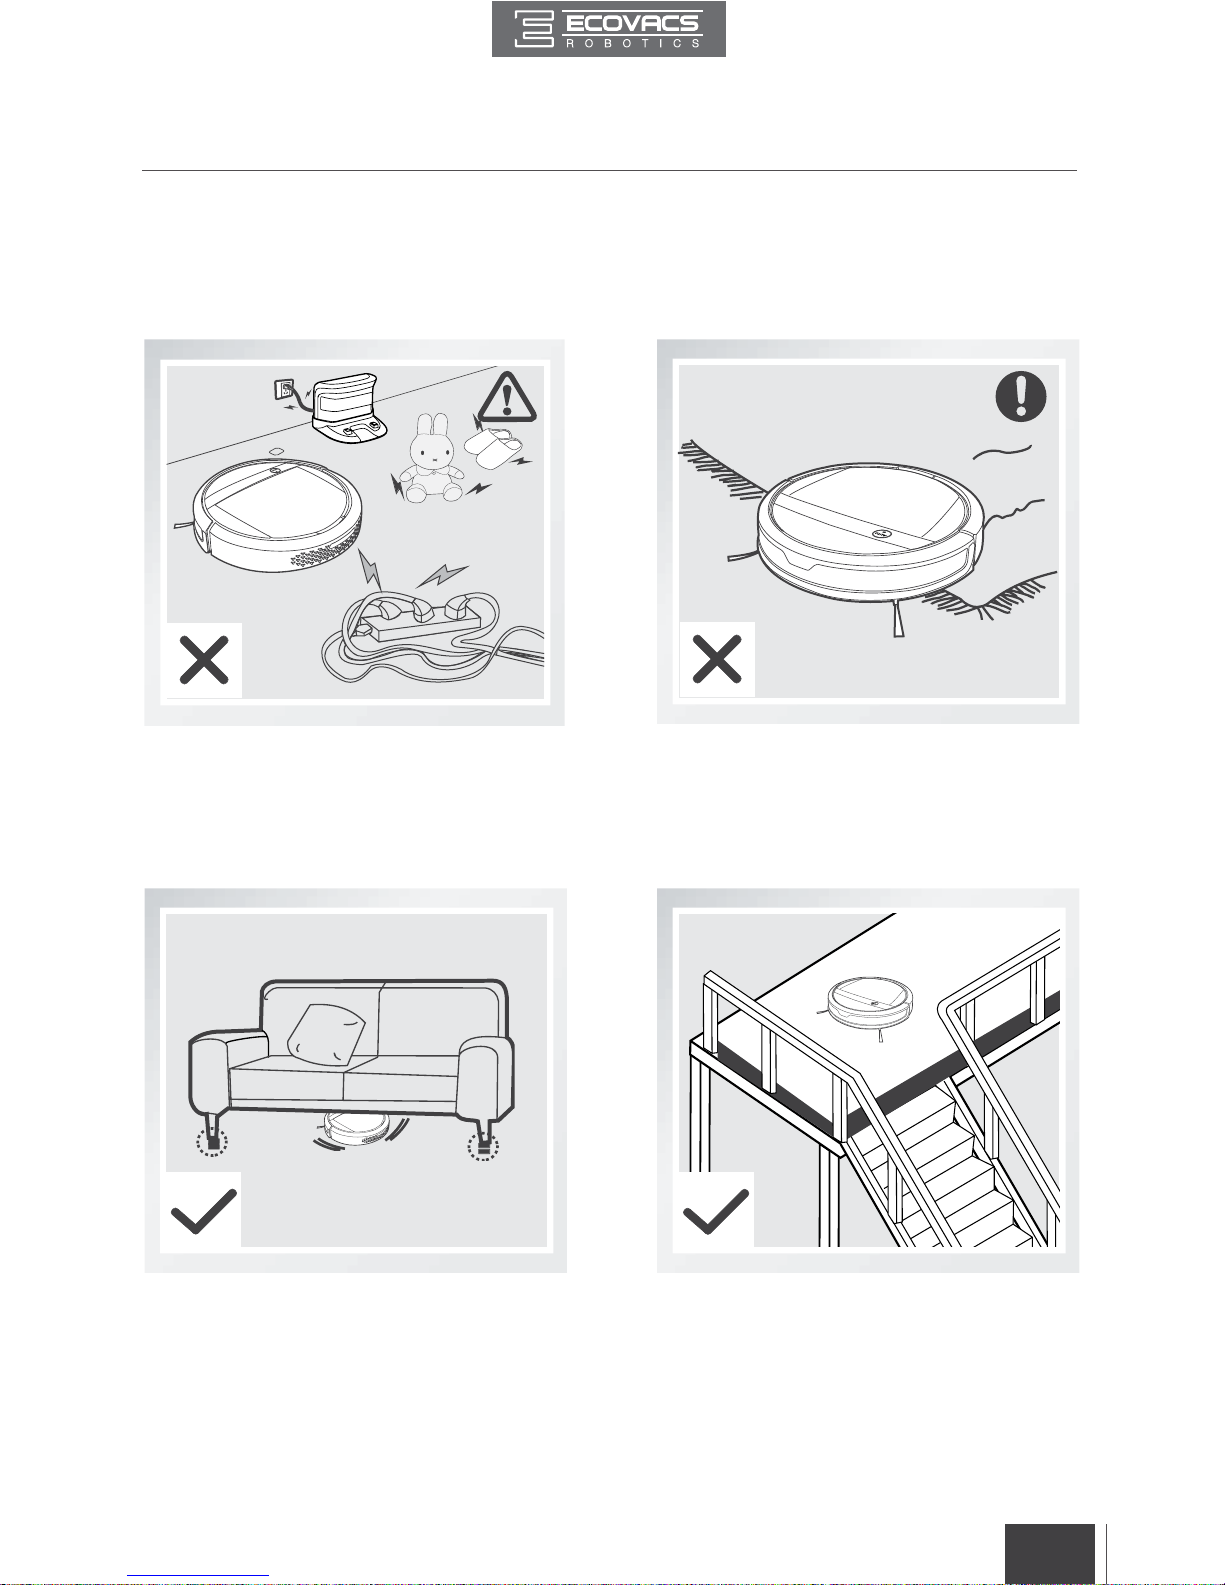
Before operating DEEBOT, take a few moments to survey the area to be
cleaned and remove any obstacles.
Remove power cords and small objects from
the oor that could entangle the product.
Please be aware that the robot needs at
least an 8 cm (3.15") clearance to clean
under furniture without complications.
The product is not suitable for use on long-pile
carpet. Before using the product near an area
rug or on a short-pile area rug with tasseled
edges, please fold area rug edges under
themselves.
If there is a step or stairs in the cleaning area,
please operate DEEBOT to ensure its AntiDrop Sensors can detect the drop off. It may
be necessary to place a physical barrier at the
edge of the drop o to keep the unit from falling
over the edge.
3. Operating and Programming
Page 10
FR-CA
8
EN
3. Operating and Programming
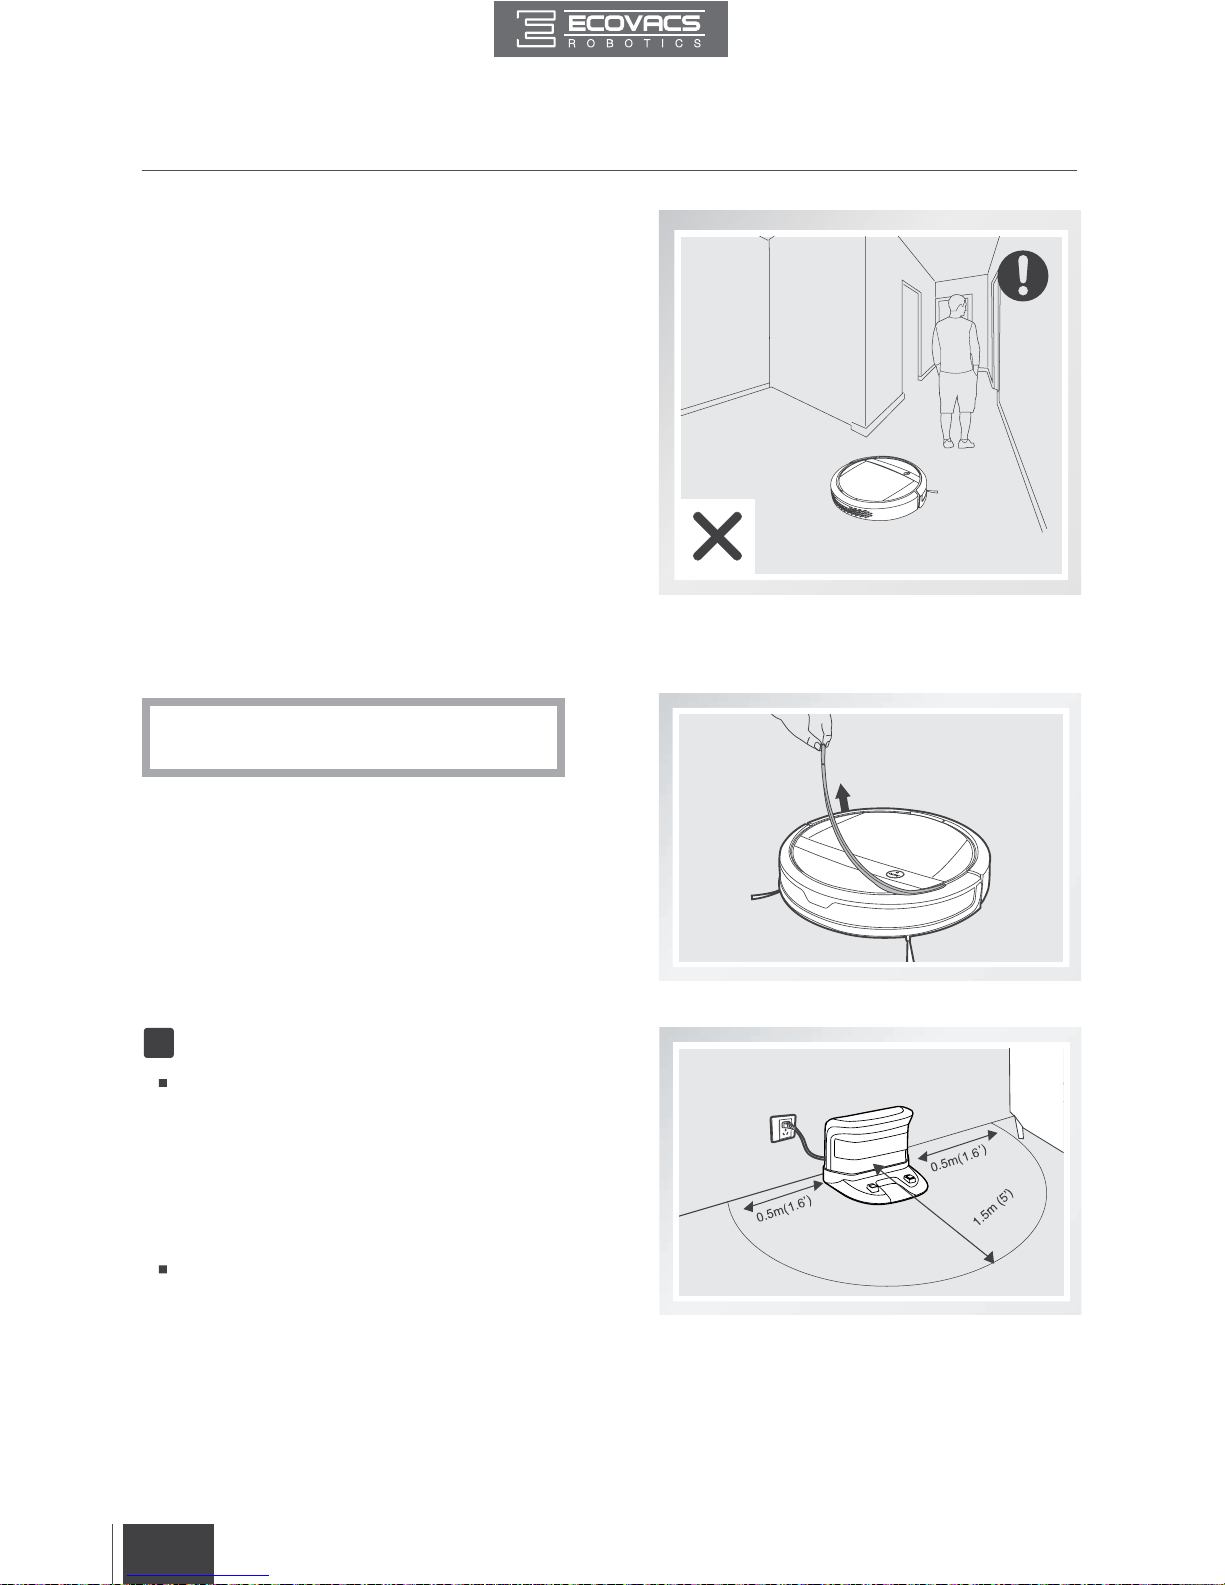
When DEEBOT is cleaning using Programmed
Cleaning Pattern, please do not stand in narrow
spaces, such as hallways, or DEEBOT may fail
to identify the area to be cleaned.
3.2 Quick Start
Charging Dock Placement
Place the Charging Dock on a level
floor surface against the wall with the
base perpendicular to the ground. Keep
the immediate area 1.5m (5') in front
of the charger and 0.5m (1.6') on both
sides of the charger clear of objects and
reective object surfaces.
Plug the Charging Dock in.
1
*
Remove the Bumper Rail protection sponge
on the DEEBOT before the rst use.
Page 11
FR-CA
9
EN
3. Operating and Programming
*
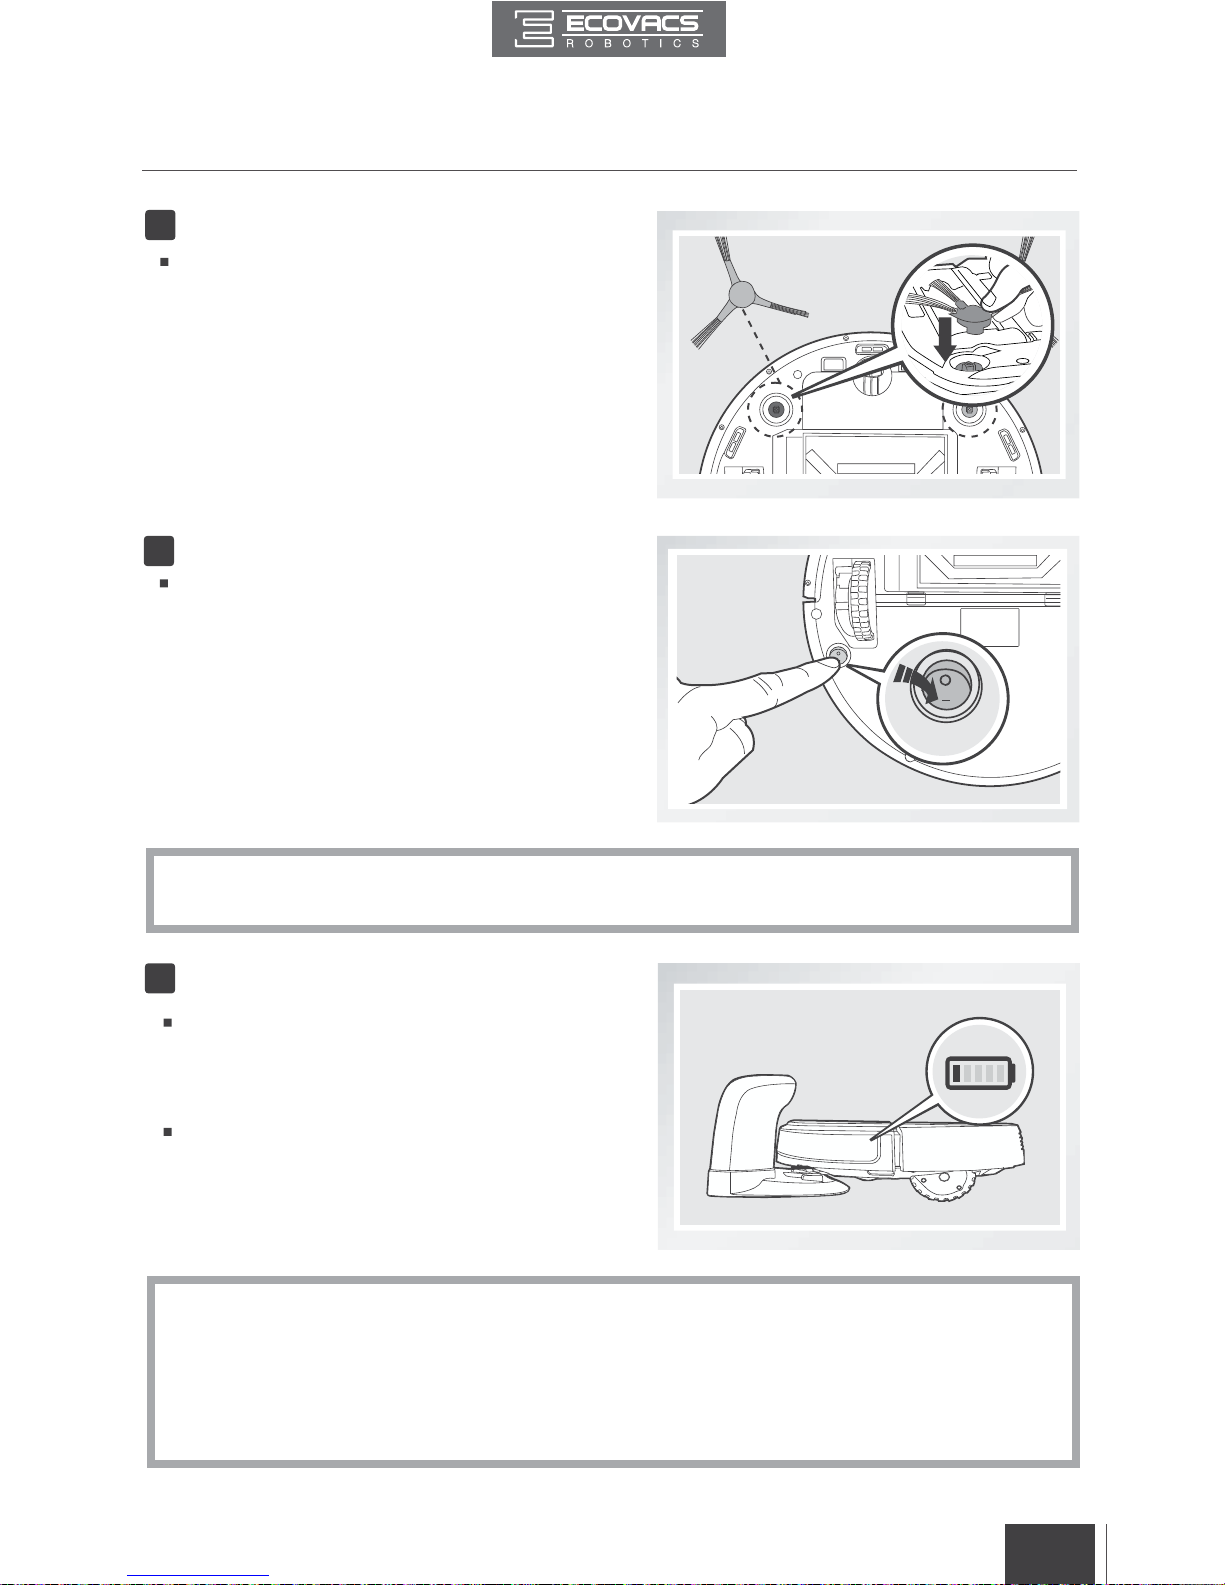
Make sure to turn the robot’s Bottom Power Switch to the ON position before charging. (“I”=power
ON; “O”=power OFF. The robot’s default setting is “O”.) DEEBOT is powered ON when the AUTO
Mode Button glows a continuous BLUE.
*
AUTO Mode Button blinks when DEEBOT is charging. AUTO Mode Button stops glowing when
DEEBOT is fully charged.
*
Remove the Water Reservoir before charging DEEBOT.
*
When DEEBOT is not cleaning, it is suggested to keep it powered ON and charging instead of
powered OFF.
Install Side Brushes
Attach Side Brushes to the bottom of
DEEBOT by pressing a brush into each
slot with the matching color until it clicks.
2
Power ON
Turn the robot’s Bottom Power Switch to
the ON position. “I”=power ON; “O”=power
OFF. Press and hold AUTO Mode Button
on the robot. DEEBOT is powered ON
when the AUTO Mode Button glows a
continuous BLUE.
3
ON
Place DEEBOT on the Charging Dock
making sure the Charging Contacts on
DEEBOT and the Charging Dock Pins make
a connection.
Charge DEEBOT for at least 4 hours before
the rst use.
4
Charge DEEBOT
Page 12
FR-CA
10
EN
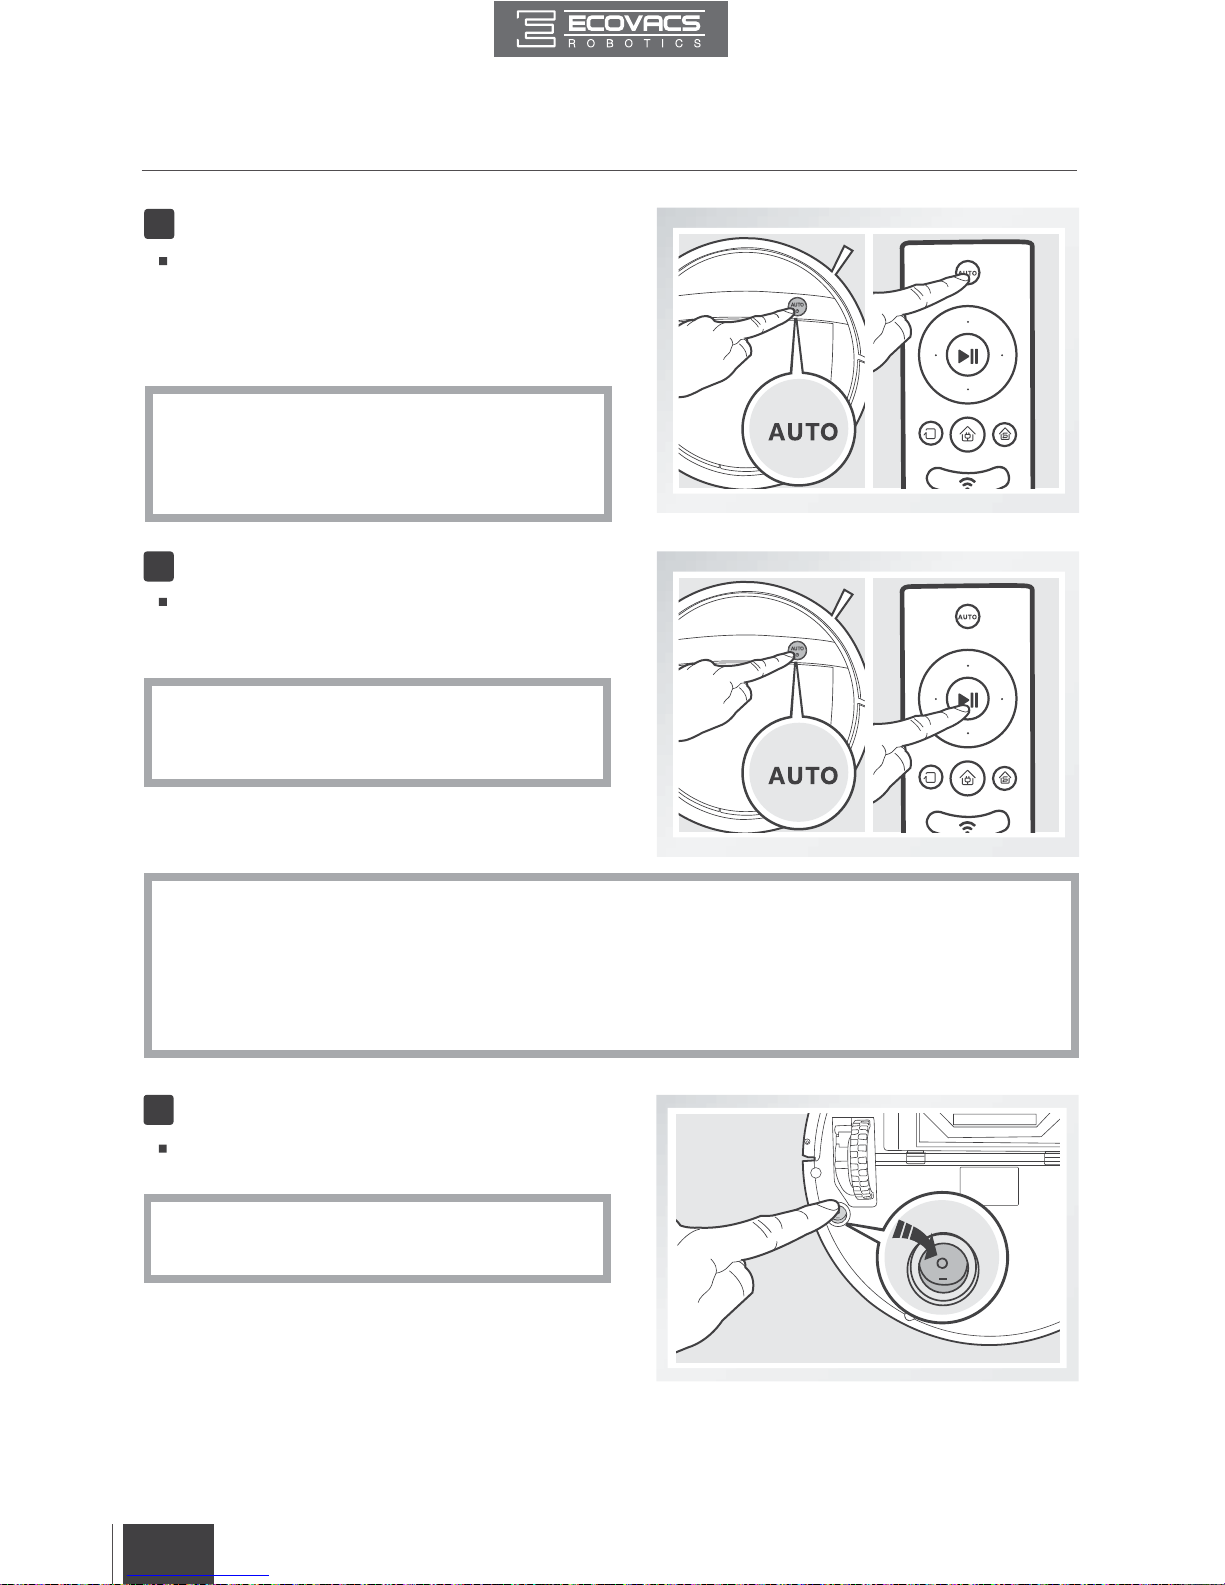
Pause DEEBOT by pressing the AUTO Mode
Button on DEEBOT or the START/PAUSE Button
on the Remote Control.
*
DEEBOT can be directed to move forward, backward, left and right using the Direction Control
Buttons on the Remote Control when it is Paused. DEEBOT cleans when it is directed to move
forward using the Remote Control.
*
The AUTO Mode Button on the robot's Control Panel stops glowing after the robot is paused for
more than 5 minutes. Press AUTO Mode Button on the robot to wake up the robot, or press any
button on the Remote Control to start the robot immediately.
*
Press AUTO Mode Button on DEEBOT or
the START/PAUSE Button on the Remote
Control to restart.
6
Pause
5
Start
Press the AUTO Mode Button on DEEBOT or
on the Remote Control. DEEBOT starts to work
immediately in AUTO Cleaning Mode using the
default Random Cleaning Pattern.
*
To choose another Cleaning Mode or Cleaning
Pattern, please refer to section 3.3 Cleaning
Pattern and Cleaning Mode Selection for
details.
3. Operating and Programming
Pause DEEBOT. Move the Bottom Power Switch to
the OFF position.
*
When DEEBOT is not cleaning, it is suggested
to keep it powered ON and charging.
7
Power OFF
OFF
Page 13
FR-CA
11
EN
3. Operating and Programming
Set Cleaning Pattern
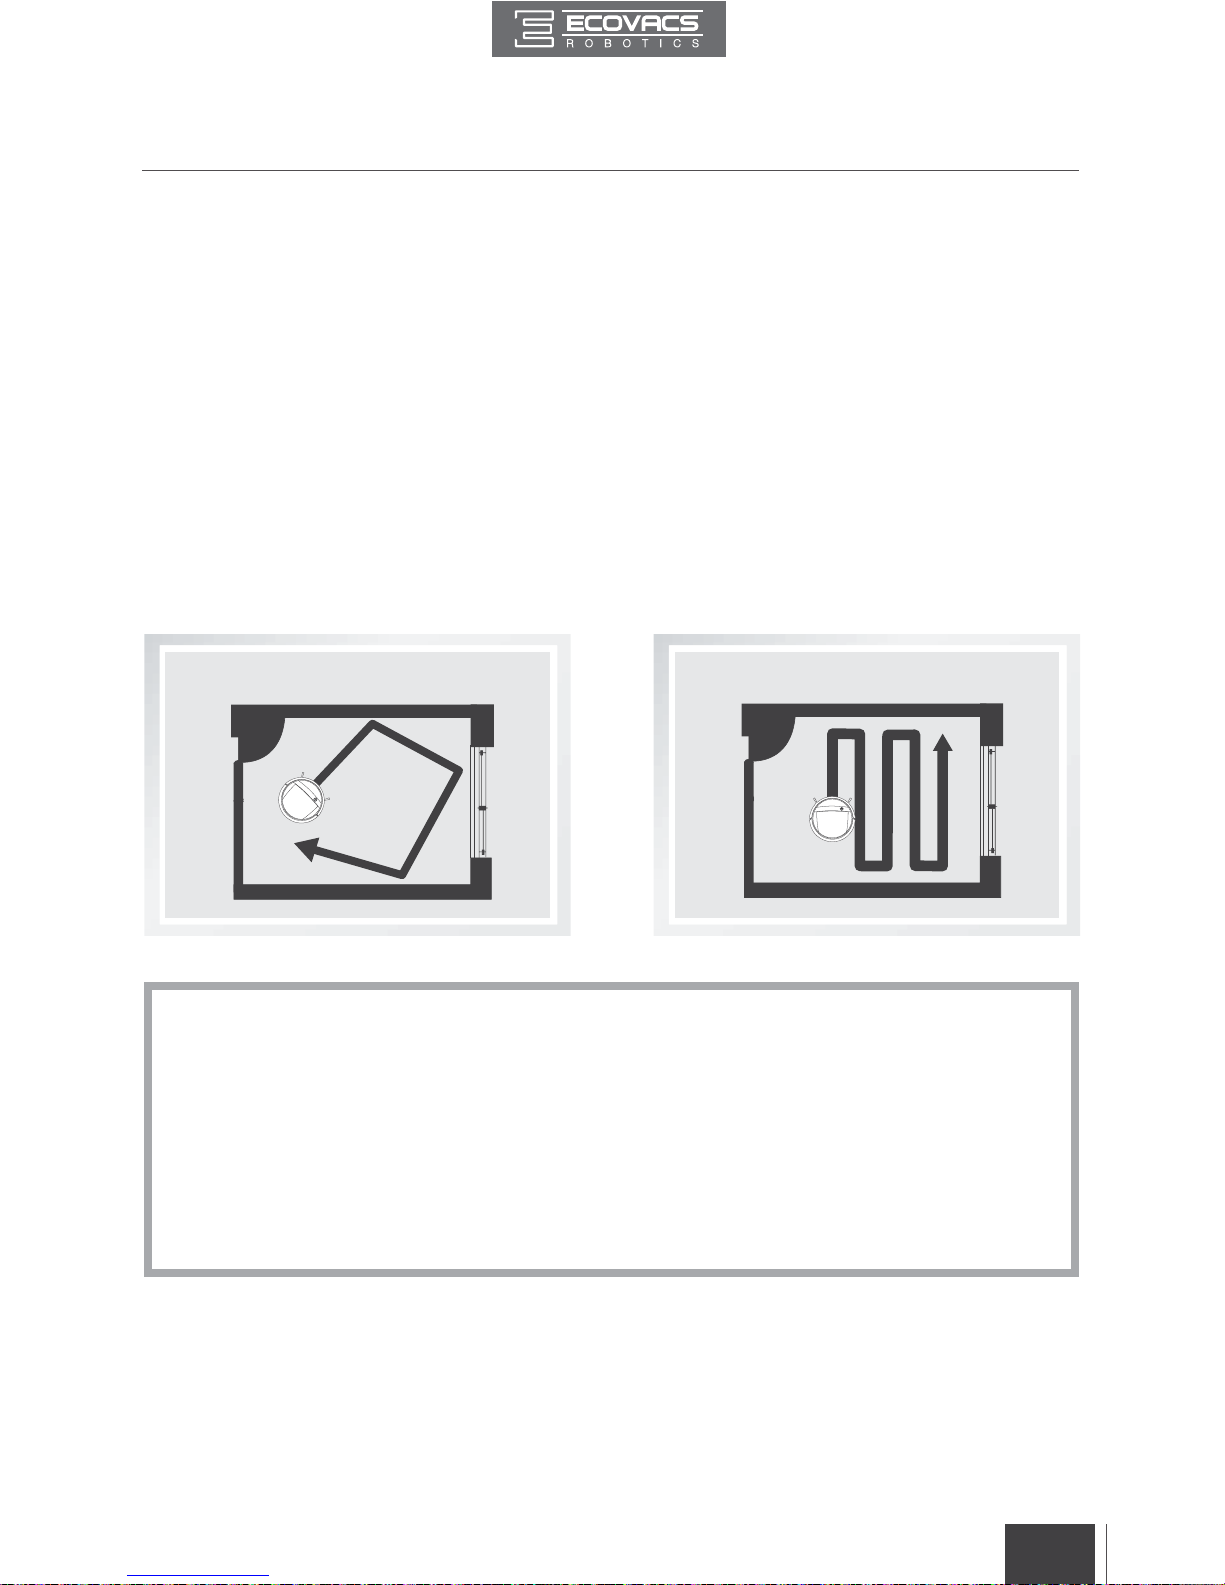
Random Cleaning Pattern (default pattern) Programmed Cleaning Pattern
3.3 Cleaning Pattern and Cleaning Mode Selection
DEEBOT has 2 Cleaning Patterns and several Cleaning Modes to choose from to effectively clean
different floors. Cleaning Patterns and Cleaning Modes are selected using the Remote Control or
the ECOVACS App. For more information on the ECOVACS App, see the separate ECOVACS App
leaet.
Set the cleaning pattern based on oor type.
Random Cleaning Pattern is the robot's default
pattern and should be set when cleaning
carpet. In Random Pattern, DEEBOT cleans
in a straight line and changes directions when it
meets an obstacle.
Programmed Cleaning Pattern should be set
when cleaning bare floors. In Programmed
Cleaning Pattern the robot plans the most efficient
route, cleans in a back and forth straight-line
pattern, returns to clean missed spots, then cleans
room edges before completing the cleaning cycle.
When Programmed Cleaning Pattern is Set:
*
DEEBOT automatically conducts route planning when cleaning. If the robot is paused, moved
manually or directed by the Remote Control during cleaning, DEEBOT will reconfigure the route
and restart. Therefore, avoid using the Remote Control or moving DEEBOT manually when it is
cleaning to ensure eciency.
*
DEEBOT may pause temporarily to recalculate its cleaning path. This is normal. Please be patient,
the frequency and duration of the pause is determined by room complexity.
* If the cleaning environment contains both bare floors and carpet, barriers (for example a closed
door) should be set between different floor types and cleaning patterns should be set accordingly.
If both oor types are to be cleaned in one cleaning cycle, Random Cleaning Pattern should be set.
Page 14
FR-CA
12
EN
AUTO Cleaning Mode
Select Cleaning Mode
This is the most commonly used mode and is
good for every day cleaning.
To start AUTO Cleaning Mode, press the AUTO
Mode Button on the robot, on the Remote
Control, or
on the App main screen.
1
*
AUTO Cleaning Mode cleans using the Cleaning Pattern set in the previous step. Random
Cleaning Pattern is best for carpet. Programmed Cleaning Pattern is best for bare oors.
*
When the cleaning cycle is complete, DEEBOT returns to the Charging Dock.
3. Operating and Programming
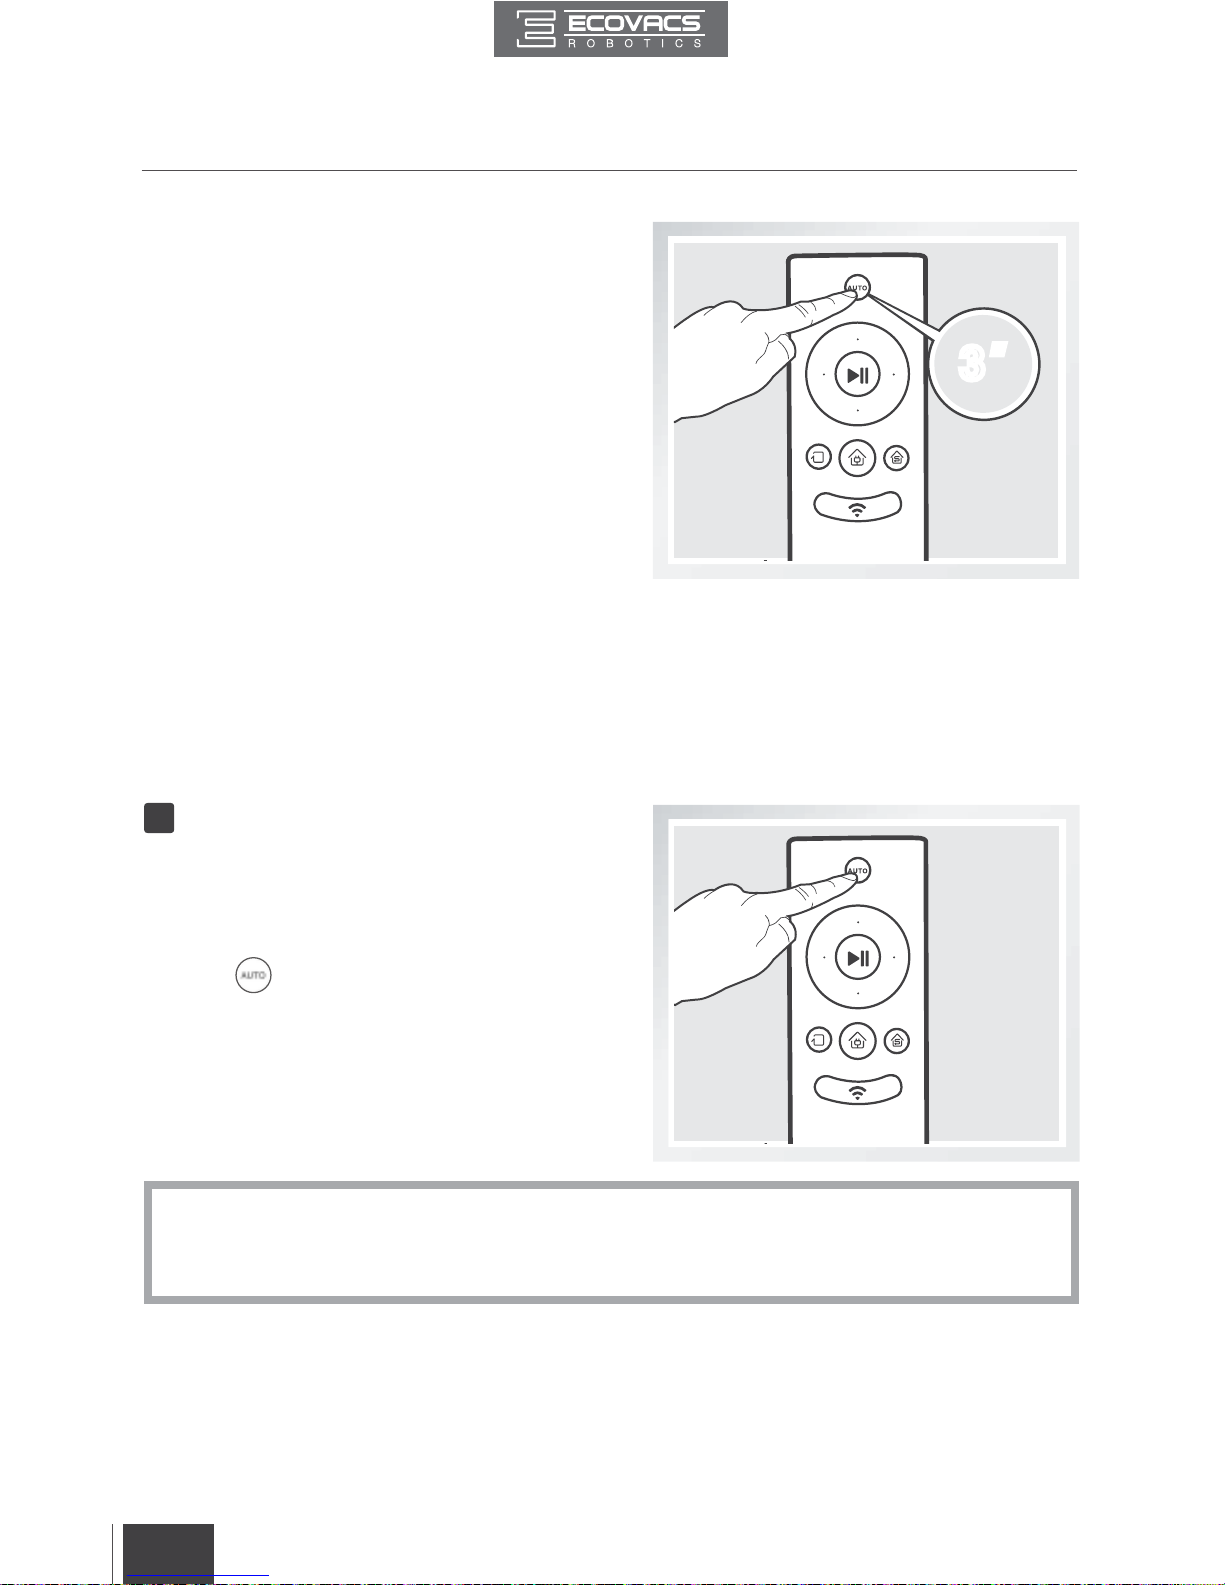
Press and hold the AUTO Mode Button on the
Remote Control for 3 seconds. Programmed
Cleaning Pattern is set when DEEBOT emits
two beeps. To switch back to Random Cleaning
Pattern, press and hold the AUTO Mode Button
on the Remote Control for 3 seconds. Random
Cleaning Pattern is set when DEEBOT emits
one beep.
Cleaning Patterns can also be set using the ECOVACS App.
DEEBOT uses the set Cleaning Pattern when cleaning in AUTO Cleaning Mode and Single Room Cleaning
Mode.
3Ƞ3 Ƞ
Page 15
FR-CA
13
EN
3. Operating and Programming
Single Room Mode
This mode is used when DEEBOT only needs to
clean a single room with a maximum size of 30 m2
(323 sq ft). To start Single Room Cleaning Mode,
press the Single Mode Button on the Remote
Control or
on the App main screen.
2
*
Single Room Cleaning Mode cleans using the set Cleaning Pattern. Random Cleaning Pattern
is best for carpet. Programmed Cleaning Pattern is best for bare oors.
*
The room must be contained for Single Room Mode to function properly. Close doors to the
room entrance and exit to contain the room.
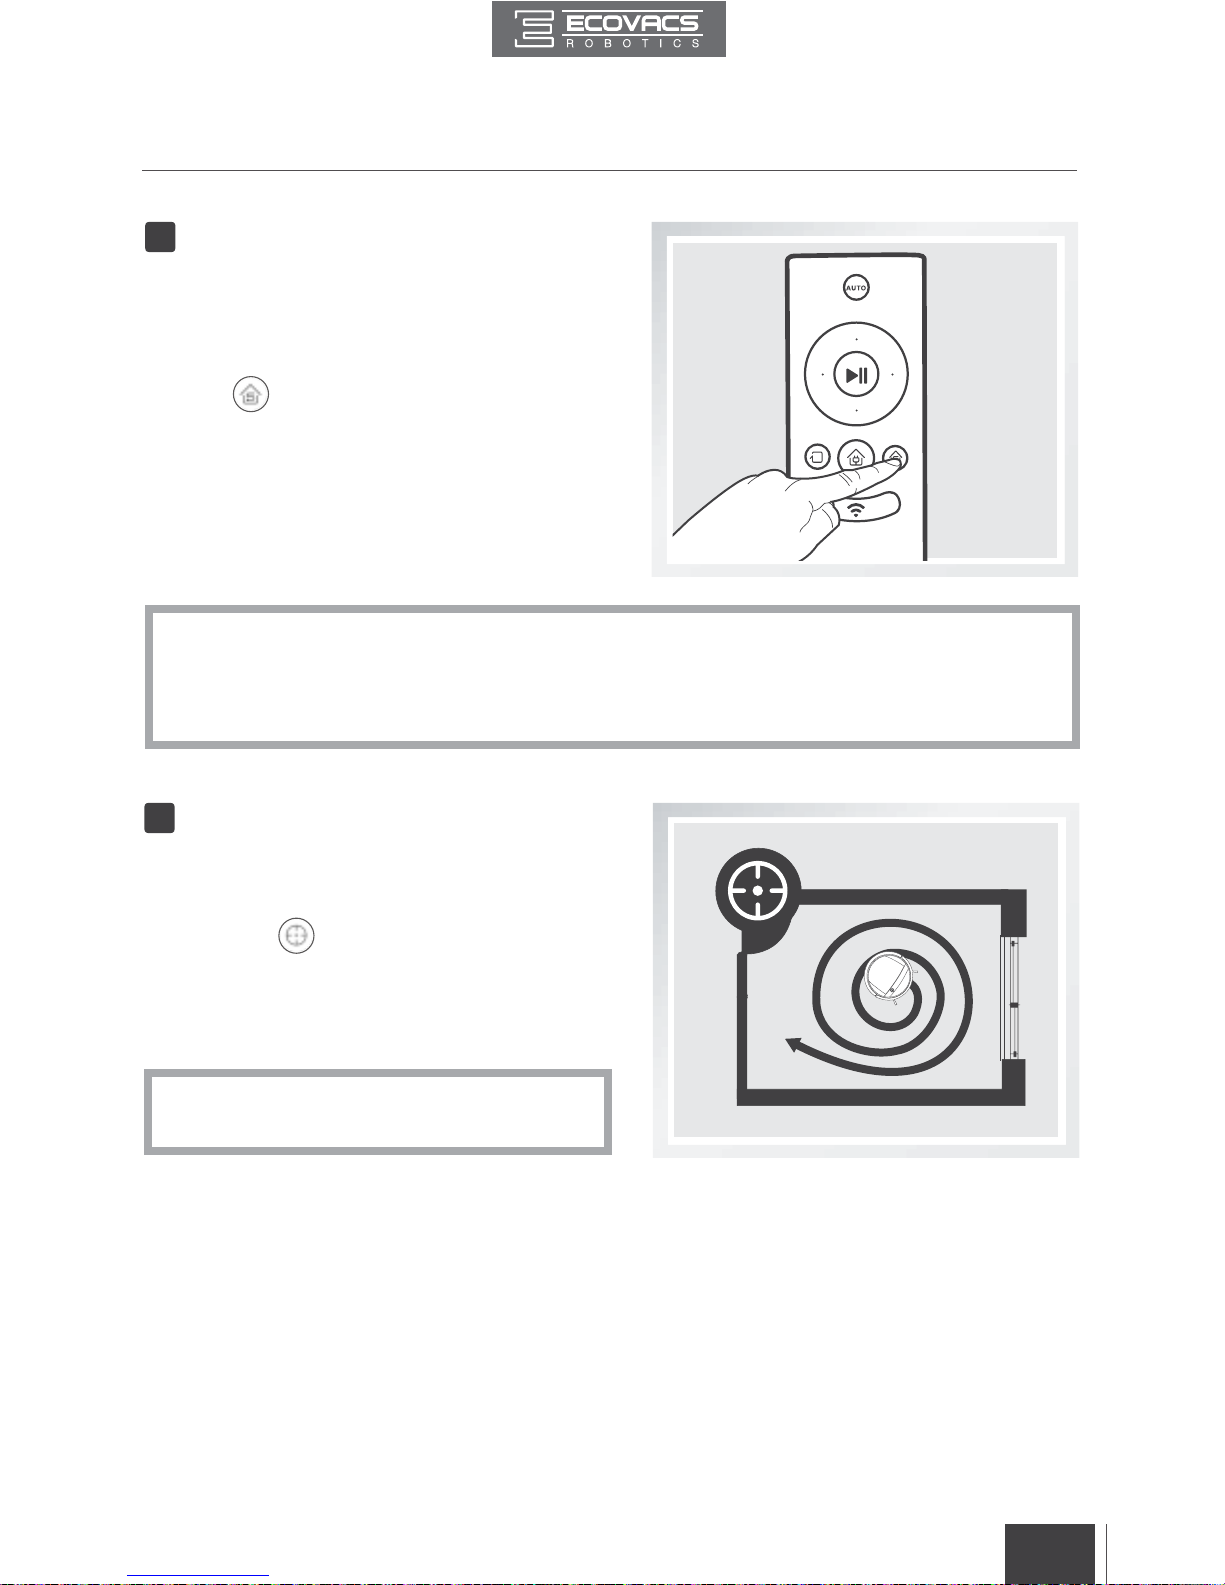
Spot Cleaning Mode
(2-5 minutes)
This mode is applicable for a small area of highly
concentrated dirt or dust. To start Spot Cleaning
Mode, press
on the App main screen. In
Spot Cleaning Mode, DEEBOT focuses on a
specific area to clean. DEEBOT cleans the area
in a spiral pattern and returns to its starting point
when it completes cleaning.
3
*
Spot Cleaning Mode can only be started
using the App.
Page 16
FR-CA
14
EN
*
Use the App to increase the suction power of any Cleaning Mode already in process. Press
in the App for MAX suction power. Press
to switch back to standard suction power.
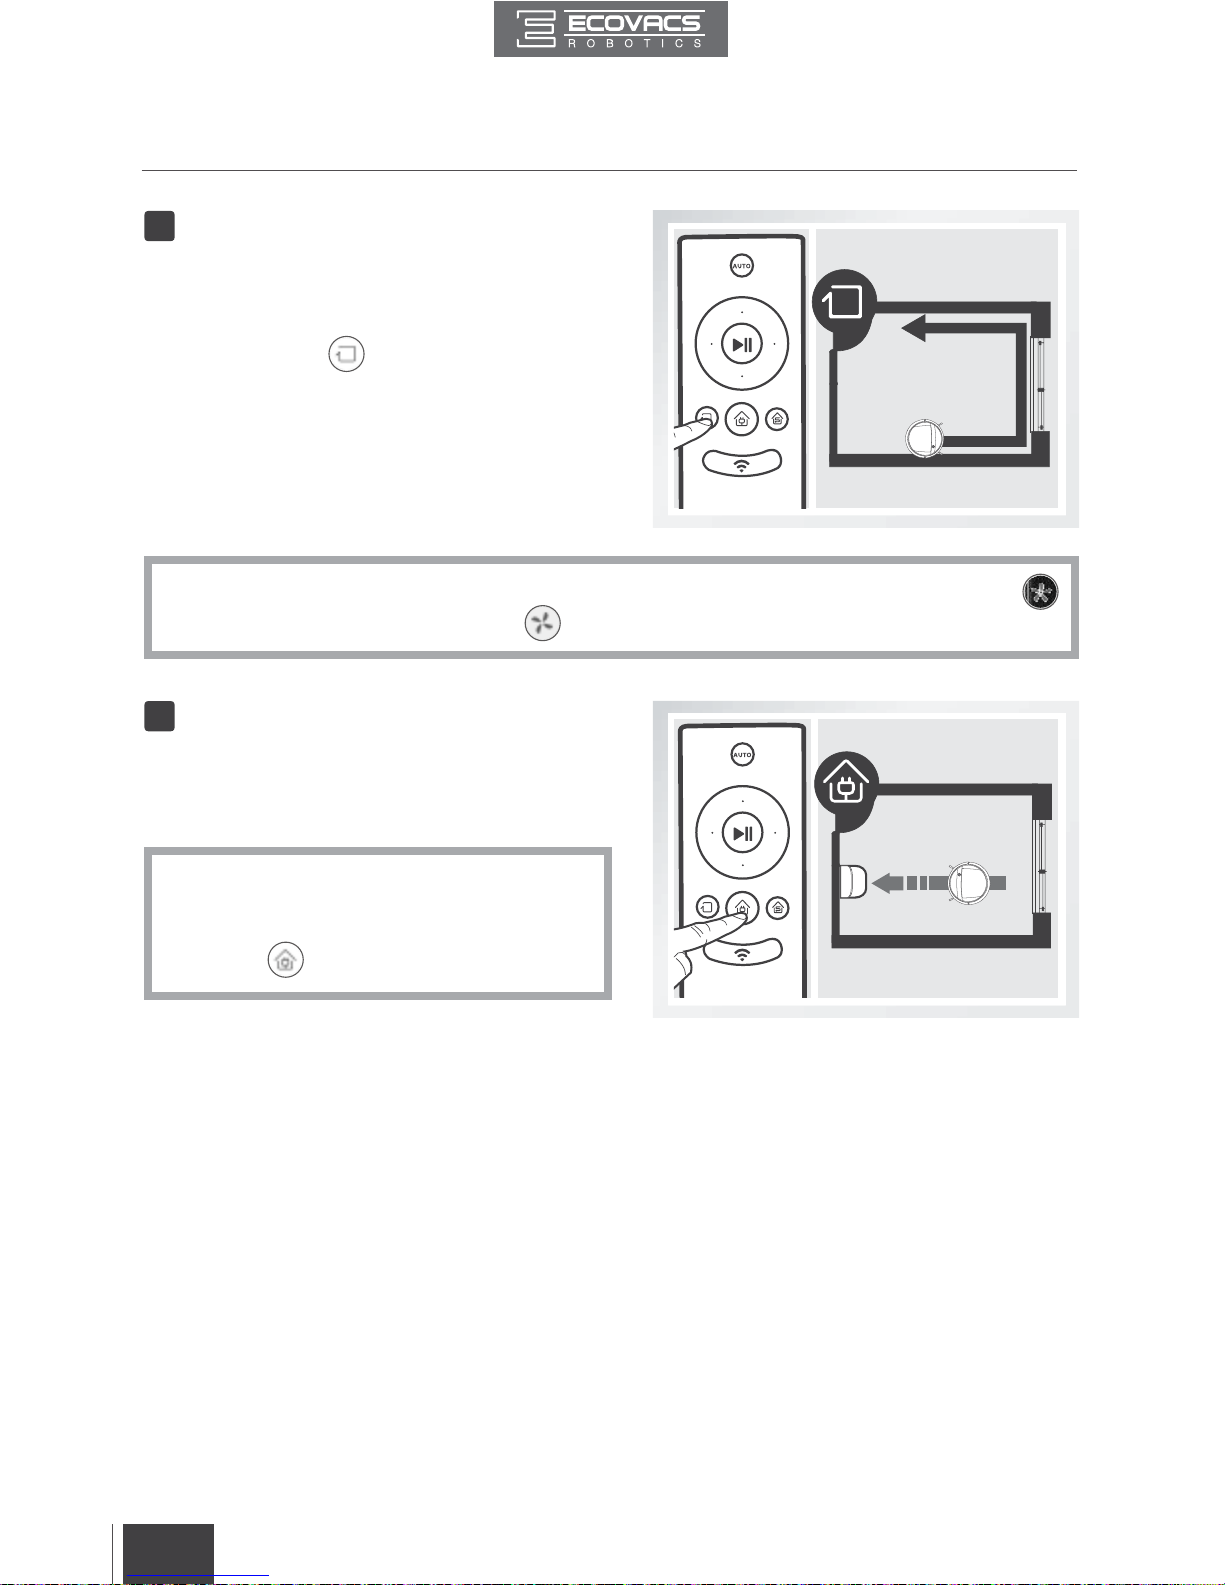
Edge Cleaning Mode
This mode is good for cleaning the edges and
corners of a room. To start Edge Cleaning Mode,
press the Edge Cleaning Mode Button on the
Remote control or
on the App main screen.
In Edge Cleaning Mode, DEEBOT cleans along
a border (e.g. wall), and returns to the Charging
Dock when it completes cleaning.
4
3. Operating and Programming
Return to Charger Mode
When battery power gets low, DEEBOT
automatically switches to Return to Charger Mode
and returns to the Charging Dock to recharge itself.
5
*
DEEBOT can also be sent back to the
Charging Dock at any time by pressing the
Return to Charger Button on the Remote
Control or
on the App main screen.
Page 17
FR-CA
15
EN
*
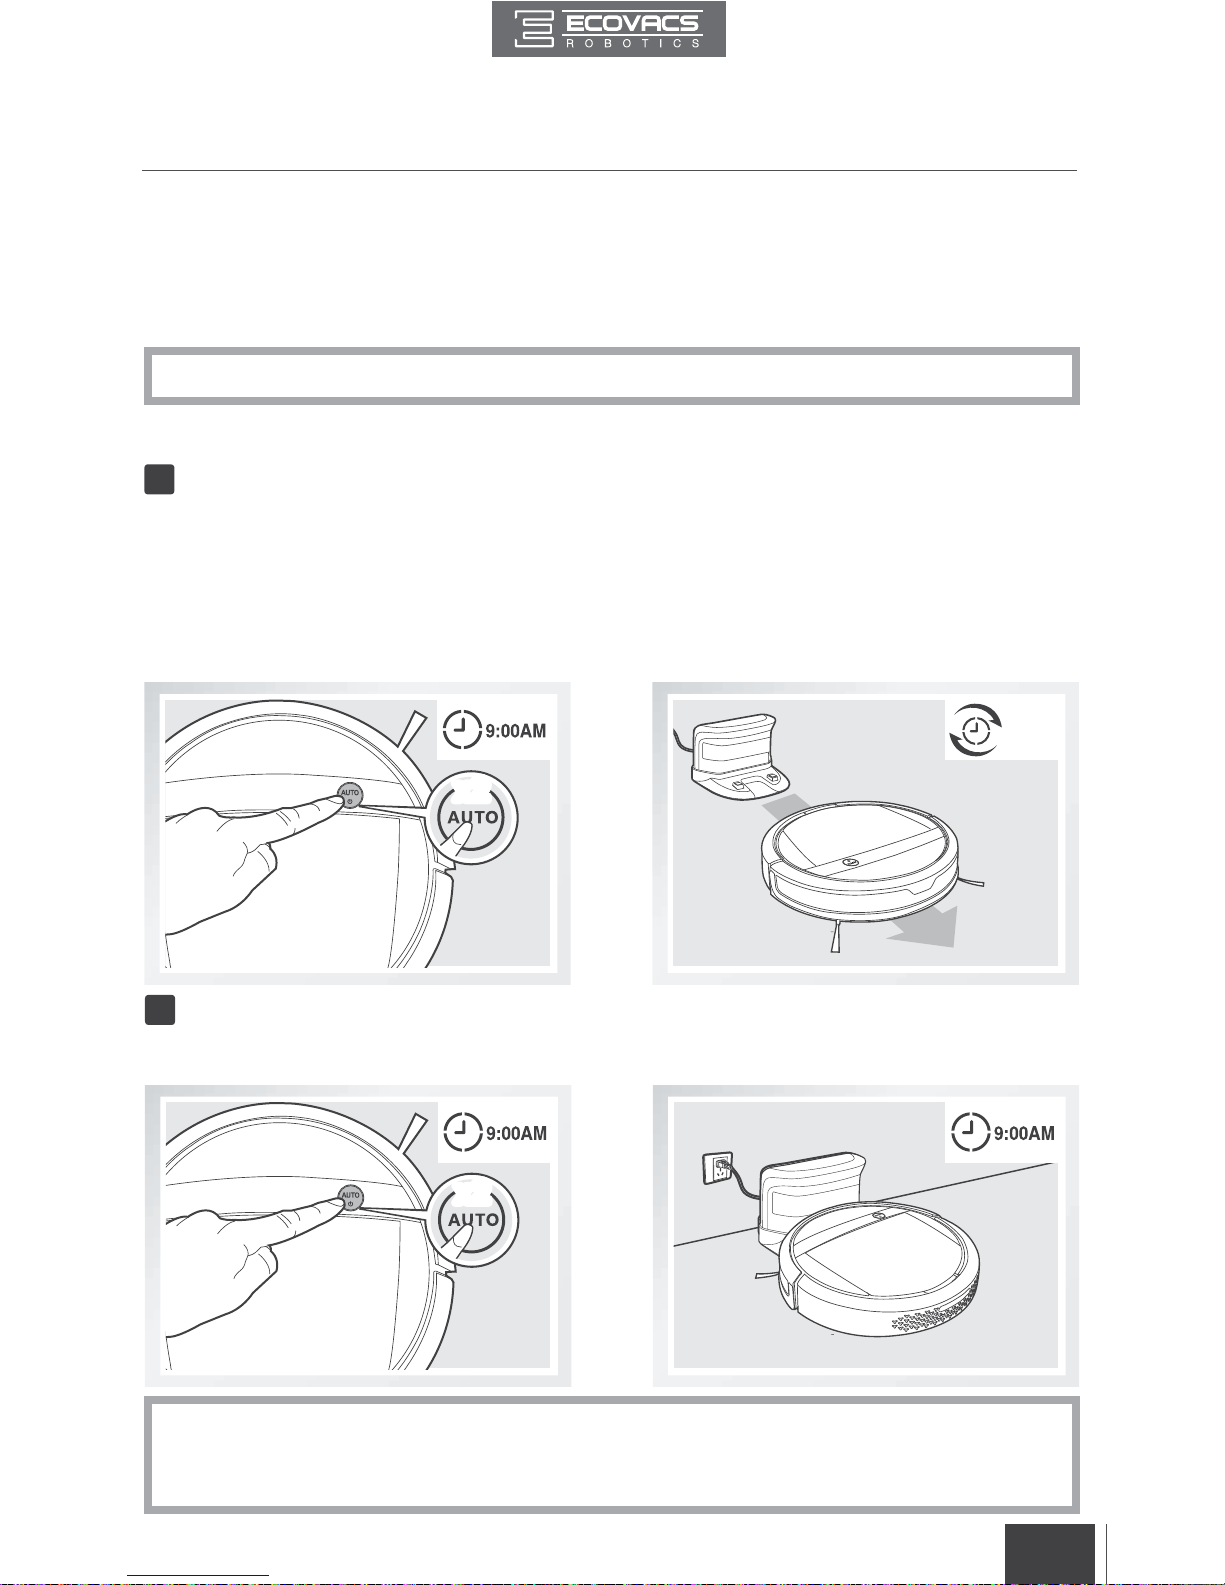
All scheduled cleanings are performed in AUTO Cleaning Mode using the Random Cleaning Pattern.
x2x2
9:00AM
Set Intelligent Scheduling
DEEBOT has an Intelligent Scheduling and a Time Scheduling function to schedule cleaning
times. DEEBOT can be programmed to automatically clean once per day at the same time with
Intelligent Scheduling using the robot’s Control Panel. DEEBOT can also be programmed weekly to
clean up to two times per day at specic times with Time Scheduling using the App.
DEEBOT can be scheduled to clean once per day at the same time, even if nobody is at home.
Press the Auto Mode Button on the robot twice to set the current time as the scheduled cleaning time.
Intelligent Scheduling is set successfully when the robot beeps twice. DEEBOT automatically cleans
at the scheduled cleaning time every day.
For example: Set Intelligent Scheduling successfully at 9:00am, and DEEBOT automatically cleans at
9:00am every day.
1
3.4 Programming the Robot
Intelligent Scheduling
*
To automatically clean at another time, rst cancel the current Intelligent Scheduling, then set
Intelligent Scheduling again at the desired time.
* If DEEBOT is powered OFF, Intelligent Scheduling is cancelled.
Cancel Intelligent Scheduling
2
Press the Auto Mode Button on the robot twice. Intelligent Scheduling is cancelled when the robot
beeps three times.
x2x2
3. Operating and Programming
Page 18
FR-CA
16
EN
Set Time Scheduling
Time Scheduling
DEEBOT can be programmed weekly to clean multiple times per day at specific times using the
ECOVACS App.
Open the ECOVACS App. Press
“
”
in top right corner on the App's main screen. Set new
scheduled cleanings and cancel existing scheduled cleanings in "Time Scheduling."
3. Operating and Programming
The robot has 2 interchangeable suction options for your convenience.
Main Brush Option: The best choice for deep
cleaning with a combination of the Main Brush
and strong suction. The Main Brush Option
comes pre-installed in DEEBOT.
Direct Suction Option: The best choice for
daily cleaning with the Main Brush removed for
direct suction. This Suction Option is specifically
designed to pick up hair without tangling.
3.5 Choosing a Suction Option
Install the Direct Suction Option
Turn the robot over. Push both buttons on the
Main Brush Option and remove the Main Brush
Cover. Remove the Main Brush.
Line up the Direct Suction Option tabs with the
slots on the bottom of the robot. Press until the
component clicks into place.
*
Please allow at least 7 hours between scheduled cleaning times.
Page 19
FR-CA
17
EN
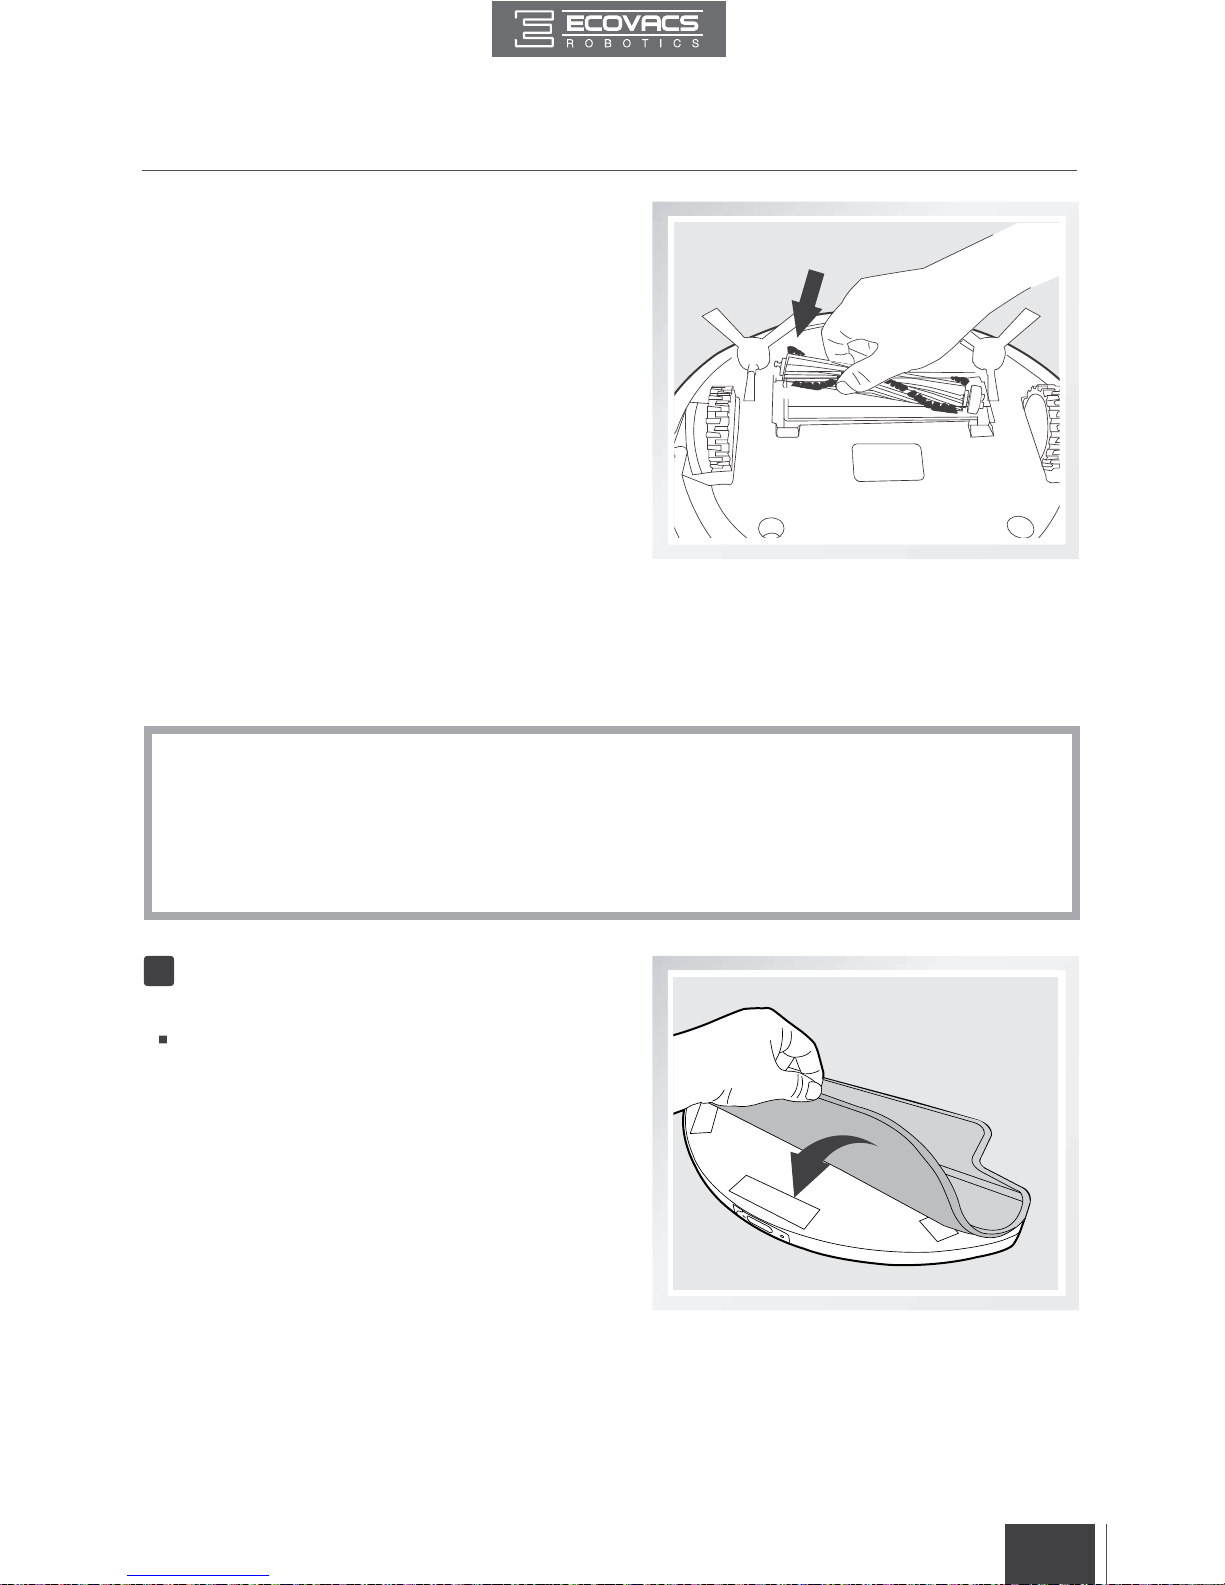
Install the Main Brush Option
Turn the robot over. Push both buttons on
the Direct Suction Option and remove Direct
Suction Option.
Insert the Main Brush into the bottom of the
robot.
Line up the Main Brush Cover tabs with the
slots on the bottom of the robot. Press until the
component clicks into place.
3. Operating and Programming
DEEBOT has an optional Advanced Wet/Dry Mopping System using a Advanced Wet/Dry
Cleaning Cloth attached to a proprietary Advanced Wet/Dry Reservoir. The washable/reusable
Cleaning Cloth automatically damp mops and then dries the oor to a spotless clean.
*
Do not use the mopping system on carpet.
*
When using the mopping system, fold area rug edges under themselves so DEEBOT will avoid
the rug.
*
When using the mopping system, do not stop the robot and allow it to stand still. This prevents
the Cleaning Cloth from leaving water on the oor.
*
Remove the Advanced Wet/Dry Reservoir before charging DEEBOT.
3.6 Optional Advanced Wet/Dry Mopping System
Attach Advanced Wet/Dry Cleaning
Cloth to the Reservoir
Attach the Advanced Wet/Dry Cleaning Cloth to
the Advanced Wet/Dry Reservoir. Ensure that the
blue and white side of the Cleaning Cloth faces out.
1
Page 20
FR-CA
18
EN
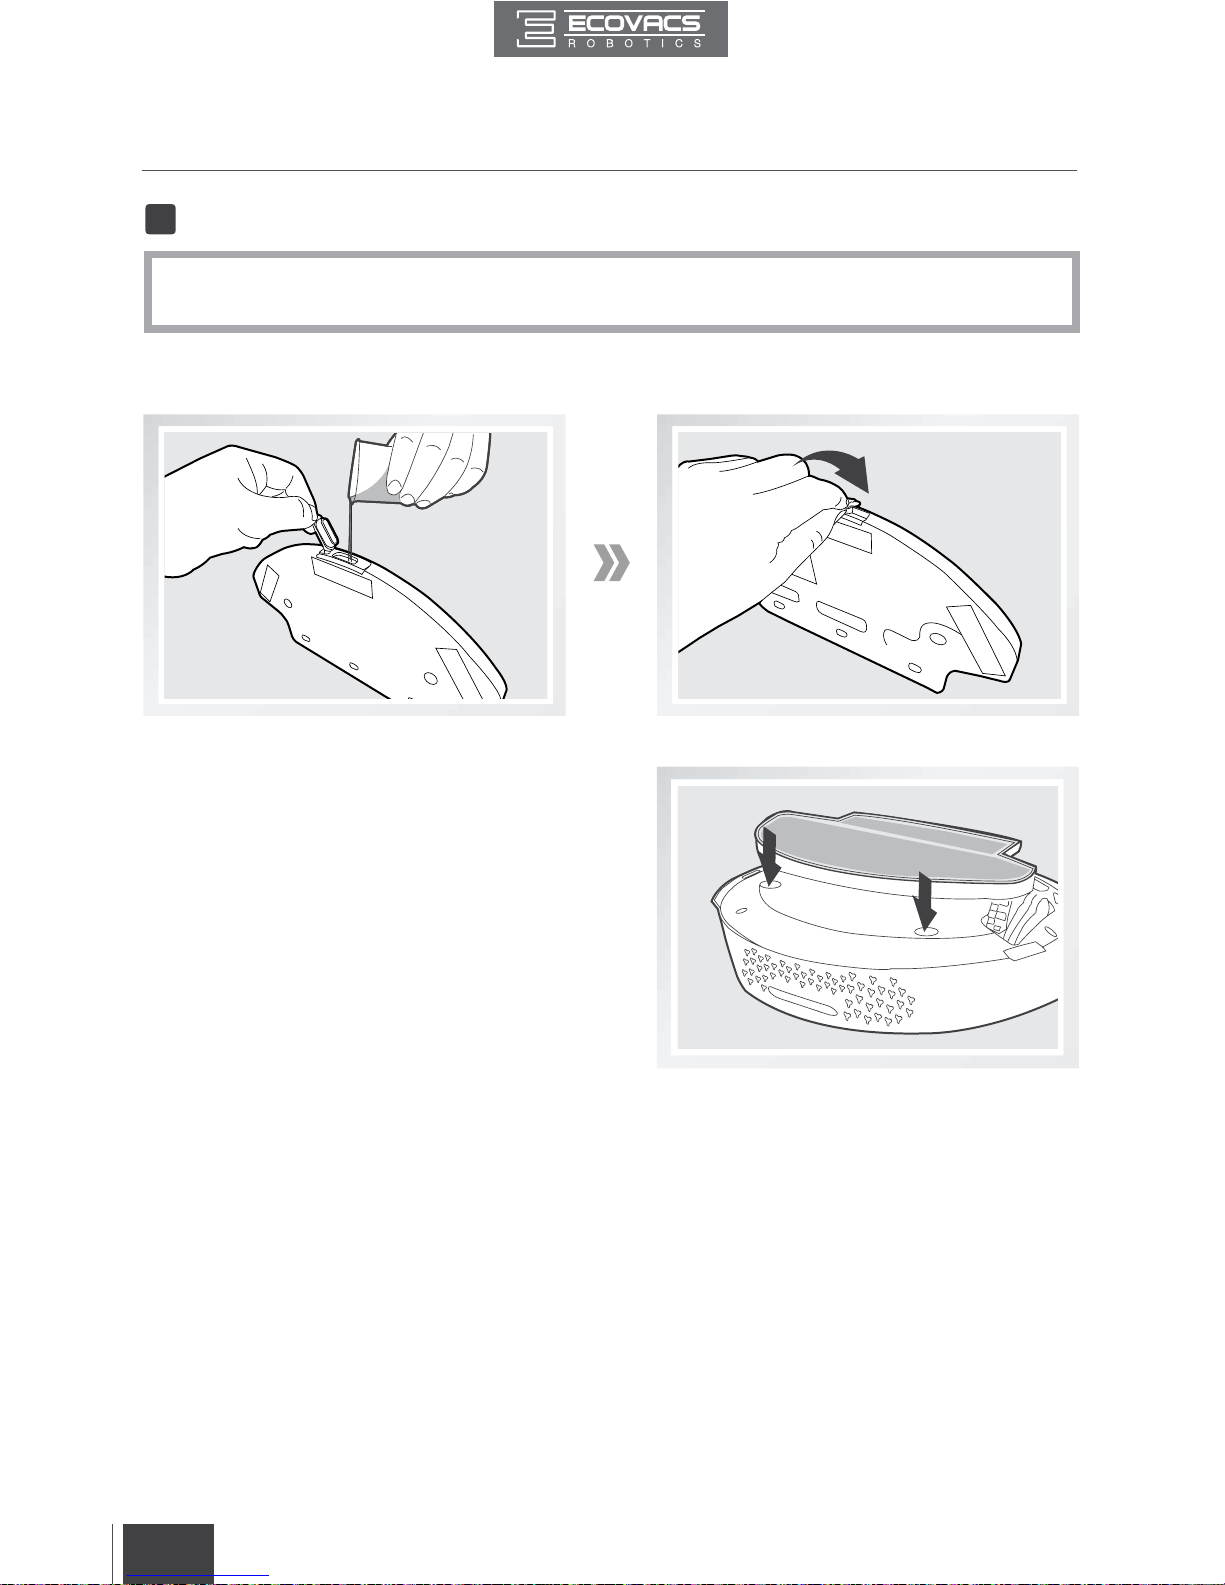
Fill the provided Measuring Cup with water. Open the Water Inlet lid on the Advanced Wet/Dry Reservoir
and slowly pour water from the Measuring Cup into the Reservoir. Close the Water Inlet lid.
Add Water to the Advanced Wet/Dry Reservoir
*
Before adding water to the Advanced Wet/Dry Reservoir remove the Advanced Wet/Dry
Reservoir from the bottom of the robot.
2
Attach the Advanced Wet/Dry Reservoir to
the bottom of the robot. Insert the tabs on
the Advanced Wet/Dry Reservoir into the
Advanced Wet/Dry ReservoirSlots on the
bottom of the robot until you hear a click.
3. Operating and Programming
Page 21
FR-CA
19
EN
3. Operating and Programming
*
It is suggested to select Single Room Mode when using the optional Advanced Wet/Dry
Mopping System for maximum eciency.
*
To mop another room, move DEEBOT to the room to be cleaned, refill the Water Reservoir/
change the Cleaning Cloth as needed and restart.
* If DEEBOT is Paused during mopping to refill the Water Reservoir or change the Cleaning
Cloth, DEEBOT will recongure its cleaning route, and restart the cleaning cycle.
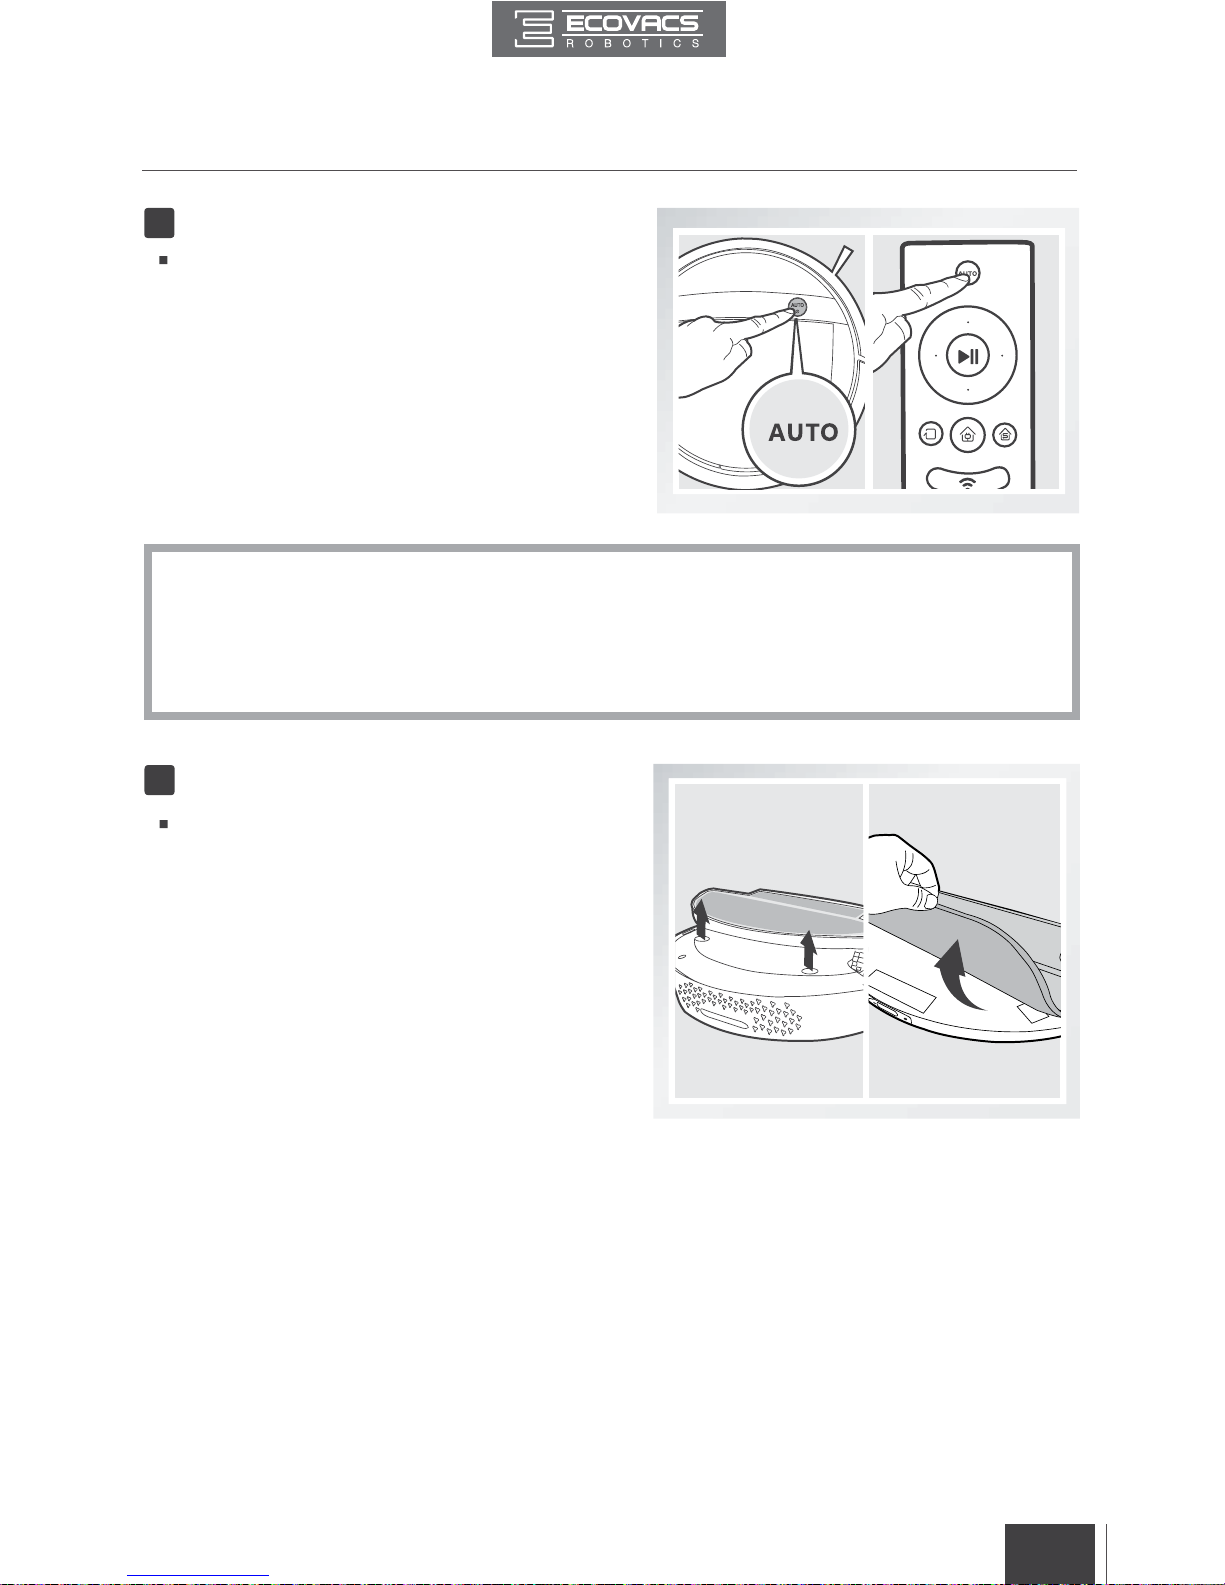
Start
Select the desired Cleaning Mode. DEEBOT
sweeps. lifts, vacuums, mops and dries in
the selected mode.
3
Remove
After DEEBOT finishes mopping, remove the
Advanced Wet/Dry Reservoir from DEEBOT,
empty any remaining water from the Reservoir,
and remove the Advanced Wet/Dry Cleaning
Cloth.
4
Page 22
FR-CA
20
EN
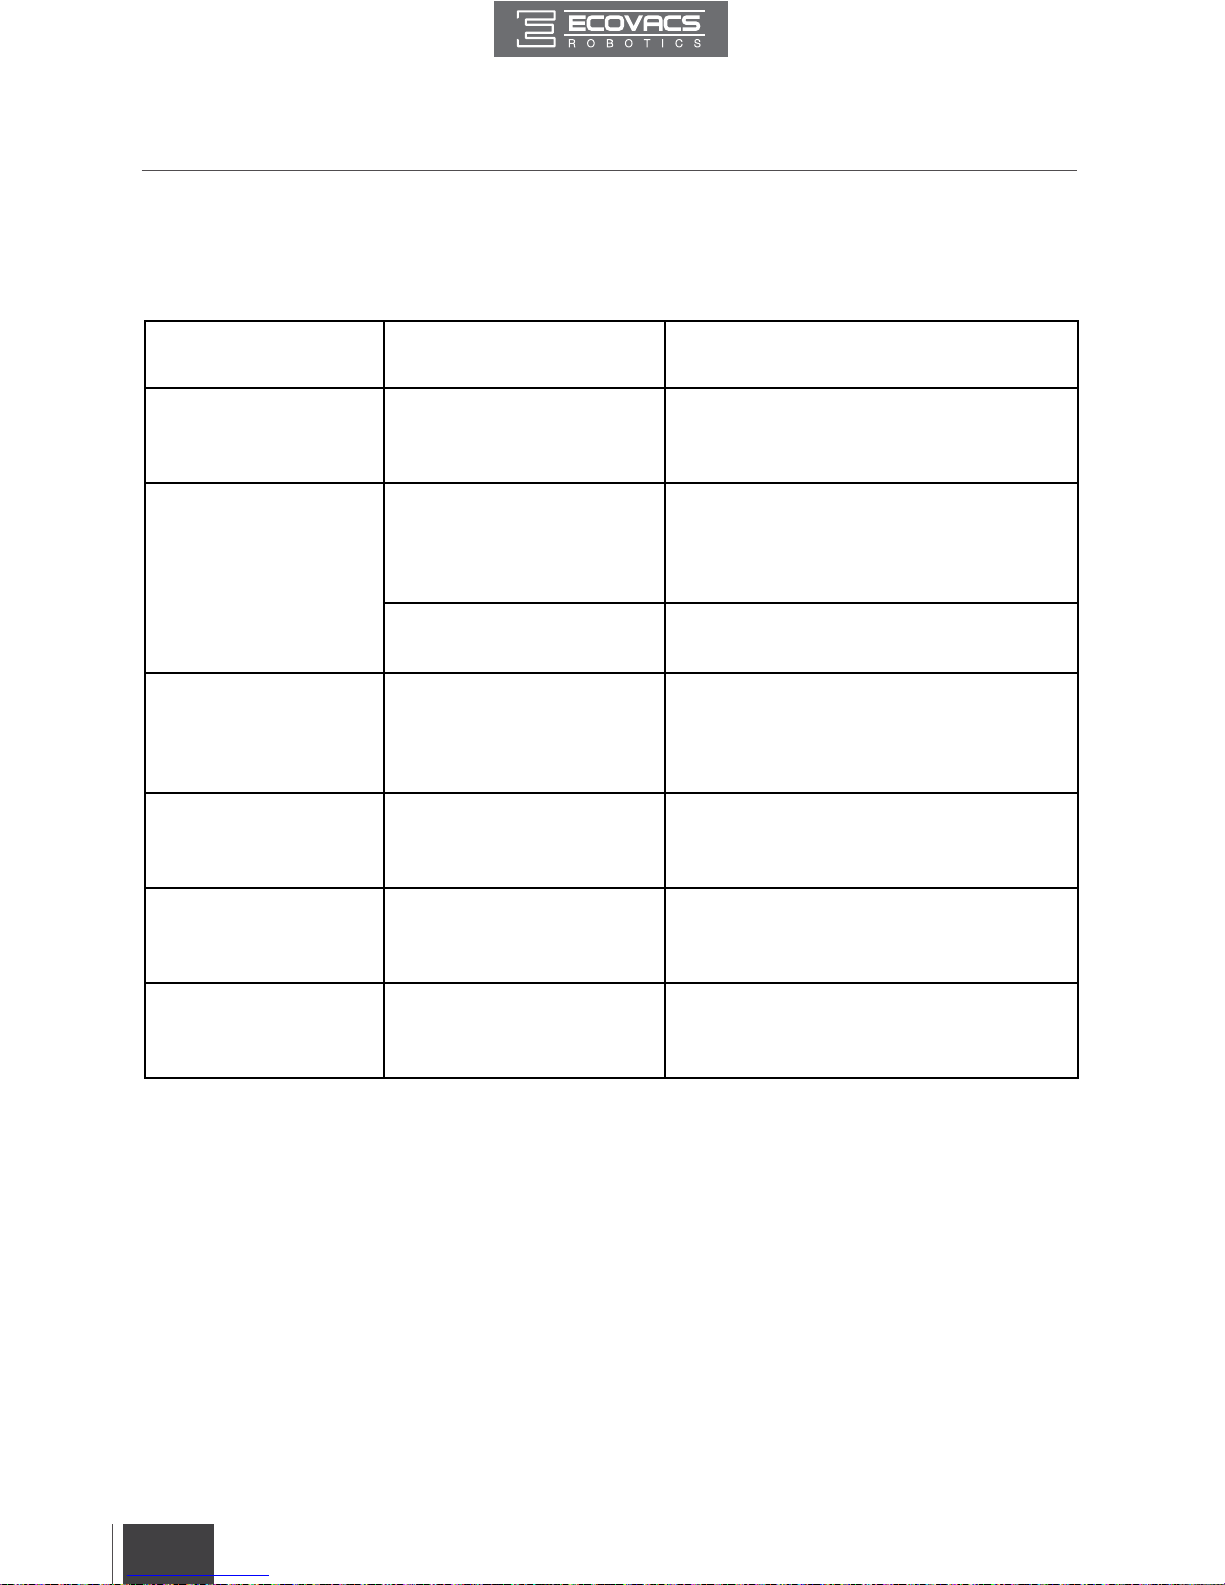
3.7 Alarm Indicator and Sounds
Alarm Sound Problems Solution
One Beep Driving Wheel Malfunction
Check Driving Wheels for tangled hair or
debris and clean as described in section
4 Maintenance.
Three Beeps
Driving Wheel Malfunction
Turn over the robot. Press Driving
Wheels to check for a clicking sound.
If they do not click, please contact
Customer Service.
DEEBOT gets into trouble
while working and stops
Manually remove the obstacles and
restart DEEBOT.
Four Beeps Dust Bin Malfunction
Remove the Dust Bin and re-install it
properly. If the robot still emits the alarm,
please contact Customer Service.
Five Beeps Low Battery
Manually place the robot on the Charging
Dock to charge.
Six Beeps Side Brush Malfunction
Check Side Brushes for tangled hair or
debris and clean as described in section
4 Maintenance.
Seven Beeps
Anti-Drop Sensor
Malfunction
Check Anti-Drop Sensors for dust
and clean as described in section 4
Maintenance.
If DEEBOT detects a problem and needs your assistance, it emits alarm beeps and the
AUTO Mode Button ashes RED.
3. Operating and Programming
Page 23
FR-CA
21
EN
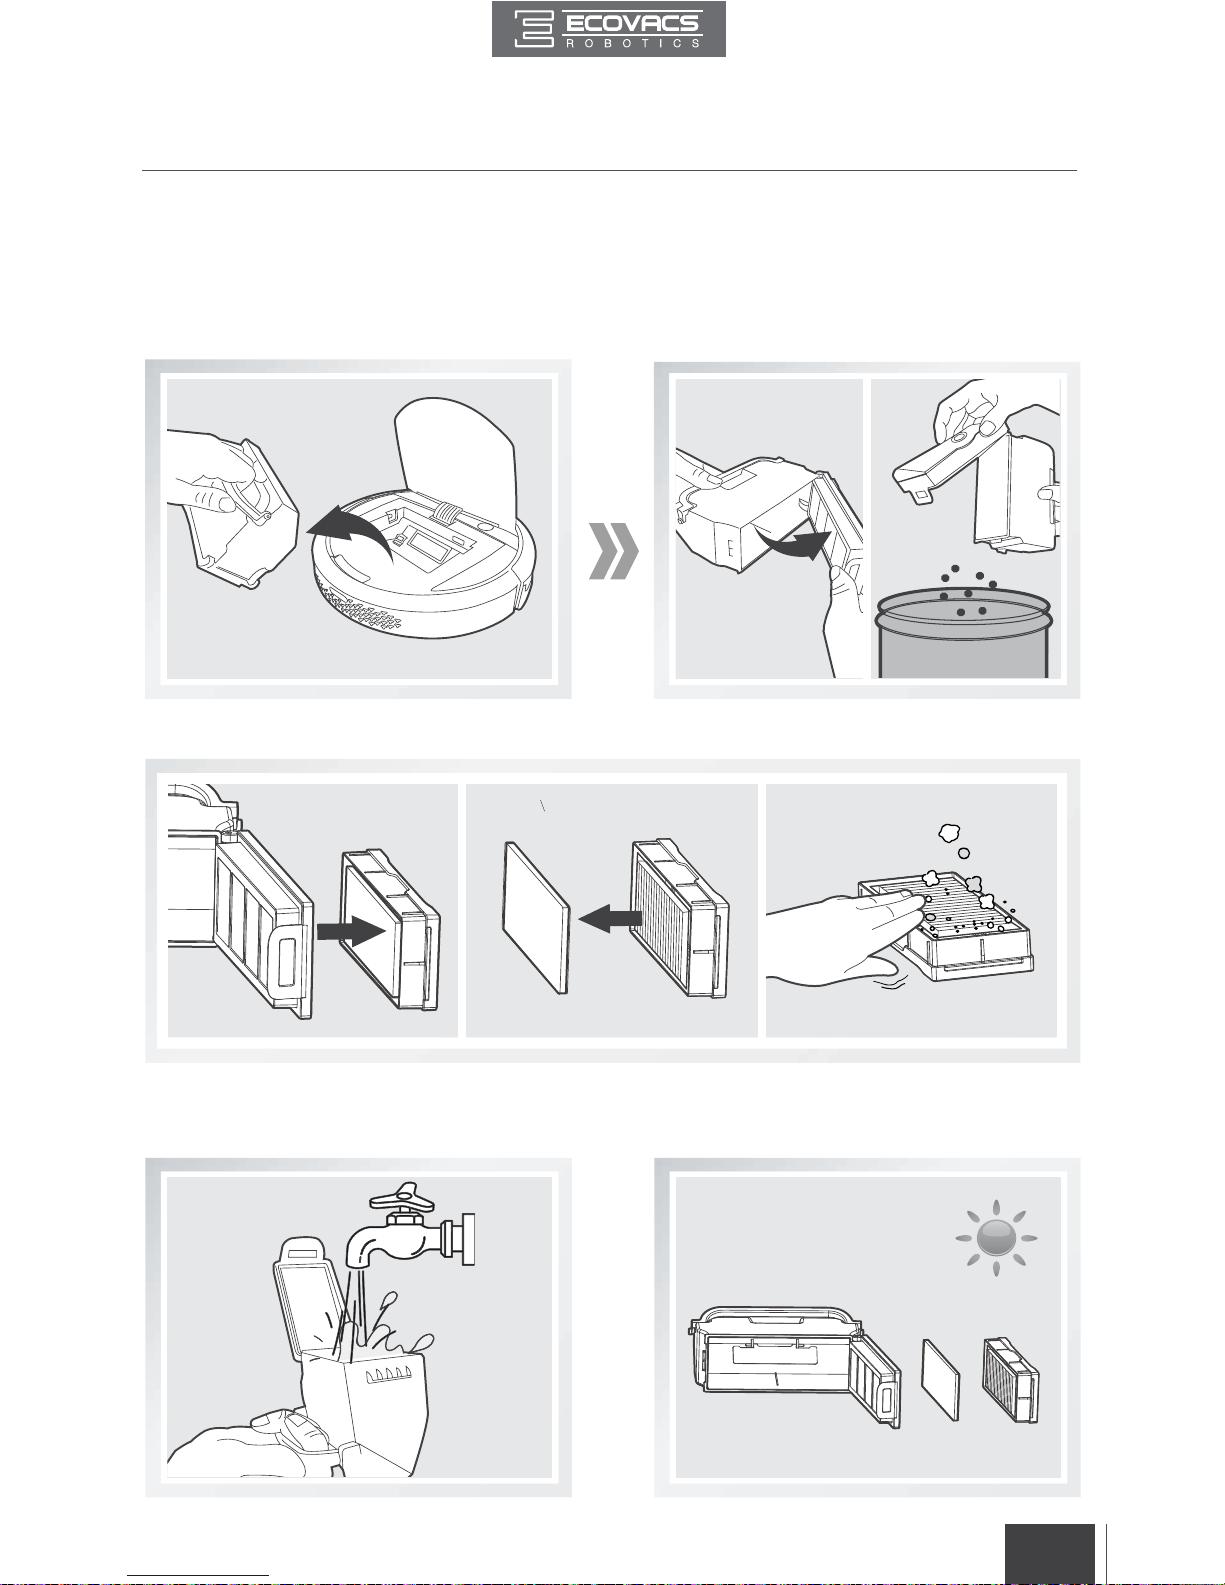
Open the robot’s Top Cover and remove the Dust Bin. Open the Dust Bin Lock and empty the Dust Bin.
Remove the lters. Pat the High Eciency Filter clean. Do not rinse the High Eciency Filter under water.
4.1 Dust Bin and Filters
Rinse the Sponge Filter, Dust Bin and Filter Net
under running water.
Dry the Dust Bin and filters completely before
reinstalling.
Before performing cleaning and maintenance, power OFF DEEBOT and unplug the Charging Dock.
Cleaning the Dust Bin and Filters
4. Maintenance
Page 24
FR-CA
22
EN
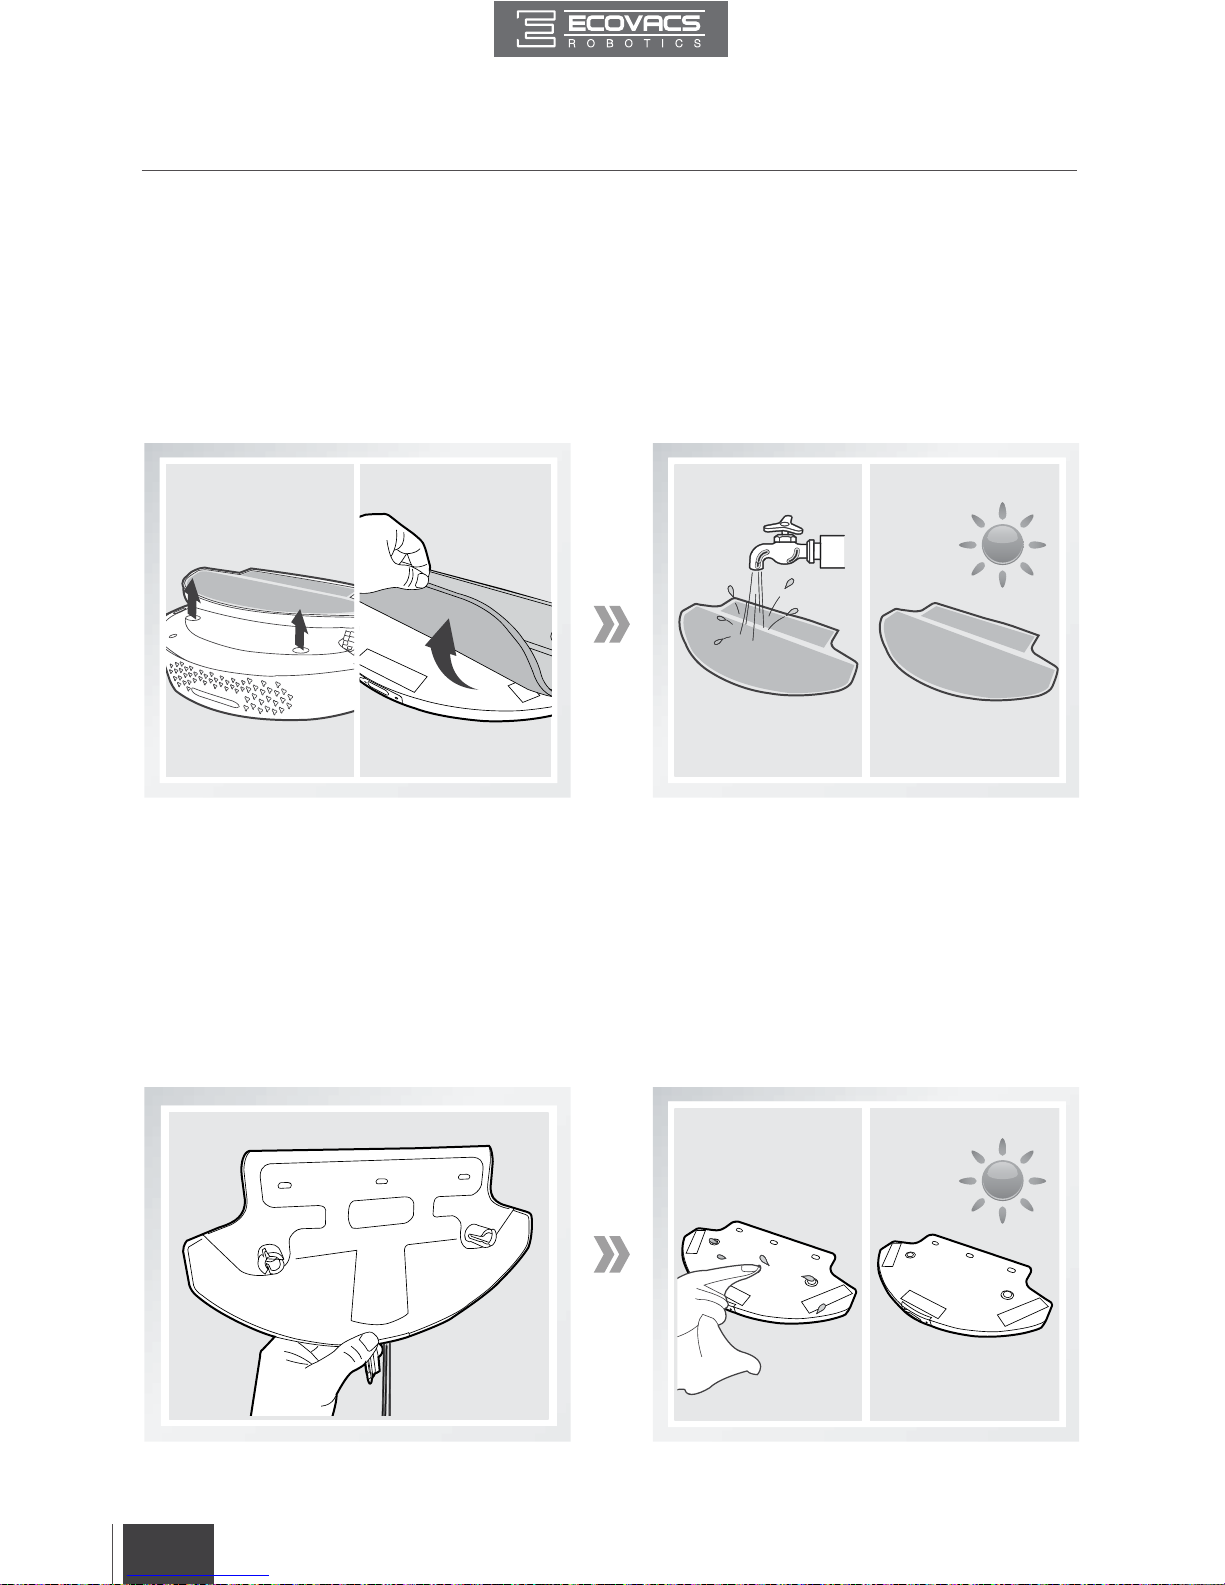
Cleaning the Advanced Wet/Dry Cleaning Cloth
Cleaning the Advanced Wet/Dry Reservoir
If the mopping system was used, remove the Advanced Wet/Dry Reservoir from the bottom of DEEBOT and
remove the Advanced Wet/Dry Cleaning Cloth.
Empty any remaining water from the Reservoir.
Wash the Cleaning Cloth by hand, and lay at to dry.
If the mopping system was used, remove the Advanced Wet/Dry Reservoir from the bottom of
DEEBOT.
Empty any remaining water from the Reservoir, and set out to dry.
Wipe the outside of the Advanced Wet/Dry Reservoir with a dry cloth.
If the Advanced Wet/Dry Reservoir does not run out of water after DEEBOT cleans for 60 minutes,
the water outlets on the Reservoir are clogged. Clean the Reservoir with the provided ECOVACS
Reservoir Cleaning Solution according to the instructions on the bottle of the solution.
4.2 Advanced Wet/Dry Cleaning Cloth an Advanced Wet/Dry Reservoir
4. Maintenance
Page 25
FR-CA
23
EN
4. Maintenance
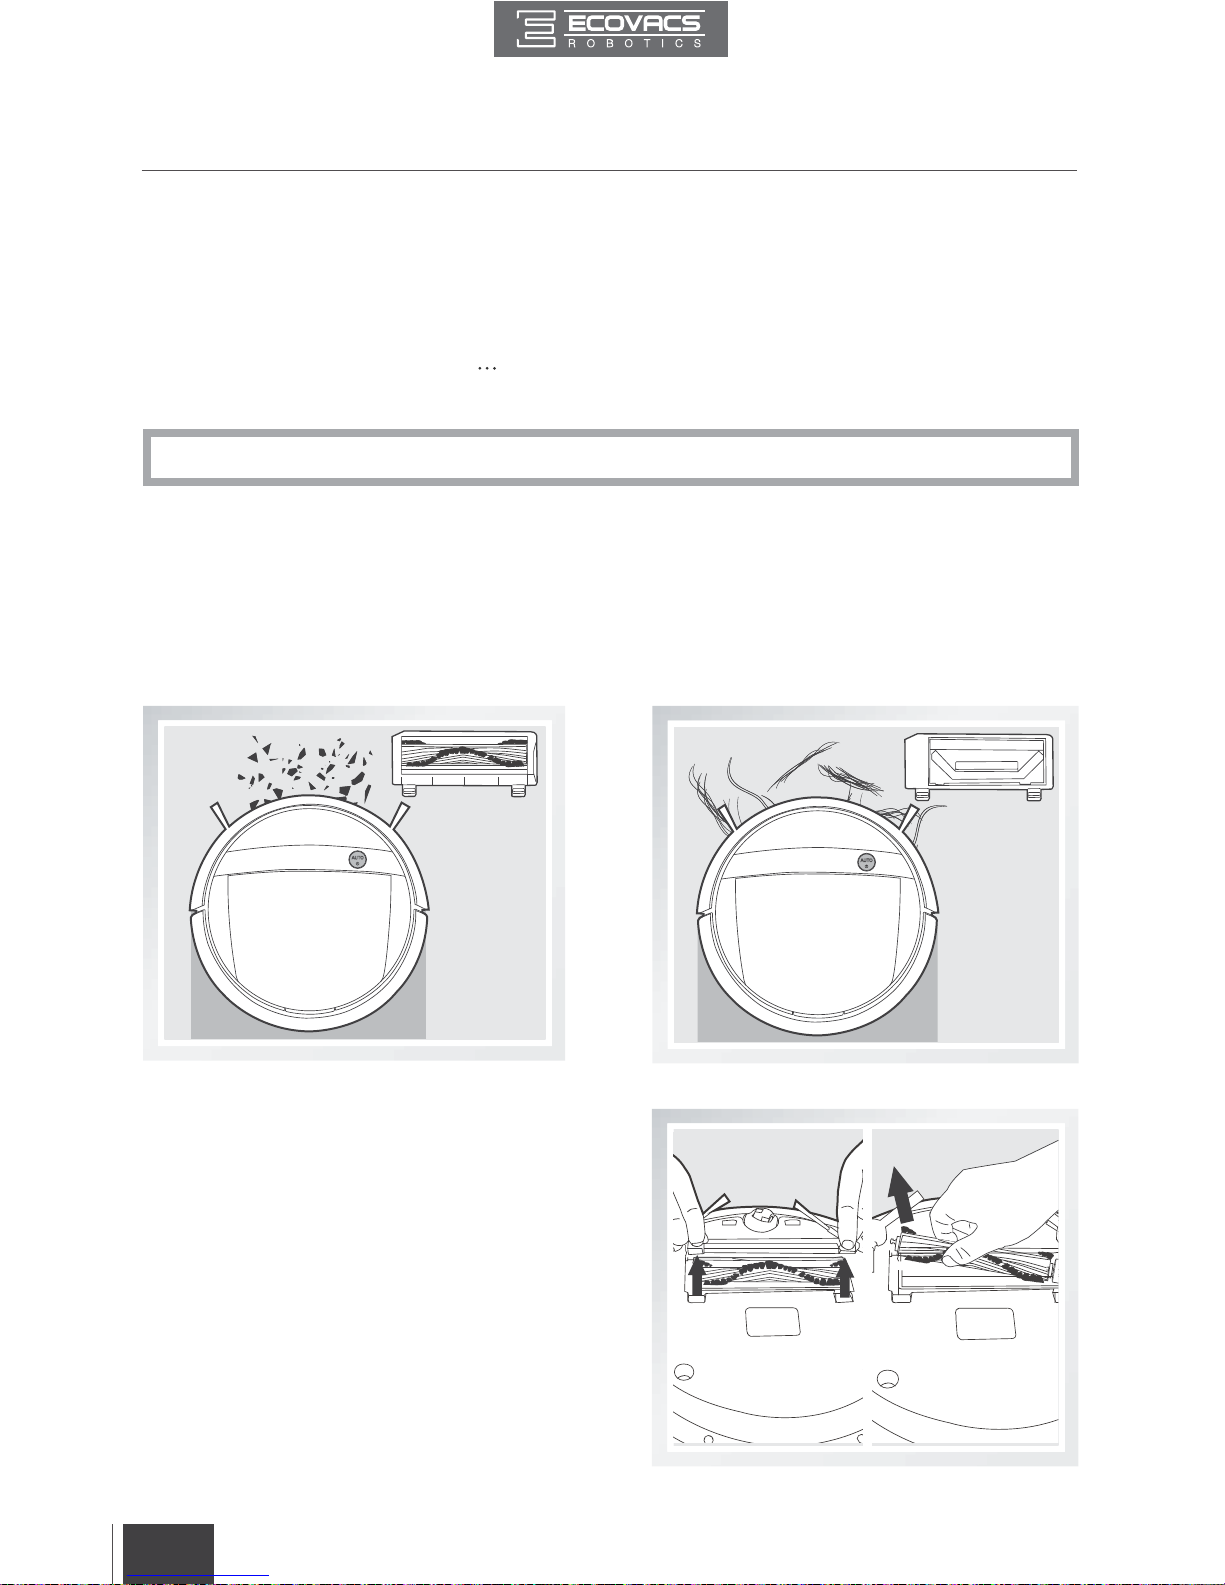
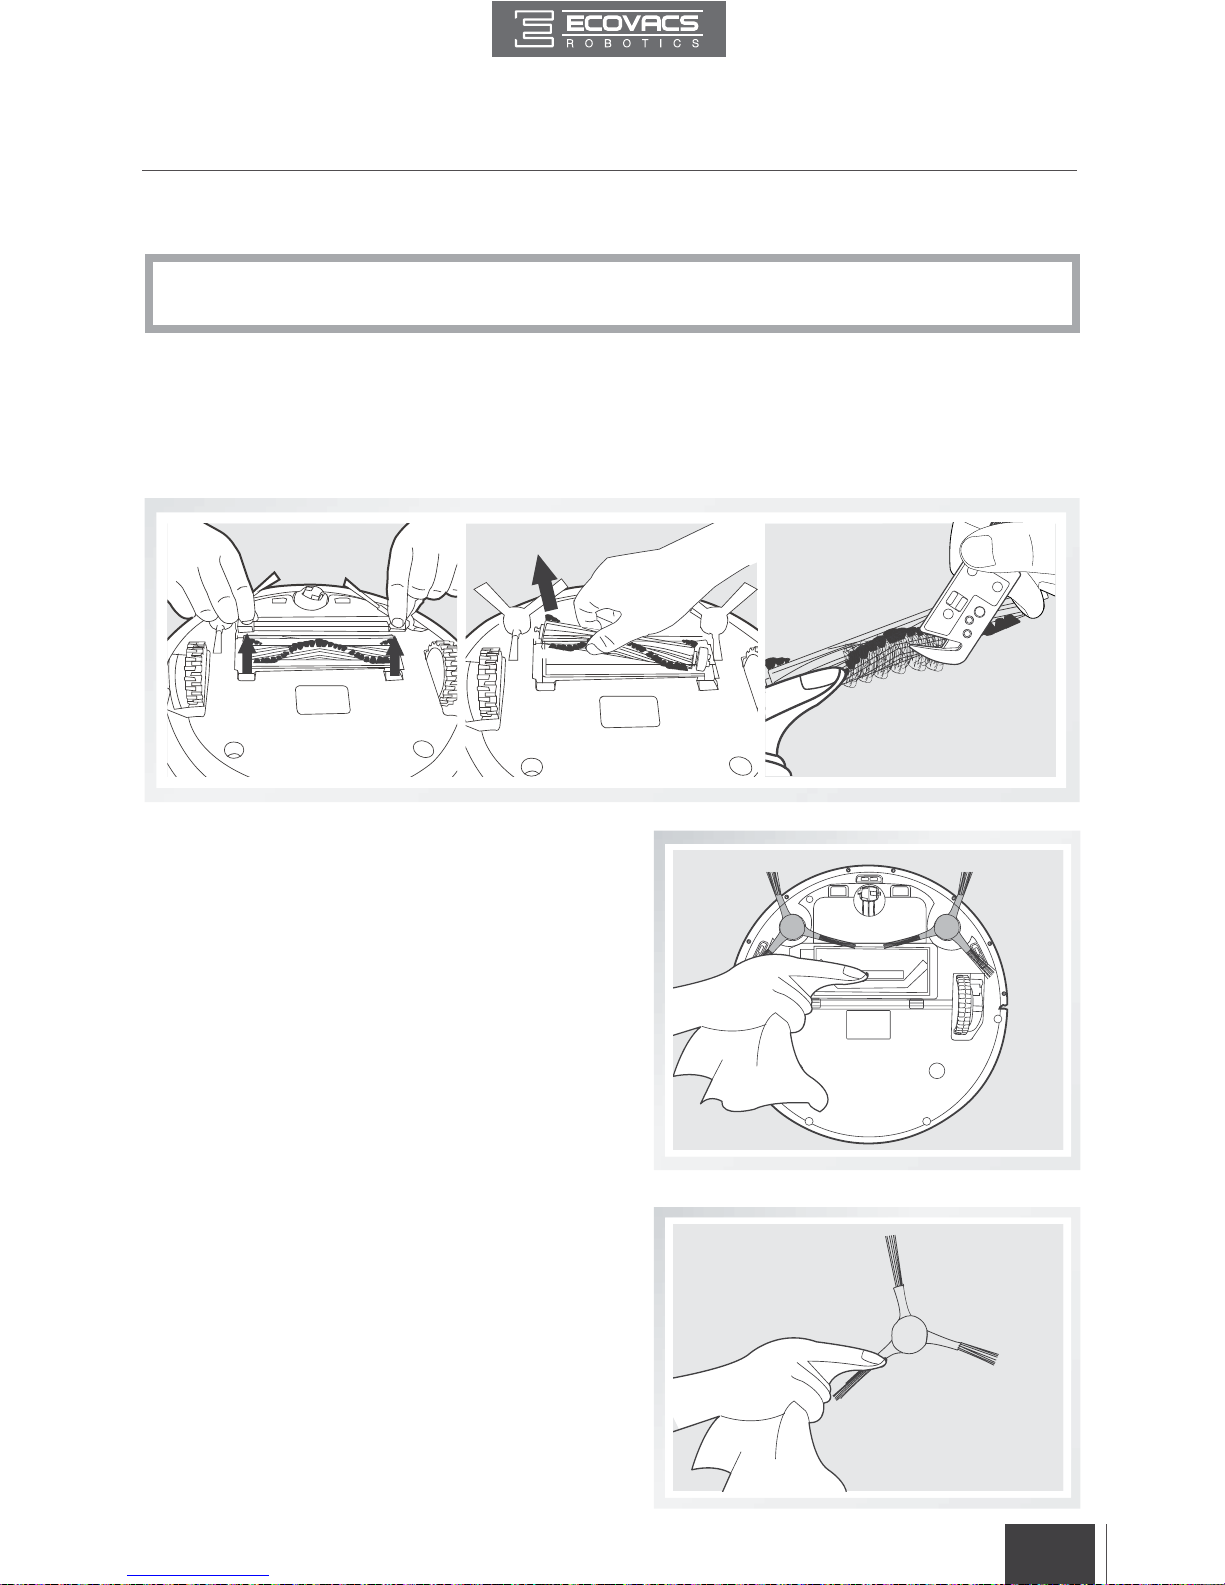
Cleaning the Main Brush
Turn the robot over. Push both buttons on the Main Brush Option and remove the Main Brush
cover. Remove the Main Brush. Use the Multi-Function Cleaning Tool to cut off and remove any
hair tangled around the Main Brush.
Clean any tangled hair or debris from both ends of the Main Brush and inside the plastic caps.
4.3 Main Brush, Direct Suction Option and Side Brushes
Cleaning the Direct Suction Option
Cleaning the Side Brushes
Wipe the Direct Suction Option clean with a dry
cloth.
Remove any hair or debris tangled around the Side
Brushes with the provided Multi-Function Cleaning
Tool. Remove the Side Brushes and wipe the Side
Brushes and their slots with a clean cloth.
*
A Multi-Function Cleaning Tool is provided for easy maintenance. Handle with care, this
cleaning tool has sharp edges.
Page 26
FR-CA
24
EN
4. Maintenance
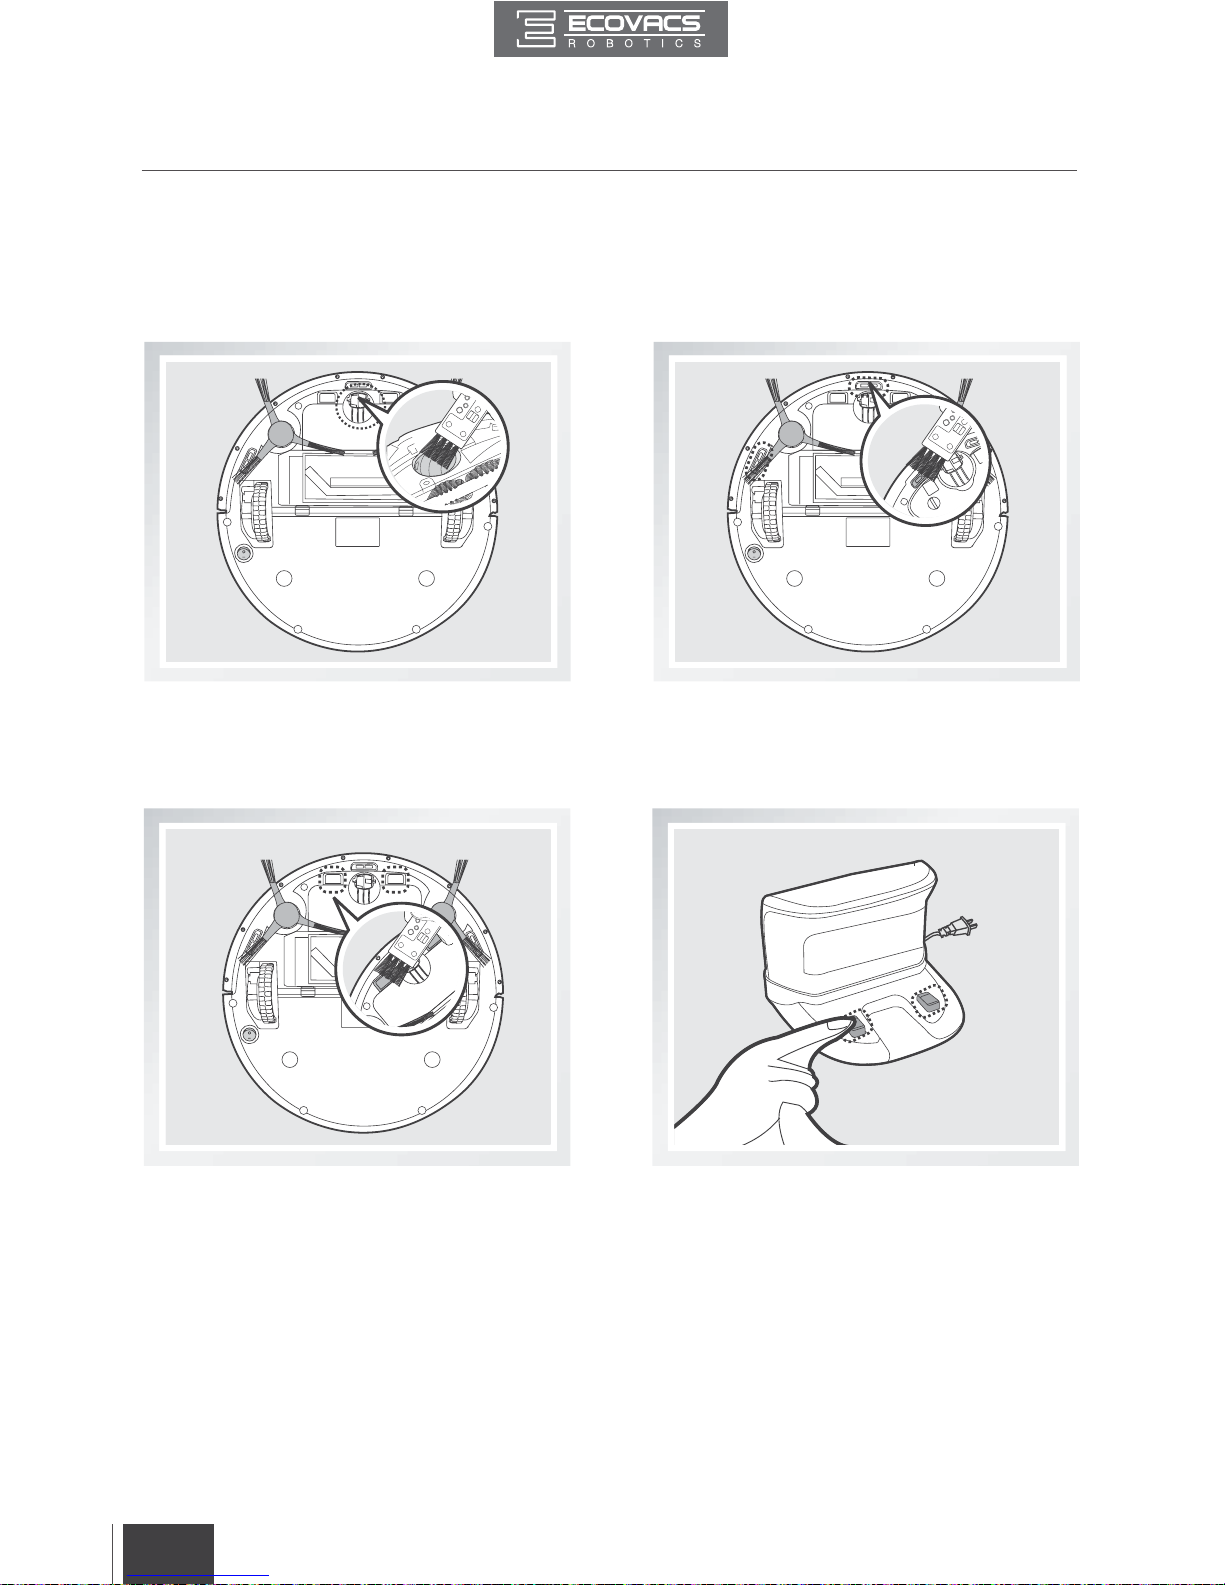
Wipe the robot’s Charging Contacts and Charging Docks Pins with the brush of the Multi-Function
Cleaning Tool or with a dry cloth to maintain their eectiveness.
4.4 Other Components
Wipe the Anti-Drop Sensors with the brush or
felt side of the Multi-Function Cleaning Tool to
maintain their eectiveness.
Use the Multi-Function Cleaning Tool to cut
off and remove any hair tangled around the
Universal Wheel.
Page 27
FR-CA
25
EN
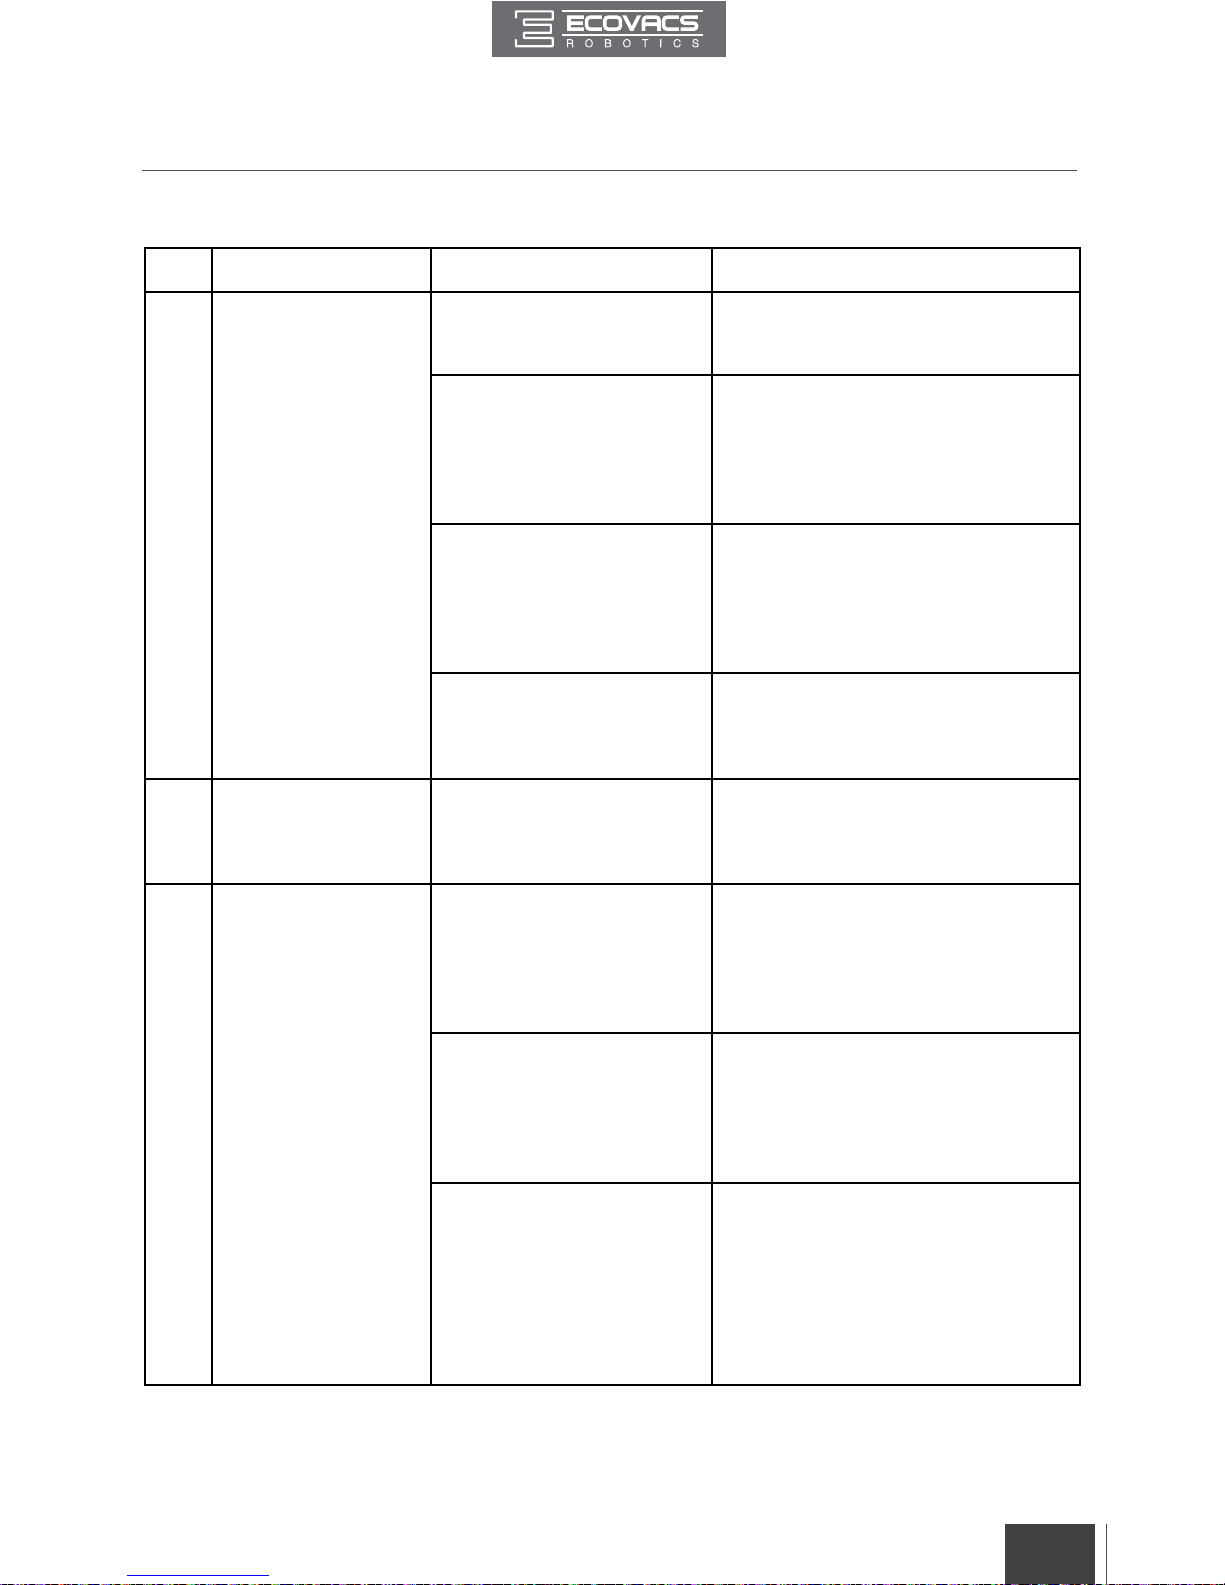
Please use this chart to troubleshoot common problems using DEEBOT.
No. Malfunction Possible Causes Solutions
1
DEEBOT will not
charge.
DEEBOT is not powered
ON.
Move the robot’s Bottom Power Switch
to the ON position.
DEEBOT has not made a
connection with the Charging
Dock.
Be sure that the robot’s Charging
Contacts have made a connection
with the Charging Dock Pins. You may
move the robot manually to make the
connection if necessary.
The Charging Dock is
unplugged while DEEBOT is
powered ON, which causes
battery consumption.
Plug in the Charging Dock and ensure
DEEBOT is powered ON. Keep
DEEBOT on the Charging Dock to
make sure it has full battery to work at
any time.
The battery is completely
discharged.
Re-activate the battery.
2
DEEBOT will not
return to the Charging
Dock.
The Charging Dock is placed
incorrectly.
Please refer to section 3.2 Quick Start
for details on proper Charging Dock
placement.
3
DEEBOT gets into
trouble while working
and stops.
DEEBOT is tangled with
something on the oor
(electrical cords, drooping
curtains, area rug fringe
etc.).
DEEBOT will try various ways
to get itself out of trouble. If it is
unsuccessful, manually remove the
obstacles and restart.
The Side Brushes are
tangled with hair or debris,
and low rotation speed
causes DEEBOT to Pause
and triggers an alarm.
Check Side Brushes for tangled hair or
debris, clean as described in section 4
Maintenance and restart. If the Side
Brushes still rotate slowly, please
contact Customer Service.
The Main Brush is stuck,
and low rotation speed
causes DEEBOT to Pause
and triggers an alarm.
Remove the Main Brush Cover and
remove the Main Brush. Clean any
tangled hair or debris on the Main
Brush as described in section 4
Maintenance and restart. If DEEBOT
does not function normally, replace the
Main Brush.
5. Troubleshooting
Page 28
FR-CA
26
EN
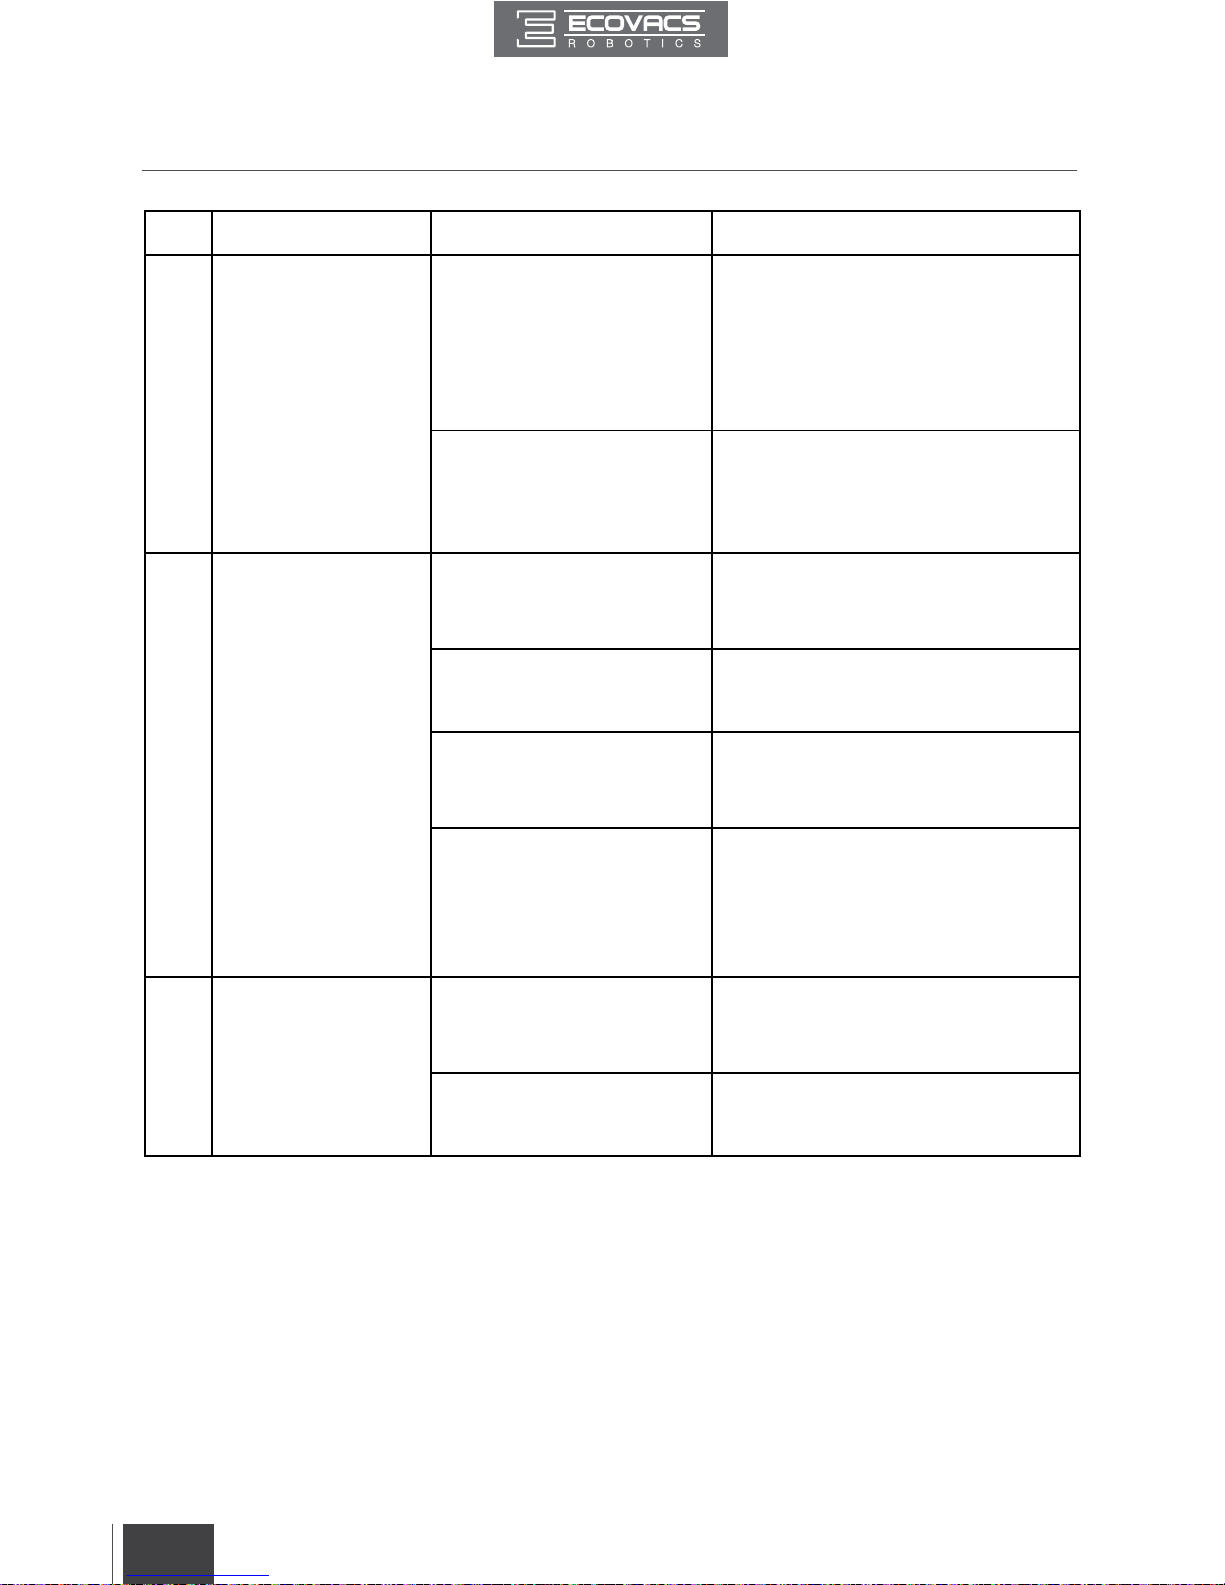
No. Malfunction Possible Causes Solutions
4
DEEBOT returns to the
Charging Dock before it
nishes cleaning.
When battery power gets
low, DEEBOT automatically
switches to Return to Charger
Mode and returns to the
Charging Dock to recharge
itself.
This is normal. No solution necessary.
Working time varies
according to oor surface,
room complexity and the
selected Cleaning Mode.
This is normal. No solution necessary.
5
DEEBOT will not
clean automatically at
scheduled time.
Intelligent Scheduling/
Time Scheduling function is
cancelled.
Set Intelligent Scheduling or Time
Scheduling. Please refer to section 3.4
Programming the Robot for details.
DEEBOT is powered OFF. Power ON DEEBOT.
The robot’s battery is low.
Keep DEEBOT powered ON and on
the Charging Dock to make sure it has
full battery to work at any time.
The robot’s components
are blocked and/or its
components are tangled with
debris.
Turn the robot’s power OFF, clean the
Dust Bin and invert the robot. Clean
the robot's Main Brush, Side Brushes
and other components as described in
section 4 Maintenance.
6
DEEBOT misses the
spots to be cleaned.
Items on the oor in the
cleaning area need to be put
away.
Please refer to section 3.1 Notes
Before Cleaning for details.
Cleaning frequency is too
low.
Daily cleaning is suggested to obtain
best results.
5.
Troubleshooting
Page 29
FR-CA
27
EN
5.
Troubleshooting
No. Malfunction Possible Causes Solutions
7
Remote Control failure
(Eective control
change of the Remote
Control is 5m (16’).
The battery in the Remote
Control need to be replaced.
Replace with a new battery making
sure it is installed correctly.
DEEBOT is powered OFF or
the robot’s battery is low.
Make sure DEEBOT is powered ON
and fully charged.
The infrared signal cannot
be transmitted because the
Infrared Emitter on Remote
Control or the Infrared
Receiver on DEEBOT is
dirty.
Use clean dry cloth or the brush
side of the provided Multi-Function
Cleaning Tool to wipe the Infrared
Emitter on Remote Control and the
Infrared Receiver on DEEBOT.
There is other equipment
interfering with the infrared
signal to DEEBOT.
Avoid using the Remote Control near
other equipment using infrared signals.
Page 30

DM88-AM01-IM2016R01
 Loading...